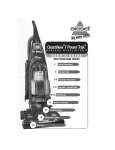
1
3750/6595 SERmES
3
4
4-6
6-9
10-13
14
15
J
de re gma you purcnasea a BBSELL Lift-Oft Vacuum Everything
we Know aDou[floor care were m[o _nedesgn and construction of this
J Nerful, Ngll-tech name /acuum_n{ s__en]
_ourBISSELL
Lift-Off s we maae ]na Nebackit with a limited
comprehensive
one-,aarwarrant, Wealsostandbehindit with a
KnowleageaDle,
aealcatedConsumerServicesdepartment,so, shouldyou
evernavea proDtemyoun recewefast considerateassistance,
My great-grandfatherin enteathefloor sweeperill 1876_Today,BBSELL
is a g oDar_eaaerHI[ne aes_g-manufacture,and serviceof high quality
']omecareproductslike yourBfSSELL
Lift-0ff,
ThanKsagain tram all of us at BBSELL
MarkJ, Bissel
Presidentand ChiefExecutiveOfficer
@
ii_
i i
ii
i_
iI
iiii
iii_ii!i iii _i _ilil
ii_ iiii filial i
iii
i _
i
ii
i
i
_i
i
i i
_i
iii
ii
i
j
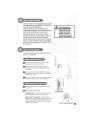
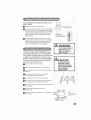
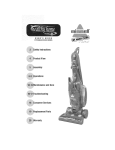
CornfoalGrip
3t_etch
Hose
NOSe bllO .
Release
Button
--BrushOn/Off
Switch
_DetachableCanister
Filter
indicator(Select
ModelsOnly)
bJevlceRbOI--
_lescopin{
Extens
on Wand
HEf_
s,Media -Post-Motor
F_lte_
Frame
Upperl_nk Filter
insideLouvers)
HandleBebase_
Peds
Dirt
ContainG
Nosebrl[ B8sej
Filter
(
Lever
Po_
- Furniture
Protection
Guard
@
ThUs
User'sGuilehasbeendedgnedto heHp
yougetthe
mostsatisfactionfromyourRUSSELL
Uft-Off.You'Hfind
assemblyandoperalJng
UnstructUons,
safetyprecaulJons,
aswenasmaUntenance
and
fToubUeshootUng
Uns_uctUons.
PleasereadthusGuilethor
oughUy
beforeassembling
yourvacuumcleaner.
PaypartUcuhrattentionto the productdUagram.
assemblyUnstructions,
and part names.Locateand
organUze
aHparts beforeassemHy.PamHUaHze
yourseUf
with the partsand wherethey fit. Following
this User'sGuidewill greatlyenhanceyourabilityto
get the most performancefrom yourBISSELLLift-Off
for manyyears,
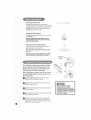
/K WARNING:
Plastic film can be
danger of snffocafinn, keep away from
babies and children,
Theonlytool you'llneedto assembleyourvacuum
cleaneris a screwdriver.
Locate the vacuum Handle and remove [ne scre_
packet taped to the base of the Handle.
Stand the vacuum upright and slide the base of
the Handle firmly into the grooves at the top of the
vacuum body.
Check to be sure the Handle is fitted to the vacuum
body. If there is a gap in front, continue to Push firmly
until the Handle is flush.
Insert two of the screws from the screw pacKe_in_o the
existing hole. Tighten securely with a screwdrive
d_
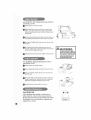
Position the HoseAssembly on the back of the canister as shown.
O
Attach the Hoseto the vacuum,
Standard Models
Standard Modems- Usethe remaining two screws from
the packet. Tighten securely with a screwdriver,
Twist 'n Snap TM Hose Mode_s = (Select ModeL_
Position the Twist 'n Snap Hose assembly _n tne vacuum
and line up the tabs on the base of the nose w_tnlne
corresponding notches, Turn the Twist 'n Snap Hoseto
the right to lock into place.
/
Twist 'n Snap Nose Modems
Combination
Slide
the
ena
ofthe
Hose
onto
[Clio,
neHose
Grip
Base.
Place
tne
Hose
_toGrip
theHose
NOTE:
The Powerfoot will net operate effectively
unmessthe Hose is firmly attached te the base.
O
Snap the Telescoping ExtensionWand Crevice Tool
and Combination Tool into storage clips as shown
On Board TurboBrush¢ (Select Models Ony)
The TurboBrush Bracket slides onto the Hanger on
the front of the Handle. Attach the Bracket by
aligning the slots wUh the rectangular oar[ on rue
Hanger as shown aria pulling eown um!l I[ is locked
in[o place.
Crevice
Note: If you do not wish to store the TurboBrush
on your Lift-Off vacuum, the Bracket may be
hung en a wall for storage and the Hanger may
he removed from the vacuum.
Place the TurboBrusn in the Bracket by angning
the small holes near the brush roll with me raps
at the bottom of the Bracket and sna_ the TurboBmsh
into place.
ThePowerSwitchis locatedjust belowthe handle
on the front of the DetachableCanister.Pushthe
rockerswitch "ON" d}to vacuum,and "OFF"(0)
Before using your vacuum, make
sure that the Dirt Container and
Upper Tankare in _ooked position
and that aH fi_ters (Upper Tank,
Pro-Meter and Post-_{etor} are
in p_aee.Be net operate your
vacuum without these filters.
The BrushSwitch is locatedjust belowthe handle
on the front d the DetachableCanisternextto
the PowerSwitch,This switch turnsthe Rotating
Brushon and off. The BrushSwitchshouldbe in
the "ON" 'J)positionfor normalcarpetcleaning.
Youmaywant to turn the BrushSwitch"OFF' (0}
for bare floorcleaningor otherdelicatesurfaces.
Note: Your BmSSELLUft-Off vacuum is equipped
with a special internaB switch that turns the
Rotating 8rush off wheuever the unit is in the
Upright position.
_
upright - Forstorageana abovefloor cleaningwith tools
Normal Cleaning - Press [ne Hane[e Release Pedal
with your foot to recline
@
Brush
Power
ThePowerfoot
onyourBUSSELL
Uft-Off
canbe
adjusted
todeanseveraU
fUoor
surfaces.
NOTE:For optima_ o_eaning performance, adjust to
the lowest practical setting. If your cleaner is dN=
fieoN to push, adjust to the next higher setting.
Place Handle in Upright Position.
Turn Height Adiustment Knob to desired setting.
Lowest Setting
= For bare floors.
NlediumSetUogs
-
Forshortandmedium
pile carpets.
Nighest Settiog
-
Forplush pile carpet.
NOTE:Youmay' also adjust the setting while in the Normal
Cleaning Position.
YourBISSELL
Lift-Offis not onlya powerfultloor
vacuumcleaner,it'salsoa vematilestaimandabove
floorvacuumwhenyouselectoned the specialtools,
Note: The too_s can be osed with the
vaooom in the Upright Position or with the
Detachable Canister.
0
Detach the Vacuum Hoseby grasping the HoseGNuand
lifting to separate from the HoseGrip Base.
Attach tools by firmly pushing onto Vacuum Moseor
Telescoping ExtensionWand.
Combioatioo Doating Brash/Upholstery Tooh
Two typesof cleaningtuols are cluaeu m one al_a{_-rent:
rotate for desiredteal,
I
UseBrush side to dust furniture }Hods,bOOKS_mos
shNves, and baseboalds,
I
UsaUpholsteryside tar curtains,draperies,cusHons
fabrics,
Crevice Tool:
Use in tight narrow spaces.
Stair Cleaoiog Teem(Select Models):
Usefor stairs, area rugs, and other small carpeceeareas
This tool can also be used for bare floors.
Note: The Stair C_eaning Too_does not
store on beard.
Nways place vaooom cBeaneron
floor in its laity Upright Position
and make sure it is Booked into
place before removing Canister
or when osing tools. P_aoiogthe
Lift Off in its foil Upright Position
automatically stops the
rotatbl_Lbrosh,
TemeseepBng
Extension Wand:
Usew_rndeslred attachment for a _ngerreach.
To extend the Wand. twist rne collar to "UnFock"positioe
and push away tram you. Twist rne colFarto the "Lock"
position to lock [efo[ ace. To retract rwlsr re u_lock,
pull reward you ar_a twist lO re[ocK.
Tarbogrush ® (BemeetMedals}:
use rotating brush action for small areassucl_as stairs
one upnoJstery.
Note: Pressgentmywhoa using TurbeBrush
to gain
maximum cleaning, Tee much pressere could cause
the brash to step totaling.
Demu×eBare FmeerTeal (SemeetI_odele):
Use for bare f!oors. SwNel neaa turns re get into
tight spaces and fits under ca[ _ne[s,
Note: The Belnxe Bare Floor Teemdoes net store
on board,
Aleitems may nat be includedwith yonr medal IViere
teemsare avaHabme;
to orderpmease
refer to page 15.
TheDetachableCanisterfeaturemakesit possible
to easilytake the powerfulcleaningactiond your
BISSELL
Lift-Offto stain_,,ays,
autointeriors,and
otherhard-to-reachareasof your home.
Beforedetachingthe Canister,your rift-Oft mustbe
in its fully UprightPosition,Youdo not needto turn
oft the powerfirst.
Press the Release Button at the rap of the Canister
Handle arid lift the Canister to remove
Detach the Vacuum Hosefro n me nose Grip Base at
the back of the Canister.
OAttach
the desired too_s_to rne nose Grid at the end of
the Vacuum Hose.
O
When you're done, remove rne roe[is and reconnem the
Hose to the Hose Grio Base
@ Retern the Canister to the Powerfoot by augmng the
feet on the front with the bumes on the foot of the
_pright Vacuum. Push the Canister toward the vacuum
frame
@
Jnrl
[
CLICKS
RIO elate.
Whi_e vacuuming, certain
carpets and _ew humidity
conditions may generate small
static discharges. The discharges
are entire_y harmless and are not
associated in any way with the
main power supply.
_l_t ModelsGniy
TheShouHerStrapmaybe usedwhilecleaningwith the
DetachableCanister,
To attach the Shoulder Strap, wrap the velcro ends attacr_ed
to the bottom of the strap securely around the Canister
handle as shown.
The lengthof the strap may be adjusted as requHeafor comtort
Select Medals Only
TheCleanFilterindicatortells you whenaidlow in the
vacuumis reduceddue to dirtytilters or a dog in the
hose.TheCleanFilterindicatorwill remaingreenuntilthe
airtlow is reduced.At that time, it beginsto changeto red.
Whenit is fully red,the airflow is significantlyreduced
or blocked.Followthe stepson pages10 11 to clean
yourfilter& All filters in the vacuumshouldbe cleanedor
replacedwhenthe CleanFilterIndicatorturns red.
If the indicatorremainsred after all filters havebeen
cleaned,follow the stepson page13 to checkfor and
clearclogs,
/KCAUTION:
While the vaeaam is ie use.
warm air is emitted through
the Pest=_latorFi_teroe the
back of the Canister. The
bottom of the Caeister may
a_sebecome warm. When
[_singthe sheo_derstrap,
to avoid discomfort, posF
tion the Canister so that
these parts are nnt directed
towards or teochieq
yonr body.
to
theUprightpdoneusingyourBISSELL
ositionand storethe PowerCord,
Whenyouare
Lift-Off,returnit
CAUTION:
@ Turn vacuum cleaner off (O).
wbil_e
trae_e
Unplug Power Cord by grasping the polarlze(_plug
(NOTthe cord) and disconnect from outlet.
CarryingHandme
tn R
vacnnm e_eaeer.The
Caeister
cooeddetach
the rest of
the va_nm causing
to fa&
J\
Loop Power Cord around Cord Wraps on side of
the Canister.
4N
/
Clip molded plug to Power Cord to secure.
CarryingHandle
To move your vacuum cleaner from room re room ourme
Handle in the Upright Position, tilt the cleaner back on its
rear wheels and push forward.
The cleaner can also be moved by using the Carrying danale
on the Detachable Canister.
@
Tomaintainmaximumdenningperformance,the
followingmaintenancestepsmustbe performed:
Empty me Dbt Container when me tort reaches the "Full" line
on the side
Check the UpperTank and Pro-Motor Filters at least once a
month and c can and replace as neeeed.
0
Replacethe HEPAMedia Post-Motor Filter every six months.
NOTE:More frequen_ finer cmeaning may be
necessary if you are vacaaminq new carpet, fine dast,
or have allergy ooncerns,
Fomlowthe instructions on the fallowing pages to pep
fern/these simple maintenance steps.
The Dirt Containerneedsto be emptiedwhenthe dirt
reachesthe "Fuji" line on the sideof the Container,
0
Unplug c_eanerfrom e_ecmca!out_et.
@
Slide the Lock 'n Seal Le_er to -[he "Unlock" position.
@
Grasp Ilandle and gull the Dirt Container straght out to
remove from vacuum
Empty dirt into garbage container.
Canto,
nor
Put the Dirt
back in the vacuum and slide the lever
to the Lock pos[tioP.
Note: The Dirt Container ma) be washed in
warn'l water with a mud detergent, blake
sara it is oempletemy dry before replacing.
Useonly BISSELL
Style8 ReplacementFiltersin your
BISSELL
Lift-Off,
@
unplug the cleaner from etectncal oune[
Tile Uppe[ Tank Figer can De reacnea uy remowng the Dgt
Container reaching underneath the UDoerTank and turning the
rim of the Filter FraHe to unlock. Pull straight down to remove.
Brush the dirt off the Louvers ann uDeer Tan Filter.
The foam Upper Tank Filter may Deremovee and hand washed
in cold water with mild detergent. Rinse weh then air dry thor}ugNy before repJacmg
The Upper Tank and Louvers may abe Dewiped dean with a
_'_ damp cloth
Note: Far easier access, the entire Upper Tank may be
removed by turning the knob an the back of the cleaner to
unlock and pulling the entire tank straight out,
@
Upper_'
L_
UseonUy
BUSSELL
Style
8Rephcement
FHters
Un
your
BUSSELL
Uft-O_
_.
Unplug the cleaner from electrical outlet.
The Pre-Motor Filter protects the motor from dirt paR_cies._t
is located in the slide out tray underneath the Dirt Container.
If the filter becomes dirty, pull out the tray, lift out the filter
and clean. This filter may be hand washed q cola walel
with mild detergent. Rinse well and air ary lnorougmy
before replacing.
The HEPAMedia Post-Motor Filter assists n the filtration process to return clean air to the room. It is Iocatea
behind the door on the back of the cleaner. If the filter
becomes dirty, open the door, remove the filter and
replace. The HEPAMedia Filter is not washable.
Checkyourvacuumcleaner'sRotatingFloorBrush
and DriveBeltregularlyfor wearor damage.Make
surethe brushand brushendsarefree d debrissuch
as strings,hair,andcarpetfibers.Thesecanwrap
aroundthe brushand hamperits ability to effectively
cleanyour carpet.Alsoremoveanydebristhat has
accumulatedunderthe brushcover.
Unplug cleaner from electrical outlet.
Remove Detachable Canister from vacuum cleaner.
Recline Handle and turn vacuum cleaner over so Do[iota
side is up.
Remove the six screws as shown with a Phillips
head screwdriver. Lift the Brush Cover off.
Grasp Rotating Floor Brush at both ends and lift
Clean strings, hair and other debris from Rotating Floor
brush, paying particular attention to brush ends
Clean strings, hair and other debris from Motor Pulley aria
Drive Belt areas.
Check Drive Belt carefully for wear, cuts or
stressed areas.
Check Air Passagewayfor obstructions, qemove debris
from this area.
@
UseonlyBUSSELL
Styb 8 RepHacement
BeHts
(#3200)Un
0
Jnp_ugcleaner trom elemncal ou!le_
With Rotating F!oor Brush remove(] from vacuum cleaner
(Steps 1-5 of Check Rotating Floor Brush and Drive Belt),
grasp old Drive Belt and remove flom Motor Pulley. Discard
old Drive Belt
Place new Drive Belt over Motor Pulle ana s_re_cnother end
over Rotating Floor Brush in the space aelween tne arts-lies.
Place ends of Rotating Floor Brush down into slots on sides
as shown,
O_urn
Rotating Floor Brush by nana several cm_esm _ne
d rection of Motor Pulley, if properly installed, Drive Belt will
center itself on Rotatrng Brush crown,
Reeosition Brush Cover and screws. Tighten screws secure y.
UseonlyBISSELLReplacementBulb _#203o1007)in
_Unp[ug
@Rernove
c_eanerfrom electrical outlet.
OetacbaNe Car Bieraria rec _neuana_eof vacuum.
Jsing a screwanver, remove _neone screw as ShOWnanc
lift off the ens.
Remove the bulb from the socket oy pusnmg in gently and
turning it towards brush. Install the ;ew bulb by pushing it
gently into _neSOCKetand turmng away from brush.
@ Reposit!on lens and secure with the one screw.
Select _ledels Only
If theTurboBrushstopsrotatingor will no1pick up
debt& checkfor a clog,It a clogis present,unscrew
the two screwsin the back ofthe TurboBrushto remove
the faceplate,Clearany obstructionsreassembleand
replacethe two screws,
@
Passageway for obstructions.
Air Passagew
An internalthermaUprotectorhas beendesUgned
Untoyourcleanerto protectit from overheating.
Whenthe thermal protectoractivates, the main
vacuummotor wiii step operating, Ufthus
happens,proceedasfellows:
Turn the cleaner OFF (0) and unplug from
electrical outlet.
Check the Upper Tank area, Pre-Motor Filter and
Pest-Motor Filter for dirt accumulation.
Refer to the "Clearing Clogs" section.
When the motor cools for approximately 30
mieates, the thermal protector automatically
resets and cleaning may continue. It the therma
protector continues to activate after following [ne
above steps, your cleaner may need servicing. Call
BISSELLConsumer Services, or vis_l me wees_le
Note: The therma_ protector coetro_s the main
vaooom motor oe_y, not the brosh motor, mfthe
therma_ protector activates, the hrosh will coo=
tieoe to operate eormaHy; however, there will be
eo sactioe.
raNG:
Vacuum
cJeaner won't
run
PossibleCauses
0
To reduce the risk of injury from
moving parts and/or emectricam
shock, turn Power Switch OFFand
disconnect pomarizedplug from
emectricaioutmetbefore performing
troubmesheating checks,
Remedies
Power cordnot pluggedin
Checkelectricalpiug
Blown fuse/triepeecroaker
Check/Replacefuse OFresetbreaker
Thermal protectoractivateu
Allow cleanerto coolfor 30 minutes,
see pg. 13
No Power at Rotating Floor Brush
Possible Causes
Canisteris not securelyseateo
Remedies
_
RemoveCanisterand replace,making
surethat it "clicks" into place
Brush Switchturned [o "Off"
Make sureBrushSwitch is in "On"position
Vacuumis in uprightposition
Reclinevacuumto operatebrush
Vacuumcleaner won't pick up dirt
Possible Causes
ncorrect HeightAdjuszmen_
Hosenot attacheeto suction opening
Remedies
_Adjost Powerfootto correctheight setting
Grasp HoseGrip and firmly push onto
the base
Crack or hole lu Hose
CheckHoseand replaceif needed
DriveBelt broken,worn or off motor pu,ey
Repositionor replace DriveBelt, see
pg. 11=12
Rotating FloorBrust_bnstlosworn
Replacebrush
Rotatingricer Brushjammeo
Removebrushandcleandebrisfrom
brushends
Clog _nvacuum
Follow instructionson pg. 11 for
cleadngclogs
Dirt Containerfuti
Empty DirtContainer
Dirt Containeror UpperTank
not installedproperty
Positioncorrectlyand lock in place
Filters are dirt.
_'_ Checkand cleanor replace UpperTank,
Pre-Motorand Post-MotorFilters
Vacuum cleaner is difficult to push
PossibleCauses
Remedies
AdjustPowerfootto correctheight setting
_:_ incorrect Heightadjostmen_
Visibledirt escaping from cleaner
PossibleCauses
Remedies
Dirt Containerfu
Filter m_ss_ng
or msia,ea incorrecn_
_
Dirt Containerinstalled Incorrecl.,
Empty DirtContainer
_
CheckUpperTank,Pro-Motorand
Post-MotorFilterfor correctinstallation
Pulloutandre-insertDirtContainercorrectly
For
[nlorrnation
about repairsor repBcernentparts, or q _esrlonsaeou(your wafral_w
all:
BISSELLConsumerSewices
1-800-237-7891
Monday - Friday
8 a.m.
Saturday
9 a.m.
Otwllte.
BSSELLHomecars,nc
POBox 3606
10 p.m. ET
8 p.m. ET
@andRapids,MI 49501
ATTN Consurrer Services
Orvisitthe B]SSELLwebste www.bisseH.cem
When contactingBBSELL,have model numberof unit avaihbb.
Pleaserecord your Model Number:
Phase record Jr PurchaseDate
NOTE:P_easekeep yeur erigirla_ sa_es receipt. N is your warranty.
Youmay purchasereplacementpartsfrom your retailer,bycalling BISSELLConsumerServicesor by
visitingour website.To locatea retailernear you, or to place an omer
usingVisa,MasterCard,Discoveror AmericanExpress,call
BISSELLConsomerSewices
1"888"237"7891
lqonday - Friday
8
Saturday
a.m,
9 a.m.
10 p,m, ET
l
2
%%
8 p,m, ET
Or visit our Website ° www.bissell.com
item Part No. PartName
1
2
3200
203-1007
3
203-1063
Styb 8 DriveBelt (2_Pack)
HeadlightBulb
Crevicelbol
4
5
203-1099
203-6624
Dusting Brush/Uphobterylbol
Stair Chartinglbol (Sebct Modeb)
6
7
203-6625
203-2081
TelescopingExtensionWand
DeluxeBare Floor 3ool
8
9
10
203-1227
203_2082
203-5542
11
12
203-6633
203-2073
TurboBrush(Select Models)
BracketAssemblyfor TurboBrush
ShoukLr Strap (SelectModels)
Vacuum Hose
13
14
203-6619
203-2085
Brush Roll (Red)
Brush Roll (Grey)
15
16
203-2074
3093
Brush Roll (Taupe)
Style7/8 Upper TankFilter/Pre-Motor Filter Set
17
3091
Style8 BEPAMedia Poet-Motor Filter
4
7
£
10
11/12
13/14115
Tvqst 'n Snap Hose(SelectMe@b)
t6
17
_<=b_
@
-his warranty gives you specmc leg_ ngnm, ana y
lav also have other rights which may vary from state to
s_a_e 'ou neea aaalt -_nal _IrUCTIC egar(ung rNs warramy or have questions regarding what it may cover,
u_easecomac-{ 3JSSELLConsumer Services b, E mail. releDnone, or regular mail as described below.
Limited One Year Warranty
Subec_re the *EXCEPTIONS
AND EXCLUSIONSidentified belo,,/, upon receipt of 1heproduct BJSSFLLHomecare,
inc. wul reealr or reolace (wlTnnow or remanulacrurea sornponentsor produds), at BJSSEIL'soption, free of
uaarge rrom [no aate or eurcnase Dy me original purchaser, for one year any defective or
mavuncnonmg par_
See
}rmarlol }elow on f your BISSELL}roaucTsnoula require service",
This warranty appues_:oF oauc-{ usea for gersona ana nol commercial or rental service, ]his warranty does not
aeL. [o rans or rouune malmenance corr }onems such as filters, bells, or brushes, Damage or malfunction caused
uy negugence,aeuse neglecb unaumonzeare _lr.or an orner use ant in accordance with 1heUser's Guide is ant
Cdverec
if your BISSELLproductshould require service:
Contact BJSSELLConsumer Services to Jocatea BISSELLAuthorized Service Center in your area.
if you need information about repairs or replacement parts, or if you have questions about your warranty,
contact BJSSELLConsumer Services.
Website or E°mail:
w_,_.bisseH.com
Usethe Customer Services" tab.
Or Call:
BISSELLConsumerServices
1-800-237-7691
Monday- Friday8 a.m.- 10 p.m. ET
Saturday9 a.m. - 8 p.m.ET
Orwrite:
BISSE_LHomecare,hc,
POBox 3606
GrandRaPidsMI 49501
ATFN:ConsumerServices
BISSELL ROMECARE0iNC. IS NOT UABLE FOR iNCiDENTAL OR CONSEQUENTIAL ONVIAOESOF ANY
NATURE ASSOCIATED WiTH THE USE OF THiS PRODUCT.BBSSELLS LIABIUTY WmLLNOT EXCEED THE
PURCHASE PRICE OF THE PRODUCT.
Somestatesdo not allowthe exclusionor limitationof incidentalor consequential
damages,sothe above
limitationorexclusionmaynot applyto you.
_EXCEPTIONS
AND EXCLUSIONS
FROMTHETERMSOFTHELIMmTEO
WARRANTY
THISWARRANTYIS EXCLNSIVEAND iN LIEUOFANY OTHERWARRANTIESeTHER
ORALONWRITTEN.ANYIMPUEOWARRANTmES
WHICHMAYARmSE
BY OPERATION
OF LAW,INCLUDINGTHEiMPLiED WARRANTIES
OF IVIERCRANTAB_LITY
AND
FITNESSFORA PARTICULARPURPOSE.
ARELII_IITEOTO THEONEYEARDURATION
FROM THE DATEOF PURCHASE AS DESCRIBEDABOVE.
Somestatesde cot anew limitatioeeon how long ae Impliedwarrantylasts,
so the aboveJimitatieemayoct appEyto yell,
@
@2004 BISSELLHomecare,Inc
GrandRapids,Michigan
All dghts resolved Printedin Korea
Part Number603 5540
Roy06/04
Visit our website at:
www bissell corn