1
2
QuickNet-RK Installation Instructions
1
2
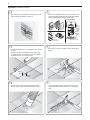
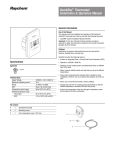
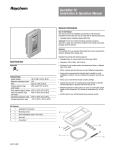
• Turn off the power to the QuickNet floor warming system at the
circuit breaker before starting any repair work.
• Disconnect the QuickNet cold leads, power wires and floor sensor
leads from the the QuickStat Thermostat. This provides additional
safety and allows for the testing required in later steps.
Line
(black)
QuickStat®
GFCI Class A
ON ON ON ON ON
LINE L1 (L)
240/(120)VAC
L2 (N)
®
Q
G uick
FC
St
N I Cla at
E ss
LI
24
L2
Power
L1 A
(L
)
0/
(1
20
(N )V
) AC
SENSOR
LOAD
OR
NS
SE
LO
16
M A
ax
.
A
D
Hig UT
powh VolION:
er tag
sup e ply Dis
bef con
DU
ore nec
384AL VO
ser t
1920W LTA
vici
ng
0W/240VAGE
/21
50/
20V C (16 60
AC A) Hz
(16
A)
16A
Max.
Neutral
(white)
Cold
lead
Cold
lead
CA
OFF OFF OFF OFF OFF
Back of thermostat
Ground
Cold leads
Floor sensor leads
Floor sensor leads
3
4
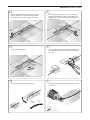
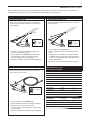
• If the damaged section has not been installed in mortar, proceed
to Step 7.
• Once the grout is removed, carefully break away the tile using a
hammer.
• Remove the tile above the damaged section by removing the
grout with a removal tool, being careful not to further damage
the heating cable. Do not use a knife or chisel.
Heating
cable
Damage
location
5
6
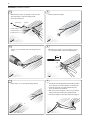
• Remove any broken tile and vacuum other debris from the
exposed surface to locate the damaged heating cable section.
• To expose the damaged section, break mortar away from the
heating cable with the hammer, making sure not to damage the
cable.