1
MODEL
AR-FX9
OPERATION MANUAL
(for facsimile)
Page
• INSTALLATION
• INITIAL SETTINGS
• CHOOSING SUITABLE
MEDIA
• HOW TO USE THE FAX
FUNCTION
• SPECIAL FUNCTIONS
• TROUBLESHOOTING
• APPENDIX
11
13
49
51
66
84
91
This equipment has been tested according to the pan-European TS103 021
regulation. It will operate on all analogue telephone networks which comply with the
TS103 021.
Please contact your dealer or network operator, if you are not sure whether your
network operates according to TS103 021.
Important safety information
• If any of your telephone equipment is not operating properly, you should
immediately remove it from your telephone line, as it may cause harm to the
telephone network.
• The AC power outlet shall be installed near the equipment and shall be easily
accessible.
• Never install telephone wiring during a lightning storms.
• Never install telephone jacks in w et locations unless the jack is specifically
designed for wet locations.
• Never touch uninsulated telephone wires or terminals unless the telphone line has
been disconnected at the network interface.
• Use caution when installing or modifying telephone lines.
• Avoid using a telephone (other than a cordless type) during an electrical storm.
There may be a remote risk of electric shock from lightning.
• Do not install or use the machine near water, or when you are wet. Take care not to
spill any liquids on the machine.
The Declaration of Conformity can be viewed at the following URL address.
http://www.sharp.de/doc/AR-FX9.pdf
Note
• This manual describes how to use the fax function of the machine.
Part names and functions shared with the copy function (for example, the
misfeed indicator and add paper indicator), are described in the Operation
Manual. For more information, please read the Operation Manual.
• This manual (fax function) refers to the Single Pass Feeder as the "SPF"
and to the Reversing Single Pass Feeder as the "RSPF".
TABLE OF CONTENTS
TABLE OF CONTENTS............................................................................................................................. 1
QUICK REFERENCE GUIDE .................................................................................................................... 3
LIST OF FAX FUNCTIONS........................................................................................................................ 6
1
INSTALLATION
CONNECTIONS .............................................. 11
● CONNECTING THE TELEPHONE LINE CORD ...11
FINAL PREPARATIONS ................................ 12
● CONNECTING OTHER DEVICES ................12
2
USING THE MACHINE WITH AN ANSWERING
MACHINE.........................................................47
● QUIET DETECT TIME .................................. 47
● ANSWERING MACHINE BACKUP............... 48
3
CHOOSING SUITABLE MEDIA
ORIGINALS SUITABLE FOR FAXING ...........49
INITIAL SETTINGS
PART NAMES................................................. 13
● SIZE AND WEIGHT ...................................... 49
● UNSUITABLE ORIGINALS ........................... 50
A LOOK AT THE FAX OPERATION PANEL ..... 14
ABOUT THE LIQUID CRYSTAL DISPLAY.... 16
USING THE ARROW KEYS ........................... 16
ADJUSTING THE RINGING VOLUME........... 17
SETTING THE LENGTH OF ALARM BEEPS .... 18
ADJUSTING THE ALARM BEEP VOLUME .. 19
FAX SETUP .................................................... 20
●
●
●
●
●
●
●
●
●
●
●
●
●
●
●
●
●
●
●
HOW TO ENTER CHARACTERS .................20
ENTERING YOUR NAME AND FAX NUMBER.....21
SETTING THE DATE AND TIME ..................22
SELECTING THE TRANSMISSION MODE ..26
SELECTING THE RECEPTION MODE.........27
SETTING THE NUMBER OF RINGS FOR
AUTO RECEPTION .......................................28
SETTING THE NUMBER OF RINGS FOR
MANUAL RECEPTION ..................................29
SELECTING THE RECEPTION PAPER SIZE .. 29
SETTING THE TRAY SELECTION ................... 30
SETTING THE NUMBER OF RECALL TIMES31
SETTING THE NUMBER OF RECALL TIMES......31
SETTING THE RECALL INTERVAL..............33
SETTING THE INDEX FUNCTION................35
SETTING RESOLUTION PRIORITY .............36
SETTING UP THE MACHINE FOR USE WITH
A PC MODEM................................................37
USING THE REMOTE RECEPTION
FUNCTION ....................................................38
PBX SETTING ...............................................40
STORING NUMBERS FOR AUTOMATIC
DIALING.........................................................41
STORING NUMBERS UNDER GROUP KEYS .....44
1
4
HOW TO USE THE FAX FUNCTION
5
SPECIAL FUNCTIONS
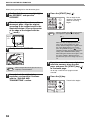
SENDING ORIGINALS ................................... 51
MEMORY .........................................................66
● SETTING THE ORIGINAL .............................51
DATA TRANSFER...........................................67
OPTIONAL TRANSMISSION SETTINGS ...... 53
TRANSMISSION RESERVATION...................69
●
●
●
●
●
●
ORIGINAL SIZE.............................................53
RESOLUTION................................................54
CONTRAST ...................................................54
COVER SHEET .............................................55
MESSAGE FUNCTION..................................56
TWO-SIDED ORIGINAL TRANSMISSION
FUNCTION ....................................................57
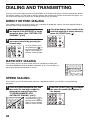
DIALING AND TRANSMITTING..................... 58
●
●
●
●
●
DIRECT KEYPAD DIALING...........................58
RAPID KEY DIALING ....................................58
SPEED DIALING ...........................................58
CHAIN DIALING ............................................59
NORMAL DIALING USING THE [SPEAKER]
KEY................................................................59
● USING THE SEARCH KEY ...........................60
● REDIALING....................................................60
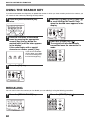
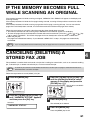
IF THE MEMORY BECOMES FULL WHILE
SCANNING AN ORIGINAL............................. 61
CANCELING (DELETING) A STORED FAX JOB...61
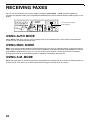
RECEIVING FAXES........................................ 62
● USING AUTO MODE.....................................62
● USING MAN. MODE......................................62
● USING A.M. MODE .......................................62
OPTIONAL RECEPTION SETTINGS ............. 63
● TWO-SIDED RECEPTION (AR-M155 only) ..63
● RECEIVE REDUCE .......................................64
WHEN USING MANUAL SENDING AND
RECEIVING..................................................... 65
BROADCASTING ............................................70
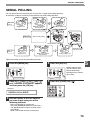
POLLING .........................................................72
● POLLING ...................................................... 72
● SERIAL POLLING......................................... 73
● POLLING TRANSMISSION (MEMORY
POLLING) ..................................................... 74
● RESTRICTING POLLING MACHINES
(POLLING SECURITY) ................................. 76
TIMER OPERATIONS .....................................78
● CANCELING A TIMER TRANSMISSION JOB.. 79
ANTI JUNK FAX ..............................................80
OPERATION IN COPY, PRINTER, SCANNER,
AND FAX MODES ...........................................83
6
TROUBLESHOOTING
PRINTING OUT REPORTS .............................84
● ACTIVITY REPORT AUTO LISTING ............ 87
● PRINTING TRANSACTION REPORTS........ 88
TROUBLESHOOTING.....................................89
MESSAGES AND SIGNALS ...........................90
● DISPLAY MESSAGES.................................. 90
● AUDIBLE SIGNALS ...................................... 90
7
APPENDIX
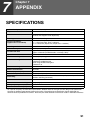
SPECIFICATIONS ...........................................91
INDEX ..............................................................92
2
QUICK REFERENCE GUIDE
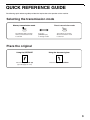
The following quick reference guide provides brief explanations the operation of the machine.
Selecting the transmission mode
Memory transmission mode
Direct transmission mode
MEMORY
MEMORY
The indicator lights up when
memory transmission mode
is selected.
Press the
[MEMORY] key
to change modes.
The indicator is off when
direct transmission mode
is selected.
Place the original
Using the SPF/RSPF
Place the original face up
(up to 30 pages at once)
Using the document glass
Place the original face
down
3
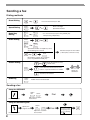
Sending a fax
Dialing methods
Direct Dialing
Press the numeric keys to dial.
Speed Dialing
SPEED/
SEARCH
Rapid Key
Dialing
01
10
Chain Dialing
SPEED/
SEARCH
Enter a two-digit
Speed Dial number.
09
18
01
10
* It is not necessary to press the [START] key
after pressing a Rapid Key.
09
18
Speed Dial number or Rapid Key set for
Chain Dialing when stored.
REDIAL/
PAUSE
Dial the next part of the number
(a Group Key cannot be used).
Dial with the numeric keys and then
press the [REDIAL/PAUSE] key.
Enter the first letter of the
stored name.
Search Dialing
SPEED/
SEARCH
Press when the first character of the
name is a special character or number.
Search by fax numbers.
Redialing
REDIAL/
PAUSE
Redial the last number dialed.
Sending a fax
Using the SPF/RSPF
RESOLUTION
Place the original.
CONTRAST
Dial.
Adjust the resolution
and contrast.
Using the document glass
Specify the
original size.
Place the original.
4
RESOLUTION
CONTRAST
Adjust the resolution
and contrast.
Dial.
If you are faxing a
multi-page original,
change pages and
press the [START]
key ( ).
Select the
destination.
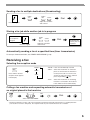
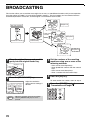
Sending a fax to multiple destinations (Broadcasting)
RESOLUTION
BROADCAST
Dial.
CONTRAST
Adjust the resolution
and contrast.
Place the original.
Storing a fax job while another job is in progress
Fax transmission
or reception in
progress
RESOLUTION
CONTRAST
Dial.
Adjust the resolution
and contrast.
Place the original.
The fax will be
transmitted after
previous jobs are
completed.
Automatically sending a fax at a specified time (timer transmission)
To set up a timer transmission, see "TIMER OPERATIONS" (p.78).
Receiving a fax
Selecting the reception mode
"AUTO" : Faxes are automatically received.
"AUTO"
RECEPTION
MODE
"MAN." : Select this mode when an extension
phone is connected to the machine to
receive phone calls. To receive a fax,
answer the call on the phone and then
press the [START] (
) key.
"MAN."
Press until the desired
reception mode appears
in the display.
"A.M."
"A.M." :
Select this mode when an answering
machine is connected to the machine.
Faxes will be received automatically.
Calling a fax machine and requesting automatic transmission of
an original placed in that machine
OK
Dial.
Select "POLLING MODE".
* Another fax machine can also call your fax machine and request automatic transmission of a original placed in
your machine. For this to take place, the reception mode of your machine must be set to "AUTO".
5
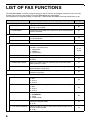
LIST OF FAX FUNCTIONS
The FAX MAIN MENU is used to configure settings for the fax function and program information such as the fax
number of the machine. The settings in the FAX MAIN MENU are shown below.
The procedure for configuring settings is explained in "SELECTING SETTINGS FOR THE FUNCTION" (p.10).
Menu item
Settings (factory default setting appears in bold)
Page
0 : RX DATA TRANSFER * (See page 9)
1 : DATA TRANSFER
Enable transfer of received faxes to another fax machine when
printing is not possible.
68
2 : FAX NUMBER
Program the fax number of the machine to which received faxes
will be transferred.
67
1 : SET
Set up a transmission or polling job to take place automatically
at a specified time.
78
2 : CLEAR
Cancel a timer transmission job.
78
1 : TIMER MODE
2 : ENTRY MODE
1 : FAX NUMBER
Store (or delete) fax numbers in Rapid Keys, Speed Dial
numbers, and Group Keys.
1 : RAPID KEY
2 : SPEED #
3 : GROUP KEY
41, 43,
44, 46
2 : DATE&TIME SET
Set the date and time in the machine.
22
3 : OWN PASSCODE SET
Program the name and phone number of the user of the
machine.
21
4 : PASSCODE # MODE
Store fax numbers that are allowed to poll the machine when
polling security is used.
77
5 : DAY LIGHT SAVING
Enable automatic adjustment of the clock at the beginning and
end of daylight savings time.
25
Check and delete stored fax jobs waiting for transmission and
automatic recall jobs.
61
Set the size of an original faxed from the document glass.
1 : A4
2 : 8.5x11
3 : 8.5x14
53
Set the default size of originals faxed from the document glass.
1 : A4
2 : 8.5x11
3 : 8.5x14
53
Set the default resolution for fax transmission.
1 : STANDARD
2 : FINE
3 : SUPER FINE
36
Set the number of rings on which the machine answers calls in
automatic reception mode.
0 - 9 (2)
28
Set the number of rings on which the machine answers calls in
manual reception mode.
0 - 9 (0)
29
3 : MEMORY STATUS
4 : USER PROGRAM
1 : DOC. GLASS SIZE
2 : FIXED DOC. SIZE
3 : RESO. PRIORITY
4 : # OF RINGS (AUTO)
5 : # OF RINGS (MANUAL)
6
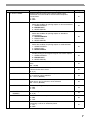
Menu item
6 : AUTO LISTING
Settings (factory default setting appears in bold)
Page
Enable automatic printing of the Activity Report when
information on a total of 50 fax transmissions/receptions
accumulates.
1 : ON
2 : OFF
87
1 : TRANSMISSION
Select the condition for printing reports on fax transmissions.
1 : ALWAYS PRINTS
2 : ERROR ONLY
3 : NEVER PRINTS
88
2 : BROADCAST
Select the condition for printing reports on broadcast
transmissions.
1 : ALWAYS PRINTS
2 : ERROR ONLY
3 : NEVER PRINTS
88
3 : RECEPTION
Select the condition for printing reports on received faxes.
1 : ALWAYS PRINTS
2 : ERROR ONLY
3 : NEVER PRINTS
88
4 : IMAGE MEM. PRINT
Enable printing of the original image on transaction reports.
1 : ALWAYS PRINTS
2 : ERROR ONLY
3 : NEVER PRINTS
88
Set the number of recall attempts that are made when the line is
busy.
00 - 10 (02)
31
Set the number of recall attempts that are made when a
communication error occurs.
0 - 5 (1)
32
Set the interval between recall attempts when the line is busy. 1
to 15 minutes can be selected.
01 - 15 min. (03 min.)
33
Set the interval between recall attempts when a communication
error occurs. 0 to 15 minutes can be selected.
00 - 15 min. (01 min.)
34
Enable the polling security function.
1 : ON
2 : OFF
76
13 : FAX REMOTE
NUMBER
Set the 1-digit number used to activate remote fax reception.
0 - 9 (5)
39
14 : REMOTE RECEPTION
Enable the remote reception function.
1 : ON
2 : OFF
38
Enable automatic fax reception when a fax tone is heard after
answering a call on an extension phone.
1 : ON
2 : OFF
37
7 : PRINT SELECTION
8 : RECALL TIMES BUSY
9 : RECALL TIMES ERR
10 : RECALL INT. BUSY
11 : RECALL INT. ERR
12 : SECURITY SELECT
15 : FAX SIGNAL RCV
7
Menu item
16 : RCV REDUCE
17 : BEEP LENGTH
18 : RINGER VOLUME
19 : BEEPER VOLUME
20 : INDEX PRINT
21 : DATE&TIME FORMAT
22 : PBX SETTING **
23 : 2-SIDED RX
24 : TRAY SELECTION
(when the 250-sheet
paper feed unit is installed)
8
Settings (factory default setting appears in bold)
Page
When a fax is received that is larger that the printing paper,
enable reduction of the fax to the size of the paper to avoid the
fax being cut off.
1 : ON
2 : OFF
64
Set the length of the beep that sounds when fax transmission or
reception ends.
1 : 3 SEC
2 : 1 SEC
3 : NO BEEP
18
Set the volume of the ringer.
1 : OFF
2 : LOW
3 : MIDDLE
4 : HIGH
17
Set the volume of the beep that sounds when a key is pressed.
1 : OFF
2 : LOW
3 : MIDDLE
4 : HIGH
19
Enable printing of a black mark (index) at the top of each
received fax page.
1 : ON
2 : OFF
35
1 : TIME FORMAT
Select 12-hour or 24-hour format for the time set in the
machine.
1 : 12 HOUR
2 : 24 HOUR
23
2 : DATE FORMAT
Set the format of the date in the display and in printouts.
1 : MMDDYYYY
2 : DDMMYYYY
3 : YYYYMMDD
24
Set this function for pbx setting.
1 : ON
2 : OFF
40
Print on both sides of the paper when a multi-page fax is
received.
1 : ON
2 : OFF
63
Set the tray for printing received faxes.
1 : AUTO
2 : TRAY 1
3 : TRAY 2
30
Menu item
Settings (factory default setting appears in bold)
Page
5 :ANTI JUNK FAX
1 : ANTI JUNK SELECT
2 : JUNK FAX #
Enable the anti junk function to block fax reception from
specified fax numbers.
1 : ON
2 : OFF
80
Program (or delete) fax numbers from which fax reception is to
be blocked.
1 : SET
2 : CLEAR
81
Activate fax reception when a period of silence longer than the
set time is detected.
00 - 10 (05)
47
Enable fax reception when the answering machine is full and
cannot receive messages or otherwise fails.
1 : ON
2 : OFF
48
6 : A.M. MODE
1: QUIET DETECT TIME
2 : AUTO RECEIVE
7 : MEMORY POLL MODE
1 : 1 TIME
Perform polling transmission once.
74
2 : REPEAT
Perform polling transmission repeatedly.
74
8 : POLLING MODE
Poll another fax machine.
72
9 : SERIAL POLL MODE
Sequentially poll multiple fax machines.
73
* Transfer is only possible when a received fax is being held in memory because printing was not possible. In this case, "0:RX
DATA TRANSFER" will appear in the display.
* Please note that the PBX setting is only available in Denmark, Finland, Iceland, Norway and Sweden.
For the other countries, the parameter "22. PBX setting" is replaced by "22 : 2-SIDED RX" and followed by "23 :
TRAY SELECTION".
9
SELECTING SETTINGS FOR THE FUNCTION
The general procedure for configuring settings for the fax function is explained below. Follow this procedure to
configure the settings explained on pages 6 through 9.
An item can also be selected after pressing the [MENU] key by pressing the numeric key for the item (the key
corresponding to the number that appears in front of the item). When the numeric key is pressed, the item is
selected or entered.
Note
1
Press the [MODE SELECT] key to
select fax mode.
4
Select a setting or enter information
The "FAX" indicator lights
up to indicate that fax
mode is selected.
R
1,2,3,
1,2,3,
2
Press the [MENU] key.
• If you mistakenly select the wrong item,
press the [CLEAR] key (
) and repeat
the procedure from step 2.
• To cancel a setting for a fax function,
press the [MENU] key.
Note
"FAX MAIN MANU" will
appear in the display.
1,2,3,
1,2,3,
5
3
To select a setting:
Press the [
] key ( )
or [ ] key ( ) until the
setting is selected.
To enter information:
Press the numeric keys
to enter characters or
numbers.
The setting or information
is entered.
Press the [ ] key ( ) or [ ] key ( )
key to select a menu item and press
the [OK] key.
1,2,3,
1,2,3,
The item is selected.
Repeat this step until the
item that you wish to
configure appears.
Press the [OK] key.
1,2,3,
1,2,3,
6
Press the [MENU] key.
Press the [MENU] key to
exit.
1,2,3,
1,2,3,
10
1
Chapter 1
INSTALLATION
CONNECTIONS
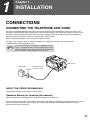
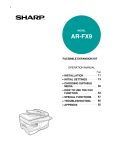
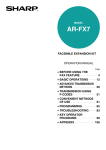
CONNECTING THE TELEPHONE LINE CORD
Use only the provided telephone line cord to connect the machine to the wall telephone socket. As shown in the
illustration, insert the end of the cord with the core into the LINE socket on the side of the machine as shown in the
illustration. Insert the other end (without the core) into the adapter and insert the adapter into the wall telephone
socket. For more information, contact your nearest Sharp service center.
Please note that the adapter is not necessary for Nordic countries.
The "TEL" jack is used to attach an extension telephone or answering machine to the machine. (See
"CONNECTING OTHER DEVICES" (p.12))
Note
If your area experiences a high incidence of lightning or power
surges, we recommend that you install surge protectors for the
power and telephone lines. Surge protectors can be purchased
from your retailer or at most telephone specialty stores.
L
TE
Insert firmly until
you hear a "click".
Wall socket
LINE socket
E
LIN
Adapter
ABOUT THE OPERATION MANUALS
The operation manuals for the machine are as follows:
Operation Manual (for facsimile) (this manual)
This manual explains the procedures for using the machine as a fax machine.
This manual only explains the fax functions of the machine. For general information on using the machine, including
safety information, installation, paper loading, removal of paper misfeeds, and peripheral equipment, see the
operation manual for the machine.
11
Operation Manual (for general information)
Explains the machine and how to use it as a copier. Also explains how to install the software that allows the machine
to be used as a printer and scanner for your computer.
The following information is contained in the operation manual for the machine :
OPERATION MANUAL contents
Page
CAUTIONS
3
PART NAMES
9
POWER ON AND OFF
12
LOADING THE PAPER TRAY
BYPASS FEED (including special paper)
15
17
OPERATION MANUAL contents
Page
CHANGING A TRAY'S PAPER SIZE
SETTING
19
MISFEED REMOVAL
79
TONER CARTRIDGE REPLACEMENT
85
CHECKING THE TOTAL COUNT
87
CLEANING THE MACHINE
88
OPTIONAL EQUIPMENT
90
Online Manual (on the CD-ROM)
This manual explains the procedures for using the machine as a printer and a scanner.
FINAL PREPARATIONS
CONNECTING OTHER DEVICES
If desired, an answering machine or external telephone can be connected to the machine through the telephone
jack, labeled "TEL," on the rear of the machine.
● Connecting an answering machine to the machine allows you to receive both voice and fax messages when you
are out. To use this feature, first change the outgoing message of your answering machine, and then set the
reception mode of the machine to "A.M." (Answering Machine mode) when you go out.
Comments:
1. It is advisable to keep the length of the message under 10 seconds. If it is too long, you may have difficulty
receiving faxes sent by automatic dialing.
2. Your callers can even leave a voice message and send a fax message on the same call. Modify your outgoing
message to explain that this can be done by pressing their [START] key ( ) after leaving their voice message.
● You can connect an extension phone to the machine to make and receive calls like any other extension phone on
your line. Even if you pick up the extension phone and hear a fax tone, the machine will automatically cut in and
take over the line. Note, however, if you also have a PC modem on the same line, you must turn on the Remote
Reception function, and deactivate the Fax Signal Receive function. See "SETTING UP THE MACHINE FOR
USE WITH A PC MODEM" (p.37) and "USING THE REMOTE RECEPTION FUNCTION" (p.38).
Note
12
The Remote Reception function is initially set to "ON".
Chapter 2
2
INITIAL SETTINGS
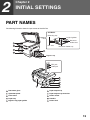
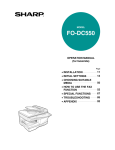
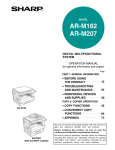
PART NAMES
The following illustration shows the part names of the AR-FX9.
SPF/RSPF
Reversing tray
Original guides
Document
feeder cover
1
Exit area
2
Document feeder tray
3
5
4
Bypass tray
TE
L
TEL jack
LINE jack
E
LIN
6
7
8
9
9
10
1
Document glass
6
Paper output tray
2
Operation panel
7
Paper output tray extension
3
Front cover
8
Power switch
4
Paper tray
9
Handles
5
Bypass tray paper guides
10
Power cord
13
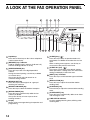
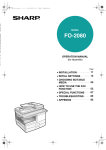
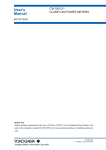
A LOOK AT THE FAX OPERATION PANEL
2
1
3
5
4
6
01
10
02
11
03
12
04
13
05
14
SPEED/ BROAD- RECEPTION REDIAL/
MEMORY SEARCH CAST
MODE
PAUSE
06
15
07
16
08
17
09
18
SHIFT
COVER
RESOLUTION
CONTRAST SHEET
AR-FX9
2-SIDED
REPORT TX
LINE STATUS
10
11 12 13
1
Rapid keys
Press one of these keys to dial a fax or telephone
number automatically.
2
[MEMORY] key / indicator
Used for sending faxes in memory (indicator is lit)
or direct sending (indicator is not lit).
3
[SPEED/SEARCH] key
Press this key to dial a two digit Speed Dial
number.
During character inputting, use this key to delete
an incorrect entry.
Also, press this key twice to search for an
automatic dialing number.
14
SPEAKER
15
16 17
18
19 20
21
8
[CLEAR] key (
)
Press this key to stop an operation before it is
completed, or to delete the number that was last
input.
When a setting menu appears, use this key to
move back to the previous menu level.
9
[CLEAR ALL] key (
)
This returns all functions to the default settings.
When pressed in a setting menu, this returns the
settings and display to the initial state.
10
[SHIFT] key / indicator
Press this key to switch between upper and lower
case.
4
[BROADCAST] key
Press this key to send originals to a group of
receiving fax machines.
11
[RESOLUTION] key
Press this key to adjust the resolution before
sending faxes.
5
[RECEPTION MODE] key
Press this key to select the mode of reception.
12
6
[REDIAL/PAUSE] key
Press this key to automatically redial the last
number you dialed.
Also, press this key to insert a pause when
entering numbers.
[CONTRAST] key
Press this key to adjust the contrast before sending
faxes.
13
[COVERSHEET] key
Press this key to automatically add a cover sheet
and message to a fax.
14
LINE STATUS indicator
Lit when sending/receiving faxes, blinking when
receiving data.
7
Display
Shows various messages during fax operation and
programming.
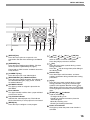
14
INITIAL SETTINGS
7
É
1,2,3,
É
1,2,3,
SP. FUNC
22
8
9
2
ZOOM
23
24
25
15
[REPORT] key
Press this key to print out a report of a fax
transaction and also when receiving a confidential
fax.
16
[SPEAKER] key
Press this key to begin manual dialing. (To close
the line, press the [SPEAKER] key again.)
26
27
23
[
] key (
), [
] key (
), [OK] key
Press the [
] key (
) or [
] key (
) to
select an item in a function setting menu.
Press the [OK] key to enter a selection.
24
[ ] key
Press this key to enter symbols during a name
storing procedure.
Press the " " key to change from pulse dialing to
tone dialing mode.
25
Numeric keys
Press these keys to dial numbers, and enter
numbers and letters during number/name storing
procedures.
26
[#] key
Press this key to enter symbols during a name
storing procedure. The [#] key scrolls through
symbols in the opposite direction of the [ ] key.
When dialing, press this key after you are finished
scanning originals into memory from the document
glass.
27
[START] key (
)/ indicator
Used for the following:
• To begin sending a fax.
• Reading an original into memory from the
document glass.
• Manually receiving a fax.
• Entering and setting information.
28
Power save indicator
This lights up when the power save function is
activated.
Please refer to "PBX function" for details about the
R-key function.
17
[2-SIDED TX] key )
Press this key to fax a two-sided original.
18
[MODE SELECT] key / Mode indicators
Press this key to select the mode. The indicator of
the selected mode lights (copy, printer, scanner,
fax mode indicators).
19
SPF/RSPF indicator
This lights up when an original is placed in the
SPF/RSPF.
20
Error indicator
This lights steadily or blinks when a paper misfeed
or other error occurs.
21
Tray location indicator
Indicates the selected paper tray. The indicator
blinks when the tray is out of paper or is not closed.
22
[MENU] key
Press this key to configure a user program.
28
15
ABOUT THE LIQUID CRYSTAL DISPLAY
The machine is equipped with a two-line liquid crystal display (LCD) on the operation panel for displaying various
messages and settings during operation. This LCD can display up to 20 characters on each line. When the machine
is idle, the LCD shows the date, time, reception mode and the stand-by memory available.
Example:
When an original is placed in the SPF/RSPF, the second line
changes from "STAND-BY" to "SEND READY".
When the [MENU] key is pressed to configure a setting, the display appears as shown below.
Example:
The selected setting or entered information appears on the
second line.
USING THE ARROW KEYS
To configure settings and program information, press the [MENU] key and then press the [
key (
) to select the item that you wish to configure.
The arrows keys can also be used while entering characters to move the cursor.
] key (
) or [
]
Example:
Press the [
] key (
) or [
] key (
) to change the
item selection that appears on the second line.
Note
16
An item can also be selected after pressing the [MENU] key by pressing the numeric key for the item
(the key corresponding to the number that appears in front of the item). When the numeric key is
pressed, the item is selected or entered.
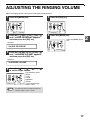
ADJUSTING THE RINGING VOLUME
Adjust the ringing volume of the machine using the procedure below.
1
5
Press the [MENU] key.
1,2,3,
1,2,3,
1,2,3,
1,2,3,
2
Press the [OK] key.
Press the [ ] key ( ) or [ ] key ( )
until "4:USER PROGRAM" appears,
and then press the [OK] key.
6
Press the [MENU] key.
Press the [MENU] key to
exit.
Selection
1,2,3,
1,2,3,
"4:USER PROGRAM"
3
Press the [ ] key ( ) or [ ] key ( )
until "18:RINGER VOLUME" appears,
and then press the [OK] key.
Selection
"18:RINGER VOLUME"
4
Press the [ ] key ( ) or [
to set the ringer volume.
1,2,3,
1,2,3,
Note
] key (
)
The selections are as
follows:
1:OFF
2:LOW
3:MIDDLE
4:HIGH
To turn off the ringer,
select "1:OFF".
An extension phone will still ring when the
machine ringer is set to "1:OFF".
17
2
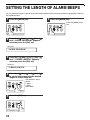
SETTING THE LENGTH OF ALARM BEEPS
You can select the length in seconds of the alarm beeps (emitted at the end of transmission and reception) following
the procedure below.
1
6
Press the [MENU] key.
Press the [MENU] key.
Press the [MENU] key to
exit.
1,2,3,
1,2,3,
2
1,2,3,
1,2,3,
Press the [ ] key ( ) or [ ] key ( )
until "4:USER PROGRAM" appears,
and then press the [OK] key.
Selection
"4:USER PROGRAM"
3
Press the [ ] key ( ) or [ ] key (
until "17:BEEP LENGTH" appears,
and then press the [OK] key.
)
Selection
"17:BEEP LENGTH"
4
Press the [ ] key ( ) or [ ] key ( )
to set the alarm beeps to the desired
length or to turn them off.
1,2,3,
1,2,3,
5
Press the [OK] key.
1,2,3,
1,2,3,
18
The selections are as
follows:
1:3SEC
2:1SEC
3:NO BEEP
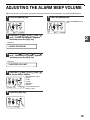
ADJUSTING THE ALARM BEEP VOLUME
Adjust the volume of alarm beeps (emitted at the end of transmission and reception) using the procedure below.
1
6
Press the [MENU] key.
Press the [MENU] key.
Press the [MENU] key to
exit.
1,2,3,
1,2,3,
2
1,2,3,
1,2,3,
Press the [ ] key ( ) or [ ] key ( )
until "4:USER PROGRAM" appears,
and then press the [OK] key.
2
Selection
"4:USER PROGRAM"
3
Press the [ ] key ( ) or [ ] key ( )
until "19:BEEPER VOLUME" appears,
and then press the [OK] key.
Selection
"19:BEEPER VOLUME"
4
Press the [ ] key ( ) or [
to set the alarm volume.
1,2,3,
1,2,3,
5
] key (
)
The selections are as
follows:
1:OFF
2:LOW
3:MIDDLE
4:HIGH
To turn off the alarm,
select "1:OFF".
Press the [OK] key.
1,2,3,
1,2,3,
19
FAX SETUP
HOW TO ENTER CHARACTERS
You can enter letters with the numeric keys. Letters are marked above each of the numeric keys [2] through [9]. To
enter a letter, press the appropriate key repeatedly until the desired letter appears (the number of the key appears
first, followed by letters in the order marked above the key). The keys used for entering characters are shown below.
The following characters can be entered with the numeric keys:
key
1
2
3
4
5
6
7
8
9
0
#
Characters that can be entered
1 Space
A B C 2 a b c
D E F 3 d e f
G H I 4 g h i
J K L 5 j k l
M N O 6 m n o
P Q R S 7 p q r s
T U V 8 t u v
W X Y Z 9 w x y z
* } { ] [ ? > = ; : , + ) ('& % $"!/_-.@ #
0
# @.-_/ !"$ % &'( )+ ,: ; = > ? [ ] { } *
● Please note that this table of characters is not complete and varies according to the destination and language.
● To enter two characters in succession which require using the same key, press the [
entering the first character, and then enter the second character.
] key (
) once after
● If you enter an incorrect character or number, follow these steps to correct the mistake.
1. Press the [ ] key ( ) or [ ] key ( ) to move the cursor to the character immediately following the
incorrect character.
2. Press the [CLEAR] key (
).
The character in front of the cursor is deleted.
3. Enter the correct character.
The character is inserted in front of the cursor.
20
INITIAL SETTINGS
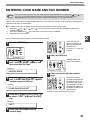
ENTERING YOUR NAME AND FAX NUMBER
You can view all of the items in the menu display by pressing the [MENU] key, then using the [
] key (
[
] key (
) to scroll through the function list. Pressing the [OK] key chooses the displayed function.
Procedures for inputting various items (name, telephone number, date, etc.) are given as follows.
Note
) or
To have your name and fax number printed at the top of every page you transmit, program them by pressing the
operation panel keys as shown below.
● If you enter an incorrect character or number, follow these steps to correct the mistake.
1. Press the [ ] key ( ) or [ ] key ( ) to move the cursor to the character immediately following the
incorrect character.
2. Press the [CLEAR] key (
).The character in front of the cursor is deleted.
3. Enter the correct character.
Use the following procedure to enter your name and fax number:
1
Enter your own fax
number (maximum 20
digits) by pressing the
Numeric keys.
To insert a "+", press the
[ ] key.
Press the [MENU] key.
1,2,3,
1,2,3,
6
2
Press the [OK] key.
"ENTER NAME" will
appear in the display.
Press the [ ] key ( ) or [ ] key ( )
until "2:ENTRY MODE" appears, and
then press the [OK] key.
1,2,3,
1,2,3,
Selection
"2:ENTRY MODE"
7
3
Press the [ ] key ( ) or [ ] key ( )
until "3:OWN PASSCODE SET" appears,
and then press the [OK] key.
Selection
"3:OWN PASSCODE SET"
4
Enter your name with the numeric
keys.
Enter your name by
pressing the appropriate
Numeric keys as shown
on the left. Press each
key repeatedly until the
desired letter appears in
the display (maximum of
40 characters).
To enter a space, press the [1] key twice.
Press the [ ] key ( ) or [ ] key ( )
to select "1:SET" and press the [OK]
key.
Selection
"1:SET"
5
Enter your fax number with the
numeric keys.
21
2
INITIAL SETTINGS
8
Press the [OK] key.
9
Press the [MENU] key.
Press the [MENU] key to
exit.
1,2,3,
1,2,3,
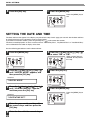
SETTING THE DATE AND TIME
The date and time that appear in the display are printed at the top of each page you transmit. Set the date and time
by pressing the keys on the operation panel as shown below.
If you enter an incorrect number, press the [CLEAR] key (
) and re-enter the number.
The time can be displayed in 12-hour or 24-hour format. "Month/Day/Year", "Day/Month/Year" or "Year/Month/Day"
can be selected for the order of display of the date.
Use the following procedure to set the date and time:
1
Press the [MENU] key.
6
Press the [ ] key ( ) or [
to select "AM" or "PM".
] key (
)
When 24-hour format is
selected, do not perform
this step.
1,2,3,
1,2,3,
2
Press the [ ] key ( ) or [ ] key ( )
until "2:ENTRY MODE" appears, and
then press the [OK] key.
1,2,3,
1,2,3,
7
Press the [OK] key.
Selection
1,2,3,
1,2,3,
"2:ENTRY MODE"
3
Press the [ ] key ( ) or [ ] key ( )
until "2:DATE&TIME SET" appears,
and then press the [OK] key
8
Press the [MENU] key.
Press the [MENU] key to
exit.
Selection
"2:DATE&TIME SET"
4
Enter the year, month, and day with
the numeric keys and then press the
[OK] key.
5
Enter the time with the numeric keys.
22
1,2,3,
1,2,3,
INITIAL SETTINGS
To change the display format to 12-hour or 24-hour format, follow the steps below:
1
Press the [MENU] key.
6
1,2,3,
1,2,3,
1,2,3,
1,2,3,
2
Press the [ ] key ( ) or [ ] key ( )
until "4:USER PROGRAM" appears,
and then press the [OK] key.
Press the [OK] key.
7
Press the [MENU] key.
Press the [MENU] key to
exit.
Selection
1,2,3,
1,2,3,
"4:USER PROGRAM"
3
Press the [ ] key ( ) or [ ] key ( )
until "21:DATE&TIME FORMAT"
appears, and then press the [OK] key.
Selection
"21:DATE&TIME FORMAT"
4
Press the [ ] key ( ) or [ ] key ( )
until "1:TIME FORMAT" appears, and
then press the [OK] key.
Selection
"1:TIME FORMAT"
5
Press the [ ] key ( ) or [ ] key ( )
to select "1:12HOUR" or "2:24HOUR".
1,2,3,
1,2,3,
23
2
INITIAL SETTINGS
To change the order of display of the date, follow the steps below:
1
6
Press the [MENU] key.
1,2,3,
1,2,3,
1,2,3,
1,2,3,
2
Press the [OK] key.
Press the [ ] key ( ) or [ ] key ( )
until "4:USER PROGRAM" appears,
and then press the [OK] key.
7
Press the [MENU] key.
Press the [MENU] key to
exit.
Selection
1,2,3,
1,2,3,
"4:USER PROGRAM"
3
Press the [ ] key ( ) or [ ] key ( )
until "21:DATE&TIME FORMAT"
appears, and then press the [OK] key.
Selection
"21:DATE&TIME FORMAT"
4
Press the [ ] key ( ) or [ ] key ( )
until "2:DATE FORMAT" appears, and
then press the [OK] key.
Selection
"2:DATE FORMAT"
5
Press the [ ] key ( ) or [ ] key (
to select the display order.
1,2,3,
1,2,3,
24
The selections are as
follows:
1:MMDDYYYY
2:DDMMYYYY
3:YYYYMMDD
)
INITIAL SETTINGS
Daylight Saving Time Setting
Enable this setting to have the internal clock automatically move forward and backward at the beginning and end of
Daylight Saving Time. The clock will move forward and backward as follows:
The last Sunday in March: 1:00 A.M.
2:00 A.M.
The last Sunday in October: 1:00 A.M.
0:00 A.M.
If a transmission is in progress when the clock adjustment time for daylight savings time arrives, the clock will not
be adjusted until the transmission ends.
Note
Follow these steps to enable Daylight Saving Time.
1
5
Press the [MENU] key.
2
1,2,3,
1,2,3,
1,2,3,
1,2,3,
2
Press the [OK] key.
Press the [ ] key ( ) or [ ] key ( )
until "2:ENTRY MODE" appears, and
then press the [OK] key.
6
Press the [MENU] key.
Press the [MENU] key to
exit.
Selection
1,2,3,
1,2,3,
"2:ENTRY MODE"
3
Press the [ ] key ( ) or [ ] key ( )
until "5:DAY LIGHT SAVING" appears,
and then press the [OK] key.
Selection
"5:DAY LIGHT SAVING"
4
Press the [ ] key ( ) or [ ] key (
to select "1:ON" or "2:OFF".
)
1,2,3,
1,2,3,
25
INITIAL SETTINGS
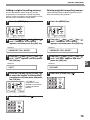
SELECTING THE TRANSMISSION MODE
The machine has two modes for sending faxes: memory transmission and direct transmission. To change modes,
press the [MEMORY] key. The MEMORY indicator lights up when memory transmission is selected, and goes off
when direct transmission is selected.
MEMORY indicator
01
10
02
11
03
12
04
13
05
14
SPEED/ BROAD- RECEPTION REDIAL/
MEMORY SEARCH CAST
MODE
PAUSE
06
15
07
16
08
17
09
18
SHIFT
COVER
RESOLUTION
CONTRAST SHEET
2-SIDED
REPORT TX
LINE STATUS
SPEAKER
Transmission takes place as follows in each mode:
Memory transmission (the MEMORY indicator is lit)
When a fax is sent from the SPF/RSPF and there are no previously stored fax jobs and no job in progress (the
telephone line is not being used), dialing and scanning begin at the same time. Each page is transmitted after it is
scanned. This transmission method is called Quick Online transmission.
If there are previously stored fax jobs or a job in progress, or the fax is being sent from the document glass, the fax
is temporarily scanned into memory before transmission.
Note
When a fax is sent by transmission reservation (p.69), broadcast transmission (p.70), broadcasting using a Group
key (p.71),or timer transmission (p.78), the fax is scanned into memory before transmission.
Direct transmission (the MEMORY indicator is off)
The fax is sent directly after the destination is dialed and the connection established.
The machine memory is not used for direct transmission, and thus direct transmission is possible even when the
memory is full.
Note
26
• A fax job cannot be stored while a direct transmission is in progress.
• Only one page can be sent from the document glass by direct transmission.
• A subsequent function cannot be used while a direct transmission is in progress.
Transmission reservation (p.69), broadcast transmission (p.70), broadcasting using a Group key (p.71), or timer
transmission (p.78)
INITIAL SETTINGS
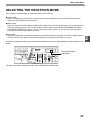
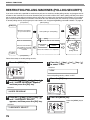
SELECTING THE RECEPTION MODE
Your machine has three modes for receiving incoming calls and faxes:
● AUTO mode:
Select this mode when you only want to receive faxes on your telephone line. The machine will automatically
answer all calls and receive incoming faxes.
● MAN. mode:
This is the most convenient mode for receiving phone calls if you have an extension phone. To have true manual
mode, the machine must be set to not answer while in MAN. mode (see "SETTING THE NUMBER OF RINGS
FOR MANUAL RECEPTION" (p.29)). You can also receive faxes; however, all calls must first be answered by
picking up the receiver on the extension phone.
● A.M. mode:
Select this mode when an answering machine is connected to the machine and you want the answering machine
to answer all calls. This allows you to receive both voice messages and faxes while you are out.
To select the reception mode, press the [RECEPTION MODE] key until the desired reception mode appears in the
display.
SPEED/ BROAD- RECEPTION REDIAL/
MEMORY SEARCH CAST MODE PAUSE
AR-FX9
NOV 05 WED 8:20 AM
STAND-BY AUTO 100%
COVER
2-SIDED
RESOLUTION CONTRAST SHEET REPORT TX
LINE STATUS
The selected reception
mode appears.
SPEAKER
1,2,3,
1,2,3,
ZOOM
For more information on reception modes, refer to RECEIVING FAXES (p.62).
27
2
INITIAL SETTINGS
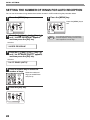
SETTING THE NUMBER OF RINGS FOR AUTO RECEPTION
You can set the number of rings before the machine answers in AUTO mode using the procedure below.
1
Press the [MENU] key.
6
Press the [MENU] key.
Press the [MENU] key to
exit.
1,2,3,
1,2,3,
2
1,2,3,
1,2,3,
Press the [ ] key ( ) or [ ] key ( )
until "4:USER PROGRAM" appears,
and then press the [OK] key.
Selection
"4:USER PROGRAM"
3
Press the [ ] key ( ) or [ ] key ( )
until "4:# OF RINGS (AUTO)" appears,
and then press the [OK] key.
Selection
"5:# OF RINGS (AUTO)"
4
Press a numeric key to select the
number of rings.
Select the number of
rings you would like to
use (0 to 9).
5
Press the [OK] key.
1,2,3,
1,2,3,
28
Note
If an external telephone is connected, the
external telephone will ring one time when
auto reception is set to 0 rings.
INITIAL SETTINGS
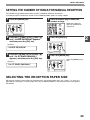
SETTING THE NUMBER OF RINGS FOR MANUAL RECEPTION
The number of rings before the machine answers in MANUAL mode can also be set.
If you do not want the machine to answer at all in MANUAL Mode, select "0" in Step 4 below.
1
Press the [MENU] key.
4
Press a numeric key to select the
number of rings.
Select the number of
rings you would like to
use (0 to 9).
1,2,3,
1,2,3,
2
Press the [ ] key ( ) or [ ] key ( )
until "4:USER PROGRAM" appears,
and then press the [OK] key.
5
2
Press the [OK] key.
Selection
1,2,3,
1,2,3,
"4:USER PROGRAM"
3
Press the [ ] key ( ) or [ ] key ( )
until "5:# OF RINGS (MANUAL)"
appears, and then press the [OK] key.
6
Press the [MENU] key.
Press the [MENU] key to
exit.
Selection
"5:# OF RINGS (MANUAL)"
1,2,3,
1,2,3,
SELECTING THE RECEPTION PAPER SIZE
Set the size of paper to be used to print received faxes. A size setting other than "A4", "8.5x11", or "8.5x14" is
regarded as out of paper. To set the paper size, see "LOADING PAPER" in the Operation Manual (for general
information).
29
INITIAL SETTINGS
SETTING THE TRAY SELECTION
(when the 250-sheet paper feed unit is installed)
Follow the steps below to select the paper tray for received faxes.
1
6
Press the [MENU] key.
Press the [MENU] key.
Press the [MENU] key to
exit.
1,2,3,
1,2,3,
2
1,2,3,
1,2,3,
Press the [ ] key ( ) or [ ] key ( )
until "4:USER PROGRAM" appears,
and then press the [OK] key.
Selection
"4:USER PROGRAM"
3
Press the [ ] key ( ) or [ ] key ( )
until "24:TRAY SELECTION" appears,
and then press the [OK] key.
Selection
"24:TRAY SELECTION"
4
Press the [ ] key ( ) or [ ] key (
to select the tray selection.
1,2,3,
1,2,3,
5
Press the [OK] key.
1,2,3,
1,2,3,
30
The selections are as
follows:
1:AUTO
2:TRAY 1
3:TRAY 2
)
INITIAL SETTINGS
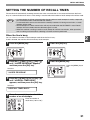
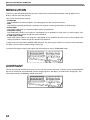
SETTING THE NUMBER OF RECALL TIMES
The machine will automatically reattempt transmission when a transmission is not successful because the line is
busy or a communication error occurs. This setting is used to select the number of recall attempts that will be made.
• If a transmission is still not successful after the set number of recall attempts is made, a report will
print and the document will be cleared from memory.
• If a communication error occurs because the memory becomes full during transmission, no recall
attempts will be made.
• Recall attempts for a direct transmission will only be made when the SPF/RSPF is used. Recall
attempts will not be made when the document glass is used.
• When the machine is waiting to make a recall attempt for a direct transmission, other operations
such as storing a transmission or selecting a function cannot be performed.
Note
When the line is busy
2
You can select the number of recall attempts made when the line is busy.
If "00" is entered, the machine will not make any recall attempts.
1
Press the [MENU] key.
5
1,2,3,
1,2,3,
1,2,3,
1,2,3,
2
Press the [OK] key.
Press the [ ] key ( ) or [ ] key ( )
until "4:USER PROGRAM" appears,
and then press the [OK] key.
6
Press the [MENU] key.
Press the [MENU] key to
exit.
Selection
1,2,3,
1,2,3,
"4:USER PROGRAM"
3
Press the [ ] key ( ) or [ ] key ( )
until "8:RECALL TIMES BUSY"
appears, and then press the [OK] key.
Selection
"8:RECALL TIMES BUSY"
4
Press the numeric keys to select the
number of recall attempts.
Enter the number of
recall times ("00" to "10").
31
INITIAL SETTINGS
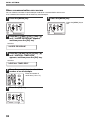
When a communication error occurs
You can select the number of recall attempts made when a communication error occurs.
If "0" is entered, the machine will not make any recall attempts.
1
Press the [MENU] key.
6
Press the [MENU] key.
Press the [MENU] key to
exit.
1,2,3,
1,2,3,
2
1,2,3,
1,2,3,
Press the [ ] key ( ) or [ ] key ( )
until "4:USER PROGRAM" appears,
and then press the [OK] key.
Selection
"4:USER PROGRAM"
3
Press the [ ] key ( ) or [ ] key ( )
until "9:RECALL TIMES ERR"
appears, and then press the [OK] key.
Selection
"9:RECALL TIMES ERR"
4
Press the numeric keys to select the
number of recall attempts.
Enter the number of
recall times ("0" to "5").
5
Press the [OK] key.
1,2,3,
1,2,3,
32
INITIAL SETTINGS
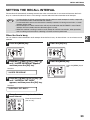
SETTING THE RECALL INTERVAL
The machine will automatically reattempt transmission when a transmission is not successful because the line is
busy or a communication error occurs. This setting is used to select the interval between recall attempts.
• If a transmission is still not successful after the set number of recall attempts is made, a report will
print and the document will be cleared from memory.
• If a communication error occurs because the memory becomes full during transmission, no recall
attempts will be made.
• Recall attempts for a direct transmission will only be made when the SPF/RSPF is used. Recall
attempts will not be made when the document glass is used.
• When the machine is waiting to make a recall attempt for a direct transmission, other operations
such as storing a transmission or selecting a function cannot be performed.
Note
When the line is busy
You can select the interval between recall attempts when the line is busy. An interval from 1 to 15 minutes can be
selected.
1
Press the [MENU] key.
5
1,2,3,
1,2,3,
1,2,3,
1,2,3,
2
Press the [OK] key.
Press the [ ] key ( ) or [ ] key ( )
until "4:USER PROGRAM" appears,
and then press the [OK] key.
6
Press the [MENU] key.
Press the [MENU] key to
exit.
Selection
1,2,3,
1,2,3,
"4:USER PROGRAM"
3
Press the [ ] key ( ) or [ ] key ( )
until "10:RECALL INT. BUSY"
appears, and then press the [OK] key.
Selection
"10:RECALL INT. BUSY"
4
Press the numeric keys to select the
recall interval.
Enter the recall interval
("01" to "15").
33
2
INITIAL SETTINGS
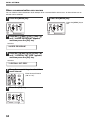
When a communication error occurs
You can select the interval between recall attempts when a communication error occurs. An interval from 0 to 15
minutes can be selected.
1
Press the [MENU] key.
6
Press the [MENU] key.
Press the [MENU] key to
exit.
1,2,3,
1,2,3,
2
1,2,3,
1,2,3,
Press the [ ] key ( ) or [ ] key ( )
until "4:USER PROGRAM" appears,
and then press the [OK] key.
Selection
"4:USER PROGRAM"
3
Press the [ ] key ( ) or [ ] key ( )
until "11:RECALL INT. ERR" appears,
and then press the [OK] key.
Selection
"11:RECALL INT. ERR"
4
Press the numeric keys to select the
recall interval.
Enter the recall interval
("00" to "15").
5
Press the [OK] key.
1,2,3,
1,2,3,
34
INITIAL SETTINGS
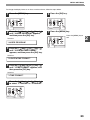
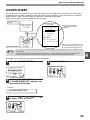
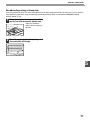
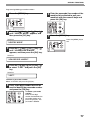
SETTING THE INDEX FUNCTION
You can print an index mark along the edge of the pages in each job. This makes it easy to separate different jobs
on the output tray.
Separate faxes
with index marks.
2
Use the following procedure to set the index function:
1
5
Press the [MENU] key.
1,2,3,
1,2,3,
1,2,3,
1,2,3,
2
Press the [OK] key.
Press the [ ] key ( ) or [ ] key ( )
until "4:USER PROGRAM" appears,
and then press the [OK] key.
6
Press the [MENU] key.
Press the [MENU] key to
exit.
Selection
1,2,3,
1,2,3,
"4:USER PROGRAM"
3
Press the [ ] key ( ) or [ ] key ( )
until "20:INDEX PRINT" appears, and
then press the [OK] key.
Selection
"20:INDEX PRINT"
4
Press the [ ] key ( ) or [ ] key (
to select "1:ON" or "2:OFF".
)
1,2,3,
1,2,3,
35
INITIAL SETTINGS
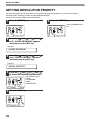
SETTING RESOLUTION PRIORITY
For most faxing jobs, you will most likely want to specify the resolution. However, you can also set a default
resolution when no setting is made using the [RESOLUTION] key.
To turn on this function, follow the procedure below:
1
Press the [MENU] key.
6
Press the [MENU] key.
Press the [MENU] key to
exit.
1,2,3,
1,2,3,
2
1,2,3,
1,2,3,
Press the [ ] key ( ) or [ ] key ( )
until "4:USER PROGRAM" appears,
and then press the [OK] key.
Selection
"4:USER PROGRAM"
3
Press the [ ] key ( ) or [ ] key ( )
until "3:RESO. PRIORITY" appears,
and then press the [OK] key.
Selection
"3:RESO. PRIORITY"
4
Press the [ ] key ( ) or [ ] key ( )
to select the transmission resolution.
1,2,3,
1,2,3,
5
Press the [OK] key.
1,2,3,
1,2,3,
36
The selections are as
follows:
1:STANDARD
2:FINE
3:SUPER FINE
INITIAL SETTINGS
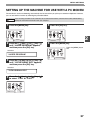
SETTING UP THE MACHINE FOR USE WITH A PC MODEM
The machine is set for not detecting automatically the fax tone when you pick up an extension telephone. However,
you can activate this function by following the procedure below.
Warning
1
If you are using a modem on the same line, do not activate this function, otherwise the machine will mistakenly
attempt to receive the transmission from your computer.
5
Press the [MENU] key.
Press the [OK] key.
1,2,3,
1,2,3,
1,2,3,
1,2,3,
2
2
Press the [ ] key ( ) or [ ] key ( )
until "4:USER PROGRAM" appears,
and then press the [OK] key.
6
Press the [MENU] key.
Press the [MENU] key to
exit.
Selection
1,2,3,
1,2,3,
"4:USER PROGRAM"
3
Press the [ ] key ( ) or [ ] key ( )
until "15:FAX SIGNAL RCV" appears,
and then press the [OK] key.
Selection
"15:FAX SIGNAL RCV"
4
Press the [ ] key ( ) or [ ] key (
to select "1:ON" or "2:OFF".
)
1,2,3,
1,2,3,
37
INITIAL SETTINGS
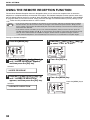
USING THE REMOTE RECEPTION FUNCTION
The machines Remote Reception feature is designed to allow you to activate fax reception from an extension
telephone or a telephone directly connected to the machine. The Remote Reception function operates even when
the FAX Signal Receive function is turned off. See "SETTING UP THE MACHINE FOR USE WITH A PC MODEM"
on page 37. When you hear the fax tone, simply press the one-digit Fax Remote Number (Factory setting: 5) and
. Follow the two procedures below to use this feature.
• If you are not using a PC modem on the same line as your machine, and have not turned off the Fax Signal
Receive function, you do not need to make any changes to the Remote Reception function. Simply use the
factory settings. The machine will automatically take over the line should you answer from the extension phone
and a fax tone is detected.
• If you want to receive a fax while you are on an extension telephone, when you hear a fax tone, press the
one-digit Fax Remote Number and
. To ensure proper fax reception, hang up the extension phone only
after you have confirmed that fax reception has begun. Confirm that fax reception has begun as follows:
• If the extension telephone is connected directly to the fax there is no sound when fax reception begins.
Note
Turning on Remote Reception:
1
Press the [MENU] key.
4
1,2,3,
1,2,3,
2
Press the [ ] key ( ) or [ ] key ( )
until "4:USER PROGRAM" appears,
and then press the [OK] key.
Press the [ ] key ( ) or [ ] key (
to select "1:ON" or "2:OFF".
)
1,2,3,
1,2,3,
5
Press the [OK] key.
Selection
1,2,3,
1,2,3,
"4:USER PROGRAM"
3
Press the [ ] key ( ) or [ ] key ( )
until "14:REMOTE RECEPTION"
appears, and then press the [OK] key.
6
Press the [MENU] key.
Press the [MENU] key to
exit.
Selection
"14:REMOTE RECEPTION"
38
1,2,3,
1,2,3,
INITIAL SETTINGS
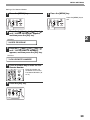
Setting a Fax Remote Number:
1
Press the [MENU] key.
6
Press the [MENU] key.
Press the [MENU] key to
exit.
1,2,3,
1,2,3,
2
1,2,3,
1,2,3,
Press the [ ] key ( ) or [ ] key ( )
until "4:USER PROGRAM" appears,
and then press the [OK] key.
2
Selection
"4:USER PROGRAM"
3
Press the [ ] key ( ) or [ ] key ( )
until "13:FAX REMOTE NUMBER"
appears, and then press the [OK] key.
Selection
"13:FAX REMOTE NUMBER"
4
Press a numeric key to enter the Fax
Remote Number.
Enter the number you
would like to use as the
Fax Remote Number ("0"
to "9").
5
Press the [OK] key.
1,2,3,
1,2,3,
39
INITIAL SETTINGS
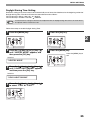
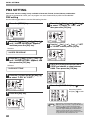
PBX SETTING
Please note that this setting is only available in Denmark, Finland, Iceland, Norway and Sweden.
The unit is connected to a PBX, you can program it to acess automatically to public line outside PBX.
PBX setting
Use the following procedure to use the PBX settiing function :
1
6
Press the [MENU] key.
Press the [ ] key ( ) or [ ] key (
to select "1:FLASH" or "2:ID", and
then press the [OK] key.
)
1,2,3,
1,2,3,
1,2,3,
1,2,3,
2
Press the [ ] key ( ) or [ ] key ( )
until "4:USER PROGRAM" appears,
and then press the [OK] key.
7
Press the [ ] key ( ) or [ ] key ( ) "1:SET"
or "2:CLEAR", and then press the [OK] key.
Selection
"4:USER PROGRAM"
1,2,3,
1,2,3,
3
Press the [ ] key ( ) or [ ] key ( )
until "22:PBX SETTING" appears, and
then press the [OK] key.
8
Selection
"22:PBX SETTING"
4
Press the [ ] key ( ) or [ ] key (
to select "1:ON" or "2:OFF".
9
Press the 10-key pad to enter the ID
CODE and choose a value between
0-999. Then press the [OK] key.
)
1,2,3,
1,2,3,
9
Press the [CLEAR ALL] key (
).
Press the [CLEAR
ALL] key (
) to exit
5
Press the [OK] key.
1,2,3,
1,2,3,
Note
40
R-key function (only activated when PBX setting is
ON) R-key allows use to dial (or register) PBX internal
numbers : to dial (or register) an internal number,
press [SPEAKER] key prior to your number. This will
add an "R" digit on LCD display to indicate that this
number is internal and will not be forwarded to the
Public Switched Telephone Network. Please note that
the speaker will not be activated in this case.
INITIAL SETTINGS
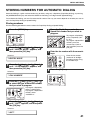
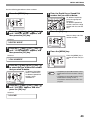
STORING NUMBERS FOR AUTOMATIC DIALING
Automatic Dialing is a quick and convenient way to dial by using only a Rapid key (Rapid Key Dialing), or pressing
the [SPEED/SEARCH] key and select the SPEED and entering a two digit number (Speed Dialing).
To use Automatic Dialing, you must first store the full number. The way you store it depends on whether you want to
use it for Rapid Key Dialing or Speed Dialing:
Storing numbers
Use the following procedure to store numbers for Rapid Key Dialing or Speed Dialing:
1
Press the [MENU] key.
6
Press the Rapid Key or enter the
Speed Dial number that you wish to
program.
SPEED/ BROAD- RECEPTION REDIAL/
MEMORY SEARCH CAST
MODE
PAUSE
1,2,3,
1,2,3,
COVER
RESOLUTION
CONTRAST SHEET
2-SIDE
REPORT TX
LINE STATUS
2
Press the [ ] key ( ) or [ ] key ( )
until "2:ENTRY MODE" appears, and
then press the [OK] key.
7
Enter the fax number with the numeric
keys.
Selection
Enter the fax number
(maximum of 40 digits
including pauses) using
the numeric keys.
"2:ENTRY MODE"
3
SPEAKER
To program a Rapid Key,
press a Rapid key ("01"
to "18").
To program a Speed Dial
number, press two
numeric keys ("00" to
"99") and then press the
[OK] key.
Press the [ ] key ( ) or [ ] key ( )
until "1:FAX NUMBER" appears, and
then press the [OK] key.
Selection
8
Press the [OK] key.
"1:FAX NUMBER"
1,2,3,
1,2,3,
4
Press the [ ] key ( ) or [ ] key ( )
to select the type of auto-dial number
that you wish to program.
1,2,3,
1,2,3,
5
To program a Rapid Key,
select "1:RAPID KEY".
To program a Speed Dial
number, select
"2:SPEED #".
Press the [ ] key ( ) or [ ] key ( )
until "1:SET" appears, and then press
the [OK] key.
Selection
"1:SET"
41
2
INITIAL SETTINGS
9
Enter the name of the destination with
the numeric keys.
Enter the name of the
location or party by
pressing numeric keys as
described in "HOW TO
ENTER CHARACTERS"
on page 20 (maximum of
20 characters). If you do
not want to enter a name,
skip this step.
10
14
Press the [OK] key.
15
Press the [ ] key ( ) or [
to select the international
communication mode.
1,2,3,
1,2,3,
Press the [OK] key.
Press the [ ] key ( ) or [ ] key (
to select a Chain Dial setting.
1,2,3,
1,2,3,
If you wish to set the
number as a Chain Dial
number, select "1:SET".
Otherwise, select
"2:CANCEL".
(See "CHAIN DIALING"
(p.59))
16
Press the [OK] key.
Return to Step 5 to store
another number.
1,2,3,
1,2,3,
17
Press the [MENU] key.
Press the [OK] key.
1,2,3,
1,2,3,
13
Press the [ ] key ( ) or [ ] key ( )
to select the communication speed.
1,2,3,
1,2,3,
Note
42
The selections are as
follows:
1:NO
2:MODE 1
3:MODE 2
4:MODE 3
)
If the number is not set as a chain dial number,
the communication speed and international
communication mode cannot be selected. Press
the [OK] key and go to step 18.
12
)
Sometimes when faxing internationally, line
noise can cause the transmission to stop
momentarily. To reduce these delays, please
intially select mode 1, if still unsuccessful
then try mode 2, and if still not successful,
try mode 3 which is combination of the first
two modes.
Note
1,2,3,
1,2,3,
11
] key (
The selections are as
follows:
1:33600bps
2:14400bps
3:9600bps
4:4800bps
For international dialing, if you find that line
noise necessitates a slower transmission
speed, set the appropriate transmission
speed. If you are not sure if a slower speed
is required, set the speed normally.
Note
Press the [MENU] key a
number of times until you
exit.
If the number is a Rapid
key number, you can
write the name on the
label above the
appropriate Rapid key.
You may need to add a pause between
certain digits in the number to allow time for
connection. For example, if you are on a
PBX telephone system that requires an
access number, such as "9", to be dialed to
access an outside line, you will need to
enter a pause between the access number
and the fax number of the other party.
Pauses are entered by pressing the
[REDIAL/PAUSE] key (2 seconds per
pause). If necessary, several pauses can be
entered in a row.
INITIAL SETTINGS
Use the following procedure to clear numbers:
1
6
Press the [MENU] key.
Enter the Rapid Key or Speed Dial
number that you wish to delete.
SPEED/ BROAD- RECEPTION REDIAL/
MEMORY SEARCH CAST
MODE
PAUSE
COVER
RESOLUTION
CONTRAST SHEET
1,2,3,
1,2,3,
2-SIDE
REPORT TX
LINE STATUS
2
Press the [ ] key ( ) or [ ] key ( )
until "2:ENTRY MODE" appears, and
then press the [OK] key.
7
SPEAKER
To delete a Rapid Key,
press the appropriate
Rapid key.
To delete a Speed Dial
number, enter the 2-digit
number with the numeric
keys.
Press the [OK] key.
Return to Step 5 to clear
another number.
Selection
1,2,3,
1,2,3,
"2:ENTRY MODE"
3
Press the [ ] key ( ) or [ ] key ( )
until "1:FAX NUMBER" appears, and
then press the [OK] key.
8
Press the [MENU] key.
Press the [MENU] key a
number of times until you
exit.
Selection
"1:FAX NUMBER"
1,2,3,
1,2,3,
4
Press the [ ] key ( ) or [ ] key ( )
to select the type of auto-dial number
that you wish to delete.
1,2,3,
1,2,3,
5
To delete a Rapid Key,
select "1:RAPID KEY".
To delete a Speed Dial
number, select
"2:SPEED #".
Press the [ ] key ( ) or [ ] key (
until "2:CLEAR" appears, and then
press the [OK] key.
Note
• A Rapid Key or Speed Dial number cannot
be deleted if it has been stored in a Group
Key.
• A Rapid Key or Speed Dial number cannot
be deleted if it is being used for a
transmission that has been stored or is in
progress.
)
Selection
"2:CLEAR"
43
2
INITIAL SETTINGS
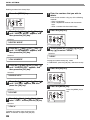
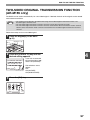
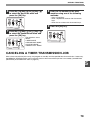
STORING NUMBERS UNDER GROUP KEYS
Group keys allow you to dial a group of fax numbers by simply pressing the appropriate Group key once. They are
convenient for the Broadcasting function, which is used to transmit an original to a group of fax machines.
All Rapid keys can be programmed as Group keys. To program or clear a group key, follow the steps below. Note
that one key cannot be programmed as both a Rapid key and a Group key at the same time.
● Up to 100 fax numbers can be stored in one Group key.
● Rapid Keys, Speed Dial numbers, and numbers directly entered with the numeric keys can be stored in Group
Keys.
Storing/adding numbers in a Group Key:
1
Press the [MENU] key.
6
Press the [OK] key.
7
Press the Rapid key you wish to use
as a Group key .
1,2,3,
1,2,3,
2
Press the [ ] key ( ) or [ ] key ( )
until "2:ENTRY MODE" appears, and
then press the [OK] key.
Selection
01
10
02
11
03
12
04
13
05
14
06
15
07
16
08
17
09
18
SHIFT
8
Enter the numbers that you wish to
store in the Group Key.
Enter the fax numbers using any of the following
methods:
• Press a Rapid Key and then press the [OK] key.
• Enter a Speed Dial number with the numeric
keys and then press the [OK] key.
• Enter a number with the numeric keys and then
press the [OK] key.
"2:ENTRY MODE"
3
Press the [ ] key ( ) or [ ] key ( )
until "1:FAX NUMBER" appears, and
then press the [OK] key.
Selection
• One Group Key cannot be stored in
another Group Key.
• A message will appear if you select a
Rapid Key or Speed Dial number that is
already stored in another Group Key.
Note
"1:FAX NUMBER"
4
Press the [ ] key ( ) or [ ] key ( )
until "3:GROUP KEY" appears, and
then press the [OK] key.
9
Press the [OK] key.
Selection
"3:GROUP KEY"
5
Press the [ ] key ( ) or [ ] key ( )
until "1:SET" appears, and then press
the [OK] key.
Selection
"1:SET"
44
To add numbers:
After pressing the Group
Key, press the [ ] key
( ) or [ ] key ( ) to
select "1:YES" and then
press the [OK] key.
1,2,3,
1,2,3,
INITIAL SETTINGS
10
Enter a name for the Group Key with
the numeric keys.
Enter the name of the
group by pressing
numeric keys as
described in "HOW TO
ENTER CHARACTERS"
on page 20 (maximum of
20 characters). If you do
not want to enter a name,
skip this step.
To add numbers:
The entered name appears. Edit the name if you need
to make a change.
11
2
Press the [OK] key.
Return to Step 7 to
program another Group
key.
1,2,3,
1,2,3,
12
Press the [MENU] key.
Press the [MENU] key a
number of times until you
exit.
1,2,3,
1,2,3,
45
INITIAL SETTINGS
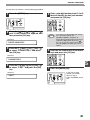
Deleting numbers from Group Keys:
1
7
Press the [MENU] key.
Enter the fax numbers using any of the following
methods:
• Press a Rapid Key.
• Enter a Speed Dial number with the numeric
keys.
• Enter a number with the numeric keys.
1,2,3,
1,2,3,
2
Enter the numbers that you wish to
delete.
Press the [ ] key ( ) or [ ] key ( )
until "2:ENTRY MODE" appears, and
then press the [OK] key.
8
Selection
Press the [OK] key.
1,2,3,
1,2,3,
"2:ENTRY MODE"
3
Press the [ ] key ( ) or [ ] key ( )
until "1:FAX NUMBER" appears, and
then press the [OK] key.
Selection
9
To exit, press the [ ] key (
key ( ) to select "2:END".
) or [
]
Selection
"2:END"
"1:FAX NUMBER"
4
Press the [ ] key ( ) or [ ] key ( )
until "3:GROUP KEY" appears, and
then press the [OK] key.
To program another Group Key, select
"1:CONTINUE", press the [OK] key, and return to step
7.
10
Press the [OK] key.
Selection
"3:GROUP KEY"
5
Press the [ ] key ( ) or [ ] key (
until "2:CLEAR" appears, and then
press the [OK] key.
1,2,3,
1,2,3,
)
11
Press the [MENU] key.
Selection
Press the [MENU] key to
exit.
"2:CLEAR"
1,2,3,
1,2,3,
6
Press the [ ] key ( ) or [ ] key ( ) to
select "1:FAX #", and then press the [OK] key.
Selection
"1:FAX #"
To delete all numbers from the Group Key:
Select "2:GROUP" and press the [OK] key.
46
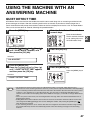
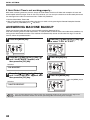
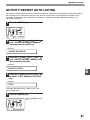
USING THE MACHINE WITH AN
ANSWERING MACHINE
QUIET DETECT TIME
Quiet Detect Time is the function that enables the machine to be used along with an answering machine for both
phone messages and faxes. After the answering machine has answered, any duration of silence longer than a
certain threshold time will prompt the machine to take over the line and prepare to receive a fax. The Quiet Detect
Time can be set from 00 to 10 seconds, following the procedure below.
1
4
Press the [MENU] key.
Enter the Quiet Detect Time with the
numeric keys.
Enter the Quiet Detect
Time in seconds, from 00
to 10. (setting "00" turns
off Quiet Detect Time)
1,2,3,
1,2,3,
2
Press the [ ] key ( ) or [ ] key (
until "6:A.M. MODE" appears, and
then press the [OK] key.
)
5
Press the [OK] key.
Selection
1,2,3,
1,2,3,
"6:A.M. MODE"
s
3
Press the [MENU] key.
Press the [ ] key ( ) or [ ] key ( )
until "1:QUIET DETECT TIME" appears,
and then press the [OK] key.
6
Press the [MENU] key.
Press the [MENU] key to
exit.
Selection
1,2,3,
1,2,3,
"1:QUIET DETECT TIME"
Note
• The machine has been set at the factory for a Quiet Detect Time of 5 seconds, which gives the best
performance for most answering machines. However, you may have to adjust the Quiet Detect Time depending
on your answering machine’s disconnect time, the time before the machine disconnects the line after a period
of silence. If your machine has a short disconnect time, you may have to shorten the Quiet Detect Time.
However, if the machine is interrupting callers in the middle of messages, you should set a longer Quiet Detect
Time.
• If there is a pause at the end of your answering machine message, make sure that the Quiet Detect Time is
longer than this pause.
• Setting Quiet Detect Time to 00 turns the function off. However, the machine will not be able to receive faxes
sent using manual dialing (picking up the receiver, dialing the number, and pressing the [START] key ( )
when the fax tone is heard).
• If your answering machine is set to answer calls after more rings than the machine's number of rings setting,
the machine will always answer first and thereby prevent callers from leaving messages in the answering
machine.
47
2
INITIAL SETTINGS
If Quiet Detect Time is not working properly...
With some answering machines, there is simply no Quiet Detect Time that will allow both reception of faxes and
uninterrupted voice messages. Even in this case, however, you can set up the machine to receive both phone and
fax messages from callers on touch-tone lines. Follow this procedure:
1. Set the Quiet Detect Time to 00.
2. Alter your phone message to tell callers that they can send a fax by pressing the Remote Reception Number
(factory set to 5), followed by the " " key twice.
ANSWERING MACHINE BACKUP
There may be times when the tape on your answering machine becomes full, or
when the answering machine itself malfunctions. It is still possible to receive faxes even under these conditions, by
turning on the Auto Receive function. The machine will automatically answer all calls after five rings. To use this
function, follow the procedure below.
1
4
Press the [MENU] key.
1,2,3,
1,2,3,
2
Press the [ ] key ( ) or [ ] key (
to select "1:ON" or "2:OFF".
)
1,2,3,
1,2,3,
Press the [ ] key ( ) or [ ] key (
until "6:A.M. MODE" appears, and
then press the [OK] key.
)
5
Press the [OK] key.
Selection
1,2,3,
1,2,3,
"6:A.M. MODE"
3
Press the [ ] key ( ) or [ ] key ( )
until "2:AUTO RECEIVE" appears, and
then press the [OK] key.
6
Press the [MENU] key.
Press the [MENU] key to
exit.
Selection
"2:AUTO RECEIVE"
Note
48
1,2,3,
1,2,3,
If you are using Auto Receive, make sure that your answering machine is set to answer on four rings or less.
Otherwise, the machine will take over all calls, preventing callers from leaving voice messages.
3
Chapter 3
CHOOSING SUITABLE MEDIA
ORIGINALS SUITABLE FOR FAXING
Make sure that the originals you want to fax meet specifications and guidelines listed in this section.
SIZE AND WEIGHT
The size and weight of originals that you can load in the SPF/RSPF depend on whether you load one sheet at a time
or several sheets at once.
When using the SPF/RSPF
52 /m2
(14 lbs.)
90 /m2
(24 lbs.)
500 mm
(19.7")
140 mm
(5-1/2")
216 mm
(8-1/2")
216 mm
(8-1/2")
Note
When feeding in a long original, grasp the original at the edges to guide it into the machine.
When using the document glass
364 mm
(14")
Maximum
216 mm
(8-1/2")
Note
When you are using the faxing functions of the machine, your originals are, in effect, being scanned through the
machine. The area of a original that is scanned by the machine while faxing is slightly smaller than the actual
original size. Any text or graphics outside this area will not be scanned.
1mm ~ 4mm
(0.04" ~ 0.16")
Scanning length
and width
Max. 4.5 mm (0.17")
(along the other edges in totals)
4 mm or less
(0.16" or less)
49
CHOOSING SUITABLE MEDIA
UNSUITABLE ORIGINALS
General guidelines:
● All clips, staples, and pins should be removed from originals before they are used. If these are not removed, they
may damage the machine.
● Ink, glue, and correction fluid on originals must be completely dry before using the originals with the machine.
● Originals that are in some way dangerous to the internal mechanisms of the machine should not be used.
● When faxing, any writing on the originals that is yellow, yellowish-green, or light blue cannot be transmitted.
The following kinds of originals should not be used:
● Originals with a glossy coating
● Originals with static electricity
● Originals with tears, folds, or curls
● Originals that have become stuck together and cannot be easily separated
● Originals with holes, windows, or perforations
● Transparency films, tracing paper, or other transparencies
● Originals with plastic or metallic coatings
Note
50
• SHARP does not accept any responsibility for the loss or damage of originals.
• It is a good idea to copy valuable originals on a flat-bed copier before using them with the machine.
• Scanning an original that is longer than 500 mm will result in a misfeed.
4
Chapter 4
HOW TO USE THE FAX FUNCTION
The stand alone fax component of your machine offers a range of sophisticated features that allow you to control
image quality, reception mode, broadcasting, polling, and transmission priorities. Functions such as sending
original(s) from memory and substituting reception into memory are possible, due to the large memory capacity.
SENDING ORIGINALS
SETTING THE ORIGINAL
This section describes setting original(s) in the SPF/RSPF or on the document glass.
When Using the SPF/RSPF:
1
Confirm that there are no original(s)
on the document glass and that
copying is not in progress, then
gently close the SPF/RSPF.
2
Adjust the original guides to the width
of your original(s).
3
Place the original(s) face up and push
it gently into the document feeder
tray. The top edge of the original(s)
should enter the fax first.
4
There are two ways to send the fax:
• To scan the original into memory, then dial and
transmit, continue with the "DIALING AND
TRANSMITTING" section.
• To dial and transmit the original directly without
first scanning it into memory, press the
[MEMORY] key. Continue with the "DIALING
AND TRANSMITTING" section.
Original face up
51
HOW TO USE THE FAX FUNCTION
When placing the Original on the document glass:
1
2
Confirm that there are no original(s) in
the SPF/RSPF, and open the
SPF/RSPF.
5
Place the original face down on the
document glass. Align the original
according to the original scale in the
illustration below. (Line up the center
of the edge of the original with the
(
) mark.)
Note
After the [START] key (
) is pressed, the
set original size appears in the display.
(EX. )
READING
A4
Make sure that the displayed size is the
same as the actual original size. (The
factory default setting for the original size is
A4.) If the displayed size is not correct,
press the [CLEAR ALL] key (
) to stop
operation and then change the original size
setting. (See "ORIGINAL SIZE" (p.53))
When faxing from the document glass, if the
size of the original is different from the
specified size, part of the image may be cut
off.
mark
Gently close the SPF/RSPF.
6
Note
).
The set original size
appears in the display
and then scanning
begins.
Original
scale
3
Press the [START] key (
When using the document glass, do not set
original(s) in the SPF/RSPF.
If you have more than one original to
read into memory, place the next
page, and press the [START] key ( )
to read each page.
Go to step 7 after the last page has been
scanned.
4
52
If needed, set the original size,
resolution, and contrast. Continue
with the "DIALING AND
TRANSMITTING" section.
7
Press the [#] key.
Transmission begins.
OPTIONAL TRANSMISSION
SETTINGS
There are several transmission settings that you can make before dialing and transmitting an original.
ORIGINAL SIZE
The original size can be set to "A4", "8.5x11", or "8.5x14". The setting is only effective for one transmission.
If desired, you can set a fixed original size that remains in effect for all transmissions.
1
5
Press the [MENU] key.
1,2,3,
1,2,3,
1,2,3,
1,2,3,
2
Press the [OK] key.
Press the [ ] key ( ) or [ ] key ( )
until "4:USER PROGRAM" appears,
and then press the [OK] key.
6
Press the [MENU] key.
Press the [MENU] key to
exit.
Selection
"4:USER PROGRAM"
3
1,2,3,
1,2,3,
Press the [ ] key ( ) or [ ] key ( )
until "1:DOC. GLASS SIZE" appears,
and then press the [OK] key.
Selection
"1:DOC. GLASS SIZE"
To set a fixed original size for all transmissions:
Press the [ ] key ( ) or [ ] key ( ) to select
"2:FIXED DOC. SIZE".
To temporarily change the original size
setting when faxing from the document
glass, use the "1: DOC. GLASS SIZE"
setting. To change the permanent original
size setting, use the "2: FIXED DOC. SIZE"
setting.
Note
4
Press the [ ] key ( ) or [
to select the original size.
1,2,3,
1,2,3,
] key (
)
The selections are as
follows:
1:A4
2:8.5x11
3:8.5x14
53
4
HOW TO USE THE FAX FUNCTION
RESOLUTION
To do this, press the [RESOLUTION] key one or more times until the desired resolution settings appear in the
display, and then press the [OK] key.
Your fax has five resolution settings:
• STANDARD
Use STANDARD for ordinary originals. This setting gives you the fastest transmission.
• FINE
Use FINE for improved reproduction, especially with originals containing small letters or fine drawings.
• SUPER FINE
Use SUPER FINE when you need the highest quality of reproduction.
• FINE (HALF TONE)
Use FINE (HALF TONE) if your original is a photograph or has gradations of color (such as a color original). This
setting will produce a clearer image than Fine used alone.
• S. FINE (HALF TONE)
Use S.FINE (HALF TONE) if your original is a photograph or has gradations of color (such as a color original). This
setting will produce a clearer image than Super fine used alone.
In order to transmit with FINE or SUPER FINE resolution, the receiving fax machine must also have that resolution.
If it doesn't, the next best available setting will be used.
If you do not change the setting, the original will automatically be sent in STANDARD mode.
01
10
02
11
03
12
04
13
05
14
SPEED/ BROAD- RECEPTION REDIAL/
MEMORY SEARCH CAST
MODE
PAUSE
06
15
07
16
08
17
09
18
SHIFT
COVER
RESOLUTION
CONTRAST SHEET
2-SIDED
REPORT TX
LINE STATUS
SPEAKER
CONTRAST
The fax automatically controls the contrast, but you can also control it manually. To do this, press the [CONTRAST]
key one or more times until the desired contrast settings appear in the display, and then press the [OK] key. The
three contrast levels are MEDIUM, DARK, and LIGHT.
01
10
02
11
03
12
04
13
05
14
SPEED/ BROAD- RECEPTION REDIAL/
MEMORY SEARCH CAST
MODE
PAUSE
06
15
07
16
08
17
09
18
SHIFT
COVER
RESOLUTION
CONTRAST SHEET
2-SIDED
REPORT TX
LINE STATUS
54
SPEAKER
HOW TO USE THE FAX FUNCTION
COVER SHEET
You can have your fax generate a cover sheet and send it as the last page of the transmission. The cover sheet
includes the date and time, the sender's name and number, and the receiver's name and number if an automatic
dialing number is used. The total number of pages sent is indicated on the bottom.
One of five messages can also be added to the cover sheet.
Your (transmitting)
machine
Automatically prints
cover page
Select cover sheet
and message
functions
AUTOMATIC COVER SHEET
If the message function
is selected, a message
is printed.
IMPORTANT
Transmission
DATE
: 11-MAY-200X FRI 07:30
T
: SERVICE CENTER
O
FAX # : 0333829161
FROM : SHARP
FAX # : 0666211221
Beep
PAGES : 02PAGES WERE SENT
(INCLUDING THIS PAGE)
If the cover sheet function is not
selected, the message is printed at
the top of the first page received.
Reception
Receiving machine
• The receiver's name must be programmed in either the Rapid Key or Speed Dial function for it to appear on the
Cover Sheet.
• The cover sheet function must be selected each time you wish to add a cover sheet to a fax transmission.
• To add a message to a cover sheet, the message must be selected using the message function.
Note
To include a cover sheet with a transmission, follow these steps:
1
4
Press the [COVER SHEET] key.
Press the [OK] key.
SPEED/ BROAD- RECEPTION REDIAL/
MEMORY SEARCH CAST
MODE
PAUSE
COVER
RESOLUTION
CONTRAST SHEET
LINE STATUS
2
1,2,3,
1,2,3,
2-SIDED
REPORT TX
SPEAKER
Press the [COVER SHEET] key until
"1:COVER SHEET SET" appears, and
then press the [OK] key.
Selection
"1:COVER SHEET SET"
3
Press the [ ] key ( ) or [ ] key (
to select "1:ON" or "2:OFF".
)
1,2,3,
1,2,3,
55
4
HOW TO USE THE FAX FUNCTION
MESSAGE FUNCTION
One of the following messages can be selected: "CONFIDENTIAL", "PLS. DISTRIBUTE", "URGENT", "PLS. CALL
BACK", "IMPORTANT".
If a message is selected when the cover sheet function is not used, the message will be added to the top of the
first page of the fax.
Note
To add a message to a cover sheet, follow these steps:
1
Press the [COVER SHEET] key.
SPEED/ BROAD- RECEPTION REDIAL/
MEMORY SEARCH CAST
MODE
PAUSE
COVER
RESOLUTION
CONTRAST SHEET
2-SIDED
REPORT TX
LINE STATUS
2
SPEAKER
Press the [COVER SHEET] key until
"2:TX MESSAGE SET" appears, and
then press the [OK] key.
Selection
"2:TX MESSAGE SET"
3
Press the [ ] key ( ) or [
to select a message.
1,2,3,
1,2,3,
] key (
)
The selections are as
follows:
1:NO MASSAGE
2:CONFIDENTIAL
3:PLS. DISTRIBUTE
4:URGENT
5:PLS. CALL BACK
6:IMPORTANT
If you do not wish to add
a message, select "1:NO
MESSAGE".
4
Press the [OK] key.
1,2,3,
1,2,3,
56
HOW TO USE THE FAX FUNCTION
TWO-SIDED ORIGINAL TRANSMISSION FUNCTION
(AR-M155 only)
The RSPF can be used to automatically fax a two-sided original. If desired, the back of the original can be rotated
180° before transmission.
• The original must be placed in the RSPF when using the two-sided original transmission function. The
document glass cannot be used.
• The two-sided original transmission function cannot be used in direct transmission mode.
• The two-sided original transmission function cannot be selected when direct transmission mode is selected.
Likewise, direct transmission mode cannot be selected when the two-sided original transmission function is
selected.
Note
Follow these steps to fax a two-sided original:
1
Place the original(s) in the RSPF.
(p.51)
Original face up
2
SPEED/ BROAD- RECEPTION REDIAL/
MEMORY SEARCH CAST
MODE
PAUSE
COVER
RESOLUTION
CONTRAST SHEET
If you wish to rotate the
back of the original 180°,
select "ON (ROTATE)".
2-SIDE
REPORT TX
LINE STATUS
3
4
Press the [2-SIDED TX] key until the
desired setting appears.
SPEAKER
The selections are as
follows:
OFF
ON (ROTATE)
ON (NON-ROTATE)
Press the [OK] key.
1,2,3,
1,2,3,
57
DIALING AND TRANSMITTING
Once you have set the original (either in the SPF/RSPF or on the document glass), and have selected the desired
transmission settings, you are ready to dial the number of the receiving fax machine and transmit the original. You
can choose from one of the several ways of dialing that best suit your needs.
DIRECT KEYPAD DIALING
If the number of the fax you want to reach is not a Rapid key or Speed Dial number, use Direct Keypad Dialing to
manually enter it using the following procedure:
1
Confirm that you have correctly set
the original in the SPF/RSPF or on the
document glass. (See "SETTING THE
ORIGINAL" (p.51))
2
Enter the number of the fax machine
you want to send to by pressing the
numeric keys.
3
Check the display. If the number of the
receiving machine is shown correctly,
press the [START] key ( ).
If it is not correct, press
the [CLEAR] key (
) to
backspace and clear one
digit at a time, and then
enter the correct number.
RAPID KEY DIALING
If the number you want to dial has been stored as a Rapid key number (See
"STORING NUMBERS FOR AUTOMATIC DIALING" (p.41)), you can dial it by
pressing the appropriate Rapid key as shown:
01
10
02
11
03
12
04
13
05
14
06
15
07
16
08
17
09
18
SHIFT
SPEED DIALING
If the number you want to dial has been stored as a Speed Dial number, you can dial it using the following
procedure:
1
Press the [SPEED/SEARCH] key and
then enter the two-digit number by
pressing the numeric keys (See
"STORING NUMBERS FOR
AUTOMATIC DIALING" (p.41)).
SPEED/ BROAD- RECEPTION REDIAL/
MEMORY SEARCH CAST
MODE
PAUSE
COVER
RESOLUTION
CONTRAST SHEET
2-SIDE
REPORT TX
LINE STATUS
58
SPEAKER
If it is not correct, press
the [CLEAR] key (
) to
backspace and clear two
digits at a time, and then
enter the correct number.
2
Press the [START] key ( ) and check
the name or number that appears in
the display.
HOW TO USE THE FAX FUNCTION
CHAIN DIALING
The Chain Dialing function allows you to combine a Rapid Key or Speed Dial number (See "PBX SETTING" (p.40))
set for Chain Dialing with another Rapid Key, Speed Dial number, or number dialed with the numeric keys to dial one
fax number up to 50 digits long. The following are some examples of how this can be done:
• Press Rapid Keys set for Chain Dialing in the correct order for the fax number that you wish to dial. For example,
press Rapid Key 01 followed by Rapid Key 02. The final Rapid Key pressed for the fax number must not be set for
Chain Dialing. Transmission will begin automatically when the final Rapid Key is pressed.
• Enter Speed Dial numbers set for Chain Dialing in the correct order for the fax number that you wish to dial. For
example, press the [SPEED/SEARCH] key and [2] [2], followed by the [SPEED/SEARCH] key and [2] [7]. The final
Speed Dial number entered for the fax number must not be set for Chain Dialing. Transmission will begin when the
[START] key (
) is pressed after the final Speed Dial number is entered.
• Enter the fax number that you wish to dial with the numeric keys. Press the [REDIAL/PAUSE] key to enter a pause
and then enter the next number. Transmission will begin when the [START] key (
) is pressed after the final
number is entered.
• To use a Rapid Key or Speed Dial number for Chain Dialing, the Rapid Key or Speed Dial number must be set
for Chain Dialing when it is stored (See "STORING NUMBERS FOR AUTOMATIC DIALING" (p.41)).
• When using Chain Dialing, the international communication setting of the final number entered is effective.
International communication mode cannot be used if the final number is entered using a Rapid Key or Speed
Dial number that does not have the setting enabled, or if the final number is entered with the numeric keys.
Note
NORMAL DIALING USING THE [SPEAKER] KEY
When dialing normally with the [SPEAKER] key, press the [SPEAKER] key and dial using the numeric keys. You can
hear the line and fax tones from the other machine through the speaker, allowing you to confirm the response of the
other machine.
1
Set the original in the SPF/RSPF and
press the [SPEAKER] key. (See
"SETTING THE ORIGINAL" (p.51))
SPEED/ BROAD- RECEPTION REDIAL/
MEMORY SEARCH CAST
MODE
PAUSE
COVER
RESOLUTION
CONTRAST SHEET
2-SIDED
REPORT TX
LINE STATUS
2
SPEED/ BROAD- RECEPTION REDIAL/
MEMORY SEARCH CAST
MODE
PAUSE
COVER
RESOLUTION
CONTRAST SHEET
2-SIDE
REPORT TX
LINE STATUS
To adjust the volume,
press the left and [ ]
key ( ) or [ ] key
( ).
Dialing with a Speed Dial
numberand, then press
the [OK] key or [START]
key (
).
SPEAKER
SPEAKER
3
When you hear the fax reception tone
of the other machine, press the
[START] key ( ).
4
Press the [ ] key ( ) or [ ] key ( )
to select "1:SEND", and then press
the [OK] key or [START] key ( ).
Dial the fax number of the receiving
machine.
Dialing with the numeric
keys
Dialing with a Rapid Key
01
10
02
11
03
12
04
13
05
14
06
15
07
16
08
17
09
18
SHIFT
59
4
HOW TO USE THE FAX FUNCTION
USING THE SEARCH KEY
If you do not remember the Rapid key or Speed Dial number in which you have stored a particular fax number, you
can search for the number by following the steps below:
1
Press the [SPEED/SEARCH] key
twice.
4
SPEED/ BROAD- RECEPTION REDIAL/
MEMORY SEARCH CAST
MODE
PAUSE
COVER
RESOLUTION
CONTRAST SHEET
Press the [ ] key ( ) or [ ] key ( )
to scroll through the names. Stop
when the desired name appears in the
display.
2-SIDED
REPORT TX
LINE STATUS
SPEAKER
1,2,3,
1,2,3,
2
Enter the first letter of the stored
name by pressing the appropriate
numeric key (the key below the
marked letter) until the letter appears
in the display.
If the name begins with a special
character or number, press [1] key.
5
Press the [START] key ( ).
The original will be automatically
transmitted once the connection is
made.
If you do not remember
the first letter, go to Step
3 and scroll through the
list from the beginning.
3
Press the [OK] key.
1,2,3,
1,2,3,
REDIALING
You can send a fax to the number you last dialed, you can redialing it using the following procedure:
1
Press the [REDIAL/PAUSE] key.
SPEED/ BROAD- RECEPTION REDIAL/
MEMORY SEARCH CAST
MODE
PAUSE
COVER
RESOLUTION
CONTRAST SHEET
2-SIDED
REPORT TX
LINE STATUS
60
SPEAKER
2
Press the [START] key (
).
IF THE MEMORY BECOMES FULL
WHILE SCANNING AN ORIGINAL
If the memory becomes full while scanning an original, "MEMORY FULL ERROR" will appear in the display and
scanning will stop.
If the memory becomes full while the first page is being scanned, scanning will stop and the transmission will be
canceled.
If the memory becomes full while scanning a page after the first page, scanning will stop. You can transmit the
pages that have already been scanned, or cancel the transmission and clear the pages from memory
Follow the steps below to transmit or clear the pages that have already been scanned.
1. The memory becomes full and scanning stops. "MEMORY FULL ERROR" appears in the display.
2. To clear the pages that have already been scanned and cancel transmission, press the [ ] key ( ) or [ ] key
( ) to select "2:CANCEL". To transmit the pages that have already been scanned, select "1:SEND XX?".
3. Press the [OK] key
The pages are cleared from memory. If you selected "1:SEND XX?" in step 2, the pages are automatically
transmitted.
Note
If you are using Quick On-line transmission (p.26), the pages that were scanned are automatically transmitted.
CANCELING (DELETING) A
STORED FAX JOB
4
This procedure is used to check and cancel a fax job that is waiting for transmission, such as an automatic recalling
job, a stored fax job, a remote transmission job, or a timer transmission job.
A stored fax job cannot be canceled while transmission of another job is in progress. Wait until transmission is
finished and then cancel the stored job.
Note
Follow the steps below to cancel (delete) a fax job:
1
Press the [MENU] key.
3
Press the [ ] key ( ) or [ ] key ( )
until the job that you wish to cancel
appears in the display and press the
[CLEAR] key ( ).
The job to be canceled is
selected.
1,2,3,
1,2,3,
1,2,3,
1,2,3,
2
Press the [ ] key ( ) or [ ] key ( )
until "3:MEMORY STATUS" appears,
and then press the [OK] key.
4
Selection
"3:MEMORY STATUS"
Press the [OK] key.
The selected job is deleted.
5
Press the [MENU] key.
Press the [MENU] key to exit.
61
RECEIVING FAXES
You can set the machine to one of three modes of reception, AUTO, MAN. , or A.M. (Answering Machine).
To select the reception mode, press the [RECEPTION MODE] key until the desired reception mode appears in the
display.
SPEED/ BROAD- RECEPTION REDIAL/
MEMORY SEARCH CAST
MODE
PAUSE
AR-FX9
COVER
RESOLUTION
CONTRAST SHEET
NOV 05 WED 8:20 AM
STAND-BY AUTO 100%
2-SIDED
REPORT TX
LINE STATUS
The selected reception
mode appears.
SPEAKER
1,2,3,
1,2,3,
ZOOM
USING AUTO MODE
Select AUTO mode when you only want to receive faxes on your telephone line. The machine will automatically
answer all calls and receive incoming faxes.
USING MAN. MODE
MAN. is the most convenient mode for receiving phone calls if you have an extension phone. To have true manual
mode, the machine must be set to not answer while in MANUAL mode (See "SETTING THE NUMBER OF RINGS
FOR MANUAL RECEPTION" (p.29)). You can also receive faxes; however, all calls must first be answered by
picking up the receiver on the extension phone or telephone connected to the same line.
USING A.M. MODE
Select this mode when an answering machine is connected to the machine and you want the answering machine to
answer all calls. This allows you to receive both voice messages and faxes when you are out.
62
OPTIONAL RECEPTION SETTINGS
The machine has various optional settings for the reception of faxes.
TWO-SIDED RECEPTION (AR-M155 only)
This function is used to print a received fax consisting of two or more pages of the same size on both sides of the
paper. Even if the pages are in different orientations, the pages are rotated appropriately to enable printing on both
sides of the paper.
Note
The two-sided reception function cannot be used when printing a transaction report or activity report.
To use this feature, follow this procedure:
1
5
Press the [MENU] key.
1,2,3,
1,2,3,
1,2,3,
1,2,3,
2
Press the [OK] key.
Press the [ ] key ( ) or [ ] key ( )
until "4:USER PROGRAM" appears,
and then press the [OK] key.
6
4
Press the [MENU] key.
Press the [MENU] key to
exit.
Selection
1,2,3,
1,2,3,
"4:USER PROGRAM"
3
Press the [ ] key ( ) or [ ] key ( )
until "23:2-SIDED RX" appears, and
then press the [OK] key.
Selection
"23:2-SIDED RX"
4
Press the [ ] key ( ) or [ ] key (
to select "1:ON" or "2:OFF".
)
1,2,3,
1,2,3,
63
HOW TO USE THE FAX FUNCTION
RECEIVE REDUCE
You may on occasion receive faxes that are larger than the paper loaded in the machine. To ensure that you do not
lose any part of the original, you should use the Receive Reduce function, which scales the fax to the printing paper
size.
In some cases the size or resolution of a received fax may not permit reduction. When this happens the fax will be
printed at full size and divided onto multiple sheets of paper.
Note
To use this feature, follow this procedure:
1
5
Press the [MENU] key.
1,2,3,
1,2,3,
1,2,3,
1,2,3,
2
Press the [OK] key.
Press the [ ] key ( ) or [ ] key ( )
until "4:USER PROGRAM" appears,
and then press the [OK] key.
6
Press the [MENU] key.
Press the [MENU] key to
exit.
Selection
1,2,3,
1,2,3,
"4:USER PROGRAM"
3
Press the [ ] key ( ) or [ ] key ( )
until "16:RCV REDUCE" appears, and
then press the [OK] key.
Selection
"16:RCV REDUCE"
4
Press the [ ] key ( ) or [ ] key (
to select "1:ON" or "2:OFF".
1,2,3,
1,2,3,
64
)
If you "2:OFF" (No
reduction) large faxes will
be printed on two sheets
of paper.
WHEN USING MANUAL SENDING
AND RECEIVING
You need to use the [SPEAKER] key or an extension telephone to perform manual sending and receiving. For
information about connecting an extension telephone See "CONNECTING OTHER DEVICES" (p.12).
1
When the extension telephone rings,
pick up the handset and converse.
If the [SPEAKER] key is used to answer a call
you cannot converse.
Note
2
You cannot use the [SPEAKER] key for fax
transmission/reception while copying is in
progress.
When the handset is off hook or the
[SPEAKER] key is used, press the
[START] key ( ).
MANUAL MODE
1:SEND,
2:RECEIVE
Press the [ ] key ( ) or [ ] key ( ) to
select "1:SEND" or "2:RECEIVE", and then press
the [START] key (
).
4
65
5
Chapter 5
SPECIAL FUNCTIONS
MEMORY
Your machine has a memory area that can be used to store both incoming faxes and outgoing originals.
● Approximately 120 pages of average content can be held in memory for transmission. Less can be held if any of
the pages were scanned using fine or superfine resolution.
Substitute Reception into Memory
This is a back-up function that is automatically activated if your fax runs out of paper, the TD cartridge needs
replacement (See the Operation Manual.), or the paper jams.
• If you received originals in memory because the fax ran out of paper, be sure to add paper which is the same size
as the paper previously used. If not, the original print-out size may not match the size of the printing paper.
Note
66
Take care that the remaining memory does not become 7% or you cannot receive any more faxes.
DATA TRANSFER
If there is a problem with the machine, you can use the Data Transfer function to have received faxes read into
memory and then sent to a different fax machine for printing.
This function is used when you cannot print received faxes, for example when the machine runs out of toner, or a
misfeed occurs.
To use this function, the fax number of the transfer destination machine must be programmed.
Your fax machine
Receiving fax machine
beep
Enter the fax number of
the fax machine your
want to transfer the data to.
FW. RX DATA
1=YES
2=NO
Select data transfer mode
Transferred faxes
are printed
[Preparation]
Transfer is only possible when a received fax is being held in memory because printing was not possible. In this
case, "0:RX DATA TRANSFER" will appear in the display.
Note
Follow these steps to program the fax number of the transfer destination machine:
1
Press the [MENU] key.
4
Enter the transferring fax
number (maximum 40
digits) by pressing the
numeric keys.
1,2,3,
1,2,3,
2
Press the [ ] key ( ) or [ ] key ( )
until "0:RX DATA TRANSFER"
appears, and then press the [OK] key.
Selection
Enter the fax number of the transfer
destination machine with the numeric
keys and press the [OK] key.
5
Enter the name of the transfer
destination with the numeric keys and
press the [OK] key.
"0:RX DATA TRANSFER"
3
Press the [ ] key ( ) or [ ] key ( )
until "2:FAX NUMBER" appears, and
then press the [OK] key.
Selection
"2:FAX NUMBER"
67
5
SPECIAL FUNCTIONS
Follow these steps to use the fax transfer function:
1
Press the [MENU] key.
1,2,3,
1,2,3,
2
Press the [ ] key ( ) or [ ] key ( )
until "0:RX DATA TRANSFER"
appears, and then press the [OK] key.
Selection
"0:RX DATA TRANSFER"
3
Press the [ ] key ( ) or [ ] key ( )
until "1:DATA TRANSFER" appears,
and then press the [OK] key.
Selection
"1:DATA TRANSFER"
4
Press the [ ] key ( ) or [ ] key ( )
until "1:YES" appears, and then press
the [OK] key.
Selection
"1:YES"
The received fax is transferred.
To cancel the transfer, select "2:NO" and press the
[OK] key.
If "NOT STORED FW.#" appears:
The transfer destination number has not been
programmed. Program the number and then transfer
the fax.
Note
68
If you set the data transfer mode, when data
cannot be transferred because the other fax
machine was busy, or when the error
condition on your fax machine is corrected,
the data does not print out. To print the data,
turn off the power to the fax machine, then
turn it on again.
TRANSMISSION RESERVATION
When your fax is busy receiving an original or transmitting an original from memory, you can "reserve" a
transmission by setting the original (either in the SPF/RSPF or on the document glass), reading it into memory, and
entering the fax number. Once the current operation is completed, your fax will automatically dial the number and
transmit the original saving you from having to wait.
When Using the SPF/RSPF:
When placing the Original on the Table:
1
Confirm that there are no originals on
the document glass and that copying
is not in progress, then gently close
the SPF/RSPF.
2
Adjust the original guides to the width
of your original.
1
Confirm that there are no original(s) in
the SPF/RSPF, and open the
SPF/RSPF.
2
Place the original face down on the
document glass. Align the original
according to the original scale in the
illustration below. (Line up the center
of the edge of the original with the
(
) mark.)
Original
scale
3
Place the original face up and push it
gently into the SPF/RSPF. The top
edge of the original should enter the
fax first.
Original face up
4
Adjust the resolution
and/or contrast settings if
desired.
3
Enter the number of the receiving
machine using one of the following
methods:
• Press a Rapid key.
If you press a Rapid Key, the next step is not
necessary.
The number will be dialed once the current
operation is completed, and transmission will
begin once the connection is made.
• Press the [SPEED/SEARCH] key and enter a
Speed Dial number.
• Enter a full number with the numeric keys.
5
mark
Note
5
When using the document glass, do not set
original(s) in the SPF/RSPF.
4
If needed, set the original size,
resolution, and contrast. (See
"DIALING AND TRANSMITTING" (p.58))
5
Press the [START] key ( ) to scan
the page into memory. If you have
more than one original to read into
memory, place the next page, and
press the [START] key ( ) to read
each page.
6
Press the # key (
Press the [START] key ( ) if you
entered a Speed Dial number or a full
number.
• The number will be dialed once the current
operation is completed, and transmission will
begin once the connection is made.
Gently close the SPF/RSPF.
).
69
BROADCASTING
This function allows you to send the same original to as many as 100 different locations with just one operation.
Once the original is loaded, it is scanned and stored in memory. The fax numbers you have entered are then
automatically dialed in succession, and the original is transmitted to each location.
beep
Recipient A
Your fax machine
mem
ory
Fax received
Faxes sent beep
in order
Recipient B
Select
broadcast sending
Original is scanned
into memory
Fax received
beep
Recipient C
Fax received
1
Place the original face up and push it
gently into the original feeder tray.
3
Original face up
2
Dial the numbers of the receiving
machines using one or more of the
following methods:
• Press one or more Rapid keys.
• Enter Speed Dial numbers with the numeric
keys.
• Press one or more Group keys.
• Enter a number with the numeric keys.
Press the [BROADCAST] key.
4
Press the [OK] key.
To enter another fax number, return to step 3.
SPEED/ BROAD- RECEPTION REDIAL/
MEMORY SEARCH CAST
MODE
PAUSE
COVER
RESOLUTION
CONTRAST SHEET
2-SIDE
REPORT TX
LINE STATUS
Note
70
Adjust the resolution
and/or contrast settings if
desired.
SPEAKER
Adjust the resolution and contrast settings
after the [BROADCAST] key has been
pressed.
5
Press the [START] key ( ).
Transmission will begin.
SPECIAL FUNCTIONS
Broadcasting using a Group key
If the fax machines to which you want to broadcast have all been programmed into one Group key, you can perform
the broadcasting operation using the following simplified procedure. Refer to "STORING NUMBERS UNDER
GROUP KEYS" (p.44).
1
Place the original face up and push it
gently into the document feeder tray.
Original face up
2
Adjust the resolution
and/or contrast settings if
desired.
Press the appropriate Group key.
Transmission will begin.
01
10
02
11
03
12
04
13
05
14
06
15
07
16
08
17
09
18
SHIFT
5
71
POLLING
Polling allows you to request another fax machine to send an original to your fax machine. In other words, the
receiving fax machine, not the transmitting fax machine, activates the transmission. You can use your fax to both
poll and be polled by others.
Serial polling can be used to poll multiple fax machines (maximum of 100) in a single operation.
POLLING
You can request that another fax machine send you the original that is set in that fax machine. You can perform a
polling operation at a scheduled time. (See "TIMER OPERATIONS" (p.78))
Polling fax
beep
Select polling
Other fax memory
Fax received
sending
polling
memory
Original is set
Original is scanned
into memory
Polling is approved
Follow these steps to use the polling function:
1
3
Press the [MENU] key.
• Press a Rapid Key.
If you press a Rapid Key, the next step is not
necessary.
• Press the [SPEED/SEARCH] key and enter a
two-digit Speed Dial number.
• Enter the fax number with the numeric keys.
1,2,3,
1,2,3,
2
Press the [ ] key ( ) or [ ] key (
until "8:POLLING MODE" appears,
and then press the [OK] key.
Selection
"8:POLLING MODE"
72
Dial the number of the fax machine
you want to poll using one of the
following methods:
)
Note
4
A group key can be pressed to perform
serial polling. Fax reception will take place in
the order that the destinations are stored in
the Group Key.
Press the [START] key (
).
SPECIAL FUNCTIONS
SERIAL POLLING
You can poll several fax machines one at a time with a single serial polling operation.
A maximum of 100 fax machines can be polled in one serial polling operation.
memory
Other fax A
memory
Original is set
Original is scanned
into memory
polling
Polling is approved
sending
Fax
received
beep
Polling fax
beep
Select serial polling
Fax received
Next fax machine is polled
sending
memory
Repeated for the
next fax machine
Other fax B
memory
Original is set
Original is scanned
into memory
Polling is approved
Follow these steps to use the serial polling function:
1
Press the [MENU] key.
4
1,2,3,
1,2,3,
1,2,3,
1,2,3,
2
Press the [ ] key ( ) or [ ] key ( )
until "9:SERIAL POLL MODE" appears,
and then press the [OK] key.
5
5
Press the [OK] key.
Repeat steps 3 and 4
until all numbers have
been entered. After
entering the last number,
go to step 5.
Press the [START] key (
).
Selection
"9:SERIAL POLL MODE"
3
Dial the number of the fax machine
you want to poll using one of the
following methods:
• Press a Rapid Key or a Group Key.
• Press the [SPEED/SEARCH] key and enter a
two-digit Speed Dial number, and then press
the [OK] key.
• Enter a fax number with the numeric keys.
73
SPECIAL FUNCTIONS
POLLING TRANSMISSION (MEMORY POLLING)
This function is used to transmit an original that has been scanned into memory to a fax machine that polls your fax
machine. If desired, polling fax machines can be restricted to machines whose fax numbers have been programmed
in your machine ("RESTRICTING POLLING MACHINES (POLLING SECURITY)" on page 76).
To let other fax machines poll your fax machine, the original to be transmitted must be scanned into memory and the
reception mode of your machine must be set to "Auto".
You can select whether polling transmission will take place once or repeatedly. If once is selected, the original that
was scanned into memory will be automatically deleted after polling transmission takes place. If repeated polling
transmission is selected, the original will remain in memory until it is deleted.
More than one original can be scanned into polling memory (all originals will transmitted when your machine is
polled).
Only one memory polling operation can be set up, and the polling machine must be capable of polling reception.
The original(s) in polling memory will be transmitted when a fax machine calls your fax machine and requests polling
transmission. Automatic fax reception is possible while your machine is on polling transmission standby.
Your fax
machine
mem
ory
Select memory polling
The original is read
into memory
Polling is
approved
Original is sent
from memory
polling
Polling fax
machine
beep
Select polling
Original is received
Setting up polling transmission:
Place the original in the SPF/RSPF or on the document glass and perform the following steps:
1
Press the [MENU] key.
3
Press the [ ] key ( ) or [ ] key ( )
to select the number of times polling
transmission will take place and press
the [OK] key.
1,2,3,
1,2,3,
1,2,3,
1,2,3,
2
Press the [ ] key ( ) or [ ] key ( )
until "7:MEMORY POLL MODE"
appears, and then press the [OK] key.
Selection
"7:MEMORY POLL MODE"
74
4
"1:1.TIME" or
"2:REPEAT" can be
selected as the number
of polling operations
allowed.
Press the [START] key (
).
SPECIAL FUNCTIONS
Adding a original to polling memory:
Deleting originals from polling memory:
Use this procedure to add an original to another
original that has already been scanned into polling
memory. Place the original in the SPF/RSPF or on the
document glass and follow the steps below.
Follow the steps below to delete originals that have
been scanned into polling memory.
1
1
Press the [MENU] key.
1,2,3,
1,2,3,
2
Press the [MENU] key.
1,2,3,
1,2,3,
Press the [ ] key ( ) or [ ] key ( )
until "7:MEMORY POLL MODE"
appears, and then press the [OK] key.
2
Press the [ ] key ( ) or [ ] key ( )
until "7:MEMORY POLL MODE"
appears, and then press the [OK] key.
Selection
Selection
"7:MEMORY POLL MODE"
"7:MEMORY POLL MODE"
3
Press the [ ] key ( ) or [ ] key ( )
until "1:SET" appears, and then press
the [OK] key.
3
Press the [ ] key ( ) or [ ] key (
until "2:CLEAR" appears, and then
press the [OK] key.
Selection
Selection
"1:SET"
"2:CLEAR"
4
Press the [ ] key ( ) or [ ] key ( )
to select the number of times polling
transmission will take place and press
the [OK] key.
1,2,3,
1,2,3,
5
4
Press the [START] key (
)
5
).
"1:1.TIME" or
"2:REPEAT" can be
selected as the number
of polling operations
allowed.
Press the [START] key (
).
75
SPECIAL FUNCTIONS
RESTRICTING POLLING MACHINES (POLLING SECURITY)
If you wish to allow only specified fax machines to poll your fax machine, enable polling security and program the fax
numbers of the machines that are to be allowed to poll your machine. When this is done, polling will take place when
the fax number of the polling machine matches one of the fax numbers that have been programmed in your machine.
Up to 10 passcode numbers (fax numbers of machines that are allowed to poll your machine) can be programmed.
To enable polling security and program passcode numbers, see "Programming/deleting passcode numbers:" on page 78.
[Preparation]
[When polling]
Polling fax
beep
Enter the fax number
for your fax machine
Select polling or serial polling
Fax is received
sending
polling
Enter the fax number of
fax machines you want
to allow to poll your fax
machine
Entered fax
number
Permitted fax
number
numbers
match
These two numbers are compared
polling allowed
Fax being
polled
[Preparation]
Follow these steps to enable polling security:
1
Press the [MENU] key.
4
Press the [ ] key (
to select "1:ON".
) or [
] key (
)
Selection
1,2,3,
1,2,3,
"1:ON"
To turn off polling security, select "2:OFF".
2
Press the [ ] key ( ) or [ ] key ( )
until "4:USER PROGRAM" appears,
and then press the [OK] key.
5
Selection
Press the [OK] key.
1,2,3,
1,2,3,
"4:USER PROGRAM"
3
Press the [ ] key ( ) or [ ] key ( )
until "12:SECURITY SELECT"
appears, and then press the [OK] key.
6
Press the [MENU] key.
Press the [MENU] key to
exit.
Selection
1,2,3,
1,2,3,
"11:SECURITY SELECT"
76
SPECIAL FUNCTIONS
Programming/deleting passcode numbers:
1
Press the [MENU] key.
6
Enter the passcode (fax number of the
machine to be allowed to poll your
machine) with the numeric keys and
press the [OK] key.
7
Press the [MENU] key.
1,2,3,
1,2,3,
2
Press the [ ] key ( ) or [ ] key ( )
until "2:ENTRY MODE" appears, and
then press the [OK] key.
Selection
Press the [MENU] key to
exit.
"2:ENTRY MODE"
1,2,3,
1,2,3,
3
Press the [ ] key ( ) or [ ] key ( )
until "4:PASSCODE # MODE"
appears, and then press the [OK] key.
Selection
"4:PASSCODE # MODE"
4
5
Press the [ ] key ( ) or [ ] key ( )
to select "1:SET" and press the [OK]
key.
Selection
"1:SET"
To delete a passcode number:
Select "2:CLEAR" and press the [OK] key.
5
Enter a two-digit number that will be
used to identify the passcode number
and press the [OK] key.
To delete a passcode
number:
Enter the two-digit
number that identifies the
passcode number and
press the [OK] key. The
passcode is deleted.
77
TIMER OPERATIONS
The timer function allows you to set a transmission or polling operation to be performed automatically at a time you
specify. Up to five transmission operations or polling operations can be set at any one time, and the times they will
be performed can be specified up to a week in advance.
You can use this function, for example, to take advantage of lower night time telephone rates without having to be
there when the operation is performed.
● For a timer transmission, scan the original into memory when you set the transmission. Scanning the original into
memory is convenient because you do not have to worry about original mix-ups or forgetting to load the original.
● If the memory becomes full while the original is being scanned, "MEMORY FULL" will appear in the display.
• Press the [START] key (
) to transmit the pages that have been stored up to that point in memory.
• Press the [CLEAR ALL] key ( ) to cancel the entire transmission.
Your fax machine
Recipient
mem
The scheduled
time arrives
• Select the recipient
-sending method
-time
• Select transmission
settings
ory
beep
Transmission begins
Transmission
/reception
Setting up a timer transmission job:
1
4
Press the [MENU] key.
Enter the time at which transmission
will take place with the numeric keys.
Enter two digits for the
hour and two digits for
the minute.
1,2,3,
1,2,3,
2
Press the [ ] key ( ) or [ ] key ( )
until "1:TIMER MODE" appears, and
then press the [OK] key.
5
Press the [ ] key ( ) or [ ] key ( )
to select "AM" or "PM" and press the
[OK] key.
Selection
"1:TIMER MODE"
3
Press the [ ] key (
to select "1:SET".
1,2,3,
1,2,3,
) or [
] key (
Selection
"1:SET"
To cancel a timer operation, select "2:CLEAR".
78
)
SPECIAL FUNCTIONS
6
Press the [ ] key ( ) or [ ] key (
to select the day of the week and
press the [OK] key.
)
8
• Press a Rapid key.
• Enter a Speed Dial number with the numeric
keys.
• Enter the fax number with the numeric keys.
1,2,3,
1,2,3,
9
7
Press the [ ] key ( ) or [ ] key ( )
to select the transmission mode and
press the [OK] key.
1,2,3,
1,2,3,
Enter the fax number of the other
machine using one of the following
methods:
Press the [OK] key.
1,2,3,
1,2,3,
The selections are as
follows:
1:SEND MODE
2:BROADCAST MODE
3:POLLING MODE
4:SERIAL POLL MODE
CANCELING A TIMER TRANSMISSION JOB
After a timer transmission job is set up, the job goes on standby until the specified time of transmission. If necessary,
the MEMORY STATUS function can be used to cancel a timer transmission job that is on standby ("CANCELING
(DELETING) A STORED FAX JOB" on page 61).
5
79
ANTI JUNK FAX
You can avoid wasting fax paper by using the Anti Junk Fax function. This function blocks reception of faxes from up
to ten specified parties.
To turn the Anti Junk Fax feature on and off, use the following procedure:
1
Press the [MENU] key.
1,2,3,
1,2,3,
2
Press the [ ] key ( ) or [ ] key ( )
until "5:ANTI JUNK FAX" appears, and
then press the [OK] key.
Selection
"5:ANTI JUNK FAX"
3
Press the [ ] key ( ) or [ ] key ( )
to select "1:ANTI JUNK SELECT" and
press the [OK] key.
Selection
"1:ANTI JUNK SELECT"
4
Press the [ ] key ( ) or [ ] key ( )
to select "1:ON" or "2:OFF" and press
the [OK] key.
1,2,3,
1,2,3,
5
Press the [MENU] key.
Press the [MENU] key to
exit.
1,2,3,
1,2,3,
80
SPECIAL FUNCTIONS
To store junk fax numbers, use the following procedure:
1
Press the [MENU] key.
5
Enter a two-digit number from 01 to 10
that will identify the anti junk number
and press the [OK] key.
1,2,3,
1,2,3,
2
Press the [ ] key ( ) or [ ] key ( )
until "5:ANTI JUNK FAX" appears, and
then press the [OK] key.
If you enter a two-digit number that already
has a fax number stored, "#xx
STORED:CHANGE?" will appear. To
change the fax number that has been stored
under that 2-digit number, press the [
]
key (
) or [
] key (
) to select "YES",
press the [OK] key, and enter the new fax
number.
Note
Selection
"5:ANTI JUNK FAX"
3
Press the [ ] key ( ) or [ ] key ( )
to select "2:JUNK FAX #" and press
the [OK] key.
6
Enter the fax number with the numeric
keys and press the [OK] key.
Selection
"2:JUNK FAX #"
4
Press the [ ] key ( ) or [ ] key ( )
to select "1:SET" and press the [OK]
key.
5
7
Press the [MENU] key.
Selection
"1:SET"
1,2,3,
1,2,3,
If you wish to store
another fax number,
return to step 5.
Press the [MENU] key to
exit.
81
SPECIAL FUNCTIONS
To clear junk fax numbers, use the following procedure:
1
6
Press the [MENU] key.
Press the [OK] key.
If you wish to store
another fax number,
return to step 5.
1,2,3,
1,2,3,
1,2,3,
1,2,3,
2
Press the [ ] key ( ) or [ ] key ( )
until "5:ANTI JUNK FAX" appears, and
then press the [OK] key.
7
Press the [MENU] key.
Press the [MENU] key to
exit.
Selection
"5:ANTI JUNK FAX"
3
1,2,3,
1,2,3,
Press the [ ] key ( ) or [ ] key ( )
to select "2:JUNK FAX #" and press
the [OK] key.
Selection
"2:JUNK FAX #"
4
Press the [ ] key ( ) or [ ] key (
to select "2:CLEAR" and press the
[OK] key.
)
Selection
"2:CLEAR"
5
82
Press the numeric keys to enter the
two-digit number (01 to 10) that
identifies the fax number you wish to
delete.
OPERATION IN COPY, PRINTER,
SCANNER, AND FAX MODES
Some operations cannot be performed simultaneously when the machine is being used in printer mode, copy mode,
scanner mode, and fax mode.
Copy
Printer
Copying
Printing
Scanning
from a
machine
Scanning
from a
computer
Transmission
Key entry
Yes
Yes
No
Yes
Yes*1
Yes
Yes
During copying
No
No
No
No
Yes*1
Yes*2
Yes
Printer
Printing
Yes
No
Yes
Yes
Yes
Yes*2
Yes
Scanner
During scanning
No
Yes
No
No
Yes*1
Yes
Yes
Fax
transmission
Key entry
No
Yes
No
Yes
Yes
Yes
Yes
During direct
transmission
No
Yes
No
No
No
No
No
During scanning
No
Yes
No
No
Yes*1
Yes*4
Yes
During memory
transmission
Yes
Yes
Yes
Yes
No*3
No*3
No
During manual
reception
Yes
No
Yes
Yes
No*3
No
No
During printing
of a received fax
Yes
No
Yes
Yes
Yes
Yes*2
Yes
During memory
reception
Yes
Yes
Yes
Yes
No*3
No*3
No
Yes
Yes
Yes
Yes
No*3
No*3
No
Modes
Copy
Fax reception
Extension phone
*1
*2
*3
*4
Scanner
Fax
Reception
Extension
phone
5
Direct transmission and scanning are not possible.
Manual reception and printing of a received fax are not possible.
Only scanning is possible.
Manual reception is not possible.
83
6
Chapter 6
TROUBLESHOOTING
PRINTING OUT REPORTS
The machine is capable of printing a range of reports on faxing activities as well as various settings you have made.
The reports are described below.
1. TIMER LIST:
You can print a list of timer or dual access operations that are currently set.
P. 01
TIMER LIST
10- SE P- 2 0 0 X F R I 0 6 : 3 0
TIMER MODE
TYPE
FILE RESERVED
RES.
MSG
01
12:12
XXXXXXXXX
XXX
X
02
XX:XX
XXX
XXXXXXXXX
XXX
X
03
XX:XX XXX
XXXXXXXXX
04
XX:XX
XXX
XXXXXXXXX
05
XX:XX
XXX
XXXXXXXXX
XXX
06
XX:XX
XXX
XXXXXXXXX
XXX
07
XX:XX
XXX
XXXXXXXXX
XXX
MON
X
BOX PAGES CVR.
XX
RECEIVER
X
XXX
XXX XXX XXX
X
XXX
XXX XXX XXX
X
XXX
XXX XXX XXX
XXX
XXX XXX XXX
XXX
XXX XXX XXX
XXX
XXX XXX XXX
XXX
XXX XXX XXX
XX
MEMORY TX
TYPE
FILE
RES.
XXX
XXXXXX
XXX
XXX
XXXXXX
XXX
MSG
X
BOX PAGES CVR.
XX
RECEIVER
X
X
XX
X
X
XX
REMOTE TX
#
TYPE
RES.
XXXX
1
MSG
PAGES CVR.
X
XXXX
TIMES
X
XXXX
2. ACTIVITY REPORT:
You can print out a list of faxes sent and received as well as the sender or recipient and the time of the
operation, etc.
P.01
ACTIVITY REPORT (SEND)
10-SE P-2 00X FRI 06:30
#
RECEIVER
DATE START TIME
XX
10-SEP
XX:XX
COM.TIME PAGES
XX
X:XX:XX
XX
TOTAL
X:XX:XX
XX
GRAND TOTAL
X:XX:XX
XX
TYPE/NOTE
XXXXXXX
XXXXX
FILE
XXX
3. TELEPHONE # LIST:
You can print out a list of number stored in rapid dialing and speed dialing.
P. 01
TELEPHONE # LIST
10- S E P - 2 0 0 X F R I 0 6 :3 0
RECEIVER'S FAX #
RAPID/SPEED #
INTL TX SET RECEIVER'S NAME
RXX
XXXXXXXXXXXXXX
XXXX
XXXX
XXXXXXXXXXXXXX
RXX
XXXXXXXXXXXXXX
XXXX
XXXX
XXXXXXXXXXXXXX
SXXX
XXXXXXXXXXXXXX
XXXX
XXXX
XXXXXXXXXXXXXX
4. GROUP LIST:
You can print out a list of group dialing numbers.
P.01
GROUP LIST
1 0 -S E P -200X FRI 06:30
#
GROUP NAME
RECEIVER
GXX
XXXX
RAPID #
GXX
XXXX
SPEED #
GXX
XXXX
FAX #
SPEED #
FAX #
: XX
: XXX
: XXXXXXXXXXXXXXXXXXXXX
: XXX XXX
: XXXXXXX
: XXXXXXXX
: XXXXXX
84
TROUBLESHOOTING
5. PASSCODE LIST:
You can print a list of your fax information and polling security information.
PASSCODE LIST
1 0 -S E P -200X FR I 06:30
POLL SECURITY
SYSTEM #
XXXX
XXXX
ID #
01
XXXX
02
XXXX
03
04
05
06
07
08
09
10
PASSCODE #
01
XXXXXXXXXX
02
XXXXXXXXXX
03
04
05
06
07
08
09
10
SENDER'S NAME
XXXXXXXXXXXXXXXXXX
SENDER'S #
XXXXXXXXXXXXXXXX
FW. STA. NAME
XXXXXXXXXXXXXXXXXXXX
FW. STATION #
XXXXXXXXXXXXXXXX
6. JUNK FAX # LIST:
Fax numbers designated as Anti Junk Fax numbers.
JUNK FAX# LIST
1 0 -S E P -200X FR I 06:30
ANTI JUNK FAX #
#
01
X
02
XXXXXXXXXX
10
XXXXXXXXXXXXXXXXXXXX
6
85
TROUBLESHOOTING
7. USER PROGRAM LIST:
Currently activated USER PROGRAM settings.
USER PROGRAM LIST
10-SEP-200X FRI 06:30
ITEM
MENU #
SETTING
1
DOC. GLASS SIZE
8.5x11
2
FIXED DOC. SIZE
8.5x11
3
RESO. PRIORITY
STANDARD
4
#OF RINGS AUTO RX
02TIME(S)
5
#OF RINGS MANUAL RX
00TIME(S)
6
AUTO LISTING
OFF
7
PRINT SELECTION
SEND : ERROR ONLY
BD : ALWAYS PRINTS
RCV : NEVER PRINTS
IMAGE : ERROR ONLY
8
RECALL TIMES (BUSY)
02TIME(S)
9
RECALL TIMES (LINE ERROR)
01TIME(S)
10
RECALL INTERVAL (BUSY)
03MIN.
11
RECALL INTERVAL (LINE ERROR)
01MIN.
12
SECURITY SELECTION
ON
13
FAX REMOTE NUMBER
5
14
REMOTE RECEPTION
ON
15
FAX SIGNAL AUTO RECEIVE
ON
16
AUTO RCV REDUCE
ON
17
BEEP LENGTH
3SEC
18
RINGER VOLUME
MIDDLE
19
BEEPER VOLUME
OFF
20
INDEX PRINT
OFF
21
DATE&TIME FORMAT SET
TIME : 12HOUR
22
PBX SETTING
OFF
23
2-SIDED RX
OFF
24
TRAY SELECTION
AUTO
DATE : MMDDYYYY
Use the following procedure to print out reports:
1
Press the [REPORT] key.
3
Press the [OK] key.
SPEED/ BROAD- RECEPTION REDIAL/
MEMORY SEARCH CAST
MODE
PAUSE
COVER
RESOLUTION
CONTRAST SHEET
2-SIDED
REPORT TX
LINE STATUS
2
SPEAKER
Press the [REPORT] key to select the
report that you wish to print.
SPEED/ BROAD- RECEPTION REDIAL/
MEMORY SEARCH CAST
MODE
PAUSE
COVER
RESOLUTION
CONTRAST SHEET
2-SIDED
REPORT TX
LINE STATUS
86
SPEAKER
1,2,3,
1,2,3,
TROUBLESHOOTING
ACTIVITY REPORT AUTO LISTING
This setting is used to automatically print the Activity Report for transmissions and receptions. The Activity Report
will automatically print when information on a total of 50 fax transmissions and receptions accumulates. Once
information on 50 transmissions/receptions accumulates, the oldest transaction is deleted each time a new
transaction takes place.
1
Press the [MENU] key.
1,2,3,
1,2,3,
2
Press the [ ] key ( ) or [ ] key ( )
until "4:USER PROGRAM" appears,
and then press the [OK] key.
Selection
"4:USER PROGRAM"
3
Press the [ ] key ( ) or [ ] key ( )
until "6:AUTO LISTING" appears, and
then press the [OK] key.
Selection
"6:AUTO LISTING"
4
6
Press the [ ] key ( ) or [ ] key ( )
to select "1:ON" and press the [OK]
key.
Selection
"1:ON"
To disable automatic printing, select "2:OFF" and
press the [OK] key.
5
Press the [MENU] key.
Press the [MENU] key to
exit.
1,2,3,
1,2,3,
87
TROUBLESHOOTING
PRINTING TRANSACTION REPORTS
The machine can be set to print a transaction report after each transmission, reception, and/or error. The printing
condition can be selected separately for three types of transaction reports: "TRANSMISSION LIST", "BROADCAST
LIST", and "RECEPTION LIST". For each type of report, select one of the following printing conditions:
"ALWAYS PRINTS" ...After each transmission, reception, or error.
"ERROR ONLY".........After an error only.
"NEVER PRINTS" ......Never prints.
Note
Part of the transmitted fax can be printed on the transaction report (IMAGE MEM. PRINT setting).
To set the machine to print transaction reports, follow these steps:
1
Press the [MENU] key.
5
Press the [ ] key ( ) or [ ] key ( )
to select the printing condition and
press the [OK] key.
1,2,3,
1,2,3,
1,2,3,
1,2,3,
2
Press the [ ] key ( ) or [ ] key ( )
until "4:USER PROGRAM" appears,
and then press the [OK] key.
6
Press the [MENU] key.
Press the [MENU] key to
exit.
Selection
"4:USER PROGRAM"
3
Press the [ ] key ( ) or [ ] key ( )
until "7:PRINT SELECTION" appears,
and then press the [OK] key.
Selection
"7:PRINT SELECTION"
4
Press the [ ] key ( ) or [ ] key ( )
to select the type of transaction report
and press the [OK] key.
1,2,3,
1,2,3,
The selections are as
follows:
1:TRANSMISSION
2:BROADCAST
3:RECEPTION
4:IMAGE MEM. PRINT
4: IMAGE MEM. PRINT" can be enabled to have part
of the transmitted fax printed on the transaction report.
88
The selections are as
follows:
1:ALWAYS PRINTS
2:ERROR ONLY
3:NEVER PRINTS
1,2,3,
1,2,3,
TROUBLESHOOTING
Problem
Dialing cannot be done.
No transmission takes place.
Nothing is printed at the
receiving end.
Cause and solution
The telephone line cord is not correctly connected to the
machine and the wall telephone jack.
→ Make sure the telephone line cord is securely connected.
Page
11
The receiving machine is out of paper.
→ Check with the operator of the receiving machine.
-
The receiving machine does not support the G3 standard.
→ Check with the operator of the receiving machine.
-
An error is displayed.
→ Check the display of the machine.
90
If a blank sheet of paper is output together with a normally
received fax, the machine's paper size setting may be different
from the size of paper actually loaded in the machine.
→ Make sure that the paper size setting matches the size of paper
loaded in the machine.
29
Noise on the line may cause a distorted image. Try sending the
fax again, or make a copy on your machine and see if the copy
A distorted image is received at
is distorted.
the other end.
→ If the image is still distorted, consult the retailer or dealer where
you bought the machine.
-
The transmitting machine may be using a light contrast setting.
→ Ask the operator of the transmitting machine to send the fax using
a darker contrast setting.
-
Noise on the line may cause a distorted image.
→ Ask the operator of the transmitting machine to send the fax
again.
-
The received original is faint.
Received images are distorted.
The TD cartridge may be running out of toner.
→ Replace the TD cartridge.
Note
Operation
Manual
(for general
information)
If your problem cannot be solved by carrying out the instructions in the Check and Remedy column above, please
contact your SHARP dealer.
89
6
MESSAGES AND SIGNALS
DISPLAY MESSAGES
Message
Cause and remedy
Page
FRONT OR SIDE COVER OPEN. The cover is open. Close the cover.
CLOSE COVERS.
See the
OPERATION
MANUAL
(for general
information)
CLOSE THE SPF/RSPF COVER.
The SPF/RSPF cover is open. Close the SPF/RSPF cover.
CLEAR PAPER JAM.
SPF/RSPF JAM.
A paper misfeed has occurred. Remove the misfeed as
explained in "MISFEED REMOVAL". (See the OPERATION
MANUAL (for general information).)
MEMORY FULL
The memory is full.
61
NO XXX SIZE TRAY
CHANGE TRAY SETTING
The setting for the printing paper size is incorrect. Set it
correctly. In the area labeled "XXX," "8.5x11" "8.5x14" or "A4"
will appear.
29
Toner cartridge is empty.
Toner cartridge is not inserted.
See the
OPERATION
MANUAL
(for general
information)
CAN NOT PRINT
NO XXX SIZE TRAY
The paper has run out and the data is read into memory. Set it
correctly. In the area labeled "XXX," "8.5x11" "8.5x14" or "A4"
will appear.
-
LOAD DOCUMENT(S)
Set the original(s) in the machine.
-
AUDIBLE SIGNALS
Sound Type
Duration
Meaning
Continuous tone
3 seconds
Indicates the end of transmission, reception, or line error.
Continuous tone
1 second
Warning tone
90
7
Chapter 7
APPENDIX
SPECIFICATIONS
Applicable telephone line
Public switched telephone network
Compression method
MH, MR, MMR, JBIG
Transmission modes
Super G3, G3 (the machine can only send faxes to and receive faxes from
machines that support G3 or Super G3)
Scanning method
CCD flatbed scanning
Scanning resolution
(supports ITU-T standards)
8 x 3.85 lines/mm (Standard)
8 x 7.7 lines/mm (Fine, Fine + Halftone)
8 x 15.4 lines/mm (Super Fine, Super Fine + Halftone)
Recording method
Laser, electrostatic charge method
Transmission speed
33.6 kbps
Transmission time
Approx. 2 seconds (Super G3 mode / 33.6 kbps, JBIG),
Approx. 6 seconds (G3 ECM mode / 14.4 kbps, JBIG)
Paper size
A4
Effective recording width
A4 max. (A4 printing)
Transmittable original size
When using the SPF/RSPF
Maximum A4 Minimum A5
When using the document glass
Maximum a4
Effective scanning width
A4 maximum
Halftone transmission
256 levels
Contrast (exposure) adjustment
Light, Medium, Dark
Extension telephone connection
Possible (1 telephone)
Auto dialing
Combined total of 18 One-Touch Dial and Group keys; 100 Speed Dial
numbers; redialing (automatic)
Timer transmission
Yes
Automatic document feeding
Yes (30 pages)
Memory capacity
2 MB
Error Correction Mode(ECM)
Yes
2.4 kbps Automatic fallback
* As a part of our policy of continuous improvement, SHARP reserves the right to make design and specification
changes for product improvement without prior notice. The performance specification figures indicated are
nominal values of production machines. There may be some deviations from these values in individual machines.
91
INDEX
A
Alarm beeps
- Alarm beep volume .......................................... 19
- Length of alarm beeps ..................................... 18
Answering machine................................................. 47
- Answering machine backup ............................. 48
- Quiet detect time .............................................. 47
Arrow keys ........................................................ 15, 16
Automatic dialing
- Group keys....................................................... 44
- Rapid key dialing.............................................. 41
- Speed dialing ................................................... 41
B
Bypass tray paper guides........................................ 13
C
Clear numbers
- Group keys....................................................... 46
- Rapid key dialing.............................................. 43
- Speed dialing ................................................... 43
Connecting
- Other devices ................................................... 12
- Telephone line cord ......................................... 11
Contrast................................................................... 54
Cover sheet............................................................. 55
D
Dialing
- Direct keypad dialing........................................ 58
- Rapid key dialing.............................................. 58
- Redialing .......................................................... 60
- Search.............................................................. 60
- Speed dialing ................................................... 58
- Using the [SPEAKER] key ............................... 59
Display .............................................................. 14, 16
Document glass ...................................................... 13
E
Entering your name and fax number....................... 21
F
Fax main menu ........................................................ 6
Fax setup
- Date and time.................................................. 22
- Daylight saving time setting ............................ 25
- How to enter characters .................................. 20
- Index function.................................................. 35
- Number of recall times .................................... 31
- Number of rings for auto reception.................. 28
- Number of rings for manual reception............. 29
- PBX Setting..................................................... 40
- Recall interval.................................................. 33
- Reception mode .............................................. 27
- Reception paper size ...................................... 29
- Remote reception............................................ 38
- Resolution priority ........................................... 36
- Transmission mode......................................... 26
- Setting the tray selection................................. 30
- Your name and fax number............................. 21
H
Handles .................................................................. 13
I
Index function ......................................................... 35
L
Line jack ................................................................. 13
List of fax functions .................................................. 6
M
Memory .................................................................. 66
Message function ................................................... 56
Messages and signals............................................ 90
O
Operation panel......................................................
Optional transmission settings
- Cover sheet.....................................................
- Message function ............................................
- Two-sided original ...........................................
Originals .................................................................
- Original size ....................................................
- Setting the original ..........................................
- Size and weight...............................................
- Two-sided original ...........................................
- Unsuitable originals.........................................
55
56
57
49
53
51
49
57
50
P
Paper output tray....................................................
Paper output tray extension ...................................
Paper tray...............................................................
PC modem .............................................................
Power cord .............................................................
Power switch ..........................................................
13
13
13
37
13
13
13
Q
Quick reference guide .............................................. 3
92
R
Receiving faxes....................................................... 62
- Receive reduce ................................................ 64
- Two-sided reception......................................... 63
Reception mode
- A.M. mode.................................................. 27, 62
- AUTO mode ............................................... 27, 62
- MAN. mode ................................................ 27, 62
Remote reception.................................................... 38
Reports
- Group list.......................................................... 83
- Junk fax # list ................................................... 84
- Passcode list .................................................... 84
- Telephone # list................................................ 83
- Timer list .......................................................... 84
- Transaction reports .......................................... 87
- Transmissions activity report ..................... 85, 86
- User program list.............................................. 87
Resolution ............................................................... 54
Ringing volume ....................................................... 17
S
Specifications .......................................................... 90
SPF/RSPF............................................................... 13
- Document feeder cover.................................... 13
- Document feeder tray ...................................... 13
- Exit area........................................................... 13
- Original guides ................................................. 13
- Reversing tray .................................................. 13
Storing numbers
- Group keys....................................................... 44
- Rapid key dialing.............................................. 43
- Speed dialing ................................................... 43
T
TEL jack .................................................................. 13
Transmission mode
- Direct transmission .......................................... 26
- Memory transmission ....................................... 26
Troubleshooting ...................................................... 88
93
INDEX BY PURPOSE
Fax setup
Storing/settings
Connecting the telephone line cord......................... 11
Daylight saving time setting .................................... 25
Entering your name and fax number....................... 21
How to enter characters .......................................... 20
Index function.......................................................... 35
Number of recall times ............................................ 31
Number of rings for auto reception.......................... 28
Number of rings for manual reception .....................29
Recall interval ..........................................................33
Reception mode ......................................................27
Reception paper size .............................................. 29
Remote reception.................................................... 38
Resolution priority ................................................... 36
Setting the date and time ........................................ 22
Transmission mode................................................. 26
Tray selection.......................................................... 30
Clear numbers
- Group keys......................................................
- Rapid key dialing.............................................
- Speed dialing ..................................................
Contrast..................................................................
Enter characters .....................................................
Original size ...........................................................
Resolution ..............................................................
Storing numbers
- Group key........................................................
- Rapid key dialing.............................................
- Speed dialing ..................................................
Faxes, sending and receiving
Dialing
- Chain dialing .................................................... 59
- Direct keypad dialing ........................................58
- Redialing .......................................................... 60
- Speed dialing ................................................... 58
- Using the [SPEAKER] key ............................... 59
Receiving faxes....................................................... 62
- Manual receiving .............................................. 65
- Optional reception settings .............................. 63
Sending originals
- Dialing and transmitting ................................... 58
- Manual sending................................................ 65
- Optional transmission settings ......................... 53
- Setting the original ........................................... 51
Special functions
Anti junk fax............................................................. 80
Broadcasting ........................................................... 70
Data transfer ........................................................... 67
Memory polling........................................................ 74
Polling ..................................................................... 72
Polling security ........................................................ 76
Reservation ............................................................. 69
Serial polling............................................................ 73
Timer operations ..................................................... 78
94
46
43
43
54
20
53
54
44
41
41
SHARP MANUFACTURING FRANCE S.A.
Route de Bollwiller - SOULTZ
68503 GUEBWILLER CEDEX FRANCE
AR-FX9
PRINTED IN FRANCE
TINSE1252TSZ2