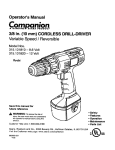
1
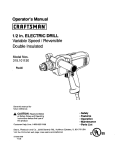
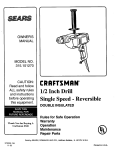
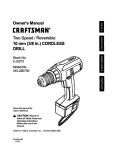
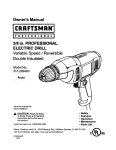
Owner's Manual
112 in. ELECTRIC DRILL
Double Insulated
Model No.
315.101000
Save this manual for
future reference
_
CAUTION: Read and follow
• Safety
• Features
all Safety Rules and
Operating Instructions before
first use of this product
• Operation
• Maintenance
• Parts List
Customer Help Line: 1 800 932 3188
Sears
Roebuck and Co
972000-630
2,99
Hoffman Estates
IL 60179 USA
®
Pdnted in USA
•
Table Of Contents ..........................................................................................................................................
2
•
Warranty .........................................................................................................................................................
2
•
Introduction.....................................................................................................................................................
2
•
Rules For Safe Operation ...........................................................................................................................
•
Product Specifications....................................................................................................................................
5
•
Unpacking.......................................................................................................................................................
5
•
Accessories ....................................................................................................................................................
5
•
Features .........................................................................................................................................................
6
•
Operation ...................................................................................................................................................
•
Maintenance.................................................................................................................................................
12
•
ExplodedView and Repair Parts List...........................................................................................................
13
•
Parts Ordering / Service ...............................................................................................................................
14
FULL ONE YEAR WARRANTY
ON COMPANION
3-5
7-11
1/2 In. DRILL
If this Companion 1/2 in. Drill fails to give complete satisfactionwithin one year from the date of purchase,
RETURN IT TO THE NEAREST SEARS STORE IN THE UNITED STATES, and Sears will replace it, free of
charge...............
If this Companion 1/2 in. Drill is used for commercial or rental purposes, this warranty applies for only 90 days
from the date of purchase.
.........
This warranty gives you specific legal rights,and you may also Ilave-other rightswhich vary from state,to state.
Sears, Roebuck and Co., Dept. 817WA, Hoffman Estates, IL 60179
Yourddll has many features for making your drilling
operations more pleasant and enjoyable. Safety,
performance and dependability have been given top
priorityin the design of this drill making it easy to
maintain and operate.
,_
Look for this symbol to point out important
Your safety is involved.
,_
',, •
_
CA_TION: Carefully read throughthis entire
owner's manual before using your new drill. Pay
close attention to the Rules For Safe Operation,
Warnings and Cautions. If you use your drill
properlyand onlyfor what it is intended, you will
enjoy years of safe, reliable service.
safety precautions.
It means attention!H
WARNING:
The operation of any drillcan result in foreign objects being thrown intoyour eyes, which
can resultin severe eye damage. Before beginning power tool operation,always wear safety
gogglesor safety glasses with side shields and a full face shield when needed. We
recommend Wide Vision Safety Mask for use over eyeglasses or standard safety glasses
with side shields, available at Sears Retail Stores.
2
Thepurposeofsafetysymbolsis to attractyourattentionto possibledangers.Thesafetysymbols,and
theexplanations
withthem,deserveyourcarefulattentionandunderstanding.
The safety warnings do
not by themselves eliminate any danger. The Instructions or warnings they give are not substitutes for
proper accident prevention measures.
SYMBOL
A
MEANING
SAFETY ALERTSYMBOL:
Indisatesdange_waming, orcaution.Mw peusedinco_un_onwithothersym_lsorpict_raphs.
A
DANGER: Failure to obey a safety warningwill resultin sedous injuryto yourself or to others.
Always follow the safety precautionsto reducethe risk of fire, electricshookand personalinjury.
A
WARNING: Failure to obey a safety waming can resultin eerious injuryto yourself or to others.
Always follow the safety precautionsto reducethe risk of fire, electricshock and personalinjury.
A
CAUTION: Failureto obey a safety waming may resultin propertydamage or personalinjuryto
yourselfor to others. Always follow the safety precautionsto reduce the dsk of fire, electdc shook
and personal injury.
NOTE:
Advisesyou of informationor instructionsvital to the operation or maintenance of the equipment.
DOUBLE INSULATION
IMPORTANT
Double insulationis a concept in safety, in electric
power toolswhich eliminates the need for the usual
three-wire grounded power cord. All exposed metal
parts are isolated from internal metal motor
componentswith protecting insulation. Double
insulatedtools do not need to be grounded.
Servicing of a tool with double insulation requires
extremecareand knowledgeof the system and
should be performed only by a qualified service
technician. For service we suggest you return the tool
to your nearest Sears Store for repair. Always usa
originalfactory replacement parts when servicing.
_k
•
KEEP WORK AREA CLEAN. Cluttered areas and
benches invite accidents.
•
AVOID DANGEROUS ENVIRONMENT. Don't use
power tools in damp or wet locationsor expose to
rain. Keep work area well lit.
•
KEEP CHILDREN AND VISITORS AWAY. All
visitorsshould wear safety glasses and be kept a
safe distance from work area. Do not let visitors
contact tool or extensioncord.
•
STORE IDLE TOOLS. When not in use, tools
shouldbe stored in a dry and high or looked-up
place - out of the reach of children.
WARNING: Do not attempt to operate this tool
until you have read thoroughlyand understand
completely all instructions,safety rules, etc.
contained in this manual. Failure to comply can
resultin accidents involvingfire, electric shock,
or serious personal injury. Save owner's manual
and review frequently for continuingsafe
operation,and instructingotherswho may use
this tool.
READ ALL INSTRUCTIONS
•
KNOW YOUR POWER TOOL. Read owner's
manualcarefully. Learn its applicationsand
limitationsas well as the specificpotential hazards
related to this tool.
• DON'T FORCE TOOL. It will do the job better and
safer at the rate for which it was designed.
• GUARD AGAINST ELECTRICAL SHOCK by
preventing body contact with groundedsurfaces.
For example; pipes, radiators, ranges, refrigerator
enclosures.
•
USE RIGHT TOOL. Don't force small toolor
attachment to do the job of a heavy duty tool. Don't
use tool for purpose not intended- for example A circular saw should never be used for cutting
tree limbsor logs.
KEEP GUARDS IN PLACE and in workingorder.
3
RULESFORSAFEOPERATION
(Continued)
• WEAR PROPER APPAREL. Do not wear loose
clothingor jewelry that can get caught in toors
moving parts and cause personal injury. Rubber
gloves and nonskidfootwear are recommended
when workingoutdoors.Wear protective hair
coveringto contain long hair and keep it from being
drawn into nearby air vents.
OUTDOOR USE EXTENSION CORDS. When tool
is used outdoors, use only extension cordssuitable
for use outdoors.Outdoor approvedcords are
marked with the suffix W-A, for example - SJTW-A
or SJOWoA.
•
ALWAYS WEAR SAFETY GLASSES. Everyday
eyeglasses have only impact-resistantlenses; they
are NOT safety glasses.
•
PROTECT YOUR LUNGS. Wear a face or dust
mask if the operation is dusty.
KEEP HANDS AWAY FROM DRILLING AREA.
Keep hands away from bits. Do not reach underneath work while bit is rotating.Do not attempt to
remove material while bit is rotating.
•
PROTECT YOUR HEARING. Wear hearing
protectionduring extended periodsof operation.
•
DON'T ABUSE CORD. Never carry tool by cord or
yank it to disconnectfrom receptacle. Keep cord
from heat, oil, and sharp edges.
•
SECURE WORK. Use clamps or a vise to hold
work. It's safer than using your hand and it frees
both hands to operate tool.
•
DON'T OVERREACH.
Keep proper footing and
balance at all times. Do not use on a ladder or
unstable support. Secure tools when working at
elevated positions.
•
MAINTAIN TOOLS WITH CARE. Keep tools sharp
and clean for best and safest performance. Follow
instructionsfor lubricatingand changing accessories.
•
DISCONNECT TOOLS. When not in use, before
servicing, or when changing attachments, blades,
bits, cutters, etc., all tools shouldbe disconnected
from power supply.
•
REMOVE ADJUSTING KEYS AND WRENCHES.
Form habit of checking to see that keys and
adjustingwrenches are removed from tool before
turning it on.
•
AVOID ACCIDENTAL STARTING. Don'tcarry
plugged-intool with finger on switch. Be sure
switch is off when plugging in.
•
MAKE SURE YOUR EXTENSION CORD IS IN
GOOD CONDITION. When using an extension
cord, be sure to use one heavy enough to carry the
currant your productwilldraw. An undersized cord
will cause a drop in line voltage resulting in loss of
power and overheating. A wire gage size (A.W.G.)
of at least 16 is recommended for an extension
cord 100 feet or less in length. A cord exceeding
100 feet is not recommended. If in doubt, use the
next heavier gage. The smaller the gage number,
the heavier the cord.
KEEP BITS CLEAN AND SHARP. Sharp bits
minimizestalling and kickback.
NEVER USE IN AN EXPLOSIVE ATMOSPHERE.
Normal sparking of the motor could ignitefumes.
INSPECT TOOL CORDS PERIODICALLY and if
damaged, have repaired by an authorizedservice
facility. Stay constantlyaware of cord location.
INSPECT EXTENSION CORDS PERIODICALLY
and replace if damaged.
•
KEEP HANDLES DRY, CLEAN, AND FREE
FROM OIL AND GREASE. Always use a clean
cloth when cleaning. Never use brake fluids,
gasoline, petroleum-based products, or any strong
solvents to clean your tool.
•
STAY ALERT AND EXERCISE CONTROL. Watch
what you are doing and use commonsense. Do
not operate tool when you are tired. Do not rush.
CHECK DAMAGED PARTS. Before further use of
the tool, a guard or other part that is damaged
shouldbe carefully checked to determine that it will
operate properly and perform itsintended function.
Check for alignment of moving parts, bindingof
movingparts, breakage of parts,mounting and any
other conditionsthat may affect itsoperation,A
guard or other part that is damaged shouldbe
properlyrepaired or replaced by an authorized
service center.
DO NOT USE TOOL IF SWITCH DOES NOT
TURN IT ON AND OFF. Have defective switches
replaced by an authorized service center.
DRILLING iNTO ELECTRICAL WIRING IN
WALLS CAN CAUSE DRILL BIT AND CHUCK
TO BECOME ELECTRICALLY LIVE. Do not touch
the chuck or metal housing when drillinginto a
wall; grasp only the insulatedhandle(s) provided
on the tool.
•
INSPECT FOR and remove all nailsfrom lumber
before drilling.
RULESFORSAFEOPERATION
(Continued)
•
DRUGS, ALCOHOL, MEDICATION. Do not
operate this tool while under the influenceof drugs,
alcohol, or any medication.
•
POLARIZED PLUGS. To reduce the risk of electric
shock, this tool has a polarized plug (one blade is
wider than the other). This plug will fit in a polarized outlet only one way. If the plug does not fit
fully in the outlet, reverse the plug. If it stilldoes
not fit, contact a qualified electricianto install the
proper outlet. Do not change the plug in any way.
•
WHEN SERVICING USE ONLY IDENTICAL
REPLACEMENT PARTS.
• SAVE THESE INSTRUCTIONS. Refer to them
frequently and use them to instructothers who may
use this tool. If you loan someone this tool, loan
them these instructionsalso.
SAVE THESEINSTRUCTIONS
Chuck
1/2 in.
Chuck Capacity
5/64 in. to 1/2 in.
Horsepower
1/3
Your drill has been shipped completely assembled
except for the auxiliary handle. Inspect it carefully to
make sure no breakage or damage has occurred
during shipping. If any parts are damaged or missing,
contact your nearest Sears Retail Store to obtain
replacement parts before attempting to operate drill.
The auxiliary handle and this owner's manual are
included in the box.
Input
3.0 Amperes
Rating
120 volts, 60 Hz, AC only
No Load Speed
_1,
WARNING:
If any parts are missing, do not
operate this tool until the missing parts are
replaced. Failure to do so could result in possible
serious personal injury.
The followingrecommended accessories are currentlyavailable at S.ears Retail Stores.
•
High Speed Bits (For wood or metal)
•
Masonry Bits
•
•
Wood Boring Bits
Hole Saws
•
Chuck
,_
WARNING:
600 RPM
1/2 in. Max.
3/4 in. Max.
1ol/2 in. Max.
2-1/2in. Max.
Item No. _ 2980
The use of attachments or accessoriesnot listed might be hazardous.
KNOWYOURELECTRICDRILL
AUXILIARY
See Figure 1.
An auxiliary handle has been packed with your drillfor
ease of operation and to help prevent loss of control.
Before attempting to use any tool, familiarize yourself
with all operating features and safety requirements.
ELECTRICAL
CONNECTION
HANDLE
_1, WARNING: Do not allowfamiliarity with tools to
make you careless. Remember that a careless
fraction of a second is sufficientto inflictsevere
injury.
Your drill has a precision builtelectric motor. It should
be connected to a power supply that is 120 volts,
60 Hz, AC only (normal household current). Do not
operate this tool on direct current (DC). A substantial
voltage drop will cause a loss of power and the motor
will overheat. If your drilldoes not operate when
plugged intoan outlet, double-check the power
supply.
AUXILIARY
HANDLE
CHUCK
TO
STORE
CHUCKKEY
STORAGE
AREA
LOCK-ON
SWITCH
TRIGGER
TO
REMOVE
Fig. 1
6
WARNING:Yourdrillshouldneverbe
connected
topowersupplywhenyouare
assembling
parts,makingadjustments,
installing
orremoving
drillbits,cleaning,
or whennotin
use.Disconnecting
yourdrillwillprevent
accidental
startingthatcouldcauseserious
personal
injury.
_lb WARNING: Before connecting yourdrill to
power supply source, always check to be sure it
is not in lock-on position(depress and release
switch trigger). Failure to do so could resultin
accidental starting of your drillresultingin
possibleserious injury. Also, do not lock the
trigger on jobs where your drill may need to be
stopped suddenly.
SINGLESPEEDSWITCH
See Figure 2.
REVERSIBLE
Your drill has a single speed switch. To turn your drill
ON, depress the switch trigger. Release switchtrigger
to turn your drill OFF.
See Figure 3.
Your electricddll has the feature of being reversible.
The directionof chuck rotationis controlledby a lever
located above the switchtrigger. With your drillheld in
normal operating position,the directionof rotationlever
should be positionedto the left of the switch for drilling.
The drilldirectionis reversedwhen the lever is to the
rightof the switch.
LOCK-ON
BUTTON
The design of the switchwill not permit changingthe
direction of rotationwhile the drill is running. Release
the switch triggerand allow the drill to stop before
changing its direction.
Note: Your drill will not run unlessthe switch lever is
pushed fully to the left or right.
FORWARD
REVERSELEVER
SWITCH
TRIGGER
Fig. 2
LOCK-ON BUTFON
See Figure 2.
Your drill is equipped with a lock-on feature, which is
convenient when continuousdrillingfor extended
periodsof time is required.To lock-on, depress the
switch trigger, push in and hold the lock-on button
locatedon the side of the handle, then release switch
trigger. Release lock-on button and your drillwill
continue running.
To release the lock, depress the switch trigger and
release.
Fig. 3
If you have the lock-on feature engaged during use
and your drill becomes disconnectedfrom power
supply, disengage the lock-on feature immediately.
7
INSTALLING
AUXILIARYHANDLE
CHUCK KEY
See Figure 5.
See Figure 4.
An auxiliaryhandle is packed with your drillfor ease
of operation and to help prevent loss of control.To
install,start the screw threads into the threaded hole
in the gear housingand tighten securely.
A chuck key has been provided for use when
installingor removing bits.
CHUCK KEY STORAGE
See Figure 5.
Note: For convenience, the screw has been trapped
inside the auxiliary handle.
When not in use, the chuck key can be placed in the
storage area located on the bottomportionof the
handle of your drill as shown in figure 1.
To prevent thread damage and possibleloss of
control,auxiliary handle should be checked pedodicanyfor tightness. Do not operate ddll with auxiliary
handle loose.
TO
STORE
CHUCKKEY
STORAGE
AREA
AUXlUARY
GEAR
HOU_NG
TO
REMOVE
Fig. 4
8
Fig. 5
TOINSTALLBITS
_l,
See Figure 6.
DRILLSIT
CHUCK
WARNING: Do not insert drillbit intochuck
jaws and tighten as shown in figure 7. This could
cause driftbit to be thrown from your drill
resultingin possibleserious personal injuryor
damage to your chuck.
CHUCK
JAWS
RIGHT
•
Fig. 6
Fig. 7
Unplug your drill.
REMOVING
_k
WARNING:
Failure to unplug your drift could
result in accidental starting causing serious
injury.
•
,_
•
Open or close the chuck jaws to a point where the
opening is slightlylarger than the drillbit you
intendto use. Also, raise the frontof your drill
slightlyto keep the drillbit from falling out of the
chuck jaws.
•
insert drill bit into chuck the full length of the jaws.
•
Tighten the chuck jaws securely using the chuck
key provided.
•
•
BITS
Unplug your drill.
WARNING: Failure to unplugyour drillcould
result in accidental startingcausing serious
injury.
Loosen the chuck jaws usingthe chuck key provialed.
Do not use a wrench to tighten or loosen the chuck
jaws.
• Remove drillbit from chuck jaws.
DRILLING
•
Secure the materialto be drilled in a vise or with
clamps to keep it from turningas the drillbit rotates.
•
Plug your drill into power supply source.
•
Hold your drill firmly and place the bit at the point to
be drilled.
•
Depress the switch trigger to start your drill. Do not
lock the switchon for jobs where your drillmay
need to be stopped suddenly.
•
Move the drillbit intoworkpiece applyingonly
enough pressure to keep the bit cutting.Do not
force your drillor apply side pressure to elongate a
hole. Let your drilland bit do the work.
See Figure8.
/
When drilling hard, smooth surfaces use a center
punch to mark desired hole location.This will prevent
the drill bitfrom slippingoff center as the hole is
started.
,_
When drillingmetals, use a light oil on the drillbit to
keep it from overheating.The oil will prolongthe life of
the bit and increase the drillingaction.
Fig.
•
WARNING: Be prepared for bindingor bit
breakthrough.When these situationsoccur, ddll
has a tendency to grab and kick oppositeto the
directionof rotationand could cause loss of
controlwhen breaking through material If not
prepared, this loss of controlcan result in
possibleserious injury.
Depressand release the switch tdgger to be sure
your ddll is in off position before connectingit to
power supply.
If the bit jams in workpiece or if the drillstalls, stop the
tool immediately. Remove the bit from the workpiece
and determine the reason for jamming.
• Check the directionof rotationlever for correct
setting(forward or reverse). See Figure 3.
10
CHUCKREMOVAL
•
See Figures 9, 10, and 1 I.
The chuck must be removed in order to use some
accessories. To remove:
•
Insert hex key wrench in chuck and tighten chuck
jaws securely. Tap sharply with a mallet in a
countemlockwisedirection.This will loosen chuck
on the spindle. It can now be unscrewed by hand.
See Figure 11.
Unplug your drill.
_k
WARNING: Failure to unplug your drillcould
result in accidental starting causing serious
injury.
•
Open chuckjaws. Insert a 5/16 inch or larger hex key
wrench (allen wrench) into the chuck of your drill and
tightenthe chuckjaws securely.
•
Tap the hex key wrench sharply with a mallet in a
clockwisedirection.See Figure 9. This will loosen
the screw in the chuck for easy removal.
MALLET
CHUCK
Fig. 11
TO RETIGHTEN
A LOOSE CHUCK
The chuck may become loose on spindleand develop
a wobble. Also, the chuck screw may become loose
causing the chuck jaws to bind and preventthem from
closing. To tighten, follow these steps:
HEXKEY
WRENCH
•
Fig. 9
• Open chuck jaws and remove hex key wrench.
Remove the chuck screw by turning it in a clockwise direction.See Figure 10.
Note: The screw has left hand threads.
_k
•
Unplug your drill.
WARNING: Failure to unplug your drillcould
result in accidental starting causing serious
injury.
Insert hex key wrench into chuck and tighten chuck
jaws securely. Tap hex key wrench sharply with a
mallet in a clockwisedirection.This willtighten
chuck on the spindle.
• Open the chuck jaws and remove hex key wrench.
• Tighten the chuck screw.
Note: The chuck screw has left hand threads.
Fig. 10
11
_k
WARNING: When servicing, use only identical
replacement pads. Use of any other part may
create a hazard or cause productdamage.
GENERAL
Only the parts shown on parts list, page 13, are
intendedto be repaired or replaced by the customer.
All other parts represent an importantpart of the
double insulationsystem and should be serviced only
by a qualified Sears service technician.
Avoid using solventswhen cleaning plasticpads.
Most plasticsare susceptibleto damage from various
types of commercial solventsand may be damaged
by their use. Use clean clothsto remove dirt, carbon
dust, etc.
,_
LUBRICATION
All of the bearings in this tool are lubricatedwith a
sufficientamount of high grade lubricantfor the life of
the unit under normal operating conditions.Therefore,
no further lubricationis required.
EXTENSION
The use of any extension cord will cause some loss of
power. To keep the loss to a minimum and to prevent
tool overheating, use an extension cord that is heavy
enough to carry the current the tool will drew.
A wire gage size (A.W.G.) of at least 16 is
recommendedfor an extension cord tO0 feet or less
in length. When workingoutdoors,use an extension
cord that is suitable for outdooruse. The cord's jacket
will be marked WA.
WARNING: Do not at any time let brake fluids,
gasoline, petroleum-based products, penetrating
oils, etc. come in contactwith plastic parts. They
contain chemicalsthat can damage, weaken or
destroyplastic.
_k
CAUTION: Keep extension cordsaway from the
ddllingarea and positionthe cord so that it will
not get caught on lumber, tools, etc., dudng
ddllingoperation.
WARNING: Check extension cords before each
use. If damaged, replace immediately.Never use
tool with a damaged cord since touchingthe
damaged area could cause electrical shock
resulting in serious injury.
It has been found that electrictools are subject to
accelerated wear and possiblepremature failure when
they are used on fiberglassboats, sports cars,
wallboard,spackling compounds,or plaster. The
chips and grindingsfrom these materialsare highly
abrasive to electdc tool parts such as bearings,
brushes, commutators,etc. Consequently, it is not
recommended that this tool be used for extended
work on any fiberglass material, wallboard, spackling
compounds,or plaster. During any use on these
materials it is extremely importantthat the tool is
cleaned frequently by blowingwith an air jet.
_,
CORDS
Extensioncords suitablefor usewithyourdrillareavailable
at your nearest Sears Retail Store.
WARNING: Always wear safety gogglesor
safety glasses with side shields during power
tool operation or when blowing dust. If operation
is dusty, also wear a dust mask.
12
COMPANION
112 in. ELECTRIC DRILL - MODEL NO. 315.101000
I
I
J
The model
number
in all
numberwillbe
correspondence
foundregardingyour
on a plate attachedto
1/2 In. the
DRILL
motorhousing.Always
or when orderingrepair
mention
paris,
the model
SEE BACK PAGE FOR PARTS ORDERING
|
INSTRUCTIONS
5
6
PARTS LIST
KEY
NO.
PART
NUMBER
DESCRIPTION
1
972895-002
AuxiliaryHandle ................................................................................
2
613150-003
3
973869-001
4
981179-001
Data Plate ..........................................................................................
1
5
981181-001
Logo Plate .........................................................................................
1
6
606858-001
Chuck Key .........................................................................................
Owner's Manual
1
972000-630
QUAN.
1
* Screw (5/16-24 x 7/8 in. Fil. Hd, Left Hand) ...................................... 1
1/2 in, Chuck ..................................................................................... 1
NOTE "A": The assembly shown represents an important part of the double Insulated system. To
avoid the possibility of alteration or damage to the system, service should be performed by your
nearest Sears Repair Center. Contact your nearest Sears Retail Store for Service Center information.
* Standard Hardware Item -- May Be Purchased Locally
13
For in-home
major brand repair service:
Call 24 hours a day, 7 days a week
1-800-4-MY-HOME
Para pedir servicio
de reparacibn
s" (1-800-469-4663)
a domicilio
- 1-800-676-5811
In Canada for all your service and parts needs call - 1-800-665-4455
Au Canada pour tout le service ou les pi_ces
For the repair or replacement
parts you need:
Call 6 am - 11 pm CST, 7 days a week
PartsDirects.
1-800-366-PART
Para ordenar
For the location
(1-800-366-7278)
piezas con entrega a domicilio
- 1-800-659-7084
of a Sears Parts and Repair Center in your area:
Call 24 hours a day, 7 days a week
1-800-488-1222
For information on purchasing a Sears Maintenance Agreement
or to inquire about an existing Agreement:
:
Call 9 am - 5 pm, Monday - Saturday
1-800-827-6655
The Service Side of Sears