1
ECOWATER SYSTEMS
Countertop
Water Filter With Monitor
Model
Installation
CWF
& Operating
Manual
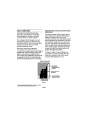
ECOWATER PARTS UST:
10 - ADAPTER KIT
TO FAUCET
t
TO DIVERTER
1
Housing
2
3
Housing O-ring
Filter, model RCCWF
4
Faucet
5
Dlverter Gasket (1_o included)
6
Diverter & Tubing Assembly
7
Base Assembly
8
9
Battery Door (not shown)
AAA Batteries Included, not
Installed, 2 necessary (not shown)
10
Adaptor
Kit
INTRODUCTION
Thank you for purchasing your new
EcoWater Countertop
Water Filter with
Monitor, an advanced
filtration system
combined with state-of-the-art
electronic capacity monitoring.
Your new
system
was designed
convenient,
portable,
water filter for today's
grated
meter
filter life,
6
Figure
1
Pogel
provides
to be a
yet highly capable
needs. Its inteinformation
on
Second Staae: Advanced
ABOUT YOUR SYSTEM
Your new Countertop
Water Filter
features
a combinafion
of filtration
technologies
to reduce
contaminants
supply2
The following
technologies
are combined
in the unique
muftFfunotlonal
EcoWater
RCCWF which
reduces
lead,
taste and odor to give you clear
sparkling
drinking
water:
First Stage:
Mechanical
Filtration
A melt blown polypropylene
outer sleeve
prefilters all water flowing through your
system, reducing rust, sediment and
other debris. This prefiltratlon significantly
Increases the life of the carbon block,
therefore extending the life of the Filter.
Thank you again for purchasing your
EcoWater Countertop Water Filter. We
hope you will enjoy It as much as we
enjoyed developing
if for you,
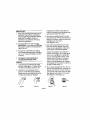
Filter Cutaway
polypropylene
prefllter
water flow Into
the filter
carbon
filtered water
to the faucet
Figure 2
I 5_
p_-_'CI
2 ATS_ Is a ti_a_ll
Oota _eet
_
ot tt_
_
_fIc
IEngelna_
cOntamlnanf
Block
The second stage utilizes carbon block
technology
and a special ATS2Sorbent
Media to reduce taste and odors,
chlorine and lead, The activated carbon
block provides high adsorptive capacity
and extreme uniformity at an economical cost. ATSutilizes a proprietary formulation to selectively reduce soluble lead
from water supplies. Its speed and high
capacity make it an Ideal media for a
single cartridge filter system.
unwanted
In a water
Carbon
r_Mor_
Co_a_cn.
Page 2
block
molded into battery compartment,
Failure to properly InstaLlbatteries can
seriously damage the system,
PRECAUTIONS:
1. Read the following precautions and
Installation instructions completely
before beginning InstaUatlon. Please
note that this system should be
Installed In accordance
with local
laws and regulations.
2, This water filter is for use on COLD
_._,
Hot water may damage
the system. Maximum temperature
Is
100° F (38 ° C).
3,
4,
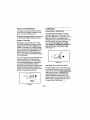
STARTUP
Thread
the Dlverter
faucet
"hand-tight*
proper
B.
2. Install the 2 AAA batteries In the
bottom of the Filter Base assembly,
Please note how batteries are to be
insta{led by looking at diagram
Figure 3
the protective
foam wrap
diverter.
Please note that
Valve
only,
onto
the
(See Figure
B.) Do not overtlghten!
Overtlghtening can damage
the threads.
If the
dlverter
will not thread on properly,
use the thin gasket, If the Diverter
Valve is not compatible,
an Adapter
and Gasket Kit is provided
to obtain
This system must be installed
on
mlcrabloloaicallv
safe water.
1, Compare box contents with major
par_s list. [See Figure 1.) Please Note:
The Filter is installed, ready for use.
Remove
from the
there are two gaskets provided
with
the dlverter.
Use the thick gasket.
3, Protect the water filter and tubing
from freezing temperatures.
Failure to
do so can cause damage and void
warranty.
4.
Remove the existing faucet aerator
by unscrewing, if the faucet aerator Is
difficu[t to remove, a pair of pliers with
padded Jaws may work.
(See Figures 3 & 4.)
fit, (See
Figure
To run water through
the filter, turn on
the COLD WATER faucet
and slide the
dlverter mechanism.
To stop the flow,
turn off the cold water faucet
or slide
the diverter
mechanism
in the opposite direction.
[See Figure 6,)
Figure
Figure 4
Page 3
a
1.)
5
Figure
6
FLUSHING THEFILTER
Screen 1: Caoacltv
On initial
start
up or aftera Filter
change,
turnthe water on and rinsethe Filter
for5
mlnutes to remove carbon finesand
expel excess air.
This display mode shows the remaining
capacity of your filter in gallons, (see
figure 7), in this case 500 gallons,
For best results, after setting over night or
after several hours of non-use, turn the
system on and rinse the filter for 15
seconds before using.
You are now ready to enjoy your
EcoWater Countertop Water Filter.
NORMAL OPERATION
Remalnina
The unit of measure is either galtons or
liters, depending
on the programming
at
the factory. The water drops at the
bottom of the screen graphically show
how much of the capacity of your filter
remains, much like a fuel gauge. By
pressing the display button you can
move on to the next display mode,
Months Remaining,
System performance and reduction of
contaminants
Isdetermined by proper
flow rote. This unit as tested under ANSI/
NSF Standards 53 & 42 must be used at a
flow rate no greater than 0.75 gpm.
Exceeding this flow rate will affect the
ability of the system to reduce contaminant levels.
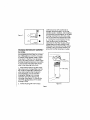
WATERMETEROPERATION SECTION
DISPLAY /
BUTTON
Figure 7
Your Countertop Water Filter comes with
a digital meter that shows you how
much filter fife is left at any given time. To
preserve battery life the display is only
acltvated when you draw water through
the tilter or press the "Display* button.
There are three informational
screens
that can be viewed by pressing the
display button.
Figure8
Page 4
Screen 2: Months Remainlna
ALARM MODES
This display mode shows the remaining
capacity
of your filter In months, In this
case, 6 months. (See figure 8.)
Advisory
Bypressing
thedisplay
button
youcon move
on tothenextdlsplay
mode, FlowRate.
Screen 3: Flow Rate
This display mode shows you at what
rate water Isflowing through your filter.
(See figure 9,) This unit Is designed and
tested to operate at 0.75 gpm through
the use of an Internal flow restrlctor that
Isdependant upon water pressure.
As
sllght
variations
Inwater pressuremay
occur,your displaymay flicker
between
0.7and 0.8gpm.
The drawing shows that water Isflowing
through your filter at 0.7 gallons per
minute. (See figure 9.) The water drop
scrolls along the gauge at the bottom
as a second Indicator that water Is
flowing through your filter and the water
meter is working properly. Pushing the
display button again would return you to
Screen 1-Capacity Remaining.
Beep
- 50 gallons
left
The water meter will alert you with an
advisory beep when there is less than
60 gallons (200 liters) of capacity remainIng In your filter. It Is a slnale advisory
beep that sounds every 5 seconds when
you draw water, and only when you
draw water. We suggest you contact
your supplier for a replacement filter as
soon as you hear the advisory beep.
(See figure 10.)
W_
O
"
, ooooooooj0
Figure I0
Alarm Beep - Filter
capacity e_austed
The alarm beep sounds when the capacit,/of your filter has been exhausted.
The
water meter will sound three aulck heeds
when water is drawn. The display will
alternate
between
"CHANGE
FILTER 1*
DISPLAY I
BUTTON
and the previous
screen viewed.
The
display will continue
to aflemate
until the
filter has been changed
and the meter
has been reset. (See figure 11 .)
Figure 9
Page 6
beep
beep
bee_
Figure
1}
oi"
i/_.
°I ....1.
CHANGING THE FILTERAND SANITIZING
water
sponge.
and
scrub
with
a soft brush
Rinse thoroughly.
Do not
or
use
abrasive
pads or cleaners.
Add 2 capfuls
of unscented
chlorine
bleach
to the Filter
Housing and fill 2/3 full with cold
Do not vet install the reolacement
water.
Filter,
3. Leaving the chlorine solution in the
Filter Housing screw the Filter Base
assembly into the Filter Housing. When
reassembling the Filter Housing to the
Filter Base it is Important that the rubber
Housing O-Ring is properly seated in its
groove in the Filter Housing or a water
THE SYSTEM
The EcoWater RCCWF Filter has a rated
life of 500 gallons or 6 months, however
in certain water supplies, taste or odors
may return or the flow may decrease
prior to its rated capaclW, In these cases
the Filter should be replaced more often.
To remove the exhausted Filter please
refer to the following Instructions'.
---
I. There well be water in the Filter Housing so be sure to change filters over the
sink. Hold the water filter upside down
when removing the Filter Housing to
reduce spillage. Unscrew the Filter
Housing by holding onto the base
assembly and turning the housing
clockwise. (See Figure 12,) Discard the
used Filter, _
discard the rubber
Housing O-Ring.
2.
8o,_e
HousingC_r_g
--Fitter
J
:111
Fitter Housing with warm soapy
Figure 12
Page6
Housing
leak
could
occur.
Place
the Housing
Base right side-up with the Faucet
pointing
Into the sink, Allow to stand
1B minutes.
4.
After
solution
15 minutes,
from
and
for
rinse the chlorine
the Housing
and
Base by
tumtng
on the COLD WATER faucet
and
sliding the dlverter
mechanism,
The
system will be adequately
rinsed when
no chlorine
smell is present, Shut-oft the
cold water.
RESETTINGTHEWATERMETER
CAUTION: After changing the filter you
must reset your meter to monitor the life
of your new filter. IT ISVERY IMPORTANT
TO USETHESAME KIND OF FILTERSTHAT
WERE SHIPPED WITH YOUR SYSTEM.THE
VALUESTHAT ARE PROGRAMMED INTO
THE WATER METERAPPLY ONLY TO THE
SYSTEMMANUFACTURER'S FILTER.
TO RESETTHE METER:
5. Again, hold the filter upside down,
unscrew the Filter Housing by turning .
clockwise and empty.
WARNING: Resetting the meter is
[E.e_Y_.
Please read the following
instructions carefully.
6,
Depress
Remove
the plastic
wrap
and
label
from the replacement
Filter and place it
In the Filter Housing so that the end with
the Cartridge
O-Rings is facing outward
(toward
the base). Make sure that the
and
hold
the reset
button
until
"RESET?
FILTER 1" appears
(2 seconds)
then release the reset button.
The
"RESET?" will be flashing.
(See Figure 13.)
Housing O-Ring is In the Filter Housing
and screw the Filter Housing onto the
Filter Base. (See Figure 12,)
7, Place the Filter System right side-up
with the Faucet pointing into the sink.
Rinse the Filter System for 5 minutes to
remove carbon fines and expel excess
air, Be certain to reset the meter after
you have comDletelv rinsed the system !!
BUttON
Figure 13
Press grid hold the display button for 5
to complete the filter reset, (See
figure 14.) (Notice how the "?" disappears after RESETand it stops flashing).
You will hear a confirming beep when
the water meter has been reset. The
Page 7
water meter has been reset and has
returned to its original programmed
capacities (500 gallons, 6 months).
if you do not complete
dure successfully,
wait
and
the reset procefor 30 seconds
try again.
CHANGING THE BA'rrERIES
Under normal circumstances,
the meter
batteries should last 1-2 years, However,
if is recommended
that the bafferles be
replaced every year or when the low
battery indicator appears on the screen
("BAT"). (See Figure 15.)
1. Change the batteries
water Isturned off,
only while the
2. Turn the system upside down.
OISPLAY J
eMrfON
Figure 14
3. Open battery door on bottom
Base assembly.
of Filter
4. Remove both AAA batteries.
5.
6,
Note how batteries are to be installed
by looking at diagram molded into
battery compartment.
Failure to
properly install batteries can seriously
damage the system. Replace with
new batteries. Use only fresh baffedes.
Close battery
door.
7. Press Display to verify correct
tion.
Figure 1.5
Page 8
installa-
OPERATING PARAMETERS:
Water Pressure(rnln-rnax)
Temperature (mln-max)
pH
Iron
Manganese
Hydrogen Sulfide
Turbidity
Bacteria _
15 psi- I(30psl
40°F - 100°F
6,5 - 8,5
0 ppm - 0.3 ppm
0 ppm - 0.05 ppm
None
Less than 5 NTU
Must be potable
103 kPa - 690 kPa
4°C - 38°C
6,5 - 8.5
0 rngL - 0.3 rngL
0 mgL - 0,05 mgL
None
Less than 5 NTU
Must be potable
PLEASENOTE:
This System contains a replaceable Filter, model number RCCWF, which must be
replaced at regular Intervals to maintain proper performance. Use only factory
approved filters. For parts or service, please contact the outlet where your unit was
purchased or contact EeoWater at 1-800-86WATER (1-800-869-2837) or at the address
below.
qhe _CCWF C_rt_Ige
does not flite¢ or _JHbocterla _
vl_e_
do not _e thl_ _y3tem wlth water that
uns_:;fe or with water of unknov_n quality wlthou t adequate
_nfectlon
before or ati_" the _ystem.
i_ mlcr o blolOglcally
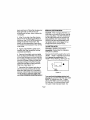
Thls ddnklng water system conforms to ANSI/NSF Std, 53 for Lead and Turbldity reduction and ANSIINSF Std 42
for Chlorine (Class I) and Taste ar_l Odor €eduction as verlfled and substantfate_ by test data, Fo_ conditions
of use, health claims certified by the Cotlfornla Department
or Health Services, and replacement
parts, see
product data sheet. Cartfc_nla Dept. of Health Certlflcate Number 97-1311
Caution: Do net use wlth water that I_ microblologlcaily
unsafe or of unknown quallt¥ without adequate
disinfection
before or offer the system.
EcoWater
Systems
PO Box 64420, St. Paul, MN 55164
1-800-869-2837
Page 9