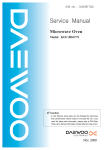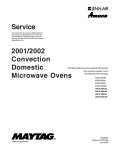
1
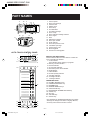
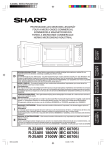
A40085 SEEG R25AT O/M
PROFESSIONELLES MIKROWELLENGERÄT
FOUR A MICRO-ONDES COMMERCIAL
KOMMERCIËLE MAGNETRONOVEN
FORNO A MICROONDE COMMERCIALE
HORNO MICROONDAS INDUSTRIAL
DEF CHECK POWER
D
Die Nichtbeachtung der Gebrauchs- und Serviceanweisungen sowie jeglicher Eingriff, der das Betreiben des
Gerätes in geöffnetem Zustand (z.B. geöffnetes Gehäuse) erlaubt, führt zu erheblichen Gesundheitsschäden.
Dieses Gerät entspricht den Anforderungen der EG-Richtlinien 89/336/EWG und 73/23/EWG mit Änderung 93/68/
EWG. SERVICEABWICKLUNG FÜR DEUTSCHLAND, siehe Seite XX.
MODE D´EMPLOI - Ce mode d´emploi du four contient des informations importantes, que vous devez lire
avant d´utiliser votre four à micro–ondes.
F
Avertissement:
Des risques sérieux pour la santé peuvent être encourus si ces instructions d'utilisation et d'entretien en sont pas
respectées ou si le four est modifié de sorte qu'il soit possible de le faire fonctionner lorsque la porte est ouverte.
Ce matériel répond aux exigences contenues dans les directives 89/336/CEE et 73/23/CEE modifiées par la directive
93/68/CEE.
GEBRUIKSAANWIJZING - Deze gebruiksaanwijzing bevat belangrijke informatie die u dient te lezen alvorens
Seite1/D-1
Inbetriebnahme des Gerätes unbedingt sorgfältig durchlesen sollten.
Achtung:
DEUTSCH
BEDIENUNGSANLEITUNG - Diese Bedienungsanleitung enthält wichtige Informationen, welche Sie vor
Page19/F-1
%
FRANÇAIS
DOUBLE FILTER
Bladzijde37/NL-1
ON 1 2 3
NEDERLANDS
NUMBER
u de oven in gebruik neemt.
I
La mancata osservanza di queste istruzioni sull'uso e sulla manutenzione del forno, o l'alterazione del forno che
ne permetta l'uso a sportello aperto, possono costituire un grave pericolo per la vostra salute.
Quest' apparecchio è conforme ai requisiti delle direttive 89/336/EEC e 73/23/EEC, come emendata dalla direttiva
93/68/EEC.
MANUAL DE INSTRUCCIONES - Este manual contiene información muy importante que debe leer antes de
utilizar el horno.
E
Advertencia:
Pueden presentarse serios riesgos para su sa-lud si no respeta estas instrucciones de uso y mantenimiento, o si
el horno se modifica de forma que pueda ponerse en funcionamiento con la puerta abierta.
Este aparato satisface las exigencias de las-Directivas 89/336/CEE y 73/23/CEE, modificadas por medio de la 93/68/
CEE.
R-23AT 1800W(IEC 60705)
R-25AT 2100W(IEC 60705)
SEEG R23AT,cover
1
03.7.24, 0:05 PM
ITALIANO
usare il forno.
Avvertenza:
Pagina55/I-1
MANUALE D’ISTRUZIONI - Questo manuale contiene informazioni importanti, che dovete leggere prima di
ESPAÑOL
Het niet naleven van de gebruiks- en onder- houdsvoorschriften evenals elke ingreep die het mogelijk maakt dat het
toestel in niet-gesloten toestand in werking kan gesteld worden, kan leiden tot ernstige gezondheidsletsels.
Dit apparaat voldoet aan de eisen van de richtlijnen 89/336/EEG en 73/23/EEG, gewijzigd door 93/68/EEG.
Página73/E-1
NL
Waarschuwing:
A40085 SEEG R25AT O/M
PART NAMES ............................................. 2, 3
IMPORTANT SAFETY INSTRUCTIONS ......... 1
INSTALLATION INSTRUCTIONS .................... 3
ACCESSORIES ............................................... 3
SHORT DESCRIPTION OF FEATURES ......... 4
BEFORE OPERATION .................................... 4
PROGRAMME OPERATION ........................... 5
MANUAL OPERATION ....................................... 8
OTHER CONVENIENT FEATURES ................. 11
CARE AND CLEANING .................................... 13
SERVICE CALL CHECK .................................. 14
GUIDE .............................................................. 15
SPECIFICATIONS ............................................ 18
1
SEEG R23AT Eng,cover
1
03.7.16, 2:53 PM
A40085 SEEG R25AT O/M
PART NAMES
OVEN
11
10
5
1
2
3
4
5
6
7
8
9
10
11
12
13
14
15
16
17
18
19
4 3 2
1
8
13
12
19
9
7
18
6
14
17
15
16
Control panel
Door lock openings
Ceramic floor
Splash cover
Oven lamp
Air intake filter
Air intake openings
Oven cavity
Door seals and sealing surfaces
Door hinges
Door
Safety door latches
Door open handle
Outer cabinet
Oven lamp access cover
Ventilation openings
Power supply cord
Mounting plate
Screw for mounting plate
AUTO-TOUCH CONTROL PANEL
3
6
DISPLAY AND INDICATORS
Check indicators after the oven starts to confirm the
oven is operating as desired.
1 Cook indicator
This indicator shows cooking in progress.
2 Memory number indicator
3 Defrost indicator
4 Check mode indicator
5 Microwave power level indicator
6 Digital display
7 Filter indicator
8 Double quantity indicator
9 3rd stage indicator
10 2nd stage indicator
11 1st stage indicator
DEF CHECK POWER
NUMBER
2
1
4
ON 1 2 3
DOUBLE FILTER
11
10
%
5
7
8
9
13
12
OPERATING KEYS
12 DOUBLE QUANTITY key
13 EXPRESS DEFROST key
14 NUMBER keys
15 MANUAL/REPEAT keys
16 STOP/CLEAR key
17 MICROWAVE POWER SETTING key
18 START key
19 SET key
20 VOLUME key
21 CHECK key
14
15
16
17
18
19
20
21
SEEG R23AT Eng,cover
2
* The illustration of OPERATING KEYS is for R-23AT.
Although the design for R-25AT is slightly different,
each key name and the function is same.
2 2/ 3
03.7.16, 2:53 PM
A40085 SEEG R25AT O/M
IMPORTANT SAFETY INSTRUCTIONS
IMPORTANT SAFETY INSTRUCTIONS: READ CAREFULLY AND KEEP FOR FUTURE REFERENCE
To avoid the danger of fire
21. See the corresponding hints in this operation manual
and in the attached cookery book section.
1. The microwave ovens should not be left
unattended during operation. Power levels that
are too high or cooking times that are too long
may overheat foods resulting in a fire.
2. This oven is not designed to be built-in to a wall or
cabinet.
3. The electrical outlet must be readily accesible so
that the unit can be unplugged easily in an
emergency.
4. The AC power supply must be 230V, 50Hz, with a
minimum 16A distribution line fuse, or a minimum
16A distribution circuit breaker. In using two ovens,
each oven must be secured with a 16A distribution
line fuse or a distribution circuit breaker.
5. A separate circuit serving only this appliance should
be provided.
6. Do not place the oven in areas where heat is
generated. For example, close to a conventional
oven.
7. Do not install the oven in an area of high humidity
or where moistrure may collect.
8. Do not store or use the oven outdoors.
9. If smoke is observed, switch off or unplug the
oven and keep the door closed in order to stifle
any flames.
10. Use only microwave-safe containers and
utensils. See "GUIDE" on page 15. Utensils
should be checked to ensure that they are
suitable for use in microwave ovens.
11. When heating food in plastic or paper
containers, keep an eye on the oven due to the
possibility of ignition.
12. Clean the splash cover and the oven cavity
after use. These must be dry and free from
grease. Built-up grease may overheat and begin
to smoke or catch fire.
13. Do not place flammable materials near the oven or
ventilation openings.
14. Do not block the ventilation openings.
15. Remove all metalic seals, wire twists, etc., from
food and food packages. Arcing on metallic surfaces
may cause a fire.
16. Do not use the microwave oven to fry with oil or
heat oil for deep frying. The temperature can not
be controlled and the oil catch fire.
17. To make popcorn, use only special microwave
makers.
18. Do not store food or any other items inside the oven.
19. Check the settings after you start the oven to
ensure the oven is operating as desired.
20. To avoid overheating and fire, special care must
be taken when cooking or reheating foods with a
high sugar or fat content, for example, Sausage
rolls, Pies or Christmas pudding.
To avoid the possibility of injury
WARNING:
1. Do not operate the oven if it is damaged or
malfunctioning. Check the following before use:
a) The door; make sure the door closes properly
and ensure it is not misaligned or warped.
b) The hinges and safety door latches; check to
make sure they are not broken or loose.
c) The door seals and sealing surfaces; ensure
that they have not been damaged.
d) Inside the oven cavity or on the door; make sure
there are no dents.
e) The power supply cord and plug; ensure that
they are not damaged.
2. If the door or door seals are damaged, the oven
must not be operated until it has been repaired by
a competent person.
3. Never adjust , repair or modify the oven yourself.
It is hazardous for anyone other than a
competent person to carry out any service or
repair operation which involves the removal of
a cover which gives protection against exposure
to microwave energy.
4. Do not operate the oven with the door open or alter
the safety door latches in any way.
5. Do not operate the oven if there is an object between
the door seals and sealing surfaces.
6. Do not allow grease or dirt to build up on the door
seals and adjacent parts. Follow instructions for
“Care and Cleaning”, Page 14.
7. Individuals with PACEMAKERS should check with
their doctor or the manufacturer of the pacemaker
for precautions regarding microwave ovens.
To avoid the possibility of electric shock
1. Under no circumstances should you remove the
outer cabinet.
2. Never spill or insert any objects into the door lock
openings or ventilation openings. In the event of a
spill, turn off and unplug the oven immediately, and
call a SHARP service agent.
3. Do not immerse the power supply cord or plug in
water or any other liquid.
4. Do not let the power supply cord hang over the
edge of a table or work surfaces.
5. Keep the power supply cord away from heated
surfaces, particularly the back of the oven.
6. Unplug the oven before replacting the oven lamp
(25W/230V).
7. If the power supply cord of this appliance is
damaged, it must be replaced with a special cord.
The exchange must be made by an authorized
SHARP service agent.
1
SEEG R23AT Eng,P01-03
1
03.7.16, 2:54 PM
A40085 SEEG R25AT O/M
To avoid the possibility of explosion
and sudden boiling
6. Slice stuffed baked foods after heating to release
steam and avoid burns.
7. Keep children away from the door to prevent them
burning themselves.
8. Do not touch the back of the oven because it will
become hot.
WARNING:
1. Liquids and other foods must not be heated in
sealed containers since they are liable to explode.
2. Microwave heating of beverages can result in
delayed eruptive boiling,therefore care must
be taken when handling the container.
3. Never use sealed containers. Remove seals and
lids before use. Sealed containers can explode
due to a build up of pressure even after the oven
has been turned off.
4. Take care when microwaving liquids. Use a widemouthed container to allow bubbles to escape.
Never heat liquids in narrow necked containers
such as baby bottles, as this may result in the
contents erupting from the container when
heated and cause burns.
To prevent sudden eruption of boiling liquid and
possible scalding:
1. Do not use excessive amount of time (See
page 16).
2. Stir liquid prior to heating/reheating.
3. It is advisable to insert a glass rod or similar
utensil (not metal) into the liquid whilst reheating.
4. Let liquid stand for at least 20 seconds in the
oven at the end of cooking time to prevent
delayed eruptive boiling.
5. Do not cook eggs in their shells and whole
hard boiled eggs should not be heated in
microwave ovens since they may explode even
after microwave cooking has ended. To cook
or reheat eggs which have not been scrambled
or mixed, pierce the yolks and the whites, or
the eggs may explode. Shell and slice hard
boiled eggs before reheating them in the
microwave oven.
6. Pierce the skin on such foods as potatoes, sausages
and fruit before cooking, or they may explode.
To avoid misuse by children
1. WARNING:
Only allow children to use the oven without
supervision when adequate instructions have been
given so that the child is able to use the oven in a safe
way and understands the hazards of improper use.
2. Do not lean or swing on the oven door. Do not play
with the oven or use it as a toy. Young children
should be supervised to ensure that they do not
play with the oven.
3. Children should be taught all important safety
instructions: use of pot holders, careful removal of
food coverings; paying special attention to
packaging (e.g. self-heating materials) designed to
make food crisp, as they may be extra hot.
Other warnings
1. Never modify the oven in any way.
2. Do not move the oven while it is in operation.
3. This oven is for food preparation only and may only
be used for cooking food. It is not suitable for
laboratory use.
To promote trouble free use of your oven
and avoid damage.
1. Never operate the oven when it is empty.
Doing so may damage the oven.
2. When using a browning dish or self-heating material,
always place a heat-resistant insulator such as a
porcelain plate under it to prevent damage to the
ceramic floor due to heat stress. The preheating
time specified in the dishes instructions must not
be exceeded.
3. Do not use metal utensils, which reflect microwaves
and may cause electrical arcing. Do not put cans in
the oven.
4. Do not place anything on the outer cabinet during
operation.
To avoid the possibility of burns
1. WARNING:
The contents of feeding bottles and baby food jars
must be stirred or shaken and the temperature
checked before consumption, in order to avoid burns.
2. Use pot holders or oven gloves when removing
food from the oven to prevent burns.
3. Always open containers, popcorn makers, oven
cooking bags, etc., away from the face and hands
to avoid steam burns and eruption of boiling.
4. To avoid burns, always test food temperature
and stir before serving and pay special attention
to the temperature of food and drink given to
babies, children or the elderly.
Temperature of the container is not a true indication
of the temperature of the food or drink; always
check the food temperature.
5. Always stand back from the oven door when
opening it to avoid burns from escaping steam and
heat.
NOTE
1. If you are unsure how to connect your oven, please
consult an authorized qualified electrician.
2. Neither the manufacuture nor the dealer can accept
any liability for damage to the oven or personal
injury resulting from failure to observe the correct
electrical connection procedure.
3. Water vapour or drops may occasionally form on
the oven walls or around the door seals and sealing
surfaces. This is a normal occurrence and is not an
indication of microwave leakage or a malfunction.
2
SEEG R23AT Eng,P01-03
2
03.7.17, 5:04 PM
A40085 SEEG R25AT O/M
INSTALLATION INSTRUCTIONS
WARNING: Always keep the caution sheet (SPECIAL INSTRUCTIONS AND WARNINGS) close to the oven for
your reference.
1) Remove all packing materials from the inside of the
oven cavity. Remove all the blue protective film
from the outside of the oven.
2) Check the oven carefully for any signs of damage.
3) Place the oven on a flat, level surface strong enough
to support the oven's weight plus the heaviest item
likely to be cooked.
4) Ensure there is a minimum free space above the
oven of 25 cm.
6-6) Remove the screw (a) holding the mounting plate B
to the rear cabinet of the oven B. And remove the
mounting plate B from the oven B. See the figure A.
6-7) Install the screw (a) to its position again.
6-8) Remove the screw (c) from the oven A.
6-9) Remove the screw (d) from the oven B.
6-10) Turn the removed mounting plate B over and
then using the removed screw (c) and (d), attach
the mounting plate B, as shown in the figure A.
WARNING:
In case where two ovens are installed together by
placing one on top of another,
1) Use the two mounting plates for fixing the two
ovens.
2) Make sure that the power supply cord is not caught
between the two ovens.
3) Do not install more than one oven on top of another.
4) Do not lose the removed screws.
25 cm
5) Securely connect the plug of the oven to a standard
earthed (grounded) household electrical outlet.
6) Two ovens can be installed together by placing
Oven B
Screw (a)
one on top of another. Follow these instructions.
6-1) Place the oven A and position the oven B on top of
the oven A as shown in the figure A.
Reat Cabinet
6-2) Remove the single screw (a) holding the mounting
plate A to the rear cabinet of the oven A. And Mounting plate A
remove the mounting plate A.
Screw (b)
Screw (d)
6-3) Remove the single screw (b) from the rear cabinet
of the oven B, as shown in the figure A.
6-4) Reinstall the mounting plate A to the rear cabinet
Screw (c)
of the oven B with the single screw (b) removed, as
Screw (a)
Mounting plate B
shown in the figure A.
Oven A Rear cabinet
6-5) Hold the mounting plate A to the rear cabinet of
the oven A with the single screw (a), as shown in
the figure A.
Figure A: How to fix two ovens
ACCESSORIES
Check to make sure the following accessories are provided:
Manuals and others
• Operation manual
• Menu sticker
Enter cooking times or dish names in this sticker and attach to the control panel.
• Caution sheet (SPECIAL INSTRUCTIONS AND WARNINGS: part code TCAUHA257WRR0)
NOTE:
• When you order accessories, please mention the two items: part name and model name to your dealer or
SHARP authorized service agent.
• The model name is printed on the door of the microwave oven.
3
SEEG R23AT Eng,P01-03
3
03.7.29, 4:11 PM
A40085 SEEG R25AT O/M
SHORT DESCRIPTION OF FEATURES
Manual operation
Double quantity function:
for individual cooking and defrosting of different types
of food by setting of time and power.
by pressing double quantity key beforehand, the oven
calculates the cooking time for the double amount of
food on Memory function.
Multiple sequence cooking:
programming of 2-3 different cooking times and power
levels, running automatically.
Counter function:
Repeat cook:
Error message:
after manual operation it is possible to use same
cooking time and power level again just by pressing
manual / repeat key and then start key.
Mistakes in operation of technical problems are
displayed with an Error code.
Defrost function:
At cooking end a signal will sound. Loudness and
length can be varied.
The oven counts automatically all operations.
for well defrosting of different types of food, without
power level setting.
Memory function:
preprogrammed cooking times and power levels
(possible to change individually).
BEFORE OPERATION
*
1)
2)
3)
4)
5)
Volume and Sound Setting
Before operating your new oven, make sure you
read and understand this operation manual
completely.
Plug in the oven.
* The digital display will then show
.
You can input the keys only when the door is
closed.
Oven lamp and fan motor work for 1 minute
whenever the door is opened or after cooking.
The programme and the check are canceled when
any keys are not touched for more than 3 minutes
during programming.
will appear on the display after the timer
reaches zero. It will disappear when the oven door
is opened or the STOP/CLEAR key (
) is
touched.
There are 3 preset volume levels of 2 different-sounds
on your oven.
To set the volume and the sound, touch the SET key
(
) twice within 2 second and then touch the
) continuously until you hear
VOLUME key (
desired volume and sound.
NOTE:
1. The volume will decrease as you press the
VOLUME key (
).
After the lowest level, the volume will return to the
maximum level and the sound will change to another
one at the same time.
2. Any audible signals will not sound when the SET
key is touched first and then an audible signal will
sound when the SET key is touched second.
Using STOP/CLEAR (
) Key
Use the STOP/CLEAR key (
) to:
1. Stop the oven temporarily during cooking.
2. Erase a mistake during programming.
3. Cancel a programme during cooking by touching
twice.
4
SEEG R23AT Eng,P04-12
4
03.7.16, 2:55 PM
DEUTSCH
Accustical signal:
A40085 SEEG R25AT O/M
PROGRAMME OPERATION
This oven has 20 memory banks (1-20) which can store cooking programmes.
The memory banks 1-10 have been programmed previously as shown in the table. These preprogrammed
memory banks can be changed individually if required. Please see page 6.
In addition for all memory banks a magnification factor 1.8 for the double quantity is stored. The stored
magnification factor can also be changed individually if required. Please see page 7.
Memory No.
1
2
3
4
5
Cook Time
5
10
20
30
40
Output Power
Memory No.
100%
100%
100%
100%
100%
6
7
8
9
10
sec.
sec.
sec.
sec.
sec.
Cook Time
1
1
1
2
Output Power
50 sec.
min.
min. 15 sec.
min. 30 sec.
min.
100%
100%
100%
100%
100%
Information in these memory banks is not lost due to power interruptions. If the power goes off, the oven does not
need to be reprogrammed. No batteries are necessary for this type of memory.
To check the stored programmes, please refer to "Memory check"on page 7.
COOKING WITH MEMORY PROGRAMME
Example : Suppose you want to cook by using memory 1, which was programmed for 5 seconds at 100 %.
NUMBER
1
Choose memory number.
ON 1
POWER
%
After 1 second, the oven starts.
Check the display.
NOTE:
If you want to cook by using memory 11-20, touch the desired NUMBER key twice within 1 second.
Cooking double quantity with memory programme
Example : Suppose you want to cook 2 servings by memory 1.
NUMBER
X
2
1
Choose double quantity cooking mode. Choose memory number.
ON 1
POWER
DOUBLE
%
After 1 second, the oven starts.
Check the display
NOTE:
1. If you want to cook double quantity by using memory 11-20, touch the desired NUMBER key twice within 1
second.
2. Double quantity means best time for cooking two servings; it is not double the time.
A. The Memory cooking system does not require the use of the START key (
). Memory can not be
used to start the oven if any programme is on display.
B. If the door is opened during memory cooking, the programme is canceled.
), then
C. To stop the cooking of a memory key and then restart, first, touch the STOP/CLEAR key (
).
open the door, check food, close door and touch START key (
D. If the memorized time exceeds a maximum time for double quantity cooking, the display will show
"EE9"and stop.You can use the memory for 1 serving cooking only. See page 8 about the maximum time.
5
SEEG R23AT Eng,P04-12
5
03.7.16, 2:55 PM
A40085 SEEG R25AT O/M
MEMORY SETTING
You can change memory programmes for 20 memory banks. Up to three sequences on any power level can be
programmed for each memory. See cooking sequence chart on page 8 for time maximums.
Setting time and power level
Example : Suppose you want to set 4 minutes at 60 % for the 1st sequence and 2 minutes at 30 % for the 2nd
sequence for 1 serving in the memory 1.
Step
1
Press key
Action
Choose set mode.
Display
within 2 sec.
2
NUMBER
X2
NUMBER will flash on and off.
Choose memory number.
NUMBER
3
DEUTSCH
1
Touch MANUAL/REPEAT key.
1
4
5
Enter desired cooking time for 1st
sequence.
NUMBER
4 0 0
1
Touch MICROWAVE POWER SETTING
key.
NUMBER
POWER
%
1
POWER will flash on and off.
6
Choose desired power level for 1st
sequence.
NUMBER
6
POWER
%
1
7
Touch MANUAL/REPEAT key.
NUMBER
2
8
Enter desired cooking time for 2nd
sequence.
NUMBER
2 0 0
2
9
Touch MICROWAVE POWER SETTING
key.
NUMBER
POWER
2
%
POWER will flash on and off.
10
Choose desired power level for 2nd
sequence.
NUMBER
3
POWER
2
11
Complete memorizing.
%
X2
NOTE:
1. If you want to set memory 11-20, touch the desired NUMBER key twice. Ex. 11= 1 X 2, 12= 2 X 2...
2. If 100% is required, it is not necessary to set the microwave power.
3. If the cooking time exceeds the max. time, the display will show EE9.
4. At Step1, any audible signals will not sound when the SET key is touched first and then an audible signal will
sound when the SET key is touched second.
6
SEEG R23AT Eng,P04-12
6
03.7.16, 2:55 PM
A40085 SEEG R25AT O/M
Setting magnification factor
It is possible to change the magnification factor for double quantity in the memory.
Example : Suppose you want to set the magnification factor to 1.67 for double quantity in memory 1.
Step
1
Action
Press key
Choose set mode.
Display
X2
NUMBER
within 2 sec.
2
Choose double quantity.
X
NUMBER
2
DOUBLE
3
Choose memory number.
NUMBER
1
4
DOUBLE
Touch MANUAL/REPEAT key.
NUMBER
DOUBLE
5
Enter magnification factor.
NUMBER
1 6 7
6
DOUBLE
Complete memorizing.
X2
NOTE:
1. In case you want to change the magnification factor it must be set for each key separately.
2. The magnification factor can be set from 0.00 to 9.99.
3. At Step 1, any audible signals will not sound when the SET key is touched first and then an audible signal will
sound when the SET key is touched second.
MEMORY CHECK
You can check the information programmed into the memory.
Checking time and power level
Example : Suppose you want to know the information programmed into the memory 1, programmed for 4 minutes
at 60% at the 1st sequence and 2 minutes at 30 % at the 2nd sequence, and after that the memory 13,
programmed for 3 minutes at 70 %.
Step
Action
Press key
Display
1
Choose checking mode.
NUMBER
CHECK
2
Choose memory number.
NUMBER
CHECK POWER
1
%
1
CHECK POWER
NUMBER
2
%
Repeat
3
Choose memory number.
3
4
X2
1
Cancel checking mode.
NOTE:
When
is displayed at step 2 or step 3, the memory is not set.
7
SEEG R23AT Eng,P04-12
7
CHECK POWER
NUMBER
03.7.29, 4:24 PM
%
A40085 SEEG R25AT O/M
Checking the magnification factor
Example : Suppose you want to know the magnification factor for double quantity in memory 1, programmed
1.67.
Action
Step
1
Choose checking mode.
2
Choose double quantity.
Press Key
X
Display
NUMBER
CHECK
NUMBER
CHECK
2
DOUBLE
Choose memory number.
CHECK
NUMBER
1
DEUTSCH
3
DOUBLE
4
Cancel checking mode.
NOTE:
Magnification factor 1.80 for the double quantity is stored in all memories previously.
MANUAL OPERATION
Your oven can be programmed for up to 3 cooking stages and has 11 preset microwave power levels.
Cooking
Sequence
1 Stage only
Cooking time that can be used
R-25AT
R-23AT
Microwave power level
that can be used
0-40 %
Max. 30 minutes
Max. 30 minutes
50-100 %
Max. 30 minutes
Max. 15 minutes
0-40 %
Max. 30 minutes any stage.
Max. 60 minutes for two stages.
Max. 90 minutes for three stages.
Max. 30 minutes for three stages.
Max. 30 minutes any
stage.
Max. 30 minutes in total.
2 or 3 Stages
50-100 %
Max. 15 minutes any stage.
Max. 15 minutes in total.
NOTE:
)
If the time you set exceeds a maximum time, the display will show "EE 9". Touch STOP/CLEAR key (
and enter appropriate time.
This model has 11 power levels. Use correct number pad after touching MICROWAVE POWER SETTING key
(
).
Microwave Power
level
100% 90% 80% 70% 60% 50% 40% 30% 20% 10%
9
Number keys
8
7
6
5
4
3
8
SEEG R23AT Eng,P04-12
8
03.7.29, 4:37 PM
2
1
0%
0
A40085 SEEG R25AT O/M
TIME COOKING
Example : Suppose you want to cook for 2 minutes and 30 seconds at 50 %.
2
Choose the manual cooking.
3
0
Touch MICROWAVE POWER
SETTING key.
Enter desired cooking time.
POWER
5
%
ON 1
Choose desired power level.
Check the display.
Start to cook.
NOTE:
1. It is not necessary to touch MICROWAVE POWER SETTING key (
) for 100 %.
2. During the cooking, the oven will stop when the door is opened. To restart the cooking, close the door
and press the START key (
). If the START key (
) is not touched within 1 minute after closing
the door, the programme will be cancelled.
3. If the time you set exceeds a maximum time, the display will show "EE 9".
) and enter appropriate time.
Touch STOP/CLEAR key (
MULTIPLE SEQUENCE COOKING
Example : Suppose you want to cook for 5 minutes at 70 % and then continue to cook for 20 minutes at 30 %.
5
Choose the manual cooking.
0
0
Enter desired cooking
time for the 1st stage.
7
Touch MICROWAVE POWER
SETTING key.
2
0
0
0
Choose desired power Touch MANUAL/REPEAT key. Enter desired cooking time for the 2nd stage.
level for the 1st stage.
POWER
3
%
ON 1
Touch MICROWAVE
Enter desired power level
POWER SETTING key. for the 2nd stage.
Start to cook.
Check the display.
NOTE:
) for 100 %.
1. It is not necessary to touch MICROWAVE POWER SETTING key (
2. When you press START pad, the display will show the total cooking time.
3. During cooking mode, the oven stops when the door is opened, and the programme is canceled if the START
key (
) is not touched within 1 minute after the door is closed.
4. If the time you set exceeds a maximum time,the display will show "EE 9".
) and enter appropriate time.
Touch STOP/CLEAR key (
REPEAT COOK
Your oven can remember the last manual programme.
Example : Suppose you want to cook with the last programme, which is programmed for 2 minutes and 30
seconds at 50 %.
POWER
1
Choose the repeat cook.
POWER
%
ON 1
Start to cook.
Check the last programme.
9
SEEG R23AT Eng,P04-12
9
03.7.16, 2:55 PM
Check the display.
%
A40085 SEEG R25AT O/M
EXPRESS DEFROST
Express Defrost is used to defrost meat and poultry. Enter desired defrost time, referring to the EXPRESS DEFROST CHART below.
Example : If you want to defrost for 1 minutes and 30 seconds.
Action
Step
1
Press the EXPRESS DEFROST key.
2
Enter desired defrost time.
Press Key
Display
DEF
DEF
1 3 0
Press the START key.
DEF
%
ON
4
5
Halfway through defrost time CHECK will flash and the oven will "beep"
4 times.
Open the door. Turn food over and shield any warm portions.
Close the door.
POWER
DEF
POWER
%
Press the START key within 1 minute
after closing the door.
DEF
ON
POWER
%
Note: 1. If you do not open the door when an audible signal sounds, the defrosting cycle will continue and
the defrosting time will count down to 0.
2. If the time you set exceeds a maximum time (30 min.),the display will show "EE 9". Touch STOP/
CLEAR key (
) and enter appropriate time.
EXPRESS DEFROST CHART
This is specially designed for smaller cuts of food. The following foods should be used on the express defrost
programme.
1.Beef Steak
2.Lamb Chops
3.Pork Chops
4.Chicken Portions
5.Fish Steaks
The oven is pre-programmed with a time and power level cycle so that the food listed above is defrosted easily.
BASIC IDEAS FOR EXPRESS DEFROST
-Always allow food to stand for approx. 10-30 minutes after defrosting to equalise the temperature and to
produce better defrosting results.
-Check food after standing. If the item is not thoroughly defrosted, continue to defrost on 20% power for additional
time.
-Choose foods that are the same thickness throughout. This will produce better defrosting results. Foods
which vary in thickness may require shielding with small flat pieces of tin foil to prevent over-defrosting.
-For foods not listed in the chart refer to the manual defrosting chart.
-When freezing chicken pieces, steak, chops and fish, freeze separately in single flat layers and if necessary
interleave with freezer plastic to seperate layers. This will ensure even defrosting.
FOOD
200 g 400 g 600 g
METHOD
Steak
1. Position the food with thinner parts in centre in a single layer,
Pork, lamb
if pieces are stuck together separate as soon as possible.
4'
1'30" approx.
chops
2. Shield any thinner parts with foil if necessary.
Chicken Portions - 1'50"
3'
- 4'30" 3. Turn over, rearrange after the audible sound.
Fish Steaks
After turning over, shield the defrosted portions with small,
flat pieces of aluminium foil.
After defrosting stand for 10-30 minutes.
10
SEEG R23AT Eng,P04-12
10
03.7.16, 2:55 PM
DEUTSCH
3
A40085 SEEG R25AT O/M
OTHER CONVENIENT FEATURES
COUNTER CHECK
The number of times when the oven will be used are automatically accumulated for each key. You can check how
many times the oven was used.
Example : Suppose you want to know total using time, times of using each memory and times of manual
cooking. In this case the oven was used 8268 times, the memory 1 was used 513 times, manual
cooking was used 3339 times, DEFROST was used 1238 and the memory 11 was used 213 times.
Step
1
Action
Press Key
Display
Choose checking mode.
CHECK
X2
CHECK will flash on and off.
(Total count)
Check times of using the memory 1.
NUMBER
CHECK
1
(Times memory 1 used)
Check times of using manual cooking.
CHECK
(Times mamual cooking used)
2
Check times of using EXPRESS
DEFROST.
DEF CHECK
(DEFROST count)
Check times of using the memory 11.
3
1
X2
Complete checking.
NOTE:
Each counter can count the times up to 9999, and then it will return to 0.
11
SEEG R23AT Eng,P04-12
11
03.7.16, 2:55 PM
NUMBER
CHECK
A40085 SEEG R25AT O/M
COUNTER RESET
Each number of times can be cleared.
Example : Suppose you want to clear the times of memory 1.
Step
1
Action
Press Key
Display
Choose checking mode.
CHECK
X2
CHECK will flash on and off.
(Total count)
2
Choose the memory 1.
CHECK
NUMBER
1
3
Clear times of using the memory 1.
4
Cancel checking mode.
CHECK
NUMBER
NOTE:
1. To clear times of manual cooking, touch MANUAL/REPEAT key (
To clear times of Defrost cooking, touch EXPRESS DEFROST key (
key.
2. To clear total using times, skip step 2.
DEUTSCH
(Times memory 1 used)
) at step 2 instead of NUMBER key.
) at step 2 instead of NUMBER
INFORMATION WITH ERROR MESSAGES
If ERROR messages are displayed, follow the below instructions.
ERROR MESSAGES
EE1, EE2, EE3,
EE6, E10, EE16
EE8,EE0 (For R-23AT)
Please contact your dealer or an authorized Sharp service agent because the oven
must be out of order.
EE19 (For R-25AT )
EE7
Exhaust air temperature is too high. Checking that nothing is blocking the ventilation
openings or that room temperature is very hot or that oven cavity is empty during
) and try again after a few
operation. Correct, touch STOP/CLEAR key (
minutes.
EE9
The time you set exceeds a maximum time. Touch STOP/CLEAR key (
enter appropriate time.
EE17
Magnetron temperature is too high, touch STOP/CLEAR key (
after a few minutes.
) and
) and try again
INFORMATION WITH FILTER INDICATOR
Clean the air intake filter when the FILTER indicator lights up (See page 14.). The FILTER indicator will light up
when the oven has been operated for about 200 hours in total.
To cancel FILTER indicator touch the START key (
). The oven will start to count the operation time
automatically again when the FILTER indicator is canceled.
12
SEEG R23AT Eng,P04-12
12
03.7.16, 2:55 PM
A40085 SEEG R25AT O/M
CARE AND CLEANING
CLEAN THE OVEN AT REGULAR INTERVALS AND REMOVE ANY FOOD DEPOSITS - Keep the oven clean,
or the oven could lead to deterioration of the surface.This could adversely affect the life of the appliance and
possibly result in a hazardous situation.
VERY IMPORTANT CAUTIONS:
3) Make sure that mild soap or water does not
penetrate through the small vents in the walls which
may cause damage to the oven.
4) Do not use spray type cleaners on the oven interior.
• DO NOT OPERATE THE OVEN WITHOUT THE
SPLASH COVER IN PLACE.
• DO NOT REMOVE THE SPLASH COVER
UNLESS THE POWER CORD IS REMOVED
FROM THE OUTLET BECAUSE THE ROTARY
ANTENNA, WHICH IS LOCATED ON THE
CEILING, OPERATES FOR 1 MINUTE AFTER
THE DOOR IS OPENED AND INJURY COULD
OCCUR.
• DO NOT USE COMMERCIAL OVEN
CLEANERS, ABRASIVE, HARSH CLEANERS
OR SCOURING PADS ON ANY PART OF YOUR
MICROWAVE OVEN.
• DO NOT SPRINKLE WATER ONTO THE OVEN
DIRECTLY. IT MAY CAUSE ELECTRIC SHOCK,
LEAKAGE OF ELECTRICITY OR DAMAGE OF
THE OVEN.
• THE OVEN SHOULD NOT BE CLEANED WITH
A WATER JET.
Splash cover
AT LEAST ONCE A WEEK, REMOVE THE SPLASH
COVER AND WASH BOTH SIDES OF IT IN A MILD
DETERGENT SOLUTION. BUILT-UP GREASE MAY
OVERHEAT AND BEGIN TO SMOKE. AND
OVERHEATED GREASE MAY BURN THE SPLASH
COVER. THE SPLASH COVER IS LOCATED IN
THE TOP OF THE OVEN AND MAY EASILY BE
REMOVED. REMEMBER TO UNPLUG THE POWER
CORD.
Removal:
1. Remove two thumb screws (A) as shown in Fig. 1.
2. Remove the splash cover from the oven.
Reinstall:
1. Insert two projections of the cover (B) into the holes
of the oven cavity backplate as shown in Fig. 2.
2. Secure the cover to the oven ceiling with two thumb
screws (A) as shown in Fig. 1.
Oven Exterior
The outside of your oven can be cleaned easily with
mild soap and water. Make sure the soap is wiped off
with a moist cloth, and dry the exterior with a soft towel.
Fig. 1
Door
Splash Cover
Control Panel
Open the door before cleaning to inactivate the control
panel keys. Care should be taken in cleaning the
control panel. Using a cloth dampened with water only,
gently wipe the panel until it becomes clean. Avoid the
use of excess water. Do not use any sort of chemical
or abrasive cleaner. To do so may cause severe
damage to the panel and make key entry impossible.
(A)
Oven Interior
Fig. 2
1) For easy cleaning, wipe any spatters or spills with
a soft damp cloth or sponge at the end of each day
for hygienic reasons. For heavier spills, use mild
soap and wipe several times with a damp cloth
until all residues are removed.
Built-up splashes may overheat and begin to smoke
or catch fire, and cause arcing.
2) Keep the ceramic floor clean at all times. If you leave
grease or fat in the cavily, it may overheat, smoke or
even catch fire when next using the oven.
Splash Cover
(B)
Holes
CAUTION:
DO NOT REMOVE THE CERAMIC FLOOR
FROM THE OVEN.
13
SEEG R23AT Eng,P13-17
13
03.7.23, 5:23 PM
A40085 SEEG R25AT O/M
Door
Keep clean the air intake filter. To clean the air intake
filter you have to pull the two clips on the filter and to
remove the air intake filter. Wash the air intake filter in
mild soapy water and dry with a soft cloth. After cleaning
re-install the air intake filter to the oven. Clean the air
intake filter once every two weeks.
To remove all trace of dirt, regularly clean both sides
of the door, the door seals and adjacent parts with a
soft, damp cloth. Do not use abrasive cleaner.
Air intake filter
CAUTION:
DO NOT OPERATE THE OVEN WITHOUT THE
AIR INTAKE FILTER IN PLACE.
ATTENTION ONLY IN GERMANY:
Hole
Oven
Clip
Air intake filter
Clip
This appliance has to be checked at least once a year
by an expert (SHARP Service). The result of this check
has to be recorded. The customer is responsible to call
an authorized SHARP Service Agent for that annual
check.
Hole
SERVICE CALL CHECK
Please check the following before calling for service.
1. Power Supply
Check the power plug is properly connected to a suitable wall outlet.
Check the line fuse/circuit breaker is functioning properly.
2. When the door is opened:
A. Does the oven lamp light?
B. Does the cooling fan work?
(Put your hand over the rear ventilation opening.)
3. Place one cup of 150 ml water in the oven and close the door securely.
Touch these keys.
1
0
YES ____ NO _____
YES ____ NO _____
0
A. Does the cook indicator go on?
YES ____ NO _____
B. At the end of this time, is the water warm?
YES ____ NO _____
If "NO" is the answer to any of the above questions, call your dealer or an authorized SHARP Service Agent and
report the results of your check.
14
SEEG R23AT Eng,P13-17
14
03.7.23, 5:23 PM
A40085 SEEG R25AT O/M
GUIDE
USEFUL THINGS TO KNOW ABOUT
MICROWAVES
Metals
should not, as a rule, be used in microwave ovens
because microwaves cannot penetrate metals and
reach the food inside.
There are, however, some exceptions: Small strips of
aluminum foil can be used to cover parts to prevent
them from defrosting or cooking too fast (e.g., chicken
wings).
Microwaves set the water molecules contained in the
food vibrating. The resulting friction generates heat
that can be used to defrost or cook the food.
Food
The microwaves are
absorbed by the food
Metal
SUITABLE UTENSILS
Glass, Glass-ceramics and Porcelain
Heat-resistant utensils made of glass, glass-ceramic
or porcelain are suitable. However, the utensils must
not contain metals (e.g., lead crystal) or be metalplated (e.g., gold rim, cobalt blue).
Microwaves are
reflected
Small metal skewers and aluminum trays (of
prepackaged food) may be used. However, they must
be small in proportion to the food. Aluminum containers,
for example, must be filled to at least 2/3 to 3/4 with
food. It is recommendable to transfer the food into
microwave-safe containers.
Glass, Porcelain, Ceramics
Plastics, paper etc.
Microwaves
pass through
When using aluminum trays or other metal utensils,
they must be placed at least 2.0 cm away from the
cavity walls. Otherwise the cavity walls may be
damaged by sparking.
Ceramics
are usually suitable but they must be enamelled. When
using utensils that are not enamelled, moisture can be
absorbed by the material and heat it up. This can
cause the material to crack.
Do not use any utensils with metal-plating, metal parts
or metal projections like screws, ribbons, or handles.
TESTING UTENSILS
Plastics and Paper Dishes
Heat-resistant and microwave-proof plastic utensils or
paper dishes are suitable for defrosting, heating and
cooking. Please follow the manufacturer's instructions.
Perform the following test if you are unsure whether a
certain utensil is microwave-safe: Place the utensil into
the oven, put a glass containing about 150 ml of water
on or beside the utensil, and operate the microwave
oven at 100% power for 1 to 2 minutes. If it is cool or
luke-warm to the touch, the utensil is suitable for
microwave use. Do not perform this test on plastic
dishes because the plastic might melt.
Microwave Plastic Wrap
or heat-resistant wrap is suitable for covering and
wrapping food. Please follow the manufacturer's
instructions.
Roasting Bags
can be used in microwave ovens. Do not close the
bags with a metal clip because the clip may cause the
bag film to melt. Close the bag with string and pierce it
several times with a fork. Films that are not heatresistant, e.g., films to retain product freshness are not
recommended for use in microwave ovens.
15
SEEG R23AT Eng,P13-17
15
03.7.16, 2:56 PM
A40085 SEEG R25AT O/M
INFORMATION ABOUT POWER LEVEL
100%-70% power:
The high power is perfect for warming up or regenerating food. You can also use it to make food boil e.g. water
and then cook further with lower power. (e.g. for rice or noodles)
60%-40% power:
For longer cooking times and compact types of food.
30%-20% power:
For considerate cooking and sensitive menus. Also after cooking to simmer or for noodles and rice.
10% power:
The low power level is mainly for defrosting. You can also use it for cooking of very sensitive menus like cheese sauce.
Basically it is recommendable to cover the food for cooking or reheating. Additionally you can sprinkle some
water over the food (you can also use salted water or even bouillon).
The water steam keeps the food moist and it also helps to make the cooking faster.
COOKING CHART AND RECIPES
1800W
Init.
Temp.
Menu
-18°C
-18°C
-18°C
-18°C
-18°C
Microwave
Power
Levels
10%
10%
10%
10%
10%
200g
400g
approx. 4'30"
approx. 4'30"
approx. 4'30"
approx. 2'50"
approx. 1'10"
approx. 6'30"
approx. 6'30"
approx. 6'30"
approx. 5'30"
approx. 1'50"
600g
Comment
approx. 8'30" Turn over at 1/2 of total
approx. 9'30" defrosting time. Standing
approx. 8'30" time about 10 mins.
—
approx. 2'10"
Meat
Poultry
Fish
Fruit
*Cake
(no fruit or cheese)
*Cream cake
Shrimps
**Cold meat
-18°C
-18°C
-18°C
10%
10%
10%
REHEAT
Soup, clear
Soup, cream
Casseroles
Supplements, Noodles
Supplements, Rice
Supplements, Potatoes
Supplements, Vegetables
Baked Beans
Goulash, Ragout
*Meat (150g)
*Sausages (50g)
5±2°C
5±2°C
5±2°C
5±2°C
5±2°C
5±2°C
5±2°C
5±2°C
5±2°C
5±2°C
5±2°C
100%
100%
100%
100%
100%
100%
100%
100%
100%
100%
100%
approx. 1'
approx. 1'
approx. 1'
approx. 50 sec.
approx. 50 sec.
approx. 50 sec.
approx. 50 sec.
approx. 1'
approx. 1'10"
approx. 40 sec.
approx. 15 sec.
COOK
Supplements, Potatoes 20±2°C
Supplements, Vegetables 20±2°C
100%
100%
approx. 2'10" approx. 4'40" approx. 6'
Use casserole lid. Stir at
approx. 2'50" approx. 4'40" approx. 6'30" 1/2 of total cooking time.
DEFROST
2100W
Init.
Temp.
Menu
-18°C
-18°C
-18°C
-18°C
-18°C
Microwave
Power
Levels
10%
10%
10%
10%
10%
Meat
Poultry
Fish
Fruit
*Cake
(no fruit or cheese)
*Cream cake
Shrimps
**Cold meat
-18°C
-18°C
-18°C
10%
10%
10%
REHEAT
Soup, clear
Soup, cream
Casseroles
Supplements, Noodles
Supplements, Rice
Supplements, Potatoes
Supplements, Vegetables
Baked Beans
Goulash, Ragout
*Meat (150g)
*Sausages (50g)
5±2°C
5±2°C
5±2°C
5±2°C
5±2°C
5±2°C
5±2°C
5±2°C
5±2°C
5±2°C
5±2°C
100%
100%
100%
100%
100%
100%
100%
100%
100%
100%
100%
COOK
Supplements, Potatoes 20±2°C
Supplements, Vegetables 20±2°C
100%
100%
DEFROST
—
approx. 1'10" approx. 2'10"
approx. 9'
approx. 4'
6'-7'
approx. 3'
approx. 5'30" approx. 8'
approx. 1'40"
approx. 2'
approx. 2'
approx. 1'20"
approx. 1'30"
approx. 1'30"
approx. 1'50"
approx. 2'
approx. 2'10"
1'20"
25 sec.
200g
400g
approx. 4'
approx. 4'20"
approx. 4'
approx. 2'50"
approx. 1'
approx. 5'50"
approx. 6'30"
approx. 5'30"
approx. 5'20"
approx. 1'40"
approx. 2'30" Cover with microwave
2'50"
foil or lid. Stir well after
approx. 2'50" reheating.
approx. 2'20"
approx. 2'30"
approx. 2'30"
approx. 2'30"
—
approx. 3'
—
—
35 sec.
600g
approx. 8'30" Turn over at 1/2 of total
approx. 9'30" defrosting time. Standing
approx. 7'30" time about 10 mins.
—
approx. 2'
—
approx. 1'25" approx. 2'10"
approx. 4'
approx. 6'30" approx. 9'
approx. 3'
approx. 5'30" approx. 8'
approx. 2'20" Cover with microwave
approx. 2'40" foil or lid. Stir well after
approx. 2'40" reheating.
approx. 2'
approx. 2'
approx. 2'10"
approx. 2'10"
—
approx. 2'50"
—
—
40 sec.
Use casserole lid. Stir at
approx. 2'
approx. 3'30" approx. 5'
approx. 2'10" approx. 3'50" approx. 5'20" 1/2 of total cooking time.
approx. 50 sec.
approx. 1'
approx. 1'
approx. 40 sec.
approx. 40 sec.
approx. 40 sec.
approx. 50 sec.
approx. 55 sec.
approx. 1'
approx. 40 sec.
approx. 15 sec.
approx. 1'30"
approx. 1'40"
approx. 1'40"
approx. 1'10"
approx. 1'20"
approx. 1'30"
approx. 1'30"
approx. 1'50"
approx. 2'
approx. 1'20"
25 sec.
*indications per pcs. (1,2,3 pcs.) not in gramm.
**Remove defrosted portions. Standing time about 10 mins.
16
SEEG R23AT Eng,P13-17
16
Comment
03.7.16, 2:56 PM
A40085 SEEG R25AT O/M
1800W
Menu
SPECIALS
Danish Pastrys
*Douhgnuts/Berliner
*Boucheés à la reine
*Burger
*Cheeseburger
Toast and Bacon(140g)
Scrambled Eggs and
Bacon(140g)
2100W
Menu
SPECIALS
Danish Pastrys
*Douhgnuts/Berliner
*Boucheés à la reine
*Burger
*Cheeseburger
Toast and Bacon(140g)
Scrambled Eggs and
Bacon(140g)
Int.
Temp.
Microwave
Power Levels
1 pc
2 pcs
20±2°C
20±2°C
20±2°C
5±2°C
5±2°C
20±2°C
5±2°C
100%
100%
100%
100%
50%
100%
100%
approx. 6 sec.
5 sec.
approx. 10 sec.
40 sec.
50 sec.
10 sec.
35 sec.
–
8 sec.
approx. 15 sec.
1'20"
1'30"
–
–
Int.
Temp.
Microwave
Power Levels
1 pc
2 pcs
20±2°C
20±2°C
20±2°C
5±2°C
5±2°C
20±2°C
5±2°C
100%
100%
100%
100%
50%
100%
100%
approx. 6 sec.
approx. 5 sec.
approx. 10 sec.
35 sec.
50 sec.
10 sec.
40 sec.
–
approx. 8 sec.
approx. 15 sec.
1'10"
1'40"
–
–
*indications per pcs. (1,2,3 pcs.) not in gramm.
Recipes
Bacon
Place 2 thin slices of bacon between paper towels and
cook approx. 20 sec / 15 sec.
Omelette
Sprinkle a normal plate with fat. Beat three eggs with
some salt and pepper. Pour the eggs on the plate and
cook for ca. 50 sec / 45 sec. Add any filling (2 tbsp.)
you want (ragout, vegetables) and cook again for ca.
10 sec / 10 sec.
Toast Hawaii
Prepare toasts and spread with butter. Place one slice
of ham, pineapple and cheeses on a plate and cook for
approx. 20 sec / 20 sec. After cooking place on the
prepared toast.
Hot chocolate with cream
Pour 150 ml milk in a big cup. Add 30 g black chocolate
(sliced). Stir and cook for 50 sec / 40 sec. Stir again
once in between. Add some stirred cream and serve
with some chocolate powder on top.
Scrambled Eggs
Mix two eggs with salt, pepper and some milk. Cook
for approx. 45 sec / 45 sec., three times strirring within
total cooking time.
Hint: The first time refer to 1800Watts, the second time to 2100 Watts.
17
SEEG R23AT Eng,P13-17
17
03.7.16, 2:56 PM
A40085 SEEG R25AT O/M
SPECIFICATIONS
AC Line Voltage
Distribution line fuse/circuit breaker
AC Power Required
Output Power
Microwave Frequency
Outside Dimensions
Cavity Dimensions
Oven Capacity
Cooking Uniformity
Weight
230V, 50Hz, single phase
16A (time lag)
R-23AT: 2.9 kW
R-25AT: 3.15 kW
R-23AT: 1800W (IEC 60705)
R-25AT: 2100W (IEC 60705)
2450MHz *(Class B/Group 2)
510 mm(W) x 335 mm(H) x 470 mm(D) (Single oven)
510 mm(W) x 670 mm(H) x 470 mm(D) (Two ovens)
330 mm(W) x 180 mm(H) x 330 mm(D)
20 litres
Rotary antenna system
Approx. 33 kg
* This is the classification of ISM (Industrial, Scientific and Medical) equipment described in the International
Standard CISPR11.
TINSMA018WRRZ-H31
Recycled paper / Printed with soyink
Printed in Japan
18
3
SEEG R23AT Eng,cover
3
03.7.16, 2:53 PM