1
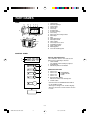
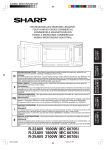
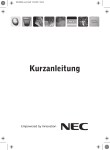
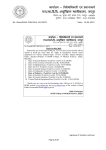
COMMERCIAL MICROWAVE OVEN
POWER
%
ENGLISH
Page 1
ON
Original Instruction
OPERATION MANUAL - This operation manual contains important information which you should read
GB
carefully before using your microwave oven.
IMPORTANT:
There may be a serious risk to health if this operation manual is not followed or if the oven is modified so that it operates
with the door open.
R-22AM 1500W (IEC 60705)
R-23AM 1800W (IEC 60705)
R-25AM 2100W (IEC 60705)
1
SEEG R22/23/25.En cover
1
13.7.10, 6:20 PM
GB
A. Information on Disposal for Users
(private households)
1. In the European Union
Attention:
Your product is
marked with this
symbol.
It means that used
electrical and
electronic products
should not be mixed
with general
household waste.
There is a separate
collection system for
these products.
Attention: If you want to dispose of this equipment, please do not use the
ordinary dust bin!
Used electrical and electronic equipment must be treated separately and in
accordance with legislation that requires proper treatment, recovery and
recycling of used electrical and electronic equipment.
Following the implementation by member states, private households within
the EU states may return their used electrical and electronic equipment to
designated collection facilities free of charge*.
In some countries* your local retailer may also take back your old product
free of charge if you purchase a similar new one.
*) Please contact your local authority for further details.
If your used electrical or electronic equipment has batteries or accumulators,
please dispose of these separately beforehand according to local
requirements.
By disposing of this product correctly you will help ensure that the waste
undergoes the necessary treatment, recovery and recycling and thus
prevent potential negative effects on the environment and human health
which could otherwise arise due to inappropriate waste handling.
2. In other Countries outside the EU
If you wish to discard this product, please contact your local authorities and
ask for the correct method of disposal.
For Switzerland: Used electrical or electronic equipment can be returned
free of charge to the dealer, even if you don’t purchase a new product.
Further collection facilities are listed on the homepage of www.swico.ch or
www.sens.ch.
B. Information on Disposal for Business Users
1. In the European Union
If the product is used for business purposes and you want to discard it:
Please contact your SHARP dealer who will inform you about the take-back
of the product. You might be charged for the costs arising from take-back
and recycling. Small products (and small amounts) might be taken back by
your local collection facilities.
For Spain: Please contact the established collection system or your local
authority for take-back of your used products.
2. In other Countries outside the EU
If you wish to discard of this product, please contact your local authorities
and ask for the correct method of disposal.
2
SEEG R22/23/25.En cover
2
13.7.10, 6:21 PM
PART NAMES .............................................. 2, 3
IMPORTANT SAFETY INSTRUCTIONS ........ 1
INSTALLATION INSTRUCTIONS ................... 3
ACCESSORIES ............................................... 3
SHORT DESCRIPTION OF FEATURES ........ 4
BEFORE OPERATION .................................... 4
TIME COOKING ............................................... 4
OTHER CONVENIENT FEATURES ............... 5
CARE AND CLEANING ................................... 6
SERVICE CALL CHECK .................................. 7
GUIDE ..............................................................8
SPECIFICATIONS ......................................... 12
SERVICE PROCEDURE FOR GERMANY ... 13
3
SEEG R22/23/25.En cover
3
13.7.10, 6:21 PM
PART NAMES
OVEN
11
10
5
4 3 2
1
8
13
12
19
9
18
7
6
14
17
15
16
1
2
3
4
5
6
7
8
9
10
11
12
13
14
15
16
17
18
19
Control panel
Door lock openings
Ceramic floor
Splash cover
Oven lamp
Air intake filter
Air intake opening
Oven cavity
Door seals and sealing surfaces
Door hinges
Door
Safety door latches
Door open handle
Outer cabinet
Oven lamp access cover
Ventilation openings
Power supply cord
Mounting plate
Screw for mounting plate
CONTROL PANEL
DISPLAY AND INDICATORS
Check indicators after the oven starts to confirm the oven is operating as desired.
1 Cook indicator
This indicator shows cooking in progress.
2 Digital display
3 Microwave power level indicator
POWER
2
1
3
%
ON
/ 100%
4
/ 50%
5
/ 20%
6
/ 10%
7
OPERATING BUTTONS
4 Power 100%
MICROWAVE
5 Power 50%
POWER LEVEL
6 Power 20%
button
7 Power 10%
8 ELECTRONIC TIMER
Rotate the knob to enter cooking time.
9 START button
* The illustration of OPERATING BUTTONS is
8
for R- 22AM/R- 23AM.
Although the design for R- 25AM is slightly
different,each button name and the function
is same.
9
242/ 3
SEEG R22/23/25.En cover
4
13.7.10, 6:21 PM
IMPORTANT SAFETY INSTRUCTIONS
IMPORTANT SAFETY INSTRUCTIONS: READ CAREFULLY AND KEEP FOR FUTURE REFERENCE
1. This appliance is intended to be used by expert or
trained user in shops, in light industry and on
farms, or for commercial use by lay persons.
2. This oven is designed to be used on a countertop
only. It is not designed to be built into a kitchen unit.
Do not place the oven in a cabinet.
14. Utensils should be checked to ensure that they are
suitable for use in the oven. See "GUIDE" on page
8. Use only microwave safe containers and utensils.
15. WARNING: The contents of feeding bottles and
baby food jars must be stirred or shaken and the
temperature checked before consumption, in order
to avoid burns.
16. When heating food in plastic or paper containers,
keep an eye on the oven due to the possibility of
ignition.
17. Clean the oven at regular intervals and remove
any food deposits.
18. Failure to maintain the oven in a clean condition
could lead to deterioration of the surface that could
adversely affect the life of the appliance and possibly
result in a hazardous situation.
19. See instructions for cleaning door seals, cavities
and adjacent parts on page 6.
20. The oven should not be cleaned with a water jet.
3. The electrical outlet must be readily accessible so
that the unit can be unplugged easily in an
emergency.
If smoke or burn is observed: Keep the oven
door closed and switch off the power by
disconnecting the plug from the socket in order to
stifle any flames. Failure to follow this procedure
may result in fire and oven damage.
4. Ensure there is a minimum of free space above the
oven of 25 cm.
5. This appliance is not intended for use by persons
(including children) with reduced physical,
sensory or mental capabilities, or lack of
experience and knowledge, unless they have
been given supervision or instruction concerning
use of the appliance by a person responsible for
their safety.
6. Children should be supervised to ensure that they
do not play with the appliance.
7. WARNING: Only allow children to use the oven
without supervision when adequate instructions
have been given so that the child is able to use the
oven in a safe way and understands the hazards of
improper use.
8. WARNING: If the door or door seals are damaged,
the oven must not be operated until it has been
repaired by a competent person.
9. WARNING: Never adjust, repair or modify the oven
yourself. It is hazardous for anyone other than a
competent person to carry out any service or repair
operation which involves the removal of a cover
which gives protection against exposure to
microwave energy.
10. If the power supply cord of this appliance is
damaged, it must be replaced by an authorised
SHARP service agent in order to avoid a hazard.
11. WARNING: Liquids and other foods must not be
heated in sealed containers since they are liable to
explode.
12. WARNING: Microwave heating of beverages can
result in delayed eruptive boiling, therefore care
must be taken when handling the container.
13. Do not cook eggs in their shells, and whole hard
boiled eggs should not be heated in microwave
ovens since they may explode even after microwave
cooking has ended. To cook or reheat eggs which
have not been scrambled or mixed, pierce the
yolks and the whites, or the eggs may explode.
Shell and slice hard boiled eggs before reheating
them in the microwave oven.
To avoid the danger of fire
1. The microwave ovens should not be left unattended during operation. Power levels that are
too high or cooking times that are too long may
overheat foods resulting in a fire.
2. The AC power supply must be 230V, 50Hz, with a
minimum 16A distribution line fuse, or a minimum
16A distribution circuit breaker. In using two ovens,
each oven must be secured with a 16A distribution
line fuse or a distribution circuit breaker.
3. A separate circuit serving only this appliance should
be provided.
4. Do not place the oven in areas where heat is generated. For example, close to a conventional oven.
5. Do not install the oven in an area of high humidity
or where moisture may collect.
6. Do not store or use the oven outdoors.
7. Clean the splash cover and the oven cavity
after use. These must be dry and free from
grease. Built-up grease may overheat and begin to smoke or catch fire.
8. Do not place flammable materials near the oven or
ventilation openings.
9. Do not block the ventilation openings.
10. Remove all metallic seals, wire twists, etc., from
food and food packages. Arcing on metallic surfaces may cause a fire.
11. Do not use the microwave oven to fry with oil or
heat oil for deep frying. The temperature can not
be controlled and the oil catch fire.
12. To make popcorn use only special microwave makers.
13. Do not store food or any other items inside the oven.
14. Check the settings after you start the oven to
ensure the oven is operating as desired.
1
SEEG R22/23/25.En1-14
1
13.7.10, 6:21 PM
1. Do not use excessive amount of time (See
page 9,10).
2. Stir liquid prior to heating/reheating.
3. It is advisable to insert a glass rod or similar
utensil (not metal) into the liquid whilst reheating.
4. Let liquid stand for at least 20 seconds in the
oven at the end of cooking time to prevent
delayed eruptive boiling.
3. Pierce the skin on such foods as potatoes, sausages
and fruit before cooking, or they may explode.
15. To avoid overheating and fire, special care must
be taken when cooking or reheating foods with a
high sugar or fat content, for example, Sausage
rolls, Pies or Christmas pudding.
16. See the corresponding hints in this operation
manual and in the attached cookery book section.
To avoid the possibility of injury
WARNING:
1. Do not operate the oven if it is damaged or
malfunctioning. Check the following before use:
a) The door; make sure the door closes properly
and ensure it is not misaligned or warped.
b) The hinges and safety door latches; check to
make sure they are not broken or loose.
c) The door seals and sealing surfaces; ensure
that they have not been damaged.
d) Inside the oven cavity or on the door; make sure
there are no dents.
e) The power supply cord and plug; ensure that
they are not damaged.
2. Do not operate the oven with the door open or alter
the safety door latches in any way.
3. Do not operate the oven if there is an object
between the door seals and sealing surfaces.
4. Do not allow grease or dirt to build up on the door
seals and adjacent parts. Follow instructions for
“Care and Cleaning”, Page 6
5. Individuals with PACEMAKERS should check with
their doctor or the manufacturer of the pacemaker
for precautions regarding microwave ovens.
To avoid the possibility of burns
1. Use pot holders or oven gloves when removing food from the oven to prevent burns.
2. Always open containers, popcorn makers, oven
cooking bags, etc., away from the face and hands
to avoid steam burns and eruption of boiling.
3. To avoid burns, always test food temperature
and stir before serving and pay special attention to the temperature of food and drink given
to babies, children or the elderly.
Temperature of the container is not a true indication of the temperature of the food or drink; always
check the food temperature.
4. Always stand back from the oven door when opening it to avoid burns from escaping steam and heat.
5. Slice stuffed baked foods after heating to release
steam and avoid burns.
6. Keep children away from the door to prevent them
burning themselves.
7. Do not touch the back of the oven because it will
become hot.
To avoid the possibility of electric shock
1. Under no circumstances should you remove the
outer cabinet.
2. Never spill or insert any objects into the door lock
openings or ventilation openings. In the event of a
spill, turn off and unplug the oven immediately,
and call a SHARP service agent.
3. Do not immerse the power supply cord or plug in
water or any other liquid.
4. Do not let the power supply cord hang over the
edge of a table or work surfaces.
5. Keep the power supply cord away from heated
surfaces, particularly the back of the oven.
6. Unplug the oven before replacing the oven lamp.
To avoid misuse by children
1. Do not lean or swing on the oven door. Do not play with
the oven or use it as a toy.
2. Children should be taught all important safety
instructions: use of pot holders, careful removal of
food coverings; paying special attention to packaging (e.g. self-heating materials) designed to
make food crisp, as they may be extra hot.
Other warnings
1. Never modify the oven in any way.
2. Do not move the oven while it is in operation.
3. This oven is for food preparation only and may only be
used for cooking food. It is not suitable for laboratory use.
To avoid the possibility of explosion
and sudden boiling
To promote trouble free use of your oven
and avoid damage.
1. Never use sealed containers. Remove seals and
lids before use. Sealed containers can explode
due to a build up of pressure even after the oven
has been turned off.
2. Take care when microwaving liquids. Use a widemouthed container to allow bubbles to escape.
Never heat liquids in narrow necked containers such as
baby bottles, as this may result in the contents erupting
from the container when heated and cause burns.
To prevent sudden eruption of boiling liquid and
possible scalding:
2
SEEG R22/23/25.En1-14
2
1. Never operate the oven when it is empty.
Doing so may damage the oven.
2. When using a browning dish or self-heating material,
always place a heat-resistant insulator such as a porcelain plate under it to prevent damage to the ceramic
floor due to heat stress. The preheating time specified
in the dishes instructions must not be exceeded.
3. Do not use metal utensils, which reflect microwaves and
may cause electrical arcing. Do not put cans in the oven.
4. Do not place anything on the outer cabinet during operation.
5. Do not use the oven near a steamer or a fryer.
13.7.10, 6:21 PM
NOTE
injury resulting from failure to observe the correct
electrical connection procedure.
3. Water vapour or drops may occasionally form on the
oven walls or around the door seals and sealing
surfaces. This is a normal occurrence and is not an
indication of microwave leakage or a malfunction.
1. If you are unsure how to connect your oven, please
consult an authorized qualified electrician.
2. Neither the manufacuture nor the dealer can accept
any liability for damage to the oven or personal
INSTALLATION INSTRUCTIONS
WARNING : Always keep the caution sheet (SPECIAL INSTRUCTIONS AND WARNINGS) close to the oven
for your reference.
1) Remove all packing materials from the inside of
the oven cavity. Remove all the blue protective
film from the outside of the oven.
2) Check the oven carefully for any signs of damage.
3) Place the oven on a flat, level surface strong
enough to support the oven's weight plus the
heaviest item likely to be cooked.
Do not place this oven in a position which is not
easily accessible. To position the oven too high
can be dangerous because food can not be removed safely.
4) Ensure there is a minimum free space above the
oven of 25 cm.
6-5)Hold the mounting plate A to the rear cabinet of the
oven A with the single screw (a), as shown in the
figure A.
6-6)Remove the screw (a) holding the mounting plate B
to the rear cabinet of the oven B. And remove the
mounting plate B from the oven B. See the figure A.
6-7)Install the screw (a) to its position again.
6-8)Remove the screw (c) from the oven A.
6-9)Remove the screw (d) from the oven B.
6-10)Turn the removed mounting plat B over and then
using the removed screw (c) and (d), attach the
mounting plate B, as shown in the figure A.
WARNING:
In case where two ovens are installed together by
placing one on top of another.
1) Use the two mounting plates for fixing the two
ovens.
2) Make sure that the power supply cord is not caught
between the two ovens.
3) Do not install more than one oven on top of another.
4) Do not lose the removed screws.
25 cm
5) Securely connect the plug of the oven to a standard
earthed (grounded) household electrical outlet.
Oven B
Screw (a)
6) Two same oven models can be installed together by
placing one on top of another. Follow these instructions.
6-1)Place the oven A and position the oven B on top of
Rear cabinet
the oven A as shown in the figure A.
6-2)Remove the single screw (a) holding the mounting Mounting Plate A
Screw
plate A to the rear cabinet of the oven A. And
Screw (b)
(d)
remove the mounting plate A.
6-3)Remove the single screw (b) from the rear cabinet
of the oven B, as shown in the figure A.
Screw (c)
6-4)Reinstall the mounting plate A to the rear cabinet
Screw (a)
of the oven B with the single screw (b) removed,
Mounting Plate B
Rear cabinet
Oven A
as shown in the figure A.
Figure A: How to fix two ovens
ACCESSORIES
Check to make sure the following accessory is provided:
• Operation manual
• Caution Sheet (SPECIAL INSTRUCTIONS AND WARNINGS : part code TCAUHA429WRRZ,
TCAUHA430WRRZ and TCAUHA445WRRZ)
NOTE:
• When you order accessories, please mention the two items : part name and model name to your dealer or
SHARP authorized service agent.
• The model name is printed on the door of the microwave oven.
3
SEEG R22/23/25.En1-14
3
13.7.10, 6:21 PM
SHORT DESCRIPTION OF FEATURES
Time setting key : time setting with different time
intervalls in both directions.
Repeat cook : after manual operation it is possible to
use same cooking time and power level again just by
pressing microwave power level button and then start
button.
Time cooking : for individual cooking and defrosting
of different types of food by setting of time and power.
Error message : Mistakes in operation or technical
problems are displayed with an Error code.
BEFORE OPERATION
*
1)
2)
3)
4)
electronic timer are not touched for more than 3
minutes during programming.
5)
will appear on the display after the timer
reaches zero. It will disappear when the oven door
is opened.
6) To cancel a programme during cooking, open and
close the door, and then open the door again.
Before operating your new oven, make sure you
read and understand this operation manual
completely.
Plug in the oven.
.
*The digital display will then show
You can input the buttons and electronic timer only
when the door is closed.
Oven lamp and fan motor work for 1 minute
whenever the door is opened or after cooking.
The programme is canceled when any buttons or
TIME COOKING
Your oven can be programmed for max. 30 minutes and has 4 preset power levels.
NOTE for R-25AM:
The maximum cooking time for 100% or 50% is 15 minutes. If the time you set exceeds a maximum time, the
display will show “EE 9”.
LEVELS
MICROWAVE
POWER
R-22AM
WATT
R-23AM
R-25AM
100%
1500
1800
2100
50%
750
900
1050
20%
300
360
420
10%
150
180
210
Example: Suppose you want to cook for 2 minutes and 30 seconds at 50%.
POWER
/ 50%
ON
Rotate the knob clockwise to
the desired cooking time
(2 min. and 30 sec.).
Start to cook.
Choose desired
power level
(50%).
%
Check the display.
NOTE:
1. It is not necessary to touch MICROWAVE POWER LEVEL button for 100 %.
2. During the cooking, the oven will stop when the door is opened. To restart the cooking, close the door and
press the START button. If any of buttons or electric timer is not touched within 1 minute after closing the door,
the programme will be cancelled.
3. The remaining cooking time is canceled when the door is closed and opened during stop mode.
4. If you rotate the knob counterclockwise, the cooking time will decrease from 30 minutes by degrees.
4
SEEG R22/23/25.En1-14
4
13.7.10, 6:22 PM
As the time to be set increases, the timer steps in larger increments (units), as shown on the table below. Ex.
for R-22AM/23AM: If a time between 0 - 60 seconds is entered, the cooking time will increase in 2 second steps,
whereas if the time is between 10 - 30 minutes each step will be a 30 second increment.
COOKING TIME SETTING UNIT
(For R-22AM/23AM)
(For R-25AM)
COOK TIME
COOK TIME
UNIT
0 - 60 seconds
2 seconds
60 seconds - 3 minutes
5 seconds
3 - 10 minutes
10 seconds
10 - 30 minutes
30 seconds
UNIT
0 - 20 seconds
2 seconds
20 seconds - 1 minute
5 seconds
1 - 6 minutes
10 seconds
6 - 15 minutes
30 seconds
15 - 30 minutes
1 minute
OTHER CONVENIENT FEATURES
REPEAT COOK
Your oven can memorize the last cooking time in each power level. If you use this function, you have no need
to enter the cooking time.
Example: Suppose you want to use this function at 100%. (The last cooking time is 10 min.).
POWER
/100%
Choose desired
power
level
(100%).
POWER
%
ON
Check the display.
Start to cook.
%
Check the display.
INFORMATION WITH ERROR MESSAGES
If ERROR messages are displayed, follow the below instructions.
ERROR MASSAGES
EE1,EE2,EE3,
EE6,EE10,EE16
Please contact your dealer or an authorized Sharp service agent because the oven
must be out of order.
EE8,EE0
(For R-22AM/23AM)
EE19
(For R-25AM)
EE7
Exhaust air temprature is too high. Checking that nothing is blocking the ventilation
openings or that room temperature is very hot or that oven cavity is empty during
operation. Correct and try again after a few minutes.
EE17
Magnetron temperature is too high, open and close the door twice, and then try again
after a few minutes.
EE9
(For R-25AM)
The time you set exceeds a maximum time. Open and close the door twice, and
enter appropriate time.
5
SEEG R22/23/25.En1-14
5
13.7.10, 6:22 PM
CARE AND CLEANING
CLEAN THE OVEN AT REGULAR INTERVALS AND REMOVE ANY FOOD DEPOSITS- Keep the oven
clean, or the oven could lead to deterioration of the surface. This could adversely affect the life of the appliance
and possibly result in a hazardous situation.
Removal:
VERY IMPORTANT CAUTIONS:
1. Remove two thumb screws (A) as shown in Fig. 1.
2. Remove the splash cover from the oven.
• DO NOT OPERATE THE OVEN WITHOUT THE
SPLASH COVER IN PLACE.
• DO NOT REMOVE THE SPLASH COVER UNLESS
THE POWER CORD IS REMOVED FROM THE
OUTLET BECAUSE THE ROTARY ANTENNA,
WHICH IS LOCATED ON THE CEILING,
OPERATES FOR 1 MINUTE AFTER THE DOOR
IS OPENED AND INJURY COULD OCCUR.
• DO NOT USE COMMERCIAL OVEN CLEANERS,
ABRASIVE, HARSH CLEANERS OR SCOURING
PADS ON ANY PART OF YOUR MICROWAVE
OVEN.
• DO NOT SPRINKLE WATER ONTO THE OVEN
DIRECTLY. IT MAY CAUSE ELECTRIC SHOCK,
LEAKAGE OF ELECTRICITY OR DAMAGE OF
THE OVEN.
• THE OVEN SHOULD NOT BE CLEANED WITH A
WATER JET.
Reinstall:
1. Insert two projections of the cover (B) into the holes
of the oven cavity backplate as shown in Fig. 2.
2. Secure the cover to the oven ceiling with two thumb
screws (A) as shown in Fig. 1.
Fig. 1
Door
Splash cover
(A)
Fig. 2
Oven Exterior
The outside of your oven can be cleaned easily with mild
soap and water. Make sure that the soap is wiped off
with a moist cloth, and dry the exterior with a soft towel.
Splash cover
(B)
Control Panel
Open the door before cleaning to inactivate the
control panel buttons or electronic timer. Care should
be taken in cleaning the control panel. Using a cloth
dampened with water only, gently wipe the panel
until it becomes clean. Avoid the use of excess water.
Do not use any sort of chemical or abrasive cleaner.
Holes
Door
Oven Interior
To remove all trace of dirt, regularly clean both sides
of the door, the door seals and adjacent parts with a
soft, damp cloth. Do not use abrasive cleaner.
1) For easy cleaning, wipe any spatters or spills with
a soft damp cloth or sponge at the end of each day
for hygienic reasons. For heavier spills, use mild
soap and wipe several times with a damp cloth
until all residues are removed.
Built-up splashes may overheat and begin to smoke
or catch fire, and cause arcing.
2) Keep the ceramic floor clean at all times. If you
leave grease or fat in the cavity, it may overheat,
smoke or even catch fire when next using the
oven.
Air intake filter
Hole
Oven
Hole
CAUTION:
DO NOT REMOVE THE CERAMIC FLOOR
FROM THE OVEN.
Clip
Air intake filter
3) Make sure that mild soap or water does not
penetrate through the small vents in the walls which
may cause damage to the oven.
4) Do not use spray type cleaners on the oven interior.
Splash cover
CAUTION:
AT LEAST ONCE A WEEK, REMOVE THE SPLASH
COVER AND WASH BOTH SIDES OF IT IN A MILD
DETERGENT SOLUTION. BUILT-UP GREASE MAY
OVERHEAT AND BEGIN TO SMOKE. AND
OVERHEATED GREASE MAY BURN THE SPLASH
COVER. THE SPLASH COVER IS LOCATED IN THE
TOP OF THE OVEN AND MAY EASILY BE REMOVED.
REMEMBER TO UNPLUG THE POWER CORD.
DO NOT OPERATE THE OVEN WITHOUT THE
AIR INTAKE FILTER IN PLACE.
Oven lamp replacement
Unplug the oven before removing the oven lamp access
cover, and replace the lamp (25W/240V). Make sure
that the cover is secured to the oven cabinet after
replacing the lamp.
6
SEEG R22/23/25.En1-14
6
Clip
Keep clean the air intake filter. To clean the air intake
filter you have to pull the two clips on the filter and to
remove the air intake filter. Wash the air intake filter in
mild soapy water and dry with a soft cloth. After
cleaning re-install the air intake filter to the oven.
Clean the air intake filter once every two weeks.
13.7.10, 6:22 PM
SERVICE CALL CHECK
Please check the following before calling for service.
1. Power Supply
Check the power plug is properly connected to a suitable wall outlet.
Check the line fuse/circuit breaker is functioning properly.
2. When the door is opened.
A. Does the oven lamp light ?
YES
NO
B. Does the cooling fan work ?
YES
NO
(Put your hand over the rear ventilation opening.)
3. Place one cup of 150 ml water in the oven and close the door securely.
Programme the oven for one minute at 100% (
).
And start the oven.
A. Does the cook indicator go on ?
YES
NO
B. At the end of this time, is the water warm ?
YES
NO
If "NO" is the answer to any of the above questions, call your dealer or an authorized SHARP Service Agent and
report the results of your check.
7
SEEG R22/23/25.En1-14
7
13.7.10, 6:22 PM
GUIDE
USEFUL THINGS TO KNOW ABOUT
MICROWAVES
Metals
should not, as a rule, be used in microwave ovens
because microwaves cannot penetrate metals and
reach the food inside.
There are, however, some exceptions: Small strips of
aluminum foil can be used to cover parts to prevent
them from defrosting or cooking too fast (e.g., chicken
wings).
Microwaves set the water molecules contained in the
food vibrating. The resulting friction generates heat
that can be used to defrost or cook the food.
Food
The microwaves are
absorbed by the food
Metal
SUITABLE UTENSILS
Microwaves are
reflected
Glass, Glass-ceramics and Porcelain
Heat-resistant utensils made of glass, glass-ceramic
or porcelain are suitable. However, the utensils must
not contain metals (e.g., lead crystal) or be metalplated (e.g., gold rim, cobalt blue).
Small metal skewers and aluminum trays (of prepackaged food) may be used. However, they must
be small in proportion to the food. Aluminum containers, for example, must be filled to at least 2/3 to
3/4 with food. It is recommendable to transfer the
food into microwave-safe containers.
Glass, Porcelain, Ceramics
Plastics, paper etc.
Microwaves
pass through
When using aluminum trays or other metal utensils,
they must be placed at least 2.0 cm away from the
cavity walls. Otherwise the cavity walls may be damaged by sparking.
Ceramics
are usually suitable but they must be enamelled.
When using utensils that are not enamelled, moisture
can be absorbed by the material and heat it up. This
can cause the material to crack.
Do not use any utensils with metal-plating, metal parts
or metal projections like screws, ribbons, or handles.
Plastics and Paper Dishes
Heat-resistant and microwave-proof plastic utensils
or paper dishes are suitable for defrosting, heating
and cooking. Please follow the manufacturer's instructions.
TESTING UTENSILS
Perform the following test if you are unsure whether a
certain utensil is microwave-safe: Place the utensil
into the oven, put a glass containing about 150 ml of
water on or beside the utensil, and operate the microwave oven at 100% power for 1 to 2 minutes. If it is cool
or luke-warm to the touch, the utensil is suitable for
microwave use. Do not perform this test on plastic
dishes because the plastic might melt.
Microwave Plastic Wrap
or heat-resistant wrap is suitable for covering and
wrapping food. Please follow the manufacturer's instructions.
Roasting Bags
can be used in microwave ovens. Do not close the
bags with a metal clip because the clip may cause the
bag film to melt. Close the bag with string and pierce
it several times with a fork. Films that are not heatresistant, e.g., films to retain product freshness are
not recommended for use in microwave ovens.
8
SEEG R22/23/25.En1-14
8
13.7.10, 6:22 PM
INFORMATION ABOUT POWER LEVEL
100% power:
The high power is perfect for warming up or regenerating food. You can also use it to make food boil e.g. water
and then cook further with lower power. (e.g. for rice or noodles)
50% power:
For longer cooking times and compact types of food.
20% power:
For considerate cooking and sensitive menus. Also after cooking to simmer or for noodles and rice.
10% power:
The low power level is mainly for defrosting. You can also use it for cooking of very sensitive menus like cheese sauce.
Basically it is recommendable to cover the food for cooking or reheating. Additionally you can sprinkle some
water over the food (you can also use salted water or even bouillon).
The water steam keeps the food moist and it also helps to make the cooking faster.
COOKING CHART AND RECIPES
1500W
Menu
Init.
Temp.
Microwave
Power
Levels
10%
10%
10%
10%
10%
200g
approx. 5'20"
approx. 5'20"
approx. 5'20"
approx. 4'
approx. 1'40"
400g
600g
approx. 12'
approx. 8'
approx. 8'30" approx. 13'
approx. 8'30" approx. 11'
—
approx. 7'30"
approx. 2'10" approx. 2'40"
Comment
Turn over at 1/2 of total
defrosting time.
Standing time : about 10
mins.
Meat
Poultry
Fish
Fruit
*Cake
(no fruit or cheese)
*Cream cake
Shrimps
**Cold meat
-18°C
-18°C
-18°C
-18°C
-18°C
-18°C
-18°C
-18°C
10%
10%
10%
REHEAT
Soup, clear
Soup, cream
Casseroles
Supplements, Noodles
Supplements, Rice
Supplements, Potatoes
Supplements, Vegetables
Baked Beans
Goulash, Ragout
*Meat (150g)
*Sausages (50g)
5±2°C
5±2°C
5±2°C
5±2°C
5±2°C
5±2°C
5±2°C
5±2°C
5±2°C
5±2°C
5±2°C
100%
100%
100%
100%
100%
100%
100%
100%
100%
100%
100%
approx. 1'10"
approx. 1'20"
approx. 1'20"
approx. 1'10"
approx. 1'10"
approx. 1'10"
approx. 1'10"
approx. 1'20"
approx. 1'30"
approx. 1'
approx. 20 sec.
COOK
Supplements, Potatoes 20±2°C
Supplements, Vegetables 20±2°C
100%
100%
approx. 2'50" approx. 5'30" approx. 6'30" Use casserole lid. Stir at
approx. 3'20" approx. 5'30" approx. 7'30" 1/2 of total cooking time.
DEFROST
1800W
Menu
Init.
Temp.
Microwave
Power
Levels
10%
10%
10%
10%
10%
approx. 1'30" approx. 2'50"
approx. 5'
approx. 8'30"
approx. 4'
approx. 6'30"
approx. 2'10"
approx. 2'20"
approx. 2'20"
approx. 2'
approx. 2'
approx. 2'
approx. 2'
approx. 2'20"
approx. 2'30"
approx. 1'40"
approx. 30 sec.
—
approx. 12'
approx. 9'
approx. 3'10" Cover with microwave
approx. 3'20" foil or lid. Stir well after
approx. 3'30" reheating.
approx. 2'50"
approx. 2'50"
approx. 3'
approx. 2'50"
—
approx. 3'30"
—
—
approx. 50 sec.
200g
400g
600g
Comment
approx. 4'30"
approx. 4'30"
approx. 4'30"
approx. 2'50"
approx. 1'10"
approx. 6'30"
approx. 6'30"
approx. 6'30"
approx. 5'30"
approx. 1'50"
approx. 8'30"
approx. 9'30"
approx. 8'30"
—
approx. 2'10"
Turn over at 1/2 of total
defrosting time.
Standing time : about 10
mins.
Meat
Poultry
Fish
Fruit
*Cake
(no fruit or cheese)
*Cream cake
Shrimps
**Cold meat
-18°C
-18°C
-18°C
-18°C
-18°C
-18°C
-18°C
-18°C
10%
10%
10%
REHEAT
Soup, clear
Soup, cream
Casseroles
Supplements, Noodles
Supplements, Rice
Supplements, Potatoes
Supplements, Vegetables
Baked Beans
Goulash, Ragout
*Meat (150g)
*Sausages (50g)
5±2°C
5±2°C
5±2°C
5±2°C
5±2°C
5±2°C
5±2°C
5±2°C
5±2°C
5±2°C
5±2°C
100%
100%
100%
100%
100%
100%
100%
100%
100%
100%
100%
approx. 1'
approx. 1'
approx. 1'10"
approx. 50 sec.
approx. 50 sec.
approx. 50 sec.
approx. 50 sec.
approx. 1'
approx. 1'10"
approx. 40 sec.
approx. 15 sec.
COOK
Supplements, Potatoes 20±2°C
Supplements, Vegetables 20±2°C
100%
100%
Use casserole lid. Stir at
approx. 2'10" approx. 4'40"
approx. 6'
approx. 2'50" approx. 4'40" approx. 6'30" 1/2 of total cooking time.
DEFROST
approx. 1'10" approx. 2'10"
approx. 4'
approx. 6'30"
approx. 3'
approx. 5'30"
approx. 1'40"
approx. 2'
approx. 2'
approx. 1'20"
approx. 1'30"
approx. 1'30"
approx. 1'50"
approx. 2'
approx. 2'10"
approx. 1'20"
25 sec.
—
approx. 9'
approx. 8'
approx. 2'30" Cover with microwave
approx. 2'50" foil or lid. Stir well after
approx. 2'50" reheating.
approx. 2'20"
approx. 2'30"
approx. 2'30"
approx. 2'30"
—
approx. 3'
—
—
35 sec.
*indications per pcs. (1,2,3 pcs.) not in gramm.
**Remove defrosted portions. Standing time : about 10 mins.
9
SEEG R22/23/25.En1-14
9
13.7.10, 6:22 PM
2100W
Init.
Temp.
Menu
Microwave
Power
Levels
10%
10%
10%
10%
10%
200g
approx. 4'
approx. 4'20"
approx. 4'
approx. 2'50"
approx. 1'
600g
Comment
400g
approx. 5'50" approx. 8'30" Turn over at 1/2 of total
approx. 6'30" approx. 9'30" defrosting time.
approx. 5'30" approx. 7'30" Standing time : about 10
—
approx. 5'20"
mins.
approx. 2'
approx. 1'40"
Meat
Poultry
Fish
Fruit
*Cake
(no fruit or cheese)
*Cream cake
Shrimps
**Cold meat
-18°C
-18°C
-18°C
-18°C
-18°C
-18°C
-18°C
-18°C
10%
10%
10%
REHEAT
Soup, clear
Soup, cream
Casseroles
Supplements, Noodles
Supplements, Rice
Supplements, Potatoes
Supplements, Vegetables
Baked Beans
Goulash, Ragout
*Meat (150g)
*Sausages (50g)
5±2°C
5±2°C
5±2°C
5±2°C
5±2°C
5±2°C
5±2°C
5±2°C
5±2°C
5±2°C
5±2°C
100%
100%
100%
100%
100%
100%
100%
100%
100%
100%
100%
approx. 50 sec.
approx. 1'
approx. 1'
approx. 40 sec.
approx. 40 sec.
approx. 40 sec.
approx. 50 sec.
approx. 55 sec.
approx. 1'
approx. 40 sec.
approx. 15 sec.
COOK
Supplements, Potatoes 20±2°C
Supplements, Vegetables 20±2°C
100%
100%
approx. 5'
approx. 3'30"
approx. 2'
approx. 2'10" approx. 3'50" approx. 5'20" Use casserole lid. Stir at
1/2 of total cooking time.
DEFROST
approx. 1'25" approx. 2'10"
approx. 4'
approx. 6'30"
approx. 5'30"
approx. 3'
approx. 1'30"
approx. 1'40"
approx. 1'40"
approx. 1'10"
approx. 1'20"
approx. 1'30"
approx. 1'30"
approx. 1'50"
approx. 2'
approx. 1'20"
25 sec.
—
approx. 9'
approx. 8'
approx. 2'20"
approx. 2'40" Cover with microwave
approx. 2'40" foil or lid. Stir well after
reheating.
approx. 2'
approx. 2'
approx. 2'10"
approx. 2'10"
—
approx. 2'50"
—
—
40 sec.
*indications per pcs. (1,2,3 pcs.) not in gramm.
**Remove defrosted portions. Standing time : about 10 mins.
1500W
SPECIALS
1800W
SPECIALS
2100W
SPECIALS
Menu
Int.
Temp.
Danish Pastrys
*Douhgnuts/Berliner
*Boucheés à la reine
*Burger
*Cheeseburger
Toast and Bacon(40g)
Scrambled Eggs and Bacon(140g)
20±2°C
20±2°C
20±2°C
5±2°C
5±2°C
20±2°C
5±2°C
Menu
Int.
Temp.
Danish Pastrys
*Douhgnuts/Berliner
*Boucheés à la reine
*Burger
*Cheeseburger
Toast and Bacon(40g)
Scrambled Eggs and Bacon(140g)
20±2°C
20±2°C
20±2°C
5±2°C
5±2°C
20±2°C
5±2°C
Menu
Int.
Temp.
Danish Pastrys
*Douhgnuts/Berliner
*Boucheés à la reine
*Burger
*Cheeseburger
Toast and Bacon(40g)
Scrambled Eggs and Bacon(140g)
20±2°C
20±2°C
20±2°C
5±2°C
5±2°C
20±2°C
5±2°C
Microwave
Power Levels
100%
100%
100%
100%
50%
100%
100%
1 pc
2 pcs
approx. 8 sec.
approx. 8 sec.
approx. 14 sec.
approx. 1'
approx. 1'
approx. 14 sec.
approx. 40 sec.
—
approx. 12 sec.
approx. 20 sec.
1'40"
1'50"
—
—
Microwave
Power Levels
100%
100%
100%
100%
50%
100%
100%
1 pc
2 pcs
approx. 6 sec.
approx. 5 sec.
approx. 10 sec.
40 sec.
50 sec.
10 sec.
35 sec.
—
approx. 8 sec.
approx. 15 sec.
1'20"
1'30"
—
—
Microwave
Power Levels
100%
100%
100%
100%
50%
100%
100%
1 pc
2 pcs
approx. 6 sec.
approx. 5 sec.
approx. 10 sec.
35 sec.
50 sec.
10 sec.
40 sec.
—
approx. 8 sec.
approx. 15 sec.
1'10"
1'40"
—
—
*indications per pcs. (1,2,3 pcs.) not in gramm.
10
SEEG R22/23/25.En1-14
10
13.7.10, 6:22 PM
Recipes
Bacon
Place 2 thin slices of bacon between paper towels and
cook. approx. 30 sec./20 sec./15 sec.
Omelette
Sprinkle a normal plate with fat. Beat three eggs with
some salt and pepper. Pour the eggs on the plate and
cook for ca. 1 min. 20 sec./50 sec./45 sec. Add any filling
(2 tbsp.) you want (ragout, vegetables) and cook again
for ca. 20 sec./10 sec./10 sec.
Toast Hawaii
Prepare toasts and spread with butter. Place one slice
of ham, pinepple and cheeses on a plate and cook for
approx. 25 sec./20 sec./20 sec. After cooking place on
the prepared toast.
Scrambled Eggs
Mix two eggs with salt, pepper and some milk. Cook
for approx. 1 min. 10 sec./45 sec./45 sec., three times
strirring within total cooking time.
Hot chocolate with cream
Pour 150 ml milk in a big cup. Add 30 g black chocolate
(pieces). Stir and cook for 1 min./50 sec./40 sec. Stir
again once in between. Add some stirred cream and
serve with some chocolate powder on top.
Hint: The first time refers to 1500 Watts, the second time to 1800 Watts, and the third time to 2100 Watts.
All recipes are cooked with 100 % microwave power.
11
SEEG R22/23/25.En1-14
11
13.7.10, 6:22 PM
SPECIFICATIONS
AC Line Voltage
Distribution line fuse/circuit breaker
AC Power Required
Output Power
Microwave Frequency
Sound level
Outside Dimensions
Cavity Dimensions
Oven Capacity
Cooking Uniformity
Weight
230V, 50Hz, single phase
16A (time lag)
R-22AM : 2.4 kW
R-23AM : 2.9 kW
R-25AM : 3.15 kW
R-22AM : 1500 W (IEC60705)
R-23AM : 1800 W (IEC60705)
R-25AM : 2100 W (IEC60705)
2450 MHz *(Group 2/Class B)
less than 70dB (A)
510mm (W) x 335mm (H) x 470mm (D) (Single oven)
510mm (W) x 670mm (H) x 470mm (D) (Two ovens)
330mm (W) x 180mm (H) x 330mm (D)
20 litres
Rotary antenna system
Approx. 33 kg
* This Product fulfils the requirement of the European standard EN55011. In conformity with this standard,
this product is classified as group 2 class B equipment. Group 2 means that the equipment intentionally
generates radio-frequency energy in the form of electromagnetic radiation for heating treatment of food.
Class B equipment means that the equipment suitable to be used in domestic establishments.
(This product is designed for commercial application only and as such it falls outside the scope of
Regulation (EC) 1275/2008 implementing EU Directive 2005/32/EC on eco-design requirements for
standby and off mode electric power consumption. Sharp do not recommend the product for domestic
application and will not accept any liability for such use.)
12
SEEG R22/23/25.En1-14
12
13.7.10, 6:22 PM
• SEULEMENT VALIDE POUR L'ALLEMAGNE ET L'AUTRICHE • SLECHTS GELDIG VOOR DUITSLAND EN OOSTENRUK •
• SOLTANTO VALIDO PER LA GERMANIA E L'AUSTRIA • SOLAMENTE VÁLIDO PARA ALEMANIA Y AUSTRIA •
• Bei Vorliegen eines Prodktmangels können Sie sich zwecks Reparaturabwicklung im Vor-Ort-Service
bei Ihnen, direkt an den KUNDEN-SERVICE wenden.
Garantie mit Quick 48 Vor-Ort-Service
Gilt für Deutschland und Österreich
Gastronomie Profi - Mikrowellengeräte
Sehr geehrter Sharp Kunde,
Ihr Profi-Mikrowellengerät wurde sorgfältig hergestellt und dessen Funktionsfähigkeit einer Endkontrolle unterzogen.
Umfang der Garantie:
Sollte Ihr Profi-Mikrowellengerät trotz sorgfältiger Herstellung und Endkontrolle einen Mangel aufweisen, können Sie
innerhalb der Garantiezeit zusätzlich zu den gesetzlichen Sachmängelansprüchen, die Ihnen gegen Ihren Verkäufer
zustehen, Garantieleistungen gegen Sharp Electronics (Europe) GmbH in Anspruch nehmen. Diese stehen Ihnen zu, wenn
ein herstellungsbedingter Material- und/oder Verarbeitungsmangel (nachfolgend "Mangel") bei dem Profi-Mikrowellengerät
oder Teilen davon - mit Ausnahme der Garraum-Glühlampe-innerhalb von 24 Monaten auftritt. Die Garantie umfasst nicht
Mängel, die durch unsachgemäße Behandlung, Bedienungsfehler oder durch Fremdeinwirkung entstanden sind.
Transportschäden bei Neugeräten müssen Sie bei Ihrem Verkäufer geltend machen.
Die Garantiefrist von 24 Monaten beginnt mit dem Tag, an dem Sie das fabrikneue Gerät von einem Händler gekauft haben.
Die Erbringung von Garantieleistungen verlängert nicht die Garantiezeit.
Garantieleistungen:
Sharp Electronics (Europe) GmbH erfüllt seine Garantieverpflichtungen für Mängel durch kostenlose Reparatur durch einen
Quick 48 Stunden Vor-Ort-Service. Etwa anfallende Transportkosten innerhalb Deutschlands und Österreich übernehmen
wir.
Im Quick 48 Stunden Vor-Ort-Service werden alle Reklamationen, die von montags und freitags zwischen 8:00 und 18:00
Uhr beim Quick 48 Deutschland, Tel.: 01806 774277* (* 0,20 € je Anruf aus dem deutschen Festnetz, und maximal 0,60 € je
Anruf aus dem deutschen Mobilfunknetz) und in Österreich Tel.: 0820 / 500 820** (€0,145/Min) eingehen, ab dem
darauffolgenden Werktag gerechnet, im Regelfall innerhalb 48 Stunden bei Ihnen im Vor-Ort-Service repariert.
Geltendmachung der Garantie:
Der Mangel des Gerätes muss innerhalb der Garantiefrist unter Angabe des Kaufdatums, der Modellbezeichnung und der
Seriennummer des Gerätes unter den oben aufgeführten Telefonnummern geltend gemacht werden. Bei der Vor-OrtReparatur ist dann der Kaufbeleg, aus dem sich das Kaufdatum, die Modellbezeichnung und die Seriennummer des Gerätes
ergibt, vorzulegen.
Selbstverständlich können Sie unseren QUICK 48 Stunden Vor-Ort-Service für Profi-Mikrowellengeräte auch nach Ablauf
der Verjährungsfristen für Sachmängel-/Garantiefristen in Anspruch nehmen, dann jedoch gegen Aufwandsberechnung des
jeweiligen Kundendienstes.
Garantiegeber: SHARP Electronics GmbH, Sonninstraße 3, 20097 Hamburg
www.sharp.de
13
SEEG R22/23/25.En1-14
13
13.7.10, 6:23 PM
Manufacturer:
GB
Authorised Representative:
SHARP Corporation
22-22, Nagaike-cho, Abeno-ku, Osaka 545-8522, Japan
SHARP Electronics Europe Ltd.
4 Furzeground Way, Stockley Park, Uxbridge, Middlesex, UB11 1EZ, UK
TINSMA056WRRZ-H31
Printed in Thailand
14
SEEG R22/23/25.En1-14
14
13.7.10, 6:23 PM