1
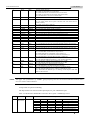
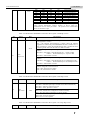
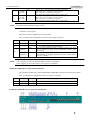
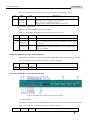
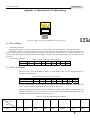
www.raisecom.com RCMS 2811 Multi Service Fiber Optical Ethernet Multiplexer User Manual xx-xxxx-xxxx-xxxxxx-xx Legal Notices Raisecom Technology Co., Ltd makes no warranty of any kind with regard to this manual, including, but not limited to, the implied warranties of merchantability and fitness for a particular purpose. Raisecom Technology Co., Ltd shall not be held liable for errors contained herein or direct, indirect, special, incidental or consequential damages in connection with the furnishing, performance, or use of this material. Warranty. A copy of the specific warranty terms applicable to your Raisecom product and replacement parts can be obtained from Service Office. Restricted Rights Legend. All rights are reserved. No part of this document may be photocopied, reproduced, or translated to another language without the prior written consent of Raisecom Technology Co., Ltd. The information contained in this document is subject to change without notice. Copyright Notices. Copyright ©2006 Raisecom. All rights reserved. No part of this publication may be excerpted, reproduced, translated or utilized in any form or by any means, electronic or mechanical, including photocopying and microfilm, without permission in Writing from Raisecom Technology Co., Ltd. Trademark Notices is the trademark of Raisecom Technology Co., Ltd. Java™ is a U.S. trademark of Sun Microsystems, Inc. Microsoft® is a U.S. registered trademark of Microsoft Corporation. Windows NT® is a U.S. registered trademark of Microsoft Corporation. Windows® 2000 is a U.S. registered trademark of Microsoft Corporation. Windows® XP is a U.S. registered trademark of Microsoft Corporation. Windows® and MS Windows® are U.S. registered trademarks of Microsoft Corporation. Contact Information Technical Assistance Center The Raisecom TAC is available to all customers who need technical assistance with a Raisecom product, technology, or, solution. You can communicate with us through the following methods: Add: 1120, Haitai Tower, 229 Fourth North Loop Middle Road, Haidian District, Beijing 100083 Tel: Fax: +86-10-82884499 Ext.878 (International Department) +86-10-82885200, +86-10-82884411 World Wide Web You can access the most current Raisecom product information on the World Wide Web at the following URL: http://www.raisecom.com Feedback Comments and questions about how the NView iEMS system software works are welcomed. Please review the FAQ in the related manual, and if your question is not covered, send email by using the following web page: http://www.raisecom.com/en/xcontactus/contactus.htm. If you have comments on the NView iEMS specification, instead of the web page above, please send comments to: [email protected] We hope to hear from you! CONTENTS Chapter 1 System Overview -------------------------------------------------------------------------- 1 Main Features -----------------------------------------------------------------------------------------------------------------------1 Device Part Number Description -----------------------------------------------------------------------------------------------1 RCMS2811 Series Model List ---------------------------------------------------------------------------------------------------2 Chapter 2 Parameters ---------------------------------------------------------------------------------- 3 Basic Configuration ----------------------------------------------------------------------------------------------------------------3 Optical Port Characteristic -------------------------------------------------------------------------------------------------------3 E1 Port Characteristic -------------------------------------------------------------------------------------------------------------3 Fast Ethernet Port Characteristic ----------------------------------------------------------------------------------------------3 PC Agent Network Management Port Characteristic ---------------------------------------------------------------------3 V.35 Interface Characteristic ----------------------------------------------------------------------------------------------------4 Power Supply------------------------------------------------------------------------------------------------------------------------4 Ambience -----------------------------------------------------------------------------------------------------------------------------4 Dimension & Weight ---------------------------------------------------------------------------------------------------------------4 Chapter 3 How to use----------------------------------------------------------------------------------- 5 Panel Introduction ------------------------------------------------------------------------------------------------------------------5 RCMS2811 Series Front Panel ---------------------------------------------------------------------------------------------------------------- 5 RCMS2811 Series Back Panel----------------------------------------------------------------------------------------------------------------- 6 RCMS 2811 Series Device Operation Introduction --------------------------------------------------------------------------------------- 6 E1 Loop-back Test --------------------------------------------------------------------------------------------------------------- 15 Application Example ------------------------------------------------------------------------------------------------------------- 16 Chapter 4 Installation and Test ---------------------------------------------------------------------17 Preparation------------------------------------------------------------------------------------------------------------------------- 17 Installation Steps------------------------------------------------------------------------------------------------------------------ 17 Connecting Optical Port A and Optical Port B -------------------------------------------------------------------------------------------- 17 Connecting E1 Interface ----------------------------------------------------------------------------------------------------------------------- 18 Connecting Fast Ethernet Interface--------------------------------------------------------------------------------------------------------- 18 Connecting Network Management Port---------------------------------------------------------------------------------------------------- 18 Connecting V.35 interface on sub card----------------------------------------------------------------------------------------------------- 18 Connecting Power Supply --------------------------------------------------------------------------------------------------------------------- 19 Power on Test --------------------------------------------------------------------------------------------------------------------- 19 E1 Bit Error Test ------------------------------------------------------------------------------------------------------------------ 19 Mask Dummy E1 LOS Alarm -------------------------------------------------------------------------------------------------- 19 Chapter 5 Troubleshooting --------------------------------------------------------------------------20 Appendix A: Introduction of Cable making --------------------------------------------------------21 E1 Cable Making ----------------------------------------------------------------------------------------------------------------- 21 A.2 Cable of Ethernet ----------------------------------------------------------------------------------------------------------- 21 A.3 Agent Cable Making -------------------------------------------------------------------------------------------------------- 22 Preface About This Manual This manual introduces primary functions of the configuration management software for RC series products. Who Should Read This Manual Sales and marketing engineers, after service staff and telecommunication network design engineers could use this manual as a valuable reference. If you want to get an overview on features, applications, architectures and specifications of Raisecom RC series integrated access devices, you could find useful information in this manual as well. Compliance The RC series products developed by Raisecom are strictly complied with the following standards as well as ITU-T, IEEE, IETF and related standards from other international telecommunication standard organizations: YD/T900-1997 SDH Equipment Technical Requirements - Clock YD/T973-1998 SDH 155Mb/s and 622Mb/s Technical conditions of optical transmitter module and receiver module YD/T1017-1999 Network node interface for the Synchronous Digital Hierarchy (SDH) YD/T1022-1999 Requirement of synchronous digital hierarchy (SDH) equipment function YD/T1078-2000 SDH Transmission Network Technique Requirements-Interworking of Network Protection Architectures YD/T1111.1-2001 Technical Requirements of SDH Optical Transmitter/Optical Receiver Modules——2.488320 Gb/s Optical Receiver Modules YD/T1111.2- 2001 Technical Requirements of SHD Optical Transmitter/Optical Receiver Modules——2.488320 Gb/s Optical Transmitter Modules YD/T1179- 2002 Technical Specification of Ethernet over SDH G.703 Physical/electrical characteristics of hierarchical digital interfaces G.704 Synchronous frame structures used at 1544, 6312, 2048, 8448 and 44 736 kbit/s hierarchical levels G.707 Network node interface for the synchronous digital hierarchy (SDH) G.774 Synchronous digital hierarchy (SDH) - Management information model for the network element view G.781 Synchronization layer functions G.783 Characteristics of synchronous digital hierarchy (SDH) equipment functional blocks G.784 Synchronous digital hierarchy (SDH) management G.803 Architecture of transport networks based on the synchronous digital hierarchy (SDH) G.813 Timing characteristics of SDH equipment slave clocks (SEC) G.823 The control of jitter and wander within digital networks which are based on the 2048 kbit/s hierarchy G.825 The control of jitter and wander within digital networks which are based on the synchronous digital hierarchy (SDH) G.826 End-to-end error performance parameters and objectives for international, constant bit-rate digital paths and connections G.828 Error performance parameters and objectives for international, constant bit-rate synchronous digital paths G.829 Error performance events for SDH multiplex and regenerator sections G.831 Management capabilities of transport networks based on the synchronous digital hierarchy (SDH) G.841 Types and characteristics of SDH network protection architectures G.842 Interworking of SDH network protection architectures G.957 Optical interfaces for equipments and systems relating to the synchronous digital hierarchy G.691 Optical interfaces for single channel STM-64 and other SDH systems with optical amplifiers G.664 Optical safety procedures and requirements for optical transport systems I.731 ATM Types and general characteristics of ATM equipment I.732 ATM Functional characteristics of ATM equipment IEEE 802.1Q Virtual Local Area Networks (LANs) IEEE 802.1p Traffic Class Expediting and Dynamic Multicast Filtering IEEE 802.3 CSMA/CD Access Method and Physical Layer Instruction www.raisecom.com User Manual Chapter 1 System Overview RCMS2811 is an ideal transmission device of optical fiber for point-to-point networks, medium-sized and small capacity networks, such as wireless communication base stations, private communication networks and switch networks. It can be applied to either public networks or various private networks. The transmission capacity of RCMS2811 is optional. The maximum capacity is 16 E1 channels and one Fast Ethernet ports. RCMS2811 can be remotely managed. Main Features Device Part Number Description RCMS Series Model List Main Features The device’s main features include: ¾ ¾ ¾ ¾ ¾ ¾ ¾ ¾ ¾ ¾ ¾ ¾ ¾ ¾ ¾ Low power consumption due to extra large-scale ASIC chips; high reliability due to 4-layer PCB Provide local/remote network management Alarm indicators of local and remote equipments Remote device power off alarm Support ALS function Provide two fiber optical interface for redundant fiber optic link to improve stability Provide maximum 16 E1 interfaces (2048Kbps), transparent mode Local/remote E1 channel loop-back test function, easy fault location One 10/100Mbps auto-negotiation Ethernet port Support auto-negotiation and force working mode of Ethernet port The maximum Ethernet frame size is 1916 bytes Support flow control of IEEE802.3x in full duplex mode and back pressure in half duplex mode One extend slot can be used for one channel V.35 service Redundant power supply of 220V, -48V and +24V. Power consumption <10W, good working stability Device Part Number Description RCMS2811 series standalone Ethernet multiplexer’s part number is defined as the following rules: RCMS2811 - A - B - C - D Here A, B, C and D are alterable in the part number. A: 120FE, 240FE and 480FE. 120FE/240FE/480FE means there are 4/8/16 channels E1 services and one Ethernet. B: Blank means E1 is 75Ωunbalanced interface; 1 www.raisecom.com User Manual BL means E1 is 120Ωbalanced interface. Note: As to the 4 E1 channels multiplexer, it has both balanced and unbalanced E1 interface so it has no B option. C: M, S1, S2, S3, SS1 and SS2 M means the optical port is dual-strand multi-mode and the transmission distance is 0-2km; S1 means the optical port is dual-strand single mode and the transmission distance is 0-25km; S2 means the optical port is dual-strand single mode and the transmission distance is 10-60km; S3 means the optical port is dual-strand single mode and the transmission distance is 15-120km; SS1 means the optical port is single strand single mode dual wavelength and the transmission distance is 0-25km. The Tx wavelength of optical port A is 1310nm and port B is 1550nm; SS2 means the optical port is single strand single mode dual wavelength and the transmission distance is 10-50km. The Tx wavelength of optical port A is 1310nm and port B is 1550nm; D: AC, DC48 and DC24. AC means the power supply is AC; DC48 means the power supply is DC -48V; DC24 means the power supply is DC +24V. Part number example: RCMS 2811-240FE-BL-S1-AC The specification of this device is: standalone 19 inches, 8 channels 120Ωbalanced E1 interfaces, one Fast Ethernet interface, one extend slot ( can insert V.35 card), transmission distance is 0-25km, two 220V AC power supplies. RCMS2811 Series Model List The RCMS series standalone dual optical port Ethernet multiplexer has 5 models as below table: Part Number RCMS2811-240FE-BL RCMS2811-480FE-BL RCMS2811-120FE RCMS2811-240FE RCMS2811-480FE Description One 10/100Mbps auto-negotiation Ethernet port(RJ45), 8 E1 interfaces, 120 Ωbalanced (RJ45). One 10/100Mbps auto-negotiation Ethernet port(RJ45), 16 E1 interfaces, 120Ωbalanced (RJ45). One 10/100Mbps auto-negotiation Ethernet port(RJ45),4 E1 interfaces, both 120Ωbalanced (RJ45) and 75Ωunbalanced (BNC). One 10/100Mbps auto-negotiation Ethernet port(RJ45), 8 E1 interfaces, 75 Ωunbalanced (DB37). One 10/100Mbps auto-negotiation Ethernet port(RJ45), 16 E1 interfaces, 75 Ωunbalanced (DB37). 2 www.raisecom.com User Manual Chapter 2 Parameters This section contains the following information: Basic Configuration Optical Port Characteristic E1 Port Characteristic Fast Ethernet Port Characteristic PC Agent Network Management V.35 Interface Characteristic Power Supply Ambience Dimension & Weight Basic Configuration The device’s basic configuration is as below: ¾ 2 optical ports, 4/8/16 E1 interfaces, one Fast Ethernet port and one extend slot for V.35 card; ¾ Power supply: 220VAC, -48VDC and +24VDC; ¾ Management port: PC Agent port. Optical Port Characteristic ¾ ¾ ¾ Rate: 150Mbps; Line Code: NRZ plus scrambling code Optical port mode: SC connector ( FC connector can be optional) E1 Port Characteristic ¾ ¾ ¾ ¾ ¾ ¾ Bit rate: Line code: Impedance of interface: interface) Electrical characteristics: Jitter Transfer characteristics: Input jitter tolerance: 2048Kbps±50ppm HDB3 75Ω (unbalanced BNC interface) or 120Ω (balanced RJ-45 complies with ITU-T G.703 complies with ITU-T G.823 complies with ITU-T G.823 Fast Ethernet Port Characteristic ¾ ¾ ¾ ¾ Port Type: RJ45; Complied with IEEE802.3 standard; 10/100 auto-negotiation; MDX/MDIX auto-negotiation. PC Agent Network Management Port Characteristic ¾ ¾ ¾ Port Type: RJ45; Complied with RS232 standard; Baud Rate: 19200bps. 3 www.raisecom.com User Manual V.35 Interface Characteristic ¾ ¾ ¾ Port Type: HDB26 Female; Physics Characteristic: Complied with ITU suggestion; Rate: E1 fractional mode V.35 rate is N×64Kbps(N=1~31); E1 unframed mode V.35 rate is 2048Kbps. ¾ Power supply voltage: Power Supply DC: -48V Voltage: -36V ~-72V; DC: +24V Voltage: +18V ~+36V; AC: 220V Voltage: 180V~260V. ¾ Power consumption: <10 W ¾ ¾ Temperature: Humidity: Ambience 0 ~45℃ ≤90% (25℃) Dimension & Weight ¾ ¾ Dimension: 440mm (W)×43.6mm×(H)×235mm(D); Weight: 3Kg (including sub card). 4 www.raisecom.com User Manual Chapter 3 How to use This Chapter introduces configuration and operation of RCMS2811 series five types’ devices: Panel Introduction E1 Loop-back Test Application Example Panel Introduction RCMS2811 Series Front Panel Figure 3-1 RCMS 2811-480FE-BL Front Panel Figure 3-2 RCMS 2811-480FE Front Panel Figure 3-3 RCMS 2811-240FE-BL Front Panel Figure 3-4 RCMS 2811-240FE Front Panel Figure 3-5 RCMS 2811-120FE Front Panel 5 www.raisecom.com User Manual RCMS2811 Series Back Panel Figure 3-6 RCMS 2811 Series Back Panel of AC Mode Figure 3-7 RCMS 2811 Series Back Panel of DC Mode RCMS 2811 Series Device Operation Introduction RCMS 2811-480FE-BL Device Operation Introduction Figure 3-8 RCMS 2811-480FE-BL Front Panel Description 1. System Indicator The System indicators mainly indicate the working status of optical port, E1 port and Ethernet port. Table 3-1 RCMS 2811-480FE-BL Front Panel Description 1-Indicator No. Name Color 1 PWR1 RED 2 PWR2 RED Description The 1st power alarm indicator It is on when the 1st power is not linked or working abnormally. It is off when the 1st power works normally. The 2nd power alarm indicator It is on when the 2nd power is not linked or working abnormally. It is off when the 2nd power works normally. 6 www.raisecom.com User Manual 3 ALM RED General Alarm Indicator It is stably on when there is a local alarm; It is flash when there is remote alarm but no local alarm; It is stably on when there are both local and remote alarm; It is off when there is no local or remote alarm. Power Indicator. It is on when the power supply works normally. 4 PWR GREEN 5 LPR RED 6 7 8 9 10 11 12 13 14 15 16 L WKA R WKA L WKB R WKB L LOSA R LOSA L LOSB R LOSB L LOF R LOF L E-3 GREEN GREEN GREEN GREEN RED RED RED RED RED RED RED Remote device power off indicator It is on when remote device power off after local and remote devices works normally; It is stably off on other conditions. It is on when local optical port A is working. It is on when remote optical port A is working. It is on when local optical port B is working. It is on when remote optical port B is working. It is on when the Rx signal of local optical port A is lost. It is on when the Rx signal of remote optical port A is lost. It is on when the Rx signal of local optical port B is lost. It is on when the Rx signal of remote optical port B is lost. It is on when there is loss of frame alarm in local optical Rx signal. It is on when there is loss of frame alarm in remote optical Rx signal. It is on when the bit error rate of local optical Rx signal is beyond 1E-3. 17 R E-3 RED It is on when the bit error rate of remote optical Rx signal is beyond 1E-3. 18 19 L E-6 R E-6 YELLOW YELLOW It is on when the bit error rate of local optical Rx signal is beyond 1E-6. It is on when the bit error rate of remote optical Rx signal is beyond 1E-6. 20-35 LOS1-16 RED 36 LNK GREEN 37 100M GREEN 38 ACT GREEN 39 FDX GREEN 1-16 E1 tributary Rx signal’s LOS alarm indicator. It is on when there is LOS alarm of only local E1; It is flash when there is LOS alarm of only remote E1; It is on when there is LOS alarm of both local and remote E1; It is off when there is no LOS alarm of local or remote E1. It is on when the Ethernet port links normally; It is off when the Ethernet port doesn’t link or links abnormally. It is on when the working speed of Ethernet port is 100M; It is off when the working speed of Ethernet port is 10M. It is flash when there is data transmission currently; It is off when there is no data transmission currently. It is on when the Ethernet port is working on full duplex mode; It is off when the Ethernet port is working on half duplex mode; It is flash when the Ethernet port is working on half duplex mode and there is data collision. NOTE: The upper row of indicators of “FIBER” group on front panel are local status indicators and the below ones are remote status indicators. 2. Dip-switch of system controlling The dip-switches are used to control optical port, E1 port and Ethernet port. Table 3-2 RCMS 2811-480FE-BL Front Panel Description 2-ADDR Dip-switch NO. Name 40 ADDR Dip-switch Bits Description Bit4 OFF OFF OFF OFF OFF OFF OFF Bit3 OFF OFF OFF OFF ON ON ON Bit2 OFF OFF ON ON OFF OFF ON Bit1 OFF ON OFF ON OFF ON OFF Device Type Remote Device The 1st local Device The 2nd local Device The 3rd local Device The 4th local Device The 5th local Device The 6th local Device 7 www.raisecom.com User Manual 4 bits OFF ON ON ON The 7th local Device ON OFF OFF OFF The 8th local Device ON OFF OFF ON The 9th local Device ON OFF ON OFF The 10th local Device ON OFF ON ON The 11thlocal Device ON ON OFF OFF The 12thlocal Device ON ON OFF ON The 13th local Device ON ON ON OFF The 14th local Device ON ON ON ON The 15th local Device Local device can be connected by PC serial port through LNK-UP port to realize network management. Address numbers of devices which are concatenated on a PC serial port mustn’t be repeated. Local concatenated devices are maximum 15pcs. Table 3-3 RCMS 2811-480FE-BL Front Panel Description 3-ETH Dip-switch NO. Name Bits 4 bits 41 ETH Dip-switch Description Bit1 Ethernet port auto-negotiation configuration. Bit1 = OFF, Ethernet auto-negotiation is enable. Bit1 = ON, Ethernet auto-negotiation is disable. When the Ethernet negotiation is disabled the port’s MDI/MDIX function is disabled too, so when connecting to switch the straight-through cable is needed and when connecting to NIC and router the cross-over cable is needed. Bit2 Ethernet port’s speed configuration when auto-negotiation is disabled. When Bit1 = ON, If Bit2 = OFF the Ethernet port’s speed is 100M; If Bit2 = ON the Ethernet port’s speed is 10M; When Bit1 = OFF the Bit2 is invalid. Bit3 Ethernet port’s duplex mode configuration when auto-negotiation is disabled. When Bit1 = ON, If Bit3 = OFF the Ethernet port is on full-duplex mode; If Bit3 = ON the Ethernet port is on half-duplex mode; When Bit1 = OFF the Bit3 is invalid. Bit4 the configuration of ALS function. Bit4 = OFF, ALS function is disable. Bit4 = ON, ALS function is enable. Table 3-4 RCMS 2811-480FE-BL Front Panel Description 4-SEL Dip-switch NO. 42 Name SEL Dip-switch Bits 4 bits Description Bit1, Bit2 Optical port Auto-negotiation/Force configuration. Bit1, Bit2 = OFF OFF, Optical port A and B can be chosen automatically. Bit1, Bit2 = OFF ON, Optical B is chosen. Bit1, Bit2 = ON X, Optical A is chosen. Bit3 mask/unmask alarm configuration of idle E1 tributary. Bit3 = OFF, unmask alarm configuration of idle E1 tributary. Bit3 = ON, mask alarm configuration of idle E1 tributary. Bit4 Local/Remote E1 loop-back position configuration. Bit4 = OFF, E1 remote loop-back. Bit4 = ON, E1 local loop-back. Table 3-5 RCMS 2811-480FE-BL Front Panel Description 5-E1 Loop Dip-switch NO. Name Bits Description 8 www.raisecom.com User Manual Bit1-8 the 1st to 8th E1 tributary loop-back configuration. Bit1 = OFF , the 1st E1 tributary is not loop-back; Bit1 = ON, the 1st E1 tributary is loop-back. The configuration method of Bit2 to Bit 8 is same as Bit 1. Bit1-8 the 9th to 16th E1 tributary loop-back configuration. Bit1 = OFF , the 9th E1 tributary is not loop-back; Bit1 = ON, the 9th E1 tributary is loop-back. The configuration method of Bit2 to Bit 8 is same as Bit 1. 8 bits 43 E1-LOOP Dip-switch 44 E1-LOOP Dip-switch 8 bits NOTE: The default status of all dip-switches is OFF. 3. Interface on front panel There are E1 and PC-AGENT ports on front panel. Table 3-6 RCMS 2811-480FE-BL Front Panel Description 6-Interface NO. Name Bits Description 45 1-8 RJ45 1st -8th tributary 120Ω E1balanced interfaces. 46 9-16 RJ45 9th -16th tributary 120Ω E1 balanced interfaces. RJ45 Local network management interface. LNK-UP connects to PC serial port or connects to upper device’s LNK-DWN interface when concatenating. LNK-DWN connects to upper device’s LNK-UP interface when concatenating. It complies with RS232 electrical standard and the baud rate is 19200bps. LNK-UP 47 RJ45 LNK-DWN NOTE: 1. Hot-swapping of LNK-UP and LNK-DWN interfaces is forbidden. 2. Hot-swapping of sub-card interface on back panel is forbidden. RCMS 2811-480FE Device Operation Introduction The operation introduction is same as RCMS2811-480FE-BL except for E1 interface description. Table 3-7 RCMS 2811-480FE Front Panel Description 1-Interface NO. Name Bits Description 45 1-8 DB37 1st -8th tributary 75Ω E1unbalanced interfaces. 46 9-16 DB37 9th -16th tributary 75Ω E1unbalanced interfaces. RCMS 2811-240FE-BL Device Operation Introduction 9 www.raisecom.com User Manual Figure 3-9 RCMS 2811-240FE-BL Front Panel Description 1. System Indicator The System indicators mainly indicate the working status of optical port, E1 port and Ethernet port. Table 3-8 RCMS 2811-240FE-BL Front Panel Description 1-Indicator No. Name Color Description st 1 PWR1 RED The 1 power alarm indicator It is on when the 1st power is not linked or working abnormally. It is off when the 1st power works normally. The 2nd power alarm indicator It is on when the 2nd power is not linked or working abnormally. It is off when the 2nd power works normally. General Alarm Indicator It is stably on when there is a local alarm; It is flash when there is remote alarm but no local alarm; It is stably on when there are both local and remote alarm; It is off when there is no local or remote alarm. Note: It is not include the loss of unworking fiber port. Power Indicator. It is on when the power supply works normally. 2 PWR2 RED 3 ALM RED 4 PWR GREEN 5 LPR RED 6 7 8 9 10 11 12 13 14 15 16 L WKA R WKA L WKB R WKB L LOSA R LOSA L LOSB R LOSB L LOF R LOF L E-3 GREEN GREEN GREEN GREEN RED RED RED RED RED RED RED Remote device power off indicator It is on when remote device power off after local and remote devices works normally; It is stably off on other conditions. It is on when local optical port A is working. It is on when remote optical port A is working. It is on when local optical port B is working. It is on when remote optical port B is working. It is on when the Rx signal of local optical port A is lost. It is on when the Rx signal of remote optical port A is lost. It is on when the Rx signal of local optical port B is lost. It is on when the Rx signal of remote optical port B is lost. It is on when there is loss of frame alarm in local optical Rx signal. It is on when there is loss of frame alarm in remote optical Rx signal. It is on when the bit error rate of local optical Rx signal is beyond 1E-3. 17 R E-3 RED It is on when the bit error rate of remote optical Rx signal is beyond 1E-3. 18 19 L E-6 R E-6 YELLOW YELLOW It is on when the bit error rate of local optical Rx signal is beyond 1E-6. It is on when the bit error rate of remote optical Rx signal is beyond 1E-6. 20-27 LOS1-8 RED 28 LNK GREEN 29 100M GREEN 30 ACT GREEN 31 FDX GREEN 1-8 E1 tributary Rx signal’s LOS alarm indicator. It is on when there is LOS alarm of only local E1; It is flash when there is LOS alarm of only remote E1; It is on when there is LOS alarm of both local and remote E1; It is off when there is no LOS alarm of local or remote E1. It is on when the Ethernet port links normally; It is off when the Ethernet port doesn’t link or links abnormally. It is on when the working speed of Ethernet port is 100M; It is off when the working speed of Ethernet port is 10M. It is flash when there is data transmission currently; It is off when there is no data transmission currently. It is on when the Ethernet port is working on full duplex mode; It is off when the Ethernet port is working on half duplex mode; It is flash when the Ethernet port is working on half duplex mode and there is data collision. 2. Dip-switch of system controlling The dip-switches are used to control optical port, E1 port and Ethernet port. Table 3-9 RCMS 2811-240FE-BL Front Panel Description 2-ADDR Dip-switch NO. Name Bits Description 10 www.raisecom.com 32 User Manual ADDR Dip-switch 4 bits Bit4 Bit3 Bit2 Bit1 Device Type OFF OFF OFF OFF Remote Device OFF OFF OFF ON The 1st local Device OFF OFF ON OFF The 2nd local Device OFF OFF ON ON The 3rd local Device OFF ON OFF OFF The 4th local Device OFF ON OFF ON The 5th local Device OFF ON ON OFF The 6th local Device OFF ON ON ON The 7th local Device ON OFF OFF OFF The 8th local Device ON OFF OFF ON The 9th local Device ON OFF ON OFF The 10th local Device ON OFF ON ON The 11thlocal Device ON ON OFF OFF The 12thlocal Device ON ON OFF ON The 13th local Device ON ON ON OFF The 14th local Device ON ON ON ON The 15th local Device Local device can be connected by PC serial port through LNK-UP port to realize network management. Address numbers of devices which are concatenated on a PC serial port mustn’t be repeated. Local concatenated devices are maximum 15pcs. Table 3-10 RCMS 2811-240FE-BL Front Panel Description 3-ETH Dip-switch NO. Name Bits 4 bits 33 ETH Dip-switch Description Bit1 Ethernet port auto-negotiation configuration. Bit1 = OFF, Ethernet auto-negotiation is enable. Bit1 = ON, Ethernet auto-negotiation is disable. When the Ethernet negotiation is disabled the port’s MDI/MDIX function is disabled too, so when connecting to switch the straight-through cable is needed and when connecting to NIC and router the cross-over cable is needed. Bit2 Ethernet port’s speed configuration when auto-negotiation is disabled. When Bit1 = ON, If Bit2 = OFF the Ethernet port’s speed is 100M; If Bit2 = ON the Ethernet port’s speed is 10M; When Bit1 = OFF the Bit2 is invalid. Bit3 Ethernet port’s duplex mode configuration when auto-negotiation is disabled. When Bit1 = ON, If Bit3 = OFF the Ethernet port is on full-duplex mode; If Bit3 = ON the Ethernet port is on half-duplex mode; When Bit1 = OFF the Bit3 is invalid. Bit4 The configuration of ALS function. Bit4 = OFF, ALS function is disable. Bit4 = ON, ALS function is enable. Table 3-11 RCMS 2811-240FE-BL Front Panel Description 4-SEL Dip-switch NO. 34 Name SEL Dip-switch Bits 4 bits Description Bit1, Bit2 Optical port Auto-negotiation/Force configuration. Bit1, Bit2 = OFF OFF, Optical port A and B can be chosen automatically. Bit1, Bit2 = OFF ON, Optical B is chosen. Bit1, Bit2 = ON X, Optical A is chosen. Bit3 mask/unmask alarm configuration of idle E1 tributary. Bit3 = OFF, unmask alarm configuration of idle E1 tributary. Bit3 = ON, mask alarm configuration of idle E1 tributary. Bit4 Local/Remote E1 loop-back position configuration. Bit4 = OFF, E1 remote loop-back. Bit4 = ON, E1 local loop-back. 11 www.raisecom.com User Manual Table 3-12 RCMS 2811-240FE-BL Front Panel Description 5-E1 Loop Dip-switch NO. Name Bits Bit1-8 the 1st to 8th E1 tributary loop-back configuration. Bit1 = OFF , the 1st E1 tributary is not loop-back; Bit1 = ON, the 1st E1 tributary is loop-back. The configuration method of Bit2 to Bit 8 is same as Bit 1. 8 bits E1-LOOP Dip-switch 35 Description 3. Interface on front panel There are E1 and PC-AGENT ports on front panel. Table 3-13 RCMS 2811-240FE-BL Front Panel Description 6-Interface NO. 36 Name Bits RJ45 1-8 RJ45 LNK-UP 37 RJ45 LNK-DWN Description 1st -8th tributary 120Ω E1balanced interfaces. Local network management interface. LNK-UP connects to PC serial port or connects to upper device’s LNK-DWN interface when concatenating. LNK-DWN connects to upper device’s LNK-UP interface when concatenating. It complies with RS232 electrical standard and the baud rate is 19200bps. RCMS 2811-240FE Device Operation Introduction The operation introduction is same as RCMS2811-240FE-BL except for E1 interface description. Table 3-14 RCMS 2811-240FE Front Panel Description 1-Interface NO. Name Bits 45 1-8 DB37 Description 1st -8th tributary 75Ω E1unbalanced interfaces. RCMS 2811-120FE Device Operation Introduction Figure 3-10 RCMS 2811-120FE Front Panel Description 1. System Indicator The System indicators mainly indicate the working status of optical port, E1 port and Ethernet port. Table 3-15 RCMS 2811-120FE Front Panel Description 1-Indicator No. Name Color Description 12 www.raisecom.com User Manual The 1st power alarm indicator It is on when the 1st power is not linked or working abnormally. It is off when the 1st power works normally. The 2nd power alarm indicator It is on when the 2nd power is not linked or working abnormally. It is off when the 2nd power works normally. General Alarm Indicator It is stably on when there is a local alarm; It is flash when there is remote alarm but no local alarm; It is stably on when there are both local and remote alarm; It is off when there is no local or remote alarm. Note: It is not include the loss of unworking fiber port. Power Indicator. It is on when the power supply works normally. 1 PWR1 RED 2 PWR2 RED 3 ALM RED 4 PWR GREEN 5 LPR RED 6 7 8 9 10 11 12 13 14 15 16 L WKA R WKA L WKB R WKB L LOSA R LOSA L LOSB R LOSB L LOF R LOF L E-3 GREEN GREEN GREEN GREEN RED RED RED RED RED RED RED Remote device power off indicator It is on when remote device power off after local and remote devices works normally; It is stably off on other conditions. It is on when local optical port A is working. It is on when remote optical port A is working. It is on when local optical port B is working. It is on when remote optical port B is working. It is on when the Rx signal of local optical port A is lost. It is on when the Rx signal of remote optical port A is lost. It is on when the Rx signal of local optical port B is lost. It is on when the Rx signal of remote optical port B is lost. It is on when there is loss of frame alarm in local optical Rx signal. It is on when there is loss of frame alarm in remote optical Rx signal. It is on when the bit error rate of local optical Rx signal is beyond 1E-3. 17 R E-3 RED It is on when the bit error rate of remote optical Rx signal is beyond 1E-3. 18 19 L E-6 R E-6 YELLOW YELLOW It is on when the bit error rate of local optical Rx signal is beyond 1E-6. It is on when the bit error rate of remote optical Rx signal is beyond 1E-6. 20-23 LOS1-16 RED 24 LNK GREEN 25 100M GREEN 26 ACT GREEN 27 FDX GREEN 1-4 E1 tributary Rx signal’s LOS alarm indicator. It is on when there is LOS alarm of only local E1; It is flash when there is LOS alarm of only remote E1; It is on when there is LOS alarm of both local and remote E1; It is off when there is no LOS alarm of local or remote E1. It is on when the Ethernet port links normally; It is off when the Ethernet port doesn’t link or links abnormally. It is on when the working speed of Ethernet port is 100M; It is off when the working speed of Ethernet port is 10M. It is flash when there is data transmission currently; It is off when there is no data transmission currently. It is on when the Ethernet port is working on full duplex mode; It is off when the Ethernet port is working on half duplex mode; It is flash when the Ethernet port is working on half duplex mode and there is data collision. 2. Dip-switch of system controlling The dip-switches are used to control optical port, E1 port and Ethernet port. Table 3-16 RCMS 2811-120FE Front Panel Description 2-ADDR Dip-switch NO. Name 28 ADDR Dip-switch Bits Description Bit4 OFF OFF OFF OFF OFF OFF OFF Bit3 OFF OFF OFF OFF ON ON ON Bit2 OFF OFF ON ON OFF OFF ON Bit1 OFF ON OFF ON OFF ON OFF Device Type Remote Device The 1st local Device The 2nd local Device The 3rd local Device The 4th local Device The 5th local Device The 6th local Device 13 www.raisecom.com User Manual 4 bits OFF ON ON ON The 7th local Device ON OFF OFF OFF The 8th local Device ON OFF OFF ON The 9th local Device ON OFF ON OFF The 10th local Device ON OFF ON ON The 11thlocal Device ON ON OFF OFF The 12thlocal Device ON ON OFF ON The 13th local Device ON ON ON OFF The 14th local Device ON ON ON ON The 15th local Device Local device can be connected by PC serial port through LNK-UP port to realize network management. Address numbers of devices which are concatenated on a PC serial port mustn’t be repeated. Local concatenated devices are maximum 15pcs. Table 3-17 RCMS 2811-120FE Front Panel Description 3-ETH Dip-switch NO. Name Bits 4 bits 29 ETH Dip-switch Description Bit1 Ethernet port auto-negotiation configuration. Bit1 = OFF, Ethernet auto-negotiation is enable. Bit1 = ON, Ethernet auto-negotiation is disable. When the Ethernet negotiation is disabled the port’s MDI/MDIX function is disabled too, so when connecting to switch the straight-through cable is needed and when connecting to NIC and router the cross-over cable is needed. Bit2 Ethernet port’s speed configuration when auto-negotiation is disabled. When Bit1 = ON, If Bit2 = OFF the Ethernet port’s speed is 100M; If Bit2 = ON the Ethernet port’s speed is 10M; When Bit1 = OFF the Bit2 is invalid. Bit3 Ethernet port’s duplex mode configuration when auto-negotiation is disabled. When Bit1 = ON, If Bit3 = OFF the Ethernet port is on full-duplex mode; If Bit3 = ON the Ethernet port is on half-duplex mode; When Bit1 = OFF the Bit3 is invalid. Bit4 the configuration of ALS function. Bit4 = OFF, ALS function is disable. Bit4 = ON, ALS function is enable. Table 3-18 RCMS 2811-120FE Front Panel Description 4-SEL Dip-switch NO. 30 Name SEL Dip-switch Bits 4 bits Description Bit1, Bit2 Optical port Auto-negotiation/Force configuration. Bit1, Bit2 = OFF OFF, Optical port A and B can be chosen automatically. Bit1, Bit2 = OFF ON, Optical B is chosen. Bit1, Bit2 = ON X, Optical A is chosen. Bit3 mask/unmask alarm configuration of idle E1 tributary. Bit3 = OFF, unmask alarm configuration of idle E1 tributary. Bit3 = ON, mask alarm configuration of idle E1 tributary. Bit4 Local/Remote E1 loop-back position configuration. Bit4 = OFF, E1 remote loop-back. Bit4 = ON, E1 local loop-back. Table 3-19 RCMS 2811-120FE Front Panel Description 5-E1 Loop Dip-switch NO. Name Bits Description 14 www.raisecom.com User Manual Bit1-4 the 1st to 4th E1 tributary loop-back configuration. Bit1 = OFF , the 1st E1 tributary is not loop-back; Bit1 = ON, the 1st E1 tributary is loop-back. The configuration method of Bit2 to Bit 4 is same as Bit 1. 4 bits E1-LOOP Dip-switch 31 3. Interface on front panel There are E1 and PC-AGENT ports on front panel. Table 3-20 RCMS 2811-120FE Front Panel Description 6-Interface NO. 32 Name 1-4 Bits Description RJ45 and BNC RJ45 1st -4th E1 tributary interface (750Ω is BNC interface and 120Ω is RJ45 interface). Local network management interface. LNK-UP connects to PC serial port or connects to upper device’s LNK-DWN interface when concatenating. It complies with RS232 electrical standard and the baud rate is 19200bps. LNK-DWN connects to upper device’s LNK-UP interface when concatenating. It complies with RS232 electrical standard and the baud rate is 19200bps. LNK-UP 33 RJ45 LNK-DWN E1 Loop-back Test The E1 loop-back position can be configured by SEL Bit4 dip-switch. Remote loop-back and local loop-back are shown in following figure 3-11 and 3-12. Fiber Multicore Bit Error Tester E1 Multicore E1 Remote Local Figure 3-11 sketch map of setting remote loop-back on local site Multicore Bit Error Tester Fiber Multicore E1 E1 Local Remote Figure 3-12 sketch map of setting local loop-back on local site NOTE: 1. Please make sure that there is no alarm on optical port before configuring the remote E1 loop-back. 2. When configuring any loop-back on local multiplexer, all E1 loop-back dip-switches on remote multiplexer must be OFF in default. 15 www.raisecom.com User Manual Application Example Figure 3-13 Point to point application example 16 www.raisecom.com User Manual Chapter 4 Installation and Test This section contains the following information: Preparation Installation Steps Power On Test E1 Bit Error Test Mask Dummy E1 LOS Alarm Preparation Please at first check the part number and quantity of device and spare parts according to packing list, and then check appearance to find whether the device is in good condition. If the device is affected with dump please dry it firstly. To make sure the device can working normally please perform the installation and configuration according to the following steps: ¾ ¾ ¾ ¾ ¾ ¾ Read this manual carefully; Prepare fiber, E1 cable, Ethernet cable and Agent network management cable and make sure all the cables are in good condition, no short and no open; Make sure the voltage of power supply is in the range of working condition; Install and Deploy the device and pay attention to requirement of condition; Connect all fibers and cables and make sure they are all inserted to the end and fastened well. Use it normally. Installation Steps Connecting Optical Port A and Optical Port B Insert fiber to optical port A and B on back panel. If the device’s optical port type is M, S1, S2 and S3 the connecting method is as figure 4-1. On the back panel TX indicates transmission of optical signal and RX indicates receiving. Figure 4-1 Optical Port Connecting Type 1 17 www.raisecom.com User Manual If the device’s optical port type is SS1and SS2 the connecting method is as figure 4-2. The optical port A and B both transmit and receive so the TX and RX are insignificant. Figure 4-2 Optical Port Connecting Type 2 If the connecting is right, when receiving optical signal the LOS alarm indictors on the front panel will be all off automatically. Connecting E1 Interface RCMS 2811-240FE-BL and RCMS 2811-480FE-BL devices: Using twisted-pair cable with RJ45 connectors to connect the 120Ω balanced interface on device. The line rule of RJ45 connector and cable making method are shown in Appendix A. RCMS2811-240FE and RCMS2811-480FE devices: Using CBL-E1-DB37F/16BNCM cable. RCMS2811-120FE device:Using 75Ω unbalanced interface or 120Ω balanced interface but can not use this two types of interface at the same time. When using 75Ω unbalanced interface the coaxial cable with BNC male connector is needed. TX indicates the transmission of E1 signal and RX indicates receiving of E1 signal. The making method of coaxial cable with BNC connector is shown in Appendix A. When using 120Ω balanced interface the twisted pair cable with RJ45 connector is needed. Connecting Fast Ethernet Interface Connect this device to relative network equipment by Ethernet cable with RJ45 connector. When the device is on auto-negotiation mode the straight-through and cross-over cable are both available. When the auto-negotiation is disabled the MDI/MDIX function is disabled correspondingly. So when connecting to switch the straight-through cable is needed and when connecting to NIC and router the cross-over cable is needed. Connecting Network Management Port To perform network management please link the RJ45 connector of Agent cable to LNK_UP interface of device, and at the same time link the DB9 connector of Agent cable to serial port on PC. When perform concatenating please connect LNK_DWN interface of upper device and LNK_UP interface of lower device by RJ45-RJ45 cable. Connecting V.35 interface on sub card If there is V.35 sub card in accessory parts please insert it in device and connecting the V.35 port to 18 www.raisecom.com User Manual relative equipment by attached connecting cable. Hot-swapping of V.35 sub card is forbidden and the operation detail please refer to “SUBM-FV35NX64K V.35 Interface Extend Module User Manual REV.B” Connecting Power Supply Insert the attached 220V AC power cable to standard three phase power supply plug and at the same time connect the -48V DC power cable to DC power connector (link device’s BGND connector to power grounding, device’s -48V connector to -48V power and device’s PGND to earth). If the power supply is +24V DC, please take above connecting method as a reference. Power on Test Link all needed cable and make sure they are connected well. Turn on the power and the PWR indicator will be on and PWR1 and PWR2 indicators will be off. Just after power on the device will perform initialization and self-check for at most 10 seconds. During this process the ACT, 100M, FDX and LNK indicators will light circularly. Maybe LOF and E-6 indicators of the optical port will flash once. These are all normal phenomena and after ten seconds system will work normally. Please make sure there are no alarms on optical port after the system works normally. If fiber is connected correctly there will be no LOS, LOF, E-3 and E-6 alarms. E1 Bit Error Test Bit error rate of each E1 tributary can be test by 2M bit error rate tester cooperating with loop-back dip-switches on front panel. For the testing method please refer to section 5 for operation introduction. Mask Dummy E1 LOS Alarm If there is no Los alarm on connected E1 tributaries but the LOS alarm indicators of unused E1 tributary are on, so these alarms are called dummy E1 Los alarm. Set the Bit3 of SEL dip-switch as on to mask local dummy alarms the relative E1 LOS alarm indicators will be off. If disconnection occurs on linked E1 tributary, the LOS indicator of this tributary will be still on after masking unused E1 alarm. 19 www.raisecom.com User Manual Chapter 5 Troubleshooting If you have any problems during installation and using, try to solve them by the following proposals. If there is no solution, please contact with distributors for technical support. z Green PWR indicator not on Answer: PS faults. Check if PS working properly and –48 PS connection is not reverse. z LOS red indicator of optical port is on Answer: Loss of receiving signal occurs at optical port. Check if the input fiber is connected well and if there is reverse in connection. Check the received optical power using optical power meter, it should be greater than receiving sensitivity. z LOF red indicator of optical port is on Answer: Loss of frame of receiving signal at optical port. In this case, optical signal has received, but the optical power may be about critical value of sensitivity. Check RX optical power to ensure if it connects well at remote optical TX port. z E-3 red indicator is on at optical port Answer: The bit error of optical RX signal is greater than 10-3. Check if optical RX port connects well and RX optical power. z E-6 yellow indicator of optical port is on Answer: The bit error of optical RX signal is greater than 10-6. It is normal that there is E-6 alarm just after turning on the power, after about 10 seconds, the E-6 indicator will be off. If there is E-6 alarm during operation process please check if optical RX port connects well and test RX optical power. z The LNK indicator of Ethernet port is not on Answer: Firstly check if the Ethernet cable is well connected or not. And then whether the other end device works normally. At last check the cable referring to section 6.2. z One E1 tributary is blocked Answer: Check whether the E1 cable and fiber are well connected, and then check the E1 LOS alarm indicator on front panel. At the same time use the loop-back function which is provided by Bit4 of SEL dip-switch to confirm the problem position. z LOS red indicator of E1 channel is on Answer: Loss alarm of RX signal at E1 channel, there is no HDB3 signal received. Check if it connects well at E1 port; if the connection of 75 Ω cable reverse and if the string of 75 Ω cable in right order. If there is LOS alarm of unused E1 tributary, can press “mask” button to “on” to make alarm after configuration of device. 20 www.raisecom.com User Manual Appendix A: Introduction of Cable making Figure A.1 RJ45 connector Pin Definition (from upper side) E1 Cable Making • 75ohm BNC Interface: Suggest using SYV75-5, SYV75-3 and SYV 75-2-2 coaxial cable. The longest distance is less than 200 meters. Take BNC connector out from accessories and screw off protecting sheath. Split the core and shielded layer of coaxial cable and then put protecting sheath onto cable. Firmly weld core of cable and core of BNC connector, and firmly weld shielded layer of coaxial cable and shell of BNC connector. At last fix the protecting sheath at the end of the connector. • 120 ohm RJ45 Interface: Table A.1 RJ 45 E1 Interface Line Definition Pin No. 1 2 3 4 5 6 7 8 Definition OUT+ OUTNC IN+ INNC NC NC A.2 Cable of Ethernet This device has Auto MDI/MDIX function so the Ethernet cable can use straight-through or cross-over twisted pair line. Pin NO. MDI Definition MDIX Definition Table A.2 Ethernet Interface line definition 1 2 3 4 5 TX+ TXRX+ NC NC RX+ RXTX+ NC NC 6 RXTX- 7 NC NC 8 NC NC Use Cat 5 twisted pair to connect the equipment. Please ensure that the twisted pair is less than 100 meters. The line definition of RJ45 connector is shown in figure A.1. Making straight-through cable the two ends should both comply with T568A or T568B standard at the same time. Making cross-over cable the two ends comply with T568A and T568B separately. The T568A and T568B line standard are shown in table A.3. Table A.3 the T568A and T568B Line Standard Line No. 1 2 3 4 5 6 7 8 White Green White Blue White Orange White Palm STD T568A 21 www.raisecom.com User Manual Green Orange Blue White T568B Oran Orange White Green White Blue A pair with A pair A pair 6 White Green Blue ge Twisted Pair Palm Palm Palm A pair with 3 A pair A.3 Agent Cable Making Agent cable is flat straight-through cable with RJ45 connector which line definition is shown in figure A.1. Table A.4 LNK_UP Connector Line Definition Pin No. Definition 1 NC 2 NC 3 IN 4 GND 5 NC 6 OUT 7 OUT 8 GND Table A.5 LNK_DWN Connector Line Definition Pin No. Definition 1 NC 2 NC 3 OUT 4 GND 5 NC 6 NC 7 IN 8 GND The connection of LNK_UP interface (RJ45) to PC serial port (DB9 Female) is shown in figure A.2. Figure A.2 Connection of Device to PC Serial Port The linking cable of LNK_UP port (RJ45) to LNK_DWN port of lower lever device is straight-through Ethernet cable. NOTE: 1 .Making above cables please use shield twisted pair in priority to ensure the requirement of EMC. 2. Making straight-through cable please use T568B line standard in priority. 22 地址: 北京市海淀区北四环中路 229 号海泰大厦 617/619 室 邮编: 100083 电话: (8610)-82884499 传真: (8610)-82885200 Http://www.raisecom.com 技术支持:[email protected] 销售热线: 86-10-82884499 转 600 技术咨询热线: (8610)-82883110 82884499 转 87