1
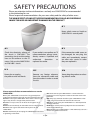
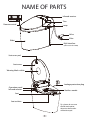
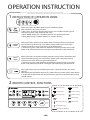
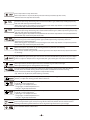
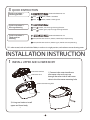
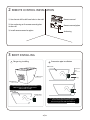
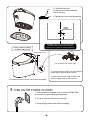
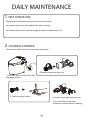
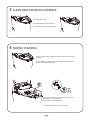
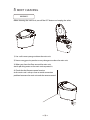
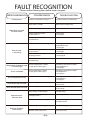
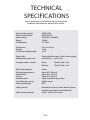
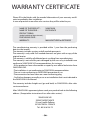
EXCELLENCE USER MANUAL INSTRUCTION SAFETY PRECAUTIONS NAME OF PARTS OPERATING INSTRUCTIONS INSTALLATION INSTRUCTION DAILY MAINTENANCE FAULT RECOGNITION TECHNICAL SPECIFICATIONS WARRANTY CERTIFICATE SAFETY PRECAUTIONS Please pay attention to these informations and only use SANICLEAN® as recommended in the precaution for use. Please respect all recommendations for your own safety and the safety of other users. THE NON RESPECT OF ONE OF THESE RECOMMENDATIONS COULD OCCUR SERIOUS INJURY FOR USER OR IMPORTANT DAMMAGE ON THE PRODUCT N°1 Never splash water or liquid on SANICLEAN®’s control panel. N°3 N°2 Check the electricity voltage of the circuit is 220-240V~. The connecting circuit and the outlet have to be conform to the CE norms. Only use the SANICLEAN® on 220-240V~ circuit. If your outlet is not conform to CE recommendation, please immediately contact a qualified and authorised electrician to replaced the outlet. If the connection cable seems to be damaged, do not plug the cable and immediately contact our after sales service in order they can replaced it. N°4 N°5 N°6 Never plus or unplug the product with wet hands. Remove any foreign elements from the connection cable and from the outlet in order to avoid fire risk. Never plug the product on a loosing electric outlet. Please respect all these recommendations to use the SANICLEAN®. N°1 If your SANICLEAN® is not use for a long period, please unplug the connection cable and drain the water from the tank. N°2 Never install your SANICLEAN® where there is direct ray of light. It may results a change of the product’s color. N°3 Veiller à ne pas uriner sur les buses de lavage ou sur le séchoir. N°4 Never urinate directly on the nozzle or on the drying outlet. N°5 Never lean against the coverlid when you sit on the SANICLEAN®. N°6 We recommend you to unplug the SANICLEAN® when there is lightening and thunder. N°7 Never connect your SANICLEAN® in a room where the temperature can be negative in order to avoid the water in the tank froze. N°8 Always pay attention to soft use your SANICLEAN® and to avoid using excessive force to close the lid or the seat. N°9 Never use or leave your SANICLEAN® in a room exposed to excessive moisture. N°10 Never stand or put heavy object on the seat coverlid in order to avoid breaking it. N°11 Never use your SANICLEAN® in a wet room. Only use it on a toilet that is conform to CE norm. N°7 N°8 N°9 Never connect other product on the SANICLEAN®’s outlet to avoid sharing outlet. Never splash water or any liquid on the connection cable and main unit. Never connect the product to an industrial water supply line. Only connect to your home potable water network. N°10 N°11 N°12 Always unplug the SANICLEAN® prior to clean. Never try to disassemble, repair or remodel the SANICLEAN® yourself. Please always contact our after sales service. If you do not respect this point, the Warranty will be stopped and cancelled. Never keep any flammable materials on and close to the SANICLEAN® (cigarettes,…). N°14 N°13 If an invalid person not able to adjust the temperature by itself, could use the SANICLEAN®, please always check that the temperature of water, air and seat are always at the level 2 not more. This will prevent any trouble du to high temperatures. Never insert or put anything that could obstruct the dryer outlet. N°15 N°16 N°17 Never lift or close the seat and the lid using excessive force in order to avoid breaking the soft closing system. Never apply excessive force on the operation panel and never put heavy object on it. This will avoid breaking the control panel. Never strain or bend the water supply connection hose in order to avoid water leakage. -- 2 -- NAME OF PARTS Infrared receiver Trim Remote control Lamp Valve Filter Bidet Mp3 interface (No function for w660) Seat cover pad Seat cover Warning labels within Leakage protection plug Operation panel Infrared receiver Stainless nozzle Seat Seat cushion Tip : please do not cover the infrared receiver, otherwise the function will be destroyed. OPERATION INSTRUCTION 1 INSTRUCTION OF OPERATION PANEL When seated, press «dry/flush» button to start water flush function. After 6 seconds, it will start dry function. > After 3 mins, dry function will stop automatically. Press «dry/flush» button again to continue using. Press «stop» button to stop using. > When nobody seated, press «dru/flush» button to start water flush function. > When power outage, «dry/flush» button can start flush function. WOMAN / MOVE WASH / MOVE When seated, press «woman/move» button, feminine cleaning nozzle is extended to start reciprocating self-cleaning. Press «woman/move» button again, nozzle stops moving reciprocatly and starts self-cleaning in the fixed position. > while cleaning, press «stop» button to stop feminine cleaning function. If the «stop» button is not pressed, the feminine cleaning will stop automatically after 60 seconds. When seated, press «wash/move» button, posterior cleaning nozzle is extended to start reciprocating self-cleaning. Press «wash/move» button again, nozzle stops moving reciprocatly and starts self-cleaning in the fixed position. > while cleaning, press «stop» button to stop posterior cleaning function. If the «stop» button is not pressed, the posterior cleaning will stop automatically after 60 seconds. Press «stop» button and stop the following functions : posterior, feminine, dry, nozzle cleaning. While the function of posterior, feminine, dry, nozzle cleaning is working, if the «stop» button is not pressed, the dry function will stop automatically after 3 mins, other functions will stop after 60 seconds. 2 REMOTE CONTROL FUNCTIONS Water temperature Battery display Seat temperature Posterior cleaning Room temperature Feminine cleaning Dry Transmit signal Water temperature gear Seat temperature gear Cleaning strength display Wide cleaning Press “stop” button to stop all function. If the “stop” button is not pressed, the dry function will stop automatically after 3 mins, other functions will stop after 60 seconds.. WASH / MOVE WOMAN / MOVE When seated, press “wash/move” button, posterior cleaning nozzle is extended to the right position to start the reciprocating self-cleaning. Press “wash/move” button again, nozzle stops moving reciprocatly and starts self-cleaning in the fixed position. While cleaning, press “stop” button to stop cleaning function. If the “stop” button is not pressed, posterior function will stop automatically after 60 seconds. When seated, press “woman/move” button, feminine cleaning nozzle is extended to the right position to start the reciprocating self-cleaning. Press “woman/move” button again, nozzle stops moving reciprocatly and starts self-cleaning in the fixed position. While cleaning, press “stop” button to stop feminine function. If the “stop” button is not pressed, feminine function will stop automatically after 60 seconds. When seated, press “wide cleaning” button, cleaning nozzle is extended to start the reciprocating wide-cleaning. Press “wide cleaning” button again, nozzle stops moving reciprocatly and starts wide-cleaning in the fixed position. While cleaning, press “stop” button to stop cleaning function. If the “stop” button is not pressed, posterior function will stop automatically after 60 seconds. When seated, press “dry” button to dry cleaning position. Dry function starts working. After 3 mins, it will stop automatically. If you want to continue using, press “dry” button again. Press the “stop” button to stop dry function while it is working.. Adjust gear : when using functions of posterior, feminine, wide-cleaning, press “adjust” button to adjust “high, middle, low” gear, set the gear and save it at the same time. While using dry function, press “adjust” button tu adjust “air temperature” as “high, middle, low” gear, set the gear and save it at the same time. Press “light” button, shimmer light makes more convinient to go to toilet in the night. Press “light” button again to extinguish the shimmer light. Press the “nozzle cleaning” button, the nozzle starts self-cleaning automatically. It will stop after 60 seconds. Press the “nozzle cleaning” button twice, nozzle is extended to do manual cleaning. If you want to stop nozzle cleaning, press the “stop” button to stop. (Tip : when start dry function, nozzle cleaning can’t work.) Moving : while using the functions of posterior, feminine, wide-cleaning, press the “front” and “back” button, can adjust the cleaning position of front and back. Press “seat temp” button and adjust seat temperature. s LIGHT OFF NORMAL TEMPERATURE s GREEN LIGHT LOW TEMPERATURE # s ORANGE LIGHT MIDDLE TEMPERATURE # s RED LIGHT HIGHT TEMPERATURE # Press “water temp” button and adjust water temperature. s LIGHT OFF NORMAL TEMPERATURE s GREEN LIGHT LOW TEMPERATURE # s ORANGE LIGHT MIDDLE TEMPERATURE # s RED LIGHT HIGHT TEMPERATURE # While using the functions of posterior, feminine, auto wash, press “massage” button to start massage, press “massage” button again, to stop massage. At the same time, the flow of water restores normal cleaning mode. Massage flow of water based on “high-low-high” mode starts cycle changes. Press “auto flush” button to flush toilet. 3 QUICK INSTRUCTION Quick instruction 1 : Cleaning position Quick instruction 2 : Massage cleaning Quick instruction 3 : Fixed position cleaning Choose the button to use 1 2 Press button, nozzle is extended. 3 Press button, nozzle is moving back. 1 2 Press button, start massage-cleaning function. 3 Press button again, stop massage-cleaning function. Choose the button to use 1 2 Press (the function used in 1) button, nozzle stops reciprocating. 3 Press (the function used in 1) button again, nozzle starts reciprocating. TIP : when seated, stick to back side of bidet, in order to sit a right position, and reduce to waste cleaning water. INSTALLATION INSTRUCTION 1 INSTALL UPPER AND LOWER BODY Inlet water interface Inlet water valve 1) Connect inlet water interface to inlet water valve and screw-up through the other side of inlet water valve in the inlet water mounting hole. Inlet water mounting hole Bait 2) Using two hooks to install upper and lower body. 2 REMOTE CONTROL INSTALLATION 1) Use electric drill to drill two holes in the wall. Remote control 2) Use anchoring to fix remote control pylon in the wall. Remote control pylon 3) Install remote control to pylon. Anchoring 3 BIDET INSTALLING a Flange ring installing b Evacuation pipe installation Main unit Evacuation Pipe Main unit Flange ring Flange ring The seal must be perfect to operate the flush. Without perfect seal flushing of the device will not work correctly Main unit Flange ring The seal must be perfect when installing the pipe because of the syphonic flushing system that can only operates with 100% Airproof. 3) Stick the main unit on the ground with an adapted stick or cement. Bidet Floor 4) Tighten the screw into the ground. Toilet evacuation 185 mm BE CAREFUL: The pressure of your existing water network should be at least 20 l/mn in order the Shower toilet can operate for washing and flushing. Sluice valve installing and flow adjusting Inlet water valve Use screwdriver to rotate right 2) If water pression is high, use screwdriver to rotate right to reduce water pressure. 1) Connect inlet water valve to sluice valve and tighten. 3) Open your network water and the water valve to supply water to the main unit. 4 TURN ON THE POWER OF BIDET 1) Thrust protective leakage valve to socket of 220V/50HZ, and make sure grounding-type receptacle. 2) Try to test if every functions are normal. 3) Clean foreign matter when finish installing. DAILY MAINTENANCE 1 TEST POWER LINE Please have to check power plug. (Once or twice one month) Press power button (on), and confirm if the lamp is shining. Press power plug, and restart button again to confirm if the lamp turns off. 2 CLEANING STRAINER Please have to check strainer. (Once or twice one month) 2) Revolve strainer the right side. 1) Use screw-driver turn off sluice valve stop water comes in 3) Clean sewage of strainer. 4) Install strainer again and screw up.. 5) Use screw-driver open valve, and make sure if the strainer is leakage. 3 #,%!. $%/$/2):!4)/. 342!).%2 1) Pull the strainer out. 2) Use toothbrush to clean strainer. 3) Install the strainer to original place. ./::,% #,%!.).' 1) Press “nozzle cleaning” button in remote control to start nozzle cleaning. Tip : the bidet has automatically flush function : before and after posterior and feminine function. 2) Press the “nozzle cleaning” button twice, nozzle is extended, can clean by hands. Use toothbrush to clean nozzle. 3) Press “stop” button to take back nozzle. 5 BIDET CLEANING WARNING ! Before cleaning the main unit, turn off the OFF button and unplug the toilet. 1) Use a soft sweet sponge to clean the main unit. 2) Never use aggressive product or any detergent to clean the main unit. 3) When you clean the floor around the main unit, avoid splashing water on the main unit to protect it. 4) Check that the Remote control receiver on the main unit is always clean to avoid connection problem between the main unit and the remote control. FAULT RECOGNITION Please confirm following items before entrust to repair. ERROR PHENOMENON Function error Water does not come out from nozzle Flow of water is not strong Temperature of cleaning water is not enought Seat is not heated Dry air temperature is low Dry function does not work Wash function does not work Remote control does not work Bidet can not flush automatically CONFIRM REASON TROUBLE SHOOTING If electric alimentation is plug-in ? Plug-off and plug-in alimentation. If the water is cut off ? Wait to restore supply water. If sluice valve is open ? Open sluice valve. If there are foreign matter in the strainer ? Clean strainer. > read page 9 If inlet water valve is flexed or blocked up ? Remove inlet water valve to flex. If the flow of water sets as low gear ? According to instruction to adjust flow water > read page 5 If there are foreign matter in the strainer ? Clean strainer. > read page 9 If the nozzle is blocked up by foreign matter ? Clean nozzle > read page 10 If inlet water valve is flexed or blocked up ? Remove inlet water valve to flex. If water temperature is setted as low gear or normal gear ? According to instruction to adjust water temperature. > read page 5 If seat temperature is setted as low gear or normal gear ? According to instruction to adjust seat temperature. > read page 5 If dry function is setted as low gear ? According to instruction to adjust air temperature. > read page 5 If human body touches seat sensor ? Please make sure the position of seat sensor. If human body touches seat sensor ? Please make sure the position of seat sensor. If the battery is not enought ? Change battery. If infrared receiver is covered by foreign matter ? Clean foreign matter. If the remote control is used right ? Adjust control angle of remote control. Whether stops water supply or not ? Wait to water supply. Whether close sluice valve ? Open sluice valve. TECHNICAL SPECIFICATIONS These specifications are liable to change and evolve for quality improvement without prior notice. Name of the product : Name of the model : Power rating : Power : Certifications : SANICLEAN EXCELLENCE 220-240V~, 50/60Hz 1650W CE - RoHs Dimensions : Weight : Connection cable length : 82 x 44 x 58 cm 13 kg 1,5 m Water inlet : Needed water pressure : Direct inlet flow type – Water home supply mini 0,4 bars – maxi 7 bars Quantity water / minute : Wash : Woman : Water tank capacity : Washing temperature : Heated seat : Drying : Deodorisation : User detection sensor : Water proof grade : 6 litres Up to 40°C (level 4) Up to 40°C (level 4) Up to 60°C (level 4) catalyst deodorising system Digital sensor IPX4. Safety devices : thermal fuses, float switch, thermal sensor, overheat protection device (bimetal). 20 mA within 0.3 second. Short circuit protector : -- 13 -- Max 0,7 litre / min Max 0,7 litre / min WARRANTY CERTIFICATE Please fill in the blanks with the needed information of your warranty certificates immediately after installation. In case of question to our after sales services they will be asked to you. NAME OF THE PRODUCT : NAME OF THE MODEL : PRODUCT SERIAL SANICLEAN EXCELLENCE (At the backside of the main unit) : PURCHASING DATE : WARRANTY : MANUFACTURER or EXTENDED The manufacturing warranty is provided within 1 year from the purchasing date (on the invoice). The warranty includes services and all needed spare parts. The warranty is only valid if all needed elements are given with a copy of the original invoice. The warranty is valid for all defected parts resulting from manufacturing. The warranty is not valid for parts damaged by the user or by installation non conform to SANICLEAN SAS recommendations, for instance: - If the product as been disassemble or repair by non official technician from SANICLEAN SAS. - The installation is not conforming to SANICLEAN recommendation. - The use is not conforming to SANICLEAN precaution of use. - The connection has been done on a non conforming plug. - Or all other damages caused by a use or an installation that is not indicated in the SANICLEAN User Manual. The warranty includes freight cost (go and back) to SANICLEAN's after sales service warehouse. After SANICLEAN’s agreement, please send your product back to the following address : (Except other instruction of our after sales service) : SANICLEAN SAS SERVICE APRES VENTE 55, rue Camille Pelletan 33150 CENON - FRANCE Tél. : 05 56 81 56 72 THIS PRODUCT SHOULD NOT BE DISPOSED WITH OTHER HOUSEHOLD WASTES AT THIS END OF ITS WORKING LIFE. IN ORDER TO BE RECYCLE, PLEASE BRING YOUR PRODUCT IN A CERTIFIED DECHETTERY. YOU CAN CONTACT ANY SANICLEAN DEALER TO STUDY THE WAY TO ELIMINATE YOUR OLD SANICLEAN. www.saniclean.fr www.saniclean.fr