1
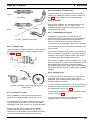
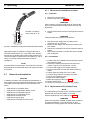
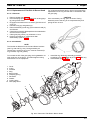
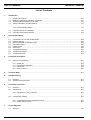
BBW 46 / DBW 46
List of Contents
List of Contents
1.
Introduction
1.1
1.2
1.3
1.4
Scope and Purpose ............................................................................................................................... 101
Meaning of Warnings, Cautions, and Notes .......................................................................................... 101
Additional Documentation to be used .................................................................................................... 101
Safety Information and Regulations....................................................................................................... 101
1.4.1 General Safety Notes .................................................................................................................. 101
1.5
1.6
2.
General Description
2.1
2.2
2.3
2.4
2.5
2.6
2.7
2.8
2.9
3.
Legal Provisions for Installation ............................................................................................................. 102
Corrections and Improvements.............................................................................................................. 103
Combustion Air Fan with Intake Muffler ................................................................................................. 202
Heat Exchanger ..................................................................................................................................... 202
Burner Head with Combustion Pipe....................................................................................................... 202
Circulation Pump.................................................................................................................................... 202
Flame Sensor......................................................................................................................................... 203
Glow Plug............................................................................................................................................... 203
Temperature Sensor .............................................................................................................................. 203
Temperature Limiter............................................................................................................................... 203
Temperature Fuse ................................................................................................................................. 203
Functional Description
3.1
Sequence of Operation .......................................................................................................................... 301
3.1.1
3.1.2
3.1.3
3.1.4
Switch On .................................................................................................................................... 301
Combustion Operation................................................................................................................. 301
Switch Off .................................................................................................................................... 302
Error Lockout ............................................................................................................................... 302
4.
Technical Data................................................................................................................................................ 401
5.
Troubleshooting
5.1
5.2
6.
General .................................................................................................................................................. 501
General Fault Symptoms ....................................................................................................................... 501
Functional Checkouts
6.1
6.2
General .................................................................................................................................................. 601
Adjustments ........................................................................................................................................... 601
6.2.1 Adjustment of CO2 Contents ....................................................................................................... 601
6.3
Components Testing.............................................................................................................................. 601
6.3.1 Temperature Sensor Resistance Check...................................................................................... 601
6.3.2 Flame Sensor Check ................................................................................................................... 601
7.
Circuit Diagrams
7.1
I
General .................................................................................................................................................. 701
BBW 46 / DBW 46
8.
List of Contents
Servicing
8.1
8.2
8.3
8.4
8.5
8.6
General ...................................................................................................................................................801
Work on the Heater.................................................................................................................................801
Work on the Vehicle................................................................................................................................801
Heater Test Run .....................................................................................................................................801
Servicing .................................................................................................................................................801
Visual Inspections and Installation Regulations......................................................................................802
8.6.1
8.6.2
8.6.3
8.6.4
8.6.5
8.6.6
8.7
Removal and Installation ........................................................................................................................808
8.7.1
8.7.2
8.7.3
8.7.4
8.7.5
8.7.6
8.7.7
8.7.8
8.8
Connection to the Vehicle Cooling System ..................................................................................802
Connection to Vehicle Fuel System..............................................................................................805
Dosing Pump ................................................................................................................................807
Fuel filter.......................................................................................................................................807
Combustion Air Supply .................................................................................................................807
Exhaust Line.................................................................................................................................807
Removal and Installation of Heater ..............................................................................................808
Replacement of Circulation Pump ................................................................................................808
Replacement of Temperature Limiter or Temperature Fuse ........................................................809
Replacement of Temperature Sensor ..........................................................................................809
Replacement of Combustion Air Fan............................................................................................809
Replacement of Flame Sensor .....................................................................................................809
Replacement of Glow Plug ...........................................................................................................809
Replacement of Felt Disk in Burner Head ....................................................................................809
First Operation ........................................................................................................................................810
8.8.1 Bleeding the Fuel Supply System.................................................................................................810
9.
Repair
9.1
General ...................................................................................................................................................901
9.1.1 Work on Components after Disassembly .....................................................................................901
9.1.2 Modification Procedures ...............................................................................................................901
9.2
Disassembly and Assembly....................................................................................................................902
9.2.1 Electrical Connections ..................................................................................................................902
9.2.2 Replacement of Temperature Limiter ...........................................................................................904
9.2.3 Replacement of Temperature Fuse..............................................................................................905
9.2.4 Replacement of Temperature Sensor ..........................................................................................905
9.2.5 Replacement of Flame Sensor .....................................................................................................905
9.2.6 Replacement of Circulation Pump ................................................................................................905
9.2.7 Replacement of Combustion Air Fan............................................................................................907
9.2.8 Replacement of Glow Plug ...........................................................................................................908
9.2.9 Replacement of Burner Head with Combustion Pipe ...................................................................909
9.2.10Disassembly of Heat Exchanger ..................................................................................................910
9.2.11Replacement of Felt Disk in Burner Head ....................................................................................911
10.
Packaging, Storage and Shipping
10.1 General .................................................................................................................................................1001
II
BBW 46 / DBW 46
List of Figures
List of Figures
301
Functional Diagram..................................................................................................................................... 303
501
General Failure Symptoms ......................................................................................................................... 501
701
702
Connector Pin Assignment ......................................................................................................................... 701
Automatic Switching Circuit for BBW 46/DBW 46, 12 and 24 Volt ............................................................. 702
801
802
803
804
805
806
807
808
809
Connection to Cooling System „Inline“ Integration...................................................................................... 803
Connection to Cooling System „Thermostat“ Integration ............................................................................ 804
Fuel Supply ................................................................................................................................................. 805
Webasto Fuel Tap....................................................................................................................................... 805
Webasto Fuel Tank Tap.............................................................................................................................. 806
Fuel Tapping from Plastic Tank (tapping via fuel drain plug)...................................................................... 806
Pipe/Hose Connection ................................................................................................................................ 807
Installation Position and Attachment of Dosing Pump ................................................................................ 807
Installation Arrangement of Exhaust Pipe Outlet ........................................................................................ 808
901
902
903
904
905
906
907
908
909
910
Electrical Connections ................................................................................................................................ 903
Replacement of Temperature Limiter, Temperature Fuse, Temperature Sensor and Flame Sensor ........ 904
Replacement of Circulation Pump .............................................................................................................. 906
Replacement of Combustion Air Fan .......................................................................................................... 907
Replacement of Glow Plug ......................................................................................................................... 908
Replacement of Burner Head with Combustion Pipe.................................................................................. 909
Replacement of Heat Exchanger ................................................................................................................ 910
Removal of Felt Disk in Burner Head.......................................................................................................... 911
Assembly Procedure for Burner Head, Fuel Version .................................................................................. 912
Assembly Procedure for Burner Head, Diesel Version ............................................................................... 912
III
BBW 46 / DBW 46
1.
1.1
Introduction
Scope and Purpose
This repair shop manual is intended to support
familiarised personnel in the repair of water heaters
BBW 46 and DBW 46 of the fuel and Diesel type.
The heater may only be operated with the specified type
of fuel (Diesel or with fuel oil EL) and the appropriate type
of electrical installation.
1.2
Meaning of Warnings, Cautions, and
Notes
WARNINGS, CAUTIONS, and NOTES in this manual
have the following meaning:
WARNING
This heading is used to highlight that non-compliance with
instructions or procedures may cause injuries or lethal
accidents to personnel.
CAUTION
This heading is used to highlight that non-compliance with
instructions or procedures may cause damage to
equipment.
NOTE
This heading is used to highlight and draw specific
attention to information.
1.3
Additional Documentation to be used
This workshop manual contains all information and
procedures necessary for the repair of water heaters
BBW 46 and DBW 46. The use of additional
documentation is normally not necessary.
Operating instructions/installation instructions and the
vehicle specific installation proposal may be used as
complementary information as necessary.
1 Introduction
1.4
Safety Information and Regulations
The general safety regulations for the prevention of
accidents and the relevant operating safety instructions
have to be observed at all times.
"General Safety Regulations" beyond the scope of these
regulations are detailed in the following.
The specific safety regulations applicable to this manual
are highlighted in the individual chapters by Warnings,
Cautions, and Notes.
1.4.1 General Safety Notes
Within the scope of the StVZO (Road Licensing
Regulations of the Federal Republic of Germany)
"Design General Approvals" laid down by the Federal
Office for Motor Traffic exist for the water heaters BBW 46
and DBW 46 with the following official marks of
conformity:
– S185 for heater BBW 46 (fuel)
– S186 for heater DBW 46 (Diesel)
Installation of the heater is to be performed in accordance
with the installation instructions and, in case of a retrofit,
must be checked by an officially authorised expert or
inspector of the Technical Supervisory Association (TÜV)
in accordance with § 19, para. 2 StVZO submitting the
"Operating Instructions" and "Installation Instructions".
With this expertise a new vehicle operating license must
be applied for with the administrative authority (vehicle
licensing agency).
Deviations are only permitted after written
authorisation of the installation plans by an officially
authorised expert or inspector of the Technical
Supervisory Association (TÜV).
The year of the initial operation must be durably
marked on the heater identification plate by removing
the relevant date of the year.
The heaters are cleared for heating the vehicle engine
and the passenger compartment. When using the heaters
in vehicles not subject to the Road Licensing Regulations
(StVZO) (e.g. ships), the applicable partially regional
regulations must be observed.
The heater may only be installed in vehicles or in
independent heating systems with a minimum coolant
capacity of 4.0 litres.
101
BBW 46 / DBW 46
1 Introduction
The heater must not be installed in the passenger or driver
compartments of vehicles. Should the heater
nevertheless be installed in such a compartment, the
installation box must be sealed tight against the vehicle
interior. There must be sufficient ventilation of the
installation box from the exterior in order not to exceed a
maximum temperature of 60 °C in the installation box.
Excessive temperatures may cause malfunctions.
WARNING
Due to the danger of poisoning and suffocation the
heater must not be operated, not even with timer or
telestart, in enclosed areas such as garages or
workshops not equipped with an exhaust venting
facility.
At filling stations and fuel depots the heater must be
switched off as there is a potential danger of
explosion.
CAUTION
Where flammable fumes or dust may build up (e.g. in
the vicinity of fuel, coal, wood, cereal depots, or
similar installations) the heater must be switched off
to prevent explosions.
In the vicinity of the control unit a temperature of 85 °C
(storage temperature) must not be exceeded (e.g. during
body paint work). Excessive temperatures may cause
permanent damage to the electronics.
Extracting combustion air from the vehicle interior is
prohibited.
The exhaust line outlet is to be positioned to the top, to the
side, or in case of exhaust venting below the vehicle floor,
to the nearest possible location of the vehicle's or cockpit
side or rear end. Exhaust pipes must be routed so that
exhaust fumes are unlikely to penetrate into the vehicle's
interior. The function of any part of the vehicle essential
for operation must not be impaired.
Accumulations of condensate in the exhaust line must be
directly drained, if required a drain hole may be provided.
Installations fitted after March 18, 1993 must have a
combustion air inlet and exhaust outlet port, into which a
ball of 16 mm in diameter cannot be inserted.
Electrical wiring and heater switching and control gear
must be located in the vehicle so that its normal
functioning is not impaired under normal operating
conditions.
For the routing of fuel lines and the installation of
additional fuel tanks §§ 45 and 46 of the StVZO are to be
adhered to. The most important regulations are:
•
Fuel lines are to be designed in such a way that they
remain unaffected by torsional stresses in the vehicle,
engine movement, and the like. They must be
protected against mechanical damage. Fuel-carrying
parts are to be protected against excessive heat and
are to be arranged so that any dripping or evaporating
fuel can neither accumulate nor be ignited by hot
components or electrical equipment.
•
In busses fuel lines and fuel tanks may be located
neither in the passenger area nor in the driver's
compartment. In these type of vehicles the fuel tanks
must be located such that they do not pose a direct
hazard to the exits in the event of a fire. Fuel supply
must not be by means of gravity or pressurisation of
the fuel tank.
•
Installation instructions for Webasto fuel tanks for fuel
supply of heaters in vehicles:
In busses the installation is not permitted in the
passengers or driver's compartment.
•
The fuel filler neck must not be located in the
passenger’s or driver's compartment of any type of
vehicle.
When checking the cooling water level proceed in
accordance with the vehicle manufacturer's instructions.
The water in the heating circuit of the heater must contain
at least 10% of a quality brand anti-freeze.
Non-authorised installations will void the heater's marks of
conformity and thus the vehicle's permit of operation. The
same applies to unskilled repairs or repairs not using
original spare parts.
1.5
Legal Provisions for Installation
For testing the heater in accordance with §§ 19, 20, or 21
of the StVZO the following regulations are to be observed
in particular (§ 22 a StVZO):
Testing is performed upon presentation of the operating
and installation instructions of the manufacturer. The year
of the initial operation must be durably marked on the
heater identification plate by the installing person.
102
BBW 46 / DBW 46
•
Fuel reservoirs for carburettor fuel must not be located
immediately behind the vehicle front fairing. They
must be away from the engine to prevent fuel fires in
case of accidents. This does not apply to towing
vehicles with open cockpit.
All fuel reservoirs offered in the Webasto Accessories
Catalogue are suitable for a maximum operating pressure
of 0.15 bar overpressure.
All fuel reservoirs offered in the Webasto Accessories
Catalogue are individually subjected to pressure testing
during the manufacturing process with a minimum of
0.15 bar overpressure.
•
1 Introduction
1.6
Corrections and Improvements
Deficiencies, improvements, or proposals for correction of
this workshop manual are to be mailed to:
Webasto Thermosysteme GmbH
Abt. Technische Dokumentation
D-82131 Stockdorf
Telephone: 0 89 / 8 57 94 - 5 42
Telefax:
0 89 / 8 57 94 - 7 57
The fuel reservoirs must be provided either with a
vented seal or any other type of venting facility (vent
line).
Only sealing caps in accordance with DIN 73400 may be
used.
•
The heater mode of operation - at least "on" or "off" must be clearly visible.
•
The retrofit of a heater must be checked by an
officially authorised expert or inspector of the
Technical Supervisory Association (TÜV) in
accordance with § 19, para. 2 StVZO. With this
expertise a new vehicle operating license must be
applied for with the administrative authority (vehicle
licensing agency).
•
Non-authorised installations will void the heater's
marks of conformity (ABG)and thus the vehicle's
permit of operation (ABE). The same applies to
unskilled repairs or repairs not using original spare
parts.
103
BBW 46 / DBW 46
2.
2 General Description
General Description
The heaters DBW 46 and BBW 46 basically consist of the
The water heaters DBW 46 and BBW 46 are used in
combination with the vehicle's own heating system to
–
–
–
–
– heat the vehicle's passenger compartment
– defrost the vehicle screens and
– preheat water-cooled engines
For control and monitoring the heater includes a
The water heater operates independent from the vehicle
engine and is connected to the vehicle's cooling system,
electrical system, and fuel system.
–
–
–
–
–
The heater designed to the evaporator principle operates
intermittently controlled by the temperature sensor.
combustion air fan with intake muffler
heat exchanger
burner head with combustion pipe
circulation pump
control unit (external)
flame sensor
glow plug
temperature sensor
temperature limiter or temperature fuse
Fuel supply is provided externally by a fuel dosing pump.
Dependent on the coolant temperature the heater
operates in full load with 4.6 kW or in part load with
2.3 kW.
5
4
6
3
7
2
8
1
9
10
11
1
2
3
4
5
6
7
8
9
10
11
Fuel connection
Flame sensor
Glow plug
Coolant outlet
Temperature limiter
Heat exchanger
Coolant inlet
Temperature sensor
Circulation pump
Exhaust outlet
Combustion air fan
with intake muffler
201
BBW 46 / DBW 46
2 General Description
2.1
Combustion Air Fan with Intake
Muffler
The combustion air fan delivers the air required for
combustion through the intake muffler to the burner head.
For combustion air control an adjustment screw is
provided on the combustion air fan housing.
2.3
Burner Head with Combustion Pipe
Within the burner head and combustion pipe the fuel is
conditioned, ignited and burned. This process heats the
coolant via the heat exchanger.
Burner Head with Combustion Pipe
2.4
Combustion Air Fan 12 and 24 V
2.2
Heat Exchanger
Circulation Pump
The circulation pump ensures circulation of the coolant
within the vehicle and heater coolant circuit. The pump is
activated by the control unit and is in continuous operation
(also during control idle) together with the heater. The
pump may be mounted externally (special type) in the
vehicle.
The heat exchanger transfers the heat generated by
combustion to the coolant circuit.
Circulation Pump
Heat Exchanger
202
BBW 46 / DBW 46
2.5
2 General Description
Flame Sensor
2.7
The flame sensor consists of a photo transistor protected
by a pipe. After flame-up the pipe starts to glow so that the
sensor signals "flame". The flame sensor monitors the
flame condition throughout heater operation.
Temperature Sensor
The temperature sensor consists of an aluminium sleeve
with an integral silicon PTC sensor.
The flame sensor senses the coolant temperature in the
heat exchanger of the heater as an electrical resistance.
The resistance changes according to temperature and
controls via the control unit the heater as well as the
vehicle air fan.
Flame Sensor
Temperature Sensor
2.6
2.8
Glow Plug
The glow plug ignites the fuel/air mixture during heater
start.
Temperature Limiter
The temperature limiter protects the heater against undue
high operating temperatures. The temperature limiter
responds when exceeding the maximum temperature and
can be reset after cooling down.
Temperature Limiter
24V
2.9
12 Volt
24 Volt
Glow Plugs
Temperature Fuse
The temperature fuse protects the heater against undue
high operating temperatures. The temperature fuse
includes a fusible plug which melts when exceeding the
maximum temperature. Fuel supply is interrupted and the
heater switches off. The temperature fuse must then be
replaced.
Temperature Fuse
203
BBW 46 / DBW 46
3 Functional Description
3.
Functional Description
3.1
Sequence of Operation
The control units with order no. 230 04_ and 230 05_ have
the glow cycling integrated with no influence on the
sampling within the control unit.
3.1.2 Combustion Operation
3.1.1 Switch On
Upon switch on positive control voltage is applied from the
battery across F2 and terminal A5 to the electronics of the
control unit.
– operating indicator light H1 illuminates.
– glowing is activated via relay K1 and circulation pump
via relay K2.
– after pre-glowing (approx. 30 sec) a cycled voltage is
applied to connector C2 via transistor V108. From
connector C2 dosing pump Y1 is triggered across
temperature fuse F3.
– the safety period of approx. 90 sec commences.
– after fuel priming time (approx. 5 sec) the combustion
air fan motor M1 is started in full load mode via relay
K4.
If there is a "flame" condition during the safety period,
flame sensor B1 signals "bright" and relay K1 deenergises. The safety period is reset and the glow plug is
switched off. This procedure requires approx. 15 sec for
normal ignition.
Repeat start:
If there is a "no flame" condition during the safety period,
there will be an automatic restart attempt with a 30 sec
run-down involving glowing, pre-glowing (approx. 30 sec)
and safety period (approx. 90 sec). This start-up pattern is
also applicable for a re-activation during controlled
operation.
After activation the heater first operates with full load.
The temperature sensor increases its resistance with
rising temperature dependent on the heating circuit
temperature.
When reaching the individual switching thresholds the
control unit initiates the following operating conditions
(see functional diagram).
Vehicle air fan:
When exceeding a water temperature of 55 °C the vehicle
air fan is switched on via relays K5, K6 and connection A6.
When the temperature drops below 50 °C the vehicle air
fan is deactivated.
Part load operation:
When exceeding a water temperature of 78 °C the part
load resistor R1 is connected in series with the
combustion air fan motor M1 (relay K4 de-energises, relay
K3 energises). At the same time the dosing pump
frequency drops by about 50 %.
Full load operation:
When in part load operation the water temperature drops
to 70 °C, full load operation is resumed (relay K3 deenergises, relay K4 energises). The dosing pump
operates at full load frequency.
Control idle
When in part load operation the water temperature
exceeds 86 °C, the dosing pump is switched off. Rundown operation commences.
NOTE
With control units
order no.
105 499
105 507
230 04_
230 05_
12 Volt
24 Volt
12 Volt
24 Volt
after switch-on and after a control idle period there will be
a glow plug condition sampling.
Glow plug filament interrupts or fusing defects in the glow
plug power circuit will cause a run-down of 60 seconds
with a subsequent error lockout.
For control units performing glow plug condition sampling
the installation of an external glow cycling relay is not
permitted, as the control unit would interpret a glow plug
open power circuit when removing the voltage.
During start-up and combustion operation also a voltage
sampling is performed. In case of a low voltage which is
9.5 V ± 0.5 V (for 12 V heaters) or 19 V ± 1 V (for 24 V
heaters) over a period of 20 seconds there will be an error
lockout with a 60 second run-down.
Run-down
Run-down operation provides for venting and degassing
of the combustion chamber as well as for cooling down
the heat exchanger to avoid overheat damage. After
"flame-out" the flame sensor signals "dark" (for optical
run-down refer to Fig. 301).
During run-down (approx. 60 sec) the combustion air fan
runs in full load and is deactivated afterwards. The rundown period (for electronic run-down refer to Fig. 301) is
always 60 sec and is not abbreviated by switch-off or a
rapid drop in temperature.
After run-down only the circulation pump and the vehicle
air fan continue their operation.
Start after control idle:
When the temperature drops below 70 °C during the
control idle period, an automatic re-start is initiated (see
3.1.1).
As soon as the flame sensor signals "bright", combustion
operation has resumed and the heater enters part load
operation when the temperature rises above 78 °C
(otherwise full load operation).
301
BBW 46 / DBW 46
3 Functional Description
NOTE
The heater may also remain in part load, full load or
control idle operation for longer periods after achieving a
balance between generation and use of heat.
Also the control sequences for full load/part load and part
load/control idle may alternate dependent on the heat
required (see functional diagram).
3.1.3 Switch Off
3.1.3.1 Heater is in Combustion Operation
– After switch off the operation indicator (H1)
extinguishes.
– Dosing pump and vehicle air fan are immediately
switched off.
– Combustion air fan immediately operates in full load.
– After flame sensor signal "dark" run-down commences
(see 3.1.2).
– After run-down also the combustion air fan is
deactivated via relay K4 and the circulation pump via
relay K2.
3.1.4.4 Error Lockout - after Pre-glowing with
Defective Flame Sensor
After pre-glowing the availability of a flame sensor "bright"
signal without the combustion air fan having started
operation, will cause an error lockout.
3.1.4.5 Error Lockout - Glow Plug Filament or Glow
Plug Power Open Circuit
After switch-on and after control idle the control units
listed in 3.1.1 will sample the glow plug. A glow plug
filament or glow plug power open circuit will cause an
error lockout.
3.1.4.6 Error Lockout - Low Voltage
In case of a voltage below 9.5 V ± 0.5 V (for 12 V heaters)
or 19 V ± 1 V (for 24 V heaters) measured over a period
of 20 seconds at the control unit input will cause an error
lockout with a 60 second run-down.
3.1.4.7 Remedy
3.1.3.2 Heater is in Control Idle
– Circulation pump and vehicle air fan continue
operation.
3.1.4 Error Lockout
In case of malfunctions the heater including the circulation
pump automatically stop operation. The operation
indicator light H1 goes off.
3.1.4.1 Error Lockout - no Flame-up
If there is a no flame-up condition even after restart, the
control unit switches the heater off with a run-down.
3.1.4.2 Error Lockout - Flame-out (e.g. lack of fuel)
If the flame extinguishes during combustion operation and
the flame sensor B1 signals "dark", the glow plug is
activated for a maximum of 90 sec (safety period) by
means of relay K1. The heater enters full load operation.
Should no combustion be achieved, the heater will go in
error lockout with a run-down.
3.1.4.3 Error Lockout - Response of Temperature
Fuse or Limiter
An overheat condition in the heating circuit will cause the
temperature fuse F3 or the temperature limiter to respond
and interrupt dosing pump control. This stops fuel delivery
and the flame extinguishes.
For further functional sequence see 3.1.4.2.
302
– Remove error.
– The error lockout condition is cleared by heater switchoff and subsequent switch-on (switch-off period at
least 1 sec).
– In case of overheating replace temperature fuse (see
8.7.3) or reset temperature limiter.
BBW 46 / DBW 46
1a 2a
1 2
A
B
C
D
E
F
°C
3 Functional Description
4
3
6
5
8
7
8
6
10
9
2
11
*55 78 70 78 86
4
3
6 13 10
5
12 9
70
Fig. 301 Functional Diagram
*
1
1a
2
2a
3
4
5
6
7
8
9
10
11
12
13
A no flame-up condition will cause an automatic
restart (30 sec run-down with glowing / 30 sec preglowing / 90 sec safety period)
Switch on
Glow plug sampling
Preheating 30 sec
Flame sensor sampling
Fuel priming 5 sec
Safety period 90 sec
Flame
Full load
Vehicle air fan on
Part load
Optical run-down, max. 80 sec
Electronic run-down 60 sec
Control idle
Switch off
Vehicle air fan off
A
B
C
D
E
F
Glow plug
Circulation pump
Combustion air fan
Vehicle air fan
Dosing pump
Flame sensor
** Glow plug sampling not applicable for control units
with Ident. No. 439 789 (12 Volt) and 439 797 (24 Volt)
303
BBW 46 / DBW 46
4.
4 Technical Data
Technical Data
Electrical Components:
Where no threshold values are specified technical data
are understood to include standard tolerances for heater
units of ± 10 % at an ambient temperature of +20 °C and
at nominal voltage.
Heater
Control unit, motors for combustion air fan and circulation
pump, glow plug, dosing pump, switch and timer are either
12 Volt or 24 Volt components.
Temperature limiter, temperature sensor and flame
sensor are identical in 12 V and 24 V heaters.
Operation
Mark of conformity
Type
BBW 46
DBW 46
~ S185
~ S186
Water heater with evaporator burner
Heating flow
Full load
Part load
Fuel
Fuel consumption
Full load
Part load
Nominal voltage
4.6 kW
2.3 kW
Fuel
Diesel
0.63 l/h
0.23 l/h
0.58 l/h
0.29 l/h
12 or 24 Volt
Operating voltage range
Nominal power consumption with circulation
pump (without vehicle air fan)
10 ... 14 or 20 ... 28 Volt
Full load
Part load
Permissible ambient temperature:
Heater:
- operation
- storage
Control unit:
- operation
- storage
Dosing pump
- operation
- storage
44 W
33 W
-40° ... + 80 °C
-40° ... + 100 °C
-40° ... + 75 °C
-40° ... + 85 °C
-40° ... + 30 °C
-40° ... + 85 °C
Permissible operating overpressure
(heat carrier)
0.4 ... 2.0 bar
Heat exchanger capacity
0.25 l
Max. combustion air intake temperature
+40 °C
Minimum coolout circuit capacity
4.0 l
Volume flow of circulation pump against 0.1 bar
950 l/h
CO2 in exhaust
500 m above sea level
Full load
CO2 setting values at room temperature and
geograph. height above sea level
Full load
10 ... 10.5 Vol.-%
CO
in exhaust
with no wind
at 100 km/h
HC
in exhaust
at nominal load
and with no wind
100 ppm (0.01 Vol.-%) max.
NOX
in exhaust
at nominal load
and with no wind
200 ppm (0,02 Vol.-%) max.
Smoke spot number
according to Bacharach
according to Bosch
Dimensions
Heater
(Tolerance ± 3 mm)
length
width
height
Weight incl. circulation pump
0.1 Vol.-% max.
0.2 Vol.-% max.
<6
<0,5
277 mm
148 mm
197 mm
3.2 kg
401
BBW 46 / DBW 46
5.
Troubleshooting
5.1
General
5 Troubleshooting
CAUTION
Troubleshooting is normally limited to the isolation of
defective components. The following possible causes for
trouble have not been taken into consideration and must
always be excluded as a possible cause for malfunction:
This section describes troubleshooting procedures for the
heaters BBW 46 and DBW 46.
corrosion on connectors
loose contacts on connectors
wrong crimping on connectors
corrosion on wiring and fuses
corrosion on battery terminals
CAUTION
Troubleshooting requires profound knowledge about
components and their theory of operation and may only be
performed by trained personnel.
In case of doubt functional interrelations may be derived
from Sections 2 and 3.
After any fault correction a functional checkout in the
vehicle has to be performed.
5.2
General Fault Symptoms
The following diagram (Fig. 501) lists possible fault
symptoms of general nature.
Low voltage protection*
Water circuit/temperature > 70 °C
Part load resistor
Water circuit
Vehicle air fan
Temperature sensor
Flame sensor
Exhaust ducting
Combustion air supply
Fuel supply
Combustion air fan
Dosing pump
Temperature fuse/limiter
Glow plug*
Circulation pump
Control unit
* not applicable for control units
with Ident. No.
439 789 (12 Volt) and
439 797 (24 Volt)
Fuses (electrical)
Power supply/electrical wiring
Check, repair or replace as required
Symptom
After switch-on - no function
● ● ●
Error lockout - after approx. 60 sec
● ●
●
●
Error lockout - after 80 sec
Error lockout - after approx. 90 sec
●
●
●
Error lockout - after 270 sec
●
●
● ● ● ● ● ●
Circulation pump - does not operate
●
● ●
Glow plug - remains cold
● ● ●
Dosing pump - does not operate
●
●
Combustion air fan - does not operate
●
●
Combustion - stops
●
Vehicle interior - does not warm up
● ● ●
Heater - does not switch to part load
●
Combustion air fan - operates after switch-on
●
● ●
●
● ● ● ● ●
●
● ● ●
●
●
●
●
● ●
●
Fig. 501 General Failure Symptoms
501
BBW 46 / DBW 46
6 Functional Checkouts
6.
Functional Checkouts
6.1
General
6.3.2 Flame Sensor Check
This section describes the tests and adjustments on the
heater in installed and removed condition to prove its
serviceability.
During electrical testing with a digital multimeter the flame
sensor readings should be as follows:
flame sensor "dark" approx. 12 V or 24 V
flame sensor "bright" approx. 1 V.
Heater On 12 V or 24 V
after 14...26 sec close to 1 V
WARNING
The heater must not be operated in closed areas like
garages or workshops not provided with exhaust
ventilation facilities.
f
kdor
8035
Stoc
et
ra
rge
6.2
ue
2V
Ste
0/1
156
SG 23004
08
274 3
Adjustments
5HB
00
D
5
C
6.2.1 Adjustment of CO2 Contents
6
7
B
8
2
4
4
any
rm
-Ge
1
in
ade
1
5
6
1
2
3
2
A
W.
M
1
2
3
Changing the combustion air quantity preset by the
manufacturer is permitted and may be achieved by
rotating the air set screw.
Adjustment Procedure
Clockwise rotation: CO2 contents decreases (prior to
measurement allow heater to operate for approx. 5 min).
Coarse setting: screw in until flush with surface, then
rotate screw back one turn.
fen
ht
!
wer
Nic
D8
D7
NOTE
Perform adjustment in full load operation only. Set CO2
adjustment value in combination with a smoke spot
number of close to "1".
6.3
Components Testing
6.3.1 Temperature Sensor Resistance Check
During electrical testing with a digital multimeter the
temperature sensor should have the following resistance
in accordance with the diagram below.
Test current < 1 mA.
1750
1500
Resistance
1250
1000
750
500
–40
0
40
80
120
Water temperature
601
BBW 46 / DBW 46
7.
Circuit Diagrams
7.1
General
7 Circuit Diagrams
Circuit diagram (Fig. 702) shows possible heater circuits
for the heater BBW 46 and DBW 46.
Fig. 701 presents the pin assignment.
1
3
5
7
9
11
2
4
6
8
10
12
Pin assignment:
1
2
3
4
5
6
7
8
9
10
11
12
=
=
=
=
=
=
=
=
=
=
=
=
circulation pump (brown)
circulation pump (black)
combustion air fan (brown)
combustion air fan (violet)
part load resistor (red)
part load resistor (red)
flame sensor (green)
flame sensor (orange)
temperature sensor (green)
temperature sensor (white)
temperature fuse (blue)
temperature fuse (blue)
Fig. 701 Connector Pin Assignment
701
BBW 46 / DBW 46
7 Circuit Diagrams
A
M1
M2
B
5
2
6
3
C
2
1
4
1
2
1
(75) 15
30
61
W1
F4
X1 Y1
D
8
4
rt
B1 E B2 R1 X1 F3
7
3
3
4 vi
4
5 br
5
6 rt
6
7 sw
7
8 ge
8
sw/rt
2
1
W1
2
1
2
3
6
4
1
7
8
S3
B3
rt/bl
5
2
12V
24V
Y
W1
R2
F3
S2
A1
M
M2
9
10
X2
ge
ws
7
1
R1
M
M1
B1
B2
31
Wire Colours
Wire Gauges
< 7.5 m
7.5 - 15 m
0.75 mm2
1.0 mm2
1.5 mm2
2.5 mm2
4.0 mm2
1.5 mm2
1.5 mm2
2.5 mm2
4.0 mm2
6.0 mm2
bl
br
ge
gn
gr
or
rt
sw
vi
ws
blue
brown
yellow
green
grey
orange
red
black
violet
white
Item
Nomenclature
Remark
Item
Nomenclature
Remark
A1
Heater
BBW 46 / DBW 46
S1
Switch for vehicle air fan
depending on vehicle, S1 or S2
A2
Control Unit
SG 1560
S2
Switch for vehicle air fan
depending on vehicle, S1 or S2
A4
Telestart receiver
T6
S3
Switch for circulation pump
for separate switch-on
B1
Flame Sensor
V3
Diode (in item A2)
B2
Temperature Sensor
V108
Transistor (in item A2)
B3
Room Thermostat
E
Glow Plug
F1
Fuse 16A
F2
Fuse 8A
F3
Temperature Fuse
F4
Fuse 16A
vehicle fuse DIN 72581
K6
Relay
for vehicle air fan
K7
Relay
for telestart receiver
M1
Motor
combustion air fan
M2
Motor
circulation pump
M3
Motor
vehicle air fan
P
Timer, digital
for timer operation
R1
Resistor
for part load operation
R2
Resistor
only required for 12 V glow plug in
24 V heater
W1
Wiring harness
X1
Connection, 12-pole
vehicle fuse DIN 72581
X2
Connection, 2-pole
vehicle fuse DIN 72581
X4
Connection, 1-pole
Y
Dosing Pump
for vehicle air fan on/off
Fig. 702 Automatic Switching Circuit for BBW 46/DBW 46, 12 and 24 Volt Timer and Telestart T6
702
2
ge
8
br
6
gn
rt
5
4
ws
3
gn
gn
1
or
M
12 2
bl
M3
11
rt
br
X1
vi
bl
S1
rt
br
or
br
vi
30
sw
87a
br
87b
85
sw
sw
br
br
br
86
sw
br
K6
87
ge/rt
87a
bl
87
K7
31
6
ws/sw
30
E2
A2
5
gn/ws
rt
A4
3
4
F2 F1
rt
9
E1
X1
1
X2 Y2
P
ge
X1
ge
3 gr
br
8 10 12
7 9 11
bl
br
2
6
5
4
3
A
W1
1
2 bl/ge
2
1
5
1
6
2
E
BBW 46 / DBW 46
8.
Servicing
8.1
General
8 Servicing
8.4
Heater Test Run
The heater must not be operated, not even with the timer,
in enclosed areas like garages or workshops not provided
with exhaust ventilation facilities.
This section describes the servicing procedures allowed
on the heater when installed.
8.5
8.2
Work on the Heater
As long as the heater is in operation or in run-down, the
battery main power supply must not be disconnected to
prevent the heater from overheating and response of the
overheat protection.
For any type of work on the heater the main power supply
cable is to be disconnected from the vehicle battery.
When performing extensive repairs on the heater its
complete removal is considered appropriate.
After work on the heating circuit replenish with a water and
anti-freeze mixture according to manufacturer's
instructions and bleed water circuit thoroughly.
Repairs requiring a change of location the relevant
installation instructions and the vehicle specific heater
installation proposal have to be observed.
8.3
Work on the Vehicle
CAUTION
In the vicinity of the heater a temperature of 100 °C and in
the vicinity of the control unit 85 °C must never be
exceeded (e.g. during paint work on the vehicle).
Servicing
To ensure functional reliability of the heater the following
servicing should be performed before each heating
season:
•
clean air heater exterior (prevent the ingress of water).
•
examine electrical connections for corrosion of
contacts and for security.
•
check combustion air and exhaust ducts for damage
and obstructions.
•
check fuel line and fuel filter for leakage.
•
check coolant circuit and circulation pump for leakage.
•
check hoses for cracks.
•
replace fuel filter if installed.
•
perform heater test run (check exhaust CO2 contents
during test run).
801
BBW 46 / DBW 46
8 Servicing
8.6
Visual Inspections and
Installation Regulations
After replacing the coolant ensure that the cooling system
is bled thoroughly. The heater and hoses must be
installed so that a static venting is guaranteed.
8.6.1 Connection to the Vehicle Cooling
System
Insufficient venting may cause malfunctions during
operation by overheating.
The installation location of the heater should be as low as
possible to ensure self-venting of the heater and
circulation pump. This applies in particular to the
circulation pump, which is not self-sucking.
Proper venting may be verified by a circulation pump
operating almost noiseless. During operation improper
venting may cause a response of the resettable
temperature limiter or of the temperature fuse.
The heater is to be connected to the vehicle cooling
system according to Fig. 801 or 802. The amount of
coolant used in the circuit must be at least 4 litres.
The coolant hoses supplied by Webasto must be installed,
other hoses must meet at least the DIN 73411
requirement. The hoses are to be routed upwards and
without kinks to ensure proper venting. Hose connections
must be protected against slippage using hose clamps.
NOTE
The hose clamps are to be torque-tightened with 1.5 Nm
(hose clamps previously used) or with 5 Nm (new, wide
hose clamps).
Old
802
New
BBW 46 / DBW 46
8 Servicing
Wiring harness
Vehicle fuel line
Heater fuel line
Exhaust line
Water circuit
1
2
3
4
5
6
7
8
9
10
11
12
13
14
15
16
17
18
19
Radiator
Coolant thermostat
Water pump
Vehicle engine with standard outfit
Water heater
Battery
Fuse holder
Control unit
Relay (for vehicle air fan)
Control valve of vehicle heating system
Heat exchanger of vehicle heating system
Air fan of vehicle heating system
Switch for air fan of vehicle heating system
Fusebox in vehicle
Timer
Fuel tapping
Dosing pump
Exhaust muffler
Circulation pump
Fig. 801 Connection to Cooling System "Inline" Integration
803
BBW 46 / DBW 46
8 Servicing
Wiring harness
Vehicle fuel line
Heater fuel line
Exhaust line
Water circuit
1
2
3
4
5
5A
6
7
8
9
10
11
12
13
14
15
16
17
18
19
20
Radiator
Coolant thermostat
Water pump
Vehicle engine with standard outfit
Water heater
Check valve
Battery
Fuse holder
Control unit
Relay (for vehicle air fan)
Control valve of vehicle heating system
Heat exchanger of vehicle heating system
Air fan of vehicle heating system
Switch for air fan of vehicle heating system
Fusebox in vehicle
Timer
Fuel tapping
Dosing pump
Exhaust muffler
Circulation pump
Thermostat
Fig. 802 Connection to Cooling System "Thermostat" Integration
804
BBW 46 / DBW 46
8 Servicing
8.6.2 Connection to Vehicle Fuel System
In vehicles with carburettor or fuel injection including a
return line the heater fuel system integration must be in
the return line.
Carburettor engines without return line must have the
heater integrated in the fuel system's fuel supply line
between fuel tank and vehicle fuel pump.
A fuel supply line can normally be identified by its fuel
filter.
The following table lists the pressures permitted at the fuel
tapping location.
Permitted fuel feed height
(H) m
at max. permissible overpressure (bar) in fuel tank
0.00
1.5
1.25
1.4
2.50
1.3
3.75
1.2
5.00
1.1
6.25
1.0
7.50
0.9
8.75
0.8
10.00
0.7
Permitted suction
height S (m)
at max. permissible
negative pressure (bar) in
fuel tank
0.00 (F; D)
-0.15 (F; D)
0.50 (F; D)
-0.11 (F; D)
1.00
-0.07
F = Fuel
(D)
Fig. 803 Fuel Supply
(D)
D = Diesel
NOTE
If a degassing vessel is included in the vehicle fuel system
installation, the fuel tap must be located upstream of the
degassing vessel.
to engine
from tank
Fuel tappings from the supply or return line may only use
the special Webasto fuel tap (Fig. 804).
The fuel tap is to be mounted so that air or gas bubbles
may escape towards the fuel tank.
to dosing pump
Fig. 804 Webasto Fuel Tap
805
BBW 46 / DBW 46
8 Servicing
Air or gas bubbles may build up in the vehicle fuel line in
case the carburettor or the fuel pump is leaking or if
ambient temperatures exceed the fuel evaporation
temperature.
Plastic Tank
The fuel tap should not be located near the engine, as gas
bubbles may build up due to the heat radiated by the
engine resulting in malfunctions of combustion operation.
When installing the heater in vehicles with fuel injection
system, the fuel pump location, internal or external of the
fuel tank, must be investigated.
With a fuel pump located inside the fuel tank, fuel may be
tapped only from the return line, ensuring that the return
line is routed almost all the way down to the fuel tank floor.
Otherwise the return line may be lengthened or fuel taps
(Fig. 805 and 806) may be used.
Gasket
With a fuel pump located outside of the fuel tank the fuel
tap may be located between tank and fuel pump.
25
Hole pattern
> 25 mm
Use fuel tank tap only
on metal fuel tanks
Fig. 806 Fuel Tapping from Plastic Tank
(tapping via fuel drain plug)
8.6.2.1 Fuel Lines
Fuel lines may only be steel, copper, or plastic lines made
of unhardened, light and temperature stabilised PA 11 or
PA 12 ( e.g. Mecanyl RWTL) according to DIN 73378. As
in most cases a permanently rising fuel line routing cannot
be ensured, the inner diameter must not exceed a certain
value. Starting from an inside diameter of 4 mm, air or gas
bubbles accumulate resulting in malfunctions should the
lines be descending or having sags. The diameters
specified in Fig. 803 ensure no disturbing formation of
bubbles.
A descending line routing from the dosing pump to the
heater should be avoided.
Loose fuel lines must be secured in order to avoid
sagging. The installation must ensure protection against
stone impacts and undue temperatures (exhaust line).
Fig. 805 Webasto Fuel Tank Tap
The fuel line joints are to be secured against slipping with
hose clamps.
Connection of 2 Pipes with Hose
The proper connection of fuel lines with hose is shown in
Fig. 807.
806
BBW 46 / DBW 46
8 Servicing
8.6.3.2 Installation and Attachment
The dosing pump is to be attached with anti-vibration
mounts. The installation location is limited according to
Fig. 808 to ensure sufficient self-venting capability.
correct
hose clamp
8.6.4 Fuel Filter
wrong
bubble
bubble
If there is the probability of contaminated fuel only the
Webasto filter, order no. 487 171, may be used.
Installation possibly vertical up to horizontal the most
(observe direction of flow).
8.6.5 Combustion Air Supply
Fig. 807 Pipe/Hose Connection
8.6.3 Dosing Pump
The dosing pump is a combined delivery, dosing and shutoff system and is subject to certain installation criteria
(Fig. 803 and 808).
Combustion air must under no circumstances be
extracted from rooms with persons. The combustion air
inlet must not point towards the forward direction of
motion. It must be located so that no clogging by
contamination, snow and splash water is to be expected.
The combustion air outlet must not be located above the
exhaust outlet.
If the heater is installed in the vicinity of the fuel tank in a
common installation compartment, combustion air must
be taken in from and the exhaust routed to the exterior.
The feedthroughs must be splash water proof.
If the heater is located in a closed installation box, a vent
hole of at least 6 cm2 is required. If the temperature within
the installation box exceeds the maximum ambient
temperature allowed for the heater (see Technical Data),
the vent hole diameter must be increased after consulting
Webasto.
8.6.6 Exhaust Line
The exhaust line (inner diameter 22 mm) may have an
installation length of up to 5 m and several bends
(altogether 720°, smallest bending radius 50 mm). An
exhaust muffler may be fitted.
Fig. 808 Installation Position and Attachment of
Dosing Pump
8.6.3.1 Installation Location
Prior to installation of dosing pump ensure that the
pressure at the tapping location is less than 1.5 bar.
In order to ensure an angle of 90° ± 10° an attachment is
required not further than 150 mm away measured from
the exhaust pipe end (see Fig. 809).
The exhaust pipe outlet must not point in forward direction
of motion (see Fig. 809).
The exhaust pipe outlet must be located so that no
clogging by snow or mud is to be expected.
It is advantageous to mount the dosing pump in a cool
location as close as possible to the tank. The ambient
temperature must never exceed + 20 °C during operation.
Dosing pump and fuel lines must not be installed in
locations exposed to heat radiated by hot vehicle
components. A heat shield is to be provided as necessary.
The preferred installation location is near the tank.
807
BBW 46 / DBW 46
8 Servicing
8.7.1 Removal and Installation of Heater
8.7.1.1 Removal
1. Disconnect vehicle battery.
2. Remove top cover (see 9.2.1).
WARNING
Allow coolant to cool down sufficiently to prevent skin
burns. Also depressurise cooling system and refit cap
afterwards.
10°
10°
Direction of exhaust
flow nearly 90° ± 10°
Fig. 809 Installation Arrangement of Exhaust Pipe Outlet
Rigid pipes made of unalloyed or alloyed steel with a
minimum wall thickness of 1.0 mm have to be used as
exhaust line or flexible pipes made of alloyed steel only.
The exhaust pipe is secured to the air heater e.g. with a
clamp. For further requirements refer to official
regulations.
NOTE
Accumulations of condensate in the exhaust line must be
directly drained, a condensate drain hole may be provided
as required.
8.7
Removal and Installation
CAUTION
In installed condition only the following disassembly or
removal procedures are permitted should the top cover be
accessible and enough space for removal allow such
action:
–
–
–
–
–
–
–
808
replacement of circulation pump
replacement of temperature limiter or fuse
replacement of temperature sensor
replacement of combustion air fan
replacement of flame sensor
replacement of glow plug
replacement of felt disk in burner head
3. Disconnect electrical connector of wiring harness from
heater.
WARNING
Take precautionary measures to avoid fires.
4. Disconnect fuel supply inlet on heater and fit
protective cap on hose end.
5. Remove hose clamps and disconnect coolant hose
from heater.
6. Disconnect combustion air inlet and exhaust outlet on
heater.
7. Open tightening strap on heater and remove heater
from its support.
8.7.1.2 Installation
1. Locate heater for installation and temporarily secure
with tightening strap.
2. Reconnect coolant hoses and secure with hose
clamps. Tighten hose clamps with 1.5 Nm.
3. Connect fuel supply line to heater fuel inlet.
4. Secure combustion air inlet and exhaust outlet on
heater.
5. Fasten tightening strap with 3.0 ± 0.3 Nm.
6. Connect wiring harness connector to heater.
7. Plug on and arrest top cover.
8. Reconnect vehicle battery.
9. Bleed fuel supply system (see 8.8.1).
10. Bleed coolant circuit.
11. Perform functional test and check CO2 setting.
8.7.2 Replacement of Circulation Pump
NOTE
The replacement procedure for the circulation pump is
identical with the heater installed or removed.
Perform replacement in accordance with 9.2.6.
WARNING
When removing from installed condition allow coolant to
cool down sufficiently to prevent skin burns. Also
depressurise cooling system and refit cap afterwards.
8 Servicing
8.7.3 Replacement of Temperature Limiter or
Temperature Fuse
BBW 46 / DBW 46
8.7.6 Replacement of Flame Sensor
NOTE
The replacement procedure for the flame sensor is
identical with the heater installed or removed.
Perform replacement in accordance with 9.2.5.
NOTE
The replacement procedure for the temperature limiter is
identical with the heater installed or removed.
Perform replacement in accordance with 9.2.2 or 9.2.3 as
applicable.
8.7.7 Replacement of Glow Plug
WARNING
When removing from installed condition allow coolant to
cool down sufficiently to prevent skin burns. Also
depressurise cooling system and refit cap afterwards.
NOTE
The replacement procedure for the glow plug is identical
with the heater installed or removed.
Perform replacement in accordance with 9.2.8.
8.7.4 Replacement of Temperature Sensor
8.7.8 Replacement of Felt Disk in Burner Head
NOTE
The replacement procedure for the temperature sensor is
identical with the heater installed or removed.
Perform replacement in accordance with 9.2.4.
NOTE
The replacement procedure for the felt disk in the burner
head is identical with the heater installed or removed.
Perform replacement in accordance with 9.2.11.
WARNING
When removing from installed condition allow coolant to
cool down sufficiently to prevent skin burns. Also
depressurise cooling system and refit cap afterwards.
WARNING
Before replacement disconnect fuel supply line at cover
and close immediately. For removal take precautionary
measures to prevent fires.
8.7.5 Replacement of Combustion Air Fan
NOTE
The replacement procedure for the combustion air fan is
identical with the heater installed or removed.
Perform replacement in accordance with 9.2.7.
WARNING
When removing from installed condition allow coolant to
cool down sufficiently to prevent skin burns. Also
depressurise cooling system and refit cap afterwards.
809
BBW 46 / DBW 46
8 Servicing
8.8
First Operation
After heater installation the coolant circuit and the fuel
supply system must be thoroughly bled observing
manufacturer's instructions. During the test run of the air
heater all coolant and fuel line connections are to be
checked for no leakage and tight fit. The coolant line
connections (20 - 27 mm Ø) are to be re-tightened with a
torque of 2.0 + 0.5 Nm. Should the heater during
operation enter an error lockout condition, perform
troubleshooting (see Section 5).
8.8.1 Bleeding the Fuel Supply System
After switch-on of the heater the dosing pump must first
prime the complete fuel supply system. Should the first
start attempt (incl. restart) not yet initiate combustion, the
heater must be switched off and on again (possibly
several times).
Fuse
Switch button
+30
8A
810
e.g. 375.004
A completely empty fuel system may require - dependent
on the length of the fuel lines and the cycle frequency of
the dosing pump - in extreme cases up to 12 minutes
(approx. 50 sec per meter of fuel line with a line diameter
of di = 2 mm).
Rapid priming of the fuel line may however be achieved as
follows:
–
connect the plus connection of the dosing pump to
+30 across a switch button (e.g. order no. 375.004)
(see Fig.)
–
continuously alternate switch-on and switch-off to
operate dosing pump until fuel line is primed.
CAUTION
Do not flood heater with fuel.
In case of an empty fuel line with a fuel tank completely
empty the heater should be started several times only with
the vehicle engine running to keep the load on the battery
to a minimum.
Dosing pump
BBW 46 / DBW 46
9.
Repair
9.1
General
9 Repair
NOTE
Prior to glow plug installation apply high temperature
grease Copaslip or copper paste to thread.
This section describes the repairs that may be performed
on the heater BBW 46/DBW 46 when removed. Any
further disassembly will void the warranty.
For re-assembly only components of the original spare
part kits are to be used.
9.1.1 Work on Components after Disassembly
CAUTION
All sealing elements located between components
disassembled must be discarded and renewed.
Volt max.
12
24
Ampere
20
13.3
Torque
30 Nm
30 Nm
Length of sleeve (1)
approx. 7 mm
approx. 3 mm
Wire gauge (2)
1.1 mm
0.8 mm
Length of filament
approx. 20 mm approx. 30 mm
30 mm overall length
64.5 ± 1
64 ± 1
9.1.1.1 Cleaning
•
no voltage identification on
12 V type
All components disassembled must be cleaned with
cleaning spirit and subsequently blown dry with air.
9.1.1.2 Visual Inspection
•
•
•
Examine all components for damages (cracks,
deformation, wear, etc.) and replace as necessary.
Examine connectors and wiring for corrosion, loose
contacts, wrong crimping, etc. and repair as
necessary.
Check terminals for corrosion and contacts for
security and repair as necessary.
24 V
9.1.1.3 Remarks on the Replacement of Glow Plugs
Due to the manufacturing process the 12 Volt glow plug
and the 24 Volt glow plug are nearly identical. In order to
avoid the use of the wrong glow plug, the most evident
differences between the plugs are illustrated together with
a table of Volt/Ampere and torque values.
Ident. No. 479594 12 V
157915 24 V
1
2
CAUTION
Glow plugs are to be handled with care and should be
removed from their packaging only immediately prior to
installation.
9.1.2 Modification Procedures
NOTE
A continuous design improvement of the heaters is
intended for their optimisation to prevent failures or
malfunctions.
Normally equipment already in operation may be modified
by retrofits using the relevant modification kits.
The following details modifications, which may be easily
performed at low expenditure during repairs:
•
replacement of temperature fuse against temperature
limiter with reset (see 9.1.2.1)
3
4
901
BBW 46 / DBW 46
9 Repair
9.1.2.1 Replacement of Temperature Fuse against
Temperature Limiter with Reset
5
General
Several reasons (e.g. unfavourable installation location,
wrong manual control during operation) favour the
premature response of the temperature fuse. Therefore
we recommend the replacement of the temperature fuse
(1) against a temperature limiter with a reset facility (2).
This component may be ordered with order no. 14865A.
1
2
4
*
CAUTION
A replacement is only possible on heaters with a flange
connection (3) on the heat exchanger (water inlet), or on
heaters from June 1988 and up, or on heaters with serial
number 71771 (BBW 46) and 38177 (DBW 46) and up.
On heaters without flange connection the heat exchanger
may suffer damage in case of overheat condition.
Procedure
WARNING
When performing the replacement with the heater
installed allow coolant to cool down sufficiently to avoid
skin burns. Also depressurise cooling system and refit cap
afterwards.
3
* Serial number
Section A-B
1. Remove top cover (4).
2. Open locking tab and separate lower portion of
connector support (5). With wiring harness connected
pins remain fixed in connector. Disconnect wire (blue)
from connector base, terminals 11 and 12.
3. Carefully remove temperature fuse (1). There is a
probability of water leakage.
4. Apply high temperature grease Copaslip (order no.
105898) to thread of temperature limiter. Manually
screw in temperature limiter (2) and using a fork
wrench (size 16) tighten with a max. of one third of a
turn. Maximum torque 1.5 Nm.
5. Reconnect wires to connector base. The temperature
limiter electrical connections cannot be mixed up. The
brown and the blue wire may be connected either to
terminal 11 or 12.
9.2
Disassembly and Assembly
9.2.1 Electrical Connections
9.2.1.1 Breaking Electrical Connections
NOTE
All electrical connections with exception of the glow plug
cable are joined in the electrical connector.
1. Slide top cover in direction of arrow and lift, then slide
back and loosen from rear lock wedge.
2. Remove rubber grommet.
3. Disconnection of round connector:
Using screw driver open locking tab of 12 pin
connector and fold down lower part of connector.
Remove pins from connector.
4. Disconnection of glow plug connector:
Using screw driver push locking tabs of glow plug
connector (next to 12 pin connector) apart and lift glow
plug connector.
902
BBW 46 / DBW 46
9 Repair
9.2.1.2 Making Electrical Connections
3. Press electrical cables into grommet as shown in
figure. Slide grommet with cables into top cover.
1. Making electrical connection of round connector:
Insert connector pins into connector lower part of
connector. Connector pins must not be interchanged.
Press lower part of connector into upper part until
locked.
4. Slide top cover into rear locking wedge first, push
against direction of arrow and then press into forward
locking wedge.
2. Making electrical connection of glow plug:
Press glow plug connector into socket until locked.
Top cover
Glow plug connector
1
2
Flame sensor cable
Glow plug cable
Motor cable
circulation pump
Temperature sensor
cable
Motor cable
combustion air fan
Rubber grommet
Pin assignment:
1 = circulation pump (brown)
2 = circulation pump (black)
3 = combustion air fan (brown)
4 = combustion air fan (violet)
5 = part load resistor (red)
6 = part load resistor (red)
7 = flame sensor (green)
8 = flame sensor (orange)
9 = temperature sensor (green)
10 = temperature sensor (white)
11 = temperature fuse or limiter (blue)
12 = temperature fuse or limiter (blue)
1
3
5
7
9
11
2
4
6
8
10
12
Fig. 901 Electrical Connections
903
BBW 46 / DBW 46
9 Repair
9.2.2 Replacement of Temperature Limiter
NOTE
The temperature limiter is installed only on heaters from
June 1988 and up or starting from serial number 71771
(BBW 46) and 38177 (DBW 46) or after performing the
modification (see 9.1.2.1).
9.2.2.1 Removal
1. Remove heater (see 8.7.1.1)
2. Break electrical connections (see 9.2.1.1).
1
2
3
4
5
6
7
8
9
10
11
12
WARNING
When removing temperature limiter from installed
condition allow coolant to cool down sufficiently to prevent
skin burns.
Also depressurise cooling system and refit cap
afterwards.
3. Withdraw protective cap (1, Fig. 902).
4. Unscrew temperature limiter (2) from heat exchanger
(9) and remove together with O-ring (3).
5. Perform procedures on components after
disassembly (refer to 9.1.1).
Protective cap
Temperature limiter
O-ring
Lock screw
O-ring
Flame sensor
O-ring
Temperature sensor
Heat exchanger
Burner head
O-ring
Temperature fuse
11
12
1
2
8
3
7
6
5
9
4
10
Fig. 902 Replacement of Temperature Limiter, Temperature Fuse, Temperature Sensor and Flame Sensor
904
BBW 46 / DBW 46
9.2.2.2 Installation
1. Apply Copaslip (Ident. No. 105898) to thread of
temperature limiter (2, Fig. 902) and manually screw
into heat exchanger (9).
2. Using a fork wrench tighten temperature limiter (2)
with a third of a turn. Maximum torque 1.5 Nm.
3. Fit protective cap (1).
4. Make electrical connections (see 9.2.1.2).
5. Install heater (see 8.7.1.2).
9 Repair
3. Unscrew temperature sensor (8, Fig. 902) and
remove together with O-ring (7).
4. Perform procedures on components after
disassembly (refer to 9.1.1).
9.2.4.2 Installation
9.2.3 Replacement of Temperature Fuse
1. Apply Copaslip (Ident. No. 105898) to temperature
sensor (8, Fig. 902), manually screw with O-ring (7) in
place into heat exchanger (9) and tighten with 0.5 Nm.
2. Make electrical connections (see 9.2.1.2).
3. Install heater (see 8.7.1.2).
9.2.3.1 Removal
9.2.5 Replacement of Flame Sensor
1. Remove heater (see 8.7.1.1).
2. Break electrical connections (see 9.2.1.1).
9.2.5.1 Removal
WARNING
When removing temperature fuse from installed condition
allow coolant to cool down sufficiently to prevent skin
burns.
Also depressurise cooling system and refit cap
afterwards.
3. Unscrew temperature fuse (12, Fig. 902) from heat
exchanger (9) and remove together with O-ring (11).
4. Perform procedures on components after
disassembly (refer to 9.1.1).
9.2.3.2 Installation
1. Apply Copaslip (Ident. No. 105898) to thread of
temperature fuse (12, Fig. 902).
2. Manually screw temperature fuse (12) with O-ring (11)
into heat exchanger (9).
3. Ensure temperature fuse is screwed properly into heat
exchanger. Distance between surfaces to be approx.
0.8 mm.
4. Make electrical connections (see 9.2.1.2).
5. Install heater (see 8.7.1.2).
9.2.4 Replacement of Temperature Sensor
9.2.4.1 Removal
1. Remove heater (see 8.7.1.1).
2. Break electrical connections (see 9.2.1.1).
1.
2.
3.
4.
Remove heater (see 8.7.1.1).
Break electrical connections (see 9.2.1.1).
Loosen lock screw (4, Fig. 902).
Withdraw flame sensor (6) on clamp together with Oring (5).
5. Perform procedures on components after
disassembly (refer to 9.1.1).
9.2.5.2 Installation
1. Apply non-acid grease to O-ring (5, Fig. 902) and
locate on flame sensor (vent port must remain open).
2. Slide flame sensor (6) into burner head (10).
3. Apply copper paste to lock screw (4) and screw into
burner head (10).
4. Make electrical connections (see 9.2.1.2).
5. Install heater (see 8.7.1.2).
9.2.6 Replacement of Circulation Pump
NOTE
For a circulation pump mounted externally in vehicle the
following procedure is similar.
WARNING
When removing circulation pump from installed condition
allow coolant to cool down sufficiently to prevent skin
burns.
Also depressurise cooling system and refit cap
afterwards.
WARNING
When removing temperature sensor from installed
condition allow coolant to cool down sufficiently to prevent
skin burns.
Also depressurise cooling system and refit cap
afterwards.
905
BBW 46 / DBW 46
9 Repair
9.2.6.1 Removal
9.2.6.2 Installation
1.
2.
3.
4.
5.
Remove heater (see 8.7.1.1).
Break electrical connections (see 9.2.1.1).
Open clamping ring (3, Fig. 903).
Remove circulation pump (2) and gasket (1).
Perform procedures on components after
disassembly (refer to 9.1.1).
1. Remove deposits form water inlet of heat exchanger.
2. Apply Copaslip (Ident. No. 105898) to new gasket (1)
and locate on connector pipe.
3. Position circulation pump (2) for assembly and secure
with clamping ring (3).
4. Make electrical connections (see 9.2.1.2).
5. Install heater (see 8.7.1.2).
1
2
3
4
Gasket
Circulation pump
Clamping ring
Heat exchanger
4
1
2
NOTE
Circulation pump may be
mounted externally in vehicle.
3
Fig. 903 Replacement of Circulation Pump
906
BBW 46 / DBW 46
9 Repair
9.2.7 Replacement of Combustion Air Fan
9.2.7.2 Installation
9.2.7.1 Removal
1. Locate combustion air fan (1, Fig. 904) for assembly
and slide onto air intake muffler (5) and burner head
(7).
2. Screw hexagon socket head cap screws (6) into
burner head and torque to 4.5 Nm.
3. Tighten hose clamp (4) on air intake muffler (5).
4. Make electrical connections (see 9.2.1.2).
5. Secure cable with cable tie (2).
6. Install heater (see 8.7.1.2).
7. Perform CO2 adjustment procedure (see 6.2.1).
1. Remove heater (see 8.7.1.1).
2. Break electrical connections (see 9.2.1.1).
3. Loosen hose clamp (4, Fig. 904) on air intake muffler
(5).
4. Loosen hexagon socket head cap screws (6).
5. Withdraw combustion air fan (1) from air intake muffler
(5) and burner head (7) and remove.
6. Perform procedures on components after
disassembly (refer to 9.1.1).
1
2
3
4
5
6
7
Combustion air fan
Cable tie
O-ring
Hose clamp
Air intake muffler
Hexagon socket head cap screw (2)
Burner head
5
4
7
3
2
1
6
Fig. 904 Replacement of Combustion Air Fan
907
BBW 46 / DBW 46
9 Repair
9.2.8 Replacement of Glow Plug
9.2.8.2 Installation
9.2.8.1 Removal
NOTE
Observe remarks on glow plug replacement (see 9.1.1.3).
1.
2.
3.
4.
5.
Remove heater (see 8.7.1.1).
Break electrical connections (see 9.2.1.1).
Pull wiring harness (2, Fig. 905) from glow plug (1).
Unscrew glow plug (1) from burner head (3).
Perform procedures on components after
disassembly (refer to 9.1.1).
1. Apply Copaslip (Ident. No. 105898) or copper paste to
thread of glow plug.
2. Screw glow plug (1, Fig. 905) into burner head (3) and
torque with 30 Nm.
3. Plug wiring harness (2) onto glow plug (1).
4. Make electrical connections (see 9.2.1.2).
5. Install heater (see 8.7.1.2).
1 Glow plug
2 Wiring harness
3 Burner head
2
1
3
Fig. 905 Replacement of Glow Plug
908
BBW 46 / DBW 46
9 Repair
9.2.9.2 Installation
9.2.9 Replacement of Burner Head with
Combustion Pipe
9.2.9.1 Removal
1.
2.
3.
4.
5.
6.
7.
Remove heater (see 8.7.1.1).
Break electrical connections (see 9.2.1.1).
Remove combustion air fan (see 9.2.7.1).
Remove glow plug (see 9.2.8.1).
Remove flame sensor (see 9.2.5.1).
Remove V-clamp (2, Fig. 906).
Engage two screw drivers in recess (4) and lever off
burner head (1) and remove.
8. Perform procedures on components after
disassembly (refer to 9.1.1).
1
2
3
4
1. Locate burner head (1, Fig. 906) with combustion pipe
for assembly. Apply Copaslip (Ident. No. 105898)
between burner head and heat exchanger (3).
2. Slide burner head (1) with combustion pipe into heat
exchanger (3) and align as required.
3. Secure V-clamp and torque with 4.5 Nm.
4. Install flame sensor (see 9.2.5.2).
5. Install glow plug (see 9.2.8.2).
6. Install combustion air fan (see 9.2.7.2).
7. Install heater (see 8.7.1.2).
Burner head with combustion pipe
V-clamp
Heat exchanger
Recess
3
2
1
4
Fig. 906 Replacement of Burner Head with Combustion Pipe
909
BBW 46 / DBW 46
9 Repair
9.2.10 Disassembly of Heat Exchanger
9.2.10.2 Assembly
9.2.10.1 Removal
1. Apply Copaslip (Ident. No. 105898) to mating
surfaces between heating pipe (1, Fig. 907) and heat
exchanger (4).
2. Fit new O-ring (2), slide heating pipe (1) into heat
exchanger (4) and locate for assembly.
3. Install burner head with combustion pipe (see
9.2.9.2).
4. Install temperature sensor (see 9.2.4.2).
5. Install temperature limiter or temperature fuse as
applicable (see 9.2.2.2 or 9.2.3.2).
6. Install flame sensor (see 9.2.5.2).
7. Install glow plug (see 9.2.8.2).
8. Install combustion air fan (see 9.2.7.2).
9. Make electrical connections (see 9.2.1.2).
10. Install heater (see 8.7.1.2).
1.
2.
3.
4.
5.
6.
7.
8.
9.
10.
11.
1
2
3
4
Remove heater (see 8.7.1.1).
Break electrical connections (see 9.2.1.1).
Remove combustion air fan (see 9.2.7.1).
Remove glow plug (see 9.2.8.1).
Remove flame sensor (see 9.2.5.1).
Remove temperature limiter or temperature fuse as
applicable (see 9.2.2.1 or 9.2.3.1).
Remove temperature sensor (see 9.2.4.1).
Remove burner head with combustion pipe (see
9.2.9.1).
Engage two screw drivers in recess (3, Fig. 907) and
lever heating pipe (1) out of heat exchanger.
Remove O-ring (2).
Perform procedures on components after
disassembly (refer to 9.1.1).
Heating pipe
O-ring
Recess
Heat exchanger
2
4
1
3
Fig. 907 Replacement of Heat Exchanger
910
BBW 46 / DBW 46
9 Repair
9.2.11 Replacement of Felt Disk in Burner Head
9.2.11.1 Removal
1. Remove heater (see 8.7.1.1).
2. Press clamping spring (6, Fig. 908) from locking pegs
(9) using screw driver.
3. Engage two screw drivers in recesses (7) and lever off
cover (1).
4. Discard O-ring (2) and gasket (8).
5. Remove felt disk (3) and ring (4) from burner head (5)
and discard.
6. Check burner head for felt deposits and contamination
and remove as required.
7. Clean glow plug orifice (10), diameter 2.5 mm.
8. Perform procedures on components after
disassembly (refer to 9.1.1).
For equipment delivered and in use we recommend the
replacement of the ring and felt disk in combination with
the glow plug.
CAUTION
Prior to assembly cut ring open as shown. During
assembly ensure that ring is not compressed beyond
spring tension or bent.
9.2.11.2 Installation
NOTE
The felt disk is different for the fuel and Diesel versions
(see Fig. 909 and Fig. 910). During assembly all
components, except for the cover, must be renewed (Oring, felt disk, ring and gasket).
To increase the life of the glow plug, the ring must be cut
open as shown in the figure. This also happens during
manufacture of new equipment.
1
2
3
4
5
6
7
8
9
10
Cover
O-ring
Felt disk
Ring
Burner head
Clamping spring
Recesses
Gasket
Locking pegs
Glow plug orifice
1. Install felt ring observing assembly procedure
according to Fig. 909 (BBW 46) or Fig. 910 (DBW 46).
2. Install heater (see 8.7.1.2).
10
5
4
3
2
1
9
8
6
Fig. 908 Removal of Felt Disk in Burner Head
911
BBW 46 / DBW 46
9 Repair
Ring must not touch
glow plug to prevent
short circuit
During installation on burner
head ensure tension spring
During
installation
onsafely on
engages
firmly and
burner
lockinghead
pegsensure
to prevent
clamping
danger ofspring
fires
engages firmly and
safely on locking pegs to
prevent danger of fires
Groove must engage
Holes covered
Groove must engage
Ensure ring seats
flush in accordance
with dimensions
shown.Holes
Duringcovered
Ensure
assembly
hold ring
and seats flush
in accordance
touch on
edge only. with
dimensions
Bending
of ring ribsshown.
During assembly hold
and touch on edge only.
Bending of ring ribs
causes coking
Fig. 909 Assembly Procedure for Burner Head, Fuel Version
Ring must not touch
glow plug to prevent
short circuit
During installation on burner
head ensure tension spring
During
installation
onsafely on
engages
firmly and
burner
lockinghead
pegsensure
to prevent
clamping
danger ofspring
fires
engages firmly and
safely on locking pegs to
prevent danger of fires
Groove must engage
Holes covered
Groove must engage
Ensure ring seats
flush in accordance
with dimensions
shown.Holes
Duringcovered
Ensure
assembly hold ring
and seats flush
in
accordance
touch on edge only. with
dimensions
Bending
of ring ribsshown.
During assembly hold
and touch on edge only.
Bending of ring ribs
causes coking
Fig. 910 Assembly Procedure for Burner Head, Diesel Version
912
BBW 46 / DBW 46
10.
10 Packaging, Storage and Shipping
Packaging, Storage and
Shipping
10.1 General
The heater or its components shipped to Webasto
Thermosysteme GmbH for testing or repair must be
cleaned and packaged so that they are protected against
damage during handling, shipping and storage.
CAUTION
When shipping a complete heater assembly it must be
drained completely. No fuel or coolant is allowed to
escape during packaging or shipping.
Dummy plugs must be fitted to the coolant line
connections.
In storage the ambient temperatures specified in Section
4 must not be exceeded.
1001
02/2002