1
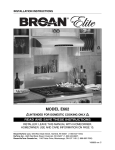
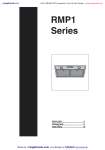
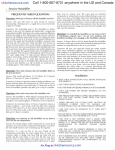
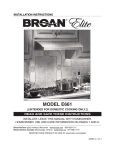
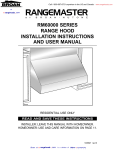
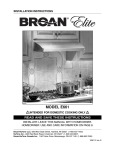
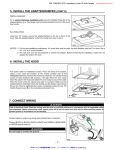
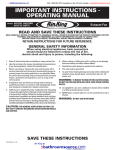
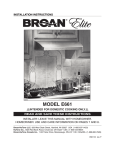
Call 1-800-667-8721 anywhere in the US and Canada - www.kitchensource.com
at
kitchen::accessories
U
N
L
I
M
I
T
E
D
! WARNING
! WARNING
TO REDUCE THE RISK OF FIRE, ELECTRIC
SHOCK OR INJURY TO PERSONS, OBSERVE
THE FOLLOWING:
TO REDUCE THE RISK OF INJURY TO PERSONS
IN THE EVENT OF A RANGE TOP GREASE
FIRE, OBSERVE THE FOLLOWING*:
1.
Use this unit only in the manner intended by the
manufacturer. If you have questions, contact the
manufacturer at the address or telephone number
listed in the warranty.
1.
2.
Before servicing or cleaning unit, switch power off
at service panel and lock service disconnecting
means to prevent power from being switched on
accidentally. When the service disconnecting
means cannot be locked, securely fasten a prominent
warning device, such as a tag, to the service panel.
SMOTHER FLAMES with a close-fitting lid, cookie
sheet or metal tray, then turn off the burner. BE
CAREFUL TO PREVENT BURNS. IF THE
FLAMES DO NOT GO OUT IMMEDIATELY,
EVACUATE AND CALL THE FIRE DEPARTMENT.
2.
NEVER PICK UP A FLAMING PAN – You may
be burned.
3.
DO NOT USE WATER, including wet dishcloths or
towels – This could cause a violent steam explosion.
4.
Use an extinguisher ONLY if:
A. You own a Class ABC extinguisher and you
know how to operate it.
B. The fire is small and contained in the area
where it started.
C. The fire department has been called.
3.
Installation work and electrical wiring must be
done by qualified personnel in accordance with all
applicable codes and standards, including fire-rated
construction codes and standards.
4.
Sufficient air is needed for proper combustion and
exhausting of gases through the flue (chimney) of
fuel burning equipment to prevent backdrafting.
Follow the heating equipment manufacturer’s
guidelines and safety standards such as those
published by the National Fire Protection
Association (NFPA), and the American Society for
Heating, Refrigeration and Air Conditioning
Engineers (ASHRAE), and the local code authorities.
5.
When cutting or drilling into wall or ceiling, do not
damage electrical wiring and other hidden utilities.
6.
Ducted fans must always be vented to the outdoors.
7.
Do not use this unit with any solid-state speed
control device.
8.
To reduce the risk of fire, use only metal ductwork.
9.
This unit must be grounded.
TO REDUCE THE RISK OF A RANGE TOP
GREASE FIRE:
a)
Never leave surface units unattended at high
settings. Boilovers cause smoking and greasy
spillovers that may ignite. Heat oils slowly on low
or medium settings.
b)
Always turn hood ON when cooking at high heat
or when cooking flaming foods.
c)
Clean ventilating fans frequently. Grease should
not be allowed to accumulate on fan or filter.
d)
Use proper pan size. Always use cookware
appropriate for the size of the surface element.
D. You can fight the fire with your back to an exit.
* Based on “Kitchen Fire Safety Tips” published by
NFPA.
CAUTION
1.
2.
3.
4.
5.
6.
7.
8.
9.
10.
For general ventilating use only. Do not use to
exhaust hazardous or explosive materials and vapors.
To avoid motor bearing damage and noisy and/or
unbalanced impellers, keep drywall spray,
construction dust, etc. off power unit.
Your hood motor has a thermal overload which will
automatically shut off the motor if it becomes
overheated. The motor will restart when it will cools
down. If the motor continues to shut off and restart,
have the hood serviced.
The minimum hood distance above cooktop must
not be less than 24’’. A maximum of 30’’ above
cooktop is highly recommended for best capture of
cooking impurities.
Two installers are recommended because of the
large size and weight of this hood.
To reduce the risk of fire and to properly exhaust
air, be sure to duct air outside – Do not exhaust
air into spaces within walls or ceiling or into attics,
crawl space or garage.
This product is equipped with a thermostat
which may start blower automatically. To reduce
the risk of injury and to prevent power from being
switched on accidentally, switch power off at
service panel and lock or tag service panel.
Because of the high exhausting capacity of this
hood, you should make sure enough air is entering
the house to replace exhausted air by opening a
window close to or in the kitchen.
Use with approved cord-connection kit only.
Please read specification label on product for
further information and requirements.
Broan at ::rangehoods.com is a division of kitchen::
accessories
U
N
L
I
M
I
T
E
D
Call 1-800-667-8721 anywhere in the US and Canada - www.kitchensource.com
kitchen::accessories
U
N
L
I
M
I
T
E
D
BROAN ELITE E662
HOOD SYSTEM
Model 634 or 644
(roof cap)
Model 647
(7” Rd wall cap)
Model 412
transition
(31⁄4” x 10”
to 7” round)
31⁄4” x 10”
rectangular
standard
duct
Model 415
7” round
adjustable
elbow
(optional)
8” round
adjustable
elbow
(optional)
Model 407
7” round
standard
duct
8” round
standard
duct
Model T460
transition
(31⁄4” x 14”
to 7” round)
Model 643
(8” Rd wall cap)
Model 634 or 644
(roof cap)
Model 459
transition
(31⁄4” x 14”
to 8” round)
31⁄4” x 14”
rectangular
standard
duct
Model 459
transition
(31⁄4” x 14”
to 8” round)
Adapter and damper 31⁄4’’ x 14’’
(supplied with hood)
Model T461
Adapter and damper 31⁄4’’ x 14’’
to 31⁄4’’ x 10’’(optional)
Left and right
flow deviators
(supplied with cabinet blower)
Cabinet blower
(supplied with hood)
BROAN ELITE E662 HOOD
HL0055
-1Broan at ::rangehoods.com is a division of kitchen::
accessories
U
N
L
I
M
I
T
E
D
Call 1-800-667-8721 anywhere in the US and Canada - www.kitchensource.com
kitchen::accessories
U
N
L
I
M
I
T
E
D
1. INSTALL DUCTWORK
Plan where and how the ductwork will be installed. Install proper-sized ductwork, elbows and roof or wall cap for the
type of blower you are installing. Use 2” duct tape to seal duct joints.
NOTE: When performing vertical exhaust ductwork, there must be at least 14” high free inside cabinet in order to
allow cabinet blower installation.
The minimum hood distance above cooktop must not be less than 24”. A maximum of 30” above cooktop is
highly recommended for best capture of cooking impurities.
Distances over 30” are at the installer and users discretion.
Roof cap
Wall
cap
Roof cap
3¼" x 14" duct
OR 3¼" x 10"
7" OR 8" round duct
3¼" x 14" to
3¼" x 10" adaptor
model T461 (optional)
Transition model 459
3¼" x 14" to 8" OR
model T460
3¼" x 14" to 7"
Cabinet blower
Wall
cap
Cabinet blower
Hood
Hood
24" minimum above
cooking surface
24" minimum above
cooking surface
HH0045A
HH0046A
2. PREPARE THE INSTALLATION
Make sure that the following items are included:
- Hood
- Accessories:
• Filters (2 for 30’’ and 36’’ width hoods, 3 for 42’’ width hood)
• Cabinet blower including left and right flow deviators (assembled to cabinet blower)
• Electrical cable with 3-prong receptacle (inside one filler)
• 31⁄4” x 14” adapter/damper (inside one filler)
• Bag of parts (inside one filler) including:
(2) wire clamps, (5) #8 x 1⁄2” screws, (3) wire connectors, (9) #8 x 3⁄8” screws
Parts sold separately:
- Halogen lights (MR16, GU10, 120V, 50W)
- Transition 31⁄4” x 14” to 8’’ round model # 459 (optional), transition 31⁄4” x 14” to 7’’ round model # T460 (optional),
adaptor/damper 31⁄4” x 14” to 31⁄4” x 10” model T461 (optional), ducts, elbows, dampers, wall or roof caps. Refer to
page 1 for a complete list of venting options and model number.
NOTES: 1. During installation, protect countertop and/or cooktop.
2. If the bottom of the cabinet is recessed, attach three 1” width wood strip (not included). Refer to figure
below for wood strips proper location.
CABINET BOTTOM
1”
1”
10¼’’
1¾’’
1”
1¾’’
HO0045A
-2Broan at ::rangehoods.com is a division of kitchen::
accessories
U
N
L
I
M
I
T
E
D
Call 1-800-667-8721 anywhere in the US and Canada - www.kitchensource.com
kitchen::accessories
U
N
L
I
M
I
T
E
3. CABINET PREPARATION
D
! WARNING
The cabinet must be sized to support the total weight of the hood. For the E662 hood model, the
total weight is 41 lb (19 kg).
If the cabinet need to be reinforced, we suggest to add wood blocks to
strengthen the connection between the bottom of the cabinet and its sides,
as shown beside.
ADD WOOD
BLOCKS
HD0139
4. CUTTING HOLES
See figures below for cut-out dimensions in the bottom of cabinet.
30” CABINET BOTTOM
C
L
36” CABINET BOTTOM
C
L
24½”
24½”
¾”
2”
10”
10”
4½”
4½”
1¼’’
1’’
1’’
1½”
42” CABINET BOTTOM
C
L
24½”
2”
10”
4½”
1¼’’
1’’
1½”
HO0040A
See figures below for cut-out locations for ducting.
VERTICAL
DISCHARGE
HORIZONTAL DISCHARGE
C
L
FRONT
C
L
BACK OF CABINET
TOP OF CABINET
7¼’’ 7¼’’
3¾”
1½’’
HH0050A
7¼’’ 7¼’’
3¾”
3¼’’
HH0051A
-3Broan at ::rangehoods.com is a division of kitchen::
accessories
U
N
L
I
M
I
T
E
D
Call 1-800-667-8721 anywhere in the US and Canada - www.kitchensource.com
kitchen::accessories
U
N
L
I
M
I
T
E
D
5. PREPARE THE HOOD
SCREW LOCATIONS
5.1 Remove filters from the hood. Remove (3) screws holding both side
panels to the hood and set aside. Remove both side panels.
HO0042
5.2 Punch out 2 knock-out holes for electrical connections (2 on top or one on top and one on back of the hood).
5.3 Attach one wire clamp on top of the hood for the provided electrical cable with 3-prong plug. Through the wire
clamp, insert this electrical cable in the hood and tighten the wire clamp to secure the cable.
B
5.4 Connect cable wires as follow: BLUE wire with red connector to BLUE
wire with red connector (A), BROWN wire with red connector to BLACK
wire with red connector (B), GREEN wire under ground screw (C).
DO NOT FORGET TO CONNECT THE GROUND.
A
C
HE0052
6. INSTALL THE HOOD
6.1 Run power cable to installation location. Position the hood in its intended location. Using a pen, mark the position
of the screws (smaller part of the keyholes, see pictures below for the (5) keyholes locations). Remove the hood.
6.2 Install (4) #8 x 1⁄2’’ screws, leaving a 1⁄8’’ gap (do not install the #5 screw yet).
3
1
1
5
3
4
2
HD0129
2
4
HD0127
HD0128
-4Broan at ::rangehoods.com is a division of kitchen::
accessories
U
N
L
I
M
I
T
E
D
Call 1-800-667-8721 anywhere in the US and Canada - www.kitchensource.com
kitchen::accessories
U
N
L
I
M
I
T
E
D
6. INSTALL THE HOOD (CONT’D)
6.3 Attach the second wire clamp, insert the power cable in the hood and tighten the wire clamp to secure the cable.
Place the hood under the cabinet and slide it in position. Run power cable from hood up through slot cut in cabinet.
Tighten the (4) screws completely, then add the last screw (screw # 5) in the center keyhole.
7. CABINET BLOWER PREPARATION
7.1 VERTICAL
DISCHARGE ONLY
7.1.1 Seal the metal shutoff plate on the back of the the cabinet
blower using duct tape.
HD0130
7.2 HORIZONTAL
DISCHARGE ONLY
7.2.1 The cabinet blower included with the E662 model is factory
set to exhaust vertically. If the horizontal discharge is
chosen, remove the metal shutoff plate from the back of
the hood, by removing the 3 screws. Set aside screws.
Discard both left and right plastic diverters assembled to
the metal shutoff plate.
HD0131
7.2.2 Press the metal shutoff plate on a flat surface to completely
flatten bent flange. and install on the top of the blower, using
the 3 screws previously set aside plus another #8 x 1⁄2’’ screw
(from parts bag).
HD0119
7.2.3 Fold down the foldable flange of the adapter/damper. This flange must
be at 90° from the remaining flanges. See picture beside.
HO0112
7.2.4 Using three (3) #8 x 1⁄2’’ screws provided with hood,
secure the adapter to the back of the cabinet blower.
Remove tape from damper flap. Seal the adapter and the
metal shutoff plate to the cabinet blower using duct tape.
HD0132
-5Broan at ::rangehoods.com is a division of kitchen::
accessories
U
N
L
I
M
I
T
E
D
Call 1-800-667-8721 anywhere in the US and Canada - www.kitchensource.com
kitchen::accessories
U
N
L
8.1
I
M
I
T
E
D
8. INSTALL THE BLOWER IN THE CABINET
Install the cabinet blower in the cabinet and rest it on the adaptor plate. If a framed cabinet is used, insert the blower
as shown in pictures below.
STEP 2
STEP 1
HH0052
HH0053
STEP 3
HH0054
8.2 VERTICAL
DISCHARGE ONLY
8.2.1 Using four (4) #8 x 1⁄2’’ screws provided with hood, secure the adapter
to the top of the cabinet blower. Remove tape from damper flap. Seal
the adapter to the cabinet blower using duct tape.
8.3 ALL
HO0043
DISCHARGE TYPES
2
1
SCREW
8.3.1 From inside the hood, secure the blower to the adaptor plate of the
hood using five (5) #8 x 3⁄8’’ screws.
LOCATIONS
4
3
5
HO0044
8.3.2 Plug the cabinet blower to the hood receptacle.
HE0053
-6Broan at ::rangehoods.com is a division of kitchen::
accessories
U
N
L
I
M
I
T
E
D
Call 1-800-667-8721 anywhere in the US and Canada - www.kitchensource.com
kitchen::accessories
U
N
L
I
M
I
T
E
D
9. CONNECT WIRING
! WARNING
Risk of electrical shock. Electrical wiring must be done by qualified personnel in accordance with
all applicable codes and standards. Before connecting wires, switch power off at service panel and
lock service disconnecting means to prevent power from being switched on accidentally.
Connect cable using provided wire connectors.
Connect wires as follow: WHITE to WHITE (A), BLACK to BLACK (B), and
GREEN or BARE wire under GREEN ground screw (C).
DO NOT FORGET TO CONNECT THE GROUND.
A
B
C
HE0054
10. REINSTALL SIDE PANELS
Reinstall both side panels, using 3 screws per side (saved from step 5), as
shown beside.
SCREW LOCATIONS
CAUTION
Remove protective plastic film covering filters before
installing them.
HO0042
Reinstall filters.
-7Broan at ::rangehoods.com is a division of kitchen::
accessories
U
N
L
I
M
I
T
E
D
Call 1-800-667-8721 anywhere in the US and Canada - www.kitchensource.com
kitchen::accessories
U
N
L
I
M
I
T
E
D
11. LIGHT BULBS
This hood must use 120V, 50W max., type MR16, GU10 shielded halogen lamps. (Purchase separately.)
! WARNING
In order to prevent the risk of personal injury, do not install a lamp identified for use only in
enclosed fixtures.
NOTE: The rings must be removed from bottom panel before installing halogen lamps.
11.1 Install the lamps by placing the bulb leads into their grooves in the socket
and gently push upward and turn clockwise until secured.
HE0047
11.2 Install trim rings by pushing upward.
HO0034
! WARNING
In order to prevent the risk of personal injury, the halogen lamps
must be cooled down before removing them.
11.3 To remove lamps, gently push upward and turn counterclockwise to
disengage bulb leads from their grooves.
HE0047
-8Broan at ::rangehoods.com is a division of kitchen::
accessories
U
N
L
I
M
I
T
E
D
Call 1-800-667-8721 anywhere in the US and Canada - www.kitchensource.com
kitchen::accessories
U
N
L
I
M
I
T
E
D
12. OPERATION
Always turn your blower on before you begin cooking to establish an air flow in the kitchen. Allow the blower run for a
few minutes to clear the air after you turn off the range.
HC0017
A
A) Blower OFF Delay touch pad
B) ON/Blower speed control touch pad
C) OFF blower touch pad
A. BLOWER OFF DELAY TOUCH
B
C
D
E
F
D) OFF lighting touch pad
E) Halogen light touch pad
F) Nightlight / Keyboard lock touch pad
PAD:
When a speed is selected, touch the delay touch pad to activate the delay function. The corresponding speed indicator
LED will start flashing to indicate this function is activated. Touch once for a 5-minute delay, twice for 10-minute delay,
three times for 15-minute delay and four times for a 20-minute delay. The fan will continue to operate for the
programmed minutes and will stop automatically. To cancel the delay function, wait 2 seconds and touch the delay
touch pad once again; the blower will then work in normal mode.
NOTE: The blower speed can be increased - or decreased - during delay mode without starting another delay cycle.
B. ON/BLOWER
SPEED CONTROL TOUCH PAD:
Touch this touch pad to turn on the blower at the last selected speed. To change the blower speed, touch the touch
pad again until the desired speed is obtained.
NOTES: 1. Each time you touch on the speed control touch pad, the speed changes by increments of 1 (e.g.: speed
1 to speed 2, to speed 3, and then speed four. From the fourth speed, goes down to speed 1.
2. The last speed used is kept in memory except the fourth, the next time the blower will be turned on, it will
run on speed 3.
HEAT SENTRY
This hood is equipped with a Heat Sentry thermostat. This thermostat is a device that will turn on or speed up the blower if it senses excessive heat above the cooking surface.
1) If blower is OFF - the Heat Sentry turns blower ON to speed 3.
2) If blower is ON at a lower speed setting – it turns the blower up to speed 3. If blower is at Boost, HEAT SENTRY
turns blower down to speed 3.
When HEAT SENTRY is activated, the first and the last speed blower LEDs are flashing alternately.
When the temperature level drops to normal, the blower will return to its original setting.
! WARNING
The HEAT SENTRY can start the blower even if the hood is turned OFF. In this case, it is impossible to turn
the blower OFF with blower switch. If you must stop the blower, do it from the main electrical panel.
C. OFF
BLOWER TOUCH PAD:
Touch this touch pad to turn off the blower. This command also cancels the delay function (if activated).
D. OFF
LIGHTING TOUCH PAD:
Touch this touch pad to turn off lighting.
E. HALOGEN
LIGHT TOUCH PAD:
Touch this touch pad to turn on the halogen lamps. The lighting intensity changes by increments of 1 (e.g.: Touch once for
low intensity, once again to get more, up to three times. From the higher intensity, touch once to go back to the lower intensity.
NOTE: The last lighting intensity used is kept in memory. The next time the halogen lamps will be turned on, they
will light with the last intensity used.
F. NIGHTLIGHT/KEYBOARD LOCK TOUCH
PAD:
Touch this touch pad to activate the nightlight. The LED will light to indicate the nightlight is on.
When cleaning the hood, use the keyboard lock. To activate the keyboard lock, touch on this touch pad during 3 seconds;
the LED will flash to indicate the keyboard lock is on. touch on the touch pad and hold for 3 seconds again to stop the
keyboard lock fonction.
NOTES: 1. When cleaning the hood, never spray cleaning agent directly on the controls; spray it on the cleaning
cloth and wipe the control with it. Spraying cleaning agent directly on the control will cause
unexpected keybord activation.
2. When the keyboard lock is on, it stops the HEAT SENTRY.
3. If there is a temporary power failure when the keyboard lock is on, when the power will be restored, the
keyboard lock will still be on.
-9Broan at ::rangehoods.com is a division of kitchen::
accessories
U
N
L
I
M
I
T
E
D
Call 1-800-667-8721 anywhere in the US and Canada - www.kitchensource.com
kitchen::accessories
N
L
I
M
I
T
E
14. WIRING DIAGRAM
D
! WARNING
Risk of electrical shock. Electrical wiring must be done by qualified personnel in accordance with
all applicable codes and standards. Before connecting wires, switch power off at service panel and
lock service disconnecting means to prevent power from being switched on accidentally.
120 V Supply
Line
BK
Return
W
J5
BK 3
nc 2
W 1
BK
W
Light Socket
W 50W max.
BL
Ground
J6
Y 3
2
BK
nc 1
Y
W
Y
Light Socket
50W max.
BN
Fan Motor no 1
BK
BK
BN
BN
BL
G
3 G
BN
Blower pack #15931
Fan Motor no 2
Note
3
BL
(2)
IEC-320
C14 Plug
BL
U
BN
BL
BL
3
(2)
IEC-320 \
C13 Socket
W
G
G
BK
ncY [120]
R [70]
P [50]
BL [35]
W W O [0]
nc
<ref>
BK
nc BK nc Y [120]
R [70]
P [50]
BL [35]
O
[0]
W W
nc
<ref>
nc
J4
BK 4
R 3
P 2
BL 1
ELECTRONIC
ASSEMBLY
A1 Main power board
J2
16
ELECTRONIC
A2 ASSEMBLY
User Interface
-t°
NOTES
WIRING COLOR CODE
BK
BL
BN
G
O
BLACK
BLUE
BROWN
GREEN
ORANGE
P
R
W
Y
nc
Heat Sentry
1. If any of the original wire, as supplied, must be replaced, use the
same equivalent wire.
2. Field wiring must comply with applicable codes, ordinances and
regulations.
3. Marked black conductor, for blower wiring.
PURPLE
RED
WHITE
YELLOW
no connection
HE0043A
- 11 Broan at ::rangehoods.com is a division of kitchen::
accessories
U
N
L
I
M
I
T
E
D
Call 1-800-667-8721 anywhere in the US and Canada - www.kitchensource.com
kitchen::accessories
U
N
L
I
M
I
T
E
D
16. WARRANTY
WARRANTY
BROAN-NUTONE LLC ONE-YEAR LIMITED WARRANTY
Broan-NuTone LLC warrants to the original consumer purchaser of its products that such products will be free
from defects in materials or workmanship for a period of one year from the date of original purchase. THERE ARE
NO OTHER WARRANTIES, EXPRESS OR IMPLIED, INCLUDING, BUT NOT LIMITED TO, IMPLIED
WARRANTIES OR MERCHANTABILITY OR FITNESS FOR A PARTICULAR PURPOSE.
During this one-year period, Broan-NuTone LLC will, at its option, repair or replace, without charge, any product
or part which is found to be defective under normal use and service.
This warranty does not cover (a) normal maintenance and service or (b) any products or parts which have been
subject to misuse, negligence, accident, improper maintenance or repair (other than by Broan-NuTone LLC),
faulty installation or installation contrary to recommended installation instructions.
The duration of any implied warranty is limited to the one-year period as specified for the express warranty. Some
states or provinces do not allow limitation on how long an implied warranty lasts, so the above limitation may not
apply to you.
BROAN-NUTONE LLC’S OBLIGATION TO REPAIR OR REPLACE, AT BROAN-NUTONE LLC’S OPTION, SHALL
BE THE PURCHASER’S SOLE AND EXCLUSIVE REMEDY UNDER THIS WARRANTY. BROAN-NUTONE LLC
SHALL NOT BE LIABLE FOR INCIDENTAL, CONSEQUENTIAL OR SPECIAL DAMAGES ARISING OUT OF
OR IN CONNECTION WITH PRODUCT USE OR PERFORMANCE. Some states or provinces do not allow
the exclusion or limitation of incidental or consequential damages, so the above limitation or exclusion
may not apply to you.
This warranty gives you specific legal rights, and you may also have other rights, which vary from state to state
or province to another. This warranty supersedes all prior warranties.
To qualify for warranty service, you must (a) give the model number and part identification describe the nature of any
of any defect in the product or part. At the time of requesting warranty service, you must present evidence of
original purchase date.
- 13 Broan at ::rangehoods.com is a division of kitchen::
accessories
U
N
L
I
M
I
T
E
D