1
Instruction Manual
120 Volt
CONVERTIBLE
MOWER
MULCHING
Model No. 900.370511
\
Safety
Assembly
Operation
Maintenance
Parts List
&WARNING:
Before using this product,
read this manual and follow
all its Safety Rules and
Operating Instructions.
Sears, Roebuck
and Co.,
www.sears.com/craftsman
Form No. 90512524 Rev. 1
Espahol
Hoffman
JULY 2007
Estates,
IL 60179
Pdg. 18
USA
Printed in Mexico
Warranty
Safety
Instructions
Maintenance
Assembly
Operation
Maintenance
Schedule
2
2
5
6
8
13
Product
Specifications
Service
andAdjustments
Storage
Troubleshooting
Illustrated
PartsList
EspaSol
14
14
14
15
16,17
18
LIMITED
TWOYEARWARRANTY
ONCRAFTSMAN
POWER
MOWER
Fortwoyearsfromdateofpurchase,
whenthisCraftsman
Power
Mowerismaintained,
lubricated,
andtunedupaccording
totheoperating
andmaintenance
instructions
inthe
owner's
manual,
Searswillrepairanydefectinmateria!
orworkmanship
freeofcharge.
IfthisCraftsman
LawnMower
isusedforcommercial
or rental
purposes,
thiswarranty
applies
foronly90daysfromthedateofpurchase.
ThisWarranty
doesnotcover:
• Expendable
itemswhichbecome
wornduringnormal
use,suchasrotarymower
blades,
bladeadapters,
andbelts.
• Repairs
necessary
because
ofoperator
abuseornegligence,
including
bent
crankshafts
andthefailuretomaintain
theequipment
according
totheinstructions
contained
intheowner's
manual.
WARRANTY
SERVICE
ISAVAILABLE
BYreturning
theCraftsman
powermower
tothe
nearest
SearsService
Center
intheUnitedStates.
Thiswarranty
applies
onlywhilethis
product
isinuseintheUnited
States.
ThisWarranty
givesyouspecific
legalrights,andyoumayalsohaveotherrightswhich
varyfromstatetostate.
SEARS,
ROEBUCK
ANDCO.,DEPT.
817WA,ROFPMAN
ESTATES,
IL60179
£t
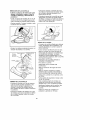
_1. WARNING: Do not attempt to
operate this mower unti! you thoroughly
read and completely understand aft
instructions, safety rules, etc. contained
in this manual. Failure to comply can
result in accidents involving fire, electric
shock, or serious personal injury. Save
Owner's Manual and review frequently
for continuing safe operation and
instructing others who may use this
mulching mower.
birth defects or other reproductive harm.
Some examples of these chemicals are:
• compounds in fertilizers
• compounds in insecticides, herbicides
and pesticides
• arsenic and chromium from chemically
treated lumber
To reduce your exposure to these chemicals,
wear approved safety equipment such as
dust masks that are specially designed to
filter out microscopic particles.
Safety standards require an Operator
Presence Control Switch to minimize the
risk of injury. Your unit is equipped with
such a Control Switch. Do not attempt to
defeat its function under any circumstances.
_kWARNING:
This product contains
chemicals, including lead, known to the
State of California to cause cancer, and birth
defects or other reproductive harm. Wash
hands after handling.
,II_WARNING:
Some dust created by
this product contains chemicals known to
the State of California to cause cancer,
,_CAUTION:
Wear appropriate personal
hearing protection during use. Under some
conditions and duration of use, noise from
this product may contribute to hearing loss.
SAFETY GUIDELINES - DEFINITIONS
It is important for you to read and
understand this manual.
The information it contains relates to
protecting YOUR SAFETY and PREVENTING
PROBLEMS. The symbols below are used
to help you recognize this information.
anyone enters the area surrounding the
mower.
6. Do not operate mower barefooted or
while wearing sandals. Always wear
substantial footwear.
7. Do not pull mower backward unless
absolutely necessary. Always look
down and behind before and while
moving backward.
8. Never direct discharged material
toward anyone. Avoid discharging
material against a wall or obstruction.
Material may ricochet back toward the
operator. Release switch lever to turn
mower off and stop the blade when
crossing gravel surfaces or when
flipping the handle.
9. Do not operate mower without the
entire grass catcher, discharge guard,
rear guard, or other safety protective
devices in place and working.
Periodically check all guards and safety
protective devices to ensure they are in
good working order and will operate
properly and perform their intended
function. Rep{ace a damaged guard or
other safety device before further use.
10. Never leave a running mower
unattended.
11. Always release the switch lever to stop
the motor and wait until the blade
comes to a complete stop and unplug
the mower before cleaning the mower
removing the grass catcher, unclogging
the discnarge guard, when leaving me
mower or before making any
ad ustments, repa rs or inspect ons.
12. Operate mower only in daylight or good
artificial light when objects in the path
of the blaae are cleany visible from the
operating area of the mower.
13. Do not operate mower while under the
influence of alcohol or drugs or when
you are tired or il!. Always stay alert
watch what you are do ng, and use
common sense.
14. Avoid dangerous environments. Never
operate mower in damp or wet grass_
never use mower in the rain. Always De
sure of your footing; walk; never run.
15. Disengage the drive system if so
equipped, before starting the motor.
16. If the mower should start to vibrate
abnormally release the switch lever
wait for the blade to stop and unplug
the mower then check for the cause
immediately. Vibration is generally a
warning of trouble.
17. Always wear proper eye and respiratory
protection when operating the mower.
18. The use of any accessory or attachment not recommended for use with
this mower could be hazardous. Only
use accessories approved by Sears.
19. Never overreach while operating the
mower. Always be sure to keep proper
footing and balance at al! times while
operating the mower.
_. DANGER:
Indicates an imminently
hazardous situation which, if not avoided, will
result in death or serious injury.
_.WARNING:
Indicates a potentially
hazardous situation which, if not avoided,
could result in death or serious injury.
_I_CAUTION:
Indicates a potentially
hazardous situation which, if not avoided,
may result in minor or moderate injury.
CAUTION: Used without the safety alert
symbol indicatespotentially hazardous
situation which, if not avoided, may result in
property damage.
_.WARNING:
IMPORTANT
SAFETY WARNINGS
AND
INSTRUCTIONS
_I.WARNING:
When using electric
gardening appliances, basic safety
precautions should always be followed to
reduce risk of fire, electric shock, and
personal injury, including the following.
READ ALL INSTRUCTIONS
_. DANGER
IMPORTANT
PRACTICES
MOWERS
FOR
SAFE
WALK-BEHIND
This lawn mower is capable of amputating
hands and feet and throwing objects. Failure
to observe the following safety instructions
could result in serious injury or death.
GENERAL OPERATION
1. Read understand and follow all
nstruct ons on the mower and n the
instruction manual before starting.
2. Do not put hands or feet near or under
the mower. Keep clear of the discharge
opening at all times.
3. Only allow responsible adults who are
fam= ar w th the nstruct ons, to operate
this mower.
4. Clear the area where the mower is to be
used of ob ects such as rocks, sticks,
wire, toys, bones, etc. which could be
thrown by the blade. 6bjects struck by
the blade can cause severe in ury to persons. Stay beh nd the hand e when the
motor is running.
5. Be sure the area surrounding the mower
is clear of bystanders before operating.
All bystanders and pets shouidbe kept
at a safe distance. Stop the mower if
3
SLOPEOPERATION
Slopes
area majorfactorrelated
toslip
andfallaccidents,
whichcanresultin
severe injury. Operation on al! slopes
requires extra caution, if you feel uneasy
on a slope, do not mow it.
1. Mow across the face of slopes; never
up and down. Exercise extreme
caution when changing direction on
slopes.
2. Watch for holes, ruts, bumps, rocks,
or other hidden objects. Uneven
terrain could cause a slip and fall
accident. Tal! grass can hide
obstacles.
3. Do not mow on wet grass or excessively steep slopes. Poor footing
could cause a slip and fal! accident.
4. Do not mow near drop-offs, ditches,
or embankments. You could lose your
footing or balance.
CHILDREN
Tragic accidents can occur if the operator
is not alert to the presence of children.
Children are often attracted to the mower
and the mowing activity. Never assume
that children wil! remain where you last
saw them.
1. Keep children out of the mowing area
and under the watchful care of a
responsible adult other than the
operator.
2. Be alert and turn mower off if a child
enters the area.
3. Never allow children to operate the
mower.
4. Use extra care when approaching
blind corners, shrubs, trees, or other
objects that may block your view of a
child.
GENERAL SERVICE
1. Never operate mower in a closed
area.
2. Keep all nuts and bolts tight to be
sure the equipment is in safe working
condition.
3. Never tamper with safety devices.
Check their proper operation
regularly.
4. Keep mower free of grass, leaves, or
other debris build-up. Allow mower to
cool before storing.
5. if you strike a foreign object, release
switch lever to turn mower off, wait
for the blade to stop and remove the
safety key and then inspect the
mower. Repair, any damage, before
starting and operating the mower.
6. Never make any adjustments or
repairs with the motor running or while
the safety key is in the mower.
7. Always remove safety key before adjusting, cleaning, repairing, inspecting, transporting, storing or leaving the mower.
8. Check grass catcher components and
the discharge guard frequently and when
necessary replace with Black & Decker
recommended parts only.
9. Mower blades are sharp. Wrap the blade
or wear gloves, and use extra caution
when servicing them.
10. Maintain or replace safety and instruction
labels, as necessary.
TRAINING:
• Read this operator's manual carefully.
Become familiar with the controls and know
how to operate your mower
properly. Learn how to quickly stop mower.
• Use mower only as described in this
manual.
• Do not operate mower if it has been
dropped or damaged in any manner.
Always have damage repaired before using
your mower.
• Do not operate mower without the
recommended extension cord. Ensure that
the cord is in good condition before starting
mower.
• The blade always turns when the motor is
running.
• Avoid accidental starting. Do not play with
the Operator Presence Control switch
when mower is not in use.
PREPARATION:
• Dress properly. Do not operate mower
when barefoot or wearing open sandals.
Wear only solid shoes with good traction
when mowing.
• Always make wheel height adjustments
before starting your mower. Do not attempt
to do this while the mower is running.
• Do not plug mower in until it is ready to be
used.
• Protect your lungs. Wear a face or dust
mask if mowing operation is dusty.
• Remove al! adjusting wrenches from
mower before turning it on.
OPERATION:
Theoperation
ofanylawn
mower
canresultinforeign
objects
thrown
intotheeyes,
whichcanresultinsevere
eye
damage.
Always
wearsafety
glasses
or
eyeshields
whileoperating
yourlawn
mowerorperforming
anyadjustments
or
repairs.
Werecommend
a widevision
safetymaskoverthespectacles
or
standard
safety
glasses
withside
shields,
available
atSears.
• Keepyoureyesandmindonyour
mowerandtheareabeingcut.Donotlet
otherinterests
distract
you.
• Guardagainst
electric
shock.Repair
or
replace
damaged
mower
cordor
extension
cordimmediately.
• Don'tabusethecord.Neverpull
lawnmower
bythecord.Disconnect
by
gentlypulling
theplug,notthecord.
• Donotrunthemotorindoors.
• Don'tforcethemower.
Itwilldothejob
betterandsaferattherateforwhichit is
designed.
Whenmowing
onrough
surfaces
orinhighgrass,selectahigher
cutting
position.
• Keepawayfrombladearea.Beawareof
theriskofinjury.
Keephandsandfeet
awayfromtheblade.
• DANGER:
DONOTattempt
toremove
cutmaterial
orunclog
debrisfromunder
mowerdeckwhilebladeismoving,
or
youwillbeseriously
injured.
• If mower
stalls,release
operator
presence
control
switchandwaitfor
bladetostoprotating.
Unplug
cord
before
attempting
toremove
anything
fromundermowerdeck.Thoroughly
inspect
andhaveanydamage
repaired
before
restarting
andoperating
mower.
MAINTENANCE
AND STORAGE:
• Check the blade and the motor mounting
bolts often to be sure they are tightened
properly.
• Check all bolts, nuts and screws at
frequent intervals for proper tightness to
be sure mower is in safe working
condition.
• To reduce fire hazard, keep the motor
free of grass, leaves or excessive grease
and oil.
• Always keep the blade on your mower
sharp.
• Keep mower dry and clean. Always use
a clean damp cloth when cleaning.
Never use brake fluids, gasoline,
petroleum-based products, solvents, or
water to clean mower.
• Do not mow if switch does not turn
mower on and off. Have defective switch
replaced at Sears Service Center.
• Check damaged parts. Before further
use of the mower, a guard or other part
that is damaged should be carefully
checked to determine that it will operate
properly and perform its intended
function. Check for alignment of moving
parts, binding of moving parts, breakage
of parts, and any other conditions that
may affect mower operation. A guard or
other part that is damaged should be
properly repaired or replaced by a
qualified service technician.
• When servicing use only identical
Craftsman replacement parts. Servicing
of this mower should be performed only
by a qualified service technician. For
repair service we suggest you return
mower to your nearest Sears Service
Center.
• When replacing blade, use only identical
Craftsman replacement blade. Use of
any other blade may result in serious
personal injury or damage to your mower.
• Store mower inside. When not in use,
mower should be stored indoors in a
garage, basement, etc. Storage area
should be a dry, locked-up place - out of
reach of children.
• Maintain mower with care. Keep blade
sharp and clean for best and safest
performance. Follow instructions for
lubricating and changing accessories.
DOUBLE INSULATION
Your Mower is DOUBLE INSULATED to
give you added safety. This means that it
is constructed throughout with TWO
separate "layers" of electrical insulation, or
one DOUBLE thickness of insulation
between you and the tool's electrica! system.
Tools built with this insulation system are
not intended to be grounded. As a result,
your mower is equipped with a two-prong
plug which permits you to use extension
cords without concern for maintaining a
ground connection.
NOTE: DOUBLE INSULATION does not
take the place of normal safety precautions
when operating this mower. The insulation
system is for added protection against
injury resulting from a possible electrical
insulation failure within the tool.
41J_.CAUTION: Repair or replace damaged
cords immediately. Use only identical
Craftsman replacement parts.
5
POLARIZED
PLUG
To reduce the risk of electric shock, this
mower has a polarized plug (one blade is
wider than the other). This mower must be
used with a suitable polarized 2 wire or 3
wire extension cord. Polarized connections
will fit together only one way. Make sure
that the receptacle end of the extension
cord has large and small blade slot
widths. If the plug does not fit fully into the
extension cord receptacle, reverse the
plug. If it still does not fit, obtain a suitable
extension cord. If the extension cord does
not fit fully into the outlet, contact a
qualified electrician to install the proper
outlet. Do not change the tool plug or
extension cord in any way.
EXTENSION CORDS
Double-insulated tools have 2 wire cords,
and can be used with 2 wire or 3 wire
extension cords. Only round jacketed
extension cords should be used, and we
recommend that they be listed by
Underwriters Laboratories (U.L)
A
_I.WARNING:
To prevent electric shock
use only with an extension cord suitable
for outdoor use, such as SW-A, SJOW-A,
SOW-A, STW-A, STOW-A, SJW-A,
SJTW-A or SJTOW-A.
An extension cord must have adequate
wire size (AWG or American Wire Gauge)
for safety, and to prevent loss of power
and overheating. The smaller the gauge
number of the wire, the greater the
capacity of the cable; that is, 16 gauge
has more capacity than 18 gauge. When
using more than one extension to make
up the total length, be sure each individual
extension contains at least the minimum
wire size.
To determine the minimum wire size
required, refer to the chart below: (Refer
to your mower's nameplate to find the
Ampere Rating)
NOTE: Using any other length or rating or
cord will diminish the performance and
possibly the life of the electric motor.
SAVE THESE INSTRUCTIONS
.......................................................
....................................................
JVott8
Total Length of Cord in Feet
120V
0-25
26-50
51-100
101-150
(0-7,6m) (7,5-15,2m)(15,2-30,4m)(30,4-45,7m)
240V
0-50
51-100
101-200 201-300
(0-15,2m)(15,2-30,4m)(30,4-60,9m)
(60,9-91,4m)
Ampere Rating
JMore Not more
American Wire Gage
JThan Than
i0
6
18
16
16
14
i6
10
18
16
14
12
i10
12
16
16
14
12
12 16
14
12
Not Recommended
I -'t=t".iI:[_] =!_JI=1_i I =]I;I B]=1
The replacement blade is stock # 33243
and is available at Sears Retail Stores and
Service Centers.
CARTON CONTENTS
• Mulching Mower (Shipped with Mulch
Insert installed)
• Grassbag
• Grasscatcher frame
TO REMOVE
MOWER
FROM CARTON
Your mulching mower has been
completely assembled at the factory
e_cept for the Grasscatcher.
CAUTION: Do not lift the tawnmower
off the ground by holding the height
adjustment finger grip.
Stock# 33243
-.i
• Remove the Grasscatcher frame,
Grassbag and cardboard fillers.
• Remove the mower from the carton and
place all four wheels on the ground or floor.
• Check the carton thoroughly and make
sure there are no loose paris.
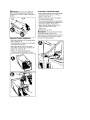
To Unfold Handle
Raise the handle section into place and
secure by tightening the two knobs. See
figure below.
A
,ILII.WARNING:
Foryourownsafety
DO
NOTusethismower
without
eitherthe
Grasscatcher
orMulchInsertinoperating
position.
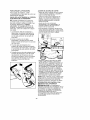
TO INSTALL GRASSCATCHER
• Reach down between the mower handle
and raise the rear door to a vertical
position. (See Fig. A)
• Remove the mulch insert. See page 11
To Remove Mulch insert.
• Pick up the grasscatcher by the handle
and lower the grasscatcher between the
lawnmower handles. Position the
grass- catcher hanger hooks on the
metal rod under the rear door.
(See Fig. B).
• Release the rear door.
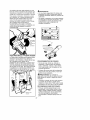
GRASSCATCHER
ASSEMBLY
• Slide the grassbag onto the grasscatcher
frame. (See Fig. A)
• The grassbag has attachment clips sewn
around the bag opening.
• Attach the two top clips to the frame,
then attach the side clips, and lastly the
bottom clip. (See Fig. B)
• Refer to "To Install Grasscatcher"
instruction before attaching to mower.
Q
_.WARNING:
Never operate the mower
unless the hanger hooks on the
grasscatcher are seated properly, and the
rear discharge door rests firmly against
the top of the grasscatcher.
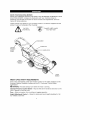
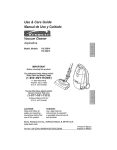
KNOW YOUR MULCHING MOWER
READ THIS OWNER'S MANUAL AND SAFETY RULES BEFORE OPERATING YOUR
MULCHING MOWER. Compare the illustrations with your mulching mower to
familiarize yourself with the location of various controls and adjustments. Save this
manual for future reference.
These symbols may appear on your mulching mower or in literature supplied with the
product. Learn and understand their meaning.
DANGER !
CAUTION
OR WARNING
...............
_
DANGER, KEEP HANDS
AND FEET AWAY
Grasscatcher
Operator
Presence
Control
Switch
Handle Knob
Height
Adjustment
Control
Height
Indicator
MEETS CPSC SAFETY REQUIREMENTS
Sears rotary walk-behind power lawn mowers conform to the safety standards of the
American National Standards institute and the U.S. Consumer Product Safety
Commission.
_L_WARNING: The blade always turns when the motor is running.
Operator Presence Control Switch
motor. Release to stop the motor.
- Must be held to the handle to start and run the
Door - Allows conversion from mulching or bagging operation.
Height Adjustment Control
four wheels at one time.
-- Allows for simple one touch height adjustment of all
• Use the Height Adjustment Control to
raise deck for high cutting and lower
deck for low cutting.
TO STOP MOWER
To stop mower fully release your grip on
the operator presence control switch.
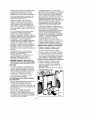
ATTACHING EXTENSION
CORD TO MOWER
• Adjust cutting height to suit your
requirements. Medium position is best
for most lawns.
DO NOT connect the extension cord to
power source until you have finished
reading this manual and you are ready to
start mowing. Read the Polarize:] Plug
section on page 6 before plugging the
extension cord into the switch housing as
shown in figure below.
• To raise or lower the cutting height, rest
the palm of your hand on the palm rest
and with your fingers, squeeze upward
on the finger grip and hold.
Palm
Rest
1. The extension cord must be polarized
and wil! only plug in one way. Orient the
wide slot with the wide blade in the
switch housing and plug in.
2. Loop the extension cord and push the
loop up through the hole in the switch
housing.
3. Pull the extension cord on the side of
the loop that is plugged into the switch
housing and remove all the slack in this
section of the extension cord..
4. Place the loop over the strain relief tab
on the switch housing. Pull the
extension cord so the loop draws down
around the strain relief tab as shown in
the detail. Double check to see that you
did not loosen the extension cord plug.
• While holding the finger grip up you can
raise or lower the cutting height. The
mulcher has eight blade height
adjustment positions. Refer to the scale
and pointer at the front of the mower.
The pointer will give you the height
setting for cutting your lawn. This setting
can be a reference for the next time you
want to cut your lawn at the same
height. When you have the mower at the
height you like, simply release the finger
grip to lock the height in.
NOTE: To ensure that the deck is securely
locked in one of the eight positions, press
down on the palm rest after releasing the
finger grip.
OPERATOR
CONTROL
TO ADJUST CUTTING HEIGHT
PRESENCE
SWITCH
4iJ_CAUTION: Federal regulations require
an Operator Presence Control Switch to
be installed on lawn mowers in order to
minimize the risk of blade contact injury.
DO NOT under any circumstances attempt
to defeat the function of this switch.
• Before making any adjustments, turn off,
unplug mower and wait for blade to stop
rotating.
9
Remember
thatthebladealways
turns
whenthemotorisrunning.
TheOperator
Presence
Control
Switch
is
a leverthatyoupul!backtostartandrun
themower.
Theswitchrequires
youtobe
positioned
behind
themower
handle
for
mower
operation.
Tooperate
theswitch,
insertyourfinger
intotheopening
(A)andpushthelever
outsothatyoucangrabitwithyourother
hand.Pulltheleverbacktoturntheunit
onandholditagainst
themower
handle
tokeepit running.
Toturnthemoweroff,
justrelease
thelever.Thespringloaded
"SNAP
ACTION"
leverwil!quickly
turnthe
mower
off.
Mulch
Insert
,_.WARNING:
• For your own safety DO NOT use this
mower without either the grasscatcher or
mulch insert in operating position.
• Do not operate the lawnmower if the rear
door is not under spring tension. Take
your mower to the nearest Sears Service
Center for repair.
MULCH
INSERT
& REAR
DOOR
The mulch insert is designed to minimize
the throwing of stones or other objects by
the mower blade backward from under the
mower deck. The mulch insert, along with
the rear door, minimizes the possibility of
accidental foot contact with the blade. DO
NOT operate mower without the mulch
insert and rear door in place.
10
• ALWAYS turn the mower "OFF" and
unplug the mower when leaving it
unattended even for a short period of
time.
MOWING PROCEDURE
• Inspect area where mower is to be used
and remove all stones, sticks, wire,
bones, and other debris which might be
thrown by the rotating blades.
• Place most of the extension cord close
to the electrical outlet, out of the path of
the mower.
MULCHING
• Your new mower is designed to re-cut
the grass clippings many times and
reduce them in size so that, as they fall
into the lawn, they will disperse into the
grass and not be noticed. Also, the
mulched grass wil! biodegrade quickly to
provide nutrients to the lawn.
• Your mower was shipped with the Mulch
Insert installed.
CAUTION: Do not plug extension
cord into receptacle outlet while standing
in water or when hands are wet.
• Begin mowing in the area closest to the
outlet. Always mow forward in a back
and forth pattern across the lawn. Keep
the cord on the cut portion of the lawn.
MOWING
TIPS
MULCHING
MOWING TIPS
• For best performance, keep the mower
housing free of built-up grass and debris.
Clean after each use. See CLEANING in
the maintenance section of this manual.
• Mow across the face of slopes, never
up-and-down. Exercise extreme caution
when changing direction on slopes. Do
not mow excessively steep slopes.
Always maintain good footing.
• Release switch to turn mower "OFF" and
wait for blade to stop before crossing
any graveled area (stones can be thrown
by the blade).
• Set mower at highest cutting height
when mowing in rough ground or in tall
weeds.
• Avoid cutting the lawn when it is wet.
Wet grass tends to form clumps which
interfere with the mulching action. The
best time to mow your lawn is in the
early afternoon. At this time the grass is
dried and the newly cut area will not be
exposed to the direct sun. For best
results, adjust the mower cutting height
so that the mower cuts off only the top
one third of the grass blades. If the lawn
is overgrown it will be necessary to
increase the cutting height to reduce the
pushing effect and reduce overloading
the motor. For extremely heavy mulching
make narrower cuts and mow slowly.
• From time to time turn off mower and
wait for the blade to come to a complete
stop. Then unplug the power cord and
turn mower on its side. Using an object
such as a stick, wipe out any
accumulation of grass in the blade area.
Be careful of the sharp edges of the blade.
• Certain types of grass and grass
conditions may require that an area be
mulched a second time to completely
hide the clippings. When doing a second
cut, mow across or perpendicular to the
first cut path. DO NOT mow
perpendicular to the first path if it
would require you to mow across a
hill.
• If a grasscatcher is used during the fast
growing season, the grass may tend to
clog up at the discharge opening. Turn
the mower "OFF", wait for the blade to
stop and disconnect the power cord
plug. Remove the catcher and shake the
grass down to the back end of the bag.
Also clean out any grass or debris which
may be packed around the discharge
opening. Replace the grass catcher.
Clean often in wet, spring grass.
• If mower should start to vibrate
abnormally, turn mower "OFF" and
unplug power cord. Check immediately
for cause. Vibration is a warning of
trouble. Do not operate mower until a
service check has been made.
• Change your cutting pattern from week
to week. Mow north to south one week
and east to west the next week. This will
help prevent matting and graining of the
lawn.
TO REMOVE MULCH INSERT
• Shut the mower off, wait until the blade
stops and unplug the mower.
• Raise the rear door and hotd it up.
11
• Locate
yourhandinthehandle
pocket
of
themulch
insert,liftandpul!outthe
mulchinsertcompletely.
• Thereardischarge
doorisspring
loaded.
Whenyourelease
itthedoorwill
returntotheclosedposition.
TO INSTALL
MULCH
• Remove square steel washer, plastic
insulator washer and blade.
Blade Nut
Plastic
Square
Steel
Washer
INSERT
Blade
• Shut the mower off, wait until the blade
stops and unplug the mower.
• Raise the rear door and slide the mulch
insert into the discharge opening until it
is firmly in contact with the deck.
• Release the rear door.
Fan Base
TO REPLACE BLADE
• Place blade on shaft so that the blade
edges are parallel with the fiat sides of
the shaft. Make sure you place the blade
so that its cutting edges wil! face the
ground when the mower is running.
• Place plastic insulator washer on shaft
so that two of the washer's raised edges
fit over the edges of the blade.
Mulch
insert
• Place square steel washer on shaft so
that flat sides of hole in washer are
parallel with flat sides of shaft.
• Place blade nut on shaft. Make sure all
parts stay aligned. Position wood to keep
shaft from turning. Securely tighten blade
nut clockwise to 20-30 ft. Ibs.
TO REMOVE BLADE
• Release Operator Presence Control
Switch to turn mower off, wait for the
blade to stop, and unplug mower!
• Cut a two foot length of 2x4 wood and
use it to keep blade from turning while
removing blade nut.
• Wear gloves, position wood, and loosen
nut counterclockwise as shown. Remove
nut.
TO SHARPEN
BLADE
• Keep blade sharp for best mower
performance. A dull blade does not cut
grass evenly.
• Wear proper eye protection.
12
• Sharpening
thebladetwiceduringa mowingseason
isusually
sufficient
undernormalcircumstances.
Sand
causes
thebladetodullfast.Ifyourlawn
hassandy
soil,morefrequent
sharpeningsarerequired.
• Replace
bentordamaged
blade
immediately.
To sharpen blade:
• Make sure blade remains balanced.
• Sharpen blade at the original cutting
angle.
• Sharpen cutting edges on both ends of
blade, removing equal amounts of material from both ends.
• Secure blade in a vise as shown in
figure below.
• Wear safety glasses and be careful not
to cut yourself.
• Carefully file the cutting edges of the
blade with a fine tooth file or
sharpening stone.
• Check balance of blade. See
instructions for blade balancing.
• After blade is sharpened and balanced
replace blade on mower and tighten
securely.
TO BALANCE
BLADE
• Check balance of blade by placing
center hole in blade over a nail or round
screwdriver shank, clamped horizontally
in a vise. If either end of the blade
rotates downward, file that end. Blade is
properly balanced when neither end
drops.
Fine
Tooth
File
Vise
•' .<
_
both ends
of blade
CUSTOMER
RESPONSIBILITIES
MAINTENANCE
TABLE
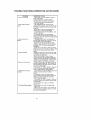
h/shYl/
SCHEDULE
FILL iN DATES
AS YOU COMPLETE
REGULAR SERVICE
SERVICE
DATES
Check for Loose Fasteners
X
clean Lawn Mower
Check/Sharpen/Replace
X
X
Blade
X
X
warranty, operator must maintain mower
as instructed in this manual.
GENERAL RECOMMENDATIONS
• Always observe safety rules when
performing any maintenance.
• The warranty on this lawn mower does
not cover items that have been
subjected to operator abuse or
negligence. To receive ful! value from the
• Once a year check blade for wear.
• Follow the maintenance schedule in this
manual.
• Before each use check for loose
fasteners.
13
LUBRICATION
Nolubrication
isrequired.
IMPORTANT:
Donotoilorgreaseplastic
wheelbearings.
Viscous
lubricants
will
attractdustanddirtandwil!shorten
the
lifeoftheself-lubricating
bearings.
Ifyou
feeltheymustbelubricated,
useonlya
dry,powdered
graphite
tubelubricant
spanngly.
TIRES
• Keeptiresfreeofgasoline,
oilorinsect
control
chemicals
whichcanharm
rubber.
•Avoidstumps,
stones,
deepruts,sharp
objects
andotherhazards
thatmay
causetiredamage.
BLADECARE
Forbestresults,
mowerblademustbe
keptsharp.Replace
bentordamaged
blades.
CLEANING
• Release Operator Presence Control
Switch to turn mower off, wait for the
blade to stop, and unplug mower!
• Use only mild soap and a damp cloth to
clean the mower. Clean out any clippings
which may have accumulated on the
underside of the deck.
PREVENTING
CORROSION
• Fertilizers and other garden chemicals
contain agents which greatly accelerate
the corrosion of metals. If you mow in
areas where fertilizers or chemicals have
been used, the mower should be
cleaned immediately after use.
• _JkCAUTION: DO NOT pour or spray
water on the mower.
• Do not store the toot on or adjacent to
fertilizers or chemicals. Such storage can
cause rapid corrosion.
PRODUCT SPECIFICATIONS
MODEL NUMBER
900.370510
POWER
120v 12 AmP
RI Ar)F ,£PFFr)
3600 RPM
CUTTING WIDTH
19"
BLADE BOLT TORQUE:
20-30 FT. LBS.
[."-]
:1.'Irt[_ :f:! _IDT.*'_
B]I[II>"-]I
itZj1:1_i i_1
rear wheels of your mower, is provided to
minimize the possibility that objects will be
thrown out of the rear of the mower into
the operator mowing position. If the
deflector becomes damaged, it should be
replaced.
TO ADJUST
CUTTING
HEIGHT
4L_CAUTION: Before performing any
service or adjustments:
• Release operator presence control
switch and stop motor.
• Make sure the blade and all moving
parts have completely stopped.
To adjust cutting height refer to "Adjust
Cutting Height" in Operation section of this
manual.
• Unplug power cord.
REAR DEFLECTOR
The rear deflector, attached between the
Immediately prepare your lawn mower for
storage at the end of the season or if the
unit wi!l not be used for 30 days or more.
movingparts for damage, breakage and
wear. Replace if necessary.
HANDLE
LAWN MOWER
When lawn mower is to be stored for a
period of time, clean it thoroughly, remove
all dirt,grease, leaves, etc. Store in a
clean, dry area.
• Clean entire lawn mower (See
"CLEANING" in the Maintenance section
of this manual).
• Be sure that all nuts, bolts, screws, and
pins are securely fastened. Inspect
You can fold your lawn mower handle for
storage.
• Ensure that the power cord has been
unplugged.
• Loosen both handle knobs.
• Carefully fold the handle forward over
the mower.
4J_CAUTION: DO NOT pinch cord
between handle and mower shroud.
14
TROUBLE
SHOOTING/CORRECTIVE
PROBLEM
-Motor will not start
-Motor keeps slowing
down
-Runs but poor cut
"esults
-Excess vibr_ion
-Mower is hard to push
-Mowerleaves
3f grass
-Discharge/Bag
clumps
plugging
ACTION
GUIDE:
CORRECTIVE ACTION
- Check fuse or circud breaker to ensure
power is to outlet
- Check extension cord with another
electrical device to ensure cord is good.
- Call customer service representative
1 800 4 MY HOME
- The underside of the mower may be
plugged with clippings. Turn mower off, wait
for blade to stop and UNPLUG mower and
ctean
out.
- Grass may be too tall, try pushing at a
slower pace, or raise cutting height.
- Check blade sharpness and balance, and
correct if required.
- If mulching, there is too much grass.
Turn mower off, wait for blade to stop and
UNPLUG mower and attach discharge chute
to disperse grass
- The blade may be dull. Turn mower off,
wait for blade to stop and UNPLUG mower
and carefully check for sharpness.
- Blade may be damaged (bent or badly
chipped). Turn mower off, wait for blade to
stop and UNPLUG mower and replace if
necessary.
- Grass may be too high or thick for cutting
height. Turn mower off, wait for blade to stop
and UNPLUG mower and raise cutting
height.
- Blade may be loose. Turn mower off, wait
for blade to stop and UNPLUG mower then
check blade for tightness.
- Blade may be bent or badly chipped.
Turn mower off, wait for blade to stop and
UNPLUG mower and replace if necessary.
- Blade may be unbalanced. Refer to blade
balancing section of instruction manual.
- Mower is too close to the ground with the
amount of grass being cut. Turn mower off,
wait for blade to stop and UNPLUG mower
and raise cutting height.
- Turn mower off, wait for blade to stop and
UNPLUG mower and check wheels and
axles to ensure all are rotating easily.
- Turn mower off, wait for blade to stop and
UNPLUG mower and raise cutting
height.
- If mulching, there is too much grass.
Turn mower off, wait for blade to stop and
UNPLUG mower and attach discharge
chute to disperse grass
- Turn mower off, wait for blade to stop and
UNPLUG mower and carefully check blade
for sharpness.
- Grass may be too wet to cut. Wait for
grass to dry.
- Grass may be too wet, try again when
grass is dry.
- There is too much grass. Turn mower off,
wait for blade to stop and UNPLUG mower
and raise cutting height.
15
16
17
Garant
fa
Reglas
deseguddad
Mantenimiento
Ensamblaje
Operacion
Itinerario
demanten[m[ento
GARANTIA
MMITADA
18
18
21
23
25
30
Especificaciones
delproducto
Servicio
yajustes
A[macenaje
Sotuci6n
a problemas
frecuentes
POR DOS ANOS EN LA PODADORA
31
31
31
32
CRAFTSMAN
Sears repararA sin cargos cualquier defecto que se presente ell materiales o mano de obra
de esta podadora Craftsman, durante dos afros a partir de la fecha de compra, siempre y
cuando se le proporcione el mantenimiento, la lubricaci6n y ajustes necesarios, de
conformidad con las instrucciones de mantenimiento y operacion seffaladas ell el manual del
propietario.
Si la podadora Craftsman se utilizase con fines comerciales o de renta, esta garantfa se
apNca Linicamente durante 90 dfas a partir de [a fecha de compra.Esta garantfa no cubre:
• Piezas que sufran desgaste con el uso normal, como las cuchillas, los adaptadores de
cuchiNas y las bandas.
• Las reparaciones necesarias debidas a maltrato o negtigencia del operador, incluyendo los
Arboles de las bandas y la falta de mantenimiento al equipo de acuerdo alas instrucciones
sei_aladas en el manual deI propietario.
EL SERVlCIO EN GARANTIA ESTA A SU BISPOSICION Nevando la podadora Craftsman al
Centro o Departamento de Servicio Sears mas cercano dentro de los Estados Unidos. Esta
garantfa se aplica Linicamente mientras se utilice el producto en los Estados Unidos.
Esta garantfa le otorga ciertos derechos especificos, y usted puede tener otros derechos que
varfen de estado a estado.
SEARS,
ROEBUCK
AND CO.> DEPT. 817WA,
HOFFMAN
A
ill, PRECAUCION: No intente operar esta
podadora hasta que haya lefdo este
manual completamente y comprendido
todas las instrucciones, reglas de
seguridad, etc., contenidas en este
manual. La falta de cumplimiento puede
resultar en accidentes que invo[ucren
incendio, choque el@ctrico o lesiones
personales de gravedad. Conserve el
manual del propietario y revfselo con
frecuencia para continuar con la operaci0n
segura y para instruir a terceras personas
que pudiesen utilizar esta podadora.
Los estAndares de seguridad requieren de
la presencia de un interruptor de control
con presencia del operador para minimizar
la posibilidad de riesgos. Su unidad ester
equipada con tal dispositivo. No intente
_ular esta funci6n por ningQn motivo.
ADVERTENClA:
Parte del polvo
originado pot este producto contiene
qufmicos queen el Estado de California
se consideran como causantes de cancer,
defectos congenitos u otros dafios
reproductivos. AIgunos ejemplos de estos
ESTATES,
IL 60179
qufmicos son:
• compuestos en fertilizantes
• compuestos en insecticidas, herbicidas
y pesticidas
• ars@nico y cromo de madera tratada
qufmicamente
Para reducir su exposici0n a estos
qufmicos, utilice equipo de seguridad
aprobado como mascaras contra potvo
dlseffadas espedficamente para filtrar
partfculas microscOpicas.
ADVERTENClA: Este producto
contiene qufmicos, incluyendo plomo, que
en el Estado de California se consideran
coma causantes de cancer y defectos
cong@nitos u otros daffos reproductivos.
Lave sus manos despu@s de manejado.
,_PRECAUCI6N:
Emplee la protecciOn
personal y auditiva adecuada durante el
uso de este producto. Bajo ciertas
condiciones y duracion de uso, el ruido
producido por este producto puede contribuir
a la perdida auditiva.
18
NORMAS DE SEGURIDAD:
DEFINICIONES
Es importante que lea y comprenda este
manual.
3. SOlo deje que adultos responsables,
familiarizados con las instrucciones,
operen esta podadora.
4. Limpie el area donde se usara la
podadora de objetos como piedras,
palos, alambres, juguetes, huesos, etc.,
que pueden ser arrojados por la hoja.
Los objetos que la hoja golpee pueden
causar lesiones graves a personas.
Cuando el motor este en
funcionamiento, permanezca detras del
mango.
5. Antes de operar la podadora, aseg_rese
de que el area circundante este fibre
de espectadores. Todos los
espectadores y las mascotas se deben
mantener a una distancia segura.
Detenga ta podadora si alguna persona
ingresa en el area circundante.
6. No opere la podadora descalzo o con
sandalias. Use siempre calzado cerrado.
7. No tire de la podadora hacia atras a
menos que sea absotutamente
necesario. Siempre mire hacia abajo y
hacia atras antes y durante
movimientos en retroceso.
8. Nunca apunte el material de descarga
hacia una persona. Evite descargar el
material contra una pared o un
obstaculo. El material puede rebotar en
direcciOn al operador. Cuando atraviese
superficies con grava o cuando suelte
el mango, libere la palanca del
interruptor para apagar la podadora y
detener la hoja.
9. No opere la podadora sin la cavidad
para el cesped, el protector de
descarga, el protector trasero o todos
los otros dispositivos de protecciOn en
su lugar yen funcionamiento. Controte
periOdicamente todos los protectores y
dispositivos de seguridad para
asegurarse de que esten en buenas
condiciones, funcionen correctamente
y cumplan con la funciOn para la que
fueron dise_ados. Reemplace un
protector u otto dispositivo de
seguridad danado antes de volver a usarlo.
10. Nunca deje de supervisar una
podadora en funcionamiento.
11. Antes de quitar la cavidad para el
cesped, desatascar el protector de
descarga o limpiar, ajustar, reparar,
inspeccionar o dejar la podadora,
siempre Iibere la patanca del interruptor
para parar el motor, espere que la hoja
se detenga por completo y desenchufe
la podadora.
12. SOlo opere la podadora de dia o con
buena luz artificial de modo que los
objetos en el area donde se usara la
podadora yen el trayecto de la hoja
sean claramente visibles.
La informaciOn que contiene esta
relacionada con la protecciOn de SU
SEGURIDAD y la PREVENCION DE
PROBLEMAS. Los sfmbolos que siguen
se utilizan para ayudar!o a reconocer esta
informaciOn.
_. PELIGRO: Indica una situaciOn de
peligro inminente que, si no se evita,
provocara la muerte o lesiones graves.
_.ADVERTENCIA:
Indica una
situaciOn de peligro potencial que si no se
evta, podr a provocar a muerte o esones
graves.
_PRECAUCI6N:
Indica una
situaciOn de peligro potencia! que, si no se
evita, puede provocar lesiones leves o
moderadas.
PRECAUCION:
Utilizado sin el
sfmbolo de alerta de seguridad indica una
situaciOn de peligro potencial que, si no se
evita, puede provocar dafios en la
propiedad.
_ADVERTENCIA:
Instrucciones
y advertencias
de seguridad
importantes
_ADVERTENCIA:
AI utilizar
aparatos el_ctricos para jardln siempre se
deben tomar c ertas preca.uc ones bas cas
de seguridad para mlnimlzar el riesgo de
incendio descarga electrica y lesiones
persona es.
LEA TODAS LAS
INSTRUCCIONES
PRh-CTICAS DE SEGURIDAD
IMPORTANTES
SOBRE
PELIGROS PARA LAS
PODADORAS
MANUALES
Esta podadora puede amputar manos y
pies y arrojar objetos. La inobservancia de
las siguientes instrucciones de seguridad
puede causar lesiones graves o la muerte.
OPERACION GENERAL
1. Lea, comprenda y siga todas las
instrucciones en la podadora y en el
manual de instrucciones antes de
comenzar.
2. No cotoque las manos ni los pies cerca
o debajo de ta podadora. Mantengase
alejado de la apertura de descarga en
todo momento.
19
13.Nooperelapodadora
bajoelefectode NII_IOS
alcohol
o drogas
o cuando
este
Si el operador no estA alerta ante la
cansado
oenfermo.
Mantengase
presencia de ni_os, pueden ocurrir
alerta,pongaatenci0n
enIoqueeste
accidentes trAgicos. Los ni5os con
haciendo
yuseelsentido
comQn.
frecuencia se sienten atraidos pot las
14.Evitelosambientes
peligrosos.
Nunca podadoras y su funcionamiento. Nunca de
pot sentado que los nii_os permaneceren
operelapodadora
sobrepasto
hdimedo
o mojado
o conIluvia.
Asegure donde los vio por _31timavez.
1. Mantenga a los ni_os fuera del Area
siempre
suestabilidad;
nocorra,
camine.
donde se corta el cesped y al cuidado
de un adulto responsable que no sea
15.Sielsistema
deimpulsion
estA
el operador.
equipado,
antesdearrancar
elmotor,
destrAbelo.
2. Este alerte y apague la podadora si un
nii_o ingresa en el Area de corte.
16.Sitacubierta
delapodadora
comienza
a vibrardemodoanormal, 3. Nunca deje que un ni_o opere la
podadora.
liberelapalanca
delinterruptor,
espere
quetahojasedetenga,
desenchufe
la 4. Tenga extremo cuidado cuando se
podadora
yverifique
lacausade
aproxima a esquinas, arbustos,
inmediato.
PorIogeneral,
lavibraci0n
Arbotes u otros objetos que puedan
eslaadvertencia
deunproblema.
bloquear la presencia de un ni_o.
17.Cuando
operelapodadora,
utilice
MANTENIMIENTO
GENERAL
siempre
protecci0n
respiratoria
y
1. Nunca opere la podadora en un erea
visualadecuada.
18.Elusodeaccesorios
o dispositivos
no 2. cerrada.
Mantenga todas las tuercas y los perrecomendados
parautilizarconesta
nos ajustados para asegurar que el
podadora
puederesultar
peligroso.
equipo este en condiciones seguras
S01o
utiliceaccesorios
aprobados
pot
de funcionamiento.
Sears.
3. Nunca altere ta podadora con disposi19.Nuncaseestiredemasiado
cuando
tivos de seguridad. Verifique que funopereestapodadora.
Conserve
el
clone correctamente con frecuencia.
equilibrio
y pArese
adecuadamente
en
4. Mantenga la podadora libre de
todomomento
mientras
operala
cesped, hojas u otros desechos
podadora.
FUNCIONAMIENTO
EN
PENDIENTE
Las pendientes son el factor principal
relacionado con los resbalones y las
cafdas, que pueden causar lesiones
graves. La operaci0n en las pendientes
requiere precauci0n extra. Si en una
pendiente se siente inseguro, en dicha
zona no corte el cesped.
1. Corte el cesped a traves de la cara de
las pendientes; nunca hacia arriba y
hacia abajo. Tenga extremo cuidado
cuando cambia de direcci0n en las
pendientes.
2. Tenga cuidado con los pozos, los
baches, las protuberancias u otros
objetos escondidos. El terreno desnivelado puede causar un resbal0n o una
catda. El cesped alto puede esconder
obstAculos.
3. No corte el cesped si el este mojado o
en pendientes pronunciadas. Una mala
pisada puede causar un resbal0n o una
caida.
4. No corte el cesped cerca de barrancas,
zanjas o terraplenes. Puede perder el
equilibrio.
5.
6.
7.
8.
9.
2O
acumulados. Antes de guardar la
podadora, deje que se enfMe.
Si golpea un objeto extral%, suelte la
palanca del interruptor para apagar la
podadora, espere que la hoja se
detenga, retire la Ilave de seguridad y
luego examine la unidad. Antes de
reiniciar la operaci0n con la podadora,
repare los dafios.
Nunca realice ajustes o reparaciones
con el motor en
funcionamiento o con la llave de seguridad colocada en la podadora.
Siempre retire esta llave de seguridad
antes de realizar tareas de ajuste,
limpieza, reparaciones e inspecciones,
o bien antes de transportar la unidad,
guardarla o dejarla de utilizar.
Controle los componentes de la
cavidad para el pasto y el
protector de descarga con frecuencia
y, cuando sea necesario reemplazar
una pieza, use sotamente los
repuestos recomendados por Black &
Decker.
Las hojas de ia podadora son filosas.
Envuelva las hojas, use guantes y
tenga mucho cuidado cuando realiza
un mantenimiento.
10.Conserve
o reemplace
lasetiquetas
de
lasinstrucciones
ylasetiquetas
de
seguridad,
segQn
seanecesario.
ENTRENAMIENTO
• Lea cuidadosamente este manual del
operador. Familiarfcese con los controles y
sepa a operar su podadora
apropiadamente. Aprenda a apagar su
podadora rApidamente.
• Utilice la podadora Qnicamente como se
describe en este manual.
• No opere la podadora si se ha cafdo o
dalfiado en aiguna forma. HAgala repara
siempre antes de usarla.
• No opere la podadora sin la extension
recomendada. AsegQrese que la extension
este en buenas condiciones antes de
encender la podadora.
• La cuchilla siempre gira cuando el motor
estA en funcionamiento.
• Evite el encendido accidental. No juegue
con el interruptor de control en presencia
del operador cuando no se emplee.
PREPARACION:
• Vlstase de manera adecuada. No opere el
equipo con los pies descaizos o cuando
utilice calzado abierto. Utilice siempre
calzado cerrado con buena tracci0n.
• Haga los ajustes necesarios a las ruedas
antes de encender la podadora. Nunca
intente hacer ajustes a ta altura de las
ruedas mientras el motor estA en
funcionamiento.
• No conecte la podadora hasta que este Iista
para usarse.
• Proteja sus pulmones. Utilice una
mascarilla o filtro contra polvo si la
operaciOn que va a efectuar Io produce.
• Retire tas herramientas de ajuste antes de
encender la podadora.
OPERACION,
La operaciOn de cualquier
podadora puede ocasionar que
objetos extra_os salgan
despedidos hacia los ojos, con el
consiguiente riesgo de da_o ocular. Utilice
siempre gafas o protectores oculares de
seguridad al operar su podadora o al
hacerle ajustes o reparaciones, he
recomendamos utilizar una mascara de
vision amplia sobre las gafas, a su
disposiciOn en Sears.
• Conserve sus ojos y su mente en su
podadora yen el area que piense podar.
No permita que Io distraiga nada.
• Protejase contra el choque electrico.
Repare o reemplace de inmediato los
21
cables y las extensiones da_adas.
• No maltrate el cable. Nunca tire de ta
podadora por el cable. Desconectela
tirando suavemente de la clavija, no del
cable.
• No encienda el motor bajo techo.
• No fuerce la podadora. Esta harA el
trabajo mejor y de manera mAs segura
bajo las especificaciones para las que
ha sido disefiada. Cuando pode en
superficies irregulares o en pasto alto,
elija una posiciOn de corte mAs alta.
• Al_jese del area de la cuchilla. Est_
consciente acerca del riesgo de
lesiones. Conserve las manos y los pies
alejados de la cuchilla.
• PELIGRO: NO intente remover el
material cortado o destapar la salida
cuando ta cuchilla este en movimiento,
existe riesgo de lesionarse gravemente.
• Si la podadora se atasca, aseg_Jrese de
apagar la podadora, espere a que ta
cuchilla se detenga y desconecte el
cordon electrico antes de intentar
destapar el canal de salida o de
remover cualquier objeto de debajo de
la cubierta. Revise cuidadosamente y
haga reparar cualquier da_o antes de
votver a encender la podadora.
MANTENtMIENTO
Y ALMACENAJE
• Revise a menudo los tornil!os de
montaje de la cuchilla y el motor para
asegurarse que esten bien apretados.
• Revise a intervalos frecuentes todos que
todos los torni!los, tuercas y pijas esten
bien apretados para asegurarse que la
podadora este en condiciones seguras
de trabajo.
• Conserve el motor libre de pasto, hojas
y grasa o aceite excesivos para reducir
el riesgo de incendios.
• Conserve siempre afilada la cuchilla de
su podadora.
• Conserve la podadora Iimpia y seca.
Utilice siempre un trapo hdimedo para
limpiarla. Nunca utilice Ifquido de frenos,
gasolina, productos con base de
petrOleo, solventes, ni agua para limpiar
la podadora.
• No pode si el interruptor no funciona.
Haga reemplazar un interruptor
defectuoso pot un t6cnico de servicio
calificado de un centro o departamento
de servicio autorizado.
A
• Revise
laspartesdaffadas.
Antesde
Repare o reemplace
seguirutilizando
lapodadora,
unaguarda .11.PRECAUTION:
los cordones electricos dafiados. Utilice
u otraspartes
daffadas
deben
set
solamente refacciones Craftsman identicas
revisadas
cuidadosamente
para
determinar
sicumplir_n
consufuncidn cuando haga servicio a cualquier herramienta.
adecuadamente.
Revise
laalineacidn
de CLAVIJA POLARIZADA
laspiezasmdviles,
laruptura
enpiezas, Esta podadora cuenta con una clavija
launiondepiezas
mdvfles,
etmontaje,
y
potarizada (con una pata mAs ancha que
cualesquiera
otrascondiciones
que
la otra) para reducir los riesgos de cheque
pudiesen
afectar
suoperacidn.
Una
Cuando el cordon electrico
guarda
uotrapiezadaffadas
deber_n
ser electrico.
cuente con este tipo de clavija, ajustar_ en
reparadas
correctamente
defectuoso
per un contacto potarizado solamente de una
untecnico
deservicio
catificado
deun
manera. Si la clavija no ajusta
centreodepartamento
deservicio
completamente en su contacto, inviertala.
autorizado.
Si ann asl no ajusta, llame a un electricista
• Cuando
efect_e
servicio
asegQrese
que calificado para que le instale un contacto
seempleen
Qnicamente
refacciones
potarizado apropiado. No modifique o haga
Craftsman
identicas.
Elservicio
aesta
cambios en la clavija per ningQn motivo.
podadora
debeefectuado
t_nicamente
un CORDONES DE EXTENSION
tecnico
calificado.
Lesugerimos
que
envielaunidad
alcentreodepartamentoLas herramientas con dobte aislamiento
deservicio
m_scercano.
cuentan con cordones electricos de dos
conductores y pueden utilizarse con
• Cuando
cambie
lacuchiila,
utilice
Qnicamente
laspiezas
recomendadas extensiones de 2 o 3 conductores.
porelfabricante.
Elusodecualquier
otra Solamente deben emplearse extensiones
cuchilla
puede
ocasionar
lesiones
personalesde cubierta cilfndrica, y recomendamos
que esten aprobadas per Underwriters
degravedad
o daffosa supodadora.
• Guarde
lapodadora
bajotecho.Cuando Laboratories (U.L.).
notautilice,
gu_rdela
enlacochera,
en
,_. ADVERTENCIA: Para evitar et cheque
els0tano,
etc.El_trea
endondela
electrico utilice solamente extensiones
guarde
deber8
estarbajoIlave,fueradel para use a ta intemperie, tales come
alcance
delosniffos.
S W-A, SJWO-A, SOW-A, STW-A,
• Cuidesupodadora.
Conserve
lacuchilla STO W-A, SJW-A, SJTW-A o SJTOW-A
limpia
yafilada
paraobtener
unrendimiento Un cordon de extension debe tenet el
meier
ym_ts
seguro.
Sigatasinstrucciones calibre adecuado (AWG o American VMre
delubricaci0n
ycambio
deaccesodos.
Gauge) per seguridad y para evitar perdida
DOBLE AISLAMIENTO
de potencia y sobrecatentamiento. Cuanto
m_s pequefio e! nOmero de calibre del
alambre, mayor la capacidad del cable,
esto es, el alambre de calibre 16 tiene
mayor capacidad queet de calibre 18.
Cuando se emplee m_ts de una extension
para Iograr la Iongitud deseada, asegOrese
que cada extension individual se
caracterice al mends por el calibre minimo
requerido.
Consulte el cuadro que sigue para
identificar el calibre minimo requerido.
(Refierase a la placa de identificaci0n de
su podadora para encontrar el amperaje)
NOTA: El use de otra Iongitud o
clasificaci0n de extension disminuir_t el
rendimiento y posiblemente la duraci0n
del motor electrico.
Su podadora cuenta con DOBLE
AISLAMIENTOpara
seguridad affadida.
Las herramientas DOBLEMENTE aisladas
se han elaborado de manera integral con
dos capas separadas de aislamiento
el_ctrico o una capa doble de aislamiento
entre usted y el sistema electrico que
contienen.
Las herramientas construidas con este
sistema de aislamiento no requieren
conectarse a tierra. Come resultado su
herramienta ester equipada con una clavija
de dos patas que le permite emplear
cordones de extension sin preocuparse
per tener una conexi0n a tierra.
NOTA: El DOBLEAtSLAMIENTO
no
substituye alas precauciones normales de
seguridad cuando se opera esta
podadora. La finalidad de este sistema de
aislamiento es ofrecer a usted protecci0n
afiadida contra tesiones resultantes de
fallas en el aislamiento el_ctrico interne de
la herramienta.
22
iVolts
i120V
Longitud total del cable en pies
0-25
26-50
51-100
101-150
(0W,6m) (7,6-15,2m) (15,2_30,4m) (30,445,7m)
0-50
51-100
101-200
201-300
(0-15,2m) (15,2_30,4m)(30,4-60,9m) (60,9-91,4m)
i
i240V
i
iAmperaje
i Mas de
No mas de
i0
6
18
i6
10
18
i10 - 12
15
CONSERVE
American Wire
16
14
14
15
15
15
Gage
14
12
12
ESTAS INSTRUCClONES
[_l[_: IIl! W:I e]=ll;t=i-.,[aJ
_r_"._
i[_]
Para desplegar el mango
La cuchilla de repuesto es la parte
#33243 y ester a su disposici0n en las
tiendas y centros de servicio Sears.
Levante ia secci0n del mango hasta su
posici0n y asegQrela apretando las dos
perillas. Consulte ta figura a continuaci0n.
_ADVERTENCIA:
Per su propia
seguridad, NO use esta podadora sin la
bolsa para paste o el inserto recortador en
_osiciOn de operaci0n.
Perillas
Mango
f,
Pa_e# 33243
i = _ E-'Y;I_v_I
:] II;!J =
CONTENIDO
DE LA CAJA
• Podadora (viene con el inserto de recorte
instalado).
• Bolsa para pasto
• Estructura de la bolsa para paste.
PARA SACAR LA PODADORA DE SU CAJA
Su podadora se ha ensamblado
completamente en ta f_brica, con
excepci0n
de la bolsa para paste.
A
PRECAUTION: No levante la
podadora sujet_tndota del ajuste de altura
de accionamiento con los dedos.
ENSAMBLAJE DE LA BOLSA PARA PASTO
• Deslice ta boisa para pasto en el
armaz0n. (Observe ta Fig. A.)
• La bolsa para paste tiene unas presillas
cosidas alrededor de la abertura.
• Saque la estructura de la bolsa para
pasto, las botsa para pasto y los
rellenadores de carton.
• Ensamble tas dos presillas superiores al
armaz0n, continQe con las dos presi!las
laterales y deje para el final la presi!la
inferior. (Observe la Fig. B)
• Consulte la secci0n "lnstalaci0n de la
bolsa para pasto" antes de cotocarla en
la podadora.
• Saque la podadora de la caja y coloque
las cuatro ruedas en el piso.
• Revise la caja cuidadosamente y
asegQrese que no hay piezas sueitas.
23
INSTALACION
DE LA BOLSA
PARA PASTO
• Pot debajo yen medio de los mangos
de la podadora, tevante la puerta trasera
de descarga hasta que quede en
posici0n vertical y sujetela. (Observe la
Fig. A)
• Saque el inserto de recorte. Oonsulte la
p_tgina 26 "Remoci0n del inserto de
recorte".
• Levante la botsa para pasto pot el
mango y a continuaci0n b_jela entre los
mangos de la podadora. Cotoque los
ganchos de la botsa en la podadora en
la varilla met_tlica, bajo la puerta trasera.
(Observe la Fig. B)
_uelte
la puerta trasera.
ADVERTENCIA: Nunca opere la
podadora a menos que los ganchos de ta
bolsa est_n correctamente asentados en
la podadora y la puerta de descarga este
firme contra la parte superior de la botsa
para pasto.
24
[o]_l_o,]_o]_l
CONOZCA
SU PODADORA
LEA ESTE MANUAL DEL PROPIETARIO
Y LAS REGLAS DE SEGURIDAD
ANTES DE OPERAR
SU PODADORA. Compare las i{ustraciones con su podadora para fami{iarizarse con la Iocalizaci6n
de los diferentes controles y ajustes. Conserve este manual para referencias futuras.
Estos simbolos pueden aparecer en su podadora o en la literatura que se proporciona
producto. Aprenda y comprenda su significado.
con el
DANGER!
\
ALEJADOS MANOS Y PIES
PELIGRO, CONSERVE
_/
para pasto
Interruptorde
control con
del mango
presencia del
operador
Control de
ajuste de altura
Indicador de altura
CUMPLE
CON LOS REQUERIMIENTOS
DE SEGURIDAD
CPSC
La podadoras electricas rotativas Sears cumpien con los est_tndares de seguridad del
American National Standards Institute y del U.S. Consumer Product Safety Comission.
ADVERTENClA: La cuchilla gira cuando el motor est8 en funcionamiento.
Interruptor de control con preeencia del operador
encender el motor• Liberese para detener el motor•
-- Debe sujetarse al mango para
Puerta -- Permite la conversion para la operaci0n de desbroce o embotsado.
Control de ajuste de altura -- Permite ajustar la altura de las cuatro ruedas al mismo
tiempo con un s01o movimiento.
PARA
APAGAR
LA PODADORA
AJUSTE DE ALTURA DE CORTE
Para apagar la podadora, suelte
completamente el interruptor de control en
presencia del operador.
UNION DE LA EXTENSION AL CORDON
ELECTRICO DE LA PODADORA
NO conecte la extension a la toma de
corriente hasta que haya terminado de
leer este manual y empiece a podar. Lea
la secci0n referente a la "Clavija
polarizada" en la p_gina 22 antes de
conectar la extension en la carcaza del
interruptor, como se muestra en la figura
que sigue.
1. La extension debe ser polarizada y
debe poder conectarse solamente de
una manera. Oriente la ranura grande
con ta pata grande en la carcaza del
interruptor.
2. Forme un bucle con el cable
prolongador y empuje el bucle hacia
arriba, a traves del orificio en la carcasa
del interruptor.
3. Tire del cable prolongador en el
extremo del bucle que estA enchufado
en la carcasa del interruptor y quite todo
el remanente de esta secciOn del cable
prolongador.
• Antes de hacer cualquier ajuste, apague
y desconecte la podadora y espere a
que acuch adeedegrar.
• Utilice el control para regulaci0n de
altura a fin de elevar la plataforma y
obtener una attura mayor de corte y
bajar la plataforma para una altura
inferior de corte.
• Ajuste la altura de corte para
acomodarse a sus necesidades, ha
posici0n media es la mejor para la
mayorfa de las ocasiones.
• Para aumentar o disminuir la altura de
corte coloque la palma de su mano sobre
el descanso para la palma y oprima el asa
para los dedos con estos, suj@tela.
Apoyo
para la
Indicador
,
4. Coloque el arco sobre el protector de la
carcaza del interruptor y tire del cable
de extension de manera que el arco
envuelva el protector, como se muestra
en el detalle. Revise que no se haya
aflojado la clavija del cable de
extension.
[_-:
Esca[a
• Mientras sujeta el asa para los dedos
usted puede aumentar o disminuir la
altura de corte. Lapodadora cuenta con
ocho posiciones diferentes. Observe la
escala y el indicador en la parte frontal
de la podadora. El indicador te mostrarA
la posici0n de altura para su c@sped.
Esta posiciOn puede set una referencia
para la prOxima vez que quiera cortar su
cesped a ta misma altura. Cuando tenga
la podadora en ta altura deseada simplemente tibere el asa para los dedos
para asegurar el ajuste a esa altura.
NOTA: Para confirmar que la cubierta est_
asegurada en una de las siete posiciones
optima en el descanso para la palma
despues de liberar el asa para los dedos.
INTERRUPTOR DE CONTROL CON
I
_ESENCIA
DEL OPERADOR
PRECAUTION: Los reglamentos
federales requieren de la instalaci0n de un
control para el motor en la podadora, a fin
de minimizar el riesgo de lesiones pot
contacto con la cuchilla. Pot NINGUNA
circunstancia trate de anular el
funcionamiento del control de operaciOn.
La cuchilla gira cuando el motor est_ en
funcionamiento.
26
Su podadora de pasto est& equipada con una
barra de control en presencia del operador que
requiere que el operador se coloque detr_.s del
mango de la unidad para encenderla y operarla.
,_ ADVERTENCIA:
• Per su propia seguridad NO utilice esta
podadora sin que ta boisa para pasto o
el inserto recortador est6n en posici0n de
operaci0n.
• No opere la podadora si la puerta trasera
no esta bajo la tension del resorte. Lleve
su podadora al centro de servicio mas
cercano para que le efect0en los
arreg!os necesarios.
Para operar el interruptor, introduzca su dedo
en la abertura (A), y empuje la palanca hacia
afuera para que pueda tomarla con la otra
mano. Tire de la palanca hacia atr_.s para
encender la unidad y sujetela contra el mango
de la podadora para conservarla en
funcionamiento, para pagar la podadora,
simplemente libere la palanca. La palanca (con
accion de resorte) apagar& la podadora
inmediatamente.
PIEZA PAPA MATILLO Y PUERTA TRASERA
La pieza para mantillo esta dise_ada para
minlmlzar la expulsion hacia atras de
piedras u otros objetos a trav6s de la hoja
de la podadora por debajo de la
plataforma de la podadora. La pieza para
mantillo, unto con la puerta trasera, minim za a pos b dad de contacto acc denta
de los pies con ta hoja. NO haga funcionar
la podadora si la pieza para manti!lo y la
puerta trasera no se encuentran en su lugar.
reoone
PROCEDIMIENTOS
DE PODADO
• Revise el area donde se utilizara la
podadora y elimine todas las piedras,
varas, alambres, huesos y otros desechos que puedan ser arrojados por las
cuchillas giratorias.
• Coloque la mayor parte de la extension
cerca de la toma de coriente, fuera del
_,_amino de la podadora.
PRECAUTION: No conecte la
extension a la toma de corriente mientras
est6 parade en agua o tenga las manes
mojadas.
• Comience a podar la zona mas cercana
a ta toma de corriente y pode hacia
adelante y hacia atras. Note que el cable
se queda en la zona que ya se ha podado.
RECOMENDACIONES
DE PODADO
• Pode en sentido perpendicular alas
pendientes, nunca hacia arriba y hacia
aba o. Tenga cuidado extremo cuando
camb e de d recc 0n en as pend entes.
No pode pendientes demasiado
pronunciadas. Siempre apoye bien los
pies.
para
27
• Suelte
elinterruptor
paraAPAGAR
(OFF) compietamente seco, y el _trea recien
lapodadora
yesperequelahojase
podada no estar_t expuesta a la tuz directa
detenga
antesdeatravesar
un_trea
del sol. Para obtener mejores resultados,
pedregosa
(lahojapuede
expulsar
piedras). ajuste la altura de corte de la podadora
para que recorte Qnicamente la tercera
• Cotoque
lapodadora
enlaposicidn
de
parte superior de las hojas de pasto. Si el
cortemAsaitacuando
podeentierrao
cesped ester demasiado crecido, ser8
donde
hayahierbas
altas.
necesario aumentar la altura de corte para
• Apague
lapodadora
decuando
en
reducir el efecto de empuje y disminuir la
cuando
y espereaquelacuchiila
se
sobrecarga det motor. Para podados
detenga
porcompleto.
Desconecte
el
extremadamente pesados haga cortes
cordon
electrico
y girelapodadora
de
angostos y haga movimientos lentos.
lado.Elimine
elpastoacumulado
enla
•
Ciertos tipos y aigunas condiciones de
zonadelacuchflla
conunobjetosimilara
pasto pueden requerir un segundo podado
unavara.Tenga
cuidado
conlosfilosde
para disimular las irregularidades.
lacuchilia.
Cuando haga el segundo corte, realice el
• Sienlaestaci0n
decrecimiento
r_pido,
movimiento en forma perpendicular al
seutilizaunrecolector
decesped,
_rEimero.Sl ESTA PODANDO EN UNA
pueden
ocurriratascamientos
enla
NDIENTE, NO REALICE EL SEGUNDO
abertura
dedescarga.
APAGUE
(OFF)la
CQRTE EN FORMA PERPENDICULAR
podadora,
espere
quelahojasedetenga Sl ESTO LO OBLIGA CORTAR
ydesconecte
elenchufe
delcablede
PARALELAMENTE A LA COLINA.
alimentaci0n.
Retire
elrecolector
y
•
Cambie el patron de corte de semana a
sacLldato
paraqueelcespedcaigahacia
semana. Rode de norte a sur una semana
elrondodelabolsa.
AdemAs,
limpieel
y de este a oeste ia siguiente, esto ie
cesped
y losresiduos
quesehayan
ayudar_ a evitar que el corte quede disparejo.
compactado
airededor
delaabertura
de
descarga.
Vuelva
a colocar
etrecoiector REMOCION DEL INSERTO DE RECORTE
decesped.
Limpie
confrecuencia
en
la podadora, espere a que la
pfimavera
yaqueelcesped
seencuentra • Apague
cuchi!la se detenga y desconectela.
hQmedo.
• Levante la puerta trasera y sujetela.
• Silapodadora
vibraanormalmente,
• Cotoque su mano en la abertura, levante y
APAGUELA
ydesconecte
elcordon
tire completamente del inserto recortador.
eiectrico.
Busque
lacausa
inmediatamente.
Lasvibraciones
son
• La puerta trasera para descarga funciona
con un resorte. Cuando libere el resorte la
avisodeproblemas.
Noopereta
podadora
hastaquelehayan
puerta regresarA a la posici0n cerrada.
efectuado
unarevision
deservicio.
INSTALACION DEL INSERTO RECORTADOR
• SIEMPRE APAGUE y desconecte la
• Apague la podadora, espere a que la
podadora cuando la deje desatendida,
aun cuando sea por un periodo corto.
RECORTE
cuchiila se detenga y desconectela.
• Levante la puerta trasera y deslice el
inserto recortador por la aeertura de
descarga hasta
que haga contacto firme con la cubierta.
• Suelte la puerta trasera.
• Su nueva podadora ester disefiada para
re-cortar los desechos del pasto varias
veces y reducir su tama_o, para que, at
caer al cesped se disperse y no se note.
El pasto se degradar8 r_tpidamente y
proporcionar_t nutrientes at cesped.
• Su podadora viene de f_brica con el
inserto recortador instalado.
RECOMENDACIONES
CON RECORTE
PARA PODADO
• Para un mejor rendimiento, mantenga la
cubierta de la podadora limpia, sin
acumulacien de cesped compactado.
Lfmpiela despues de usarla cada vez. Vea
LIMPIEZA en la secoi0n de mantenimiento
de este manual.
• Evite cortar el cesped cuando este
hQmedo. El pasto mojado tiende a
agruparse y esto interfiere con la acoi0n
de recorte. El mejor momento para podar
su cesped es poco despues del mediodia.
A esta hora, el pasto estarA
Inserto
de
recorte
28
REMOClON
DE LA CUCHILLA
• Coloque la roldana cuadrada de acero
en el eje de manera que los iados rectos
de la roidana queden paralelos a los
lados pianos del eje.
• Coloque la tuerca de la cuchilta en el eje.
AsegOrese que todas las partes esten
alineadas. Cotoque la madera de manera
que evite que la flecha gire y apriete la
tuerca a 20 a 30 libras-pie.
• iLibere la palanca del interruptor para
apagar la podadora, espera a que la
cuchilla se detenga y desconecte
la
podadora!
• Corte una plaza de madera de 10 cm de
ancho por 60 cm de Iongitud para evitar
que la cuchilla gire cuando quite la tuerca.
• Emplee guantes. Coloque la tabla y quite
la tuerca como se ilustra.
Afilado de la cuchilla
• Conserve la cuchilla afilada para obtener
mejor rendimiento de la podadora. Una
cuchilla desafllada no corta el pasto en
forma uniforme.
• Quite el la roldana cuadrada de acero, el
aislador de pl_tstico y la cuchi!la.
Roldana
cuadrada
Tuerca d
• Utilice siempre protecci0n para los ojos.
• Afilar la cuchilla dos veces durante la
temporada de podado es suficiente bajo
circunstancias non'nales, ha arena
desafila ta cuchilla r_tpidamente. Si su
suelo tiene tierra arenosa, afile la cuchi!la
con mayor frecuencia.
• Reemplace las cuchiltas dai_adas o
dobiadas inmediatamente.
• Para afilar la cuchilla:
Roldana aislante
de acero
• AsegQrese que la cuchilla ester
baianceada.
• Afile la cuchi!la
original.
• Afile los bordes
extremos de la
misma cantidad
Base del
ventiEador
en el Angulo de corte
cortantes en ambos
cuchilla, removiendo la
de material de ambos.
• Asegure la cuchilla en una prensa como
se ilustra.
CAMBIO
• Utilice galas de seguridad y tenga cuidado de no cortarse.
• Afile cuidadosamente los bordes cortantes de la cuchilla con una lima de
dientes finos o con una piedra de afllar.
• Verifique el balance de la cuchilla. Vea
las instrucciones para balancear la
cuchilla.
• Vuelva a cotocar ta cuchilla en la
podadora y apriete con flrmeza.
DE LA CUCHILLA
• Coloque la cuchi!la en el eje de manera
que los bordes queden paralelos a tos
lados pianos del e e. AsegQrese de
cotocar la cuchilla de manera que los
filos queden de cara al suelo al funcionar
la podadora.
• Coloque el aislador de pt_tstico en el eje
de manera que los dos bordes en relieve
de la roidana queden sobre los bordes
de la cuchilla.
29
rados en la prensa en direcci0n
horizontal. Si alguno de los extremos de
la hoja rota hacla abajo, lime ese
extremo. La hoja est8 bien balanceada
cuando ninguno de los extremos rota
hacia abajo.
BALANCEO DE LA CUCHILLA
• Verifique el balanceo de la hoja
ubicando el agujero central en la hoja a
trav_s de un clavo o de un destornillador
de cuerpo redondo, previamente asegu-
Prensa
Limafina
en arr!bos
extremos de la
cuchilla
CUADRO DE RESPONSABILIDADES
iTiNERARIO
DEL USUARIO
/#/3/
DE MANTENIMIENTO
/
LLENE LAS FECHAS
EN QUE EFECTUA EL
SERVlClO REGULAR
/@-/_
Revision de tornillos flojos
X
Limpieza de la podadora
Revisar/AfiladCambiar
RECOMENDACIONES
/ -¢t/ -¢_/@- /
X
X
X
cuchilla
X
• Antes de cada uso revise en busca de
torni!los y tuercas flojos.
LUBRICACION
GENERALES
• Observe siempre las reglas de
seguridad cuando efectQe cualquier tipo
de mantenimiento.
No se requiere lubricaci0n.
IMPORTANTE: No aceite ni engrase los
baleros de las ruedas de pl_stico. Los
lubricantes viscosos atraen el polvo y la
mugre y acortar_n la vida de los baleros
auto lubricantes. Si usted piensa que
deben ser lubricados, utilice L_nicamente
lubricante de grafito pulverizado.
LLANTAS
• La garantfa de esta podadora no cubre
partes que hayan sufrido maltrato o
abuso por parte del operador. Para
recibir el valor completo de la garantia,
el operador debe dar mantenimiento a la
podadora como se indica en este
manual.
• Todos tos ajustes que se mencionan en
las secciones de Ajustes y Servicio
deben revisarse por Io menos una vez
cada temporada.
• Revise el desgaste en la cuchilla una
vez at afio.
• Siga el itinerario de mantenimiento
este manual.
FECHAS DE SERViCIO
• Conserve tas llantas libres de gasolina,
aceite o pesticidas que puedan dafiar el
hule.
• Evite baches, piedras, agujeros profundos, objetos afilados y otros peligros que
puedan dafiar las Ilantas.
de
3O
CU|DADO DE LA CUCHILLA
EVITE LA CORROSION
Para obtener mejores resultados, la
cuchilla de la podadora debe estar afilada.
Reemplace las cuchi!las dobiadas o
daffadas.
• Los fertilizantes y otros productos
qulmicos para jardinefla contienen
agentes que aceleran la corrosion de los
metales. Si poda en _treas en donde se
ban utilizado fertilizantes u otros
qulmicos, la podadora deberA ser
limpiada inmediatamente.
• ,_k PRECAUTION: NO vacle o rode
agua sobre la podadora para limpiarla.
LIMPIEZA
• iLibere et interruptor de control en
preeencia del operador, espere a que
se detenga ta cuchitta y deeconecte ta
podadora!
• No guarde la herramienta en donde hay
fertilizantes o agentes qulmicos ni cerca
de ellos, pues esto causa corrosion
aceierada.
• Utilice Qnicamente jab0n suave y un
trapo hQmedo para limpiar la podadora.
Limpie las ranuras en donde se hayan
acumulado desechos en la parte interior
de la cubierta. Despues de varios uses,
verifique que todos los torni!los esten
apretados.
ESPECIFICACIONES
DEL PRODUCTO
NUMERO DE MODELO
900.370510
ALIMENTACION
120 V_, 12 A
VELOCIDAD DE LA CUCHILLA
3600 RPM
CORTE
482,6 mm (19")
PAR DEL TORNILLO DE LA CUCHILLA
20-30 FT.LBS.
t.'] _ ltVt (i_l]t_J.,.'t
£t
i 4,.'1
DEFLECTOR
PRECAUTION: Antes de realizar
cualquier servicio o ajustes:
TRASERO
Refierase a la secci0n de operaci0n,
"Ajuste de la altura de corte" en este manual.
• Libere el interrupter de control en presencia del operador y pare el motor.
• AsegQrese que la cuchilla y todas las
piezas m0viles se hayan detenido.
• Desconecte el cable de alimentaci0n.
Prepare su podadora para almacenarla
inmediatamente al termino de la temperada si no se usarA durante 30 dfas o
m_ts.Ouando la podadora deba guardarse
por cierto tiempo, Ifmpiela a conciencia,
elimine toda la mugre, grasa, hojas, etc.
GuArdela en un lugar timpio y seco.
• Limpie la podadora completa (Vease
"LIMPIEZA" en la secci0n de mantenimiento de este manual).
MANGO
Usted puede plegar su podadora para
guardaria.
• AsegQrese que el cable este
desconectado.
• Afloje ambas peri!las del mango.
• Doble cuidadosamente el mango hacia
delante sobre la podadora.
• AsegQrese que todos los tornillos, tuercas y pijas esten apretados, lnspeccione
las piezas m0viles en busca de daffos,
rupturas y desgaste. Cambie en case
necesario.
PRECAUTION: NO machuque el
cable entre el mango y la cubierta de la
podadora.
31
SOLUCION
DE PROBLEMAS/GU|A
PROBLEMA
El motor no arranca
El motor sigue
funcionando despado
Funciona pero corta
Exceso de vibraci6n
- La podadora no se puede
mover con facitidad
-La podadora deja terrones
de cesped
-Taponamiento de la
bolsa o el conducto de
descarga
DE MEDIDAS CORRECTIVAS:
MEDIDA
CORRECTIVA
- Controle el fusible o el interruptor automatico para asegurar
que Hegue corriente al tomacorriente
- Controle el cable prolongador con otto dispositivo electrico
para asegurar que funcione.
- Uame al representante de atenci6n al cliente al
1 800 4 MY HOME
- La parte inferior de la podadora puede estar taponada con
recortes de cesped. Apague la podadora, espere que la hoja se
detenga, desenchufe la podadora y limpiela.
- Es posible que el cesped este muy alto. Intente empujar a un
ritmo m&s lento o aumente la altura de corte.
- Controle el filo y el equilibrio de la hoja y, de ser necesario,
corrija.
- Est& desbrozando y hay mucho cesped. Apague la podadora,
espere que la hoja se detenga, DESENCHUFE la podadora, y
anexe el conducto de descarga para dispersar e cesped.
- Es posible que la hoja este desafi{ada.
Apague la podadora, poco espere que la hoja se detenga,
DESENCHUFE la podadora y vefifique con cuidado el filo de
la hoja.
- Es posible que _ahoja este dafiada (doMada o muy astillada).
Apague la podadora, espere que la hoja se detenga,
DESENCHUFE la podadora y, de ser necesario, reemplace la
hoja.
- Es posible que el cesped sea muy alto o espeso para la altura
de corte. Apague la podadora, espere que la hoja se detenga,
DESENCHUFE la podadora y aumente la altura de corte.
- Es posible que la hoja este floja. Apague la podadora, espere
que la hoja se detenga, DESENCHUFE la podadora y
verifique si _a hoja est& bien ajustada.
- Es posible que la hoja este doblada o muy astillada. Apague la
podadora, espere que la hoja se detenga, desenchufe la
podadora y, de ser necesario, reemplace la hoja.
- Es posible que la hoja no este nivelada. Consulte la secci6n de
nivelado de la hoja del manual de instrucciones.
- La podadora est& muy cerca del suelo con respecto a la
cantidad de cesped que se desea cortar. Apague la podadora,
espere que la hoja se detenga, DESENCHUFE la podadora y
aumente la altura de corte.
- Apague la podadora, espere que la hoja se detenga,
DESENCHUFE la podadora y verifique que las ruedas y los ejes
giren con facilidad.
- Apague la podadora, espere que la hoja se detenga,
DESENCHUFE la podadora y verifique que las ruedas
- Est& desbrozando y hay mucho cesped. Apague la podadora,
espere que la hoja se detenga, DESENCHUFE la podadora, y
anexe el conducto de descarga para dispersar e_cesped.
- Apague la podadora, espere que _ahoja se detenga,
DESENCHUFE ta podadora y verifique que la hoja este afilada.
- Es posible que el cesped este muy mojado para cortarlo.
Espere que el cesped se seque.
- Es posible que el cesped este muy mojado. Vuelva a intentar
cuando se seque.
- Hay demasiado cesped. Apague la podadora, espere
que la hoja se detenga, DESENCHUFE la podadora y
aumente la altura de oorte.
32
1-80_827_6655 _SSSA
1-8t01_361_665
_C_a_)
1-.!_)O-LE=FOYE_R
_:
M-_533_37i
I_.H_
33