1
Use & Care Guide
Manual de Uso y Cuidado
Vacuum Cleaner
Aspiradora
Model, Modelo
t16.29914
116.29915
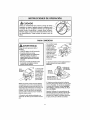
IMPORTANT
Before returning this productFor..replacement parts,please contact:
Sears Parts and Repair Center
(1-800-4MY-HOME)
(1-800-469_4663)
Anytime, day or night
(USA. and Canada)
For any other issue, please contact:
Vacuum Cleaner Help Line
(1-877-531-7321)
8:00am-5:00pmEST, M-F
(U.SA and Canada)
CAUTION:
Read and follow all
safety and operating
instructionsbefore first
use of this product,.
CtJlDADO:
Lea y siga todas las
instrucciones de operaci6n
y seguddad antes del uso de
este producto_
Sears, Roebuck and Co., Hoffman Estates, tL 60179 U.S.A.
www, sears.corn
Part No. CO tZDGU10UOO-KC01ZDGUZOUO
Printed in Mexico
Impreso en M6xico
Canister
Before Using Your New
Vacuum Cleaner
...................
2
Packing List ............................
Kenmore
Vacuum Cleaner Warranty.
Important
Safety Instructions
Parts and Features ..................
Assembly
Instructions
Pet PowerMate
_ Storage
.......
2
,3
4
5-6
..............
7-8
..............
9
9-10
10-1t
I1
12
t3
t3-15
........................
15
Belt Changing and Agitator Cleaning
Bulb Changing ........................
Dirt Sensor ..........................
8
Operating
Instructions
.................
How to Start
.......................
Vacuuming Tips ....................
Suggested Pile Height Settings ........
Attachments .......................
Attachment Use Table ................
Performance Features .............
Care
Removing Clogs ..................
Bag Changing ........................
Cleaning Extedor and Attachments .......
Motor Safety Filler Changing ..........
Exhaust Filter Changing
.............
PowerMate _ Care .......................
t5
t6
I7
t7
!8
t9
19-20
2I
22
Agitator Servicing .....................
Troubleshooting
.............
Master
Agreements
Protection
Requesting
Or Service
Assistance
.....................
23
24-25
.......
26
Back Cover
Please read this guide, It will help you assemble and operate your new Kenmore vacuum
cleaner in the safest and most effective way.
For more information about vacuum cleaner care and operation, call your nearest Sears
store. You will need the complete model and serial numbers when requesting information,
"four vacuum cleaner's model and serial numbers are located on the Model and Serial
Number Plate,
Use the space below to record the model number and serial number of your new Kenmore
vacuum cleaner,
Model No,,
Serial No,
Date of Purchase
Keep this book and your sales check (receipt) in a safe place for future reference,,
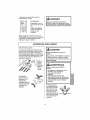
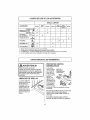
PACKING
LIST
Your KENMORE VACUUM CLEANER is packaged with the following parts and components assembled separately in the carton:
1
i
1
1
I
Canister Vacuum Cleaner
PowerMate®
Hose Assembly
Floor Brush*
Crevice Toot*
I
1
1
1
1
Combination Brush*
Pet PowerMate®
Telescoping Wand
Use & Care Guide
Parts List
Each of the above assemblies are shown in detail inside the Repair Parts List,
*These items are found under the Tool Cover,,
]
OneYearLimitedWarranty
Whenassembled,
operated
andmaintained
according
toallinstructions
supplied
with
theproduct,
ifthisvacuum
cleaner
failsduetoa defect
inmaterial
orworkmanship
within
oneyearfromthedateofpurchase,
return
ittoanySearsstore,SearsParts&Repair
Center
orotherKenmore
outletforfreerepair._
Ifthisvacuum
cleaner
isusedforotherthanprivate
familypurposes,
thiswarranty
applies
foronly90daysfromthedateofpurchase°
This warranty covers only defects in material and workmanship, Sears will NOT
pay for:
1=, Expendable items that can wear out from normal use, including but not limited to
filters, bells, light bulbs, and bags..
2. A service technician to instruct the user in correct product assembly, operation or
maintenanca..
3.. A service technician to clean or maintain this product..
4o Damage to or failure of this product if it is not assembled, operated or maintained
according to all ins_Jctions supplied with the product..
5_ Damage to or failure of this product resulting from accident, abuse, misuse or use for
other than its intended purpose..
6, Damage to or failure of this product caused by the use of detergents, cleaners,
chemicals or utensils other than those recommended in all instructions supplied with
the product.
7. Damage to or failure of parts or systems resulting from unauthorized modifications
made to this producL
Disclaimer of implied warranties; limitation of remedies
Customer's sole and exclusive remedy under this limited warranty shall be product repair
as provided herein.. Implied warranties, including warranties of merchantability or fitness
for a particular purpose, are limited to one year or the shortest period allowed by law.
Sears shall not be liable for incidental or consequential damages._ Some states and
provinces do not allow the exclusion or limitation of incidental or consequential damages,
or limitations on the duration of implied warranties of merchantability or fitness, so these
exclusions or limitations may not apply to you
This warranty applies only while this vacuum cleaner is used in the United States and
Canada_
This warranty gives you specific legal dghts, and you may also have other rights which
vary from state to state.,
Sears, Roebuck and Coo, Hoffman Estates, IL 60179
Sears Canada Inc.., Toronto. Ontario, Canada M5B 2B8
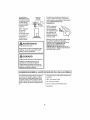
Read all instructions
in this manual before assembling
or ustng your vacuum cleaner_
WARNmNG
Your safety is important
to us_, To reduce the risk of fire, electrical
shock,
injur_y to persons
or damage
when usin_q your vacuum cleaner, follow
{oasic
satety precautions
including
the following:
Use your vacuum cleaner only as
descdbed in this manual.. Use only with
Sears recommended attachments..
Use extra care when cleaning on stairs.. Do
not put on chairs, tables, etc. Keep on
floor.
Disconnect electrical supply before
servicing or cleaning out brush area.
Failure to do so could result in electrical
shock or brush suddenly starting..
Do not leave vacuum cleaner when
plugged in.. Unplug from outlet when not in
use and before servicing.
Do not use vacuum cleaner to pick up
flammable or combustible liquids (gasoline,
cleaning fluids, perfumes, etc), or use in
areas where they may be present. The
fumes from these substances can create a
fire hazard or explosion
Do not pick up anything that is buming or
smoking, such as cigarettes, matches, or
hot ashes..
To reduce the dsk of electrical shock - Do
not use outdoors or on wet surfaces
Do not use vacuum cleaner without dust
bag andlor filters in place
Do not allow to be used as a toy. Close
attention is necessary when used by or
near children.
Always change the dust bag after
vacuuming carpet cleaners or freshener,
powders and fine dust. These products clog
the bag, reduce airflow and can cause the
bag to burst.. Failure to change bag could
cause permanent damage to the vacuum
cleaner_
Do not use with damaged cord or plug. if
vacuum cleaner is not working as it should,
has been dropped, damaged, left outdoors,
or dropped into water, return it to a Sears
Service Center.
Do not pull or carry by cord, use cord as a
handle, close door on cord, or putt cord
around sharp edges or comers Do not run
vacuum cleaner over cord.. Keep cord away
from heated surfaces.
Do not use the vacuum cleaner to pick up
sharp hard objects, small toys, pins, paper
clips, etc They may damage the vacuum
cleaner or dust bag
Do not unplug by pulling on cord To
unplug, grasp the plug, not the cord
Do not operate vacuum cleaner without the
exhaust filter or exhaust filter door in place
(If applicable)_
Do not handle plug or vacuum cleaner with
wet hands
The hose contains electrical wires Do not
use when damaged, cut, or punctured..
Replace if cut or worn Do not pick up
sharp objects..
Do not put any objects into openings..
Do not use with any opening blocked; keep
free of dust, tint, hair and anything that may
reduce airf ow..
Always turn off and unplug the vacuum
cleaner before connecting or disconnecting
either hose, Handi-Mate Jr..® (if applicable),
or nozzle
Keep hair, loose clothing, t_ngers, and all
parts of body away from openings and
moving parts
Hold plug when rewinding onto cord reel.
Do not allow plug to whip when rewinding.
You are responsible for making sure that
your vacuum cleaner is not used by anyone
unable to operate it properly
Turn off all controls before unplugging.
SAVE THESE
iNSTRUCTiONS
Proper assembly
and safe use of your vacuum
cleaner are your responsibilities.,
"Your vacuum cleaner is intended for Household
use, Read t,51s Use & Care Guide
carefully
for important
use and safety information.
This guide contains
safety
statements
under warning and caution symbols.
4
It is important
to know your vacuum cleaner's parts and features to ensure its proper and safe
use_ Review these before using your vacuum cleaner,
PowerMate
Style No.
Part No.
in USA
Part No.
in Canada
Belt
CB-3
20_5218
2040118
Headlight Bulb
....
20-5248
20.40601
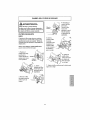
Object
Handle
Quick
Release
Button
Telescoping
Wand
Wand Length
Adjust Button..--,.
Wand Light---_
Wand Quick
Release
Headlight
and Lens
1
_
HOSE
ATTACHMENTS
3-Way On/Off Switch
Off/Floor/Carpet
Electronic
Suction
Control
Crevice
Tool -_
_
Handle
Floor
Brush _
t
_
Pet PowerMate
Hose SwiveJ
CANISTER
Object
Dust Bag
Style No.
Q
Part No,
in USA
Part No.
in Canada
20,,50557 .....
20:50410
Exhaust Filter
EF-1
20-86889
2040324
Motor Safety Filter
CF-1
20:86883
2040321
Cord
Rewind
Button
Tool Storage Cover
(Attachment
Stora
Cord
CHECK BAG
Indicator
Storage Cover
Canister
_--_ExhaustFilter
(NotShown)
Hood
\
Carr_
Motor Safety Filter
(Behind Dust Bag)
Dust Bag
Cover
I,II,,U,U,I,,H,U,HI,,U,UUlU,II,Ul,i UUl%
,IllUl
Please pay special attention to these hazard alert boxes, and follow any instructions
WARNING
atert you
to such alert
dangers
assuch
fire, dangers
electric
shock,given.
burns and
personal statements
injury. CAUTION
statements
you to
as personal injury and/or property damage.
WARNING
Electrical Shock Hazard
Handfe_
DO NOT plug into electrical supply until
assembly is complete. Failure to do so
could result in electrical shock or
injury.
Before assembling vacuum cleaner,
check the PACKING LIST_.Use this list to
verify that you have received all the components of your new Kenmore vacuum
cleanest.
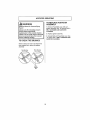
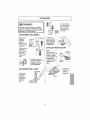
Handle
Quick
Release
Button.----_
WAN D-TELESCOPING
The wand length
is adjustable and
requires no
assembly, To
adjust, simply
push down on the
wand adjust button and slide the
I
J
,)
#
- Keep
Hand
Above
Wand Length
Adjust Button
Wand
Length
upper wand to
the desired
height,
Adjust
Burro.
When adjusting the wand length you may
have to hold the PowerMate with your hand
or foot.
Wand
Swivel_..\_
tl
_'
The swivel, located on
the PowerMate, allows
you to turn the handle
L
to the left or right side
_-- lo reach farther under
low furniture
PowerMate
Insert wand into PowerMate until the wand
button snaps into place.
To remove: Step on wand release pedal,
then pull up on wand
B
m
Button
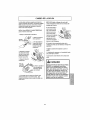
CANISTER
HOSE
I,, Open the canister hood.
2, Check to see that the dust bag is properly
installed See BAG CHANGING for
instructions
3, Check to see that the motor safety filter is
properly installed, See MOTOR SAFETY
FILTER CHANGING for instructions,
1. Line up the hose
latch tab and notch
in canister hood
and insert hose
into canister until it
snaps into place
2. Insert handle
into wand until
lock button
snaps in place,
Be sure hose is
not twisted
It is normal for the canister hood and tool
storage cover to come off when opened
further than needed, Line up the hinge slots,
insert the hinges into the slots, and close the
hood and tool storage cover to reinstall
ill
i
To remove:
Press handle
quick release
button and pull
up on handle,
i
kCAUTION
Never open canister hood with the tool
storage cover open, This will help to
prevent damage from occurring to the
canister hood and/or tool storage cover°
This canister is equipped with an on-board
storage area for a Pet PowerMate
attachment.,
To Install:
Open the Pet PowerMate storage cover
Insert the Pet PowerMate, press down into
place, and close the lid securely,
To Remove:
Open the storage cover, Remove Pet
PowerMate from the storage area and use
as needed (see ATTACHMENTS and
ATTACHMENT USE TABLE)_
)J
To remove: Do not open hood before
removing hose, With hood closed, depress
hose latch tab and pull upward on hose,
HOOD AND TOOL
STORAGE COVER
ii
,.,o,.
To store: Disconnect hose from wand and
canister to prevent stress on hose during
storage. Store hose in a loosely coiled
position so the hose covering is not stressed°
Pet PowerMate
Storage Cover._.
i
CAUTION
Moving parts] To reduce the risk of personal injury,
DO NOT touch the agitator when vacuum cleaner is _'_,
on.
cut,
and
Use
_F_...____2_i_
Contacting the agitator while it is rotating can __/_/_
bruise or cause other injuries., Always turn off
unplug from electrical outlet before servicing,,
caution when operating near children.
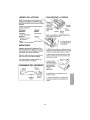
HOW TO START
i
illl
i
illl
kWARNING
Personal
Hazard
Injury and Product Damage
DO NOT plug in if switch is in ON
position, Personal injury or property
damage could result°
The cord moves rapidly when
rewinding. Keep children away
and provide a clear path when
rewinding the cord to prevent
personal injury,_
DO NOT use outlets above counters°
Damage from cord to items in
surrounding area could occur.
To rewind: Turn
off and unplug the
vacuum cleaner.
Hold the plug while
rewinding to prevent damage or
injury' from the
moving cord, Push
cord rewind button,,
3oLower wand from upright position by
pressing on the handle release pedal,
rift/ j_
t_
Release
Cord
Rewind
Button.
1. Pull cord out
of canister to
desired length.,
The cord will not
rewind until the
cord rewind button is pushed,
NOTE: To reduce the risk of electric shock,
this vacuum cleaner has a polarized plug;
one blade is wider than the other. This plug
will fit in a potadzed outlet only one way, tf
the plug does not fit fully in the outlet,
reverse the piugo If it still does not fit, contact a qualified electrician to install the proper outtet, Do not change the plug in any
way,
2. Plug the polarized power cord into a 120
Volt outlet located near the floor,
I
f_
Pile Height
L_
Pedal
4,, Select a pile height setting by pressing
the HEIGHT ADJUST pedal on the rear of
the PowerMate, The pile height setting
shows on the indicator,, See SUGGESTED
PILE HEIGHT SETTINGS,
Attention: Refer to your carpet manufacturers cleaning recommendations Some
more delicate carpets may require that they
be vacuumed with the PowerMate agitator
turned off 1o prevent carpet damage,
5oSelect
a position
onthehandle
three-way
On/Off
switch.
CAUTION
IJ
OFF
DO NOT leave the PowerMate running
in one spot in the upright position for
any length of time. Damage to carpet
may occur.
FLOOR - turns on the
canister motor only
CARPET - turns on
both the canister and
the PowerMate
motors°
NOTE - When this switch is in the FLOOR
position, the wand light, nozzle headlight
and dirt sensor DO NOT function since no
electricity flows to the PowerMale.
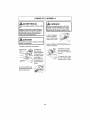
VACUUMING
TIPS
Suggested sweeping pattern.
kCAUTION
For best cleaning action, the PowerMate
should be pushed straight away from you
and pulled straight back. At the end of each
pull stroke, the direction of the PowerMate
should be changed to point into the next
section to be cleaned.. This pattern should
be continued across the carpet with stow,
gliding motions,,
Product Damage Hazard
Use care if the PowerMate and wand is
left in the upright position as it may tip
over easily. Property damage can occur
if tipped.
, kWARNING
NOTE:
Fast, jerky
strokes do
not provide
complete
cleaning,,
Personal
Hazard
injury
and Product
Damage
DO NOT run over power cord with
PowerMate. Personal injury or
product damage could result,
DO NOT pull plug from wall by
the power cord. If there is damage to
the cord or plug, personal injury or
property damage could result,
The nozzle swivel
rotates left and
right for improved
maneuvering in
tight spaces and
around corners,
The hose swivel
allows the hose to turn
without moving the
•
canister This is
_,_1_/_,_
helpful for cleaning in
small areas. Check
,f_r
hose for twisting
before pulling canister,
10
"_,"
Carpeted stairs
need to be
For best cleaning
results,
useregularly.
HIGH
vacuumed
setting on electronic
suction control.
suction
Control
The stair grip located
on the caster will aid
in preventing the
canister from
slipping when used
on stairs (see
PERFORMANCE
FEATURES).
_
NOTE: Be sure
the mechanical
suction control
located on the
handle is closed
for maximum
cleaning powe_
r----7
%
NOTE'. Be sure the canister is resting
securely on the stairs and the caster is in a
locked position before using,
I 1
For best cleaning results, keep the
airflow passage open Check each
assembly area in REMOVING CLOGS
occasionally for clogs_ Turn off and
unplug vacuum cleaner from outlet
before checking.
_
, WARNING
Personal Injury Hazard
Use care if canister is placed on stairs°
It may fall, causing personal injury or
property damage.
CAUTION
Product Damage Hazard
Do not pull on the hose to move the
canister from one stair to the next.
When finished cleaning in one area use
the handle grip on the canister to move
the vacuum cleaner to a new location
for further cleaning.
SUGGESTED
PILE HEIGHT SETTINGS
For best deep down cleaning, use the XLO
setting, However, you may need to raise the
height to make some jobs easier, such as
scatter rugs and some deep pile carpets,
and to prevent the vacuum cleaner from
shutting off, Suggested settings are:
HI - Shag, deep pile, or scatter rugs,.
MED - Medium to deep pile,,
LO - Low to medium pile,
XLO - Most carpets and bare floors,,
ti
i
i
ATTACHMENTS
I
i
_CAUTION
DO NOT attach or remove handle or
wands while vacuum cleaner is ON.
This could cause sparking and damage
the electrical contacts or electronic
controls.
ATTACHMENTS
NOTE: If the
PowerMate is
attached, turn
vacuum cleaner
off before
removing handle
from wand..
_,-_
3_ Put attachments on wand
as needed See
ATTACHMENT
USE TABLE.
_- Handle
Button -_,
Handle
Quick
Release_,-
1. Press handle
quick release
button and pull
up on handle,
rm=
DUSTING BRUSH
To assemble
1_
ATTACHMENTS
i_ To remove
wand from
PowerMate,
lock wand in
straight-up
ON WAND
"
dusting,bi'us,h'
brush inta'_he /
nozzfe,_3nd,'press
into@lace',
Dusting
.
Brush
_"'
12
t
Fabric
_
Brush
To remove,
press latch
and lift out..
,,_
:_
"_../_}"_
, i
,_, ,i,¢-,Y
:_
_.1_/"
i _- _-_ ,"_
)_
_ ";.,'
_._
,'
insert the fabric..
2, Slide attachments
firmly on handle as
needed. See
ATTACHMENT USE
TABLE.
position.
Quick
Release
Pedal
l]l
ON HANDLE
_
Wand
2oPress wand
quick release
pedaI with foot and
pull the wand
straight up and out
of PowerMate
Latch
ATTACHMENT
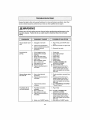
USE TABLE
CLEANING
Between
Furniture1 Cushions 1
ATTACHMENT
Drapes I
Combination t_rusn
Brush
Fabric
Dust!ng
Brush _'_
v'
V'
V
V
Crevice Tool
V
V
FiOOrBrush
PowerMate'
Stairs
Bare
Floors
Carpeted
:[0ors/Rugs
W_lls
V'
I
i
"' ','_,.1,
Handi-MateJr._:_
Pet PowerMate3,4
AREA
....................
.........
i
.
V'
_
V
v'
1, Always clean attachments before using on fabrics
2 3-way OnlOff switch should be in FLOOR position,
3 Some Models; Handi-mate Jr® and Pet PowerMate attachment instructions are included
with the products
4. Pet PowerMate can only be used on the hose handle
PERFORMANCE
FEATURES
OVERLOAD
kWARNING
PROTECTOR
The PowerMate
Overload Protector/
has built-in
Belt Reset
protection against
motor and belt
Reset
damage should
the agitator jam. If
the agitator slows
down or stops, the
overload protector
shuts off the
PowerMate and
the red light will
come on. The
canister motor will continue to run,
Personal Injury Hazard
Always turn off and unplug the vacuum
cleaner before cleaning the agitator area
as agitator may suddenly restart,
Failure to do so can result in personal
injury.
EDGE CLEANER
Active brush edge
cleaners are on both
sides of the
PowerMate. Guide
either side of the
PowerMate along
baseboards or next
to furniture to help
remove dirt trapped
at carpet edges
To correct problem: Turn off and unplug
vacuum cleaner, remove obstruction, then
press BELT RESET button..
If the problem persists, have the
vacuum cleaner serviced by a Sears or
other qualified service agent..
13
STAIR GRIP
ELECTRONIC
CONTROL
During normal operation while the canister is
in the horizontal position, the caster wheel
freely 360°,
In o
the
the
feat
The electronic suction control allows you to
change the power of the vacuum cleaner
suction motor
r to prevent
nister from
1stairs,
_GRIP
Increase
Suction
to V,
ally locks
wheel in
,hen the
raised
_odzontal
_osition.
Wl
LIGHT
the
posi
can
25=
SUCTION
.I
Decrease
Suction
1
MECHANICAL
CONTROL
This vacuum cfeaner is
equipped with a light on the
extension wand. This light
wil! operate only when the
vacuum cleaner is in
CARPET mode (see HOW
TO START). The light will
operate when attached or
not attached to the
PowerMate
LOW POWER
decreases suction
for draperies and
lightweight rugs_
HIGH increases
suction for
upholsteries and
carpets_
SUCTION
The mechanical suction control allows you
to adjust the vacuum suction for very light
fabrics,
Opening the
control decreases
suction white
closing the
control increases
suction.
The light can be used for lighting hard to
reach locations
THERMAL
Suction
Suction
PROTECTOR
CHECK BAG INDICATOR
This vacuum cleaner has a thermal
protector which automaticalfy trips to protect
the vacuum cleaner from overheating, If a
Indicator_
__
_._"
Hog
prevents the normal flow of air to the
m_otor,the thermal protector turns the
motor off automatically, This allows the
light is off,, The
./"
"_.
-motor to cool in order to prevent possible
light comes on
//
_
_
damage to the vacuum cleaner,.
whenever the
/// f.._.
/,
airflow
becomes
_I!
I_
"_'_t
\
OcuOrrect problem: Tum off and unplug
blocked. If that 9_rs,
fifskF.heck the ''_'um cleaner to allow the vacuum
disposable dus[_o'ag., Then check the
cleaner
to cool and the thermal protector
motor safety _ilterand other possible/.//
to reset., Check for and remove clogs, if
clog Iocations_s_hown in REMOVING"
necessap.,-t,Also check and replace any
CLOGS..
clogged filters,, Wait approximately
thirty (30) minutes and plug the vacuum
To correct problem: See the TROUBLEcleaner in and turn back on to see if the
SHOOTING table,,
motor protector has reseL
NOTE: The light may come on when using
certain attachments, due to reduced airi]ow
through attachment,
When the vacuum
cleaner is running
with normal airflow,
theC.ECK
BAG
CHECKBAG
!'Q-Z.q-.. ;.
t4
DIRT SENSOR
IN OPERATION
The DIRT SENSOR
DIRT
light system is mountSENsoR...._.
ed on the PowerMate
nozzle near the reset
button. It consists of a
series of two red lights
and two green lights..
The lights give you an indicationof the amount
of dirt particles that are passing through the
sensor on its way to the dust bag..
When the PowerMate is being moved back
and forth on the floor, the lightswill change
from one configuration to another as dirt is
being vacuumed..As long as the red lights are
on, dirt is passing through the wand to indicate
that the surface still needs cleaning.
INITIAL START UP
NOTE: Dirt sensor lights DO NOT function
in the FLOOR setting
When the green lights stay on as the
PowerMate is moved back and forth over an
area, the sensor is not seeing enough dirt to
warrant further cleaning of that area.
When the PowerMate is first started, the following light sequence occurs in a two-second
time frame:
IoTwo reds come on.
2. Two greens are on and wi]l remain on until
the PowerMate nozzle is placed in use_
NOTE: if the nozzle is on a surface that has
dirt on it, dirt will be picked up by the vacuum
cleaner and the red lights might slay on
REMOVING
The vacuum cleaner creates suction that
picks up dirt.. Rapidly moving air carries the
dirt to the dust bag through the airflow passages. The dust bag lets the air pass
,i'f/_._.'_._
//).,_
,/_._/'
through, while it traps the dirt_
////
For best cleaning results, keep the airflow ,,,_>_y
passage openr Check the starred areas ..,_'._"
occasio.ally
foFclogs,
Turn
offand #/
unplug vacuum cleaner from outlet
before checking
I
CLOGS
..___/
__//
15
t
[,
li
Motor
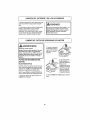
BAG CHANGING
Note: DO NOT bend or crease the
middle of the cardboard when installing
the bag into the bag mount slots.
For best cleaning results, the dust bag
should be changed often.. The CHECK BAG
indicator will come on when the bag needs
to be changed or the airflow is blocked..
8. Rotate red bag
mount down and
install bag into slots
per illustration,
pushing down until
the cardboard tab
locks into position
and the holes align.
NOTE: See PARTS AND FEATURES for
Bag Number
t. Turn off and unplug vacuum cleaner.
2. Remove hose
from canister,
Hood
Release.
9, Tuck the bag securely into the bag cavity
so that none of the bag is able to be pinched
by the hood.
3, Pull hood
release out and up,
then lift canister
hood.
10, Close and latch canister hood
11. Insert hose into canister until it snaps in
place
4. Disengage
cardboard tab from
red bag mount by
pulling away and
lifting up..
t2,. Plug cord into wall outlet.
, CAUTION
5. Pull bag out of the
red bag mount.
NEVER REUSE A DUST BAG. Very fine
materials, such as carpet freshener,
face powder, fine dust, plaster, soot,
new carpet lint, etc. can clog the bag
and cause it to burst before it is full
and may cause damage to vacuum
cleaner motor° Change bag more often
when vacuuming these materials.
6oCheck the
motor safety filter
and replace, if
necessar!..
7. The red bag mount will flip forward after
removing bag. This will prevent the hood
from closing until a new bag is installed.
t6
j
i
CLEANING
EXTERIOR AND ATTACHMENTS
1. Turn off and unplug vacuum cleaner. DO
NOT drip water on vacuum cleaner.
CAUTION
2. To clean exterior, or to reduce static electricity and dust build-up, wipe outer surface
of vacuum cleaner and attachments. Use a
dean, soft cloth that has been dipped in a
solution of mild {iquiddetergent and water,
then wrung dry. Wipe dry after cteaning
Do not use attachments if they are wet°
Attachments used in dirty areas, such
as under a refrigerator, should not be
used on other surfaces until they are
washed. They could leave marks.
/
= nlllm
uuluull,lll.ul=
MOTOR SAFETY FILTER CHANGING
iL, ,WARNING
2° Lift the rubber
retainer and pull out
motor safety filter as
shown
Electrical Shock Hazard
Turn off and unplug vacuum cleaner
From electrical outlet. Do not operate
the vacuum cleaner without the motor
safety filter. Be sure the filter is dry and
properly installed to prevent motor
failure andlor electrical shock.
i
..4L_,j_'_/_----_
Retainer
S
i
,._ _
MOTOR SAFETY FILTER
3oReplace the fitter,
toward dust bag, by
ELECTROSTATIC
This filter must be replaced when dirty It
should be replaced regularly depending on
use conditions° The filter CANNOT be
washed as it will lose its dust trapping
ability.
sliding it back into
place under the ribs in
white side facing
the bag cavity Tuck
_
_iRubber
_Retainer_
NOTE: See PARTS AND FEATURES for
Motor Safety Filter number
_"
J
filter in so that it fits
completely under the
rubber retainer.
4. Replace the bag as outlined in the BAG
CHANGING section.
1oRemove the bag as outlined in the BAG
CHANGING section.
I7
EXHAUST
FILTER CHANGING
WARNING
Exhaust
Fire andlor Electrical Shock Hazard
Do not operate with a clogged exhaust
filter or without the exhaust filter
installed° Do not operate without filter
cover installed.
iJ
EXHAUST
4. Replace the
exhaust filter
cartridge.. Place
the new filter into
the canister with
the foam seal
towards the
canister,
J
FILTER
5oTo replace the
exhaust filter
cover place the
two tabs on the
filter cover into
the slots on the
canister,
HEPA
The exhaust filter cadridge must be
replaced when dirty, Replace the filter
when the entire surface area is covered
evenly, The filter CANNOT be washed as
it will lose its dust trapping ability_
NOTE: See PARTS AND FEATURES for
exhaust filter number,
1,, Press latch
down to release
the exhaust filter
cover from slot in
canister.,
rotate filter cover
into place..
7. Release latch and verify that filter cover
is locked into place,.
2, Pull filter
cover outward to
remove from
canister
/
3o Remove the
exhaust filter
using the recess
as shown
18
Always
followal!safety
precautions
whenperforming
maintenance
tothePowerMate
,d_WARNING
Electrical Shock Or Personal Injury
Hazard
Always turn off and unplug vacuum
cleaner before performing maintenance
to the vacuum cleaner, Failure to do so
could result in electrical shock or
personal injury from vacuum cleaner
suddenly starting.
BELT CHANGING
AND AGITATOR CLEANING
TO REMOVE BELT
Rear
Latches
5. Lift rear latches
up
'__
,.,..,
1,.Remove the
wand by pressing
the quick release
_
_'_
Wand
Ill
Side
Latch
pedat
,ifting
up on and
the wand..
Quick
Release
Pedal
Screws
PowerMate
upside down and
unscrew two (2)
PowerMate
cover
2.
Turn
screws,
3. Turn PowerMate
right side up,
Handle
Pedal----_%
i =
,
End Cap
4. Press handle
release pedal and
lower the swivel.
9. Check and clean end cap areas. See
AGITATOR ASSEMBLY for picture of
complete agitator assembly.
t9
TO CLEAN AGITATOR:
NOTE: In order to keep cleaning efficiency
high and to prevent damage to your vacuum
cleaner, the agitator must be cleaned every+
time the belt is changed.
Vacuum Cleaner Use
_itator
HEAVY (used daily)
every week
Drive
then over be
path.
The agitator must also be cleaned according to the following schedule:
Agitator
MODERATE (used 2-3 timeslweek)
LIGHT +
(used I time/week)
NOTE: See PARTS AND FEATURES for
Belt number,
eveF_
every 2 months_
2oPlace agitator
assembly into
PowerMate.
IMPORTANT
Turn off and unplug vacuum cleaner from
electrical outlet, Check and remove hair,
string and lint build-up frequently in the
PowerMate agitator and end cap areas.
3. NOTE: On dirt sensor models be sure
that the dirt sensor board is upright and the
wires are tucked back in place
4+ Line up front of cover and base Rest
cover on front edge of base as shown,
Remove any dirt or debris in the belt path
area or in the brush roller area,,
Carefully remove any stdng or debris
located on the agitator or end caps,
AGITATOR
5. Rotate cover
back., Press cover
firmly until side
latches snap into
place+
ASSEMBLY
_ End Cap
Belt Path q
Brush Unit
End Cap
"",
6. Make sure there is no gap between the
cover and base and that the rear latches
are snapped in place,,
End Cap _
7, Turn PowerMate upside down and
replace two (2) cover screws,
2O
BULB CHANGING
, WARNING
Electrical
Hazard
CAUTION
Shock Or Personal
Injury
Do not use a bulb rated over 9W (13V)o
During extended use, heat from the
bulb could overheat surrounding plastic
Turn off and unplug vacuum cleaner
before performing maintenance to the
vacuum cleaner, Failure to do so
could result in electrical shock or
personal injury from the vacuum
cleaner suddenly starting.
parts°
,
......
4_ To replace the
light bulb, carefully
insert fully into sloL
Note: See PARTS AND FEATURES
for bulb number,
1. Turn off and unplug vacuum cleaner
from electrical outlet,
5. To replace light
lens, place tab at front
of lens into slot.,
Flat
2,,
Pry light
lens out at
slots as shown
on both sides,
Rotate lens up
and Iift off,,
6, Rotate lens down
and firmly snap into
place,,
3, Remove the light
bulb by pulling straight
out.,
21
I
DIRT SENSOR
2. As indicated by the illustration, the two dirt
sensor elements are located on the inside of
the swivel, approximately 3'½ inchest90 mm
down, (note the arrows),, Each element
should be cleaned periodically To reach the
sensor elements, use a small brush such as
a bottle brush, Brush each sensor element
several times to remove dust and dirt
Although the dirt sensor feature in your
Kenmore PowerMate_ is designed for years
of trouble free use, the passage of dirt
through the air passage system can coat the
lenses causing the green light to come on
and stay on - never switching to red. When
this happens the lenses must be cleaned,
Cross Section View
, CAUTION
Never use water or any cleaning
solution when cleaning the lenses. The
residue of the water or cleaners will
accelerate the recoating of the lenses
and make cleaning necessary sooner.
Ap_prox.,
. Ring
3 ½ inches
or 90 rnm
i
TO CLEAN THE LENSES
1oRemove the
wand from the
PowerMate by
pressing the quick
release pedal and
lifting up on the
wand,
_Sensor
Elements
NOTE: Looking down inside the swivel you
will see a ring.,The sensor elements are
located just slightly below this r_ng,,
_._-_
3. Reinstall the wand after cleaning the sensors.
Wand
!1t
Quick
Release
Pedal
22
AGITATOR SERVICING
TO REPLACE
ASSEMBLY
_kWARNING
Electrical
Hazard
Shock Or Personal Injury
AGITATOR
!o Remove PowerMate cover, belt and
agitator assembly. See 'To Remove Belt" in
BELT CHANGING AND AGITATOR
CLEANING
Always turn off and unplug vacuum
cleaner before performing
maintenance to the vacuum cleaner.
Failure to do so could result in electrical
shock or personal injury from vacuum
cleaner suddenly starting,
2,, Replace agitator assembly,
3_ Reinstall belt and PowerMate cover. See
"To replace belt" in BELT CHANGING AND
AGITATOR CLEANING,,
TO CHECK THE BRUSHES
When brushes are worn to the level of the
base support bars, replace the agitator
assembly
New Brushes
'l
Worn Brushes
Base
Support
Bar
23
Review
this table to find do-it-yourself
service
needed
should
be performed
solutions
for minor performance
by a Sears or other
qualified
problems,
service
Any other
agent
WARNING
Always turn off and unplug vacuum cleaner before performing
maintenance
to the
vacuum
cleaner.
Failure to do so could result in electrical
shock
or personal
injury°
Vacuum cleaner won't
starL
t,, Unplugged at wall outlet
2., Tripped circuitbreaker/blown
fuse at householdservice panel,
3. Loose hose electrical
connections
Poor job of dirt
pick-up,,
Vacuum cleaner starts
but shuts off.
to Full or clogged dust bag
2_ Clogged airflow passages.
3o Dirty fillers.
4_ Wrong p_leheight setting.
5. Wrong power level selected
6_ Hole in hose.
7o Worn PowerMata agitator
8o Worn or broken belt
9. Dirty agitator or end caps.
Canister hood open
ti,. Tripped overload protectorin
PewerMate
1. Hose orhood electrical
connections,
2. Tripped overload protectorin
PowerMate
3. Tripped thermal protector
in canister.
PowerMate will not
run when attached°
1. PowerMate connections
unplugged,
2. Worn or broken bell:,
3_ Didy agitator or end caps
4,, Tripped overload protectorin
PowerMate
1o Plug in firmly, push ON/OFF switch
to on
2. Reset circuit breaker or replace fuse
3, Reconnect hose ends,,
Change bag
Clear airflow passages
Change fillers,,
Adjust setting
Adjust control
6- Replace hose.
7. Change agitator.
8&9. See BELT CHANGING AND
AGITATOR CLEANING
10. Close and talch hood
11. Remove any items lhat may be
caught or jammed, lhen reset If
vacuum cleaner starts and stops
again, clean agitator and end caps,
then reset,
2.
3,
4,
5,
1,, Check connections, reconnect hose
ends
2o Remove any items that may be
caught or jammed, then reset If
vacuum cleaner starts and stops
again, clean agitatorand end caps,
then reset.
3,, See PERFORMANCE FEATURES "Thermal Prolector"
I,, Plug in firmly
2 & 3. See BELT CHANGING AND
AGITATOR CLEANING,,
4. Remove any items that may be
caught or jammed, then reset If
vacuum cleaner starts and stops
again, clean agitator and end caps,
lhen reset,
5. Switch not in CARPET posilion,
5. Move switch to CARPET position,
24
Constant
green Eight on
in dirt sensor,
1. Dirt passage is dogged
2. Lenses ere dirty
t Check for clogs in air passages.
2, Clean lenses,,
No green or red dirt
sensor lights,
1o Switch not in CARPET position,,
2, No power to sensor board.
1, Move swilch to CARPET position
2. Take to your nearest Sears Service
Cen_er,
CHECK BAG Indicator
activates,
1,,
2,,
3,,
4_
1,
2,
3,
4,
Vacuum cleaner picks
up moveable rugs -orPowerMate pushes too
hard.
I, Wrong pile height setting
2, Suction too strong
1, Adjust setting.
2 Select lower Power Level
Red light for BELT
RESET (overload
protector) is lit on the
PowerMate,
!, Tripped overload protector in
PowerMate.
1. Remove any items that may be
caught or jammed, then reset. If
vacuum cleaner starts and stops
again, clean agitator and end caps.
then reset
Cord won't rewind°
Io Dirty power cord
2., Cord jammed
1. Clean the power cord
2. Pull out cord and rewind
Vacuum cleaner leaves
marks on carpet,
1., Wrong vacuuming pattern
1, See VACUUMING TIPS
Full or clogged dust bag
Didy filters
Blocked airflow passage
Certain attachmenI tools
25
Change bag
Change filters
Clear blockage from airflow passage
This is normal Light should go off
when tool is removed
Master Protection Agreements
Congratulations on making a smart purchase. Your new Kenmore® product is designed and
manufactured for years of dependable operation. But like all products, it may require preventive
maintenance or repair from time to time. That's when having a Master Prolection Agreemenl can
save you money and aggravation
The Master Protection Agreement also helps extend the life of your new product
Agreement" includes:
Here's what the
Parts and labor needed 10 help keep products operating properly under normal use, not
just defects Our coverage goes well beyond the product warranty No deductibles, no
functionat failure excluded from coverage-- real protection,,
Expert service by a force of more than 10,000 authorized Sears service technicians,
which means someone you can trust will be working on your product
i_
Unlimited
want us..
I_
"No-lemon"
guarantee - replacement
failures occur within twelve months.
Product
Annual
service
calls and nationwide service,
replacement
as often as you want us. whenever you
of your covered product if four or more product
if your covered product can't be fixed
Preventive Maintenance
Check at your request - no extra charge
Fast help by phone - we cat_ it Rapid Resolution - phone support from a Sears
representative on alt products.. Think of us as a "talking owner's manual"
I_
Power surge protection
against electrical damage due to power fluctuations
$250 Food Loss Protection annually for any food spoilage that is 1he result of
mechanical failure of any covered refrigerator or freezer.
I_
Rental reimbursement
I_
10% discount
parts
if repair of your covered product takes longer than promised..
off the regular price of any non-covered
repair service and related installed
Once you purchase the Agreement, a simple phone call is all that it takes for you to schedule
service You can call anytime day or night, or schedule a service appointment online
The Master Protection Agreement is a risk free purchase. If you cancel for any reason during the
product warranty period, we wi|I provide a full refund. Or, a prorated refund anytime after the
product warranty period expires Purchase your Master Protection Agreement today!
Some limitations and exclusions appty. For prices and additional information
call 1-800-827-6655,,
* Coverage
361-6665_
in the U.S.A.
in Canada varies on some items° For full details call Sears Canada at 1-800-
Sears Installation Service
For Sears professional installation of home appliances, garage door openers, water heaters, and
other major home items, in the U S.A. or Canada cab 1-800--4-MY-HOME®..
26
Antes de usar su aspiradora nueva.
1
Lista de embalaje ..........................
1
Garantia de la aspiradora
de Kenmore ............................
2
Instrucciones importantes de
seguridad .......................................
3
Piezas y caracteristicas
.............
4-5
Instrucciones de ensamble ............. 6-7
Almacenaje del Pet PowerMate _ ......... 7
Instrucciones de operati6n .............. 8
Pars cornenzar .......................
8-9
Sugerencias pars aspirar .............
g-10
Sugerencias sobre el sjuste de nivel de
pelo de la alfombra ......................
10
Accesorios ..................................
1t
Cuadro de uso de los accesofios .......... 12
Caracteristicas de rendimiento ........ 12-14
Cuidado det recept&culo
.................
Quitar de los residuos de basura
en los conductos
...........................
Cambio de la bolsa
.....................
14
15
Limpieza del exteffor y de los accesorios
Cambio del fiftro de seguridad del motor
Cambio del filtro de escape .............
Cuidado de la PowerMate
_ ............
16
16
17
18
Cambio de la correa y limpieza
de! agitador ............................
Cambio de la bombilta
.....................
14
18-19
20
Detector de polvo ...........................
Cuidado del agitador .......................
21
22
Reconocimiento de problemas ._,23-24
Acuerdos maestros de protecci6n ....25
InformaciSn de asistencia
o servicio
....................... Posterior Cubierta
Por favor lea esta guia que le ayudara a ensamblar y operar su aspiradora nueva de Kenmore en una manera
m&s segura y efectiva
Pars mas informaci6nacerca del cuidado y operaci6n de esta aspiradora, Ilame a su tienda Sears mas cercans Cuando pregunte pot informaci6n usted necesiiar& el numero complelo de serie y modelo de la aspiradora que est_ localizado en la placa de los n_meros de modelo y sene
Use el espacio de abajo para registrar el numero de modelo y serie para su nueva aspiradora Kenmore,
Numero de Model0
NtJmero de Sefie
Fecha de Compra
Manlenga este tibro y su recibo en on lugar seguro para referencias futuras.
t
LISTA DE EMBALAJE
Su ASPIRADOR
por separado:
1
1
1
1
1
KENMORE
se empaca
Recept&culo
PowerMate@
Manguera
Cepillo pars pisos*
Herramienta pars
hendiduras*
con las siguientes
1
I
1
I
I
i
piezas
y componentes
Cepillo para combinaci6n*
Pet PowerMate@
Tubo telescopico
Manual de uso y cuidado
Lists de partes
Cada uno de estos ensambles es mostrado detalladamente en la lista de p=ezas
para reparaci6n.,
*Estos articulos se encuentran bajo la cubierta de almacenamiento para accesorios,,
Garantia
limitadadeuna#,o
Siestaaspiradora
fallaperundefecto
ensusmatedales
o fabricaci6n
enelperiodo
de
unafodesdetafechadecompra,
cuando
seinstala,
maneja
y mantiene
siguiendo
todaslasinstrucciones
incluidas
conelproducto,
devu_,lvala
a cualquier
tiendaSears,
SearsParts&Repair
Center
(Centre
deReparaciones
y Piezas
Sears)
oa otro
distdbuidor
Kenmore
paraquereparen
elaparato
deforrna
gratuita..
Estagarantia
es v_lida
solamente durante 90 alias desde ia fecha de compra,
si la aspiradora se utiliza para otros fines que no sean el use familiar pdvado..
Esta garantia cubre exclusivamente los defectos de materiales y fabricaci6n,,
Sears NO pagar&:
1. Los elementos desechables que puedan desgastarse con un use normal, incluyendo
sin car&cter exciuyente, fittros, correas, I_mparas y bolsas..
2, Un t6cnico det servicio t6cnico para que ensefe al usuado a instalar, manejar o
mantener correctamente el producto.
3, Un t6cnico dei servicio t6cnico para limpiar o mantener este producto.
4. Dafos o averia de este producto si no se ha instalado, manejado o mantenido
siguiendo todas las instrucciones incluidas con el producto.
5. Dafos o averia a este producto originados per accidente, abuse, use incorrecto o
use del producto para otros fines distintos de los indicados.
6. Dafos o averia de este producto causados per el use de detergentes, limpiadores,
productos quimicos o utensilios diferentes a los recomendados en todas las
instrucciones que se incluyen con el producto_
7.. Dafos o averias de las piezas o sistemas causados per modificaciones no
autorizadas que se hayan hecho a este producto_
Limitaci6n de responsabilidad de las garantias implfcitas; limitaci6n de remedies
l_l _nico y exclusive remedio del cliente bajo esta garantfa limitada ser_ la reparaci6n del
producto seg(m 1oindicado en este documento. Las garantias implicitas, incluyendo las
garantias de comerciabilidad o idoneidad para un prepSsito especifico, se limitan a un
aSo o el periodo m&s corto permitido per la ley. Sears no ser& responsable per daSos
incidentales ni consecuenciales. Algunos estados o provincias no permiten la exclusi6n
o limitaci6n de daSos incidentales o consecuenciales, ni limitaciones en la duraci6n de
las garantias implicitas de comerciabilidad o idoneidad, per Io que estas exclusiones o
limitaciones podrian no aplicar en su case.
Esta garantia aplica solamente cuando esta aspiradora se utiliza en Estados Unidos o
Canada,
Esta garantia le otorga derechos legales especificos,
derechos que varian en funci6n de cada estado..
y usted podria tener otros
Sears, Roebuck and Co., Hoffman Estates, IL 60179
Sears Canad_ Inco, Toronto, Ontario, Canad_ M5B 2B8
Lea las instrucciones
en este
manual
antes
de arrnar
o usar
su aspirador,,
ADVERTENCIA
Su seguridad
es muy importante
para nosotroso
Pare reductr
ef desgo
de incendio,.
cheque
el_ctrico,
lesibn
corporal
o da_os
at utilizer su aspiradora,
act_e ae acueroo
con precauciones
D_sicas ue seguridad,
entre elias:
Use su aspiradera
_nicamente
en la forma
descr_ta en este manual. Use Qnicamente con
accesor_os recomendados
per Sears
Desconecte
el cord6n eI_ctrico antes de
componer o ]impiar el _rea del cepillo De Io
contrario, el cepiIto podda arranear de retina
imprevista o podHa producirse un cheque
e{_ctrico
Apague
todos los controles
desenchufar
antes
de
Tonga cuidado especial
al utiiizar Ia
aspiradora
en escalones No la co!oque sabre
si{las, mesas, etc Mant_nga_a en el piso
No abandone la aspirsdora
cuando est_
conectada
Descon_ctela
cuando no ta est_
usando y antes de dade servicio
No use la aspiradora pare aspirer liquidos
inflamables o combustibles
(gasoline, I{quidos
pare limpieza, perfumes, etc) ni la use en
tugares donde _stos poddan ester presentes
Los vapores de estas sustancias pueden crear
un peligro de }ncendio o expIosi6n
Pare reducir el desgo de cheque et_ct,dco, no
use su aspiradora al aire libre ni sabre
superficies
mojadas..
No levante ninguna cosa que se est6
quemando o emitiendo humo, come
cigarrillos, cerillos o cenizas calientes
No permita que sea utilizada come juguete
Se requiere toner mayor cuidacto cuando sea
utilizada en la proximidad
de niSos a per
niSos..
No use ia aspiradora sin tenor insta_ada la
balsa pare polvo ylo los filLros
No use la aspiradora si el cord6n o el enchufe
est_n da_ados. Si la aspiradora no esta
funcionando
adecuadamente
o si se ha
dejado caer, es_ daSada, se ha dejado
expuesta ala }ntemperie o se ha dejado caer
en ague, devu_Na_a a un Centre de servicio
de Soars.
No jale ni transporte la aspiradora
per el
cerd6n; no use et cord6n come mango; no
cierre puertas sabre el cord6n; no jale et
cord6n sabre rebordes agudos ni esquinas..
No pase la aspiradora sabre e! cordon
Mantenga et cord6n alejado de superficies
calientes
No desconecte
la aspiradora
tirando
cord6n el_cMco
Pare desconectada,
enchufe, no el cord6n..
No toque la aspiradora
manes mojadas
del
jate el
ni el enchufe con las
No cotoque ebjetos en {as aberturss..
No u_Jlice la aspiradora
si alguna abedura
est_ bloqueada;
mant_ngala
libre do polvo,
pelusa, cabelles y cualquiera case que podria
disminuir el tlujo de aire
Mantenga el eabello, ropa suelta, dodos y
todas las partes del cuerpo alejades do las
aberturas y piezas mec_nicas.
GUARDE
Cambie siempre la balsa pare polvo despu6s
de aspirer limpiaderes
de alfombras o
desodorantes,
talcos y pelves fines Estos
productos atascan la balsa, reducen el flujo de
aire y pueden causer que 6sta se tampa
Si
no cambia fa balsa podr{a ocasionar daSo
permanente
ala aspiradora
No use la aspiradora pare levantar objetos
agudos, juguetes pequer_os, atfiteres,
sujetapapeles,
etc. Poddan daQar la
aspiradora o la balsa pare polvo
No oper_ sin el filtro de escape
del filtro de escape instalados
ni ]a cubierta
La manguera
contiene cables el6ctricos
fa use cuando es_ dafiada, cortada, o
perforada. Reemplace
si est_ cortada o
desgastada
No levante objetos afilados
No
Siempre
apagu_ y desconecte
la aspiradora
antes de conectar o desconectar
la manguera,
Handi-Mate J_.@ (si apltcable), o la boqui_la
Sujete el enchufe con la mane al entailer el
cord6n el_ctr_co Pare desconectada,
jale e[
enchufe, no el cord6n
Usted es responsable
de asegurar que su
aspiradora no sea utilizada per ninguna
persona que no pueda manejada
correctamente
ESTAS JNSTRUCCIONES
El armada
y use seguro de su aspiradora
sen su responsab!lidad.
Esta aspiradora
ha side
dise_ada
ex(;lusivamente
para use dom_stico.
La as_raaora
aeber_ almacenarse
en un lugar
seco y en e[ interior. Lea este Manual
de Use y _uidado
detenidamente,
pues eontiene
imormaci6n
!mpo rtante
sabre
seguridad
y use. t:sta guia contiene
imormaci6n
soore
seguriaad
de_a,_o ee s_mr_o_os ee advertencia
cuidado.
Es impor_ante conocer las piezas y caracteristicas de su aspiradora para asegurar su use adecuado y seguro
Exam_neias antes de usar su aspiradera
PowerMate
Objeto
Estilo No,
Correa
CB-3
Bombilla
Pieza N_'
en EUA
Pieza N°
en Canad_
20-52 t8
20-40118
20]5248
2040601'
Bof6n de
fiberaci6n
t-_plda del
mango **_
I
Tubo
telescoptco
Bot6n de
ajuste de
extensi6n
LUZ
Pedal de liberaci6n
r_pida
Detector
de polvo
Luz
NEtmeros de serie
y modelo de PowerMale
Pedal de liberactdn
de! mango
Pedal de selecci6n de
nivel de pelo de la alfombra
Limptador de orillas
(no mostrado)
MANGUERA
ACCESORIOS
Interruptor
de encendido/
apagado de tres posiciones
(OFF/FLOOR/CARPET)
(Apagado/Piso/Alfombra)
Herramienta
paFa
Control de
succi6n
Mango
hendiduras--*_"
Cepillo
_7
_1
para pisos _
U-_
Cepillo para
combinaci6n
._.-I
Pet Po _werMate
,
_
_
Cepil/o
para sacudir
i
I
-_'-- Cepitlo
para telas
Dispositivo
giratorio de
la manguera
RECEPTACULO
Pieza N°
Pieza Na
Estilo No,,
en EUA
en Canadb
Boisa para potvo
Q
20-50557
20-50410
Filtre de escape
EF-I
20-86889
20-40324
Filtro de seguridad
del motor
CF-I
20-86883
20_032i
Objeto
......
i i n i i I, II i, ,i illllll,,J,,/,/,,,,t,t,J,,,,t,JllUUU,,,,,t,,t,t,,,,I
,PL
|
_
Per favor ponga especial atenci6n a 6stos recuadras con aleda de nesgo Advertencia:
informaci6nIe alertara det peligrode fuego, cheque el6ctfico, quemaduras y Iesiones
I.._..........C.u!dad°:
Esta
Esla ,nformaci6n ,e alertara de peligros come ,esiones y dafios a la propiedad
Peligro de cheque el6ctrico
No conecte la aspiradora hasta que ten"ninede
armada. De Io contrario podria causar un
cheque el6ctrico o lesi6n corporal
Antes de arrnar la aspiradora, reivise la
LISTA DE EMBALAJEo Use esta iista para
vedficar que ha recibido todas los componentes de su nueva aspiradora Kenmore
Bet6n
Bot6n de
liberaci&n
raptda
del mango
TUBe TELESCOPlCO
arrtb_
Control de
extensi6n
adjustable
del tube
es ta
fenggeta
La extensi6n
del lubo es
ajuslable y no
requeire el
monlaje Para
ajustar, empuje
hacia abajo en
el bot6n def
tubo y mueva el
tubo superior a
ta posici6n
dedeada
telesctSpice
Bot6n de ajuste
de extensi6n
de
Cuando ajuste la longilud de la vara hay que tener
el PowerMatecon Ia mane o el pie
La parle giratoria.
Dispositivo
situada en el
glratorio
PowerMate, le permite
mover el mango a la
izquierda para pasar la
aspiradora a una
extensi6n m_s larga
debajo de los muebles
bajos
PowerMate
lntroduzca la vara en la PowerMate hasta que el
bot6n del tube quede fijo en posici6n.
Para quilar: Pise en el pedal de liberaci6n de la vara
y jale esta hacia ardba
'Pedal de
tfberactSn
rapida
del tube
RECEPTACULO
MANGUERA
1 Abra la tapa del recept_culo
1, Alinee la pesta_a
de sujeci6n de la
manguera y la ranura
de la cubieda del
recept_culo e inlroduzca ia manguera
en el recept&culo
hasta que quede fija
en pesici6n
2. Examine que la boisa para polvoeste instaiada
correctamente Consu_telos instrvccionesde instalaci6n en: CAMBIO DE LA BOLSA.,
3. Examine que el fiffro de segufidad del motor que
este instaladocorrectamente, Consul_elas instrucciones de insta}aci6n en: CAMBIO DEL FILTRO DE
SEGUR|DAD DEL MOTOR.
LA TAPA Y LA CUBIERTA
"'_"
de su]eci6n
de la
mangueral
Ranura_
Para rettrar:
Es normal que la tape def recept_culo se desprenda
al set abierta m_s de to necesario. Para colocar nuevamente la tapa, alinee 1asranuras de la bisagra, ins6rtelas y cien'e la tapa.
No abra la cubierta antes de desprender la
manguera Con la cubierta cercada, tire hacia arriba
ta ]eng0elade seguddad y jate de ta manguera
I, CO'OADO
INunca debe abrir la capucha del contenedor
|estando ta tapa abterta, As{ se evitar_ dafios a |a
Icapucha delcontenedor Vie a la _pa °
_
Bot6n
mango en el tube
hasta que ei botSn
quede en posici6n,,
Aseg6rese de que la
2, Introduzca el
manguera no est_
Para retirar: Optima
el bot6n de liberaci6n
r_,pidadel mango
para liberar el mango
ytorcidao
tire det mango hacia
ardba
d___[j_
Para Guardar: Para prevenir la presi6n de la
manguera mientras se guarda, desuna la manguera
del tube de la aspiradora, Guarde la manguera en
ona posici6n enrollada y floja de lai manera que la
tapa de la manguera no se estire
:::::: :: : ::::::::: :
::::::: ::: ;
::: :::::: i ::::::::: _::::::: :::::::
::: ;::: ":::;::::
:i;:;:_:
::::
:__:i
ii:ii:_:i
:_
:i!::::
::i:¸:i!:::i
:_
:_::!
::_:
:_
:i::
:;:
::;iil¸:i!;!
;i::;
i::::;
;:;::i:!ii
i:!::::i
Est_ aspiradora esta equipada con atmac_n
a bordo para el accesorio Pet PowerMate,,
Para instatar:
Abra la cubierta de almacenaje del Pet
PowerMate. Inserte el Pet PowerMate, presi6ne!o en su lugar hacia abajo, y cierre la
cubierta con seguridad,.
Para quitar:
Abra la cubierta de almacenaje. Levante el
Pet PowerMate de su lugar utilicelo come
sea necesario (v6ase ACCESORIOS y
CUADRO DE use DE LOS
ACCESORIOS)..
Almacenamtento
para Pet PowerMate_,,
:::::::::::::::::::::::::::::::
CUIDADO
iPartes en movimientol
Para reducir el riesgo de da_os
corporales, no toque el agitador cuando ta asplradora est& _'_-_"
encendida., Et tocar el agitador mientras que est_ girando _,
puede cortar,
contusionar
o causar otras lesiones.
Siempre apague y desconecte del tomacorriente antes de
dar mantenimiento°
Tenga cuidado al aspirar cerca de
nifios_
PARA COMENZAR
ADVERTENCIA
Peligm de lesi6n personal y dafio a!
_roducto
SIEMPRE apague ante de desconectar,,
El cord6n el_ctrico se mueve
r_ptdamente durante el enrollamiento.
Mantenga alejados a los niSos y
asegure espacio libra sufictente para
evitar tesiones personales al enro|lar
el cord6no
NO use los enchufes Iocalizados sobre
los muebtes. Los objetos cercanos
podrian resultar daSados,
y desconect6 la
aspiradora. Sujete el
enchufe mientras
v
enrolla el cord6n para
impedir daSo o lesi6n
corpora_per el moviPara enrollar:
Apagu_ _
mien[o
delcord6n
1,,Tire de1cord6n
para sacar_ode]
recept_culo basra
tener la Iongitud
deseada El cord6n no se enroiar_ hasta que
optima el bot6n
para enrolado.
NOTA: Pare reducir el desgo de cheque el_clrfco,
asia aspiradora cuenta con una clavija polar;zada,
uno de los conlactos es m_s ancho que e] otto La
clavija s6to puede inlroducirse de una manera en el
enchufe, Si la clavija no cabe bien en e} enchufe,
invi_da_a Si a0n no cabe, ]lame a un electricista
para que instale un enchufe correcto, No altere la
clavija de ninguna manera.
2, Conecte el cord6n e}Sctdco polarizado en un
enchufe de 120 voltios qua se encuentre cerca del
piso
.=.
-_
Optima el control para
bot6n et cord6n
el_ctdco con la mane
o con el pie
3oBaje el tube desde ta posici6n vertical pisando el
pedal de liberacibn del mango (HANDLE
RELEASE)
_
Bot6n
_'
Pedal de
//_'l
F- Indicador de
lt,_h_%
de la alfombra
ADJUST (seleccidn de
__
nivel de/pale de la affombra)
4. Seleccione una atura del pelode la alfembra
usando el pedal pequeSo ubicado en la parle posterior de ]a PowerMale El nivet de; pelo la alfombra
se muestra en el indicador.Consute SUGERENClAS SOBRE EL AJUSTE DE NIVEL DEL PELO
DE LA ALFOMBRA
Atenci6n: Ret_rase alas recomendaciones del
fabdcante para limpiar su alfombra, Algunas alfombras mrs delcadas pueden requefir el use de la
aspiradora con e] agtador PowerMate desconectado para prevenir que la alfombra sea dafada
5.Seleccione
una
posici6n
delinternJptor
de
tres_osiciones
enetmango
u
OFF
(APAGADO)
y,_._
FLOOR
(PISO}
-sO!o
enciende
elmotor
deIrecepldculo.
!_ _
CARPET
(ALFOMBRA)'. --":" :
"_-._
_o,9._
NO deje la PowerMate funcionando en
CUIDADO
posiciOn
vertical en un lugar durante ningr3n
espacio de tiempo: se puede debar la alfombra,
enciende los motores de!
recept_culo y de la
PowerMate,
NOTA - Cuando este control est_ en la posiciOn
FLOOR (PISO}, fa tuz de1tubo, la luz de PowerMale.
y del detector de polvo no funciona porquela
efectdcidad no fluye at PewerMate.
SUGERENCIAS
Estilo de fimpieza sugeridoo
PARA ASP1RAR
A
Pare obtener la mejor acciOn de limpteza se recomienda empujar la PowerMate en direcciOn direclamonte opuesla a usted y jalarla en linea recta, AI
final de coda pasada de regreso0cambie la direcciOn
de la PowerMale hacia la siguiente secciOn a limpiar
Contin,3e asi a Irav_s de toda la alfombra de una
manera lenta y deslizante,
CUlDADO
Peligro de tesi6n personal y daOo al
}roducto
Tenga cutdado st el PowerMate y la manguera
se dejan en posiciOn vertical pues pueden
caerse f_cilmente. Si se voltean puede haber
:da5o de proPiedad.
pasadas
r_pidas y
jalonadas no
Iogran una
_k
El dispositivo
giratorio gira a fa
izquierda y a la
derecha para
maniobrar mejor en
espacios reducidos
y alrededor de
esquinas
complela
limpieza
kADVERTENCIA
Peligro de lesion personal y dar3o al
_roducto
No atropelle el cordon eldctrico con la
PowerMate. Hay un peligro de
lesion corporal o daOos de
propiedad,
No tire del cordon el_ctrtco para
desenchufado de la pared° S| hay da_os
en el cordon el_ctrico o el enchufe, hay un
pellgro de lesion corporal o da5os de
proptedad,
..,_,,_¢_-4
_\_\; _--,_.__.,'
El dispositivo giralodo
de la manguera permite
que _sla gire sin necesidad de mover el recept&culo, Esto es muy Otil
para limpiar en _reas
pequefas Asegurese de
que la manguera no est_
torcida antes de jalar el
recept_culo
Los escalones
alfombrados requie=
ran limpieza per_6dica
Use et Nivel de Poder
en HIGH (ALTO) y
cierre pot completo el
control de succi6n
eleclr6nico
El sost&n para la escalera ests situado en e!
cuerpo y ayudar_ a evitar que la aspiradora se
deslice cuando se est_ utilizado en Iss esca[eras
Control de
succt6n
efectr6nico
_
l
_'-L'L_
(v_ase CARACTERISTICAS
REND¿MIENTO)
NOTA: Aseg0rese
qua la aspiradora
est@descansando
con seguridad sobre
las escaleras y el
echador est_ en la
posici6n bloqueada
antes de usarfa
que el conlrol
mec_nico de
succi6n esta situado
en es mango
NOTA:
Asegurese
de la
manguera esta
cerrado para una
timpieza m_xima.
DE
f ,f
_, 1
Mantenga el paso de aire abierto palra Iograr
los mejores resuttados de timpieza.,
Examine de vez en cuando cada una de las
_,reas de uni6n en QUtTAR DE LOS
RESIDUOS DE BASURA EN LOS
CONDUCTOS para asegurarse de que no
est@n bloqueadas.. Apagu@ y desconect_ la
aspiradora antes revisaro
, ADVERTENCIA
Peligro de tesi6n personal
Tenga cutdado si coloca el recept_cuto sobre
escalones
Si se cae_podrJa causar lesi6n
_ersonal o daSo a ia propiedad.
CUIDADO
Peligro de tesi6n personal y daSa at producto
No jale de la manguera para mover la
aspiradora de un escal6n at siguienteo
Cuando term|he de timpiar un &rea use la
man|ja en ta aspirsdors pars moverla a otto
lugsr para continuar la limpiezm
I
SUGERENCIAS SOBRE EL AJUSTE DE NIVEL DE PELO DE LA ALFOMBRA I
Use e_ajuste XLO (bajo) para obtener la major limpieza a fondo Pot otra parle, quiz_,s se requiera
alBvsr el nivel para facililar algunas tareas, como
per ejemp!o cuando se trata de tapates y aSgunas
a_fombrasde pale largo, y para impedir que la aspiradora se apague. Se sugieren los sfguientes ajustes:
HI- Pelo muy largo y sueflo, tapetes, slfombras muy
acojinadas
MED - Pelo mediano a largo..
LO - Pale corto a mediano
XLO - La mayoria de [as affombras y pisos
descubiedos
10
i
ACCESORIOS
CUIDADO
2. Pise et pedal de
_iberaci6n r_pida de1
tuboy tire del tubo
hacia amba para
desprenderlo de la
PowerMate
i=,
NO instale nt retire el mango ni los tubos
cuando la aspiradora est6 encendida, Esto
podria causar chispas y da6ar los contactos
el6ctrtcos o control electronico.
ACCESORIOS DEL MANGO
NOTA: Si _,iene
instalada la
./
*_ Mango
\\.
3, Cobque el
accesoHo deseado
sobre el tubo. Consuite la CUADRO
DE USO DE LOS
ACCESORIOS
B ot6n de
PowerMale,
apague la
aspiraclora antes
Bot6n de
c,,erre._...._ _
de quitar el mango
de los tubos,
r_pide
del mango -._
liberaci6n
]
L.
CEPILLO PARA SACUDIR
1. Opdma ef bot6n
de Iiberaci6n
r_pida del mango
para liberar ef
mango y tire del
mango hacia
arriba
NOTA:
,
Para rnontar el.:
Cepillo
cepillo para _'cud[r
insede ef ce'pillo'
para telas'_eg(ro
de
ta boquJ!la (JeE
cepi!b'par&
sacudir
pre_ion_'en
su
IL_gar..,'
Z Destice el accesorio
deseado con fkmeza sobre
el mango Consulte:
CUADRO DE USO DE
LOS ACCESORIOSo
ACCESORIOS
/
cept//o
para telas
Para quitar,
presionar el
pestilfo y
levantarse
DEL TUBO
t Para retirar
los tubosde la
PowerMate.
col6quelos en
la posici6nver|icat de blo-
Pestillo
queo,
"1"1
CUADRO
DE use
DE LOS ACCESORIOS
AREA A LIMPtAR
ACCESORIO
MueWes
I
Cepillo para _t
Cepil]o para sacudir
_
combinaci_n Cepillo
para telas L_J
Entre
cojines
I
v'
v'
v'
v'
V
! Para hendtduras
Codlnas
I
....
Pisos
Pfsos
Esca!ones8escubiertos
]lfornbrados/Paredes
Aifombras.
v'
v'
Cepitlo para pisos
v'
V 2
PowerMate
Handi-Mate
v'
Jr.._3
Pet PowerMate 3.4
1,
2,
3
4
I
v'
v'
v'
Siempre limpie Ios accesorios antes de usar sobre telas.
El interrupter de 3 posiciones debe estar en la posici6n FLOOR (PISO)
La Handi-Mate Jr _ y ia Pet PowerMate incluyen sus propias instrucciones para use de accesorios,
La Pet PowerMate solo pude ser utilizada en el mango de ta manguera
CARACTERiSTICAS
DE RENDIMIENTO
PROTECTOR CONTRA
SOBRECARGAS
, kADVERTENCIA
Pelfgro de lesiones personales
La PowerMate
cuenta con protecciSnincorporada
contra daSo del
Apagu_ y desconecte siempre la aspiradora
antes de |impiar los _roas do la agitador pues
_stos podrian arrancar de manera imprevista.
El no hacerlo, podria rosuitar en Iosiones
personafes.
motor y la correa
en case de atascamiento del
It
II
II
__
Reset
agilador. Si el
agilador funciona
m_s dospacio o so
atasca, el protector
de sobrecarga do
la PowerMate se
LIMPIADOR DE ORILLAS
Los activos cepillos timpiadores de odllas eaton
en coda lade de la
PowarMate Paso la
PowerMate junto a los
paredes o junto a los
mueb_espara ayudar a
eliminar la tiorra acumulada en las orillas de ta
Blfombra
BetSn de
BELTRESET
(Protector contra
II/._"//'"
activa y la luz roja
se enciende El motor de] recept_cufo continuar_
funcionando
"--..._.__'._
Para corregir e! problema: Apagu_ y desconect_ la
aspiradora,
limpie la obstrucci6n, y despu_s
presione el bot0n de BELT RESET (protector do
sobrecarga)
Si el problema persiste, busque un t_cnico
catificado que haga el servicio de la aspiradora_
12
SOSTEN PARA LA ESCALERA
CONTROL ELECTRONICO
DE ASPIRACION
Durante la operaciEn normal de la aspiradora
mientras qua est_ en la posiciEn horizontal, los
ruedas del cuerpo giren libremenle 360 _,
El control electronico de aspiraciOn le permite
cambiar la potencia de succi6n de la aspiradora.
La caracteristica del
STA
para
GRIP (Sost_n
Escalera)
peru
delc
auto
.=qt_e las ruedas
;rpdlsetraben
]tic,monte en
I
"--_
Aumentar
aspiractEn
I
Dfsmtnuir
aspiraciEn
En LOW POWER la
succi6n disminuye,
para limpiar cortinas
y tapeles delgados
posb =nc_andola
aspiJ Jor_ gira 25 ° de
una ,sici)n horizonlal
menta la succi6n
para muebfes y
En HIGH se increalfombras,.
]
s
ave
_al !=araque la aspiradora descanse con
segL Jad _obrelos escaleras
LU
CONTROL MECANICO DE
ASPIRACION
D :.LTUBa
Esta aspiradora
El control mec_nico de aspiraciEn le permile ajustar
ta potencia de succion de la aspiradora dependiendo
del grosor de la tela,
asta equipa
con una luz en el tube de
mec_nico se
Abriendo
&_L|_
I""-_
disminuyeelcontrol
fa
succiEn y cerrando Disminutr_.( O=L._L
,_Aumentar
_O
el control se
aspiraci6n _
aspiractSn
incrementa la
t .--.\
potencia de succion
funcionar& solamente
extensiEn. Esta fuz
mode CARPET
ii
PARA
La ]uz
cuando COMENZAR)
la aspiradora
(ALFOMBRA)
(v_ase es en
funcionar,_ cuando est& o no
unida a ta PowerMate
PROTECTOR TERMAL
Esta aspiradora tiene un protector terrnai que
se ajusta autom_ticamente para proteger a la
aspiradora det sobrecalentamiento. Si una
ebstrucciEn impide et flujo normal de aire al
motor, el protector termal apaga el motor
autom&ticamente para permitir que el motor se
enfrie a fin de evitar posibles da_,os a la
aspiradora
La luz se puede utilizar para la iluminar
lugares dificiles de alcanzar,
INDICADOR
DE "CHECK
BAG"
Cuando la aspirad0ra
est_ funcionando con
lndicador de
CHECK BAG_
f
/_"
_./-2_Z-
__0_qarmal
de aire,
_.__.._
;"elind_dqr de
_/_-'_.,
"CHECK BAG" est&
"_
apagado. Se
eneiende la luz cuando
,_,
-_,._obstruido.
Para corregir el problema: Apagu_ y
desconect6 la aspimdora para permitir que la
aspiradora se enfrie y qua et protector termal
se reajuste.. Busque y saque los
obstrucciones,
si es necesario,. Examine
tambiEn y reemplaceflimpie
cua|quier
filtro obstruido,. Espere aproximadamente
treinta (30) minutes y enchufe la aspiradora
y voltEela para ver si el protector del motor
se ha reajustado. El protector del motor no
se reajustar& si no se ha apagado la
aspiradora aun cuando la aspiradora se
haya enfriadoo
Siesto
i'Wseguridad del motor y otros lugar_sl_osibles par
(
residues de basura V_ase_U|TAR DE LOS
"_RESIDUOS
DE B_SURA EN LOS
"s_s.f
Para corregir el problema: Vease el diagrama
RECONOCIMIENTO DE PROBLEMA&
Nota: Es posible qua la luz encienda al usar los
accesodos porque el tlujo de aire es reducido par los
accesodos
13
DETECTOR
EN OPERAClON
DE TIERRA
El sistema indicador de1
DIRT SENSOR (detector
de tien'a)esl,_montado en
la boquilla de la
Powe_.,late, cerca del
bot6n de restablecimiento.
Cuando desliza la PowerMate per el piso, los
indicadorescambian de una aotra cenfiguraci6n
seg_n si ta aspiradora recoge mucha o poca tierra. Si
uno o varies indicadores rajas permanecen
encendidos, significa que ]a aspiradora sigue
tevantado lierra, 6sta sigue pasando a trav6s de1
tube, y que necesita conlinuar aspirando la superficie
DIRT SENSOR
(Detector de
Consiste en una serie de dos indicadores luminosos
rajas y dos verdes Las tuces indicanla cantidad de
parflculas de tierra que est_n pasando a lrav6s del
detector al ser transportadas hada ta bolsa pare
polvo.
Cuando se queda encendidoel indicador verde
mientras desliza la PowerMate sabre una zona
determinada, significa que eFdetector no esta
detectando tierray que ta zona ya est_ timpia,
ARRANQUE
NOTA: Las luces deldetector de tierra no funcionan
cuando se selecciona el ajuste pare pises
descubiertos FLOOR (PISO)
INIClAL
La pdmera yes que arranca la PowerMate ocurre
siguiente en un periedo de 2 segundes:
t. Los dos indicadores rajas se encienden
2,.Dos indicadores verdes est_ encendidos y
permanece encendido haste el memento en que
comience a usar la PowerMate
NOTA: Si la boquitla esl& sabre una superScie que
tiene tierra, 6sta ser_ aspirada per la aspiradora y
posiblemente se queden encendidos algunos de los
indicadores rajas
I
QUITAR DE LOS RESIDUES DE BASURA EN LOS CONDUCTOS
La aspiradora crea succi6n o aspiraci6n que levanla
la tierra La tierraes impulsada a trav6s de las vies
de fiujo aire basra la balsa per una r_pida corriente
de aire. La botsa para pobo permile el flujo de aire,
pete atrapa la tierra.
_
//('(._._
/.}
_',../
'
///(
,t'.
f
Para lograr los mejores resu[tados de limpieza,
_#_/"
mantenga abierlas las vlas de aire. Examine
/=.._7"
peri6dicamente las 6reas indicadascon asleris- ./_,_/"
j
,/
I,
cospa,a
ase,o so
de noest n
b,o-
11
queadas Apagu6 y desconecle del
recepl6culo antes de revisa_
\
_/_._/
14
Filtro de
seguridad
]
CAMBIO DE LA BOLSA
La bolsa debe cambiarse seguido para lograr los
mejores resultados de limpieza El indicador CHECK
BAG (indicadoretectr6nico de ta bolsa) prendera
cuando esla necesile ser cambiada o cuando el
fluido de aire este bloqueado.
NOTA: NO doble ni pliegue el centre del
cart6n al instalar la botsa en las ranuras del
montaje de la bolsa°
8, Gire hacia abajo el
soperle para la bolsa
roja y para inserlar la
bolsa en las ranuras
NOTA: V6ase PIEZAS Y CARACTERiSTICAS
para el n0mero de la bolsa
empuje hacia abajo
hasla que las leng0etas
de carl6n encierren
I,, Apagu& y desconecl6 la aspiradora
2oQuite la manguera
de la aspiradora.
seguramente en lax
posiciones apropiadas
come se ve en el diagrama
3, Tire del peslillode
fa tapa hada fuera y
hacia arfiba; Iuego
tevante la tapa del
recept&culo.
9. Empuie la bolsa asegur_ndola dentro de ta
cavidad para evitar que sea trabada per fa tapa de la
aspiradora
I0o Baje ta cubierla del recept#_culoy cierre el
peslillo
4. Destrabe la pestaSa
de carl6n del montaje
rojo de la belsa empujando hacia afuera y
tirando hacia arriba.
t I_ lntroduzca la manguera en el recept&cufo hasta
que quede fija en posiciOn
12oConecte el cord6n eleclrico en la clavija de la
pared
5, Saque la bolsa del
montaje rojo
ill i illn,
ii, i ,i n iiil,lllllll J/IJlJ
CUIDADO
Ffl_o de
segu_dad
de!mo_
_-_
__
NUNCA REUT1LICE UNA BOLSA PAR.A
POLVO, Los materiales muy fines,
tales come desodorantes para alfombras, talco facial, potvo fine, yeso, hotlin, pelusa de alfombras nuevas, etc..,
pueden atascar la bolsa y causar que
se rompa antes de que est_ llena y
puede da_ar el motor de la aspiradora.
Cambie la bolsa m&s seguido cuando
aspire este tipo de materiales.
6,, Revise y cambie el
filtrode segufidad
del motoq cuando
sea necesa_o,
!,, El monlaje rojo de la bolsa se inclinar_ hacia
adelante despu_s de que retire la bolsa. Esto
impedir& que la tapa se cierre antes de instalar una
bolsa nueva
15
1
I,Apagu_ y desconecte eI cordSn electdco de la claviia de la pared NO rocie agua sabre la aspiradora,,
_CUIDADO
2. Para limpiar et exterior o reducir la electricidad
est&tica y acumulacien de polvo, limpie la
superficie exterior de la aspiradora y los
accesorios Use un trapo suave y limp|o, mejeio
en una soluci6n de agua y detergente liquido, y
expdmalo seco. Sequela despu&s de limpiar
I
i
LIMPIEZA DEL EXTERIOR Y DE LOS ACCESORIOS
No use los accesorios si est_n mojados,. Los
accesorir, s que se utilicen en &teas sucias,
debajo de| refrigerador, no deben usarse en
otras superficies sin antes ser lavades.
Podrian dejar marcas_
CAMBIO DEL FILTRO DE SEGURIDAD DEL MOTOR
_ADVERTENCIA
2, Levante el dispositivo
]
.J.Li
(_"__2._-_-_
j'_,_,
_
_#-
Peligro de cheque e|_ctrico
saque el filtrode seguridad come se ve en e!
diagrama
de retenci6n de goma y __;,_
Apagu_ y desconect_ la aspiradora. No opere
|a aspiradora sin el filtro de seguridad del
motor,. Asegeurese de que el filtro est6 seco e
lnstalado adecuadamente para impedir que el
motor fa!le y/o que se produzca un cheque
et_ctricm
FILTRO DE SEGURIDAD
MOTOR
ELECTROSTATlCO
_dd_eyoma"
DEL
¢_"*'_.
Jj _L'_-;%-_%.
_&=-'_"\?"Xt"botsa
_"_
Esle filtro se |iene que cambiar cuando est_ sucio
Oebe cambiarse peri6dicamente segOnlas condi*
ciones de use El filtro no se puede lavar pues
perderia su capacidad para atrapar polvo,
_,_----_
_I_
t'_"%
",_
_
_3, Reemplace el filtro,
_ instale la superficie
bl&nca de el lade de Ia
de polvo
des_iza.,o
es_e
e.I_s
"cost|Has de la cavidad
debaja del dispositivo
de retenci6nde goma.
NOTA, Vease PIEZAS y CARACTERiSTICAS
para el n_mero del filtro de seguridad del motor.
4, V_ase CAMBIO DE LA BALSA para cambiar ia
balsa
I. Para quitar la balsa, siga las instrucdones en
CAMBIO DE LA BOLSA..
16
CAMBIO
DEL FILTRO
DE ESCAPE
]
4,, Reemplace el
cartucho del filtro
del escape
Caloque el fiitro
nuevo
.81"1IB
aspiredora con el
lade de esponja
en direcci6n a la
FILTRO DE ESCAPE
aspiradoreo
HEPA
5, Monte la
cubierta del filtro
Et car_uchodel filtroescape tiene que cambiarse
cuande est_ sucio Cambie ei fittra cuando ei _rea
superficiaI est_ cubieda per complete El filtro no
se puede tavar pues perderia su capacidad para
atrapar polvo°
de escape
cotocando las dos
lengSelas en la
cubierta del fillro
en las ranuras de
NOTA: V_ase PIEZAS y CARACTERiSTlCAS
pare eJ hi, mere del filtro de escape.
la aspiradora y
gire en su luga_
I. Presione et
peslilto hacia abajo
para Iiberar [a
cubierta de{ fittro de
_.,
& Deslizar el
Pestillo__
pestitlo hacia
abajo para cerrer
la cubierla de[
escape de la ranura
en la aspiradora..
filtro de escape
en su lugar
7_ Suelte el pistille y confirme que Ia cubierta esta
_
segura en su lugar
cubierta dei filtro
2.. Jale [a
hacia fuera para
aspiradora
3. Remover el ffltro
de escape usando fa
paEancacome se
nuestra
17
Siempre debe_n
a la PowerMate,
seguirse todas las precauciones
de seguridad antes de efectuar el mantenimiento
Apagu_ y desconect_ ta aspiradora antes de
efectuar el mantenimiento a su aspiradora,
De Io centrario podria producirse un cheque
Petigro deo cheque
e!#,ctricoo
lesi6n
corporal
el_ctrico
causar lesi6n
corporal
si la
aspiredora arranca de manera imprevtsta,
CAMBIO DE LA CORREA Y LIMPIEZA DEL AGITADOR
PARA RETIRAR LA CORREA
5. Jafe hacia fuera y
levante los cierres
=
I_
===
[J-_
r_
I_Piss el pedal de
liberaci6n r,_pida del
Pedal de
liberacl6n
If!
rapida
poster;ores
tube yardba
tire delpara
tube
hacia
desprendedo de la
PowerMate,
/
del tube
jale hacia a fuera y
levante
Torn#los
2. Gire ia PowerMate
para mostrar la parle
infedor hacia ardba y
desatornilIe dos (2)
tomillosde la
cubierta
7. Levante fa
cubierta hacia
arriba y quedara
liberada la
3_Gire la PowerMate
con la parle supedor
hacia ardba
correa gastada
4,,Press handle
refease pedal and
lower the swivel
-'._',e,,,_
se
Tapedel
extreme
9.,Examine y limpie
las _reas de tapa del extreme En la ENSAMBLE
eEL AGITADOR se preporciona una ilustraci6n de
lode el ensemble del agitado_
18
LIMPIEZA DEL AGITADOR
NOTA: Para mantener
PARA RETIRAR LA CORREA
una alta eficiencia de _,
limpieza y evitar da_os a la aspiradora, h_.a.y
cue limDiar et ag.ilador cada vez c_ue se cambia
Tambi_n hay que limpiar el agitador segOn el
siguiente calendario:
E_EI
use de la
as&&Diradora
Limie_
a gLitador
Frecuente (usada diariamente)
cada semana
correa rr_e_a
sobre el eje_,_.
-_._--._.._
_,_-_,"_
"_2_'_/
luege sobre la
"_\_%_,4kF "_
polea del agilador.
-
\ _:#_'_
"
"Ru,a de
'_
\
ta Gorrea
Agitador Tape del
"_tmpulsor
_
extreme
NOTA: V&ase PIEZAS Y CARACTERiSTICAS
Moderado (usada 2 o 3 veces
per semana)
para el n0mero de la correa.
Ligero (usada 1 vez per semana)
,% "-_.
IMPORTANTE
"_/.._
_
__
I/
unidad del agitador en
la PowerMa[e
Apagu6 y desconect6 la aspiradora,, Examine frecuentemente et agitador y las _reas de
soporte del mismo en la PowerMate y elimine
todo cabello, hifo y pelusa acumulad&
3, NOTA: En los modelos con e! indicador de polvo,
aseg0rese de que la tarjeta del sensor de polvo est6
vertical y los cordones es{_n metidos en posicion
Retire todo indicio de basura o suciedad de la
ruta de la correa y del roditlo del agitador,.
4. Alinee la parte frontal de la cubierta con la base.
Coloque la cubierta sobre el horde delantero de la
base come se muestra
Con cuidado saque las tapas y quite el hilo o
los restos ubicados en el agitador
ENSAMBLE
5. Rote la cubieda
hacia alr_s, Apriete
con poea fuerza hasta
que {asleng_etas
lalerales y traseras
encierren
DEL AGITADOR
Ruta de
_
apa del
extremo
seguramente
la correaq
6. Cerci6rese que no hay espacio entre la
cubierta y la base.
Untdad del
Tape det_
exfJ-emo -J
7. Cotoque la PowerMale conla parte infedor
hacia arfiba e inserte los dos (2) tomillosen la
cubierta
cepillo
19
CAMBIO
DE LA BOMBILLA
l
ADVERTENCIA
Pe]igro
ral
de cheque el6ctrico
o lesi6n corpo-
tiempo, el cater de la bombilla
Juade calentarfas partes de plasticocerca.
Apagu_ y desconecte la unidad antes de
limpiada o dade servicioo De |o contrario
podria producirse un cheque el6ctrieo o
causar lesi6n corporal si la aspiradora
arranca de manera imprevista,,
u_JJNu=
4_ Para reemplazar ta
bombilta cuidadosa-
LNULNNU=L
mente ins_rtela segurameate en la ranura
No conecte o encencte la aspiradora antes de
armarla completamente.,
1, Apagu_ y desconect_
Nora: Mire PIEZAS Y CARACTER1STDCASpara e_
numero de la bombiIla
la aspiradora,.
Destornilladar
Ranuras_..
Lenfe de
luz
2, Extraiga el
lente de la hendidura insertando
el desarmador en
de la lente insertando la
parte inferior de la lente en
la ranura
la rendija, empuje
hacia abajo el
lente y gireto con
el desa mador en
diracci6n hacia la
unidad,.
5,, Un
Substiiuya
la cubierta
6o
sonido 'pop"
indica
que la lente esta co_ocada
correctamente en su lugar,
3,, Quite ta bombiila vieja
det pertal_mparas jalando
derecho hacia fuera
2O
DECTECOR
Aunque la funci6n de detecci6n de polvo de fa
aspiradora Kenmore est_ diseSada pare brindar
muchos aSos de funcionamiento interrumpido, el
paso de polvo a trav6s del sistema de tas vfas de
ake puede causar una escama en las lentes,
hacienda que se endenda y continOe encendido el
indicador verde, sin cambiar nunca a rojo Cuando
astosuceda, se tienen que limpiar las lentes.
1
DE POLVO
2 Come se ve en el diagrama los dos indic.adores
de poivoest6n colocados dentro de la articulad6n
giratoda, aproximadamente3 ½ pulgadas o 90 mm
abajo, Observe las flechas) Pare Ilegar a los alemantes det detector, use un cepitlo pegueSo, come
per ejemplo para botellas Cepille cada deteclor
varias veces para etiminar la tierra y el poivo
Corte transversal
No utilice nunca agua nt solucibn limpiadora
para limpiar las lentes,, El residue del agua o
del limpiador causar_ que las tentes se cubran
de tierra m_s r_pido, requiriendo limpieza con
mayor frecuencia.
,,_j
3 g pulgadas 11-- I J. •Antflo
II
PARA LIMPIAR LAS LENTES
I1-t
Elementos
del detector
NOTA: Si mira hacia dentro del dispositivo giratorio
pod_ vet un anillo, El elemento detector est_ justamente debajo de dicho anillo,
extensi6n pisando el
pedal de liberaci6n
3. Vuelva a instalar el tube despu6s de limpiar los
detectores
jale
del tube
hacia
r,_pidadel
tube
Y
_I_1_ " _,_._ Pedalde
arriba para desprenderlo de la
_
PowerMate
_
_
11l
liberact6n
_p_d.det
tube
2t
i
CUIDADO
DEL AGITADOR
PARA CAMBIAR
AGITADOR
_ADVERTENCIA
Peligro de choque el_ctrico
ra!
o lesi6n
corpo*
1. Quite la cubierta de la PowerMate, fa correa
y el agitador. V6ase CAMBIO DE LA CORREA Y LIMPIEZA DEL AG|TADOR
Apagu6 y desconect6 la aspiradora antes
de efectuar el mantenimiento a su
aspiradora., De Io contrario podria producirse un choque el_ctdco o causar lesi6n
corporal si la aspiradora arranca de
manera imprevtsta.
2o Reemplace
el ensamble del agitador
3. Reinstale la correa y la cubierta de la
PowerMate_ Consulte "Para cambiar la correa _
bajo CAMBIO DE LA CORREA Y LIMPIEZA
DEL AGITADOR..
PARA REVISAR LOS CEPILLOS
Cuando est_n gastados los cepillos al nivel de Ias
barras de soporte en la base, cambie la unidad del
agitador
Cepi/Ios Nuevos
EL
Cepillos Desgastado
Barra de
soporte
de la base
22
Revise este recuadro pare encontrar soluciones a problemas que puede corregir usted mismo
ser,_icio debe ser realizado por SEARS u otro agente de servicio calificado
Cue]quiet
otto
de efectuar
el mantenfmiento
a su aspiradorao
et6ctrico
o causar lesi6n corporal
De
, ADVERTENCIA
Apagu_ y desconect_
]a aspiradora
antes
io contrario
podria productrse
un cheque
La asplradora no arrancao
1. Est,i desconecierJa
I, Conecte biee_ presione el helen
ON/OFF
2, Restablezca el coftacircuitos o
cambie elfusible
2,. Cortacircuitos bo_do o fusible
quemado en el tsblero de sen,'ido
de la restdenc}a
3., Conexiones et_cfffcas de la
3. Vueiva a conectar los extremes de
manguera sueffas
No asptra
satisfactodamenteo
la manguera,
i,
1. Balsa pacepotvo _lena o atascada
2, V_as de fluio de aire atascadas
3. Filtros sucios.
4. Ajusle incorrecto de nivel
de
pelode laalfomb_
5, incorrecta
selecci6n
de niveI
de poder
6. Manguera rata
7., Agilador de la PowerMate desgastados,
B&
8_ Correa desgastada o rola
9, Agilador o tapes de los extremos
sucios
I0, Tapa detrecept_cuIo
abierta
I'I,Prolector
centresobrecargasde la
PowerMate batado
La asplradora arranca,
i,
pete se apaga.
Conexiones ei6ctdcas de la manguera
o de la tape
2. Protector conlra sobrecargas de la
PowerMate bo{ado
3. Protector termal botedo
on e! recept_,culo.
La PowerMate no funciona
cuando est_ lnstalada
I,
Conextones de Is PowerMate
desconectades
2, Correadesgastada o rata
3, Agitader o tBpas cte extremes de
_.ste sucres
4, Protector centre sobrecargas de la
PowerMate be_do.
Cambie ]a balsa,
2 Limpie las vlas de fluto de aire
3. Cambie las filtros
4
Ajusle el nivel
5.
6,
7,
9,
Ajusle el co_rot,
Camblela mangue_
Cambiela agitador
Consul[eCAMBIO DE LA CORREA
LIMPIEZA DEL AGITADOR
Y
I0, Cierre bien la tape
11. Retire cualquier objeio atorado o
alascado, luego restabtezca Si ia
aspiradora aIIanca pete se vuelve a
apagar, timp}e el agi_dor y bs tapes
del extremos de _ste, bego reslablezca
i,, Examine fas conexianes electdcas_
vuelva a coneclar los extremes
de la manguera,
2, Retire cualquier objeto atorado o
atascado, luego reslab_ezca Si la
aspiradera arranca pero se vuelve a
apagm', limpie el agita,dot y los tapas del
extremes de _sle, luego reslablezca
3. Consulte CARACTERISTICAS DE
RENDIMIENTO - _Proteclor Terrnalo"
1,. Coneele bien
2&3.
Consulte CAMBIO DE LA CORREA Y
LIMP|EZA DEL AGITADOR
4, Retire cualqUier obleto aterado a
atascado, luego reslablezca Si Ia
aspiradera arranca pero se vuelve a
apagar, limpie el agitador y los tapas
5. Elswitch no esta en la posiciEn
CARPET (alfombra)
del extremes de 6s_e, luego restablezca
5,, Mover elswilch a la posici6n
CARPET (alfombra)
23
@
Indtcador verde
encendido conttnuamente
en el detector de polvo,
1, La via de paso de lierra o la bolsa de
polvo est_n bloqueadas
2. Lente st_cia.
No se encienden los
tndicador_s verde o rojo
de deteccIBn de tferra
I
El indtcador de CHECK
I.,
Boisa
pa,a
polvo
ll_r_"_'_'i_'gd_
.... i_Cambie
la
bolsa
BAG (indicator electr6ntco
de la bolsa) enclende,
2o Filtros su,_;ios,
3, Vias de fluio de aire atascadas
4_ Ciedos accesodos
2, Cambie los filt_os
La asplradora levanta
tapetes o es dtfietl
empujar la PowerMate
i
Ajusle incorrectode nivel de
peto de ta alfombra
2 Aspiracihn demasiado potente,
t
Ajuste el nivel
2
Seleccionar nivel de poder bajo,
LB |uz roJa para el BELT
RESET (protector para
sobrecarga) PowerMate
i,
i,
Relire cua{quier ebjelo atorado o
alascado, luego reslablezca Si la
aspiradora arranca pare se vuelve a
El switchno esta en la posicihn
CARPET {alfombra)
2, No hay suminsitrode energia al
lablero
deleclor
1, Determine si est_n bloqueadas las
vtas de aire
2, Limpie las lenles.
1. Mover e! switch a la posici6n
CARPET {alfombra)
2., Acuda ai Centre de Servicio de
Sears m,is cercano
3, Desbloquee las vias de _Iujode aire
4, EsIo es normal El indicader debe ser
norma! cuando la herramienla es{_
quilada.
Protector contra sobrecargas de la
PowerMate botado
se prende,
apagar, limpie ef agilador y los lapas
del extremes de ,_sle, luego restablezca
El cord6n no se enrolla
i Cord6n el6ctdco sucio
2. Ccrdbn atascado
i Limp{e el cord6n el_cldco
2, iqre de_ cordon y despu_s enrb!le!o
La aspfradora deja
marcas en ta alfombra
t,
1, Consulte SUGERENCIAS PARA
ASPIRAR
Estik) de limpieza incorrec_a
24
Acuerdos Maestros de Protecci6n
Enhorabuena per hacer una compra inteligente
fabdcado para ofrecede aSos de funciortamiento
pueden precisar un mantenimiento preventive o
motive, tener un Acuerdo Maestro de Protecci6n
Su nuevo producto Kenmore(_ est,. dise£|ado y
confiable. Pero al igual que todos los produclos
alguna reparaci6n de vez en cuando.. Per este
puede aherrade dinero e inconvenientes.
El Acuerdo Maestro de Protecci6n tambi_n Ie ayuda a prolongar la vida Litil de su nuevo
producto. A continuaci6n indicamos Io que e$Acuerdo* inciuye:
Partes y mane de obra necesarios para ayudar a que estos productos funcionen
correctamente bajo condicionales normales de use, no simplemente defectos Nuestra
cobertura va mucho m_s all_ de la garantfa del producto. Ningr_n deducible, ninguna
avefia funcional queda excluida de la cobertura_ protecci6n
realo
_f
Servicio experto ofrecido per una lista de m_s de 10.000 t_cnicos autorizados
del
servtcio t_cnico de Sears, Io que significa que alguien en quien usted puede confiar
estar& trabajando en su producto.
N_mero ilimttado de llamadas al servic|o t_cnico y servicio
continue come usted nos to solicite, sin importar donde est_
en toda la nacl6n,
tan
Garantfa seria de sustituci6n
del producto. La sustituci6n de su produclo cubierto si se
producen cuatro o m,_s averias en doce meses.
Sustituci6n
del producto
RevisiOn y mantenimlento
per otto nuevo si su producto cubierto no puede repararse
anual preventive siempre que Io desee y sin cargo alguno.
Ayuda rzlpida per tel_fono - Nosolros 1oflamamos Resoluci6n
te_efSnico de un representante de Sears en redes los productos
un "manual dei usuario parlante"
Protecci6n contra subidas de tensi6n
fluctuaciones de la corriente.
r_ptda. Soporte
Piense en nosotros come
que provoquen daSos el_ctricos causados
per las
$250 de protecci6n contra ia p_rdida de alimentos anualmente en case de que se
estropee alg_n alimento come resultado de una averfa mec,_nica de cuatquier congelador
o refrigerador cubierto..
Reembolso
prometido_
[_
del alquiler
si la reparaci6n de su producto cubierto toma m_s tiempo dee
10% de descuento en el precio regular de cualquier servicio de reparaci6n no cubierto y
de Ias piezas instaladas relacionadas.
Una vez que compre et Acuerdo, s61o bastard, una simpIe tlamada telef6nica para que pueda
programar un servicio. Puede llamar a cualquier hera del dia o de la noche, o concertar una cita
de servicio en Iinea
El Acuerdo maestro de protecci6n es una compra libre de riesgos Si per cualquier raz6n cancela
durante el peri'odo de garantia del producto, te devolveremos todo el dinero. O, un reembolso
prorrateado despu_s del pefiodo de vencimiento de la garantia tCompre su Acuerdo maestro
hey!
Apt!can atgunas lim[taciones
llame al 1_800-827-6655.
y exclusiones. Para precios y m_s informacl6n
en EE.,UU,,,
* La cobertura en Canada varfa en algunos artfculos. Para obtener redes los detalles,
Ilame a Sears Canad& t-800-361-6665..
Servicio
de instalaci6n
de Sears
Para la ins_alaciSn profesionat per parte de Sears de electrodom_stices,
abridores de puertas de
garajes, calentadores de agua y otros articulos principales para el hogar, en EE UU o Canad_
!tame al 1-800-4-MY=HOME®.
25
Get it fixed, at your home or ours!
Your Home
For expert troubleshooting
and home solutions advice:
manage home
www, managemyhorne.com
For repair - in your home - of all major brand appliances,
lawn and garden equipment, or heating and cooling systems,
no matter who made it, no matter who sold it!
For the replacement parts, accessories and
owner's manuals that you need to do-it-yourself
For Sears professional installation of home appliances
and items like garage door openers and water heaters
1-8OO-4-MY-HOME
(1-800-469-4663)
w'ww,sears, corn
®
ca, anytime,
day or night
(USA.. and Canada)
w'_w.,sears ,,ca
Our Home
For repair of carry-in items like vacuums, lawn equipment,
and electronics, call anytime for the location of the nearest
Sears Parts & Repair Service Center
1-800-488-1222
(US.A)
1-800-469-4663
www.sears.ca
www,,sears,,com
(Canada)
To purchase a protection agreement on a product serviced by Sears:
l m800-827-6655 (U.,S.A,,)
Para pedir servicio de reparaci6n
a domicilio, y para ordenar piezas:
1-8BB-SU-HOGAR®
1-800-361-6665(Canada)
Au Canada pour service en franqais:
1-800.LE.FOYER Mc
(l-888q84-6427)
(1-800-533_6937)
www.sears ca
S@ /fs
© SearsBrar_ds.LLC
® Registered Trademark l
_
Trademark
I
SM
Service Mark of Sears Brands. LLC
® Marca Registrada t T_ Marca de Fabdca ! su Marca de Servicio de Sears Brands. LLC
_CMa_ue de commerce t _,_D
Marque d6pos_e de Sears Brands, LLC