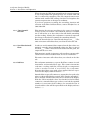
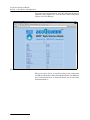
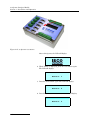
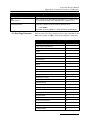
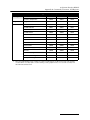
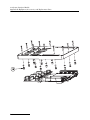
1
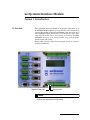
accQcomm™ Interface Module Installation and Operation Guide Part #69-7503-015 of Assembly #60-7504-015 Copyright © 2007. All rights reserved, Teledyne Isco. Revision D, February 2012. Foreword This instruction manual is designed to help you gain a thorough understanding of the operation of the equipment. Teledyne Isco recommends that you read this manual completely before placing the equipment in service. Although Teledyne Isco designs reliability into all equipment, there is always the possibility of a malfunction. This manual may help in diagnosing and repairing the malfunction. If the problem persists, call or e-mail the Teledyne Isco Technical Service Department for assistance. Simple difficulties can often be diagnosed over the phone. If it is necessary to return the equipment to the factory for service, please follow the shipping instructions provided by the Customer Service Department, including the use of the Return Authorization Number specified. Be sure to include a note describing the malfunction. This will aid in the prompt repair and return of the equipment. Teledyne Isco welcomes suggestions that would improve the information presented in this manual or enhance the operation of the equipment itself. Teledyne Isco is continually improving its products and reserves the right to change product specifications, replacement parts, schematics, and instructions without notice. Contact Information Customer Service Phone: (800) 228-4373 (USA, Canada, Mexico) (402) 464-0231 (Outside North America) Fax: (402) 465-3022 Email: [email protected] Technical Support Phone: Email: (800) 775-2965 (Analytical) (866) 298-6174 (Samplers and Flow Meters) [email protected] Return equipment to: 4700 Superior Street, Lincoln, NE 68504-1398 Other Correspondence Mail to: P.O. Box 82531, Lincoln, NE 68501-2531 Email: [email protected] Web site: www.isco.com Revised March 17, 2009 accQcomm Interface Module Table of Contents Section 1 Introduction 1.1 1.2 1.3 1.4 1.5 Overview . . . . . . . . . . . . . . . . . . . . . . . . . . . . . . . . . . . . . . . . . . . . . . . . . . . . . . . . . . Outputs . . . . . . . . . . . . . . . . . . . . . . . . . . . . . . . . . . . . . . . . . . . . . . . . . . . . . . . . . . . Cables and Connectors . . . . . . . . . . . . . . . . . . . . . . . . . . . . . . . . . . . . . . . . . . . . . . . Unpacking Instructions . . . . . . . . . . . . . . . . . . . . . . . . . . . . . . . . . . . . . . . . . . . . . . Technical Specifications . . . . . . . . . . . . . . . . . . . . . . . . . . . . . . . . . . . . . . . . . . . . . . 1-1 1-2 1-2 1-4 1-5 Section 2 Installation and Operation 2.1 Programming. . . . . . . . . . . . . . . . . . . . . . . . . . . . . . . . . . . . . . . . . . . . . . . . . . . . . . . 2-1 2.1.1 Configuration Software . . . . . . . . . . . . . . . . . . . . . . . . . . . . . . . . . . . . . . . . . 2-1 2.1.2 Connecting Without Configuration Software . . . . . . . . . . . . . . . . . . . . . . . . 2-1 2.2 Site Setup . . . . . . . . . . . . . . . . . . . . . . . . . . . . . . . . . . . . . . . . . . . . . . . . . . . . . . . . . 2-2 2.2.1 LCD Display . . . . . . . . . . . . . . . . . . . . . . . . . . . . . . . . . . . . . . . . . . . . . . . . . . 2-2 2.2.2 Display Units . . . . . . . . . . . . . . . . . . . . . . . . . . . . . . . . . . . . . . . . . . . . . . . . . 2-3 2.2.3 Totalizers . . . . . . . . . . . . . . . . . . . . . . . . . . . . . . . . . . . . . . . . . . . . . . . . . . . . 2-3 2.2.4 Instruments . . . . . . . . . . . . . . . . . . . . . . . . . . . . . . . . . . . . . . . . . . . . . . . . . . 2-4 2.2.5 Error Handling and Timeouts . . . . . . . . . . . . . . . . . . . . . . . . . . . . . . . . . . . . 2-5 2.3 Communication . . . . . . . . . . . . . . . . . . . . . . . . . . . . . . . . . . . . . . . . . . . . . . . . . . . . . 2-6 2.3.1 Port Settings . . . . . . . . . . . . . . . . . . . . . . . . . . . . . . . . . . . . . . . . . . . . . . . . . 2-6 2.3.2 Network Settings . . . . . . . . . . . . . . . . . . . . . . . . . . . . . . . . . . . . . . . . . . . . . . 2-7 2.3.3 Modem . . . . . . . . . . . . . . . . . . . . . . . . . . . . . . . . . . . . . . . . . . . . . . . . . . . . . . 2-7 2.4 Alarms . . . . . . . . . . . . . . . . . . . . . . . . . . . . . . . . . . . . . . . . . . . . . . . . . . . . . . . . . . . . 2-8 2.5 Outputs . . . . . . . . . . . . . . . . . . . . . . . . . . . . . . . . . . . . . . . . . . . . . . . . . . . . . . . . . . . 2-9 2.5.1 MODBUS . . . . . . . . . . . . . . . . . . . . . . . . . . . . . . . . . . . . . . . . . . . . . . . . . . . . 2-9 2.5.2 Analog . . . . . . . . . . . . . . . . . . . . . . . . . . . . . . . . . . . . . . . . . . . . . . . . . . . . . . 2-10 2.6 Smoothing . . . . . . . . . . . . . . . . . . . . . . . . . . . . . . . . . . . . . . . . . . . . . . . . . . . . . . . . 2-13 2.6.1 TCF . . . . . . . . . . . . . . . . . . . . . . . . . . . . . . . . . . . . . . . . . . . . . . . . . . . . . . . . 2-13 2.6.2 “Don’t Smooth” Function . . . . . . . . . . . . . . . . . . . . . . . . . . . . . . . . . . . . . . . 2-14 2.6.3 Zero Value for Small Flows . . . . . . . . . . . . . . . . . . . . . . . . . . . . . . . . . . . . . 2-14 2.6.4 Bad Data . . . . . . . . . . . . . . . . . . . . . . . . . . . . . . . . . . . . . . . . . . . . . . . . . . . 2-14 2.7 Alarm and Output Parameters. . . . . . . . . . . . . . . . . . . . . . . . . . . . . . . . . . . . . . . . 2-15 2.8 Viewing Data Via Ethernet . . . . . . . . . . . . . . . . . . . . . . . . . . . . . . . . . . . . . . . . . . 2-16 2.9 Default System Recovery . . . . . . . . . . . . . . . . . . . . . . . . . . . . . . . . . . . . . . . . . . . . 2-19 2.10 Cleaning. . . . . . . . . . . . . . . . . . . . . . . . . . . . . . . . . . . . . . . . . . . . . . . . . . . . . . . . . 2-21 Appendix A Commands, Constants, and Registers A.1 Program Commands . . . . . . . . . . . . . . . . . . . . . . . . . . . . . . . . . . . . . . . . . . . . . . . . . A-1 A.2 Data Type Constants . . . . . . . . . . . . . . . . . . . . . . . . . . . . . . . . . . . . . . . . . . . . . . . . A-7 A.3 MODBUS Register Locations. . . . . . . . . . . . . . . . . . . . . . . . . . . . . . . . . . . . . . . . . . A-8 A.3.1 Explanation of an Example Output Reading . . . . . . . . . . . . . . . . . . . . . . . . A-9 A.3.2 Explanation of Volume Interval Registers . . . . . . . . . . . . . . . . . . . . . . . . . A-9 Appendix B Equipment, Accessories, and Replacement Parts B.1 Equipment and Accessories . . . . . . . . . . . . . . . . . . . . . . . . . . . . . . . . . . . . . . . . . . . B-2 B.2 Replacement Parts Diagrams and Listings . . . . . . . . . . . . . . . . . . . . . . . . . . . . . . B-3 v accQcomm Interface Module Table of Contents List of Figures 1-1 accQcomm connectors and cables . . . . . . . . . . . . . . . . . . . . . . . . . . . . . . . . . . . . . . 1-3 1-2 Power input wiring . . . . . . . . . . . . . . . . . . . . . . . . . . . . . . . . . . . . . . . . . . . . . . . . . . 1-3 2-1 Site tab . . . . . . . . . . . . . . . . . . . . . . . . . . . . . . . . . . . . . . . . . . . . . . . . . . . . . . . . . . . 2-2 2-2 Select units of measure . . . . . . . . . . . . . . . . . . . . . . . . . . . . . . . . . . . . . . . . . . . . . . 2-3 2-3 Reset totalizer . . . . . . . . . . . . . . . . . . . . . . . . . . . . . . . . . . . . . . . . . . . . . . . . . . . . . . 2-4 2-4 Instrument settings and error counter . . . . . . . . . . . . . . . . . . . . . . . . . . . . . . . . . . 2-5 2-5 Communication tab . . . . . . . . . . . . . . . . . . . . . . . . . . . . . . . . . . . . . . . . . . . . . . . . . 2-6 2-6 Activate modem function . . . . . . . . . . . . . . . . . . . . . . . . . . . . . . . . . . . . . . . . . . . . . 2-7 2-7 Alarms tab . . . . . . . . . . . . . . . . . . . . . . . . . . . . . . . . . . . . . . . . . . . . . . . . . . . . . . . . 2-8 2-8 Output tab: MODBUS settings . . . . . . . . . . . . . . . . . . . . . . . . . . . . . . . . . . . . . . . 2-10 2-9 Output tab: Analog Output settings . . . . . . . . . . . . . . . . . . . . . . . . . . . . . . . . . . . 2-11 2-10 Analog output test dialog . . . . . . . . . . . . . . . . . . . . . . . . . . . . . . . . . . . . . . . . . . . 2-12 2-11 Smoothing tab . . . . . . . . . . . . . . . . . . . . . . . . . . . . . . . . . . . . . . . . . . . . . . . . . . . . 2-13 2-12 Summary page in Web view . . . . . . . . . . . . . . . . . . . . . . . . . . . . . . . . . . . . . . . . 2-17 2-13 Detailed view of instrument data . . . . . . . . . . . . . . . . . . . . . . . . . . . . . . . . . . . . 2-18 2-14 Viewing historical site data . . . . . . . . . . . . . . . . . . . . . . . . . . . . . . . . . . . . . . . . 2-19 2-15 accQcomm reset button . . . . . . . . . . . . . . . . . . . . . . . . . . . . . . . . . . . . . . . . . . . . 2-20 List of Tables 1-1 2-1 2-2 A-1 A-2 A-3 vi accQcomm Technical Specifications . . . . . . . . . . . . . . . . . . . . . . . . . . . . . . . . . . . . 1-5 Totalizer Rollover Values . . . . . . . . . . . . . . . . . . . . . . . . . . . . . . . . . . . . . . . . . . . . . 2-3 Alarm and Output Parameters . . . . . . . . . . . . . . . . . . . . . . . . . . . . . . . . . . . . . . . 2-15 accQcomm Program Commands . . . . . . . . . . . . . . . . . . . . . . . . . . . . . . . . . . . . . . . A-1 Data Type Constants . . . . . . . . . . . . . . . . . . . . . . . . . . . . . . . . . . . . . . . . . . . . . . . . A-7 MODBUS Register Addresses . . . . . . . . . . . . . . . . . . . . . . . . . . . . . . . . . . . . . . . . A-10 accQcomm Interface Module Section 1 Introduction 1.1 Overview The accQcomm Interface Module is an optional component of an H-ADFM/ADFM/accQmin Velocity Profiler flow monitoring system. The module accepts RS-232/RS422 serial data from up to three ADFM/accQmin flow meters and converts the data, typically measured flow, level, and velocity, to industry standard MODBUS protocol, or an analog current loop, with programmable format and scaling. The module provides eight alarm outputs based on user-programmed conditions. Negative system power Chassis ground Note Negative System Power must be connected to Chassis Ground, and should be Earth-Grounded. 1-1 accQcomm Interface Module Section 1 Introduction 1.2 Outputs The accQcomm has an array of outputs for different data types, summarized below. For detailed information about each output and its configuration, see section 2, Installation and Operation. LCD The LCD on the front of the unit can be configured to display System Information (device name, firmware, and date/time), data output for each flow meter (flow, totalized flow, velocity, level, and temperature in user selectable units), and 4-20 mA outputs. LED indicators The LED lights indicate the accQcomm’s activity. They signal power, the presence of alarm conditions, serial transmit/receive, and Ethernet activity. 4-20 mA outputs The accQcomm has up to four 4-20mA analog outputs (specified at time of order). The analog outputs can be assigned to any data type from one to three connected flow meters. Sums and/or averages can be selected as an analog output. Relay alarms The accQcomm has eight programmable relays for triggering alarms based on user-defined conditions. Web viewing Data from all connected flow meters can be viewed on the Web by logging on to the fixed IP address of your accQcomm module. MODBUS protocol MODBUS communication provides a standard protocol that can be used to retrieve real-time data from one to three connected Isco flow meters. The data can be sent to a central computer for display, data collection, or process control. The accQcomm can send MODBUS data using either the RS232 or RS485 connector on the front panel. MODBUS is a simple command/response mechanism to read from and write to specific memory locations called registers. A register is a holding place for a piece of digital information within the equipment. A table of MODBUS register addresses and their data types is provided in Appendix A, Table A-3. The Isco ADFM flow meters can use either MODBUS ASCII or RTU protocol. 1.3 Cables and Connectors Figure 1-1 shows the locations and functions of all of the accQcomm’s connectors, as well as Isco part numbers for the appropriate connecting cables where used. Note Negative System Power must be connected to Chassis Ground, and should be Earth-Grounded. 1-2 accQcomm Interface Module Section 1 Introduction Serial RS422 Flow Meter 1 Serial RS232 Serial RS422 Flow Meter 2 Serial RS232 Serial RS422 Flow Meter 3 Serial RS232 Modbus Output RS485 Modbus Output RS232 LCD Negative SYSTEM POWER must be connected to Chassis-Ground & Earth-Grounded. Computer Modem cable Alarm Outputs (8) cables 60-75:04-016 - console 60-7004-057 - ADFM/accQmin 60-7004-027 - canister cable 69-7504-020 Ethernet (Input inductor recommended) Power 12 - 24VDC cable 480-7999-02 4-20 mA Outputs (4) Figure 1-1 accQcomm connectors and cables Note Negative System Power must be connected to Chassis Ground as shown below in Figure 1-2, and should be Earth-Grounded: Figure 1-2 Power input wiring 1-3 accQcomm Interface Module Section 1 Introduction 1.4 Unpacking Instructions Teledyne Isco Customer Service Dept. P.O. Box 82531 Lincoln, NE 68501 USA Phone: (800) 228-4373 Outside USA & Canada call: (402) 464-0231 FAX: (402) 465-3022 E-mail: [email protected] Web site: www.isco.com 1-4 When the system arrives, inspect the outside packing for any damage. When you unpack the system, check the items against the packing list. If any parts are missing, contact the delivery company and Teledyne Isco’s Customer Service Department. When you report missing parts, please indicate them by part number. It is recommended that you retain the shipping carton as it can be used to ship the unit in the event you need to transport it. If there is damage, contact the delivery company and Teledyne Isco (or its authorized representative) immediately. CAUTION If there is any evidence that any items may have been damaged in shipping, do not attempt to install the unit. Please contact Teledyne Isco (or its agent) for advice. accQcomm Interface Module Section 1 Introduction 1.5 Technical Specifications Table 1-1 lists the technical specifications for the accQcomm. Table 1-1 accQcomm Technical Specifications Physical Dimensions (H x W x D) 2.75 in (70 mm) x 10.5 in (267 mm) x 5.62 in (143 mm) Weight 2.06 pounds (.95 kg) Material Polycarbonate Enclosure NEMA 1, IP20 Power Requirements 9 to 30 VDC Negative System Power must be connected to Chassis Ground, and should be Earth-Grounded. @ 12VDC: Typically < 475 mA, max 600mA @ 24VDC: Typically < 250 mA, max 300mA Temperature -4 to 158° F (-20 to 70° C), operating and storage Display Type Backlit 1” x 3” LCD, 4 lines, 80 characters Communication Analog Output Channels Number of channels 0 to 4 Output range 4-20 mA Maximum load 600 Isolation: Output galvanically isolated from DC power, from the network, and from other outputs Accuracy: Integral nonlinearity: ±0.012% max Offset (0 mA or 4 mA) (Ta = 25°C): ±0.05%max Offset Drift: 50 ppm/°C max Total Output Error (20 mA or 24 mA)(Ta = 25°C): ±0.15% max Total Output Error Drift: 50 ppm/°C max PSRR: 10 µA/V max Resolution: 16 bits, 244 µA, 0.0015% of 16 mA span Relay Alarm Outputs Serial Data Communication Number of alarms 8 Type Normally open, solid state Maximum contact resistance 35 Sampler Pacing Contact closure pulses are 100ms long, separated by 100ms pause Total ports Input type RS232 Input type RS422 Output type MODBUS 232 Output type MODBUS 485 MODBUS protocols 8 3 3 1 1 DB9 Connector Terminal Strip DB9 Connector Terminal Strip ASCII, RTU Setup and Data Retrieval PC compatible computer running accQcomm Configuration Software, or utility software such as HyperTerminal Ethernet Communication Ethernet port (Input inductor recommended: Steward #28B2024-0A0 or equivalent) Modem External connection Communication Speeds Supported 1200, 2400, 4800, 9600, 12000, 19200, 38400, 57600 (default) bps RS232 serial connector 1-5 accQcomm Interface Module Section 1 Introduction 1-6 accQcomm Interface Module Section 2 Installation and Operation 2.1 Programming 2.1.1 Configuration Software The accQcomm’s configuration software is a simple program for managing your site files. Install the program by inserting the CD-ROM in the appropriate drive on your PC. Run the application accQcomConfigSetupV1.00.exe. Connect your PC to the accQcomm’s serial configuration port on the front of the unit, or connect to the Ethernet port on the back, and open the accQcomm configuration software. Tabs The five tabs, Site, Communication, Alarms, and Output, and Smoothing are used to set up the site and configure the transfer of data. Menu File – Open an existing site file by selecting File > Open Configuration. Save a new site file by selecting File > Save Configuration. The file type will end in .cfg. Program – Use Program > Send Configuration to open the Connect window and save new program settings to the accQcomm. To set the accQcomm time clock or zero the totalizer, check the box(es) next to these options. Click Program to save the new settings. The unit will be reinitiated with the new settings. Use Program > Read Configuration to load the accQcomm’s program settings into the current site file. Software – Install updates to the accQcomm’s software by selecting Software > Flash Software. 2.1.2 Connecting Without Configuration Software Teledyne Isco recommends connecting to the accQcomm with the configuration software provided. However, if you need to connect to the accQcomm using a basic utility program, such as HyperTerminal®, Table A-1 in Appendix A contains all accQcomm commands and their definitions. Connect your PC to the accQcomm’s serial configuration port on the front of the unit (at 57,600 bps, 8 bits, no parity, 1 stop bit, no flow control), or Ethernet port on the back, and use keystrokes CTRL + D. Once connection is established, the accQcomm will return the header [ENTERED CONTROL MODE], followed by the prompt, ?>. All settings are programmable with this method, but commands must be entered into the computer and saved to the unit’s flash memory. After saving the new program with the SS command, restart the accQcomm with the SR command. The new program will be applied upon restart. 2-1 accQcomm Interface Module Section 2 Installation and Operation 2.2 Site Setup Begin creating a site file for the flow meter(s) connected to the accQcomm by clicking the Site tab (Figure 2-1) and enter the desired Site Name. Figure 2-1 Site tab 2.2.1 LCD Display 2-2 The accQcomm’s LCD can be configured to display several different types of information. These include: System Information (device name, firmware, and date/time), data output for each flow meter (flow, velocity, level, temperature, and volume, in user selectable units), 4-20 mA outputs, and totalized flow. These displays, except for System Information, can be switched on or off, and will cycle through all displayed parameters every 3 to 10 seconds, as set by dragging the slider bar. accQcomm Interface Module Section 2 Installation and Operation 2.2.2 Display Units In the Display Units box (Figure 2-2), click the pull-down menus to select the units of measure the accQcomm will use for displaying measured Flow, Velocity, Depth, Temperature, and Volume. Figure 2-2 Select units of measure 2.2.3 Totalizers Flow volume can be totalized separately for each connected instrument. Each totalizer will roll over when an ensemble is received, or when volumetric units of measure are changed. The totalizer rolls over to zero when it reaches a certain value; this value is determined by the units of measure for volume, as shown below: Table 2-1 Totalizer Rollover Values Units of Measure Rollover Limit Liters 1,000,000,000 Cubic Meters 100,000,000 Megaliters 100,000 Gallons 1,000,000,000 KGallons 10,000,000 Million Gallons 10,000 Cubic Feet 1,000,000,000 Acre Feet 100,000 Note that an alarm to indicate when a rollover has occurred can be set by using the rollover value as an alarm for Totalized Flow (Refer to Alarms, on page 2-8). 2-3 accQcomm Interface Module Section 2 Installation and Operation Totalizer Mode There are three selectable totalizer modes: Net – Total flow includes both positive and negative (forward and reverse) flows. Positive – Total positive (forward) flow; negative (reverse) flow not included. Negative – Total negative (reverse) flow; positive (forward) flow not included. The selected totalizer mode applies to all connected instruments. When the mode is changed, all totalizers are reset to zero. Resetting the Totalizer To reset the totalizer to zero, first select Program > Send Configuration... In the Connect screen, check the Zero totalizer box and click Program. Figure 2-3 Reset totalizer A totalizer reset can also be performed via HyperTerminal with the SZ command (refer to Table A-1). HADFM Totalizer Limitations 2.2.4 Instruments 2-4 The totalizer for a connected HADFM will always totalize net flow, regardless of the selected mode. This does not affect totalizers for any other connected instruments. The accQcomm cannot zero an HADFM totalizer. Whenever the HADFM is reset, the accQcomm’s corresponding totalizer will also reset. By default, only Instrument 1 will be set as active when you click the Site tab; the other two will be set to Inactive. Use the pull-down menus for Type to select between Inactive, ADFM, accQmin, or HADFM for inputs 1, 2, and 3, and enter an identifying name for each instrument. accQcomm Interface Module Section 2 Installation and Operation Instruments 2 and 3, when first made active, will have the default name of INACTIVE, which can be deleted and replaced with new names. Figure 2-4 Instrument settings and error counter 2.2.5 Error Handling and Timeouts A timeout (Figure 2-4) signifies that the accQcomm is not receiving readings in the proper format from the configured instrument within the specified time period (default setting 90 seconds). If a timeout occurs, the accQcomm will continue to display the last valid reading, incrementing the Timeout counter, and continue to increment the counter with each consecutive Timeout. If the “Clear all data” box is checked, when the counter exceeds the specified number of timeouts, all data for that instrument will be cleared, and the accQcomm display will read NO DATA until the next valid reading, at which time the counter will reset to zero. If the accQcomm receives readings in the proper format and within the specified time period, but one or more values within the reading are marked bad, no Timeout will occur. The bad values are represented on the display with two dashes (– –). See section 2.6.4 for more information about bad data. 2-5 accQcomm Interface Module Section 2 Installation and Operation 2.3 Communication Click the Communication tab to select the appropriate communication settings for the PC connection and each flow meter. Figure 2-5 Communication tab Note Record your Port and Network settings for future use. If you attempt to connect with the accQcomm without the correct configuration baud rate or IP address, you will be unable to communicate with the unit unless you correct the baud rate or reset the module to system default settings (see Section 2.9). 2.3.1 Port Settings 2-6 The default baud rate for the accQcomm’s configuration port is 57600 bps. The default baud rate for the instruments is 9600 bps. The accQcomm and flow meter baud rates must match for the instruments to communicate with each other. accQcomm Interface Module Section 2 Installation and Operation Flow Control can be used when the accQcomm is communicating through a modem, to regulate data transmission so that when the buffer is full, data flow will halt until enough data has been read to continue transmitting. To activate this function, check the box next to Flow Control. 2.3.2 Network Settings In the Address box, enter the IP address you will use to access your flow data via the Internet, as well as the Subnet mask. The default IP address is 192.168.1.10, and the Subnet is 255.255.255.0. If you change the IP address, your Subnet may need to be adjusted. The IP address is static, meaning it does not change, and must be manually entered into the Web browser each time you log on (see Section 2.8 for more information on viewing data on the Web). To prevent excessive network EMI from interfering with the accQcomm’s operation, Teledyne Isco recommends placing an inductor on the accQcomm’s incoming line when connecting via the Ethernet port. The inductor type recommended is the Steward #28B2024-0A0, or equivalent, with 2 wire wraps (see Appendix A for Isco part number). 2.3.3 Modem Connect the modem to the MODEM 9-pin connector on the front of the accQcomm. To begin using the modem, check the Use Modem box at the bottom left of the Communication screen and enter the command string to initialize the modem. All parameters must be entered on one line with no spaces. Note The command string is sent to the modem at startup. For the modem to be initialized, you must cycle power on the accQcomm. In the example below, the initialization string instructs the modem to auto-answer after two rings, and disables DTR line checking and Flow Control: Figure 2-6 Activate modem function If Flow Control is desired, K0 should be replaced by K1. Note Teledyne Isco recommends using Creative Labs Modem Blaster V.92 Serial Modem #DE5621. The sample initialization string shown above is based on this modem, but may also work for other modems. If problems occur when using another modem, the string may need modification. 2-7 accQcomm Interface Module Section 2 Installation and Operation 2.4 Alarms The accQcomm has eight programmable relays for triggering alarms based on one or two user-defined conditions (i.e., flow rate, level, velocity, etc.). To program alarms, click the Alarms tab. Define the conditions by using the pull-down menus to select the instrument (flow meter), parameter (level, flow, etc.), comparator (>, <, ==, >=,<=), and value (Figure 2-7). For a list of all available alarm parameters, and their definitions, see Table 2-2. To use two conditions to activate an alarm, use the pull-down menu between Condition 1 and Condition 2 to select AND or OR. To use only Condition 1, select N/A. To set an alarm to remain activated regardless of changes in data, check the “Latching when triggered” box. To clear an alarm, select the alarm and click the Clear Selected button. In the example in Figure 2-7, an alarm will be permanently triggered if the flow reverses. Figure 2-7 Alarms tab 2-8 accQcomm Interface Module Section 2 Installation and Operation When you highlight the desired alarm number in the Current Alarms window and click Set Alarm Condition, the alarm appears beside its number. To remove an alarm condition, highlight the alarm and click Clear Selected. Note For the accQmin flow meter, the accQcomm displays and transmits secondary level data at 10X the actual value when using Standard Data format. This should be considered when setting up alarm conditions and analog outputs. This will not occur with an accQmin using Reduced Data format. Sampler Pacing The alarm function can signal a connected sampler to take a sample every time a specified volume of flow is reached. In the Sampler Pulse box, select the instrument and enter the volume at which to send the pulse. When you highlight the desired alarm number in the Current Alarms window and click Set Pulse Volume, the setting appears as an alarm. A separate sampler pulse output can be set for each connected instrument, if needed. 2.5 Outputs The accQcomm can make the flow meter data available in several formats. Data output is configured on the Output tab. From the Output Type pull-down menu, select either MODBUS or Analog (4-20mA). 2.5.1 MODBUS Selecting MODBUS from the pull-down menu activates the MODBUS settings at the bottom of the screen. Select ASCII or RTU protocol from the pull-down menu, as well as appropriate serial data settings. Internal units of measure for MODBUS cannot be changed. Parameter values will always be output as follows: Flow cc/sec Area cm2 Temp °C Velocity mm/sec Depth mm Volume m3 Note For the accQmin flow meter, the accQcomm displays and transmits secondary level data at 10X the actual value when using Standard Data format. This should be considered when setting up alarm conditions and analog outputs. This will not occur with an accQmin using Reduced Data format. 2-9 accQcomm Interface Module Section 2 Installation and Operation Alternate MODBUS Port Although ordinarily only MODBUS or Analog output (see next section) can be selected as the Output Type (refer to Figure 2-8 on the following page), an alternate MODBUS port can be used at the same time as Analog Output. To activate and configure this port while the Output Type is set for Analog, check the box next to “Use alternate MODBUS port.” Note that enabling this alternate port will disable instrument #2. Figure 2-8 Output tab: MODBUS settings 2.5.2 Analog Selecting Analog (4-20mA) from the pull-down menu activates the Analog Output and Advanced Analog Calculations settings. One to four analog outputs can be assigned to any data type from one to three connected flow meters, including the sums and averages of readings from all active connected instruments. For a listing of all available analog output data types, and their definitions, see Table 2-2. 2-10 accQcomm Interface Module Section 2 Installation and Operation Ranges are user-defined using the 4mA and 20mA boxes. Parameter values will be displayed using the units entered in the Display Units box on the Site tab (see Section 2.2.2). Only the analog outputs installed at the factory will be operational when shipped. If additional outputs are required, call Teledyne Isco. Regardless of how many analog outputs are installed in your accQcomm, each channel selection will appear on the screen as active until you deactivate it by deselecting its checkbox. When this setting is saved to the accQcomm, the LCD will indicate that this analog channel has been turned off. For example, if Channel 3 were deactivated, the accQcomm screen would display: #1: x.xx mA #2: x.xx mA #3: off #4: x.xx mA Check box to use both MODBUS and Analog outputs. Figure 2-9 Output tab: Analog Output settings 2-11 accQcomm Interface Module Section 2 Installation and Operation Note For the accQmin flow meter, the accQcomm displays and transmits secondary level data at 10X the actual value when using Standard Data format. This should be considered when setting up alarm conditions and analog outputs. This will not occur with an accQmin using Reduced Data format. Testing Analog Outputs To verify that the analog outputs are functioning properly. 1. Attach the leads of a current meter to the output circuit to be tested. 2. Click Test Analog Outputs to open the test dialog. Figure 2-10 Analog output test dialog 3. Select a COM port and baud rate for communication. 4. Select the channel and enter a current value in mA. 5. Click Test Output. The measured current value should match the set value, until or unless changed by another event or action. 2-12 accQcomm Interface Module Section 2 Installation and Operation 2.6 Smoothing The smoothing function stabilizes data outputs by disregarding brief spikes in the condition being monitored. The Smoothing tab allows you to control several aspects of your data output, including the degree of smoothing, the smoothing cutoff point, minimum smoothed flow value, and smoothing on output display. Figure 2-11 Smoothing tab 2.6.1 TCF TCF (Time Constant Factor) refers to a coefficient between 0 and 1 that the accQcomm applies to each new data reading, giving the output a continuity from one reading to the next. Just use the slider under Flow, Velocity, or Depth to adjust the amount of smoothing for each parameter. 2-13 accQcomm Interface Module Section 2 Installation and Operation When selecting the TCF, keep in mind that the system’s response to any change within the specified range (see sections 2.6.2 and 2.6.3) is affected by smoothing. The data output becomes more uniform with smaller TCF settings, but this also lengthens the system’s response time to changes in conditions. If you have questions regarding the smoothing function and selection of the Time Constant Factor, contact Teledyne Isco at (866) 298-6174. 2.6.2 “Don’t Smooth” Function This function deactivates smoothing in the event of an abrupt change in flow rate within a measurement interval. A sudden rise or fall in flow at or above this value will disable smoothing for that reading, allowing the accQcomm to accurately represent this change in flow before resuming the smoothing function. Enter the desired value for “Don’t smooth changes over____”. The units of measure will reflect those you selected on the Site tab. 2.6.3 Zero Value for Small Flows In order to avoid continued data output when the flow values are minimal, enter the desired minimum values for “Force to zero if less than____”. When a measured value falls below this point, the output will be set to zero. This function is useful, for instance, with overflow or storm applications where normal condition flows are low to nonexistent. The units of measure will reflect those you selected on the Site tab. 2.6.4 Bad Data The accQcomm maintains a separate Bad Data counter for each instrument and smoothed data type. The counter increments each time a reading with flow, velocity, depth, or temperature value(s) marked as bad is received by the accQcomm. Non-smoothed data types with values marked bad are represented on the display with two dashes (– –). Smoothed data types will continue to output their last good value when a value marked bad is received. If the “Display smoothed...” box is checked, smoothed data will also be shown on the display. With the “Clear smoothed values” box checked, if the Bad Data counter for a smoothed data type reaches or exceeds the specified number of consecutive bad readings, the smoothed value is cleared and the value will be represented on the display with two dashes (– –). 2-14 accQcomm Interface Module Section 2 Installation and Operation 2.7 Alarm and Output Parameters Table 2-2 contains the parameters shown in the pull-down menus for selecting alarm and output functions. Table 2-2 Alarm and Output Parameters Alarm 4-20 Output Flow rate calculated from cross-sectional velocities Q Manning Flow rate calculated with Manning formula, for flow depths that fall below the velocity profiling range Smoothed flow Flow data with smoothing applied. Totalized flow Total flow, including both positive and negative flow. Name Function Flow (Q Main) Velocity (Raw Velocity) Average of individual point velocities from all velocity beams. Avg. Velocity Flow divided by cross-sectional area Smoothed Velocity Velocity data with smoothing applied. Main Depth (Level) This is the depth used for flow calculation, after comparing the readings from the primary depth sensor with the readings from the secondary depth sensor. Ult. Depth Liquid level from ultrasonic depth sensor Sec. Depth Liquid level from secondary depth sensor Smoothed Depth Level data with smoothing applied. Sensor Temperature Temperature in stream Voltage Input voltage Built-in Test A code ‘0’ indicates that there are no problems detected. Average Flow Average flow reading of all active instruments Average Velocity Average velocity reading of all active instruments Average Depth Average liquid level reading of all active instruments Data Timeouts: Number of timeouts on counter Average Temperature Average temperature reading of all active instruments Summed Flow Summed flow reading of all active instruments Bad Flow Count Number of consecutive readings with a bad value Bad Velocity Count Number of consecutive readings with a bad value Bad Depth Count Number of consecutive readings with a bad value 2-15 accQcomm Interface Module Section 2 Installation and Operation 2.8 Viewing Data Via Ethernet To view your flow data via LAN or Internet connection, or in TELNET using terminal emulation software such as HyperTerminal, the flow system must be connected online through the accQcomm’s Ethernet port. Open your browser and go to the URL shown in the Address box on the Communication tab in the accQcomm configuration software. Note Some users have reported difficulty viewing the accQcomm web page using Internet Explorer version 6.0.2600.2180. Other versions of Internet Explorer, as well as other browsers, have no known problems with the accQcomm web page. The default settings for the IP address and Subnet mask are 192.168.1.10 and 255.255.255.0, respectively. The default TELNET port is 23. Note If you change the IP address, your Subnet may need to be adjusted. Once the address of a site is changed, this becomes the static address (unchanging), and must be entered into your browser every time you enter the site, or saved as a favorite site. Note The accQcomm uses TCP/IP communication protocol. Nearly all network servers include these services. If yours does not, install these services. You may also need to adjust your security and firewall settings to access the accQcomm. For assistance in reserving a different static IP address for your unit, contact your network administrator. When you enter the site, the initial view will show a summary of flow data, as well as sums and averages (Figure 2-12). The table will display readings for each connected instrument. For ports not connected to an instrument, the table will display “No Valid Data.” Note For the accQmin flow meter, the accQcomm displays and transmits secondary level data at 10X the actual value when using Standard Data format. This should be considered when setting up alarm conditions and analog outputs. This will not occur with an accQmin using Reduced Data format. 2-16 accQcomm Interface Module Section 2 Installation and Operation Figure 2-12 Summary page in Web view 2-17 accQcomm Interface Module Section 2 Installation and Operation For each connected instrument, the table will provide links to additional data (Figure 2-13, View Details) and recorded data (Figure 2-14, View History). Figure 2-13 Detailed view of instrument data These pages may also be accessed by typing in the accQcomm’s IP address, followed by either /instrument1.shtml (for additional data from Instrument 1) or /history1.shtml (for recorded data from Instrument 1). 2-18 accQcomm Interface Module Section 2 Installation and Operation Figure 2-14 Viewing historical site data The accQcomm will store the last 100 readings for historical data on the web site. 2.9 Default System Recovery In the event that the accQcomm’s IP address or configuration baud rate are not known, communication can be reestablished by performing a system reset. This procedure restores the unit to factory default settings. Note Record your configuration settings for future use. Resetting the system erases all configuration settings. Only the totalizer values will remain. If you attempt to connect with the accQcomm without the correct configuration baud rate or IP address, you will be unable to communicate with the unit unless you adjust the baud rate or reset the module to system default settings. To restore the accQcomm with default settings, perform the following steps. 1. With power applied to the unit, use a straightened paperclip to depress the reset button (Figure 2-15). 2-19 accQcomm Interface Module Section 2 Installation and Operation Figure 2-15 accQcomm reset button After a brief pause, the LCD will display: 2. While “ISCO” is displayed, press the reset button again. The LCD will display: Resets: 1 3. Press the reset button again. The LCD will display: Resets: 2 4. Press the reset button once more. The LCD will display: Resets: 3 2-20 accQcomm Interface Module Section 2 Installation and Operation After a few seconds, the LCD will change to display: USING DEFAULT SETTINGS Once the accQcomm has moved past the Initializing screens, communication is possible through the configuration port with default settings (57600 bps, no parity, 1 stop bit, no Flow Control), or through the Ethernet port (at IP address 192.168.1.10). Startup will once again use saved settings (if different settings are entered). 2.10 Cleaning The module case may be cleaned with warm water and a mild detergent. Avoid getting liquids in the terminal connections or communication connectors. Do not spray or immerse the module in any liquids. CAUTION Do not immerse the module in a bath for cleaning. The accQcomm is not hermetically sealed. If internal components get wet, the module may be permanently damaged. 2-21 accQcomm Interface Module Section 2 Installation and Operation 2-22 accQcomm Interface Module Appendix A Commands, Constants, and Registers A.1 Program Commands Teledyne Isco recommends using the accQcomm configuration software to configure the accQcomm. The following section is intended for use when configuring the accQcomm using a terminal emulation software such as HyperTerminal, instead of the accQcomm Configuration Software. All program commands are listed in Table A-1. To correctly program the accQcomm, enter all commands first, then save them to the unit’s internal flash using the SS command. Afterward, restart the accQcomm with the SR command. The new settings will be applied upon restart. Table A-1 accQcomm Program Commands Commands and Definitions Functions AB Maximum bad readings Param 1 (Range – 255): Defines the maximum number of bad data readings before the current data is cleared from memory. The counters for bad flow, bad velocity, bad depth, and time-outs, are compared to this value. AE Param 1 (Range 1 to 0): Channel 1 state: 0 is disabled and 1 is enabled. Enable/Disable analog output channels Param 2 (Range 1 to 0): Channel 2 state: 0 is disabled and 1 is enabled. Param 3 (Range 1 to 0): Channel 3 state: 0 is disabled and 1 is enabled. Param 4 (Range 1 to 0): Channel 4 state: 0 is disabled and 1 is enabled. NOTE: The number of parameters is always 4, even if the system has less than four analog outputs. If a given output is not installed, that command has no effect. Example — Enables analog output channels one and two, disables three and four. ?>AE 1 1 0 0 AR Analog channel range Param 1 (Range 1 – 4): The analog channel being set. Param 2: The instrument being assigned to the channel. Valid values include numbers 1 to 3, Ins1, Ins2, Ins3, and Sys (used for averages and summed flow). Param 3: The data type that is assigned to the channel. Valid values include Flow, Velocity, Depth, Temperature, Voltage, AvgDepth, SumFlow, etc. The numerical data type constants in Table A-2 can also be used. Param 4: The low range of the analog span; must be in internal units for the data type specified. Param 5: The high range of the analog span; must be in internal units for the data type specified. Example — Assigns analog output 1 to instrument 1 level; sets span from 0 to 2 meters: ?>AR 1 Ins1.Level 0 2000 A-1 accQcomm Interface Module Appendix A Commands, Constants, and Registers Table A-1 accQcomm Program Commands (Continued) Commands and Definitions Functions AS “Big Step” Constant Param 1: A big step value for flow measurements. Changes exceeding this value will not be smoothed. Param 2: A big step value for velocity measurements. Changes exceeding this value will not be smoothed. Param 3: A big step value for depth measurements. Changes exceeding this value will not be smoothed. AT TCF Param 1, 2, and 3 (range 0 – 1000): A time constant factor (TCF) for smoothing flow measurements. The value entered for each parameter is divided by 1000 to obtain the smoothing constant (e.g. entering 500 yields a constant of 0.50). AZ Zero screen constant Param 1: A zero screen value for flow measurements (in cubic cm/s). Measured values below this value will be forced to zero in the smoothed flow data type. Param 2: A zero screen value for velocity measurements (in cubic mm/s). Measured values below this value will be forced to zero in the smoothed velocity data type. Param 3: A zero screen value for depth measurements (in mm). Measured values below this value will be forced to zero in the smoothed depth data type. IP Sets the device IP Address Param 1 (Range 0 – 255): First byte of the address. Param 2 (Range 0 – 255): Second byte of the address. Param 3 (Range 0 – 255): Third byte of the address. Param 4 (Range 0 – 255): Fourth byte of the address. Example — ?> IP 192.168.1.10 IS Sets the device IP subnet mask Param 1 (Range 0 – 255): First byte of the subnet mask. Param 2 (Range 0 – 255): Second byte of the subnet mask. Param 3 (Range 0 – 255): Third byte of the subnet mask. Param 4 (Range 0 – 255): Fourth byte of the subnet mask. Example — ?> IS 255.255.255.0 LB LCD Backlight Param 1 (Range 0 – 1): Sets the LCD screen backlight. 0 is off and 1 is on. LC LCD cycle interval Param 1 (Range 0 – 15): Sets the time (in seconds) for which each display on the LCD is shown. The LCD loops through all screens continuously showing each screen for the time entered here. The LCD screens can be configured using the LD command. LS Display Smoothed Values Param 1 (range 0 – 1): If 1, smoothed data types will be displayed in the LCD and on the main webpage. If <1, measured data is displayed. A-2 accQcomm Interface Module Appendix A Commands, Constants, and Registers Table A-1 accQcomm Program Commands (Continued) Commands and Definitions Functions LD Configures the LCD Display Param 1 (0 or 1): Toggles the Instrument 1 display on or off. 1 is on, 0 is off. Param 2 (0 or 1): Toggles the Instrument 2 display on or off. 1 is on, 0 is off. Param 3 (0 or 1): Toggles the Instrument 3 display on or off. 1 is on, 0 is off. Param 4 (0 or 1): Toggles the 4-20 mA analog output display on or off. 1 is on, 0 is off. Param 5 (0 or 1): Toggles the Pushed Data display on or off. 1 is on, 0 is off. NOTE: The system info display is always turned on. Example — For a two instrument setup with analog output but no pushed data. ?> LD 1 1 0 1 1 0 MA Modbus address Param 1 (Range 1 – 247): The device’s address as a Modbus slave. This is the same for RTU and ASCII protocols. MR Modbus RTU/ASCII toggle Param 1 (0 or 1): 1 sets the device in Modbus RTU, 0 sets the device for Modbus ASCII. Modbus should already be selected using the SA command. MF Alternate Modbus on Serial Port F Param 1 (0 or 1): Enables the device to use MODBUS and analog output simultaneously. However, the Instrument 2 connection is lost. If MF is used, SA 1 should also be used to enable analog output. PE Poll Ensemble Param 1 (Range 1 - 3): The instrument to be polled. When a PE command is issued, the accQcomm will output the full binary data of the last ensemble received from the instrument over the connection. This may look like “garbage” characters, but can be used by an automated polling program. RC Sets one of the two conditions for each of the eight alarms Param 1 (Range 1 - 8): The alarm number. NOTE: See programming example in right column. Param 2 (1 or 2): The condition for the given alarm. Each alarm has two conditions that can be joined by an “AND” or “OR” logical operator. Each condition must be set separately with different RC commands and the operator must be specified with RO. Param 3 (Range 1 – 3): The instrument to which the alarm applies, can be numerical 1 – 3 or Ins1, Ins2, etc., or Sys for averages and summed flow. Param 4: The data type that is used in the condition. Can be a string constant such as Flow, Level, Depth, Temperature, etc. or any of the numerical data type constants listed in Table A-2. Param 5: A comparator for the data value (parameter 4) and the test value (parameter 6). Can be any of the following: =, >, <. >=, <=. Param 6: A test value, entered in internal units for the data type specified in parameter 4. Example: Set alert one, condition one, to alarm if Instrument 1 has a velocity less than 0. ?>RC 1 1 Ins1.Velocity < 0 A-3 accQcomm Interface Module Appendix A Commands, Constants, and Registers Table A-1 accQcomm Program Commands (Continued) Commands and Definitions Functions RC Set one alarm condition for flow pulse output to a sampler Param 1 (Range 1 - 8): The number of the alarm. NOTE: Condition 2 and relay operator field are ignored when a sampler pulse output is configured. Param 2 (1): The condition triggering the sampler pulse output. Param 3 (Range 1 – 3): The instrument to which the alarm applies, can be numerical 1 – 3 or Ins1, Ins2, etc. Param 4: 1 (pulse). Param 5: Comparator is SAMPLER. Param 6: Volume per pulse, entered in units of 0.1L for the Volume / Totalized flow specified in parameter 4. Example: Set up alarm 8 as a sampler pulse, generating one pulse for every 1000L on instrument #2. ?>RC 8 1 INS2 1 SAMPLER 10000 RE Relay enable (on/off toggle) Param 1 (Range 1 - 8): The relay alert to enable or disable Param 2 (0 or 1): Toggle for the relay. If 1, the alert for that relay is evaluated, if 0 it is not. NOTE: If a relay is not enabled, it will remain inactive (closed) unless power fails. By disabling a relay, it can be used as a power fail alert. RL Relay is latching (on/off toggle) Param 1 (Range 1 - 8): The relay alert that will be set as latching/not latching. Param 2 (0 or 1): Toggle for the latching mode. If 1, the relay will remain open (alarmed) if the alert condition evaluates true, regardless of any change in the data value. If 0, the relay will open if the alarm expression evaluates true and will close again if it evaluates false. RO Relay operator Param 1 (Range 1 - 8): The relay operator is being set. Param 2: The relay operator. The operator joins the two conditions and can have any of the following values: And, Or, or None. If the value is None, a second condition is never evaluated. Example — Sets the relay 1 operator to None, such that only the first argument is evaluated. ?>RC 1 None Programming Example — The accQcomm has eight programmable relays for triggering alarms based on one or two user-defined conditions (i.e., flow rate, level, velocity, etc.). Each condition is specified with a set of program commands. In command mode, the relay alarm is enabled (RE), one or two conditions are set (RC), followed by a comparator (>,<, >=, <=, or ==) and a user-defined value, and an operator of AND/OR/NONE is set (RO). If NONE is selected, the second condition is ignored. The alarm can also be specified as latching (RL), meaning once the relay is triggered, it will remain open regardless of changes in data. In the following example, an alarm will be permanently triggered if the flow reverses: ?>RE 1, TRUE ?>RC 1 1 Ins1.Velocity < 0 ?>RO 2 NONE ?>RL 1 TRUE SA Analog output enabled A-4 (Sets Relay 1 to active) (Sets Relay 1, Condition 1) (Sets Relay 2, Operator to NONE) (Sets Relay 1 as latching) Param 1 (1 or 0): Enables/disables the 4-20 mA outputs. If 1, the analog outputs are enabled and Modbus is disabled (unless the MF 1 command is sent), if 0 then analog outputs are disabled and Modbus is enabled. accQcomm Interface Module Appendix A Commands, Constants, and Registers Table A-1 accQcomm Program Commands (Continued) Commands and Definitions SB Initialize modem Functions Param 1 (String): A command string used to initialize the modem. All parameters must be entered on one line with no spaces. The command string is sent to the modem at startup. Example — Sets the modem to auto-answer after two rings and disables DTR line checking: ATS0=2;&D0&K0 SC Coordinate Flash/BBRAM totalizers Param 1 (0 or1): Direction of coordination: SD Set all settings to system defaults NOTE: Reset the unit to factory defaults by entering an SD command followed by an SS command. SF Control/Programming port flow control toggle Param 1 (1 or 0): Toggles flow control on the unit’s programming port. Flow control (CTS/RTS) can be used if the unit is connected to a modem or other telephony device. 1 enabled flow control, 0 disabled flow control. If 0, then the Flash totalizers are set to the current value of the BBRAM totalizers. If 1, the BBRAM totalizers are set to the current value of the Flash totalizer. SH This command configures all hardware for the current settings without a Reinitialize hardware to current settings restart. SI Instrument type Param 1 (Range 1 to 3): The instrument connection that is being set. This corresponds to the connections labeled 1 to 3 on the front panel. Param 2: The instrument type. The valid entries are “ADFM,” “AccQmin,” “HADFM,” and “NONE.” If the instrument type is “None” then the given port is disabled. Example — Sets instrument 1 as an ADFM. ?>SI 1 ADFM SM Modem Connected Param 1 (Range 1 or 0): 1 if a modem is connected, 0 if it is not. If 1, the modem initialization string will be sent at startup (see SB command); this does not turn flow control on or off (see SF command). SN Site Name/Instrument Name Param 1 (Range 0 to 3): The device for which the name is being set. 0 is the site device name, 1 – 3 are the instrument names. Param 2: The site name length. Must be less than 12 characters, alphanumeric only. SO Instrument time-out Param 1 (Range 60 to 3600+): The time-out for instrument 1 in seconds. If the specified time elapses without a valid reading from the instrument, then the bad data counter is incremented. If this counter reaches the value specified by the AB command, the analog output returns to 4.0 mA. The minimum value is 60 seconds; if the value is greater than 3600, the time-out counter is not used. Param 2 (Range 60 to 3600+): The time-out for instrument 2 in seconds (see parameter 1). Param 3 (Range 60 to 3600+): The time-out for instrument 2 in seconds (see parameter 1). NOTE: To disable time-outs, enter a value greater than 3600. A-5 accQcomm Interface Module Appendix A Commands, Constants, and Registers Table A-1 accQcomm Program Commands (Continued) Commands and Definitions Functions SP Serial port configuration Param 1 (Range 0 to 3): The serial port that is being configured. Values are as follows: 1 = Instrument 1 (Serial Port B) 2 = Instrument 2/Modbus alternate (Serial Port F) 3 = Programming port (Serial Port C) 4 = Instrument 3 (Serial Port A) 5 = Modbus (Serial Port D, only when Modbus is enabled on Serial D). Param 2 (Range 1200 – 115200): Baud rate for the port, entered as an integer. Param 3 (0 or 1): The data bits for the port, 1 is 8 bits, 0 is 7 bits. Param 4 (Range 0 to 3): The parity on the port. Values are as follows: 0 = None 1 = Odd 2 = Even 3 = Two stop bits Example — Sets Instrument 1 to defaults. ?>SP 1 9600 1 0 SR System restart SS Save settings to flash ST Sets the system time NOTE: A system restart is required after changing any settings. To correctly program the unit, enter all commands, enter SS to save the settings to flash memory, and SR to restart the unit with the new settings. To correctly program the unit, enter all commands, enter SS to save the settings to flash memory, and SR to restart the unit with the new settings. Param 1 (Range 1980 - 2047): Year Param 2 (Range 1 - 12): Month Param 3 (Range 1 – 31): Day Param 4 (Range 0 – 23): Hour Param 5 (Range 0 - 59): Minute Param 6 (Range 0 – 59): Second SU Display units for a given measurement type Param 1: An abbreviation for the display units. The accQcomm will automatically determine the measurement type and display all measurements in the units. Valid entries are as follows. Level measurements: FT, IN, CM, MM, M Velocity measurements: M/S, CM/S, MM/S, FT/S, Flow measurements: MGD, GPM, CFS, CUMECS, CUBICCM/S, LPS Area measurements: FT^2, IN^2, CM^2, M^2 Volume measurements: LITERS, MEGALITERS, CUBICMETERS, GALLONS, KGALLONS, MGALLONS, CUBICFEET, ACREFEET Temperature measurements: C, F Example — Sets flow measurements to display in Million Gallons per Day ?>SU MGD SX Prepare unit for firmware flash A-6 Param 1: Flash baud rate. This differs from the regular configuration port baud rate. It must match the flash program baud rate. This command is generally issued by the software flash program. accQcomm Interface Module Appendix A Commands, Constants, and Registers Table A-1 accQcomm Program Commands (Continued) Commands and Definitions Functions SZ Reset Totalizer Param 1 (range 1 to 3): The totalizer for Instrument 1, 2, or 3 will be reset to zero. (Also performed with menu command. Refer to Section 2.2.3.) TM Set Totalizer Mode Changing the mode will reset all totalizers to zero. If this command is used but not set to a different mode, the totalizers will not be reset. ?>TM <MODE> The possible values for <MODE> are: NET, POSITIVE, and NEGATIVE. A.2 Data Type Constants Table A-2 lists all of the parameters that can be specified for the AR (analog range) and RC (alarm range/condition) commands. Table A-2 Data Type Constants Data Type Description Numeric Constant Q Main (actual computed flow) 1 Q ModAV 2 Q HRW 3 Q Manning (computed Manning flow) 4 Q Shape 5 Smoothed Flow 6 Area 7 Totalizer 8 Forward totalizer increment 9 Reverse totalizer increment 10 Raw velocity 11 Average velocity 12 Virtual beam 1 velocity 13 Virtual beam 2 velocity 14 Smoothed Velocity 15 Main depth 16 Ultrasonic Range 17 Ultrasonic Depth 18 Secondary Depth 19 Smoothed Depth 20 Sensor Temperature 21 Electronics Temperature 22 Voltage 23 BIT Result 24 Ensemble Number 25 A-7 accQcomm Interface Module Appendix A Commands, Constants, and Registers Table A-2 Data Type Constants (Continued) A.3 MODBUS Register Locations Data Type Description Numeric Constant Received Time 26 Time-outs 27 Bad Flow Count 28 Bad Velocity Count 29 Bad Depth Count 30 Ensemble Timestamp 31 Ensemble Year 32 Ensemble Month 33 Ensemble Day 34 Ensemble Hour 35 Ensemble Minute 36 Ensemble Second 37 Average Flow 38 Average Velocity 39 Average Level (Depth) 40 Average Temperature 41 Summed Flow 42 Table A-3 on the following page lists all available MODBUS register addresses and data types. Internal units of measure for MODBUS cannot be changed. Parameter values will always be output as follows: Flow cc/sec Area cm2 Temp °C Velocity mm/sec Depth mm Volume m3 All data is expressed as 16-bit integer values in the MODBUS internal units. Some values may be large enough to require two registers. If a data type is bad or missing, the corresponding register is assigned a value of -32768. A-8 accQcomm Interface Module Appendix A Commands, Constants, and Registers A.3.1 Explanation of an Example Output Reading Assume the current flow rate value is .446697 m3/s. The accQcomm screen will display a flow rate of .446 m3/s. The Modbus output value will appear as 446697 (Modbus units of measure for flow are always in cc/sec, as stated above.) In Table A-3, the two corresponding flow rate registers are 30001 and 30002. In this case, register 30001 (lower word) contains the value -12055, and register 30002 (upper word) contains the value 6. Combine these two values into a 32-bit integer by doing the following: Convert the decimal values into hex. -12055 = D0E9 6 =6 Combine the two hex values for a sum of 6D0E9. Converted back into decimal format, this value becomes 446697. This is the flow rate in cc/sec. Divided by 1,000,000, this value becomes .446, the flow rate in m3/s displayed on the accQcomm. A.3.2 Explanation of Volume Interval Registers Note that Modbus registers 30015, 30016, 30065, 30066, 30115, and 30116 do not represent cumulative volumes; they are interval volumes. To use these values, consider the following points: 1. Track the ensemble number and only read/process the incremental volumes when a new ensemble occurs--not with every scan. 2. On scans when the ensemble number increments, count the interval volume number(s) and add/subtract from a running total maintained in SCADA. This mechanism allows the user to implement a forward totalizer, reverse totalizer, and/or net totalizer as desired. Further refinement(s) would be to ensure that the SCADA system does not miss any updates, and/or check the flow rate against the incremental total. 3. For positive flow, the forward total will be a positive value, and reverse total will be zero. For negative flow, the reverse total will be a positive value, and forward total will be zero. 4. Short update intervals with low flow rates may show a zero volume due to rounding. A-9 accQcomm Interface Module Appendix A Commands, Constants, and Registers Table A-3 MODBUS Register Addresses Data Type Data Value Sums Summed Flow (lower word) 30151 Summed Flow (upper word) 30152 Average Flow (lower word) 30153 Average Flow (upper word) 30154 Average Velocity 30155 Average Level 30156 Average Temperature 30157 Averages Flow Area Volume Velocity Level Instrument 1 30001 30051 30101 Flow (Q Main, upper word) 30002 30052 30102 Q ModAV (lower word) 30003 30053 30103 Q ModAV (upper word) 30004 30054 30104 Q HRW (lower word) 30005 30055 30105 Q HRW (upper word) 30006 30056 30106 Q Manning (lower word) 30007 30057 30107 Q Manning (upper word) 30008 30058 30108 Q Shape (lower word) 30009 30059 30109 Q Shape (upper word) 30010 30060 30110 Smoothed flow (lower word) 30011 30061 30111 Smoothed flow (upper word) 30012 30062 30112 Wetted Area (lower word) 30013 30063 30113 Wetted Area (upper word) 30014 30064 30114 Volume (Forward Interval) 30015 30065 30115 Volume (Reverse Interval) 30016 30066 30116 Raw velocity 30017 30067 30117 Average velocity 30018 30068 30118 Virtual beam 1 velocity 30019 30069 30119 Virtual beam 2 velocity 30020 30070 30120 Smoothed Velocity 30021 30071 30121 Level (Main Depth) 30022 30072 30122 Ultrasonic Range 30023 30073 30123 30024 30074 30124 Secondary Depth 30025 30075 30125 Smoothed Depth 30026 30076 30126 Sensor Temperature 30027 30077 30127 a A-10 Instrument 3 Flow (Q Main, lower word) Ultrasonic Depth Temperature Instrument 2 accQcomm Interface Module Appendix A Commands, Constants, and Registers Table A-3 MODBUS Register Addresses (Continued) Data Type Data Value Instrument 1 Instrument 2 Instrument 3 Electronics Temperature 30028 30078 30128 Voltage Voltage 30029 30079 30129 System BIT Result 30030 30080 30130 Ensemble Number 30031 30081 30131 Ensemble Year 30032 30082 30132 Ensemble Month 30033 30083 30133 Ensemble Day 30034 30084 30134 Ensemble Hour 30035 30085 30135 Ensemble Minute 30036 30086 30136 Ensemble Second 30037 30087 30137 Received Time 30038 30088 30138 Received Time (upper word) 30039 30089 30139 Time-outs 30040 30090 30140 Bad Flow Readings 30041 30091 30141 Bad Velocity Readings 30042 30092 30142 Bad Depth Readings 30043 30093 30143 a. When using Standard Data format, accQmin secondary level data appears as 10X its actual value. This should be considered when secondary depth is used for alarming or analog output. This does not occur with secondary level data with Reduced Data format. A-11 accQcomm Interface Module Appendix A Commands, Constants, and Registers A-12 accQcomm Interface Module Appendix B Equipment, Accessories, and Replacement Parts Equipment, accessories, and replacement parts can be purchased by contacting Teledyne Isco’s Customer Service Department. Teledyne Isco Customer Service Department P.O. Box 82531 Lincoln, NE 68501 USA Phone: (800) 228-4373 (402) 464-0231 FAX:(402) 465-3022 E-mail:[email protected] B-1 accQcomm Interface Module Appendix B Equipment, Accessories, and Replacement Parts B.1 Equipment and Accessories accQcomm Interface Module . . . . . . . . . . . . . . . . . . . . 68-7500-010 MODBUS output only accQcomm Interface Module . . . . . . . . . . . . . . . . . . . . 68-7500-011 MODBUS + 1 analog output accQcomm Interface Module . . . . . . . . . . . . . . . . . . . . 68-7500-012 MODBUS + 2 analog outputs accQcomm Interface Module . . . . . . . . . . . . . . . . . . . . 68-7500-013 MODBUS + 3 analog outputs accQcomm Interface Module . . . . . . . . . . . . . . . . . . . . 68-7500-014 MODBUS + 4 analog outputs Note All accQcomm packages listed above consist of the accQcomm module, 6ft RS232 cable, 24VDC power supply, configuration software, and user manual. accQcomm Configuration Software. . . . . . . . . . . . . . . 60-7504-019 accQcomm Instruction Manual . . . . . . . . . . . . . . . . . . 69-7503-015 Flow Meter to accQcomm 9-Pin Cable . . . . . . . . . . . . 60-7004-057 Flow Meter to accQcomm Terminal Cable . . . . . . . . . 69-7504-020 ADFM Canister to accQcomm 9-pin Cable. . . . . . . . . 60-7004-027 RS232 Cable . . . . . . . . . . . . . . . . . . . . . . . . . . . . . . . . . 480-7999-02 Console to accQcomm Cable . . . . . . . . . . . . . . . . . . . . 60-7504-016 24VDC Power Supply. . . . . . . . . . . . . . . . . . . . . . . . . . 60-7504-017 Environmental Console 115VAC. . . . . . . . . . . . . . . . . 68-7800-015 Environmental Console 230VAC. . . . . . . . . . . . . . . . . 68-7800-023 Environmental Console 115VAC w/ 400w heater . . . 68-7800-415 Environmental Console 230VAC w/ 400w heater . . . 68-7800-423 Environmental Console 115VAC w/ 800w heater . . . 68-7800-815 Environmental Console 230VAC w/ 800w heater . . . 68-7800-823 B-2 accQcomm Interface Module Appendix B Equipment, Accessories, and Replacement Parts B.2 Replacement Parts Diagrams and Listings Replacement parts are called out in illustrations on the following pages. Reference the call-outs in the accompanying tables at the end of the section to determine the part number for the item. B-3 accQcomm Interface Module Appendix B Equipment, Accessories, and Replacement Parts B-4 accQcomm Interface Module Appendix B Equipment, Accessories, and Replacement Parts B-5 accQcomm Interface Module Appendix B Equipment, Accessories, and Replacement Parts B-6 accQcomm Interface Module Appendix B Equipment, Accessories, and Replacement Parts B-7 accQcomm Interface Module Appendix B Equipment, Accessories, and Replacement Parts B-8 accQcomm Interface Module Appendix B Equipment, Accessories, and Replacement Parts B-9 accQcomm Interface Module Appendix B Equipment, Accessories, and Replacement Parts B-10 accQcomm Interface Module Appendix B Equipment, Accessories, and Replacement Parts B-11 accQcomm Interface Module Appendix B Equipment, Accessories, and Replacement Parts B-12 accQcomm Interface Module Index Numerics O 4-20 mA output, 2-10 outputs, 1-2, 2-9 alarms, 2-8 analog, 2-10 ethernet, 2-16 MODBUS, 1-2, 2-9 smoothing, 2-13 A alarms, 2-8 command mode, A-4 example, 2-8, A-4 analog output, 2-10 P E port settings, 2-6 flow control, 2-7 programming, 2-1 alarms, 2-8 analog output, 2-10 command mode, 2-1, A-1 communication tab, 2-6 configuration software, 2-1 display units, 2-3 error handling, 2-5 instruments, 2-4 LCD, 2-2 MODBUS, 2-9 modem activation, 2-7 network settings, 2-7 outputs, 2-9 port settings, 2-6 site tab, 2-2 smoothing tab, 2-13 errors, 2-5 Ethernet connection, 2-7, 2-16 R F reset system, 2-19 rest totalizer, 2-4 B bad data, 2-14 C cables, 1-2 cleaning, 2-21 command mode, A-1 alarms, A-4 data type constants, A-7 table of commands, A-1 communication, 2-6 connectors, 1-2 D data type constants, A-7 default settings restore, 2-19 flow control, 2-7 L LCD, 2-2 M MODBUS, 2-9 registers, A-8 units of measure, 2-9, A-8 modem, 2-7 initialization string, 2-7 N S site setup, 2-2 small flows, 2-14 smoothing, 2-13 bad data, 2-14 deactivate for abrupt changes, 2-14 TCF, 2-13 zero flow, 2-14 software, 2-1 specifications, 1-5 system reset, 2-19 network settings, 2-7 Index-1 accQcomm Interface Module Index T technical specifications, 1-5 totalizer, 2-3 reset, 2-4 U units of measure, 2-3 unpacking instructions, 1-4 W Web viewing, 2-16 Z zero flow, 2-14 Index-2 Compliance Statements DECLARATION OF CONFORMITY Application of Council Directive: Manufacturer's Name: Manufacturer's Address: Standard of C on fo r m ity Equipment Type/Environment: Trade Name/Model No: Year of Issue: Standards to which Conformity is Declared: 89/336/EEC – The EMC Directive 73/23/EEC – The Low Voltage Directive Teledyne Isco, Inc. 4700 Superior, Lincoln, Nebraska 68504 USA Mailing Address: P.O. Box 82531, Lincoln, NE 68501 Laboratory Equipment for Light Industrial/Commercial Environments accQcomm 2006 EN 61010-1 Safety Requirements for Electrical Equipment for Measurement, Control, and Laboratory Use EN 61326:1998 EMC Requirements for Electrical Equipment for Measurement, Control, and Laboratory Use Description Severity Applied Performance Criteria Electrostatic Discharge Level 2 - 4kV contact discharge Level 3 - 8kV air discharge A EN61000-4-3 Radiated RF Immunity 80 MHz to 1000MHz 80% AM at 1kHz Level 1 – 10V/m A EN61000-4-4 Electrical Fast Transient Level 2 – 2kV on AC lines A EN61000-4-5 Surge on I/O Lines 2kV common mode, 1KV differential mode A EN61000-4-6 Conducted RF on AC lines 150 kHz to 80 MHz, 3V rms, 80% modulated A EN61000-4-11 Voltage Dips/Short Interruptions 0.5 cycle, each polarity/100% A CISPR11/ EN 55011 RF Emissions Group 1, Class A Industrial, Scientific, and Medical Equipment EN61000-3-2, 3-3 Harmonic, Flicker C E D ec la ra ti o n EN61000-4-2 I hereby declare that the design of the equipment specified above conforms to the above Directive(s) and Standards as of October 16, 2006 William Foster USA Representative Teledyne Isco Inc. William Foster Director of Engineering Teledyne Isco, Inc. 4700 Superior Street Lincoln, Nebraska 68504 Phone: (402) 464-0231 Fax: (402) 464-4543 60-7502-013 Warranty Teledyne Isco One Year Limited Factory Service Warranty* This warranty exclusively covers Teledyne Isco instruments, providing a one-year limited warranty covering parts and labor. Any instrument that fails during the warranty period due to faulty parts or workmanship will be repaired at the factory at no charge to the customer. Teledyne Isco’s exclusive liability is limited to repair or replacement of defective instruments. Teledyne Isco is not liable for consequential damages. Teledyne Isco will pay surface transportation charges both ways within the 48 contiguous United States if the instrument proves to be defective within 30 days of shipment. Throughout the remainder of the warranty period, the customer will pay to return the instrument to Teledyne Isco, and Teledyne isco will pay surface transportation to return the repaired instrument to the customer. Teledyne Isco will not pay air freight or customer’s packing and crating charges. This warranty does not cover loss, damage, or defects resulting from transportation between the customer’s facility and the repair facility. The warranty for any instrument is the one in effect on date of shipment. The warranty period begins on the shipping date, unless Teledyne Isco agrees in writing to a different date. Excluded from this warranty are normal wear; expendable items such as charts, ribbon, lamps, tubing, and glassware; fittings and wetted parts of valves; and damage due to corrosion, misuse, accident, or lack of proper maintenance. This warranty does not cover products not sold under the Teledyne Isco trademark or for which any other warranty is specifically stated. No item may be returned for warranty service without a return authorization number issued by Teledyne Isco. This warranty is expressly in lieu of all other warranties and obligations and Teledyne Isco specifically disclaims any warranty of merchantability or fitness for a particular purpose. The warrantor is Teledyne Isco, Inc. 4700 Superior, Lincoln, NE 68504, U.S.A. * This warranty applies to the USA and countries where Teledyne Isco Inc. does not have an authorized dealer. Customers in countries outside the USA, where Teledyne Isco has an authorized dealer, should contact their Teledyne Isco dealer for warranty service. Before returning any instrument for repair, please call, fax, or e-mail the Teledyne Isco Service Department for instructions. Many problems can often be diagnosed and corrected over the phone, or by e-mail, without returning the instrument to the factory. Instruments needing factory repair should be packed carefully, and shipped to the attention of the service department. Small, non-fragile items can be sent by insured parcel post. PLEASE BE SURE TO ENCLOSE A NOTE EXPLAINING THE PROBLEM. Shipping Address: Mailing Address: Phone: Fax: Email: Teledyne Isco, Inc. - Attention Repair Service 4700 Superior Street Lincoln, NE 68504 USA Teledyne Isco, Inc. PO Box 82531 Lincoln, NE 68501 USA Repair service: (800) 775-2965 (lab instruments) (866) 298-6174 (samplers & flow meters) Sales & General Information: (800) 228-4373 (USA & Canada) (402) 465-3001 [email protected] August 13, 2011 P/N 60-1002-040 Rev F