1
Ttiis tis®r manual iT_clude,sd®taiJedusage
instructions for }/our O8['[/@1"F_ J')I@F;/S@..
!@8([I
tiqis manual tho_oughlx/
Click a topic
Samsung
SMARTCAMERA
UAI_
WB150/WB150F/WB151/WB152/WB152F
Viewingphotosor videosin Playbackmode
Learn how to play back photos or videos and how to manage files.
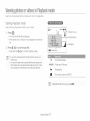
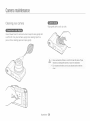
Starting Playback mode
View photos or play videos stored in your camera.
@
1/2
1o0-oool
al_
Press [Ell.
Memory in use
• The most recent filewill be displayed.
• if the camera is off, it will turn on and display the most recent
file.
Press [_J@] to scroll through fibs
• Pressand hold [_/_,._]to scrollthroughfilesquickly.
" t } )u want to view f es stored n the n_erTlalmemory, remove yc
1/2
memory care
•
}urea
notDeaD_etoeatsrpJa}
backflesthatwereca,tureaw_r
o_nercameras aue to uneuoDortea s£e8
_ge sze, e_c
:c lees
use a cornsu_eror anotner aev ce to eal_ c play eack these fies,
Current file/Totalfiles
100-0001 Folder name File name
Protected file
I_
Playback/Editing77
Print order has been set (DPOF)
{
{
{ {:{ }
You can rank your favodte faces, The favorite face feature is
available only when you insert a rnernory card into the camera,
'
In Playback
Select
mode, press
[MENU],
Face List,
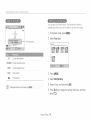
File information
1/2
Current file/Totalfiles
100-0002
Foldername Fibname
00:00
Current playback time
00:20
Video length
Protected file
{J_ Press [MENU],
_:SSelect Edit Ranking,
{!} Select a face, and then press [OK].
(!_ Press [_./xt_)]to change the ranking of the face, and then
press [_].
PlaybacWEditing78
{
{
{ {:{ }
You car/delete pur favorite faces. The favorite face teature is
available only when you insert a memory card into the camera.
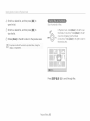
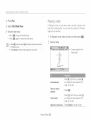
View filesby category,such as date. face, or filetype.
in Playback mode, rotate [Zoom] to the left.
In Playback
mode, press [MENU],
2
Press [MENU],
_ii} Select Face List,
_ Select Filter _a category,
{_ Press
[MENU]
_S SeJect Cancel
My Star
_!; SeJect a face, and then press [OK],
_i_ Press [_1,
/
When the pop-up
message
appears,
seled Yes.
_L
All: View files normally.
Date: View files by the date they were saved,
Face List: View files by recognized faces and favorite
faces. (Upto 20 people)
File Type: View files by the file type,
PlaybacWEditing79
{
4
(
Scroll to a desired
{ {:{ )
list, and then press [OK] to
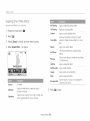
Scan thumbnails of files.
open the list,
::;
_J
Scroll to a desired file, and then press [OK] to
In Playback mode, rotate [Zoom] to the lett to view
thumbnails (12 at a time). Rotate [Zoom] to the left
once more to display more thumbnails
(24 at a time), Rotate [Zoom] to the nght to return to
the previous view.
view the file.
_
Rotate [Zoom] to the left to return to the previous view.
_!,!,_!!!!!i!ii!iiii!iiiiiiiiiiiiiiiiiiiiiiil
ii!i!i!ii_>_i!!!_i_i!i_
!_I_I_I_
'_,_i_!i_ili!il
iiiiiii!i_ii!iiiii!ii!ii!ii!iii!i!iiiiiiiiii!iiiii!ii
iiiiiii!i_ii!iiiii!ii!ii!ii!iii!i!iiiiiiiiii!ii
iiiiii!ii_ii!!i!!_!i!i!i!i!i_iiiiiiiiii
iiiiiii!i_ii!iiiii!ii!ii!ii!iii!i!iii
ill¸
iii_!_i!!!!!!!!!i
!!iii!!!!!!!!!!!!i_i_i_i_i_i_i_i_i_i_i_i_i_i_i_i_i_i_i_i_i_i_i_i_i_i_i_i_i_
Press [BISP/_/_./@]
PlaybacWEditing
80
to scroll through files
{
{
Protect
{ {;{ }
your
files from acddental
deletion.
In Playback mode, press [MENU],
_' Select Protect _On.
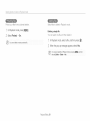
Select files to delete in Playback mode.
Deleting
a single
You can select
'
file
one file, and then
delete
it.
in Playback mode, select a file, and then press [_].
Youcannot debte or rotate a proteot÷Jfie:
When the pop-up message appears, select Yes,
Youca-, also deletefiles inPlayback mode by pressirq [MENU], aid fl-_en
selectingDelete 7_Delete 7_Yes,
PlaybacWEditing
81
Vlw:{
p :q::s::'
{:{qsy:ack
Deleting multiple files
Deleting all fibs
You can select all files, and then delete them at once.
You can select multiple files, and then delete them at once.
'
In Playback
mode, press [_].
In Playback
• When in thumbnails view, press [MENU], select
Delete _ Select, and then skip to step 3, or press [_'],
select Select, and then skip to step 3.
_ii!' When the pop-up
Delete.
message
appears,
mode, press [MERU],
• When in thumbnaib view, press [MENU], select
Delete , Delete All, and then skip to step 3, or press [_'],
select Delete All, and then skip to step 3.
select Multiple
_ii_ Select
Delete
_ Delete
{_ When the pop-up
{_ Scroll to each file you want to delete, and then
All,
message appears,
select Yes.
• All unprotected files are deleted.
press [OK],
• Press[OK] againto cancelyourselection.
4
Press [_],
Copy files from the internal memory to a memory card.
{!} When the pop-up message appears, seled Yes.
In Playback mode, press [MERU],
_ii!'Select Copy to Card
Playback/Editing
82
{
{
{ {:{ }
' '
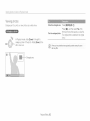
Viewing photos
Move the enlarged area
Enlarge part of a photo or view photos as a slide show.
_@ 5s
" .....
Press [DISP/_/{/_t_],
Press [OK], and then select Yes. (The
Trim the enlarged photo
[]w
In Playback mode, rotate [Zoom] to the right to
enlarge a portion of the photo. Rotate [Zoom] to the
left to zoom out.
Enlarged area
PlaybacWEditing
83
trimmed photo will be saved as a new file.
The original photo is retained in its original
form,)
'
{
{
{ {:{ }
View photos captured in Live Panorarna rhode,
Apply effects and audio to a slide show of your photos. The slide
show function does not work for videos,
In Playback mode, press [_./_t_p]to scroll to a desired
In Playback mode, press [MENU].
panoramic photo.
• Theentirepanoramicphotoappearsonthe screen.
2
_ii_ Select Slide Show Options
Press [OK]
• The camera automatically scrolls through the photo from left to
right tot a honzontal panoramic photo and from top to bottom
tot a vertical panoramic photo. The camera then switches to
Playback mode.
• While playing back a panoramic photo, press [OK] to pause
or resume.
{_ Select a slide show effect option.
• Skipto step 4 to starta slideshowwithno eftects,
* Default
Play Mode
• Atter you have paused the playback of a panoramic photo,
press [BISP/_/_/@]
to move tile photo horizontally or
vertically, depending on the direction you moved when
capturing the photo.
{_i_ Press [_]
Set whether or not to repeat the slide show,
(One Play*, Repeat)
• Set the interval between photos.
Interval
(1 sec*, 3 sec, 5 sec, 10 sec)
° You must set the Effect option to Off to set the
interval.
Music
to return to Playback mode,
Effect
• Set a scene change effect between photos,
(Off, Calm*, Shine, Relax, Lively, Sweet)
• Select Off to cancel effects.
• When you use the Effect option, the interval
between photos will be set to 1 second,
PlaybacWEditing
84
{
4
{
{ {:{ }
Press [_].
_!_ Select Start Slide Show.
_!_View the slide show.
• Press[OK]to pausethe slideshow.
• Press[OK] againto resumethe slideshow.
Playing a video
Its Playback mode you can view a video, and then capture or trim
parts of the playing video. You can save the captured or trimmed
segments as new files.
in Playback mode, select a video, and then press [OK].
View the video.
, Rotate [Zoom] to the left or right to adjust the volume level,
Press [_]. Each time you press [_],
you change the scan speed inthis
order: 2X, 4X, 8X.
Scan backward
Pause or resume
Press [OK].
playback
Press [6.)]. Each time you press [@],
you change the scan speed inthis
order: 2X, 4X, 8X.
Scan forward
Adjust the volume
PlaybacWEditing
85
level
Rotate [Zoom] to the left or right.
{
(
{ {:{ )
In Playback mode, select a video, and then press
'
[MENU].
want to capture an image.
_ii_ Select Trim Movie,
_
While viewing a video, press [OK] at the point where you
Press [_].
Press [OK] to start playing the video
_:SPress [OK] _ [_] at the point where you want the
* The captured image is saved as a new file,
trimming to begin.
_!_ Press [OK] to resume playing the video.
_!_ Press [OK] _ [_] at the point where you want the
trimming to end.
/
Press [_] to trim.
4!i:When the pop-up message appears, select Yes.
" The original video shouU be at least ! 0 seconds long,
* The Camerawill save the edited Video as a new file and leave the
o%inal video intact,
PlaybacWEditing
86
Editinga photo
Learnhow to edit photos,
a lower resdution,
Resizing photos
Rotating a photo
Changethe sizeof a photo and save itas a new file.
Rotate the mode dial to 0.
In Playback mode, select a photo, and then
press [MENU]
_ii_ Select Resize
{_ Select an option.
_ii_ Select
{_ Rotate [Zoom] to the left, and then select a photo.
_:SSelect Rotate _ an option
5
Q
Press [_] to save
Ava!abl_ resizeop!on8 d!fferd_pending or! the oqginaJ8_z__f lf_ephoto:
a photo,
Playback/Editing87
iiidiiin{i
sphoto
Applying Smart Filter effects
Apply special effects to your photos.
Rotate the mode dial to I_.
Ink Painting
Apply a watercolor painting effect,
Oil Painting
Apply an oil painting effect.
Cartoon
Apply a cartoon painting effect.
Cross Filter
Add lines that radiate outward from bright
objects to imitatethe visual effect of a cross
filter,
Sketch
Apply a pen sketch effect.
Soft Focus
Hide facial imperfections or apply dreamy
effects,
_ii> Select
{_ Rotate [Zoom]
_:S Select Smart
to the left, and then select a photo
Filter
_ an option
Normal
No effect
Miniature
Apply a tilt shift effect to make the subject
appear in miniature,
Vignetting
Apply the retro looking colors, high contrast, and
strong vignette effect of Lomo cameras,
:;
_J
Playback/Editing
Fish-eye
Distort dose objects to imitate the visual effect
of a fisheye lens.
Old Film
Apply a vintage film effect,
Half Tone Dot
Apply a halftone effect.
Classic
Apply a black and white effect,
Retro
Apply a sepia tone effect.
Zooming Shot
Blur the edges of a photo to emphasize the
subjects in the center,
Press [_,_] to save
88
iiidiiin{i s photo
_S Select an adjusting option.
Adiusting your photos
Learn howto adjustthe brightness,contrast, or saturationor how
to correctthe red eye effect, If the centerof a photo is dark, you
can adjustit to be bnghter,The camerawillsave an edited photo
as a new fiJe,but may convert itto a lowerresolution,
{_["
_D
Brightness
Contrast
Saturation
You cannot apply the ACB, Face Retouch, and Red eye Fix eftects
at the same time,
::; Press [_/6_.p]to adjust the option
_J
_i_ Press [OK],
/7 Press [_] to save.
Rotate the mode dial to 0.
2
Select _J,
_
Rotate [Zoom] to the left, and then seled a photo.
Rotate the mode dial to 0.
2 Select _.
{_ Rotate [Zoom] to the left, and then seled a photo.
_S Select ACB.
5
Playback/Editing
Press [_] to save.
89
iiidiiig{i g pi_oto
Creating a pnnt o_de_(DPOF)
Selectphotos to printand save printoptions inthe DigitalPrint
Order Format(DPOF),This intormationis savedinthe MISCfolder
on your memory cardfor convenientprintingon
DPOFcompatibleprinters.
Rotate the mode dial to I_.
2
Select _.
{_ Rotate [Zoom] to the left, and then select a photo.
In Playback mode, select a photo you want to print, and
_:SSelect Face Retouch.
5
then press [MI:NU],
Press [_./6_)] to adjust the option.
_ii_ Select DPOF.
• As thenumberincreases,the skintonebecomesbnghterand
smoother.
{_ Press [DISP/_] to select the number of copies, and
then press [OK].
(!_ Press [_] to save.
_,J
• _hotos with dlmerisio _ that are wlaer _n_1ins paper may se out off
_n tne left and lght edges. Ensure that you Dno_oalmens ons are
Rotate the mode dial to I_.
2
Select _.
_
Rotate [Zoom] to the left, and then select a photo.
3omDa_Jelewl_n tr/e eaDeryou sele £,
ou oar _etset DPOF oouons tot phOtOSs_orea n the n[eul£
91Tie,y,
-
_:SSelect Red-eye Fix.
5
• _ou carl _aKethe memoly cad to a print shop 1flat supports DPOF
(Dig Ia Pdnt Order Format sryou san pnn_photos alrec_ly_nreugna
DPOF come sup e onn_era_home
Press [_] to save.
Playback/Editing
90
_you specly the pnnt size, you san prn_ photos onyw_n
DPOF 1.1 comea_m)lesnn_ers
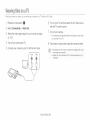
Viewingfiles on aTV
Playback photos or videos by connectingyour ear-herato a TVwith the AA/cable.
Rotate the mode dial to _.
_ii_ Select Connectivity
_!_Turn on your TV, and then select the A/V video source
with the TV remote control.
* Video Out
{_ Select the video signal output for your country or region
(p. 123)
_:STurn off your camera and TV.
_7 Turn on your camera
• ThecameraautomaticallyentersintoPlaybackmodewhen
you connectitto a T_
4};:View photos or play videos using the camera buttons.
_!_ Connect your camera to your TV with the A/V cable.
@
" Depending on the TV rnodel, you may see some digital nobe or part
of arl image may not appea_.
Images may not be cente/sd en the TV screen dependhg on your
TV ae_lr/gs,
PlaybacWEditing
91
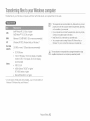
]?ansferdngfiles te yeurWindewscemputer
Transfer
files to your Windows
eornpute_,
edit them
with
Intelli studio
and upload
them to the web,
, The rec Jremen_s are recommenaa_on or y, n_e i s_uaJon ay lot work
properl_ even when me cc 9u_ermee_s ins _@u_remer_8,@eDenalng
_r rns oonaJl9D at your compute
CPU
InteP Pentium:% 3.2 GHz or higher/
AMD Athlon TM FX2,6 GHz or higher
RAM
Minimum 512 MB RAM (1 GB or more recommended)
Ityour computer aces no_ meel ins reaul_men_s, v leas may _ K play
_orTeotlyor t may _aKeanger ro eo _vlqeo8
•
•
aS*
Hard disk
capacity
Windows XP SP2, Windows Vista, or Windows 7
our oc -_'EJter must De rut
2 vwnaows (R W ndows Vista Dr
Windows 7 fo ou _oconnec_ rne oanle_ as a removable OISK
250 MB or more (1 GB and above recommended)
Thema]utactu_er s not resp'onsbe for any damage _/at resultstram us ng
OD RaM drive
Others
ns_a DJrectX9,00 or a_el )store you use ntell stud )
Jr ]uaJfed con- )ureassucn as a con su_e_you assemDea yourself
• 1024 X 768 pixels, 16 bit color display compatible
monitor (1280 X 1024 pixels, 32 bit odor display
recommended)
• USB 2.0 port
• nVIDIAGdorce 7600GT or higher/
AT1X1600 series or higher
. Microsoft DirectX 9,00 or higher
* A 82 bit version of Intelli studio will be installed
Windows XR Windows Vista. and Windows
even on 64 bit editions at
7,
PlaybacWEditing
92
Tiaiisi(!_ixiii{iiiies ie }io_iiWiii_iiowscoiYipiiix_i
¸
T_ansfe_dngflies with Intelli studio
{!} Turn on the camera.
You car/download Intelli studio from the linked webpage and
install it on your computer, When you connect the camera to
a computer with Intelli studio installed, the program will launch
automatically,
• When the Intelli studio installation pop up appears on the
cornputer screen, tollow the on screen instructions to
complete the installation.
• Once the Intelli studio is installed on your computer, the
computer recognizes the camera and launches the
Intelli-studio automatically.
Rotate the mode dial to
_ii_ Select Connectivity
* PC Software
_!_ Select a destination
* On
folder on your computer,
and then
select Yes.
_ Turn off the camera
• New files stored on the camera will automatically transfer to
the selected tolder.
_S Connect the camera to your computer with the USB
cable.
° If your camera has no new files, the pop-up window for saving
new files will not appear.
responsibb
totarlylossofdata.
lJ'-_e
compute:, dick _
; Computer _r_Intelli_studio, and 1hentdlew the
on sa-een ins#uctions to complete fl/e Intelli_studio
insts]JaScn,
PlaybacWEditing
93
i_isi01iiii{i
fii(_six}yo_i_Wiii_iows (}oiYipiiiei¸
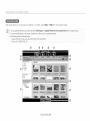
Int÷lli studio allows you to play back and edit files. For details, select Help
_ Help frx}m the program toolbar.
Photos: ,JPG,GIF, BMR PNG, TIFF
@
Playback/Editing 94
Tiai
fii_i(!_ixiii{i
iiies
io}io_ii
Wifii<iiows
fix}fifiipiiii_i
¸
@
@
@
@
@
@
@
@
@
@
@
@
@
@
@
Open
menus,
Display
files
intheselected
fdder
Switch
tothePhoto
edit
mode,
Switch
tothe
Video
edit
mode,
Switch
totheSharing
mode
(to
send
files
byemail
or
upload
files
towebsites,
such
asFlickr
orYouTube),
Enlarge
orreduce
the
thumbnails
inthe
list,
Select
afile
type,
View
files
inthe
selected
folder
onyour
computer,
Show
orhide
files
onthe
connected
camera,
View
files
inthe
selected
folder
onthe
camera,
View
files
asthumbnails
oronamap,
Browse
folders
stored
onthecamera,
Browse
folders
stored
onyour
computer,
Move
tothe
previous
ornext
folder,
Print
files,
view
files
onamap,
store
files
inMy
Folder,
or
register
faces,
Playback/Editing
/_ansfe_dng flies by connecting the came_a
as a _emovable disk
Connect the camera to your computer as a removable disk.
Rotate the mode dial to
_ii_ Select Connectivity
_ PC Software
_ Off
{_ Turn off the camera
_S Connect
cable.
_s\
_.s
95
the camera to your computer
with the USB
Youmustplugfl-8 smallendof fl-leUSBcableintoyourcamera,Iffl-_e
cableis _eversed;
it maydanlageyourfiles.Themar_utacturer
is not
resp'onsible
tcranyJossofdata,
Tiaii_i;i(!_ixiii{i
iiies io }io_iiWiiidows coiYipiiix_i
¸
:;
Turn on the camera.
_J
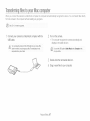
Disconnecting the camera (for Windows XP}
• Thecomputerrecognizesthecameraautomatically,
@
With WindowsVistaand Windows7, the methodsfor
disconnectingthe cameraare similar.
Ifyo u set1he USB eptlon to Select Mode, _lect Computer it!1he
pop_upwindow,
_!_ On your computer, select My Computer
Disk _ DCIM _IOOPHOTO.
Verify that the status lamp is not blinking.
_Removable
• Thestatuslampblinkswhentransferringfiles.Waituntilit
steps,
_ii!'Click _
on the tool bar at the bottom right of your
computer screen,
_? Drag or save fibs to your computer.
_ Click the pop-up message
d{ Click the message box that indicates the camera can be
removed safely,
{? Remove the USB cable.
PlaybacWEditing
96
°l?ansferdngfiles to 70ur Maccomputer
When you connect the camera to a Macintosh computer, the computer win automatically recognize the device. You can transfer files directly
from the camera to the computer without installing any programs,
@
Mac©S!Q.4orlaterissu_p_rted:
Connect your camera to a Macintosh
computer
with the
USB cable,
Turn on the camera.
• The computer recognizes the camera automatically and
displays a removable disk icon,
responsible
totanylossofdata,
{_ Double-click the removabb disk icon.
_S Drag or save fibs to your computer
Playback/Editing
97
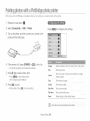
Printingphotoswith a PictBndgephotoprinter
Print photos with a PictBndge compatible printer by connecting your camera directly to the printer.
'
Rotate the mode dial to ,_
_::_!_
Select Connectivity
_ USB _ Printer
Press [MENU]to configure print settings.
_ Turn on the printer, and then connect your camera to the
printer with the USB cable.
_S If the camera is off, press [POWER]
or [E]]
to turn it on.
images
Select whether to print the current photo or all photos.
Size
Set the print size.
Layout
Set the number of photos to be printed on a single
sheet of paper
Type
Set the type of paper.
Quality
Set the print quality.
• The printer recognizes the camera automatically.
{!} Press [_./_t_.P]to select a file to print.
• Press [MENU] to set pnnting options.
See "Configuring print settings."
(!_ Press [OK] to print.
• Printing starts. Press [OK] to cancel printing.
Date Print
Playback/Editing
File Name
Set to pint the file name.
Reset
Reset settings to their default values.
98
Wireless nE
LearF
qow
to
Connecting
CoRRecI
IO wireless
local
2FooJyl
area
ReIWOrKS
to a WLAN and configuring
network settings
(WLANs}and use functions.
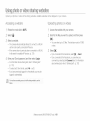
Using a smart phone as a remote
10d
shutter release
110
3onnec_ng to a VVLAN
lUU
Uploading
112
using _ne _c.
10
102
Using Auto Backup to send photos
S[WOrK
o_ov,/a_ . .
CO[I[]GC[IOH
I _S
Enter j _ex_
........
Sending photos or videos via email
3ha/_ging em_H se[tlngs
Send
3t
]oso[
xeosvlaern_
bendirlg
118
aids or w_e,_s _) a HC
IL_
104
Viewing photos or videos on a
10b
10C
Sending photos using Wi-Fi Direct
1C
Sending photos or videos _o a
smart phone ........
11S
four PC
104
/-_cueaal_lga _Dsl[e _
Jsa_ng )no[as orvlaeos
or videos
ns[alllnfl _neproL "am lot Auto Baa_,_
Using photo or video sharing
websites
photos to a cloud server
lC :_
TV Link-enabled
......
TV .....
11{5
-_
_.
11/
About the Wakeup on LAN (WOL)
feature
.....................................
__
Connectingto a
and configunngnetwork seSings
Learn to connect via an access point (AP) when you are in a range of a WLAN, You can also configure network settings.
Connecting to a WLAN
¢i_)
Rotate the mode dial to Wi-Fi,
2
Select @, @, _>, 2,
I_
or _,
_:SSelect an AR
2
Samsung
3
_
(_1_)
_ _"
Sat,suing
4
_
a _' i_!
Secured AP
WPS AP
{_ Press [MENU],and then select AP Setting,
• Insome modes,press[MENU]or to/owthe on screen
instructionsuntilthe APSettingscreenappears.
• Thecameraautomatically
searchestot available
AP devices.
Samsung
iAd hoc AP
"@ !_
i Signal strength
Press [Q] to open AP setting options
• When you select a secured AR a pop-up window appears,
Enter the required passwords to connect to the WLAN, For
information about entering text, refer to "Entering text".
(p. 103)
• When a Iogin page appears, reter to "Using the Iogin browser".
(p, 101)
• When you select an unsecured AR the camera wi/connect
to the WLAN.
• If you select a WPS profile supported AR select WPS PIN,
and then enter a PIN on the AP device, You can also connect
to a WPS profile supported AP by selecting WPS PBC on the
camera, and then pushing the WPS button on the AP device.
• Select WPS PBC to connect to a WPS AR
• Select Refresh to refresh connectable APs,
• Select Add wireless network to add an AP manually,
Wirelessnetwork (VVB150F/WB152F
only) 100
Cogg0ciig{i
io_}_
WLi\N
gr_:i
cogii!ii_iiiii{i
ueiv,_oii<
seitii_{is
Using the Iogin browse_
IntheAPSetting
screen,
move
toanAP,
and
then
press
[_t_)].
_ii!'
Select
each
option,
and
then
enter
therequired
information.
Authentication
Select
anetwork
authentication
type,
Data
Encryption
Select
anencryptJon
type,
Network
Password
Enter
the
network
password.
IPSetting Set
theIPaddress
manually,
You can enter your Iogin information via the Iogin browser when
connecting to sorne APs, sharing sites, or cloud servers,
[DISP/,_t,/I/Q]
Move to an _temor scroll tne sage
[OK]
Seect an ter_
Access the fol ow ng c xions
. Previous Page love to the }revous )age
.
[MENU:
. Stop Stop oading the page
• Exit: Close the log n Drowser
[_:D]
In the AP Setting screen, move to an AP, and then
press [_t_.)].
z_!
_ Seiect IP Setting
Next Page: Move to one nex_page
° Reload: Reoad _ne }ac e
}lose the oc
orowse
• 7OUcanno_ seieo[ some _ems aepenol/g on [ne page you connec_eo
to. This does not r 9ioate a matunct or
• The oglnorowserma} qo_coseau_omatcalJyatteryoulog
[oeome
pages, t th s occurs, close the logn orowse W press ng [_]
ant
then oroceea wl_nthe aesl,eo ooerauon
_ Manual.
_J Seiect each option, and then enter the required
information.
IP
SubnetMask
EnterthestaticIPaddress.
Enterthesubnetmask.
Gateway
DNSServer
Enterthegateway.
EntertheDNSaddress.
, _may taKe longer _oioaa the ogln page aue _otne page size o
_le_?o eDeed, ltthlsoccu/s wa_unt tnelogin ntorlqlatorlinput
wnaow aE)ears,
Wireless network (VVB150FA/VB152F only)
101
C0i_i_ectin{ii0 s WLAN si_8 c0i_ii!ii_in{i _ei_0ii< seiiin{is
Netwo_k connection tips
• If you cannot connect to a WLAN, try another AP from the
available AP list.
The quality of the network connection will be determined by
the AIR
The further the distance between your camera and the AR the
longer it will take to connect to the netwo£.
If a nearby device is using the same radio frequency signal as
your camera it may interrupt your connection,
If your AP name is not in English the camera may not be able
to locate the device or the name may appear incorrectly,
For network settings or a password, contact your network
administrator or network service provider,
If a WLAN requires authentication from the service provider,
you may not be able to connect to it. To connect the WLAN,
contact your network service provider.
• Depending on the encryption type, the number of digits in the
password may differ,
• A WLAN connection may not be possible in all surroundings.
• The camera may display a WLAN enabled printer on the AP
List, You cannot connect to a network via a printer,
• You cannot connect your camera to a network and a TV
simultaneously, Also, you cannot view photos or videos on a TV
while connected to a network.
• Connecting to a network may incur additional charges. Costs
will vary based on the conditions of your contract.
• You can also connect to free WLANs in sorne foreign countries.
• A Iogin page may appear when you select free WLANs
provided by some network sewioe providers. Enter your ID
and password to connect to the WLAN, For intormation about
registenng or the sewice, contact the network service providers.
• Be cautious when you enter personal intormation for an AP
oonrlection, Do not enter any payment or credit card intormation
on your camera, The manufacturer is not liable for any problem
caused by entenng such information.
• Available network connections may differ by country,
• The WLAN teature of your camera must comply with radio
trarlsmission laws in your region, To ensure compliance, use
the WLAN feature only in the country where you purchased the
camera,
• The process tot adjustir/g network settings may differ,
depending on network conditions,
• Do not access a network that you are not authorized to use,
• Before you connect to a network, ensure your battery is fully
charged.
• When a DHCP server is riot available you must make an autoip.
txt file and copy it to the inserted memory card to connect to
the network using Auto IR
Wireless network (WB150FA/VB152F
only)
102
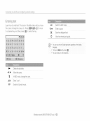
Entedng text
Learn how to enter text. The icons in the table below let you move
the cursor, change the case, etc. Press [DISP/_/_./Q]
to move
to a desired key, and then press [OK] to enter the key.
ABC
Sw teh to ABC moqe
SrJace
-nter a space
OK
Save the disp_ayeo text
(_
view tne en_enngtext gulae
• You can use ony the Eng sh a }naDet, regarsles _ :_fthe d sp a_
anguage.
• To move to OK d rect y, press [E]].
• You can en_e_k ) to 64 characters
Delete the last letter.
_1 1_
"1"
Move the cursor.
In ABO mode, change the case.
.corn
Enter ".corn".
!@#
Switch to Symbol mode.
Wireless network (VVB150FA/VB152F only)
103
Usingphotoor video sharingwebsites
Upload your photos or videos to file sharing websites. Available websites will be displayed on your camera.
Accessing a website
Rotate the mode dial to
2
Uploading photos or videos
Wi-Fi.
Access the website
Select @.
_ii!' Scroll to the files you want to upload, and then press
[oK].
{_ Select a website,
• The camera will automatically attempt to conned to a WLAN
via the most recently connected AP device,
• If the camera has not previously been connected to a WLAN,
it will search for available AP devices. (p, 100)
_S Enter your ID and password,
with your camera.
and then select Login
• For information about entering text, refer to "Enteringtext".
(p. 103)
• To select an ID from the list, select V _ an ID.
• Jfyou have previously logged in to the website, you may be
logged in automatically.
• You can select up to 20 files. The total size must be 10 MB
or less.
{_ Select
OK,
• If you connected to the Facebook, select OK _ Send.
• If you connected to the Facebook, you can enter your
comments W selecting the Comment box, For intormation
about entering text, refer to "Entering text". (p. 103)
Wireless network (VVB150F/WB152F
only)
104
i.Jsig{ipii0i0 i:ii¸Viiiie0Sii_iqg{iwebsites
_s
• The max mum photo resdut on you can upoad s 2M, and the Ionges_
vJcleoyou can upload is 30 seconds at QVI_A reso utor sr a vlaeo
sc aea us r _ _
t the seJected E rote resoJurlon s n aner tnan
2M, t wi] be autor _ ca] y res ze(] re a ower resolu_ on
• The me_noa or upoaang pno_os orvaeos
The_eectea WeDSte
may differ aepenang Dr
° _ ,ou oanno_access a weoeJ_eDec _uee of fi_ewa or user
au_nen_oauoneesngs, oonracl your neTworKaaron srra_c or netwon
serv oe Drov(se
• uooaoeoDno[osorveeosmayDeau_or
_ucalJytteo
tntneaate
_neywere cap,urea
- The _peed of yc Jr in[eme_connect oR may affec_ now au oKlypno[os
oJoa(lor WeDpages ooer
• when __ereare no fi es n the o_116a memoW, you oanno_use _n_s
tearu a,
)u can also UDJOa(]DFIOIOS
O /ideos to fie 8ha{ln{, /eDeJ_es
Pl_ pack moae Dy pressing [M_NU] an8 _nen se ec_ng Share(Wi-Fi)
a ae8 rea weDs_6
Wireless network (VVB150FA/VB152F only)
105
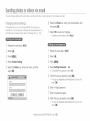
Sendingphotosor videosvia email
You car/change
settings in the email menu, and send photos or videos stored on the camera via email,
Changing email settings
In the email menu you can change settings for storing your
information, You car/also set or change the email password. For
information about entering text, refer to "Entenng text". (p. 103)
Rotate the mode dial to
_!_Select the Email box, enter your email address, and
then select 01(
/7 Select OK to save your changes.
• Todeleteyour intormation,
selectReset.
Wi-Fi
_ii_ Select @,
Rotate the mode dial to
{<_ Press [MI:NU]
_:S Select Sender
5
Wi-Fi
_ii_ Select _0.
Setting
3
Select the Name box, enter your name, and then
Press [MENU].
_:S Select Setting
select OK,
Password
_ On.
• To deactivate the password, select Off.
{!}
When the pop-up
appears,
press [OK],
• The pop-up disappears automatically even if you do not
press [OK].
_i_ Enter a 4-digit password.
/7 Enter the password
{i/ When the pop-up
again.
appears,
press [OK].
• The pop-up disappears automatically even if you do not
press [OK],
Wirelessnetwork (WB150F/WB152Fonly) 106
3ei_dii_{i
pi_oiesoiwideosviae_sii
Sending photos or videos via email
You car/send photos or videos stored on the camera via email,
For information about entering text, refer to "Entering text". (p. 103)
Rotate the mode dial to Wi-Fi.
2
Select @.
3
Press [MENU].
Rotate the mode dial to
2
"_SSelect Change Password
Select _,
{_ Select the Name(Email)
and then select OK.
_j; Enter your current 4-digit password.
Wi-Fi
box, enter your email address,
• If you have previously saved your information, it will be inserted
automatically. (p. 106)
_i_ Enter a new 4-digit password
_7 Enter the new password again
_:S Select the Receiver
_i/ When the pop-up appears, press [OK].
• Thepop up disappearsautomaticallyevenifWu do not
press [OK],
box, enter an email address,
and
then select OK,
• To use an address from the list of previous recipients, select
v
_ an address.
• Select 4- to add additional recipients. You can input up to
30 recipients.
• Select X to delete an address from the list.
{j} Select OK
Wirelessnetwork (WB150F/WB152Fonly) 107
_i_!!_i_i:iii
i{iii;>ii0ti:i_;
i:ii
¸Vid00_i;
Vi_!!_
i!_iYi_ii
_!_Scroll
tofiles
tosend,
and
then
press
[OK],
• You
can
select
upto20files.
The
total
size
must
be10MB
orless,
, Ever t a d-_oto aoDears to have transferred successtu
-ecognzea _s scram
-
_7 Select OK.
c J ms -_otDe as e to sena an emal t no network conneouor •
_vallaoleo f your emal accotun[ sex ngs are ncorrect
• The max
_:4 Select the Comment box, enter your comments, and
then select OK.
e rors w_n
_ne rec )en_s ema acooun[ may cause the pno[o [o De rejec_ea or
]m DROIOreso u_on } )u can send is 2M and the ongesl
vaeo Jou can upload is SOseconds at QVGA resoJul]cq c E aeo
reooraea ue _g_.
I the se ectec Dno_oresoJu;on s gner _nar
21v t w De automa_c_ y reszea EOa ower resou_or
o t you cant :_teena a_"erna because ot frewa or user au_nen_:auor
!i;_ Select Send.
_eslngs, oon[ao_ your networK aam n s_a_or or neTworKservice
_rovla_
• The camera will automatically attempt to connect to a WLAN
via the most recently connected AP device and send the
email.
• vvr_eninere are no ties n the came _ memory, you canno_ use _nl_
earl e
• If the camera has not previously been connected to a WLAN,
it will search for available AP devices. (p. 100)
• _ou can aso send ar emall in Playback moae by pressing [MENU]
_na _nenselec;ng Share(Wi-Fi)
_Email,
Wirelessnetwork (WB150FA/VB152F
only) 108
Sendingphotosor videosto a sma£ phone
The camera
smart
@_
connects
to a smart
phone
that supports
the
MobileLink
feature
via a WLAN,
You can easily send
photos
or videos
to your
phone,
t The MebileLink feature is supported by Galaxy S smart phones with _'TeAndroid 2.20 S or higher, Ifyour smart phone uses the Android 2,1 QS, upgrade your
smart phone to Android 2,2 or higher. This feature is also supported by the T and _Q,1 inch Galaxy Tab. This feature may be SUPPO
rted by ether devices w!th
Andreid 2.2 el higher, but Samsgng makes he guarantee of its functi0nality,
You should install the MebileLink application on YOUr phone or device be!ore Using this feature, You can downJead the applicaSon from Sarnsung Apps o_Android
market.
When fl-lereare nq %s in the camera memory4you cannot use this feature,
* Yes can share up to 1,000 photos or videos,
On the camera,
_ii!
_ On the camera,
rotate the mode dial to
Wi-Fi,
:i_J On the smart phone, select files to send from the camera
to the smart phone.
select _,
• If the pop up message that prompts you to download the
application appears, select OK.
{_ On the smart phone, turn on the MobileLink
(!_ On the smart phone, select Copy.
•
The camerawill
application,
• The smart phone will start searching for and then connect to
the camera automatically.
• The smart phone can connect to only one camera at a time,
_S On the camera,
select OK.
Wirelessnetwork (VVB150F/WB152F
only) 109
send
the files.
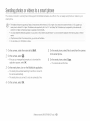
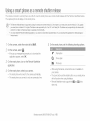
Usinga sma£ phoneas a remoteshuSerrelease
Tlae camera connects to a smart phone via a WLAN. Use the smart phone as a remote shulter release with the Remote Viewfinder feature,
The captured photo will display on the smart phone.
You should installthe Bernote y!e,,@Tder@pJbat!on on your phone or dev_c9before iJsing th!s feature, You can download the applicat!gn from Samsung AlaPSor
Android market.
On the camera, rotate the mode dial to Wi-Fi.
2
{!} On the smart phone, set the following
On the camera, select _.
• ifthe pop up messagethat promptsyou to downloadthe
applicationappears,select OK.
_R
(_
{_ On the smart phone, turn on the Remote Viewfinder
shooting
options,
Flash option
Timer option
Photo size
application.
d{ On the smart phone, sebct your camera.
• Thesmartphonewill connectto thecameraautomatically.
• Thesmartphonecan connectto onlyonecameraat atime.
• Whib using this feature, some buttons are not available on
your
camera.
• The zoom button and the shutter button on your smart phone
will not function when using this teature.
• Remote Viewfinder mode supports the [_] and _ photo
sizes only,
Wireless network (WB150F/WB152F
only)
110
_!_ On the smart phone, touch and hold _
to focus
• The focus is automatically set to multi AR
/7 Release _
to capture the photo.
• The photo will be saved in your camera.
° Touch the photo in the bottom of the screen to save it to the
smart phone. The photo will be resized to 640 X 360.
• The smart t_hone must be wth n 93 ft/7 m of the camera i ) use tnls
tea_ure,
• TW_ taKe some _me to ca xure _ne OnOIOatter yc ] reease _
smart enone
on tn_
• The Remo;e v _wfindet tuner on _v_
J oeaowa;e wner
_-_eres an r sor ng caJ on the sma_ )none
el_ner_ne canlera or tne sm_ t ohone tuH7oit
Theme 3 3tu
el_nereevloe ose81is cc _nec_on to tr_6
flTeW_ F _'omecton is _ooro
JAb
sns[aele
• To rotate the sc ene Dy rotatng the smart _qone turn on the au_c
otat on teature o_ your smari F lone,
F.
Wireless network (WB1o0F/WB152F
only)
111
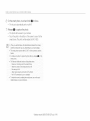
Uploadingphotosto a cloud server
You car/upload your photos to SkyDrive. To upload photos,
you must visit the Microsoft website
and register before connecting
your
oarr-le4"(t,
Rotate the mode dial to
Wi-Fi.
::;
_J Scroll to the photos you want to upload, and then
press [OK].
_ii> Select ,_;'
3
_:_ Select
Select SkyDrive,
0K,
• If the pop up message that prompts you to create an account
appears, select OK,
• The camera will attempt to connect to a WLAN via the most
recently connected AR
• If the camera has not previously been connected to a WLAN,
it will search for available AP devices. (p, 100)
When lhe/e are no photos b the camera memery_y@ cannot use this
feature.
d{ Login with your ID and password,
• For information about entering text, refer to "Enteringtext".
(p. 103)
• If you connected to SkyDnve, refer to
"Using tile Iogin browser", (p, 101)
Wireless network (WB150F/WB152F
only)
112
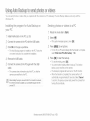
UsingAuto Backupto send photosor videos
You can send photos or videos that you captured with the camera to a PC wirelessly, The Auto Backup feature works only with the
Windows OS.
Installing the program for Auto Backup on
your PC
Install Intelli-studio on the PC (p 93)
Sending photos or videos to a PC
Rotate the mode dial to
2
_ii_ Connect the camera to the PC with the USB cable.
Wi-Fi
Select _,
• If the guide message appears, press [OK],
{_ Click OK on the pop-up window.
• TheAutoBackupprogramis installedon the PC.Followthe
on screeninstructionsto completethe installation.
{_ Press [MENU] to set options.
_:SRemove the USB cable.
_:S Press [OK] to start the backup.
5
Connect the camera to the PC again with the USB
cable
, Thecamerastoresinformationaboutthe PC, sothatthe
cameracan sendfilesto the PC.
• To turn off your PC automatically after the transter is complete,
select Shut down PC after backup _ On.
• To cancel sending, press [OK],
• You cannot select individual files to backup. This function
backs up only new files on the camera,
• The baekup's progress will be shown on the PC monitor.
• When the transter is completed, the camera will turn off
automatically in approximately 30 seconds. Select Cancel
to return to the previous screen and prevent the camera from
turning off automatically,
provd÷.l CD.
Wireless network (WB150F/WB152F
only)
113
• tthe
PC
sue
Doris
_ne
waKe
on
L,_WOL)
feature,
you
can
turn
on
the
PC
automat
calybysearching
tot
the
P1
C1onl
yOL
canera
D,118/
• vvnenyouconnec_neoame_o_n_
_ seecttheAPtha_ls
connectea
tothe
PC
•The
camera
vsearor
tor
availaUe
access
Dc
nts
even
tyou
are
conneo_rlg
totne
same
access
B)in1
again,
• It})uturn
off
the
came_
orren"
)ve
_ne
oaEery
wn
lesenang
flestne
fietlanster
wlbe
interrulxea,
• vvnl
eyou
are
L_lgthsfeature,
only
[POWER]
isava
ab_onyou
camera
You
can
connect
only
one
canlera
totne
PO
aattime
totsenaJng
e.
<
•The
backuo
may
De
canoe
easue
tone_7orK
oonaJt
one
• D_xos
orvie
cos
can
be
sent
toaPC
one
tme
only,
Flies
car
qo_
D6
sent
again
even
ifyou
reconnect
your
camera
toanother
PC
• wnen
_-_ere
are
no
fiesnthe
camera
menlory,
y,"
]cannot
use
tnls
feature,
)umust
turn
err
Windows
Firewa
_na
anolne
rlrewa
sbefore
uslgthis
teatur_
• )ucansenauotc
D00ties
• On
1lePrO
so.rare
tne
server
name
must
De
ente_ga
1tne
Latn
ale
1abet
and
can
contain
nomore
than
48cha_cter_
Wireless
network
(WB150F/WB152F
only)
114
Viewingphotosor videoson a TVLinkoenabbdTV
TV Link is a technology for sharing media files between a camera and TV connected to the same AP device. With this technology, you can
view your photos or videos on a widescreen TV.
Rotate the mode dial to
Wi-Fi.
_:S On the TV, search for the camera and browse the shared
photos or videos.
Select _.
• if the guide message appears, press [OK].
• The camera will automatically attempt to connect to a WLAN
via the most recently connected AP device.
• if the camera has not previously been connected to a WLAN,
it will search for available AP devices. (p. 100)
{_ Connect your TV to a wirebss
network via an AP device.
• For intormation about searching for the camera and browsing
the photos or videos on the TV. refer to the TV user manual.
• Videos may not play smoothly depending on the type of TV
or network condition. If this happens, re-record the video
in VGA or QVGRquality and play it again. If videos do not
play smoothly on your TV over the wireless connection, try
connecting the camera to the TV with an A/V cable.
• Refer to your TV's user manual for more intormation.
AP
Wireless network (WB150F/WB152F
only)
115
{
{
b_
r
• You oar, sna _ uo to 1,000 ohoTosorvaeos
• On a %/street
yOL C_mera
you can v ew on y pno_os or vlaeos ca rumbaWm"
• -he range of the wireless oct leo_ on Des/veer your camera and a %/
may vary depending on the spec foations otthe AF
• Ittne oamerc s connected to 2 %/,_ pJayaacKma! De sic ver
• Ph( tos o aeos wi De snarea in melr o% lal szes
- Du can use in steature or wth %/Unk enabl_ _T_s,
• Shared xro_os or vJaeosw not be stored on the %
s[orea n rne camera to meet the TV s s )eoifloatlons
)u_ tney can De
• ] ansterrng _no_os _r videos to the %/ma, taKe some Time
ae)enang :)n the nes,vorKoclneouor
shared, or sizes ot the fies
thenurnberotfilestoDe
• t you power off %e camera aenorma]lywn e v ew ng pr xos or v aeos
on a %/ Ior example, oy removlr ] me baltery), the TV consJaers tne
camera _os_lHDe oct "lecrea
The
order
ot
onoTos
or
v asos
on
_ne
camera
may be ditterenT [na
on rne %/
• Depenalngon_nen
)erotphotosorvdeos})L
_/anirosnare, r
may raKesome _lmeto oaa your pnoTosor waeos ar _ oomDJe_erne
n_ua se_ uD crocess
• vvnle vle_ J F lores or videos on the T_ 3on_rluou81 usng the TV
emo_e o }erterm ng aaal_Jonaloperations on the %/may preven__ns
tea_urefrom wolk lg proper1!
•
you reorder or sort fles on the camera wnlle yew r _ Ihem on a %/,
you must reDear _ne
on the %{
• vvnen_rerearenofies
; a se_ uo D_ooessToupdate tf/e st ot ties
nthecameramemor
euoanno_usetnls
teature,
Wireless network (WB150F/WB152F
only)
116
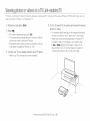
SendingphotosusingWioFiOirect
When the camera connects via a WLAN to a device that supports the Wi Fi Direct function, you can send photos to the device. This feature
may laot be supported on some devices.
On the device, turn on the Wi-Fi Direct option.
_ii_ On the camera, in Playback mode, scroll to a photo.
{_ Press [MENU],and then select ShareO/Vi-Fi)
Wi-Fi Direct.
• Wheninthumbnailsview,you can select multiplephotosby
scrollingto thumbnails,andthenpressing[OK]. SelectOK
whenyou arefinishedselectingphotos.
_:SSelect the device from the camera's list of AP devices.
• Youcan alsoselectyourcamerafromthe device'slistof AP
devices.
:;
_J
On the device, allow the camera to connect to the
device,
• The photo will be sent to the device.
! Ifyou cancel the connection attempt before it is complete, the camera
may not be able to reconnQct to the device. In this case, update your
device with the latest firmware,
Wireless network (WB150F/WB152F
only)
117
Aboutthe Wakeupon LAN(WOL)feature
W th the WOL feature, ! ou can autor-natcauy tu n oH or waKe up a PC with 'your camera. Tn s feature has been avai abe for Sar-nsurl 9
aesKto ) POs for the ast 5 years nOTava ladle tot al n one P©s
£1ychangesloyourPO'sBIOSs_r js oTlerTlanlne onesaescnDea
_ owmayaamageyourPC Themanutacturer
isnotresDons
bleturdanlagecauseabyyourcnangn{
_os- j surPO'sBOSse_dngs
Click Start. and [nen ooen the Control Panel.
Ricqt CLICK
Local Area. and inert click Properties.
Configure the networK connectl Jr
• Windows 7
Cli sk Configure
_tne Power manage tab _ Allow this
device to wake the computer
}lick Network and Internet , Network and Sharing
Center , Change adapter settings
Nlndows vista
}hck Network and Internet
Network and Sharing
Center , Manage network connections
Nlndows XF
}hck Network and Internet Connection
, Network
Connection.
Click OK,
#estart the PC.
vv re ess ne_,_vorKWB150F/WB152F
on
118
Turn on the PC ana _nenpress F2 while the PC s
Select the drivers for the network aaaDter,
oooung.
• TheBIOSsettingmenu,iv]appear.
CIi sk the Advanced taL and then set the WOL menus.
Select Advanced tab _ Power management Setup
Press F10 to save your cnanges, and then continue
Dooung.
Click Start, ana tnen eden the Control Panel,
Configure the network connection
}lick
connec_ on _othe LA[ Ensure that the nd cator q/t on the PC's LAP
r x] s on /aca_r j that the LAN connecton s actve
• Depend ng on your PC mode _ne camera may on v }e aD e _owaKe
Ihe PC
• Depend ng on your PO's OS or drvel._ the names ot the WOL sett r j
menu may va
exalt es ot sett ng menu names Enab e PME YVakeon LAI
_xarr )esotsettng _nenuvaues Enab÷ vaglc )acKel e_c
7
Network
Center
bu cannot use th s t_ature across a flrewa or t a securt}/program nas
been ins_alec
• To turn on the PC wth the WOL tuature the PC must have an aotve
Select Resume on PME _ Enabled,
Nindows
"
and
, Change
Internet
adapter
, Network
and
Sharing
and
Sharing
settings
/Vlndc Ns vista
}lick
•
Network
and Internet
Center
_ Manage
Windows
XF
lick
Network
and
-- Network
network
connections
Internet
Connection
_ Network
Connection.
/v rsess ne_,_vork
WB150F/WB152Fon
119
elc
S
Refer to options to configure your camera's 3ettlngs
Settings menu
lzl
......... g me se_ungs IrlenL
Sounc
121
22
Display
Corlaec/ivit
_2
121_,
Gerlera_
.. 124
S
rigs men
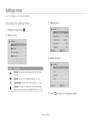
Learn to configure your camera% settings,
{_ Select an item.
Accessing the settings menu
Rotate the mode dial to ,_,
2
Select a menu
_:SSelect an option,
8"
_)
*
Sound: Set various camera sounds and the volume,
(p. 122)
Display: Customize the display settings. (p. 122)
Connectivity:
Set the connection options, (p. 123)
Genera J:Change the settings for the camera system
such as memory format and default file name, (p, 124)
::;
Press [_]
sJ
Settings 121
to return to the previous screen
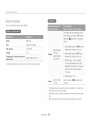
Sound
* Default
,
v°um e
Set the _Qume of all sounds.
(Off, Low, Medium* High)
Beep Sound
Set to emit a sound when you press the buttons
or switch modes, (Off, On*)
Shutter Sound
* Default
Set a start image to alspay v _en_necamera
IU N'18 O_"
• Off*: Dsplayno start image
• Logo: Display a detaut rT_ge storec n zne
xema memory
Set the sound the camera emits when you press
the shutter button,
Start Image
(Off, Sound !*, Sound 2 Sound 3)
Start Sound
Set the sound the camera emits when you turn on
your camera.
(Off*, Star Flight, Laser Show, Cloud)
• User Image: Select user rlage from zne
snotos you captu ea in tne memor}
• Thecamerawll saveony one _ set_mage
sTe]n_err/slemoryata [Jme
• If youselecta newF_o_oas a user imagec
reset!ourcamers tne cameraWl aeete the
currentimac
Guide Line
Date/Time
Displa_
Held Display
Settings 122
Seect a ]uae _onelp you colt Dosea scene
Off*, 3 X 3 2 X 2, Cross, Diagonal
Set whether c _ot to a s Day _neaate ana t me o
tne camera s a splay. (Off*, On
Dsplay a bret descnDton ot an oDton or men_
Off, On*
* Default
* Default
Display
Brignmess
OUICK
view
AdjJst the b[ {-qtness of the screen
(Auto*. Dark. Normal. Bright
NormalJst_edinPl__aokmodeeven1 ounave
...... seectedAuto
-Setwhether or not t review a capture@ mage
before return ng _othe Shoot ng mode, (Off On"
Video Out
you perform no oeera_ons tot 30 sect _as. me
samera aJ_omatc _ Jyswitches to Power save
mode. (Off* On/
PAL (supports 0nly BDGHI):Australia, Austria,
BelgiUm, ©bina, Denmark, Eng a!3d, FHand,
Ge(many, Italy,Kuwait, Malaysia, Nethe:lands,
New Zealand, Norway, Singapore, Spain,
Sweden, Switzerland, Thailand
Power Save
• Even I )u do not set the Power save moae
the screen wlJ dim 3C seconds atter the last
)Derat on _osave 9ow_
'
USB
Select the mode to use when you connect the
camera to a computer or printer with a USB cable.
• Compute€: Connect your camera to a
computer for transferring files,
• Printer: Connect your camera to a printer for
printingfiles,
• Select Mode: Manually select the US8 mode
when you connect your camera to a device,
PC Software
Settings 123
Set Intelli studio to launch automaticallywhen you
Connect your camera 1:oyour compute_. (Off, On*)
* Default
General
Detau t
Specify how to name files.
° Reset: Set the file number to start from 0001
Device Informauon
6_B150F/WB52F
only)
Language
3et a lar guage tot the d sp ay [ex_
Time Zone
3et the I me zone for your ocatDn, vvnen• }u
_rave_o another country seect Visit, a s tner
_eect The aDr_roDnaTe
tme zone. Home*. Visit/
Date/Time
Set
when you insert a new memory card, format a
memory card, or delete all files,
° Series*: Set the file number to resume from
the previous file number when you insert a
new memory card, tormat a memory card, or
delete all files.
3ee the Mac _8aress aN{] set@ nur'NDerOT} }U
)amera
The default name of the first folder is
3et the date and t me
1(}(}PHOTO and the default name of the first
file is SAMO001
3et a date format 'YYYY/MM/DD
VlM/DD/YYYY. DD/MM/YYYY
File No.
° The file number increases W one trom
SAMO001 to SAM 9999 each time you
take a picture
Date Type
Thedetaultdat_
_y_se
laydlfterdependng
Drltne
ar juageseect_c
° Thetolder number increases byone trom
1(}(}PHOTO to 999PHOTO, each time a
tolder is tull
° The maximum number of files that can be
stored in one tolder is 9,999
° The camera defines file names according
to the Design rule for Camera File system
(DOFfstandard If you intentionally change
file names, the camera may not play back
the files.
Settings
124
* Default
3et whether or not to displa_ me @ale an@ _me
m caDtureu Dnotc _. Cell'. Date. Date & Time
* Default
AF Lamp
Format the internalmemory and the memory
card. Formattingwill delete all files, including
protected files. (Yes, No)
• The date and time w I be dis ) ayea on me
bottom rght corner of the shore,
•
Set 8 light to autematica!ly turrl on in dark places
to help you focus. (Off, On* )
_ome Drln[er moae s may not Drln_me aa_e
ana tree properly
Imprint
®
The
_no[o
wJJJ
no[
alspJa}
me
aa_e
}u se ect Text in SBN
tree
ana
"
Format
sae
Duseect Live Panorama
WB 50F/WB152F on
n _
_loae
you seect _
_oae
'VB150/WB151/WB152 {
yqu se ec_Picture in Picture Jn t11_ /oa_
-Set the camera
to automatic_
you pertorm
o c }eratons
{Off 1 rain 3min*,5min
Auto Power Off
Reset
turn off whet
for a sDecitec
10rain
seroc
)ur seslngs w no_ cnange wnen yoL
eD ace me Daser',
• _/e cameraw
not automates
turn
ff when the camera a connected to r
;omDuler E n_er orWLAN
and when you
are payng a s @eSNOWor v@eos
Settings 125
_
Errorscanoccurifyouusea memo%/osd
tormatted
byanotherbrandofcamera,a memory
cardreader,
ora computerPlease
formatmemory
cardsinthecamerabetoreusingthemtocapture
phobc
Beset me/_usand shqqting options. Date and
time, language, and video output settings will
not be reset. (Yes No)
Get
information
about
error
messages
sDecifications,
ano
-ha ntenance
Error messages
....
12/
Camera maln[enance
12:
.,_eanlngyour came .....
US
/g or S[OH[I_
129
1{50
_[le CaHleit
od[ memory care,
1;5I
u[ [ne Danery
3efore contacting
34
a service center
188
Camera specifications
_L_-_
Glossary
145
--CC notice
1bC
DeclaratLon sentence in official languages
ndex
........
158
155
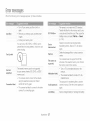
Error messages
When the following error messages appear, try these remedbs.
Fie names 8o n }t match the DCF stanaara
Card Error
* Remove your memory card, and then insert
it again.
' Eprmat your memqry 9ard:
DCF Full Error
You can lock an SD, SDHC, or SDXC card to
prevent files from being deleted, Unlock the card
when shooting.
Device
Settings menu and select File No. _ Reset
o. 124
File system
SUDDor[ea.
Card not
Suppo_aa.
Connection tailed,
el}NOrK connector
alsconneetea wn le
transtemng }no_os Select aTV Link device
aga r
disconnected.
Delete the damaged fie or contact a servlce
centeK
File Error
Card Locked
nor
Toe qserted memory Card s not Supported
byyour
camera,
n_e_
aSDSDHc,?rSDXC
memory oard_
• The camera cannot connect to the network
using the selected access point. Select
another AP and try again.
• The camera has failed to connect to the other
camera, Tryconnecting again,
Transter the filesfrom the memory cal] to your
corn )u:er ana Tormatthe card, Then. open tne
Initialization
failed.
Invalid oassword.
Low Battery
Appendixes 127
our camera @oesnot sur_)oft the FATfle
structure ot the °/ser_e memo :ara, Format
tne memor taro orl _necamera
• Turr )n %/ nK enaDleo aev 3es or t e
nelwor_
• The camera has Iaibd to DoateaTV Lnk
_naolec/oev oe
The )assword tot transterr nct let to anothe
camera is wror"_ Enter the correct }asswor(
aga r
lser_ a cnarge8 oasery or reonarge tne Dasery,
Delete unnecessap ties or nsert a ne4 memoe
Memor,
Fu
3arc
No Image File
Photo transfer
failed.
Photo recepuon
failed.
Transfer failed.
Caoture onotos or nsert a memor, saraina_
3ontalns
some
noto_ c
4etworkconnection d sconnected wh_e
transTerrn< photos. Try turning on the T unF
teature again
The camera nas Talea _orece ve a }noto TrorY
tne senaJn{ c _mera Askthe Dtnel De_sonto
3end the fie ac a
• The camera has taled to send a )noto to _ne
}ther camera, 7 y senolng a{
. The camera has taled to send an emal or
transter a }hoto to a T unK aevlce, "}hecl_
tne network connec_on ano try agalr
Appendixes 128
Cameramaintenance
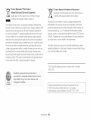
Cleaning your camera
Wipe gently with a soft, dry cloth,
Use a blower brush to rernove dust and wipe the lens gently with
a soft cloth. If any dust remains, apply lens cleaning liquid to a
piece of lens cleaning paper and wipe gently,
_\
Appendixes 129
• Neverusebenzer/e,
thinners,o£alcoholIo cleanthe device.These
solutiQrls
ear!damagethe _emeraor causeitto malfunction,
Donot pre,%90the !enscoyer9r usea bbwer bcu@98 the bns
cover,
(}8 Yii(_r8 YiX_iiiii!£isY_0(!_
Using or storing the camera
• Protect your camera from sand and dirt when you use it on
beaches or in similar areas,
• Avoid exposing the camera to very odd or very hot
temperatures,
• Avoid using your camera in areas with extremely high humidity,
or where the hLimidity changes drastically,
• Avoid exposing the camera to direct sunlight and storing it in
hot, poorly ventilated areas, such as in a car during summer
time.
• Protect your camera and the display from impact, rough
handling, alad excessive vibration to avoid serious damage.
• Avoid usir/g or storir/g your camera in dusty, dirty, humid, or
poorly ventilated areas to prevent darnage to moving parts and
internal components,
• Do not use your oarnera near fuels, combustibles, or flarnmable
chemicals, Do not store or carry flarnmable liquids, gases, or
explosive materials in the same compartment as the camera or
its aocessones,
• Your camera is not waterproof, Do not hat/die the battery,
adapter, or memory card with wet hands, Operadlag the carnera
with wet har/ds may cause damage to your camera,
• When you store the camera for an extended pedod, place it in a
sealed cor/tair/er with ala absorbent material, such as silica gel.
• Remove the batteries from your camera when storirlg it for an
extended period. Installed batteries may leak or corrode over
time and cause serious damage to your camera.
• Over time, unused batteries will discharge and must be
recharged before use.
• The present date and time car/be initialized when the camera
is turned on after the camera and battery laave been separated
for over 40 hours.
• Do not store the carnera where there are mothballs.
When you transfer the camera frorn a cold environment to a warm
one, conder_sation can form on the lens or ir_ternalcomponents
of the camera, In this situation, tuna off the camera and wait for at
least 1 hour, If condensation forms on the memory card, remove
the memory card frorn the camera and wait until all moisture has
evaporated before reinserting it,
Appendixes 130
• Donotswing
your
camera
bythestrap.
This
may
cause
injury
toyourself
orothers
ordamage
toyour
camera,
• Donotpaint
your
carnera,
aspaint
can
clog
moving
parts
and
prevent
proper
operation.
•Turn
offthecamera
when
notusing
it.
•Your
camera
contains
delicate
parts.
Avoid
impacts
tothe
camera.
• Protect the display from extemaJ force by keeping it in the case
wher/not in use. Protect the camera from scratches by keeping
it away from sand, shaq-3implements, or loose change.
• Do not expose the lens to direct sunlight, as this may discolor
the image sensor or cause it to rnalfunction,
• Protect the lens frorn fingery3rints and scratches. Clean the lens
with a soft, clean, debds free lens cloth.
• The camera may turn off if struck or dropped, This is to protect
the memory card. Turn on the carnera to use it again.
• Paint or metal on the outside ot the camera may cause
allergies, itchy skin eczema, or swelling tot people with
sensitive skin, If you experience any ot these symptoms, stop
using the camera immediately and consult a doctor.
• Do not insert foreign objects into any ot your camera's
compartments, slots, or access points, Damage due to
improper use may not be covered by your warranty.
• Do not allow unqualified personnel to service the camera or
attempt to service the camera yourself, Any damage that results
from unqualified service is not covered by your warranty.
About memo,s/cards
Your camera supports SD, SDHC, or SDXC memory cards.
• While you use the camera, it rnay heat up. This is normal and
should not affect your carnera's lifespan or pertormance.
• When you use the camera in low temperatures, it rnay take
sorne time to turn on, the color of the display may be changed
temporarily, or aftepimages may appear, These conditions are
not malfunctiorls and they will correct themselves when the
camera is returned to milder temperatures.
Terminal -Wnte protect switch -Label (front)
You can prevent files from being deleted by using the write
protect switch on an SD, SDHC, or SDXC card, Slide the switch
down to look or slide it up to unlock, Unlock the card when
capturing photos and videos.
Appendixes 131
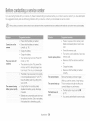
(}SYii(_i8 YiX_iiiii!£i8Y_8(!_
Video
The memory capacity may d fief depending on shooting scenes
or snoonn{ conGirons, These co:}ao_les are Dasec_ x-/a
1 GB SD ca_c
Photo
[]
@
@
lss
25_
381
162
287
42_
190
348
498
701
358
51q
246
438
63C
386
68_
624
" }65
846
[]
817
95C
1
_73
_93
8 433
15' 20"
_G_
640 X 480
Approx,
35' 54"
320 X240
320
_:Q
For Sharing
(WB150F/WB152Fonly)
138'19"
Approx,
138' 19"
29'42'!
Approx.
67' 30"
287' 41!'
Approx.
237' 41"
* The figures above are measured without using the zoom function. Available
recording time may vary if you use the zoom. Several videos were recorded
in succession
_
2 _09
1280 X 720
Appendixes 132
to determine the total recording time
• Prevent
memory
cards
frorn
making
contact
with
liquids
dirtor
toreign
sclbstances,
Ifdirty,
wipe
thememory
card
clean
with
a
Avoid
exposing
memory
cards
tovery
cold
orvery
hot
soft
cloth
before
you
insert
thememory
card
into
your
camera.
teruperatures
(below
0°O/32
°Forabove
40°(}/104
°F),
• Donotallow
liquids,
dirt,
orforeign
substances
tocome
in
Extreme
temperatures
car/cause
memory
cards
tomalfunction,
contact
with
memory
cards
orthememory
card
slot,
Doing
so
Insert
amemory
card
inthecorrect
direction.
Inserting
a
cause
memory
cards
orthecamera
tomalfunction,
memory
card
inthewrong
direction
may
damage
your
camera may
•When
you
carry
amemory
card,
use
acase
toprotect
thecard
and
memory
card.
from
electrostatic
discharges,
Donotuse
rnernory
cards
that
have
been
tormatted
byother
•Transfer
important
data
toother
media,
such
asahard
disk,
cameras
orbyacomputer.
Reformat
thememory
card
with
OD,
orDVD.
your
caruera.
you
use
thecamera
foranextended
periocl,
thernernory
•Turn
offthecamera
before
you
insert
orremove
thememory °When
card,
card
may
become
warm.
This
isnormal
and
does
notindicate
amalfunction.
• Donotremove
ther//ernory
card
orturn
offyour
carnera
while
thelamp
isblinking,
asthis
may
damage
your
data,
•When
thelifespan
ofamemory
card
has
expired,
you
cannot
store
any
more,
photos
onthecard.
Use
anew
memory
card,
• Donotbend,
drop,
orsubject
memory
cards
toheavy
impact
orpressure.
•Avoid
using
orstoring
memory
cards
near
strong
magnetic
fields.
•Avoid
using
orkeeping
mernory
cards
inareas
with
high
temperature,
high
humidity,
orcorrosive
substances.
Appendixes
133
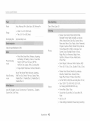
(}8 Yii(_r8 YiX_iiiii!£isY_0(!_
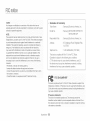
About the batte_7_
Use only Samsung approved batteries.
'heDal:te ite was measurea unae
trle rolowlr _ cond tlons: in P moae.
aamness _ resouton. Fineoua _y,
CSor
Model
SLB qOA
Type
Lithium ion battery
Cell caPacity
t,080 rnAh
Voltage
3,7 V
Charging time* when the camera is
Switched
Off)
;
/RpproxIrYla[ely
. , r, _, .
1, Set the flash ooton to Fill in, take a
Photos
2z#u r'q[h
Approximatey
185 m n/
Approximatey
270 mhotos
s nge snot, ant zoom in or out
2. Set the tlash cat on to Off. take a
s nc_e snot _na zoom Jr-_
or ouz
8. Pertorm stems " and 2, watln{
80 seconds De]weeneacn step.
Reoeat the orocess tot 5 minutes
and then turn olt tne cameraTo
1 m nute
* Charging the battery by connecting it to a computer may take longer.
4. Reoea_stems 1 to
videos
Approximatey
10 m n
Record
30 FPS,
eos at H[I resoluton anq
• The figures above are measured by Samsung's standards Your results may
differ depending on your actual usage
• Several videos were recorded in succession to determine the total recording
time
• When using nek_ork tunctions, the battery will be depleted more quickly
Appendixes 134
When
thebattery
has
fully
discharged,
thebattery
icon
will
turn
red
and
the"Low
Battery"
message
willappear.
Protect
batteries,
chargers,
andmemory
cards
from
damage
Prevent
batteries
frorn
ruaking
contact
with
metal
objects,
asthis
carl
create
aconnection
between
the+andterminals
otyour
battery
and
lead
totemporary
orpermanent
battery
damage
and
cause
afireorelectric
shock.
•Avoid
exposing
batteries
tovery
cold
orvery
hottemperaturesmay
(below
0°0/32
°Forabove
40°0/104
°F).
E£reme
temperatures
can
reduce
thecharging
capacity
ofyour
batteries,
Ifthestatus
lamp
i8off,make
sure
that
thebattery
isinserted
•When
you
use
thecamera
foranextended
penod,
thearea
correctly,
around
thebattery
chamber
may
become
warm.
This
does
not
affect
thenormal
use
ofthecamera,
Ifthecamera
isonwhile
charging,
thebattery
may
notfully
charge,
Turn
offthecamera
before
charging
thebatte%
• Donotpull
thepower
supply
cord
todisconnect
theplug
from
thepower
outlet,
asthis
may
cause
afireorelectric
shock,
Donotuse
your
camera
when
you
are
charging
thebattery,
may
cause
afire
orelectnc
shock.
• Intemperatures
below
0°C/32
°F,battery
capacity
and
battery This
life
may
decrease,
Donotpull
thepower
supply
cord
todisconnect
theplug
from
thepower
outlet,
asthismay
cause
afire
orelectdc
shock.
• Battery
capacity
may
decrease
inlowtemperatures
but
will
return
tonormal
inmilder
temperatures.
Let
thebattery
charge
foratleast
10minutes
before
turning
on
thecamera,
Ifyou
connect
thecamera
toanexternal
power
source
when
thebattery
isdepleted,
using
high
energy
consuming
functions
willcause
thecamera
toturn
off.Touse
thecamera
normally,
recharge
thebattery.
Appendixes
135
• Ifyou
reconnect
thepower
cable
when
thebattery
isfully
charged,
thestatus
larTsp
turns
onforapproximately
30minutes,
• Using
theflash
orrecording
videos
depletes
thebattery
quickly. • Never
dispose
otbatteries
inafire,
Follow
alllocal
regulations
Charge
thebattery
until
theredstatus
lamp
turns
off.
when
you
dispose
ofused
batteries.
• Ifthestatus
larTsp
blinks
inred,
reconnect
thecable,
orrerTsove • Never
place
batteries
orcameras
onorinheating
devices,
thebattery
and
insert
itagain,
such
asmicrowave
ovens,
stoves,
orradiators.
Batteries
rTsay
• Ifyou
charge
thebattery
when
thecable
isoverheated
or
explode
when
they
are
overheated.
thetemperature
istoohigh,
thestatus
lamp
rnay
blink
itsred.
Charging
will
start
when
thebattery
cools
down.
• Overcharging
bal:LeHes
may
shorten
battery
life,
Alter
charging
is
finished,
disconnect
thecable
frorTs
your
carTsera,
• Donotbend
orplace
heavy
objects
ontheACcable.
Doing
so
may
damage
thecable.
• Use
only
theprovided
USB
cable.
•The
battery
may
notcharge
when:
you
use
aUSB
hub
other
USB
devices
are
connected
toyour
co/nputer
you
connect
the
cable
totheport
ors
the
front
side
ofyour
computer
the
USB
port
otyour
computer
does
not
support
the
power
output
standard
(5V,500
mA)
Appendixes
136
(}PYii(_i8 YiX_ii]ii!£iPi]8(!_
Personal injury or death can occur if the battery is
handled Carelessly Or impropeilyl For your safety,
follow these instructions for proper battery handling:
The battery can !gr/ite or explode if n0t bandbd properly,
_ryou notice any deformities, cracks, or 0tber
abnormalities in the battery, immediately discontinue use
of the battery and contact a service center.
. Use only authentic, manu_acturehrecernrnendbat!ery
chargers and adapters and charge the battery only by the
methods described in this Usermanual,
L_
'
Do 11( [ o[sassemE
srlarlO
. Do no} pl6ee the battery in a microwave eyen,
WIN
any
. Avoid e" posng tne Da_Tery
to majc_ ''_DaOTS,suet/as
]rcpp ng it trc-n nigh places
. Do not e>pose Ine potTeryto tem_)eraturesof
SO°C (140 °F or aoove
• Dc _o_al ow tne [ as:cry1:ooorr/e i[i contact wltr/molstlJr_
aula8
• Do no_expose _ne_asery TOSOUrCesot excess /e nea_
SUChas sunsn_ne f_reorthe ike
Disposal guidelines
• Dispose ot the batten WlTNcare.
t Avoid stori!sg 0r using the battery in !cot, humid places,
SuChas spas 0r shower enclosures,
.
TNe Dat_ery
• Avoid e" DOSng the DatTeryto n[gr sressure or crusn]n
forces
or
t Do not place the battery near heating devices or expose
e OF Dur/etur@
oBJect
Do not rest the camera on flarnmable sur[aoes, such as
bedding carpets, or electr!o blankets for a prolo!}ged
period.
• Dc lot d sDose of _ne DaTTeryn a fro
• Disaosal reguLa_onsrr ay differ by oou [ry or region,
E SDOSeo1the oa_en
ac soroanoe win al c )al ar
Teaeral
regulai
on c
Guidelines for charging the battery
Charge _ne satiety o_11y
oy 1he r-net"ca aesor/Dea r
:nls user manaa/, The Dasery can gnze or ex }poe T
}_ cnargea propery
, Do not allow battery termxals to come in contact with
r71etal!bobjects, such as necklaoes, c@ss, keys, or
watches,
, Use only aut!_entio,manu{aoturercreoommended,
Lithium4on replacement batteries.
Appendixes 137
Beforecontactinga servicecenter
If you are having trouble with your camera try these troubleshooting procedures before you contact a service center. If you have attempted
the suggested remedy and are still having problems with your device, contact your local dealer or sewice center,
Cannot Iurn on the
camera
• Ensure that the cannerys nsertec
• There s no space on the memory card,
- Ensure tna_tne oa_terys nsertec
oorreoty, tP 19/
Delete unnecessary fl es or nsert a new
card.
- Charge tne ma_ery
•
•
The cower turns off
sudden
•
•
}barge tne oa_:ery
four camera ma De
node D, 125
• Format the memory card,
Auto Power Off
The camera mav turn off :c sreven: tne
nero
nard from being damaged due
to an ° }ac_, Turn on your camera aga n
° The basery may ose power more quickly
ow temeeratu es )elow 0 °O/32 °P
The camera is losing
battery power qUICKly
Cannot capture photos
_,eep tne oa_ery warm Dy puI_ng _ Jr-_to
your pocKeI.
• us ng the flash or recc "anr_ ]eos
aeeetes tne Da_ery dUCKy.Recbarge
• The memory card s detective. Get a new
memory card.
• Make sure that the camera s swtched
on,
• Charge the battery.
• Make sure that the battery s inserted
The camera freezes
The camera heats up
correcty.
Remove the battery and insert it aga n.
Wh le you use the camera, t may heat up.
Th s s normal and should not affect your
camera's itespan or pertormance.
- needeci
• Batte es are consumao_e saris _na_mus_
Deree_acedover _ he. Get a new battery
Ttne oa_ep, ife is dim n sitar _ qu eKD
Appendixes 138
• You cannot use the flash in some modes.
iii0ieii!_ (}0iTixiciiii{i 8 $i!_tYiO!!_{}(!_iiiet
The flash fires
unexpectedly
ake sure that the focus D_lonyou set
s suitable for case u _ snots, {D 60/
The flash may fire due to static eleetndty,
The camera is not malfunctioning,
The date and time are
incorrect
Set the date and time h the display s@_ings,
(p 124)
The display or buttons
do not work
Remove the battery, and then insertit again.
If yeu use your Camera at very low
The pnoto
is blurry
ake sure that the suL ect s wKnn range
Dtthe flasl _D, 42/
The colors In the abate
co no1 match the actua
scene
your camera in moderate temperatures,
• Turn offyour camera, and then turn it
on again.
The memory card has
an error
An incorrect White Balance sat steals
unrealls_c 3oar, Seect the DroDervvnKe
BalanceoDtontosutzne
_ tsource,
s. 71
}u DnoIo 9 overexeoseq
• Turn off the tlasl- D, 57/
The 3noto
IS IOO
orlgnI
• Remove your memory card, and then
insert it again,
• /_c ust the SO senstivit
). 59/
. /_c us_tne exoosure vaue, o 69/
bur onoto s uRGers: }oseo
• Turn on the rash./o. 6-
• Format your memory card,
See "Cautions when using memory cards"
for more detail, (p, 138)
Cannot play back files
ake sure that the ens _ cean, It no]
clean_neens _ 129
The photo Is too oarK
If you 0hangs the r_anqe0f a file, your
camera may not play the file (the name of
the file should meet the DOEsta!7_da(d).If
you encounter this situation, play back the
files on your eomputer_
Appendixes 139
. /4ojJst the ISC 3enstivity, {p, 5{
• ,_djJsf the exposure vaue. (p, 6{
iii0i0i@ c0iTiXiciiii{i 8 $i!_hdiO!!_
i}(!_i_ii!_t
The TV does not
• Make sure that the camera s correct
connec_e to the TV with the A/V cabe
* End Intelli studio and restart the program.
* You cannot use Intelli studio on
d_splay your pnotos
• Make sure that your memory car8
Macintosh computers,
* Make sure that PC Software is set to
conIalns
Your
aces
computer
not recognize your
camera
E '/010, c
• Make sure that the USB cable s
connectea correct
° Make sure that burcamerals swtcner
Intelli-studio
functioning
is not
properly
or
- Make sure that you are us nga suppor[ea
oDera_ng system
On in the settings menu. (p, 128)
* Depending on your computer's
specifications and environment, the
program may not launch automatically, In
this case, click Start * AJl Programs
SAMSUNG * Intelli-studio
Intelli-studio on your computer,
Your comeuter
disconnects
tne
camera Wnlle
transferring files
The t e _ransr'nsson may De interruptea Dy
3ta_lcelec_nc_ D sconnect the JSB cable
_na connect i_ac
vlaeos
Your computer
pla_ waeos
cannot
may n x play on some vlaeo
playel
xograms. Tcg ay video fi es cap,urea w_7
our camera, nstal ana u.c _ 1[heline ii stualo
program
on your computer.
(p. 98]
sto_ed on an SDXC
memory card
c°mpatible with the exFATfile system her°re
¢ °!Xlec_ir!g_beQamefa t° the d@yioe'
SDXC memory cards use the exFATfile
Your computer does
system, To use SDXC memory cards or/
not recognize an SDXC a Windows XP computer, download and
memory card.
update the exFATfile system driver from the
Microsoft website,
Appendixes 140
Cameraspecificatbns
Type
1/2,3" (Approximately 7.76 mm) COD
Effective pixels
Approximately
Total pixels
Approximately
F-stop range
Range
14.2 mega-pixels
Lens f = 4072.0
(35 mm film equivalent: 24-432
Tele (T)
350 cm infinity
Macro
5 80 cm
180 350 cm
Auto Ivlacro
5 cm infinity
180 cm infinity
Ivlanual Focus
5 om infinity
180 om infinity
mm
mm)
F3,2 (W}-F5,8 (T)
•
Wide (VV)
80 cm infinity
16.4 mega-pixels
SohneidepKREUZNACN
Focal length
Normal (AF)
Still image mode: 1.018.0X
• Auto: 1/8 1/2,000
eec
•
Program: ld/2,000eec.
•
Manual: 16-1/2.000
°
Night: 8-1/2,000
eec.
eeo.
(Optical zoom X Digital zoom: 90,0X,
Optical zoom X Intelli zoom: 36,0}{)
Zoom
,
Playback mode: 1.014.4}{
Control
Program AE, Aperture Priority AE, Shutter Priorils/AE,
Manual Exposure
(depending on image size)
Type
TFT LCD
Feature
3,0" (7.62 cm) 460K
7L
Type
Metering
Multi, Spot, Centel-weighted,
Compensation
+2EV (1/3 EV Step)
ISO equivalent
Auto. ISO 80, ISO 100, ISO 200, ISO 400, ISO 800,
ISO 1600, ISO 3200
auto toous (Center AF, Multi AR
Selection AR Tracking AF, Face Detection AR
Smart Face Recognition AF), Manual Focus
Appendixes 141
Face Detection
{}8_i01_ 3peciiiCSii0iiS
Mode
Auto, Red-eye, Fill in, Slow Sync, Oft, Red-eye Fix
°
Wide: 0.8_.5
•
Tele: 0,5-1,9
Date & Time, Date, Off
m (ISO Auto)
Range
Recharging time
Approximately
m (ISOAut@
Modes: Smart Auto (Portrait, Night Portrait,
Backlight Portrait, Night, Backlight, landscape,
4 sec.
White, Natural Green, Blue Sky, Sunset, Macro,
Macro text, Macro Odor, Tripod, Action. Fireworks),
Program, Aperture Priority, Shutter Priority. Manual.
Optical Image Stabilization (OIS)
Photos
Scene (Beauty Shot, Night, landscape,
Text,
Sunset. Dawn, Backlight, Beach & Snow),
Magic Plus (Live Panorama, Magic Frame,
•
Photo Filter (Smart Filter): Miniature, Vignetting,
Split Shot, Picture in Picture, Artistic Brush.
Ink Painting, Oil Painting, Cartoon, Cross Filter,
Photo Shooting
Photo Filter)
Sketch, Soft Focus, Fish-eye, Old Film,
mode
Burst: Single, Continuous,
Half Tone Dot, Classic, Betro, Zooming Shot
Motion Capture. AEB
Timer: Off, 10 Seo, 2 Seo, Double (10 Seo, 2 Seo)
o
Image Adjust: Sharpness, Contrast, Saturation
Modes: Smart Scene Detection (Landscape,
Movie Filter (Smart Filter): Miniature, Vignetting,
Video Shooting
Half Tone Dot, Sketch, Fish eye, Classic, Retro,
mode
Palelte Effect 1. Palelte Effect 2, Palelte Effect 3,
Palelte Effect 4
Blue Sky, Natural Green, Sunset), Movie,
Magic Plus (Picture in Picture. Movie Filter)
Forrnat: MP4 (H.264) (Max recolding time: 20 rain)
Size: 1280 X 720, 640 X 480, 320 X 240,
Videos
Auto VVB, Daylight, Cloudy, FluorescentH,
Fluorescent
For Sharing 6!VB150FA/VB152F only)
Frame Rate: 30fpe,
L, Tungsten,
Custom Set, Color Temp,
15fpe
Sound Alive: Sound Alive On. Sound Alive Off.
Mute
OIS: On, Off
Video editing (embedded):
Appendixes 142
Pause during recording
(}3Yii(_i3 3p_!!_ciii63ii0iX_
For 1 GB SD: Number of photos
•
Type: Single image, Thumbnails,
Multi Slide Show
Super Fine
with Music and EffecL Movie clip, Smart Album*
[]
• Smart Album category: All, Date_ Face LisL
File Type
Photos
i
Fine
Normal
259
381
4320 X 3240
144
4320 X 2880
i62 i %7 i 423
190
Edit: Resize_ Rotate_ Image Adjust, Smart Filter,
_]
4320 X 2432
_
343
_
498
Crop
[]
3648x2736201
i
353
i
519
2832 X 2832
246
i
435
i
630
[]
26g2
xlg44
386
_
686
95O
[]
1984X 1488
624
1,065
1,404
Eftect: Image Adjust (Brightness, Contrast,
Saturation. ACB. Face Retouch, Red eye Fix),
Image size
Smart Filter (Normal, Miniature, Vignetting,
Ink Painting, Oil Painting, Cartoon, Cross Filter.
Sketch, Soft Focus. Fish-eye, Old Film.
Half Tone Dot, Classic, Retro, Zooming Shot)
Videos
1920 X 1080
[]
Edit: Still image capture, Time trimming
1024X768
846
1,817
1,373
1,993
2809
3,433
These figures are measured under Samsung's
standard conditions.
• Internalmemory:Approximately18 MB
Media
File format
Your results may vary depending
on the shooting conditions and camera settings,
• Externalmemory (Optional):
SD card (1 2 GB guaranteed),
SDHCcard (upto 32 GB guaranteed),
SDXCcard (upto 64 GB guaranteed)
Internalmemorycapacils/maynot match these
specifications,
• StillImage:JPEG(DCF),EXIF2.21, DPOF1.1,
PictBridge1.0
• MovieClip: MP4 (Video:MPEG4,AVC/N.264,
Audio: AAC)
Appendixes 143
Social Sharing, Email. MobileLink, Remote Viewfinder, SkyDrive,
Auto Backup, 7//Link, Authentication
106,5 X 59,9 X 23,4 mm (4.19 X 2,36 X 0,92 in.) (without protrusions)
Browser, Wi-Fi Direct
• WB150A/VB151NVB152:187.9
Digital output
connector
USB 2,0
Audio input!output
internal speaker (Mono), Microphone (Mono)
Video output
A/V: NTSC, PAL (selectable)
DO power input
connector
5 V
g (6.628 oz.)
(without battery and memory card)
• WB150FA/VB152F: 188,2 g (6.639 oz.)
(without battery and memory card)
0-40 °C (32-104 °F)
5-85 %
RechargeaUe
battery
Lithiumqon batte/y (SLB-10A, 1,030 mAh)
Connector type
Micro USB (5 pin)
Intelli-studio
Specifications
The power source may differ depending on your region,
Appendixes 144
may change without notice to improve performance.
ACB
(Auto
Contrast
Balance)
This
feature
automatically
improves
thecontrast
ofyour
images
when
thesubject
isbaoklit
orwhen
there
isahigh
contrast
between
your
subject
and
theIoaokground.
AEB
(Auto
Exposure
Bracket)
This
feature
automatically
captures
several
images
atdifferent
exposures
tohelp
you
capture
aproperly
exposed
image.
Composition
Composition
inphotography
means
arranging
objects
inaphoto.
Usually,
abiding
bytherule
ofthirds
leads
toagood
composition.
DCF
(Design
rule
forCamera
File
system)
Aspecification
todefine
afileformat
and
filesystem
totdigital
cameras
created
bytheJapan
Electronics
and
Information
Technology
Industries
Association
(JEITA).
AF(Auto
Focus)
Depth
offield
Asystem
that
automatically
foeuses
thecamera
lens
onthe
The
distance
between
thenearest
and
farthest
points
that
can
subject,
Yeur
camera
uses
thecontrast
tofocus
automatically.beacceptably
focused
inaphotograph,
Depth
offield
vanes
with
lens
aperture,
focal
length,
and
distance
from
thecamera
tothe
subject,
Selecting
asmaller
aperture,
forexarnple,
willincrease
Aperture
thedepth
offield
and
blur
thebackground
ofacomposition.
The
aperture
controls
theamount
oflight
that
reaches
the
camera's
sensor.
Digital
zoom
Afeature
that
artificially
increases
theamount
ofzoom
available
Camera
shake
(Blur)
azoorn
lens
(Optical
zoom),
When
using
theDigita]
zoom,
Ifthecamera
ismoved
while
theshutter
isopen,
theentire
image with
theimage
quality
will
detenorate
asthemagnification
increases.
may
appear
Ioklrred,
This
occurs
more
otten
when
theshulter
speed
isslow.
Prevent
camera
shake
Wraising
thesensitivity,
using
theflash,
orLlsing
afaster
shutter
speed,
Alternately,
use
a
tripod,
theDIS
orOIS
function
tostabilize
thecamera.
Appendixes
145
Gi0sssry
DPOF (Digital Print Order Format)
Exposure
A forrnat for writing printing intormation, such as selected images
and number of prints, on a memory carol DPOF compatible
printers sometimes available at photo shops, car/read the
information from the card for convenient printing,
The amount ot light allowed to reach the camera's sensor.
Exposure is cor/trolled by a combination of the shutter speed, the
aperture value, and ISO sensitivity.
Flash
EV (Exposure Value)
A speed light that helps to create adequate exposure in low light
conditions.
All the combinations of the camera's shulter speed and lens
aperture that result in the same exposure.
Focal length
EV Compensation
I-his feature allows you to
measured by the camera,
exposure of your photos.
adjust the value one step
quickly adjust the exposure value
in limited increments, to improve the
Set the EV cornpensation to 1,0 EV to
darker and 1.0 EV to one step brighter.
The distance from the middle ot the lens to its focal point (in
millimeters), Longer focal lengths result in narrower ar/gles of view
and the subject is magnified. Shorter focal lengths result in wider
angles of view.
Histogram
Exif (Exchangeable image File Format)
A specification to define an image file tormat for digital cameras
created by the Japan Electronic Industries Development
Association (JEIDA).
A graphical representation of the bdghtr/ess ot an image, The
horizontal axis represents the brightness and the vertical axis
represents the number of pixels. High points at the left (too dark)
and right (too bright) on the histograrn indicate a photo that is
improperly exposed.
Appendixes 146
Gi0sss_y
H.264/MPEG-4
LCD (Liquid Crystal Display)
A high compression video format established by international
standard organizations ISO lEO and ITU T and developed by the
Joint Video Team (JVT). This codec is capable of providing good
video quality at low bit rates.
A visual display cornmonly used in consurner electronics, This
display needs a separ_te backlight, such as CCFL or LED, to
reproduce colors.
Macro
Image sensor
The physical part of a digital camera that contains a photosite for
each pixel in the image, Each photosite records the brightness of
the light that strikes it during an exposure, Common sensor types
are QCD (Charge coupled Device) and CMOS (Complementary
Metal Oxide Semiconductor).
This feature allows you to capture close tip photos of very small
objects. When using the macro feature, the camera car/maintain
a sharp focus on small objects at a near life size ratio (1:1).
Metering
The metering refers to the way in which the camera measures the
quantity of light to set the exposure.
ISO sensitivity
The sensitivity of the camera to light, based on the equivalent film
speed used in a film camera, At higher ISO sensitivity settings,
the camera uses a higher shutter speed, which car/reduce blur
caused by carnera shake and low light, However, images with
high sensitivity are more susceptible to noise.
JPEG (Joint Photographic
Experts Group)
A Iossy method of compression for digital images. JPEG images
are compressed to reduce their overall file size with minimal
deterioration of the image resdution.
MJPEG (Motion JPEG)
A video format which is compressed as a JPEG image.
Noise
Misinterpreted pixels in a digital image that may appear as
misplaced or random, bright pixels, Noise usually occurs when
photos are shot with a high sensitivity or when a sensitivity is
automatically set in a dark place.
Appendixes 147
Gi0sss_V
OIS (Optical Imago Stabilization)
Vignetting
This feature compensates in real time for shaking and vibrating
while shooting, There is no image degradation compared to
Digital Image Stabilization feature.
A reduction of an image's brightness or saturation at the periphery
(outer edges) compared to the center ot the image, Vignetting
can draw interest to subjects positioned in the center of an
image.
Optical zoom
This is a general zoom which can enlarge images with a lens and
does not deteriorate quality of images.
Quality
An expression ot the rate of compression used in a digital image,
Higher quality images have a lower rate of compression, which
usually results in a larger file size.
White balance (color balance)
An adjustment ot the intensities of odors (typically the pqmary
colors red, green, and blue), in an image. The goal of adjustir/g
the white balance, or color balance, is to correctly render the
colors in an image.
Resolution
The number of pi×els present in a digital image. High resolution
images contain more pixels and typically show more detail than
low resolution images.
Shutter speed
Shulter speed refers to the amount of time it takes to open and
dose the shutter, and it is an importar/t taotor it/the brightness of
a photo, as it controls the amount of light which passes through
the aperture before it reaches the image sensor, A fast shutter
speed allows less time to let light in and the photo becomes
darker and more easily freezes subjects
in motion.
Appendixes
148
(Waste Electrical & Electronic Equipment)
orrect Disposal of This Product
(Applicable inthe European Union and other European
countries with separate colbction systems)
_
(Applicable in the European Union and other European
orrect disposal
of batteries
in thissystems)
product
countries
with separate
battery return
_
This marking on the product, accessones or literature indicates that
the product and its electronic accessories (e.g. charger, headset, USB
cable) should not be disposed of with other household waste at the
end of their working life. To prevent possible harm to the environment
or human health from uneontrolbd waste disposal, please separate
these items from other types of waste and recycle them responsibly to
promote the sustainable reuse of material resources. Household users
should contact either the retailer where they purchased this product,
or their local government oftice, for details ot where and how they can
take these items for environmentally sate recycling. Business users
should contact their supplier and check the terms and conditions ot the
purchase contract. This product and its electronic aecessones should
not be mixed with other commercial wastes for disposal.
This markqngon the battery, manual or packaging indicates that
the battenes in this product should not be disposed ot with other
household waste at the end ot their working life, Where marked, the
chemical symbols Hg, Cd or Pb indicate that the battery contains
mercury, cadmium or lead above the reterence levels in EC Directive
2006/66, If batteries are not properly disposed or, these substances
can cause harm to human health or the environment,
To protect natural resources and to promote matenal reuse, please
separate battenes from other types ot waste and recycle them through
your local, free battery return system,
This Class [B] digital apparatus complies with Canadian
ICES 003,
R H
lSlanetFirstrepresents Samsung Ebctronips!
Commitment io sustainabb development and Social
respensibility through eco{drlven business and
management aCtMties,
Disposeunwantedelectronicsthroughan approvedreoyclen
Tofind the nearestrecyclinglocation, goto ourwebsite:
ws_v,samsung.com/recyclingdirectOr call,(877) 278 - 0799
Appendixes 149
F(}Cnotice
Caution:
Declaration of Conformity
_ly onanges or rood fLcatone in construction of I s aevlce wn]cn are not
expressly approve(] Dy _ne par[y responsJDe for come once eoulo voJc Teeuser s
Trade Name
: Samsung Electronics Amenca, Inc.
autr )n_yTOoperare _!le eouJsmen]
Model No.
: Samsung WB150ANB150FANS151/
WB152ANB152F
ThLs 6 uuETen[ no8 eeen tested and round to compl_ with the limits for a O ass
B dig_aleevlce, eurssan[ to Dan 15 ot 1 e FOC Rules. These I m ts _re 8es gnee
Responsible Party
: Samsung Electronics America, Inc.
to Dmvlae reaeonae e proteouon against harmtu interterence in ares een[la
sstal a[ )n, This equJpmen[ genera[es Jsee 8_1ecan roe ale ad o trequeney
Address
: 85 Challenger Road, Ridgefield Park,
NJ 07660
Telephone No,
: 1 800 SAMSUNG (726 7864)
NOTE:
enel j} sna if not insta ed and ueea in accoraar_eewm ice ns[ruc[ons
_y cause hamlfu nter[erence to raalo commu cailone, _lowever. mere
Dguarantee _na[ _ntarTerenoew]JJno[ ocour Je a )art cular netd ation, Ifthis
eat )men[ Go8 _cause ha_nfu nterference to radio Drte eveJon receD_lor
wnlcn can De ae[e[rnlnea cy [urnng lee eau }ment off and on tne user is
enoch _gea to try to car oct the nterterence ey one or more ot the to low sg
neasures
Reonentate. or re oca[e, tne reoe v lg an[enna
increase _ne als[ance between __eeau E"nent one recew
Connect the eeu 8rnen[ n[o an OUtle[on a o]rcul[ different from I _[ [o wnlc
This device complies with Part 15 ot the FCC Rules.
Operation is subject to the following two conditions:
(1) This device may not cause harmful interference, and (2)
this device must accept any interference received, including
interference that may cause undesired operation,
_le rece _r 18conneo[ea
Censu t the dealer or an e )enenced rod o/TV technician for heL
i°C'0:A3°F
w'
This device cernpl]es with part 75 of the FCC Rules, Operation is subject to !he
folbw!ng two conditions: (1) __i8 device may not cause harmful interference, a-ld
(2) th!e device must accept any interference reoeived; including interference that
This device is for haqdheld operation only, The antenr_a(s)used for thi8
transmitter must be instalJedto provide a separation distance of at least 20 em
fmrn a!l persons and must not be co located or operaeng in conjunction with any
otJ-letanterlna or trar/smJtter,
Appendixes 150
comp,,.s,
iA prov.dby
1 ,,h
CAUTION
IDA Standards
DAIO0790
RISK OF EXPLOSION IF BATTERY IS REPLACED
AN INCORRECT TYPE.
DISPOSE OF USED BATTERIES ACCORDING
TO THE INSTRUCTIONS.
BY
year
_
NTC
.
[ N O- L- 1140471/C1/2_/1/LE
sJualngwiTer_erencethat n la} cause unaestrecl oDeratlorl
Caution:
Any changes }r modificatic s8 zo The ec1uiDrlqeriTnot exDrs _sly
spprovea D_ rise Da[Ty re8 oonsible
for oomDIlanoe
coulc!
VQIC
user
S aUTFIOrlTy
To operate
[ne
eaulDmerlt
3 649E-WB150F
This eaL }merit may De opera_ec in all EL countries
is France, ThiSequ@men_ may only }e usea inc_oors
Appendixes 151
! c_:sA _A20_E_7
APPROVED
TYoPeApPlr°ved7c
Operation is subject to the fol owing two conditions:
.... s aevEce may o_cause narmfut interferenc e anc
/2' Th_s device must acceD_ at arerTerence recewec
2011
TA/2011
I
Declaration
of Conformity
and the Eco-Design Directive (2009/125/EC)implemented
by
Regulations (EC) No 278/2009 for external power supplies.
For the following
Product : DIGITAL CAMERA
Model(s):
WB150R WB152F
Samsung Electronics Euro QA Lab.
:YEAR
TOBEGINAFFIXING
OEMARKING
20//)
Blackbushe Business Park
Saxony Way, Yateley, Hampshire
We hereby declare that the product(s) above is(are) in
compliance with the essential requirements and other provisions
of the R&TTE Directive (1999/5/EC), the Low Voltage Directive
(2006/95/EC) and the Electromagnetic Compatibility Directive
(2004/108/EC) by application of:
EN60950 1:2006+A1:2010
EN 55024:1998+A1:2001+A2:2003
EN55022:2006+A1:2(}07
EN 610003 2:2006 +A1:2009+A2:2009
EN61000 3 3:2(}08
EN 300 328 v1.71
EN301 489 1 v1.8 1
EN 301 489 17V2 1 1
GU46 6GG, UK
21 October, 2(}11
Joong-Hoon
(Placeand dateof issue)
(Nameand signatureof authorizedperson)
Choi / Lab. Manager
* This is not the address of Samsung Service Centre. For the
address or the phone number of Samsung Service Centre, see
the warranty card or contact the retailer where you purchased
your product.
EN62311:2(}08
Appendixes 152
Declaratbnsentencein cial
languages
@
Cesky
Dansk
Deutsch
Samsung
Samsung
EF
Electronics
Kaesolevaga
Espaliol
Electronic.
Electronics
der Richtlinie
1999/5/EG
alg [aalKaamera
declares
pozadavKy
ae vaeseml ge Krav og _vnge relevante
a dal_im
In Uberems_lmmung
mK den grundlegenaen
krav i direktiv
1999/5
Anforderungen
und den
beftndet.
vastavust
mat this d g_tai camera
abucaoles
j Electronics
o exlgibles
dlrektHv11999/5/EU
p6hm6uetele
]a nlme[atua
is in compliance
wKh the essential
reaulremems
dlrekt,wst
aria omer relevan[
declara aue la camara algl_a curable con los reauisKos esenclales
de la Directiva
Fran_aJs
Par la oresente Samsung Electronic aeclare due
alsoosKions 3emnen[es ae _aalrec[ive 1999/5/CE
Itatiano
Con la presente Samsung Electronicsalcnlara
stabilite daIla DirettJva 1999/5/CE.
LatviskJ
Ar _o Samsung
notelKumlenl
Lietuviq
SJuo Samsun9
nuos[a[as.
bllerDIj verKlaan
se zakladnimi
satetele
ME THN F1APOYTA q Samsung Electronics AHAONEI
OYTI[QAEI_- AIqAITHEEIT KAI TITAOIrlET
TXETIKET
Depaungen
overnolaer
aass sich die DigkaiKamera
E_qvlKfl
Nederlands
le ve shod_
!999/5/EC.
Por medio de la aresenl:e Samsur
xras alsDoslclones
fotoaparat
at c gl[ale Kameraer
Electronics
as.aKonastele
of Directive
ze tento digitalni
!999/51ES.
Bestimmungen
Kmnl[ao Samsung
telstele
Hereby, Samsung
provisions
prohla_uje,
sm_rnice
erklaerer hervec
einschtagigen
tulenevatele
English
timto
ustanovenimi
H]ermn erklart Samsung
(]brigen
Eesti
Electronics
p[islu_n£mi
Electronics
deklar&
--lectronJcs deklaruqa.
Sanlsung
Electronics
OTI q quqq_laKr'lq)WTOVpa_IKQ tJqXaVr'l TYMMOPCDNETAI
&IATAEEIT THT O&HFIAE 1999/5/EK.
abbarell
y cualesc
.llera
1999/5/CE
PhOtO numenaue
cne auesta fotocamera
digitate _ conforme
Ka CgitSI9 kamera atbilst Direktfvas
Karl sis sKaltmenJnis fotoaDara[as,
aa]: ae a gKale camera
est conforme
t999/5/EK
in overeenstemmlng
van ncnmjn 1999/5/EG
Appendixes 153
aux exJgences essentlelles
al reouisitl essenzlaIi
bOtlskajSm prasfbSm
a[iilnKa esmlnlus
IqPOT TIE
relkalawmus
is met ae essentlete
et aux autres
e alle a [re alsposizlon
un cltlem ar to salstfta, err
_r kltas 1999/5/EB
Direk[yvos
elsen en ae anaere
relevame
Malti
Hawnhekk.
ohrajn
Magyar
Polski
Samsung
Electronics,
A Samsung
Electronics
egyeb vonatkoze
Niniejszym
stosownyml
kijelenti,
firma Samsung
dectara
Slovensko
Samsung Electronics
1999/5/ES.
izjavlja
Slovensky
Samsung
Smernice
ogwiadcza,
Dyrektywy
fenykepezCgep
Ja je [a aigitalni
fotoaparat
u ma' dispozlzzjo%
e[ nlevanu
iranyew ataovetO kOvetelmen,eineK
es
Samsung
bestammeIser
ze [emo algl[any
-lectronicsatt
fotoaparat
as requisites
essenclals
wymogami
oraz Dozos[a_ym
e outras
alsoosi_ 3es da Directive
n os[aHml relevantnlmt
spffia zSkladn6 po2iadavky
on alrektiivin
dessadlgll[alKamerors][ar
sam ffarr _ar av alreK[i
a vsetky pdstu_n6
1999/5 EY oleetlls[en
doIo_lh o_reK_/e
ustanovenia
vaa_lmus[en ja ella KOSKevlen
Electronics
aeKnap_pa,
Ha _peKT_Ba
mea aevasen][
gaegensKapsKravocnovnga
'_e TO3H IAH0_pOBc_goToanaoaT e B C_OTBeTCTBHeC_O O_bLLeCTBeHViTe
Vi3HOKBaHVi_H
1999/5/EK
Samsung Ebctronicserklserer
direktiv 1999/5/ER
camer_ fete elg tat8 este in conformitate
herved a_ ae[te dlgitalkamerae[
-tectronicsbudijl[a_kameramn
overenss_ammelse
t999/5/EG
Norsk
Samsung
jest zgoany z zasadnlczymi
mukalnen.
apymTe np_noX<_MM pa3nope_5_
)lau0unu
az 1999/5/EK
v sktadu z b_stvenlml zahtevam
vaKuu[_aa laden e[[a lama algl[aallKamera
C HaOTO_OTO Sant_Jng
Bubeigeite,
megfelel
ze ten aDarat cyfrowy
D_ Drezenta. Samsung Electronics. declar8 c8 aceast8
ereveden relevante a_e Directivei t999/5/CE
istenska
mar-reKwlzlt_ essenzjali
1999/5/WE.
Rom_n_
TiJrkiye
dig [ati hi konformi
_ue esta c&mera d gital esta conforme
t£mto vynlasuje,
mulaen emcen
blarmealntygar
relevama
E;'bnrapcK_
Electronics
1999/5/ES
Samsung Electrorlcs
alreK[llvin
bogy ez a algl[alis
Electronics
postanowieniami
Samsung Electronics
1999/5/CE
Svenska
din ll-kamera
etOirasainak
Portugu_s
Suomi
uaatKjara
ta' Direttiva 1999/5/KE.
er i samsvar
1999/5/EC
mea ae grunnleggenae
cu cenn[ele
esemlale 91al_e
Krav og _8vnge relevame
Kra_.
OnetmehglnntemelgereklitiklerineveilglllnuKumlenneuygun
oeyan eaer
Her me6 %ir Samsung
1999/5/E B.
Electronics
bvi yfir a6 Isessi stafraana
mjnaavet
Appendixes 154
se i samraemi
vi6 grunnkrOfur
og Onnur akvaeCi [ils_ Dunar
A
B
AF-assist light
Location 16
Battery
Caution 135
Charging
Settings 125
Charging 20
Cleaning
122
Aperture Priority mode 41
Aperture value 40
Auto Backup
Display 129
Lens 129
66
Connecting
Mac 97
to a computer
Windows 92
Shooting mode 69
Playback mode 89
Shooting mode 70
Burst modes
Playback mode 89
Shooting mode 74
Auto Exposure Bracket
(AEB) 7S
Continuous 73
Auto Exposure Bracket
(AEB) 73
D
Motion Capture 73
C
Camera maintenance
Camera specifications
Display type 26
E
Editing photos 87
Editing videos
Trimming $6
Enlarging
83
Error messages
DatefTime Set 124
A/V port 16
123
Capturing 86
Contrast
Auto Contrast Balance (ACB)
the camera
20
Camera body 129
Brightness
Playback mode 89
113
29
Display brightness
Beauty Shot mode 38
Blink Detection
Digital zoom
Disconnecting
Inserting 19
AF Lamp 125
AF Sound
Capturing an image from
video 86
Deleting files 81
129
141
Digital Print Order Format
(DPOF) 90
Appendixes 155
Exposure
69
127
96
n@x
F
H
Face Detection
64
Image quality
HaIFpress shutter
82
Auto 57
RIIin 58
Intelli zoom
Icons
Off 57
Red@ye Rx 58
Slow Sync 58
Magb Frame 45
Move RIter 50
30
ISO sensitMty
Photo Rlter 49
Rcture n Rcture 46
59
S_
L
Image Adjustment
ACB 89
FOCUSarea
Center AF 63
Mu_ AF 63
Sebctlon AF 63
Trackng AF 63
125
G
94
Playback mode 77
Shootng mode 23
Red@ye 58
Function button
Magic Plus mode
Artistic Brush 48
Uve Panorama z4
125
IntellPstudio
Flash
Formatting
Imprint
55
t8
Bnghtness
Pbybaek mode
Shooing mode
Contrast
Payback mode
Shoot, g mode
Red_ye 90
Saturatbn
Pbyback mode
Shootr 9 mode
Sharpness 74
Language settings
89
69
89
74
89
74
Shot 46
Manual mode 43
1_4
Live Panorama mode 44
Memory card
Cauton 133
Insert 19
Menu button
18
M
Meterirg
Macro
Auto Macro 61
Macro 61
Manua Focus 61
Centenweighted
Mu_ 70
Spot 7O
Mode dial 17
Magic Frame mode 45
Guide Une 122
Appendxes 156
70
iii(iex
Motion Capture
Power button
73
16
Movie mode 51
Power save mode
My star
Printing photos
Resolution
98
Cancelling 79
Ranking 78
Program mode 89
Registering 67
Protecting files 81
Retouching faces
Playback mode 90
Shooting mode 3S
Rotating
O
@
Optical Image Stabilization
(OIS) 31
Quick view
Optional accessories
15
PictBfidge
Red eye 58
Red eye fix 58
Self portrait 65
Smart Face Recognition 66
Smile Shot 65
16
Shutter Priority mode 42
Playback mode 89
Shooting mode 74
R
Beauty Shot mode 38
Blink Detection 66
Face Detection 64
Shutter button
Saturation
Slide show 84
Smart Album 79
Scene mode 37
Playback mode 90
Shooting mode 57
98
Playback button
87
S
123
Red-eye
P
Shooting portraits
Playback mode 87
Shooting mode 54
123
Smart Auto mode 35
Self portrait
65
Smart Face Recognition
18
Playback mode 77
Remote Viewfinder
110
Service center
66
138
Smart Filter
Reset
125
Settings
Sharpness
124
74
Photo shooting mode 49
Playback mode SS
Video recording mode 50
Smart Scene Detection
mode 52
Appendixes 157
iii(iex
Smile Shot 65
Sound settings
27
Start Image 122
U
White Balance
Unpacking
Wireless network
15
Z
V
T
Zoom
Video
Playback mode 85
80
Using the zoom 29
Zoom button 17
Zoom sound settings 75
Shooting mode 51
Timer
Video out 128
Shooting mode 56
Timer lamp 16
Time settings
Viewing fibs
2!
Time zone settings
Transferring fibs
Auto Backup 113
Email 106
Mac 97
21,124
Panoramic photos 84
Slide show 84
Smart Album 79
Thumbnaib 80
TV 91
W
Windows 92
Website
Tripod mount
TV Link 115
16
100
USB port 16
Status lamp 17
Thumbnails
71
Accessing 104
Uploading photos or
videos 104
Appendixes 158
Please
refer
tothewarranty
that
came
with
your
product
or
visit
ourwebsite,
www.samsung.com,
forafter-sales
service
orinquiries.
/c 0678¢1