1
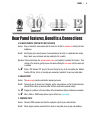
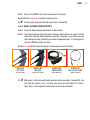
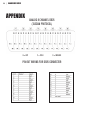
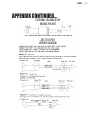
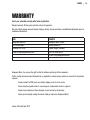
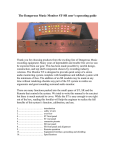
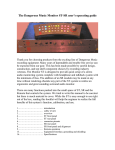
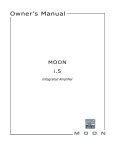
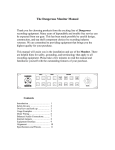
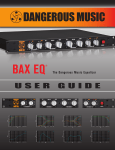
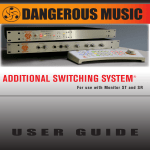
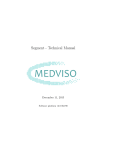
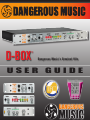
D-BOX
®
Dangerous Music’s Greatest Hits
U S ER
GUI DE
SAFETY REVIEW
!
!
!
!
!
!
!
The Exclamation point within an equilateral triangle is intended to alert the user to the presence of important operating and maintenance
(servicing) instructions in the literature accompanying this product
Certain precautions should be taken when using electrical products. Please observe the safety hints by reading the manual and obtaining
qualified help if necessary to adhere to the precautions.
1. Always use a properly grounded power supply cord with this product. Please do not defeat the ground pin on the mains plug. This connection
provides earth to the chassis and signal grounds inside the device for clean and quiet operation.
2. Avoid high temperature operation in equipment racks by providing air circulation. The number one killer of electronic gear is HEAT. Vented
rack panels may look like wasted space to an interior decorator, but they look like beauty to a technician or equipment designer! If the front
panel is hot, it is roasting inside the box.
3. Avoid areas of high magnetic fields. The steel chassis is designed to shield the circuits from EMI and RFI (magnetic and radio interference).
When installing equipment in racks, it is prudent to put power amplifiers and large power supplies at least several rack spaces, if not in a
different rack, away from equipment that deals with low level signals. Separation of high level and low level equipment can pre-empt trouble
caused by heat and EMI.
4. Care should be taken to avoid liquid spills around equipment. If a spill occurs, please shut off the gear and disconnect the mains. A qualified
technician should investigate accidents to prevent further equipment damage or personnel hazards caused by spills.
5. If one is uncomfortable with opening gear and changing jumpers or making adjustments, please seek qualified help if necessary.
6. If adjustments or jumper changes are required, please disconnect the mains plug before opening the top. Dropped screws or tools on a live
circuit board can manifest themselves as burn marks and smoked components. While we feel your pain, (been there) subsequent damage is
not covered by the warranty.
Dangerous Music Incorporated reserves the right to change the specifications or modify the designs of its equipment. Sending in the
registration card is our way of keeping in touch with users of our equipment should this become necessary. Registration information is
always kept confidential and never disclosed to third parties for any reason. Company contact information is on the last page of this manual.
The CE sign on this product signifies the fact that the Additional Switching System® has been
tested and verified to conform to the applicable standards of 89/336/EEC.EN55103-1 (emissions)
EN61000-2 (immunity) and EN60065:2002 (safety requirements)
This product uses components of the types and quantities that comply with the EC RoHS
standard 2002/95/EC. A list of suppliers and materials is available from DMI. We tightly control
production to use top quality materials.
| 1
THANK YOU
Thank you for choosing products from the exciting and innovative line of
Dangerous Music recording equipment. Many years of reliable service can
be expected from our gear. This is made possible through careful design,
construction, and component choices by recording industry veterans.
The Dangerous Music D-Box is designed to improve your quality of life by
allowing you to hear on a different level. There are many features packed into
this product, so don’t skip the read. This user’s guide will help the engineer
(perhaps you?) realize the maximum benefits of this unit.
If you have any suggestions for future products, feel free to forward them!
2| DANGEROUS MUSIC
TABLE OF CONTENTS
Overview
3
D-BOX Front Panel Features & Benefits 4
D-BOX Rear Panel Features, Benefits & Connection
9
Connection Scenarios12
Appendix
16
Specifications
18
Warranty
19
D-BOX | 3
OVERVIEW
The D-Box is Dangerous Music’s Greatest Hits Box. In other words, it incorporates some of the finest features and
functionality from other products in the line with ZERO audio compromise. Analog summing, headphone amplification,
speaker selection, talkback and monitoring functions are all neatly tucked away into this powerful single rack space.
The D-Box provides solutions to the practical, daily needs of today’s compact computer based studio, and executes
them with no audio sacrifice.
How is this possible?
Only the most useful and requested options were incorporated into the design, with sonic purity being prioritized over
feature count. This unadulterated signal path was born out of Chris Muth’s design expertise and the critical listening
skills of top-tier engineers. Enjoy.
[The Dangerous Music D-Box and Power Supply pictured above]
Inside the box you’ll find the D-Box and Power Supply.
Tip:
, Why is there an external power supply? To lower the already unbelievably low noise floor. Make certain to position it away from sensitive audio components and audio cables. Also plug it into the D-Box BEFORE
plugging it into the wall.
Place the D-Box in your rack, where it’s easily accessible, since you’ll be tweaking the knobs and buttons frequently.
4| DANGEROUS MUSIC
1 2
3
4
Front Panel Features & Benefits
1. HEADPHONE JACKS AND LEVEL CONTROL KNOBS
Feature: Two independent, 20 watt headphone amplifiers (1).
Benefit: Tons of headroom, to audition intelligibly, make intelligent decisions and drive an inspired performance.
Separate volume knobs to accommodate different users tastes and varying headphone impedances.
Please exhibit caution when selecting a level. (See “tip”)
Operation: First choose a source to monitor from, by depressing the appropriate input select button (4). Then
determine a moderate listening level via the volume knobs.
Tip:
, Always start with the level control completely counter clockwise (minimum).
The headphone
amplifiers are very powerful and there is no solution for destroyed hearing, even from the pros at
Dangerous Music.
2. TALKBACK MIC & LEVEL CONTROL KNOB
Feature: Communicate with the talent via the built-in talkback mic directly into their headphones.
D-BOX | 5
Benefit: Avoid figuring out a separate means of communication to the artist (i.e. complicated mic setups)
Keep it quick, easy, and simple.
Operation: Hit the tb (talkback) switch (3) to activate this function. Then starting at the minimum, gently
increase the volume utilizing the level knob until the sweet spot is achieved. More magic revealed
about this switch in the next segment. (Hint: momentoggle.)
, Always start with the level control completely counter-clockwise (minimum). You don’t want to be
the cause of someone’s hearing loss.
Tip: , To create an isolated talkback output, choose one of the headphone outputs and turn the volume
Tip:
completely counter-clockwise. The talkback level is independent of the headphone level.
3A. FUNCTION BUTTONS (TB, MONO, ALT SPKR)
Feature: The tb switch (3) injects the microphone into the Headphones.
Benefit: See section 2 and momentoggle for more.
Feature: The mono switch (3) combines the left and right channels to the monitors.
Benefit: Always check phase by depressing this button. Did things get quieter? Louder? Instruments
missing? This is an indication that left and right are not playing nicely together.
Tip:
, Many formats are still delivered in mono. Consider television and radio in developing countries. Or
what about all those folks listening to music on their iPhone’s built-in speaker?
Feature: The alt spkr switch (3) allows the engineer to switch between two sets of monitors.
Benefit: Every studio should have at least two points of reference. Not all switchers are equal! The D-Box
achieves this noiselessly, without drop outs or phase shift. Remember... every decision you make
while tracking and mixing is affected by your monitor management system. It is the only piece of
gear that EVERYTHING goes through.
Tip:
, Make certain to level match your monitors, so one is not louder, since humans are often fooled by
the “louder is better” illusion. These adjustments should be made on the monitors themselves.
Feature: momentoggle is a feature built into the three function buttons above. It provides either a momentary
or latching mode, at the user’s discretion.
Benefit: Want to dart between mono and stereo a few times quickly? [toggle mode] Or need to leave it in
mono to see what’s ailing the mix? [latch mode]
6| DANGEROUS MUSIC
Need to step between monitors to see if that distortion is emanating from the speakers or the mix?
[toggle mode] Or listen to one set for an extended period? [latch mode]
Need to say, “rolling!” over the talkback mic to the talent? [toggle mode] Or leave it open for a
lengthy discussion between the singer in the tracking room and the drummer in the control room.
[latch mode]
Operation: latch mode. If the buttons are pressed and released quickly, they will latch.
Tip:
toggle mode.
,
If pressed and held for more than a second, the function remains engaged until the
button is released.
Be certain the talkback switch is not latched on when finished addressing the artist. For example:
To the artist “Okay, we got it.” To the second engineer “How are we going to get him to sing in
key?” Click. Oops. A talkback remote switch plugged into the jack on the rear panel (9) will not
latch, thus keeping this scenario from happening.
3B. SETUP BUTTONS (MONO, ALT SPKR)
Setup Mode: To enter setup mode press the mono and alt spkr buttons simultaneously (3). Both switches will
flash alternately indicating that the D-Box is waiting to set the input selection mode and the analog
input gain. To exit setup mode press one of the flashing switches. The D-Box is now reset and any
input selection mode and/or analog input gain mode changes will be saved.
Sum Switch: To monitor from up to three sources simultaneously (instead of the default single source), enter
setup mode (above) and press the sum switch (4). It will light up. Next, exit setup mode and like
magic, monitor a combination of inputs mixed together. When in setup mode, pressing the lit sum
switch (4) extinguishes the light and returns the D-Box back to normal monitoring mode. (i.e. one
input at a time.) So for example, monitor from the sum switch, analog switch and either the daw
or cd switch. (The digital switches will not combine).
Analog Input Gain: The analog input gain is factory calibrated for +4dBu sources. To accommodate consumer
and other -10dBV devices, first enter setup mode (see above) and then press the analog switch (4).
The switch will light and add 11.7dB of gain. Pressing the lit analog switch (4) while in setup mode
extinguishes the light and returns the calibration to +4dBu.
4. INPUT SELECT BUTTONS (SUM, ANALOG, DAW, CD)
Tip:
,
The Input Select section has two analog and two digital sources to choose from. The selected input
is sent to both the speakers and headphone amplifiers.
D-BOX | 7
Feature: The sum switch selects monitoring from the stereo summing mix output. (i.e. the summed
combination of the 8 inputs).
Benefit: Hear your mix BEFORE it hits external processing or A/D conversion.
Feature: The analog switch selects the analog input source from the rear panel.
Benefit: Connect all sorts of devices here! Samplers, synths, drum machines, an iPod, virtual instruments,
a Sound Effects Library or two track editor fed from an alternative computer output.
, Either +4dBu or -10dBV analog devices may be utilized (see:
).
Tip: , Plugging in a submixer to this input allows all the aforementioned devices simultaneous connection.
Tip:
setup mode
Feature:Both daw & cd buttons are digital inputs that feed the D-Box’s D/A converter.
Benefit: Monitoring from the same D/A allows mix decisions to be made, unbiased by different converters.
“Wow, where’s all that top end crunch coming from? That bell ringing?” Eliminate the .10 cent
converter in the mp3 player, and listen accurately.
, The converter will recognize and lock to either AES or SPDIF sources. Only one digital source may
be monitored at a time.
Tip: , Pushing a lit Input Select switch will mute that input.
Tip:
6
5 7
8
5. SUM OUTPUT KNOB
Feature:The sum output trim knob (5) affects the sum output level (14) by adjusting the overall level of the
stereo summed mix.
Benefit: Used to adjust the mix volume for optimum level into the mixdown A/D converter.
Tip:
,The
should start out near 12:00 (straight up). This gives you flexibility with
your mix levels. You can add or subtract mix level as needed.
sum output trim knob
8| DANGEROUS MUSIC
6. SIGNAL LEDs
Feature:8 signal leds reveal when signal is present at the summing inputs (11).
Benefit: Determine whether audio is passing into the D-Box for trouble shooting.
Tip:
,
If the signal lights are active and nothing is plugged into the unit, there is a DC offset present in
your system. Track it down and exterminate it.
7. PAN CONTROLS
Feature: The first six channels of the summing section are fed to the stereo bus in pairs (i.e. 1-2, 3-4 and
5-6). 7 & 8 have pan pots.
Benefit:The pan pots for channels 7 & 8 allow the placement of their signals anywhere in the mix and for
treating individual instruments. For example, assign both the bass and vocal track to a mono output
in the computer software. Now patch their signals into your favorite outboard gear like a BAX EQ
and then on into the D-Box’s sum inputs 7 and 8. Pan these up the center and you’re summing
with analog outboard. Don’t forget you can always strap stereo processors across the other pairs
as well.
Operation:First confirm that the desired signal is traveling to 7 or 8 and then adjust the pan pots to your liking.
Tip:
,An important track like lead vocals or kick drum can benefit from having its own output.
8. VOLUME KNOB
Feature:The volume knob controls the level to the monitors from whatever source(s) have been selected (4).
Operation: Always begin with the knob completely counter-clockwise to avoid hearing loss and blown drivers.
Tip:
, This knob does not affect the summing output.
D-BOX | 9
9 10 11 12
Rear Panel Features, Benefits & Connections
9. TALKBACK REMOTE (FOOTSWITCH NOT INCLUDED)
Feature: Using a footswitch, communicate with the talent via the built in
headphones.
talkback mic
directly into their
Benefit: Avoid figuring out a separate means of communication to the artist (i.e. complicated mic setups)
Keep it quick, easy, and simple, and stop reaching for the tb switch.
Operation: Click and hold down the talkback remote pedal (not included) to activate this function. Then
starting at the minimum, gently increase the volume utilizing the level knob until the sweet spot
is achieved.
Tip:
, Utilize a TRS balanced 1/4” plug for this jack. Closing the ring to the tip activates the Talkback
function of D-Box. Ask for a “normally open, momentary footswitch” at your local audio dealer.
10. ANALOG INPUT
Feature: The analog input provides an alternative analog input source.
Benefit: Connect all sorts of devices here! Samplers, synths, drum machines, an iPod, virtual instruments,
a Sound Effects Library or two track editor fed from an alternative computer output.
, Plugging in a submixer to this input allows all the aformentioned devices simultaneous connection.
Tip: , Either +4dBu or -10dBV analog devices may be utilized (see:
).
Tip:
setup mode
11. SUMMING INPUT
Feature: Connect a DB25 connector here from the analog line outputs of your audio interface.
Benefit: Simple, elegant, common connector that is found on many other pieces of gear and patchbays.
10| DANGEROUS MUSIC
Tip:
, The DB25 connector adheres to the Tascam Wiring Standard for 8 channels of balanced analog
input. See the wiring diagram in appendix if you’re comfortable with soldering, or just buy an
excellent quality cable with a spiral shield. (Example M3).
12. DC INPUT
Feature: The power supply plugs into this jack.
Benefit: An external power supply allows the unit to run at a cooler temperature.
Operation:Make certain to position it away from sensitive audio components and audio cables.
Tip:
, Observe safe power supply etiquette and plug the supply into the D-Box BEFORE plugging it into
the wall.
13 14 15 16
13. DIGITAL INPUTS
Feature:Both daw & cd connections are digital inputs that feed the D-Box’s D/A converter.
Benefit: Every decision you make is influenced by the monitor section; via headphones or reference monitors.
It had better sound transparent, or you won’t make the right decisions. Monitoring from the same
D/A also allows unbiased mix decisions to be made, unhampered by different converters. Plug your
mp3 player into a digital dock and compare your mix to a reference at the same level, through the
same D/A.
Operation:Connect either an AES or S/PDIF cable and use the front panel controls to select the source (4).
Tip:
, The converter will recognize and lock to either AES or S/PDIF sources. Only one digital source may
be monitored at a time. Purchase high quality cables, see examples M1 and M4.
14. SUM OUTPUTS
Feature: This is the stereo output of the 8 summed inputs. The sum switch selects monitoring from here.
D-BOX |11
Benefit: Hear your mix BEFORE it hits external processing or A/D conversion.
Operation:Utilize the sum switch to select this monitoring source.
Tip:
, Use high quality analog quad cable with a spiral shield. (Example M2).
15 & 16. MAIN & ALTERNATE SPEAKER OUTPUTS
Feature: These jacks allow connection with two pairs of studio monitors.
Benefit: Every studio should have at least two points of reference. Not all switchers are equal! The D-Box
achieves this noiselessly, without dropouts or phase shift. Remember... every decision you make
while tracking and mixing is affected by your monitor management system. It is the only piece of
gear that is ALWAYS on while in the studio.
Operation: alt spkr switch (3) allows the engineer to switch between two sets of monitors.
EXAMPLE M1:
AES CABLE
EXAMPLE M2:
MIC CABLE
EXAMPLE M3:
ANALOG SNAKE
EXAMPLE M4:
AES to S/PDIF CABLE
[AES XLR(F)-XLR(M)]
[ANALOG XLR(F)-XLR(M)]
[ANALOG DB25-XLR(F)]
[DIGITAL XLR(M)-RCA]
Tip:
, Make certain to utilize high quality analog quad cable with a spiral shield. (Example M2). Also
level match the monitors, so one is not louder, since humans are often fooled by the “louder is
better” illusion. These adjustments would be made on the monitors themselves.
12| DANGEROUS MUSIC
D-BOX AND UNIVERSAL AUDIO APOLLO
D-BOX |13
D-BOX AND DIGIDESIGN 003 EXAMPLE
iPOD OUT
TO ANALOG INPUT
MINI 1/8”-2XLR(M)
8 OUTPUTS
TO SUMMING INPUT
1/4” BALANCED-DB25
ATTACH POWER
SUPPLY TO
D-BOX BEFORE
WALL
AES OR S/PDIF CD
PLAYER OUT TO
CD DIGITAL INPUT
XLR(F)-XLR(M)
S/PDIF OUTPUT
TO DAW
DIGITAL INPUT
RCA-XLR(M)
SUM OUTPUTS
TO 5-6 OR 7-8
INPUTS
XLR(F)-TRS
ALT SPEAKER OUT
TO POWERED
MONITOR INPUTS
XLR(F)-XLR(M)
MAIN SPEAKER
OUT TO
POWERED
MONITOR
INPUTS
XLR(F)-XLR(M)
ANALOG CABLE:
DIGITAL CABLE:
POWER CABLE:
14| 14| Endox
DANGEROUS MUSIC
D-BOX AND SYMPHONY 8X8
LOREM D-BOX |15
IPSUM | 15
D-BOX AND 2-BUS LT EXPANSION
FROM D/A CONVERTER OR
COMPUTER INTERFACE
OUTPUTS 17-24
TO A/D CONVERTER OR
COMPUTER INTERFACE,
BACK INTO THE SESSION
ANALOG CABLE:
DIGITAL CABLE:
POWER CABLE:
D-BOX AND 2-BUS LT EXPANSION SETUP
FROM D/A CONVERTER OR
COMPUTER INTERFACE
OUTPUTS 9-16
DIGITAL OUTPUT OF THE
INTERFACE OR CONVERTER
(AES OR SPIDF)
FROM D/A CONVERTER OR
COMPUTER INTERFACE
OUTPUTS 1-8
16| DANGEROUS MUSIC
APPENDIX
H = HOT
ANALOG 8 CHANNEL DB25
(TASCAM PROTOCOL)
C = COLD
G = GROUND
PIN OUT WIRING FOR DB25 CONNECTOR
D-BOX |17
APPENDIX CONTINUED...
EXTERNAL TALKBACK KEY
WIRING PIN OUT
AES TO S/PDIF
WIRING DIAGRAM
18| DANGEROUS MUSIC
SPECIFICATIONS
SUMMING SECTION
Frequency Response 1Hz-100kHz within 0.1dB
THD+N < 0.003%
IMD < 0.0035%
Crosstalk < -97dB
Noise < -89dBu total energy in audio band
Maximum Input +27dBu
MONITOR SECTION
Frequency Response 1Hz-100kHz within 0.1dB
THD+N < 0.002%
IMD < 0.003%
Crosstalk < -101dB
Noise < -92dBu total energy in audio band
Maximum Input +26dBu
D/A CONVERTER
Lock Range Fs=30kHz-100kHz
Crosstalk < -101dB
Noise -92dBu
THD+N 0.005%
D-BOX |19
WARRANTY
Free 2 year extended warranty with online registration.
Standard warranty: 90 days parts and labor, subject to inspection.
Does not include damage incurred through shipping damage, abusive operation or modifications/attempted repair by
unauthorized technicians.
USA
Dangerous Music Inc.
231 Stevens Road
Edmeston, NY 13335
E-mail: [email protected]
EUROPE
Dangerous Music Europe
Stieleichenweg 55
50999 Cologne, Germany
Fon: +49 2236 393731
E-mail: [email protected]
Dangerous Music, Inc. reserves the right to alter the software and design of their equipment.
If after reading the manual more information for an application is needed, please contact us via email for the quickest
response.
•Factory contact for RA# must occur before shipping a unit to us for service.
•Please keep the original cartons in case storage or transportation of units is required.
•Always insure shipment as these damages are not covered by the warranty.
•Thank you for actually reading the manual. Now go make some Dangerous Music!
revision 3.0 marek April 2013
Dangerous Music Inc. 231 Stevens Road, Edmeston, NY 13335 [email protected] www.dangerousmusic.com