1
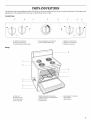
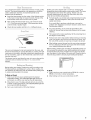
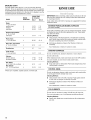
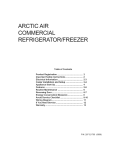
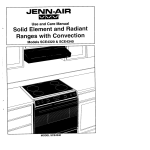
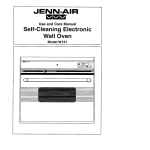
STANDARD
CLEANING
ELECTRICRANGE
For questions about features, operation/performance
parts, accessories or service, call: 1-800-253-1301.
or visit our website at...
www.whirlpool.com
Table of Contents .......................................
To the installer: Please leave this
instruction book with the unit.
To the consumer: Please read and
keep this book for future reference.
9763000
2
TABLEOF CONTENTS
RANGE SAFETY .............................................................................
The Anti-Tip Bracket ....................................................................
PARTS AND FEATURES ................................................................
COOKTOP USE ..............................................................................
3
3
5
6
Cooktop Controls .........................................................................
Coil Elements and Burner Bowls .................................................
6
6
Lift-up Cooktop ............................................................................
Home Canning .............................................................................
Cookware .....................................................................................
7
7
7
OVEN USE .......................................................................................
8
Oven Temperature Control .......................................................... 8
Aluminum Foil ...............................................................................
8
Positioning Racks and Bakeware ................................................ 8
Bakeware ......................................................................................
8
Meat Thermometer .......................................................................
9
Oven Vent .....................................................................................
9
Baking and Roasting ....................................................................
9
Broiling ..........................................................................................
9
RANGE CARE ...............................................................................
10
General Cleaning ........................................................................
Oven Door ..................................................................................
Storage Drawer ..........................................................................
TROUBLESHOOTING ..................................................................
10
11
12
13
ASSISTANCE OR SERVICE .........................................................
WAR RAN TY ..................................................................................
14
16
RANGESAFETY
Your safety and the safety of others are very important.
We have provided many important safety messages in this manual and on your appliance. Always read and obey all safety
messages.
This is the safety alert symbol.
This symbol alerts you to potential hazards that can kill or hurt you and others.
All safety messages will follow the safety alert symbol and either the word "DANGER" or "WARNING."
These words mean:
You can be killed or seriously injured if you don't immediately
follow instructions.
You can be killed or seriously injured if you don't follow
instructions.
All safety messages will tell you what the potential hazard is, tell you how to reduce the chance of injury, and tell you what can
happen if the instructions are not followed.
The range will not tip during normal use. However, the range can tip if you apply too much force or weight to the open door without
having the anti-tip bracket fastened down properly.
Tip Over Hazard
A child or adult can tip the range and be killed.
Connect anti-tip bracket to rear range foot.
Reconnect the anti-tip bracket, if the range is moved.
See the installation instructions for details.
Failure to follow these instructions
Anti-Tip Bracket
can result in death or serious burns to children and adults.
Making sure the anti-tip bracket is installed:
• Slide range forward.
• Look for the anti-tip bracket securely attached to floor.
• Slide range back so rear range foot is under anti-tip bracket.
Range Foot
iMPORTANT SAFETY iNSTRUCTiONS
WARNING:
To reduce the risk of fire, electrical shock,
injury to persons, or damage when using the range, follow
basic precautions, including the following:
[] WARNING:
TO REDUCE THE RISK OF TIPPING OF
THE RANGE, THE RANGE MUST BE SECURED BY
PROPERLY INSTALLED ANTI-TIP DEVICES. TO CHECK
IF THE DEVICES ARE INSTALLED PROPERLY, SLIDE
RANGE FORWARD, LOOK FOR ANTI-TIP BRACKET
SECURELY ATTACHED TO FLOOR, AND SLIDE RANGE
BACK SO REAR RANGE FOOT IS UNDER ANTI-TIP
BRACKET.
[] CAUTION:
Do not store items of interest to children in
cabinets above a range or on the backguard of a range children climbing on the range to reach items could be
seriously injured.
[] Proper Installation - Be sure the range is properly installed
and grounded by a qualified technician.
[] Never Use the Range for Warming or Heating the Room.
[] Do Not Leave Children Alone - Children should not be left
alone or unattended in area where the range is in use.
They should never be allowed to sit or stand on any part of
the range.
[] Wear Proper Apparel - Loose-fitting or hanging garments
should never be worn while using the range.
[] User Servicing - Do not repair or replace any part of the
range unless specifically recommended in the manual. All
other servicing should be referred to a qualified technician.
[] Storage in or on the Range - Flammable materials should
not be stored in an oven or near surface units.
[] Do Not Use Water on Grease Fires - Smother fire or flame
or use dry chemical or foam-type extinguisher.
[] Use Only Dry Potholders - Moist or damp potholders on
hot surfaces may result in burns from steam. Do not let
potholder touch hot heating elements. Do not use a towel
or other bulky cloth.
[] DO NOT TOUCH SURFACE UNITS OR AREAS NEAR
UNITS - Surface units may be hot even though they are
dark in color. Areas near surface units may become hot
enough to cause burns. During and after use, do not touch,
or let clothing or other flammable materials contact surface
units or areas near units until they have had sufficient time
to cool. Among those areas are the cooktop and surfaces
facing the cooktop.
[] Protective Liners - Do not use aluminum foil to line surface
unit drip bowls or oven bottoms, except as suggested in
the manual. Improper installation of these liners may result
in a risk of electric shock, or fire.
[] Glazed Cooking Utensils - Only certain types of glass,
glass/ceramic, ceramic, earthenware, or other glazed
utensils are suitable for range-top service without breaking
due to the sudden change in temperature.
[] Utensil Handles Should Be Turned Inward and Not Extend
Over Adjacent Surface Units - To reduce the risk of burns,
ignition of flammable materials, and spillage due to
unintentional contact with the utensil, the handle of a
utensil should be positioned so that it is turned inward, and
does not extend over adjacent surface units.
[] Do Not Soak Removable Heating Elements - Heating
elements should never be immersed in water.
[] Do Not Cook on Broken Cooktop - If cooktop should
break, cleaning solutions and spillovers may penetrate the
broken cooktop and create a risk of electric shock. Contact
a qualified technician immediately.
[] Clean Cooktop With Caution - If a wet sponge or cloth is
used to wipe spills on a hot cooking area, be careful to
avoid steam burn. Some cleaners can produce noxious
fumes if applied to a hot surface.
[] Use Care When Opening Door - Let hot air or steam
escape before removing or replacing food.
[] Do Not Heat Unopened Food Containers - Build-up of
pressure may cause container to burst and result in injury.
[] Keep Oven Vent Ducts Unobstructed.
[] Placement of Oven Racks - Always place oven racks in
desired location while oven is cool. If rack must be moved
while oven is hot, do not let potholder contact hot heating
element in oven.
[] DO NOT TOUCH HEATING ELEMENTS OR INTERIOR
SURFACES OF OVEN - Heating elements may be hot even
though they are dark in color. Interior surfaces of an oven
become hot enough to cause burns. During and after use,
do not touch, or let clothing or other flammable materials
contact heating elements or interior surfaces of oven until
they have had sufficient time to cool. Other surfaces of the
appliance may become hot enough to cause burns - among
these surfaces are oven vent openings and surfaces near
these openings, oven doors, and windows of oven doors.
[] Use Proper Pan Size - The range is equipped with one or
more surface units of different size. Select utensils having
flat bottoms large enough to cover the surface unit heating
element. The use of undersized utensils will expose a
portion of the heating element to direct contact and may
result in ignition of clothing. Proper relationship of utensil to
burner will also improve efficiency.
For self-cleaning
[] Never Leave Surface Units Unattended at High Heat
Settings - Boilover causes smoking and greasy spillovers
that may ignite.
[] Clean Only Parts Listed in Manual.
[] Make Sure Reflector Pans or Drip Bowls Are in Place Absence of these pans or bowls during cooking may
subject wiring or components underneath to damage.
ranges -
[] Do Not Clean Door Gasket - The door gasket is essential
for a good seal. Care should be taken not to rub, damage,
or move the gasket.
[] Do Not Use Oven Cleaners - No commercial oven cleaner
or oven liner protective coating of any kind should be used
in or around any part of the oven.
[] Before Self-Cleaning the Oven - Remove broiler pan and
other utensils.
For units with ventilating hood [] Clean Ventilating Hoods Frequently - Grease should not
be allowed to accumulate on hood or filter.
[] When flambeing foods under the hood, turn the fan on.
SAVE THESE INSTRUCTIONS
PARTSAND FEATURES
This manual
appearances
covers several different
of the features shown
models. The range you have purchased
may have some
here may not match those of your model.
or all of the items listed.
The locations
Control Panel
A
B
C
D
E
F
G
_J
15_0_F
e
A. Left front control knob
B. Left rear control knob
e
D. Oven temperature control knob
E. Oven heating indicator light
F Right rear control knob
G. Right front control knob
H. Surface area Iocator
C. Surface heating indicator light
Range
G
B
II
A. Oven vent
B. Surface burner
E. Model and serial number plate
(behind left side of storage drawer)
C. Anti-tip bracket
D. Door stop clip
E Storage drawer
G. Control panel
H
!
H. Broil element (not shown)
I. Door gasket
J. Bake element
H
and
COOKTOPUSE
Coil elements should be level for optimal cooking results. Burner
bowls, when clean, reflect heat back to the cookware. They also
help catch spills.
Cookware should not extend more than 1/2"(1.3 cm) over the coil
element. If cookware is uneven or too large, it can produce
excess heat, causing the burner bowl to change color. For more
information, see the "General Cleaning" section.
NOTE: Before removing or replacing coil elements and burner
bowls, make sure they are cool and the control knobs are in the
Off position.
Fire Hazard
Turn off all controls when done cooking.
Failure to do so can result in death or fire.
To Remove:
1.
Push in the edge of coil element toward the receptacle. Then
lift it enough to clear the burner bowl.
2.
Pull the coil element straight away from the receptacle.
3.
Lift out the burner bowl.
The control knobs can be set to anywhere between HI and LO.
Push in and turn to setting. On some models, the surface cooking
area Iocator shows which element is turned on. Use the following
chart as a guide when setting heat levels.
SETTING
RECOMMENDED
USE
HI
•
Start food cooking.
•
Bring liquid to a boil.
Medium High
Between MEDIUM
and HI
•
Hold a rapid boil.
•
Quickly brown or sear food.
MEDIUM
•
Maintain a slow boil.
•
Fry or saute foods.
•
Cook soups, sauces and gravies.
Medium Low
Between MEDIUM
and LO
•
Stew or steam food.
•
Simmer.
LO
•
Keep food warm.
•
Melt chocolate or butter.
To Replace:
1. Line up openings in the burner bowl with the coil element
receptacle.
\
2.
Holding the coil element as level as possible, slowly push the
coil element terminal into the receptacle.
3.
When the terminal is pushed into the receptacle as far as it
will go, push down the edge of the coil element opposite the
receptacle.
Thelift-upcooktop
provides
easyaccess
forcleaning
beneath.
Donotdropthecooktop.
Damage
couldoccurtothefinishand
thecooktop
frame.Formoreinformation,
seethe"General
Cleaning"
section.
To Lift:
Lift the cooktop by both front corners until the supports lock into
place.
IMPORTANT: Do not leave empty cookware on a hot surface
cooking area, element or surface burner.
Ideal cookware should have a flat bottom, straight sides and a
well-fitting lid, and the material should be of medium-to-heavy
thickness.
Rough finishes may scratch the cooktop or grates. Aluminum and
copper may be used as a core or base in cookware. However,
when used as a base they can leave permanent marks on the
cooktop or grates.
Cookware material is a factor in how quickly and evenly heat is
transferred, which affects cooking results. A nonstick finish has
the same characteristics as its base material. For example,
aluminum cookware with a nonstick finish will take on the
properties of aluminum.
Cookware with nonstick surfaces should not be used under the
broiler.
To Replace:
1. Lift the cooktop from both sides while pressing the support
rods back to unlock them.
2.
Slowly lower the cooktop into place.
When canning for long periods, alternate the use of elements
between batches. This allows time for the most recently used
areas to cool.
•
Center the canner on the element. Canners should not extend
more than 1/2"(1.3 cm) beyond the element.
•
Do not place canner on 2 elements at the same time.
•
For more information, contact your local agricultural
department. Companies that manufacture home canning
products can also offer assistance.
Use the following chart as a guide for cookware material
characteristics.
COOKWARE
CHARACTERISTICS
Aluminum
•
Heats quickly and evenly.
•
Suitable for all types of cooking.
•
Medium or heavy thickness is best for
most cooking tasks.
•
Heats slowly and evenly.
•
Good for browning and frying.
•
Maintains heat for slow cooking.
Ceramic or
•
Follow manufacturer's
Ceramic glass
•
Heats slowly, but unevenly.
•
Ideal results on low to medium heat
settings.
Copper
•
Heats very quickly and evenly.
Earthenware
•
Follow manufacturer's
•
Use on low heat settings.
Porcelain
enamel-onsteel or cast
iron
•
See stainless steel or cast iron.
Stainless
•
Heats quickly, but unevenly.
•
A core or base of aluminum or copper
on stainless steel provides even
heating.
Cast iron
steel
instructions.
instructions.
OVENUSE
Odors and smoke are normal when the oven is used the first few
times, or when it is heavily soiled.
IMPORTANT: The health of some birds is extremely sensitive to
the fumes given off. Exposure to the fumes may result in death to
certain birds. Always move birds to another closed and wellventilated room.
IMPORTANT: Do not use a thermometer to measure oven
temperature because opening the oven door and element or
burner cycling may give incorrect readings.
The oven provides accurate temperatures;
faster or slower than your previous oven.
however, it may cook
IMPORTANT: Do not line the oven bottom with any type of foil,
liners or cookware because permanent damage will occur to the
oven bottom finish.
•
Do not cover entire rack with foil because air must be able to
move freely for best cooking results.
•
To catch spills, place foil on rack below dish. Make sure foil is
at least 1/2" (1.3 cm) larger than the dish and that it is turned
up at the edges.
IMPORTANT: To avoid permanent damage to the porcelain
finish, do not place food or bakeware directly on the oven door or
bottom.
BAKEWARE
Hot air must be able to circulate around food to cook evenly, so
allow 2" (5 cm) of space around bakeware and oven walls. Use
the following chart as a guide.
NUMBEROF
PAN(S)
POSITION ON RACK
1
Center of rack.
2
Side by side or slightly staggered.
3 or 4
Opposite corners on each rack. Make sure
that no bakeware piece is directly over
another.
The bakeware material affects cooking results. Follow
manufacturer's recommendations and use the bakeware size
recommended in the recipe. Use the following chart as a guide.
BAKEWARE/
RESULTS
RECOMMENDATIONS
Light colored
aluminum
•
Use temperature and time
recommended in recipe.
•
May need to reduce baking
temperatures 25°F (15°C).
•
Use suggested baking time.
•
For pies, breads and casseroles,
use temperature recommended in
recipe.
•
Place rack in center of oven.
Insulated cookie
sheets or baking
pans
•
Little or no
bottom browning
•
Place in the bottom third of oven.
•
May need to increase baking time.
Stainless steel
•
May need to increase baking time.
•
Follow manufacturer's
instructions.
•
May need to reduce baking
temperatures 25°F (15°C).
•
Light golden
crusts
•
Even browning
•
Position racks before turning on the oven.
Dark aluminum and
other bakeware with
dark, dull and/or
nonstick finish
•
Do not move racks with bakeware on them.
•
•
Make sure racks are level.
RACKS
NOTES:
To move a rack, pull it out to the stop position, raise the front
edge, then lift out. Use the following illustration and chart as a
guide.
5,,..--]
2---],
FOOD
RACK POSITION(S)
Frozen pies, large roasts, turkeys,
angel food cakes
1 or 2
Bundt cakes, most quick breads,
yeast breads, casseroles, meats
2
Cookies, biscuits, muffins, cakes,
nonfrozen pies
2 or 3
Brown, crisp
crusts
•
Light, golden
crusts
•
Uneven browning
Stoneware/Baking
stone
•
Crisp crusts
Ovenproof
glassware, ceramic
glass or ceramic
•
Brown, crisp
crusts
Useameatthermometer
todetermine
doneness
ofmeat,poultry
andfish.Theinternal
temperature,
notappearance,
shouldbe
usedtodetermine
doneness.
Ameatthermometer
isnot
supplied
withthisappliance.
• Insertthethermometer
intothecenterofthethickest
portion
ofthemeatorinnerthighorbreastofpoultry.
Thetipofthe
thermometer
shouldnottouchfat,boneorgristle.
• Afterreading
thethermometer
once,pushitintothemeat
1/2"
(1.3cm)moreandreadagain.Ifthetemperature
drops,
cookthemeatorpoultry
longer.
• Check
allmeat,poultry
andfishin2or3different
places.
Broiling uses direct radiant heat to cook food. Changing the
temperature when broiling allows more precise control. The lower
the temperature, the slower the cooking. Thicker cuts and
unevenly shaped pieces of meat, fish and poultry may cook
better at lower broiling temperatures.
•
If you would like to purchase a broiler pan, one may be
ordered. See "Assistance or Service" section to order. Ask for
Part Number 4396923.
•
For proper draining, do not cover the grid with foil. The
bottom of the pan may be lined with aluminum foil for easier
cleaning.
•
Trim excess fat to reduce spattering. Slit the remaining fat on
the edges to avoid curling.
•
Pull out oven rack to stop position before turning or removing
food. Use tongs to turn food to avoid the loss of juices. Very
thin cuts of fish, poultry or meat may not need to be turned.
•
After broiling, remove the pan from the oven when removing
the food. Drippings will bake on the pan if left in the heated
oven, making cleaning more difficult.
A. Oven vent
The oven vent releases hot air and
should not be blocked or covered.
cause poor air circulation, affecting
Do not set plastics, paper or other
near the oven vent.
moisture from the oven, and
Blocking or covering vent will
cooking and cleaning results.
items that could melt or burn
For best results, use a broiler pan and grid (provided on some
models). They are designed to drain juices and help avoid
spatter and smoke.
Before broiling, position rack according to the Broiling Chart. It is
not necessary to preheat the oven before putting food in unless
recommended in the recipe. Position food on grid in the broiler
pan, then place it in the center of the oven rack. Close the door to
the broil stop position to ensure proper broiling temperature.
The element can be used when the oven is in use as long as the
cookware does not extend more than 1/2"(1.3 cm) over the
element.
Before baking and roasting, position the racks according to the
"Positioning Racks and Bakeware" section. When roasting, it is
not necessary to wait for the oven to preheat before putting food
in, unless recommended in the recipe.
To Bake or Roast:
1. Push in and turn the oven control knob to the desired
temperature setting. The OVEN HEATING light will turn on
and remain on until the oven reaches the set temperature.
2. Place food in oven. The bake element will turn on and off to
maintain cooking temperature. The OVEN HEATING light will
turn on and off with the element.
3.
Turn oven control knob to OFF when finished.
To Broil:
1. Push in and turn oven control knob to BROIL HI or turn to
BROIL LO to broil at a lower temperature.
2.
After broiling, turn the oven control knob to OFR
BROILING
CHART
For best results, place food 3" (7 cm) or more from the broil
element. Times are guidelines only and may need to be adjusted
for individual foods and tastes. Recommended rack positions are
numbered from the bottom (1) to the top (5). For diagram, see the
"Positioning Racks and Bakeware" section.
FOOD
Steak
1" (2.5 cm) thick
medium rare
medium
well-done
Ground meat patties*
3/4"(2 cm) thick
well-done
Pork chops
1" (2.5 cm) thick
RACK
POSITION
COOK TIME
(in minutes)
Side 1
Side 2
RANGE CARE
IMPORTANT: Before cleaning, make sure all controls are off and
the oven and cooktop are cool. Always follow label instructions
on cleaning products.
Soap, water and a soft cloth or sponge are suggested
otherwise noted.
4
4
4
14-15
15-16
18-19
EXTERIOR PORCELAIN
(on some models)
7-8
8-9
9-10
SURFACES
Food spills containing acids, such as vinegar and tomato, should
be cleaned as soon as the entire appliance is cool. These spills
may affect the finish.
4
4
13-14
20-22
7-8
Cleaning Method:
•
Glass cleaner, mild liquid cleaner or nonabrasive scrubbing
pad: Gently clean around the model and serial number plate
because scrubbing may remove numbers.
•
All-Purpose Appliance Cleaner Part Number 31662 (not
included):
10-11
Ham slice, precooked
1/2"(1.25 cm) thick
4
8-10
4-5
Frankfurters
4
5-7
3-4
See "Assistance
COOKTOP
Lamb chops
1" (2.5 cm)thick
4
14-17
8-9
Chicken
bone-in pieces
boneless breasts
3
4
17-20
11-16
17-20
11-16
Fish Fillets
1/4-1/2"(0.6-1.25 cm) thick
Fish Steaks
3/4-1" (2-2.5 cm) thick
ENAMEL
first unless
or Service" section to order.
CONTROLS
Do not use steel wool, abrasive cleansers or oven cleaner.
Do not soak knobs.
When replacing knobs, make sure knobs are in the OFF position.
On some models, do not remove seals under knobs.
Cleaning Method:
4
8-10
4-5
4
16-18
8-9
•
Soap and water or dishwasher: Pull knobs straight away from
control panel to remove.
CONTROL
PAN EL
*Place up to 9 patties, equally spaced, on broiler grid.
Do not use abrasive cleaners, steel-wool pads, gritty washcloths
or some paper towels. Damge may occur.
Cleaning Method:
•
Glass cleaner and soft cloth or sponge: Apply glass cleaner
to soft cloth or sponge, not directly on panel.
•
All-Purpose Appliance Cleaner Part Number 31662 (not
included):
See "Assistance
or Service" section to order.
COIL ELEMENTS
Do not clean or immerse in water. Soil will burn off when hot.
For more information,
see "Coil Elements and Burner Bowls."
Cleaning Method:
•
10
Damp cloth: Make sure control knobs are off and elements
are cool.
BURNER
BOWLS
Cleaning Method:
•
Solution of 1/2cup (125 mL) ammonia to 1 gal. (3.75 L) water:
Soak for 20 minutes, then scrub with stainless steel-wool
pad.
•
•
Oven cleaner: Follow product label instructions.
Mildly abrasive cleanser: Scrub with wet scouring pad.
For normal range use, it is not suggested to remove the oven
door. However, if removal is necessary, make sure the oven is off
and cool. Then, follow these instructions. The oven door is heavy.
To Remove:
1.
Open oven door all the way.
2.
Flip up the hinge latch on each side.
3=
Close the oven door as far as it will shut.
4.
Lift the oven door while holding both sides.
Porcelain enamel only, not chrome
•
Dishwasher
Gas Grate and Drip Pan Cleaner Part Number 31617 (not
included):
See "Assistance
SURFACE
or Service" section to order.
UNDER
COOKTOP
Do not remove the cooktop to avoid product damage.
For more information,
see "Lift-up Cooktop"
Continue to push the oven door closed and pull it away from
the oven door frame.
section.
Cleaning Method:
•
Steel-wool
pad
OVEN DOOR
EXTERIOR
Cleaning Method:
•
Glass cleaner and paper towels or nonabrasive plastic
scrubbing pad: Apply glass cleaner to soft cloth or sponge,
not directly on panel.
•
All-Purpose Appliance Cleaner Part Number 31662 (not
included):
See "Assistance
BROILER
To Replace:
1. Insert both hanger arms into the door.
or Service" section to order.
PAN AND GRID (on some models)
Do not clean in the Self-Cleaning
cycle.
Cleaning Method:
•
Mildly abrasive cleanser:
Scrub with wet scouring pad.
•
Solution of 1/2cup (125 mL) ammonia to 1 gal. (3.75 L) water:
Soak for 20 minutes, then scrub with scouring or steel-wool
pad.
•
Oven cleaner: Follow product label instructions.
2=
Porcelain enamel only, not chrome
•
Dishwasher
STORAGE
Open the oven door.
You should hear a "click" as the door is set into place.
3.
Move the hinge levers back to the locked position. Check
that the door is free to open and close. If it is not, repeat the
removal and installation procedures.
DRAWER
Make sure drawer is cool and empty before cleaning.
For more information,
see "Storage Drawer" section.
Cleaning Method:
•
Mild detergent
Drawer Liner (on some models)
Remove all stored items from drawer and lift out drawer liner.
•
Clean with mild detergent
•
All-Purpose Appliance Cleaner Part Number 31662 (not
included):
See "Assistance
or Service" section to order.
11
The storage drawer can be removed. Before removing, make sure
drawer is cool and empty.
To Remove:
1.
Pull the storage drawer straight back past the drawer stop
notch and the end of the side rails.
To Replace:
1. Lift up the back of the drawer and place it inside the range in
its fully forward position.
2.
Lift up the front of the drawer to a level position.
3.
Slowly push the drawer into the range until the drawer side
rails engage with the gap in the drawer glides.
\
\
A. Drawer stop notch
B. End of side rail
2.
Lift up the back of the drawer and pull the drawer out.
A. Engage drawer glide
Once the drawer is fully engaged on both sides, slide the
drawer back into the closed position.
NOTE: When you are removing and replacing the storage
drawer, a slight push may be needed to move the drawer
stop notch past the drawer glides.
12
TROUBLESHOOTING
Try the solutions suggested here first in order to avoid the cost of an unnecessary
Nothing will operate
•
Oven indicator
Is the power supply cord unplugged?
Plug into a grounded outlet,
•
Has a household fuse blown, or has a circuit breaker
tripped?
Replace the fuse or reset the circuit breaker. If the problem
continues, call an electrician.
Cooktop
will not operate
Is the control knob set correctly?
Push in knob before turning to a setting,
•
On coil element models, is the element inserted
See "Coil Elements and Burner Bowls" section.
•
heat around cookware
cooking
results not what expected
Is the proper cookware being used?
See "Cookware" section.
•
Is the control
See "Cooktop
•
properly?
on cooktop
•
•
Is the appliance level?
Level the appliance. See the Installation Instructions,
Was the oven preheated?
See "Baking and Roasting" section.
Is the cookware the proper size?
Use cookware about the same size as the surface cooking
area, element or surface burner. Cookware should not extend
more than 1/2"(1,3 cm) outside the cooking area.
Cooktop
results not what expected
Is the proper temperature set?
Double-check the recipe in a reliable cookbook.
•
Excessive
lights flash
Do the OVEN HEATING indicator lights flash?
See "Assistance or Service" section,
Oven cooking
•
service call.
knob set to the proper heat level?
Controls" section.
Is the appliance level?
Level the appliance, See the Installation Instructions.
On coil element models, is the element inserted properly?
See "Coil Elements and Burner Bowls" section.
Is the proper bakeware being used?
See "Bakeware" section.
Are the racks positioned properly?
See "Positioning Racks and Bakeware" section.
Is there proper air circulation around bakeware?
See "Positioning Racks and Bakeware" section,
Is the batter evenly distributed in the pan?
Make sure batter is level in the pan,
Is the proper length of time being used?
Adjust cooking time.
Has the oven door been opened while cooking?
Oven peeking releases oven heat and can result in longer
cooking times.
Are baked items too brown on the bottom?
Move rack to higher position in the oven.
Are pie crust edges browning early?
Use aluminum foil to cover the edge of the crust and/or
reduce baking temperature.
13
ASSISTANCEOR SERVICE
Before calling for assistance or service, please check
"Troubleshooting." It may save you the cost of a service call. If
you still need help, follow the instructions below.
When calling, please know the purchase date and the complete
model and serial number of your appliance. This information will
help us to better respond to your request.
If you need replacement
parts
If you need to order replacement parts, we recommend that you
use only FSP® replacement parts. FSP replacement parts will fit
right and work right because they are made with the same
precision used to build every new WHIRLPOOL ® appliance.
To locate FSP replacement parts in your area, call us or your
nearest Whirlpool designated service center.
Call the Whirlpool Customer eXperience Center
toll free: 1-800-253-1301.
Our consultants provide assistance with:
•
Features and specifications on our full line of appliances.
•
Installation information.
•
Use and maintenance
•
Accessory and repair parts sales.
•
Specialized customer assistance (Spanish speaking, hearing
impaired, limited vision, etc.).
U.S.A.
To order accessories, call the Whirlpool Customer eXperience
Center toll free at 1-800-442-9991 and follow the menu prompts.
Or visit our website at www.whirlpool.com
and click on "Buy
Accessories Online."
Canning Unit Kit
(coil element models)
Order Part Number 242905
Cooktop
Cleaner
(ceramic glass models)
Order Part Number 31464
Cooktop Protectant
Order Part Number 31463
Cooktop Care Kit
(includes cleaner, protectant,
Order Part Number 31605
and applicator pads)
procedures.
Cooktop Scraper
(ceramic glass models)
Order Part Number 3183488
Referrals to local dealers, repair parts distributors and service
companies. Whirlpool designated service technicians are
trained to fulfill the product warranty and provide afterwarranty service, anywhere in the United States.
Stainless
To locate the Whirlpool designated service company in your
area, you can also look in your telephone directory Yellow
Pages.
All-Purpose Appliance Cleaner
Order Part Number 31662
For further
assistance
If you need further assistance, you can write to Whirlpool
Corporation with any questions or concerns at:
Whirlpool Brand Home Appliances
Customer experience Center
553 Benson Road
Benton Harbor, MI 49022-2692
Please include a daytime phone number in your correspondence.
14
Accessories
Steel Cleaner
& Polish
(stainless steel models)
Order Part Number 31462
15
WHIRLPOOLCORPORATIONMAJORAPPLIANCEWARRANTY
ONE YEAR LIMITED WARRANTY
For one year from the date of purchase, when this major appliance is operated and maintained according to instructions attached to or
furnished with the product, Whirlpool Corporation or Whirlpool Canada LP (hereafter "Whirlpool") will pay for FSP replacement parts
and repair labor to correct defects in materials or workmanship. Service must be provided by a Whirlpool designated service company.
ITEMS WHIRLPOOL
WILL NOT PAY FOR
1.
Service calls to correct the installation of your major appliance, to instruct you how to use your major appliance, to replace or repair
house fuses or to correct house wiring or plumbing.
2.
Service calls to repair or replace appliance light bulbs, air filters or water filters. Those consumable parts are excluded from warranty
coverage.
3.
Repairs when your major appliance is used for other than normal, single-family
4.
Damage resulting from accident, alteration, misuse, abuse, fire, flood, acts of God, improper installation, installation
accordance with electrical or plumbing codes, or use of products not approved by Whirlpool.
5.
Any food loss due to refrigerator or freezer product failures.
6.
Replacement
7.
Pickup and delivery. This major appliance is designed to be repaired in the home.
8.
Repairs to parts or systems resulting from unauthorized modifications
9.
Expenses for travel and transportation
household use.
not in
parts or repair labor costs for units operated outside the United States or Canada.
made to the appliance.
for product service in remote locations.
10. The removal and reinstallation of your appliance if it is installed in an inaccessible location or is not installed in accordance
published installation instructions.
with
DISCLAIMER OF IMPLIED WARRANTIES; LIMITATION OF REMEDIES
CUSTOMER'S SOLE AND EXCLUSIVE REMEDY UNDER THIS LIMITED WARRANTY SHALL BE PRODUCT REPAIR AS PROVIDED
HEREIN. IMPLIED WARRANTIES, INCLUDING WARRANTIES OF MERCHANTABILITY OR FITNESS FOR A PARTICULAR PURPOSE,
ARE LIMITED TO ONE YEAR OR THE SHORTEST PERIOD ALLOWED BY LAW. WHIRLPOOL SHALL NOT BE LIABLE FOR
INCIDENTAL OR CONSEQUENTIAL DAMAGES. SOME STATES AND PROVINCES DO NOT ALLOW THE EXCLUSION OR LIMITATION
OF INCIDENTAL OR CONSEQUENTIAL DAMAGES, OR LIMITATIONS ON THE DURATION OF IMPLIED WARRANTIES OF
MERCHANTABILITY OR FITNESS, SO THESE EXCLUSIONS OR LIMITATIONS MAY NOT APPLY TO YOU. THIS WARRANTY GIVES
YOU SPECIFIC LEGAL RIGHTS AND YOU MAY ALSO HAVE OTHER RIGHTS, WHICH VARY FROM STATE TO STATE OR PROVINCE
TO PROVINCE.
Outside the 50 United States and Canada, this warranty does not apply. Contact your authorized Whirlpool dealer to determine if
another warranty applies.
If you need service, first see the "Troubleshooting" section of the Use & Care Guide. After checking "Troubleshooting," additional help
can be found by checking the "Assistance or Service" section or by calling Whirlpool. In the U.S.A., call 1-800-253-1301. In Canada,
call 1-800-807-6777.
8/05
Keep this book and your sales slip together for future
reference. You must provide proof of purchase or installation
date for in-warranty service.
Write down the following information about your major appliance
to better help you obtain assistance or service if you ever need it.
You will need to know your complete model number and serial
number. You can find this information on the model and serial
number label located on the product.
Dealer name
Address
Phone number
Model number
Serial number
Purchase date
9763000
© 2005 Whirlpool Corporation.
All rights reserved.
® Registered Trademark/TM
Trademark
of Whirlpool,
U.S.A.
12/0 5
Printed in U.S.A.