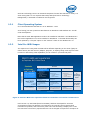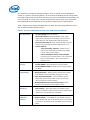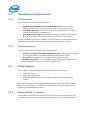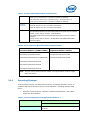
1
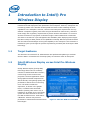
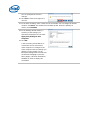
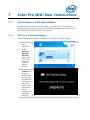
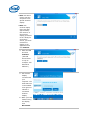
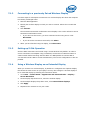
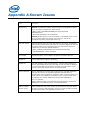
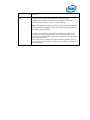
Intel® Pro Wireless Display Deployment Guide for Limited Proof-of-Concept in Enterprise January 2014 Revision 1.1 Revision History Copyright © 2014 Intel Corporation. All rights reserved. Intel, Core, vPro, and the Intel logo are trademarks of Intel Corporation in the U.S. and/or other countries. *Other names and brands may be claimed as the property of others. INFORMATION IN THIS DOCUMENT IS PROVIDED IN CONNECTION WITH INTEL PRODUCTS. NO LICENSE, EXPRESS OR IMPLIED, BY ESTOPPEL OR OTHERWISE, TO ANY INTELLECTUAL PROPERTY RIGHTS IS GRANTED BY THIS DOCUMENT. EXCEPT AS PROVIDED IN INTEL'S TERMS AND CONDITIONS OF SALE FOR SUCH PRODUCTS, INTEL ASSUMES NO LIABILITY WHATSOEVER AND INTEL DISCLAIMS ANY EXPRESS OR IMPLIED WARRANTY, RELATING TO SALE AND/OR USE OF INTEL PRODUCTS INCLUDING LIABILITY OR WARRANTIES RELATING TO FITNESS FOR A PARTICULAR PURPOSE, MERCHANTABILITY, OR INFRINGEMENT OF ANY PATENT, COPYRIGHT OR OTHER INTELLECTUAL PROPERTY RIGHT . UNLESS OTHER WISE AGREED IN WRI TING BY INTEL, THE INTEL PRODUC TS ARE NOT DESI GNED NOR INTENDED FOR ANY APPLIC ATION IN WHICH THE FAILURE OF THE INTEL PRODUCT COU LD CRE ATE A SITUATION WHERE PERSONAL INJURY OR DE ATH MAY OCCUR . Intel may make changes to specifications and product descriptions at any time, without notice. Designers must not rely on the absence or characteristics of any features or instructions marked "reserved" or "undefined". Intel reserves these for future definition and shall have no responsibility whatsoever for conflicts or incompatibilities arising from future changes to them. The information here is subject to change without notice. Do not finalize a design with this information. The products described in this document may contain design defects or errors known as errata which may cause the product to deviate from published specifications. Current characterized errata are available on request. Contact your local Intel sales office or your distributor to obtain the latest specifications and before placing your product order. Copies of documents which have an order number and are referenced in this document, or other Intel literature, may be obtained by calling 1-800-548-4725, or by visiting Intel’s Web site at www.intel.com. Copyright © 2009 Intel Corporation. All rights reserved. Intel, the Intel logo, and Xeon are trademarks of Intel Corporation in the U.S. and other countries. Copies of documents which have an order number and are referenced in this document, or other Intel literature, may be obtained by calling 1-800-548-4725, or go to: http://www.intel.com/design/literature.htm 280114/BOR/BOR Revision History Revision History Revision Number Date Notes 1.0 27Jan/2014 Initial release. 1.1 29/Jan/2014 Updated legal information. Table of Contents Table of Contents Contents 1 Introduction to Intel® Pro Wireless Display............................................................6 1.1 Target Audience ......................................................................................6 1.2 Intel® Wireless Display versus Intel Pro Wireless Display .............................6 1.2.1 1.2.2 2 Intel Pro WiDi Requirements ................................................................................9 2.1 Overview ................................................................................................9 2.2 Adapters for Intel Pro WiDi........................................................................9 2.3 Infrastructure Requirements ................................................................... 10 2.3.1 2.3.2 2.4 4 Supported HW / Platforms ......................................................... 10 Operating Systems ................................................................... 11 Windows 7 Required Configuration .............................................. 12 Infrastructure Considerations ............................................................................. 13 3.1 WiFi-Direct ............................................................................................ 13 3.2 Using Intel Pro WiDi with a VPN ............................................................... 13 3.3 DFS Considerations ................................................................................ 13 3.4 Intel Pro WiDi and WiFi Interaction........................................................... 13 Display Adapter Setup ....................................................................................... 14 4.1 5 IT Department ......................................................................... 10 Conference Room ..................................................................... 10 Client System ........................................................................................ 10 2.4.1 2.4.2 2.4.3 3 Client Operating System ..............................................................7 Intel Pro WiDi Usages..................................................................7 Physical Adapter requirements ................................................................ 14 Client Setup ..................................................................................................... 15 5.1 Installing the WiDi Software Stack ........................................................... 15 Step 1: Install Intel HD Graphics Driver.................................................... 15 Step 2: Install Intel PROSet Wireless Software .......................................... 15 Step 3: Install Intel WiDi Application ........................................................ 15 5.2 Intel WiDi Software Command Line Installation Switches ............................ 16 5.2.1 5.2.2 5.2.3 Silent Installations & Uninstall .................................................... 16 Desktop Shortcut...................................................................... 16 Help ........................................................................................ 16 5.3 Uninstalling Intel WiDi Software ............................................................... 17 5.4 Configuring the Video Resolution ............................................................. 17 6 Creating a WiFi Settings Package ........................................................................ 18 7 Intel Pro WiDi User Instructions .......................................................................... 23 7.1 Connecting to a Wireless Display ............................................................. 23 7.1.1 Pairing to a Wireless Display ...................................................... 23 Table of Contents 7.1.2 7.1.3 7.1.4 8 Troubleshooting................................................................................................ 26 8.1 Intel Pro WiDi Logging ............................................................................ 26 8.1.1 8.1.2 8.2 9 Connecting to a previously Paired Wireless Display ....................... 25 Setting up 5 GHz Operation ....................................................... 25 Using a Wireless Display as an Extended Display .......................... 25 Installer Logging ...................................................................... 26 Enabling Session Runtime Logging .............................................. 26 Common Issues ..................................................................................... 26 Conclusion ....................................................................................................... 29 9.1 Intel Pro WiDi POC management .............................................................. 29 Appendix A Known Issues ................................................................................................... 30 Appendix B External Resources ........................................................................................... 32 1 Introduction to Intel® Pro Wireless Display As of writing (Jan 2014) Intel® Pro Wireless Display (Pro WiDi) technology is not yet intended for broad deployment into production at an enterprise. However, enterprises are increasingly aware of the benefits of Intel® WiDi and want to take advantage of these capabilities in the workplace. However, consumer and enterprise requirements are very different. Companies typically have more stringent demands for data security, and often must comply with regulatory requirements to protect sensitive information. An unsecure wireless connection to a projector or television might create unwanted risk. Businesses also have to consider life-cycle management and scalability when deploying technologies like WiDi. Intel® Pro WiDi) builds on the capabilities of Intel® WiDi and provides business with the tools and technologies to bring this capability to the enterprise. This document is intended to guide you through the process of performing a limited pilot of Intel® Pro WiDi technology. 1.1 Target Audience This document is intended for IT administrators and professionals planning to evaluate Intel Pro WiDi in a limited Proof-of-Concept (POC) environment within an enterprise. 1.2 Intel® Wireless Display versus Intel Pro Wireless Display Intel® Wireless Display (Intel® WiDi) technology allows users to wirelessly connect to certified Intel WiDi receivers, such as large screen monitors and projectors. The Intel application utilizes Intel graphics and WiFi components to deliver Blu-Ray* and gaming quality and performance without wires in the living room. The Intel Pro WiDi user experience, as shown in the graphic below, is enabled when Intel WiDi software (starting with version 4.2) is installed on an Intel® vPro™ technology system and then connects to an Intel Pro WiDi certified receiver. Intel WiDi is a Miracast* solution with premium performance enhancements based on Intel technologies. Figure 1: Intel Pro WiDi vs. Intel WiDi Intel vPro technology PCs are an essential component for Intel Pro WiDi but for clarity it is worth noting that it is not required that Intel® iAMT (Intel Active Technology Management) is activated or enabled on the target PCs. 1.2.1 Client Operating System It is recommended that the POC be run on Windows* 7 PCs. As of writing (Jan 2014) Intel Pro WiDi features on Windows 8 and Windows 8.1 are still under development. Note that the Intel WiDi application needs to be installed on Windows 7 and Windows 8.0 PCs but this application is not to be installed on Windows 8.1. The WiDi functionality has been replaced by a “Project” option on the “Devices” charm on the Windows 8.1 UI. 1.2.2 Intel Pro WiDi Usages The experience of using Intel Pro WiDi will be different depending on the client (laptop or mobile device) and the receiver (adapter, projector, or display) being used. Figure 2 below is useful in determining what capabilities you can include in your POC test plans. Intel Pro WiDi user experiences by Corporate, BYO, Visitor Clients Cumulative on Y-axis only Receivers Miracast* only Security & Manageability Intel® Pro WiDi Security & Manageability Transmitters Certified Intel® WiDi Certified Intel® Pro WiDi (Intel WiDi app with Pro features activated; on Intel® vPro and other Pro WiDi segmented platforms) • • Intel NIC • Intel® WiDi Display Privacy • Connect Confirm • Now Presenting Network Security • Isolate WiFi-Direct from Corp LAN • Restrict to WiDi Data Corp fleet Intel WiFi Client Remote Management • Network Security • Isolate WiFi-Direct from Corp LAN • Restrict to WiDi Data • Network Security • Isolate WiFi-Direct from Corp LAN • Restrict to WiDi Data • Intel WiFi Client Remote Management • Intel WiFi Client Remote Management • • (Intel WiDi app) • Intel and • Non-Intel NIC Managed Handoff (2014) Fast Presenter Handoff (2013) Channel Mgmt (2014) Intel WiDi Performance& Quality • • Channel Mgmt (2014) Intel WiDi Performance& Quality • • • Rx Remote management Miracast standard compliance OS-based Network Isolation • • Miracast standard compliance OS-based Network Isolation Miracast* only (not an Intel WiDi app) • • Miracast standard compliance OS-based Network Isolation ITProvisioned and Managed Clients BYOD Visitor clients (ie. Not ITProvisioned) *Names and brands may be claimed as the property of others Intel Confidential Figure 2: Intel Pro WiDi user experience based on transmiter and receiver infrastructure Until version 4.2, Intel WiDi (based on Miracast) had been developed for consumer environments where the optimum user experience is to quickly connect with as little interaction as possible, and to block any other user from accessing a display once a user has connected. The security requirements are not as stringent as required in enterprise as the connection is simply for displaying content, which is usually not of a confidential nature (e.g. photos, movies and games). In most cases the displays are far enough away from public spaces that the wireless connection may not be intercepted. All day battery life is not as critical in a living room or home entertainment environment, so for consumers, Intel optimizations are positioned for their quality and performance improvements. Table 1 below lists the features enabled when an Intel vPro technology platform is used with an Intel Pro WiDi certified receiver. Table 1. Intel Pro WiDi Features with a Pro WiDi Certified Adapter User Experience Connect Quickly within 12 seconds. Panel Self Refresh optimizes bandwidth usage; saves battery life by allowing the transmitting client to transmit image data only when display buffer data has changed. Fast Presenter hand-off - Next waiting presenter connects quickly, if previously paired with the WiDi receiver in use. Privacy features o “Now Presenting” indicator reminds the user that they are connected and sharing their display content with a wireless display. o Visual confirmation before content display provides a way to confirm that the user is connected to the wireless display in their room and not an adjacent room. Security Isolate WPANs - Blocks bridging to corporate WLAN. Restrict WPAN to WiDi - Prevent PC-to-PC access to data via WPAN. Manageability Manage Remotely – Manage clients via Intel WiFi IT Admin Limit network bandwidth – Limits bandwidth used for Tool; Manage receivers via SNMP, telnet/CLI, or HTTP. display with a particular Pro WiDi receiver by restricting client connections to 720p resolution. Identify WiDi Receivers in the Environment - Name receivers and customize receiver splash screens. Regulatory DFS Roaming – When DFS Roaming is enabled and the client is connected to a DFS channel, the client automatically switches to a non-DFS channel, if available. Additional Features Adapter standby – The adapter for Intel ProWiDi should go into a standby state after 30-60 seconds when not connected to a client. In the standby state, the display device should be blank. 2 Intel Pro WiDi Requirements This chapter defines the overall requirements for implementing Intel Pro WiDi. Additional requirements information may be included in the setup sections for individual components. 2.1 Overview Intel Pro WiDi consists of several components, all of which are required to experience the full benefits of Intel Pro WiDi. As of writing, there are no Pro WiDi adapters available on the market so while an end-to-end POC incorporating the adapter-side features of Pro WiDi may not be possible, this document will comprehend what a full POC could look like, while calling out what can actually be tested. The illustration below provides a high level visual overview of the deployment topology for end to end testing of Intel Pro WiDi. Figure 3: Intel Pro WiDi Depolyment Topology 2.2 Adapters for Intel Pro WiDi As mentioned earlier, Intel Pro WiDi adapters are not yet available on the market. However, Intel is working with Adapter, TV and Projector OEMs and has defined some of the features expected to be present in a “Pro” display device. That said, Intel cannot make guarantees with respect to OEM device features or availability. For the purposes of this document, the features outlined will reflect what Intel expects a “Pro” device to support. 2.3 Infrastructure Requirements 2.3.1 IT Department The IT Department requirements are as follows: Updated Intel graphics drivers and Intel WiFi drivers: IT must install updated graphics drivers and Intel Pro WiDi drivers on all client computers. Intel WiDi application: IT must install the Intel WiDi application on all client computers (except those on Windows 8.1) Intel WiDi session logging: we recommend turning on logging in case there is an issue that is difficult to reproduce (refer to section 8.1 for instructions). IT needs to identify users that are prepared to test and report on their experiences with Intel WiDi. It will be important to manage expectations with this group of users. 2.3.2 Conference Room The requirements for the conference room are listed below. 2.4 Projector or display with VGA or HDMI input ports: depending on the adapter in use Intel Pro WiDi can connect to the display unit via VGA or HDMI. A/C power: the adapter must be plugged into an A/C power outlet. Network connection: “Pro” manageable adapters may require a RJ45 interface for the management connection (firmware updates, etc.). Client System Intel Pro WiDi is enabled through the following Intel software components: Intel WiDi software Intel® HD Graphics Driver Intel PROSet/Wireless Driver with Intel® My WiFi Technology (Intel® MWT) enabled Note that is it possible to utilize OEM Graphics and Wireless drivers and have Intel WiDi display on a display device, but that Intel recommends the use of the latest Intel HD Graphichs and PROSet/Wireless drivers. 2.4.1 Supported HW / Platforms Intel Pro WiDi 4.2 64-bit and 32-bit requires an Intel® vPro™ Personal Computer (PC) configured with one of the Intel supported configurations shown in Table 2 and Table 3. Table 2. Intel Pro WiDi Supported PC Configurations Processors 3nd Generation Intel® Core™ processor family: - All Intel® Core™ i3, Intel Core i5, and Intel Core i7 processors (Mobile and Desktop) 4th Generation Intel® Core™ processor family: - All Intel® Core™ i3, Intel Core i5, and Intel Core i7 processors (Mobile and Desktop) Graphics Controller Intel® HD Graphics 2nd Gen Core Mobile Intel HD Graphics 3rd Gen Core Mobile and Desktop Intel HD Graphics 4th Gen Core Mobile and Desktop Chipsets Intel® 6 Series Express Chipsets - Mobile Intel Q67/Q65/B65/Z68/H67/H61/QS67/QM67/HM67/UM67/HM65 Express Chipsets Intel® 7 Series Express Chipsets - Desktop/Mobile QS77/QM77/HM77/UM77/HM76/HM75/Q77/Q75/B75/Z77/Z75/H77 Express Chipsets Intel® 8 Series Express Chipset - Desktop/Mobile Q87/QM87/HM87/HM86 Express Chipsets Table 3. Intel® Centrino® Wireless Hardware Requirements Dual-Band Adapters (2.4GHz & 5GHz) Single Band Adapter (2.4GHz) Intel Centrino Ultimate-N 6300 Intel Centrino Wireless-N 2200 Intel Centrino Advanced-N + WiMAX 6250 Intel Centrino Wireless-N 2230 Intel Centrino Advanced-N 6230 Intel Centrino Advanced-N 6205 Intel Centrino Advanced-N 6235 NOTE: The Intel Centrino Advanced-N 6230 adapter only supports Mobile. All others support Mobile and Desktop. 2.4.2 Operating Systems As mentioned previously, Pro WiDi features will run on Windows 8 and 8.1 but for an enterprise POC we recommend using one of the Windows 7 operating systems listed below. • Windows 7 Home Premium / Ultimate / Professional-Enterprise / Home Basic 64-bit and 32-bit editions Table 4. Intel Pro WiDi Features Supported by Windows 7 Intel Pro WiDi feature Operating System version Windows 7 “Now Presenting” indicator Task bar icon background is highlighted in green while connected Intel Pro WiDi feature Operating System version Windows 7 Confirm before Display Supported PIN required on every connect Supported Fast Handoff (a.k.a. Presenter Eviction) Supported Network Security: Isolation (WPAN-to-WLAN bridge blocking) Supported by Intel PROSet and by OS policy Network Security: Restrict to WiDi on WPAN Supported by Intel PROSet only Remote Management of WiDi client SW Use either of the following: Intel PROSet and IT-selected software distribution/fix solution (e.g. BigFix, Microsoft* System Center* Configuration Manager (Configuration Manager), etc.) Remote management via Active Directory and Microsoft GPOs (does not provide management of “Restrict to WiDi” policy) 2.4.3 Windows 7 Required Configuration Microsoft* Windows 7 3rd Generation Intel Core processor (see Table 2 for a complete list of supported PC configurations) Intel Pro WiDi requires Microsoft* .Net 4.0 Framework Intel HD Graphics Driver Release 9.18.10.3310 or above Intel PROSet Wireless Driver Release 15.9.1.2 or above Intel WiDi application version 4.2.21.0 or above It is recommended that you use the configuration checking tool at the Intel® Wireless Display site (http://intel.com/go/WiDi under “Get Software and Driver Updates”) to check your configuration and download the latest drivers and applications. Note: All Intel software and drivers are available from Intel Validation Internet Portal (https://platformsw.intel.com). 3 Infrastructure Considerations This chapter contains some points to consider before deploying Intel Pro WiDi for the pilot. 3.1 WiFi-Direct You must enable WiFi-Direct in your environment. See Chapter 6. 3.2 Using Intel Pro WiDi with a VPN Depending on your infrastructure settings, you may need to connect to WiDi before initiating a VPN connection. 3.3 DFS Considerations For regulatory reasons, Intel Pro WiDi does not operate on WiFi channels reserved for radar use (also known as “DFS channels”). To avoid potential use of a DFS channel, you may enable DFS roaming using the Intel PROSet IT Admin Tool. When DFS roaming is enabled and the client system is currently connected to WLAN using a DFS channel, the client attempts to ‘roam’ and locate the same SSID on a different channel. If successful, the client connects to the WLAN and WiDi using the new channel. If not, Intel Pro WiDi displays an error message and does not connect to the wireless display. If your WLAN is enabled for using DFS channels, as a temporary solution, you may need to do one of the following to accommodate the pilot: 3.4 Turn off 5 GHz on the client Disable DFS on the WAPs near the Rx Add a non-DFS WAP near the Rx Intel Pro WiDi and WiFi Interaction When a WiFi-enabled PC comes within range of a WiFi access point, it initiates a WiFi connection before it can create an Intel Pro WiDi connection. Since Intel Pro WiDi can only connect using the same channel and band that the WiFi connection uses, the WiFi connection may impact performance by creating additional traffic on the network. 4 Display Adapter Setup Until Intel Pro WiDi Certified Adapters are available, POCs will need to be run using an adapter designed for the consumer market. There are a number of adapters, TVs and projectors that support Intel WiDi but we strongly recommend using an adapter that has recent firmware available to ensure your POC is as effective as possible. Some adapters to consider are the ActionTec ScreenBeam Pro (which has Gen4 firmware available) and others on Gen3 firmware include the Viewsonic WPG-370, the Netgear PTV3000 and the IOGear GWAVR as well as two projectors from Dell, the M900HD and the S520. 4.1 Physical Adapter requirements The Intel WiDi adapter will require an A/C power source and either a VGA or HDMI connection to the display device. Pro WiDi manageable adapters may also requie an RJ45 connection for remote manageability. Specific implementations of the VGA and HDMI interfaces on display devices will vary. For example, connection auto-sensing and timeout behavior when connected to a WiDi adapter may need to be characterized before initiating the POC and may even be specific to the wiring within particular conference-rooms. Conference-room switchgear, repeaters and signal adapters in the VGA or HDMI path can also affect the success of the POC. It should be decided if sound is to be included in the scope of the POC. It is important to realize that once a WiDi session is established and active, Intel® Pro WiDi encrypts the data stream creating a secure tunnel between the client and WiDi adapter. However, if no session is established it is possible for anyone with a WiDi-enabled client and line-of-sight to the display to establish a session and stream their own content. This limitation makes the consumer versions of WiDi unacceptable for use in public areas. 5 Client Setup This chapter describes how to set up the client platforms to deliver the Intel Pro WiDi remote display user experience. This is a “Best Known Configuration” that describes the intended outcome of the client setup process. When you have completed the client setup process, you should have a client system that is configured with the “Best Known Configuration.” 5.1 Installing the WiDi Software Stack This section describes how to install Intel Pro WiDi and the required device drivers on the client system(s). Note: It is best practice to remove any previous versions of WiDi software, Intel PROSet/Wireless software, and the Intel HD Graphics Driver on the client before installing the new software stack. Note: For best results the drivers and software must be installed in the following order: 1. Intel HD Graphics Driver. 2. Intel PROSet/Wireless Software with Intel My WiFi Technology (Intel MWT). 3. Intel WiDi Software. Step 1: Install Intel HD Graphics Driver Install the Intel HD Graphics Driver by following the steps below. To perform this step you must have administrative rights to the client system and have installed the platform software components previously defined in the guide. Navigate to the drive and directory location containing the Intel HD Graphics Driver installation files and double click Setup.exe. After the client system reboots, the graphics driver installation is complete. Step 2: Install Intel PROSet Wireless Software Install the Intel PROSet/Wireless Software with Intel MWT by following the steps below. To perform the steps in this section, you must have administrative rights to the client system and have installed the platform software components previously defined in the guide. Your installation should closely resemble the example below. Navigate to the drive and directory location containing the Intel PROSet Wireless installation files and double click Autorun.exe. Step 3: Install Intel WiDi Application This section describes how to install the Intel WiDi application on the client system(s). Notes: 1. Both the Intel HD Graphics Driver and the Intel PROSet/Wireless Driver MUST be installed prior to installing Intel WiDi software to meet platform detection requirements in the Intel WiDi software. 2. Intel WiDi requires Microsoft .Net 4.0 framework to be installed prior to installing the WiDi application. 3. To perform a large-scale batch install using a script, see Section 5.2. The Intel WiDi software release is a single-file-based installer. Install the software as follows: Copy the Intel WiDi Setup.exe file to an accessible drive. The file doesn’t have to be on the PC hard drive but must be an accessible drive that is writable so the installation files can be extracted. For example, CDROM disk installs are not supported. Depending on your firewall rules you may need to configure your firewall to allow WiDi traffic. 5.2 Intel WiDi Software Command Line Installation Switches To perform a larger scale “batch” install using a script, use the information in this section. 5.2.1 Silent Installations & Uninstall Silent install and uninstall modes for the Intel WiDi software are used to run the setup.exe from the command line, in a non-verbose mode, with all default options selected and all licenses accepted. 5.2.2 Install Command line: setup.exe /s /v/qn Uninstall command line setup.exe /x /s /v/qn Desktop Shortcut Desktop Shortcut is used to enable or disable the creation of a desktop shortcut for all users. 5.2.3 Command line: setup /v”WIDIAPP_DESKTOP_SHORTCUT=x” Enable: setup.exe /v”WIDIAPP_DESKTOP_SHORTCUT=1” Disable: setup.exe /v”WIDIAPP_DESKTOP_SHORTCUT=0” Help Help is used to display the supported command line options: Command line: setup.exe /v/help 5.3 Uninstalling Intel WiDi Software Note: Perform this procedure only to uninstall Intel WiDi software if the installation process was successful. If the install procedure was unsuccessful, you do not need to uninstall it. To uninstall Intel WiDi software, do the following: 1. Go to Start > Control Panel > Programs and Features. 2. Select Intel WiDi. 3. Select the Uninstall option to uninstall the Intel WiDi. 4. Reboot the system to complete the uninstall process. 5.4 Configuring the Video Resolution Use the steps below to set the screen resolution to one of these supported resolutions: 1280x720 1280x768 1280x800 1366x768 1440x900 1600x900 1920x1080 (preferred) 1. Establish an Intel WiDi session with the adapter. 2. Right-click on the desktop and select Screen Resolutions. 3. Select the preferred resolution, 1920x1080, if supported. Note: The resolution is retained by the graphics driver on all subsequent Intel WiDi sessions until it is changed. 6 Creating a WiFi Settings Package Creating a WiFi policy script for the client PC requires the Intel WiFi driver and Intel PROSet Administrators Toolkit to be installed. During the installation, select the Customize button and select all options on the next screen. Follow the installation instructions in Section 5.1, Step 2: Install Intel PROSet Wireless Software. Note: Perform the steps below on an IT Administrator computer, not on a client computer. The sequence below reflects the dialog as run on a Windows 7 PC 1. Click the Windows Start button and click All Programs. 2. Scroll to “Intel PROSet Wireless” folder and double-click WiFi Administrator Tool to launch the Toolkit. The Enter Password dialog is displayed. 3. Create a password to protect the administrator profiles from nonAdministrator users. Create a password of your choice that you can remember and click OK. In the Open Administrator Package dialog, select Create a new package, and click OK. 4. In the Administrator Tool – New Package window, select the Intel® MWT Setting tab to define your Intel MWT policy options. 5. Select Include Intel® My WiFi Technology settings in this package, and select the Enable Intel® My WiFi Technology. The lower right Intel MWT policy options window becomes active. You can allow or disallow Wireless LAN and Wireless PAN bridging on client PCs as required for your IT security to prevent data traffic between Intel MWT and other network interfaces. (For example, no internet sharing will be possible.) 6. In the left pane, select Policy Enforcement. In the right pane, select Always enforce these policies. 7. In the left pane, select Allowed Devices. In the right pane, select Allow only the following device types to connect to the Intel® MyWiFi Technology. 8. Click Add. The Add device type dialog is displayed. 9. In the top drop-down selector, select Intel® WiDi receiver – Enterprise. This allows PC clients to connect to only enterprise class wireless displays. Leave the other settings unchanged. Click OK. 10. Click Add again. Another Add device type dialog is displayed. In the top drop-down selector, select Intel® WiDi receiver – Consumer. Leave the other settings unchanged. Click OK. 11. Click Add a third time. Another Add device type dialog is displayed. In the top drop-down selector, select Intel® My WiFi dashboard. Leave the other settings unchanged. Click OK. There should be three entries under Devices allowed to connect. 12. In the left-hand pane, select Network Isolation. In the righthand pane, select Isolate the Intel network…. This prohibits network bridging between the Intel® MyWiFi personal area network and other network interfaces. Selecting this option prevents Internet Connection Sharing (ICS). 13. Do not make any changes to options under SSID Name override. 14. Select the Intel® WiDi tab. Select Include Intel WiDi settings in this package. 15. In the left-hand pane, select USB over WiDi. In the right pane, select Allow USB over WiDi functionality. 16. In the left pane, select DFS Roaming. In the right pane, select Allow DFS roaming. See Section 3.3. 17. In the left-hand pane, select Connection Indicator. In the right pane, select both options Show indicator when … and Enforce the setting…. This ensures that the connection indicator in the taskbar is green and that the user cannot change it, i.e., turn off the indicator. 18. In the left-hand pane, select Connection Confirmation. In the right pane, select both options Confirm connection to… and Enforce the setting….This ensures that the connection must be confirmed before the user’s desktop is displayed in the WiDi display and that the user cannot change it. 19. Click Close. You are prompted to save the changes. 20. Click Yes to save the changes to a new file. 21. In the Save As dialog, enter a name for the new Profile. Do not change the default location. Click Save. This creates an executable profile. When the package is written, click Finished. 22. In the Package Saved window, a summary of the settings you specified is displayed. Do not select Apply this package to this computer. 23. Click OK. A self-extracting executable file is created and can be executed on client computers. It configures the client computer with the settings you defined. IT will normally use an Enterprise Management Console such as Microsoft ConfigMgr, Symantec Altiris, BigFix, HP Client Automation, LANDesk or other to deploy this executable. 7 Intel Pro WiDi User Instructions 7.1 Connecting to a Wireless Display The first time you connect to a wireless display, you must “pair” your computer to a wireless display by exchanging a PIN. The second and subsequent connections use the stored pairing information to connect more quickly. 7.1.1 Pairing to a Wireless Display Use this procedure the first time a computer is connected to a wireless display. 1. Start the Intel WiDi application. 2. In the Detected Wireless Displays page, select the wireless display to which you want to connect. 3. Click Connect. The wireless display shows an eight-digit PIN. Enter this number in the Enter PIN screen. (The PIN shown is only an example. Your PIN will be different.) Note: Note: The PIN is used to pair the computer to the specific wireless display. Note: Note: The wireless display times-out after approximately two minutes. If the wireless display goes back to the “Ready for connection.” screen, you must reselect the display in the application and click Connect. 4. Enter the PIN and click Continue. (The PIN shown below is only an example. Your PIN will be different.) 5. The wireless display connects with your computer. The Intel WiDi icon in the taskbar turns green to indicate a connected wireless display. 6. When you have finished using the display, click Disconnect. 7.1.2 Connecting to a previously Paired Wireless Display Use these steps for subsequent connections to a wireless display with which the computer has already exchanged a PIN. 1. Start the WiDi application. 2. Identify the wireless display to which you want to connect. Select the row with that display. 3. Click Connect. The Connection Successful confirmation screen displays. This is also referred to as the Connection Confirmation screen. If you don’t see this screen, you have connected to the wrong screen. Click Disconnect. If you do see the Connection Successful, click Share. 4. When you have finished using the display, click Disconnect. 7.1.3 Setting up 5 GHz Operation Intel Pro WiDi connections are formed using 2.4 GHz Wireless-N by default. In order to ensure connection to an adapter using 5 GHz band, connect the PC’s Wireless LAN to a 5 GHz network before launching Intel Pro WiDi. It is NOT possible to connect WiFi to 2.4 GHz and Intel Pro WiDi to 5 GHz simultaneously. The reverse configuration is also not possible. 7.1.4 Using a Wireless Display as an Extended Display When you connect to a wireless display, by default it is configured as a duplicate display that shows the same screen as your laptop. You may also configure a wireless display to be an extended display by following the instructions below. 1. Go to Start > Control Panel > Appearance and Personalization > Display > Screen Resolution. 2. On the Display drop-down menu, select the wireless display. 3. On the Multiple displays drop-down menu, select Extend these displays. 4. Click Apply. 5. Reposition the monitors to suit your needs. 8 Troubleshooting 8.1 Intel Pro WiDi Logging Use the information in this section to set up logging for Intel Pro WiDi. 8.1.1 Installer Logging During installation, the Intel WiDi installer creates a MSI Install log and WDL log in the following location: C:\Users\<User>\AppData\Local\Temp\MSI<number>.log C:\Users\<User>\AppData\Local\WiDiSetupLog.<timestamp>.wdl 8.1.2 Enabling Session Runtime Logging 1. Exit the Intel WiDi application. 2. Launch Regedit.exe. 3. Navigate to the Intel WiDi application section by looking for: Computer\HKEY_CURRENT_USER\Software\Intel Corporation\Intel WiDi 4. Create a new DWORD (32) key named LogEnable. 5. Set the value of LogEnable = 1 6. Exit Regedit.exe. Log files are created for each Intel WiDi session, for the duration of the Intel WiDi application being launched, and then is closed. Log files are created immediately after launching the Intel WiDi application and can be opened at any time. Log files are stored in the following location: C:\Users\<userID>\AppData\Local Log files are named using this format: WiDiLog.<date>.<time>.wdl 8.2 Common Issues Common issues and resolutions are given in this section. For more detailed troubleshooting steps, refer to the extensive help file provided with the Intel WiDi Software application. Issue Solutions The PC Doesn’t Seem to be Connecting to the Adapter At the PC, verify that WiFi is switched on. Antivirus / Firewall software may be blocking Intel WiDi software. Add the Intel WiDi application (“widiapp”) to the software’s white list. Disconnect from the WiFi network and connect to Intel WiDi without a WiFi connection. Issue Solutions Wireless Network Reception is Poor Best Known Methods (BKMs) Disconnect and exit VPN and connect to Intel WiDi without a VPN or WiFi connection. Double check the internet connection speed using 2Wire’s speed test or geospecific equivalent. (http://www.2wire.com/bandwidth/meter.php?kbps=8256.5) Leave the notebook stationary and refrain from moving it for best wireless reception / performance. 802.11x is not a “mobile” networking technology like GSM or CDMA. If wireless reception/performance is borderline good, try rotating the notebook 90 degrees and see if reception/performance improves. The presence of wireless networks during simple SSID (infrastructure) scan doesn’t guarantee a channel free from high traffic/interference. Use a spectrum analyzer like the Meta Geek* Wi-Spy* and Chanalyzer Pro* (see Appendix B) to show actual traffic on a given channel/network. Steps to determine if streaming problems are related to wireless interference: 1. Launch and connect to the adapter for Intel Pro WiDi. 2. Use WindowsK+P to select Extend mode. 3. Play the sample video file, Wildlife, in Media Player and move that window to the secondary display. 4. From the Primary display launch the task manager by right-clicking on the task-bar and select Start Task Manager. 5. Select the Networking Tab. On the lower part of this window there is a list of network connection. The network connection with a consistent activity level will be the PAN network. 6. Monitor the Link Speed (PHY rate) column. 7. If the Link Speed varies but stays above 36Mbps. then you should see no streaming issues. If the Link speed drops under ~24Mbps, you should see streaming issues. Note that if the Link speed falls too low then you will see the green and pink block artifacts. Issue Solutions No Video is Displayed on TV Check if TV / adapter are powered on. Check if correct input on TV is selected. Reset adapter. Replace adapter. Issue Solutions PC Desktop Does not Display on TV Verify that the correct security code was entered into the Intel WiDi Software for the adapter you are connecting to. Reset the adapter. Verify that the PC screen is set to one of the following supported screen resolutions; 1280x720, 1280x768, 1280x800, 1366x768, 1440x900, 1600x900, or 1920x1080. Issue Solutions I can’t get a good picture using 2.4GHz Try changing the WiFi channel used by Intel Pro WiDi. In general, 2.4 GHz channels 1, 6, or 11 work best. You can set the network channels using Intel MWT software. Open My WiFi software on the laptop, select Profiles, select Intel Wireless PAN (preset), and then click Edit. Select the Advanced tab and select the default channel from the drop down. Use inSSIDer* software (see Appendix B) to determine which specific channel has the least congestion (as defined by the least number of wireless networks on that channel). 9 Conclusion 9.1 Intel Pro WiDi POC management Intel Pro WiDi is an exciting technology with great potential to improve user experience in the enterprise. As Intel Pro WiDi matures and Pro WiDi Certified adapters become available these potential opportunities can be made available in production deployments. Until then, it will be important to explore what Intel WiDi can provide while managing expectations amongst IT and the user base with respect to what can be delivered today. Appendix A Known Issues Issue Description DFS Roaming Windows 7: Enable DFS roaming either through the Intel PROSet IT Admin tool, or by creating a registry key, shown below: [HKEY_LOCAL_MACHINE\SOFTWARE\Intel Corporation\Intel WiDi\Enterprise] "DFS Roaming Enabled”=dword:00000001 Windows 8: DFS roaming is not yet functional. To avoid DFS errors, set the NIC on the client platform to connect only to 2.4 GHz. This can be accomplished by setting the WiFi NIC to 802.11g. Stale scan entries Switching between users can cause stale entries to be cached. The following registry setting prevents stale entries, but as a result the adapter list may not be complete when a scan is performed. The user may need to select scan multiple times to show the available adapters. [HKEY_CURRENT_USER\Software\Intel Corporation\Intel WiDi] “FilterStaleAdapters”=dword: 00000001 Fast Handoff Fast Handoff requies a “Pro” adaptor and cannot be tested at this time. Windows 8 Intel Pro WiDi feature support in Windows 8 Windows 8.1 Intel WiDi capability is built into Windows 8.1. Intel Pro WiDi features have not been implemented at this time. Intel WiDi 4.x will not install on Windows 8.1 and the Intel WiDi user interaction is through a “Project” option on the “Devices” charm when swiping-in from the right-hand side. Antivirus Software Antivirus applications may block ports required by the Intel WiDi application. When this issue occurs, the Intel WiDi application indicates that it is connecting but never completes the connection. After one to two minutes, the system returns to the “Ready for connection” screen. To prevent this issue, the “WiDiapp.exe” must be added to the list of trusted applications. Here is an example: McAfee* Enterprise HIPS* (Host Intrusion Prevention System) requires the “WiDiapp.exe” to be added to the list of trusted applications. McAfee LiveSafe* Security Center McAfee LiveSafe Security Center Version 12.1 has a known issue that blocks TCP Ports used by the WiDi application. This issue is fixed in McAfee LiveSafe Security Center Version 12.8. Upgrade to Version 12.8. Issue Description VPN The WiDi subnet should be excluded from the VPN routing table. If NOT using the exclude "Local LAN Access" capability, add a static exclusion to "192.168.x.x" in order to support Intel WiDi. Note: Note: This might be considered a security risk and personal firewall settings should be modified to allow only specific ports\protocols on this subnet (ingress\egress). If using "Local LAN Access", verify that the VPN client can adjust to new subnets post connection establishment. If the "Local LAN Access" is not dynamic during VPN connection, add a static exception to the routing table and exclude 192.168.x.x. Cisco AnyConnect* 3.1.04072 now supports dynamic updates to the host routing table. If you are using Cisco AnyConnect, update to 3.1.04072 to avoid VPN issues. Appendix B External Resources Go to MetaGeek at http://www.metageek.net/ to obtain tools such as inSSIDer, Wi-Spy, and Chanalyzer Pro.