1
User's Guide ______________________________________________________________________
3.
NOTE
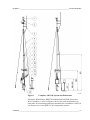
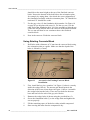
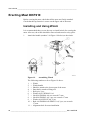
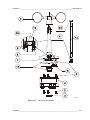
Use the spirit level on the RG13(H) for the leveling (number 3 in Figure
46 on page 89).
4.
5.
NOTE
Place the base of the rain gauge (9) onto the stand and level it with
the three leveling screws (2). Use the spirit level (13) on the rain
gauge for the leveling. Finally, secure the locknuts (12).
Secure the base through the two holding lugs (14) with the
provided Allen bolts, washers, and nuts (7, 8, and 10).
Carefully remove the rubber band (11), which is fitted for transit
purposes, and check that the bucket pivots easily.
Remember to remove the rubber band from inside the RG13(H) (number
11 in Figure 46 on page 89).
6.
7.
8.
Attach the outer tube of the rain gauge (1) onto the base and secure
it with the locks.
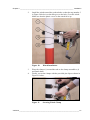
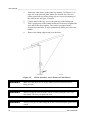
Route the signal/power along the stand and secure it with cable ties
(15 and 16).
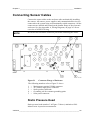
Connect the signal/power cable to the Rain connector on the
bottom of the enclosure; see section Connecting Sensor Cables on
page 95.
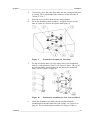
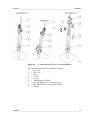
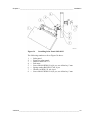
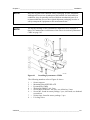
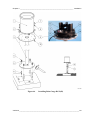
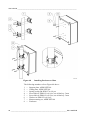
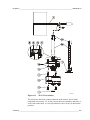
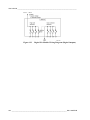
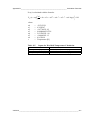
The following numbers refer to Figure 46 on page 89:
1
2
3
4
5
6
7
8
9
10
11
12
13
14
15
16
=
=
=
=
=
=
=
=
=
=
=
=
=
=
=
=
Outer tube of Rain Gauge RG13
Leveling screw
Pedestal
Nut M10 DIN934 A4, 4 pcs; use wrench 17 mm
Washer A10 DIN125 A4, 4 pcs
Wedge bolts; use a hammer
Allen bolt M8x30 DIN912 A4, 2 pcs; Allen key 6 mm
Washer A8 DIN125 A4, 2 pcs
Base of Rain Gauge RG13
Nut M8 DIN985 A4, 2 pcs; use wrench 13 mm
Rubber band
Locknut
Spirit level
Holding lugs, 2 pcs
Cable
Cable tie
88 __________________________________________________________________ M211296EN-B