1
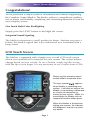
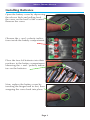
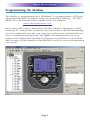
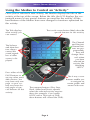
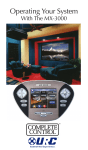
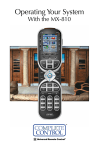
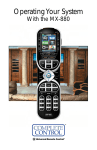
Operating Your System
With The Medius TX-1000
This remote control was
Custom Programmed for you by:
For questions about your Custom Programming call:
Custom Programming of a complex home theater and/or a multi-room
system is one of the most challenging tasks within an audio/video installation. It involves an intimate knowledge of how the components interact
and exact details on the proper sequences of control.
Only a Complete Control dealer has the requisite experience and training
to quickly and effectively customize a remote control for true automated
operation.
Congratulations on your choice!
TX-1000 Owners Manual © 2006-2013 Universal Remote Control, Inc.
Front Cover Photo courtesy of Robert Ridenour of Connected Technologies,
www.connected-technologies.com
The information in this owner’s manual is copyright protected. No part of this
manual may be copied or reproduced in any form without prior written consent
from Universal Remote Control, Inc.
UNIVERSAL REMOTE CONTROL, INC. SHALL NOT BE LIABLE FOR OPERATIONAL,
TECHNICAL OR EDITORIAL ERRORS/OMISSIONS MADE IN THIS MANUAL.
The information in this owner’s manual may be subject to change without prior
notice.
Complete Control is a registered trademark of Universal Remote Control, Inc.
Entertainment Made Simple is a trademark of Universal Remote Control, Inc.
All other brand or product names are trademarks or registered trademarks of their
respective companies or organizations.
Universal Remote Control, Inc.
500 Mamaroneck Avenue, Harrison, NY 10528
Phone: (914) 835-4484 Fax: (914) 835-4532
TABLE OF CONTENTS
Introduction
1
LCD Touch Screen
1
Optional RF “No Rules” Operation
2
Installing Batteries
3
Programming the Medius
4
Selecting a New “Activity”
5
Using the Medius to Control an “Activity”
6
Displaying the Setup Screen
7
Selecting from the Setup Screen
7
Setting the TIME
8
Setting the LCD
8
Light Settings
10
Sound Volume
10
System Settings
11
Calibrating the Touch Screen
11
Version Information Displays
12
Warranty
12
End User Agreement
15
Specifications
15
MEDIUS OWNERS MANUAL
Congratulations!
You’ve purchased a unique synthesis of hardware and software engineering,
the Complete Control Medius. The Medius achieves a magnificent combination of power and flexibility, simplifying and automating operation of even the
most complex system.
One Touch Multi-Color Backlighting
Simply press the LIGHT button to backlight the screen.
Integrated Sound Signaling
The Medius incorporates a small speaker for beeps. Anytime you press a
button, the Medius signals that it has understood your command with a
beep sound.
LCD Touch Screen
The Medius is equipped with a bright easy to read LCD touch screen
which your installer will customize for your system. The screen buttons
change based on your activity. To use a button, simply tap the screen
with the tip of your finger. It is not necessary to use a stylus from a PDA.
Simply tap the interactive touch
screen buttons to operate them.
The busy symbol
appears
when Medius is controlling your
system. It will blink as long as the
Medius is transmitting a command
or a series of commands (a
macro) to your system. While it is
transmitting, the Medius will not
respond to another button press.
When the Medius is finished controlling your system, the indicator
will disappear, and you can press
any button.
Page 1
MEDIUS OWNERS MANUAL
Optional RF “No Rules” Operation
In combination with a Complete Control RF Base Station, the Medius can
control your system without being in line-of-sight of the equipment.
Any of the Complete Control MRF series of RF base stations is compatible with
the Medius. Both incorporate RF addressing. RF Addressing gives you the ability
to control equipment locations throughout your home, even if they are concealed
in other rooms or are behind closed doors.
1. The Medius sends radio
waves in every direction, so
you don’t have to point the
remote anymore!
2. The RFX-150 RF Sensor can be
freely positioned for optimal reception.
3. The MRF-300’s built-in Front Blaster sends commands to
components in the same cabinet space as the MRF-300.
4. Self-adhesive “Flashers” affix to the
Infrared sensors on the front panels of your
components. The Flashers relay commands
to components out of sight of the MRF-300’s
Front Blaster. The flashers plug in to the
MRF-300’s rear flasher line outputs via their
10 foot cables. Uniquely, the MRF-300 can
also connect to a components rear panel IR
input via its adjustable IR Line Outputs.
Page 2
MEDIUS OWNERS MANUAL
Installing Batteries
Open the battery cover by depressing
the release latch and pulling back
the cover on the back of the control.
Remove the cover.
Observe the + and - polarity indications inside the battery compartment.
Place the four AA batteries into their
positions in the battery compartment
observing the + and - polarity indicators on the batteries.
Now, replace the battery cover by
inserting the hinged end in first, then
snapping the cover back into place.
Page 3
MEDIUS OWNERS MANUAL
Programming the Medius
The Medius is programmed via a Windows PC equipped with a USB port
(programming cable included), using our proprietary software, TX-1000
Editor. You can download this software from our website:
www.universalremote.com
Basic setup takes only a short time with this software. However, to fully
automate an audio/video system the user must have a detailed knowledge
of each component, you the user (and your preferences) and how the system is connected and operated. We highly recommend that you use a
professional audio/video installer to program your Medius so you will be
able to enjoy all the benefits of the Medius as well as one touch operation
via macros.
Page 4
MEDIUS OWNERS MANUAL
Selecting a New “Activity”
The Medius’s WATCH and LISTEN buttons display the activities you can control
with your Medius. When you want to watch something else (a DVD movie, a
videotape or an HDTV broadcast), simply press the WATCH button and select the
new activity. When you want to listen to the radio or to a CD, touch the LISTEN
button and select what you would like to listen to.
Your installer will have programmed the button you pressed to totally configure
your system to watch or listen to whatever you selected. Now, the screen will
change, and all of the LCD buttons will be reconfigured to give you full control of
your system while watching or listening to your selection!
Press either of the PAGE buttons to see
any other available choices. You may
have only one page or your system may
have several pages of “Listen Activities”.
When you press the LISTEN button, you
can see the most frequently used activities you have for listening in your system.
Press either of the PAGE buttons to see
any other available choices. You may
have only one page or your system may
have several pages of “Watch Activities”.
Page 5
When you press the WATCH button,
you can see the most frequently used
activities you have for watching the
sources in your system.
MEDIUS OWNERS MANUAL
Using the Medius to Control an “Activity”
Once you’ve selected a new activity, the Medius displays the title of the
activity at the top of the screen. Below the title, the LCD displays the customized names of any special features you need for the activity. All the
hard buttons of the Medius have now changed to functions optimized for
this activity.
The Title displays
what activity you
can control.
The touch screen button labels describe
special features for this activity.
The Channel
and Previous
Channel buttons are programmable.
They will
change channels when
you have
selected an
activity like
Watching
HDTV .
The Volume
and Mute buttons always
control the
sound regardless of what
screen is displayed.
Press either of the
PAGE buttons to
see any other available choices. You
may have only one
page or your system may have several pages of special features for this
activity.
The 4 way cursor
buttons enable you
to navigate on
screen guides and
menus with ease.
The transport buttons (Play, Stop,
Back, Ahead and Pause) operate
when the selected activity requires
them (for example, if you watch
HDTV with a TiVo type of DVR,
these buttons will control the DVR).
Page 6
MEDIUS OWNERS MANUAL
Displaying the Setup Screen
You can adjust the settings of the Medius whenever you like by pressing and
holding both the WATCH and the SEL button at the same time for three seconds. When you do, the screen will change to the SETUP screen. If you do
not press any button on the SETUP screen within 30 seconds, the Medius
will time out and automatically return to normal operation. You can return to
normal operation before that by pressing either the WATCH or the LISTEN
button.
At the same time, press and
hold both the WATCH
button and the SEL button.
When the SETUP screen
appears, you can release the
two buttons.
Selecting from the Setup Screen
Simply touch the button for the setting you’d like to adjust:
TIME - The time displayed on the Medius.
LCD - The appearance of the screen.
LIGHT - What the LIGHT button does.
SOUND - The beeps the Medius can make.
SYSTEM - The battery low warning.
TOUCH - Calibration of the touch screen.
VER - No adjustments are possible. Displays factory info.
Page 7
MEDIUS OWNERS MANUAL
Setting the TIME
You can correct the time displayed by changing the settings on this screen.
After activating
AM/PM, press this
button to change
AM/PM.
To activate the
AM/PM setting,
press this button. .
To activate the
HOUR setting,
press this button.
After activating
them, change the
HOURS or MINUTES by observing
these buttons and
adjusting with the
LEFT and RIGHT
arrow keys.
To activate the
MINUTE setting,
press this button.
To SAVE any
changes you have
made, press SAVE.
To exit without saving
any changes you have
made, press EXIT.
Setting the LCD
With these settings, you set the screen’s appearance when the Medius is not in
use. You can select either a blank or constant LCD display. Additionally, you can
control the contrast of the screen and the color of the backlighting.
After activating LCD
On/Off, press this
button to change
whether the LCD is
displayed when not
in use.
Press the TIMEOUT
button if you wish to
change how much
time must pass
before the Medius
turns the LCD off.
To activate the LCD
On/Off setting,
press this button. .
To activate the
CONTRAST setting,
press this button.
For COLOR settings, see the next
page.
To SAVE any
changes you have
made, press SAVE.
After activating
change the CONTRAST by observing
this button and
adjusting with the
LEFT and RIGHT
arrow keys.
To exit without saving
any changes you have
made, press EXIT.
Page 8
MEDIUS OWNERS MANUAL
Overriding COLOR Settings
Your professional installer may have set the color of the backlighting to display different colors when you change activities. You can override the settings he/she made
in the TX-1000 software with one constant backlighting color for all activities
Normally, this button displays S/W to
indicate that the colors are controlled by
the software (S/W).
To override these
settings, after
activating the
COLOR row, press
the S/W button to
change it to USER.
Once the button displays USER, press
the EDIT button to
change the backlight
color.
Press the COLOR
button to activate
the COLOR Settings
row of buttons.
After pressing the EDIT button shown above, the COLOR SET screen appears.
Here’s how the settings are adjusted:
After activating
them, change the
RED, GREEN or
BLUE by observing
these buttons and
adjusting with the
LEFT and RIGHT
arrow keys.
To activate RED,
first press this button.
To activate GREEN,
first press this button.
To activate BLUE,
first press this button.
To SAVE any
changes you have
made, press SAVE.
To exit without saving any changes
you have made,
press EXIT.
Page 9
MEDIUS OWNERS MANUAL
Light Settings
You can adjust the backlighting of the remote in three additional ways:
1. You can turn on/off the LCD backlighting.
2. You can turn on/off the hard button backlighting.
3. You can select the amount of time the lighting stays on after the last button
press.
Once the LCD row is
activated, change
whether the backlighting is on or off by
pressing this button.
To activate LCD
backlighting, first
press this button.
To activate the hard
button backlighting,
first press this button.
Once the BUTTON
row is activated,
change whether
the backlighting is
on or off by pressing this button.
To activate the
TIMER setting, first
press this button.
To SAVE any
changes you have
made, press
SAVE.
Once the TIMER row
is activated, change
the amount of time
the backlighting will
stay on by using the
LEFT and RIGHT
arrow keys.
To exit without saving any changes
you have made,
press EXIT.
Sound Volume
Your Medius beeps whenever a button is pressed. However, you can adjust
the volume to any level you like by adjusting the volume control here.
Adjust the volume of
the beep by using the
LEFT and RIGHT
arrow keys.
To SAVE any
changes you have
made, press
SAVE.
To exit without saving any changes
you have made,
press EXIT.
Page 10
MEDIUS OWNERS MANUAL
System Settings
You can set your Medius to display the Low Battery warning at a power
level between 0% and 20% (in 5% increments).
The current battery
power remaining is
displayed here.
To activate the
battery low warning row, press the
WARN button.
Once the WARN row
has been activated,
use the LEFT and
RIGHT arrow keys to
cycle through the
available battery level
settings (0%, 5%,
10%, 15% or 20%).
The amount of
available memory
left to utilize is displayed in this row.
To exit without saving any changes you
have made, press
EXIT.
To SAVE any
changes you have
made, press
SAVE.
Calibrating the Touch Screen
If you find that your Medius is not responding to finger presses accurately,
you can calibrate the touch screen with this setting. It works like this:
1. Press the TOUCH button on the SETUP screen.
2. The screen changes and displays a small + symbol in the top left
corner.
3. Press the + symbol with the tip of your fingernail as accurately as
you can.
4. The + symbol now moves to the top right corner, then the bottom
left corner, the bottom right corner and finally the center of the
screen. Each time, press the + symbol as accurately as you can.
5. When the process is complete, the screen will return to the
SETUP screen.
Anytime you want, you can exit the Calibration screen by pressing the
WATCH button.
Page 11
MEDIUS OWNERS MANUAL
Version Information Displays
Should you be curious, the Version indicates what firmware and software
versions were used to program your Medius.
To exit, press
EXIT.
Limited Warranty Statement
1. Limited Warranty and Disclaimers
Universal Remote Control, Inc. (“URC”) warrants that the URC equipment shall be
free from defects in material and workmanship under normal usage for one (1) year
from purchase when such is purchased from URC. This limited warranty is valid only
in the United States of America. URC warrants that the software will substantially
conform in any material respect to its functional specifications at the time of delivery.
URC SHALL NOT BE LIABLE FOR OPERATIONAL, TECHNICAL OR EDITORIAL
ERRORS AND/OR OMISSIONS MADE IN THE URC DOCUMENTATION. URC
DOES NOT WARRANT THAT THE URC SOFTWARE IS BUG-FREE OR ERROR
FREE OR THAT THERE ARE NO ERRORS/BUGS IN THE URC SOFTWARE.
URC warrants that at the time of purchase the URC equipment and the URC software
complied with all applicable regulations and policies of the Federal Communications
Commissions (“FCC”) regarding electromagnetic interference caused by
electronic/computing devices and to the extent that the URC equipment and/or the
URC software fails to so comply, URC shall, at its own expense, take all reasonable
measures to promptly cause such to comply.
URC equipment purchases from other than an authorized URC dealer or distributor
are without warranty.
THIS LIMITED WARRANT DOES NOT COVER TECHNICAL ASSISTANCE FOR
HARDWARE OR SOFTWARE USAGE EXCEPT AS EXPRESSLY PROVIDED FOR
HEREIN, THE EQUIPMENT, SOFTWARE AND DOCUMENTATION OF URC ARE
SUPPLIED “AS IS” WITHOUT ANY WARRANTY, EXPRESS, STATUTORY OR
IMPLIED, OF ANY KIND. TO THE MAXIMUM EXTENT PERMITTED BY
Page 12
MEDIUS OWNERS MANUAL
APPLICABLE LAW, URC EXPRESSLY DISCLAIMS ALL WARRANTIES, EXPRESS,
STATUTORY OR IMPLIED, INCLUDING BUT NOT LIMITED TO THE
WARRANTIES OF MERCHANTABILITY AND FITNESS FOR A PARTICULAR
PURPOSE. URC DOES NOT WARRANT, GUARANTEE, OR MAKE ANY
REPRESENTATIONS REGARDING THE USE OF, OR THE RESULTS OF THE USE
OF, THE EQUIPMENT, SOFTWARE OR DOCUMENTATION IN TERMS OF
CORRECTNESS, ACCURACY, RELIABILITY OR OTHERWISE.
EXCEPT AS EXPRESSLY PROVIDED FOR HEREIN, TECHNICAL SERVICES ARE
SUPPLIED “AS IS”, WITHOUT ANY WARRANTY, EXPRESS, STATUTORY OR
IMPLIED, OF ANY KIND. TO THE MAXIMUM EXTENT PERMITTED BY
APPLICABLE LAW, URC EXPRESSLY DISCLAIMS ALL WARRANTIES, EXPRESS,
STATUTORY OR IMPLIED, INCLUDING BUT NOT LIMITED TO THE
WARRANTIES OF QUALITY OR REASONABLE SKILL AND CARE, OR OUTCOME
OR RESULTS.
WITHOUT IN ANY WAY LIMITING THE GENERALITY OF THE OTHER
PROVISIONS HEREIN, WARRANTY DOES NOT COVER: (I) DAMAGE FROM
MISUSE, NEGLECT OR ACTS OR NATURE, (II) MODIFICATIONS, (III)
INTEGRATION WITH THIRD PARTY CONTENT (IV) BEYOND THE WARRANTY
PERIOD AND/ OR FAILURE TO FOLLOW URC WARRANTY CLAIM
PROCEDURE.
The warranty limitations and warranty disclaimers may not apply to end user in
whole or in part, where such are restricted or excluded by applicable law and such
shall apply to the maximum extent permitted by applicable law.
In the event of any warranty claim, URC will, at its sole option, repair the URC
equipment using new or comparable rebuilt parts, or exchange the URC equipment
for new or rebuilt equipment. In the event of a defect, these are the end user’s
exclusive remedies.
All the URC equipment returned for service, exchange or repair require an RGA
number. To obtain an RGA number, you must complete a Return Request Form
which you may obtain by calling (914) 835-4484 or contacting URC at
[email protected]. To obtain warranty service, end user must
deliver the URC equipment, freight prepaid, in its original packaging or packaging
affording adequate protection to URC at 420 Columbus Avenue, Valhalla, NY
10595. It is end user’s responsibility to backup any macro programming, artwork,
software or other materials that may have been programmed into the unit. It is likely
that such data, software, or other materials will be lost during service and URC will
not be responsible for any such damage or loss. A dated purchase receipt, bill of sale,
installation contract or other verifiable proof of purchase is required. For the URC
equipment support and other important information, please visit URC's website
available at www.universalremote.com or call the Customer Service Center at (914)
835-4484.
Page 13
MEDIUS OWNERS MANUAL
This limited warranty only covers the URC equipment issues caused by defects in
material or workmanship during ordinary consumer use. It does not cover product
issues caused by any other reason, including but not limited to product issues due to
commercial use, acts of God, third-party installation, misuse, limitations of
technology, or modification of or to any part of the URC equipment. This limited
warranty does not cover the URC equipment sold as used, as is, refurbished, so called
"B stock" or consumables (such as batteries). This limited warranty is invalid if the
factory applied serial number has been altered or removed from the URC equipment.
This limited warranty specifically excludes the URC equipment sold by
unauthorized resellers.
With the exception of URC’s IR-only, broad-based consumer remotes, none of URC’s
PC programmable remotes or any of our Total Control® whole-house equipment are
authorized for online internet sales. Buying URC’s PC programmable remotes or any
of our Total Control® whole-house equipment online means buying equipment that
does not have a URC’s limited warranty. Such equipment is not eligible for URC tech
support or software support, either.
2. URC’S Limitations of Liability
IN NO EVENT SHALL URC BE LIABLE FOR INDIRECT, SPECIAL, INCIDENTAL,
EXEMPLARY, PUNITIVE OR CONSEQUENTIAL DAMAGES OF ANY KIND OR
LOSS OF PROFITS OR BUSINESS OPPORTUNITY, EVEN IF URC IS ADVISED OF
THE POSSIBILITY OF SUCH DAMAGES.
IN NO EVENT SHALL URC BE LIABLE FOR LOSS OF OR DAMAGE TO DATA,
COMPUTER SYSTEMS OR COMPUTER PROGRAMS.
URC’S LIABILITY, IF ANY, FOR DIRECT DAMAGES OF ANY FORM SHALL BE
LIMITED TO ACTUAL DAMAGES, NOT IN EXCESS OF AMOUNTS PAID BY END
USER FOR THE URC EQUIPMENT.
IN NO EVENT SHALL URC BE LIABLE FOR ANY EVENTS BEYOND ITS
CONTROL, INCLUDING ANY INSTANCE OF FORCE MAJEURE.
IN NO EVENT SHALL URC BE LIABLE FOR THE ACTS OR OMISSIONS OF END
USER OR ANY THIRD PARTY.
THE LIMITATIONS OF LIABILITY MAY NOT APPLY TO END USER IN WHOLE
OR IN PART, WHERE SUCH ARE RESTRICTED LIMITED OR EXCLUDED BY
APPLICABLE LAW AND SUCH SHALL APPLY TO THE MAXIMUM EXTENT
PERMITTED BY APPLICABLE LAW.
URC SHALL NOT BE HELD RESPONSIBLE FOR THE STATEMENTS MADE BY
OTHERS.
SOME STATES OR JURISDICTIONS DO NOT ALLOW THE EXCLUSION OR
LIMITATION OF INCIDENTAL OR CONSEQUENTIAL DAMAGES, OR ALLOW
LIMITATIONS ON HOW LONG AN IMPLIED WARRANTY LASTS, SO THE
Page 14
MEDIUS OWNERS MANUAL
ABOVE LIMITATIONS OR EXCLUSIONS MAY NOT APPLY TO END USER. THIS
LIMITED WARRANTY GIVES END USER SPECIFIC LEGAL RIGHTS AND END
USER MAY HAVE OTHER RIGHTS WHICH VARY FROM STATE TO STATE OR
JURISDICTION TO JURISDICTION.
End User Agreement
The terms and conditions of the End User Agreement available at
www.universalremote.com/eua.php shall apply.
Specifications
Memory - 4 Megabits of Flash Memory (for User Configuration)
Devices - Flexible, typically can support up to 40 Devices
Pages - Flexible, typically can support up to 40 Pages on each Device
Learning Capability - Standard frequencies (15kHz to 460kHz)
Macro Capability - Up to 255 steps each, however nesting is allowed
IR Range (Line of Sight via Infrared): 30-50 feet, depending on the environment
RF Range (radio frequency): 50 to 100 feet, depending upon the environment
RF Frequency: 418MHz
Weight: 31.4 ounces (with batteries)
Size: 6.46” H x 5.39” W x 1.66” D
Batteries: 4 AA Batteries
Page 15
500 Mamaroneck Avenue, Harrison, NY 10528
Phone: (914) 835-4484 Fax: (914) 835-4532
www.universalremote.com
OCE-0044A REV02