1
Precomputer Power Pad Plus
TM
User’s manual
Dear Parent:
At VTech® we know that children have the ability to do great
things. That’s why all of our electronic learning products
are uniquely designed to develop a child’s mind and allow
them to learn to the best of their ability. Whether it’s learning
about letters, numbers, geography or algebra, all VTech®
learning products incorporate advanced technologies and
extensive curriculum to encourage children of all ages to reach
their potential.
When it comes to providing interactive products that enlighten,
entertain and develop minds, at VTech® we see the potential
in every child.
87
CONTENTS
CHAPTER 1 INTRODUCTION ............................ 1
CHAPTER 2 GETTING STARTED ........................ 2
MAIN BATTERY INSTALLATION ............................... 2
BACKUP BATTERY INSTALLATION ........................... 2
AC ADAPTOR CONNECTION ................................... 3
PRINTER CONNECTION ..........................................4
MOUSE CONNECTION ............................................4
GENERAL OPERATION ..........................................4
CHAPTER 3 THE KEYBOARD ............................ 6
SPECIAL KEYS ........................................................6
ACTIVITY SELECTOR ...............................................9
CHAPTER 4 ACTIVITIES AND FUNCTIONS ........ 11
HOW TO PLAY.....................................................11
CHAPTER 5 WORD PROCESSOR .................... 20
FILE OPTIONS......................................................21
EDIT OPTIONS .....................................................22
FORMAT OPTIONS .............................................. 23
TOOLS OPTIONS .................................................24
PRINT OPTIONS .................................................. 24
HELP ...................................................................25
EXIT.....................................................................25
CHAPTER 6 SYSTEM SETUP ............................. 26
PRINTER SETUP ................................................... 26
TIPS OF TODAY ................................................... 26
SCREEN SAVER .................................................... 27
CLEAR LAST SCORE .............................................. 27
ICON BOX ...........................................................27
QUICK MENU SETUP ............................................27
CUSTOMIZE SETUP ............................................... 27
DEMO MODE ......................................................28
88
RAM CART MANAGER.......................................... 28
POWER LINK .......................................................29
CHAPTER 7 BASIC.......................................... 30
INTRODUCTION ................................................... 30
GETTING STARTED .............................................. 32
BASIC COMPUTER TUTORIAL................................ 34
REFERENCE SECTION ........................................... 47
ARITHMETIC FUNCTIONS ...................................... 52
STRING FUNCTIONS.............................................53
GRAPHICS FUNCTION .......................................... 54
SUBSTRINGS .......................................................54
LOGICAL OPERATORS .........................................59
APPENDIX ...........................................................65
THE ERROR MESSAGES ....................................... 74
CHAPTER 8 CALCULATOR.............................. 76
BASIC CALCULATOR OPERATIONS ....................... 76
USING THE MEMORY FEATURES ........................... 76
ADVANCED FUNCTIONS ....................................... 77
TRIGONOMETRY FUNCTIONS .............................. 78
CHAPTER 9
TIME LIMITS............................... 79
CHAPTER 10 SCORING .................................. 79
CHAPTER 11 POWER LINK ............................ 81
CONNECTING THE CABLE .....................................81
CONTROLLING VTECH POWER LINK™ ................. 81
CHAPTER 12 HOW TO USE AN EXPANSION
CARTRIDGE ............................... 83
CHAPTER 13 CARE AND MAINTENANCE ......... 84
89
CHAPTER 1:
INTRODUCTION
Thank you for buying the PRECOMPUTER POWER PAD™ PLUS learning toy by VTECH®.
We at VTECH® are committed to providing the best possible products to develop a child’s
mind. Should you have any questions or concerns, please call our Consumer Services
Department at 1-800-521-2010 in the U.S. or 1-800-267-7377 in Canada.
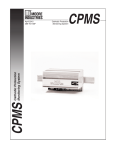
PRECOMPUTER POWER PAD™ PLUS is a powerful learning computer tool featuring
120x32 full dot matrix LCD screen and a standard sized computer style keyboard that gives
the user the look and the feel of a real laptop computer. PRECOMPUTER POWER PAD™
PLUS offers 38 activities that include tenses, antonyms, synonyms, grammar, spelling,
vocabulary, basic and advanced mathematics, 1000 trivia questions, logic games, a word
processor, BASIC programming with tutorial, a built-in calculator, a 75,000 word spell checker
and more. Get ready for hours of learning fun with the PRECOMPUTER POWER PAD™
PLUS learning unit.
CABINET LOCKS
LCD SCREEN
CONTRAST SWITCH
VOLUME SWITCH
SPEAKER
9 LED STATUS
DISPLAY BAR
ON SELECTOR
OFF SELECTOR
MEMBRANE
ACTIVITY
SELECTOR
EXPANSION
CARTRIDGE DOOR
COMPUTER
KEYBOARD
AC ADAPTOR PORT
PRINTER PORT
MOUSE PORT
PULL OUT CARRYING HANDLE
1
CHAPTER 2:
GETTING STARTED
The PRECOMPUTER POWER PAD™ PLUS learning unit operates on 4 “AA” (UM-3/LR6)
size batteries for the main compartment or a 9V AC adaptor. 2 “AA” (UM-3/LR6) batteries
are required to backup the unit.
MAIN BATTERY INSTALLATION
1. Make sure the unit is OFF.
2. Locate the main battery cover on the back of the unit
and open it.
3. Insert 4 “AA” (UM-3/LR6) size batteries as
illustrated. DO NOT USE RECHARGEABLE
BATTERIES in this unit. (The use of Rayovac
Renewable/Rechargeable Alkaline batteries is
encouraged.)
4. Replace the battery cover.
5. Turn the unit ON.
BATTERY NOTICE
•
Install batteries correctly observing the polarity (+,-) signs to avoid leakage.
•
Do not mix old and new batteries.
•
Do not use batteries of different types.
•
Remove exhausted or new batteries from equipment when you are not going to use
it for a long time.
•
Do not dispose of batteries in fire.
•
Do not attempt to recharge ordinary batteries.
•
The supply terminals are not to be short-circuited.
•
Non-rechargeable batteries are not to be recharged.
•
Rechargeable batteries are to be removed from the toy before being charged.
•
Rechargeable batteries are only to be charged under adult supervision.
NOTE: If the unit suddenly stops working, or the sound seems weak, turn the unit off for
15 seconds, then turn it back on. If the problem persists, it may be caused by
weak batteries. Please install a new set of batteries and try the unit again.
BACKUP BATTERY INSTALLATION
1. Make sure the unit is OFF.
2. Locate the backup battery cover on the back of the unit and open it.
2
3. Insert 2 “AA” (UM-3/LR6) size batteries as illustrated.
DO NOT USE RECHARGEABLE BATTERIES in this
unit. (The use of Rayovac Renewable/Rechargeable
Alkaline batteries is encouraged.)
4. Replace the battery cover.
5. Turn the unit ON.
NOTE: While replacing the backup batteries, the 4 “AA” size
batteries must be kept in the unit or the unit must be connected
to the 9V adaptor while the adaptor is plugged in. If not, the
information stored in the following activities will be lost:
•
Word Processor
•
BASIC
•
User Name and Personal Message
•
Last Scores
•
Quick Menu Icons
AC ADAPTOR CONNECTION
Use a standard 9V
300mA
AC adaptor.
1. Make sure the unit is OFF.
2. Locate the adaptor jack on the back of the unit.
3. Plug the adaptor into a wall outlet.
4. Plug the adaptor into the unit’s adaptor jack.
5. Turn the unit ON.
NOTE: Do not leave the adaptor plugged in for a long period of time if the unit is not
in use. If the unit suddenly stops working or the sound seems weak, it may be
the result of the adaptor connection. Turn the unit off and unplug the adaptor from
the unit for 15 seconds. Next plug the adaptor back in and turn the unit on. If
the problem persists, it may be the result of the adaptor's wiring or the unit. Please
call our Consumer Services Department at 1-800-521-2010 in the U.S., 1-800-2677377 in Canada and a service representative will be happy to help you.
The VTECH® AC adaptor is perfectly suitable to operate this product. Many retailers
carry the adaptor, however, if you are unable to find one locally, you can send
$10.00 plus $5.00 for shipping and handling (Illinois residents please add an 8.25%
sales tax.) to:
Adaptor c/o
VTECH® Industries, LLC
101 E. Palatine Road
Wheeling, IL 60090-6500
Please do not send cash.
3
PRINTER CONNECTION
The PRECOMPUTER POWER PAD™ PLUS learning unit can support 12 different kinds
of printers. For details, please refer to Chapter 6.
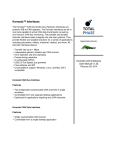
MOUSE CONNECTION
Use our standard mouse, included with the PRECOMPUTER POWER PAD™ PLUS.
1. Make sure the unit is OFF.
2. Locate the mouse jack at the back of the unit.
3. Slide open the mouse port door and insert the mouse connector into the unit.
4. Turn the unit ON.
5. The mouse will work best if it is kept on the mouse pad.
Left Mouse
Button
Right Mouse
Button
This 'ARROW' shows the unlocking
direction.Lock by pushing to the
opposite side of the 'ARROW'
®
®
The mouse functions the same as a real computer mouse. Move the cursor on the screen
by moving the mouse in the direction you would like the cursor to move. The Left mouse
button functions as a select key (Enter key) while the Right mouse button functions as
an Esc key.
GENERAL OPERATION
ON BUTTON & OFF BUTTON
Turn on your PRECOMPUTER POWER PAD™ PLUS learning unit by pressing the ON
button located at the upper right-hand side of the Membrane Activity Selector. A welcome
animation will be displayed and you can begin play. Turn the unit off at any time by pressing
the OFF button.
4
Automatic Shut Off
If there is no input into the PRECOMPUTER POWER PAD™ PLUS unit for about 20 minutes,
the unit will automatically shut off to save power. To turn the unit back on after an automatic
shut off, press the ON button again. We recommend turning the unit OFF when not in
use. If the PRECOMPUTER POWER PAD™ PLUS unit is not in use for a long period
of time, remove the main compartment batteries or unplug the adaptor.
CONTRAST SWITCH
Depending on your lighting conditions, slide the Contrast Switch to the left or right to allow
for better viewing.
VOLUME SWITCH
Adjust the volume by sliding the Volume Switch to the left or right.
LED STATUS DISPLAY BAR AND LCD SCREEN
LED Light
There are 9 icons on the LED status display bar. Each icon represents an activity or function.
LCD SCREEN
On top of the LCD screen, a status bar is displayed.
Left Player's
Right Player's
Left Player's
Right Player's
5
CHAPTER 3:
THE KEYBOARD
The computer keyboard on PRECOMPUTER POWER PAD™ PLUS combines the operation
of a standard computer keyboard with several other functions described below.
SPECIAL KEYS
Enter Key:
Press this key after typing or choosing an answer to input your selection.
Shift Key:
Press this key to type capital letters or the symbols shown on top of the number keys.
Esc Key:
Press this key to exit an activity.
to the main menu.
By repeatedly pressing the ESC key, you can return
6
Caps Lock Key:
Press this key to make all letters appear in upper case. Press this key again to return
to normal typing mode. When the Caps Lock function is activated, the Caps Lock light
will turn on.
Answer Key:
Press this key to see the correct answer to any question.
Right Player/Left Player Keys:
Press these keys with activities featuring a 2-player mode. The first person to hit his or
her appropriate left or right player button will get the opportunity to answer the question
first.
Cursor Keys:
Press the
key to move the cursor to the right.
Press the
key to move the cursor to the left.
Press the
key to move the cursor downward.
Press the
key to move the cursor upward.
Help Key:
Press this key at any time and you will see helpful hints to assist you with the current
screen.
7
Hint Key:
Press the Shift key and this key simultaneously when inputting text in Trivia activities when
you need a hint. You will be given three multiple choice answers to choose from. In
Rocket Fuel, you may replay the current stage.
Break Key:
Press the Shift and Break keys simultaneously when you want to interrupt a program in
the BASIC activity while it is running.
Alt Key:
Press this key and the letter ‘P’ to activate the printing function in the activities.
Press this key and the “3” key to get the symbol “#”.
Erase Key:
Press this key when you are inputting text. This will clear the entire input line so that
you can re-enter the text.
AC Key:
Press this key for an ‘All Clear’ screen in the Calculator activity.
Insert Key:
Press this key when you want to insert text in the Word Processor, BASIC and Design
A Card activities.
Delete Key:
Press this key when you want to delete the character at the cursor position.
8
Backspace Key:
Press this key when you want to delete the character before the cursor position.
3, #, and £:
Press this key to type the number “3”.
Press Shift and this key simultaneously when you want to type the symbol “£”.
Press Alt and this key simultaneously when you want to type the symbol “#”.
ACTIVITY SELECTOR
There are 38 activities in the PRECOMPUTER POWER PAD™ PLUS unit and they are
divided into 5 categories. This includes Word Games, Mathematics, Computer Skills, Games
and Trivia. Press any one of the activities to go into the activity directly.
MAIN MENU
/DEMO
WORD GAMES
MATHEMATICS
COMPUTER SKILLS
GAMES
TRIVIA
FUNCTION
Word
Puzzles
Word
In Word
Addition
Flip Flop
Fractions
Keyboard
Skills
Spy Trap
Science
ON
Comparatives
Vocabulary
Builder
Subtraction
Ratios
Typing
Challenge
Rocket
Fuel
English
OFF
Word
Recall
Synonyms
Word
Maker
Multiplication
Algebra
Word
Processor
Design
A Card
Geography
Level
Plurals
Antonyms
Sentence
Scrambler
Division
Story
Problems
BASIC
Tutor
Spell
Checker
General
Player
Tenses
Letter
Drop
Grammar
Quiz
Fractions
Equation
Builder
BASIC
Calculator
Print
Screen
Cartridge
Mystery
Letter
On Key:
This key is used to turn the unit ON. When the unit is OFF, press this key to turn the
unit ON.
Off Key:
This key is used to turn the unit OFF. When the unit is turned ON, press this key any
time to turn the unit OFF.
IMPORTANT: When using an AC adaptor, always make sure to FIRST PRESS THE OFF
KEY on the unit before unplugging the adaptor.
9
Player Key:
Press this key to change from 1-player mode to 2-player mode and vice versa for activities
with 2-player mode. If you want to change the player mode, press this key first and then
select a player mode by typing the number 1 or 2. If you select the 2-player mode, you
will be prompted to enter the names of the first player and second player.
Level Key:
The unit provides 4 levels of challenge in most of the activities. If you want to change
the level, press this key first and then select a level by typing a number 1, 2, 3, 4. The
first level is the easiest and the fourth level is the most difficult.
Cartridge Key:
This key is used to access VTECH® PRECOMPUTER expansion cartridges that are
compatible with the unit. An expansion cartridge must be inserted into the unit to operate
the cartridge feature.
NOTE: Cartridges are sold separately. Please refer to Chapter 12 for details and a listing
of VTECH® PRECOMPUTER expansion cartridges.
Print Screen Key:
This key is used to print the current screen. Press this key at any time, and the current
screen will print through the connected printer.
Main Menu/DEMO Key:
This key is used to return to the main menu. Press this key at any time and you will
return to the main menu immediately. When you are already in the main menu, pressing
this key will show the demo of this unit.
10
CHAPTER 4:
ACTIVITIES AND FUNCTIONS
HOW TO PLAY
SELECTING/CHOOSING/HIGHLIGHTING
During the course of entering the activities and during game play, you will be asked to
either select, choose or highlight an object, a number, a letter or a word. This can be
done in two different ways:
Mouse
You can move the cursor arrow with the mouse. When the cursor arrow is on the
item you want to choose, press the left mouse button, or the Enter key.
You may also move the cursor to highlight text. To highlight, select text by pressing
the left mouse button and dragging the cursor over the text.
You may exit an activity, go to previous menu, and close pop-up windows by pressing
the right mouse button, or the ESC key.
Cursor Keys
You can move the cursor arrow with the cursor keys on the keyboard. When the
cursor arrow is on the item you want to choose, press the Enter key.
Also, you may select a highlighted option by pressing the cursor keys. If the highlighted
option is the one you want, press the Enter key.
CUSTOMIZED SCREEN AND TIPS OF TODAY
After turning on the unit, a welcoming animation and the customized screen will appear.
You can change the name and the message of the customized screen in System Setup.
Please see Chapter 6 for details.
After the customized screen appears, the Tips of Today pop-up on the screen. There are
55 different interesting facts that will be randomly shown each time the unit is turned on.
ENTERING ACTIVITIES
After the Customized Screen and Tips of Today are displayed, the Main Menu will appear.
11
There are 5 large icons on top of the Main Menu. You can choose from the following:
Word Games
.
, Mathematics
, Computer Skills
, Games
, and Trivia
Use 1 of the following 2 ways to enter into one of the five categories:
1. Press any one of the five activity buttons from the Membrane Activity Selector.
2. Choose an activity icon on the screen.
After choosing the category (Word Games, Mathematics, etc.), you may select an activity:
Choose an activity on the screen. Due to the limitation of the screen, you will have to
scroll through the activity list by using the UP and DOWN arrow icons located on the right
side of the screen. Or you can use the UP or DOWN arrow keys on the keyboard. Press
the Enter key or the left mouse button to enter the selected activity.
During any of the activities, press the ESC button to quit the activity and return to the
main menu.
During any of the activities, press the Main Menu/Demo key to return to the main menu.
At the bottom of the Main Menu, there are three smaller icons. Choose from: Demo Icon
, Help Icon
and System Setup
.
Demo Icon
When this icon is selected, the demo mode begins. The unit will automatically enter one
of the Word Games, Mathematics, Computer Skills, Games or Trivia activities, and answer
a question. This process will repeat until you press any key, or move the mouse.
Help Icon
When this icon is selected, helpful text will assist you with the current screen.
System Setup
When this icon is selected, System Setup is entered. Please refer to Chapter 6 for details
of System Setup.
PLAYER MODES:
The unit will automatically begin in 1-player mode when the unit is turned on. To enter
the 2-player mode, press the Player key first and then type the number “2”. The unit will
prompt you to enter the names of the first player and the second player.
12
NOTE: The
•
•
•
•
•
•
•
•
•
•
•
following activities do not feature the two-player mode:
Word Puzzles
Spy Trap
Rocket Fuel
Keyboard Skills
Typing Challenge
Word Processor
BASIC Tutor
BASIC
Design A Card
Spell Checker
Calculator
GENERAL DISPLAY
In most of the activities, you will see a display with status information, useful icons and
a working area. The status information will include the players’ scores, the number of
chances remaining to answer a question, the current level, and the time indicator. At the
right side of the screen, there are several icons displayed. They include the Quit icon,
the Help icon, and the Up/Down arrow icons. The Up/Down icons are used to scroll the
text, if the text is too long to be displayed on one screen. Besides clicking on the icons
with your mouse, you can also press the Up/Down cursor keys on your keyboard.
WORD GAMES
MYSTERY LETTER
A word (missing a letter) will appear on the screen. Type in the missing letter and press
the Enter key to confirm your answer.
WORD RECALL
The unit will first display a word on the screen. After 3 seconds, the word will disappear.
Type in the same word as originally displayed. The underlines tell you how many letters
are in the word. Press the Enter key to confirm your answer.
PLURALS
A singular form of a noun will appear on the screen. Type in the plural form of the given
word and press the Enter key to confirm your answer.
13
TENSES
Two tenses of a verb will appear on the screen. Type in the missing tense (present, past
or past participle) of that verb and press the Enter key to confirm your answer.
WORD PUZZLES
This is a crossword puzzle game with 10 missing words in each puzzle. Use the cursor
keys or mouse to select one of the missing words. Press the Enter key to receive a clue
for the chosen word. Type in the word for that clue and press the Enter key to confirm
your answer. If you need to see the clue again, press the Hints key and the clue will
appear. Also, you may use the Erase key to clear any word you have typed in, and the
unit will delete the word. After you have answered this clue, choose another word until
you have entered all of the 10 missing words.
COMPARATIVES
This activity shows three forms of adjectives or adverbs. Two comparatives will be displayed
on the screen, and you need to input the third one. Type in the missing comparative and
press the Enter key to confirm your answer.
SYNONYMS
The unit will display a word on the screen. Type in a word that has the same meaning.
The underlines tell you how many letters are in the word. Press the Enter key to confirm
your answer.
ANTONYMS
The unit will display a word on the screen. Type in a word that has the opposite meaning.
The underlines tell you how many letters are in the word. Press the Enter key to confirm
your answer.
LETTER DROP
An incomplete word will appear on the bottom row with its missing letter above it. Use
the Left/Right cursor keys or mouse to place the missing letter in its correct position and
press the Enter key to confirm your answer.
WORD IN WORD
The unit will display a word on the screen. Use the Left/Right cursor keys or mouse to
move the pointer and select a letter to be removed. Try to remove a letter so that the
remaining letters still make a word. Press the Enter key to confirm your answer.
VOCABULARY BUILDER
The unit will display a word on the screen with three definitions of the word. Only one
is the correct answer. Choose the correct definition of the word and enter your selection
by pressing the corresponding number or pressing the Enter key or clicking your mouse.
14
WORD MAKER
The unit will display a prefix or a suffix of a word at the bottom of the screen. Several
suffixes/prefixes scroll across the screen above the word. When the correct suffix/prefix
is above the word, press the Enter key to input your answer.
SENTENCE SCRAMBLER
A group of words will appear on the screen. You must rearrange the words to form a
correct sentence. Select the word you think is the first word of the sentence with the
arrow keys or the mouse cursor, and then press the Enter key or the left mouse button.
The word will move to the answer line. Repeat the same process for the second word,
the third word and so on until the entire sentence is constructed. If you make a mistake,
you can select the word from the answer line with your mouse and the word will move
to the top of the screen. When you select the last word of the sentence, the unit will
check whether your selections are correct or incorrect.
GRAMMAR QUIZ
A sentence will appear on the screen with one grammatical error. Choose the grammatically
incorrect word with your arrow keys or the mouse cursor. Then press the Enter key or
left mouse button. If you pick out the grammatical error, 3 multiple choice options will
appear on the screen. Select the option that makes the sentence grammatically correct
by pressing its corresponding number, or moving the mouse cursor or pressing the Up/
Down arrow keys to highlight your choice then press the Enter key to input your answer.
MATHEMATICS
ADDITION
An addition problem will appear on the screen. Type in your answer, from right to left,
using the number keys on the keyboard and press the Enter key to confirm your answer.
SUBTRACTION
A subtraction problem will appear on the screen. Type in your answer, from right to left,
using the number keys on the keyboard and press the Enter key to confirm your answer.
MULTIPLICATION
A multiplication problem will appear on the screen. Type in your answer, according to the
position of the blinking cursor, using the number keys on the keyboard and press the Enter
key to confirm your answer.
DIVISION
A division problem will appear on the screen. Type in your answer, from left to right, using
the number keys on the keyboard and press the Enter key to confirm your answer.
15
FRACTIONS
A fraction will display on the screen. 3 multiple choice options will be given. Decide which
option is the correct answer and press its corresponding number or click on the answer
with your mouse.
FLIP FLOP FRACTIONS
An equation which involves turning a fraction into a decimal/percentage will appear on the
screen. Type in the answer using the number keys on the keyboard and press the Enter
key to confirm your answer. When inputting your decimal answer, place a zero before
the decimal point when the answer is less than 1. Example: "0.94" is correct. ".94" is
incorrect.
RATIOS
A ratio problem will appear on the screen. Type in the answer to make the ratios equal
by using the number keys on the keyboard and press the Enter key to confirm your answer.
ALGEBRA
An algebra problem will appear on the screen. Type in the value of “x” or “y” using the
number keys on the keyboard and press the Enter key to confirm your answer.
STORY PROBLEMS
In this activity the PRECOMPUTER POWER PAD™ PLUS learning unit challenges you
to find answers to math problems that are presented as story problems instead of numerical
equations. The question will appear on the screen. You may type your answer or press
the Hint key to choose from 3 multiple choice options. Select your answer by typing in
the corresponding number, using the mouse or use the Up/Down arrow keys to highlight
your selection then press the Enter key to confirm your answer.
EQUATION BUILDER
The unit will display an equation. Three signs < (less than), > (greater than) and = (equal
to) will scroll across the screen. When the correct sign is at the middle of the equation,
press the Enter key to choose the correct sign to complete the equation.
COMPUTER SKILLS
KEYBOARD SKILLS
You can learn keyboarding skills through this helpful typing tutorial. This activity is divided
into Basic and Expert courses.
Basic Course
In the basic course, you will type the letters displayed in the upper right corner of the
screen. The hand and the keyboard on the screen indicates which finger should be used
16
to type each letter. Each correct letter equals 1 point. After typing 100 letters (50 for
the left hand, 50 for the right hand), the score and the rewarding screen will be shown.
Expert Course
In the expect course, follow the screen and type the given text. After you have completely
typed the text, your typing speed and accuracy will appear on the screen.
TYPING CHALLENGE
This activity helps to improve your keyboarding skills through this exciting typing game.
The cannon on the right side of the screen will fire letters to the castle on the left side.
Type the letter before it hits the castle. If the castle on the screen is hit 8 times, one
chance is deducted. You will win the game if you can type all the given letters before
your three chances are up.
WORD PROCESSOR
This activity offers word processing for your documents. Please see Chapter 5 of this manual
for further details.
BASIC TUTOR
This activity will acquaint you with the fundamental BASIC computer programming concepts.
At the end of the text, there is a program for the game “Rock, Paper, Scissors.” You
can learn the technique of a BASIC program by writing your own game.
BASIC
This is an intensive computer programming activity.
in Chapter 7 of this manual.
Complete instructions are provided
DESIGN A CARD
The PRECOMPUTER POWER PAD™ PLUS learning toy has several built-in pictures,
including holiday, birthday, and celebration scenes. With these pictures, you can print letter
greetings and folded cards along with your personal messages to give to your friends and
relatives.
To create and print a Letter Greeting:
Select Letter Greeting.
Choose a picture to be used in the Letter Greeting.
Type in your text message. You are allowed up to eight lines of text. Press the
Enter key several times. The unit will ask you if you have finished entering your
message. Select yes or no.
Select Print.
17
To create and print a Folded Card :
Select Folded Card.
Choose a picture to be used in the folded card.
Type in your text message. You are allowed up to eight lines of text. Press the
Enter key several times. The unit will ask you if you have finished entering your
text. Select yes or no.
Select Print.
SPELL CHECKER
Spell Checker is an electronic word list that contains approximately 75,000 words and is
used to check the correct spelling of words. This program can work independently or within
the Word Processor activity.
The Spell Checker searches words phonetically. English words can be difficult to spell
because the same sound can sometimes be spelled several different ways. Remember,
Spell Checker never actually spells a word for you but will check for spelling errors and
gives you suggestions for correcting the possible misspelling.
Type a word the way you think it is spelled and press the Enter key. PRECOMPUTER
POWER PAD™ PLUS will spend a few seconds checking the dictionary. If the word is
spelled correctly, the unit will respond with “Correct!” If the word you typed is not in the
dictionary, it will give you a list of possible words to correct the misspelled word. To continue
checking additional words, continue typing without pressing the Enter key.
CALCULATOR
This activity allows you to use the unit as an advanced, scientific calculator. Please see
Chapter 8 of this manual for instructions.
GAMES
SPY TRAP
The object of the game is to catch all of the four spies within the time alotted. The spies
are hidden behind the numbers. The only way to reveal a spy is to select 2 to 3 continuous
numbers that add up to the number stated in the middle of the screen. When a spy is
revealed, select the spy to send him to jail. There is a time limit to catch the spies. If
you cannot catch the spies within the time limit, you will lose a turn. The following are
18
the rules of the game:
1. Press the number key or use your mouse to select the numbers. You may select any
number. If all nine of the squares fill up, you will lose a turn.
2. Try to select the numbers so that 2 to 3 continuous numbers that you choose, add
up to the number in the middle of the screen.
3. A spy appears in one of the blank squares. Press the Space bar or click on the spy
immediately to put the spy in jail. If you don’t catch a spy within 5 seconds, he will
disappear.
4. If you cannot catch four spies within the time limit, you will lose a turn.
Repeat the above steps until all four spies are in jail.
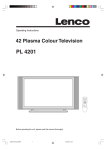
ROCKET FUEL
Robot
Fuel
Rock
Rock
Rock
The object of the game is to push all of the fuel into the rocket so that the rocket has
enough fuel to travel to the next planet.
Use the cursor keys to control the robot in pushing the fuel into the rocket. The following
are guidelines when playing this game:
1. The robot can only push the fuel.
It cannot pull fuel.
2. The robot can only push one fuel tank at a time.
simultaneously.
It cannot push two fuel tanks
3. If you find that you cannot continue pushing the fuel tanks into the rocket, you may
press the Hint (Shift & Help) key. This restarts this stage. You can then try again
with another approach. Remember: you have only three chances to use the Hint key.
4. The rocket will start travelling to another planet only after you have pushed all of the
fuel into the rocket.
Note: You may click on the Help icon to learn playing tips.
The game also gives you the opportunity to load the game for different levels . You
need to enter the password that appears in the top right hand corner of the screen
to reload the stage.
19
TRIVIA
This challenging trivia game has 1000 questions in 4 different topics: Science, English,
Geography and General. All topics are available with a 2-player mode and 4 levels.
Once you have selected a topic, a question will appear on the screen. If you know the
answer to the question type in your answer and the press the Enter key to input your
answer. If you don’t know the answer, you may select 3 multiple choice options by pressing
the Hints key. Decide which option is the correct answer and press its corresponding number.
Using the Hints key will result in losing one chance.
DEMO MODE
To access the demo mode, press the Main Menu/Demo key. You may also select the
Demo icon located on the bottom right hand corner of the screen. This mode demonstrates
some of the activities in the PRECOMPUTER POWER PAD™ PLUS. When the demo
mode starts, the PRECOMPUTER POWER PAD™ PLUS enters the activities in all
categories. After the unit demos one activity it will return to the Main Menu. This process
is repeated until you press any key or move the mouse.
SYSTEM SETUP
System Setup allows you to change various defaults. These include printer setup, quick
menu setup, customize screen setup and more. Please see Chapter 6 for further details.
CHAPTER 5:
WORD PROCESSOR
The PRECOMPUTER POWER PAD™ PLUS offers you one of the first and most important
applications found in computers: word processing. With this word processor, you will be
able to create, edit, save and print documents you have created. The unit can hold
approximately 3500 characters or 500-600 words before data has to be saved or printed.
The bottom line represents the status of the text on the screen.
L=1 “L” stands for a line of text. The number (i.e. “1”) represents the first line of text.
L=2 would mean the user is editing the second line of text. A “line of text” refers to one
line (60 characters) on an 8 1/2 X 11 sheet of paper - not one line on the LCD viewing
screen. PLEASE NOTE THAT 60 CHARACTERS WILL TAKE UP 3 LINES ON THE LCD
VIEWING SCREEN BUT TRANSLATE TO ONE LINE OF TEXT ON AN 8 1/2 X 11 SHEET
OF PAPER WHEN PRINTED (SEE PRINT SECTION). This feature allows the user to
effectively print documents using a standard 8 1/2 X 11 format.
20
J=L means the current line is justified left.
NB
means the current word is not bolded.
B means the current word is bolded.
CH means which character the cursor is on in a particular line.
PLEASE NOTE THAT THE VT-25 THERMAL PRINTER PRINTS 25 CHARACTERS PER
LINE ON A STANDARD ROLL OF THERMAL PAPER. YOUR PREPARED TEXT WILL
AUTOMATICALLY BE ADJUSTED TO FIT THIS FORMAT WHEN YOU SELECT THE VT25 THERMAL PRINTER IN PRINTER SETUP. WHILE THE FORMATTING WILL NOT
CHANGE ON THE LCD SCREEN, THE TEXT WILL PRINT CORRECTLY TO FIT THE VT25 FORMAT.
The Word Processor has a menu with many functions. You may view the Word Processor
menu by pressing the Help key. The Word Processor menu will appear with the following
options: File, Edit, Format, Tools, Print, Help and Exit.
FILE OPTIONS
Under the File Options menu, you may select four different functions: New, Load, Save
and Delete. To enter the File Options menu, press the Help key and select File Options.
New
New is the command to create a new file. Every time you enter the Word Processor
activity, you will see the same document you worked on the last time you were in
Word Processor. To create a file, select New from the FILE options and it will ask
if you want to create a new document. If you select “Yes”, it will ask if you want
to overwrite the current document. If you select “Yes”, the document will be deleted,
allowing you to create a new one. Selecting “No” will return you to the existing
document. If you want to save your document in order to create a new one, you
must have a RAM cartridge. This cartridge allows you to save multiple documents
and is sold separately.
Load
Load is the command used to retrieve an existing file from the optional RAM cartridge.
Select Load from the File Options and it will list all of the files in the RAM cartridge.
Select the file you want to retrieve and press the Enter key. The chosen file will
then appear on the screen.
Save
Saving a file is a very important option in Word Processor because if you forget to
save the file, your document will be lost permanently. You must have a RAM cartridge
in order to save a file. Select Save from the File Options and it will prompt you
to input the name of your file. Type in your file name and press Enter to save the
file. The PRECOMPUTER POWER PAD™ PLUS can store one page, 8 1/2 X 11.
But if you would like to save the document before creating a new one, you must
have a RAM cartridge. To rename a file, enter System Setup and select RAM Cart.
Manager.
Please note that the filename can only be up to 8 characters long.
21
Delete
When you no longer need a file, erasing it from the optional RAM cartridge is a
good idea because it will free up more space for other files. Select Delete from
the File Options and it will prompt you with a list of files in the optional RAM cartridge.
Select the file to delete and press the Enter key. A message will appear on the
screen asking you to confirm your selection. Be careful when deleting a file because
whatever you delete will be gone permanently.
Note: If you have purchased our VTECH POWER LINK™, and connect it to the unit correctly,
you may also Save, Load or Delete a file on the connected PC. In the File Options,
select Load. The unit will ask you whether to load a file from RAM Cartridge or
from PC. If you select PC, the files on the PC will be listed. You may then select
a file on the PC to be loaded into the unit’s main memory. The same applies to
the Save and Delete functions. Please refer to Chapter 11 for more details about
our VTECH POWER LINK™.
EDIT OPTIONS
Most simple editing can be accomplished by using the Backspace, Insertion (INS)
and Deletion (DEL) keys. When you want to change large blocks of text, you need
to do block editing. The EDIT menu is for editing blocks of text. You can find Edit
Options by pressing the HELP key.
Define a Block
The first step in block editing is to define or mark a block of text. There are two
ways to define a block of text. 1) Drag the mouse over the desired text to highlight
it. 2) Place the cursor at the first character of the block you want to edit, then select
Block Begin from the EDIT menu. When the cursor is at the end of the block, select
Block End from the EDIT menu. After a block of text is defined, you can use one
of the four blocking tools: block copy, block cut, paste block or clear block.
Block Begin
This marks the beginning of a block of text.
Block End
This marks the end of a block of text. The text between the Block Begin mark and
the Block End mark will be highlighted, up to 60 characters or one line of printed
text.
Block Copy
After a block of text has been defined, select Block Copy from the EDIT menu. The
original block will remain and you can paste the block in any location in the document.
Block Cut
To cut a block of text, first define the block of text and select Block Cut from the
EDIT menu. The block will be removed from its current position and will be placed
in memory. You can now paste the block in any location in the document.
22
Paste Block
After you have used the Block Cut or Block Copy option, move the cursor to the
position where you want the block of text to be pasted. Select Paste Block from
the EDIT menu and the block of text you defined will be pasted to the new location.
Clear Block
To erase a block of text, first define the block of text and select Clear Block from
the EDIT menu to clear the block. The defined block will be permanently cleared
from the document.
FORMAT OPTIONS
There are four options in the FORMAT menu. They are: Justify Left, Justify Right, Justify
Center, and Bold.
Justify Left
By default, the text is aligned left with the margin, Justify Left.
Justify Right
To align your text to the right margin, choose Justify Right.
Justify Center
To align your text so it is centered within your document, choose Justify Center.
Important note:
You will not be able to view the format you selected on the screen. It will be reflected
in the printed document. This is due to the differences between the screen size
and the printed document.
Bold
There are two types of fonts, bold font and normal font. If you want to bold a word,
place the cursor on any letter of the word, and then select Bold from the FORMAT
menu. The entire word will be bolded. You may also use your mouse. Click and
drag on the word you want bolded to highlight it. Then select Bold from the FORMAT
menu. Your word will be bolded. The Bold command also applies to a block of text.
After you have defined a block of text, select Bold from the FORMAT menu. The
entire block of text will be bolded.
23
TOOLS OPTIONS
The TOOLS menu provides two functions: Check Spelling and Symbols.
Check Spelling
Spell checker checks a word to see if it is in the unit's dictionary. To check the
spelling of a word, highlight a word using your mouse. Then choose Tools Options
and select Check Spelling. Press the Enter key. If the word does not exist in the
unit’s dictionary, it will give you a list of possible words for reference.
Also, you may spell check an entire document. Select Check Spelling from the TOOLS
menu. The entire document will be checked word by word. When there is a word
that is not found in the dictionary, several options will be provided: Ignore Word,
Edit Word, or Suggestions.
Ignore Word
If you think the word is spelled correctly, select Ignore Word and press the Enter
key. The Spell Checker will skip this word and continue checking the remaining text.
Edit Word
If you know the correct spelling of the misspelled word, select Edit Word and press
the Enter key. Type in the correct spelling of the word and press Enter. The Spell
Checker will change the word within your document automatically.
Suggestions
If you don’t know the correct spelling of a word, and you would like the unit to provide
you suggestions, select Suggestions and press the Enter key. A list of similar words
will appear on the screen. You may scroll from a list of possible suggestions, and
then press the Enter key to select a choice. There may be instances where the
unit does not have any suggestions. The unit will then say “No Suggestions.”
Symbols
Symbols gives you a list of useful characters to use in your documents. Press the
Symbol key located on your keyboard or select Symbols from the TOOLS menu. A
window will appear showing all of the different symbols you can choose from. Press
the scrolling arrows on the screen or the arrow keys on your keyboard to locate
a symbol. Press the Enter key to select it. The symbol window will close automatically
and the symbol you have chosen will appear in your document. Press the Esc key
to close the window if you do not choose a symbol. Remember you can also select
additional symbols located on the number keys.
PRINT OPTIONS
To view the printing options, press the Help key and you will see the Word Processor menu.
Select Print Options. There are three features in this menu: Printer Setup, Print and Print
Preview.
24
Printer Setup
Printer Setup allows you to select a printer. This can also be done through System
Setup. Please see Chapter 6 for details.
Print
In order to use the print feature, you must connect it to one of the printers compatible
to the PRECOMPUTER POWER PAD™ PLUS. Please see the list of printers listed
in Chapter 6 under Printer Setup.
When this option is selected, the unit will ask you whether to print the text in Single
or Double Line Spacing. Select one as you like. The unit will then ask if you are
ready to print. Select yes or no. The current text will be printed if you selected
yes. Make sure the printer cable is correctly connected, and the correct printer is
selected in Printer Setup. Please note that 60 characters take up 3 lines of text
on the LCD Viewing Screen, but translate to one line of text on an 8 1/2 X 11 sheet
of paper when printed. (See Examples)
On screen:
Printed on paper:
What kinds of graphics are you referring to?
Am I going to
recei
Print Preview
If you have purchased our VTECH POWER LINK™(sold separately), you can use
the PC monitor to view your text before it is printed. Make sure the VTECH POWER
LINK™ is correctly connected, then select Print Preview from the PRINT menu. The
text will be displayed on your PC screen. Use the Up/Down arrows to scroll through
the text, and press the Esc key when you have finished viewing the file.
HELP
Several pieces of Help Text will be shown when this option is selected. These helpful
hints will provide you with additional information to guide you through play.
EXIT
Selecting this option will bring you back to the main menu.
25
CHAPTER 6: SYSTEM SETUP
To enter System Setup, click on the System Setup icon located at the bottom right-hand
corner of the screen. The System Setup menu will appear with the following options: Printer
Setup, Tips of Today, Screen Saver, Clear Last Score, Icon Box, Quick Menu Setup,
Customize Setup, Demo Mode, Ram Cart. Manager and Power Link.
PRINTER SETUP
Due to the extensive varieties of printers, not all compatible printers are listed. Please
check with your printer manufacturer for information on reconfiguring your printer.
There are a number of printers which PRECOMPUTER POWER PAD™ PLUS is compatible
with. Printer Setup allows you to select a printer to print your documents. PRECOMPUTER
POWER PAD™ PLUS supports the following printers:
VTECH Thermal VT-25
EPSON LQ-X70
EPSON 24 Pin
EPSON 9 Pin
EPSON Stylus
EPSON Stylus Color II
Canon BJC 4100
Canon BJ 200
Canon BJ 30
Canon BJ 300/330
HP Laser IV L
HP DESKJET
Before selecting a printer, make sure the printer is correctly connected to the PRECOMPUTER
POWER PAD™ PLUS learning unit. After setting up the printer, you can print a document
from the Word Processor activity or print any screen. When you want to print a screen,
press the Print Screen key on the Membrane Activity Selector.
If no printer is selected, you will be unable to choose a printer using this feature.
Note:
In Printer Setup, Epson® Stylus Color II is displayed as Epson® Stylus Color.
TIPS OF TODAY
The Tips of Today will provide an interesting fact every time the PRECOMPUTER POWER
PAD™ PLUS unit is turned on. You may turn the Tips of Today ON or OFF, by pressing
the Enter key or selecting it with your mouse.
26
SCREEN SAVER
The unit features a screen saver option. The screen saver will appear after two minutes
with no input. You can turn this feature ON or OFF by pressing the Enter key or selecting
it with your mouse.
CLEAR LAST SCORE
The PRECOMPUTER POWER PAD™ PLUS learning unit will store all players’ last scores
in memory. This will allow you to check future scores to measure your progress.
Select the Clear Last Score option. Last scores cleared will appear on the screen. Select
OK to clear the last scores stored in the PRECOMPUTER POWER PAD™ PLUS learning
unit.
ICON BOX
You may turn the Icon Box ON or OFF by pressing the Enter key or selecting it with your
mouse. When the Icon Box is turned ON, the unit will specify each icon when you place
the mouse cursor over an icon for 1 second.
QUICK MENU SETUP
Quick Menu is a useful tool for advanced users. You can select three activities to put
into Quick Menu. This allows you to quickly access your favorite three activities directly
from the Main Menu instead of selecting from a list of activities.
Go to System Setup. Select Quick Menu Setup and press the Enter key. Check
to be sure the Quick Menu feature is “ON”. You can turn this feature ON/OFF by
pressing the Enter key or selecting it with your mouse.
Select First Icon using your mouse or the Up/Down arrow keys and pressing the
Enter key. The unit will display all the activities to choose from. Scroll through the
list and select your first activity. Press the Enter key. The unit will then return to
the Quick Menu Setup screen.
Select Second Icon and repeat this process.
Select Third Icon and repeat this process.
Return to the Main Menu. There you will see the three icons you selected at the
bottom of your screen.
You can enter the activities you chose immediately when you select these icons.
CUSTOMIZE SETUP
In Customize Setup, you can customize your opening screen, opening sound effect and
closing sound effect.
27
Customize Screen
The Customized Screen is the screen shown after the opening animation. You may
personalize the screen by entering your name and your message. This information
will be displayed each time you turn on the PRECOMPUTER POWER PAD™ PLUS
learning unit. Also, we have provided three different default messages for you to
choose from. To customize your screen, select Customize Screen and press the
Enter key. A Customize Screen menu will appear.
To enter your name, select Enter Name and click on the left mouse button or press
the Enter key. Then type in your name and press the Enter key.
To enter your personal message, select Enter Message and click on the left mouse
button or press the Enter key.
If you want to choose a default message, select Default Messages and click on the
left mouse button or press the Enter key. Choose from: VTech - Precomputer Power
Pad (TM) Plus COPYRIGHT (C); Proverb 1 - “Triumph” is try added to umph.; Proverb
2 - Reach for your potential and your potential will reach for you.
After you have typed in your personal message, or selected a default message, you
may preview it. Select Preview Screen and click on the left mouse button or press
the Enter key. The message you input will appear on the screen. To see your
customized screen, turn the unit off and then back on. Your customized screen will
appear.
Opening Sound
There are three different sound effects that you can choose from for the opening
sound. Select Opening Sounds and press the Enter key. Then choose either Opening
Sound 1, Opening Sound 2 or Opening Sound 3 and press the Enter key or click
on your left mouse button.
Closing Sound
There are also three different sound effects that you can choose from for the closing
sound. Select Closing Sounds and press the Enter key. Then choose either Closing
Sound 1, Closing Sound 2 or Closing Sound 3 and press the Enter key or click
on your left mouse button.
DEMO MODE
In System Setup, select Demo Mode and press the Enter key. The unit will show several
activities from all categories (Word Games, Mathematics, Computer Skills, Games and Trivia)
automatically. This process will repeat until you press any key or move the mouse.
RAM CART. MANAGER
The RAM Cart. Manager can be accessed through System Setup. The RAM Cart. Manager
is functional only when utilizing a RAM cartridge. RAM cartridges are sold separately. Insert
the cartridge into the PRECOMPUTER POWER PAD™ PLUS unit, located on the left side.
The RAM Cart. Manager has the following functions: List Files, Save File, Load File, Rename
File, Delete File and Format Cartridge.
28
List Files
When this function is selected, the files stored in the RAM cartridge are listed on
the screen.
Save File
When this function is selected, you will be asked to choose whether to save a BASIC
program or a Word Processor file. After you have made your selection, provide a
filename for your file. This process allows the BASIC program or Word Processor
file to be saved into the RAM cartridge.
Load File
When this function is selected, the files stored in the RAM cartridge are listed on
the screen. You can select one of the files and load the file into the main unit.
If it is a Word Processing file, the unit will take you to the Word Processor activity.
If it is a BASIC file, the unit will bring you to the BASIC activity. To view the BASIC
program, type LIST and press the Enter key. Continue pressing the Enter key to view
each line.
Rename File
When this function is selected, the files stored in the RAM cartridge are listed on
the screen. You can select one of the files and provide a new filename for the selected
file. The file will be renamed.
Delete File
When this function is selected, the files stored in the RAM cartridge are listed on
the screen. You can select one of the files. When you confirm that you want to
delete the file, the file is removed from the RAM cartridge.
Format Cartridge
When this function is selected, all files stored in your RAM cartridge will be cleared.
After you select Format Cartridge, the unit will prompt you to confirm you would like
your files cleared. If you select Yes, all data on the RAM cartridge will be cleared.
POWER LINK
If you have purchased our VTECH POWER LINK™, you can connect the PRECOMPUTER
POWER PAD™ PLUS unit to a Personal Computer. Please see Chapter 11 for details.
29
CHAPTER 7: BASIC
INTRODUCTION
WHAT IS BASIC?
BASIC is a computer language. The name BASIC stands for Beginner’s All-purpose
Symbolic Instruction Code. It was developed by professors at Dartmouth College
in the mid-1960s. It was designed for students who had no previous experience
in programming computers.
BASIC is a basic language; however there are differences in the language based
on the computer that uses it in much the same way that English is different depending
on which country it is spoken in (Great Britain or the United States) or which part
of the country the language is spoken in (East Coast, Midwest, South or the West
Coast).
The differences in the language will depend on the computer that is being used and
on the computer that produced the language for the computer manufacturer. Microsoft
BASIC is found on Apple II+, IBM PC and PC jr., Laser Computers, Commodore
VIC20 and Commodore 64 and others. Other computers such as the Timex Sinclair
ZX80 and the Texas Instruments 99/4 use versions of BASIC similar to MS-BASIC.
WHAT IS A PROGRAM?
A computer program is a series of instructions that tells a computer what tasks you
want it to perform. Computer programs are written in a programming language. BASIC
is one of the languages that both a human and a computer understand and so BASIC
can be used to write a program that a computer can carry out for you.
WHY SHOULD I LEARN TO USE A COMPUTER?
Computers can
to be done, by
done to do the
do this requires
to get started.
do many things if they are given instructions. For a particular job
a person or a machine, we must specify the steps which must be
job. The computer becomes an extension of our capabilities. To
us to learn how to talk to our computer. This chapter will help you
WHAT IS THIS CHAPTER FOR?
This chapter is a step-by-step guide for understanding programs and learning to use
the computer language called BASIC.
WHO IS THIS CHAPTER FOR?
This guide is written for students and adults who have little or no computer experience.
With a little time and effort you will discover that there is nothing difficult about learning
to talk to a computer.
WHAT IF I MAKE A MISTAKE?
Don’t worry about making a mistake, this program allows you to experiment. The
more you experiment, the more you will learn.
30
THE KEYBOARD
1.
The numeric (top row) keys are used for entering numbers. The letter keys are
used for entering letters.
2.
The cursor is the blinking symbol “_” on the display that indicates where the
next character that is pressed on the keyboard will be entered in the computer.
3.
The SHIFT key is used with another key to enter a character into the computer.
For example to enter the “+” character, you must press SHIFT and the key marked
“+ =”. If you just press the “+ =” key then the “=” character will be entered.
4.
The Left Arrow key and the Right Arrow key are used to position the cursor left
or right, respectively. They do not erase any character that is displayed, but
you can type over anything in their positions.
5.
To enter a space, simply press the SPACE bar. Each time you press the SPACE
bar, one space is inserted on the display line.
6.
The INS and DEL keys are used to insert or delete one character at a time
on the display where the cursor is positioned.
When the INS key is pressed once, it will be in the insert mode. All characters
to the right of the cursor position will be shifted one character to the right to
make room for the new character once it is input through the keyboard. Pressing
the INS key again will go to the overwrite mode.
The DEL key is used to delete one character at a time on the display where
the cursor is positioned. The DEL key will shift all characters on the display
one position to the left, thereby erasing the character under the cursor.
7.
Before anything on the display is actually sent, you must press the ENTER key.
This key acts much like a Return key on a typewriter. You press all the keys
that comprise a statement to the PRECOMPUTER POWER PAD™ PLUS learning
unit and then press ENTER. PRECOMPUTER POWER PAD™ PLUS will process
your command and the information.
8.
Every time BASIC is selected, it is in the overwrite mode. That is, the character
you type will appear on the screen whether there is a character at the cursor
position or not.
9.
The “^” character on the ^ 6 key (which is used only in the BASIC program)
is used to tell the computer you want to raise the number preceding it to a power
of the number following it.
10. The BREAK key is used to do the following. When you are typing a line, but
before you press ENTER, it will erase all that you have typed; or, if you are
running a BASIC program, you can interrupt it by pressing this key. You can
restart a program by typing CONT and pressing the ENTER key.
When using the INPUT command, PRECOMPUTER POWER PAD™ PLUS will
ask you to supply it with some data from the keyboard. PRECOMPUTER POWER
PAD™ PLUS tells you it needs input with a prompt. The prompt is the “?” symbol
and it appears on the display indicating that the computer is waiting for you to
type something. The letters and numbers that you press will appear on the LCD
screen.
31
THE LCD SCREEN
The PRECOMPUTER POWER PAD™ PLUS learning unit uses a Liquid Crystal
Display (LCD) screen. Each line will display 20 characters at a time. The Left Arrow
key and Right Arrow key are used to scroll the 20 character display window left or
right, respectively.
In BASIC, pressing the ENTER key allows you to see the next printed statement
that your program is displaying. You need to do this so the output doesn’t scroll
off the end of the line.
GETTING STARTED
This activity lets you type in your own programs and run them. Follow these simple steps:
1) Turn on PRECOMPUTER POWER PAD™ PLUS.
2) Choose the BASIC activity from the Membrane Activity Selector.
There are two modes available; Command and Run.
Type in this program:
10
PRINT “HI THERE”
press ENTER
This is a simple way of writing a program. Type in the program lines and remember to
press the ENTER key. Each line starts with a number and is followed by a statement.
PRECOMPUTER POWER PAD™ PLUS stores the line with the other lines into memory.
Later you can execute the program by typing the command, RUN. Remember to press
the ENTER key after typing RUN. The results appearing on the LCD screen are: HI THERE.
There is a short cut.
Enter the following (no line number in front):
PRINT “HI THERE”
press ENTER
This time PRINT was used as a command and the results appeared immediately on the
display after the ENTER key was pressed. The computer executes the command right
away, without waiting for you to type RUN. When you do this, the statements are not
saved for future re-use. They are executed immediately and discarded. This is not
recommended for creating programs but highly recommended for use as a calculator.
The following are some additional commands to be used:
NEW
This command clears the memory of any BASIC statements that have been previously
entered.
LIST
This command displays each line of your program starting with the lowest line number.
Each time you press ENTER, the next lines are displayed. You can stop this by pressing
the SHIFT and BREAK keys. If you enter the command with a line number after the word,
i.e., LIST 50, PRECOMPUTER POWER PAD™ PLUS will list the statement at line 50.
32
RUN
This command instructs PRECOMPUTER POWER PAD™ PLUS to begin executing each
BASIC statement with a line number that was typed into memory. The computer will start
with the lowest line number and proceed up to the highest numbered statement.
EDIT
Use the EDIT command when you want to change a statement that has been typed into
memory without re-typing the entire line. Type EDIT and the line number and press the
ENTER key. The statement will appear on the display. Use the LEFT-ARROW and RIGHTARROW keys to move the cursor. Use the DEL key to remove an unwanted character,
or type in a new character.
You can type in line-numbered BASIC statements in any order. The PRECOMPUTER
POWER PAD™ PLUS will sort them out for you and LIST them or RUN starting with the
lowest numbered statement to the highest numbered statement. It is a good idea to number
your lines in increments of 10 (10, 20, 30...) or 100 (100, 200, 300...). This way you will
have room to add more statements if you decide to change your program in the future.
You
line
line
the
can insert an entirely new line in a program between two existing ones by using a
number that doesn’t exist. To delete an existing line-numbered statement, type the
number and press the ENTER key. You can also change an existing line by re-typing
entire line.
AUTO
When you want to type in a program, type in the line number before the statement. With
the AUTO function, the line number will generate automatically.
e.g. AUTO
generate the line no.
increments of 10
starting from 10 with
AUTO 100
generate the line no.
increments of 10
starting from 100 with
AUTO 100, 5
generate the line no.
increments of 5
starting from 100 with
i.e.
100
105
“
“
To end the AUTO mode, press ENTER without input or press the SHIFT key and the BREAK
key at the same time.
CONT
This command causes the program to resume executing after encountering the BASIC
command called STOP. The program will be carried on with the next statement after STOP.
Type CONT to resume the program after you press the SHIFT and BREAK keys.
33
BASIC COMPUTER TUTORIAL
EXAMPLE OF A BASIC PROGRAM
You and Teresa went to the local video store to rent some movies. Teresa brought back
12 but 4 were too scary for you so you returned them. On that trip you came home with
7 new movies. How many are you going to watch this afternoon? You could work this
out yourself, but here is a BASIC program that can do the arithmetic for you.
Type in:
10
PRINT 12-4+7
press ENTER
20
END
press ENTER
Now type RUN and press ENTER. What happens? The answer, 15, appears on the screen.
In BASIC, you write a series of line-numbered statements that tell the PRECOMPUTER
POWER PAD™ PLUS what to do. The first statement, numbered 10, tells the computer
to work out the sum of three numbers and then PRINT the answer on the screen. The
next statement, number 20, tells the computer that this is the end of the program and that
it can stop RUNNING. However, the last statement is not necessary in this program because
you only want to print out the sum of 3 numbers, therefore, it could be removed.
Remove that last line by typing 20 and press ENTER. Now type RUN and press ENTER. What
happens? You get the same results.
Suppose you typed:
10
PRONG 12-4+7
press ENTER
Now type RUN and press ENTER. What happens? You get a strange message, “? SYNTAX
ERROR IN 10” in the display. That means you made a mistake in BASIC grammar and
this is the PRECOMPUTER POWER PAD™ PLUS unit’s way of telling you this. You need
to EDIT the line or re-type it, changing “PRONG” to “PRINT” and then RUN the program
again to get the correct answer.
You can use PRECOMPUTER POWER PAD™ PLUS as a calculator in arithmetic statements
like the one above by not using a line number.
Just type:
PRINT 12-4+7
press ENTER
The answer will appear on the screen.
Another short cut is that you could use the “?” symbol to stand for the word “PRINT.” When
you are using BASIC as a calculator in “command mode”, think of the question mark as
meaning “What is 12-4+7?” When you are using the question mark as a “PRINT” command
in a program, the computer will replace the “?” with the word “PRINT” for you.
34
LET’S DO SOME ARITHMETIC
In the previous section you learned to program the sum of three numbers using the BASIC
program. Numbers like 1, 3, 27, 14.3, etc., are called CONSTANTS, numbers that do not
change value. The program added and subtracted the constants 12, 4 and 7. The order
that you do addition is unimportant: 6+10 is the same as 10+6. In subtraction, the order
is important: 10-6 is not the same as 6-10. So the order that you write numbers and
do arithmetic operations is very important. In BASIC, operations are from left to right.
The * symbol is used to represent multiplication. Like addition, the order of the numbers is
unimportant. Here’s an example. There are 2.204 pounds to a kilogram. How many pounds
does a 6 kilogram parakeet weigh?
Type this:
10
PRINT 6*2.204
press ENTER
RUN
The symbol / is used for division. Here, like in subtraction, the order of the numbers is
important since 15/3 is 5 and 3/15 is .2. How many kilograms does a 6 pound parakeet
weigh?
Type this:
10
PRINT 6/2.204
press ENTER
RUN
You can also raise a number to a power. To do this you need the ^ sign. The expression
5^3 means 5*5*5 or 125; similarly, 3^5 means 3*3*3*3*3 or 243. There are fractional powers;
for example 2^.5 is the square root of 2 or 1.414.... Here’s an example: I bet you 1 dollar
and throw the dice 10 times; each time you double your money. How much have you
won?
Type this:
10
PRINT 2^10
press ENTER
RUN
When you use all the operations together, it can get a bit complicated. After a winning
baseball game, your 7 person team is awarded 3 cans of pop for the game plus another
11 cans because you finished first in the league. How many cans does each player get?
35
Type this:
10
PRINT 3+11/7
press ENTER
RUN
Is it really evaluated from left to right? Yes, but was it the answer you were expecting?
If the answer came out to 4.57143, the computer first divided 11 by 7 getting 1.57143 and
then it added 3 to the result giving 4.57143. You probably were expecting the answer
to be 2 because 3+11 is 14, then divided by 7 is 2.
You can see that expressions are not simply evaluated from left to right. It is necessary
to have an exact set of rules to follow.
Here they are:
Functions
Order in which they are performed
( )
things in parentheses
(1st)
^
raising to a power
(2nd)
* /
multiplication and division
(3rd)
+ -
addition and subtraction
(4th)
The computer will always look at an expression in parentheses first and follows those
commands. It could be an expression or more sets of brackets. Among the expression,
raising to a power is calculated first, followed by multiplication and division from left to right,
followed by addition and subtraction from left to right. If you’re not sure how the computer
will evaluate the expression, simply put brackets around the expression you want computed
first. Remember the brackets must always be in pairs, one right bracket for each left one.
If you don’t use both brackets, you will receive a “? SYNTAX ERROR” message.
NUMERIC VARIABLES
You have seen how you can use BASIC to print numbers and messages. You can also
give values to a BASIC program yourself. The computer uses a letter to stand for a value.
This is called a variable. For example LET D = 609. This statement puts the value 609
into a memory box called “D.”
Try this.
10
Type:
LET A=8
press ENTER
36
The computer creates a box in memory and calls it “A”. It puts the number 8 in this box.
Now type:
20
LET B=10
press ENTER
The computer creates a box called “B” and places 10 into it.
Type:
30 LET B=15
press ENTER
Since there is a box called “B” already with a value of 10 in it, it doesn’t make another
box called “B” with a value of 15 in it. The number 10 is just replaced with the number
15.
Now type:
40
LET C=A+B
press ENTER
This statement is a bit more complicated. Here’s how it works. First, the computer searches
for a memory box called “B” and finds the number 15. The “+” sign tells the computer
to add the numbers found in “A” and “B” together. It computes this and the answer is
23. Now, where is the answer placed? The “=” tells the computer to store the answer
in a memory box called “C”. The computer searches for a box called “C”. It doesn’t find
one so it creates one in memory and then puts the answer there.
Of course, if there was a memory variable called “C” that had a number in it from a previous
operation, the old number would be replaced by the new one in this statement.
Now let’s finish this by typing:
50
PRINT “FIRST NUMBER”; A
press ENTER
60
PRINT “SECOND NUMBER”; B
press ENTER
70
PRINT “THE SUM IS”; C
press ENTER
RUN
37
You will see the following on the screen:
FIRST NUMBER 8
press ENTER
SECOND NUMBER 15
press ENTER
THE SUM IS 23
Let’s take a look at the print statements on lines 50 through 70. The words in quotes
are called a STRING or a LITERAL. Whatever you put between a set of quotation marks
will appear on the screen exactly the way you typed it. Remember that quotation marks
come in pairs!
Next, the semicolon tells the print statement to print what is immediately to the right of
the end of the string. This is the number 8, which is the value in memory box A.
Suppose that you asked the computer to multiply 3 million times 3 million.
Let’s try.
Type:
10
PRINT 3000000*3000000
press ENTER
RUN
The answer on the screen is 9E+12. This is the computer’s way of showing extremely
large numbers. A number with the letter E and a number to the right of the decimal point
is called scientific or exponential notation. You find the decimal point and move the number
of places specified after the “E” to the right filling in with zeros. The long way to write
out the above answer is 9,000,000,000,000. The procedure works in reverse for very small
numbers. The number 9E-12 is .000000000009. This is a very small positive number.
The number -9E+12 is a very large negative number while the number -9E-12 is a very
small negative number.
STRING VARIABLES
String variables are similar to the numeric variables that we have been working with so far
except that the variables contain alphabetic characters (numbers, letters and symbols). The
name of the memory variable always contains a $ to distinguish it as a string variable. String
variables are not used in arithmetic but allow you to store things like your pet’s name. Here
are some examples:
38
VARIABLE NAMES
CONTENTS
A
675
B
2.3434
C$
CURTIS
A$
ALPHABET SOUP
Here’s an example of storing a string variable:
10
LET A$=“ALPHABET SOUP NO 123”
You can have a numeric variable called A and a string variable called A$. The $ lets
BASIC know how to tell them apart.
NOTE: For both numeric and string variables, only the first 2 characters of the variable
names are valid. Also, they cannot resemble the name of any command.
Examples: TOTAL is interpreted as the TO command and POTATO is interpreted as variable
PO.
CONSTANTS
A constant is something that doesn’t change. The computer stores it in memory just like
a variable. However, since a constant doesn’t change it has no variable name. The number
6 is a constant; so is 4.567 or 28967.35. “QUICK BROWN FOX” is a string constant.
You can store constants to a variable. That’s usually done to start out a program; later
the contents of the variables change. Suppose we want to count to 10.
Type in this program:
New
press ENTER
10
N=0
press ENTER
20
N=N+1
press ENTER
30
PRINT N
press ENTER
40
IF N<10 THEN 20
press ENTER
39
50
PRINT “THE ANSWER IS”; N press ENTER
RUN
The statement at line 10 stores the numeric constant zero into N, a numeric variable. In
statement 20 the variable will have a numeric constant,1, added to itself and then the sum
of that operation will be stored in place of the value previously stored there.
The program in the above example contains a programming construction called a loop.
A loop is one or more BASIC statements, usually called a set, that can be executed as
many times as you want. The statement in line 40 contains an IF statement. It is called
a conditional statement and will be discussed in detail under the topic called Making
Decisions.
INPUTTING DATA
We have been putting information into the computer by typing constants into programs using
statements like the following:
10
LET N=10
press ENTER
20
LET A$=“NANCY LIKES CHOCOLATE CUPCAKES”
Another way to supply data is by using an INPUT statement.
Try this out by typing:
NEW
10
INPUT “GIVE ME A NUMBER”; N
press ENTER
20
PRINT “YOUR NUMBER IS”; N
press ENTER
RUN
The unit will prompt you to input a number with the character. Type any number of digits
that you like and press ENTER.
You can also input alphabetic data into string variables like this program:
10
INPUT “WHAT IS YOUR NAME”; N$
20
PRINT “HI THERE”; N$
40
press ENTER
You can use as many input statements as you need to get all the values into your program.
Try this:
NEW
10
INPUT “GIVE ME A NUMBER”; N1
press ENTER
20
INPUT “AND ANOTHER”; N2
press ENTER
30
PRINT “I WILL ADD THEM”
press ENTER
40
C=N1+N2
press ENTER
50
PRINT “THE ANSWER IS”; C
press ENTER
Type RUN and press ENTER to see what happens.
MAKING DECISIONS
The IF statement tells the computer that it has to make a decision. It does this by comparing
two numbers, or arithmetic expressions or string variables. It uses special symbols to represent
a condition.
The symbol > means greater than.
The symbol < means less than.
The symbol = means equal to.
The symbol > = means greater than or equal to.
The symbol < = means less than or equal to.
Here are some conditions:
5 < 10
20 > 10
They are both true because
5 is less than 10
20 is greater than 10
The IF statement has a condition either TRUE or FALSE. The computer evaluates the
condition and decides that if a condition is TRUE it will do something for the TRUE condition.
Take the following:
IF A > 90 THEN PRINT “YOU ARE SMART”
41
The A > 90 is a condition. The print “YOU ARE SMART” is the command given for the
true condition. In the above example, let’s give A the value 80. Would the message be
printed? No, it would not be printed because the condition is false (80 is less than 90).
Let’s try a program to compute the area of a rectangle.
Type:
NEW
10
INPUT “ENTER THE LENGTH”;L press ENTER
20
INPUT “ENTER WIDTH”;W
press ENTER
30
LET A=L*W
press ENTER
40
PRINT “THE AREA IS”;A
press ENTER
50
INPUT “ANOTHER? (Y/N)”;R$
press ENTER
60
IF R$=“Y” THEN 10
press ENTER
70
PRINT “THAT’S ALL FOLKS!”
press ENTER
80
END
RUN
This program uses the INPUT statement to get values for numeric variables and prints
a computed result. It then prompts for a string variable and makes the decision to begin
again if the value typed in is a Y.
Here’s another one.
Type:
NEW
10
INPUT “GIVE ME A NUMBER”;A
20
INPUT “AND ANOTHER”;B
30
PRINT “ADD, SUBTRACT, MULTIPLY OR DIVIDE”
40
PRINT “TYPE IN THE FIRST LETTER OF THE”
42
50
PRINT “ARITHMETIC OPERATION YOU WANT”
60
PRINT “ME TO DO FOR YOU”
70
INPUT R$
100 IF R$=“A” THEN C=A+B : GOTO 200
110 IF R$=“S” THEN C=A-B : GOTO 200
120 IF R$=“M” THEN C=A*B : GOTO 200
130 IF R$=“D” THEN C=A/B : GOTO 200
140 PRINT “YOU MADE A MISTAKE”
150 PRINT “TRY AGAIN”
160 GOTO 30
200 PRINT “THE ANSWER IS ”;C
300 END
This is a long program but it has a lot of new information that is worthwhile to know. Line
70 contains an INPUT statement without the prompt string. Lines 100 through 130 contain
two statements for the command when the condition is true. One is a LET statement
without the word LET (C=A+B) and the other is a GOTO statement. Both of the statements
are separated from each other by the colon ( : symbol). The GOTO statement tells the
computer the number of the next statement to do. Line 140 is an error trap. It tells you
that you have not followed instructions.
You can experiment some more with this program and put in a decision to start the program
all over again.
If you change line 300 to be GOTO 10, the program runs continually. You can stop it
by pressing the SHIFT and BREAK keys and resume it by typing in CONT and press
ENTER.
43
LOOPING
A loop is a set of one or more instructions. These instructions can be repeated as many
times as you want. You can create a loop with a GOTO statement.
A program like the following will run continually:
10
INPUT “GIVE ME A NUMBER”;N
20
PRINT “YOUR NUMBER IS”;N
30
GOTO 10
RUN
You can modify the program to get out of a loop by using an IF statement to control the
loop like the program that calculates the area of a rectangle.
Another way to create a loop is through the use of the FOR and NEXT statements. These
statements surround the instructions that you want to repeat.
For example, type the following:
NEW
10
FOR N=1 TO 10
press ENTER
20
PRINT “HELLO”
press ENTER
30
NEXT N
press ENTER
RUN
The word “HELLO” appears 10 times on the screen. You can change line 20 to print
the value of N every time the loop repeats.
Type:
20
PRINT “N IS”;N
press ENTER
44
We could always rewrite the program like this:
10
N=1
20
PRINT “N IS”;N
30
N=N+1
40
IF N > 10 THEN END
50
GOTO 20
We can also count by 2’s.
Let’s bring back the previous program and change line 10.
The entire program looks like this:
NEW
10
FOR N=1 TO 10 STEP 2
press ENTER
20
PRINT “N IS”;N
press ENTER
30
NEXT N
press ENTER
The STEP 2 part changes the meaning hidden in the NEXT N statement to be N = N
+ 2 or any other number that gets put in the STEP part.
We can even count backwards.
Try this:
NEW
10
FOR N=10 TO 1 STEP -1
20
PRINT N
30
NEXT N
40
PRINT “BLAST OFF”
RUN
45
MORE ABOUT GROUPS - GOSUB ...
RETURN
How much is 10 degrees Celsius in Fahrenheit? What is 100 degrees Fahrenheit in Celsius?
Here’s a program that gives you the answers. It uses the GOSUB and RETURN statements
to create a group of instructions that can be executed from various parts of the program.
Remember when you use a GOSUB, the program branches to the line number that you
specify in the statements that will be executed sequentially until a RETURN statement is
encountered. At that point the program will resume at the next statement following the
GOSUB. Confusing? Not really, but first some more background about our problem.
The formula for converting Celsius to Fahrenheit is:
F=(9/5*C)+32
The formula for converting Fahrenheit to Celsius is:
C=(F-32)*5/9
Now for the program!
Type:
New
10
INPUT “ENTER THE CELSIUS TEMP”;C
20
GOSUB 500
30
INPUT “ENTER THE FAHRENHEIT TEMP”;F
40
GOSUB 600
50
END
500 F=(C*9/5)+32
510 PRINT “THE FAHRENHEIT TEMP IS”;F
520 RETURN
600 C=(F-32)*5/9
610 PRINT “THE CELSIUS TEMP IS”;C
630 RETURN
RUN
46
REFERENCE SECTION
The REFERENCE SECTION contains a brief explanation of all the commands and
statements you will use in this chapter. Refer to this when you need help.
CLEAR
The CLEAR statement is used to assign more memory space for the string variables.
Example:
10
Clear 100
This command will assign 100 bytes of memory for strings. If the CLEAR command is
not used, the computer will assume the number of bytes of memory for strings to be 50.
The use of the CLEAR command only will reserve the same number of bytes as the default
value. However, if a value follows the CLEAR command, the computer will assign the
number of bytes of that value. If you want to use more strings in your program, set this
number to a larger one but, at the same time, you will have less space for your program.
CONT
Also see STOP
This command causes the program to resume executing after encountering the BASIC
command called STOP. The program will carry on with the next statement after STOP.
You can type CONT to resume the program after you hit the SHIFT and BREAK keys.
DIM
Line # DIM array-name (array-size).
The DIM command reserves space for one dimensional numeric or string arrays. The arrayname may be up to 6 characters long but only the first 2 characters are valid. For a
string array the last character must be a $. The array can contain up to 100 elements
(0-99).
Example:
10
DIM FRIEND$(50)
10
DIM PRICE(19)
47
EDIT
Use the EDIT command when you want to change a statement that has been typed into
memory without re-typing the entire line. Just type EDIT and the line number and press
the ENTER key. The statement will appear on the display. Use the LEFT-ARROW and
RIGHT-ARROW keys to move the cursor. Use the DEL key to remove an unwanted
character, or simply type in new characters.
Example:
10
INPUT B
press ENTER
EDIT 10
10
press ENTER
INPUT B_
Then use Left-Arrow key to move the cursor back under“B”.
10
INPUT B
Then type in “C”.
10
INPUT C_
You can type in line-numbered BASIC statements in any order. PRECOMPUTER POWER
PAD™ PLUS will sort them out for you and LIST them or RUN them starting with the
lowest numbered one. It is a good idea to number your lines in increments of 10 (10,
20, 30...) or 100 (100, 200, 300...). This way you have room to add more statements
if you decide to change your program in the future.
You can insert an entirely new line in a program by using a line number that doesn’t exist
between two existing ones. You can delete an existing line-numbered statement by merely
typing the line number and pressing the ENTER key. Of course, you can change an existing
line by merely re-typing the entire line.
END
Line # END
The END statement is used as the last command in a program.
Examples:
160 END
999 END
48
It stops the program.
PSET
This command is used for drawing a specified point on the screen.
PSET X, Y
(X, Y) is a coordinate of the specified point to be shown.
X represents a value of a horizontal position.
Y represents a value of a vertical position.
Example:
10
CLS
20
PSET 100, 8
RUN
The result:
a screen pixel at coordinate (100, 8) will be turned on.
PRESET
This command turns off a specified point on the screen.
PRESET X, Y
(X, Y) is the coordinate of the specified point to be cleared.
X
represents a value of a horizontal position.
Y
represents a value of a vertical position.
Example:
10
CLS
20
FOR X= 50 TO 100
30
PSET X, 8
40
FOR DELAY= 1 TO 70
50
NEXT DELAY
60
PRESET X, 8
70
NEXT X
80
END
49
SOUND
This is a command to generate a sound note.
SOUND consists of two functions: frequency and duration
frequency The frequency of the sound in hertz; a value in the range
0 < frequency parameter < 256
duration
The number of the system clock ticks so the sound lasts; a value in the range
0 < duration parameter < 256
FOR ...
Line#
TO ...
STEP ...
NEXT
FOR variable = initial value TO final value STEP stepsize (optional)
Line#
Line#
Line#
Line#
NEXT variable
The FOR ... NEXT statement repeats a task a set number of times without having to
rewrite it. All statements between the FOR and NEXT command are repeated based on
the initial value, the final value and the stepsize. If the STEP portion of the command
is not used, it is assumed to be 1.
Example:
60
FOR ITEMS=1 TO 20
70
INPUT PRICE
80
SUM=PRICE+SUM
90
NEXT ITEMS
RUN
FUNCTION
A function is a mathematical procedure which when applied to a certain value will give
a new value. We call the value in brackets ( ), the argument, and the new value, the
result.
Example:
SQR is a square root function.
50
Type PRINT SQR (9).
(press ENTER)
The answer is 3.
Example:
Y=9 : X=SQR(Y) : PRINT X
press ENTER
The answer is 3.
In these two examples, 9 is the argument, SQR is the function and 3 is the result.
A LIST OF NUMERIC FUNCTIONS
Function
What it does
ABS
Returns the absolute (positive) Value of X
(X)
SGN (X)
Returns the sign of the argument
X negative returns - 1
X positive returns + 1
X zero returns 0
SQR (X)
Returns the square root of X.
X cannot be negative.
LOG (X)
Gives the natural logarithm of X, i.e.,
the logarithm to the base e (=2.71828).
The value of the argument must be greater than zero.
EXP
(X)
Gives you the value ex, i.e., the natural antilogarithm
of X.
INT
(X)
Gives the greatest integer which is less than or
equal to X.
RND (X)
Gives a random whole number between 1 and X.
If X equals zero, RND (X) returns a random number
between 0 and 1. X cannot be negative.
SIN (X)
COS (X)
TAN (X)
The argument of the trigonometrical functions
is taken to be in radians (1 radian=360/2π = 57.296 degrees).
The range of X is -999 < (X) < 999.
ATN
This gives the result of ARC TANGENT in radians.
(X)
51
ARITHMETIC FUNCTIONS
ABS (X)
This gives the absolute (positive) value of the argument.
So ABS (-7)=7.
Example:
PRINT ABS (7-2*4)
press ENTER
1
SGN (X)
This function will give the value of +1 if X is positive, 0 if X is zero, and -1 if X is negative.
So SGN(4.3)=1; SGN(0)=0; SGN(-276)=-1
Example:
A=6
press ENTER
PRINT SGN (A); SGN (A-A)
press ENTER
1
0
INT (X)
This converts numbers which are not whole into the largest whole number below the
argument. So INT (5.9)=5; also INT (-5.9)=-6. Note that with negative arguments, the
absolute value of the result returned by INT will be greater than that of the number.
Example:
PRINT INT (-6.7)
press ENTER
-7
RND (X)
This will produce a random number between 1 and X if X is a positive number.
52
Example:
PRINT RND (19)
press ENTER
You will get a number between 1 and 19. RND (0) will give you a number between 0
and 1.
Note:
X cannot be negative.
Important Note: From now on, the ENTER key sign will be deleted for simplicity.
Remember to press the ENTER key after each line of entry.
STRING FUNCTIONS
We can also use functions to act on strings.
Take a look at the following:
LEN
This function computes the length of the string argument, which must be in brackets. So
if you type PRINT LEN (“JOHN”) the computer will return the result 4. This is telling
you that there are 4 characters in the string “JOHN”. Blank spaces have the value of
characters. Thus if you put in spaces “J O H N”, it comes out as 7 characters.
STR$
The STR$ function changes a number argument into a string. Take a look at the following
example and see how it works.
Example:
A$=STR$(73)
This is the same as saying A$=“73”.
Here is a sample program.
Type the next example:
10
A$=STR$(7*3)
20
B$=A$+“BIG”
30
PRINT B$
RUN
21BIG
53
VAL
VAL works like STR$ but in reverse. It changes a string argument into a number. Look
at the following short program.
Example:
10
A$=“33”
20
B$=“20”
30
C=VAL(A$+B$)
40
D= VAL (A$) + VAL (B$)
50
PRINT C;D
RUN
3320 53
GRAPHICS FUNCTION
PGET function
Returns the color attribute of a specified pixel.
PGET(X, Y) = n
n
Returns
1
the current coordinates(X, Y) turns the pixel status ON
0
the current coordinates(X, Y) turns the pixel status OFF
SUBSTRINGS
It is also possible to get substrings of strings. A substring is a part of a string. For example:
“ABC” is a substring of “ABCDE”. The following three functions operate on substrings.
LEFT$ (A$,N)
This will return the substring from the left-most of string A$, the first character to the Nth
character.
54
Example:
10
A$=“ABCDE”
20
B$=LEFT$ (A$+“FGH”,6)
30
PRINT B$
RUN
ABCDEF
RIGHT$ (A$,N)
This will return a substring but starting from the Nth character from the end and running
to the last one - the right-most character in the string A$.
Example:
10
A$=“WHY”
20
B$=RIGHT$(A$+“ME”,4)
30
PRINT B$
RUN
HYME
MID$ (A$,M,N)
This function returns a substring of the string A$ starting from the Mth character with a
length of N characters.
Example:
10
A$=“ABCDEFGH”
20
B$=MID$(A$,2,3)
30
PRINT B$
RUN
BCD
55
ASC(A$)
The ASC statement will return the ASCII code, a code for representing alphanumeric
information, for the FIRST character of the specified string. Brackets must enclose the
string specified. Refer to the appendix of THE ASCII CODE TABLE (Page 72). For example,
the ASCII decimal value of “X” is 88. If A$=“XAB”, then ASC (A$)=88.
Example:
10
X=ASC(“ROY”)
20
PRINT X
RUN
82
CHR$ (N)
This statement works the opposite way as the ASC statement. The CHR$ statement will
return the string character which corresponds to the given ASCII code. The argument may
be any number from 32 to 127 or any variable expression with an integer value within
that range. Brackets must be put around the argument.
Example:
30
PRINT CHR$(68)
RUN
D
GOSUB...RETURN
Line#
GOSUB first line number of subroutine.
Line#
Line#
Line#
Line#
first line number of subroutine
Line#
Line#
RETURN
The GOSUB command tells the computer to GOTO another line number. After the process
has been completed, a RETURN statement is used to send the computer back to the line
immediately after the GOSUB. These statements are used to process a series of commands
that are frequently used.
56
Example:
30
GOSUB 120
.
.
other program lines
.
.
120 PRINT “WELCOME TO THE”
130 PRINT “PRECOMPUTER POWER PAD PLUS”
140 RETURN
GOTO
Line #
GOTO line number
The GOTO statement is used to change the normal flow of the program (which is from
the lowest statement number to the highest). A GOTO command transfers control to the
specified line.
Examples:
10
GOTO 130
200 GOTO 65
IF...THEN...ELSE
In general terms, the IF...THEN... statement is used for CONDITIONAL BRANCHING. It
uses the general form “IF (condition) THEN (action clause)”. A condition is made up of
an expression, a relation and another expression.
Any BASIC expression, either numeric or string, may be used, but both expressions must
be the same type.
57
Relations or comparisons used in the IF...THEN statement are the following:
= Equal to
< = Less than or equal to
< > Not equal to
> = Greater than or equal to
< Less than
> Greater than
Examples
IF....THEN
IF....THEN
IF....THEN
IF....THEN
of how you can use conditions:
A=B
GOTO
GOSUB
PRINT
IF....THEN INPUT
Example:
30
IF X >25 THEN 60
If the condition X>25 is true, the computer is told to go to line 60 (Note: the GOTO is
optional after THEN).
If the condition is not true, that is, if X is not greater than 25, then the computer simply
carries on with the normal line number order in the program. Notice that it is not necessary
to use the ELSE part of the command here, as this is optional.
Example:
10 INPUT A,B
20 IF A > B THEN 50
30 IF A < B THEN 60
40 IF A = B THEN 70
50 PRINT A; “IS GREATER THAN”; B:END
60 PRINT A; “IS LESS THAN”; B: END
70 PRINT A; “IS EQUAL TO”;B
80 END
RUN
? 7 (pick a number)
?? 3 (pick a number)
7 IS GREATER THAN 3
58
Example:
40
IF P=6 THEN PRINT “TRUE” ELSE PRINT “FALSE”
In this example, if P=6 the computer will print TRUE. Any other value will print FALSE.
In either case the computer will carry onto the next line.
It is possible for more than one statement to follow the THEN or ELSE command. A colon
separates the statements.
Example:
50
IF A =5 THEN PRINT “TRUE”: S=S-3:
GOTO 90 ELSE PRINT “FALSE”: K=K+8
So if A equals 5 the computer will print TRUE, subtract 3 from the variable S and go to
line 90. If A does not equal 5 the computer will print FALSE, add 8 to the variable K
and then carry on with the next normal line.
LOGICAL OPERATORS
Logical operators are used IF...THEN...ELSE and such statements where a condition is used
to determine subsequent operations within the user program. The logical operators are:
AND, OR, and NOT.
For the purpose of this discussion, A and B are relational expressions having only TRUE
and FALSE. Logical operations are performed after mathematical and relational operations.
Operator
Example
NOT
NOT A
AND
A AND B
Meaning
If A is true, NOT A is false.
A AND B has the value true, only if A and B
are both true.
A AND B has the value false if either A or B
is false.
OR
A OR B
A OR B has the value true if either A or B or
both are true.
It has the value false if both are false.
59
TRUTH TABLES
The following tables are called TRUTH TABLES. They illustrate the results of the previous
logical operations with both A and B given for every possible combination of values.
TRUTH TABLE FOR “NOT” FUNCTION
A
NOT A
T
F
F
T
TRUTH TABLE FOR “AND” FUNCTION
A
B
A AND B
T
T
T
T
F
F
F
T
F
F
F
F
TRUTH TABLE FOR “OR” FUNCTION
A
B
A OR B
T
T
T
T
F
T
F
T
T
F
F
F
60
Note that T = TRUE and F = FALSE.
Example:
10
INPUT A,B,C
20
IF A=B AND B=C THEN PRINT “A=B=C”
30
IF (NOT A=B) OR (NOT B=C) THEN 50
40
END
50
PRINT “A=B=C IS FALSE”
60
END
RUN
? 10
(pick a number)
?? 5
(pick a number)
?? 7
(pick a number)
A=B=C IS FALSE
Moreover AND, OR, and NOT can be used to manipulate numerical values. These operations
are based on binary numbers with 1 and 0 representing TRUE and FALSE respectively.
For example:
NOT 1=-2 [1=binary 00000001 and -2=binary 11111110, so it just changes the 1 to 0 and
0 to 1. In other words, TRUE(1) changed to FALSE(0) and FALSE(0) changed to TRUE(1).]
OR 13=15 [6=binary 00000110 and 13=binary 00001101, so, with reference to the OR truth
table, 6 OR 13 =15=binary 00001111]
AND 13=4 [6=binary 00000110 and 13=binary 00001101, so with reference to the AND truth
table, 6 AND 13=4 binary 00000100]
INPUT
Line #
INPUT “(optional character string)”; variable 1, variable 2,....
INPUT allows the user to type in the value of a variable at the time the program is RUN.
If an optional character string is used, this message will be printed before the question
is asked. The type of data to be INPUT varies according to the type of the variable.
61
Examples:
35
INPUT AMOUNT
140 INPUT “WHAT IS YOUR NAME”;NAME$
LET
Line #
LET variable = variable expression
The variable expression is calculated and the result is stored under the variable. The word
LET is optional.
Examples:
40
LET SUM=A+B+C
25
LET AMOUNT=PRICE-DISCOUNT
LIST
LIST (optional line number)
LIST is used to display the active program. If the optional line number is omitted, the
program will be displayed from the first line-on. If the line is longer than 20 characters,
you must use Right Arrow key to move to the right. To continue the LISTING press the
ENTER key. To discontinue the LISTING press the SHIFT and BREAK keys.
Examples:
LIST
LIST 50
62
NEW
NEW erases all program lines from the active program area.
PRINT
Line #
PRINT expression and/or character string
The PRINT statement is used to produce output on the display panel. The PRINT command
will print one or several items - either expressions or strings. Each item in the list should
be separated by a comma or a semicolon.
Example:
80
PRINT NAME$; “IS COMING”
230 PRINT “SUM=”; A+B+C
READ AND DATA
When it is necessary to enter a lot of information or data into the computer, using the
INPUT statement can be very time consuming. To help out, use the READ and DATA
commands.
Example:
10
DATA 10,60,70,80,90
20
READ A,B,C,D,E
30
PRINT A;B;C;D;E
RUN
10 60 70 80 90
The READ statement consists of a list of variable names with commas between each
variable.
The DATA statement consists of a list of expressions separated by commas. These
expressions can be either numeric or strings. The READ statement makes the computer
look up the value of its variables from the DATA statement. When the computer goes
to READ first it will assign the first expression from the DATA list. The next time it goes
to READ it will assign the second value and so on. If the READ runs out of DATA you
will get “? OUT OF DATA ERROR.”
63
RESTORE
If you want to use the same data later on in the program, you can do so by using the
RESTORE statement.
Example:
10
DATA 1,3,8,9
20
READ A,B,D
30
RESTORE
40
READ X,Y
50
PRINT A;B;D
60
PRINT X;Y
70
END
RUN
1 3 8
1 3
The RESTORE command makes subsequent READ statements get their values from the
start of the first DATA statement.
Example:
10
REM FIND AVERAGE
20
DATA 0.125,3,0.6,7
30
DATA 23,9.3,25.2,8
40
S=0
50
FOR I=1 TO 8
60
READ N
70
S=S+N
80
NEXT
90
A=S/8
100 PRINT A
RUN
9.52813
64
REM
Line # REM text
REM is used to add comments in your program which are ignored when the program is
RUN.
Example:
10
REM**GUESSING GAME**
20
REM TEST OF SORTING
RUN
RUN tells the computer to begin to perform your program beginning with the lowest statement
number.
STOP ...
Line #
CONT
STOP
CONT
The STOP command halts the RUNNING of a program at that line. This is helpful for
debugging. To CONTINUE at the next line after the STOP command, type CONT directly
without a line number.
Example:
800 STOP
APPENDIX
EXAMPLE PROGRAMS
MOONWEIGHT
10
PRINT “Weight on the Moon”
20
INPUT “Your Weight in Lbs.” ; WEIGHT
30
MOONWEIGHT = WEIGHT /6
40
PRINT “Your moon weight would”
50
PRINT “be” ; MOONWEIGHT; “pounds.”
60
PRINT “Wow”
RUN
65
ROCK, PAPER, SCISSORS
10
PRINT “Rock, Paper, Scissors”
20
PRINT “Type in P, R, S”
30
INPUT “and see if you win. ->”; ANSWER$
40
PRINT “You :” ; ANSWER$;
50
MYGUESS = INT (RND (0)*(3) + 1)
60
IF MYGUESS = 1 THEN PRINT “ Me : Rock”
70
IF MYGUESS = 2 THEN PRINT “ Me : Paper”
80
IF MYGUESS = 3 THEN PRINT “ Me : Scissors”
90
INPUT “To play again press Y : ”; AGAIN$
100 IF AGAIN$ = “Y” OR AGAIN$ = “y” THEN 20
110 END
RUN
CANDY KISSES
10
PRINT “How many candy kisses”
20
PRINT “would equal your”
30
PRINT “weight if each kiss”
40
PRINT “weighed one ounce”
50
INPUT “Enter your weight.” ; WEIGHT
60
INPUT “Enter a guess.”;GUESS
70
AMOUNT = WEIGHT *16
80
DIFF = ABS (AMOUNT-GUESS)
90
PRINT AMOUNT; “kisses will”
100 PRINT “equal your weight.”
110 PRINT “You were ”; DIFF; “off.”
120 IF DIFF= 0 THEN PRINT “Wow that was right on!”
130 END
RUN
66
LIFE
10
PRINT “If an average life”
20
PRINT “span is 70 years”
30
PRINT “Then how many”
40
PRINT “generations would have”
50
PRINT “lived in 2000 years?”
60
INPUT “Enter a guess.”;GUESS
70
AMOUNT = INT (2000/70)
80
DIFF = ABS (AMOUNT-GUESS)
90
PRINT “The answer was ” ;AMOUNT
100 PRINT “You were ”; DIFF
110 PRINT “generations off.”
120 END
RUN
THE COOLEST PERSON
10
PRINT “Enter the coolest”
20
INPUT “person you know”;COOL$
30
FOR COUNT = 1 TO 50
40
PRINT COOL$;“ is super cool!”
50
NEXT COUNT
60
END
RUN
67
THE FORTUNE TELLER
10
DIM N$(5)
20
PRINT “The Fortune Teller”
30
INPUT “Are you a boy or a girl” ;S$
40
INPUT “Pick a number between 2-5”; NUMBER
50
FOR COUNT = 1 TO NUMBER
60
IF S$ = “boy” OR S$=“BOY” THEN 70 ELSE 90
70
INPUT “Enter a girl’s name”; N$ (COUNT)
80
NEXT
85
GOTO 110
90
INPUT “Enter a boy’s name”; N$ (COUNT)
100 NEXT COUNT
110 Y= INT (RND (NUMBER))
120 TG$ = N$ (Y)
130 PRINT “The person of your”
140 PRINT “dreams is ” ; TG$
RUN
68
LEARN SCHEDULE
10
DIM WEEK$(6)
20
DIM EVENT$(6)
30
DATA “SUNDAY”,“PLAY TIME”
40
DATA “MONDAY”,“LEARN ECOLOGY”
50
DATA “TUESDAY”,“LEARN ENGLISH”
60
DATA “WEDNESDAY”,“LEARN MUSIC”
70
DATA “THURSDAY”,“LEARN HISTORY”
80
DATA “FRIDAY”,“LEARN GEOGRAPHY”
90
DATA “SATURDAY”,“PLAY FOOTBALL”
100 REM(*)LIST(*)
110 FOR W=0 TO 6
120 READ WEEK$(W)
130 READ EVENT$(W)
140 PRINT WEEK$(W),EVENT$(W)
150 NEXT W
999 END
RUN
69
MAD LIB’S
10
REM * MAD LIB’S *
20
PRINT “Mad Lib’s”
30
INPUT “Adjective”; A1$
40
INPUT “Verb”; V$
50
INPUT “Adverb”; A2$
60
PRINT “Once upon a time”
70
PRINT “there was a ”; A1$
80
PRINT “dog that decided to”
90
PRINT V$; “ ”; A2$;“ down the”
100 PRINT “hill to fetch its”
110 PRINT “bone.”
120 END
SECRET NUMBER
0
REM **Secret Number**
10
NO = RND(100)
20
PRINT “Hi! I’ve got a secret number”
30
PRINT “between 1 and 100.”
40
INPUT “Guess it by typing a number”; ANSWER
50
IF ANSWER = NO THEN GOTO 200
60
IF ANSWER > NO THEN GOTO 100
70
PRINT “No! The secret number is bigger.”
70
80
GOTO 40
100 PRINT "No! The secret number is smaller."
110 GOTO 40
200 PRINT "Yes! The number is "; NO;"."
210 END
RUN
PATTERN PICTURE
10
CLS
20
REM **DRAW A PICTURE**
30
FOR Y=0 TO 7
40
X= 50+Y
50
PSET X,Y : X=X+1
60
IF X<70-Y THEN GOTO 50
70
NEXT
80
FOR Y=8 TO 15
90
X=50+15-Y
100 PSET X,Y : X=X+1
110 IF X<55+Y THEN GOTO 100
120 NEXT
130 REM REVERSE THIS PICTURE
140 FOR X=49 TO 70
150 FOR Y=0 TO 15
160 IF PGET(X,Y)=0 THEN PSET X,Y ELSE PRESET X,Y
170 NEXT
190 END
RUN
71
TWINLKE TWINKLE LITTLE STAR
10
REM Twinkle Twinkle Little Star
20
DATA 62,62,19,19,10,10,19,30,30,36,36
30
DATA 50,50,62,19,19,30,30,36,36,50
40
DATA 19,19,30,30,36,36,50,62,62,19,19
50
DATA 10,10,19,30,30,36,36,50,50,62
60
FOR I=1 TO 42
70
READ F
80
SOUND F,20
90
NEXT I
100 END
RUN
THE MUSIC NOTE VALUE TABLE
High
Octave
Low
Octave
Do
Re
Mi
Fa
So
La
Te
Do
62
50
36
30
19
10
03
0
126
114
100
94
83
74
67
64
190
178
164
158
147
138
131
128
254
242
232
226
215
206
199
196
72
THE ASCII CODE TABLE
Decimal
Value
Printable
Character
Decimal
Value
Printable
Character
Decimal
Value
Printable
Character
32
(Space)
64
@
96
‘ (Accent)
33
!
65
A
97
a
34
“
66
B
98
b
35
#
67
C
99
c
36
$
68
D
100
d
37
%
69
E
101
e
38
&
70
F
102
f
39
‘ (Apostrophe)
71
G
103
g
40
(
72
H
104
h
41
)
73
I
105
i
42
*
74
J
106
j
43
+
75
K
107
k
44
,
76
L
108
l
45
-
77
M
109
m
46
.
78
N
110
n
47
/
79
O
111
o
48
0
80
P
112
p
49
1
81
Q
113
q
50
2
82
R
114
r
51
3
83
S
115
s
52
4
84
T
116
t
53
5
85
U
117
u
54
6
86
V
118
v
55
7
87
W
119
w
56
8
88
X
120
x
57
9
89
Y
121
y
58
:
90
Z
122
z
59
;
91
[
123
{
60
<
92
\
124
61
=
93
]
125
}
62
>
94
^
126
~
63
?
95
_ (Under score)
127
(THE ERROR)
73
THE ERROR MESSAGES
CANNOT CONTINUE
An attempt is made to continue a program that:
1. Has halted due to an error.
2. Has been modified during a break in execution, or
3. Does not exist.
DIVISION BY ZERO
A division by zero is encountered in an expression, or the operation of involution results
in zero being raised to a negative power.
EXTRA IGNORED
More than one parameter is entered to ‘INPUT’ command.
ILLEGAL DIRECT
A statement that is illegal in direct mode command.
Example: INPUT
ILLEGAL FUNCTION CALL
A parameter that is out of range is passed to a math or string function. This error may
also occur as the result of:
1. A negative or unreasonably large subscript.
2. A negative or zero argument with LOG.
3. A negative argument to SQR.
4. A negative mantissa with a non-integer exponent.
5. An improper argument to MID$, LEFT$, RIGHT$.
MISSING OPERAND
The operand of some commands are missed.
NEXT WITHOUT FOR
A variable in a NEXT statement does not correspond to a previously executed unmatched
FOR statement variable.
OUT OF DATA
A READ statement is executed when there are no DATA statements with unread data
remaining in the program.
OUT OF MEMORY
A program is too large, had too many FOR loops or GOSUB, too many variables, or
expressions that are too complicated.
74
OUT OF STRING SPACE
String variables have caused BASIC to exceed the amount of free memory remaining.
OVERFLOW
The result of a calculation is too large to be represented in the number format. If underflow
occurs, the result is zero and execution continues without an error.
REDIMENSIONED ARRAY
Two DIM statements are given for the same array, or a DIM statement is given for an
array after the default dimension of 10 has been established for that array.
REDO
A string is assigned to a numeric variable during the execution of the INPUT command.
RETURN WITHOUT GOSUB
A RETURN statement is encountered for which there is no previous unmatched GOSUB
statement.
STRING FORMULA TOO COMPLEX
A string expression is too long or too complex. The expression should be broken into
smaller expressions.
STRING TOO LONG
An attempt is made to create a string more than 255 characters long.
SUBSCRIPT OUT OF RANGE
An array element is referenced either with a subscript that is outside the dimensions of
the array or with the wrong number of subscripts.
SYNTAX ERROR
A line is encountered that contains some incorrect sequence of characters (such as
unmatched parentheses, misspelled command or statement, incorrect punctuation, etc.)
TYPE MISMATCH
A string variable name is assigned a numeric value or vice versa; a function that expects
a numeric argument is given a string argument or vice versa.
75
CHAPTER 8: CALCULATOR
The Calculator function turns the PRECOMPUTER POWER PAD™ PLUS unit into a
calculator with a 14-digit memory. The number keys and the 19 specially marked keys
in the second and third rows of the keyboard are used in the Calculator activity. To clear
the screen, use the
key at the top right of the keyboard.
BASIC CALCULATOR OPERATIONS
The basic calculator symbols are:
Addition:
or
Subtraction:
or
+
Multiplication:
Division:
USING THE MEMORY FEATURES:
To input a number to memory:
To recall a number from memory:
To add a number to the number in memory:
To subtract a number from the number in memory:
Example:
Input
Display
23 + 45 + 78
M =146
23+45+78_
=
M =146
_
76
Input
Display
34 - 78
M=146
34-78
=-44
M=102
34-78_
=
M=102
_
23 - 6 + 9
M=102
23-6+9
=26
M=76
23-6+9_
=
ADVANCED FUNCTIONS
The Calculator has special function keys located on the second and third rows of the
keyboard. Always press the function key first when using it in a problem and then enter
the numbers it is to operate on.
Aim
Operation
Square root of a number
9
Display
sqrt 9
= 3
Square of a number
3
sqr
3
= 9
The constant e to the power
of the entered number.
2
exp
2
= 7.38906
(e=2.718282)
LN function
100
In 100
= 4.60517
log 10 function
100
log 100
= 2
77
TRIGONOMETRY FUNCTIONS
All the trigonometric functions can take two forms of input-radians and degrees. If you
just type in a number, the Calculator assumes the number is in radians. To enter a number
in degrees, press the degree sign
Function
SINE
after inputting the number.
Operation
Display
60
sin 60
= -0.30481
SINE
60
sin 60°
= 0.866025
COSINE
60
cos 60
= -0.952413
COSINE
60
cos 60°
= 0.5
TANGENT
60
tan 60
= 0.32004
TANGENT
60
tan 60°
= 1.73205
ARC TANGENT
60
atn 60
= 1.55413
ARC TANGENT
60
atn 60°
= – – E – –
(atn 60°
produces an error)
π(Constant)*
(3.1415927)
*This special constant can be entered into any problem by using this key.
78
CHAPTER 9: TIME LIMITS
Categories
Activities
Timing Code
Word Games
All Word Games (except Word Puzzles)
Word Puzzles
1
2
Mathematics
All Math Games
1
Trivia
All Trivia Games
1
Games
Spy Trap
Rocket Fuel
3
None
Computer Skills
All Computer Skills
None
TIMING CODE
1. In the one player mode, the answer must be input within 60 seconds. In two player
mode, the player has 10 seconds to press their player button to answer first. When
it is your turn, you have only 30 seconds to answer.
2. After you have viewed the hint for a missing word, you have 1 minute to answer.
3. Level
Time limit to catch the spies (seconds)
1
60
2
45
3
30
4
30
CHAPTER 10: SCORING
Category
Activities
Scoring Code
Word Games
All Word Games
(except Word Puzzles)
Word Puzzles
2
Math Games
All Math Games
1
Trivia Games
All Trivia Games
1
Games
Spy Trap
Rocket Fuel
3
4
Computer Skills
All Computer Skills
(Except Keyboard Skills and Typing Challenge)
Keyboard Skills
Typing Challenge
79
1
None
5
6
SCORING CODE
POINTS
1. One Player Mode
5 Questions per round
Correct answer on 1st try
20
Correct answer on 2nd try
15
Correct answer on 3rd try
10
Two Players Mode
10 Questions per round
Starting Score
100
Correct answer
10
Wrong answer
-10
2. Missing words per puzzle
10
Correct answer on 1st try
20
Correct answer on 2nd try
15
Correct answer on 3rd try
10
3. A spy is caught
1
Every four spies caught
4
Every spy who gets away
-2
4. Successfully finished a stage
50
Every time a hint is used
-25
5. Only the Basic Course will count scores
A letter typed correctly
1
6. A letter cannon removed
Level 1
5
Level 2
4
Level 3
3
Level 4
2
80
CHAPTER 11:
POWER LINK
If you have purchased our VTECH POWER LINK™, you can connect the PRECOMPUTER
POWER PAD™ PLUS unit to an IBM 386 or higher compatible personal computer. This
feature allows you to save and load files to your personal computer. The VTECH POWER
LINK™ is sold separately at your local retailer or you may order it directly from our Consumer
Services Department at 1-800-521-2010 in the U.S. or 1-800-267-7377 in Canada.
CONNECTING THE CABLE
At the back of the PRECOMPUTER POWER PAD™ PLUS unit, there is a printer port.
Connect the VTECH POWER LINK™'s cable to this port. Please see Chapter 1 for a
diagram.
CONTROLLING VTECH POWER LINK™
In System Setup, choose the option POWER LINK, and press the Enter key or use your
mouse to select it. You can turn this option ON/OFF by pressing the Enter key or selecting
it with your mouse. Please make sure the POWER LINK function is on in order to perform
the following activities: Trivia PC, File Transfer and Print Screen. If the connection is
successful, “Installing Power Link. Please wait” will appear on the LCD screen. If the unit
says “POWER LINK NOT READY,” please refer to the VTECH POWER LINK™ manual.
Trivia PC
You may play the Trivia activities on a personal computer using the monitor as a viewing
device when the Trivia PC option is turned ON. Select POWER LINK and choose the
option Trivia PC.
To enter a trivia activity, the VTECH POWER LINK™ cable must be connected to both
the PC and this unit. You will see the trivia questions being shown on the personal computer
monitor. Type in your answer or press the Shift + Help key to view your three multiple
choice answers, and then press the Enter key. Your score will also be shown on the PC
monitor.
NOTE: The VTECH POWER LINK™ feature must be in Trivia PC to use the Trivia Playback
feature.
File Transfer
In File Transfer, you may choose from the following options: View File, Save File, Load
File and Delete File. Please make sure you select the VTECH POWER LINK™ feature
through System Setup.
View File
After selecting this option, you can view the PC monitor for a list of files in the PC. The
following are the file extensions you may view using this option: PCW, BMP, PCG, TXT.
Use the up/down arrows on the PRECOMPUTER POWER PAD™ PLUS learning unit to
view files on the PC monitor and press the Enter key to select the file. The content of
the file will be shown on the PC monitor. Use the up/down arrows to scroll the text. After
you have finished viewing the file, press the ESC key to return to the menu. Press the
ESC key again to return to the File Transfer menu.
81
Save File
After selecting this option, you can choose to save a Word Processor file or save a BASIC
program. The unit will ask you to save a TXT file or BASIC program, then press the Enter
key to select option. Next, you will be prompted to input the filename. Do not use spaces
as characters, and please remember you have up to 8 characters. The data will now be
saved on your personal computer.
Load File
After selecting this option, you can view a list of files in the personal computer on the
PC monitor. Use the up/down arrows on the PRECOMPUTER POWER PAD™ PLUS to
scroll through the list of files on the PC monitor. Press the Enter key to select the file.
You can only load files with a PCW extension or a BAS extension (example: test1.pcw).
The unit will say “Data exists. Overwrite data?” If you select yes, please remember you
will lose any existing data in your PRECOMPUTER POWER PAD™ PLUS Word Processing
activity or BASIC activity. The file will be loaded into the main unit.
Delete File
After selecting this option, you can view the PC monitor for a list of files in the PC. Use
the up/down arrows on the PRECOMPUTER POWER PAD™ PLUS to scroll through the
list of files on the PC monitor. The unit will ask if you would like to delete the selected
file. If you select yes, please remember this file will be gone permanently.
Print Screen
If you press the Print Screen key on the PRECOMPUTER POWER PAD™ PLUS membrane
activity selector, you will be able to capture any screen and view it on the PC monitor
using the VIEW function. Please refer to your VTECH POWER LINK™ manual for further
details on this feature.
Additional File Transfer Option
You may transfer a file from your personal computer to a RAM cartridge. This will allow
you to carry more than one file with you. Load the file into your PRECOMPUTER POWER
PAD™ PLUS Word Processing or BASIC activity. Then press the Hints key. Select File
Options. Choose save. The unit will ask you to save the file to a RAM cartridge or PC.
Select RAM and press the Enter key. The unit will prompt you to enter a new filename.
Type in your filename. Remember you only have 8 characters. Your file is now also saved
to the RAM cartridge.
To transfer a file from the RAM cartridge to the PC, you must first load the RAM cartridge.
Press the Hints key and select File Options. Choose load and the unit will ask you to
load from the RAM cartridge or PC. Choose RAM and press the Enter key. Select your
file and press Enter. The message “Data exists. Overwrite data?” will appear. Select yes
and press the Hints key again and choose File Options. Select save and press the Enter
key. The unit will ask you to save file to RAM cartridge or PC. Select PC and then input
your filename. Please remember do not use spaces in your filename. Your file is now
transferred to your personal computer.
Note: To free up space on your RAM cartridge, you may delete that file from the cartridge.
82
CHAPTER 12:
HOW TO USE AN EXPANSION CARTRIDGE
There is an entire library of optional expansion cartridges available for the PRECOMPUTER
POWER PAD™ PLUS unit.
To use a cartridge, follow these steps:
1. Make sure the unit is OFF.
2. Insert a cartridge into the slot located on the left-hand side of the unit.
3. Turn the unit ON.
4. Press
key on the Membrane Activity Selector and the cartridge activity
will be accessed.
Look for the following titles at your local retailer or order them directly from our Consumer
Services Department. Just call 1-800-521-2010 in the U.S., 01235-546810 in the U.K. or
1-800-267-7377 in Canada. A service representative will be happy to help you.
Item No.
80-1410 SUPER SCIENCE™
Item No.
80-1533 FAMOUS THINGS & PLACES™
Item No.
80-0989 BIBLE KNOWLEDGE™
Item No.
80-1001 FANTASY TRIVIA™
Item No.
80-1002 GENERAL KNOWLEDGE II™
Item No.
80-1003 SPORTS HISTORY™
Item No.
80-2314 FAMILIAR FACES™
Item No.
80-2315 HISTORICAL HAPPENINGS™
Item No.
80-2333 ARTS, ENTERTAINMENT & MORE™
Item No.
80-2334 CUSTOMS & CULTURES™
Item No.
80-12051 SPACE SCHOLAR™
Item No.
80-12053 FRENZY OF FACTS™
Item No. 80-1531 32K RAM Memory Expansion Cartridge (Expands the memory
of the BASIC programming activity and the Word Processor activity.)
When the RAM Memory Expansion Cartridge is plugged in, the RAM Cart. Manager
will open. Please refer to Chapter 6 for more details.
83
CHAPTER 13:
CARE AND MAINTENANCE
1. Keep the unit clean by wiping it with a slightly damp cloth.
2. Keep the unit out of direct sunlight and away from heat.
3. Remove the batteries when the unit is not in use for extended periods of time.
4. Do not drop the unit on hard surfaces or try to dismantle the unit.
5. Unplug the AC adaptor when the unit is not in use.
6. Do not expose the unit to moisture or water.
7. Please remove the protective clear plastic film covering the LCD screen before using
this product.
IMPORTANT NOTE:
Creating and developing learning aids is accompanied by a responsibility that we at VTECH®
take very seriously. We make every effort to ensure the accuracy of the information which
forms the value of our product. However, errors sometimes can occur. It is important for
you to know that we stand behind our products and encourage you to call our Consumer
Services Department at 1-800-521-2010 in the U.S. or 1-800-267-7377 in Canada with any
problems and/or suggestions that you might have. A service representative will be happy
to help you.
Note:
This equipment generates and uses radio frequency energy and if not installed and used properly, that is in strict
accordance with the manufacturer’s instructions, it may cause interference to radio and television reception. It
has been type tested and found to comply within the limits for a Class B computing device in accordance with
the specifications in Subpart J of Part 15 FCC Rules, which are designed to provide reasonable protection against
such interference in a residential installation. However, there is no guarantee that interference will not occur
in particular installation. If this equipment does cause interference to radio or television reception, which can
be determined by turning the equipment off and on, the user is encouraged to try to correct the interference
by one or more of the following measures:
• reorient the receiving antenna
• relocate this product with respect to the receiver
• move this product away from the receiver
84