1
Installation
Preparation
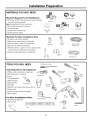
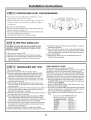
PARTS SUPPLIED:
Remove
fl'om
Check
parts
the
inside
hardware
or taped
contents
are
accessory
to the
against
bag
outside
and
other
of the
illustrations
parts
I
dishwasher.
to iilsure
that
all
Template
for
included,
I
ZBDT005
[] 2-piece toekick
[] 6 screws (see illustration)
Oily
ZBBTO00_
Junction
BoxCover
with screws
[] 2 leveling legs
[] Templatefor the installation of a
2 Leveling Legs
custom panel packed with models
'1
Template with Mounting Hardware
ZBD7000and ZBD7005only
[] Junction box cover
Screws A
Screws B
(2) Countertop
Mounting
Screws
(2) Cabinet
Mounting
Screws
Screws C
(2) Color
Matched
Toekick
Screws
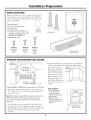
PREPARE DISHWASHER
2-PieceToekickwith
SoundInsulation
ENCLOSURE
• The
with
floor inside
the finished
floor
is tile,
the opening
floor
of the
it may
be
higher
than the floor
the installation
cutout,
34"to35"
Underside
ofCountertop
to Floor
Pieces
of wood
may
must be even and level
kitchen,
If the kitchen
of
be
placed
into the cutout
floor to make
it level or
higher
floor,
removal
service,
24-1/4"Max
than the room
This will alh)w easy
fi)r
any flmu'e
*Models ZBD7000and ZBD7005 with custom panels are 24-3/4"deep
CornerInstallation
• When installing into a
corner, allow 2" rain.
clearance between
dishwasher and adjacent
cabinet or wall.
• Allow 24-1/8"min.
clearance from the front
of the dishwasher for door
opening.
• The rough cabinet opening
i/ltlSt be at least 24" deep,
23-7/8"rain,
to 24-1/4" wide. The height should be 34"
rain. and 35" max.
Note: ADA installation, beneath 34" high countertops may be accomplished by removing front leveling legs. Drain hose, water and
electrical must be routed through the cutout on the back of the
dishwasher.
• The
no
• The
dishwasher
more
than
dishwasher
and back,
enclosure,
but
must
10 feet
must
should
be installed
so that
in length
for
be flfllv
enclosed
not
support
drain
proper
any
on
part
hose
is
drainage.
the
top,
sides
of the
5
Countertop