1
For assistance
and information
call toll free 1-800-BUY-AIWA
(United States and Puerto Rico)
i
ENGLISH
WARNING
TO REDUCE THE RISK OF FIRE OR ELECTRIC
SHOCK, DO NOT EXPOSE THIS APPLIANCE TO
RAIN OR MOISTURE.
RISK OF ELECTRIC
Read the Operating Instructionscarefully and completely before
operating the unit. Be sure to keep the Operating Instructions
for future reference. All warnings and cautions in the Operating
Jnstructionsand on the unit should be strictlyfollowed, as well
as the safety suggestions below.
SHOCK
DO NOT OPEN
"CAUTION:TO REDUCE THE RISK OF
ELECTRIC SHOCK,
DO NOT REMOVE COVER (OR BACK).
NO USER-SERVICEABLE
PARTS INSIDE.
REFER SERVICING TO QUALIFIED
SERVICE PERSONNEL."
Explanation
of Graphical
Symbols:
The lightning flash with arrowhead symbol,
within an equilateral triangle, is intended to
alert the user to the presence of iJninsulated
"dangerous
voltage" within the product's
enclosure that may be of sufficient magnitude
to constitute a risk of electric shock to persons.
The exclamation point within an equilateral
triangle is intended to alert the user to the
presence
of important
operating
and
maintenance
(servicing) instructions in the
literature accompanying the appliance.
Owner's record
For your convenience, record the model number and serial
number (you will find them on the rear of your set) in the space
provided below. Please referto them when you contact yourAiwa
dealer in case of difficulty.
ModelNo.
CX-NMA845
SX-WNA888
SX-R275
SerialNo.(LotNo.)
1 Water and moisture-- Do not use this unit near water, such
as near a bathtub, washbowl, swimming pool, or the like.
2 Heat-- Do not use this unit near sources of heat, including
heating vents, stoves, or other appliances that generate heat.
It also should not be placed in temperatures less than 5°C
(41 °F) or greater than 35°C (95°F).
3 Mounting surface
Place the unit on a flat, even surface.
4 Ventilation -- The unit should be situated with adequate
space around it so that proper heat ventilation is assured.
Allow 10 cm (4 in.) clearance from the rear and the top of the
unit, and 5 cm (2 in.) from each side.
- Do not place the unit on a bed, rug, or similar surface that
may block the ventilation openings.
- Do not install the unit in a bookcase, cabinet, or airtight rack
where ventilation may be impeded.
5 Objects and liquid entry
Take care that objects or liquids
do not get inside the unit through the ventilation openings.
or mounted on a stand or cart, the
unit should be moved with care.
stops,
excessive
force,
and
6 Quick
Carts and
stands-When
placed
uneven surfaces may cause the
unit or cart to overturn or fall.
7 Condensation
Moisture may form on the CD pickup lens
when:
- The unit is moved from a cold spot to a warm spot
- The heating system has just been turned on
- The unit is used in a very humid room
- The unit is cooled by an air conditioner
When this unit has condensation inside, it may not function
normally. Should this occur, leave the unit for a few hours,
then try to operate again.
8 Wall or ceiling mounting -- The unit should not be mounted
on a wall or ceiling, unless specified in the Operating
Instructions.
1 Power sources -- Connect this unit only to power sources
specified in the Operating Instructions,and as marked on the
unit.
2 Polarization -- As a safety feature, some units are equipped
with polarized AC power plugs which can only be inserted
one way into a power outlet. If it is difficult or'impossible to
insert the AC power plug intoan outlet, turn the plug over and
try again. If it still does noteasily insert into the outlet, please
call a qualified service technician to service or replace the
outlet. To avoid defeating the safety feature of the polarized
plug, do not force it into a power outlet.
3 AC power cord
- When disconnecting the AC power cord, pull it out by the
AC power plug. Do not pullthe cord itself.
- Never handle the AC power plug with wet hands, as this
could result in fire or shock.
- Power cordsshould be firmlysecured to avoid beingseverely
bent, pinched, or walked upon. Pay particular attention to
the cord from the unit to the power outlet.
-Avoid ovedoading AC power plugs and extension cords
4 Extension
cord--
To help prevent electric shock, do not use
a polarized AC power plugwith an extensioncord, receptacle,
or other outlet unless the polarized plug can be completely
inserted to prevent exposure of the blades of the plug.
5 When not In use-- Unplug the AC power cordfrom the power
outlet if the unit will not be used for several months or more.
When the cord is plugged in, a small amount of current
continues to flow to the unit, even when the power is turned
off.
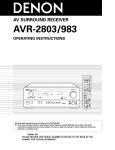
Outdoor Antenna
Power lines --When connecting an outdoor antenna, make
sure it is located away from power lines.
2 Outdoor antenna grounding -- Be sure the antenna system
is properly grounded to provide protectionagainst unexpected
voltage surges or static electricitybuild-up. Article 810 of the
National ElectricalCode, ANSI/NFPA 70, providesinformation
on proper grounding of the mast, supporting structure, and
the lead-in wire to the antenna discharge unit, as well as the
size of the grounding unit, connection to groundingterminals,
and requirements for grounding terminals themselves.
Antenna
Grounding
ACcording to the National
Elect r{cal Code
PRECAUTIONS ...................................................................
2
PREPARATIONS
CONNECTIONS .................................................................
REMOTE CONTROL ..........................................................
BEFORE OPERATION ........................................................
4
6
7
SOUND
AUDIO
ADJUSTMENTS
....................................................
9
RHYTHM PLAY FUNCTION(BEAT
MASTER D_ ............ 9
GRAPHIC
EQUALIZER ....................................................
13
DSPSURROUND
.............................................................
14
RADIO
RECEPTION
MANUAL TUNING ............................................................
PRESETTING STATIONS ................................................
15
15
TAPE PLAYBACK
BASIC OPERATIONS......................................................16
CONTINUOUSPLAY .......................................................17
CD PLAYING
ANTENNA OFSCHARGE UNIT
(N£C SECTION 810-20)
BASIC OPERATIONS ......................................................
PROGRAMMED PLAY .....................................................
18
19
RECORDING
ELECTRIC
SERVICE
(NEC SECTION
CONDUCTORS
810-21)
ELECTRODE SYSTEM
(NEC ART 250 pART H)
NEC-NATIONAL
ELECTRICAL
CODE
BASIC RECORDING ........................................................
DUBBING ATAPE MANUALLY .......................................
DUBBING THE WHOLE TAPE .........................................
AI EDIT RECORDING ......................................................
PROGRAMMED EDIT RECORDING ...............................
DOLBY
Clean the unit only as recommended
Instructions,
in the Operating
Damaae Reauirino Service
Have the units serviced by a qualified service technician if:
The AC power cord or plug has been damaged
Foreign objects or liquid have gotten inside the unit
The unit has been exposed to rain or water
The unit does not seem to operate normally
The unit exhibits a marked change in performance
The unit has been dropped, or the cabinet has been damaged
DO NOT ATTEMPT TO SERVICE THE UNIT YOURSELF.
20
21
21
22
23
PRO LOGIC
ADJUSTING SPEAKER LEVEL BALANCE ................... 24
PLAY WITH DOLBY PRO LOGIC .................................... 25
KARAOKE
MICROPHONE MIXING ...................................................
KARAOKE PROGRAM ....................................................
26
27
CLOCK AND TIMER
SETTING THE CLOCK .....................................................
SETTING THE SLEEP TIMER .........................................
SETTING TH E TIMER ......................................................
OTHER
28
28
29
CONNECTIONS
CONNECTING OPTIONAL EQUIPMENT ....................... 30
LISTENING TO EXTERNAL SOURCES ......................... 30
CONNECTING A DVD PLAYER ...................................... 31
GENERAL
CARE AND MAINTENANCE ...........................................
TROUBLESHOOTING GUIDE .........................................
SPECIFICATIONS ............................................................
PARTS INDEX ...................................................
32
32
33
Back cover
PREPARATIONS
Refer to the diagram on the next page.
The DOLBY PRO LOGIC system which is the biggest feature of
this stereo system provides you with multi channel sound in your
home.
Complete setting and connection of the main unit, supplied
speakers, your TV and video equipment according to the following
procedure.
1 Connect the right speaker to the main unit.
Connect the speaker cord with the plug to the SPEAKERS
HIGH FREQ R terminal.
Check your system and accessories
{ NSX-MA845]
CX-NMA845 Compact disc stereo cassette receiver
SX-WNA888 Front speakers
SX-R275 Surround speakers
SX-C605Center speaker
Remote control
AM antenna
Connect the speaker cord with the white stripe to the
SPEAKERS (LOW FREQ + SUBWOOFER) R O terminal
and the black cord to the • terminal.
FM antenna
Sound signals from 5.1CH SUB WOOFER INPUT jack are
outputted from the built-in subweofer in the front speakers.
2 Connect
the left speaker to the main unit.
Connect the speaker cord with plug to the SPEAKERS HIGH
FREQ L terminal, and another speaker cord to the
SPEAKERS (LOW FREQ + SUB WOOFER) L terminals in
the same manner as step t
3 Connect
Operating Instructions, etc
Before connecting the AC cord
The rated voltage of your unit is 120 V AC, as specified on the
rear panel. Check that the rated voltage matches your local
voltage,
the surround speakers.
Connect the surround speaker cords to SURROUND
SPEAKERS terminals.
There is no difference between the surround speakers. Both
speakers can be connected as R (right) or L (Jeff).
IMPORTANT
Connect the speakers, antennas, and all optional equipment first.
Then connect the AC cord.
There are no differences between the front speakers. Both
speakers can be connected as L (left) or R (right).
4 Connect the center speaker.
Connect the center speaker cord to CENTER SPEAKER
terminal.
5 Connect the video equipment.
Connect VIDEO/AUX jack of this unit to the audio output jack
ofthe video equipmentwith an optional audio connectingcord.
6 Connect theTelevision
to the video equipment.
Referto the OperatingInstructions ofthe connected equipment
for details.
Surround speaker
{I
<
{L
IIJ
IT
0,
Surround speaker cord
Center speaker
Right speaker
61
\
/i
Television
AC cord
7 Connect the supplied antennas.
Connect the FM antenna to FM 75 _ terminals and the AM
antenna to AM LOOP terminals,
8
• Be sure to connect the speaker cords correctly, improper
connections can cause short circuits in SPEAKERS terminals.
FM antenna
AM antenna
iFFM
@
8 Connect
the AC cord
to an AC outlet.
• The game Demc will begin when the AC cord is plugged
into an AC outlet. See page 8 "Game Demo" for details.
To position the antennas
FM feeder antenna:
Extend this antenna horizontally in a T-shape and fix its ends to
the wall.
AM antenna:
Positionto find the best possible reception.
To stand the AM antenna on a surface
Fix the claw to the slot.
• Do not leave objects generating magnetism, such as credit
cards, near the speakers, as these objects may be damaged.
• Do not bring the FM antenna near metal objects or curtain rails.
• Do not bring the AM antenna near other optional equipment,
the stereo system itself, the AC cord or speaker cords, since
noise will be picked up.
• Do not unwind the AM antenna wire.
CONNECTING
AN OUTDOOR
ANTENNA
For better FM reception, useof an outdoor antennais recommended.
Connect the outdoor antenna to FM 75 _ terminals.
POSITIONING
THE SPEAKERS
To achieve the optimum effects obtainable with the DOLBY PRO
LOGIC system, it is important to position the speakers properly.
Refer to the following illustration to find out the best location in
your room.
Inserting batteries
Detach the battery cover on the rear of the remote control and
insert two R6 (size AA) batteries,
6
CX-NMA845
......
R6(AA)
®
, J]
When to replace the batteries
The maximum operational distance between the remote control
and the sensor on the main unit should be approximately 5 meters
(16 feet). When this distance decreases, replace the batteries
with new ones.
(
O Front speakers
Center speaker
Positionthis at the center of the two front speakers and also,
if a'lV set is connected, on or below the set.
Surround speakers
Place the surround speakers directly to the side of or slightly
behind the listening area. Align them horizontally, about 1
meter (3.2 feet) above ear height.
• No sound is heard from the center and surround speakers when
the DOLBY PRO LOGIC, the SURROUND system and the 5.1
CH (page 31) are set to off.
• The center speaker sounds when the DOLBY PRO LOGIC or
the 5.1 CH (page 31) is set to on.
Using the remote control
The instructions in this manual refer mainly to the buttons on the
main unit. Buttonson the remote control with the same names
as those on the main unit can be used as well.
I_/<11_ PRESET on the remote control
The function is the same as that of <11_ on the main unit.
--
I_/_11_
PRESET
To mount the surround speakers on the wall
Mount each speaker on a spot that can hold its weioht.
• If the remote control is not go!ng to be used for an extended
period of time, remove the batteries to prevent possible
electrolyte leakage.
• The remote control may not operate correctly when:
- The line of sight between the remote control and the remote
sensor inside the display window is exposed to intense light,
such as direct sunlight
- Other remote controls are used nearby (those of a television,
etc.)
z
o
il
.......
.............
i..........
t
ENTER
POWER
ECO
CLOCK
MULTI JOG
SETTING
To turn the power on
Press one of the function buttons (TAPEJDECK 1/2, TUNER/
BAND, MIDEO/AUX/5.tDH, CD, MD). Playback of the inserted
disc or tape begins, or the previously tuned station is received
(Direct Play Function).
POWER is also available.
When the power is turned on, the disc compartment may open
and close to reset the unit.
To turn the power off
Press POWER.
Flash Window
The inside of both cassette holders are lit up upon powering up.
The light turns off when you hord down TAPE and press i.
Repeat the process to turn the light back on.
To change the brightness level of the display
1 Press ECO so that"ECO MODE" is displayed.
2 Within 4 seconds, turn MULTI JOG to display "DIM MODE",
and then press ENTER within 4 seconds.
3 Within4seconds, turnMULTIJOGtoselectthedimmermode
as below.
The mode will be automatically set after 4 seconds. It will also
be set if ENTER is pressed within 4 seconds after step 3.
r
DIM-OFF'_'DIMMER
1_
DIMMER 2"-"
POWER
ECONOMIZING
MODE
Setting this unit to power economizing mode reduces power
consumption as follows.
• When the power is turned off, air the display lights turn off.
However, if the clock is not set, the game Demo (page 8) will
begin when the power is turned off.
• If CD, Tape or Rhythm play function (page 9) does not play for
10 minutes or if there is no audio input from any connected
external equipment for 10 minutes when VIDEO/AUX or MD is
selected as the source, the power shuts off.
• When the power turns on due to timer recording (page 29), the
display brightness level is set to "DIMMER 3" (page 7), all button
lamps are off, and the volume is set to the minimum level (0).
• The display brightens only when operating the unit. When the
unit has not been used for 10 seconds, the brightness level
switches to the mode previously selected in "DIM MODE". (Page
7)
(If the display brightness level is set to "DIM-OFF", the
brightness does not change. When the level is "DIMMER 3",
the button lamps are also turned off.)
1 Press ECO.
"ECO MODE"will be displayed.
2 Press
ENTER
within
4 seconds.
The current power-economizing mode status will be displayed.
If the power-economizing mode is OFF: ECO OFF
If the power-economizing mode is ON: ECO ON
DIMMER 3"*_
3 Turn MULTI
DIM-OFF: The normal display.
DIMMER 1: The illumination of the display is dimmer than
usual.
DIMMER 2: The illumination of the display is dimmer than
DIMMER 1.
DIMMER 3: The illumination of the display is dimmer than
DIMMER 2, and the front panel blacks out.
JOG within
4 seconds
to switch
the
power-economizing
mode on or off.
Example: When "ON" is selected
::;-"
" '=.":',
o-f...__,__ .....
The mode will be automatically set after 4 seconds. It will also
be set if ENTER is pressed within 4 seconds after step 3.
If the timer recording (page 29) is done with the economizing
mode (page7) set to"ON" and the power turns off, the dimmer
mode will be set to "DIMMER 3" the next time the power is
turned on.
rtr m
TOviewthe clock when all the displaylightsturn off,press CLOCK
so that the time is displayed for 4 seconds.
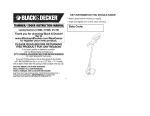
7-Channel
Multi-Amplifier
To play the game
System
To provide reinforcement for the ultra-low frequencies, in addition
to the Left/Right 2-channel amplifier used to reproduce mid-tohigh-range frequencies, this system incorporates a second L/R
2-channel amplifier just for reproduction of ultra-low frequencies
-- making the front speakers, in effect, a 4-channel amplifier
system. Therefore, this has a total of 7-channel amplifiers in the
Multi Amplifire System (4-channel amplifiers in the front speakers
+ a L/R 2-channel amplifire in the surround speakers + a 1channel amplifier in the center speaker). By utilizing discrete
amplifiers for mid to-high-frequencies and low frequencies, highquality sonic reproduction that is virtually free from distortion can
be realized.
This Multi Amplifier System, which utilizes independent circuitry
for the different frequency ranges, enables superb sonic
reproduction free from distortion.
Built-in
Subwoofer
System
The built-in subwoofer System has a separate subwoofer cavity
area that is part of the loudspeaker cabinet structure, which acts
as a sonic filter to cut distortion components. (Inthe Multi Amplifier
System, the ultra-low frequency signals transmitted from their
own independent amplifier are reproduced in this area.) This
separate construction gives a clear, rich definition to bass
reproduction and it can realize clear, well-defined mid-to-high
frequency signals.
And AIWA's built-in subwoofer system incorporates a subwoofer
capable of powerful, satisfying bass performance with true stereo
separation.
Built-inSubwoofer
Demo
Press DEMO whether the unit is turned on or off, and whether
the clock has been set or not.
With the power switched off the game is silent, With the power
switched on it is livened up with audio (referred to as game sound
in the following).
1 Press <11_.
Three numberson the display start to run.
2
Press
•
once.
The number on the left side stops.
3 Press
•
numbers.
twice
to
stop
the
remaining
two
Scoring:
20 points are given to start the game.
If all the numbers are equal, 50 points are added to the score.
If not eu&U_Lone point is subtracted.
If the gained points reach 9999, you win.
If the gained points fall to 0, you lose.
To cancel the game Demo
Press DEMO.
To reset the game Demo
Press DEMO twice.
To change the probability of equalizing the three numbers
Press <1.< or _
repeatedly to select one of the three probability
levels when playing the game Demo.The tray number indicator
in the display changes between 1 and 3. As the tray number
increases from 1 to 3, the higher the probability of equalizing.
r1_2--3_
Multi-Amplifier
I
--
_- Amplifiers for Mid-to-high
range frequencies
--
,_
Amplifiers
for
Low frequencies
- _ - Amplifiers for
Surround speakers
SubwOOfer Cavity area
,-
- Amplifier
for center speaker
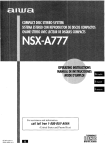
DEMO
W
<1<1, IH_
=== 0
Game
0
0
Demo
When you only plug the AC power cord for the first time after
purchase, the game automatically comes on. This initial state is
disabled on ce.yo uset the built-!n c!ock. As long asyou leave !he
To mute the game sound
Firstly, cancel the game Demo by pressing DEMO. Then, keep
pressing DEMO until "_ OFF" is displayed.
To restore the game sound, keep pressing DEMO again until
"_ ON" is displayed.
• During playing the game Demo, m, <1<1, IH_ and <11_ are
available only for the game Demo. Cancel the game Demo to
use these buttons for the functions such as CD playing, etc.
• To change the game sound, see"RHYTHM PLAY FUNCTION"
on page 9.
• During the game Demo, some indicators unrelated with the
actual operation light up on the display.
• DEMO is locked out during recording and is not operative.
• The game Demo and the game sound are automatically
canceled if the volume is adjusted while the unit is turned on.
SOUND
.=
2
BBE
USING THE BEAT FUNCTION
OOOQ
OQO
0o0o
000o
T-BASS
--T-BASS
@
ooo
eo0o
VOLUME
This unit has a library of rhythm patterns from which you can
select the desired one to add to the playback of any music
sources, thus allowing you to create your original sounds.
The mix created with the BEAT and BBE functions can be
recorded on tape if you want to. Also, the mix is available at LINE
OUT.
-- VOL
e,
=,
.=
Q,
O
Z
0
Cn
The BEAT function is not available when making a tape copy
between two tape decks using SYNC DUB.
To select a rhythm pattern
VOLUME
Turn VOLUME on the main unit, or press VOL on the
remote control.
The volume level is displayed as a number from 0 to MAX (50),
The volume level is automatically set to 20 when the power is
turned off with the volume level set to 21 or more.
To change the left/right balance
Press MANUAL SELECT on the remote control."lJR" is displayed
for 2 seconds.Press _
DOWN or _
UP on the remote control
within these 2 seconds.
• The DOLBY PRO LOGIC and the DOLBY DIGITAL SURROUND
frontspeakers level is also changed. (See pages 24 and 31)
1 Press BEAT ON/OFF to switch the function on.
You'll hear the current rhythmpattern, the display showing
the name of the rhythm.
2 Turn MULTI JOG to cycle through the options
provided until you find one that meets the music.
The display will change as follows:
GAME_
H.ROCK1-2
(HARD ROCK)
TANGO
BOSSANOV
WALTZ
1-2
(BOSSA NOVA)
SAMBA
_ 14
4 BEAT1-2
8BEAT1-2
BBESYSTEM
CUBRMBA
(CUBAN
RUMBA)
t
16 BEAT 1-3
The BBE system enhances the clarity of high-frequency sound.
it also enriches the Karaoke function to make your voice sound
clear and pleasant.
Press BBE.
Each time it is pressed, the level changes. Select one of the
three levels, or the off position to suityour preference.
MERENG
1-3
(MERENGUE)
REGGAE
_
SALSA 1-3
SLRMBA1-2
(SLOW
RUMBA)
AFRO
BBE
• The BBE systemdose notperform while 5.1 CH INPUTs (page 31)
are active.
SUPER%BASS
SYSTEM
TheT-BASS system enhances the realism of low-frequencysound.
PressT-BASS.
Each time it is pressed, the level changes. Select one of the
three levels, or the off position to suit your preference,
T-BASS
• Low frequencysound may be distortedwhenthe T-BASS system
is used fora disc or tene in which lowfrenuAnr:v_nlmd i_ nrinin_llv
These voice wave data incorporated in this product are Yamaha
To adjust
the tempo
of the rhythm
pattern
Using the AUTO
mode
The AUTO mode automaticafly adjusts the tempo of the current
rhythm pattern so it coincides with the tempo of the music.
RHYTHM
_,
1
[
]_lj
|F_
_l
MULTI JOG
Depending on the music the AUTO mode may not work correctly
(with songs whose tempo is fuzzy, or is varying, for example).
S AT
ON/OFF-
2,3
2,4
1 Press RHYTHM
"Tempo
XXX."
repeatedly
until the display
reads
1
rrr m
=_=
If "AUTO" shows while you are pressing RHYTHM, change it to
"MANUAL' by turning MULTI JOG to the left. In AUTO mode the
tempo is automatically set and you cannot access the display of
"Tempo." (More about AUTO mode later.)
2 Turn MULTI
JOG.
Turning to the right speeds up the tempo.Turning to the left slows
down the tempo.
(If a time-out occurs before you turn the dial, go back to the
display of "Tempo" by pressing RHYTHM. )
The tempo can be changed within the limits of 81 to 160.
_
0
0
0
c=r2_
J
You can let the music start playing before performing step 1 or
later at the desired moment.
1 Press BEAT ON/OFF to switch the function on.
Youwill hear the current rhythm pattern.
2 Change the rhythm pattern and the level setting
as required by pressing RHYTHM and turning
MULTI JOG.
3 Press RHYTHM to switch the display to read
"MANUAL" or "AUTO."
The tempo of GAME is not adjustable.
To change the volume level of the rhythm pattern
f_
_,
--o
2
BEAT
ON/OFF
1 Press RHYTHM repeatedly until the display reads
"LEVEL X."
I_-!'ii..._l"._!...ll-'{L_
i
4 Turn MULTI JOG to the right to change the display
to "AUTO."
If "AUTO" is displayed in step 3, turn MULTI JOG to the left to
change the display to "MANUAL" before performing step 4.
On switching from MANUAL over to AUTO the level of the
rhythm pattern is automatically reduced to "1."The preset level
will be resumed when the unit takes on the tempo of the music.
While the unit is trying to get synced up to the tempo of the
music, a cascade-like blue indicator will flash on the sides of
the graphic equalizer display section.
2 Turn MULTI JOG.
Threelevels,1-3, are available.
To stop the BEAT function
Press BEAT ON/OFF.
BEAT toggles between On and Off.
l_.],i=
When the unit gets synced up to the tempo of the music,the
display will momentarily read the synced-up tempo.
Depending on sound sources (such as, songs whose tempo
is varying), however,you may see differenttempos appearing
one after the other in the display.
After once synced up if the sync lock unlocks the display will
read "BEAT OUT," and again the unit will try to get synced up.
USING THE SPICE FUNCTION
SPICE A/B function
The SPICE A/B function allows you to add percussion to the
playback of the music and create your original sounds.
Your sounds created with SPICE A!B can be recorded on tape if
you want to.
a
Z
O
To select sounds
At the occurrence of BEAT OUT the level of the rhythm is
automatically reduced to"1"; and it increases back to the preset
level when eync is achieved again.
3
2
The BEAT function can be used together with the SPICE A/B
function, as well as with the FILL IN function. (For these functions
see below.) But you cannot use the AUTO SPICE function at the
same time as the BEAT function.
Using the FILL IN function
The FiLL IN function is used together with the BEAT function to
insert a variation of the current rhythm pattern.
The AUTO SPICE/FILL IN double function switch takes on the
FILL IN function when the BEAT function is switched on.
• The AUTO SPICE function is not available at the same time as
the FILL iN function.
• The FILL IN function is not available when making a tape copy
between two tape decks using SYNC DUB.
,'i
......
i¸ -,"I
FILL IN
T
1
1 Press A.
You'll hear the current sound stored in A.
2 Within 4 seconds, turn MULTI JOG to the left or
right until you find the desired sound.
As thedisplay changes,you'llhearthe respectivesound,
3 In a similar way, select a sound for B.
To use the FILL IN function
-r_
w
r---F--T
_fi-
To actually use the function
Once you are satisfied with the sound selection, let the music
start playing, and hit SPICE A or B in time with the music as if to
play percussion instruments,
BEAT
ON/OFF
You cannot use the SPICE A!B function when making a tape
copy between two tape decks using SYNC DUB.
'=== O (3 0
During playback with the BEAT functionswitched on, press FILL
IN at the desired moment.
I-=
l'--'_', r
i
:.f.............
_,t
\=-_1,
"N
The display will read "FILL IN" and, when the current cycle of the
rhythm pattern is over, you'll hear a short sound different from
the rhythm pattern. This sound depends on rhythm patterns. If
you want, try to change the rhythm pattern. (Selecting a rhythm
pattern is discussed earlier, under the corresponding heading.)
BI
Using a scratch mode
5
-_
m]
T'I
•
[
r
]
F
i --1----Fr7
lm
2
3,4,5
1
2
:J
4
1
1 Hold down SPICE A, (Don't release the button
until you complete step 2.)
The display will read "SCT MODE."
1 Press AUTO SPICE.
"A-SPICE"will show in the display.
/--_--E.'.....'::.j':;'
T _"_."." -\
_Z.._,
Press
2 Still holding down the button, turn MULTI JOG.
Depending on the direction in which you turn MULTI JOG,
different scratches are produced.
The Scratch mode is disabled when you release the A button.
Using the AUTO SPICE function
The AUTO SPICE function produces the sounds of SPICE A
and B in sync with the music, the sound of A in response to low
frequency signals, and the sound of B in response to high
frequency signals.
• The AUTO SPICE function cannot be used together with the
BEAT function.
• Depending on the music the AUTO SPICE function may not
work the way you'd expect. In such a case, use the SPICE A/B
function instead.
• The AUTO SPICE function is not available when making a tape
copy between two tape decks using $YNC DUB.
SPICE
L=
: "j
...,=I
.L
:.,.:
....
=_
A.
You'll hear the sound currently stored in A, its name appearing
in the display.
Each time you press A the sound is produced.
If you want to change the sound of A, turn MULTI
JOG until you find the desired sound.
(If a time-out occurs after completing step 2 and before
performingstep 3, press SPICE A again.)
4 In a similar way, check the sound of B and change
it if you want to.
5 To adjust the level of the A and B sounds, access
the display of "LEVEL X" by pressing RHYTHM
as many times as necessary, then within 4
seconds turn MULTI JOG.
Threelevels,1,2 and 3, are available.
f
I-L_,"_'....,-.:......
_
LL_J_
."_, _-|
The A and B levels are adjusted at one time.
6 Let the source start playing to audition the effect.
The blue cascade-like indicator to the left of "BBE" in the
display will flash and the sound of SPICE A will play in sync
with the bass, and the sound of SPICE B in sync with the
treble.
When a rhythm pattern is playing or while a FILL IN sound is
being produced if you flip SPICE A or B or produce scratches, a
momentary break would occasionally occur in the rhythm pattern
or the FILL IN sound. The same goes for the AUTO SPICE sounds
when you flip SPICE A or B or produce scratches.
SE'n'ING
A NEW EQUALIZATION
MANUALLY
Q
z
1,3
SELECTING THE PROGRAMMED
EQUALIZATION CURVE
This unit provides the following 5 different programmed
equalization curves.
ROCK: Powerful sound emphasizing treble and bass
POP: More presence in the vocals and midrange
LATIN: Accented higher frequencies for latin music.
CLASSIC: Enriched sound with heavy bass and fine treble.
JAZZ: Accented lower frequencies for jazz-type music
1X
MULTI JOG -
CURVE
.GEQ
0
2,4
t
tJ s
,l
The equalization curve can be customized to suit your preference.
1 Press GEQ, followed
by ENTER within 4 seconds.
The display will be switched to read "GEQ LOW."
PHONES-
GEQ-
•b,-I_
Ii_
il
2 Within 8 seconds,
level of the lowest
turn MULTI
frequency.
JOG
to adjust
the
I
._1<1
Press GEQ, and turn MULTI JOG to select one of the
programmed equalization curves within 4 seconds.
l-
"GRAPHIC EQUALIZER"
appears
displayed cyclically as follows.
" ROCK _
g
and the GEQ mode is
POP _ LATIN .,-- CLASSIC ..-,>JAZZ _1
'.------ .... Programmed mode ..........
M5
M4_
M3 _
M2 _
" ...........
Manual mode ..............
3 Press ENTER to let "GEQ HIGH" show.
The highest level frequency indicator flashes for 8 seconds.
4 Within 8 seconds,
turn MULTI
level of the highest frequency.
=,
.£--.......
JOG to adjust
the
:÷%
The frequency level indicators between the lowest and the
highest are adjusted accordingly.
_|
M1
To display the current GEQ mode
Press GEQ, The current mode is displayed for 4 seconds.
To cancel the selected mode
Press GEQ twice.
"GEQ OFF" appears and "GRAPHIC EQUALIZER" disappears.
Using the headphones
Connect headphones to the PHONES jack with a standard stereo
plug (e6.3 mm, _/4inch).
No sound is output from the speakers while the headphones are
plugged in.
• When the headphones are plugged in,the SURROUND system,
the DOLBY PRO LOGIC and the 5.1 CH (page 31) do not
function.
Sound sdjaetment during recording
The VOLUME control has no effect on recording. It only sets the
level feeling the sneakers end heedhones. Remember, however,
MEMORIZING
CURVES
THE NEW EQUALIZATION
1,2,4
1,3
The DSP (Digital Signal Processor) SURROUND sonically
changes the acoustic characteristics of any listening rooms,
allowing you to enjoy the real sound presence of different
environments.
This unit has been programmed with 5 different SURROUND.
modes.
1
SELECTING
SURROUND
A PROGRAMMED
MODE
DSP
Up to 5 customized equalization curves can be stored as the
manual modes M1 - M5.
MULTI
JOG
1 Go through steps 1-4 on previous page.
The created curve is displayedfor 8 seconds.
2 Within 8 seconds, press ENTER.
"M 1"flashes on the display for 8 seconds,
SURROUND
:fl
............".'.;......
• tf this step is not completed within 8 seconds, press GEQ
first to display "GEQ ON". Then within 4 seconds press
ENTER repeatedly until "Mt" flashes.
3 Within 8 seconds, turn MULTI JOG to select one
of the manual modes M1 - M5 to store the curve.
4 Within 8 seconds, press ENTER.
The new equalization curve is stored.
Five modes of DSP SURROUND offer the sound presence you'd
experience in disco (DISCO), at a live concert (LIVE), stadium
(STADIUM), in a concert hall (HALL) or movie theater (MOVIE).
(Shown in parentheses are indications appearing in the display.)
Press SURROUND, and turn MULTI JOG or press
<1<1 or _
repeatedly
to select the desired
programmed mode within 4 seconds.
To select the stored equalization curve
Press GEQ, and turn MULTI JOG to select one of the manual
modes M1 - M5 within 4 seconds.
"DSP SURROUND" appears and the DSP SURROUND mode is
displayed cyclically as follows.
_*
DISCO "._- LIVE -,,I,- STADIUM -.-I_ HALL.._
MOVIE-,-- 1
Equalization curves are selected automatically to match the DSP
SURROUND modes and can also be manually selected or turned
off to suit your preference.
To adjust the volume of the surround speakers
Press MANUAL SELECT twice or three times on the remote
control.
"S-L" or "S-R" is displayed for 2 seconds. Press <1.<1DOWN or
ll,t,- UP on the remote control within these 2 seconds.
• The DOLBY PRO LOGIC (page 24) and the DOLBY DIGITAL
SURROUND (page 31) surround speakers level is also
changed.
The SURROUND mode is canceled when:
- the ECHO level is changed.
- the DOLBY PRO LOGIC is turned on.
To display the current DSP SURROUND mode
Press SURROUND. The currentmode is displayedfor 4 seconds.
To cancel the selected mode
Press SURROUND twice. "DSP OFF" appears
SURROUND" disappears.
and "DSP
When the music source Is monaural
Select"LIVE", "STADIUM" or "MOVIE" to obtain a simulated stereo
effect.
When "DISCO" or "HALL" is selected, no sound will be heard
from the surround speakers.
RADIO
RECEPTION
Q
Z
_ o II-O
DO0o
DOOQ
DOOQ
DO
-MONa
TUNER
0
(/)
1
)oo
)oo
2
)oo
o o
o 0
30
TUNER
BAND
_
-0-9,+10
3
_Q_O
o
<
1 Press TUNER/BAND
desired band.
repeatedly
to select
the
I-_FM-_AM_
When TUNER/BAND is pressed while the power is off, the
power is turned on directly.
2
Press
_
DOWN or _
UP to select
The unit can store a total of 32 preset stations. When a station is
stored, a preset number is assigned to the station. Use the preset
number to tune in to a preset station directly.
1 PressTUNER/BAND
DOWN or _
2 Press
a station.
SET to store
the station.
A preset number beginning from 1 in consecutive order for
each band is assigned to the station.
Preset number
Each time the button is pressed, the frequency changes,
When a station is received, "TUNE" is displayed for 2 seconds.
During FM stereo reception, ((€(_))) is displayed.
(l((_))f)
II
to select a band, and press
UP to select a station.
TUNE
f3
To search for a station quickly (Auto Search)
Keep HI< DOWN or _
UP pressed until the frequency starts
to change rapidly. After tuning in to a station, the search stops.
To stop the Auto Search manually, press _
DOWN or I_H
UP.
• The Auto Search may notstop at stationswith very weak signals.
When an FM stereo broadcast contains noise
Press MONO TUNER on the remote control so that "MONO"
appears on the display.
Noise is reduced, although reception is monaural.
To restore stereo reception, repeat the above so that "MONO"
disappears.
Repeat steps 1 and 2.
The next stationwill not be storedif a total of 32 preset stations
for all the bands have already been stored.
_o]W"FULL' is displayed if you attempt to store more than 32 preset
stations.
PRESET
Use the remote control to select the preset number directly.
1 Press TUNER/BAND
2 Press
To change the AM tuning interval
The default setting of the AM tuning interval is 10 kHz/step. If
you use thisunit in an area where the frequency allocation system
is 9 kHz/step, change the tuning interval.
Press POWER while pressing <11_.
To reset the interval, repeat this procedure.
When the AM tuning interval is changed, all preset stations are
cleared. The preset stations have to be set again.
NUMBERTUNING
numbered
to select
buttons
a band.
0-9 and +10 to select
a
preset number.
Example:
To select preset number 20, press +10, +10 and a.
To select preset number 15, press +10 and 5.
Selecting a preset number on the main unit
Press TUNER/BAND to select a band. Then, press 411_
repeatedly or turn MULTI JOG.
Each time <11_ is pressed, the next ascending number is
selected.
To clear a preset station
Select the preset number ofthe stationto be cleared.Then, press
• CLEAR, and press II SET within 4 seconds.
The oreset numbers of all other stations in the band with hiQher
TAPE PLAYBACK
To select a reverse mode (deck 2 only)
Each time REV MODE (DECK 2) is pressed, the reverse mode
changes.
TAPE/DECK
1/2--
.........
To play one side only, select _-.
----_PUSH
--_PUSHEJECT-Deck 1-REV MODE -(DECK 2)
EJECT
-- Deck 2
.--l,_=C,-
C; 0
/-
1 PressTAPE/DECK 1/2 and press _-- PUSH EJECT
to open the cassette holder.
indicates
Continuous
_--) on the display
Play,
To select a playing deck
When tapes are loaded in both decks, press TAPE/DECK 1/2
first to select a deck.
The selected deck number is displayed.
To stop play, press I.
To pause play (deck 2 only), press II,To resume play, press
again.
To change the playback side, press <11_ in play or pause mode.
To fast forward or rewind, press _
or IH_.Then press • to
stop the tape.
To start play when the power is off (Direct Play Function)
Press TAPE/DECK 1/2. The power is turned on and play of the
inserted tape begins,
To set the tape counter to 0000
Press • CLEAR in stop mode.
The counter is also set to 0000 when the cassette holder is
opened and closed.
EJECT-
Insert a tape with the exposed side down. Push the cassette
holder to close.
2 Press <11_ to start play.
Playing deck number
,-0
side once only, select _.).
To play both sides repeatedly, select (:_.),
• When tapes are leaded in both decks,
c:::z:::_
• On deck 1, tapes are always played back on both sides.
On deck 2, you can select a reverse mode to play back one or
both sides.
• Use Type I (normal), Type lI (high/CrO2) or Type IV (metal)
tapes for playback.
_PUSH
To play from front side to reverse
/
The tape counter indicatesthe
tape running length.
/
Playback side indicator
_-: The front side is being played (forward).
<l:The back side is being played (reverse).
f
MUSIC
SENSOR
If there isa 4-second or longerblank between each track, a search
for the beginning of the current or next track during playback can
be done easily.
Press _
or _
during playback referring to the playback side
indicator (41 or _') on the display.
For example,when I_ is pressed while I_ is displayed, playback
of the next track starts.
Music sensor function may not be able to detect tracks under the
following conditions:
• Blanks of less than 4 seconds between tracks
• Noisy blanks
• Long passages of low-end sound
• Low overall recording levels
About cassette tapes
• To prevent accidental erasure, break off the plastic tabs
on the cassette tape after recording with a screwdriver or
other pointed tool,
-
I :Ye ecllo,
n Pe__mab fors,de
At
L sot
"J
To record on the tape again, cover the tab openings with
adhesive tape, etc. (On Type 11tapes, take care not to cover
the Type 11tape detection slot.)
• 120-minute or longer tapes are extremely thin and easily
deformed or damaged. They are not recommended.
• Take up any slack in the tape with a pencil or similar tool
before use. Slack tape may break or jam in the mechanism.
After playback on one deck finishes, the tape in the other deck
will start to play without interruption.
1 Insert tapes into deck 1 and deck 2.
2 Press TAPE/DECK
played back first.
1/2 to select the deck to be
3 Press REV MODE (DECK 2) to select 7-).
4 Press <11_ to start playback,
Playbackcontinuesuntil • ispressed,
CD PLAYING
To Dlav one disc onlv, press DISC DIRECT PLAY 1-3,
The selected disc is played once.
MULTI JOG
CD
i oo
"RANDOM/
REPEAT
"0-9,+10
II-II--
"DISC
DIRECT
PLAY
DISC
DIRECT "
PLAY 1-3
DISC
CHANGE-
Press
To start play when the power is off (Direct Play Function)
Press CD. The power is turned on and play of the loaded disc(s)
begins.
When _AOPEN/CLOSE is pressed, the power is also turned on
and the disc compartment is opened.
To check the remaining time
During play, press CD EDIT/CHECK. The amount of time
remaining until all tracks finish playing is displayed. To restore
the playing time display, repeat the above.
--_OPEN/CLOSE
LOADING
To stop play, press II.
To pause play, press II.To resume play, press again.
To search for a particular point during playback, keep <1.<1
or _
pressed and release it at the desired point.
To skip to the beginning of a track during playback, press
_14 or _
repeatedly or turn MULTI JOG.
To remove discs, press __ OPEN/CLOSE.
DISCS
CD, then
press
A OPEN/CLOSE
to open the
disc compartment.
Load disc(s) with the label side
up.
To olav one or two discs, place the discs on tray 1 and 2.
To play three discs, press DISC CHANGE to rotate the trays
after placing two discs. Place the third disc on tray 3.
Close the disc compartment by pressing '_ OPEN/CLOSE
Selecting a track with the remote control
1 Press DISC DIRECT PLAY and within 3 seconds press 1, 2
or 3 to select a disc.
2 Press numbered buttons 0-9 and +10 to select a track.
Example:
To select the 25th track, press +10, +10 and 5.
To select the 10th track, press + 10 and 0.
The selected track starts to play and continues to the end of
that disc.
Replacing discs during play
While one disc is playing,the other discs can be replaced without
interrupting play.
1 Press DISC CHANGE.
2 Remove the discs and replace with other discs.
3 Press --&OPEN/CLOSE to close the disc compartment.
• When loading an 8-cm (3-inch) disc, put it onto the inner circle
of the tray.
• Do not place more than one compact disc on one disc tray.
• Do not tilt the unit with discs loaded. Doing so may cause
malfunctions.
• Do not use irregular shape CDs (example: heart-shaped,
octagonal ones). It may result in malfunctions,
Tray 1 _ I
Tray number of the
disc to be played
Total playing time
Total number of tracks
PLAYING
DISCS
Load discs,
TO olav all discs in the disc comoartment,
Play begins with the disc on tray 1,
Number of track being played
press <11_.
Elapsed playing time
RANDOM/REPEAT
Use the remote
i
PLAY
<
control.
RANDOM play
All the tracks on the selected disc or all the discs can be played
randomly.
Up to 30 tracks can be programmed from any of the inserted
discs.
REPEAT play
A single disc or all the discs can be played repeatedly.
--2,3
Press RANDOM/REPEAT.
Each time it is pressed, the function can be selected cyclically.
RANDOM play -- RANDOM lights up on the display.
REPEAT play -- _. lights up on the display.
RANDOM/REPEAT play -- RANDOM and _ light up on the
display
Cancel -- RANDOM and _ disappear from the display.
To olav all discs, press 41_ to start play.
TO clay a sinole disc. press DISC DIRECT PLAY and within 3
seconds press 1,2 or 3 to start play.
QQQ
--II
Use the remote control.
1 Press PRGM twice
"PRGM" is displayed
while in stop mode.
PRGM
During random play it is not possible to skip to the previously
played track with <1<1.
BLANK
• When PRGM is pressed once in step 1, the unit enters the
KARAOKE PROGRAM (page 27).
SKIP PLAY
The silent portions between tracks recorded on a CD can be
skipped during playback.
1 Press CD BLANK SKIP.
"CD BLANK SKIP ON" is displayed and a small dot appears
in the display.
Small dot
,_,_-"_--_
u,=
_
[_.ii....r,
..J
r".,
..'-
"...=;".,i":.
", ",_; _==1
2 Press DISC DIRECT PLAY and within 3 seconds
press 1,2 or 3 to select a disc.
Go to the next step when the tray stops rotating.
Press numbered
buttons 0-9 and +10 to program
a track.
Example:
To select the 25th track, press +10, +10 and 5,
To select the 10th track, press +10 and 0.
Total number of
Selected track number
selected tracks
......
2
Press <11_ to start playback.
The silent portions between tracks will be skipped, and the
sound will be played back without interruption. If a track fades
out (ends with the sound gradually decreasing), the fadeout
portion also will be skipped.
To return to normal playback
Press CD BLANK SKIP again, and "CD BLANK SKIP OFF" is
displayed and the dot in the display disappears.
Program number
) 1___---_,
I
Total playing time of
the selected tracks
4 Repeat steps 2 and 3 to program other tracks.
5 Press ID,.-/<I>- to start play,
To check the program
Each time .<1<1or I_ is pressed in stop mode, a disc number,
track number, and program number will be displayed.
To clear the program
Press • CLEAR in stop mode.
•There may be a case where BLANK SKIP PLAY does not
function correctly.
• BLANK SKIP PLAY is automatically canceled when performing
AI EDIT RECORDING (page 22), PROGRAMMED EDIT
RECORDING (page 23), or recording during PROGRAMMED
PLAY (page 19) or RANDOM PLAY (page 19).
To add tracks to the program
Repeat steps 2 and 3 in stop mode,The track will be programmed
after the last track.
To change the programmed tracks
Clear the program and repeat all the steps again.
To play the programmed tracks repeatedly
After programming the tracks, press RANDOM/REPEAT
repeatedly until _-_ appears on the display.
• During programmed play, you cannot perform random play,
check the remainino time. and select a disc or track. "Can't
.I
g.
a
O
RECORDING
To stop recording, press III.
To pause recording, press II. (Applicable when the source is
TUNER, VIDEO/AUX or MD.) Toresume recording, pressit again.
This section explains how to record from the tuner, CD player, or
external equipment.
3
Sound adjustment during recording
The VOLUME control has no effect on recording. It only sets the
level feeding the speakers and headphones.Remember, however,
recording takes on the BEAT, AUTO SPICE/FILL IN, SPICE NB
functions, as well as on the BBE function.
INSERTING
BLANK
SPACES
Insertion of 4-second blank spaces enables you to activate the
Music Sensor function. (Applicable when the source is TUNER/
BAND, VIDEO/AUX or MD.)
1 Press • REC/REC MUTE during recording or while in
recording pause mode.
on the display flashes for 4 seconds and 4-second blank
space is made. Then, the deck enters the recording pause
mode.
2 Press II to resume recording.
Preparation
• Use Type I (normal) and Type I1 (high/CrO2)tapes for recording.
• Set the tape to the point where recording will start.
1 Insert the tape to be recorded on into deck 2.
Insert the tape with the side to be recorded on first facing out
from the unit.
TO insert a blank sDace of less than 4 seconds, press •
REC/REC MUTE again while I'ff'-J31
is flashing,
To insert blank saaces of more than 4 seconds, after the deck
enters recording pause mode, press • REC/REC MUTE again.
Each timethe button is pressed, a 4-second blankspace isadded.
- _PUSH EJECT
2 Press REV MODE (DECK 2) to select the reverse
mode.
To recordon one sideonly,selectT..
To recordon bothsides,select_) or C_.;).
3
Pressfunction(TUNER/BAND,
VIDEO/AUX!5.1CH,
CD or MD) and prepare the source to be recorded.
To record from a CD, press CD and load the disc(s).
To record from a radio broadcast, press TUNER/BAND and
tune in to a station.
To record from _1connected source, press VIDEO/AUX!
5.1CH or MD.
4
Press • REC/REC
MUTE to start recording.
When recording from a connected source, start playback of
the source.
rtm'
_"
•..-.,
F=_r/_--/.F_=-=--= ,__..-.-_=,
I-i-I'/
,:,l"..-d
"-'1=--I
"Can't REC" is displayed if you attempt to record on a tape with
the plastic tabs broken off.
_ ......
When the selected function is CD, playback and recording
start simultaneously.
To erase a recording
Remember to unplug the microphone(s). Also, check to make
sure that BEAT and AUTO SPICE are switched off (page g).
1 Insert the tape to be erased into deck 2 and press TAPE/
DECK 1/2 to display "TP 2".
2 Set the tape to the point where the erasure is to be started.
i
E
0
O
=€
1,3
i--
m
2
iT
2
• Set the tape to the point where recording will start.
• The reverse mode is automatically set to T..
Note that recording will be done on one side of the tape only.
1 PressTAPE/DECK
• Dubbing does not start from a point halfway in the tape.
• The reverse mode is automatically set to T_)
1/2.
2 Insert the original tape into deck 1 and the tape
to be recorded on into deck 2.
Insertthetapeswiththesidesto be played backor recorded
on facingoutfromthe unit,
3 PressTAPE/DECK
"TP 1"is displayed.
1/2 to select deck 1.
4 Press • REC/REC MUTE to start recording.
Playingand recordingstart simultaneously,
-,....
•
To stop dubbing
Press 1.
_
:
.=,r
This function allows you to make exact copies of both sides of
the original tape. The reverse 'side of both tapes will start
simultaneously as soon as the longer tape has been reversed.
J...a
-...,.
-...÷ -
1 Press TAP E/DECK 1/2.
2 Insert the original tape into deck 1 and the tape
to be recorded on Into deck 2.
Inserteachtape withthe side to be played backor recorded
on facingoutfromtheunit.
3 Press SYNC DUB once or twice to start recording.
For recording at normal speed, press it once to display
NORM-DUB
For recording at high speed, press it twice to display
HIGH-DUB.
.-_
'I- £:,\
........
--..
ItHT__._H-...L,]£,_\
.............
The tapes are rewound to the beginning of the front sides,
and recording starts.
To stop dubbing
Press I.
Recording does not start, if the erasure prevention tab on either
side of the tape is broken off.
6 Press •
MULTI
JOG
"
2
REC/REC
MUTE to start recording on
the first side.
The tape is rewound to the beginning of the front side, the
lead segment is playedthroughfor 10 seconds, and recording
starts. When recording on the front (side A) ends, recording
on the back (side B) starts.
3QQ
I--
T
1 1
-5
300
_
_ ci ci Q
To stop recording
Press I. Recording and CD play stop simultaneously.
To clear the edit program
Press • CLEAR twice so that "EDIT" disappears on the display.
To check the order of the programmed track numbers
Before recording, press CD EDIT/CHECK to select side A or B,
and press <1<1or _
repeatedly.
3-
4 ii
Track number
The AI edit recording function enables CD recording without
worrying about tape length and track length. When a CD is
inserted, the unit automatically calculates the total track length.
If necessary, the order of tracks is rearranged so that no track is
cut short.
(AI: Artificial Intelligence)
AI edit recording will not start from a point halfway into the tape.
The tape must be recorded from the beginning of either side.
1 Insert the tape into deck 2.
Insert the tape with the side to be recorded on first facing out
from the unit.
2 Press
,._.
once.
EDIT
,= ,,_..
4 Press DISC DIRECT PLAY 1-3 to select e disc.
numbered
Program number
To add tracks from other discs to the edit program
If there is any time remaining on the tape after step 5, you can
add tracks from other discs in the CD compartment.
1 Press CD EDIT/CHECK to select side A or B.
2 Press DISC DIRECT PLAY t-3 to select a disc.
3 Press numbered buttons on the remote control to select tracks.
A track whose playing time is longer than the remaining time
cannot be programmed.
4 Repeat steps 2 and 3 to add more tracks.
..........
• When "PRGM" isdisplayed, press CD EDIT/CHECK
5 Press
Tape side
''
Time on cassette tapes and editing time
The actual cassette recording time is usually a little longer than
the specified recording time printed on the label. This unit can
program tracks to use the extra time. When the total recording
time is a little longer than the tape's specified recording time
after editing, the display shows the extra time (without a minus
mark), instead of the time remaining on the tape (withthe minus
mark).
CD and load the disc(s).
3 Press CD EDIT/CHECK
"EDIT" is displayed,
.
Programmed
track numbers
buttons
0-9
on
the
remote
control to designate
the tape length.
10 to 99 minutes can be specified.
Example: When using a 60-minute tape, press 6 and 0.
In a few seconds, the tracks to be recorded on each side of
the tape are determined.
• <1<1, _
or MULTI JOG are also available to designate
the tape length.
Remaining time Programmed
of recording tracks for side A
Tape length
Tape side
A: First recording side
B: Second recording side
• The AI edit recording function cannot be used with discs
containing 31 tracks or more. "TR OVER" is displayed if this is
attempted.
• Recording is inhibited if the erasure prevention tab on either
side of the tape is broken off.
6
Repeat step 5 for the rest of the tracks for side
A,
A track whose playing time is longer than the remaining time
cannot be programmed.
7
MULTI
-4,5
Press CD EDIT/CHECK
to select
side
program the tracks for side B.
After confirming "B" on the display, repeat step 5.
Tape side B (reverse side)
."--_-,
I-=-_-;f....
B and
Press
the
•REC/REC
.........-...-..=,
",1.'i ;;.t."d-'3_-t
MUTE
button
to start
recording.
The tape is rewound to the beginning of the front side, the
lead segment is played throughfor 10 seconds, and recording
starts. When recording on the front side (A) ends, recording
on the back side (B) starts.
In the programmed edit recording function the tracks can be
programmed while checking the remaining time on each side of
the tape.
The programmed edit recording will not start from a point halfway
in the tape.The tape must be recorded on from the beginning of
either side.
To stop recording
Press •. Recording and CD play stop simultaneously.
To check the order of the programmed track numbers
Before recording, press CD EDIT/CHECK to select side A or B,
and press <1<1or _
repeatedly.
Disc number
Track number
Programmed track
numbers
1 Insert the tape into deck 2.
Insert the tape with the side to be recorded on first facing out
from the unit.
2 Press CD and load the disc(s).
3
Tape side
Press CD EDIT/CHECK
twice.
"EDIT" and "PRGM" are displayed.
• When "AI" is displayed, press CD EDIT/CHECK again.
4 Press
numbered
buttons
on the
remote
control
to designate
the tape length.
to to 99 minutes can be specified,
• The <1.4, _
or MULTI JOG are also available to designate
the tape length.
Tape length
)
r
.. /=PF.'.Gt
Maximum recording
time for side A
5 Press DISC DIRECT PLAY 1-3 to select a disc.
Then, press numbered buttons 0-9 and +10 on
the remote control to program a track.
Example:To select the 10th track of disc 2, press DISC
DIRECT PLAY2, thenpress +10 and 0,
Selected track number
Program number
To change the program of each side
Press CD EDIT/CHECK to select side A or B, and press •
CLEAR to clear the program on the selected side.Then program
tracks again,
To clear the edit program
Press • CLEAR twice so that"EDIT" disappears on the display.
Tape side A (front side)
j_L
Remaining time
on side A
_._.+._1
Program number
._____
Programmed
tracks
ILl
I¢
"DISC
DIRECT
PLAY
8
io
• Up to 30 tracks can be programmed from any of the inserted
discs.
• "FULU' is displayed if you attempt to program more than 30
tracks.
• Recording is inhibited if the erasure prevention tab on either
side of the tape is broken off.
DOI
The DOLBY PRO LOGIC feature and the center and rear
speakers (standard) assure full-scale home theater sound. When
playing back laser discs or video software that have been
recorded in Dofby Surround, astonishingly
realistic sound
surrounds the listener to create a new level of audio/visual
entertainment.
Independent control of the five sound channels allows the listener
to enjoy the same type of sound reproduction experienced in
movie theaters. Voices are reproduced in the front and center
sound field, while ambient sounds like cars and crowds are
reproduced on all sides of the listener for an incredibly lifelike
audio/video experience. Please read the following carefully to
"tune" the system's output to match the characteristics of your
listening space.
Check the following:
• Before using the DOLBY PRO LOGIC, adjust the proper
balance of speaker sound levels.
• Make sure the supplied speakers are properly connected and
positioned. (See pages 4-6)
• Make sure the TV set and video unit are properly connected.
(See pages 4 and 5)
• Make sure the laser disc, video tape, etc., support
2 Press MANUAL SELECT and hold it down for
about 4 seconds until "L" flashes.
A noise signal is sent to each channel in turn in the following
sequence.
_-L: Left speaker_ CEN: Center speaker_ R: Right speaker_
J
S-L: Left surround speaker-.- S-R: Right surround speaker_,J
3 Adjust
the sound
level of the center and the
surround speakers.
While "CEN""S-R" or "S-I" is displayed, press <1<1DOWN or
UP to adjust the volume of the center or each surround
speaker to match the level of the front speakers.
To adjustthe balance between the left and right front speakers,
see page 7. At this time, the DOLBY PRO LOGIC mode should
be canceled by pressing DOLBY PRO LOGIC until the "PROOFF" is displayed.
4 Press MANUAL SELECT again to stop the noise
signal.
[]{]PRO
4
The unit is equipped with a built-in test signal generator called a
noise sequencer for easy balance adjustment of all 5 channels.
The sequencer outputs a noise signal that "travels" from channel
to channel, enabling the simple adjustment of sound level to
achieve, at the listening position, the same apparent loudness
from each channel.
Use the remote control.
1 Press DOLBY PRO LOGIC to select "NORMAL".
"NORMAL" is displayed.
If "PHANTOM" or "3 STEREO" is displayed, press DOLBY
PRO LOGIC repeatedly until "NORMAU' is selected.
When using the unit, press OBPRO LOGIC.
• If the surround speakers or the center speaker level of the
DOLBY PRO LOGIC is changed, that of the SURROUND
system (page 14) and the DOLBY DIGITAL SURROUND (page
31) is also changed.
• While "S-U' or"S-R" is displayed, both surround speakers output
the noise signal together. However, only the sound level of one
surround speaker displayed as "S-L" or "S-R" can be adjusted.
• When the sequencer outputs a noise signal, a clicking sound
might be heard from the speakers due to the characteristics of
the circuit. This is not malfunction.
About the channels
The left and right front speakers create the stereo effect.
The center speaker helps achieve precise sound positioning
over a broad sound field.
The rear-mounted surround speakers enhance the "depth" of
the sound field.
To change the delay time
The surround speakers reproduce sounds a split second after
the front speakers.The delay isinitiallyset to 20 ms (milliseconds).
To change this standard delay time, press MANUAL SELECT
on the remote control repeatedly until "TIME" is displayed. Then,
press .<1<1DOWN or _
UP. Each time one of the buttons is
pressed, the delay time changes as shown below.
15mS_20mS_30mS
£
In addition to the NORMAL mode, this unit is also equipped with
0000
oo_
OO_O
OOII
om
0000
-MANUAL
SELECT
-1
the PHANTOM and the 3 STEREO modes.
PHANTOM mode: Use this mode when no center speaker is
connected. The center channel signals are output through the
left and right speakers.
3 STEREO mode: Use this mode when no surround speakers
are connected. This mode reproduces rear sounds through the
front speakers,
-2
To select
DOWN,
II,-II,-Up
PHANTOM
or 3 STEREO
Press DD PRO LOGIC repeatedly
until the desired
LOGIC mode is displayed. The DOLBY
displayed cyclically as follows.
DOLBY
PRO LOGIC
PRO
mode
is
_-
NORMAL --_ PHANTOM _ 3 STEREO 7
cancel
To adjust the balance of connected speaker sound levels
Carry out steps 2 to 4 of "ADJUSTING SPEAKER LEVEL
BALANCE".
1 Press VIDEO/AUX/5.1
the video source.
OH and
start
playback
of
"VIDEO" is displayed.
If "51 ch IN" is displayed, press VIDEO/AUX/5.1 CH again
2 Press
[][] PRO LOGIC.
"NORMAl" is selected, and the playback sound has the
DOLBY PRO LOGIC effect.
When using the remote control, press DOLBY PRO LOGIC.
To cancel Oolby Pro Logic mode
Press on PRO LOGIC repeatedly until "PRO-OFF" is displayed.
To change the sound levels during playback
After adjustingthe balance with the noise sequencer, the sound
levels of the center or each surround speaker can be adjusted
during playback of laser discs or video software.
1 Press MANUAL SELECT on the remote control repeatedly
to select "CEN" (center speaker) "S-U' (Left surround speaker)
or"S-R" (Right surround speaker).
2 While the"CEN""S-l" or"S-R" is displayed, press <1.<1 DOWN
or _
UP on the remote control to adjust the volume.
• Depending on the sound source and/or listening conditions, a
surround effect may not be obtained even when the DOLBY
PRO LOGIC
• The full DOLBY PRO LOGIC effect cannot be obtained when
using software without 130[=ou"=""_o] mark. In this case, use
the SURROUND system instead. (See page 14.)
• The DOLBY PRO LOGIC is automatically canceled when:
- the ECHO level is changed.
- the SURROUND system or the BBE is turned on.
- the headphones are plugged in.
- the Karaoke function is turned on.
- the 5.1 CH (page 31) is selected.
• Set the microphone volume to OFF while the DOLBY PRO
LOGIC is on. Otherwise, the DOLBY PRO LOGIC sound cannot
be reproduced correctly.
O
11
8_
="..i
O
a
KARAOKE
• When the function is changed, the microphone volume and the
echo volume are set to off.
Recommended microphones
The use of unidirectional type microphones is recommended to
prevent howling. Contact your local Aiwa dealer for details.
VOCAL
FADER/MULTIPLEX
FUNCTIONS
This unit can use discs or tapes as Karaoke sources.
Use the vocal fader function for ordinary discs or tapes.
Use the multiplex function for multi audio discs or tapes.
m5
KARAOKE--
Press KARAOKE repeatedly to select the vocal fader or
multiplex function,
Each time KARAOKE is pressed, one of these functions is
selected cyclically.
y
Two microphones (not supplied) can be connected to this unit,
allowing you to sing along to music sources.
Use microphones with mini plugs (o3.5 mm, 1/8inch).
1 Connect
jacks.
your
microphones
_...!i"
'5
to MIC 1 and MIC 2
MIC 1
i..''"l..t r"
•...'r
!'it" ,.'.,""! ....
@
L.I= _
_-.I E_ ,",
MtC 2
Vocal Fader
The singer's voice becomes softer than the accompaniment.
(_ Auto Vocal Fader
The singer's voice becomes softer only while there is audio
input through a microphone.
2 Press one of the function buttons to select the
source to be mixed, and play the source.
3 Adjust the volume and tone of the source•
4 Press
MIC and turnVOLUME
within
4 seconds
to
adjust the microphone
volume•
The microphone volume can be selected from 1 to MAX (7)
or OFF (cancel).
The volume of both microphones is adjusted simultaneously.
5 Press
ECHO and turn VOLUME
within
4 seconds
to adjust the echo level.
The echo level can be selected from 1 to MAX (7) or OFF
(cancel).
To change the delay time of echo
Hold down ECHO while the echo is on.
"1" (Long) and "M" (Middle) are displayed alternately. At the
desired position, release the button.
To record microphone sound mixed with source sound
Follow the procedure for recording from the sound source (see
page 20),
SYNC DUB cannot be used for mixing recording,
When not using the microphones
Set the microphone volume and echo level to OFF and remove
the microphones from MIC jacks.
• When the ECHO level is changed, the SURROUND mode and
the DOLBY PRO LOGIC are automatically canceled.
• When the MIC or ECHO is turned on while the 5.1 CH (page
31) is selected, the 5.1 CH is chaged to VIDEO.
• If a microphone is held toe near the speakers, a howlingsound
may be produced. In thiscase, hold the microphone away from
the speakers, or decrease the microphone volume.
Multiplex
Only the sound on the left channel is heard from both speakers,
and the sound on the right channel is muted.
_) Auto Multiplex
The sound on the left channel is heard from both speakers,
and the sound on the right channel is muted only while there
is audio input through a microphone.
®Cancel
To change the time lag setting in Auto Vocal Fader or
Auto Multiplex function
The muted singer's voice can be restored faster.
When Auto Vocal Fader or Auto Multiplex is selected, "A-VF" or
"A-MPX" is displayed for 3 seconds and changes to the selected
function name. After the selected function name is displayed,
keeo oressine KARAOKE until "FAST" is displayed.
To return to the initial setting, select SLOW.
When the power is turned off, SLOW is restored.
To change the audible channel in Multiplex function
When Multiplex is selected, "MPX .1"is displayed for 3 seconds
and changes to the selected function name. After the selected
function name is displayed,keep pressinoKARAOKE until"MPXR" is displayed.
To return to the initiaJsetting, select MP×-L..
When the power is turned off, MPX-L is restored.
• The Karaoke functions may not operate correctly with the
following kinds of CDs or tapes.
- Those with monaural sound
- Those recorded with strong echoes
- Those with the vocal part recorded on the right or left side of
the sound width
• While the Karaoke function is on, the sound is output as
To add a reservation during play
Repeat step 3,
To check the reserved tracks
Press CD EDIT/CHECK repeatedly. Each time it is pressed, the
disc number and track number are displayed in the reserved order.
12
3QC
90¢
90¢
I
To stop play
Press I.
When I_/<11b is pressed, the play starts from the last track again.
--3
Ig_
I1
To skip a current track
Press IH_. The skipped track is cleared from the program.
To clear all the reservations
Press IH_ repeatedly until "K - P00" is displayed.
I--
--
" .....
....................
Before or during CD play, you can reserve up to 15 tracks to be
played after the current track. Each reservation is cleared when
it finishes
Press it once more to cancel the Karaoke programs, The display
returns to that of CD play.
playing.
Use the remote control
1 Press
CD and load the discs,
2
PRGM
Press
-
once.
t i
/I--L,-
_
!_ r...
'....
i'"i:'.3"-':'.._
/
3 Press DISC DIRECT PLAY and within 3 seconds
press 1,2 or 3 to select a disc.
Then, press numbered buttons 0-9 and + 10 to
program a track.
Reserved disc number
4 Repeat
Reserved track number
step 3 to reserve
other tracks.
5 Press I_/<11_ to start play.
After a track is played, it is cleared from the program.
Currently
playing disc
Disc number of the
last reservation
Number of remaining
reserved tracks
Track number of
the last reservation
Currently playing
track number
flashes
• If the reserved track number does not exist on the selected
disc, the unit stops playing and the display flashes.
In this case, press I,.11,-to skip the error track. Then press ._1_
to start play with the next reserved track.
• When PRGM is pressed repeatedly in step 2, "PRGM" is
displayed and the unit enters CD program play mode (page
19).
To cancel program play, press • CLEAR.
ILl
O
<
1€
<
CLOCK
I
AND TIMER
3
m
II m
2
-1
2
oo
c
ooo
c t1
2
1
--ql_
The clock is displayed. (The":" between the hours and minutes
flashes.) When the power cord is plugged into an AC outlet
for the first time after purchase or when the clock setting is
canceled due to a power failure, the entire clock display
flashes.
The unit can be turned off automatically at a specified time.
Use the remote control.
1 Press SLEEP.
l== ,.........
•
1 Press CLOCK.
= ..............
it..
,=
t ,l_
¢
._..'-..,....
],:"- _';i._.--.=.
/
.-':3,
....
2
L \
2 Within 4 seconds, turn MULTI JOG to designate
the hour and the minute.
TurningMULTiJOG changesboththe hourand the minute,
<1<1or _ isalso availableinsteadof MULTIJOG, Holding
these buttonsdown will vary the time rapidly.
Within
4 seconds,
turn MULTI JOG to specify
the
time until the power is turned off.
The time changes between 5 and 240 minutes in 5-minute
steps.
<1<1and IH_ are also available instead of MULTI JOG.
Specified time
3 Press ENTER or I1.
The clock starts from 00 seconds.
To restore an original clock setting
Press CLOCK before completing step 3 to restore the previous
time setting. This cancels any new setting.
To view the clock when another display is in the display
Press CLOCK. The time is displayed for 4 seconds and then the
original display reappears. However, the clock cannot be
displayed during recording,
To switch to the 24-hour standard
Press the CLOCK and then press • within 4 seconds.
Repeat the same procedure to restore the 12-hour standard.
If the clock
display
flashes
This is caused by a power interruption. The current time needs
to be reset.
If power is interrupted
for more than approximately
all settings stored in memory
after purchase
24 hours,
need to be reset.
rmm
If the power-economizing mode (page 7) is on, all the display
lights turn off when the power is turned off. To view the clock,
press CLOCK so that the time is displayed for 4 seconds.
To check the time remaining until the power Is turned off
Press SLEEP once, The remaining time is displayed for 4
seconds.
To cancel the sleep timer
Press SLEEP twice sothat "SLEEP oFF" appears on the display.
5 Adjust the volume.
The source sound will play at the volume level set in this step
when the power is turned on by the timer.
If the volume level is set to 21 or higher, however, it will
automatically be set to 20 when the power is turned on.
5
-TIMER
OOO
0000
O00Q
000_
OO
0
6 Prepare
To listen
To listen
To listen
the source.
to a CD, load the disc to be played first on tray 1,
to a tape, insert the tape into deck 1 or 2.
to the radio, tune in to a station
7 Press POWER to turn off the power.
When the timer-on time is reached, the unit turns on and
begins play with the selected source
QOQI
OOQOJ
3
You can change the source that was selected in step 1 by pressing
one of the function buttons before pressing ENTER or II in step
3.
The unit can be turned on at a specified time every day with the
built-in timer
Preparation
Make sure the clock is set correctly.
1 Press one of the function
buttons
to select a
source.
• If TUNER/BAND is pressed, the band cannot be selected in
this step.
2 PressTIMER
repeatedly
until _ appears
display.
Time and audio source name flash alternately
-..__.
I-
! f
i.-'_
I-1Y
on the
4 Within
4 seconds,
-'_
turn
MULTI
• Timer playback and timer recording will not begin unless the
power is turned off.
• Connected equipment cannot be turned on and off by the builtin timer of this unit. Use an external timer.
TIMER RECORDING
Timer recording is applicable for TUNER and VIDEO/AUX (with
an external timer) sources only.
L---
JOG to select
the
duration for the timer-activated
period.
The duration can be set between 5 and 240 minutes in 5minute steps.
<1<1or IH_ is also available instead of MULTI JOG
I
To cancel the timer standby mode temporarily
Press TIMER repeatedly so that _ disappears.
To restore the timer standby mode, press again to display _).
=--I
3 Within 6 seconds, turn MULTi JOG to designate
the timer-on time, then press ENTER or II.
Turning MULTI JOG changes both the hour and the minute,
or _
is also available instead of MULTI JOG. Holding
these buttons down will vary the time rapidly.
t "
To change any of the previous setting
Carry out from step 1.
However, if you do not change the timer-on time, in step 3 just
press ENTER twice and continuefrom step 4.
Using the unit while the timer is set
You can use the unit normally after setting the timer.
Before turning off the power, carry out step 5 and 6.
e_
cO
To check the timer setting
Press TIMER.
The selected source, the timer-on time, and the duration for the
timer-activated period will be displayed for 4 seconds.
®
:'w,_ =M =...=.
The duration will be automatically set after 4 seconds. It will
also be set if ENTER or II is pressed within 4 seconds after
step 4.
Press either TUNER/BAND or VIDEO/AUX]5.1CH to select a
source, then press TIMER repeatedly until E_)REClights up
on the display. Within 6 seconds, carry cut the steps of
"SETI-ING THE TIMER" from step 3 and insert the tape to be
recorded on into deck 2 after step 6.
• When the power-economizing mode (page 7) has been turned
on, the timer recording volume level will be 0 (minimum level)
• You cannot use the timer function to record from a CD or tape
Q
Z
<
O
0
,J
0
OTHER
CONNECTIONS
5.1 CH INPUT JACKS
This unitcan inputsound signalsfrom the audio equipment (DVD
player, LD player, etc.) that contains a Dolby Digital decoder with
the 5.1 ch output terminals. Refer to "CONNECTING A DVD
PLAYER" on page 31.
-- VIDEO/AUX
--5.1CH
INPUT
--Me
-- LINE OUT
oeo
el
VIDEO/AUX/5,1CH
POWER--
2-
(OPTICAL)
|
I
"1
_
. Jtiiiilliili
==== 0
0
0
c:c::_',
JACKS
v
This unit can input analog sound signals through these jacks.
Use a cable with RCA phone plugs to connect audio equipment
(turntables, LD players, MD players, VCRs, TV, etc.).
Connect the red plug to the VIDEO/AUX R jack, and the white
plug to the VIDEO/AUX L jack.
When connecting a turntable
Use an Aiwa turntableequipped with a built-in equalizer amplifier.
MD JACKS
This jack is recommended to connect with an MD player.
Use a cable with RCA phone plugs.
Connect the red plug to the MD R jack, and the white plug to the
MD L jack.
LINE OUT JACKS
This unit can output analog sound signal through these jacks.
Use a cable with RCA phone plugsto connect audio equipment
with LINE IN (analog input) jacks.
Connect the red plug of a cable to LINE OUT R jack, and the
white plug to LINE OUT L jack.
Do not connect an equipment to LINE OUT jacks and VIDEO/
AUX jacks simultaneously. Otherwise, noise is generated and
malfunction occurs.
CD DIGITAL
]-
--MD
Refer to the operating instructions of the connected equipment
for details.
• The connecting cords are not supplied. Obtain the necessary
connecting cords.
• Consult your local Aiwa dealer for optional equipment.
VIDEO/AUX
rl
OUT (OPTICAL)
JACK
This unit can output CD digital sound signals through this jack.
Use an optical cable to connect digital audio equipment (DAT
deck, MD recorder, etc.).
Remove the dust cap _) from the CD DIGITAL OUT (OPTICAL)
jack. Then, connect an optical cable plug to the CD DIGITAL
OUT (OPTICAL) jack.
When the CD DIGITAL OUT (OPTICAL) Jack Is not being
used
To play equipment connected to VIDEO/AUX]5.1CH jacks or MD
jacks proceed as follows.
1 PressVIDEO/AUX/5.1CH
or MD.
To clay the eauioment connected to VIDEO/AUX, press
VIDEO/AUX/5.t CH. "VIDEO" appears on the display.
To olav the eauiDment connected to MD, press MD. "MD"
appears on the display.
2 Play the connected equipment.
To change a source name in the display
When VIDEO/AUX/5.1CH
is pressed, "VIDEO" is displayed
initially. It can be changed to "AUX" or "TV".
With the power on, press POWER while pressing VIDEO/AUX/
5,1CH.
Repeat the procedure to select one of the names.
To adjust the sound level of the external source
When the sound level of the external source is much higher or
much lower than that of other functionsources, adjustit as follows.
1 Press VIDEO/AUX/5.1CH or MD and play the equipment.
2 Press <t<1 or _
sothat the sound level becomes the same
as that of other function sources.
During recording, the sound level can not be adjusted.
LISTENING
SURROUND
5.1CH
INPUT
jacks
of this
unit support
SURROPUND
system,
Connect a DVD player with 5. t CH output
cables
with RCA phono plugs
OUTPUT
CENTER,
DIGITAL
to this unit using
etc.
1
1
rTI
This unit's jack
etc. 5.1CH SUB WOOFER
5.1CH OUTPUT SURROUND (L,R), etc.
5.1CH OUTPUT FRONT (L,R), etc.
LINE OUT (L,R),
jacks
DOLBY
as follows;
DVD player's jack
5.tCH OUTPUT SUB WOOFER,
5.tCH
the
5.1CH
TO
SOUND
I
I
]
DOLBY
DIGITAL
Z
0000
000
OQQQ
1
I
Ir_
Z
OQQQ
QQQ!
OQ
Q
-1
0
_'-<?o_o_o_
CENTER
OIP'_
OOO0
5.1CR SURROUND (L,R)
5.fCH FRONT (L,R)
-MANUAL
SELECT
--_1_1
DOWN,
IHbUp
etc.
_E[ellJl_-,llrlB
When a DVD player is connected to the 5.1CH INPUT jacks of
this unit, you can listen to DOLBY DIGITAL SURROUND sound,
which enables you to enjoy theater-quality sound in your home.
[e]_|l:l:;
iml
1 Press VIDEO/AUX/5,1CH
IN" is displayed.
repeatedly until "5.1 ch
I III
N,,'l_O_llll
[]
2 Start playing DOLBY DIGITAL SURROUND sound
on the DVD player.
mr.-'nm
n i mm
DVD
L_]_L.'I[o]IJu
= "
m%
• The DOLBY PRO LOGIC, BBE and the SURROUND are
automatically canceled when the 5.1 CH is selected.
• Make sure the software played back with the connected DVD
player support the DOLBY DIGITAL SURROUND.
• The function is changed from the 5.1 CH to the VIDEO when;
- the headphones are plugged in.
- the MIC or ECHO level is changed,
- the SURROUND system, the DOLBY PRO LOGIC or the
Karaoke function is turned on.
To adjust the sound levels of the center and surround
speakers in DOLBY DIGITAL SURROUND
1 Press VIDEO/AUX/5.1CH
repeatedly until "5.1 ch iN" is
displayed.
2 Press MANUAL SELECT repeatedly.
Speaker names appear in turn as follows;
• If the DVD is not connected to VIDEO/AUX jack of this unit;
- the spectrum analyzer dose not show the sound level of the
DVD player.
- the sound from the connected DVD player cannotbe recorded.
To remove these limitations,connect the LINE OUT jacks of the
DVD player to VIDEO/AUX jacks of this unit besides connecting
to 5.1CH INPUT jacks. The signals through VIDEO/AUX jacks
enable the spectrum analyzer to work and the recording to be
done.
Refer also to the operating Instructions of the DVD player.
• DOLSY DIGITAL SURROUND sound cannot be recorded in
any way.
L/R (Speaker balance) _
S-W: Sub woofer
CEN: Center speaker
S-L: Left surround speaker
LS.R:Right surround speaker
z
o
.,_
3 Press _
DOWN or _
UP to adjust the sound level while
"CEN", "S-L", "S-R" or "S-W" is displayed.
Each level can be adjusted between -8dB and +7dB.
4 Repeat steps 2 and 3 to adjust each speaker's sound level.
If the surround speakers or the center speaker level of the DOLBY
DIGITAL SURROUND is changed, that of the SURROUND
system (page 14) and the DOLBY PRO LOGIC (page 24) is also
changed.
0
o
I&l
,T.
I=
o
UMP L
Occasional care and maintenance of the unit and the software
are needed to optimize the performance of your unit.
If the unit fails to perform as described
Instructions, check the following guide.
To clean the cabinet
GENERAL
There is no sound.
• Is the AC cord connected properly?
• Is there a bad connection? (4 pages 4&5)
• There may be a short circuit in the speaker terminals.
Disconnect
the AC cord, then correct the speaker
connections.
• Was an incorrect function button pressed?
Sound is emitted frOm one speaker only,
• Is the other speaker disconnected?
The output sound is not stereo.
• Is the Karaoke function turned on? (--* page 26)
An erroneous display or a malfunction occurs.
-_ Reset the unit as stated below.
The power is not turned on.
-_ Disconnect the AC cord, and connect it again in a few
seconds.
Use a soft and dry cloth.
if the surfaces are extremely dirty, use a soft cloth lightly
moistened with mild detergent solution.
Do not use strong
solvents, such as alcohor, benzine or thinner as these could
damage the finish of the unit.
To clean the tape heads
When the tape heads are dirty;
- high frequency sound is not emitted
- the sound is not adequately high
- the sound is off-balance
- the tape cannot be erased
- the tape cannot be recorded on
After every 10 hours of use, clean the tape heads with a head
cleaning cassette.
Refer to the instructions of the cleaning cassette for details.
To demagnetize the tape heads
The tape heads may become magnetized after long-term use.
This may narrow the output range of recorded tapes and increase
noise.
After every 20 to 30 hours of use, demagnetize the tape heads
with a separately sold demagnetizing cassette.
Refer to the instructions of the demagnetizing cassette for details.
Care of discs
• When a disc becomes dirty, wipe the disc from the center out
with a cleaning cloth.
• After playing a disc, store the disc in its case. Do not leave the
disc in places that are hot or humid.
Care of tapes
• Store tapes in their cases after use.
• Do not leave tapes near magnets, motors, television sets, or
any source of magnetism.This will downgrade the sound quality
and cause noise.
• Do not expose tapes to direct sunlight, or leave them in a car
parked in direct sunlight.
in these Operating
TUNER SECTION
There is constant, wave-like static.
• is the antenna connected properly? (-_ page 5)
• Is the signal weak?
Connect an outdoor antenna.
The reception contains noise interferences or the sound
is distorted.
• Is the system picking up external noise or multipath distortion?
-_ Change the orientation of the antenna.
--* Move the unit away from other electrical appliances.
CASSE'I-rE DECK SECTION
The tape does not run.
• Is deck 2 in pause mode? (4 page 16)
The sound is off-balance or not adequately high.
• Is the playback head dirty? (-+ page 32)
Recording is not possible.
• Is the erasure prevention tab on the tape broken off? (_ page
20)
• Is the recording head dirty? (4 page 32)
Erasure is not possible.
• Is the erasure head dirty? (4 page 32)
• is a metal tape being used?
High frequency sound is not emitted.
• Is the recording/playback head dirty? (-_ page 32)
CD PLAYER SECTION
The CD player does not play.
• Is the disc correctly placed? (-_ page 18)
• Is the disc dirty? (-_ page 32)
• Is the lens affected by condensation?
--* Wait approximately one hour and try again.
To reset
If an unusual condition occurs in the display window or the
cassette decks, reset the unit as follows.
I Press POWER to turn off the power.
2 Press POWER to turn the power back on while pressing •
CLEAR. Everything stored in memory after purchase is
canceled.
If the power cannot be turned off in step 1 because of a
General
Main unit CX-NMA845
FM tuner
Power requirements
Power consumption
Dimensions of main unit
120 V AC, 60 Hz
210W
260 x 324 x 346 mm
(WxHx
D)
Weight of main unit
(10:h x 127/e x 13%in.)
7.8 kg (171be 3 oz.)
Standby power consumption
With power-economizing
29W
mode off:
With power-economizing
1.5W
mode on:
<
E
W
Z
W
o
section
87.5 MHz to 108 MHz
13.2 dBf
Tuning range
Usable senslvlty (IHF)
Antenna terminals
75 ohms (unbalanced)
AM tuner section
Tuning range
530 kHzto1710 kHz(lO kHzstep)
531 kHzto 1602 kHz(9 kHz step)
350 _V/m
Loop antenna
Usable sensitivity
Antenna
Amplifier
section
Mid-high frequency
Power output
Total harmonic
amplifier
distortion
LOW FREQ + SUB WOOFER
Front
20 W + 20 W (200 Hz - 20 kHz,
THD less than 1%, 6 ohms)
0.1% (10 W, 1 KHz, 6 ohms, DIN
AUDIO)
amplifier
Power output
Total harmonic
distortion
80 W + 80 W (50 Hz- 200 Hz, THD
less than 1%, 6 ohms)
0.1% (45W, 80 Hz, 6 ohms, DIN
AUDIO)
Rear (Surround)
33 W + 33 W (1 kHz, THD less than
1%, 8 ohms)
Center
34 W (1 kHz, THD less than 1%, 8
ohms)
VIDEO/AUX: 316 mV (adjustable)
MD: 316 mV (adjustable)
MIC 1, MIC 2:1 mV (10 k ohms)
5,1CH iNPUT (adjustable)
FRONT (L,R): 240 mV
REAR (L,R): 240 mV
CENTER: 600 mV
SUB WOOFER: 240 mV
SPEAKERS HIGH FREQ:
Inputs
Outputs
accept speakers of 6 ohms or more
SPEAKERS:
LOW+FREQ
SUB WOOFER
/
/
accept speakers of 6 ohms or more
SURROUND SPEAKERS:
accept speakers
ohms
of 8 ohms to 16
CENTER
SPEAKER:
accept
speakers of 8 ohms or more
LINE OUT: 150 mV
PHONES (stereo jack): accepts
headphones of 32 ohms or more
Cassette deck section
Track format
Frequency response
Recording
Heads
system
Compact
disc player
4 tracks, 2 channels stereo
CrO2 tape: 50 Hz- 16000 Hz
Normal tape: 50 Hz- 15000 Hz
AC bias
Deck 1 : Playback head x 1
Deck 2: Recording/playback
head
x 1, erase head x 1
section
Laser
D-A converter
Semiconductor laser (_. = 780 nm)
1 bit dual
Slgnal-to-nolee
ratio
Harmonic distortion
85 dB (1 kHz, 0 dB)
0,05 % (1 kHz, 0 dB)
Speaker
system
SX-WNA888
Cabinet type
3 way, built-in subwoofer (magnetic
shielded type)
Speakers
Subwoofer:
160 mm (6 3/8in.) cone type
Full range:
120 mm (4 3/4in.) cone type
Super tweeter:
Impedance
Output sound pressure level
Dimensions (W x H x D)
Weight
Specifications
notice.
20 mm (_3/_6in.) ceramic type
6 ohms/6 ohms
87 dB/W/m
240 × 345 x 300 mm
(9 1/2 x 13 5/8 x 11 7/8in.)
5.5 kg (12 Ibs 2 oz.)
and external appearance are subject to change without
BSkaSYSTEM
The word "BBE" and the "BBE symbol"
Sound, Inc,
Under license from BBE Sound, Inc,
are trademarks
of BBE
DOLBY PRO LOGIC
Manufactured under license from Dolby Laboratories Licensing
Corporation.
DOLBY, the double-D symbol i3['1 and "PRO LOGIC" are
trademarks of Dolby Laboratories Licensing Corporation.
COPYRIGHT
Please check the laws on copyright relating to recordings from
discs, radio or external tape for the country in which the machine
is being used.
NOTE
This equipment has been tested and found to comply with the
limits for a Class B digital device, pursuantto Part 15 of the FCC
Rules.These limits are designed to provide reasonable protection
against harmful interference in a residential installation.
This equipment generates, uses, and can radiate radio frequency
energy and, if not installed and used in accordance with the
instructions,
may cause harmful interference
to radio
communications. However, there is no guarantee that interference
will not occur in a particular installation. If this equipment does
cause harmful interference to radio or television reception, which
can be determined by turning the equipment off and on, the user
is encouraged to try to correct the interference by one or more of
the following measures:
- Reorient or relocate the receiving antenna.
- Increase the separation between the equipment and receiver.
- Connect the equipment into an outlet on circuit different from
that to which the receiver is connected.
- Consult the dealer or an experienced radio/'l'V technician
for help.
CAUTION
Modifications
or adjustments
to this product,
which
are not