1
alu.la
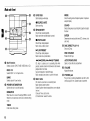
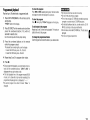
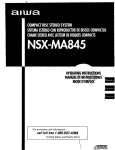
CDStereoSystem
NSX-D70
ill
DIGITAL AUDIO
OWNER'S RECORD
Recordthe model numberand serialnumberof your set(foundat [he
rearofyourset)bdow Refertothemwhencontactingyor Nwa dealer
Model No
SerialNO
Forassistance and information
call toll free 1-800-BUY-AIWA
(United States and Puerto Rico)
8C+N F6-903-01
011125AKH-U-M
n
|i|Ji|OJ
I|
f;,|
L | m[_]_||
N ||
|_PJ
ReadtheOperatingInstrudons carefullyandcompletelybefore
operatingthe unit Besire to keeptheOperatinginstructions
for futureieferenceAll warningsandcau[ionsin [heOperating
instructionsandon theunt shouldbestrictlyfollowed=asweft
asthesafetysuggestionsbelow
Warning
TOpreventelectric shock ol injury, thesesafetyinstructions
should be followedin the installaton, useand serv cing the
unit
Installation
Attachments- Do notuseattachmentsnot recommended
by
theunitmanufacturer
astheymayresultintheriskof fire,e ectdc
shockor iniury to persons
Water and Moisture Do not useth s unit nea water- tar
example,heal a bathtub,washbowl,kitchen sink, or laundry
tub, ina wet basement,or neara swimmngpoe, andtile like
Heat - Oeoat use this _nit near sourcesoi beat,nc/uding
nestingvents,stoves,or otherapp ancesthatgenerateheat It
alsoshouldnot beplacedin temperaturesass than5"C(41F)
or greaterthan35"C(95F)
Mountingsadace- Place_heunt on a fiat, evensurface
Accessories-Donotplaceths unit onanunstabe cart,stand,
tdpod,bracket,or table Theunit maytal, causingseriousnjury
to a child or an adult, and seriousdamageto the appliance
Use only with a cart, stand, tripod, bracket, or table
recommended
by the marefacurer,or sold withthe unit Any
mountingof theapplianceshould fellow the manufacturer's
instructions, and should use a mounting accessory
recommended
bythe manufadume
Portable cart - An appliance and cart
combinationshouidbemovedwithcam Quick
StOps,excessiveforce,and unevensurfaces
maycausetheapplianceandcartcombination
to overturn
|i|'JrJlifJ
k P_
Ventilation Theunit sbouldbesgaatedwithadequatespace
aroundit sohat properheatvanlilaton s assured Allow 10
cmclearancefrom the rearandlhe top of theunit, and 5 cm
Itemthe eachside
SIoisandopeningsin thecabinetandthebackor bottomare
providedfor ventilagon,andto ensurere iableoperationolthe
unit andto protectit from overheating,theseopeningsmust
not be blocked or covered The openingsshou!d never be
blockedbyplacing theunit on abed,sofa,rug or othersimilar
surfacelhs unit sllould notbepiacedina built-in installation
suchasa bookcaseunlessproperventilationis provided
Object and Liquid Entry- Neverpush obiectsof any kind
into this unit through _hecab net slots as they may touch
dangerousvoltagepointsor short cimuit partsthatcoud result
n a tireor electricshock Neverspill liquidof any kindon the
unit
ElectricPower
Pa_e_:Saa_ces- This _it shouldbeopelate,
d onlyI_omg_o
typeOfpowersourceindicatedonthema_kinglabel ifyou are
not sureofthetypeof powersupplyto yourhome,consultyour
appliancedealeror localpowercompanyTo operateunil on
battery power, or other sources, refer to the operating
instructions
Grounding or Polarization - This unit is providedwith a
po arizedaiternating-curren_
ine plug (a plughavingoneblade
widel thanthe ethel} This plug will ft into thepowel outer
oniy oneway This is asafetyfeatureif youareunableto insert
the plug fully into theoutlet,l_yreversingtheplug If the plug
should still [a to ill, contactyour electrician_orap aceyour
obsoleteoatiet Donotdefeatthesafetypurposeofthepolarized
Plug
Power-Cord Prolection - Power-suppy cords should be
rootedsothattheyarenot likelyto bewalkedon or pinchedby
itemsplaceduponor againstthem,payingparticularattention
to cordsatplugs,conveniencereceptac!es,
andthepointwhere
they exP.from the produd
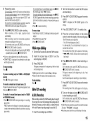
TABLE
OFCONTENT5
Overloading- DOnotoverloadwall outletSrextensioncords,
integralconveniencereceptaclesasibiscan resJlt in a risk of
fre or electricshock
OutdoorAntenna
Powerlines -Anoutsideantennasystemshouldnotbelocated
inthevicinity of overheadpowerIglesor other electricght or
powerdmu ts, or where il can fall into such power ines or
circuits Wheninstalling an outsideantennasystem,extreme
careshouldbe takento keepfromtouchingsuch power[nes
or circuitsascontactwi_hthemmight berata
OutdoorAntennaGrounding ifanoutsideantennaor cable
systemis connectedto the unit, be suretheantennaor cable
systems groundedso asto providesomeprotectionagainst
vogagesulges andbu it-up staticcharges Section810of the
National Electr cal Code, ANS[/NFPA No 70, provides
informaton with regardto propergrounding of the mastand
supportingstructure,groundingof thelead-inwiretoanantenna
discharge unit, size ot grounding conductors, IDeationof
antenna-discharge
unit, connectionto groundingelectrodes,
andrequirereemsfor thegroundng electrodeSeethefigure
Lightning
Foraddedprolecgonfor this unit receiverduringa Iightngg
storm,or whenitis leftunattendedandunusedfor long per ode
of time,unplugitfromthewal outletanddisconnect[heantenna
or cable sys[em This will preventdamageto the unit due [u
lightningandpower nesurges
I
INSTRUCTIONS .........
2
4
PARTSAND CONTROLS ..............
5
...........
ADJUSTMENTSBEFOREOPERATIONS ........
8
CO OPERATIONS .............................
10
Maintenance
8ADI0 OPERATIONS ...........................
12
Cleaning- Unpugthis unitfromthewall outletbeforecleaniP,
g
Do not use fiquid cleanersor aerosolcleanersUsea damp
ololh for cleaning
TAPEOPERATIONS .............................
14
SOUND ADJUSTMENTS ........................
17
TIMER OPERATIONS ...........................
18
Damage RequiringService
REFERENCE .....................................
20
Unplug this unit from the wal ou!let and referservicingto
qualiliedservicepersonne underthefo owingeondit ona
Whenthe powercord or plug is damaged
If liquidhas beenspilled,or objectshavefaen inlo theuni
- If theunit hasbeenexposedIo rainor water
- Iftheunitdoesnotoperalenormallybyfollowinglheoperating
nstroctone Adjustonly thoseconlrolathatare coveredby
the oberalinginstructionsas improperadjl stmentof other
controlsmayresulln damageandwil oftenrequireextensive
work bya qualifiedtechnicianto restoretheunit to normal
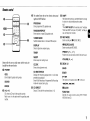
LEADIN
operaPon
-"
WIRE
If theunit hasbeendroppedor thecabinethasbeendamaged
- When the unit exhibitsa distinct changein performanceGROUND
CRAMP
ANTENNA
ths indicatesa needfor service
DISCHARGE
_
NTENNA
UNIT
(NECSECTION Do not attemptto service this unit yoursef as opening or
removingcoversmayexposeyoulo dangerousvoltageor other
hazardsReferall servcing to qualifiedservicepersonnel
CONDUCTORSReplonenieet Pails - Whenreplacementpartsarerequired,
be sure the service teclmician has used rep acementparts
Ep_GROUNDING
(NECSECT
ON
0
SERVCE
810-21
specifiedbythemanufactureror havingthesamecharaciedslics
as theorigina part Unaulhodzedsubstitutionsmay resull in
ELECTROD£
SYSTEM
GROUND
CLAMPS
(NECART250PART
N)
NRCNADONAL
ELECTRICAL
CODE fire,e ectdcshock or other hazards
I
IMPORTANTSAF_
PREPARATIONS..................................
System and accessories
CX-ND7OCOstereoeassetlereceiver
SX-ND70Frontspeakers
Remoteconlrol
FM antenna
AM antenna
J;C I
Solely Check- Uponthecompletonof anyserv eeor repairs
to Ibis unt, askthe servicetechnicianIo performsafetycllecks
to determinethat[heunit is n properoperatingcond t on
3
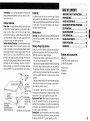
PREPARATIONS
Connection
2
b _ AC_wercordtotheAC_weroutleta_ _ o_
_onnectiorJs
oremQde.
1 Connect the front speakers.
Connectthe dghl front speaker(marked"R" on the rear
side) to the SPEAKERS
R terminalsand plaoeit on the
rgh side of theunit Connedthe left(marked"L" on the
rearside) to the SPEAKERS
L terminalsand place it on
the left sideThe speakercords with the whitestlipes go
to _he0 _ermrials
Connect the supplied antennas.
Strp off the nsu aton of the FM antennawith twisting
the cord
ConnecttheFM antennato theEM75 _ terminalwiihoui
the • mark and the AM antsn _ato '.he AM lOOP
ie_minas
Remotecontrol
Detachthe batterycompartmentd at lhe leal of the remote
contlol and inselt two R6 (sze AA) batterieswi_hcorrect
Polarty
AMantenna
R6(AA)
• Repace the batterieswith new ones whenthe operationa
distancebetweenLheremolecontrolandmain unitbecomes
shorter
• Removethebatteriesif the unii is notgoing to be usedlot
an extendedperiodo[ time
• Theremolecontrolmaynotoperatef ii is usedunderintense
sun ght, elc, o if its Ine of sigd is obstructed
3
Connect the AC power cord to an AC outlet.
WhentheAC powercord is connectedrean ACouter for
the first time, DEMOappearson the display
Tc deactivatetheDEMO,pressDEMO/ECO
• Do not short-circuitthe @ and@ speakercord leads
• Do not leave obeds generating magnetism or ob eels
affectedby magnetismnearthe speakers
4
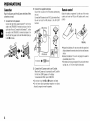
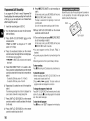
PARTS AND
CONTROLS
Mainunit:rear
_'yna°m_int-_rat-_ed-_e_o°_A_mp_ifie
O
]
--O
AM LOOP, FM 75 _2terminals
Pug n the suppliedAM and EManiennashere
IE_ VIDEO/AUX jacks
AccepBanalogsouedsignalsfrom exlemalequipmeot
Connectusing an optionalconnectng cablewith RCA
phoneplugs (red plug lo R jack,white plug _oL iack)
Referalsototheoperatnginstruciionsofyourequipment
Toswitchluncgonto externalinput,turnthe Dial%nelion
(see"ADJUSfMEN1SBEFORE
OPERATIONS"
)to select
heVID£O/AUXtunc%n
--0
TI,O;
TOchangethe displayednamelot this function, select
the VIDEO/AUXfunction, then Iold down ENTERand
pressPOWERon theunit Repea!lheprocedurelo seled
'RUX", "VIDEO" or 'TV"
--G
O
SPEAKERS_
terminals
Coneectthespeakercordof the supped front speakers
here
O AC power cord
isabrend-newampli%rsys_emwhereclea_midtohigl_raoge
frequencysound asweftasrich low frequencysound,can be
rep educedandlisfenerscanenjoytheclose-to-o%inalsound
wgh lessdistorton at eitherhigh or lowvolume levels
"_
...........................
Mainunit:front
0
O--
o
o
0
0
MODE
EntersthesettingmodeofGraphicEqualizerorSpectrum
analyzerdisplay
• REC/REC MUTE
Stadsrecording
0
m
SYNC DUB
Startsdubbingawholetape
SOUND
SeledsaI_quencyrangeofG_phicEquafizertoadjust
theleve]
I I PAUSE/SET
CD andTape:pausesplayback
Radio:storesthe receivedstationto preset
0
• STOP/CLEAR
CDandTape:stopsplayback
Radio:clearsastation!)reset
0
ENTER
Determinesthemodeandthetime (ECO,dimmel,clock
andtimer)
O
I_ PLAY/PRESET
0
Dial Function
Selectsa function(TAPE,TUNER,VIDEO/AUXor CD)
DECK
1/2
SelectsDECK1 or 2 inTapefunction
BAND
Selectsa bandin T_nerfunction
0
POWER _STANDBY/ON
Switchestheung on andoff (standby)
DEMO/ECO
Whenthe unit is turnedoff: switchesDEMOon andoff
Whenlheunit is turnedon:enlersECOor dimmersetting
mode
TIMER
Enterstimersetting mode
6
0
MULTI JOG
CD: skips to a previousor a succeedngtrack
Radio:selectsa presd number
GrapHcEqualizer:se]edsa equafizationcurveor adiusts
[he level
ClockandTmer: setsthetime
ECOandDimmer:selectsthe mode
PLAY 1-3
DISC CHANGE
CD andTape:startsplayback
Radio:tunes intoa presetstation
<I<I/t<I_DOWN,
IH_/IHHUP
TUNING
CD: skips to a previous or a succeedingtrack when
pressed,searchesa track in fastforwardor fast reverse
playbackwhenhed down
Tape:last forwardsor rewindsthetape.
Radio:manuallytunesdown or up withn theband
DISC DIRECT
Selectsa CD tray
Rota_es
the CD tlays
'LCD OPEN/CLOSE
Opensor closestbe disc eombar[rnent
0
VOLUME
Adiuststhevolume
0
PHONES jack
Pig in here an optional headphonessetwith a mini
stereoplug (03 5 ram) Speakeroutputis canceled
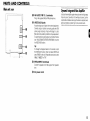
Remotecontrol
0
Theaurrthered
buttoes
takeonthesefunctions
whenpressed
SHIFT
Haiddownwhenpressinga numberedbuttonto change
its functionto thatprintedabovethe numbec
e.g.)
'Press SHIFT+SLEEP onthe remotecontroi"indicates
"Hold down SHIFTand press '6' (SLEEP)",so that you
can use 'SleeptimeP iundion
together
withSHIFT
helddown:
0
0
PROGRAM
Estersprogrammed
CDplaybackmode
RANDOM/REPEAT
Enters_andom
ol tepeeCDplayback
mode
0
0
0
m
TUNER MODE
Switches
between
stereoar monaural
FMreception
0
REC MODE
Staffs recordingwith OREC/REC MUTE
DISPLAY
Selects
a Spect_unq
analyzer
display
Q REC/REC
TIMER
PRESET (J_., V)
Pedo_msthe samelunctass asMULTIJOGon lhe unit
SLEEP
Enterss sap-timer
settngmode.
VOLUME
Buttonswiththesameor similarnameswiththemaiaunit
hesicafly
havethesamefuediaa.
CLOCK
Enters
clockad}ustment
mode
DECK
O POWER
CD EDIT/CHECK
Displaysthe remainingprayoacktimeof a CDwhen
pressed
dudngplayback
Enters
AIEditRecording
orProgrammed
EditRecording
modewhenpressed
dodngstop
IISET
GEO
EnlersGraphic
Equalizer
settngmode
SOUND
ENTER
E) 0-9, +10
CO selectsaCOtrackofthespecified
number
Radio:tunesinto the stationwiththespecgedpreset
number
0 CD DIRECT
SeleclaCDtraywiththenumbered
button(1-3)
MUTE
Startsrecordingwith RECMODE
(-t'-, --)
1/2
BAND
Thefunctionis thesameas_hatot _
on the unil
_I1_1/1<1<, I_/1_1
IICLEAR
FUNCTION
Swdpheshe active f oction amoog TAPE, TUNER,
VIDEO/AUXpod CD
7
ADJUSTMENTS
BEFORE OPERATIONS
DEMO
MODE
....... ,_ j_-,_.................... _
D,o,F°oo,,on-POWER_
STA
N D BY/O
DEMO/ECO
N
--
=
::
.....
_
_ _'
the _
--
MULTI JOG
--
VOLUME
J
f"-_
POWER
DISPLAY_
J La -VOLUME
CLOCK
_
- ENTER
--
,,i_l. I_11_
SHIFT
I
_
• IISET
-[,__
Volume
Turningthe uniton
PressPOWER_STANDI3Y/ON
(POWER
on the remote
control)
Turn VOLUME (Press VOLUME +, -- on the remote
control).
Adjst from O(minimum)to 40 a_,dMAX(maximum)
Tip:
Veume evelsettingis retaineddring power off sta_dby I
the unit is turnedoff with the volumeset1o27 or more,it is
automaticallyturneddownto 26thenexttime the[Jnt is turned
o[i
DialFunction
T_rn_e Dial FLJnCtiSlle select a Ieostier! (TAPE,TUNER,
VIOEO/AUXor CO)
The red light besideiheselecledfunci on turns en
8
Todeactivateandactivatethe DEMO
PressDEMO/ECO
whgnthe!!nilis tum_g_!!
Spectrum
analyzerdisplay
You_n change_e _ectrum _atyzer _/a_
Power
Turning the unit off
PressPOWER(_STANDBY/ONagan
The unit goes into standby
h_ not beenset, o DEMOappeorson _e disptoy
- ENTER
Press MODE twice and then within 4 seconds turn
MULTI JOG to select one of the three spectrum
analyzer dispIays.
Onthe remoteconiro i pressSHIFt+DISPLAYrepeatedly
- NORMAL:D spays thefluctuationfrom ew frequenciesto
high ones
BASS:Displaysthefluct atioo of lowfrequenciesonly
LEVEL:Displaysthe ilucluaPon of the averageof a the
frequencies
ECOmode
Dimmer
Reduces
power_nsumpfion
w# theb_wingoperations,
etc.
Adjusts
thebrightness
of thedispla_
1 PressSHIFT+CLOCK
on the remotecontrol.
ECO ON mode
1 PressDEMO/ECOtwice when the unit is turned
on, and then within 4 seconds press ENTER.
2 Press_1_1 or I_ to set the time.
Eachpresschanges
thetimein1-minutesteps.Holding
it downchanges
thetimeinlO-rninute
steps
if _
or Ib-I_ s nd pressedwithin4 seconds,
the
settngis canceled
• MULTiJOGisalsoavailable
inplaceof _
or I_
Theunt blacksoutwhenR'eunit is turboedoff Onlythered
indicatorIghts up (Onlywhenthe clock is set)
if dimmermodeis setto on, theunit ifluminationbrightens
(for 10seconds)only whenyou operatetbe uni
1 Press DEMO/ECOonce when the unit is turned
on, andthen within 4 secondspress ENTER
2 Turn MULTIJOGto select "EEO ON" and then
press ENTER.
g thereis no MULTIJOGo_butel operaton within4
seconds,
thesettingis canceled
Tocancelthe ECOmade
Repeat
theaboveandstied "ECO OFF"
2 TurnMULTIJOGto selectoneof thethreedimmer
modes or 'DiM-OFF', andthen press ENTER.
"DIM-OFF' is lhebr gMestand"DIMMER 3" is the
dimmest
If thereis no MULTi,JOGor buttonoperation
within4
seconds,
thesettingiscancded
Tocancelthedimmer
Repeat
theaboveandseled"DIM-OFF'
Settingtheclock
3 PressENTERor IISET.
Thetimedisplaystopsflashingandthedockstartsfrom
OOseconds
Todisplay thelime
PressSHIFT+CLOCK
ontheremoteconlroi
Thetimewill bedisplayedfor4 seconds,but it cannotbe
displayed
dudngrecording
Toswitchtothe 24-hourstandard
Displaytbetimeandpress• within4 seconds
Witheachpress,the dock alternates
between
the 12-hour
slandard
and_he24-hourstandard
in the12 Liedstandard,"RM 12:00" indicates
midnight
aed"PM 12:00"noon
If the clockdisplayflasheswhenthe unitis tnrned
off
Therel_asbeeea powernterruptionRe-sdtbedock
9
CD OPERATIONS
_
0-9,+10
To replace disc(s) during playback without
interruption
Whie onedisc is beingplayedback,pressDISCCHANGEso
hat thecompartmentopens,replaced sc(s) withotherone(s).
andpress DISCCHANGEto closethe compadmenl
_1"_
_--_ _1 I
CD EDIT/
CHECK
Random/Repeat
playback
PROGRAM MULTi dOG
Dial Function
Random
playback
playsallthetracks
ononedesired
_ orall
_a discsm randomorder.Repeatplaybackplaysall the tracks
repeatedlyan onedesireddiscor all thediscs•
II
II
.__/
1
...................
This
unitplaysbackfinalized
CD-R/RW
discs
aswellasaudio To skip to the beginningof the current/preceding/
@s
succeeding
track
Press_1_1or I_D,-repeatedly
or turnMULTiJOG
Playback
I
Turn the DiaI Function to select the CD function
andloaddisc(s).
Press_ CD OPEN/CLOSE
toopenthedisccompadmen!
and placeoneor wa disc(s)with the labelledsideup
TOplacethreediscs,pressDISCCHANGEsothatthetrays
rotate, then place ihe third one Lastly. close the
compadmentwith _CD OPEN/CLOSE.
','When load ng an 8cm (3 inch) disc. pace it on tie
innercirce of thetray
T_,
press IP-.
T_sired
disc, press DISC DIRECT
PLAY1-3.
T'aynumberbeingpayedbackflashes
To stop playback
Press •
To paase playback
PressII Pressagainto [esme p!ayback
10
Tosearch(playbackinlast forwardor fastreverse)
Holddown4141or _
Release
at!hedesRed
pont
To select a disc and a track with the remote control
1 PressCD DIRECfl aDd_henPressthenumberedbutton(t3) within 3 secondsto selecta disc
2 Pressthe numberedbuttonsto selecta lrack
Toseed track 25. press-1 O,4-10and 5
- TOse!ecttrack 10. press+10 and0
Press SHIFT+RANDOM/REPEAT repeatedly on
the remote control to select one of the following
modes:
Randomplayback:"RANDOM" lights up
Repeatplayback:'c_,.' lightsup
- Randomand_epeatplayback:"RANDOM" and "_-"
lightsup
2 To g!ay one desired drsc, press DISC DIRECT
PLAY1-3.
T_,
press IbTo cancel random/repeat playback
PressSHIFT RANDOM/REPEAT
repeatedy on the iemote
control so that both "RANDOM' and "_,_' disappearon
thedisplay
To display the remaining playback lime of the CO
PressSHIFT+CDEDIT/CHECKon theremotecontrol Press
again to leturn to _heelapsedtime disp ay
To repeat a selected set of tracks
Selectthe lracks with programmed p ayback, then press
SHiEI+RANDOM/REPEAT
on lhe lemote control to sebct
repeatp ayback
",'Remainingplayback time cannot be displayed during
randomp aybackor programmedplayback
"-qtis impossibleto play a se]ededset of tracks in random
order
Programmed
playback
Playsbackup to 30 selected_s
_ programm_ order.
1 PressSHIFT+PROGRAM
on the remote contrd
during stop.
"PRGM' flashesonthedisplay
2 PressCDDIRECTon the remotecontrd andthen
press the numbered button (1-3) within 3
secondsto select a disc.
Gotothenextstepwhenthetraystopsrotating
3
Press the numbered buttons on the remote
control to program a track.
The selectedtlacknumberlights up on the display
- To selectthe25th track,press 10. _10 and5
- in selectthe lOth track,press_I0 and 0
To check the program
Press_
or I_ repealedlyduringstop the tracknumber
and programnumberaredisplayedin succession
Tocleartheprogram
Press• dudngstop "PRGM"disappears
onthedisplay
Toaddtrackstothe program
Repeat
step2and3 beforestartingplaybackThetracksare
addedtotheendof theprogram
Tochangetheprogrammedtracks
Cleartheprogram
andreseled
thetracksinyourdesired
order
• Do notplacemore [nanonedisc on onetray
• Do nottilt the unit with discs loaded
• Tile unil maynot playa CD R/RWdisc recordedon personal
computersor certainkindsof CD-R/RWrecorders
• Do notattachadhesivelabel,etc to eithersde of a CD R/
RWdisc. asdoing so may causemagunctioe
• Denot loadanunrecordedCD-R/RWdisc Thediscmaybe
damaged
• Do not use irregular-shapedCDs
4 Repeatstep 2 and 3 to program othertracks.
5 Press I_.
• Duringprogrammedplayback,you canrlotselecta dsc or a
t_ack with the numbered buttons "ERN'T USE' s
displayedwhenyou try to selecta track.
• if the total playback time of the program exceeds99:59
rnir utes. or if a track with a track rumber exceeding30 is
programmed,the playingtime is displayedas"- -:- -"
,,You caeeot program more than 30 tracks "FULL" is
disp ayed
11
RADIO OPERATIONS
Tunin#in to preset stations
BAND
--
On the unit
1 Turn the Dial Function
MULTI JOG
POWER
to select the TUNER
function and press BAND to select a band.
MODE
2
Dial Function -• BAND
I|SET
- Ilm,_,
• IISET
mCLEAR
- FUNCTION
mCLEAR
Manualtuning
1
Turn the Dial Function
function.
Preset tuning
to select the TUNER
Presetyourfavoritestationsand tunethemin direcHybyusing
presetnumbers.
2 PressBANDto select a band (FMor AM).
Presetting stations
3 Press _1 or _
to tune in to a station.
"TUNE"is dispayedwbenastationis tunedin
"11_¢)_1)'
gh!s upforFMstereoecepton
1 Turn the Dial Function
To search for a station automatically (Auto Search)
Hold down _
or
Theunit seachesfor a stationupor downthe bandandstops
at reception
To stop thesearchmanuafly,press _1,_1or I_
• AUlOSearchmaynot stop at slat onewgh weaksignals
to select the TUNER
function and press BAND to select a band.
2
3
Press _141 or _
station.
to tune in to the desired
Press IISETtostorethestation.
The presetnumber beginningIrom "1", appearson the
display
4
Repeat step 1 to 3 to preset other stations.
"You cannot sto_emore than a total of 32 presetstations
"FULL" s displayed
12
Press IP- repeatedly or turn MULTI JOG.
With each press the station wth the succeedingpreset
numberis tunedin
On the remoteQgetroj
1 PressFUNCTION
repeatedlyto selectthe TUNER
function and press BANDto select a band.
2
Press the numbered buttons for the preset
number of your desired station.
- To selectpresetnumber20, press+10, 10 and0
To selectpresetnueqber15,press+10 arid 5
• Pressing PRESET/_. , V
or _ repeatedlycan
aBo select thepreset number
To clear a preset station
1 Tunein to the staten by presettoing
2 Press ==CLEAR,thenpress | |SET wthin 4 seconds
Presetnumbersof presetstations n the bandwith higber
numbersdecreaseby one
Adjustments
Antennas
Keepaniennasawayfrom,netal[icebpde, dectricalequipment
andcords
F_:
Extendfuly andpus tiun for the bestreception
[fiecdvingconditionisPoor,connectoptionaloutdoorantenna
to FM 75 _ terminal Besureto corned the shield braid oi
theantennato ne _ terminal
A_nlenna: Rda}eto find best reception
Toswitch to monaural FM reception
PressSHIFT+TUNER
MODEon theremotecontro With each
press 'MONO' and "STEREO" are displayedalternatey
on thedspay
Tip:
When FM stereoreception is poor, swi cPing to monaural
reducesnoise
To switch the AM tuning interval
Hoiddown BANDand press POWERon the unt Witb each
p_ess,theAM tunng in e_vaialternatesbetween9 kHz/step
and 10 kHz/step
Tip:
The default s 10 kHz/step Changeit only when using the
unit n a 9 kHz/steparea SwitchingAM tunng intervaldears
all '.hep_esetstations
13
TAPE OPERATIONS
To reset the tape counter
Press• inslop mode,andthe tapec(nmleronthe displayis
resetin '0000
Openingand dosing the cassetteholder
will a'so resetthetapecounter
REC ------'%
- MULT JOG
MODEA--O,SC
D REOT
PLAY 1-3 • REC/
RED F"
DECK 1/2
Dial Function
-
0-9,+10 _=
CD EDIT/
C.ECK
SYNC DUB --
--DECK2
DECK 1 -• REC/-REC MUTE
I_
SHIFT ----'_
I!
3 Press D,,-.
Playback
Useonly type, (normal)tapes.
1 Turnthe Dia!Functionto selecttheTAPEfunction.
Toopen the innercassetteholder
Theinnercassette
holderopensordosesautomalically
when
openingor closingthe ou!ercasse!teholder¸g _heouter
cassette
hoderisalreadyopen,p_ess
A PUSHEJECT
ofthe
innercassette
holdertoopenit
2 Press A PUSH EJECT/CLOSEon either side
(DECKI and DECK2) to openthe outercassette
holder andinsert the tapein the deck.
To open or close beth decks (DECK 1 and DECK2)
Insert
withtheexposed
sdedownandplayback
sidefacing
putfromtheunit Toclose,pushA PUSHEJECT/ClOSE simultaneously
Pressor push APUSH EJECT/ClOSEon both sidesof the
onthesidewherethetanes nse[ed
APUSH EJECT
inner cassette holder
t
_PUSH EJECT/CLOSE
Outer cassette holder
14
_)
outercassetteholdersimu tar eousl_
Tostopplayback
Press•
To play continuously(DECK 1 to DECK2 )
Loadtapesin bothdecksandslart playbackon DECK1 Then,
assoon as playbackoil DECK1 finishes,playbackoil DECK
2 will startwithout interruption.
• Theboth deckspay oneside of thetapes
TOplay bask type II (High position) tapes
TurnMULTIJOGuntil "SOFT" is displayedwhile playng a
type g tape
Theunit automatical
y setsthegraphicequalizerto appropriate
levelsto providetheoptimump aybacksoundfor typeII tape
The 'SOFT"funct on workseven afterthe unit is turnedoff or
thefunctionis chanaedunless t is canceled
To cancel it cancel the orao!ic eeualizer /see "SOUND
• Use of 120-minute or Ionge_tapes is net recommended
since they are extremely tlin and easily deformed of
damaged
,,Takeup any slack in the tapewith a pencil or similar tool
beforeuse Slackape may iam in themechanism
Basicrecording
Topauseplayback(DECK2 only)
PressI| Pressagainto resume
Userally typeI (normal) tapes.DECK2 is the recordingdeck.
Onlyonesideof the tapecan be recordedat a time.
Tofastforwardor rewind
Press_
or I_
I
Toselect a deck (DECK 1 or DECK2)
PressDECK1/2 in stop modewhentapesare loadedn both
decks Thedecknumbe_("TI" or "T2") is displayed
Insert the recording tape in DECK 2.
Press_ PUSHEJECf/CLOSEto opentheoutercassette
holder,and insert with the exposedside down and the
sideto be recordedon facng out fromfhe unit
Wind upthe tapeto the desiredpoint if needed
2
Prepare the source.
T_,
selectfheCDfunctionand load disc(s)
TOrecorda radiobroadcasttunein tothe desiredstation
To recorda togA,nsert the sourceIape d! DECK1 and
selectthe 1APEfundion (DECKt)
T_zecordf_omconnectedexternaleOUiDmentselectthe
ViDEO/AUXfunctionand preparetheequipment
T_gL!_-_,
press QREC/
RECMUTEagain while "REC' flashes
To.recordmerethana 4-secondblanksoace press•REC/
RECMUTEagainaftertheungentersrecordingpausemode
Eachtime the buttonis pressed,a 4-secnndblafk spaceis
added
2 PressII to resumerecording
3 Press OREC/RECMUTEto start recording,
When recording a CD or tape, playback starts
autemaPcafly
Whenrecordinginputfrom connectedequipment,
maouafly
startplayback
ofthesource
Ontheremotecontrol,pressRECMODEandthenpress
OREC/REC
MUTEwthio3 seconds
• Youcanalsochange
thesourcebypressing
REDMODE
repeatedly
beforeplessingQREC/REC
MUTE
TOerasea tape
I insertd'etapeinDECK
2 Setthetapetothedesredpoiotif
needed
2 PlessDECK1/2
toselect"T2"
3 PressOREC/REC
MUTE
• Volumeoftoneadjustment
doesnotaffectrecording
• "ERN'T REE"s displayedif youattempt
torecordatape
wghthetabbrokenoff
2 Insert the original tape in DECK t and the
recordingtape in DECK2.
Wholetapedubbing
1 Turnthe DialFunctionto selecttheTAPEfunction.
3 PressSYNCDUB.
the tapesarerewoundtothebeginningnftheImntside
To stop recording
Press •
andrecording
starts
•
Dubbing
c
annot
startJromapointhagway
inthetape
Topauserecording(only for TUNERor VIDEO/AUX
•
Only
onesdeofthetape
canberecorded
atatime
source)
PressII
Pressagainteresume
Torecorda selectedsetoftracksfrom a CD
Program
thedesired
traeks(see"Programmed
playback')
and
tdenpressOREC/REC
MUTE
To record a 4-second blank space (only for TUNER
or VIDEO/AUXsource)
1 PressQREC/REC MUTEdudogrece_dingor n recording
pausemode
"REE" flasheson _hedisplayfor 4 seconds(a blankspace
is madeinthe meantime)andthentheunit eole_srecordng
pausemode
Tostopdubbing
Press•
EditedCDrecording
AI Edit Recordinl7
When
recording
a wholeCD,AIEditRecording
takesthelength
ofyourtapeintoaccount
andrearranges
therecording
orderof
thetracksif necessary,
sothatnotrackiscutshortattheend
oftheside.Prepare
o tapetongenoughtorecordtheCD.
1 Insert the recordingtape in DECK2,
2 Turnthe Dial Functionto select the CDfunction
and load disc(s).
3 PressSHIFT+CDEDIT/CHECK
onceonthe remote
control
'EDIT" is dsplayedand'AI c-g0" appearsonthe
dsplay
4 PressDISC DIRECTPLAY1-3 to select adisc.
Press the numbered buttons on the remote
control to enterthe length of the recordingtape,
10to99 minntes
canbespecfied
Fora60-minutetapepress6and0
in a fewseconds,theunit ddermnesthetraeksto be
recorded
foreachsde
ThemcoldingtimeleftlotsideAappearsonthedisplay
• _1_1,I_ o_MULTIJOGcanalsnbeusedtospecify
tapeength
Press OREC/REC MUTE to start recording on
side A.
Onthe remotecontrol pressRECMODEandthenpress
OREC/REC MUTEwghin 3 seconds
The tape s rewound to the beginning of side A and
recordingstarts
Go_othenext step whenrecordhlgon side A f nishes
7 PressSHIFT+CDEDIT/CHECK
onceon the remote
control.
Therecording
ime leI:fat sideBappearsonIhedisplay
Turn overthe tapeand press QREC/RECMUTE
to start recordingon side B.
Ontheremotecontro,pressRECMODEandthenpress
OREC/REC
MUlEwithin3seconds
• AIEdit Recoding cannotbeusedwgh discswithmorethan
30 Lracks"TR OVER" is displayed
• Recordingcannotstartfrom a point halfwayin thetape
15
Pro#rammed Edit Recording
As you program the CDtracks to record, ProgrammedEdlt
Recordingdisplaystile remainingrecordinglime for eachside
of the tape, so you can easilyselect a set of desiredtracks
within the lengthof yourtape.
1 Insert the recordingtaps in DECK2.
9
Press OREC/REC MUTE to start recording on
side A.
Ontheremotecontrol, pressRECMODEandthen press
• REC/RECMUlE within 3 seconds
Tbe tape is rewound to the beginning of side A and
recordingslarts
Go_othe nextstep whenlecordingon side A finishes
2 Turnthe Dial Functionto select the CDfunction
and load disc(s).
19 Press SHIFT+CDEDIT/CHECKon the remote
control to switch to side B.
3 Press SHIFT+CDEDIT/CHECKtwice on the
remote controL
'PRGM"and"EDIT" aredisplayedand'P C-O0'
appeals
onthedisplay
11 Turn over the tape and press OREC/REC MUTE
to start recording on side B.
Onthe remotecontrol, pressRECMODEand thenpress
OREC/RECMUTEwithin 3 seconds
4
Press the numbered
buttons
on the remote
control to enter the length of the recording tape.
10to 99 minuies canbe specified
• _,
_
or MULTIJOGcanalso be usedto specify
tapeleng!h
5 PressDiSC DIRECTPLAY1-3 to select a disc.
Then,pressthe numberedbuttonson the remote
control to seIectthe first track to be recordedon
side A.
Toselectthe25thtrack,press÷10,_10and5
- ToselectthelOthrack,p_essHOandO
8 Repeatstep 5 to selectthe rest of the tracks for
side A.
1tiereroaggng
recarding
[meofsideAis disp!ayedYou
cannotselecta trackwithalongerplayinggme
7 Press SHIFT+CDEDIT/CHECKon the remote
control to switch to side B and select the tracks
fortheside.
8 Press SHIFT+CDEDIT/CHECKon the remote
control to switch backto side A.
16
• You cannot program more than 30 tracks "FULL' is
displayed
• Youcannotprograma tlackwith atrack numberlargerthan
30
• Recordingcannotstaff from a point ha fwayin thetape
To stop recording
Press• Recordng and CD playbackstop simu laneous}y
To check the program
1 Before recording press SHIE_CD EDll/CHECK on the
remoteconbol to seed side A or B
2 Press _
m I_1_ repeafedly The track nnmber and
programnumberare disp ayedin s cress on
Tochangethe programofeachside
PressSHIFI+CD
EDIT/CHECK
ontheremotecontroltoselect
sideAor B,andpress• tocleartheprogram
fortheselected
sideThen,selecttracksagain
Toclearthe editprogram
Press• twicesothat'EDIT" disappears
fromthedisplay
Breakoff lhep astir tab ofthecassettetapewitha screwdriver
or other pointedtoo To recordon the tapeagain,cover the
detectionslot with adhesivetape
SideA _e
A
SOUND
ADJUSTMENTS
Theequalizationcurvecan be customizedto suit your
preference.
-- MULTI JOG
MODE
-- :._OUND
-ENTER
!NTER
I
PressSOUNDrepeatedtytoselectoneof the three
frequency rangesto adjust.
BASS:Lowrangeflequencies
- MiD:Mddlerangef_esuencies
- TRE:Highrangefrequencies
2 TurnMULTiJOG(pressPRESET/%. or V on
the remote control) to adjust the level within 4
seconds.
3 Repeat Step 1 and 2 to adjust all the three ranges
Graphic
equalizer
Seledsosoundequotizoiion
curvetomatchfilemusic_,pe.
PressMODEonceandthen turn MULTi JOGwithin
4 seconds to select one of the four equalization
To display the current GEQ mode
PressMODE/GEQon the remotecontrol) once
ThemodewiP bedisplayedfor 4 seconds
if necessary.
_g_our
thenext :_f,g.
customizedcurve, orocegdto
4 HoId down MODE(GEQon the remote control)
Tocancelequalization
until "PRESET" flashesin the display and then
Press
M
ODE
once
andthen
turnMULTi
JOG
within4seconds
curves,
press ENTERwithin 4 seconds.
Onthe remoteconhol,pressGEQandthenpressPRESET toselect"GEQ OFF"
Thecustomized
curveis storedin "USER"
Ontheremotecontrol,pressGEQandthenwithin4seconds
/% or V _epeatedly
within4 seconds
press
PRESE]/_.or
V
repeatedly
until
'GEQQFF"is
•
if
youse]ect
oneotthepreset
curvessuchasROCK
before
ROCK:
Powedld
soundemphasizglg
lrebleandbass
d splayed
performing
STEPE youcancustomize
a curveonit
- POP:Morepresence
inthevocalsandmidrange
• Onceoneof the frequency
rangesis adjusted,the GEQ
- JAZZ:Accented
lowerfrequencies
foriazz-type
music
ndJcatorremains
displayed
urdi["GEQOFF"isselected
USER:
Acustomized
curve(see"Setting
a curvemanually")
17
TIMER OPERATIONS
--ENTER
- TIMER
POWER
STANDBY/ON
B
• SLEEP
• IISET
TIMER
- II_lb
IIBET
Sleeptimer
Timerplayback
Turnsoff theunit nutomat_atlyafter a specifiedtime.
Turnson theunit at a specifiedtime for thespecifiedduration.
Make sum the dock_ setcorrecH_
1 PressSHIFT+SLEEP
on the remote controL
"SLP" appears
onthedisplay
2
Press _
or I_-t,,- repeatedIy to set the sleep
timer duration.
With eachpress,the timerdurabenchangesin 5-minute
stepsbetween5 to 240minutes It thereis no buttoninput
for 4 seconds,thecurrentsetgngisenteredautomabcally
Theunit turns off afterthese]eetedtime
,, MULTiJOGis alsoavailabien placeof _
or
Tip:
Te oisplay is dimmedwhile the sleeptimer is active
Press TIMER (SHIFT+TIMER on the remote
control).
_5" indicatorlights upand _(_ PLRY" appearson the
display Then,the timer-on time and the source name
appea_alternatelyon the display
Press <_1 or i,,i,,- to set the timer-on time, then
press ENTER or ||SET.
if _
or I_i,,- is not pressedwithin 6 seconds,you
wifl exil thetmer settingmodeendthe preyous setting,
howeve_s entered
3 Press _1<1 or i-i,- to select the source,then
Tocheckthe remainingtime untilthe anitturnsoff
press ENTERor IISET.
PressSHIFT+SLEEP
on tileremotecontrol Theremaining
times displayed
for4seconds
Press << or _
to set the timer-activated
duration, then press ENTERor IISET.
Tocancelthesleeptimer
Witheachpress,thegmeractivated
duretoochanges
in
P_ess
SHIFT_SLEEP
twceontheremote
contretsothat% LP
5 minulestepsbetween
5 to240minutes
OFF" isdisplayed
18
5 Press _
or _
to adjust the volume level,
then pressENTERor IISET.
Adjustfrom0to 26
6 Preparethe source.
T_I
loaddisc(s)
T_,
selectthebandandtuneintothedesired
station.
T_,
insertthetapeandselectthedeck
Top]_yexiernal
enuioment
connected
totheV]DEO/AUX
jTLO_,
setanexternal
timerfortheequipment
sothatits
playback
beginsetthesametime
7 Press POWER _STANDBY/ON to turn the unit
off,
At bmer-ontime, theunt turnson andplaysthe seeeted
source After the specifiedtimer-activatedduretion, the
unit turns off again
Tip:
Thedisplay is dimmedwhile tbe timer playbackis active
• Tostop tmer settingin steps2 to 5, press •
Timerstandbymedeis alsocanoeed
",,Timerplaybackwill not begin unlessthe unit is turnedoff
first
• Connectedequipmentcannotbeturnedonor offbythebuiltin timer(If !his ung Useanexternaltimer
• MULTIJOGis alsoavailablein placeof << or i,,,!,,• In step3, FUNCIIONel Dial Functionis also availableto
selectthesource
In step 5, VOLUME'-I-, -- or VOLUMEis alsoavailableto
selectthe source
To display the timer setting
PressTIMER
Thetimer-ontime,thesourceandthetimer-activatedduration
ared splayedfor 6 seconds
Tip:
Timersettingcan be dislgayedeven while theung is turned
off,andatthattime if youpressENTERol II| within 6 seconds
afterTIMERis pressedryou canenterthetimersettingmode
andchangethe setting
Tochangethetimer setting
Resetthetimeragain
To cancel the timer
PressTIMERrepeatedlyuntd "(_ OFF" is displayed "_)"
disappearsfrom thedisp!ay
Tip:
Yor timersetting is retaned even if thetimeris canceled
Nexttime thetimeris activated,you (;anchangeyourprevious
setting,or simply usethe samesettingagain
Timer recording
Timer
recording
isavailable
onlyforTUNER
andVIDEO/AUX
(withanexternal
timer)sources.
1 Press TIMER (SHIFT+TIMER on the remote
control) repeatedlyuntil "_)REC"appearson the
display.
2 Carry out step 2 to step 5 described in "Timer
playback".
Prepare the source.
To recordthe radio select the band and tune in to the
desiredstation
To recordexternaleouirJmentconnectedto the VIDEO/
_,
setanexternalHmerfor theequipmentsothat
its playbackbeginsat thesametime
4 Insertthe recordingtape in DECK2andthenturn
the unit off.
TIp_
Thed splay isdimmedwhile thelimef recordingis active
19
REFERENCE
Careandmaintenance
Troubleshooting
Oneusiun_coreandm_teo_ce of the unit andthe so_ure
ore neededto _fimize the performanceof yourunit.
tf yourunit failstoperformproperty,checkthefollowingguide
and therelevantsectionsof the OperatingIostraetlons.
To clean the cabinet
Use a soft and dry oath if the uflg Suflacesara extremey
oirty, use a soft clotb tightly moistenedwilh mid detergent
solution Donot usestrongsolventssuchasalcohol, benzine
or thinner
There is no sorted,
• Are tbespeakersand ACpowercord connededproperly?
To clean the tape heads
Dirtytape heads causesound deterioration After every 10
hours of use dean the tape l_eadswith a head cleaning
cassette Referto fheinstructionsof thecleaning cassette
To demagnetize the tape heads
Usea demagnetizingcassetteafter every20 to 30 hours Ol
use Referto theinstructcos at the demagnetizingcassette
CareofCDs
WhenaCDbecomes
dirty,wipeit fom thecentreoutwitha
cleaning
cloth AfterplayingaCD,storeit inits caseDonot
keepit inhotor humidplaces
Care of tapes
Storetapesin their casesafter use DOnot leavetapes near
magnets,motors,televisionsets,or anysourceof magneism
DOoutexposetapesto direct sunlight=or leavethemin acar
parkedn dirad sunigbt
The unit shot off suddenly.
• Possiblya shortcircuit inthespeake[termieaisDisconnect
theAC powercordfrom theACpowerotlet andre-connect
*.hespeakercords correctly
The unit blacks out when the unit is turned off.
• is ECOmodesetto on?
Erroneous
display.
• Resettheunit
Poor radio reception.
• Checkantennaconnection Adiust Pieantennato fed the
best reception
• Moveunit andanteonaawayfrom otherelectricapp iances
andcolds
Thetapedoesnotran,
• is thedeckin pause?
Poortapesound,
• CheckfordirtyPleads
Cleanthemif needed
• UsetypeI(norma)tapes
Cannot record.
• is the erasurepreventiontabof the tapebrokenoff? g so,
cove_the detectionaid wth adflesivetape
The CD player works poorly.
• Is thedisc cormclly loaded?
• is thedisc dirty?
',,is the lens affected by condensation? if so, wait
appraximatdyone hour andfly again
20
Condensation
Moisture mayform on theCD pickup lens when:
• Theunit is movedlrom a cold spot to a warmspot
• Thehealingsystemhas just beenturnedon
• Theunit is used in a very humid room
,,Theunit is cooledby anair conditioner
When this unit has condensationinside=it may not funcgon
normally Should this occur leavethe unit for a few hours,
thentry to operateagan
Resetting the unit
if an unusualcoedgionoccursin the display windowor the
cassettedeck,resetthe ungas follows:
1 PressPOWERtoturnoff the power
if thepowercannot beturnedoff, disconnecttheAC power
cord,thenphJg it in again
2 Holddown • and press POWER
Everythingstoredn memoryafterpurchaseis cleared
GENERAL
Specifications
MAIN UNIT CX-ND70
TUNER
FMtuningrange
875 MHeto108MHz
FMusablesensitivity(IHF) 132 dBf
FMantennalerminal
75o_ms(unbalanced)
AMtunng range
530kHzto 1710,_Hz(10 kHzstep)
531kHzto 1602kHz(9 kHzstep)
AMusablesensilivily
350pV/m
AMantenna
Loopartenna
AMPLIFIER
Poweroutput
To[alharmonicd storton
Ingul
Outputs
CASSETTEDECK
Track
Iom'at
Frequency
response
Recording
system
H_ds
CO PLAYER
Laser
D/Aconveder
SignaHo-eoise
ratio
Harmonicdistortion
112W+ 112W(40Hz-20 kHe,THD
lessthan1%, 6 ohms)
140W - 140W (1 kHz,THDless
than10% 6 ohms)
008 % (56 Wr1kHz=6 ohms D!N
AUDIO)
VIDEO/AUX:
700mV
SPEAKERS:
6 ohmsor mole
PHONES:
32ohmsor more
4 tracks,2 channelsstweo
50Hz 15kHz
ACbias
DECK1:playbackx
DECK2: lecording/playbac,_
x 1,
erasex 1
Powe_requhemen[s
Powerconsumption
Pewee
consumotion
o standby
mode
Dimensions
(WxH x D)
Weight
120VAC,60 Hz
120W
WithECOmodeon:06 W
WilhECOmodeoff:25W
260x 324x360 mm
(lO Vax12 f/s x14 /a in)
85 kg(18 Ibs!2 oz)
[RONT SPEAKERSSX-ND70
Speakersystem
3 way, bass reflex (magnetic
shielded)
SpeakerurHs
Wooer:160mm(6 _ in )cone
_woe_r:60mm(2 _8 in) cone
Super!weeter:20 mm (13/16in)
ceramic
impedance
D mensions(Wx H xD)
Weigh
g ohms
250 x324x268mm
(9 V_x12V_xlO_in)
4 5 kg(9 !bs15az)
Specifications
andexternal
appearance
aresubjecttochange
withoutnotice
COPYRIGHT
Checkcopyright
lawsrelevant
torecordings
fromdiscs,radio
ortapefo_thecountrywheretheunitistobeused
Semiconduc!or
laser(7,= 780nm)
1bt dual
85dB(1 kHz,0 dB)
0 05 % (1 kHz 0 dB)
As an ENERGY
STAR®
that this product
STAR® guidelines
Partner,
meets
AIWA has determined
the ENERGY
for energy efficiency¸
21
NOTE
[his equipmenthas beeneared and fou_'dto comply with
thefimits for a C]assBdigga device pursuaMto Part15 of
the FCC Rules These mite are designed to provide
reasonableprotection against harmful interference in a
residential nsta iation
The equipment generates, uses and can radiate radio
frequencyenergyand g not nslal}edandused n accordance
withtheinstrud ona,maycase harmfu interferenceto fade
communications However,there is no guarantee that
intedelencewill :_otoct Jr in a particularinsta[at on I[ this
equ pment does cause harmlul interterence to radio or
television!eception,whch can be deterroinedby turningthe
equipmergoffandon, _heuseris encouragedto try to correct
the interiereneebyone or moreof the iollow ng measures:
Reodenlor relocatethe receivingantenna
[nc easetheseparagonbetweentheequipmentandreceiver
Conned the equ pmentinto an ou_lelon circuit different
from thatto whch the ieceiveris connected
Consultthe dealel or an experiencedradio/TVtechnician
fo_help
CAUTION
Modifica!iors el adj slmentsto this producl,whch are not
expresslyapprovedby themanufadurer mayvoid the user's
right or authorityre epelatethis product
For assistance and information
AIWA CO.,LTD.
call tell free 1-800-BU¥-AIWA
(United States and Puerto Rico)
Printed
in Malaysia