1
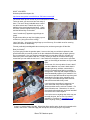
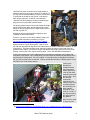
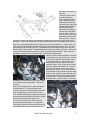
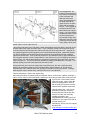
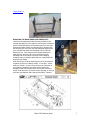
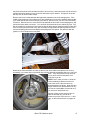
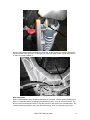
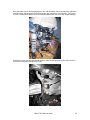
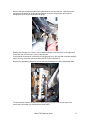
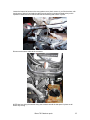
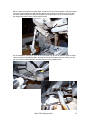
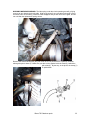
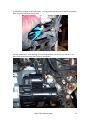
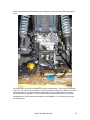
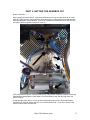
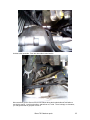
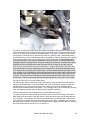
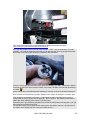
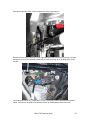
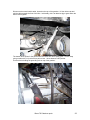
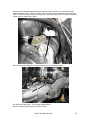
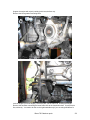
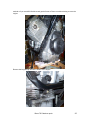
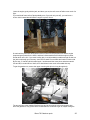
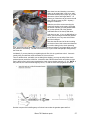
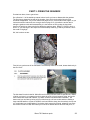
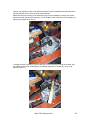
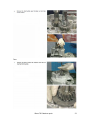
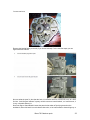
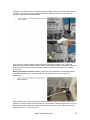
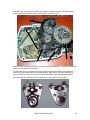
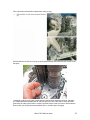
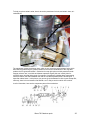
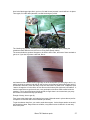
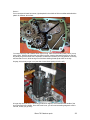
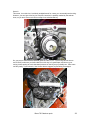
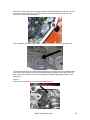
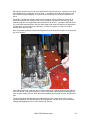
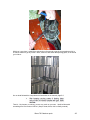
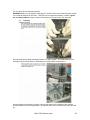
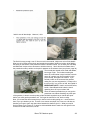
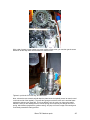
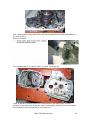
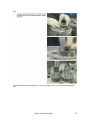
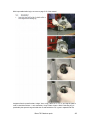
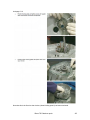
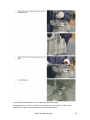
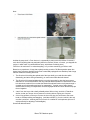
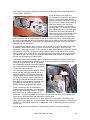
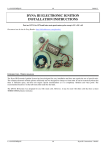
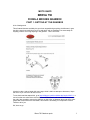
MOTO GUZZI
BREVA 750
FIXING A BROKEN GEARBOX
PART 1: GETTING AT THE GEARBOX
A bit of background:
This all started because suddenly the gear lever stopped doing anything; the bike was in gear,
but all the gear lever would do is move up and down, with no resistance, but not actually do
anything in terms of moving anything in the gearbox. Then I found this:
It had to be that. And so began this sorry saga, which I shall now attempt to document; I hope
that none of you ever have to find use for it.
To see the thread that started this, go to http://wildguzzi.com/forum/index.php?topic=25247.0. It
turned out that two other Breva owners (Muzz and NOLAGuzzi, real names withheld to protect
the guilty) also needed to remove the gearbox on their bikes, so between them and all the other
people who contributed to the discussion, this manual is something of a cooperative venture.
Thanks to all of you
OK, here we go.
Breva 750 Gearbox repair
1
WHAT YOU NEED:
Workshop manual and parts list:
http://www.motoguzzisti.com/m/br/breva-750-frame-manual.pdf
The e-mail and/or phone number of your local/favourite Guzzi dealer.
Tools: as usual, you can never have too many of
them. The ones I found invaluable were a set of
hex drive sockets and T-handle hex drivers, in
addition to the usual hammers and stuff. I really
like these, with the regular hex key in the handle
and the ball-end key on the shaft.
Lots of containers (Tupperware-type things are
great).
A light whose cable you won’t be tripping up over
all the time (I hung mine off the ceiling).
Lots of wire ties – long ones for tying things up out of the way, 20 cm black ones for securing
cables and wires on reassembly.
Friends, preferably knowledgeable about motorcycles, and strong enough to lift the bike.
Beer (for friends)1.
If you are going to take the gearbox apart, I have no clue how you could do it without the two
special tools that you need to get the nut on the mainshaft off and then back off again (picture).
So you need those. One you can have manufactured (cost me about US$ 65), the other you
have to buy from Guzzi (about US$ 185 – ouch!), unless you have an old clutch centre lying
around that you can make the tool out of. I have both tools, and hope I never have to use them
again, so am willing to lend them out if you need
them.
For the rest of it, the only advice I have is that if
you take a fastener out, screw it back where it
belongs right away, washers, nuts and all; a
heck of a lot simpler than figuring out where it
belongs later. And keep the component parts of
each subassembly together (in a container if it is
some internal part that should be kept clean) and
assembled in the right order, otherwise you’ll
never figure out what belongs where and how
and with what and which way round.
I’ve tried to keep everything in sequence, but
you’ll notice that every now and again the
pictures and the text are a bit out of whack. If in
doubt, follow the text. Remember, I’m new to
the manual-writing business, and never intended
to write this one in the first place.
I’ve tried to cover everything that I think may not
be totally obvious, but I’m sure I’ve missed
something. E-mail me at [email protected] if
there’s anything missing or not clear.
1
I have it on good authority (aka Mrs. Muzza) that Muzz prefers wine; whether this extends to his
friends, I don’t know. Mine are happy with cheap beer, that’s why they are my friends.
Breva 750 Gearbox repair
2
GETTING THE BIKE TO WHERE YOU CAN WORK ON IT
Now that you have disconnected the battery, drained the gearbox oil, and put the beer in the
fridge (you did all of those, right?), you’ll need some way of getting the bike up off the ground, and
of holding the back end up and the whole thing steady, especially if the bike doesn’t have a
centre stand.
Muzz did it like this (http://wildguzzi.com/forum/index.php?topic=25247.0):
And I did it like this (which is why I needed the strong friends):
Breva 750 Gearbox repair
3
I built this fine piece of furniture out of scrap lumber; it
measures about 130 cm long by about 75 cm wide by 75
cm high, and worked beautifully (I’m about 190 cm (6’3”)).
If I’d worked on the bike on the ground, I’d be having
back surgery right now, or else be in a wheelchair.
I kept the front end steady by screwing a channel-type
thing to the front of the table, worked a treat:
The pulleys made it easy to lift the bike, adjust the height,
and let it back down again; they would also have been
handy for stringing myself up if the repair hadn’t worked.
I’m kind of proud of it.
NOLAguzzi took an entirely different approach, and
‘crabbed’ the frame (see below):
If, like me, you have no clue what ‘crabbing’ means, all
will be revealed (at least in principle) if you go to
http://wildguzzi.com/forum/index.php?topic=10896.0.
where all is explained; also, Pete Roper summarised the
whole process in a single idiot’s guide2. Bear in mind
that this was developed for big-block Tonti-frame bikes, so needs considerable adaptation for use
on the Breva. The basic principle is that, rather than leave the frame in place and move the
gearbox and/or engine, you leave the engine and gearbox where they are and move the frame,
pivoting it around one of the engine mounting bolts. This is how NOLAGuzzi described it:
“There were some things I had to adapt because of the difference between the big block and
small block Tonti frames. On our bikes there is a lower frame rail attachment that passes all the
way through the timing chest. It is in the middle. On the big blocks, as described in the Roper
pdf, you can pivot the frame on this bolt. I did not get that the bolt was in a different place on the
small block until I had already started.
I pretty much
followed the
smallblock Breva
frame manual on
what to disconnect.
I took off the entire
exhaust system and
then the tank. All of
the electrical
connections
mentioned in the
manual, pretty much
everything except
the oil sending unit.
Next I started
undoing all of the
bolts (5, 10 and 7 in
the picture) holding
the upper frame to
the gearbox.
Bolt 2 is what I used
as the pivot point.
2
Or http://www.thisoldtractor.com/guzzitech.dk/gb_en_complex-technical_crab-frame.htm
Breva 750 Gearbox repair
4
But it takes some doing to
get there.
I took off the side panels
to expose the frame.
Then I dropped the rear
brake, disconnected the
speed sensor and brake
light switch at the plug and
separated the brake line
and the speed sensor
cable from the swingarm
and the brake light cable
from the frame. Off and
away now is the tank, both
side panels, and all of the
bolts are loose. I did not
unhook any brake lines and the rear caliper is still attached to the master cylinder on the right
side panel. Then I had to disconnect the ECU to get access to one of the battery plate bolts out.
Now I am a smug bastard thinking this is going to work out just as planned. I can see that I can
pivot the frame using bolt #2 by removing the top two and loosening the bottom ones. So I did,
and nothing moved. Profanity ensued. I realized that the throttle bodies had to come off if this
method was to have any shot. I had already disconnected all the cables, (2 throttle, 1 fake choke,
clutch), and separated them from the mounts on the gearbox and crankcase. Then with much
trepidation I stepped into the unknown realm of fuel injection disassembly.
Once you remove the bolt holding the injectors
to the manifold you just pull them out. It takes
about as much effort to open a bottle of wine
as a point of reference. Now its time for the
throttle bodies to come off and much more
profanity ensues. Once I finally got the damn
thing off I realized how simple it is. The rear
hoses are soft enough that you can deform
them with your hands. If you loosen all three
of the clamps on each side of the throttle body
hoses you can squish the rear hose and pull it
off the back of the throttle body while pushing
it into the airbox. Once the hoses are off the
whole assembly comes off easily. There was
something, the neutral sensor wire I think, ziptied
to the brace on the throttle bodies. That zip tie
has to go.
Now you can slightly pivot the frame and get the
throttle bodies out. You may be able to get
access to the Screw of Doom without the need to
pivot the upper part, but I don’t know for sure.
Then I double checked that nothing was binding or
would get pinched and tilted the frame up on bolts
#2 on the left and right lower frame rails.
So now you are at the point where I took the
picture of the bike crabbed up. I thought that I
could slide the gearbox back enough to clear the
crankshaft without taking off a lower frame rail. I
Breva 750 Gearbox repair
5
was disappointed. So
instead I loosened all the
bolts from the bellhousing
to the crankcase and
tilted the frame back
down and replaced all of
the bolts that hold the
upper frame to the lower
frame and the gearbox
back in. Then I rigged up
something similar to the
Muzz Breva rear support
thingy. I put a 2x4 across
a handtruck and the top of
the fence (luckily they
were similar height), and
tied up the rear of the rear
of the bike to keep the top
frame stable, ha ha yeah
stable, while I took the right lower off.
I took off the rear bolts on the right lower, center stand bracket and frame brace, then both of the
#2 bolts that link the upper and lower frame. Then I undid the rod that runs through the timing
chest and links the left and right lower frame rails and took off the right lower rail. I popped out
the gearbox/upper frame bolts, popped out the loosened bellhousing bolts, yanked the gearbox
out, and immediately put the right lower frame rail back on and snugged up all the remaining
upper/lower frame bolts. Then I pulled the ropes taut. My rationale is that my upper handtruck/
fence support structure is not the most stable so I don’t want to rely on it for anything other than a
brace of sorts. So now the bike is tied up to support the back part of the upper frame, but both
lowers are back on. The whole ridiculous assembly is resting comfortably on the oil sump. I am
patiently waiting for a new clutch plate and rear main oil seal.
Having done this now I bet, and I really hope to not find this out, but I bet I could have both
wheels, the complete exhaust, the tank, throttle bodies, and the gearbox off, as well as the
flywheel/clutch out in about 8 hours max, figuring in a little time for beer and cussin’. Getting it
back together may be another story entirely but as of now I am optimistic.”
Thanks, NOLAGuzzi. Back to the original story:
Assuming your follow my method (and you might not want to, and use the ‘crabbing’ technique; I
plan to if ever I have to do this job again), and that you don’t have a centre stand, now is the time
to put a jack or some kind of stand
under the engine, it will prevent the
bike from flopping about, since all
that is holding it in place is the front
wheel and the skyhook at the back.
Note the trolley jack – this is much
preferable to the type of crummy
scissors jack that comes with cars,
which is all I had, and is horribly
unstable and hard to use.
Beg/steal/borrow a trolley jack if you
possibly can; you might even want to
consider buying one.
Alternatively, invent your own support,
like Muzz did
(http://wildguzzi.com/forum/index.php
Breva 750 Gearbox repair
6
?topic=25247.0)
REMOVING THE BACK WHEEL AND DRIVESHAFT:
Loosen the clamps that hold the silencers (mufflers) to the
exhaust downpipes (10 mm spanner), and unbolt the silencers
from the footrest brackets (15 mm socket and 6 mm hex key).
Unscrew the brake caliper mounting bolt (#15, recessed into
the swinging arm; 8 mm hex key) and swing the caliper down
(you can’t take the caliper off completely until you take the
wheel axle out). Don’t forget to put a keeper between the
pads (picture), and use a wire tie or similar through the
mounting hole on the caliper to prevent it from dropping
suddenly when you take the wheel axle out; it also keeps the
bushing in the caliper.
Undo the 24-mm nut at the right-hand end of the axle (there’s
a spanner for this in the factory toolkit). It’s on tight – torque
setting is 120 Nm – so you may need to put an extension on
your spanner; putting all your weight on the spanner by
standing on the end of it also works. Put a block of wood or
similar under the wheel, to prevent it from dropping, or else get
a friend to put that beer down and hold the wheel. Remove
Breva 750 Gearbox repair
7
the pinch bolt and nut at the left-hand end (#16-18; 8-mm hex), and unscrew the axle (8-mm hex);
a gentle tap with a hammer on the end of the axle helps to get it started. The spacer on the left
will drop out, as will the brake caliper.
Remove the 8-mm nut that attaches the right-hand suspension unit to the swinging arm. If the
rubber bush comes out of the bottom eye of the suspension unit, like mine shouldn’t have but did,
you’ll need WD-40 and a screw clamp to get it back in; best do it now, you can’t once the muffler
is back on. Remove the four 13-mm acorn nuts that hold the bevel box on the swinging arm, and
pull the bevel box back to remove it. You can then roll the back wheel out without any fuss. Pull
the drive shaft out; mind that you don’t lose the spring (#6) that goes inside the splined collar (#3).
If the universal joint at the front is dry, like mine was, it’s a good idea to slather grease all over it,
and over anything else that moves against something else, like splines. Be generous with the
grease, it’s much cheaper than new parts.
Now that you have the wheel out, take out the six cush drive rubbers and put them in a box or
something, if you leave them in the wheel they’ll fall out and hide somewhere where you can’t find
them. They can go back in only one way,
so you don’t have to mark them, but it
won’t hurt if you do.
NOTE: Just in case you miss it: I write the
recommended tyre pressure on the rim
next to the valve, helps overcome my
amnesia about such things. Note also dirty
finger marks all over and scratches on rim;
the first are unavoidable, the second not if
you are more careful than I am.
Sooner or later you are going to have to
take the fuel tank off; you can do it
whenever you like from here on in. I did it
later, so the instructions are on pages 1921.
Breva 750 Gearbox repair
8
Remove the footrest mounting bracket from each side; on the left side you’ll need to disconnect
the seat release cable (picture). On the right side, leave the brake master cylinder right where it
is, there’s no need to detach it.
Rear brake hose
When I undid these two nuts, the whole stud came out, not good. Just be careful screwing them
back in, a stripped thread in the swinging arm would not be fun. A job for care and Loctite. The
wire is for the rear brake light switch, it may also connect to the sensor for the speedometer. The
arrow at bottom right points to the clutch arm return spring, which you will hear more of later.
Breva 750 Gearbox repair
9
Once the brake hose is off the swinging arm, lift it and the caliper and the wire with the right-hand
footrest bracket and hang it all off the frame on the right somewhere out of the way. You’ll need
to move it several times before you are finished because what’s ‘out of the way’ keeps changing.
Unscrew the cover nuts and shouldered plugs on which the swinging arm pivots; mine came out
much more easily than I thought they would.
Breva 750 Gearbox repair
10
Remove the hose clamp that holds on the rubber boot for the universal joint. Remove the bolt
that secures the bottom of the left-hand suspension unit to the swinging arm and voila! the
swinging arm is no longer connected to anything.
Remove the swinging arm. There’s a thrust washer between it and the frame on the right-hand
(drive) side, but not on the left, I have no idea why not.
In the manual, all the above is covered in one single page (4-4); let’s say that it is a little lacking in
detail. Plus my gloves are quite a bit dirtier than Mr. Guzzi Dismantler’s.
Remove the gearchange linkage pinch bolt and slide the linkage arm off the gearchange shaft.
The arrow points to where the clutch arm return spring goes; this is the one you have to be
careful not to lose when you disconnect the clutch cable.
Breva 750 Gearbox repair
11
Loosen the bottom left screw on the rear gearbox cover (don’t remove it, you’ll do that later, with
less chance of losing it) and take the cable from the sensor (real name lambda probe) on the
expansion chamber out from behind the little bent tab thing that holds it in place:
Disconnect the sensor cable at the connector:
NOTE that I am doing the sensible thing: the screws that hold the side panel in place are all
where they belong.
Breva 750 Gearbox repair
12
Scribe a mark on the gear lever pivot shaft, so that you can put it back together in the same place.
Then remove the linkage arm and slide the gear lever pivot shaft out; make sure you don’t lose
the thrust washer (which isn’t shown in the parts list, but there was one on the inside, between
the linkage arm and the frame, which makes sense).
On the handlebars, remove the clutch lever pivot screw, line up slots on adjuster, slide out cable.
Leave the whole mess hanging there, take the other end of the cable outer out of the lug on the
top of the gearbox and disconnect the cable from the clutch operating arm.
Breva 750 Gearbox repair
13
WARNING WARNING WARNING: The little spring under the clutch operating arm will go flying
as soon as you release the clutch cable. Wrap a rag around it or put a cable tie through or have
someone hold it or something, otherwise it will disappear and you will never see it again, at least
not until after the replacement spring arrives:
Remove the exhaust downpipes (they will come off as one piece with the expansion chamber,
although they don’t have to). Make sure you take out the gasket inside the head (5), behind the
split collet (6). By the way, in the photo, the clamp (7)
is upside down.
Breva 750 Gearbox repair
14
Cut the wire tie holding the two drain tubes. You may as well pull the caps off the tubes and drain
them, mine had quite a lot of oil in them.
Off with starter motor. Nice and easy: two screws at the front, one fat wire, one thin wire. Like
Muzz said, comes off quicker than a lizard up a drainpipe.
Breva 750 Gearbox repair
15
At this point it should look something like this, although you may have less dirt and oily gunk on
yours.
The arrows point to (a) wire tie holding bush in place in brake caliper. This is why you need lots
of wire ties: not only are the bits together, you know which way round they go. Saves a lot of time
and temper when you are putting the bike back together; (b) the rubber bush that you need a
clamp and WD-40 to get back in, I wish I’d fixed it when access was this good. Live and learn.
Congratulations! Time for a beer and a moment of contemplation. You are about to get to the
more difficult part.
Breva 750 Gearbox repair
16
PART 2: GETTING THE GEARBOX OUT
Now the fun starts ….
Next is getting the frame rails off. Muzz and NOLAGuzzi took only the right-hand rail off; I took
both off, mainly because I was planning to move the engine, but also because it looked like less
work than taking the centre stand off. I don’t think it makes much difference which way you do it,
but in any case the right-hand rail has to come off.
This is NOLAGuzzi’s picture, showing (from the top, short arrows: oil pressure sensor, screw that
holds both grounding cables, clutch cable lug, neutral indicator) and, with the long arrow, the
Screw of Doom.
Simple enough, right? Well, it is if you do the intelligent thing and remove the throttle bodies,
manifolds, etc, like NOLAGuzzi did, then you have access like that. If you don’t, access to the
Screw of Doom looks more like this:
Breva 750 Gearbox repair
17
And that’s the good side. From the other side it looks like this:
Muzz somehow got the Screw of Doom out without taking the throttle bodies off and without
moving the engine; I could not do either, and believe me, I tried. There is simply no clearance;
you can get a socket in (just) but not turn it.
Breva 750 Gearbox repair
18
If it weren’t for that stupid screw, taking the gearbox off would be dead simple. Access to all the
other screws that hold the clutch bell housing to the crankcase is fine, but because of the Screw
of Doom, you have to do some heavy-duty dismantling. In my case, I moved the engine, which
proves that I am a dimwit, as you will discover further on; unless you are a masochistic lunatic, I
recommend that you use the NOLAGuzzi method (see pages 4-6 above), which gives you access
to the throttle bodies, which you can then remove. Here’s his description: “Both throttle bodies
come off as one piece. The only thing holding them on are the hoses. The tank should be off. I
unplugged almost everything electric, except the sending unit connection, and took off all cables,
pivoted the frame up, and blocked it under the airbox with a 2x4 scrap on the right side jug.
Undo all three of the clamps but leave them attached. Facing the bike grab the rear hose, that
goes into the airbox, with your hand palm up on the bottom of the hose thumb pointing at the air
box. Squeeze the hose and push it into the airbox. Unhook throttle and choke (fast idle or what
ever you want to call it) cables then pull the throttle bodies back and down and the whole throttle
body assembly, both throttle bodies with the brace that is in the way of the Screw of Doom, will
come off. I don't know if there is clearance to get them out without tilting the frame but I think it
should work. Also there is a cable ziptied to the throttle body brace; you need to cut the ziptie.”
So now you know how to do it the intelligent way.
The manual says that you can get the engine and gearbox out of the frame as one unit without
taking off the throttle bodies. It may be possible, but I have no idea how. Unless you take the
throttle bodies off, you can’t move the engine back, and you can’t move it forward or down
because it fouls the down tubes on the frame. If you manage to do it, I’d be interested in knowing
how. And bending the down tubes or sawing off the cylinders is cheating.
There’s some stuff you have to do before you can take the frame rails off.
You pretty much have to take the fuel tank off at this point, if you haven’t already. Remove the
black plastic grille at the front of the tank and the 10 mm bolt at the back, pull the tank back and
lift it, but gently. You may have to get one of the beer drinkers to bend the plastic ‘wings’ at the
front of the tank out a bit if they catch on the horn (horns in my case, I installed a pair of Fiamms
that really get the attention of dozy drivers on mobile phones; I highly recommend them). Support
the back of the tank with a block of 2”x2” or similar, viz:
Breva 750 Gearbox repair
19
Then follow Holt’s instructions for disconnecting the plastic hose-to-tank connector
(http://wildguzzi.com/forum/index.php?topic=25247.0):
“Give the thing a spray with some kind of dry lubricant - PTFE - use two nose pliers - flat ones
preffably - one used for support and the other one for pressing the outer ring straight backwards.
No turning! Connector works like an air-compressor hose connector
-when it's time to change the air filter you've gotta do it anyway. (It's said it CAN be done without
removing the tank. But I don't have the fingers of a surgeon, the sight of an owl and the patience
of a sloth.
)
Also it's easier done if the bike has been standing for a couple of hours to release fuel pressure.”
Also, hearken unto NOLAGuzzi’s words of wisdom on the subject of getting the connector apart:
“The problem is the pressure in the lines. If you disconnect the fuel pump and turn over the
engine it will be easy to get the fuel line fitting off. Even I can do it. Be careful not to break the
plastic bits I think replacing them means a new fuel pump.
And make sure to put something in between the front of the tank and the steering tube or you will
chip up the front of the tank like I did.
The two little hoses, one is a drain and the other goes to the carbon evap can, I guess now that
my carbon can is missing that line is now just a tank vent too.”
Breva 750 Gearbox repair
20
Here are the two little hoses. Easy to disconnect, tricky to get back on:
Disconnect the multi-pin connector (on the right-hand side) that goes to the fuel pump in the tank,
and pull it up next to the red plastic elbow so that it won’t get hung up on anything when you lift
the tank:
Lift the tank off, and be very careful when you put it down that you don’t damage the red plastic
elbow. It’s fine on a flat surface, the elbow is tucked up underneath the sides of the tank.
Breva 750 Gearbox repair
21
Disconnect the neutral switch cable, located on the top of the gearbox. Lift the rubber cap and
pull the cable towards the front of the bike. Incidentally, this is an absolute pig to get at when the
bike is back together.
The bottom arrow points to the place where the clutch arm return spring goes. I know I keep
going on about this, it’s just that it’s a pain to lose. I know because I did just that.
Cut the wire tie holding the grounding wire on top of the gearbox.
Breva 750 Gearbox repair
22
Disconnect the sidestand safety switch (you may not need to do this if you are taking only the
right-hand frame rail off). There’s a couple of wire ties that hold the hoses and wires to the frame
tube, I’d cut them off by the time I took this picture. Obviously, they go where the hose is dimpled
and/or there are marks on the frame.
Remove the screw holding the two grounding wires to the clutch bell housing.
OK, back to the frame rails. This is pretty straightforward.
Remove the black plastic guard in front of the sump.
Breva 750 Gearbox repair
23
Support the engine with a jack (a trolley jack is best, believe me).
Remove the lower gearbox mounting bolts.
Jack the engine up ever so slightly, so that the jack, not the frame rail, is taking the weight.
Remove the hex bolts connecting the lower frame rails to the front down tubes. Cut the wire tie
first, obviously. You need to do this on the right-hand side only if you are using NOLAGuzzi’s
Breva 750 Gearbox repair
24
method or if you are skillful like Muzz and got the Screw of Doom out without having to move the
engine.
Remove the long through bolt at the bottom of the engine.
Breva 750 Gearbox repair
25
Lower the engine gently with the jack, and there you are; the rails come off without too much of a
fight.
If you took both frame rails off (and probably even if you took only one off), you now have a
choice: build a stand that will hold the engine in place, like so:
Or wait until the precarious arrangement of bits of wood on the jack falls over and the engine
drops and gets jammed in the frame, and then build a stand that will hold the engine in place.
Guess which one I did. If you used a trolley jack, it would probably be stable enough on that, but
the jack would really get in the way; some kind of stand is more stable and easier to work round.
By the way, if I had to build this stand again, I would extend the cross piece and also extend it
fore and aft; it worked OK as I had it, but it would have been much more stable that way.
To get the gearbox out, remove the upper mounting bolt (this is a long through bolt).
The arrows point to the gearbox filler/level plug and to what I think is the neutral switch wire.
Once the gearbox is out, given that the neutral switch is so difficult to get at, maybe cutting the
Breva 750 Gearbox repair
26
wire about here and inserting a connector
might not be a bad idea; it can’t hurt, and if
the neutral switch quits or plays up, you can
disconnect it here and forget about it. Of
course you’ll then have to go back to the old
way of finding neutral, by feel. Anyway, I
thought I’d mention it.
Undo the rest of the screws securing the
clutch bell housing to the engine (including
the Screw of Doom), pull the gearbox back
(to get the splined end of the gearbox
mainshaft clear of the clutch) and down,
And there you are. If you are NOLAGuzzi or
Muzz, you have long since had the gearbox
on the bench, but in any case this is what
you’ll be looking at:
Note how the back end of the box is sitting
on blocks of wood; this is because otherwise
it would be sitting on the clutch operating
lever, which flops about annoyingly and could well get bent or broken if you forget about it or drop
the gearbox or something. I should have taken it off (it’s just a cotter and split-pin arrangement),
but never did.
Incidentally, if you are planning on replacing the air filter, this is a good time to do it. Access is
usually lousy, but with this much stuff taken off, it’s not so bad.
Time for another beer, and while you are sitting there sipping, you may as well pull the clutch
pushrod (arrow) out before it falls out. Note that it has a thick end and a thin end; what you see
here is the thin end, which goes up against the clutch (see workshop manual, p. 5-18). NOTE: in
the parts list, this is shown the wrong way round, i.e. with the thick end up against the clutch.
See the next part of this thrilling story to find out how to take the gearbox apart and fix it.
Breva 750 Gearbox repair
27
PART 3: FIXING THE GEARBOX
Put that beer down, time to get serious.
Go to Section 5.1 of the workshop manual, where it tells you how to disassemble the gearbox.
The first picture shows the innards of the gearbox, from which the clutch bell housing has
somehow disappeared. So you turn back a few pages, but no, that’s all about the engine, so you
look at the section index and, sure enough, there on page 5-12, right after the section about
taking the gearbox to bits and reassembling it, is the section on how to take the clutch bell
housing off, which you have to do before taking the gearbox apart. REALITY CHECK: this is a
Guzzi – if you want logic in the sequence of the workshop manual, go and buy a Beemer; this is
the world of Luigilogic.
OK, this is where we are:
First job is to get that nut off the mainshaft. The workshop manual, as usual, shows that brevity is
the soul of wit:
The little detail it omits is that Mr. White Gloves is holding US$ 250 worth of special tools, neither
of which you have in your garage (you don’t have the neat ‘vice-held support’ either, but you do
have friends and some kind of stand – my Black & Decker Workmate was invaluable). The
bottom tool you can fake by boring a 33 mm hole through a 36 mm socket and then welding a
large cranked handle to it (cost me US$ 65 at a local machine shop, plus the socket); the top one
you could make in a similar fashion if you had a clutch centre lying around, otherwise you pretty
much have to shell out US$ 180 unless your local Guzzi dealer has one and will lend you it, or
Breva 750 Gearbox repair
28
else you can somehow make a tool that fits the splines on the mainshaft well enough that both it
and the shaft will survive some seriously brutal treatment.
With these two tools in hand, you knock back the tab on the lockwasher, for which you need a
hammer and drift (aka an old screwdriver). Once the tab is clear of the slot in the mainshaft, you
apply the two special tools, like so:
You apply all sorts of pressure, but even with you on one tool and your friend on the other, that
nut is going nowhere; Mr. Guanti Bianchi is evidently Superman on his day off. So you use
Special Tool No. 3:
Breva 750 Gearbox repair
29
Even then you have to use some serious violence to get the nut free; part of the problem is that it
is difficult to hold the gearbox firmly, which makes the official torque spec of 100 Nm feel more
like about 300 Nm. The ‘vice-held support’ might have been handy here.
Anyway, eventually the nut loses the fight, and you undo the hex screws that secure the bell
housing (page 5-12). Whether you remove the gasket is up to you; I did, and most of what I
found was that quality control at MG is not what I’d like it to be:
I don’t appear to have photographed the next step. See page 5-3 of the manual, which in this
instance is pretty much grounded in reality:
The ‘prescribed holding tool’ is the US$ 180 one, and I suppose you could do this step without it if
you had a vice with soft jaws. You also need a large socket, I forget the size:
Breva 750 Gearbox repair
30
Then:
Breva 750 Gearbox repair
31
You are now here:
Remove the layshaft gear (on the left) if you haven’t already. For the next few steps you can
again follow the manual:
Not sure what the ‘pawl’ is, but what the heck, it’s whatever is there; I never took it out, so I didn’t
find out. And ‘idle gear indicator’ is pretty much the same as ‘neutral switch’, so I took that out, it
is very vulnerable where it is.
Note how Signor Guanti Bianchi leaves the parts he has taken off just lying around on the
workbench; either his bench is much cleaner than mine, or he has servants to clean things up, or
Breva 750 Gearbox repair
32
he works in the Guzzi Quality Control Department and doesn’t much give a toss whether the bits
are dirty or missing when he puts them back together. Whatever the truth, do not follow his
example, especially with gearbox innards.
Once you figure out that what the instruction with the next picture means is not ‘Loosen the
locknut and remove the eccentric screw in order to position the preselector’ but rather ‘Loosen the
locknut and remove the eccentric screw that is there for positioning the preselector’, it makes
more sense.
Before you loosen the locknut, scribe a mark on the screw head and a corresponding one on
the gearbox housing so that you can line the two up, this will save you a lot of worry on
reassembly.
TIP: From here on in, if you go away from the job for more than about 15 minutes, say, put the
gearbox in a position where the oil can drain out. Several times I thought I’d got all the oil out, but
the minute you start working on it, either oil drips all over the place, or else it fills up the bit you
are trying to work on. Hey, it’s a Guzzi.
Breva 750 Gearbox repair
33
And here is the Holy Grail, the innards of the gearbox; clockwise from top: mainshaft (primary
shaft), layshaft (driven shaft), oil tube, selector drum, preselector fork).
And there is the cause of the problem: jammed teeth on the preselector. It should not be possible
for it to be in the position shown above.
The two teeth which are supposed to be sprung and engage on the selector drum shaft were
neither; they were totally jammed in the down position, which fits the symptoms perfectly: the
gear lever can move freely, but its actions are not transmitted to the gearchange mechanism.
This is the difference between the new preselector fork (left) and the old one (right).
Breva 750 Gearbox repair
34
This is where the manual takes a break from reality. It says:
As Muzz discovered, there is no way on God’s good earth that the preselector fork comes out at
that point.:
I managed to get mine out (just), but that was only because the teeth were jammed. Normally,
you cannot get both teeth back that far; they are sprung in such a way that, if one of the teeth
goes back, the other goes forward. Anyway, what this means is that you have to lift the selector
drum so that you can get the new preselector fork in, and then get it to engage.
Breva 750 Gearbox repair
35
To help you picture what is what, here is where the preselector fork sits, and what it does, as I
understand it:
The preselector rotates the selector drum, which in turn moves the actual selector forks, which
then slide the gears along the gearbox shafts into the various combinations of the cogs that
produce the five gears and neutral. Clockwise from top right: pins on which preselector teeth
engage; selector ‘star’, on which each detent represents a gear (this one is third); hole for
eccentric screw; slot that limits range of movement of preselector; shallow detent representing
neutral, therefore, the detent between this and the one that represents third is second gear. I
hope that makes sense. In this picture you can see (just) the detents for all the gears except fifth;
obviously, there isn’t one between first and fifth, so it’s easy to work out which one is which.
Just for information, here are the component parts of the mechanism:
Breva 750 Gearbox repair
36
Here’s the little bugger right after I got it out; if it hadn’t been jammed, it would still be in its place.
Then again, if it hadn’t been jammed, I wouldn’t be doing any of this.
The ‘blocking ring’ (spacer, bushing) is still in place (right). Take care when passing the
preselector shaft down the hole, there is an O ring there (barely visible).
The screws inside the gearbox all appear to be held in with Loctite, and most of them are hard to
get at, so if your hex keys have a ball end, like so:
and it starts to feel at all like the key might slip out of the screw while you are trying to turn it, my
advice would be to grind the ball end off until you have a nice flat hex end that fits tightly into the
screw head, and thus is much less likely to slip out and round it off (believe me, it happens; when
I went to change the oil in the forks, the hex screw on the bottom yoke (triple tree) rounded off. It
took an impact driver to get that one out, not a good option with these small screws inside the
gearbox.). Don’t get carried away with the grinder, though: there is one case where you pretty
much have to use a ball-end key (see below).
Enough of theory, time to get oily.
First, remove the plastic tube, and undo the hex screw (left-hand arrow in picture above) and its
companion on the other side of the mainshaft (not shown).
To get the selector drum free, you need to undo three screws. As the famous author never said,
but should have done ‘Easy screws are all alike; every difficult screw is difficult in its own way’.
Here is the proof.
Breva 750 Gearbox repair
37
Screw 1:
5 mm countersunk-head hex screw, right slap-dab in the middle of all three shafts and behind the
plastic oil deflector, about here:
You need a hex key with a shaft at least 150 mm long. Mine came out fairly easily; Muzz’ put up
quite a fight. With this and the other two difficult screws, keeping downward pressure on the hex
key while you get the screw free is important; sometimes it’s best to put a ring spanner on the key
and use that to turn it, while having one of the beer-drinking friends push down on the key.
Anyway, this is how you get it out (see what I mean about getting rid of the oil?):
A longer key would be nice; I could only get about an eighth of a turn because the handle of the
key hit the ends of the shafts. Once the screw is out, you will need something magnetic to fish it
out with, unless you get lucky.
Breva 750 Gearbox repair
38
Screw 2:
This screw, 4 mm this time, is relatively straightforward; for a start, you can actually see the thing.
However, you can’t get a hex key into it square, because it is partially masked by the selector
drum, so you don’t have much choice except to use a ball-ended key.
So, you pray to Santa Rosetta Ondulata (parts list, table 15, no. 31) that Luigi did not use too
much Loctite, make sure your ball-ended 4 mm hex key is in good shape, and have a go at
turning it while putting as much downward pressure on the key as you possibly can. Mine came
out fairly easily; if yours doesn’t, I don’t know what to suggest, beyond being circumspect.
Breva 750 Gearbox repair
39
Next is the nut that holds down the spring-loaded arm that bears against the selector ‘star’. The
nut comes off easily, but when you pull the arm off its pivot shaft, the spring jumps out. No
problem, you just need to be ready for it.
I say ‘no problem’; Muzz may beg to differ. When he took this nut off, this is what he found:
The stud was held at the two points marked, and the top of the stud, with the nut attached, was
on the verge of going flying into the box, with spectacularly destructive results (not just for the
bike – having your gearbox lock up solid is somewhere between frightening and fatal). Mine
looked fine.
Screw 3:
Finally, there is one more 4 mm countersunk-head hex screw.
Breva 750 Gearbox repair
40
Although the access to this one is much better than for the previous two, it caused me more grief
than anything else, including the Screw of Doom. I tried the hex key that got its neighbour out,
but it felt like it might be slipping, so I ground the end off the key, the screw still didn’t want to
move.
Eventually, I decided that it simply wasn’t worth running the risk of rounding the screw off, so
bought an extra-long 4 mm hex key and a 4 mm ratcheting ring spanner, 200 mm long, both
made by Snap-On, who supposedly make the best tools in the U.S. I ground the ball end off the
key, so that the end was square, with nice sharp edges, and made sure that the key was square
into the screw, and into it as far as it would go. It was a nice tight fit, so a tap or two with a
hammer had it in there firmly.
Next, we pointed a propane blowtorch at the general area of the screw for about 10 minutes, and
got it nice and hot.
I then had a friend lean on the key with his entire weight while I applied pressure to the spanner.
Even with all that, I was putting quite a lot of force on the other end of spanner and beginning to
think we were wasting our time, when the Loctite suddenly gave way with a crack!, and that was
that.
The nice thing about this arrangement is that keeping the key in place and turning it are two
separate operations, and with the spanner all the way down, near the screw, you eliminate the
twisting and waggling inherent in using such a long, thin key.
Breva 750 Gearbox repair
41
With that, I was done; I could lift the selector drum far enough to get the new preselector fork in,
so had no reason to go any further. Muzz, however, had some decomposing gears, so he had to
go in further:
He no doubt followed the comprehensive instructions in the manual, page 5-6
That’s it. No pictures, no nothing; you are very much on your own. I shall let Muzz add
something here if he feels so inclined. (Keep it clean, Muzz, this is a family manual.)
Breva 750 Gearbox repair
42
For me, this is where reassembly started.
WARNING: Before you do anything, read pages 5-7 and 5-8 of the Guzzi manual (below); getting
out of order at this point is not clever. That is the voice of experience talking. However, ignore
the very first sentence; leave the selector drum loose, you’ll need to lift it one more time.
Not sure what all this spring measuring is about, but I did it anyway. The distances were near
enough the same; if they weren’t, I doubt that you’d need calipers to determine it.
Not the clearest of instructions, but fairly clear from the picture: the solid side of the eccentric
screw toward the pivot of the preselector. At that point the screw is in pretty much as far as it will
go.
Breva 750 Gearbox repair
43
I wish it were all that simple. However, it isn’t:
The first bit is easy enough, even if, like so much in the manual, it skips over a lot of little details.
What you do is lift the selector drum and waggle the preselector shaft into its hole, while fiddling
the spring on the bottom of the preselector over the eccentric screw. It’s not hard, just a bit fiddly
and awkward; it helps to have someone to hold the drum up. I don’t think that it matters where
the preselector ends up relative to the pins it operates on the selector drum (see picture, page 36).
The second part caused much doubt and debate,
but we got it right. The bit about rotating the
screw 90° means what it says: back the eccentric
screw off a quarter turn from its position in the
previous step, and tighten the locknut. If you
scribed a mark on the screw and the gearbox
casing like you were supposed to, it’s easy to line
the screw up; if not, you do as I did, and eyeball it.
IRRELEVANT NOTE: I hadn’t noticed this before,
but Mr. Guanti Bianchi didn’t take the clutch
operating lever off any more than I did.
Since the manual pretends that you can get the
preselector out without disturbing any other part
of the gearbox, it doesn’t mention putting all the bits back together that you had to take apart
before you could get the preselector out. So forget the manual for a bit, back to reality.
Next, you reinsert the three screws that you had so much trouble getting out. I used Loctite on
them, up to you whether you do. The two 4 mm screws are simple, the 5-mm one a bit less so,
because you have to get it way down there between the shafts to get it in. What you need is
Kevin’s Patent Tool, a piece of ¼” dowel or similar whittled down to make it a nice tight fit in the
recess in the head of the screw, like so:
Breva 750 Gearbox repair
44
With a dab of grease on the washer to prevent it falling off the screw, you can then get the screw
started in its hole way down there between the shafts, like so:
Tighten it up with the 5 mm hex key, and that’s that.
Next, reinsert the two screws that hold down the plate below the layshaft (arrow; its mate is round
on the other side of the layshaft). Then refit the sprung arm with the roller on the end that bears
against the selector ‘star’ (page 40). This is not difficult, but it is a pain: you have to be careful
because, while you are refitting the arm, with the spring round it (arrow), the straight end of the
spring, which bears up against the gearbox casing, will jump out over the edge of the casing and
could easily scratch the mating surface.
Breva 750 Gearbox repair
45
Next, refit the plastic oil tube, which has a notch that fits against the hex screw marked above, so
you can’t go wrong.
Back to the manual:
The ‘prescribed torque’ is 10 Nm (7.5 lb/ft). In real life, it looks like this:
I have no idea why I have the gasket on the wrong section of the casing (right); obviously, it
should be on the section with the gears in it (left), the way Signor GB has it, otherwise the gasket
falls off when you lower the right section on to the left one.
Breva 750 Gearbox repair
46
Next:
‘Prescribed torque’ is 65 Nm (48 lb/ft). Life is much easier here if you have the splined special
tool.
Breva 750 Gearbox repair
47
With impeccable Italian logic, we move to page 5-15 of the manual.
It appears from the parts list that a ‘sieger’ is an o-ring (Table 14, no. 14). If you kept the parts in
order, it should be obvious. I can’t remember; I hope I didn’t forget it. And the ‘blocking ring’ is
presumably the spacer that goes inside the oil seal behind the nut; it goes in tapered side first.
Breva 750 Gearbox repair
48
And page 5-16
Note that this is the first time that Loctite (‘thread locking paste’) has been mentioned.
Breva 750 Gearbox repair
49
I never took the breather plug out, so the last instruction did not apply.
“Prescribed torque’ is 10 Nm (7.5 lb/ft) for the casing screws, and 100 Nm (75 lb/ft) for the
mainshaft nut. Again, you need special tools, this time both of them.
Breva 750 Gearbox repair
50
Next:
And that is pretty much it. From here on in, reassembly is pretty much the reverse of removal; I
can’t think of anything that was particularly difficult or obscure (unless, of course, you dropped the
engine, in which case it’s a whole different story, which does not belong here).
Feel free to let me know if I’ve missed anything, or if you have something you’d like to add.
Based on my experience, I'd say that anybody wanting to take a 750 Breva gearbox apart who
doesn't have access to anything fancier than a reasonably-equipped home workshop and a large
hammer needs the following four tools:
1. The Guzzi tool for holding the splined end of the input shaft (you need this twice while
dismantling, and twice during reassembly), or some home-made facsimile thereof.
2. The Guzzi tool for loosening/tightening the nut on the input shaft, or else the home-grown
alternative: a 36-mm socket with a nice long cranked handle welded on it and with the centre
hole bored out to about 33 mm so that the head of the splined Guzzi tool will pass through it
(needed once for dismantling and once for reassembly). I bought a set of eight cheapo
sockets sold for taking car suspensions and steering apart and had a local machine shop put
the tool together.
3. 4 and 5 mm hex keys, with a shaft preferably about 200 mm long, and with a T-handle or
similar, so that you can put a lot of pressure on the key without it going out of square.
4. A 4 mm ring spanner, so that you can turn the 4-mm hex key nice and close to the screw
head, to eliminate twisting and waggling. I paid about US$ 27 (!) for mine, which is the only
one that I could find - evidently there is not much of a market for such spanners (this one is
sold specifically for adjusting Ford headlights).
Some final odds and ends:
Breva 750 Gearbox repair
51
After refitting the preselector and bolting everything down, but before putting the casing back on
(in other words, about here):
I spun the shafts just to make sure
everything was moving freely; they moved
just fine. I then tried to select different
gears by moving the selector drum so that
the roller on the sprung arm that bears up
against the selector ‘star’ was in the
corresponding position, thus effectively
changing gear. This worked fine, selector
forks and dogs and all moving freely until
suddenly the whole thing jammed and
nothing would move. We eventually freed
it off, I can’t remember how (nor can I
remember what position anything was in
when it jammed), and left it alone during the rest of the reassembly; the next time anything was
moved in the gearbox was when we checked to make sure we had five gears and a neutral when
the gearbox was mated to the engine and both were fitted into the frame. I have no idea what
happened, but it all works now.
We assembled the gearbox with the selector ‘star’ in neutral; I have no idea whether this is right,
or whether it matters which gear it is in when you assemble the gearbox. Neutral has the
advantage of being easy to check – if you can spin the input shaft without the output shaft moving,
the gearbox is in neutral. The position of the preselector relative to the selector drum does not
seem to matter, which makes sense – the preselector performs the same action every time there
is a change of gear, up or down. The important relationship is that between the selector forks
and the cogs, and nothing I did affected that.
I would have liked to check whether I had five gears and neutral before putting the gearbox back
in the frame, but couldn’t figure out how to do it. The obvious way would be to fit the gear lever
directly to the gearchange shaft on the gearbox,
but the diameters seemed to be slightly different,
and I was not about to risk damaging the splines
on either the shaft or the lever.
Once the whole thing was back together and we
started the bike, the engine died as soon as a
gear was engaged. Obviously the sidestand
interlock was at fault; eventually we found that
one of the two pins in the female connector for
the wire from the sidestand had been pushed
back when we reconnected the connector; once
we pushed the pin back into the connector
where it belonged, the problem was solved.
Finally, for about the first 30-odd miles, the
gearbox changed up beautifully, but downshifts
were ‘crunchy’, and finding neutral (or engaging
first) with the bike at a standstill was nearly
impossible – it felt like the gearbox was seized. After that, and ever since, the gearchange has
been just fine. Who knows why that happened, I certainly don’t.
I now have almost 2,000 miles on the box, and it works fine. In retrospect, it would have been
easier, and no more expensive, to have bought a whole used gearbox (supposing I could find one)
and slot it in, but it wouldn’t have been so educational. Plus, it might have gone wrong just like
this one did ….
Anyway, if you ever need to do this job – and pray that you don’t – I hope this will help.
Breva 750 Gearbox repair
52