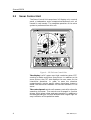
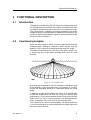
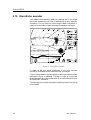
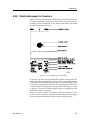
1
Operator manual
Simrad SD570
Fishery sonar
www.simrad.com
ALWAY S
AT
THE
FOR EFR ONT
OF
TECHNOLOG Y
Simrad SD570
Fishery sonar
Operator manual
850--160368 / Rev.B
Note
Simrad AS makes every effort to ensure that the information contained within this
document is correct. However, our equipment is continuously being improved and
updated, so we cannot assume liability for any errors which may occur.
Warning
The equipment to which this manual applies must only be used for the purpose for
which it was designed. Improper use or maintenance may cause damage to the
equipment or injury to personnel. The user must be familiar with the contents of the
appropriate manuals before attempting to operate or work on the equipment.
Simrad AS disclaims any responsibility for damage or injury caused by improper
installation, use or maintenance of the equipment.
Copyright
E 2004 Simrad AS
ISBN 82-8066-017-8
The information contained within this document remains the sole property of Simrad
AS. No part of this document may be copied or reproduced in any form or by any
means, and the information contained within is not to be communicated to a third party,
without the prior written consent of Simrad AS.
Support
For support on your Simrad equipment, consult your local dealer, visit
www.simrad.com, or contact us directly at [email protected].
Simrad AS
Strandpromenaden 50
Box 111
N-3191 Horten
Telephone:
Facsimile:
+47 33 03 40 00
+47 33 04 29 87
M A X I M I Z I N G
Y O U R
P E R F O R M A N C E
A T
S E A
Operator manual
Sections
1
System familiarization
This section contains a description of the SD570 sonar.
2
Modes of operation
This section describes the different modes of operation.
3
Operation
This section contains descriptions of all control knobs and menu systems of the SD570
sonar, as well as start and stop procedures.
4
Maintenance
This section deals with maintenance work that may be carried out by the user.
850-160368 / B
I
Simrad SD570
Remarks
References
Further information about the SD570 system may be found in the following manuals:
• SD570 Installation manual
The reader
This operator manual is intended to be used by the system operator. He/she should be
experienced in the operation of positioning systems, or should have attended a Simrad
training course.
Note
This manual includes sections that may be revised individually. In the event of a
revision to any part of this manual, this “Cover and Contents” section will be replaced.
II
850-160368 / B
Operator manual
Document logistics
Rev
Date
A
Unknown
B
02.02.04
Sect
Title
Written
Checked
Approved
RBr
EGJ
ESB
File
P.no/Rev
0
Cover and contents
850--130368
B
1
System familiarization
850--160137
A
2
Modes of operation
850--160138
A
3
Operation
850--160139
A
4
Maintenance
850--160140
A
Rev. A
First edition
Rev. B
Re--issued with ISBN number. Only this cover and contents document
changed.
850-160368 / B
III
Simrad SD570
Blank page
IV
850-160368 / B
System familiarization
850- 160137 / AA000 / 3- 14
SD570
System familiarization
This section contains a description of the SD 570
sonar.
850--160137 / A
I
Simrad SD570
Document revisions
Rev
Date
Written by
Checked by
Approved by
A
13.01.97
CL
SØJ
SØJ
B
C
D
(The original signatures are recorded in the company’s logistic database)
II
850--160137 / A
System familiarization
Table of contents
1
INTRODUCTION . . . . . . . . . . . . . . . . . . . . . . . . . . . . . . . . . . . . . . . . . . . . .
1
2
SD 570 UNITS . . . . . . . . . . . . . . . . . . . . . . . . . . . . . . . . . . . . . . . . . . . . . . .
2
2.1
2.2
Introduction . . . . . . . . . . . . . . . . . . . . . . . . . . . . . . . . . . . . . . . . . . . . . . . . .
Sonar Control Unit . . . . . . . . . . . . . . . . . . . . . . . . . . . . . . . . . . . . . . . . . . .
2
4
2.3
2.4
2.5
Transceiver Unit . . . . . . . . . . . . . . . . . . . . . . . . . . . . . . . . . . . . . . . . . . . . .
Hull Unit . . . . . . . . . . . . . . . . . . . . . . . . . . . . . . . . . . . . . . . . . . . . . . . . . . .
Auxiliary equipment . . . . . . . . . . . . . . . . . . . . . . . . . . . . . . . . . . . . . . . . .
5
7
8
3
4
FUNCTIONAL DESCRIPTION . . . . . . . . . . . . . . . . . . . . . . . . . . . . . . . . .
9
3.1
3.2
3.3
Introduction . . . . . . . . . . . . . . . . . . . . . . . . . . . . . . . . . . . . . . . . . . . . . . . . .
Functional principles . . . . . . . . . . . . . . . . . . . . . . . . . . . . . . . . . . . . . . . . .
FM (Frequency Modulation) . . . . . . . . . . . . . . . . . . . . . . . . . . . . . . . . . . .
9
9
10
3.4
Receiving . . . . . . . . . . . . . . . . . . . . . . . . . . . . . . . . . . . . . . . . . . . . . . . . . . .
11
TECHNICAL SPECIFICATIONS . . . . . . . . . . . . . . . . . . . . . . . . . . . . . . . .
850--160137 / A
13
III
Simrad SD570
Document history
(The information on this page is for internal use)
Rev. A
IV
Original issue.
850--160137 / A
System familiarization
1
INTRODUCTION
The Simrad SD 570 sonar is a medium range omnidirectional
sonar, designed for small, medium and large sized fishing
vessels, both purse seiners and trawlers. Great emphasis has
been placed on giving the best possible presentation on the 14”
high--resolution colour display. The result is 9 different display
modes, which gives a flexible choice for a large range of user
applications.
The transceiver system contains an advanced multifrequency
filter system (FM). This, in addition to giving a clear and
noiseless echo presentation, also gives the system a far greater
range than traditional single--frequency sonars.
The multi--element transducer allows the sonar beam to be
trained and tilted electronically in any direction. This gives
unlimited possibilities for automatic tracking of a school of fish
and for displaying the whole water volume around the vessel.
The retractable transducer unit is designed to be used at a
maximum speed of 15 knots.
WARNING !
Whenever docking the vessel, the switch S101 at the rear of the
Sonar Control Unit should be switched to OFF position to
prevent inadvertent use of the sonar. For location of the switch,
see figure 1 in section “Maintenance”. The transducer might
be damaged if transmitting in air.
850--160137 / A
1
Simrad SD570
2
2.1
SD 570 UNITS
Introduction
Figure 1 shows a system diagram for the SD 570 sonar, and as
can be seen, it consists of only three main units:
· Sonar Control Unit
· Transceiver Unit
· Hull Unit
A short description of each unit will be given in the following
chapters.
2
850--160137 / A
System familiarization
Figure 1 - SD 570 Sonar system diagram
850--160137 / A
3
Simrad SD570
2.2
Sonar Control Unit
The Sonar Control Unit comprises a 14” display unit, a control
panel, a loudspeaker and a computerized electronic unit, all
housed in one console. The complete operation of the sonar
system is performed from this unit.
Figure 2 - SD 570 Sonar Control Unit
The display is a 14” raster--scan high--resolution colour CRT,
creating a stable and flicker--free picture. In addition to the
sonar picture, the CRT also displays the user menu for the
interactive operation. In order to ease the situation
comprehension, certain specific colours have been chosen to
better the distinction between the various elements in the
scene.
The control panel contains all necessary control functions for
operating the sonar. The controls are arranged in function
groups, which gives a clear and easy operation. In addition to
the background light, the push buttons have a signal light for
easy indication of the operation mode.
4
850--160137 / A
System familiarization
The computerized electronic unit is located in the bottom
section of the console, and performs the following functions:
· Interfacing of the control panel
· Interfacing external connections (log, gyro, etc.)
· Generating the total display presentation
· Generating the audio of the echo signal
· Controlling the serial line communication to the transceiver
The loudspeaker, which is mounted inside the electronic unit,
reproduces the audio of the echoes for the selected audio
channel.
2.3
Transceiver Unit
The Transceiver Unit is located in the sonar room, close to the
Hull Unit. The unit contains the following modules, seen from
the left--hand side in figure 3:
· Eight equal transceiver boards (TRB--32)
· Signal processor board (SPB--31)
· Transceiver Interface Board (TIB)
· Power supply
· High voltage unit
The Transceiver Unit performs most of the main functions
of the SD 570 sonar:
· Receives the operator settings from the Sonar Control Unit.
· Generates the high voltage for the 256 transmitters
· Controls the transmission with a total of 256 separate 57
kHz transmitters
· Controls the total gain and data acquisition of the 256
separate preamplifiers
· Performs the digital beamforming of the received signals
· Executes the FM (Frequency modulation)
· Accomplishes the postprocessing (detection, AGC/RCG and
ping--to--ping correlation)
· Transmits the received echo data to the Sonar Control Unit
The 256 transducer elements on the Hull Unit are connected
directly to the front of the eight transceiver boards in the
Transceiver Unit.
850--160137 / A
5
Simrad SD570
Figure 3 - The SD 570 Transceiver Unit
6
850--160137 / A
System familiarization
2.4
Hull Unit
The SD 570 Hull Unit is designed to be lowered 1.0 meter below
the ship’s hull at a maximum ship’s speed of 15 knots. The
transducer can also be lowered to a middle position where only
the transducer face is outside the sonar trunk.
In addition to the solid construction of the hoisting/lowering
mechanism, the SD 570 Hull Unit comprises the following
main components:
· Raising/lowering motor
· Motor control unit
· Multi--element transducer
The motor on the Hull Unit is a three--phase motor, and it uses
less than 25 seconds for raising and lowering the transducer.
Note, that in case of voltage failure, the Hull Unit can be
manually raised or lowered by a hand crank.
The motor control unit which is mounted on the Hull Unit,
contains the control electronics for the raising/lowering motor.
The optional sensor for the electronic stabilization of the sonar
beams is also housed in the motor control unit.
The transducer has a diameter of 20 cm, and contains 256
separate transducer elements. This provides unlimited
electronic control of the sonar beams in any direction around
and below the vessel.
WARNING !
If the transducer hits larger objects or bottom, the transducer
shaft may be bent, or in worst case it can be broken off. A
broken transducer shaft will cause water leakage in the top of
the shaft. To prevent larger leakages in such a case, do not raise
the transducer shaft to the upper position. To prevent serious
damages it is therefore of great importance to have a good
pump and warning system in the sonar room.
850--160137 / A
7
Simrad SD570
2.5
Auxiliary equipment
The SD 570 sonar requires connection to a speed log and a
course gyro. An inaccurate log or gyro input will cause
inaccurate indication of the vessel and target movements.
In addition to log and gyro, the following auxiliary equipment
can be connected to the sonar:
· Simrad echo sounder, types EQ 50, EQ 55, EQ 100,
ES 380/700 or ES 500.
Gives depth readout in the menu and a bottom plot on the
catch data page.
· Simrad Trawl Instrumentation: FS 900, FS 3300 or ITI.
FS 900 and FS 3300: The trawl will be displayed in correct
depth.
ITI: The trawl will be displayed in correct depth, distance
and bearing.
For connection of any of these auxiliary equipments, contact
your local dealer.
8
850--160137 / A
System familiarization
3
3.1
FUNCTIONAL DESCRIPTION
Introduction
The basic principles of the SD 570 sonar are unique because of
the 256 separate transmitter and receiver channels with their
transducer elements spread around on the transducer array.
The transmission, reception and data processing are under
computer control, and the powerful capabilities of the sonar are
results of sophisticated digital signal processing software and
state of the art hardware.
3.2
Functional principles
When the omni beam is tilted, the total beam picture can be
compared with folding an umbrella, which means that all
beams in 360° around the vessel have the same tilt angle.
The beam can be tilted from +10° up to --90° down, where --90°
is formed by one single beam straight down like an echo
sounder.
Figure 4 - The OMNI beam
Note that the presentation can be selected in the menu to be
HORIZONTAL with true distance to the target, or SLANT
where the displayed distance is measured along the tilted
beam.
In addition to seeing the target from above, it is also possible
to see the target from the side, by using the vertical slice
presentation. In this case the beam covers a continuous vertical
beam from 0° to --90° in one transmission. By adding two such
slices, a complete 180° vertical slice can be presented.
This vertical slice, which is presented by the white audio line
in the horizontal picture, can be selected to any bearing by the
manual training control.
850--160137 / A
9
Simrad SD570
Figure 5 - OMNI/Vertical combination
The combination of the OMNI mode and the vertical slice, will
give an optimal visualizing of the catch situation. In addition
to the OMNI picture, the vertical slice is especially useful for
visualizing the vertical distribution of a school of fish. In that
way, it is not necessary to go over the target to see the
distribution on the echo sounder, which often results in a
spreading of the school.
When the optional stabilization system is installed in the
sonar, the transducer will be stabilized electronically for roll
and pitch up to approximately ±30°. The stabilization may be
switched ON and OFF in the menu.
The OMNI/vertical combination is used in several display
modes to give the best situation overview for both purse seiners
and trawlers. In these presentations the seine net and the
trawl can be seen in relation to the vessel, the school of fish and
the bottom.
3.3
FM (Frequency Modulation)
In addition to the traditional single frequency transmitting
method, the SD 570 sonar is equipped with an FM correlation
mode.
In FM mode each transmission pulse contains up to 8 different
frequencies, and the receiver makes a spectrum analysis and
compares the received echoes with the transmitted frequency
code. This provides a filtering effect, which efficiently reduces
interference, noise and reverberation. In addition to giving a
clean and stable echo presentation, this also increases the
sonar’s detection range
10
850--160137 / A
System familiarization
3.4
Receiving
A great effort has been made to reduce unwanted noise to get
a clean and stable echo presentation. To achieve this goal the
sonar receiver has the following filtering possibilities:
BANDPASS FILTER
One hardware filter for each preamplifier with a bandwidth of
1500 Hz to reduce interference and noise from signals outside
the sonar frequency.
FM CORRELATION FILTER
See description in paragraph 3.3.
AGC (Automatic Gain Control)
This control will automatically adjust the gain in the
preamplifier, dependent on the strength of the incoming echo
signals. The strength of the filtering can be selected in the
menu: OFF, WEAK, MEDIUM and STRONG. Note that the
AGC is sensing the echo strength in the audio channel, and use
this as a basis for adjusting all the receiver beams.
RCG (Reverberation Controlled Gain)
RCG is sensing the noise level (reverberation, propeller noise,
etc.), adjusting the gain individually for each of the 64 receiver
beams to eliminate the noise on the display. The strength of the
filtering can be selected in the menu: OFF, WEAK, MEDIUM
and STRONG.
Note that scattered fish can be perceived as reverberation, so
therefore RCG should be used with care if scattered schools are
to be detected.
PP FILTER
The sonar is equipped with a ping--to--ping filter which gives a
clean and steady presentation by reducing the interference and
noise. This filter compares the echoes from a selected amount
of transmissions (pings), and an echo has to be present in the
selected amount of pings in order to be presented on the display.
The selection is made in the menu, with the following
possibilities:
OFF
- filter switched off
WEAK
- compares 2 pings
MEDIUM - compares 4 pings
STRONG - compares 8 pings
Note that in rough seas, when the beam easily can miss the
target in several pings, the PP filter should be used with care.
850--160137 / A
11
Simrad SD570
TVG (Time Variable Gain)
The TVG function controls the gain of the receiver so that a
school with a given size and density is presented with
approximately the same strength on the display, inside the
regulated TVG range. This can also be seen as a filter, because
it reduces the noise close to the vessel.
The regulated strength of the TVG can be selected in the menu.
12
850--160137 / A
System familiarization
4
TECHNICAL SPECIFICATIONS
Frequency:
57 kHz
Range:
Maximum: 4000 meters
Minimum: 125 meters
Source level (SL):
Sound pressure measured 1 meter from the transducer:
OMNI: 214 dB/1mPa
Single beam: 220 dB/1mPa
Detection range:
1700 m against a 0 dB target under ideal conditions
Transmitter:
Output power: 3500 W
256 transmitters with electronic beamforming
241 transmitters with electronic beamforming
CW or FM transmission
Receiver:
256 receiver channels with electronic beamforming
FM pulse correlation filter
TVG/AGC/RCG regulation
Ping- to- ping filter
Transducer:
Combined half sphere/cylinder transducer with 256
elements
Beam widths:
Horizontal: 12°, 360°
Vertical: 12°
Tilt:
Electronically from +10° to - 90°
Display:
14” colour monitor
Echo presentation in 32 colours
Resolution: 512 x 680 pixels
850--160137 / A
13
Simrad SD570
Modes of presentation:Bow up
North up
True motion
180° horizontal/audio channel
180° horizontal/echo sounder
180° horizontal/180° vertical
270° horizontal/90° vertical
OMNI/180° vertical
OMNI/90° vertical/echo sounder
Track/search functions:
Automatic position track
Automatic/manual target track
Automatic/manual tilt search
Automatic/manual audio search
Auxiliary equipment:
Mains supply:
Speed log, course gyro, echo sounder, ITI and FS trawl
systems.
Display unit: 115/230 VAC ? 15%, 47- 63 Hz
Transceiver unit:115/230 VAC ? 15%, 47- 63 Hz
Hull unit: 230/380/440 VAC ? 15%, 47- 63 Hz 3- phase
Power consumption:
14
1200 VA max.
850--160137 / A
Modes of operation
850- 160138 / AA000 / 3- 14
SD570
Modes of operation
This section describes the different modes of
operation of the SD 570 sonar.
850--160138 / A
I
Simrad SD570
Document revisions
Rev
Date
Written by
Checked by
Approved by
A
13.01.97
CL
SØJ
SØJ
B
C
D
(The original signatures are recorded in the company’s logistic database)
II
850--160138 / A
Modes of operation
Table of contents
1
INTRODUCTION . . . . . . . . . . . . . . . . . . . . . . . . . . . . . . . . . . . . . . . . . . . . .
1
2
MODES OF OPERATION . . . . . . . . . . . . . . . . . . . . . . . . . . . . . . . . . . . . .
2
2.1
2.2
General . . . . . . . . . . . . . . . . . . . . . . . . . . . . . . . . . . . . . . . . . . . . . . . . . . . . .
Bow up . . . . . . . . . . . . . . . . . . . . . . . . . . . . . . . . . . . . . . . . . . . . . . . . . . . . .
2
3
2.3
2.4
2.5
North up . . . . . . . . . . . . . . . . . . . . . . . . . . . . . . . . . . . . . . . . . . . . . . . . . . .
True motion . . . . . . . . . . . . . . . . . . . . . . . . . . . . . . . . . . . . . . . . . . . . . . . . .
1805/Audio . . . . . . . . . . . . . . . . . . . . . . . . . . . . . . . . . . . . . . . . . . . . . . . . .
4
5
6
2.6
2.7
2.8
2.9
1805/Echo sounder . . . . . . . . . . . . . . . . . . . . . . . . . . . . . . . . . . . . . . . . . .
1805/Vertical . . . . . . . . . . . . . . . . . . . . . . . . . . . . . . . . . . . . . . . . . . . . . . . .
2705/Vertical . . . . . . . . . . . . . . . . . . . . . . . . . . . . . . . . . . . . . . . . . . . . . . . .
Omni/Vertical . . . . . . . . . . . . . . . . . . . . . . . . . . . . . . . . . . . . . . . . . . . . . . .
7
8
9
10
2.10 Omni/Echo sounder . . . . . . . . . . . . . . . . . . . . . . . . . . . . . . . . . . . . . . . . .
12
850--160138 / A
III
Simrad SD570
Document history
(The information on this page is for internal use)
Rev. A
IV
Original issue.
850--160138 / A
Modes of operation
1
INTRODUCTION
All operation of the sonar is made from the Sonar Control Unit.
This section contains a detailed description of the different
modes of operation. The man--machine interface, the normal
start/stop procedure and the menu operation is described in
section ”Operation”. In order to get the necessary
understanding of the sonar working principle, read first
through section ”System familiarization”.
Note that the SD 570 transducer in its lower position reaches
1.0 meter below the hull, and that the maximum speed in that
position is 15 knots.
To ensure the best possible reliability of the sonar, it is
important to follow the maintenance procedure described in
section ”Maintenance”.
Caution !
Whenever docking the vessel, the switch S101 at the rear of the
Sonar Control Unit should be switched to OFF position to
prevent inadvertent use of the sonar. For location of the switch,
see figure 1 in the section "M aintenance".
Caution !
The transducer might be damaged if transmitting in air.
Caution !
When docking, also refer to chapter 4.2 in the same section.
850--160138 / A
1
Simrad SD570
2
2.1
MODES OF OPERATION
General
Great emphasis has been placed on giving the best possible
overview presentation of the echo situation of the water volume
around and under the vessel. The result is 9 different display
modes, which gives a flexible choice for a large range of user
applications.
The mode selection is made in the menu, and a detailed
description of each mode will be given in the following chapters.
In addition to the symbols shown in the following mode figures,
different ”cosmetics” can be added on the display. A description
of the different symbols and cosmetics will be given throughout
this chapter.
Note that the different mode figures shown in the following
chapters are common for several types of sonars. Details like
range, menu etc. may therefore not be correct.
2
850--160138 / A
Modes of operation
2.2
Bow up
In this mode the ship symbol is stationary in the centre of the
screen, with the bow pointing upwards. The echo presentation
can cover 360 degrees around the ship, and if OMNI is selected,
all echoes will be updated for each ping. The distance from the
ship symbol to the echo ring is equal to the selected range.
Figure 1 - Bow up
The movement of the echoes across the screen will be a
combination of the ship’s course and speed and the targets’ own
movement. Figure 1 shows the Bow Up mode with a school of
fish in manual and automatic target tracking. The manual
tracking data is shown in the lower right--hand side of the echo
field, and the automatic tracking data is shown in the lower
left--hand side. The menu field shows the submenu for the
MODE selection.
850--160138 / A
3
Simrad SD570
2.3
North up
In this mode, true north is always up on the screen, and the ship
symbol is stationary in the centre of the screen with the bow
pointing in the direction of the ship’s course.
Figure 2 - North up
The echoes will also here move across the screen relative to the
ship’s course and speed, and, as indicated in the figure, a course
line after the ship and target can be displayed.
The ship’s course and speed, and the date and the time are
shown in the bottom of the menu field.
The tilt indicator is displayed in the upper right--hand corner.
The bearing, distance and depth of the moveable cursor cross
are displayed in the upper left--hand side of the echo field.
4
850--160138 / A
Modes of operation
2.4
True motion
In true motion the picture is locked to a geographical position,
with true north up, as shown in figure 3.
Figure 3 - True motion
The ship symbol moves around on the screen according to the
course and speed readings. All echoes are always in correct
position relative to the ship, and their movements on the screen
will be a true representation of the movements of the targets
through the water.
When the ship symbol reaches the screen edge, it will
automatically be moved to the centre or to a position
determined by the DISPLAY CENTRE button. This position is
reset to the screen centre whenever the mode is changed.
When selecting TARGET TRACKING, the target will
automatically be moved to the screen centre. In this mode the
DISPLAY CENTRE button will bring the target back to the
centre in case it has moved. The target will also be moved to the
centre when changing range.
850--160138 / A
5
Simrad SD570
2.5
180°/Audio
In this mode the upper half of the screen shows a 180° bow up
presentation, while the lower part is used for a recording of the
audio channel.
Figure 4 - 180°/Audio
The audio channel is shown with a continuous white line in the
horizontal picture, and can be trained in any direction. The
recorded echoes are a direct replica of the echoes under the
white audio line.
As the audio channel is recorded over a period of time, this
mode is especially useful for detection of weak echoes mixed
with reverberation or noise.
The recording of the last 512 transmissions is always stored in
the computer, even if another mode is selected. That means
that this recording will always be presented when selecting the
180°/audio mode.
Note that the ping sector will remain 360° if OMNI is selected,
but that only 180° are presented.
6
850--160138 / A
Modes of operation
2.6
180°/Echo sounder
In this mode the upper half of the screen shows a 180° bow up
presentation, while the lower part is used for an echo sounder
recording. That means that the sonar acts alternately as a
normal sonar and an echo sounder for each second
transmission.
Figure 5 - 180°/Echo sounder
When selecting this mode, the lower half of the screen will be
dark. A recording will then be built up from right to left on the
screen, and store the last 512 transmissions.
Most of the vertical settings as range, gain etc. may be selected
separately in the VERTICAL menu (refer to chapter 5.25 in
section Operation).
850--160138 / A
7
Simrad SD570
2.7
180°/Vertical
In this mode the upper half of the screen shows a 180° bow up
presentation, while the lower part is used for a vertical slice
presentation. In that way an echo can simultaneously be
presented in both horizontal and vertical dimensions.
Figure 6 - 180°/Vertical
The bearing of the vertical slice is indicated in the horizontal
plane by the white audio line, and can be trained to any bearing
by the manual training knob.
The white audio line indicates the fore part of the 180° vertical
slice, and is always preset to the right in the vertical
presentation, while the rear part is to the left.
Most of the vertical settings as range, gain etc. may be selected
separately in the VERTICAL menu (refer to chapter 5.25 in
section Operation).
If the vertical range is selected to be shorter than the sonar
range, the vertical range can be presented in the horizontal
sonar picture with a white circle, selected in the COSMETICS
menu.
In addition to the normal tilt indicator, the tilt angle is also
shown in the vertical slice by a continuous white line. In that
way, it is easy to select the optimal tilt angle on an echo in the
vertical slice, to get the best drawing of the echo in the
horizontal presentation.
8
850--160138 / A
Modes of operation
2.8
270°/Vertical
This mode is specially made for purse seining, where the
vertical half slice is displayed in the lower left corner for normal
setting of the net on starboard side. If the net is selected to be
set on the port side, the vertical half slice will be displayed in
the lower right--hand corner.
Figure 7 - 270°/Vertical
With this presentation mode, it will be easy to keep the best
contact with a school in both the vertical and horizontal
presentation, and to determine the size distribution of the
school. The position of the school relative to the bottom is
another important information in the presentation.
Figure 7 shows a typical example of a seine catch situation. The
horizontal presentation shows the seine circle and the course
line of the target and the ship. The upper square marker
indicates the position where the net was shot, and the lower
square marker indicates the half net position.
The slice shows a detailed presentation of the school and the
bottom. The lower dotted line indicates the total net depth, and
the vertical line to the left indicates the sinking depth of the
net.
The catch data page for purse seining is selected in the menu
field. In addition to showing all the net data relative to the
target and the bottom, this page also shows all available target
data. A detailed description of this catch data page is given in
chapter 5.26 in section Operation.
850--160138 / A
9
Simrad SD570
2.9
Omni/Vertical
This mode is specially made for trawling, where a complete
overview of the horizontal and vertical situation is presented.
Figure 8 - Omni/Vertical
The bearing of the vertical slice on the right--hand side is as in
180°/Vertical mode indicated by the white audio line, while the
slice on the left--hand side in this mode is indicated by a
long--dashed line. This left--hand slice can be selected with the
gear button to be an 180° extension of the audio line, or to be
locked to the trawl symbol.
The trawl symbol can be added into the echo presentation in
three different ways:
· Manually from the menu.
· Automatically in correct depth when connected to Simrad
FS900 or FS 3300 trawl sonars.
· Automatically in correct depth, distance and bearing when
connected to Simrad ITI Trawl Instrumentation.
Figure 8 shows a typical example of a pelagic trawling
situation. The right--hand vertical slice is here locked to the
school of fish, while the left--hand slice is locked to the trawl
symbol. The vertical opening of the trawl is indicated by two
dotted lines in the vertical presentation.
The normal tilt indicator is here replaced by the digital readout
in the centre on the top of the display, this to give more space
for the echo presentation.
10
850--160138 / A
Modes of operation
The catch data page for trawling is selected in the menu field.
Here the trawl position is presented in relation to the target,
and this can be used as a sight in order to optimize the catch.
In addition to showing the trawl position this page also shows
all available target data.
A detailed description of this catch data page is given in chapter
5.27 in section Operation.
850--160138 / A
11
Simrad SD570
2.10 Omni/Echo sounder
This mode is also specially made for trawling, but in this mode
the trawl--locked vertical slice is replaced by an echo sounder
recording. This to ensure a more correct depth indication in
case the sonar beam is bent because of temperature layers.
Figure 9 - Omni/Echo sounder
In order to get the school presented in the echo sounder
recording, the vessel must here pass over the target.
Figure 9 also shows a typical pelagic trawling situation where
automatic tilting is selected. The dot in front of the school
shows the position of the school after 8 minutes, selected in the
MOVEMENT submenu.
The falling line in the echo sounder recording shows the sinking
of the trawl.
12
850--160138 / A
Operation
850- 160139 / AA000 / 3- 14
SD570
Operation
This section contains description of all control knobs
and menu commands of the SD 570 sonar, as well as
start and stop procedures.
850--160139 / A
I
Simrad SD570
Document revisions
Rev
Date
Written by
Checked by
Approved by
A
13.01.97
CL
SØJ
SØJ
B
C
D
(The original signatures are recorded in the company’s logistic database)
II
850--160139 / A
Operation
Table of contents
1
MAN-- MACHINE INTERFACE . . . . . . . . . . . . . . . . . . . . . . . . . . . . . . . . .
1
1.1
1.2
1
2
General . . . . . . . . . . . . . . . . . . . . . . . . . . . . . . . . . . . . . . . . . . . . . . . . . . . . .
The main control panel . . . . . . . . . . . . . . . . . . . . . . . . . . . . . . . . . . . . . . .
2
THE MENU SYSTEM . . . . . . . . . . . . . . . . . . . . . . . . . . . . . . . . . . . . . . . . .
15
3
DISPLAY CONTROLS . . . . . . . . . . . . . . . . . . . . . . . . . . . . . . . . . . . . . . . .
17
4
START AND STOP PROCEDURES . . . . . . . . . . . . . . . . . . . . . . . . . . . .
18
4.1
4.2
18
18
5
Start procedure . . . . . . . . . . . . . . . . . . . . . . . . . . . . . . . . . . . . . . . . . . . . . .
Stop procedure . . . . . . . . . . . . . . . . . . . . . . . . . . . . . . . . . . . . . . . . . . . . . .
MENU OPERATION . . . . . . . . . . . . . . . . . . . . . . . . . . . . . . . . . . . . . . . . . .
19
5.1
5.2
5.3
5.4
5.5
5.6
5.7
5.8
5.9
5.10
5.11
5.12
5.13
5.14
5.15
5.16
5.17
5.18
Mode . . . . . . . . . . . . . . . . . . . . . . . . . . . . . . . . . . . . . . . . . . . . . . . . . . . . . . .
Pulse form . . . . . . . . . . . . . . . . . . . . . . . . . . . . . . . . . . . . . . . . . . . . . . . . . .
Transmission power . . . . . . . . . . . . . . . . . . . . . . . . . . . . . . . . . . . . . . . . . .
Ping sector . . . . . . . . . . . . . . . . . . . . . . . . . . . . . . . . . . . . . . . . . . . . . . . . . .
TVG (Time Variable Gain) . . . . . . . . . . . . . . . . . . . . . . . . . . . . . . . . . . . . .
AGC (Automatic Gain Control) . . . . . . . . . . . . . . . . . . . . . . . . . . . . . . . .
RCG (Reverberation Controlled Gain) . . . . . . . . . . . . . . . . . . . . . . . . . .
PP Filter . . . . . . . . . . . . . . . . . . . . . . . . . . . . . . . . . . . . . . . . . . . . . . . . . . . .
Markers . . . . . . . . . . . . . . . . . . . . . . . . . . . . . . . . . . . . . . . . . . . . . . . . . . . .
Audio sector . . . . . . . . . . . . . . . . . . . . . . . . . . . . . . . . . . . . . . . . . . . . . . . .
Tilt step . . . . . . . . . . . . . . . . . . . . . . . . . . . . . . . . . . . . . . . . . . . . . . . . . . . . .
Track window . . . . . . . . . . . . . . . . . . . . . . . . . . . . . . . . . . . . . . . . . . . . . . .
Colour threshold . . . . . . . . . . . . . . . . . . . . . . . . . . . . . . . . . . . . . . . . . . . . .
Display gain . . . . . . . . . . . . . . . . . . . . . . . . . . . . . . . . . . . . . . . . . . . . . . . .
Wind marker . . . . . . . . . . . . . . . . . . . . . . . . . . . . . . . . . . . . . . . . . . . . . . . .
External synchronizing . . . . . . . . . . . . . . . . . . . . . . . . . . . . . . . . . . . . . . .
Cosmetics . . . . . . . . . . . . . . . . . . . . . . . . . . . . . . . . . . . . . . . . . . . . . . . . . . .
Constants . . . . . . . . . . . . . . . . . . . . . . . . . . . . . . . . . . . . . . . . . . . . . . . . . . .
Time . . . . . . . . . . . . . . . . . . . . . . . . . . . . . . . . . . . . . . . . . . . . . . . . . .
Gear . . . . . . . . . . . . . . . . . . . . . . . . . . . . . . . . . . . . . . . . . . . . . . . . . .
School data . . . . . . . . . . . . . . . . . . . . . . . . . . . . . . . . . . . . . . . . . . . .
21
22
24
25
26
27
28
29
30
31
32
33
34
35
36
36
37
40
41
42
45
Menu . . . . . . . . . . . . . . . . . . . . . . . . . . . . . . . . . . . . . . . . . . . . . . . . .
Alignment . . . . . . . . . . . . . . . . . . . . . . . . . . . . . . . . . . . . . . . . . . . . .
Options . . . . . . . . . . . . . . . . . . . . . . . . . . . . . . . . . . . . . . . . . . . . . . .
47
48
49
Bearing . . . . . . . . . . . . . . . . . . . . . . . . . . . . . . . . . . . . . . . . . . . . . . .
Units . . . . . . . . . . . . . . . . . . . . . . . . . . . . . . . . . . . . . . . . . . . . . . . . .
Language . . . . . . . . . . . . . . . . . . . . . . . . . . . . . . . . . . . . . . . . . . . . .
50
51
52
850--160139 / A
III
Simrad SD570
IV
Simrad test . . . . . . . . . . . . . . . . . . . . . . . . . . . . . . . . . . . . . . . . . . . .
5.19 Standard . . . . . . . . . . . . . . . . . . . . . . . . . . . . . . . . . . . . . . . . . . . . . . . . . . . .
5.20 Test . . . . . . . . . . . . . . . . . . . . . . . . . . . . . . . . . . . . . . . . . . . . . . . . . . . . . . . .
52
53
54
5.21
5.22
5.23
5.24
Course . . . . . . . . . . . . . . . . . . . . . . . . . . . . . . . . . . . . . . . . . . . . . . . . . . . . .
Speed . . . . . . . . . . . . . . . . . . . . . . . . . . . . . . . . . . . . . . . . . . . . . . . . . . . . . .
Vertical menu . . . . . . . . . . . . . . . . . . . . . . . . . . . . . . . . . . . . . . . . . . . . . . .
Catch data page for purse seiners . . . . . . . . . . . . . . . . . . . . . . . . . . . . . .
55
56
57
58
5.25 Catch data page for trawlers . . . . . . . . . . . . . . . . . . . . . . . . . . . . . . . . . . .
61
850--160139 / A
Operation
Document history
(The information on this page is for internal use)
Rev. A
Original issue.
850--160139 / A
V
Simrad SD570
Blank page
VI
850--160139 / A
Operation
1
1.1
MAN--MACHINE INTERFACE
General
The operating controls are located on an easily- operated control
panel. As some of the functions on a sonar system are in more
intensive use than others, these have their own control knobs
arranged in function groups, as tilt, train, etc. The other functions
are ”menu- oriented”, controlled by a single joystick.
The menu is displayed on the right- hand side of the display. In
order to make the best possible use of the sonar, the user must be
familiar with all the operating controls and functions. It is not
possible to identify settings that will provide the best results at all
times. This is because the sonar conditions will vary from place
to place as well as from time to time, and the variations may
sometimes be severe. Study the sections Modes of Operation
and Operation carefully, preferably while practising on the
sonar at the same time.
Figure 1 - Display and control panel
850--160139 / A
1
Simrad SD570
1.2
The main control panel
Figure 2 shows the main control panel. The following pages give
a detailed description of each function, and for an inexperienced
operator it is recommended to try the functions on an operative
sonar while reading this chapter.
Figure 2 - The main control panel
2
1)
Cursor joystick
2)
Main switch
3)
Display- oriented push buttons
4)
Gain controls
5)
Range controls
6)
Menu joystick
7)
Tilt controls
8)
Illumination
9)
Train controls
850--160139 / A
Operation
1. CURSOR JOYSTICK
This joystick is used to move the yellow cursor (+) on the display,
and can be used for the following purposes, which will be
described thoroughly for each function later in this chapter:
· Distance, bearing and depth indication
for any position on the screen, with the readouts in yellow
figures in the upper right- hand corner (lower corner for
omni/vertical modes).
· Target marker positioning
when using the TARGET MARKER push button.
· Målmarkør- posisjonering
ved bruk av MÅLMARKØR trykknappen.
· Circle marker positioning
when using the CIRCLE MARKER push button.
· Manual target tracking
for calculation of the target movement between the two latest
selected TARGET MARKERS.
· Selection of position to be tracked
when using the POSITION TRACK push button.
· Selecting of target to be tracked
when moving the cursor to a target and using the TARGET
TRACK push button.
· Selecting of new display centre
when using the DISPLAY CENTRE push button in TRUE
MOTION mode.
The joystick can be moved in any direction. The speed of the
cursor increases with the movement of the joystick. The joystick
is self- centring, and the cursor will remain in the selected position
until it is used for one of the above- mentioned purposes.
850--160139 / A
3
Simrad SD570
2. MAIN SWITCH
The main switch controls the mains power to the sonar, the
lowering and hoisting of the transducer, and indicates the
transducer position.
Note !
Before lowering the transducer, check that the depth of water below the
vessel is sufficient, and that the vessel’s speed is below 15 knots. This is
the maximum speed specified with the transducer lowered.
ON- OFF
In order to start up the sonar, press the ON- OFF/HOIST button
for approx. two seconds. The button lights up and indicates that
the transducer is in upper position. To be able to switch off the
sonar, the transducer must be in upper position. Press the button
for approx. two seconds, until the sonar is switched off.
WARNING !
If the Sonar Control Unit is switched OFF due to, for
example, power failure, with the Hull Unit lowered, the
Hull Unit must be raised by using the hoisting/lowering
switch in the motor control unit, or by the hand crank
(refer to section Maintenance ).
HOISTING
If the transducer is in the lower position, the transducer can be
hoisted to the upper or middle position with the
ON- OFF/HOIST button. The selected transducer position is
shown on the upper line in the menu field.
· MIDDLE position is selected by a normal short press on the
button.
· UPPER position is selected by pressing the button for approx.
two seconds.
LOWERING
If the transducer is in the upper position, the transducer can be
lowered to the lower or middle position with the LOWER button.
Selected transducer position is shown on the upper line in the
menu field.
· MIDDLE position is selected by a normal short press on the
button.
· LOWER position is selected by pressing the button for approx.
two seconds.
4
850--160139 / A
Operation
TRANSDUCER POSITION
In addition to the indicated transducer position on the upper line
in the menu field, the lights in the ON- OFF/HOIST and LOWER
buttons will also indicate the transducer position:
· The ON- OFF/HOIST button lights with the transducer in
UPPER position.
· The LOWER button lights with the transducer in LOWER
position.
· No button lights with the transducer in MIDDLE position.
· Both buttons lights when the transducer is hoisting or
lowering.
850--160139 / A
5
Simrad SD570
3. DISPLAY- ORIENTED PUSH BUTTONS
TARGET MARKER
To set a target marker, move the cursor to the target and press the
button. A triangle symbol with a corresponding number will then
appear at the cursor position. 8 numbered target markers may be
shown simultaneously. When more than 8 markers are
positioned, the oldest one is erased. The position data for 8
markers is displayed in the MARKERS menu.
The sonar keeps track of the markers even outside the display.
The target marker can also be used for MANUAL TARGET
TRACKING, because the sonar calculates the speed (S), course
(C) and distance (D) between the two last selected target markers.
The result is displayed in white figures in the lower right corner
(left corner in AUDIO or ECHOSOUNDER modes). The
calculated result will be displayed for 3 minutes.
In addition to be used for target tracking, this is also useful for
distance measurements between two selected positions.
OWN SHIP MARKER
A square marker is displayed on the own ship symbol when the
button is pressed. The marker will then be locked to that
geographic position.
As with the target markers, this marker is given a number, and its
position data is also displayed in the MARKERS menu.
CIRCLE MARKER
To set the circle marker, move the cursor to the desired position
and press the button. A circle symbol will appear at the cursor
position, and the button will light. The size of the symbol will be
equal to the selected seine net if a net is selected in the GEAR
menu, or equal to net no. 1 if a trawl symbol is selected.
To erase the circle symbol, press the button once more.
6
850--160139 / A
Operation
GEAR SYMBOL
The gear symbol can be a seine circle or a trawl symbol,
depending on the selection in the GEAR menu.
Seine circle:
To set a seine symbol, first press the GEAR button once. The
button lights, and the seine circle appears in front of the ship
symbol, on the side that is selected in the GEAR menu. The seine
circle will now follow the ship’s movements.
At the moment the setting of the seine starts, press the GEAR
button again. The seine circle will now be stationary to indicate
the ideal ship’s path for the seine setting. A square symbol
indicates the starting point, another square shows the half- seine
out, and a third square shows the end of the seine.
Trawl symbol:
The trawl data can be set manually in the GEAR menu, or
automatically by connecting the SIMRAD FS 3000 or ITI trawl
monitoring system to the sonar system.
In the manual mode, the trawl symbol will be displayed on the
ship’s course line, with the selected depth and distance.
If the FS 3000 trawl sonar is connected, the trawl symbol will
automatically be displayed in correct depth in the vertical display
modes.
If the ITI trawl system is connected, the trawl symbol will be
displayed with correct distance, bearing and depth. In addition,
the trawl opening, temperature, and trawl filling indicator may be
displayed.
Press the GEAR button to set the trawl symbol. The button lights
and the trawl symbol appears on the display.
In the OMNI/VERTICAL mode, a long- dashed line will indicate
the bearing of the left- hand side vertical slice. The first time the
GEAR button is pressed, this line will become white and a 180°
extension of the audio line. The second operation of the GEAR
button will lock the left- hand slice to the trawl symbol, and the
colour of the line will change to yellow.
850--160139 / A
7
Simrad SD570
This button has three functions:
QUICK MODE SELECTION
Pressing this button in bow up mode gives a quick change to the
270° /vertical mode. This can be used for easy evaluation of the
target, or for preparing the catching phase. Next operation of the
button brings back the bow up mode.
DISPLAY CENTRE
In true motion mode, a new position of the ship symbol can be
selected by moving the cursor to the wanted new position, and
then pressing the button.
If position track or automatic target tracking is used in the true
motion mode, the tracking point will be moved to the display
centre when pressing the button.
ERASE ECHO
Pressing this button in other modes than bow up or true motion
erases all echoes, except the stored echoes from the audio channel
and the echo sounder.
The main purpose of using erase is to ”clean up” the screen when
11° sector mode is used, or to erase old echoes in the catch data
page in the menu field.
8
850--160139 / A
Operation
4. GAIN CONTROLS
VOLUME
The two upper push buttons control the volume of the audio
channel in the loudspeaker. The audio channel is shown with a
continual white line, and can be trained by the train controls. Also
note that the size of the audio sector can be changed from 11° to
99° in the menu (chapter 5.10).
MAN/AUTO GAIN
These two push buttons are used to simplify the ON/OFF
selection of the AGC and the RCG.
The selection adjusts the AGC and the RCG to the following
menu settings:
AGC.........:
OFF
AGC.........:
MEDIUM
RCG.........:
OFF
RCG.........:
MEDIUM
Note that the GAIN (see below) may be readjusted when selecting
MAN/AUTO GAIN.
GAIN
The two lower push buttons control the total gain of the sonar. The
gain is displayed in the upper right- hand corner of the display.
The gain has 51 values, numbered from 0 to 50, and the receiver
gain is changed 1 dB per step.
850--160139 / A
9
Simrad SD570
5. RANGE CONTROLS
The selected range is displayed in the upper right- hand corner of
the display. The ranges are: 125, 250, 375, 500 , 750, 1000, 1500,
2000, 3000 and 4000 meters.
To make an optimal position tracking or target tracking
programme, the range selection will go to AUTO when selecting
these modes. To keep a steady display picture during seine
setting, the lower automatic range is set to 400 meters. Changing
the range or pressing the MAN button will stop the auto- ranging.
The sonar is designed to work with different range measurement
units such as meters or feet for distance, and meters, feet or
fathoms for depth. The choice can be made in the CONSTANTS
menu.
10
850--160139 / A
Operation
6. MENU JOYSTICK
This joystick controls the menu operation, and can be moved in
four directions: up, down, left and right. The up and down
movement is used to move the menu cursor (inverted video) up
and down in the menu, and the left and right movement is used
as an ENTER function.
When the menu cursor is in the main menu or the extra menu, and
the menu joystick is moved to the left, a catch data page will
appear in the menu field. There is one special page for seining and
one for trawling, depending on the selection in the GEAR menu.
For further explanation of these catch data pages, see chapters
5.24 and 5.25.
850--160139 / A
11
Simrad SD570
7. TILT CONTROLS
The tilt can be adjusted electronically from +10° to - 90°. The tilt
angle is normally repeated on the tilt indicator in the upper
left- hand corner, but in some of the dual modes, the tilt angle is
shown directly in the vertical slice.
MANUAL TILT
In manual mode, the transducer may be tilted within the limits of
+10° to - 90° by pressing the tilt up or down push buttons. By
giving short pushes on the up/down buttons the tilt changes in
1° steps, while it changes continually when one of the buttons is
pushed and held in position.
AUTO TILT
In auto mode the transducer will automatically tilt in steps within
the selected tilt limits.
When AUTO is pressed, the tilt angle will form the centre of the
tilt search, and the selected tilt limits are displayed on the tilt
indicator with yellow lines, and by digits for the upper and lower
tilt limit.
The tilt centre can be adjusted by using the tilt up/down buttons.
The tilt limits are adjusted by holding the AUTO button in the
inner position and using the tilt up/down buttons to increase or
decrease the sector.
The tilt step can be selected from 1° to 10° in the menu (chapter
5.11).
12
850--160139 / A
Operation
8. ILLUMINATION
These buttons controls the backlights and signal lights in the push
buttons.
In broad daylight only the signal lights may be selected by
pressing the + button for maximum light and then releasing the
button and giving it a new short press. Then only the signal lights
will light up with maximum light.
9. TRAIN CONTROLS
The audio channel is shown with a continuous white line, and can
be trained manually or automatically. The bearing angle is
displayed in the upper right- hand corner of the display, indicated
with ? 180° relative to the bow.
MANUAL TRAINING
In manual training, the audio channel can be trained
continuously in either direction to the wanted bearing. The
automatic training programme is overridden when the manual
training knob is operated. When the activated button is released,
the automatic search will continue. The bearing at the moment
when the button was released will then be the new centre bearing
of the search area.
AUTO SEARCH
In this mode the sonar will automatically search within the sector
set by the search sector buttons.
The bearing at the time of pressing the button will be the centre
of the search area.
The AUTO SEARCH button also has a stop/return function,
which means that if the button is held in the inner position, the
search will stop, and when it is released again, it will train in the
opposite direction.
850--160139 / A
13
Simrad SD570
POSITION TRACK
This tracking programme is only fully activated when both
course gyro and speed log are connected to the sonar system.
Place the cursor on the position to be tracked and press the button.
A geographically fixed circle is then displayed, and the sonar will
automatically track this position. The track sector angle is set by
the SEARCH SECTOR buttons.
When auto tilt is used in position track, the tilt centre will
automatically be adjusted in accordance with the distance to the
tracked position.
TARGET TRACK
The target tracking programme is activated by moving the cursor
onto the target, and then pushing the button. A circle is displayed,
and the sonar will track the strongest echo situated within the
”window” indicated by the two lines on the bearing line. The
window size may be changed by accessing the track window
menu (chapter 5.13).
A line starting at the target’s centre of gravity indicates the course
and speed of the target. The length of the line increases with the
speed, and one knot is indicated with a small mark on the line.
A course line is also displayed showing the target’s track. All
target readouts are given a light violet colour, and in addition to
the readouts on the catch data page (refer to chapters 5.24 and
5.25), the speed, course and distance can for some modes also be
found in the lower left- hand corner.
When auto tilt is used in target track, the tilt will automatically
track the strongest echo.
Note that the manual training can be used to override the tracking
programme.
SEARCH SECTOR
The search sector is only displayed in the automatic training
programmes. The sector may be adjusted between 22° and 360°
for any centre bearing.
In the auto search and position tracking programmes, the search
sector is used for setting limits for the audio search.
In the target tracking programme, the search sector may be used
to override the tracking limits.
14
850--160139 / A
Operation
2
THE MENU SYSTEM
The menu is displayed on the right--hand side of the display. In
order to make an optimal use of the sonar for most types of
operation, three different menus may be selected (refer to
chapter 5.18.4).
The table below shows the contents of the main menu for the
different submenus, with reference to the chapter in which the
submenu is described.
MAIN MENU
REFER TO
CHAPTER
SHORT
NORMAL & FULL
MODE
MODE
5.1
PULSE FORM
TX POWER
PING SECTOR
5.2
5.3
5.4
AGC
RCG
PP FILTER
TVG
AGC
RCG
PP FILTER
5.5
5.6
5.7
5.8
COURSE
SPEED
COURSE
SPEED
5.21
5.22
The sonar is equipped with a battery memory that remembers
all selected menu settings even if the sonar is switched off.
The menu settings marked with an asterisk indicate the
normal settings which perform well under normal conditions.
If one has got lost in the menu settings, a STANDARD function
(see chapter 5.19) will bring up these normal settings.
850--160139 / A
15
Simrad SD570
If the cursor is moved below PP FILTER in the main menu, an
extra menu will appear at the bottom of the menu field.
This information is normally hidden because these functions
are seldom used, and the system is more easily operated with
an uncluttered screen.
EXTRA MENU
SHORT
NORMAL & FULL
MARKERS
MARKERS
5.9
AUDIO SECTOR
TILT STEP
TRACK WINDOW
COLOURTHRESH.
DISPLAY GAIN
WIND MARKER
EXTERNAL SYNC
COSMETICS
CONSTANTS
STANDARD
TEST
5.10
5.11
5.12
5.13
5.14
5.15
5.16
5.17
5.18
5.19
5.20
CONSTANTS
16
REFER TO
CHAPTER
850--160139 / A
Operation
3
DISPLAY CONTROLS
Six display controls are located under the frame on the top of
the display.
Figure 3 - Display controls
1. BRIGHTNESS Adjusts the brightness of the display. turn
the knob clockwise to increase the
brightness.
850--160139 / A
2. CONTRAST
Adjusts the contrast on the display. Turn
the knob clockwise to increase the
contrast.
3. V--CENTER
Adjusts the vertical display position.
4. V--SIZE
Adjusts the vertical size.
5. H--CENTER
Adjusts the horizontal display position.
6. H--SIZE
Adjusts the horizontal size.
17
Simrad SD570
4
START AND STOP PROCEDURES
4.1
Start procedure
Note !
Before starting up the sonar, check that the depth of water below the
vessel is sufficient, and that the vessel’s speed is below 15 knots, which
is the maximum speed specified with the transducer lowered.
The numbers in brackets refer to figure 2.
1
Switch on the sonar by pressing the ON- OFF/HOIST
button (2) for approx. two seconds. The button lights green
to indicate that the transducer is in the upper position.
2
Set the display contrast and brightness according to
ambient light.
3
Press the LOWER button (2) until the selected transducer
position on the upper line in the menu field shows
SELECTED POS: LOWER. During the lowering, the text
will change to LOWERING TO: LOWER. When the
transducer is fully lowered, the text will change to
TRANSD.POS: LOWER. the orange LOWER button will
also light, to indicate that the transducer is fully lowered.
4
If the sonar is connected to a course gyro with stepper or
synchro output, the menu on the display will now blink
with the text: ADJUST COURSE, to remind you to adjust
the course readout on the sonar to correspond with the
course gyro. Adjust the course by means of the menu
joystick (6) and enter the value by pushing the menu
joystick to the right.
This completes the start procedure.
4.2
Stop procedure
1
2
WARNING !
18
Press the ON- OFF/HOIST button (2) until the selected
transducer position on the upper line in the menu field
shows SELECTED POS: UPPER. During the hoisting the
text will change to HOISTING TO: UPPER. When the
transducer is fully hoisted, the text will change to
TRANSD.POS: UPPER. the green ON- OFF/HOIST button
will also light, to indicate that the transducer is fully
hoisted.
Switch off the sonar by pressing the ON- OFF/HOIST
button (2) for approx. two seconds.
If the Sonar Control Unit is switched OFF due to, for
example, power failure, with the Hull Unit lowered, the
Hull Unit must be raised by using the hoisting/lowering
switch in the motor control unit, or by the hand crank
(refer to section “Maintenance”).
850--160139 / A
Operation
5
MENU OPERATION
The menu joystick can be moved in four directions: up, down, to
the right and to the left. The up and down movements are used
to move the cursor (inverted video) up or down to the desired
position. Movement to the right is used as the ENTER function,
and will hereafter be called ”press ENTER”. Movement to the left
is also used as an ENTER function, and when the menu cursor is
in the main menu or the extra menu, this ENTER function will
bring up a catch data page (see chapters 5.24 and 5.25).
TRANSD. POS:
LOWER
RANGE......: 3500 M
BEARING....:
123°
GAIN.......:
8
MODE:
BOW UP
PULSE FORM.:*FM-AUTO
TX POWER...:
*FULL
PING SECTOR:
*OMNI
TVG........: *20 LOG
AGC........: *MEDIUM
RCG........: *MEDIUM
PP FILTER..: *MEDIUM
MARKERS
AUDIO SECT.:
*11°
TILT STEP..:
*2°
TRACKWINDOW: *MEDIUM
COLOURTHRES:
0
DISPL. GAIN:
*5
WIND MARKER:
EXT. SYNC..:
*OFF
COSMETICS
CONSTANTS
STANDARD
TEST
COURSE.....:
234°
SPEED.....A: 12.3 KN
1997.10.15 12:27:56
850--160139 / A
19
Simrad SD570
If the operator wishes to change one of the settings in the menu,
the cursor must be moved up or down until it covers the desired
function. Press ENTER, and the submenu for this control function
will appear on the screen. The cursor will then be on the relevant
setting.
Move the cursor to the desired function and press ENTER to
complete the operation. The submenu will disappear, and the
new setting will now appear in the main menu.
Note that the cursor will stop in upper or lower position in the
menu field when the joystick is kept in up or down position.
When a new operation of the joystick is then made in the same
direction, the menu cursor will jump to the opposite end of the
menu.
This chapter describes all submenus of the main menu, the extra
menu and the catch data pages. For an explanation of how to use
the menu system, refer to chapter 2.
20
850--160139 / A
Operation
5.1
Mode
The sonar has nine different operational modes. To select the
MODE submenu, move the menu cursor to MODE in the main
menu and press ENTER.
MODE:
BOW UP
NORTH UP
TRUE MOTION
180°/AUDIO
180°/ECHOSOUND
180°/VERTICAL
270°/VERTICAL
OMNI/VERTICAL
OMNI/ECHOSOUND
Use the menu joystick once more to select the desired operational
mode. The selected mode will then be displayed. When pressing
ENTER, the submenu disappears, and the cursor goes back to the
main menu. The various modes are described in section “Modes
of operation”.
Note that the cursor will stop in upper or lower position in the
submenu when the joystick is kept in up or down position. Then,
when a new operation of the joystick is made in the same
direction, the menu cursor will jump to the opposite end of the
submenu.
850--160139 / A
21
Simrad SD570
5.2
Pulse form
With this function one may choose the form of the transmitter
pulse:
PULSE FORM.:
CW SHORT
CW NORMAL
CW LONG
*FM AUTO
FM 1
FM 2
FM 4
FM 8
CW (Continuous wave):
The frequency of the transmitter pulse is here constant. There is
a choice between three pulse lengths: short, normal and long. In
addition, the length of the pulse will change automatically in
accordance with chosen range. The table below shows the
different pulse lengths for CW and FM. The pulse length is given
in milliseconds (ms).
RANGE
(meters)
CW -- PULSE LENGTH (ms)
FM
AUTO
SHORT
NORMAL
LONG
125
0.6
1.25
3.75
FM4
250
1.25
2.5
7.5
FM4
375
2
3.75
11.25
FM4
500
2.5
5
15
FM4
750
3.75
7.5
22.5
FM4
1000
5
10
30
FM8
1500
7.5
15
45
FM8
2000
10
20
50
FM8
3000
15
30
50
FM8
4000
20
40
50
FM8
FM (Frequency modulation):
In the FM mode the transmitter pulse is frequency modulated.
This provides a stable echo presentation and greater ability of
detection as noise and reverberation are reduced.
22
850--160139 / A
Operation
There is a choice between five different modes:
FM- AUTO:
Chooses automatically the optimal number of
frequencies (1- 8) for selected range.
FM- 1:
Transmits one- frequency pulses with a total
pulse length of 0.6 ms
FM- 2:
Transmits two- frequency pulses with a total
pulse length of 2.5 ms
FM- 4:
Transmits four- frequency pulses with a total
pulse length of 10 ms
FM- 8:
Transmits eight- frequency pulses with a total
pulse length of 40 ms
The chosen number of frequencies are transmitted in one ping,
and the receiver unit undertakes a spectrum analysis and
compares the received echoes with the transmitter’s frequency
code. This provides a filtering effect which efficiently reduces
noise and reverberation, thereby increasing the sonar’s range.
The table on the previous page shows the maximum FM mode for
all ranges. The maximum FM mode will automatically be selected
when using FM- AUTO.
850--160139 / A
23
Simrad SD570
5.3
Transmission power
The transmitter operates with three different power settings in
addition to OFF (passive).
TX POWER...:
*FULL
MEDIUM
LOW
OFF
The output voltage which can be checked on the voltmeter in the
transceiver unit has the following values:
FULL:
MEDIUM:
LOW:
90 V
40 V
20 V
Note that the output voltage can drop as much as 30% during the
transmission pulse.
24
850--160139 / A
Operation
5.4
Ping sector
The ping sector is defined as the sector covered by one ping. The
size of the sector can be selected between 360° (OMNI) and 11°
(single beam).
PING SECTOR:
*OMNI
11°
When choosing 11°, the current bearing will be the centre of the
beam. Furthermore, the beam can be turned manually by means
of the train buttons, or automatically in the AUTO SEARCH or
tracking programmes.
850--160139 / A
25
Simrad SD570
5.5
TVG (Time Variable Gain)
The TVG controls the gain in the signal amplifier. The gain is
weakest just after the ping and increases in accordance with time
(and therefore distance). The TVG reaches the maximum gain at
1000 meters.
TVG........:
OFF
10 LOG
15 LOG
*20 LOG
25 LOG
30 LOG
R
R
R
R
R
In addition to OFF, the TVG can be selected with five different
curve slopes, each having different gain regulation. The line in the
menu marked with an asterisk shows the theoretically correct
setting (20 log R). With this setting, the gain is adjusted in such
a way that a school of fish with a certain size and density will be
presented with approximately the same strength on the screen in
any position inside the regulated TVG range.
26
850--160139 / A
Operation
5.6
AGC (Automatic Gain Control)
This control adjusts the gain in the sonar’s preamplifier
dependent on the strength of the incoming echo signals. The
result is a filter- effect reducing noise and reverberation.
AGC........:
OFF
WEAK
*MEDIUM
STRONG
As shown in the menu, the AGC has four different settings:
OFF
WEAK
MEDIUM
STRONG
-
no adjustment
slow adjustment
medium fast adjustment
fast adjustment
Note that the AGC is sensing the echo strength in the audio
channel, and use this as a basis for a common adjustment for all
the receiver beams.
850--160139 / A
27
Simrad SD570
5.7
RCG (Reverberation Controlled Gain)
The RCG function is individual for each of the 32 receiving beams.
Signals with small variations, like propeller noise, surface and
bottom reverberation will be eliminated, while signals with fast
variations, like target echoes or bottom echoes will not be
removed.
RCG........:
OFF
WEAK
*MEDIUM
STRONG
As shown in the menu the RCG function has four different
settings. It is difficult to tell which is the best for extreme varying
sonar conditions, but with experience and by repeated usage one
will discover the best setting for any given situation.
The normal gain setting when RCG is OFF is 0- 3. The optimal
gain setting when using RCG is normally gain 6.
Note that scattered fish can be perceived as reverberation, so
therefore the RCG should be used with care if scattered schools
are to be detected.
28
850--160139 / A
Operation
5.8
PP Filter
The sonar is equipped with a ping- to- ping filter in order to
reduce all unwanted noise and echoes from the screen. The filter
has three different strengths:
PP FILTER..:
OFF
WEAK
*MEDIUM
STRONG
As the ping- to- ping filter compares the echoes from the last 2
(WEAK), 4 (MEDIUM) or 8 (STRONG) pings, it will take this
selected amount of pings to make a stable presentation when
changing most of the sonar functions.
When selecting PP Filter, an extra interference filter will also be
activated to reduce the interference from other vessels.
The filtering routine takes the vessel’s speed into consideration
when comparing the echoes from ping to ping.
Note that in rough seas, when the beam can easily miss the target
in several pings, the PP filter should be used with care.
850--160139 / A
29
Simrad SD570
5.9
Markers
This menu shows position data (distance, bearing and depth) for
the markers in the sonar picture. Positioning of markers is
described in chapter 1.2.(3) “Display oriented push buttons”.
MARKERS
M DIST. BEAR DEPT
1 12345 -134 1234
2
564
89
120
3 1567 121
675
4 1234 143
566
5
876 113
98
6
832 -78
176
7
854
9
123
8
88 -173
46
C
455 131
76
A maximum of eight markers can be positioned at one time. If this
number is exceeded, the marker first selected will be replaced by
the one last selected. ”C” on the bottom line shows the position
data of the moveable marker cross. If automatic tracking is used,
a ”T” will show the position data for the tracking circle.
As the numbered markers are locked geographically they may
move outside the screen. The computer keeps track of all markers
inside a radius of 60 kilometers. Outside this radius the position
data will be replaced by a row of x’es.
To present the bearing line to a selected marker, move the menu
cursor to the relevant marker. To erase a marker, move the menu
cursor to the relevant marker. Press ENTER and this submenu
will appear:
MARKER NO:
ERASE MARKER
5
NO
YES
This is also intended as a ”regret function” if one by mistake has
pressed ENTER after selecting a bearing line.
30
850--160139 / A
Operation
5.10 Audio sector
The audio sector is the part of the ping which is reflected in the
audio channel. The size of the sector can be selected from the
menu:
AUDIO SECT.:
*11°
33°
55°
77°
99°
When using AUTO SEARCH for audio search, the step of the
search will be equal to the selected audio sector.
Note that the audio sector can never be larger than the ping sector
if a ping sector of 11° is used.
850--160139 / A
31
Simrad SD570
5.11 Tilt step
When AUTO TILT has been selected, the tilt step function is used
to decide by how many degrees the tilt angle is to be changed for
each ping.
TILT STEP..:
1°
*2°
3°
4°
5°
6°
7°
8°
9°
10°
The limits for the tilt searches are set by the tilt controls at the
operator’s panel (see description of tilt control).
32
850--160139 / A
Operation
5.12 Track window
This function is only used when target tracking is selected.
TRACKWINDOW:
SMALL
*MEDIUM
LARGE
The selected target window is presented on the bearing line. As
the sonar will follow the strongest echo inside this window, it is
used to prevent the sonar from locking to surface or bottom
echoes close to the desired echo. The window is automatically
centred on the strongest part of the echo.
The size of the window is normally set to MEDIUM, but if the
target is small and the surroundings full of noise, a SMALL
window should be selected. However, if the target is large, a
LARGE window is preferred.
(CD3988)
When the stabilization is used, this also allows the use of the PP
filter in rough seas. This will give a cleaner and more stable echo
presentation.
850--160139 / A
33
Simrad SD570
5.13 Colour threshold
The strength of the echoes is presented by a scale of 32 colours on
the screen. A weak echo has a cold colour (blue), medium echoes
warmer colours (green, yellow) and strong echoes the warmest
colours (orange, red).
If desired, the number of colours may be reduced. In that case one
starts with the colour representing the weakest echo. The number
of colours that can be reduced depends on the selected menu
colour.
COLOURTHRES:
0
SET THRESHOLD
?
? 0
Note that by reducing colours, the maximum detection range will
be reduced. This because all echoes normally will appear as weak
echoes on the display at long range.
34
850--160139 / A
Operation
5.14 Display gain
Display gain increases or decreases the colour threshold on the
screen.
DISPL. GAIN:
0
1
2
3
4
*5
6
7
8
9
Display gain only controls the presentation on the screen, it is the
gain control on the front panel which controls the receiver’s total
gain.
850--160139 / A
35
Simrad SD570
5.15 Wind marker
A wind marker can be selected in the menu for COSMETICS (see
chapter 5.17). The marker which can be used to indicate the wind
or current direction, has to be adjusted manually.
WIND MARKER:
123°
SET WIND DIRECTION
?360°
? 0°
5.16 External synchronizing
In order to eliminate interference from other equipment on board,
the sonar’s trigger pulse can be synchronized with the other
equipment’s trigger pulse. The external trigger pulse must then
be connected to the sonar.
EXT.SYNC...:
*OFF
ON
This menu is used to switch the synchronizing input ON/OFF. If
switched ON, the sonar will wait for a trigger pulse before
starting a new transmission. This wait state has a timeout of five
seconds, whereafter the sonar will start a new transmission.
When using external synchronizing, the sonar’s ping rate will be
reduced.
36
850--160139 / A
Operation
5.17 Cosmetics
This menu is used to choose different ”cosmetics” on the screen.
COSMETICS:
ECHO DISTANC:HORIZ
BEARING CARD: OFF
COMPASS CARD:
ON
DIST. RINGS.:
ON
CURSOR RING.:
ON
CURSOR BEAR.:
ON
BOW MARKER..:
ON
COURSE LINE.:
ON
MINUTE MARK.:
ON
WIND MARKER.:
ON
VERT. RING..:
ON
Similar to other menu selections, desired cosmetics are stored in
a battery operated memory. The sonar will therefore remember
them even if the unit is switched off.
ECHO DISTANC:
HORIZONTAL
SLANT
With this function one may choose presentation of echo distance
on the screen.
850--160139 / A
37
Simrad SD570
With HORIZONTAL presentation, the echo distance is the
distance which the vessel must sail in order to come on top of the
target.
With SLANT presentation the distance to the target is measured
along the tilt angle.
Figure 4 - Display cosmetics
The rest of the submenus for cosmetics have normal ON/OFF
functions.
1. Bearing card
2. Compass card
3. Distance rings
4. Cursor ring
5. Cursor bearing
6. Bow marker
7. Course line
8. Minute markers
9. Wind marker
10. Vertical ring
38
850--160139 / A
Operation
850--160139 / A
1
The BEARING CARD is shown in white colour outermost
in the echo ring, and is relative to the ship’s bow. The
bearing card has a stroke for each 10°.
2
The COMPASS CARD is also shown outermost in the echo
ring, but in a yellow colour. Because this compass card is a
replica of the course readout in the lower right- hand corner,
and always depends on a correct adjustment and
interfacing to the gyro, this readout should never be used
for navigation.
3
The DISTANCE RINGS are shown with white dashed
rings in the horizontal pictures, and white dashed lines in
the vertical pictures. The distance rings and lines divide the
total range into four, to make it easier to calculate the
distance or depth to a target.
4
The CURSOR RING is a yellow dashed ring with a radius
like the distance to the yellow cursor cross. The size of the
ring will change when operating the cursor joystick, and it
can then be used for distance measurements.
5
The CURSOR BEARING is a yellow line from the ship
symbol through the yellow cursor cross, and can be used for
bearing measurements.
6
The BOW MARKER is a white dashed line which is an
extension of the bow or the sailing direction. This marker is
useful as a sight for the ship’s manoeuvring.
7
The COURSE LINE indicates the ship’s and targets’
movement as a path after the symbol. The length of the
course line depends on the manoeuvring of the symbol. To
erase the course line, it has to be ”switched OFF” in this
menu.
8
The MINUTE MARKERS are shown as small circles on the
ship’s and targets’ course line. In the audio and echo
sounder modes, they are shown as small lines at the top of
the recordings.
9
The WIND MARKER is indicated in the outermost area of
the echo presentation as an arrow. This arrow can be
manually adjusted in the WIND MARKER menu to show
the wind or current direction.
10
The VERTICAL RING shows the selected range of the
vertical slice as a white circle in the horizontal picture. This
will then be an indication of which distance a target should
be presented in the vertical slice.
39
Simrad SD570
5.18 Constants
This submenu contains functions seldom used, or they are set
permanently when the sonar is installed.
CONSTANTS
TIME
GEAR
SCHOOL DATA
MENU
: NORMAL
ALIGNMENT :
123°
OPTIONS
BEARING
:
REL
UNITS
LANGUAGE: ENGLISH
SIMRAD TEST
The submenu for CONSTANTS contains several submenus.
Below is an example of how to change the year in the TIME
function. The arrows show how to choose both ways with the
right/left operation of the menu joystick.
?
?
COSMETICS
CONSTANTS
STANDARD
TEST
CONSTANTS
TIME
TIME
GEAR
Þ SHOAL DATA
MENU
Ü ALIGNMENT
OPTIONS
BEARING
UNITS
LANGUAGE
SIMRAD TEST
YEAR
MONTH
Þ DAY
HOUR
Ü MINUTE
SECOND
YEAR
-INCREASE
Þ ¯DECREASE
Ü
Þ
Some functions in CONSTANTS have less, while others have
more submenus than presented in the illustration.
When pressing ENTER in the last submenu, the menu system will
be brought back to the main menu or the extra menu.
A detailed description of each function follows on the next pages.
40
850--160139 / A
Operation
Time
Year, date and time is shown at the bottom of the main menu. This
function is battery powered and continues even if the sonar is
switched OFF. To change the setting, the TIME function is used.
TIME:
YEAR.....:
MONTH....:
DAY......:
HOUR.....:
MINUTE...:
SECOND...:
1997
10
15
10
7
31
Setting of year, month, etc. is done by increasing/decreasing the
function as shown in the example below:
YEAR.....:
1997
?INCREASE
?DECREASE
Note that time starts running only when ENTER is pressed.
850--160139 / A
41
Simrad SD570
Gear
This function is used for selection of fishing gear and to program
data for this. It is possible to preprogram the system for three
different seines and three different trawls to get the right size and
position of the gear symbol on the display.
GEAR:
NET 1
NET 2
NET 3
TRAWL1
TRAWL2
TRAWL3
When the fishing gear has been selected, a menu for setting of
relevant equipment data will appear. In the examples below
menus for both seine and trawl are shown.
NET DATA
NET
1
LENGTH...:
DEPTH.....:
SINKRATE.M:
THROW SIDE:
LENGTH:
0 M
0 M
0M/M
STARB
0 M
SET NET LENGTH
?INCREASE
?DECREASE
DEPTH:
0 M
SET NET DEPTH
?INCREASE
?DECREASE
42
850--160139 / A
Operation
SINKRATE.M:
0 M/M
SET SINKRATE
IN METER/MINUTE
?INCREASE
?DECREASE
SET -1 FOR AUTO
WITH DEPTH SENSOR
THROW SIDE:
STARB
PORT
TRAWL DATA
TRAWL
1
DISTANCE.M.:
DEPTH....M:
HEIGHT...M:
WIDTH....M:
DISTANCE.M:
0
0
0
0
M
M
M
M
0 M
SET TRAWL DISTANCE
?INCREASE
?DECREASE
SET -1 FOR AUTO
WITH TRAWL SONDE
DEPTH....M:
0 M
SET TRAWL DEPTH
?SHALLOW
?DEEPER
SET -1 FOR AUTO
WITH DEPTH SENSOR
850--160139 / A
43
Simrad SD570
HEIGHT...M:
0 M
SET TRAWL HEIGHT
?INCREASE
?DECREASE
SET -1 FOR AUTO
WITH TRAWL SONDE
WIDTH....M:
0 M
SET TRAWL WIDTH
?INCREASE
?DECREASE
SET -1 FOR AUTO
WITH TRAWL SONDE
44
850--160139 / A
Operation
School data
This function is used to obtain information on the volume in tons
and the movement of a school when the sonar is in the automatic
target tracking programme.
SCHOOL DATA
TYPE OF FISH
MOVEMENT
0
When TYPE OF FISH is selected, the presumed tons per 1000 m2
is presented.
TYPE OF FISH:
OFF
CAPELIN...:
HERRING...:
MACKEREL..:
BL.WHITING:
OWN SCHOOL:
25
25
25
25
25
Four types of known fish plus OWN SCHOOL can be selected.
Assumed value for all five types can be adjusted according to
experience by use of the menu below:
CAPELIN...:
10
?INCREASE
25 TONS PER 1000M2
?DECREASE
Estimation of volume is based on tons per 1000 m2 school area.
The standard value is 25 tons per 1000 m2, and the operator may
adjust this figure with the INCREASE/DECREASE function.
In order to estimate total volume of fish in a school, the school
must be tracked in the target tracking programme. The result of
the volume calculations is shown in the page for CATCH DATA.
This page is selected by pressing the menu control to the left when
the cursor is in the main menu.
850--160139 / A
45
Simrad SD570
By using the MOVEMENT function it is possible to calculate the
position of a school being target tracked at any given time:
MOVEMENT:
0
?10 MINUTES
?0 = OFF
It is here possible to estimate the position of the school at a given
time (from one to ten minutes). The basis for the calculation is the
motion of the bulk of the school. Estimated school position is
presented by a violet dot. The time for the estimation is selected
in the submenu. When selecting 0, the movement estimation is
switched OFF.
46
850--160139 / A
Operation
Menu
There is a choice between three different modes of menu
operation:
MENU.....: NORMAL
SHORT
NORMAL
FULL
The two tables in chapter 2 show the differences between SHORT
and NORMAL/FULL menu operation.
SHORT
This shortened menu version is recommended for novice sonar
operators. All settings not included here are set to the standard
settings which will perform well for most conditions.
NORMAL
This menu contains all changeable sonar parameters. All settings
are equal for both the horizontal and the vertical picture except for
the range which may be selected separately for the vertical slice.
FULL
This extended menu is mainly equal to the NORMAL menu, but
in addition most parameters for the vertical slice can be selected
separately from the horizontal settings (refer to chapter 5.23). This
because the settings for the horizontal picture seldom is fully
optimal for the vertical slice.
850--160139 / A
47
Simrad SD570
Alignment
If the Hull Unit is installed differently from what is recommended
(0° mark towards the bow), the echo picture has to be aligned on
the display. The complete alignment procedure is described in
section “Start- up procedures” in the Installation Manual.
ALIGNMENT:
123°
? 360°
? 0°
To increase the angle, press the joystick upwards, and to decrease
the value, press the joystick downwards.
When the alignment is checked to be correct, write the angle here:
ALIGNMENT CORRECTION:...................................
Note !
48
In case of service on the Sonar Control Unit where software is changed
or when complete reset is given to clear the software memory, the
alignment angle has to be reselected to the value noted above.
850--160139 / A
Operation
Options
When connecting options (additional equipment), the sonar
system must be told what has been connected. This is done by
using the menu for options as shown below.
OPTIONS:
ECHOSOUND.:
TRAWL SYST:
DEPTH SENS:
ES500
ITI
NONE
ECHOSOUND.:
NONE
EQ50
EQ100
ES380
ES500
TRAWL SYST:
NONE
FS900
FS3300
ITI
DEPTH SENS:
NONE
ITI
850--160139 / A
49
Simrad SD570
Bearing
This function is used for selecting the bearing data to be relative
to the ship, or to be true north readouts.
BEARING
:
REL
TRUE
The following data will change when selecting relative or true
bearing:
· Cursor bearing readout.
· Wind direction.
· Markers bearing in the MARKERS menu.
· Target position bearing on the catch data page.
The following data is permanent, and will not change when
selecting relative or true bearing.
· The bearing of the audio line is always relative to the ship.
· The ship’s course is always true north.
· The course of the target in manual and automatic target
tracking, is always true north.
Note that there is no indication in any of the readouts if it is in
relative or true bearing.
50
850--160139 / A
Operation
Units
This function is used for selecting desired units on the screen.
UNITS:
HORIZONTAL:
VERTICAL..:
TEMP......:
METER
METER
°CELS
HORIZONTAL.:
METER
FEET
VERTICAL..:
METER
FATHOMS
FEET
Note that the sonar has been designed with METERS as the basic
unit for measurements. By selecting FEET or FATHOMS, the scale
for range may produce some strange values as these are
computed from the original meter scale.
TEMP......:
°CELS
°FAHR
The temperature selection is only valid when the sonar is
connected to the Simrad ITI trawl system.
850--160139 / A
51
Simrad SD570
Language
The sonar is usually delivered with English menu texts. By using
the LANGUAGES menu any listed language can be selected.
LANGUAGE:
ENGLISH
FRENCH
SPANISH
ICELANDIC
RUSSIAN
NORWEGIAN
Language is normally selected at installation.
Simrad test
These tests are only used for start- up and service purposes.
52
850--160139 / A
Operation
5.19 Standard
The sonar is equipped with a battery memory which will
remember all selected settings even if the sonar is switched off.
The STANDARDS function might be of assistance if one has got
lost in the settings.
STANDARD:
NO
YES
SET ALL VALUES
TO NORMAL POSITION
When STANDARD is selected, the settings of the sonar will revert
to normal preset mode which will perform well under normal
conditions. The settings which are affected when STANDARD is
selected are marked with an asterisk in the menus. From the
familiar settings the operator may then modify as desired.
850--160139 / A
53
Simrad SD570
5.20 Test
TEST
NONE
BITE
BITE
BITE
BITE
BITE
SPB1
SPB2
MEM256
TRIF
RX
The BITE (Built In Test Equipment) system is normally used for
test and service in case of faults in the system.
54
850--160139 / A
Operation
5.21 Course
If a gyro with a stepper or synchro output is connected to the
sonar, the text ADJUST COURSE will be shown every time the
sonar system is switched ON. This is a reminder that the course
shown on the screen must be adjusted in accordance with the gyro
course.
COURSE:
123°
ADJUST COURSE
? 360°
?
0°
To increase the course value, press the joystick upwards, and to
decrease the value, press the joystick downwards.
When the course on the screen corresponds to the gyro course,
press ENTER and check that the course is correct.
Note !
850--160139 / A
The course on the screen must not be used for navigation.
55
Simrad SD570
5.22 Speed
When a speed log is connected to the sonar system the indicated
speed automatically complies with that of the speed log. If the
speed log system is faulty or if a log is not connected, the speed
can be set manually as explained in the submenu below.
SPEED.....A:12.3KN
SET MANUAL
? 51 KN
? 0 KN
SET -0.1 FOR
AUTO SPEED
Note !
56
An inaccurate log or gyro input will cause inaccurate indication of the
vessel and target movements.
850--160139 / A
Operation
5.23 Vertical menu
When the menu system is selected to FULL (refer to chapter
NO TAG), most parameters for the vertical picture can be selected
separately in the vertical menu. This menu will appear under
MODE in the main menu whenever a vertical menu is selected
and the menu cursor is moved below MODE.
VERT.MENU:
RANGE......:
GAIN.......:
PULSE FORM.:
TVG........:
AGC........:
RCG........:
PP FILTER..:
250 M
5
MAIN
MAIN
WEAK
MAIN
WEAK
In all submenus of the vertical menu, the word MAIN in the first
line means that the parameter in question is equal to the settings
in the normal horizontal menu.
RANGE.....:
MAIN 125 M
250 M
375 M
500 M
750 M
1000 M
1500 M
2000 M
3000 M
4000 M
Note that when the menu system is selected to NORMAL (refer
to chapter NO TAG), only the vertical range can be selected
separately for the vertical pictures.
850--160139 / A
57
Simrad SD570
5.24 Catch data page for purse seiners
When the menu cursor is in the main menu or the extra menu, and
the menu joystick is pressed to the left, a catch data page will be
displayed in the menu field. There is one catch data page for purse
seiners and one for trawlers, stated with the NET or TRAWL
selection in the GEAR menu.
In order to get the school presentation and the school data, the
automatic target tracking must be used. The vertical distribution
of the school is determined by the manual or automatic tilting of
the sonar beam.
Figure 5 - Catch data page for purse seining
58
850--160139 / A
Operation
850--160139 / A
59
Simrad SD570
When the seine circle is selected, and the GEAR button is pressed
when shooting the net, both the time and the amount of the shot
net start running. If an echo sounder is connected to the sonar, the
bottom profile will be drawn.
The indicators for the sinking of the net can be manually set by the
sinking rate in the GEAR menu, or automatically when a depth
sensor system is connected to the sonar.
The depth marker line with depth marker readout can be moved
up and down by the menu joystick for depth measurements in the
catch data page. The vertical range can be changed by moving this
depth marker to the scale end.
The volume estimation of the school is based on the selected type
of fish in the SCHOOL DATA menu. Note that this value can be
adjusted according to experience.
60
850--160139 / A
Operation
5.25 Catch data page for trawlers
When a trawl is selected in the GEAR menu, and the menu cursor
is in the main menu or the extra menu, the catch data page for
trawling will be displayed in the menu field when the menu
joystick is pressed to the left.
Figure 6 - Catch data page for trawling
In order to get the school presentation and the school data, the
automatic target tracking must be used. The vertical distribution
of the school is determined by manual or automatic tilting of the
sonar beam. Note that the school on the catch data page can be out
of centre because it depends on the position of the target’s centre
of gravity. The trawl symbol should always be sighted on the
horizontal centre of this page.
When the trawl symbol is selected, and the extension of the
trawl’s course is inside a distance of 200 meters from the target,
the trawl symbol should be visible on the catch data page.
850--160139 / A
61
Simrad SD570
The trawl opening size can be selected manually in the GEAR
menu. The trawl depth can also be manually selected, or
automatically if a Simrad FS 3300 or ITI trawl system is
connected to the sonar.
If an echo sounder is connected to the sonar, a white bottom line
will indicate the depth. If an ITI trawl system is connected, the
depth at the trawl will also be indicated.
The depth marker line with depth marker readout can be moved
up and down by the menu joystick, for depth measurements in
the catch data page. The vertical range can be changed by moving
this depth marker to the scale end.
The trawl filling indicators will only operate if an ITI trawl filling
system is connected to the sonar.
The volume estimation of the school is based on the selected type
of fish in the SCHOOL DATA menu. Note that this value can be
adjusted according to experience.
62
850--160139 / A
Maintenance
850- 160140 / AA000 / 3- 14
SD570
Maintenance
This section deals with maintenance work that may
be carried out by the user.
850--160140 / A
I
Simrad SD570
Document revisions
Rev
Date
Written by
Checked by
Approved by
A
13.01.97
CL
SØJ
SØJ
B
C
D
(The original signatures are recorded in the company’s logistic database)
II
850--160140 / A
Maintenance
Table of contents
1
INTRODUCTION . . . . . . . . . . . . . . . . . . . . . . . . . . . . . . . . . . . . . . . . . . . . .
1
2
SONAR CONTROL UNIT . . . . . . . . . . . . . . . . . . . . . . . . . . . . . . . . . . . . .
2
2.1
2.2
Cleaning . . . . . . . . . . . . . . . . . . . . . . . . . . . . . . . . . . . . . . . . . . . . . . . . . . . .
Dust filter . . . . . . . . . . . . . . . . . . . . . . . . . . . . . . . . . . . . . . . . . . . . . . . . . . .
2
2
2.3
Replacing fuses . . . . . . . . . . . . . . . . . . . . . . . . . . . . . . . . . . . . . . . . . . . . . .
3
3
4
TRANSCEIVER UNIT . . . . . . . . . . . . . . . . . . . . . . . . . . . . . . . . . . . . . . . . .
4
3.1
3.2
4
4
Dust filter . . . . . . . . . . . . . . . . . . . . . . . . . . . . . . . . . . . . . . . . . . . . . . . . . . .
Replacing fuses . . . . . . . . . . . . . . . . . . . . . . . . . . . . . . . . . . . . . . . . . . . . . .
HULL UNIT . . . . . . . . . . . . . . . . . . . . . . . . . . . . . . . . . . . . . . . . . . . . . . . . . .
6
4.1
4.2
General . . . . . . . . . . . . . . . . . . . . . . . . . . . . . . . . . . . . . . . . . . . . . . . . . . . . .
Docking the vessel . . . . . . . . . . . . . . . . . . . . . . . . . . . . . . . . . . . . . . . . . . .
6
6
4.3
4.4
4.5
Cleaning the transducer . . . . . . . . . . . . . . . . . . . . . . . . . . . . . . . . . . . . . .
Lubrication of the Hull Unit . . . . . . . . . . . . . . . . . . . . . . . . . . . . . . . . . . .
Hoisting and lowering with hand crank . . . . . . . . . . . . . . . . . . . . . . . . .
7
8
8
850--160140 / A
III
Simrad SD570
Document history
(The information on this page is for internal use)
Rev. A
IV
Original issue.
850--160140 / A
Maintenance
1
INTRODUCTION
This section deals with maintenance work that may be carried
out by the user. In addition to cleaning the cabinets and dust
filters, the user should inspect the sonar room at least once a
week. The ventilation and heating system, as well as the bilge
pump arrangement should then be checked to be in good
working order.
The spare part box which is delivered with the sonar, contains
fuses for the complete sonar. For location and replacing of
these, refer to the chapter for the unit in question.
Major repairs and complete overhaul of the sonar, should be left
to an authorized Simrad service engineer.
850--160140 / A
1
Simrad SD570
2
SONAR CONTROL UNIT
2.1
Cleaning
The cabinet should be kept clean and dry. Remove salt water
residue with a soft cloth which has been moistened in fresh
water. Do not use strong solvents.
Note !
2.2
The display screen should be handled with care to avoid
damaging the anti- glare filter coating. Use a soft cloth without
any strong solvents when cleaning it.
Dust filter
There is a dust filter on the air inlet at the rear wall of the Sonar
Control Unit (refer to figure 1). To avoid overheating, this
should be inspected, and if necessary, cleaned once every third
month.
The filter is accessible by snapping off the plastic cover. The
filter should be vacuum cleaned, or washed in soap and water.
If washed, the filter must be dried thoroughly before being
reinstalled.
2
850--160140 / A
Maintenance
2.3
Replacing fuses
The Sonar Control Unit is fused with two 3.15A slow blow fuses
on the rear wall (refer to figure 1).
Figure 1 - Location of fuses in the Sonar Control Unit
Before changing fuses on the Sonar Control Unit, make sure
that the mains power plug at the rear of the unit is correctly
mounted.
Spare fuses are located in the spare parts box.
850--160140 / A
3
Simrad SD570
3
3.1
TRANSCEIVER UNIT
Dust filter
There is a dust filter in the bottom of the Transceiver Unit. To
avoid overheating, this should be inspected, and if necessary,
cleaned once every third month.
The dust filter is accessible from the outside of the Transceiver
Unit, by unscrewing the eight finger nuts in the bottom of the
unit. The filter should be vacuum cleaned, or washed in soap
and water. If washed, the filter must be dried thoroughly before
being reinstalled.
3.2
Replacing fuses
The Transceiver Unit is fused with two 8A slow blow main fuses
(F201 and F202) located on the front of the Power Supply (see
figure 2). If one of the fuses are blown, the lamp L201 should
light and lamp L202 should be extinguished. If L201 does not
light, check the fuses of the ship’s main power system.
In addition, the High Voltage Unit is fused with two 8A slow
blow fuses (F204 and F205 in figure 2). If one of the fuses is
blown, the lamp L205 should light and lamp L206 should be
extinguished.
Spare fuses are located in the spare parts box.
4
850--160140 / A
Maintenance
Figure 2 - The transceiver power system
850--160140 / A
5
Simrad SD570
4
4.1
HULL UNIT
General
The sonar hull unit should be under continuous watch as a part
of the vessel’s machinery. As it may be exposed to severe strain
because of pitching and vibrations, it should be inspected for
loose parts.
In addition to lubrication (see chapter 4.4), check for signs of
corrosion. If required, clean the corroded areas and paint over
with a high quality protective paint.
4.2
Docking the vessel
Whenever docking the vessel, the switch S101 at the rear of the
Sonar Control Unit (refer to figure 1) must be switched OFF.
When docking the vessel, great care must be taken not to
damage the sonar trunk and protecting blister.
On vessels which have been in dock, the Hull Unit should be
examined and the hoist/lower functions should be tried out and
watched while operating the hoisting/lowering switch (S302 in
figure 3 in the motor control unit on the Hull Unit). The
hoist/lower motor will automatically stop when the transducer
shaft reaches the upper or lower limit switch.
Remember to set the hoisting/lowering switch back to
REMOTE for normal operation.
After the vessel has been in dock, use the air bleeding plug (see
figure 4) to get the air out of the trunk. Loosen the plug
carefully two to three turns until the air inside the trunk starts
blowing out. When water starts splashing, tighten up the
screw.
6
850--160140 / A
Maintenance
Figure 3 - The motor control unit
4.3
Cleaning the transducer
The transducer normally needs little attention. However, the
transducer face should be inspected and cleaned when docking.
Do not use strong solvents, but a normal synthetic soap and
water. Marine growth should be carefully removed with
fine--grade sandpaper or emery paper.
Note !
850--160140 / A
The transducer face must not be painted.
7
Simrad SD570
4.4
Lubrication of the Hull Unit
From the factory, the Hull Unit is lubricated with the types of
oil or grease as specified below. However, if of equal quality,
other types may be utilized. The numbers below refer to the
lubrication points on figure 4.
4.5
1
The ball bearing on the top of the hoist/lower screw
should be lubricated with normal ball bearing grease.
2
The hoisting spindle should be lubricated with
MOLYBDENUM DISULPHIDE GREASE.
3
Topping up the shaft sleeve through the grease nipple is
only required if the shaft is dry of lubrication, or if water
tends to force its way up along the shaft. Remember to
open the pressure let--down plug when topping up. The
shaft sleeve is filled with ESSO CACAR K1 from the
factory.
Hoisting and lowering with hand crank
In case of emergency or for service purposes, the transducer
may be hoisted and lowered by means of the hand crank, which
is located in the motor control box on the Hull Unit.
8
1
First set the hoisting/lowering switch S302 to STOP (see
figure 3).
2
Dismount the timing belt cover on the top of the Hull Unit
and fasten the hand crank to the hoisting spindle as
shown in figure 4.
3
Remember to set the hoisting/lowering switch back to
REMOTE after the timing belt cover has been mounted.
850--160140 / A
Maintenance
Figure 4 - The Hull Unit
850--160140 / A
9
Simrad SD570
Blank page
10
850--160140 / A
E 2004 Simrad AS
ISBN 82-8066-017-8
Simrad AS
Strandpromenaden 50
Box 111
N-3191 Horten
Telephone:
Facsimile:
+47 33 03 40 00
+47 33 04 29 87
M A X I M I Z I N G
Y O U R
P E R F O R M A N C E
A T
S E A
Simrad SD570
Operator manual
Simrad SD570
Operator manual
Simrad SD570
Operator manual
Simrad SD570
Operator manual