1
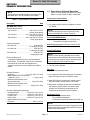
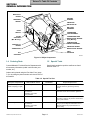
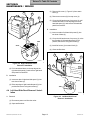
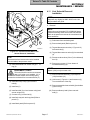
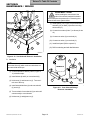
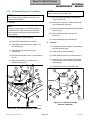
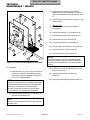
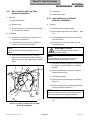
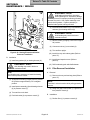
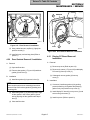
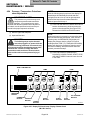
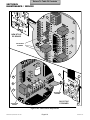
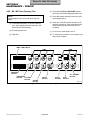
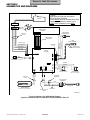
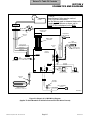
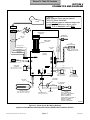
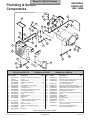
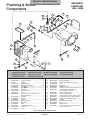
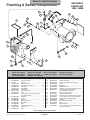
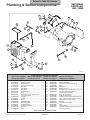
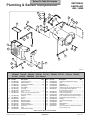
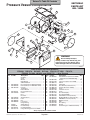
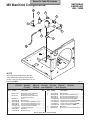
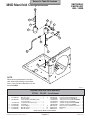
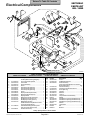
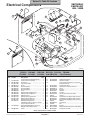
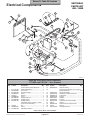
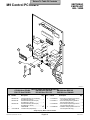
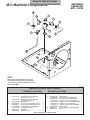
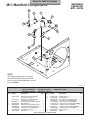
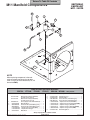
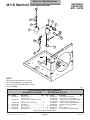
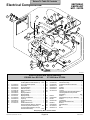
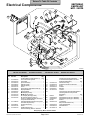
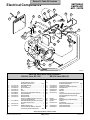
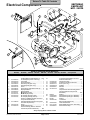
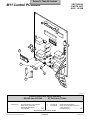
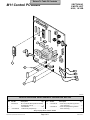
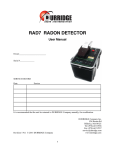
Return To Table Of Contents
SECTION IV
MAINTENANCE / SERVICE
4.12
Fill Solenoid Removal / Installation
NOTE
Spacer (12A) is only on newer units.
NOTE
Steps will vary slightly for M9D / M11D units. Use
this procedure as a guide.
(7) Remove manifold assembly (12) and spacer
(12A) from base (13).
A. Removal
(8) Hold screw (1, Figure 4-13) and loosen nut (2).
Turn terminals out of the way.
NOTE
(9) Remove assembled vent solenoid (3) and elbow
(4) from tee (5).
Units prior to serial number CZ1110/OM1000 have a
manifold assembly which secures the fill solenoid.
Refer to the parts list to remove the fill solenoid on
these sterilizers.
(10) Remove elbow (6) and tee (5) from fill
solenoid (7).
(1) Drain water from condensing tank.
(11) Remove elbow (8) from fill solenoid (7).
(2) Remove back panel (Refer to para 4.5).
B. Installation
(3) Tag and disconnect two wires (1, Figure 4-12)
from terminals (3).
(1) Coat threads of tee (5, Figure 4-13) and elbows
(6 and 8) with teflon tape.
(4) Tag and disconnect two wires (2) from
terminals (4).
(2) Install elbow (8) on fill solenoid (7).
(5) Disconnect three tubes (5 thru 7) from elbows (8
thru 10).
(3) Install elbow (6) and tee (5) on fill solenoid (7).
(6) Remove two screws (11) from bottom of
manifold assembly (12).
(4) Loosen nut (9). Turn terminals of fill solenoid
(7) so wires will connect easily to fill solenoid.
Tighten nut (9).
12
3
(5) Coat threads of elbow (4) with teflon tape.
7
1
9
7
8
10
1
6
5
2
TERMINALS
9
2
8
6
4
12A
13
5
4
3
MA205801
11
Figure 4-13. Fill Solenoid Fittings
Removal / Installation
MA2056-02
Figure 4-12. Fill Solenoid Removal / Installation
© Midmark Corporation 2002 SF-1827
Page 4-9
Printed in U.S.A.