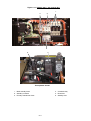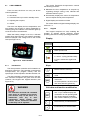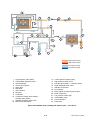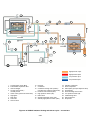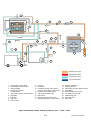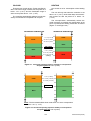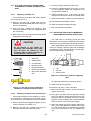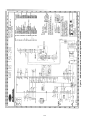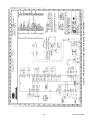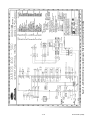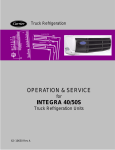
1
OPERATION AND
SERVICE MANUAL
DIRECT DRIVE
REFRIGERATION UNIT
XARIOS
150, 200, 300ry, 350, 400, 500
Carrier Transicold Europe – 10, Bd de l’Oise – 95031 Cergy Pontoise Cédex – FRANCE
Carrier Transicold Division, Carrier Corporation, P.O. Box 4805, Syracuse, N.Y. 13221
© Carrier Refrigeration Operation 2003 Printed in France – 62-61165-20 12/03
TABLE OF CONTENTS
Page
Section 1
SAFETY INSTRUCTIONS . . . . . . . . . . . . . . . . . . . . . . . . . . . . . . . . . . . . . . . . . . . . . . . . . . . . . . .
1-1
Section 2
DESCRIPTION . . . . . . . . . . . . . . . . . . . . . . . . . . . . . . . . . . . . . . . . . . . . . . . . . . . . . . . . . . . . . . . .
2-1
2.1
Introduction . . . . . . . . . . . . . . . . . . . . . . . . . . . . . . . . . . . . . . . . . . . . . . . . . . . . . . . . . . . . .
2-1
2.2
Compressor reference data . . . . . . . . . . . . . . . . . . . . . . . . . . . . . . . . . . . . . . . . . . . . . . .
2-13
2.3
Refrigeration system data . . . . . . . . . . . . . . . . . . . . . . . . . . . . . . . . . . . . . . . . . . . . . . . . .
2-13
2.4
Electrical data . . . . . . . . . . . . . . . . . . . . . . . . . . . . . . . . . . . . . . . . . . . . . . . . . . . . . . . . . . .
2-13
2.5
Torque values . . . . . . . . . . . . . . . . . . . . . . . . . . . . . . . . . . . . . . . . . . . . . . . . . . . . . . . . . . .
2-14
2.6
Safety devices . . . . . . . . . . . . . . . . . . . . . . . . . . . . . . . . . . . . . . . . . . . . . . . . . . . . . . . . . .
2-15
2.6.1
2.7
Fuses . . . . . . . . . . . . . . . . . . . . . . . . . . . . . . . . . . . . . . . . . . . . . . . . . . . . . . . . . . . . .
2-16
Cab command . . . . . . . . . . . . . . . . . . . . . . . . . . . . . . . . . . . . . . . . . . . . . . . . . . . . . . . . . .
2-17
2.7.1
2.7.2
2.7.3
2.7.4
2.7.5
2.7.6
2.7.7
2.7.8
2.7.9
Introduction . . . . . . . . . . . . . . . . . . . . . . . . . . . . . . . . . . . . . . . . . . . . . . . . . . . . . . . .
Keypad . . . . . . . . . . . . . . . . . . . . . . . . . . . . . . . . . . . . . . . . . . . . . . . . . . . . . . . . . . . .
Digital display . . . . . . . . . . . . . . . . . . . . . . . . . . . . . . . . . . . . . . . . . . . . . . . . . . . . . . .
Set-point . . . . . . . . . . . . . . . . . . . . . . . . . . . . . . . . . . . . . . . . . . . . . . . . . . . . . . . . . . .
Configuration . . . . . . . . . . . . . . . . . . . . . . . . . . . . . . . . . . . . . . . . . . . . . . . . . . . . . . .
Defrost cycle . . . . . . . . . . . . . . . . . . . . . . . . . . . . . . . . . . . . . . . . . . . . . . . . . . . . . . .
Alarm display . . . . . . . . . . . . . . . . . . . . . . . . . . . . . . . . . . . . . . . . . . . . . . . . . . . . . . .
Other data . . . . . . . . . . . . . . . . . . . . . . . . . . . . . . . . . . . . . . . . . . . . . . . . . . . . . . . . .
Changing display brightness . . . . . . . . . . . . . . . . . . . . . . . . . . . . . . . . . . . . . . . . . .
2-17
2-17
2-18
2-18
2-18
2-19
2-20
2-21
2-21
2.8
Compressor pressure regulating valve . . . . . . . . . . . . . . . . . . . . . . . . . . . . . . . . . . . . . .
2-21
2.9
Hot gas solenoid – HGS1 (two-way) . . . . . . . . . . . . . . . . . . . . . . . . . . . . . . . . . . . . . . . .
2-22
2.10 Condenser closing solenoid – HGS2 (two-way) . . . . . . . . . . . . . . . . . . . . . . . . . . . . . .
2-22
2.11 Refrigerant circuit during cooling . . . . . . . . . . . . . . . . . . . . . . . . . . . . . . . . . . . . . . . . . . .
2-22
2.12 Refrigerant circuit during heat and defrost . . . . . . . . . . . . . . . . . . . . . . . . . . . . . . . . . . .
2-22
Section 3
OPERATION . . . . . . . . . . . . . . . . . . . . . . . . . . . . . . . . . . . . . . . . . . . . . . . . . . . . . . . . . . . . . . . . . .
3-1
3.1
3-1
Control and starting up . . . . . . . . . . . . . . . . . . . . . . . . . . . . . . . . . . . . . . . . . . . . . . . . . . .
3.1.1
3.1.2
On road . . . . . . . . . . . . . . . . . . . . . . . . . . . . . . . . . . . . . . . . . . . . . . . . . . . . . . . . . . . .
On standby (road / standby version) . . . . . . . . . . . . . . . . . . . . . . . . . . . . . . . . . . .
3-1
3-1
Section 4
SERVICE . . . . . . . . . . . . . . . . . . . . . . . . . . . . . . . . . . . . . . . . . . . . . . . . . . . . . . . . . . . . . . . . . . . . .
4-1
4.1
4-1
Unit maintenance . . . . . . . . . . . . . . . . . . . . . . . . . . . . . . . . . . . . . . . . . . . . . . . . . . . . . . . .
4.1.1
4.1.2
4.2
Unit maintenance schedules . . . . . . . . . . . . . . . . . . . . . . . . . . . . . . . . . . . . . . . . . .
Description of maintenance operations . . . . . . . . . . . . . . . . . . . . . . . . . . . . . . . . .
4-1
4-2
Belt maintenance and adjustment . . . . . . . . . . . . . . . . . . . . . . . . . . . . . . . . . . . . . . . . . .
4-2
4.2.1
Belt tension gauge (road compressor) . . . . . . . . . . . . . . . . . . . . . . . . . . . . . . . . . .
i
4-2
62-61165-20 (12/03)
4.3
Removing the refrigerant charge . . . . . . . . . . . . . . . . . . . . . . . . . . . . . . . . . . . . . . . . . . .
4-3
4.4
Refrigerant leak checking . . . . . . . . . . . . . . . . . . . . . . . . . . . . . . . . . . . . . . . . . . . . . . . . .
4-3
4.5
Evacuation and dehydration . . . . . . . . . . . . . . . . . . . . . . . . . . . . . . . . . . . . . . . . . . . . . . .
4-3
4.5.1
4.5.2
4.5.3
General . . . . . . . . . . . . . . . . . . . . . . . . . . . . . . . . . . . . . . . . . . . . . . . . . . . . . . . . . . . .
Preparation . . . . . . . . . . . . . . . . . . . . . . . . . . . . . . . . . . . . . . . . . . . . . . . . . . . . . . . . .
Evacuation and dehydration procedure . . . . . . . . . . . . . . . . . . . . . . . . . . . . . . . . .
4-3
4-3
4-3
4.6
Charging the refrigeration system . . . . . . . . . . . . . . . . . . . . . . . . . . . . . . . . . . . . . . . . . .
4.6.1 Installing a complete charge . . . . . . . . . . . . . . . . . . . . . . . . . . . . . . . . . . . . . . . . . .
4.6.2 Adding a partial charge . . . . . . . . . . . . . . . . . . . . . . . . . . . . . . . . . . . . . . . . . . . . . .
4.6.3 Checking the refrigerant charge . . . . . . . . . . . . . . . . . . . . . . . . . . . . . . . . . . . . . . .
4-5
4-5
4-5
4-5
4.7
Replacing the compressor . . . . . . . . . . . . . . . . . . . . . . . . . . . . . . . . . . . . . . . . . . . . . . . .
4-6
4.8
Checking and replacing filter-drier . . . . . . . . . . . . . . . . . . . . . . . . . . . . . . . . . . . . . . . . . .
4-6
4.9
Checking and replacing high pressure cutout switch . . . . . . . . . . . . . . . . . . . . . . . . . .
4-6
4.9.1
4.9.2
Replacing high pressure cutout switch . . . . . . . . . . . . . . . . . . . . . . . . . . . . . . . . .
Checking high pressure cutout switch . . . . . . . . . . . . . . . . . . . . . . . . . . . . . . . . . .
4-6
4-6
4.10 Checking and replacing condenser fan motor brushes . . . . . . . . . . . . . . . . . . . . . . . .
4-7
4.11 Evaporator coil-cleaning . . . . . . . . . . . . . . . . . . . . . . . . . . . . . . . . . . . . . . . . . . . . . . . . . .
4-7
4.12 Condenser coil-cleaning . . . . . . . . . . . . . . . . . . . . . . . . . . . . . . . . . . . . . . . . . . . . . . . . . .
4-7
4.13 Hot gas (two-way) solenoid and condenser closing solenoid (two-way) . . . . . . . . . .
4.13.1 Replacing solenoid coil . . . . . . . . . . . . . . . . . . . . . . . . . . . . . . . . . . . . . . . . . . . . . . .
4.13.2 Replacing solenoid valve internal parts . . . . . . . . . . . . . . . . . . . . . . . . . . . . . . . . .
4-8
4-8
4-8
4.14 Adjusting the road compressor pressure regulating valve (cpr) . . . . . . . . . . . . . . . . .
4-8
4.15 Thermostatic expansion valve . . . . . . . . . . . . . . . . . . . . . . . . . . . . . . . . . . . . . . . . . . . . .
4-9
4.16 Microprocessor . . . . . . . . . . . . . . . . . . . . . . . . . . . . . . . . . . . . . . . . . . . . . . . . . . . . . . . . . .
4-9
Section 5
TROUBLESHOOTING . . . . . . . . . . . . . . . . . . . . . . . . . . . . . . . . . . . . . . . . . . . . . . . . . . . . . . . . . .
5-1
5.1
Refrigeration . . . . . . . . . . . . . . . . . . . . . . . . . . . . . . . . . . . . . . . . . . . . . . . . . . . . . . . . . . . .
5.1.1 Unit will not cool . . . . . . . . . . . . . . . . . . . . . . . . . . . . . . . . . . . . . . . . . . . . . . . . . . . . .
5.1.2 Unit runs but has insufficient cooling . . . . . . . . . . . . . . . . . . . . . . . . . . . . . . . . . . .
5.1.3 Unit operates long or continuously in cooling . . . . . . . . . . . . . . . . . . . . . . . . . . . .
5.1.4 Unit will not heat or heating insufficient . . . . . . . . . . . . . . . . . . . . . . . . . . . . . . . . .
5.1.5 Defrost malfunction . . . . . . . . . . . . . . . . . . . . . . . . . . . . . . . . . . . . . . . . . . . . . . . . . .
5.1.6 Abnormal pressure . . . . . . . . . . . . . . . . . . . . . . . . . . . . . . . . . . . . . . . . . . . . . . . . . .
5.1.7 Abnormal noise . . . . . . . . . . . . . . . . . . . . . . . . . . . . . . . . . . . . . . . . . . . . . . . . . . . . .
5.1.8 Cab command malfunction . . . . . . . . . . . . . . . . . . . . . . . . . . . . . . . . . . . . . . . . . . .
5.1.9 No evaporator air flow or restricted air flow . . . . . . . . . . . . . . . . . . . . . . . . . . . . .
5.1.10 Expansion valve malfunction . . . . . . . . . . . . . . . . . . . . . . . . . . . . . . . . . . . . . . . . . .
5.1.11 Malfunction hot gas (two-way) solenoid / expansion closure valve . . . . . . . . . .
5-1
5-1
5-1
5-1
5-1
5-1
5-2
5-2
5-2
5-2
5-3
5-3
5.2
Standby compressor malfunction . . . . . . . . . . . . . . . . . . . . . . . . . . . . . . . . . . . . . . . . . .
5-3
Section 6
EXTRACT FROM MATERIAL SAFETY DATA BULLETIN . . . . . . . . . . . . . . . . . . . . . . . . . . .
6-1
6.1
Poe oil . . . . . . . . . . . . . . . . . . . . . . . . . . . . . . . . . . . . . . . . . . . . . . . . . . . . . . . . . . . . . . . . .
6-1
6.2
Forane R404a . . . . . . . . . . . . . . . . . . . . . . . . . . . . . . . . . . . . . . . . . . . . . . . . . . . . . . . . . . .
6-3
Section 7
ELECTRICAL SCHEMATIC WIRING DIAGRAMS . . . . . . . . . . . . . . . . . . . . . . . . . . . . . . . . . .
ii
7-1
LIST OF FIGURES
Figure 2-1 XARIOS 150 / 200 . . . . . . . . . . . . . . . . . . . . . . . . . . . . . . . . . . . . . . . . . . . . . . . .
2-2
Figure 2-2 XARIOS 300ry / 350 . . . . . . . . . . . . . . . . . . . . . . . . . . . . . . . . . . . . . . . . . . . . . .
2-2
Figure 2-3 XARIOS 400 / 500 . . . . . . . . . . . . . . . . . . . . . . . . . . . . . . . . . . . . . . . . . . . . . . . .
2-2
Figure 2-4 Unit top view . . . . . . . . . . . . . . . . . . . . . . . . . . . . . . . . . . . . . . . . . . . . . . . . . . . . .
2-3
Figure 2-5 Unit top view . . . . . . . . . . . . . . . . . . . . . . . . . . . . . . . . . . . . . . . . . . . . . . . . . . . . .
2-4
Figure 2-6 Unit top view . . . . . . . . . . . . . . . . . . . . . . . . . . . . . . . . . . . . . . . . . . . . . . . . . . . . .
2-5
Figure 2-7 MXS 600 1 fan ( for XARIOS 150 ) . . . . . . . . . . . . . . . . . . . . . . . . . . . . . . . . .
2-6
Figure 2-8 MXS 850 2 fans ( for XARIOS 200 / 300ry ) . . . . . . . . . . . . . . . . . . . . . . . . . .
2-7
Figure 2-9 MXS 1100 2 fans ( for XARIOS 350 / 400 ) . . . . . . . . . . . . . . . . . . . . . . . . . .
2-8
Figure 2-10 MXS 1550 3 fans ( for XARIOS 500 ) . . . . . . . . . . . . . . . . . . . . . . . . . . . . . .
2-9
Figure 2-11 XARIOS 150 / 200 Control box . . . . . . . . . . . . . . . . . . . . . . . . . . . . . . . . . . . .
2-10
Figure 2-12 XARIOS 300ry / 350 Control Box . . . . . . . . . . . . . . . . . . . . . . . . . . . . . . . . . .
2-11
Figure 2-13 XARIOS 400 / 500 Control Box . . . . . . . . . . . . . . . . . . . . . . . . . . . . . . . . . . . .
2-12
Figure 2-14 Cab Command . . . . . . . . . . . . . . . . . . . . . . . . . . . . . . . . . . . . . . . . . . . . . . . . . .
2-17
Figure 2-15 XARIOS 150/200: Cooling Cycle . . . . . . . . . . . . . . . . . . . . . . . . . . . . . . . . . .
2-23
Figure 2-16 XARIOS 150/200: Heating and defrost Cycle – over 22 bar . . . . . . . . . . .
2-24
Figure 2-17 XARIOS 150/200: Heating and defrost Cycle – under 17 bar . . . . . . . . . .
2-25
Figure 2-18 XARIOS 300/350: Cooling cycle . . . . . . . . . . . . . . . . . . . . . . . . . . . . . . . . . . .
2-26
Figure 2-19 XARIOS 300/350: Heating and defrost cycle – over 22 bar . . . . . . . . . . . .
2-27
Figure 2-20 XARIOS 300/350: Heating and defrost cycle – under 17 bar . . . . . . . . . . .
2-28
Figure 2-21 XARIOS 300ry: Cooling cycle . . . . . . . . . . . . . . . . . . . . . . . . . . . . . . . . . . . . .
2-29
Figure 2-22 XARIOS 300ry: Heating and defrost cycle – over 22 bar . . . . . . . . . . . . . . .
2-30
Figure 2-23 XARIOS 300ry: Heating and defrost cycle – under 17 bar . . . . . . . . . . . . .
2-31
Figure 2-24 XARIOS 400/500: Cooling cycle . . . . . . . . . . . . . . . . . . . . . . . . . . . . . . . . . . .
2-32
Figure 2-25 XARIOS 400/500: Heating and defrost cycle – over 22 bars . . . . . . . . . . .
2-33
Figure 2-26 XARIOS 400/500: Heating and defrost cycle – under 17 bars . . . . . . . . . .
2-34
Figure 3-1 Thermostat operating sequence Standby or road operation
Set-point higher than –12C (+10F) . . . . . . . . . . . . . . . . . . . . . . . . . . . . . . .
3-2
Figure 3-2 Thermostat operating sequence Standby or road operation
Set-point lower than –12C (+10F) . . . . . . . . . . . . . . . . . . . . . . . . . . . . . . .
3-2
Figure 4-1 Road compressor belt tension . . . . . . . . . . . . . . . . . . . . . . . . . . . . . . . . . . . . . .
4-2
Figure 4-2 XARIOS 150/200: Vacuum pump connection . . . . . . . . . . . . . . . . . . . . . . . . .
4-4
Figure 4-3 XARIOS 300ry/350: Vacuum pump connection . . . . . . . . . . . . . . . . . . . . . . .
4-4
Figure 4-4 XARIOS 400/500: Vacuum pump connection . . . . . . . . . . . . . . . . . . . . . . . . .
4-5
Figure 4-5 Typical setup for testing high pressure switch HP1, HP2 & HP3 . . . . . . . . .
4-6
Figure 4-6 Fan motor brushes . . . . . . . . . . . . . . . . . . . . . . . . . . . . . . . . . . . . . . . . . . . . . . .
4-7
Figure 4-7 Hot gas (two-way) solenoid or Condenser closing solenoid (Two-way) . . .
4-8
Figure 4-8 Compressor pressure regulating valve . . . . . . . . . . . . . . . . . . . . . . . . . . . . . .
4-8
Figure 4-9 Thermostatic expansion valve bulb and thermocouple . . . . . . . . . . . . . . . . .
4-9
Figure 7-1 – XARIOS 150/200: Electrical schematic diagram – ROAD – 12V/24V . .
7-3
Figure 7-2 – XARIOS 150/200: Electrical schematic diagram – ROAD –
230/1/50Hz – 208–230/1/60Hz . . . . . . . . . . . . . . . . . . . . . . . . . . . . . . . . . . . .
7-4
Figure 7-3 – XARIOS 150/200: Electrical schematic diagram –ROAD – 400/3/50Hz .
7-5
Figure 7-4 – XARIOS 300ry: Electrical schematic diagram – Road/Standby – 400/3/50Hz 7-6
Figure 7-5 – XARIOS 300ry: Electrical schematic diagram Road/Standby – 230/1/50Hz . 7-7
Figure 7-6 – XARIOS 350: Electrical schematic diagram Road version . . . . . . . . . . . .
iii
7-8
62-61165-20 (12/03)
Figure 7-7 – XARIOS 350: Electrical schematic diagram Road/Standby –
230/400/3/50Hz/60Hz . . . . . . . . . . . . . . . . . . . . . . . . . . . . . . . . . . . . . . . . . . . .
7-9
Figure 7-8 – XARIOS 350: Electrical schematic diagram Road/Standby version –
230/1/50Hz . . . . . . . . . . . . . . . . . . . . . . . . . . . . . . . . . . . . . . . . . . . . . . . . . . . . .
7-10
Figure 7-9 – XARIOS 350: Electrical schematic diagram Road/Standby – 208-230/1/60Hz7-11
Figure 7-10 – XARIOS 400/500: Electrical schematic diagram – Road version . . . . . .
7-12
Figure 7-11 – XARIOS 400/500: Electrical schematic diagram – Road version
230V without electrical heating . . . . . . . . . . . . . . . . . . . . . . . . . . . . . . . . . . . .
7-13
Figure 7-12 – XARIOS 400/500: Electrical schematic diagram – Road version
400V without electrical heating . . . . . . . . . . . . . . . . . . . . . . . . . . . . . . . . . . . .
7-14
Figure 7-13 – XARIOS 400/500: Electrical schematic diagram – Road/standby –
208–230/1/50–60Hz . . . . . . . . . . . . . . . . . . . . . . . . . . . . . . . . . . . . . . . . . . . . .
7-15
LIST OF TABLES
Table 2-1 Model Chart . . . . . . . . . . . . . . . . . . . . . . . . . . . . . . . . . . . . . . . . . . . . . . . . . . . . . . .
2-1
Table 2-2 Safety Devices – Microprocessor controller . . . . . . . . . . . . . . . . . . . . . . . . . . . .
2-15
Table 2-3 Fuses – Xarios 150/200 . . . . . . . . . . . . . . . . . . . . . . . . . . . . . . . . . . . . . . . . . . . .
2-16
Table 2-4 Fuses – Xarios 300ry/350 . . . . . . . . . . . . . . . . . . . . . . . . . . . . . . . . . . . . . . . . . . .
2-16
Table 2-5 Fuses – Xarios 400/500 . . . . . . . . . . . . . . . . . . . . . . . . . . . . . . . . . . . . . . . . . . . .
2-16
Table 3-1 XARIOS 150 / 200:Management of condenser
and evaporator fan and heat and defrost valve (from version 3.01) . . . . .
3-3
Table 3-2 XARIOS 150 / 200: Management of condenser
and evaporator fan and heat and defrost valve (until version 3.01) . . . . .
3-3
Table 3-3 XARIOS 300ry / 350 / 400 / 500: Management of condenser
and evaporator fans and heat and defrost valves . . . . . . . . . . . . . . . . . . . .
3-4
Table 4-1 Maintenance schedules . . . . . . . . . . . . . . . . . . . . . . . . . . . . . . . . . . . . . . . . . . . .
4-1
Table 4-2 Pressure – Temperature R404A . . . . . . . . . . . . . . . . . . . . . . . . . . . . . . . . . . . . .
4-10
Table 4-3 Sensor Resistance (RAS) . . . . . . . . . . . . . . . . . . . . . . . . . . . . . . . . . . . . . . . . . .
4-10
iv
SECTION 1
SAFETY INSTRUCTIONS
This manual contains safety and service instructions to follow in order to prevent any accident. Stickers have
been placed on the product for your SAFETY.
BEFORE USING THIS REFRIGERANT UNIT, read carefully all safety information explained
in this manual and indicated on the product. Be sure that everybody who will use this
refrigeration unit has been trained to use it in a safe way.
DURING THE USE OR MAINTENANCE OF THIS REFRIGERATION UNIT, the notes on
safety are to be considered.
Personal Protective Equipment :
Always use adequate Personal Protective Equipment before doing anything on this
refrigerant unit, as explained in this manual.
Working at height :
Take all necessary safety precautions when accessing this refrigeration unit : use
safe ladders, working platforms with appropriate guards.
Belts and fans :
This refrigeration unit is equipped with Auto–start/stop, it may start at any time
and without warning.
When the unit is running beware of belts and fans that are moving.
Before servicing refrigeration unit, make sure the main power switch is on the
OFF position. Ensure the unit will not restart. Lock–out / Tag–out can be
performed as described above.
When there is protective structure (fan grid or guard for example) make sure
they are in place. Never removed them when the refrigeration unit is running.
Always keep your hands, body parts, clothes, hairs and tools far from moving
parts.
1-1
62-61165-20 (12/03)
Electricity :
When this refrigeration unit is running in electrical operation, some devices are
powered up especially in the electrical control box.
Before servicing refrigeration unit, make sure the main power switch is on the
OFF position. Ensure this refrigeration unit is disconnected from the local
electrical network.Lock–out / Tag–out can be performed as described above.
Before working in the electrical control box, it is required to control the lack of
tension.
WHEN IT IS NECESSARY TO WORK IN THE ELECTRICAL CONTROL BOX
UNDER TENSION, PEOPLE MUST BE QUALIFIED FOR WORKS UNDER
LOW OR HIGH VOLTAGE.
Always use adequate tools and Personal Protective Equipment when working
on electrical devices : safety gloves and safety glasses.
Refrigerant :
The refrigerant contained in this refrigeration unit can cause frosbite, severe
burns or blindness in case of projection and direct contact with the skin or eyes.
In contact with flame or heat refrigerant generate toxic gas.
Refrigerant handling must be done by qualified people.
Keep any flame, any lighted object or any source of sparks away from the refrigerant unit.
Always use Personal Protective Equipment when handling refrigerant : safety
clothes, safety gloves and safety glasses.
Burning with hot and cold :
When this refrigeration unit is running or even after, different components can
be very cold or hot (exhaust pipe, tubes, coils, receiver, accumulator or engine
for example)
Beware when operating closed from cold or hot components.
Always use adequate safety gloves when doing any maintenance on this
refrigeration unit.
Cuttings :
Beware when handling or operating closed from parts that could be sharp (coils,
evaporators, clamps for example).
Always use adequate safety gloves when doing any maintenance on this
refrigeration unit.
Environment :
Think about protection of environment during all the life of this refrigeration unit.
To prevent environmental damages NEVER release refrigerant in the atmosphere,
NEVER throw coolant, oil, battery and chemicals in the nature. It must be
recuperate and recycle according to current regulations.
When disposing this refrigerant unit do it in an environmentally sound way and in
accordance with current regulations.
1-2
CAUTION
Under no circumstances should anyone attempt to repair the Logic or Display Boards. Should a problem
develop with these component, contact your nearest Carrier Transicold dealer for replacement.
Under no circumstances should a technician electrically probe the processor at any point, other than the
connector terminals where the harness attaches. Microprocessor components operate at different voltage
levels and at extremely low current levels. Improper use of voltmeters, jumper wires, continuity testers, etc.
could permanently damage the processor.
Most electronic components are susceptible to damage caused by electrical static discharge (ESD). In certain
cases, the human body can have enough static electricity to cause resultant damage to the components by
touch. This is especially true of the integrated circuits found on the truck/trailer microprocessor.
1-3
62-61165-20 (12/03)
SECTION 2
DESCRIPTION
2.1
INTRODUCTION
Road operation
– driven by the engine of the vehicle when in
operation over-the-road.
WARNING
Road/Standby version
Beware of unannounced starting of
engine or standby motor caused by the
unit thermostat or the start/stop cycle.
– driven by the engine of the vehicle when in
operation over-the-road and by connecting
the unit to the mains power on shut-down.
Personal Protective Equipment : before
doing anything on this product, as
explained in this manual.Always use
safety precautions before doing any
maintenance on the unit
The model/serial nameplate is located inside of the
unit on the frame as shown in Figure 2-1, Figure 2-2
and Figure 2-3.
safety glasses
, gloves
safety shoes
The standard control system is a microprocessor
controller. Once the controller (remote Command
within the cab of the truck) is set at the desired
temperature, the unit will operate automatically to
maintain the desired temperature within very close
limits.
,
, safety clothes
This manual contains Operating Data, Electrical
Data and Service Instructions for the van refrigeration
units listed in Table 2-1. Also Table 2-1 charts some
significant differences between these models.
The XARIOS 150/200/300ry/350/400/500 models
are units designed for truck applications. Two types of
drive are available :
The control system automatically selects cooling
and heating cycles as necessary to maintain the
desired temperature.
The evaporator assembly consists of an
evaporator coil, an expansion valve, one defrost
thermostat (termination switches) and an electrical
evaporator fan motor, one starting valve and a
optional injection valve.
Table 2-1 Model Chart
R-404A
Model
Road compressor
Standby Compressor
HA 090
HA 090
HB 135
TM 15
06VM306 ( 1 and 3 phases )
06VM306 ( 1 phase )
LB
KG
XARIOS 150
XARIOS 200
XARIOS 300 ry
XARIOS 350
XARIOS 400
2.7
4
3.8
4.2
6
1.2
1.8
1.7
1.9
2.7
UP 90 / SD5 H09
TM 13
TM 15
TM 15
TM 16
XARIOS 500
6.5
2.9
TM 16
06VM307 ( 3 phases )
2-1
Condenser Weight
Road and
Road
Standby
30 kg
53 kg
30 kg
53 kg
40 kg
75 kg
40 kg
77 kg
90 kg
133 kg
90 kg
143 kg
nameplate
Figure 2-1 XARIOS 150 / 200
Figure 2-2 XARIOS 300ry / 350
nameplate
will move here
nameplate
Figure 2-3 XARIOS 400 / 500
2-2
62-61165-20 (12/03)
XARIOS 150 / 200
2.
3.
4.
1.
5.
17.
6.
16.
7.
15.
8.
14.
9.
13.
10.
11.
12.
1.
2.
3.
4.
Condenser fan
Accumulator
Standby check valve
Road check valve
10.
11.
12.
13.
Control box
Microprocessor
Condenser
Condenser closing solenoid (option)
5.
6.
7.
8.
Check valve (option)
Frame
Compressor
Filter-drier
14.
15.
16.
17.
Condenser fan motor
Transformer
Safety switch
Receiver
9. Sight glass
Figure 2-4 Unit top view
2-3
XARIOS 300ry
16.
17.
18.
XARIOS 350
1.
2.
14.
3.
4.
13.
5.
7.
6.
12.
11.
10.
9.
8.
15.
1.
2.
3.
4.
Receiver
Filter drier
Sight glass
Transformer
10.
11.
12.
13.
Road fuse
Microprocessor
Condenser
Oil separator
5.
6.
7.
8.
Electric motor
Compressor (TM15)
Electrical box
Diode rectifier assembly
14.
15.
16.
17.
Hot gas solenoid valve
Safety switch
Rotary Compressor
Relief valve
9. Standby fuse
18. Accumulator
Figure 2-5 Unit top view
2-4
62-61165-20 (12/03)
XARIOS 400 / 500
1.
2.
1.
2.
3.
4.
Diode rectifier assembly
Condenser
Sight glass
Filter drier
5.
6.
7.
8.
Fan
Fan gard
Transformer
Cooler
9.
10.
11.
12.
3.
Condenser motor
Oil separator
Frame assembly
Coil
13. Condenser closing valve HGS2
14. Defrost valve HGS1
4.
13.
14.
5.
6.
7.
12.
8.
9.
10.
11.
Figure 2-6 Unit top view
2-5
EVAPORATOR
Figure 2-7 MXS 600
1 fan ( for XARIOS 150 )
3.
1.
2.
4.
5.
6.
7.
15.
14.
13. 12.
11.
10.
9.
8.
16.
19.
17.
18.
20.
21.
22.
1.
2.
3.
4.
Injection valve (option on Xarios 150)
Defrost termination thermostat
Evaporator fan blower
Heat exchanger
5.
6.
7.
8.
Defrost element
Evaporator coil
Frame
RAS sensor connector
9.
10.
11.
12.
Injection valve connector
Klixon connector
Fan connector
Liquid line
13.
14.
15.
16.
Standby suction line
Road suction line
Hot gas line
Left side cover
17.
18.
19.
20.
21.
Bottom cover
Return air sensor
Right side cover
Starting valve
Expansion valve
22. Quick fitting for superheat adjustment
2-6
62-61165-20 (12/03)
EVAPORATOR
Figure 2-8 MXS 850
2 fans ( for XARIOS 200 / 300ry )
2.
3.
4.
1.
5.
13.
6.
8.
9.
10.
11.
1.
2.
3.
4.
Evaporator fan blowers
Defrost klixon
Injection valve
Low pressure switch
5.
6.
7.
8.
Liquid line fitting
Standby suction line fitting
Hot gas line fitting
Road suction line fitting
9.
10.
11.
12.
Orifice
Expansion valve
Evaporator coil assembly
Starting valve
13. Check valve (optional)
12.
2-7
7.
EVAPORATOR
Figure 2-9 MXS 1100
2 fans ( for XARIOS 350 / 400 )
3.
4.
1.
2.
5.
7.
8.
9.
10.
1.
2.
3.
4.
Liquid valve
Evaporator fan blowers
Heat exchanger
Defrost klixon
5.
6.
7.
8.
Liquid line fitting
Hot gas line fitting
Suction line fitting
Orifice
9. Expansion valve
10. Evaporator coil assembly
11. Starting valve
11.
12.
2-8
62-61165-20 (12/03)
EVAPORATOR
1.
1.
2.
3.
4.
Figure 2-10 MXS 1550
3 fans ( for XARIOS 500 )
Evaporator fan blowers
Orifice
Expansion valve
Hose water drain fitting
5. Evaporator coil assembly
7.
8.
9.
10.
2.
3.
14. 13. 12. 11.
15.
6.
7.
8.
9.
4.
5.
10.
11.
12.
13.
Starting valve
Heat exchanger
Defrost klixon
Low pressure switch
Injection valve
Hot gas fitting
Standby suction line fitting
Road suction line fitting
14. Liquid line fitting
15. Check valve
6.
2-9
1.
2.
Figure 2-11 XARIOS 150 / 200 Control box
5.
3.
4.
1.
2.
3.
Three phases Road/Stanby
5.
6.
7.
Single phase Road/Stanby
4.
8.
9.
Relay module
1.
2.
3.
4.
10.
Standby contactor
Primary transformer fuse
Main standby fuses
Overload relay
6.
7.
8.
9.
5. Permanent capacitor
Filter capacitor
Microprocessor board
Standby fuse
Road main fuse
10. Diode bridge
2-10
62-61165-20 (12/03)
Figure 2-12 XARIOS 300ry / 350 Control Box
3.
2.
1.
4.
5.
6.
Three phases shown
1. Main standby fuses
2. Standby contactor
3. Primary transformer fuses
4. Overload relay
5. Road fuse
6. Standby fuse
2-11
Figure 2-13 XARIOS 400 / 500 Control Box
1.
2.
4.
3.
5.
6.
8.
7.
Three phases shown
1.
2.
3.
4.
Microprocessor
Standby fuse
Road fuse
Harness
5.
6.
7.
8.
2-12
Main standby fuses
Electronic overload relay
Standby Contactor
Primary transformer fuses
62-61165-20 (12/03)
2.2
COMPRESSOR REFERENCE DATA
Model
TM 13
Units: Xarios
200
No.Cylinders
Weight
131 cc
7.94 in3
6
6.7 kg
HA090
150
200
12.7 cc
0.77 in3
–
10.3 kg
92 cc
5.61 in3
10
6.2 kg
Oil Charge
200 ml
355 ml
180 ml
Displacement
UP 90
150
Approved oil
2.3
TM 15
HB135
TM 16 06VM306 06VM307
300
400
400
400
300 ry
350
500
500
500
147 cc
19.1 cc
163 cc
113 cc
130 cc
8.91 in3
1.16 in3
9.88 in3 6.85 in3
7.88 in3
6
–
6
2
2
6.7 kg
10 kg
7 kg
37 kg
47kg
250 ml - road
370 ml - stby 250 ml
1200 ml
1200 ml
150 ml - stby
CARRIER POE #46-60002-02
REFRIGERATION SYSTEM DATA
h. Thermostatic expansion valve superheat
Type: TES 2 / Orifice n1 / MOP 75 psi ( Xarios150)
TES 2 / Orifice n2 / MOP 75 psi (Xarios 200 / 300)
TES 2 / Orifice n3 / MOP 75 psi (Xarios 350 / 400)
TES 2 / Orifice n4 / MOP 75 psi ( Xarios 500)
Set for a box temperature of -20C (0F)
4C (7 1F) during commissioning
a. Defrost Timer
Automatic triggering or at present intervals :
0, auto, 1h, 2h, 3h, 4h, 5h, 6h
b. Defrost Thermostat (DTT)
Opens at:
9 3C (48 5F)
Closes at: 3 3C (37 5F)
i. R404a low pressure switch
Cutout at : -0.2 bar (-2.9 psig 3 psi)
Cut-in at : 1 bar (14.5 psig 3 psi)
c. HP R404a Safety Pressure switch (HP1)
Cutout at : 32 bars (465 10 psig)
Cut-in at : 25 bars (360 10 psig)
j. Quench valve ( option on Xarios 150)
Opens at:
127C (260F)
Closes at: 105C (212F)
d. HP R404a Control Pressure switch (HP2)
Cutout at : 17 bars (245 10 psig)
Cut-in at : 22 bars (320 10 psig)
2.4
e. HP R404a Control Pressure switch (HP3)
Cutout at : 30 bars (430 10 psig)
Cut-in at : 25 bars (360 10 psig)
a. Evaporator fan motors
f. Refrigerant charge
Bearing lubrification
Refer to Table 2-1.
Horse power
Operating amps
g. Compressor Pressure Regulating Valve (CPR)
at the end of a defrost
MODEL
XARIOS 150
XARIOS 200
XARIOS 300ry
XARIOS 350
XARIOS 400
XARIOS 500
XARIOS 400
XARIOS 500
ELECTRICAL DATA
CPR Setting
bar
psig
2.2 (2200 rpm)
32 1
1.4 (1400 rpm)
20 1
2 (2000 rpm)
29 1
2.4 (2400 rpm)
35 1
2.5 (2500 rpm)
( standby )
36 1
Speed
12 V
factory
lubrificated
0.1 kw
7 to 9 amps
2100 rpm
(rated)
b. Standby motors speed
– 1450 rpm – 50 hz
– 1760 rpm – 60 hz
CAUTION: Adjustement on road ONLY
2-13
24 V
factory
lubrificated
0.1 kw
4 to 6 amps
2150 rpm
(rated)
c. Overview motor or moto compressor ratings
Standby motor ratings (amps)
UNIT
Xarios
150/200
Xarios 300 ry
Xarios 350
Xarios 400
Xarios 500
Voltage
Frequency Phase
kW
Constructor data
MRA*
LRA*
Unit overload setting
115
60 Hz
1
0.85
1.14
13.5
55.3
220/240
50 Hz
1
0.85
1.14
5.6
17.2
6.3
208/230
60 Hz
1
0.85
1.14
7
23
7
400
50 Hz
3
0.85
1.14
2.2
6.47
1.5
230
50 Hz
1
1.1
1.47
8
21.9
8.5
400
50 Hz
3
1.1
1.47
4.5
15.2
3.7
230
50 Hz
1
1.5
2
8.5
52
8.5
230
50 Hz
3
1.5
2
6.4
32
6.4
400
50 Hz
3
1.5
2
3.7
18
3.7
208
60 Hz
1
1.5
2
9.05
53
9.1
230
60 Hz
1
1.5
2
8.4
60
8.4
460
60 Hz
3
1.5
2
3.5
18
19
230
50 Hz
3
1.491
2
9.5
42.8
KRIWAN
400
50 Hz
3
1.491
2
5.7
21.7
KRIWAN
230
60 Hz
3
1.491
2
11.8
45.1
KRIWAN
400
60 Hz
3
1.491
2
9.8
26
KRIWAN
230
50 Hz
1
1.491
2
13.9
65.6
KRIWAN
208/230
60 Hz
1
1.491
2
21.4
80.6
KRIWAN
230
50 Hz
3
1.865
2.5
11.8
43.1
KRIWAN
400
50 Hz
3
1.865
2.5
6.8
24.9
KRIWAN
230
60 Hz
3
1.491
2
11.8
45.1
KRIWAN
400
60 Hz
3
1.491
2
9.8
26
KRIWAN
230
50 Hz
1
1.491
2
13.9
65.6
KRIWAN
208/230
60 Hz
1
1.491
2
21.4
80.6
KRIWAN
* MRA : Maximum Rotor Amps
2.5
HP
* LRA : Locked Rotor Amps
TORQUE VALUES
Assembly
Standby compressor platform
Standby motor platform
Standby motor pulley
Compressor pulley
Evaporator fan motor
Evaporator fan
Condenser - frame
Condenser fan blade
Mounting bolts
kg-m
ft-lb
5.5
5.5
4.5
3.0
1.8
1.0
1.0
2.5
40
40
32
22
13
7
7
18
6 to 8
44 to 60
2-14
62-61165-20 (12/03)
2.6
SAFETY DEVICES
System components are protected from damage caused by unsafe operating conditions by automatically
shutting down the unit when such conditions occur. This is accomplished by the safety devices listed in Table 2-2.
Table 2-2 Safety Devices – Microprocessor controller
Unsafe Conditions
Safety Device
Automatic
restart with
fault
cleared
Device setting
1. Excessive drop in pressure
Automatic reset of low
pressure switch
2. Excessive current draw on all
microprocessor outputs
(evaporator and condenser fan)
Electronic relay
3. Excessive current draw control
circuit
4. Excessive current draw moto
compressor or standby motor
5. Excessive current draw evaporator and condenser fan motors
6. Excessive compressor discharge
pressure
Fuse on electronic board
Automatic reset of High
pressure switch
(HP1/HP3)
YES
Timer 5 mn
7. Excessive current draw unit on
standby
Standby fuse (see
Figure 2-11, Figure 2-12
or Figure 2-13)
NO
See fuse Table 2-3,
Table 2-4 & Table 2-5
8. Excessive current draw unit on
road
Road fuse (see
Figure 2-11, Figure 2-12
or Figure 2-13)
NO
See fuse Table 2-3,
Table 2-4 & Table 2-5
9. Connection error on primary
transformer
Standby Fuses (see
Figure 2-11, Figure 2-12
or Figure 2-13)
NO
See fuse Table 2-3,
Table 2-4 & Table 2-5
10. Excessive temperature on moto
compressor or standby motor
winding
Overload relay
Electronic relay
O.L.P. (overload protector) (EXCEPT for
Xarios 300ry in 3
phases)
YES
YES
NO
YES
YES
Cutout : -0.2 bar (R404A)
Timer 5 mn
Self-protected opening
Self-protected opening
See electrical wiring diagram
Self-protected opening
Self-protected opening
YES
11. Clutch malfunction - road (exces- Electronic relay
sive current draw)
YES
12. Clutch malfunction - road (insuffi- Electronic relay
cient current draw)
YES
Detection of min. threshold at 750 mA
YES
Display on Cab Command
until one of the 2 power
supplies have been disconnected.
YES
Cutout/cut-in
at 10 V for 12 V unit
at 20 V for 24 V unit
13. Double power supply (road +
standby)
Microprocessor
14. Low battery voltage
Microprocessor
2-15
Self-protected opening
2.6.1
Fuses
Table 2-3 Fuses – Xarios 150/200
230 / 1 / 50hz
Item
208 / 1 / 60Hz
400 / 3 / 50Hz
12V
24V
12 V
24 V
12 V
24V
1.
Road supply fuse
30 A
20 A
30 A
20 A
30 A
20 A
2.
Standby supply fuse (a)
30 A
20 A
30 A
20 A
30 A
20 A
3.
Main standby fuse FB
(x2)(b)
10 A
10 A
4A
4.
Transformer primary fuse F1
4 AT
4 AT
2.5 AT
40 A
40 A
40 A
5.
Main road fuse
(c)
Table 2-4 Fuses – Xarios 300ry/350
230 / 3 /
50hz
(except for
300ry)
230 / 1 /
50HZ
Item
12V
24 V
12V
300ry:30 A
350:40 A
400 / 3 /
50Hz
24V
12V
24V
300ry:30 A
350:40 A
12V
24V
12 V
24 V
400 / 3 /
60Hz
12 V
24V
300ry:30 A
350:40 A
300ry:30 A
350:40 A
30 A
30 A
Road supply fuse
2.
Standby supply
fuse (a)
3.
Main standby fuse
FB (x2)(b)
4.
Standby clutch
fuse FC ( except
for 300ry )
5.
Transformer primary fuse F1/F2
4 AT
2.5 AT
2.5 AT
4 AT
4 AT
2.5 AT
6.
Main road fuse (c)
50 A
50 A
50 A
50 A
50 A
50 A
230 / 1 /
50Hz
208–230 / 1
/ 60Hz
20 A
30 A
12 A
5A
20 A
30 A
300ry: 6 A
350: 10 A
10 A
3A
5A
20 A
3A
5A
3A
40 A
230 / 1 /
60Hz
1.
30 A
40 A
208 / 1 /
60Hz
(except for
300ry)
30 A
20 A
12 A
5A
3A
20 A
12 A
5A
3A
20 A
300ry: 6A
350: 10 A
5A
3A
Table 2-5 Fuses – Xarios 400/500
Item
230 / 3 /
50HZ
400 / 3 /
50hz
230 / 3 /
60Hz
400 / 3 /
60Hz
12V
24 V
12V
24V
12V
24V
12V
24V
12 V
24 V
12 V
24V
1.
Road supply
fuse
50 A
40 A
50 A
40 A
50 A
40 A
50 A
40 A
50 A
40 A
50 A
40 A
2.
Standby supply
fuse (a)
50 A
40 A
50 A
40 A
50 A
40 A
50 A
40 A
50 A
40 A
50 A
40 A
3.
Main standby
fuse FB (x3)(b)
16 A
10 A
16 A
12 A
Circuit
breaker
max setting
Circuit
breaker
max setting
4.
Transformer
primary fuse
F1/F2/F3
3.15AT 4 AT
3.15 AT
3.15AT 4 AT
3.15 AT
5 AT
5 AT
5.
Main road fuse
(c)
60 A
50 A
60 A
50 A
60 A
50 A
60 A
50 A
60 A
50 A
60 A
50 A
(a) On road / standby unit only
(b) If located in standby box
(c) This fuse is located close to the vehicle battery (12 or 24 v).
2-16
62-61165-20 (12/03)
2.7
The Carrier Transicold microprocessor controls
the following functions :
CAB COMMAND
From his seat, the driver can carry out all the
control operations :
shut-down,
a. Maintains the box temperature at set-point by
regulating through cooling, heat, offmode and
automatic defrost cycles.
automatic start-up in road or standby mode,
b. Permanently displays the return air temperature
and on request the set-point temperature.
adjusting the set-point,
c. Digital display and selection of data.
defrost.
For further details on digital message display, see
section 2.7.7.
The driver can display the box temperature, and
see whether the set-point is being maintained by
checking the green indicator. The indicator lights up
red in the event of a malfunction.
When the battery voltage is too low, a fail-safe
system shuts down the unit. Unit restart is automatic
and time-delayed if the voltage rises to the normal
level (see Figure 2-14)
2.7.2
Keypad
The keypad comprises six keys enabling the
operator to activate various functions, display
operating data and to modify operating parameters.
Display
Readout
Standby operation led
Road operation led
Unit operating data led
Green : cycling (left-hand side)
Red : malfunction (right-hand
side)
Figure 2-14 Cab Command
2.7.1
Keys
Introduction
The microprocessor controller card is located in an
aluminium control box. The controller comprises the
microprocessor, the program memory and the
input/output circuits required to interface with the unit.
The cab command is mounted remote in the cab.
The command comprises the green and red LED
readouts, the keypad and keypad interface (see
Figure 2-14).
WARNING
Manual defrost control key
Unit start-up key in standby or road
mode
Unit shut-down key in standby or
road mode
On road operation, the unit can be
shut down with the ignition key.
Unit data and function modification
The SET key, together with the +
and – keys, enables display and
modification of unit operating data.
The display changes parameter
each time the SET key is pressed.
The controller card and cab command
must never be repaired by the driver!
(see section 3.16). In the event of a
malfunction
with
any
of
their
components please contact your
nearest Carrier Transicold distributor
so that they can be replaced.
Decrement key for selected data
Increment key for selected data
2-17
2.7.3
Digital display
The digital display comprises 4 alphanumeric
characters. The default value displayed is the box
temperature. The microprocessor enables selection
of the display in degrees Celsius or Fahrenheit (see
photo Road control box).
The display also includes settings for defrost
operation (DF).
2.7.4
Set-point
Modification of the set-point temperature
Press the + or – keys to change
UtC or UtF.
Press the SET key to go to the
next configuration.
UNIT VOLTAGE
PS12 : unit voltage 12 V
PS24 : unit voltage 24 V
Display of the set-point temperature
Press the + or – keys to change
PS12 or PS24.
Decrease the set-point
Press the SET key to go to the
next configuration.
Increase the set-point
NUMBER OF EVAPORATOR FAN
FAn1 : 1 fan
FAn2 : 2 fans
FAn3 : 3 fans
Validates set-point temperature.
Returns to display of the box temperature.
It is possible to increase or decrease the set-point
by whole numbers until the required set-point is
displayed. If display stays highlighted, this indicates
the set-point displayed has not been validated.
The new setting for the set-point is validated by
pressing the SET key.
2.7.5
TEMPERATURE UNIT
Ut_C : celcius degree display
Ut_F : farenheit degree display
Configuration
Access by the configuration button located
on the rear of cab command.
Configuration
button
Press the + or – keys to change
FAn1, FAn2 or FAn3.
Press the SET key to go to the
next configuration.
FAN SPEED
SPd– : 1st speed mini
SPd= : 2nd speed medium
SPd : 3rd speed maxi
Press the + or – keys to change
SPd–, SPd= or SPd
Press the SET key to go to the
next configuration.
2 or 3 ET MODE
2 Et : cool, null
3 Et : cool, null, heat
Press the + or – keys to change
2 Et or 3 Et.
Xarios 300/350 without condenser
closing valve : 2 Et
IMPORTANT
Press once on the configuration button.
All changes made are recorded with OFF/ON.
2-18
Xarios 300/350 with condenser closing valve : 3 Et
Press the SET key to go to the
next configuration.
62-61165-20 (12/03)
OPTIONAL ROAD HEATING KIT
hrOF : option road heating kit
not installed
hrOn : option road heating kit
installed
Press the + or – keys to change
hrOF or hrOn.
2.7.6
Defrost cycle
Defrost is an independent cycle overriding cooling
and heating functions, because it enables the
evaporator to be defrosted when necessary. In defrost
mode, the microprocessor displays “dF” on the cab
command, which no longer displays the set-point.
DEFROST
Defrost is fully automatic but can be manually
controlled if authorized by the defrost thermostat.
Press the SET key to go to the
next configuration.
The defrost cycles are fully managed by the
integrated microprocessor.
OPTIONAL STANDBY HEATING
KIT
hSOF : option standby heating
kit not installed
During the defrost phase, the evaporator fan shuts
down. The condenser fan is controlled by the
microprocessor.
hSOn : option standby heating
kit installed
The end of the cycle is controlled by a “Klixon”
thermostat (DTT).
Press the + or – keys to change
hrOF or hrOn.
During the defrost phase, the readout of the cab
command indicates “dF”.
Press the SET key to go to the
next configuration.
a. Defrost
Defrost mode is activated by the microprocessor
automatically or manually by the operator. The cycle
stops when the defrost termination thermostat (DTT)
is activated. The defrost interval timer is reset to zero
when the defrost cycle is terminated, for whatever
reason.
DRAIN RESISTOR
drOF : drain heater (option) not
installed
drOn : drain heater (option)
installed
b. Defrost termination safety
Press the + or – keys to change
drOF or drOn.
If the defrost cycle does not terminate after 45
minutes, the cycle terminates automatically and
displays alarm code A14.
Press the SET key to go to the
next configuration.
c. Modification of defrost parameters
DOOR SWITCH
dOFF : door switch (option) not
installed
d On : door switch (option)
installed
Shut-down unit.
+
Display parameters.
Modify parameters.
Press the + or – keys to change
dOFF or d On.
Validate modified settings.
Return to display of box temperature.
Press the SET key to go to the
next configuration.
0 : complete deletion of defrost.
0.5 to 0.9 : decreases time interval between 2 auto
defrost cycles in relation to calculated time (coefficient
1).
IMPORTANT
If when settings are adjusted, no key is activated
within 5 sec. the system reverts to displaying the
box temperature. All changes made are
recorded with OFF/ON.
AUT : automatic defrost optimized by the
microprocessor according to the type of cargo
transported (variable intervals).
2-19
1.1 to 1.5 : increases the time interval between 2
automatic defrost cycles in relation to calculated time
(coefficient 1).
Malfunction : evaporator 1 fan
control.
Malfunction : heating road 1 control
(option).
1 H, 2 H,... 6 H : Forced interval between each
defrost expressed in hours.
Malfunction : defrost valve control
(HGS1).
Malfunction : quench valve control
(BPV).
IMPORTANT
If when settings are adjusted, no key is activated
within 5 sec. the system reverts to displaying the
box temperature. All changes made are recorded.
Malfunction : heating valve control
HGS2).
High temperature alarm.
d. Minimum shut-down only on standby
The minimum shut-down
compressor is 5 minutes.
for
the
Low temperature alarm.
standby
Defrost alarm > 45 minutes.
After this minimum shut-down period, the unit
restarts when the temperature goes out of the cycling
range by ± 1. 2 or 3°C (± 1.8. 3.6 or 5.4°F).
Setpoint adjusted out of the range
–29C/+30C.
e. Battery voltage
Drain water resistor static control
fault (DWR).
If the battery voltage drops below
10 V for 12 volts unit
Thermal breack down standby
compressor (PTO).
20 V for 24 votls unit
Static control fault heating standby
1 control (option).
the unit shuts down and the cab command displays
the message “bAt”.
2.7.7
Static control fault liquid valve 1.
Alarm display
LP standby pressure switch opened.
Access to malfunction codes
Open circuit detected standby compressor.
Malfunction management
Open circuit detected condenser
fan (CFM).
Press SET for 5 seconds : enables
access to malfunction codes.
Open circuit detected heating road
1 (option).
Open circuit detected defrost valve
(HGS1).
MALFUNCTION CODES
Red LED flashes
Open circuit detected liquid injection valve (BPV).
No malfunction.
Unit in operation.
Open circuit detected hot gas valve
(HGS2).
Cut-out : low-pressure switch (LP).
Open circuit detected drain water
resistor (DWR1).
Cut-out : high-pressure safety
switch (HP).
Open circuit detected heating
standby (option).
Cut-out : electric motor overload
protection or overload relay.
In case of several simultaneous malfunctions, use
Malfunction : road operation clutch
control.
the keys
to list them.
Malfunction : standby contactor
control (MC).
Malfunction : condenser fan control
(CFM).
2-20
62-61165-20 (12/03)
2.7.8
NOTE
Immediate display messages are displayed
instead of temperature read-out as soon as the
malfunction is detected, and remain displayed as
long as malfunction persists.
Other data
Press SET for 5 sec. : enables
access to malfunction codes
The unit does not run until the malfunction has
disappeared or been corrected. Except for “Twin
power supply” where the unit starts in Road
mode.
Display of codes for malfunctions
Immediate display in case of malfunction
Display of cab command software
version
Display of software versions
Malfunction : evaporator
temperature probe (RAS)
Display of road hourmeter (Road
led ON)
Low battery voltage low alarm
( < 10 V)
Display of standby hourmeter
(Standby led ON)
Twin power supply (road and
standby)
Defrost interval (mn) calculated by
the microprocessor between 2
defrosts
Incorrect set-point setting
Elapsed time (mn) since the last
defrost
Setpoint lower than maximum
setpoint but in the range
–29C/+30C
Return to box temperature
GREEN LIGHT STATUS
IMPORTANT
Green LED
flashing 0.5 Hz
Green LED
flashing 3 Hz
Steady
green LED
Set-point +5C
If when settings are adjusted, no key is activated
within 5 sec. the system reverts to displaying the
box temperature. All changes made are recorded.
2.7.9
Set-point +
differential hysteresis 1, 2, 3
Unit start-up
Press during 5 seconds the
+ or – key to increase or
decrease the display brightness.
SETPOINT
Steady
green LED
Green LED
flashing 3 Hz
Green LED
flashing 0.5 Hz
Changing display brightness
Set-point –
differential 1, 2,
3
2.8
COMPRESSOR PRESSURE REGULATING
VALVE
Set-point – 5C
The red alarm LED flashes at 3 Hz after 15’ of high
or low alarm (alarms AXX)
The red LED flashes at 0.5 Hz when the
temperature goes back within the Set-point range ±
differential (steady green LED) and the alarm
becomes inactive (PXX).
2-21
This CPR valve is installed on the suction line of
ROAD compressor to limit the suction and then avoid
overloading of compressor. For CPR settings refer to
section 2.3 g.
The suction pressure is controlled to avoid
overloading engine during high box temperature
operation.
2.9
HOT GAS SOLENOID – HGS1 (TWO-WAY)
The hot gas solenoid is normally closed (NC) and
is only powered in defrost and heating modes and 40
seconds before start-up if box temperature is higher
than –5C.
The transfer of heat from the air to the low
temperature liquid refrigerant causes the liquid to
vaporize. The steam at low temperature and pressure
enters the heat exchanger then enters the
compressor pressure regulating valve (CPR – on
Road only depends of the unit) which regulates
refrigerant pressure entering the compressor, where
the cycle starts over.
The discharge pressure is regulated with HP2. If
P>22 bars HP2 is switch and the fan is switch on.
When the pressure decreases at 17 bars the fan is off.
2.10 CONDENSER CLOSING SOLENOID –
HGS2 (TWO-WAY)
The condenser closing solenoid is normally open
(NO) in cooling mode. It is closed in defrost and
heating mode to increase the capacity.
The quench valve opens as required to maintain a
maximum discharge temperature of 127C (260°F).
2.12 REFRIGERANT CIRCUIT DURING HEAT
AND DEFROST (SEE FIGURE 2-16,
FIGURE 2-17, FIGURE 2-19, FIGURE 2-20,
FIGURE 2-22, FIGURE 2-23, FIGURE 2-25
& FIGURE 2-26)
2.11 REFRIGERANT CIRCUIT DURING
COOLING (SEE FIGURE 2-15,
FIGURE 2-18, FIGURE 2-21 &
FIGURE 2-24)
When cooling, the unit operates as a vapor
compression refrigeration system. The main
components of the system are the reciprocating
compressor, air-cooled condenser, thermostatic
expansion valve, direct expansion evaporator, and
hot gas solenoid (two-way).
The compressor raises the pressure and
temperature of the refrigerant and forces it into the
condenser tubes.
The condenser fan circulates surrounding air over
the outside of the condenser tubes. Heat transfer is
thus established from the refrigerant gas (inside the
tubes) to the air condenser (flowing over the tubes).
The condenser tubes have fins designed to improve
the transfer of heat. This removal of heat causes the
refrigerant to liquefy; liquid refrigerant flows from the
condenser to the receiver.
The refrigerant then flows through the filter-drier,
where an absorbent keeps it dry and clean. The
refrigerant then flows through a sight glass with
moisture indication to the check valve (option) and
then to the liquid / gas heat exchanger.
The liquid enters than to the thermostatic
expansion valve (with external pressure equalizer)
which regulates the flowrate of refrigerant towards the
evaporator in order to obtain maximum use of the
evaporator heat transfer surface.
When refrigerant vapor is compressed to a high
pressure and temperature in a compressor, the
mechanical energy necessary to operate the
compressor is transferred to the gas it is being
compressed. This energy is refereed to as the ”heat
of compression ” and is used as the source of heat
during the defrost and heating mode.
Case 1 : With condenser closing solenoid option.
When the microprocessor activates heating or
defrost, the hot gas HGS1 (two-way) solenoid
energizes, and (if HP2 is open) the condenser closing
solenoid HGS2 energizes, closing the port to the
condenser and opening a port which allows heated
refrigerant vapor to flow directly to the evaporator coil.
Case 2 : Without condenser closing solenoid
option. When the microprocessor activates heating or
defrost, the hot gas solenoid HGS1 (two-way)
energizes, opening a port which allows heated
refrigerant vapor to flow directly to the evaporator coil.
The main difference between heating and
defrosting is that, when in heating mode all the
evaporator fans continue to run, blowing the air
around the heated coils to heat the product. When
defrosting, the evaporator fans stop, allowing the
heated vapor to defrost any ice build-up there may be.
The evaporator tubes have aluminium fins to
increase heat transfer; therefore heat is removed from
the air circulated through the evaporator. This cold air
is circulated throughout the truck to maintain the box
at the desired temperature.
2-22
62-61165-20 (12/03)
1.
3.
4.
5.
6.
24.
2.
22.
23.
14.
22.
14.
7.
13.
12.
21.
10.
15.
9.
8.
19.
20.
18.
17.
High pressure vapor
High pressure liquid
Low pressure vapor
Low pressure liquid
1.
2.
3.
4.
5.
6.
7.
8.
9.
10.
Liquid injection valve (BPV)
Thermostatic expansion valve
Heat exchanger (for Xarios 200 only)
Check valve (option)
Sight glass
Filter drier
Shut-off valve
Receiver
Condenser
Condenser closing valve (HGS2) –
normally open (option)
11. Relief valve (RV)
12. Control pressure switch (HP2)
13.
14.
15.
16.
17.
18.
19.
20.
21.
22.
23.
24.
High pressure switch (HP1)
Road discharge check valve
Standby discharge check valve
Standby compressor
Accumulator
Klixon (BPT) (for liquid injection valve)
Road compressor
Low pressure switch (LP)
Starting valve
Hot gas valve (HGS1) (normally closed)
Defrost element
Evaporator
Figure 2-15 XARIOS 150/200: Cooling Cycle
2-23
1.
3.
24.
4.
6.
5.
2.
22.
23.
14.
22.
14.
7.
13.
21.
12.
10.
15.
9.
19.
20.
8.
17.
18.
High pressure vapor
High pressure liquid
Low pressure vapor
Low pressure liquid
1.
2.
3.
4.
5.
6.
7.
8.
9.
10.
Liquid injection valve (BPV)
Thermostatic expansion valve
Heat exchanger (for Xarios 200 only)
Check valve (option)
Sight glass
Filter drier
Shut-off valve
Receiver
Condenser
Condenser closing valve (HGS2) –
normally open (option)
11. Relief valve (RV)
12. Control pressure switch (HP2)
13.
14.
15.
16.
17.
18.
19.
20.
21.
22.
23.
24.
High pressure switch (HP1)
Road discharge check valve
Standby discharge check valve
Standby compressor
Accumulator
Klixon (BPT) (for liquid injection valve)
Road compressor
Low pressure switch (LP)
Starting valve
Hot gas valve (HGS1) (normally closed)
Defrost element
Evaporator
Figure 2-16 XARIOS 150/200: Heating and defrost Cycle – over 22 bar
2-24
62-61165–20 (12/03)
1.
3.
24.
4.
6.
5.
2.
22.
23.
14.
22.
14.
7.
13.
12.
21.
10.
15.
9.
19.
20.
8.
17.
18.
High pressure vapor
High pressure liquid
Low pressure vapor
Low pressure liquid
1.
2.
3.
4.
5.
6.
7.
8.
9.
10.
Liquid injection valve (BPV)
Thermostatic expansion valve
Heat exchanger (for Xarios 200 only)
Check valve (option)
Sight glass
Filter drier
Shut-off valve
Receiver
Condenser
Condenser closing valve (HGS2) –
normally open (option)
11. Relief valve (RV)
12. Control pressure switch (HP2)
13.
14.
15.
16.
17.
18.
19.
20.
21.
22.
23.
24.
High pressure switch (HP1)
Road discharge check valve
Standby discharge check valve
Standby compressor
Accumulator
Klixon (BPT) (for liquid injection valve)
Road compressor
Low pressure switch (LP)
Starting valve
Hot gas valve (HGS1) (normally closed)
Defrost element
Evaporator
Figure 2-17 XARIOS 150/200: Heating and defrost Cycle – under 17 bar
2-25
1.
3.
5.
6.
7.
23.
2.
4.
22.
13.
12.
8.
19.
21.
18.
14.
20.
11.
10.
17.
9.
15.
16.
High pressure vapor
High pressure liquid
Low pressure vapor
Low pressure liquid
1.
2.
3.
4.
5.
6.
7.
8.
Liquid injection valve (BPV)
Thermostatic expansion valve
Heat exchanger
Hot gas valve (HGS1) –
normally closed
Check valve (option)
Sight glass
Filter drier
Shut-off valve
9. Receiver
10. Condenser
11. Condenser closing valve (HGS2)
normally open (option)
12. Pressure control switch (HP2)
13. High pressure switch (HP1)
14. Standby discharge check valve
15. Standby compressor
16.
17.
18.
19.
20.
21.
22.
23.
Road compressor
Klixon (BPT) (for liquid injection valve)
Oil separator
Road discharge check valve
Low pressure switch (LP)
CPR Starting valve
Defrost element
Evaporator
Figure 2-18 XARIOS 300/350: Cooling cycle
2-26
62-61165–20 (12/03)
1.
3.
5.
6.
7.
23.
2.
4.
22.
13.
12.
8.
19.
21.
18.
14.
20.
11.
10.
17.
9.
15.
16.
High pressure vapor
High pressure liquid
Low pressure vapor
Low pressure liquid
1.
2.
3.
4.
5.
6.
7.
8.
Liquid injection valve (BPV)
Thermostatic expansion valve
Heat exchanger
Hot gas valve (HGS1) –
normally closed
Check valve (option)
Sight glass
Filter drier
Shut-off valve
9. Receiver
10. Condenser
11. Condenser closing valve (HGS2) –
normally open (option)
12. Pressure control switch (HP2)
13. High pressure switch (HP1)
14. Standby discharge check valve
15. Standby compressor
16.
17.
18.
19.
20.
21.
22.
23.
Road compressor
Klixon (BPT) (for liquid injection valve)
Oil separator
Road discharge check valve
Low pressure switch (LP)
CPR Starting valve
Defrost element
Evaporator
Figure 2-19 XARIOS 300/350: Heating and defrost cycle – over 22 bar
2-27
1.
3.
5.
6.
7.
23.
2.
4.
22.
13.
12.
8.
19.
21.
18.
14.
11.
20.
10.
17.
9.
15.
16.
High pressure vapor
High pressure liquid
Low pressure vapor
Low pressure liquid
1.
2.
3.
4.
5.
6.
7.
8.
Liquid injection valve (BPV)
Thermostatic expansion valve
Heat exchanger
Hot gas valve (HGS1) –
normally closed
Check valve (option)
Sight glass
Filter drier
Shut-off valve
9. Receiver
10. Condenser
11. Condenser closing valve (HGS2) –
normally open (option)
12. Pressure control switch (HP2)
13. High pressure switch (HP1)
14. Standby discharge check valve
15. Standby compressor
16.
17.
18.
19.
20.
21.
22.
23.
Road compressor
Klixon (BPT) (for liquid injection valve)
Oil separator
Road discharge check valve
Low pressure switch (LP)
CPR Starting valve
Defrost element
Evaporator
Figure 2-20 XARIOS 300/350: Heating and defrost cycle – under 17 bar
2-28
62-61165–20 (12/03)
1.
3.
4.
24.
5.
6.
2.
15.
23.
16.
22.
14.
13.
7.
11.
10.
21.
9.
12.
8.
19.
20.
17.
18.
High pressure vapor
High pressure liquid
Low pressure vapor
Low pressure liquid
1.
2.
3.
4.
5.
6.
7.
8.
9.
10.
Liquid injection valve (BPV)
Thermostatic expansion valve
Heat exchanger
Check valve (option)
Sight glass
Filter drier
Shut-off valve
Receiver
Condenser
Condenser closing valve (HGS2) –
normally open (option)
11. Standby discharge check valve
12. Relief valve RV (option)
13.
14.
15.
16.
17.
18.
19.
20.
21.
22.
23.
24.
Control pressure switch (HP2)
High pressure switch (HP1)
Hot gas valve (HGS1) – normally closed
Road discharge check valve
Standby compressor
Accumulator
Klixon (BPT) (for liquid injection valve)
Road compressor
Low pressure switch (LP)
CPR Starting valve
Defrost element
Evaporator
Figure 2-21 XARIOS 300ry: Cooling cycle
2-29
1.
3.
4.
24.
5.
6.
2.
15.
23.
16.
22.
14.
13.
7.
10.
11.
21.
12.
9.
8.
19.
20.
17.
18.
High pressure vapor
High pressure liquid
Low pressure vapor
Low pressure liquid
1.
2.
3.
4.
5.
6.
7.
8.
9.
10.
Liquid injection valve (BPV)
Thermostatic expansion valve
Heat exchanger
Check valve (option)
Sight glass
Filter drier
Shut-off valve
Receiver
Condenser
Condenser closing valve (HGS2) –
normally open (option)
11. Standby discharge check valve
12. Relief valve RV (option)
13.
14.
15.
16.
17.
18.
19.
20.
21.
22.
23.
24.
Control pressure switch (HP2)
High pressure switch (HP1)
Hot gas valve (HGS1) – normally closed
Road discharge check valve
Standby compressor
Accumulator
Klixon (BPT) (for liquid injection valve)
Road compressor
Low pressure switch (LP)
CPR Starting valve
Defrost element
Evaporator
Figure 2-22 XARIOS 300ry: Heating and defrost cycle – over 22 bar
2-30
62-61165–20 (12/03)
1.
4.
3.
24.
5.
6.
2.
15.
23.
16.
22.
14.
7.
13.
10.
11.
21.
12.
9.
19.
20.
18.
8.
17.
High pressure vapor
High pressure liquid
Low pressure vapor
Low pressure liquid
1.
2.
3.
4.
5.
6.
7.
8.
9.
10.
Liquid injection valve (BPV)
Thermostatic expansion valve
Heat exchanger
Check valve (option)
Sight glass
Filter drier
Shut-off valve
Receiver
Condenser
Condenser closing valve (HGS2) –
normally open (option)
11. Standby discharge check valve
12. Relief valve RV (option)
13.
14.
15.
16.
17.
18.
19.
20.
21.
22.
23.
24.
Control pressure switch (HP2)
High pressure switch (HP1)
Hot gas valve HGS1) – normally closed
Road discharge check valve
Standby compressor
Accumulator
Klixon (BPT) (for liquid injection valve)
Road compressor
Low pressure switch (LP)
CPR Starting valve
Defrost element
Evaporator
Figure 2-23 XARIOS 300ry: Heating and defrost cycle – under 17 bar
2-31
1.
3.
5.
6.
7.
26.
2.
4.
25.
8.
14.
22.
24.
13.
9.
15.
21.
12.
16.
23.
17.
20.
11.
10.
18.
19.
High pressure vapor
High pressure liquid
Low pressure vapor
Low pressure liquid
1.
2.
3.
4.
5.
6.
7.
8.
9.
Liquid injection valve (BPV)
Thermostatic expansion valve
Heat exchanger
Hot gas valve (HGS1) –
normally closed
Check valve (option for Xarios 400)
Sight glass
Filter drier
Subcooler
Shut-off valve
10. Receiver
11. Condenser
12. Condenser closing valve (HGS2) –
normally open (option for Xarios 400)
13. Pressure control switch (HP2)
14. High pressure switch (HP1)
15. Relief valve
16. Standby discharge check valve
17. Standby high pressure switch (HP3)
18.
19.
20.
21.
22.
23.
24.
25.
26.
Standby compressor
Road compressor
Klixon (BPT) (for liquid injection valve)
Oil separator
Road discharge check valve
Low pressure switch (LP)
CPR Starting valve
Defrost element
Evaporator
Figure 2-24 XARIOS 400/500: Cooling cycle
2-32
62-61165–20 (12/03)
1.
3.
5.
6.
7.
26.
2.
4.
25.
8.
14.
22.
24.
13.
12.
9.
15.
21.
16.
23.
17.
20.
11.
10.
18.
19.
High pressure vapor
High pressure liquid
Low pressure vapor
Low pressure liquid
1.
2.
3.
4.
5.
6.
7.
8.
9.
Liquid injection valve (BPV)
Thermostatic expansion valve
Heat exchanger
Hot gas valve (HGS1) –
normally closed
Check valve (optional for Xarios 400)
Sight glass
Filter drier
Subcooler
Shut-off valve
10. Receiver
11. Condenser
12. Condenser closing valve (HGS2) –
normally open (option for Xarios 400)
13. Pressure control switch (HP2)
14. High pressure switch (HP1)
15. Relief valve
16. Standby discharge check valve
17. Standby high pressure switch (HP3)
18.
19.
20.
21.
22.
23.
24.
25.
26.
Standby compressor
Road compressor
Klixon (BPT) (for liquid injection valve)
Oil separator
Road discharge check valve
Low pressure switch (LP)
CPR Starting valve
Defrost element
Evaporator
Figure 2-25 XARIOS 400/500: Heating and defrost cycle – over 22 bars
2-33
1.
3.
5.
6.
7.
26.
2.
4.
25.
8.
14.
22.
24.
13.
9.
15.
21.
12.
16.
23.
17.
20.
11.
10.
18.
19.
High pressure vapor
High pressure liquid
Low pressure vapor
Low pressure liquid
1.
2.
3.
4.
5.
6.
7.
8.
9.
Liquid injection valve (BPV)
Thermostatic expansion valve
Heat exchanger
Hot gas valve (HGS1) –
normally closed
Check valve (optional for Xarios 400)
Sight glass
Filter drier
Subcooler
Shut-off valve
10. Receiver
11. Condenser
12. Condenser closing valve (HGS2) –
normally open (option for Xarios 400)
13. Pressure control switch (HP2)
14. High pressure switch (HP1)
15. Relief valve
16. Standby discharge check valve
17. Standby high pressure switch (HP3)
18.
19.
20.
21.
22.
23.
24.
25.
26.
Standby compressor
Road compressor
Klixon (BPT) (for liquid injection valve)
Oil separator
Road discharge check valve
Low pressure switch (LP)
CPR Starting valve
Defrost element
Evaporator
Figure 2-26 XARIOS 400/500: Heating and defrost cycle – under 17 bars
2-34
62-61165–20 (12/03)
SECTION 3
OPERATION
3.1
CONTROL AND STARTING UP
3.1.2
Evaporator motor : During the starting mode, the
motor speed increases continuously from 0 to 2100
rpm in 30 seconds for 12V unit and 12 seconds for 24V
unit.
Start–up equalization : The hot gas valve is energized for few seconds before and after the compressor
start.
3.1.1
On road
On standby (road / standby version)
VERY IMPORTANT
The unit must be shut–down to connect
or disconnect the standby supply cable.
Before start-up, check :
Check the belt tension of the compressor drive
belts.
Start-up and control of box temperature
On the power network :
Check that the type of current corresponds to the
characteristics of the unit (see section 1.8).
On the power unit :
Start the vehicle engine
Press the ON key to start the
unit (start-up is time-delayed
for 40 seconds).
The digital display of the cab
command displays the box
temperature.
Connect the unit to the power network.
Start-up and box temperature control
Press the ON key to start the
unit (start-up is time-delayed
for 40 seconds).
The digital display of the cab
command displays the box
temperature.
Check the temperature setpoint is correct by pressing
the SET key; the set-point
temperature is highlighted on
the digital display.
Check the temperature setpoint is correct by pressing
the SET key; the set-point
temperature is highlighted on
the digital display.
Enter a new set-point if necessary (see temperature set-point adjustment).
In the event of difficulty on start-up, check
that :
The road fuses have not blown.
Enter a new set-point if necessary (see temperature set-point adjustment).
Unit shut-down
The temperature selected by the cab command
has not been affected.
Press the OFF key.
Unit shut-down
If you have difficulty in starting up, check:
Turn off the ignition key or press
the OFF key.
The set-point temperature selected on the cab
command has not been reached.
The standby fuses have not blown.
3-1
COOLING
HEATING
There are two control ranges, Frozen and Perishable. The frozen range is active with set points at or
below -12°C (+10°F) and the Perishable range is
active at set points above -12°C (+10°F).
See section 2.12 for a description of the heating
cycle.
The unit will only heat when the controller is set
above -12°C (+10°F) as the heat relays are electronically locked out with set points at or below -12°
(+10°F)
The controller automatically selects the mode necessary to maintain box temperature at set point.
The microprocessor automatically selects the
mode necessary to maintain box temperature at set
point. In pulldown the heating modes are as follows
(Figure 3-1 and Figure 3-2) :
DECREASE IN TEMPERATURE
INCREASE IN TEMPERATURE
+1C (+1.8F)
COOL
COOL
or +2C (+3.6F)
or +3C (+5.4F)
NULL
SET-POINT
NULL
–1C (–18F)
or –2C (–3.6F)
or –3C (–5.4F)
HEAT
(setting)
HEAT
Figure 3-1 Thermostat operating sequence Standby or road operationSet-point higher than –12C (+10F)
COOL
+1C (+1.8F)
COOL
or +2C (+3.6F)
or +3C (+5.4F)
SET-POINT
NULL
NULL
NOTE : The thermostat inhibits heat mode when it is set to a temperature
lower than -12°C (+ 10°F).
Figure 3-2 Thermostat operating sequence Standby or road operationSet-point lower than –12C (+10F)
3-2
62-61165-20 (12/03)
DEFROST
See section 2.12 for a description of heat and defrost cycles.
DEFROST ON STANDBY
Defrost on standby operates the same way as the defrost on road operation (see section 2.12).
Table 3-1 XARIOS 150 / 200:Management of condenser
and evaporator fan and heat and defrost valve (from version 3.01)
EFM
CFM
DWR
evaporator fan
condenser
fan
drain water
resistor
HGS2
HGS1
heat valve
ON
OFF
OFF
ON
ON
3 mn
minimum
Cool
Cycling
OFF
OFF
Heating if set-point
= or > -12_C
Defrost
HP2
DTT
defrost valve
pressure
switch
Klixon
defrost
OFF
OFF
OPEN
XX
OFF
OFF
OFF
CLOSED
XX
OFF
OFF
OFF
OFF
OPEN
XX
OFF
OFF
OFF
OFF
CLOSED
XX
ON
OFF
OFF
ON
ON
OPEN
XX
ON
ON
if HGS2 =
OFF + 1mn
OFF
OFF
1mn mini
ON
CLOSED
XX
OFF
OFF
ON
ON
ON
OPEN
CLOSED
OFF
ON
if HGS2 =
OFF + 1mn
ON
OFF
1 mn mini
ON
CLOSED
CLOSED
HP2
DTT
ON if
forced by
config.
XX : indifferent position
Table 3-2 XARIOS 150 / 200: Management of condenser
and evaporator fan and heat and defrost valve (until version 3.01)
EFM
CFM
DWR
evaporator fan
condenser
fan
ON
ON
Cool
Cycling
OFF
OFF
ON if
forced by
config.
ON
HGS1
heat valve
defrost valve
pressure
switch
Klixon
defrost
OFF
OFF
OFF
OFF
OPEN
XX
ON
3 mn
minimum
OFF
OFF
OFF
CLOSED
XX
OFF
OFF
OFF
OFF
OPEN
XX
OFF
OFF
OFF
OFF
CLOSED
XX
OPEN
OFF
OFF
ON
ON
OPEN
OFF
ON
if HGS2 =
OFF + 1mn
OFF
OFF
1mn mini
ON
CLOSED
OFF
OFF
ON
ON
ON
OPEN
CLOSED
OFF
ON
if HGS2 =
OFF + 1mn
ON
OFF
1 mn mini
ON
CLOSED
CLOSED
Heating if set
set-point
point
OFF
= or > -12_C
ON
Defrost
drain water
resistor
HGS2
XX : indifferent position
3-3
CLOSED
OPEN
CLOSED
Table 3-3 XARIOS 300ry / 350 / 400 / 500: Management of condenser
and evaporator fans and heat and defrost valves
FUNCTION
CLHR/CLHS
Compressor
HEAT**
HEAT**
(without option)
(Standby, OHS1
installed)
DEFROST
OFF
(ON, following
config)
ON
ON
ON
OFF
ON
OFF
ON
OFF
ON (SCC)
ON
OFF
OFF
OFF
OFF
OFF
ON
REGUL
ON
EFM
Evaporator fan
motors 1, 2
HEAT**
(Road,
OHR1
installed)
COOL
DWR1
Drain water
resistor
ON* if
HP2 is
ON > 1
min. if not
OFF
CFM
Condenser fan
motor
HWP–HWV/
EHR
OFF
ON*
OFF
OFF
OFF
OFF
N.A.
Optional heating
HGS2
Heating valve
HGS1
Defrost valve
HP2
High pressure
DTTI
Defrost klixon
OFF
ON
(HWV–
HWP)
OFF
OFF
ON 1 min. mini
OFF
OFF
OFF
ON
OFF
OPENED
XX
CLOSED
XX
XX
OPENED
CLOSED
XX
* according to HP2 value (3 min. mini)
** only if setpoint >–12C
XX
XX
ON* if
HP2 is
ON > 1
min. if
not OFF
OFF
ON (EHR)
ON 1 min.
mini for
Xarios
300ry/350
OFF 1
min. mini
for
Xarios
400/500
ON* if
HP2 is
ON > 1
min. if
not OFF
OFF
OFF
ON 1 min.
mini for
Xarios
300ry/350
ON
OPENED
OFF 1
min. mini
for
Xarios
400/500
ON
CLOSED
XX
OPENED
CLOSED
CLOSED
XX : indifferent position
Minimum ”OFF” time (5 minutes) : Once the motor has cycled off, it will remain off for the minimum ”off time”.
This prevents the motor from rapid cycling due to changes in air temperature. Air temperature in the box change
rapidly, but it takes time for the product temperature to change.
3-4
62-61165-20 (12/03)
SECTION 4
SERVICE
Table 4-1 Maintenance schedules
WARNING
Hours
Beware of unannounced starting of
engine or standby motor caused by the
unit thermostat or the start/stop cycle.
Personal Protective Equipment : before
doing anything on this product, as
explained in this manual.Always use
safety precautions before doing any
maintenance on the unit
safety glasses
safety shoes
, gloves
,
Service A
Service B
100
1000
2000
3000
4000
5000
6000
7000
Service C
Service D
Refrigerant : type R404A
Road compressor oil type: The road compressors are supplied with CARRIER POLYESTER (POE)
oil. The presence of a sticker indicates that the oilchange has been correctly carried out in our CARRIER TRANSICOLD plant. Oils of PAG type are
strictly incompatible with the operation of our units,
never use an oil other than that approved by CARRIER.
, safety clothes
To disconnect the unit from its power
sources :
– disconnect the standby cable
– disconnect the negative battery
cable and enclose it in the locked box
(see procedure 98-60348-00)
Oil analysis :
On request we can analyze your compressor oil.
NOTE
To avoid damage to the earth’s ozone layer, use a
refrigerant recovery system whenever removing
refrigerant.
To do this, we send a small drum with a label on
which you should indicate :
– the type of compressor,
– the lapse of time or mileage since the last
oil change,
4.1
– the type of CARRIER equipment,
UNIT MAINTENANCE
– the date of initial operation.
4.1.1
Unit maintenance schedules
IMPORTANT
Regular servicing is required in order to optimize
the service life and reliability of your unit. Service
operations are to be carried out according to the following schedule.
Before any operation requiring an intervention on
the unit, check that :
that the unit (cab command) is OFF.
that it is impossible for the unit to automatically
start up during maintenance.
that the safety switch is OFF.
4-1
4.1.2
Description of maintenance operations
Service A
Check the tightness of bolts and
screws and that the unit is correctly
fastened onto the box.
Clean the condenser and the evaporator.
Replace the road & standby compressor belt(s) – For the standby
reciprocating compressor
Replace the filter-drier.
Clean the TXV orifice filter.
Check the standby compressor oil
level.
Check the operation of the cab
command.
Check the defrost
– Cut-in
– Fan shut-down
– Cut-out
– Defrost water drain
Check the functionning of the
emergency switch.
Check the bearings of the belt tension pulleys and bearing of the mechanics kits. Change the spring if there is
one.
Service C
BELT MAINTENANCE AND ADJUSTMENT
Check the tension of the alternator
belt(s).
Check that the vehicle engine runs
correctly at low speed and that the
compressor kit is correctly tightened /
belt tension.
Service B
4.2
CAUTION
Beware of V-belt and belt-driven
components as the unit may start
automatically.
4.2.1
Belt tension gauge (road compressor)
A belt tension gauge provides an accurate and
easy method of adjusting belts to their proper tension.
Properly adjusted belts give long lasting and efficient
service. Too much tension shortens belt and bearing
life, and too little tension causes slippage and excessive belt wear. It is also important to keep belts and
sheaves free of any foreign material which may cause
the belts to slip.
The Belt Tension gauge can be used to adjust all
belts. The readings which we specify for Carrier
Transicold units are applicable only for our belts and
application, as the tension is dependent on the size of
the belt and distance between sheaves. When using
this gauge, it should be placed as close as possible to
the midpoint between two sheaves.
When installing a new V-belt the tension should be
somewhat higher than specified and readjusted after
allowing the unit to run for some time.
Change the shockmounts (if any)
installed on the road compressor
mounting kit.
Check the operation of the evaporator and condenser fans. Change the
condenser motor brushes.
Service D
Change the compressor oil. Only
use Ester oil (POE) approved by CARRIER. See the technical information
sheets for the recommended quantities and types of oil.
Change the removable fuses and
capacitor (if any) in the control box.
Note : The evaporator of this unit is equipped with
brushless fan motors which don’t need to be
maintained.
4-2
Figure 4-1 Road compressor belt tension
Belt tension depends on each kit. In each kit installation instruction, we indicate the belt tension (given
with belt tension gauge CLAVIS, type 1–30–300 Hz).
62-61165-20 (12/03)
4.3
REMOVING THE REFRIGERANT CHARGE
4.5
4.5.1
CAUTION
General
Moisture is the deadly enemy of refrigerant systems. The presence of moisture in a refrigeration system can have many undesirable effects. The most
common are copper plating, acid sludge formation,
”freezing-up” of metering devices by free water, and
formation of acids, resulting in metal corrosion.
When working with refrigerant use
safety glasses and gloves to avoid skin
contact or burning.
Remember that hoses and copper tube
can be hot points when the unit is
functionning.
4.5.2
Preparation
a. Evacuate and dehydrate only after pressure leak
test. (Refer to section 4.4).
NOTE
Once the system is OPEN, it must be evacuated
and deshydrated (see section 4.5.3).
Connect a refrigerant system to the unit to remove
refrigerant charge. Refer to instruction provided by the
manufacture of the refrigerant recovery system.
4.4
EVACUATION AND DEHYDRATION
b. Essential tools to properly evacuate and dehydrate
any system include a good vacuum pump (5cfm =
8m3/h volume displacement, code 07-00176-01)
and a good vacuum indicator such as a thermocouple vacuum gauge (vacuum indicator).
NOTE
Use of a compound gauge is not recommended
because of its inherent inaccuracy.
REFRIGERANT LEAK CHECKING
Once the recovery system is OPEN and repairs
completed, leak check the unit by proceeding as follows:
f. The recommended procedure for finding leaks in
a system is with a halide torch or electronic leak
detector. Testing joints with soapsuds is satisfactory only for locating large leaks.
g. If system is without refrigerant, charge system with
refrigerant to build up pressure between 2.1 to 3.5
bar (30 to 50 psig). Remove refrigerant cylinder
and check for leak all connections.
NOTE
Important : only the correct refrigerant cylinder
must be connected to pressurize the system.
Any other gas or vapor will contaminate the
system which will require additional purging
and evacuation of the high side (discharge) of
the system.
h. Remove refrigerant using a refrigerant recovery
system and repair any leaks. Evacuate and dehydrate the unit. (Refer to section 4.5) Charge unit
with refrigerant. (Refer to section 4.6)
c. Keep the ambient temperature above 15.6°C
(60°F) to speed evaporation of moisture. if ambient
temperature is lower than 15.6°C (60°F), ice might
form before moisture removal is complete. Heat
lamps or alternate sources of heat may be used to
raise system temperature.
4.5.3
Evacuation and dehydration procedure
a. Remove refrigerant using a refrigerant recovery
system.
b. The recommended method to evacuate and dehydrate the system is to connect three evacuation
hoses to the vacuum pump and refrigeration unit
as shown in Figure 4-3 (do not use standard service hoses as they are not suited for evacuation
purposes). Also, as shown, connect an evacuation
manifold with special evacuation hoses to the vacuum pump, to the electronic vacuum gauge and to
the refrigerant recovery system.
c. Shut off the pump and check to see if the vacuum
holds. This operation is to test the evacuation
setup for leaks, repair if necessary.
d. Open the vacuum pump and electronic vacuum
gauge valves, if they are not already open. Start
the vacuum pump. Evacuate unit until the electronic vacuum gauge indicates 2000 microns.
Close the electronic vacuum gauge and vacuum
pump valves. Shut off the vacuum pump. Wait a
few minutes to be sure the vacuum holds.
e. Break the vacuum with clean dry refrigerant. Use
refrigerant that the unit calls for. Raise system
pressure to approximately 2 psig.
4-3
f. Remove refrigerant using a refrigerant recovery
system.
g. Repeat steps d. to f.
h. Evacuate unit to 500 microns. Close off vacuum
pump valve and stop pump. Wait five minutes to
see if vacuum holds. This checks for residual moisture and/or leaks.
1.
2.
3.
4.
i. With a vacuum still in the unit, the refrigerant
charge may be drawn into the system from a refrigerant container on weight scales. The correct
amount of refrigerant may be added by observing
the scales (see section 4.6)
NOTE
Vacuum duration must be at least 8 hours.
Refrigerant recovery unit
Refrigerant cylinder
Evacuation manifold
Valve
5. Vacuum pump
6. Electronic vacuum gauge
4.
4.
3.
1.
6.
4.
5.
2.
Figure 4-2 XARIOS 150/200: Vacuum pump connection
1.
2.
3.
4.
Refrigerant recovery unit
Refrigerant cylinder
Evacuation manifold
Valve
5. Vacuum pump
6. Electronic vacuum gauge
4.
4.
3.
1.
6.
4.
5.
2.
Figure 4-3 XARIOS 300ry/350: Vacuum pump connection
4-4
62-61165-20 (12/03)
1.
2.
3.
4.
Refrigerant recovery unit
Refrigerant cylinder
Evacuation manifold
Valve
5. Vacuum pump
6. Electronic vacuum gauge
4.
4.
3.
1.
6.
4.
5.
2.
Figure 4-4 XARIOS 400/500: Vacuum pump connection
4.6
4.6.1
f. Open the receiver valve back seat and follow the
step 4.6.3.
CHARGING THE REFRIGERATION
SYSTEM
4.6.2
Installing a complete charge
a. Dry the refrigeration circuit and create a high vacuum (see section 4.5).
b. Place refrigerant cylinder on scale and connect
charging line from cylinder to manifold. Purge
charging line at outlet valve. Purge charging line at
inlet manifold.
c. Note weight of refrigerant cylinder. Be sure that the
unit is stopped during this operation.
d. Open liquid valve on refrigerant cylinder. Open
king valve half way and allow the liquid refrigerant
to flow into the unit until the correct weight of refrigerant has been added as indicated by scales. (Correct charge will be found in section 2.2).
NOTE
Adding a partial charge
a. Place refrigerant cylinder on scale and note
weight.
b. Connect charging line from the cylinder to the
receiver valve. Purge the line at the cylinder valve.
c. Start the unit with the road compressor turning at
2400 rpm.
d. Front seat the receiver valve.
NOTE
The refrigerant R404A must be charged from
liquid valve and not vapor. The refrigerant
R404A is a blend. Charging by the vapor valve
will change the properties of the refrigerant and
affect cooling capacity.
e. Add refrigerant by small quantity.
It is possible that all liquid may not be pulled
into the circuit, as outlined in step (d) above.
In this case, close the cylinder valve front seat
and start the unit. Refrigerant will accumulate in
the receiver and liquid of the refrigerant cylinder
will be succed by the compressor.
e. When refrigerant cylinder weight (scale) indicates
that the correct charge has been added, close the
manifold valves.
4-5
f. Back seat the receiver valve.
g. Follow the step 4.6.3 and repeat if necessary from
step c.
4.6.3
Checking the refrigerant charge
Start unit in cooling mode. Run approximately ten
minutes. Partially block off air flow to condenser coil
so discharge pressure rise to 22 bars (R404A).
The charge is correct if there are no bubbles at the
liquid line sight glass.
4.9
4.7
4.9.1
REPLACING THE COMPRESSOR
CHECKING AND REPLACING HIGH PRESSURE CUTOUT SWITCH
– Remove defective switch.
a. Read carefully the following instructions,
strict observance of these procedures are
essential for operator safety.
do not switch on compressor with terminal
box open.
remove terminal box cover only with power
source disconnected.
before compressor installation, slowly open
the plug on the discharge valve and vent the
nitrogen holding charge.
–Install the new switch.
NOTE
The seal is done by schraeder, it is not
necessary to dehydrate or evacuate it.
4.9.2
Do not use a nitrogen cylinder without
a pressure regulator. Cylinder pressure
is approximately 165 bar (2350 psi). Do
not use oxygen in or near a refrigerant
system as an explosion may occur. (See
Figure 4-5).
Wiring diagrams and further instructions inside
the terminal box.
do not touch the compressor shortly after
stopping as surface temperatures will be dangerous.
b. Evacuate the unit. Repeat the steps in section
4.3.
Checking high pressure cutout switch
CAUTION
ensure that suction and discharge valves are
open before starting the compressor.
do not operate the compressor with
hydrocarbon gases.
Replacing high pressure cutout switch
1.
4.
2.
c. Installation
5.
To install the compressor, reverse the procedure
outlined when removing the compressor. Refer to section 2.5 for torque values.
Pump down the unit, see section 3.5 then charge
system, see section 4.6.
4.8
6.
3.
1.
2.
3.
4.
Cylinder valve and gauge
Pressure regulator
Nitrogen cylinder
Pressure gauge (0 to 400
psig = 0 to 28 bars)
5. Bleed-off valve
6. 1/4 inch connection
CHECKING AND REPLACING FILTERDRIER
Checking filter-drier
Check for any obstruction of the filter-drier by feeling the inlet and outlet connections of the liquid line on
the filter cartridge. If the temperature of the outlet connection seems lower than the temperature of the inlet
connection, replace the filter-drier.
Replacing the filter-drier
Remove the drier mounting clip, then replace the
filter-drier.
4-6
Figure 4-5 Typical setup for testing high pressure switch HP1, HP2 & HP3
a. Remove switch as outlined in section 4.9.1.
b. Connect ohmmeter or continuity light across
switch terminals. Ohmmeter will indicate resistance and continuity light will be lighted if switch is
closed (HP1 / (HP3 for Xarios 400/500)) or open
(HP2) after relieving pressure.
62-61165-20 (12/03)
c. Connect switch to a cylinder of dry nitrogen (see
Figure 4-5)
d. Set nitrogen pressure regulator higher than cut-out
point on switch being tested. Pressure switch
cut-in points are shown in sections 2.3.
e. Close valve on cylinder and open bleed-off valve.
f. Open cylinder valve. Slowly close bleed-off valve
and increase pressure until the switch opens. If
light is used, light will go out and if an ohmmeter is
used, the meter will indicate open. Open pressure
on gauge. Slowly open bleed-off valve (to
decrease pressure) until switch closes (light will
light or ohmmeter will move).
4.10 CHECKING AND REPLACING CONDENSER FAN MOTOR BRUSHES
The fan motor brushes should be checked periodically for cleanliness and wear to maintain proper
operation of the fan motors.
There is no maintenance on evaporator fan motor.
4.11 EVAPORATOR COIL-CLEANING
The use of recycled cardboard cartons is increasing. The recycled cardboard cartons create much
more fiber dust during transport than ”new” cartons.
The fiber dust and particles are drawn into the evaporator where they lodge between the evaporator fins.
If the coil is not cleaned on a regular basis, sometimes
as often as after each trip, the accumulation can be
great enough to restrict air flow, cause coil icing, repetitive defrosts and loss of unit capacity. Due to the
”washing” action of normal defrost the fiber dust and
particles may not be visible on the face of the coil but
may accumulate deep within.
It is recommended to clean the evaporator coil on
a regular basis, not only to remove cardboard dust,
but to remove any grease oil film which sometimes
coats the fins and prevents water from draining into
the drain pan.
Cardboard fiber particles after being wetted and
dried several times can be very hard to remove.
Therefore, several washings may be necessary.
2.
1.
1. Brush cap
2. Brush
a. Spray coil with a mild detergent solution such as
any good commercial-grade automatic dish
washer detergent and let the solution stand for a
few minutes. Reverse flush (opposite normal air
flow) with clean water at mild pressure. A garden
hose with spray nozzle is usually sufficient. Make
sure drain lines are clean.
b. Run unit until defrost mode be initiated to check for
proper draining from drain pan.
Figure 4-6 Fan motor brushes
4.12 CONDENSER COIL-CLEANING
To check brushes proceed as follows :
a. With unit off and battery disconnected, remove
brush cap (item 1; 2 per motor). See Figure 4-6.
b. Remove brushes (item 2; 2 per motor) and check
the length of the brush. If the length is less than 1/4
inch (6 mm) the brushes should be replaced (after
checking collector).
c. Blow out the brush holder with low pressure air to
remove any carbon dust in the holder. This dust
could prevent a good contact between the brushes
and collector.
d. Remove the back cover of the motor and inspect
the collector. If the commutator is heavily grooved,
polish it using fine sandpaper; do not use abrasive
paper. Wipe out any accumulation of greasy material using a clean rag dampened with solvent.
Reassemble the motor; install new brushes and
replace cap.
The evaporator fan motor is a brushless fan motor.
4-7
Remove all foreign material from the condenser
coil by reversing the normal air flow. (Air is pulled in
through the front and discharges over the engine.)
Compressed air or water may be used as a cleaning
agent. It may be necessary to use warm water mixed
with any good commercial dishwasher detergent.
Rinse coil with fresh water if a detergent is used.
4.13 HOT GAS (TWO-WAY) SOLENOID AND
CONDENSER CLOSING SOLENOID (TWOWAY)
c. Check for foreign material in valve body.
4.13.1
e. Tighten enclosing tube. If the valve has been
removed from the circuit, check for eventual leaks.
Replacing solenoid coil
It is not necessary to pump the unit down to replace
the coil (see Figure 4-7).
a. Remove coil snap cap, voltage plate and coil
assembly. Disconnect leads and remove coil junction box if necessary.
b. Verify coil type, voltage and frequency. This
information appears on the coil voltage plate and
the coil housing.
c. Place new coil over enclosing tube and then install
voltage plate and snap cap.
d. Check for damaged plunger and O-ring. If O-ring
is to be replaced, always put refrigerant oil on
O-rings before installing.
f. Install coil assembly, voltage cover and snap cap.
g. Evacuate and dehydrate the circuit.
h. Install a complete refrigerant charge.
i. Start unit and check operation.
4.14 ADJUSTING THE ROAD COMPRESSOR
PRESSURE REGULATING VALVE (CPR)
The CPR valve is not factory pre-set and need
adjustment. It is necessary to adjust the valve during
commissionning, proceed with the following outline :
CAUTION
When adjusting the CPR valve, the unit must be
running in heating or defrost mode and at 2400rpm
(compressor speed). This will ensure a suction pressure above the proper CPR setting.
Do not damage or over tighten the
enclosing tube assembly. Also make
sure all parts are placed on the
enclosing tube in proper sequence to
avoid premature coil burn-out.
1.
1.
2.
1.
2.
3.
4.
3.
3.
Snap cap
Voltage plate
Coil assembly
Enclosing tube
5. Plunger assembly
6. Valve body assembly
7. Way of the refrigerant
flow
4.
2.
5.
1. Cap
2. Jam nut
3. Setting screw
Figure 4-8 Compressor pressure regulating
valve
To adjust the CPR valve, proceed as follows :
6.
7.
a. Install a low-pressure gauge.
b. Remove cap (item 1) from CPR valve.
Figure 4-7 Hot gas (two-way) solenoid or
Condenser closing solenoid (Two-way)
4.13.2
Replacing solenoid valve internal parts
If the hot gas solenoid is to be replaced, or if a service operation is scheduled on the internal components of the valve, the refrigerant must be evacuated.
a. Remove and store the refrigerant charge in an evacuated container (see section 4.3).
b. Remove coil snap cap, voltage cover and coil
assembly. Remove the valve body head.
4-8
c. With an 8 mm Allen wrench, loosen the jam nut
(Figure 4-8, item 2.).
d. Using the 8 mm Allen wrench, adjust the setting
screw. To raise the suction pressure turn the setting screw (item 3.) clockwise; to lower the suction
pressure, turn the setting screw counterclockwise.
Refer to section 2.3 for CPR valve setting.
e. When the setting has been adjusted, tighten the
jam nut securely against the setting screw (item
3.). This will prevent any movement of the setting
screw due to vibrations in the unit. Replace the
cap.
62-61165-20 (12/03)
4.15 THERMOSTATIC EXPANSION VALVE
MOP expansion valve characteristics :
– Rule : in order to avoid the compressor
overcharge, a MOP expansion valve (expansion valve with limited flow) is used.
– Operating : this kind of expansion valve
can not open more than MOP setpoint. Any
temperature increase of the sensor can not
open more the expansion valve.
3.
The thermal expansion valve is an automatic
device which maintains constant superheat of the
refrigerant gas leaving the evaporator regardless of
suction pressure. The valve functions are: (a) automatic response of refrigerant flow to match the evaporator load and (b) prevention of liquid refrigerant
entering the compressor. Unless the valve is defective, it requires adjustment, but maintenance must be
done every year in order to clean the orifice filter.
ÏÏÏÏÏÏÏ
ÏÏÏÏÏÏÏ
ÏÏÏÏÏÏÏ
ÏÏÏÏÏÏÏ
ÏÏÏÏÏÏÏ
ÏÏÏÏÏÏÏ
ÏÏÏÏÏÏÏ
1.
Suction line (end view)
2.
TXV bulb clamp
3.
Nut and bolt (clamp)
4.
Thermocouple
5.
TXV bulb
4.
5.
2.
1.
Figure 4-9 Thermostatic expansion valve bulb
and thermocouple
4. Connect an accurate gauge to the ¼” port on the
suction service valve.
5. Run unit until stabilized at -20C (box temperature).
a. Replacing expansion valve
1. Remove refrigerant charge.
2. Remove insulation from expansion valve bulb and
then remove bulb from suction line.
6. From the temperature/pressure chart (Table 4-2),
determine the saturation temperature corresponding to the evaporator outlet pressure.
3. Loosen inlet nut and unbraze equalizer line and
outlet line from expansion valve.
7. Note the temperature of the suction gas at the
expansion valve bulb.
4. The thermal bulb is located below the center of the
suction line. This area must be clean to ensure
positive bulb contact. Strap thermal bulb to suction
line and insulate both.
8. Subtract the saturation temperature determined in
Step 7 from the average temperature measured in
Step 6. The difference is the superheat of the suction gas. (see section 1.3.f)
5. Braze the equalizer tubes to expansion valve.
4.16 MICROPROCESSOR
6. Evacuate by placing vacuum pump on suction and
receiver tank service valve.
7. Recharge unit.
8. Check superheat (see section 2.3).
b. Measuring superheat
NOTE
The expansion valve and bulb location are
shown in Figure 4-9.
1. Remove insulation from expansion valve bulb and
suction line.
2. Loosen one TXV bulb clamp and make sure area
under clamp (above TXV bulb) is clean.
3. Place thermocouple above (parallel) TXV bulb and
then secure loosened clamp making sure both
bulbs are firmly secured to suction line as shown
in Figure 4-9.
4-9
Although there is less danger of electrical static
discharge ESD damage in the outdoor environment,
where the processor is likely to be handled, proper
board handling techniques should always be
stressed. Boards should always be handled by their
edges, in much the same way one would handle a
photograph. This not only precludes the possibility of
ESD damage, but also lowers the possibility of physical damage to the electronic components. Although
the microprocessor boards are fairly rugged when
assembled, they are more fragile when separated and
should always be handled carefully.
When welding is required on the unit frame, or on
the front area of the trailer, ALL wiring to the microprocessor MUST be disconnected. When welding is performed on other areas of the truck and van, the welder
ground connection MUST be in close proximity to the
area being welded. It is also a good practice to remove
both battery cables before wedding on either the unit
frame or the truck to prevent possible damage to other
components such as the alternator and voltage regulator.
Table 4-2 Pressure – Temperature R404A
Temperature (C)
Vapor pressure
(bar abs.)
-60
0.50
-58
0.57
-56
0.63
-54
0.70
-52
0.78
-50
0.86
-48
0.95
-46
1.04
-44
1.14
-42
1.25
-40
1.37
-38
1.50
-36
1.63
-34
1.78
-32
1.93
-30
2.11
-28
2.27
-26
2.48
-24
2.65
-22
2.85
-20
3.09
-18
3.32
-16
3.57
-14
3.83
-12
4.11
-10
4.40
-8
4.71
-6
5.03
-4
5.38
-2
5.73
0
6.11
2
6.50
4
6.92
6
7.35
8
7.80
10
8.28
12
8.77
14
9.29
16
9.83
18
10.39
20
10.98
22
11.59
24
12.22
26
12.89
28
13.57
30
14.29
32
15.03
34
15.80
36
16.61
38
17.44
Table 4-2 Pressure – Temperature R404A
Temperature (C)
Vapor pressure
(bar abs.)
40
18.30
42
19.19
44
20.12
46
21.08
48
22.07
50
23.10
52
24.16
54
25.26
56
26.40
58
27.57
60
28.79
Table 4-3 Sensor Resistance (RAS)
Temperature
RAS
C
F
Resistance In Ohms
–28.9
–20
165,300
–23.3
–10
117,800
–17.8
0
85,500
–12.2
10
62,400
– 6.7
20
46,300
– 1.1
30
34,500
0
32
32,700
4.4
40
26,200
10.0
50
19,900
15.6
60
15,300
21.1
70
11,900
25
77
10,000
26.7
80
9,300
32.2
90
7,300
37.8
100
5,800
43.3
110
4,700
48.9
120
3,800
90
194
915
100
212
680
130
266
301
150
302
186
4-10
62-61165-20 (12/03)
SECTION 5
TROUBLESHOOTING
CAUTION
Under no circumstances should anyone attempt to service the microprocessor (see section
4.16). Should a problem develop with the microprocessor, contact your nearest Carrier
Transicold dealer for replacement.
INDICATION / TROUBLE
5.1
POSSIBLE CAUSES
REFERENCE
SECTION
REFRIGERATION
5.1.1
Unit will not cool
Compressor malfunction
Compressor drive defective
Compressor defective
Refrigeration system
Defrost cycle has not terminated
Abnormal pressure
Hot gas (two-way) solenoid malfunction
5.1.2
Unit runs but has insufficient cooling
Compressor
Compressor valves defective
Refrigeration system
Abnormal pressure
Expansion valve malfunction
No or restricted evaporator airflow
5.1.3
Unit operates long or continuously in cooling
Box
Hot Load
Refrigeration system
Defective box insulation or air leak
Abnormal pressure
Temperature controller malfunction
Compressor
Defective
5.1.4
Unit will not heat or heating insufficient
Refrigeration
Abnormal pressure
Temperature controller malfunction
Hot gas (two-way) solenoid malfunction
Compressor
5.1.5
Defrost malfunction
Automatic defrost will not initiate
Manual defrost will not initiate
Defrost cycle initiates but does not
defrost
Frequent defrost
Does not terminate or cycles on defrost
Compressor drive defective
Compressor defective
Defrost thermostats (DTT) open or
defective
Hog gas valve
Electronic card malfunction
Microprocessor defective
Defrost thermostats (DTT) open or defective
Hot gas (two-way) solenoid malfunction
Wet load
Defrost thermostats (DTT) shorted closed
5-1
4.7
4.7
5.1.5
5.1.6
5.1.11
4.7
5.1.6
5.1.10
5.1.9
Insufficient pull
down time
Correct
5.1.6
Figure 3-1 &
Figure 3-2
4.7
5.1.6
Figure 3-1 &
Figure 3-2
5.1.11
4.7
4.7
Replace
Check operation
Check defrost
parameters
Replace
Replace
5.1.11
Check defrost
parameters
Replace
POSSIBLE CAUSES
INDICATION / TROUBLE
5.1.6
REFERENCE
SECTION
Abnormal pressure
5.1.6.1 Cooling
High discharge pressure
Low discharge pressure
High suction pressure
Low suction pressure
Suction and discharge pressures tend to
equalize when unit is operating
5.1.6.2 Heating
High discharge pressure
Low discharge pressure
Low suction pressure
5.1.7
Abnormal noise
Compressor
Condenser or evaporator fan
Condenser coil dirty
Non-condensibles or refrigerant overcharge
Compressor valves(s) worn or broken
Hot gas (two-way) solenoid malfunction
Compressor valves(s) worn or broken
Hot gas (two-way) solenoid malfunction
Suction service valve partially closed
Filter-drier partially plugged
Low refrigerant charge
Expansion valve malfunction
No evaporator air flow or restricted air
flow
Excessive frost on coil
Compressor valves defective
Hot gas (two-way) solenoid malfunction
4.12
Replace
Overcharged system
Condenser fan of HP2 pressure switch
defective
Non-condensibles in system
Condenser fan defective
4.6.3
4.9.2
Compressor valve(s) worn or broken
Hot Gas -two-way valve malfunction
Refrigerant shortage
Compressor pressure regulating valve
malfunction
Loose mounting bolts
Worn bearings
Worn or broken valves
Liquids lugging
Insufficient oil
Loose shroud
Bearings defective
Bent shaft
5.1.8
Cab command malfunction
Cab Command non-operational
Sensor defective
Microprocessor malfunction
Microprocessor/Cab command cable
5.1.9
No evaporator air flow or restricted air flow
Evaporator coil blocked
Frost on coil or dirty
Fan motor(s) malfunction
No or partial evaporator air flow
Evaporator fan loose or defective
Evaporator fan rotating backwards
Evaporator air flow blocked in box
Fan motor(s) malfunction
5-2
4.7
5.1.11
4.7
5.1.11
Open
4.8
4.6
5.1.10
5.1.9
Check
4.7
5.1.11
Check
Check
4.7
5.1.11
4.6
4.14
Tighten
4.7
4.7
5.1.10
Check / 4.7
Check
Check
Check
4.16
4.16
Change
Check
Check
Check
Check
Check
Check
62-61165-20 (12/03)
INDICATION / TROUBLE
POSSIBLE CAUSES
5.1.10 Expansion valve malfunction
Low suction pressure with high superheat Low refrigerant charge
External equalizer line plugged
Ice formation at valve seat
Wax, oil or dirt plugging valve or orifice
Broken capillary
Power assembly failure or partial
Loss of element/bulb charge
Superheat setting too high
Low superheat and liquids lugging in
Superheat setting too low
compressor
External equalizer line plugged
Pin and seat of expansion valve eroded
or held open by foreign material
Fluctuating suction pressure
Improper bulb location or installation
Low superheat setting
High superheat
Expansion valve setting
5.1.11
Malfunction hot gas (two-way) solenoid / expansion closure valve
Valve does not function properly
No power to valve
Improper wiring or loose connections
Valve improperly assembled
Coil or coil sleeve improperly assembled
Movement of plunger restricted due to:
a. Corroded or worn parts
b. Foreign material lodged in valve
c. Bent or dented enclosing tube
Valve shifts but refrigerant continues to
Foreign material lodged under seat
flow
Defective seat
5.2 STANDBY COMPRESSOR MALFUNCTION
Standby compressor fails to start
Motor contactor defective
Motor Overload open
Improper power supply
Malfunction displayed on Cab Command
5-minute timer on standby
Standby compressor starts, then stops
Motor Overload open
High amperage draw
5-3
REFERENCE
SECTION
4.4 / 4.6
Clean
4.5
4.15
4.15
Replace
Replace
4.15
4.15
Open
4.15
4.15
4.15
Adjust
Check
Check
4.13
4.13
4.13
4.13
4.13
Replace
Check/replace
motor
Check
Check/replace
motor
Check
SECTION 6
EXTRACT FROM MATERIAL SAFETY DATA BULLETIN
6.1
POE OIL
1. PRODUCT AND COMPANY IDENTIFICATION
CARRIER TRANSICOLD INDUSTRIES
810 route de Paris
76520 FRANQUEVILLE ST PIERRE
FRANCE
4. FIRST AID MEASURES
EYE CONTACT :
flush thoroughly with water. If irritation occurs, call a physician.
SKIN CONTACT :
wash contact areas with soap and water. High pressure accidental injection through the skin requires immediate medical attention for possible incision, irrigation and/or debridement.
INHALATION :
not expected to be a problem.
INGESTION :
not expected to be a problem. However, if greater than 1/2 liter (pint) ingested, seek medical attention.
5. FIRE-FIGHTING MEASURES
EXTINGUISHING MEDIA :
carbon dioxide, foam, dry chemical and water fog
SPECIAL FIRE FIGHTING PROCEDURES :
water or foam may cause frothing. Use water to keep fire exposed containers cool. Water spray may be used
to flush spills away from exposure. Prevent runoff from fire control or dilution from entering streams, sewers,
or drinking water supply.
SPECIAL PROTECTIVE EQUIPMENT :
for fires in enclosed areas, fire fighters must use self-contained breathing apparatus.
UNUSUAL FIRE AND EXPLOSION HAZARDS :
none. Flash point C (F) : 232 (450) (ASTM D–92). Flammable limits – LEL : NA, UEL: NA.
NFPA HAZARD ID :
health : 0,
flammability : 1,
reactivity : 0
HAZARDOUS DECOMPOSITION PRODUCTS :
carbon monoxide
6-1
62-61165-20 (12/03)
6. ACCIDENTAL RELEASE MEASURES
PROCEDURES IF MATERIAL IS RELEASED OR SPILLED :
small spills can be absorbed with fire retardant treated sawdust, diatomaceous earth, etc. Contain and remove
larger spills for salvage or disposal according to applicable regulation.
ENVIRONMENTAL PRECAUTIONS :
prevent spills from entering storm sewers or drains and contact with soil.
PERSONAL PRECAUTIONS :
see section 8.
7. HANDLING AND STORAGE
STORAGE :
do not store in open or unlabelled containers. Store away from strong oxidizing agents or combustible material.
8. EXPOSURE CONTROLS / PERSONAL PROTECTION
VENTILATION :
no special requirements under ordinary conditions of use and with adequate ventilation.
RESPIRATORY PROTECTION :
no special requirements under ordinary conditions of use and with adequate ventilation.
EYE PROTECTION :
normal industrial eye protection practices should be employed.
SKIN PROTECTION :
no special equipment required. However, good personal hygiene practices should always be followed.
10. STABILITY AND REACTIVITY
HAZARDOUS DECOMPOSITION PRODUCTS :
carbon monoxide (in case of fire)
13. DISPOSAL CONSIDERATIONS
WASTE DISPOSAL :
EVEN THOUGH THIS PRODUCT IS READILY BIODEGRADABLE, IT MUST NOT BE INDISCRIMINATELY
DISCARDED INTO THE ENVIRONMENT.
This product is suitable for burning in an enclosed, controlled burner for fuel value and for recycling at an approved facility. In addition, it can be disposed of at an approved waste disposal facility. Land farming and processing through sewage treatment facilities may be available disposal options but necessary approvals must first
be obtained from appropriate regulatory authorities. Specific characteristics of the waste at the time of disposal
may affect the availability of the above options.
The complete data sheets are available in English and French from Carrier Transicold Industries on
request.
6-2
6.2
FORANE R404A
1. PRODUCT AND COMPANY IDENTIFICATION
CARRIER TRANSICOLD INDUSTRIES
810 route de Paris
76520 FRANQUEVILLE ST PIERRE
FRANCE
Product name :
Forane (R) 404A
Product synonym(s)
Chemical family : hydrofluorocarbons
Chemical formula : CF3CH2F/CF3CH2F/CF3CH3
Chemical name : 1,1,1,2-tetrafluoroethane (HFC-134a)/Pentafluoroethane (HFC-125)/
1,1,1-trifluoroethane (HFC-143a).
2. COMPOSITION / INFORMATION ON INGREDIENTS
BLEND OF FORANE 125, 143a, 134a
This product is not hazardous to health as define by the European Union dangerous substances and preparations directives.
3. HAZARDS IDENTIFICATION
EMERGENCY OVERVIEW
Colorless liquified gas with faint ether odor.
WARNING
LIQUID AND GAS UNDER PRESSURE, OVERHEATING AND OVERPRESSURIZING MAY CAUSE GAS
RELEASE OF VIOLENT CYLINDER BURSTING. MAY DECOMPOSE ON CONTACT WITH FLAMES OR
EXTREMELY HOT METAL SURFACES TO PRODUCE TOXIC AND CORROSIVE PRODUCTS. VAPOR
REDUCES OXYGEN AVAILABLE FOR BREATHING AND IS HEAVIER THAN AIR. HARMFUL IF INHALED AND MAY CAUSE HEART IRREGULARITIES, UNCONSCIOUSNESS OR DEATH. LIQUID
CONTACT WITH EYES OR SKIN MAY CAUSE FROSTBITE.
POTENTIAL HEALTH, EFFECTS
Skin contact and inhalation are expected to be the primary routes of occupational exposure to this material.
As with most liquified gases, contact with the rapidly volatilizing liquid can cause frostbite to any tissue. High vapor
concentrations are irritating to the eyes and respiratory tract and may result in central nervous system (CNS)
effects such as headache, dizziness, drowsiness and, in severe exposure, loss of consciousness and death. The
dense vapor of this material may reduce the available oxygen for breathing. Prolonged exposure to an oxygendeficient atmosphere may be fatal. Inhalation may cause an increase in the sensitivity of the heart to adrenaline,
which could result in irregular or rapid heartbeats. Medical conditions aggravated by exposure to this material
include heart disease or compromised heart function.
6-3
62-61165-20 (12/03)
4. FIRST AID MEASURES
EYE CONTACT
immediatly flush with plenty of water. Get medical attention if irritation persists.
SKIN CONTACT
flush exposed skin with lukewarm water (not hot), or use other means to warm skin slowly. Get medical attention if frostbitten by liquid or if irritation occures.
INGESTION
not applicable. Product is a gas at ambient temperatures.
INHALATION
remove to fresh air. If not breathing, give artificial respiration. If breathing is difficult, give oxygen. Get medical
attention. DO NOT GIVE ADRENALINE, EPINEPHRIN OR SIMILAR DRUGS FOLLOWING EXPOSURE TO
THIS PRODUCT.
5. FIRE FIGHTING MEASURES
EXTINGUISHING MEDIA
use extinguishing media appropriate to surrounding fire conditions.
FIRE FIGHTING INSTRUCTIONS
stop the flow of gas if possible. Use water spray on person making shut-off and on containers and cylinders.
Fire fighters and others who may be exposed to products of combustion should wear full fire fighting turn out gear
(full Bunker Gear) and self-contained breathing apparatus. Fire fighting equipment should be thoroughly decontaminated after use.
FIRE AND EXPLOSION HAZARDS
some mixtures of HCFCs and / or HFCs, and air or oxygen may be combustible if pressurized and exposed
to extreme heat or flame.
6. ACCIDENTAL RELEASE MEASURES
IN CASE OF SPILL OR LEAK
use Halogen leak detector or other suitable means to locate leaks or check atmosphere. Keep upwind. Evacuate enclosed spaces and disperse gas with floor-level forced-air ventilation. Exhaust vapors outdoors. Do not
smoke or operate internal combustion engines. Remove flames and heating elements.
7. HANDLING AND STORAGE
HANDLING
avoid breathing gas. Avoid contact with eyes, skin and clothing. Keep container closed. Use only with adequate
ventilation. Do not enter confined spaces unless adequately ventilated.
STORAGE
do not apply direct flame to cylinder. Do not store cylinder in direct sun or expose it to heat above 48C (120F).
Do not drop or refill this cylinder. Keep away from heat, sparks and flames.
6-4
8. EXPOSURE CONTROLS / PERSONAL PROTECTION
EYE / FACE PROTECTION
where there is potential for eye contact, wear chemical gloggles and have eye flushing equipment available.
SKIN PROTECTION
wear appropriate chemical resistant protective clothing and chemical resistant gloves to prevent skin contact.
Consult glove manufacturer to determine appropriate type glove material for given application. Rinse contaminated skin promptly. Wash contaminated clothing and clean protective equipment before reuse. Wash skin thoroughly after handling.
RESPIRATORY PROTECTION
avoid breathing gas. When airborne exposure limits are exceeded, use respiratory protection equipment
appropriate to the material and / or its components (full facepiece recommended). For emergency and other conditions where exposure limit may be significantly exceeded, use an approved full face positive-pressure, self-contained breathing apparatus or positive-pressure airline with auxiliary self-contained air supply.
10. STABILITY AND REACTIVITY
INCOMPATIBILITY
avoid contact with strong alkali or alkaline earth metals, finely powdered metals such as aluminium, magnesium or zinc and strong oxidizers, since they may react or accelerate decomposition.
HAZARDOUS DECOMPOSITION PRODUCTS
thermal decomposition products include hydrogen fluoride, hydrogen chloride, carbon monoxide, carbon
dioxide and chlorine.
13. DISPOSAL CONSIDERATIONS
WASTE DISPOSAL
recover, reclaim or recycle when practical. Dispose of in accordance with federal, state and local regulations.
Note : chemical additions to, processing of, or otherwise altering this material may take this waste management information incomplete, inaccurate, or otherwise inappropriate. Furthermore, state and local waste disposal
requirements may be more restrictive or otherwise different from federal laws and regulations.
The complete data sheets are available in English and French from Carrier Transicold Industries on
request.
6-5
62-61165-20 (12/03)
SECTION 7
ELECTRICAL SCHEMATIC WIRING DIAGRAMS
This section contains Electrical Schematic Wiring Diagrams covering the Models listed in Table 2-1. The following general safety notices supplement the specific warnings and cautions appearing elsewhere in this manual.
They are recommended precautions that must be understood and applied during operation and maintenance of
the equipment covered herein.
Model
XARIOS 150/200: Road – 12V/24V
XARIOS 150/200: Road – 208/230/1/50Hz/60Hz
XARIOS 150/200: Road – 400/3/50Hz
XARIOS 300ry: Road/Standby – 230/1/50Hz
XARIOS 300ry: Road/Standby – 400/3/50Hz
XARIOS 350: Road version
XARIOS 350: Road/Standby – 230/400/3/50Hz/60Hz
XARIOS 350: Road/Standby – 230/1/50Hz
XARIOS 350: Road/Standby – 208-230/1/60Hz
XARIOS 400/500: Road version
XARIOS 400/500: Road version 230V without electrical heating
XARIOS 400/500: Road version 400V without electrical heating
XARIOS 400/500: Road/standby – 208/230/1/50Hz/60Hz
Drawing #
62-60920
62-60921
62-60922
62-61348
62-61349
62-60901
62-61345
62-61346
62-61347
62-60873
62-60856
62-60817
62-60827
WARNING
Beware of unannounced starting of the fans and V-belts caused by the thermostat and the
start/stop cycling of the unit.
CAUTION
Under no circumstances should anyone attempt to repair the Logic or Display Boards !
Should a problem develop with these components, contact your nearest Carrier Transicold
dealer for replacement.
CAUTION
Observe proper polarity when installing battery, negative terminal must be grounded. Reverse
polarity will destroy the rectifier diodes in alternator. As a precautionary measure, disconnect
positive battery terminal when charging battery in unit. Connecting charger in reverse will
destroy the rectifier diodes in alternator.
7-1
CAUTION
Under no circumstances should a technician electrically probe the processor at any point, other
than the connector terminals where the harness attaches. Microprocessor components operate
at different voltage levels and at extremely low current levels. Improper use of voltmeters,
jumper wires, continuity testers, etc. could permanently damage the processor.
CAUTION
Most electronic components are susceptible to damage caused by electrical static discharge
(ESD). In certain case, the human body can have enough static electricity to cause resultant
damage to the components by touch. This is especially true of the integrated circuits found on
the truck/trailer microprocessor.
7-2
62-61165-20 (12/03)
7-3
Figure 7-1 – XARIOS 150/200: Electrical schematic diagram – ROAD – 12V/24V
7-4
62-61165-20 (12/03)
Figure 7-2 – XARIOS 150/200: Electrical schematic diagram – ROAD – 230/1/50Hz – 208–230/1/60Hz
7-5
Figure 7-3 – XARIOS 150/200: Electrical schematic diagram –ROAD – 400/3/50Hz
7-6
62-61165-20 (12/03)
Figure 7-4 – XARIOS 300ry: Electrical schematic diagram – Road/Standby – 400/3/50Hz
7-7
Figure 7-5 – XARIOS 300ry: Electrical schematic diagram Road/Standby – 230/1/50Hz
7-8
62-61165-20 (12/03)
Figure 7-6 – XARIOS 350: Electrical schematic diagram Road version
7-9
Figure 7-7 – XARIOS 350: Electrical schematic diagram Road/Standby – 230/400/3/50Hz/60Hz
7-10
62-61165-20 (12/03)
Figure 7-8 – XARIOS 350: Electrical schematic diagram Road/Standby version – 230/1/50Hz
7-11
Figure 7-9 – XARIOS 350: Electrical schematic diagram Road/Standby – 208-230/1/60Hz
7-12
62-61165-20 (12/03)
Figure 7-10 – XARIOS 400/500: Electrical schematic diagram – Road version
7-13
Figure 7-11 – XARIOS 400/500: Electrical schematic diagram – Road version 230V without electrical heating
7-14
62-61165-20 (12/03)
Figure 7-12 – XARIOS 400/500: Electrical schematic diagram – Road version 400V without electrical heating
7-15
Figure 7-13 – XARIOS 400/500: Electrical schematic diagram – Road/standby – 208–230/1/50–60Hz