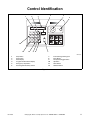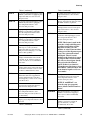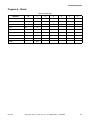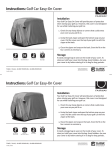
1
Pocket Hardmount Variable-Speed
PS40 Control
Refer to Page 9 for Model Identification
Programming
Washer-Extractors
RUN
PROG
1
2
3
4
5
6
7
8
9
PS40
0
PHM1398C
PHM1398C
Keep These Instructions for Future Reference.
(If this machine changes ownership, this manual must accompany machine.)
www.comlaundry.com
Part No. F8112301R1
December 2007
Table of
Contents
Safety Information..............................................................................
Explanation of Safety Messages...........................................................
Important Safety Instructions ...............................................................
Safety Decals ........................................................................................
Operator Safety.....................................................................................
Safe Operating Environment ................................................................
Environmental Conditions ...............................................................
Machine Location ............................................................................
Input and Output Services................................................................
DirectDrive ......................................................................................
Model Identification ............................................................................
3
3
3
5
6
6
6
7
7
8
9
Introduction.........................................................................................
Nameplate Location..............................................................................
Replacement Parts ................................................................................
Customer Service..................................................................................
10
10
10
10
Control Identification......................................................................... 11
Start-up................................................................................................
Setup (Pre-Program) Mode ..............................................................
Test Mode ........................................................................................
Test 1: Inputs....................................................................................
Test 2: Analog Reference.................................................................
Test 3: Not Available .......................................................................
Test 4: Water Level Control Test.....................................................
Test 5: Temperature Sensor Test .....................................................
Test 6: Test of Outputs.....................................................................
Test 7: Keyboard Test ......................................................................
Ram Reset ........................................................................................
12
12
16
16
17
17
17
17
18
18
18
Programming ......................................................................................
Overview Of Modes .............................................................................
Operating Mode ....................................................................................
Select and Run a Program................................................................
Program Progress Indicators ............................................................
Program Start Delay.........................................................................
Changing To Another Program........................................................
Temporary Program Alteration........................................................
Temperature and RPM Display .......................................................
Rapid Advance.................................................................................
Programmed Stop.............................................................................
Stopping a Program..........................................................................
Manually Adding Water ..................................................................
Manually Draining ...........................................................................
Manual Heating................................................................................
Manually Activating the Chemical Supply Signals .........................
Display Total Operating Hours ........................................................
Program Memory Inventory ............................................................
19
19
20
20
20
20
20
20
20
20
21
21
21
21
22
22
22
22
© Copyright 2007, Alliance Laundry Systems LLC
All rights reserved. No part of the contents of this book may be reproduced or transmitted in any form or by any
means without the expressed written consent of the publisher.
F8112301
© Copyright, Alliance Laundry Systems LLC – DO NOT COPY or TRANSMIT
1
2
Programming Mode ..............................................................................
Creating a Program ..........................................................................
Inserting/Deleting a Program Step...................................................
Copy Mode ...........................................................................................
PS40 Water Level Sensor Calibration Procedure ............................
PS40 Diagnostics ..................................................................................
Alarm Codes ....................................................................................
Fault Codes ......................................................................................
Programming Tips ................................................................................
22
22
27
28
28
29
29
29
30
Standard Programs ............................................................................
Program 0 – Rinse and Spin .................................................................
Program 1 – Cold Wash........................................................................
Program 2 – Warm Wash .....................................................................
Program 3 – Hot Wash .........................................................................
Program 4 – Perm Press........................................................................
Program 5 – Cold Gentle ......................................................................
Program 6 – Warm Gentle....................................................................
Program 7– Rubber Mats......................................................................
Program 8 – Soak..................................................................................
Program 9 – Starch ...............................................................................
Program Worksheet ..............................................................................
31
32
34
36
38
40
42
44
46
48
50
52
© Copyright, Alliance Laundry Systems LLC – DO NOT COPY or TRANSMIT
F8112301
Safety Information
Explanation of Safety Messages
Precautionary statements (“DANGER,” “WARNING,”
and “CAUTION”), followed by specific instructions,
are found in this manual and on machine decals. These
precautions are intended for the personal safety of the
operator, user, servicer, and those maintaining the
machine.
Important Safety Instructions
WARNING
To reduce the risk of fire, electric shock,
serious injury or death to persons when
using your washer, follow these basic
precautions:
W023
DANGER
1. Read all instructions before using the washer.
DANGER indicates the presence of a
hazard that will cause severe personal
injury, death, or substantial property
damage if the danger is ignored.
WARNING
WARNING indicates the presence of a
hazard that can cause severe personal
injury, death, or substantial property
damage if the warning is ignored.
CAUTION
CAUTION indicates the presence of a
hazard that will or can cause minor
personal injury or property damage if the
caution is ignored.
Additional precautionary statements (“IMPORTANT”
and “NOTE”) are followed by specific instructions.
IMPORTANT: The word “IMPORTANT” is used
to inform the reader of specific procedures where
minor machine damage will occur if the procedure
is not followed.
NOTE: The word “NOTE” is used to communicate
installation, operation, maintenance or servicing
information that is important but not hazard
related.
2. Refer to the GROUNDING INSTRUCTIONS in
the INSTALLATION manual for the proper
grounding of the washer.
3. Do not wash textiles that have been previously
cleaned in, washed in, soaked in, or spotted with
gasoline, kerosene, waxes, cooking oils, drycleaning solvents, or other flammable or
explosive substances as they give off vapors that
could ignite or explode.
4. Do not add gasoline, dry-cleaning solvents, or
other flammable or explosive substances to the
wash water. These substances give off vapors that
could ignite or explode.
5. Under certain conditions, hydrogen gas may be
produced in a hot water system that has not been
used for two weeks or more. HYDROGEN GAS
IS EXPLOSIVE. If the hot water system has not
been used for such a period, before using a
washing machine or combination washer-dryer,
turn on all hot water faucets and let the water
flow from each for several minutes. This will
release any accumulated hydrogen gas. The gas is
flammable, do not smoke or use an open flame
during this time.
6. Do not allow children to play on or in the washer.
Close supervision of children is necessary when
the washer is used near children. This is a safety
rule for all appliances.
7. Before the washer is removed from service or
discarded, remove the door to the washing
compartment.
8. Do not reach into the washer if the wash drum is
moving.
F8112301
© Copyright, Alliance Laundry Systems LLC – DO NOT COPY or TRANSMIT
3
Safety Information
9. Do not install or store the washer where it will be
exposed to water and/or weather.
10. Do not tamper with the controls.
11. Do not repair or replace any part of the washer, or
attempt any servicing unless specifically
recommended in the user-maintenance
instructions or in published user-repair
instructions that the user understands and has the
skills to carry out.
12. To reduce the risk of an electric shock or fire, DO
NOT use an extension cord or an adapter to
connect the washer to the electrical power source.
13. Use washer only for its intended purpose,
washing textiles.
14. Never wash machine parts or automotive parts in
the machine. This could result in serious damage
to the basket.
15. ALWAYS disconnect the washer from electrical
supply before attempting any service. Disconnect
the power cord by grasping the plug, not the cord.
16. Install the washer according to the
INSTALLATION INSTRUCTIONS. All
connections for water, drain, electrical power and
grounding must comply with local codes and be
made by licensed personnel when required.
17. To reduce the risk of fire, textiles which have
traces of any flammable substances such as
vegetable oil, cooking oil, machine oil,
flammable chemicals, thinner, etc., or anything
containing wax or chemicals such as in mops and
cleaning cloths, must not be put into the washer.
These flammable substances may cause the
fabric to catch on fire by itself.
18. Do not use fabric softeners or products to
eliminate static unless recommended by the
manufacturer of the fabric softener or product.
20. Be sure water connections have a shut-off valve
and that fill hose connections are tight. CLOSE
the shut-off valves at the end of each wash day.
21. Loading door MUST BE CLOSED any time the
washer is to fill, tumble or spin. DO NOT bypass
the loading door switch by permitting the washer
to operate with the loading door open.
22. Always read and follow manufacturer’s
instructions on packages of laundry and cleaning
aids. Heed all warnings or precautions. To reduce
the risk of poisoning or chemical burns, keep
them out of the reach of children at all times
(preferably in a locked cabinet).
23. Always follow the fabric care instructions
supplied by the textile manufacturer.
24. Never operate the washer with any guards and/or
panels removed.
25. DO NOT operate the washer with missing or
broken parts.
26. DO NOT bypass any safety devices.
27. Failure to install, maintain, and/or operate this
washer according to the manufacturer’s
instructions may result in conditions which can
produce bodily injury and/or property damage.
NOTE: The WARNINGS and IMPORTANT
SAFETY INSTRUCTIONS appearing in this
manual are not meant to cover all possible
conditions and situations that may occur. Common
sense, caution and care must be exercised when
installing, maintaining, or operating the washer.
Any problems or conditions not understood should be
reported to the dealer, distributor, service agent or the
manufacturer.
19. Keep washer in good condition. Bumping or
dropping the washer can damage safety features.
If this occurs, have washer checked by a qualified
service person.
4
© Copyright, Alliance Laundry Systems LLC – DO NOT COPY or TRANSMIT
F8112301
Safety Information
WARNING
CAUTION
This machine must be installed, adjusted,
and serviced by qualified electrical
maintenance personnel familiar with the
construction and operation of this type of
machinery. They must also be familiar
with the potential hazards involved.
Failure to observe this warning may result
in personal injury and/or equipment
damage, and may void the warranty.
SW004
IMPORTANT: Ensure that the recommended
clearances for inspection and maintenance are
provided. Never allow the inspection and
maintenance space to be blocked.
Be careful around the open door,
particularly when loading from a level
below the door. Impact with door edges
can cause personal injury.
SW025
WARNING
Never touch internal or external steam
pipes, connections, or components.
These surfaces can be extremely hot and
will cause severe burns. The steam must
be turned off and the pipe, connections,
and components allowed to cool before
the pipe can be touched.
SW014
CAUTION
Install the machine on a level floor of
sufficient strength. Failure to do so may
result in conditions which can produce
serious injury, death and/or property
damage.
W703
Safety Decals
Safety decals appear at crucial locations on the
machine. Failure to maintain legible safety decals
could result in injury to the operator or service
technician.
To provide personal safety and keep the machine in
proper working order, follow all maintenance and
safety procedures presented in this manual. If
questions regarding safety arise, contact the
manufacturer immediately.
Use manufacturer–authorized spare parts to avoid
safety hazards.
F8112301
© Copyright, Alliance Laundry Systems LLC – DO NOT COPY or TRANSMIT
5
Safety Information
Operator Safety
Safe Operating Environment
WARNING
NEVER insert hands or objects into
basket until it has completely stopped.
Doing so could result in serious injury.
SW012
To ensure the safety of machine operators, the
following maintenance checks must be performed
daily:
Safe operation requires an appropriate operating
environment for both the operator and the machine. If
questions regarding safety arise, contact the
manufacturer immediately.
Environmental Conditions
●
Temperatures above 120°F (50°C) will result in
more frequent motor overheating and, in some
cases, malfunction or premature damage to solid
state devices that are used in some models.
Special cooling devices may be necessary.
1. Prior to operating machine, verify that all
warning signs are present and legible. Missing or
illegible signs must be replaced immediately.
Make certain that spares are available.
Water pressure switches are affected by increases
and decreases in temperature. Every 25°F (10°C)
change in temperature will have a 1% effect on
the water level.
2. Check door interlock before starting operation of
machine:
a. Attempt to start machine with door open.
Machine should not start with door open.
●
b. Close door without locking it and attempt to
start machine. Machine should not start with
door unlocked.
c. Close and lock door and start a cycle. Attempt
to open door while cycle is in progress. Door
should not open.
●
Ventilation. The need for make-up air openings
for such laundry room accessories as dryers,
ironers, water heaters, etc., must be evaluated
periodically. Louvers, screens or other separating
devices may reduce available air opening
significantly.
●
Radio Frequency Emissions. A filter is available
for machines in installations where floor space is
shared with equipment sensitive to radio
frequency emissions.
●
Elevation. If machine is to be operated at
elevations of over 3280 feet (1000 m) above sea
level, pay special attention to water levels and
electronic settings (particularly temperature) or
desired results may not be achieved.
●
Chemicals. Keep stainless steel surfaces free of
chemical residues.
a. Door does not remain securely locked during
entire cycle.
b. Excessively high water level is evident.
c. Machine is not connected to a properly
grounded circuit.
Do not bypass any safety devices in machine.
WARNING
Never operate the machine with a
bypassed or disconnected balance
system. Operating the machine with
severe out-of-balance loads could result
in personal injury and serious equipment
damage.
Humidity. Relative humidity above 90% may
cause machine’s electronics or motors to
malfunction or may trip ground fault interrupter.
Corrosion problems may occur on some metal
components in machine.
If relative humidity is below 30%, belts and
rubber hoses may eventually develop dry rot.
This condition can result in hose leaks, which
may cause safety hazards external to machine in
conjunction with adjacent electrical equipment.
If door lock and interlock are not functioning
properly, call a service technician.
3. Do not attempt to operate machine if any of the
following conditions are present:
Ambient Temperature. Water in machine will
freeze at temperatures of 32°F (0°C) or below.
SW039
6
© Copyright, Alliance Laundry Systems LLC – DO NOT COPY or TRANSMIT
F8112301
Safety Information
Input and Output Services
DANGER
Do not place volatile or flammable fluids
in any machine. Do not clean the machine
with volatile or flammable fluids such as
acetone, lacquer thinners, enamel
reducers, carbon tetrachloride, gasoline,
benzene, naptha, etc. Doing so could
result in serious personal injury and/or
damage to the machine.
SW002
●
●
Water Pressure. Best performance will be
realized if water is provided at a pressure of 30 –
85 psi (2 – 5.7 bar). Although machine will
function properly at lower pressure, increased fill
times will occur. Water pressure higher than 100
psi (6.7 bar) may result in damage to machine
plumbing. Component failure(s) and personal
injury could result.
●
Steam Heat (Optional) Pressure. Best
performance will be realized if steam is provided
at a pressure of 30 – 80 psi (2 – 5.4 bar). Steam
pressure higher than 125 psi (8.5 bar) may result
in damage to steam components and may cause
personal injury.
Water Damage. Do not spray machine with
water. Short circuiting and serious damage may
result. Repair immediately all seepage due to
worn or damaged gaskets, etc.
For machines equipped with optional steam heat,
install piping in accordance with approved
commercial steam practices. Failure to install
supplied steam filter may void warranty.
Machine Location
●
●
Foundation. The concrete floor must be of
sufficient strength and thickness to handle floor
loads generated by high extract speeds of
machine.
●
Drainage System. Provide drain lines or troughs
large enough to accommodate total number of
gallons that could be released if all machines on
site drained at same time from highest attainable
level. If troughs are used, they should be covered
to support light foot traffic.
●
Power. For personal safety and for proper
operation, machine must be grounded in
accordance with state and local codes. Ground
connection must be to a proven earth ground, not
to conduit or water pipes. Do not use fuses in
place of circuit breaker. An easy-access cutoff
switch should also be provided.
Service/Maintenance Space. Provide sufficient
space to allow comfortable performance of
service procedures and routine preventive
maintenance.
Consult installation instructions for specific details.
CAUTION
Replace all panels that are removed to
perform service and maintenance
procedures. Do not operate the machine
with missing guards or with broken or
missing parts. Do not bypass any safety
devices.
SW019
WARNING
Ensure that a ground wire from a proven
earth ground is connected to the ground
lug near the input power block on this
machine. Without proper grounding,
personal injury from electric shock could
occur and machine malfunctions may be
evident.
SW008
Always disconnect power and water supplies before a
service technician performs any service procedure.
Where applicable, steam and/or compressed air
supplies should also be disconnected before service is
performed.
F8112301
© Copyright, Alliance Laundry Systems LLC – DO NOT COPY or TRANSMIT
7
Safety Information
DirectDrive
Machines equipped with DirectDrive require special
attention with regard to operating environment.
●
An especially dusty or linty environment will
require more frequent cleaning of AC inverter
drive cooling fan filter and of AC inverter drive
itself.
●
Power line fluctuations from sources such as
uninterruptible power supplies (UPS) can
adversely affect machines equipped with AC
inverter drive. Proper suppression devices should
be utilized on incoming power to machine to
avoid problems.
●
A clean power supply free from voltage spikes
and surges is absolutely essential for machines
equipped with AC inverter drive. Inconsistencies
(peaks and valleys) in power supply can cause
AC inverter drive to generate nuisance errors.
If voltage is above 230 Volt for 200 Volt
installation or 460 Volt for 400 Volt installation,
ask power company to correct. As an alternative,
a step-down transformer kit is available from
distributor. If voltage is above 240 Volt for 200
Volt installation or 480 Volt for 400 Volt
installations, a buckboost transformer is required.
●
8
Sufficient space to perform service procedures
and routine preventive maintenance is especially
important for machines equipped with AC
inverter drive.
© Copyright, Alliance Laundry Systems LLC – DO NOT COPY or TRANSMIT
F8112301
Safety Information
Model Identification
Information in this manual is applicable to these
models:
Medium Speed
High Speed
40
Pound
CP040PMN1
CP040PMQ1
CP040PMX1
CPC40M
IP040PMN1
IP040PMQ1
IP040PMX1
IPH40M
IPH180
CP040PHN1
CP040PHQ1
CP040PHX1
CPC40H
IP040PHN1
IP040PHQ1
IP040PHX1
IPH40H
JP040PHN1
JP040PHQ1
60
Pound
CP060PMN1
CP060PMQ1
CP060PMX1
CPC60M
IP060PMN1
IP060PMQ1
IP060PMX1
IPH60M
IPH270
JP060PMQ1
CP060PHN1
CP060PHQ1
CP060PHX1
CPC60H
IP060PHN1
IP060PHQ1
IP060PHX1
IPH60H
JP060PHN1
JP060PHQ1
80
Pound
CP080PMN1
CP080PMQ1
CPC80M
IP080PMN1
IP080PMQ1
IPH80M
IPH370
CP080PHN1
CP080PHQ1
CPC80H
IP080PHN1
IP080PHQ1
IPH80H
JP080PHN1
JP080PHQ1
100
Pound
CP100PMN1
CP100PMQ1
CPC100M
IP100PMN1
IP100PMQ1
IPH100M
IPH460
JP100PMQ1
CP100PHN1
CP100PHQ1
CPC100H
IP100PHN1
IP100PHQ1
IPH100H
JP100PHN1
JP100PHQ1
CP125PHN1
CP125PHQ1
CPC125H
IP125PHN1
IP125PHQ1
IPH125H
IPH570
JP125PHN1
CP140PHN1
CP140PHQ1
CPC140H
IP140PHN1
IP140PHQ1
IPH140H
JP140PHN1
JP140PHQ1
CP175PHN1
CPC175H
IP175PHN1
IPH175H
IPH790
125
Pound
140
Pound
Not Applicable
IP140PMQ1
IPH140M
IPH640
JP140PMQ1
CP140PMN1
CP140PMQ1
CPC140M
IP140PMN1
175
Pound
Not Applicable
Model Number Familiarization Guide
Sample Model Number: IP060PMQ1
I
Model Number Prefix Brand
P
Product Family; P=IPH
060
Washer-Extractor Capacity
(pounds dry weight of laundry)
P
Type of Control; P=PS40
M
Spin Speed; M=Medium
Q
Electrical Voltage; Q=200-208/220-240 Volt/50 or 60 Hertz/3 Phase
F8112301
© Copyright, Alliance Laundry Systems LLC – DO NOT COPY or TRANSMIT
9
Introduction
This manual is designed as a guide for the installation
of a washer-extractor equipped with DirectDrive.
NOTE: All information, illustrations and
specifications contained in this manual are based
on the latest product information available at the
time of printing. We reserve the right to make
changes at any time without notice.
Nameplate Location
The nameplate is located inside the door and on the
upper rear panel. Always provide the machine’s serial
number and model number when ordering parts or
when seeking technical assistance. Refer to Figure 1.
2
1
Replacement Parts
If literature or replacement parts are required, contact
the source from which the washer-extractor was
purchased or contact Alliance Laundry Systems LLC
at (920) 748-3950 for the name of the nearest
authorized parts distributor. A parts manual may be
ordered by returning the reply card provided with each
washer-extractor.
Customer Service
For technical assistance, contact your local distributor
or call:
(920) 748-3121
Ripon, Wisconsin
A record of each washer-extractor is on file with the
manufacturer. Always provide the machine’s serial
number and model number when ordering parts or
when seeking technical assistance. Refer to Figure 1.
PHM1397C
PHM1397N
1
2
Inside Door
On Upper Rear Panel
Figure 1
10
© Copyright, Alliance Laundry Systems LLC – DO NOT COPY or TRANSMIT
F8112301
Control Identification
2
1
4
3
5
6
RUN
PROG
1
2
3
4
5
6
7
8
9
PS40
0
12
PHM1398C
11
10
9
8
7
PHM1398C
1
2
3
4
5
6
Stop Button
Start Button
Main Display
Program Number/Alarm Display
Emergency Stop Button
Run/Program Mode Key Switch
7
8
9
10
11
12
Infra-Red Programming Port
Enter Button
Temperature/Toggle Button
Up Button
Down Button
Number Buttons
Figure 2
F8112301
© Copyright, Alliance Laundry Systems LLC – DO NOT COPY or TRANSMIT
11
Start-up
No equipment installation is complete until
guidelines for startup listed herein have been
followed.
1. Check incoming AC voltage at circuit breaker for
machine manufacturer’s recommended voltage.
2. Activate auto grease cartridges. If they have
previously been activated, replace them. Inspect
all lubricating hoses for air bubbles (if
applicable).
3. Turn on circuit breaker to machine.
4. Check AC voltage on washer-extractor incoming
power terminal strip.
Setup (Pre-Program) Mode
In order to access setup (pre-program) mode, insure
that “StArt” is on display, turn programming key to
“Program” and quickly press enter “619” on the
keypad (all four buttons must be pressed quickly). If
“Prog 19” appears, keys were not pressed quickly
enough. Press stop button to abort and repeat process.
If “ProGrAM” appears, you are in setup (pre-program)
mode. Press enter button and “PrE” will appear on
display.
NOTE: Use temperature key to alter/toggle
selection. Use stop button to back up one selection
at a time.
5. Turn on water supplies to washer-extractor.
PrE
Setup (pre-program) mode. Press enter.
HF
7. Inspect drive belts and pulleys for adjustment and
proper alignment.
Cannot be altered with the keypad. Press
enter.
FC
8. Turn on electrical power at emergency stop
button of washer-extractor.
Cannot be altered with the keypad. Press
enter.
Coin
Does not apply. Always select “no Coin”.
Press enter.
LECo
Level control. Do you want the ability to
make the program stop until a water level is
achieved? Press temperature button to alter
your selection. Press enter.
6. Check water inlet fill hoses and water inlet valves
for leaks.
9. Pre-program/configure/commission
microprocessor following instructions in Setup
(Pre-Program) Mode section.
10. After checking all outputs, perform tests listed in
Test Mode section.
11. Run a factory program through to its completion
with a load. Look, watch and listen. Investigate
any leaks, noises or shaking of machine
completely.
NOTE: Level control will add time to
the total program time.
le.pct
Do you want to select the water levels by
percentage of cylinder volume? Select “no
le.pct” if you want to set the water level in
centimeters. Press temperature button to
alter your selection. Press enter.
SE.i
Cannot be altered. Proceed to water inlet
valve selection. Select all inlet valves that
are equipped with machine, if desired.
Press enter.
Table 1 (continued)
12
© Copyright, Alliance Laundry Systems LLC – DO NOT COPY or TRANSMIT
F8112301
Start-up
Table 1 (continued)
Table 1 (continued)
NOTE: Not all machines have five soap
components. Refer to the 12th digit in the model
number. If it is a 5 or 6, there are 5 soap
compartments.
FL d 00
Input the number of seconds delay before
i9 opens (15 seconds recommended).
Press enter.
NOTE: During each chemical
injection the flush valve (i9) will
turn on to flush chemicals. Each
time a chemical injection is called
for, the PS40 will wait for time
programmed in “FL d” and then
flush chemical drippage for time
programmed in “FL t”.
i1
Powdered supply compartment number
1. Press temperature button to alter
selection, then press enter.
i2
Powdered supply compartment number
2. Press temperature button to alter
selection, then press enter.
i3
Powdered supply compartment number
3. Press temperature button to alter
selection, then press enter.
no ir1
Optional water reuse valve number 1.
Press temperature button to alter
selection, then press enter.
i4
Powdered supply compartment number
4. Press temperature button to alter
selection, then press enter.
no ir2
Optional water reuse valve number 2.
Press temperature button to alter
selection, then press enter.
i5
Powdered supply compartment number
5. Press temperature button to alter
selection, then press enter.
no ir3
Optional water reuse valve number 3.
Press temperature button to alter
selection, then press enter.
i6
Not used on this model. Press enter.
no rP
iCold
Main cold water inlet fill valve. Press
temperature button to alter selection,
then press enter.
Optional water recirculating pump. Press
temperature button to alter selection,
then press enter.
d1
Main hot water inlet fill valve. Press
temperature button to alter selection,
then press enter.
Drain valve number 1 (standard
equipment). Press temperature button to
alter selection, then press enter.
no d2
Optional drain valve number 2. Press
temperature button to alter selection,
then press enter.
no rd1
Optional water reuse drain valve
number 1. Press temperature button to
alter selection, then press enter.
no rd2
Optional water reuse drain valve
number 2. Press temperature button to
alter selection, then press enter.
iHot
i9
i9 FluSH
Liquid supply flush valve, activates for a
brief period after a predetermined time
upon liquid supply injection signal or to
be used as an additional cold water inlet
valve. Press temperature button to alter
selection, then press enter.
Select between liquid supply flush valve
or additional cold water inlet (i9 Hard).
Press temperature button to alter
selection, then press enter.
Table 1 (continued)
NOTE: If “i9 Hard” was selected,
“no ir1” will be displayed. If
“i9 FluSH” was selected, “FL t 00”
will be displayed.
FL t 00
Input the number of seconds that you
wish i9 to open after each chemical
injection (15 seconds recommended).
Press enter.
Table 1 (continued)
F8112301
© Copyright, Alliance Laundry Systems LLC – DO NOT COPY or TRANSMIT
13
Start-up
Table 1 (continued)
Table 1 (continued)
HEAtSYS
Cannot be altered. Press enter. All
machines are capable of taking
advantage of the built in “Temperature
Controlled Water Fill” feature of the
PS40. This mixes hot and cold water to
best achieve programmed temperature.
Machines with supplemental steam or
electric heating can also utilize this
feature. Press enter.
NOTE: If no hot water inlet valves
were selected earlier in
preprogramming or configuration
process, computer will default to
“HEAt” setting and “HEAtSYS”
will not be displayed.
HEAt
HEAt-Nod
Water inlet and supplemental heating
without using “Temperature Controlled
Water Fill” feature. Press temperature to
alter selection, then press enter.
Water inlet and supplemental heating
using “Temperature Controlled Water
Fill” feature. Press temperature button to
alter selection, then press enter.
Nod
Water inlet only using “Temperature
Controlled Water Fill” feature. Press
temperature button to alter selection,
then press enter.
HECo
If “HEAt” or “HEAt-Nod” were chosen,
utilize this feature to make program time
pause until programmed temperature is
achieved. Press temperature button to
alter selection, then press enter.
GEntlE
If “HEAt” or “HEAt-Nod” were chosen,
utilize this feature to make machine run
in “Gentle Action” (agitate 3 seconds,
pause for 12 seconds) until programmed
temperature is achieved. This will
decrease amount of time required to heat
water to programmed temperature. Press
temperature button to alter selection,
then press enter.
NOTE: If “Nod” was selected,
“HECo” and “GentlE” will not be
displayed.
t *C
To change temperature displayed as
Celsius or Fahrenheit, press temperature
button to alter selection, then press enter.
Table 1 (continued)
14
SoAP
To program liquid supply outputs, press
temperature button to alter your
selection, then press enter.
NOTE: If “noSoAP” was selected,
all soap options will be bypassed
and “Add” option will be
displayed.
SoAP. 1
To program liquid supply output
number 1, press temperature button to
alter selection, then press enter.
SoAP. 2
To program liquid supply output
number 2, press temperature button to
alter selection, then press enter.
SoAP. 3
To program liquid supply output
number 3, press temperature button to
alter selection, then press enter.
SoAP. 4
To program liquid supply output
number 4, press temperature button to
alter selection, then press enter.
SoAP. 5
To program liquid supply output
number 5, press temperature button to
alter selection, then press enter.
SoAP. 6
To program liquid supply output
number 6, press temperature button to
alter selection, then press enter.
no.5iGnAL
NOTE: Soap 7-12 not available in
all models. Refer to position 12 in
model number. A 2, 6 or 12
indicates 12 signals
To assign liquid supply output number 6
to activate an external signaling device
rather than using it for a liquid supply
output, press temperature button to alter
selection, then press enter.
NOTE: Choosing this signal will
put the signal at the end of the step
it is programmed in.
SoAP. 7
To program optional liquid supply output
number 7 (if machine is equipped), press
temperature button to alter selection,
then press enter.
SoAP. 8
To program optional liquid supply output
number 8 (if machine is equipped), press
temperature button to alter selection,
then press enter.
Table 1 (continued)
© Copyright, Alliance Laundry Systems LLC – DO NOT COPY or TRANSMIT
F8112301
Start-up
Table 1 (continued)
SoAP. 9
To program optional liquid supply output
number 9 (if machine is equipped), press
temperature button to alter selection,
then press enter.
SoAP. 10
To program optional liquid supply output
number 10 (if machine is equipped),
press temperature button to alter
selection, then press enter.
SoAP. 11
SoAP. 12
To program optional liquid supply output
number 11 (if machine is equipped),
press the temperature button to alter
selection, then press enter.
ACCL
To enable rapid advance feature, press
temperature button to alter selection,
then press enter.
EnEr
Enables stop button. Press temperature
button to alter selection, then press enter.
“No EnEr” disables stop button.
ALArn
To be able to view various alarm codes
on display in the event of a fault, press
temperature button to alter selection,
then press enter.
no.tiHoLd
To use timer hold feature for use in
conjunction with liquid supply system,
press temperature button to alter
selection, then press enter.
To program optional liquid supply output
number 12 (if machine is equipped),
press temperature button to alter
selection, then press enter.
Add
Allows one to program a cool down, a
timer stop or a soak cycle. Press
temperature button to alter selection,
then press enter. Changing to “no Add”
removes this capability.
iSt.Lt.00
Input number of times machine should
attempt an intermediate extract in the
event that an out of balance situation
occurs. A value of 5 is recommended.
Press enter.
ESt.Lt.00
Input number of times machine should
attempt a final extract in the event that an
out of balance situation occurs. A value
of 10 is recommended. Press enter.
HYSt 0
Input number of degrees temperature
differential desired for supplemental
heating and temperature controlled
water. Typically, a value of 5°C / 9°F is
used. Press enter.
bu
To have a buzzer sound at end of
program, press temperature button to
alter selection, then press enter.
SP GF
To program speed in RPM or G Force,
press temperature button to alter
selection, then press enter (G Force is
recommended).
t
Table 1 (continued)
To be able to view temperature on
display, press temperature button to alter
selection.
Table 1 (continued)
NOTE: This feature is used in the
event that a single solid dispenser
is feeding two machines and the
dispenser can only serve one
machine at a time. If one machine
is being served, the dispenser opens
a busy relay connected to timer
hold inputs. Then, if second
machine needs chemicals, it pauses
its program timer and waits until
busy relay is cleared (goes closed)
then proceeds with chemical
signals. If there is no chemical
system that uses this feature, select
“no.t.iHoLd”. Otherwise there will
be no chemical signals at all, even
in test mode!
dEFAuL
To use preset default values when
programming water levels and speed.
Press temperature button to alter
selection, then press enter.
NOTE: If “no.dEFAuL” was
selected, setup (pre-program)
process is done and will return to
“StArt”.
AG.An00.0
Input default number of seconds for
cylinder to rotate before stopping to
reverse (12 seconds recommended).
Press enter.
AG.Sn00.0
Input default number of seconds for
cylinder to stop before rotating in
opposite direction (3 seconds
recommended). Press enter.
Table 1 (continued)
F8112301
© Copyright, Alliance Laundry Systems LLC – DO NOT COPY or TRANSMIT
15
Start-up
Table 1 (continued)
dWASh. 00
Input default wash speed (in RPM)
desired or press enter to select 0.8 G
optimal wash speed for machine. Press
enter.
LE.LoP0.00
Input default low water level desired in
percentage or centimeters, depending on
selection earlier in setup (pre-program)
process (15% recommended). Press
enter.
LE.NEP0.00
LE.HiP0.00
SP.LoG.000
SP.NEG.000
SP.HiG.000
Input default medium water level
desired in percentage or centimeters,
depending on selection earlier in setup
(pre-program) process (20%
recommended). Press enter.
Input default high water level desired in
percentage or centimeters, depending on
selection earlier in setup (pre-program)
process (25% recommended). Press
enter.
In order to access “Test Mode”, insure that “StArt” is
on display, turn programming key to “Program” and
very quickly press enter “217” on keypad. If “Prog 17”
appears, keys were not pressed quickly enough. Press
stop button to abort and repeat process. If “tESt”
appears on display you are in “Test Mode”. Once
“tESt” appears on display, select test to perform and
enter that number.
NOTE: If programming key is not turned to
“Program” when this is attempted, “A0” will flash
on display.
Test 1: Inputs
With “test” on the display, press 1 on keypad.
This test can be used to check all inputs to PS40
control.
inP.tHEr.o
Motor overload protector
Input default low extract speed desired in
RPM or G force, depending on selection
earlier in setup (pre-program) process.
Press enter.
inP.hEY.o
Programming switch
inP.door.c
Door lock switch S1
Input default medium extract speed
desired in RPM or G force, depending on
selection earlier in setup (pre-program)
process. Press enter.
inP.tiLt.o
Vibration switch
inP.Coi1.o
Inverter balance signal
Input default high extract speed desired
in RPM or G force, depending on
selection earlier in setup (pre-program)
process. Press enter.
inP.Coi2.o
Timer hold
Table 1
NOTE: Preprogramming or configuration process
is now completed. The display will now return to
“StArt”.
Use test 6 to check outputs. Follow test procedures
below. Watch for leaks from inlet valves, hoses and
soapbox.
16
Test Mode
inP.LoCh.o Door lock switch S2
inP.SEnS.o Proximity sensor
Table 2
Display will indicate whether input contacts are open
or closed using last character on right (o for open, c for
closed). Pressing enter advances to next input. Press
temperature button to go back to previous.
Example: “inP.tHEr.o” means motor overload
protector is open. “inP.tHEr.c” means motor overload
protector is closed. Also, activating or deactivating the
input will change open and closed state to verify
component operation.
© Copyright, Alliance Laundry Systems LLC – DO NOT COPY or TRANSMIT
F8112301
Start-up
Test 2: Analog Reference
Test 4: Water Level Control Test
With “test” on the display, press 2 on the keypad.
With “test” on the display, press 4 on the keypad.
Tests analog reference output voltage in comparison to
cylinder speed.
Immediately after selecting “Test 4”, display will show
current water level in machine.
NOTE: Because PS40 control does not try to
compensate for speed in this mode, running RPM
will not necessarily match commanded RPM – this
is normal.
Press green start button and drain will close and
machine will begin taking in water. Water will
continue to fill until small red stop button is pressed.
Display will indicate water level as it increases. This
will be quite useful in order to select water level
settings for programming.
After selecting Test 2, display will show P000u0.00
Press enter.
Door will now lock. Press enter.
Example: “t4.LEV 00.0” indicates test 4 water level
00.0%.
The cylinder will rotate to the left in wash speed and
the RPM and analog output will be displayed: such as
LO46u.39 (numbers on left indicate running RPM,
numbers on right indicate analog voltage). Press Enter.
Press stop again to leave this test.
Display will show P000u0.00. Press enter.
Test 5: Temperature Sensor Test
Cylinder will rotate to right in wash speed and RPM
and analog output will be displayed: such as
r046u0.39. Press enter.
With “test” on the display, press 5 on keypad.
Cylinder will rotate in distribution speed and RPM and
analog output will be displayed: such as d046u0.39.
When drive SpartSpin signal turns on, “bs” will be
displayed. Press enter.
Refer to PS40 Water Level Sensor Calibration
Procedure section for more information.
Immediately after selecting “Test 5”, PS40 control will
display current temperature in machine. Press stop
button to end this test.
Example: “t5. 00.0” indicates test 5 temperature is
00.0 degrees.
Cylinder will rotate low extract speed and RPM and
analog output will be displayed: such as L335u03.40.
Press enter.
Cylinder will rotate to right in high speed extract and
RPM and analog output will be displayed: such as
H715u7.20. Press stop.
Cylinder will slow to a stop and door will unlock.
Press stop.
Test 3: Not Available
Proceed to Test 4.
F8112301
© Copyright, Alliance Laundry Systems LLC – DO NOT COPY or TRANSMIT
17
Start-up
Test 6: Test of Outputs
Table 3 (continued)
With “test” on the display, press 6 on the keypad.
out.So.4.0
Liquid supply number 4 output is open.
To go to next output, press enter.
out.So.5.0
Liquid supply number 5 output is open.
To go back to previous output, press temperature
button.
out.So.6.0
Liquid supply number 6 output is open.
out.So.7.0
Liquid supply number 7 output is open.
out.So.8.0
Liquid supply number 8 output is open.
out.So.9.0
Liquid supply number 9 output is open.
outSo.10.0
Liquid supply number 10 output is open.
outSo.11.0
Liquid supply number 11 output is open.
outSo.12.0
Liquid supply number 12 output is open.
outDrA.1.0
Drain valve number 1 output is open.
outDrA.2.0
Drain valve number 2 output is open.
Pressing “1” turns on selected output.
Pressing “0” turns off selected output.
Press stop button to end this test.
Example: “out.dooR.o” indicates this output is turned
off (door can be opened). “out.dooR.c” indicates this
output is turned on (door is locked).
List of outputs
out.door.0
Door lock output is open.
out. rd1.0
Reuse drain 1 output is open.
out. rd2.0
Reuse drain 2 output is open.
out. rP.0
Recirculation pump output is open.
out. ir3.0
Reuse water inlet valve number 3 output is
open.
out. ir2.0
Reuse water inlet valve number 2 output is
open.
out.HEAt.0
Supplemental heating system output is
open.
out. ir1.0
Reuse water inlet valve number 1 output is
open.
out.iFLu.0
Flush valve i9 output is open.
out. Hot.0
Hot water inlet valve output is open.
Example: Change of chemical suppliers, where
deletion and reprogramming of all programs is
required, or corrupted memory.
out. Col.0
Cold water inlet valve number output is
open.
While “Test” is on display, press “0”. “CodE” will
now be shown on display. Very quickly, press “753”.
out. i.6.0
Inlet valve number i6 output is open.
out. i.5.0
Inlet valve number i5 output is open.
Wait a few seconds for display to change, then cycle
power to machine.
out. i.4.0
Inlet valve number i4 output is open.
out. i.3.0
Inlet valve number i3 output is open.
out. i.2.0
Inlet valve number i2 output is open.
out. i.1.0
Inlet valve number i1 output is open.
out.So.1.0
Liquid supply number 1 output is open.
out.So.2.0
Liquid supply number 2 output is open.
out.So.3.0
Liquid supply number 3 output is open.
Table 3
Test 7: Keyboard Test
With “test” on the display, press 7 on the keypad.
Immediately after selecting this test “t8. - - “ will
appear on display. The corresponding display for each
key pressed on keypad should be shown on display. To
end this test, press small red stop button.
Ram Reset
Should it be necessary to erase all programming from
PS40’s memory, use this procedure.
Everything from memory has been erased and
machine must be setup (pre-programmed) prior to
operation.
Table 3 (continued)
18
© Copyright, Alliance Laundry Systems LLC – DO NOT COPY or TRANSMIT
F8112301
Programming
Overview Of Modes
Copy Mode
Self Test Mode
This function is used in order to copy entire programs
and assign them new program numbers. This feature
saves a lot of time and effort when creating similar
programs with few changes. In order to access copy
mode, insure that “StArt” is on display and turn
programming key to “Program”. Very quickly press
“enter 328” on keypad. If “Prog 08” appears, keys
were not pressed quickly enough. Press stop to abort
and start over. If “CoPY PrG” appears on display, you
are in copy mode. Refer to Copy Mode section.
When machine is powered up, the computer will
proceed through a self-test and will show “ProM.3.10”
and then “Good.3.10” temporarily on display. The last
three digits of each indicate software version. Then
“dAtA.XXXX” appears temporarily. This number will
change each time a program is installed or modified. If
all is good, display will then change to “StArt”
indicating that machine is in operating mode and is
ready to run.
Operating Mode
This is the mode in which the machine is normally
operated. In order to access and run an existing
program, enter program number on keypad, and then
press start. Refer to Operating Mode section.
NOTE: If this is the first time that the PS40 has
been powered up and it has not been set up, “A3”
will appear on display. Press Enter to make it go
away and proceed to Setup (Pre-Program) Mode
section.
Programming Mode
This mode is used in order to install new programs or
to alter previously installed programs. In order to
access programming mode, insure that “StArt” is on
display, turn programming key to “Program” and very
quickly press “enter 455” on keypad. If “Prog 05”
appears, keys were not pressed quickly enough. Press
stop to abort and start over. If “ProGr” appears on
display (flashing), you are in programming mode.
Refer to Programming Mode section.
NOTE: If Programming key is not turned to
“Program” when this is attempted, A0 will appear
on display indicating that copy mode has been
locked out.
Setup (Pre-program) Mode
NOTE: Do not modify any of PS40’s setup items
unless necessary – some settings can make machine
appear to be malfunctioning. Although all
machines are preconfigured at the factory, some
special features, such as chemical timer hold or
temperature units (°C or °F), may need to be
enabled or changed for a particular installation.
Refer to Setup (Pre-Program) Mode section.
NOTE: If Programming key is not turned to
“Program” when this is attempted, “A0” will
appear on display indicating that program mode
has been locked out.
F8112301
© Copyright, Alliance Laundry Systems LLC – DO NOT COPY or TRANSMIT
19
Programming
Operating Mode
Program Start Delay
Select and Run a Program
After selecting a program to run, press and hold start
button for approximately 5 seconds. “dELAY.00”
appears on display. Input number of hours of delay for
program to begin operating (1-99). Press start and
display will show “dELAY.xx” where xx is the
programmed delay time and decimal point will begin
flashing. The number of hours remaining will be
displayed while counting down and, during the last
hour, the minutes remaining will be displayed. To
cancel this operation, press stop.
Make sure programming key switch is turned to “Run”
position. With keypad, select a program to operate.
Press start. Program is now in operation.
Program Progress Indicators
1
01 29 31
2
Changing To Another Program
1
2
3
05
4
5
6
PS40
7
8
9
3
0
PHM1194R
1
2
3
Cycle Step Number
Cycle Time Remaining
Cycle Number
Figure 3
As program is progressing, program number and time
remaining will be displayed (not including fill or
heating times). Refer to Figure 3 – the control is on
step 1 of program 5 and there are 29 minutes and 31
seconds left on timer.
(Programming “LECo” and “HECo”, where
applicable, determine whether time remaining
includes fill and heat times.)
When “LECo” is programmed, when machine is
filling with water, decimal point on far right of display
will flash. Once level is satisfied, light will be
continuous and time will count down.
When bath requires supplemental heating and “HECo”
is programmed, decimal point second from right of
display will flash and time will remain constant. Once
programmed temperature is achieved, light will stay
on.
When machine is draining, decimal point third from
right on display will flash.
When program has completed, “Pxx. End” where xx is
the cycle number last used will be displayed and
buzzer will sound for 10 seconds. If a “Signal” was
programmed it will sound at this point. Open door and
display will revert to “StArt”.
20
For the first 3 minutes after machine has started, it is
possible to change selected program to a different
program. To change to a different program simply
input program number to change. The display will now
show “P.00.StArt” (P.00 indicates new program
number). If this is correct program number, press
enter.
Temporary Program Alteration
Select a program number. Before starting program,
press and hold temperature button. While holding
temperature button in, press enter. Scroll through each
program step using enter button and make desired
changes. When finished, press start to begin program.
The program will now run with temporary alterations.
Temperature and RPM Display
By pressing temperature button on keypad one time
while program is in operation, the current temperature
will be displayed.
Press temperature button again and programmed
temperature will be displayed momentarily.
Press temperature button again and highest
programmed temperature of program will be displayed
momentarily.
Press temperature button again and cylinder speed will
be displayed momentarily.
By pressing and holding temperature button for 3
seconds during any of the above, display will remain at
that function until temperature button is pressed again.
Rapid Advance
Pushing and holding enter button on keypad can rapid
advanced program through each program step. Rapid
advance will stop at each drain and enter button must
be released and pressed again in order to continue with
rapid advance sequence.
© Copyright, Alliance Laundry Systems LLC – DO NOT COPY or TRANSMIT
F8112301
Programming
Rapid advance feature may be disabled by selecting
“no ACCL” in setup (pre-program) process. Refer to
Setup (Pre-Program) Mode section.
Programmed Stop
If an indefinite time stop (0 minutes) was
programmed, the program will pause and wait for
operator to restart program. Water will stay in machine
and all cylinder movement will cease. Display will
show “StoP”. Program will not continue until start
button is pressed.
Manually Adding Water
After program has been running for 3 minutes, add
more water to machine by first pressing and releasing
button number 1, then pressing and holding buttons
“1-9” on keypad. After releasing button, water will
shut off and water level will be displayed for 3
seconds. These buttons correspond to water inlet
valves.
1. Cup 1
2. Cup 2 (optional)
If a programmed time stop was programmed (1-999
minutes), display will alternate between “StoPtiME”
and remainder of programmed stop time. Time stop
can also be interrupted by pressing start button.
3. Cup 3 (optional)
NOTE: If a signal has been programmed, it will
sound at beginning of “Programmed Stop Time”. If
a stop was programmed during “final spin/
extract”, program will automatically resume after
20 minutes.
6. Cup 6 (not used on this machine)
Stopping a Program
To terminate a program, press stop button on keypad.
After 5 seconds machine will drain water and “oPEn
door” will appear on display after approximately 30
seconds. Open door and “CloSE” will appear on
display. Close door and display will flash program and
time information where it was stopped. Press stop
again. Display will show “End”. Open door and
display will return to “StArt”.
Stop button may be disabled by selecting “no EnEr” in
setup (pre-program) process. Refer to Setup
(Pre-Program) Mode section.
F8112301
4. Cup 4 (optional)
5. Cup 5 (optional)
7. Cold water inlet
8. Hot water inlet
9. Chemical flush
For machines equipped with water reuse inlet valves,
access these by first pressing and releasing button
number 2, then pressing button on keypad that
corresponds with desired reuse water inlet valve ( 1 =
water reuse valve number 1, etc.).
Manually Draining
After program has been running for 3 minutes, drain
water by pressing “0” button on keypad, then pressing
corresponding drain valve number on keypad (1 =
Drain valve number 1, 2 = Drain valve number 2, etc.).
Water level will be displayed while pressing these
buttons, so water can be drained back down to a
desired level.
© Copyright, Alliance Laundry Systems LLC – DO NOT COPY or TRANSMIT
21
Programming
Manual Heating
Creating a Program
After program has been running for 3 minutes, activate
heating system by pressing and holding 4 button on
keypad (if machine is equipped with an optional
electrical or steam heating system). While button is
pressed, temperature will be shown on display and
supplemental heating system will be activated until
button is released.
ProG
(flashing) Entering programming mode.
Press enter.
ProG 00
Enter program number to program or
modify. Press enter.
00id 00
When entering program, display will be last
step programmed. Press enter to go into last
step or key in the desired step number and
press enter.
Manually Activating the Chemical Supply
Signals
The first “00” indicates program number
selected, “id 00” indicates program step or
bath, (i.e., “02id 01” indicates program 2,
step number 1). A program step, or bath, is a
part of a wash program (prewash, main
wash, rinse, etc.) and always ends with the
option of a drain or extract. Enter program
step number to be programmed. Press enter.
After program has been running for 3 minutes, activate
liquid supply outputs “1-12” by first pressing and
releasing “3” button on keypad and then pressing
corresponding number on keypad for desired liquid
supply output. Hold button in for desired output
length, then release.
Display Total Operating Hours
00. Cyt.
Before machine has been started, quickly press “enter
223” and total hours machine has been run will be
displayed for 5 seconds.
Cycle or program step time, not including
fill, drain or extract time. (No user input
required). Press enter.
t 00.00
Input desired agitation time for this step, in
minutes and seconds. Press enter.
00.rotE
Cylinder action and pause times. (Dwell)
(No user input required). Press enter.
AG.Force
Wash action type desired. To use a wash
action other than what was preset in setup
(pre-program) process as default, press
enter. To use default wash actions preset in
setup (pre-program) process, press
temperature button. Display will now show
AG.norMAL.
A
example:
A 12.0
Input number of seconds for cylinder to
rotate before pausing to reverse direction.
Press enter.
S
example:
S 03.0
Input number of seconds for cylinder to
pause before turning in opposite direction.
Press enter.
SP
example:
SP 42
Input desired wash speed in RPM. Press
enter.
Program Memory Inventory
Before machine has been started, quickly press “enter
788” and display will show first program in machine
and total number of steps in that program.
Example: “Prg01.08” means program 1 contains 8
steps.
After 1 second, next program in machine will be
displayed and so forth.
After last program in machine is displayed, total
number of free program steps will be displayed.
Press enter and display will return to “StArt”.
Programming Mode
In order to access programming mode, insure “StArt”
is on display. Turn programming key to “Program”
and very quickly press “enter 455” on keypad. If “Prog
05” appears, keys were not pressed quickly enough.
Press stop to abort and start over. If “ProG” appears on
display (flashing), you are in programming mode.
Table 4 (continued)
NOTE: If programming key is not turned to
“Program” when this is attempted, “A0” will flash
on display.
22
© Copyright, Alliance Laundry Systems LLC – DO NOT COPY or TRANSMIT
F8112301
Programming
A Word About Wash Speeds
Table 4 (continued)
Research has shown that for optimal mechanical
action, a horizontal axis washer should turn at a speed
corresponding to 0.8 G’s – this speed is dependent on
cylinder diameter. So as a machine gets bigger, proper
wash speed gets slower. When running at 0.8 G’s, the
laundry in a machine will fall from about the 1 o’clock
position to the 7 o’clock position (running counter
clockwise – refer to Figure 4). For this machine,
optimal wash speeds are:
Model
RPM
40 Pound
46
60 Pound
43
80 Pound
39
100 Pound
39
125 Pound
36
140 Pound
36
175 Pound
36
00.tENP
Temperature of this program step or bath.
(No user input required). Press enter.
°F 000
Input temperature desired for this program
step or bath. If no temperature control is
desired for this bath, select 033. This will
allow you to specify which main fill valves
are to open. Press enter.
NOTE: The next step will be determined
by “HEAtSYS” option chosen in setup
(pre-program) mode.
If “HEAt-nod” was chosen in setup (preprogram), select from:
●
“HEAt” (supplemental heating without
temperature controlled water inlets). If
this option is chosen, pressing enter
transfers to “no HECo” or “00. SE-i”.
Pressing temperature button transfers
to “nod”.
●
“HEAt-Nod” (temperature controlled
water inlets with supplemental
heating). Pressing enter transfers to
“no HECo” or “00. SE-i”. Pressing
temperature button transfers back to
“HEAt”
●
“nod” (temperature controlled water
inlets without supplemental heating).
Pressing enter transfers to “00. SE-i”.
Pressing temperature button transfers
to “HEAt-nod”.
Table 5
If gentle action is needed, a very slow speed can be
programmed (such as 10 RPM).
If “HEAt” was chosen during
preprogramming or configuration, display
will automatically go to “no HECo” or “00.
SE-i”.
If “nod” was chosen during preprogramming
or configuration, display will automatically
go to “XX. SE-i”.
PHM788R
Figure 4
no HECo
If “HECo” is selected, program will stop
until programmed temperature is reached.
Press temperature button to alter selection.
Press enter.
t 00.00
Input time of program step where program
will stop until programmed temperature is
reached (use “0” for beginning of program
step). Press enter.
Table 4 (continued)
F8112301
© Copyright, Alliance Laundry Systems LLC – DO NOT COPY or TRANSMIT
23
Programming
Table 4 (continued)
noGEntLE
If selected, cylinder will operate in gentle
action mode until programmed temperature
is reached. Press temperature to alter
selection. Press enter.
00. SE-I
Water inlet selection. Inlets displayed in this
section will be determined by settings in
setup (pre-program) process. (No user input
required). Press enter.
no i.1
Powdered supply compartment number 1.
Press temperature to alter selection, then
press enter.
no i.2
Powdered supply compartment number 2.
Press temperature to alter selection, then
press enter.
no i.3
Powdered supply compartment number 3.
Press temperature to alter selection, then
press enter.
no i.4
Powdered supply compartment number 4.
Press temperature to alter selection, then
press enter.
no i.5
Powdered supply compartment number 5.
Press temperature to alter selection, then
press enter.
noi.CoLd
Main cold water inlet fill valve. Press
temperature to alter selection, then press
enter.
NOTE: If not altered there is no fill or
flush of supply line hose.
no i.Hot
Main cold water inlet fill valve. Press
temperature to alter selection, then press
enter.
NOTE: If not altered there is no fill or
flush of supply line hose.
noiFLuSH
(Or no.iHArd) (No user input required).
Press enter.
00.SE-LE
Water level selection. (No user input
required). Press enter.
LE.Force
Table 4 (continued)
no LE.Co
Level control. To make program time pause
until a water level is achieved, press
temperature to alter selection, then press
enter. If “no LE.Co” is selected, transfer to
“no SoAP”.
LESP 000
Input water level when program time should
resume. Press enter. If a default water level
(low, med, or high) was programmed, enter
“99” and press enter twice. The PS40 will
automatically select a number corresponding
to water level.
Table 4 (continued)
A Word About Water Levels
All machines are setup at factory to measure water
levels in % (percent). 0% is bottom of cylinder, 50% is
half way up cylinder back and so on. This is done
because, for example, a 10% water level will give
same performance on a 60 pound model as a 140
pound model, whereas a 10 inch (254 mm) water level
will not give same performance on the two machines.
If programs are transferred from a 60 pound model to a
140 pound model with inch based water levels all
water levels in the programs would have to be
adjusted. If programs have % based water levels they
will work the same in any size machine with no
modification.
Table 4 (continued)
no SoAP
NOTE: The number of liquid supply
outputs available will be determined by
equipment options chosen during setup
(pre-program) process.
no So1
Liquid supply output signal number 1. Use
temperature to alter selection. Press enter. If
“no So1” was selected, the next available
liquid supply output will be shown.
NOTE: Next step will be determined by
“SoAP” option chosen during setup (preprogram) process.
If “no SoAP” was chosen, “no Add” will be
displayed.
If “ SoAP” was chosen, “SoAP” (or
“no SoAP”) will be displayed.
t1. 000
Input number of seconds for this liquid
supply signal. Press enter.
Water level desired. To use a water level
other than what was preset in setup (preprogram) process as defaults, press enter.
Input desired water level (LE. 000) in
percentage or millimeters depending on
selection made during setup (pre-program)
process and press enter. To use default water
levels preset in setup (pre-program) process,
press temperature to toggle through water
level selections, then press enter.
Table 4 (continued)
To utilize 1 or more liquid supply outputs
during this step, press temperature to alter
selection, then press enter. If “no SoAP”
was chosen, “no Add” will be displayed.
Table 4 (continued)
24
© Copyright, Alliance Laundry Systems LLC – DO NOT COPY or TRANSMIT
F8112301
Programming
Table 4 (continued)
no So2
Liquid supply output signal number 2. Use
temperature to alter selection. Press enter. If
“no So2” was selected, the next available
liquid supply output will be shown.
t2. 000
Input number of seconds for this liquid
supply signal. Press enter.
no So3
Liquid supply output signal number 3. Use
temperature to alter selection. Press enter. If
“no So3” was selected, the next available
liquid supply output will be displayed.
t3. 000
Input number of seconds for this liquid
supply signal. Press enter.
no So4
Liquid supply output signal number 4. Use
temperature to alter selection. Press enter. If
“no So4” was selected, the next available
liquid supply output will be displayed.
t4. 000
Input number of seconds for this liquid
supply signal. Press enter.
no So5
Liquid supply output signal number 5. Use
temperature to alter selection. Press enter. If
“no So5” was selected, the next available
liquid supply output will be displayed.
t5. 000
Input number of seconds for this liquid
supply signal. Press enter.
no So6
Liquid supply output signal number 6. Use
temperature to alter selection. Press enter. If
“no So6” was selected, the next available
liquid supply output will be displayed.
t6. 000
Input number of seconds for this liquid
supply signal. Press enter.
no So7
Liquid supply output signal number 7. Use
temperature to alter selection. Press enter. If
“no So7” was selected, the next available
liquid supply output will be displayed.
T7. 000
Input number of seconds for this liquid
supply signal. Press enter.
no So8
Liquid supply output signal number 8. Use
temperature to alter selection. Press enter. If
“no So8” was selected, the next available
liquid supply output will be displayed.
Table 4 (continued)
T8. 000
Input number of seconds for this liquid
supply signal. Press enter.
no So9
Liquid supply output signal number 9. Use
temperature to alter selection. Press enter. If
“no So9” was selected, the next available
liquid supply output will be displayed.
T9. 000
Input number of seconds for this liquid
supply signal. Press enter.
no So10
Liquid supply output signal number 10. Use
temperature to alter selection. Press enter. If
“no So10” was selected, the next available
liquid supply output will be displayed.
T10.000
Input number of seconds for this liquid
supply signal. Press enter.
no So11
Liquid supply output signal number 11. Use
temperature to alter selection. Press enter. If
“no So11” was selected, the next available
liquid supply output will be displayed.
T11.000
Input number of seconds for this liquid
supply signal. Press enter.
no So12
Liquid supply output signal number 12. Use
temperature to alter selection. Press enter. If
“no So12” was selected, the next available
liquid supply output will be displayed.
T12.000
Input number of seconds for this liquid
supply signal. Press enter.
no Add
Choose “Add” option to insert a cool down
cycle, program stop cycle or soak in this
program step. Use temperature to alter
selection. Press enter.
Cool
To insert a cool down cycle in this program
step, use temperature to alter selection.
Press enter.
Cdu\.000
Input highest cool down temperature
desired in first increment. Press enter.
Cdu. 000
Input lowest cool down temperature desired
in first increment. Press enter.
Cdn\.000
Input highest cool down temperature
desired in last increment. Press enter.
Cdn. 000
Input lowest cool down temperature desired
in last increment. Press enter.
StoP
To insert a program “stop” in this step, use
temperature to alter selection. Press enter.
StoP.000
Input number of minutes (up to 999) that
program stops. Press enter. If “SiGnAL”
was selected during setup (pre-program)
process, “SiGnA000” will be displayed.
Table 4 (continued)
Table 4 (continued)
F8112301
© Copyright, Alliance Laundry Systems LLC – DO NOT COPY or TRANSMIT
25
Programming
Table 4 (continued)
SoAH
To program a “soak” cycle during this step,
use temperature to alter selection. Press
enter.
SoAH.000
Input number of minutes (up to 999) for
soak cycle to last. Press enter. If “SiGnAL”
was selected during setup (pre-program)
process, “SiGnA000” will be displayed.
SiGnA000
Input desired number of seconds for
external signal output to be activated.
Press enter.
SPin
For a “Spin/Extract” at end of this program
step, use temperature to alter selection.
Press enter.
A Word About SmartSpin
When SmartSpin is selected as extract mode, the
machine uses a process to determine the amount that
the cylinder is out of balance. The maximum safe spin
speed for that load is then calculated, allowing the
machine to spin as high as 300 G’s. This ground
breaking feature is a powerful tool for processing
goods like towels or sheets that need to be as dry as
possible – more water is removed from goods at higher
extract speeds so they spend less time in dryer and
save operator money.
Table 4 (continued)
dl
Select from d1 (drain 1), d2 (drain 2), rd1
(reuse drain 1) and rd2 (reuse drain 2)
depending on equipment options selected
during setup (pre-program) process. Use
temperature to alter selection. Press enter. If
“no Spin” was selected the option of d0 (no
drain) will be added and programming will
proceed to “dt 000”.
00. dEt.
No user input required. Press enter.
td XXX
Input desired coast delay time before
cylinder resumes wash action. Delay time
starts when cylinder begins stopping. Press
enter.
dt 000
Input number of seconds for machine to
drain (30 to 40 seconds is recommended).
Press enter.
dRAin
Select from dRAin (no movement), UASH
(normal wash action), diSt (distribution
speed) or JoLt (repeated 10 second low
extract followed by a right and left tumble)
to select cylinder movement while draining.
Press temperature to alter selection. Press
enter.
t=00.00
Display of total time for this program step
(plus fill and heating). No user input
required. Press enter.
FrEE 000
Free area left in RAM available for
programming. No user input required. Press
enter.
End
Programming for this formula is complete
To program another step in this formula
select “no End”. Use temperature button to
alter selection. Press enter.
NOTE: If “no SPin” is selected, “d1” will
be displayed.
Spit00.00
Input number of minutes and seconds for
extract. Press enter.
SP.ForcE
Extract speed desired. To use an extract
speed other than what was preset in setup
(pre-program) process as defaults, press
enter. Enter extract speed desired, in Gforce or RPM depending on selection made
during setup (pre-program) process. To use
default extract speeds preset in setup (preprogram) process, press temperature. The
display will now show “SP. Lo” for low
speed. Press temperature and display will
show “SP. NE” for medium speed. Press
temperature and display will show “SP. Hi”
for high speed. Press temperature and the
display will show “smart” for SmartSpin.
Press enter when selection is made.
Table 4 (continued)
A Word About Extract Speeds
To obtain same extract performance in different sized
machines, extract speeds are commonly expressed in
“G’s”. For example, a very large machine spinning at
500 RPM will remove more water than a small
machine spinning at the same RPM. However, if a
large machine spins at 80 G’s it will perform the same
as a small machine spinning at 80 G’s. For this reason
it is convenient to program extracts in G’s so when
programs are transferred to machines of different
sizes, the same extract results will be obtained.
NOTE: All washer-extractors rotate counter
clockwise in extract.
NOTE: If “no End” is selected “00.id 00”
(the last two zeros would be the next step
number in the program) will be
displayed.
Table 4 (continued)
26
© Copyright, Alliance Laundry Systems LLC – DO NOT COPY or TRANSMIT
F8112301
Programming
Table 4 (continued)
tu 000
SiGnA000
Tumble (Shakeout). Input number of
seconds for cylinder to tumble in wash
speed before ending program and unlocking
loading door. Press enter. If SiGnAL was
selected during setup (pre-program)
“SiGnA000” will be displayed.
Input desired number of seconds for
external signal output to be activated (if
feature was enabled in setup [pre-program]
process). Press enter.
Table 4
The display will now read “dAtA.0000” and then
change to “StArt”, exiting program mode.
Inserting/Deleting a Program Step
To insert or delete a program step, enter “Program
Mode”.
To access programming mode, insure that “StArt” is
on display, turn programming key to “Program” and
very quickly press “enter 455” on keypad. If
“Prog 05” appears, keys were not pressed quickly
enough. Press stop to abort and start over. If “ProGr”
appears on display (flashing), programming mode is
activated.
NOTE: If programming key is not turned to
“Program” when this is attempted, “A0” will flash
on display.
ProG
Entering programming mode. Press enter.
ProG 00
Enter program number to program or
modify. Press enter.
Table 6
F8112301
To Insert a Step
00.id 00
Enter “Program Step” where
“New Program Step” will be inserted.
Press enter. Now press start.
00 inS
Press temperature. A new program step has
been inserted.
Table 7
Example: 03.id 04
Enter “Program Step” where “New Program Step” will
be inserted.
Press enter (program number 3 is selected, step number
4).
Press start. “04 inS” appears on display.
Press enter. A new program step has been inserted in
place of program step number 4 and old program step
number 4 has been moved to program step number 5.
To Delete a Step
00.id 00
Enter “Program Step” to delete. Press enter.
Now press stop.
00 dEL
Press enter. The program step has been
deleted.
Table 8
Example: 03.id 04
Enter “Program Step” to delete.
Press enter (program number 3 is selected, step number
4).
Press stop. “04 dEL” appears on display.
Press enter. Program step number 4 has been deleted
and program step number 5 has been moved into its
place.
© Copyright, Alliance Laundry Systems LLC – DO NOT COPY or TRANSMIT
27
Programming
Copy Mode
In order to access copy mode, insure StArt is on
display and turn programming key to “Program”. Very
quickly press “enter 328” on keypad. If “Prog 08”
appears, keys were not pressed quickly enough. Press
stop to abort and start over. If “CoPY PrG” appears on
display, copy mode is displayed.
NOTE: If programming key is not turned to
“Program” when this is attempted, “A0” will
appear on display indicating copy mode has been
locked out.
PS40 Water Level Sensor Calibration
Procedure
1. Verify machine is properly installed. Check
water supply and drain connections.
2. Power-up machine.
3. From start display, press “enter 217” to enter test
mode. These buttons must be pressed in rapid
succession. If not entered quickly, machine will
return to start or prog display and it will be
necessary to press stop and try again.
4. From test display, press “4” for water level sensor
calibration.
Copy Prg
Press enter.
Source.00
Enter two-digit source program number –
this is the program number to make a copy
of. Press enter.
5. Close door.
Enter two digit destination program number
– this is the program number to store copy
in. Press enter.
7. Press start to start filling shell with water.
Dest .00
01....02
The PS40 will display “source . . . .
destination” program numbers to confirm
operation. Press enter to complete
operation or stop to abort operation.
Table 9
Example: To copy program 41 to program 5, do the
following. Enter copy mode as explained above.
Source.00: Enter source program number (41) on
keypad.
6. Press “0” to zero sensor. Wait for drain to open,
display to go to zero and drain to close.
8. When water reaches center of basket back, press
stop to stop filling.
9. Wait a few minutes for excess water to drain out
through overflow hose and level to stabilize.
10. Press “1” to access fill measurement.
11. 40 Pound Model – Press “343” enter to enter
correct water level (343 mm).
60 Pound Model – Press “394” enter to enter
correct water level (394 mm).
Source.41: Press enter.
80 Pound Model – Press “470” enter to enter
correct water level (470 mm).
Dest .00: Enter destination program number (05) on
keypad.
100 Pound Model – Press “470” enter to enter
correct water level (470 mm).
Dest .05: Press enter.
125 Pound Model – Press “510” enter to enter
correct water level (510 mm).
41....05: Press enter to confirm operation.
Start: The display will return to start prompt. The
program has been copied.
140 Pound Model – Press “546” enter to enter
correct water level (546 mm).
175 Pound Model – Press “586” enter to enter
correct water level (586 mm).
12. Press stop to drain machine.
13. Press stop to exit test mode.
14. Procedure is complete.
28
© Copyright, Alliance Laundry Systems LLC – DO NOT COPY or TRANSMIT
F8112301
Programming
PS40 Diagnostics
Fault Codes
Alarm Codes
Fault codes indicate safety issues, which may cause
operator injury or property loss. Thus, when an alarm
occurs, control will lock out machine’s operation until
power has been cycled and a technician corrects
problem. Note that all fault codes are composed of
letter “F” followed by a code reference number.
Alarm codes are used to alert operator to problems
with machine’s performance. However, because
alarms do not indicate safety problems, they do not
interrupt operation of machine. When an alarm occurs,
control will flash code on program number display to
get operator’s attention. Operator should make note of
this code and report it to a technician so issue can be
resolved. Note that all alarm codes are composed of
the letter “A” followed by a code reference number.
Code Description
A0
Program key was in wrong position when trying to
access programming mode. Press enter to clear.
A2
Program selected does not exist. Press enter to
clear.
A3
Machine has not been setup (pre-program) or
memory has been lost. Refer to Programming
section. Press enter to clear.
A4
Programmed water level was not achieved within
15 minutes. Press enter to clear.
A5
Programmed temperature for supplemental heating
was not achieved within 60 minutes. Press enter to
clear.
A6
Temperature in cylinder is unsafe at end of a
program (greater than 150°F [65°C]). Wait until
load cools to prevent burns. Press enter to clear.
A7
There is water remaining in machine at end of
program. Press enter to clear.
A8
Temperature sensor is not working properly. Press
enter to clear.
A9
Rear electrical enclosure too high. Clean cooling
fan filter. Press enter to clear.
Ab
There is already water in the machine when a
program was started (check for leaking water
valves). Press enter to clear.
Ac
There was water remaining in machine after 3
minutes of draining (check for clogged drain).
Press enter to clear.
Ad
Machine is not running at correct speed or speed
sensor is damaged. Press enter to clear.
Anything that stops analog voltage or directional
voltage could cause alarm (i.e. loose door switch
connections).
AG
Final extract was at a lower than programmed
speed (fixed mount machines only). Load could
not be balanced for a fixed speed spin.
AH
Final extract was skipped (free standing machines
only).
Code
Description
F1
Invalid control configuration or corrupted PS40
firmware. Load a new version or call for service.
F5
Door open switch was tripped during program.
Door lock mechanism is malfunctioning. This
problem must be corrected and power to machine
cycled in order to clear it.
F6
Door locked switch was tripped during program.
Door lock mechanism is malfunctioning. Problem
must be corrected and power to machine cycled in
order to clear it.
FA
Vibration switch is tripped at beginning of
program. Correct problem and cycle power to
clear.
E
Check keypad.
Table 11
Table 10
F8112301
© Copyright, Alliance Laundry Systems LLC – DO NOT COPY or TRANSMIT
29
Programming
Programming Tips
●
Avoid using spins after wash program segments.
This can cause suspended soil to be redeposited
in fabric before it can be rinsed out.
●
For optimum agitation, program wash speed at
0.8 G’s (ex. 42 RPM in 60 pound, 38 RPM in 80/
100 pound) for machine. This will give best drop
in cylinder and best soil removal.
●
Use SmartSpin in programs for processing cotton
and other sturdy goods that can take higher
extract forces. This will reduce drying time and
energy consumption.
●
High spin speeds (> 80 G’s) can set wrinkles in
goods made of Visa and some other synthetic
materials.
●
For processing non-porous rubber mats, try a
long “jolt” drain period instead of a final extract.
Jolt routine alternates short spin and tumble
segments and will effectively remove water from
non-porous goods because they are continuously
rearranged, freeing water trapped in pockets.
30
© Copyright, Alliance Laundry Systems LLC – DO NOT COPY or TRANSMIT
F8112301
Standard Programs
Inlet Assignments
Index
Program 0
Rinse and Spin
1
Cup 1
Program 1
Cold Wash
2
Cup 2
Program 2
Warm Wash
3
Cup 3
Program 3
Hot Wash
4
Cup 4
Program 4
Perm Press
5
Cup 5
Program 5
Cold Gentle
6
Program 6
Warm Gentle
7
Cold Water
Program 7
Rubber Mats
8
Hot Water
Program 8
Soak
9
Chemical Injection Flush
Program 9
Starch
Table 14
Table 12
Chemical Signal Assignments
Dispenser Assignments
Break 1
Cup1
Break 1 / Starch
Chem 2
Break 2
Cup2
Break 2
Chem 3
Sour / Softner
Cup3
Chem 4
Starch
Cup4
Chem 5
Cup5
Sour / Softner
Table 13
F8112301
Chem 1
Chem 6
Table 15
© Copyright, Alliance Laundry Systems LLC – DO NOT COPY or TRANSMIT
31
Standard Programs
Program 0 – Rinse and Spin
Rinse and
Spin
Segment
id
1
2
Wash Time
Cyt ti
3.00
Rotation
rotE
normal
Rotation Action Time
rotE A
Rotation Stop Time
rotE S
Speed
rotE SP
Temperature
teMP F
33
Supply Flush 1
SE-i i1
/
Supply Flush 2
i2
/
Supply Flush 3
i3
/
Supply Flush 4
i4
/
Supply Flush 5
i5
/
Cold Water Inlet
iCold
x
Hot Water Inlet
iHot
x
Flush
Flush
/
Level Type
SE-LE LE
Hi
Level
SE-LE LE.P
Level Control
LE.Co LE.S.P
Chem 1
SoAP t1
/
Chem 2
SoAP t2
/
Chem 3
SoAP t3
/
Chem 4
SoAP t4
/
Chem 5
SoAP t5
/
Chem 6
SoAP t6
/
Additional
Add
Cool Down To Cdu
Add Cool
CduI
Highest Cd Temp
Add Cool Cdu
Cool Down To Cdn
Add Cool
CdnI
Lowest Cd Temp
Add Cool Cdn
Additional Stop Time
Add Stop t
Additional Soak Time
Add SoaH t
Spin Time
Spin SP. T
Spin Type
Spin Speed GF
3
4
5
6
20
no add
5.00
Smart
SP
Table 16 (continued)
32
© Copyright, Alliance Laundry Systems LLC – DO NOT COPY or TRANSMIT
F8112301
Standard Programs
Program 0 – Rinse and Spin
Table 16 (continued)
Rinse and
Spin
Segment
id
1
Drain
drain
Drain Movement
drain
Drain Time
drain t
Spin Delay Time
Spin dEti td
005
Total Time
t=
8.05
Tumble
tu
030
2
3
4
5
6
d1
Table 16
F8112301
© Copyright, Alliance Laundry Systems LLC – DO NOT COPY or TRANSMIT
33
Standard Programs
Program 1 – Cold Wash
Segment
id
Prewash
Wash1
Rinse 1
Rinse 2
Rinse and
Spin
1
2
3
4
5
Wash Time
Cyt ti
5.00
10.00
2.00
2.00
4.00
Rotation
rotE
normal
normal
normal
normal
normal
Rotation Action Time
rotE A
Rotation Stop Time
rotE S
Speed
rotE SP
Temperature
teMP F
33
33
33
33
33
Supply Flush 1
SE-i i1
X
/
/
/
/
Supply Flush 2
i2
/
X
/
/
/
Supply Flush 3
i3
/
/
/
/
/
Supply Flush 4
i4
/
/
/
/
/
Supply Flush 5
i5
/
/
/
/
X
Cold Water Inlet
iCold
X
X
X
X
X
Hot Water Inlet
iHot
/
/
/
/
/
Flush
Flush
X
X
X
X
X
Level Type
SE-LE LE
Hi
Lo
Med
Med
Med
Level
SE-LE LE.P
Level Control
LE.Co LE.S.P
20
9
13
13
13
Chem 1
SoAP t1
030
/
/
/
/
Chem 2
SoAP t2
/
030
/
/
/
Chem 3
SoAP t3
/
/
/
/
030
Chem 4
SoAP t4
/
/
/
/
/
Chem 5
SoAP t5
/
/
/
/
/
Chem 6
SoAP t6
/
/
/
/
/
Additional
Add
no add
Additional
Add
no add
no add
no add
no add
no add
Cool Down To Cdu
Add Cool
CduI
Highest Cd Temp
Add Cool Cdu
Cool Down To Cdu
Add Cool
CduI
Lowest Cd Temp
Add Cool Cdn
Additional Stop Time
Add Stop t
Additional Soak Time
Add SoaH t
6
Table 17 (continued)
34
© Copyright, Alliance Laundry Systems LLC – DO NOT COPY or TRANSMIT
F8112301
Standard Programs
Program 1 – Cold Wash
Table 17 (continued)
Segment
Spin Time
id
Spin SP. T
Prewash
Wash1
Rinse 1
Rinse 2
Rinse and
Spin
1
2
3
4
5
no spin
no spin
:30
:30
5.00
Lo
Lo
Smart
d1
d1
d1
005
005
005
2.35
2.35
9.05
Spin Type
Spin Speed GF
SP
Drain
drain
d1
d1
Drain Movement
drain
dist
dist
Drain Time
drain t
45
45
Spin Delay Time
Spin dEti td
Total Time
t=
Tumble
tu
5.45
10.45
6
030
Table 17
F8112301
© Copyright, Alliance Laundry Systems LLC – DO NOT COPY or TRANSMIT
35
Standard Programs
Program 2 – Warm Wash
Segment
id
Prewash
Wash1
Rinse 1
Rinse 2
Rinse and
Spin
1
2
3
4
5
Wash Time
Cyt ti
5.00
10.00
2.00
2.00
4.00
Rotation
rotE
normal
normal
normal
normal
normal
Rotation Action Time
rotE A
Rotation Stop Time
rotE S
Speed
rotE SP
Temperature
teMP F
33
33
33
33
33
Supply Flush 1
SE-i i1
X
/
/
/
/
Supply Flush 2
i2
/
X
/
/
/
Supply Flush 3
i3
/
/
/
/
/
Supply Flush 4
i4
/
/
/
/
/
Supply Flush 5
i5
/
/
/
/
X
Cold Water Inlet
iCold
X
X
X
X
X
Hot Water Inlet
iHot
X
X
/
/
/
Flush
Flush
X
X
X
X
X
Level Type
SE-LE LE
Hi
Lo
Med
Med
Med
Level
SE-LE LE.P
Level Control
LE.Co LE.S.P
20
9
13
13
13
Chem 1
SoAP t1
030
/
/
/
/
Chem 2
SoAP t2
/
030
/
/
/
Chem 3
SoAP t3
/
/
/
/
030
Chem 4
SoAP t4
/
/
/
/
/
Chem 5
SoAP t5
/
/
/
/
/
Chem 6
SoAP t6
/
/
/
/
/
Additional
Add
no add
no add
no add
no add
no add
Cool Down To Cdu
Add Cool
CduI
Highest Cd Temp
Add Cool Cdu
Cool Down To Cdn
Add Cool
CdnI
Lowest Cd Temp
Add Cool Cdn
Additional Stop Time
Add StoP t
Additional Soak Time
Add SoAH t
Spin Time
SPin SP. T
no spin
no spin
:30
:30
5.00
Lo
Lo
Smart
Spin Type
Spin Speed GF
6
SP
Table 18 (continued)
36
© Copyright, Alliance Laundry Systems LLC – DO NOT COPY or TRANSMIT
F8112301
Standard Programs
Program 2 – Warm Wash
Table 18 (continued)
Segment
id
Prewash
Wash1
Rinse 1
Rinse 2
Rinse and
Spin
1
2
3
4
5
d1
d1
d1
005
005
005
2.35
2.35
9.05
Drain
drain
d1
d1
Drain Movement
drain
dist
dist
Drain Time
drain
45
45
Spin Delay Time
Spin dEti td
Total Time
t=
Tumble
tu
5.45
10.45
6
030
Table 18
F8112301
© Copyright, Alliance Laundry Systems LLC – DO NOT COPY or TRANSMIT
37
Standard Programs
Program 3 – Hot Wash
Segment
id
Prewash
Wash1
Rinse 1
Rinse 2
Rinse and
Spin
1
2
3
4
5
Wash Time
Cyt ti
5.00
10.00
2.00
2.00
4.00
Rotation
rotE
normal
normal
normal
normal
normal
Rotation Action Time
rotE A
Rotation Stop Time
rotE S
Speed
rotE SP
Temperature
teMP F
33
33
33
33
33
Supply Flush 1
SE-i i1
X
/
/
/
/
Supply Flush 2
i2
/
X
/
/
/
Supply Flush 3
i3
/
/
/
/
/
Supply Flush 4
i4
/
/
/
/
/
Supply Flush 5
i5
/
/
/
/
X
Cold Water Inlet
iCold
/
/
X
X
X
Hot Water Inlet
iHot
X
X
X
/
/
Flush
Flush
X
X
X
X
X
Level Type
SE-LE LE
Hi
Lo
Med
Med
Med
Level
SE-LE LE.P
Level Control
LE.Co LE.S.P
20
9
13
13
13
Chem 1
SoAP t1
030
/
/
/
/
Chem 2
SoAP t2
/
030
/
/
/
Chem 3
SoAP t3
/
/
/
/
030
Chem 4
SoAP t4
/
/
/
/
/
Chem 5
SoAP t5
/
/
/
/
/
Chem 6
SoAP t6
/
/
/
/
/
Additional
Add
no add
no add
no add
no add
no add
Cool Down To Cdu
Add Cool
CduI
Highest Cd Temp
Add Cool Cdu
Cool Down To Cdn
Add Cool
CdnI
Lowest Cd Temp
Add Cool Cdn
Additional Stop Time
Add Stop t
Additional Soak Time
Add SoaH t
Spin Time
Spin SP. T
no spin
no spin
:30
:30
5.00
Lo
Lo
Smart
Spin Type
Spin Speed GF
6
SP
Table 19 (continued)
38
© Copyright, Alliance Laundry Systems LLC – DO NOT COPY or TRANSMIT
F8112301
Standard Programs
Program 3 – Hot Wash
Table 19 (continued)
Segment
id
Prewash
Wash1
Rinse 1
Rinse 2
Rinse and
Spin
1
2
3
4
5
d1
d1
d1
005
005
005
2.35
2.35
9.05
Drain
drain
d1
d1
Drain Movement
drain
dist
dist
Drain Time
drain t
45
45
Spin Delay Time
Spin dEti td
Total Time
t=
Tumble
tu
5.45
10.45
6
030
Table 19
F8112301
© Copyright, Alliance Laundry Systems LLC – DO NOT COPY or TRANSMIT
39
Standard Programs
Program 4 – Perm Press
Segment
id
Prewash
Wash1
Rinse 1
Rinse 2
Rinse and
Spin
1
2
3
4
5
Wash Time
Cyt ti
5.00
10.00
2.00
2.00
4.00
Rotation
rotE
normal
normal
normal
normal
normal
Rotation Action Time
rotE A
Rotation Stop Tme
rotE S
Speed
rotE SP
Temperature
teMP F
33
33
33
33
33
Supply Flush 1
SE-i i1
X
/
/
/
/
Supply Flush 2
i2
/
X
/
/
/
Supply Flush 3
i3
/
/
/
/
/
Supply Flush 4
i4
/
/
/
/
/
Supply Flush 5
i5
/
/
/
/
X
Cold Water Inlet
iCold
/
/
/
/
X
Hot Water Inlet
iHot
X
X
X
X
/
Flush
Flush
X
X
X
X
X
Level Type
SE-LE LE
Hi
Lo
Med
Med
Med
Level
SE-LE LE.P
Level Control
LE.Co LE.S.P
20
9
13
13
13
Chem 1
SoAP t1
030
/
/
/
/
Chem 2
SoAP t2
/
030
/
/
/
Chem 3
SoAP t3
/
/
/
/
030
Chem 4
SoAP t4
/
/
/
/
/
Chem 5
SoAP t5
/
/
/
/
/
Chem 6
SoAP t6
/
/
/
/
/
Additional
Add
no add
no add
no add
Cool down
no add
Cool Down To Cdu
Add Cool
CduI
Highest Cd Temp
Add Cool Cdu
Cool Down To Cdn
Add Cool
CdnI
Lowest Cd Temp
Add Cool Cdn
Additional Stop Time
Add Stop t
Additional Soak Time
Add SoaH t
Spin Time
Spin SP. T
2
105
2
105
no spin
no spin
Spin Type
Spin Speed GF
6
:30
:30
5.00
Lo
Lo
Smart
SP
Table 20 (continued)
40
© Copyright, Alliance Laundry Systems LLC – DO NOT COPY or TRANSMIT
F8112301
Standard Programs
Program 4 – Perm Press
Table 20 (continued)
Segment
id
Prewash
Wash1
Rinse 1
Rinse 2
Rinse and
Spin
1
2
3
4
5
d1
d1
d1
005
005
005
2.35
2.35
9.05
Drain
drain
d1
d1
Drain Movement
drain
dist
dist
Drain Time
drain t
45
45
Spin Delay Time
Spin dEti td
Total Time
t=
Tumble
tu
5.45
10.45
6
030
Table 20
F8112301
© Copyright, Alliance Laundry Systems LLC – DO NOT COPY or TRANSMIT
41
Standard Programs
Program 5 – Cold Gentle
Segment
id
Prewash
Wash1
Rinse 1
Rinse 2
Rinse and
Spin
1
2
3
4
5
Wash Time
Cyt ti
3.00
8.00
2.00
2.00
4.00
Rotation
rotE
Force
Force
Force
Force
Force
Rotation Action Time
rotE A
4.0
4.0
4.0
4.0
4.0
Rotation Stop Tme
rotE S
16.0
16.0
16.0
16.0
16.0
Speed
rotE SP
30
30
30
30
30
Temperature
teMP F
80
80
80
80
80
Supply Flush 1
SE-i i1
X
/
/
/
/
Supply Flush 2
i2
/
X
/
/
/
Supply Flush 3
i3
/
/
/
/
/
Supply Flush 4
i4
/
/
/
/
/
Supply Flush 5
i5
/
/
/
/
X
Cold Water Inlet
iCold
X
X
X
X
X
Hot Water Inlet
iHot
X
X
X
X
X
Flush
Flush
X
X
X
X
X
Level Type
SE-LE LE
Hi
Lo
Med
Med
Med
Level
SE-LE LE.P
Level Control
LE.Co LE.S.P
20
9
13
13
13
Chem 1
SoAP t1
030
/
/
/
/
Chem 2
SoAP t2
/
030
/
/
/
Chem 3
SoAP t3
/
/
/
/
030
Chem 4
SoAP t4
/
/
/
/
/
Chem 5
SoAP t5
/
/
/
/
/
Chem 6
SoAP t6
/
/
/
/
/
Additional
Add
no add
no add
no add
no add
no add
Cool Down To Cdu
Add Cool
CduI
Highest Cd Temp
Add Cool Cdu
Cool Down To Cdn
Add Cool
CdnI
Lowest Cd Temp
Add Cool Cdn
Additional Stop Time
Add Stop t
Additional Soak Time
Add SoaH t
Spin Time
Spin SP. T
no spin
no spin
no spin
0.30
5.00
Lo
Med
Spin Type
Spin Speed GF
6
SP
Table 21 (continued)
42
© Copyright, Alliance Laundry Systems LLC – DO NOT COPY or TRANSMIT
F8112301
Standard Programs
Program 5 – Cold Gentle
Table 21 (continued)
Segment
id
Prewash
Wash1
Rinse 1
Rinse 2
Rinse and
Spin
1
2
3
4
5
d1
d1
005
005
2.35
9.05
Drain
drain
d1
d1
d1
Drain Movement
drain
dist
dist
dist
Drain Time
drain t
45
45
45
Spin Delay Time
Spin dEti td
Total Time
t=
Tumble
tu
3.45
8.45
2.45
6
030
Table 21
F8112301
© Copyright, Alliance Laundry Systems LLC – DO NOT COPY or TRANSMIT
43
Standard Programs
Program 6 – Warm Gentle
Segment
id
Prewash
Wash1
Rinse 1
Rinse 2
Rinse and
Spin
1
2
3
4
5
Wash Time
Cyt ti
3.00
8.00
2.00
2.00
4.00
Rotation
rotE
Force
Force
Force
Force
Force
Rotation Action Time
rotE A
4.0
4.0
4.0
4.0
4.0
Rotation Stop Tme
rotE S
16.0
16.0
16.0
16.0
16.0
Speed
rotE SP
30
30
30
30
30
Temperature
teMP F
110
110
110
110
110
Supply Flush 1
SE-i i1
X
/
/
/
/
Supply Flush 2
i2
/
X
/
/
/
Supply Flush 3
i3
/
/
/
/
/
Supply Flush 4
i4
/
/
/
/
/
Supply Flush 5
i5
/
/
/
/
X
Cold Water Inlet
iCold
X
X
X
X
X
Hot Water Inlet
iHot
X
X
X
X
X
Flush
Flush
X
X
X
X
X
Level Type
SE-LE LE
Hi
Lo
Med
Med
Med
Level
SE-LE LE.P
Level Control
LE.Co LE.S.P
20
9
13
13
13
Chem 1
SoAP t1
030
/
/
/
/
Chem 2
SoAP t2
/
030
/
/
/
Chem 3
SoAP t3
/
/
/
/
030
Chem 4
SoAP t4
/
/
/
/
/
Chem 5
SoAP t5
/
/
/
/
/
Chem 6
SoAP t6
/
/
/
/
/
Additional
Add
no add
no add
no add
no add
no add
Cool Down To Cdu
Add Cool
CduI
Highest Cd Temp
Add Cool Cdu
Cool Down To Cdn
Add Cool
CdnI
Lowest Cd Temp
Add Cool Cdn
Additional Stop Time
Add Stop t
Additional Soak Time
Add SoaH t
Spin Time
Spin SP. T
no spin
no spin
no spin
0.30
5.00
Lo
Med
Spin Type
Spin Speed GF
6
SP
Table 22 (continued)
44
© Copyright, Alliance Laundry Systems LLC – DO NOT COPY or TRANSMIT
F8112301
Standard Programs
Program 6 – Warm Gentle
Table 22 (continued)
Segment
id
Prewash
Wash1
Rinse 1
Rinse 2
Rinse and
Spin
1
2
3
4
5
d1
d1
005
005
2.35
9.05
Drain
drain
d1
d1
d1
Drain Movement
drain
dist
dist
dist
Drain Time
drain t
45
45
45
Spin Delay Time
Spin dEti td
Total Time
t=
Tumble
tu
3.45
8.45
2.45
6
030
Table 22
F8112301
© Copyright, Alliance Laundry Systems LLC – DO NOT COPY or TRANSMIT
45
Standard Programs
Program 7– Rubber Mats
Segment
id
Prewash
Wash1
Rinse 1
Rinse 2
Rinse 3
Spin
1
2
3
4
5
6
0.00
Wash Time
Cyt ti
5.00
10.00
2.00
2.00
4.00
Rotation
rotE
normal
normal
normal
normal
normal
Rotation Action Time
rotE A
Rotation Stop Tme
rotE S
Speed
rotE SP
Temperature
teMP F
33
33
33
33
33
Supply Flush 1
SE-i i1
X
/
/
/
/
Supply Flush 2
i2
/
X
/
/
/
Supply Flush 3
i3
/
/
/
/
/
Supply Flush 4
i4
/
/
/
/
/
Supply Flush 5
i5
/
/
/
/
X
Cold Water Inlet
iCold
X
X
X
X
X
Hot Water Inlet
iHot
X
X
X
X
X
Flush
Flush
X
X
X
X
X
Level Type
SE-LE LE
Hi
Med
Hi
Hi
Hi
Level
SE-LE LE.P
Level Control
LE.Co LE.S.P
20
13
20
20
20
Chem 1
SoAP t1
030
/
/
/
/
Chem 2
SoAP t2
/
030
/
/
/
Chem 3
SoAP t3
/
/
/
/
030
Chem 4
SoAP t4
/
/
/
/
/
Chem 5
SoAP t5
/
/
/
/
/
Chem 6
SoAP t6
/
/
/
/
/
Additional
Add
no add
no add
no add
no add
no add
Cool Down To Cdu
Add Cool
CduI
Highest Cd Temp
Add Cool Cdu
Cool Down To Cdn
Add Cool
CdnI
Lowest Cd Temp
Add Cool Cdn
Additional Stop Time
Add Stop t
Additional Soak Time
Add SoaH t
Spin Time
Spin SP. T
no spin
no spin
no spin
no spin
no spin
Spin Type
Spin Speed GF
3.00
Lo
SP
Table 23 (continued)
46
© Copyright, Alliance Laundry Systems LLC – DO NOT COPY or TRANSMIT
F8112301
Standard Programs
Program 7– Rubber Mats
Table 23 (continued)
Segment
id
Prewash
Wash1
Rinse 1
Rinse 2
Rinse 3
Spin
1
2
3
4
5
6
d1
Drain
drain
d1
d1
d1
d1
d1
Drain Movement
drain
wash
wash 1
jolt
jolt
jolt
Drain Time
drain t
30
30
30
60
180
Spin Delay Time
Spin dEti td
005
Total Time
t=
5.30
Tumble
tu
005
10.30
2.30
3.00
7.00
3.50
030
Table 23
F8112301
© Copyright, Alliance Laundry Systems LLC – DO NOT COPY or TRANSMIT
47
Standard Programs
Program 8 – Soak
Segment
id
Prewash
Soak
Wash
Rinse 1
Rainse 2
Rinse and
Spin
1
2
3
4
5
6
Wash Time
Cyt ti
5.00
5.00
10.00
2.00
2.00
4.00
Rotation
rotE
normal
normal
normal
normal
normal
normal
Rotation Action Time
rotE A
Rotation Stop Tme
rotE S
Speed
rotE SP
Temperature
teMP F
33
33
33
33
33
33
Supply Flush 1
SE-i i1
X
X
/
/
/
/
Supply Flush 2
i2
/
/
X
/
/
/
Supply Flush 3
i3
/
/
/
/
/
/
Supply Flush 4
i4
/
/
/
/
/
/
Supply Flush 5
i5
/
/
/
/
/
X
Cold Water Inlet
iCold
X
/
X
X
X
X
Hot Water Inlet
iHot
X
X
X
X
/
/
Flush
Flush
X
X
X
X
X
X
Level Type
SE-LE LE
Hi
Hi
Lo
Med
Med
Med
Level
SE-LE LE.P
Level Control
LE.Co LE.S.P
20
20
9
13
13
13
Chem 1
SoAP t1
030
030
/
/
/
/
Chem 2
SoAP t2
/
/
030
/
/
/
Chem 3
SoAP t3
/
/
/
/
/
030
Chem 4
SoAP t4
/
/
/
/
/
/
Chem 5
SoAP t5
/
/
/
/
/
/
Chem 6
SoAP t6
/
/
/
/
/
/
Additional
Add
no add
Soah
no add
no add
no add
no add
Cool Down To Cdu
Add Cool
CduI
Highest Cd Temp
Add Cool Cdu
Cool Down To Cdn
Add Cool
CdnI
Lowest Cd Temp
Add Cool Cdn
Additional Stop Time
Add Stop t
Additional Soak Time
Add SoaH t
Spin Time
Spin SP. T
no spin
0.30
0.30
5.00
Lo
Lo
Smart
600
no spin
no spin
Spin Type
Spin Speed GF
SP
Table 24 (continued)
48
© Copyright, Alliance Laundry Systems LLC – DO NOT COPY or TRANSMIT
F8112301
Standard Programs
Program 8 – Soak
Table 24 (continued)
Segment
id
Prewash
Soak
Wash
Rinse 1
Rainse 2
Rinse and
Spin
1
2
3
4
5
6
d1
d1
d1
005
005
005
2.35
2.35
9.05
Drain
drain
d1
d1
d1
Drain Movement
drain
dist
dist
dist
Drain Time
drain t
45
45
45
Spin Delay Time
Spin dEti td
Total Time
t=
Tumble
tu
5.45
605.45
10.45
030
Table 24
F8112301
© Copyright, Alliance Laundry Systems LLC – DO NOT COPY or TRANSMIT
49
Standard Programs
Program 9 – Starch
Segment
id
1
2
Wash Time
Cyt ti
7.00
Rotation
rotE
normal
Rotation Action Time
rotE A
Rotation Stop Tme
rotE S
Speed
rotE SP
Temperature
teMP F
33
Supply Flush 1
SE-i i1
X
Supply Flush 2
i2
/
Supply Flush 3
i3
/
Supply Flush 4
i4
/
Supply Flush 5
i5
/
Cold Water Inlet
iCold
X
Hot Water Inlet
iHot
X
Flush
Flush
X
Level Type
SE-LE LE
Med
Level
SE-LE LE.P
Level Control
LE.Co LE.S.P
Chem 1
SoAP t1
/
Chem 2
SoAP t2
/
Chem 3
SoAP t3
/
Chem 4
SoAP t4
030
Chem 5
SoAP t5
/
Chem 6
SoAP t6
/
Wash Time
Cyt ti
7.00
Additional
Add
no add
Cool Down To Cdu
Add Cool
CduI
Highest Cd Temp
Add Cool Cdu
Cool Down To Cdn
Add Cool
CdnI
Lowest Cd Temp
Add Cool Cdn
Additional Stop Time
Add Stop t
Additional Soak Time
Add SoaH t
3
4
5
6
13
Table 25 (continued)
50
© Copyright, Alliance Laundry Systems LLC – DO NOT COPY or TRANSMIT
F8112301
Standard Programs
Program 9 – Starch
Table 25 (continued)
Segment
Spin Time
id
Spin SP. T
Spin Type
1
2
3
4
5
6
5.00
Smart
Spin Speed GF
SP
Drain
drain
Drain Movement
drain
Drain Time
drain t
Spin Delay Time
Spin dEti td
Total Time
t=
12.05
Tumble
tu
030
d1
005
Table 25
F8112301
© Copyright, Alliance Laundry Systems LLC – DO NOT COPY or TRANSMIT
51
Standard Programs
Program Worksheet
Segment
id
Wash Time
Cyt ti
Rotation
rotE
Rotation Action Time
rotE A
Rotation Stop Tme
rotE S
Speed
rotE SP
Temperature
teMP F
Supply Flush 1
SE-i i1
Supply Flush 2
i2
Supply Flush 3
i3
Supply Flush 4
i4
Supply Flush 5
i5
Cold Water Inlet
iCold
Hot Water Inlet
iHot
Flush
Flush
Level Type
SE-LE LE
Level
SE-LE LE.P
Level Control
LE.Co LE.S.P
Chem 1
SoAP t1
Chem 2
SoAP t2
Chem 3
SoAP t3
Chem 4
SoAP t4
Chem 5
SoAP t5
Chem 6
SoAP t6
Additional
Add
Cool Down To Cdu
Add Cool
CduI
Highest Cd Temp
Add Cool Cdu
Cool Down To Cdn
Add Cool
CdnI
Lowest Cd Temp
Add Cool Cdn
Additional Stop Time
Add Stop t
Additional Soak Time
Add SoaH t
Spin Time
Spin SP. T
Rinse and
Spin
Wash1
Rinse 1
Rinse 2
Rinse and
Spin
1
2
3
4
5
6
Spin Type
Spin Speed GF
SP
Table 26 (continued)
52
© Copyright, Alliance Laundry Systems LLC – DO NOT COPY or TRANSMIT
F8112301
Standard Programs
Program Worksheet
Table 26 (continued)
Segment
id
Drain
drain
Drain Movement
drain
Drain Time
drain t
Spin Delay Time
Spin dEti td
Total Time
t=
Tumble
tu
Rinse and
Spin
Wash1
Rinse 1
Rinse 2
Rinse and
Spin
1
2
3
4
5
6
Table 26
F8112301
© Copyright, Alliance Laundry Systems LLC – DO NOT COPY or TRANSMIT
53