1
1
XM Radio
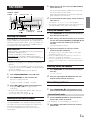
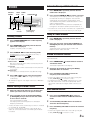
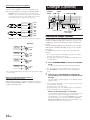
SOURCE/
POWER
BAND/
TEL.
Rotary encoder
While receiving X1, X2 or X3, press g or f to
select channel “0.”
The unit alternately displays “RADIO ID” for 2 seconds,
then the ID number for 10 seconds.
While displaying "RADIO ID" as shown above, Blackout
(page 14) becomes nonfunctional.
8
2
To cancel the ID number display, set the channel to
other than “0.”
• You cannot use “O,” “S,”“ I,” or “F” for the ID Number.
• You can check your ID number printed on the label on the bottom
of the CDA-9820XM, or on the label on the packing box.
g
f
9
F/SETUP
Preset buttons
SEARCH/
(1 through 6)
QS
DISP/
TITLE
Storing XM Channel Presets
1
Receiving XM Channels
XM Satellite Radio* is the next generation of audio entertainment,
with up to 100 brand-new digital channels. For a small monthly fee,
subscribers can hear crystal-clear music, sports, news and talk, coastto-coast via satellite. For more information, visit XM’s website at
www.xmradio.com or call 1-800-852-9696.
How to Subscribe
Make sure that the optional XM antenna has been installed before
beginning the subscription process.
Listeners can subscribe by visiting XM’s Website at
www.xmradio.com or by calling 1-800-852-9696. Customers
should have their Radio ID ready; see “checking the XM Radio ID
Number” on this page.
* XM and its corresponding logos are trademarks of XM Satellite
Radio Inc.
• Do not connect an external XM Tuner to this unit. Connecting an
external tuner unit will cause an “ERROR” to be displayed and all
functions are disabled.
• The X1, X2 or X3 band illuminates when in XM mode.
1
2
2
After tuning in the desired channel, press and hold
any one of the preset buttons (1 through 6) that
you want to store the station on for at least 2
seconds.
The selected station is stored.
3
Repeat the procedure to store up to 5 other
channels onto the same band.
• To use this procedure for other bands, simply select the band
desired and repeat the procedure.
• A total of 18 channels can be stored in the preset memory (6
channels for each band; X1, X2 and X3).
• If you store a channel in a preset memory which already has a
station, the current channel will be cleared and replaced with the
new one.
Receiving Stored XM Channels
1
Press BAND/TEL. to select the desired band (X1,
X2 or X3).
X1 → X2 → X3 → X1
Press SOURCE/POWER to select XM mode.
Press BAND/TEL. to select X1, X2 or X3.
Press BAND/TEL. to select the desired band (X1,
X2 or X3) you want to store.
2
Press the channel preset button that has your
desired satellite channel in memory.
Each press changes the band:
X1 (XM1) → X2 (XM2) → X3 (XM3) → X1 (XM1)
3
Press g or f to select the desired channel.
Holding the g or f will change channels
continuously.
• The channel number display automatically changes after a few
seconds to the channel name display.
• You can change Category by pressing 8 or 9.
Channel/Category Search
You can search for programs by Channel No. or Category.
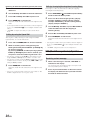
1
Press SEARCH/QS
in the XM mode to select
Channel Search mode or Category Search mode.
Channel Search mode:
Checking the XM Radio ID Number
2
You need to provide XM with the unique XM Radio ID number for
your CDA-9820XM in order to subscribe to XM's programming.
* The Channel No. is selected within the selected Category.
This number is an 8 character alphanumeric number that is
printed on a label directly on the bottom of the unit.
It can also be displayed on the screen of this unit in the
following way.
3
Turn the Rotary encoder to select the desired
Channel No.* within 10 seconds.
Press Rotary encoder to receive the selected
Channel No.
7-EN