1
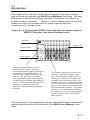
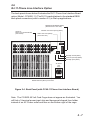
. MultiModemManager Model CC4800 Card Cage Hardware Manual Owner’s Manual P/N 82024202, Rev. C CC4800, CC4800/11, CC4800/21, and CC4800 48 volt Card Cage This publication may not be reproduced, in whole or in part, without prior expressed written permission from Multi-Tech Systems, Inc. All rights reserved. Copyright © 1994, by Multi-Tech Systems, Inc. Multi-Tech Systems, Inc. makes no representation or warranties with respect to the contents hereof and specifically disclaims any implied warranties of merchantability or fitness for any particular purpose. Furthermore, Multi-Tech Systems, Inc. reserves the right to revise this publication and to make changes from time to time in the content hereof without obligation of Multi-Tech Systems, Inc. to notify any person or organization of such revisions or changes. Record of Revisions Revision A (06/15/93) B (03/07/94) C (11/02/94) Description Manual released. All pages at Revision A. Manual restructured. Additional safety material included. CC4800 48 Volt material added. TRADEMARKS Multi-Tech, MultiModemManager and the Multi-Tech logo are trademarks of Multi-Tech Systems, Inc. Windows™ is a trademark of Microsoft Corporation. Multi-Tech Systems, Inc. 2205 Woodale Drive Mounds View, Minnesota 55112 U.S.A. (763) 785-3500 or (800) 328-9717 U.S. Fax (763) 785-9874 Technical Support (800) 972-2439 Important Safety Requirements 1. No manual adjustments to the equipment are necessary for connection to mains power within rated voltage and frequency. 2. The power supply cord (or input screw terminals if a CC4800 48 Volt Card Cage) is intended to serve as the disconnect device. The socket-outlet must be installed near the equipment and be easily accessible. 3. To reduce the risk of shock, all openings should be covered during normal operation of the equipment. 1. Aucun réglage manuel de l'équipement n'est nécessaire pour des connexions à l'alimentation principale sous une tension et une fréquence nominales. 2. Le cordon d'alimentation a été conçu pour servir de dispositif de déconnexion. La prise d'alimentation doit être installée près de l'équipement et doit être facile d'accès. 3. Afin de réduire les risques de choc, toutes les ouvertures doivent être couvertes pendant le fonctionnement normal de l'équipement. 1. No son necesarios ajustes manuales del equipo para la conexión a la corriente de la red dentro del voltaje y frecuencia establecidas. 2. El conector de alimentación de energía sirve como dispositivo de desconexión. La toma de corriente se debe instalar cerca del equipo y tener un acceso sencillo. 3. Para reducir el riesgo de sacudida eléctrica, todas las aberturas deben estar cubiertas durante el manejo normal del equipo. 1. Bei Anschluß am Versorgungsnetz innerhalb der Nennleistung und -frequenz ist es nicht erforderlich, dieses Gerät manuell nachzustellen. 2. Die Netzschnur dient als Trennvorrichtung. Die Steckdose muß in der Nähe des Geräts installiert werden, um leicht zugänglich zu sein. 3. Um Elektroschockgefahr zu vermindern, müssen beim normalen Betrieb des Geräts alle Öffnungen abgedeckt sein. safety - 1 Power Requirements For CC 4800 48 Volt Card Cage: DC, 42-54V, 7A. CAUTION: For continued protection against risk of fire, replace with same type and rating of fuse. The fuse size is T7.0A, 250 V. For CC4800, CC4800/11, and CC4800/21: AC 100-240V, 50/60 Hz, 5-2.5 A CAUTION: For continued protection against risk of fire, replace with same type and rating of fuse. Safety requirements are not fulfilled unless the equipment is connected to a wall outlet socket that is provided with an earth contact. 230V T.2.5A, 250V 115V T.5.0A, 250V Alimentation Requise C.A. 100-240 V, 50/60 Hz, 5-2,5A ATTENTION: Pour garantir une protection continue contre tout risque d'incendie, utilisez toujours des fusibles de même type et de même intensité. Les conditions de sécurité ne sont pas remplies si votre équipement n'est pas branché sur une prise murale avec mise à la terre. 230 V T 2,5 A, 250 V 115 V T 5,0 A, 250 V safety - 2 Requisitos de potencia C.A. 100-240 V, 50/60 Hz, 5-2,5 Amp ATTENCION: Para garantizar la protección continua frente al peligro de incendio, sustitúyase con un fusible del mismo tipo e iguales especificaciones de funcionamiento. Adviertase que los requisitos respecto a medidas de seguridad no quedan satisfechos a menos que este equipo eléctrico esté conectado a una toma de corriente mural conectada a tierra. 230 V T 2,5 Amp, 250 V 115 V T 5,0 Amp, 250 V Stromaufnahme AC 100-240V, 50/60 Hz, 5-2,5A VORSICHT: Als Vorkehrung gegen Brandgefahr immer nur Sicherungen der gleichen Art und mit gleichem Nennwert verwenden. Die Sicherheitsvorschriften sind nur erfüllt, wenn das Gerät an eine geerdete Wandsteckdose angeschlossen ist. 230 V, T2,5A, 250V 115V T5,0A, 250V safety - 3 NOTE: This equipment has been tested and found to comply with the limits for a Class A digital device, pursuant to Part 15 of the FCC rules. These limits are designed to provide reasonable protection against harmful interference when the equipment is operated in a commercial environment. This equipment generates, uses and can radiate radio frequency energy, and if not installed and used in accordance with the instruction manual, may cause harmful interference to radio communications. Operation of this equipment in a residential area is likely to cause harmful interference in which case the user will be required to correct the interference at his own expense. WARNING: Changes or modifications to this unit not expressly approved by the party responsible for compliance could void the user's authority to operate the equipment. Contents IMPORTANT SAFETY CONSIDERATIONS CHAPTER 1 – INTRODUCTION & DESCRIPTION 1.1 Introduction ....................................................................................... 1-1 1.2 Description — Possible Associated Components .............................. 1-1 1.3 Special Considerations for 48 Volt Card Cages ................................. 1-2 1.4 General Installation Considerations ................................................... 1-2 CHAPTER 2 – INSTALLATION 2.1 Introduction ....................................................................................... 2-1 2.2 Hardware Installation Procedure ........................................................ 2-2 2.3 Back Panel ....................................................................................... 2-4 2.4 Cabling .............................................................................................. 2-5 2.5 RJ21 Phone Line Interface Option ..................................................... 2-6 2.6 RJ-11 Phone Line Interface Option .................................................... 2-7 CHAPTER 3 – CABLE AND CONNECTOR DESCRIPTIONS 3.1 Standard DB25 Phone Line Interface Connector Panel ...................... 3-1 3.2 CA 1432MR Line Cable ..................................................................... 3-2 3.3 Dial-up Line 50-Pin Connector (CC48-21L) ......................................... 3-3 3.4 2-Wire Leased Line or 4-Wire Transmit Pair Connector ...................... 3-4 3.5 4-Wire Receive Pair (CC48-21L) ........................................................ 3-5 CHAPTER 4 – SERVICE, WARRANTY & TECH SUPPORT 4.1 Service .............................................................................................. 4-1 4.2 Limited Warranty ............................................................................... 4-1 4.3 Tech Support .................................................................................... 4-2 APPENDIX A – RELATED PRODUCTS AND DOCUMENTATION iii . Chapter 1 Introduction & Description 1.1 Introduction The CC4800 card cage is the housing for the MultiModemManager, Multi-Tech Systems’ high-density modem management system. The modem rack may contain one rack controller module, two power supply modules (one is required, and two are recommended), and 48 modems (16 modem cards, with three modems per card). You may connect phone lines to the rack by using either RJ11, or optional RJ21 connectors. You may control up to 254 MultiModemManager racks from a single PC running the MultiModemManager software, which operates under Windows™ 3.1. Model CC4800/11 consists of a card cage with a backplane of 48 RJ11 (6-pin modular) phone connectors, and one PS4800 power supply. It supports dial-up lines. Model CC4800/21 consists of a card cage with a backplane of 6 RJ21 (50-pin amphenol) phone connectors, and one PS4800 power supply. It supports dial-up lines, and 2-wire and 4-wire leased lines. 1.2 Description of Card Cage and Possible Associated Components • 19" wide x 12.1" high x 18.25" deep EIA rack; • 16 modem card slots per card rack; • three high-speed modems per card; • up to 48 modems (DB25S female RS232C/D interface) per rack; • up to 254 racks connected together via the MultiManager Link; • up to 12,192 modems networked together and controlled from one central PC; • 3 DB25S female RS232C/D connectors (A/B/C) per modem card for host connection; • standard phone line interface has 16 male DB25 phone line connectors; • weight: 27.5 lbs. (12.3 kg). 1 - 1 1.3 Special Considerations for CC4800 48 Volt Card Cages The power supply input screw terminals, located on the bottom right portion of the back of the card cage, are intended to serve as the disconnect device. The power requirement is DC, 42-54V, 7A. For continued protection against risk of fire, replace with same type and rating of fuse. The fuse size is T7.0A, 250V. The rack back panel on your CC4800 48 Volt Card Cage does not appear as illustrated in Chapter Two of this manual. Instead of an AC Power outlet and fuse on the bottom right of the cage, you will find a 3-terminal power input strip and an hexagonal-shaped fuse holder. The power input strip is labelled, from left to right, negative (-), positive (+) and earth ground: 1.4 General Installation Considerations This equipment should only be installed by properly qualified service personnel. You may be installing components into a CC4800 card cage for the first time, or you may be re-installing or replacing components. Please observe the following: • unpack hardware carefully. • perform a visual inspection of the hardware. If you are concerned about the condition of your rack, call Technical Support. • make sure that the flat ribbon cable on the back of your card cage is properly seated. • for a first-time installation, install your power supplies, then power-up the rack to make sure the supplies work, then power the unit down before installing the other components. • consult the manuals for your other component(s) (Power Supply, Rack Controller, and Modem Cards) to customize your settings before you install it (them) into the Card Cage. If you are installing more than one rack, you will need to change the Node ID of the additional controller(s). You will need to see the Controller manual for full instructions. 1 - 2 • only connect like circuits. In other words, connect SELV (Secondary Extra Low Voltage) circuits to SELV circuits and TN (Telecommunications Network) circuits to TN circuits. 1 - 3 . Chapter 2 Installation 2.1 Introduction This chapter tells you how to install the power supplies, the rack controller card, and modem cards into your MultiModemManager Card Cage. The cage itself may be installed in an industry-standard 19-inch wide rack cabinet, or placed on a secure tabletop. Figure 2-1, below, displays the front of a fully loaded rack with one controller card, two power supplies, and a full complement of 16 modem cards. Figure 2.1 A Fully-loaded CC4800 Card Cage with two power supplies, MR4800 Controller, and sixteen modem cards. Controller modem card Power Supply Power Supply The rack can work with one or two PS4800 power supplies. A second recommended power supply provides the system with a "redundant" function. If any of the three outputs on either supply fails, or is low, the other supply takes over, producing all of the power required to run the system, without any switchover period. (This is assuming that both power supplies are powered on; with both powered on and operational, they share the load.) This module contains the processor and memory for intelligent operation of the rack. The back panel contains an RJ11 connection for Network UTP attachment to another rack, to an Active Hub, or to a manager node. The front panel provides 16 two-color LEDs for rack controller card status, and a 3-digit 7-segment display for cage number/node ID display. A 3-position connector on the back panel is available for attaching one of several warning alarm systems (such as audio, video or DTR dialer systems). The next sections of this chapter give step-by-step installation procedures and detailed information about the back panel of the MultiModemManager Card Cage. 2-1 2.2 Hardware Installation Procedure WARNING: When the modem rack is connected to the phone lines, it is possible for hazardous voltages to be present within the modem rack. To avoid injury, all modems should be installed in the rack, and any card slot that does not have a modem in it should be fitted with a blank panel prior to making any connections from the rack to the phone lines. All openings on the front of the modem rack, including the sixteen modem slots, the controller card slot, and the two power supply slots should remain covered by either a blank panel or the appropriate module at all times, unless the connections to the phone lines are removed. 1. Place the rack in a standard 19-inch wide rack cabinet and secure (refer to the rack cabinet manual); or set it on a secure tabletop. 2. Loosen rack front panel access screws. 3. Install the power supply module(s) in proper location(s), by aligning the power supply flanges in the card guides. A positioning pin will align the connectors at the back interior of the rack. Press firmly to mate the connectors. Secure with provided screw. 4. Install blank panels where needed to cover any unused power supply, controller card, or modem card slots. 5. Connect the cables at the rack back panel (refer to Figure 2-2, 2-3 or 2-4). 6. Install the rack controller card in proper location by aligning the printed circuit board in the card guides. Press firmly to mate connector and secure. For full information on configuring the controller, see your Rack Controller manual. 7. Turn rack Power Switch On ( |). A self-test is performed to confirm front panel operation. If a controller card is installed, you will observe the following: • the seven segment display shows all 8s; • the green LEDs light, then go out; • the red LEDs light, then go out; • and the rack Node ID is finally displayed. 8. Power down the modem rack. 2-2 9. Determine the modem slot(s) to be used and remove front panel slot(s) if necessary. Insert the MultiModem cards. Align modem module in card guides and press firmly to mate the connectors. 10. Power on the rack. 2-3 2.3 Back Panel The back panel of the MultiModemManager provides the system and power connectors for the installation of the rack hardware, as shown below. DB25S Female RS232 (SELV) (Reserved For Future Use) TN 1-16 DB25 Connectors For Phone Line Interface (TNV Circuit) (SELV) Test Points Power Supply Network Connectors (RJ11) (SELV) Alarm Connector (SELV) (for future use) 5 volts NO COM NC Normally Closed (SELV) Common (Ground) (SELV) Normally Open (SELV) 0 volts AC Power and Fuse RS232 Interface (SELV) Connectors Figure 2-2. MultiModemManager Back Panel The basic back panel includes a phone line cable; refer to Chapter 3 for cable pin assignments. Note that the basic back panel is shown in Figure 2-2. The optional RJ21 version of the back panel is shown in Figure 2-4; the optional RJ11 version is shown in Figure 2-5. Note: The CC4800 48 Volt Card Cage does not appear as illustrated. You will find a 3-terminal power input strip and hexagonal-shaped fuse holder instead of an AC Power outlet and fuse on the bottom right of the cage. 2-4 2.4 Cabling The rack back panel provides the connections for rack operation in the system. These connectors include: • 16-DB25P male Phone Line Connectors (standard), • 48-RJ11 female Phone Line Connectors (option), or 6-RJ21 female Phone Line Connectors (option), • 2-RJ11 (four-pin) female network connectors, • 48-RS232C/D female modem connectors, and • 1-female 3-prong Power cord connector; or if a 48 Volt CC4800 one 3terminal power input strip. Refer to the appropriate Network interface card (NIC), PC, or modem manual for cable specs. MultiModemManager Link The back panel contains two female RJ11 connections for installation in a multiple-rack configuration (maximum of 254 racks) via UTP wire. The control PC must be node - 255 (FF hex). CAUTION: Whenever the MultiModemManager is connected in a multi-rack installation, the last rack must have a terminating plug (one shipped already installed on each rack in the left RJ11 connector). If the PC-to-rack connection goes down (cable failure, inadvertent disconnection) the Rack Controller Card can store a limited set of records until the connection is restored. 2-5 2.5 RJ21 Phone Line Interface Option The back panel shown below illustrates the RJ21 version of the Phone Line Interface Board (Model - CC4800-21). The RJ21 board attaches to the standard DB25 back panel connectors (refer to section 2.2) for leased line or dial-up applications. DB25S Female RS232 (SELV) (Reserved For Future Use) Network Connectors (RJ11) (SELV) CC48-21L Phone Line Interface Board (see Callouts Description) (TNV Circuit) 2 1 Alarm Connector (SELV) (For Future Use) 4 3 6 5 NO COM NC Normally Closed (SELV) Common (Ground) (SELV) Normally Open (SELV) AC Power and Fuse RS232 Interface (SELV) Connectors Figure 2-3. Back Panel (with CC48-21L Phone Line Interface Board) Note: The CC4800 48 Volt Card Cage does not appear as illustrated. You will find a 3-terminal power input strip and hexagonal-shaped fuse holder instead of an AC Power outlet and fuse on the bottom right of the cage. 2-6 2.6 RJ-11 Phone Line Interface Option The back panel shown below illustrates the RJ11 Phone Line Interface Board option (Model - CC4800-11). The RJ11 board attaches to the standard DB25 back panel connectors (refer to section 2.2) in Dial-up applications. DB25S Female RS232 (SELV) (Reserved For Future Use) CC48-11L Phone Line Interface Board (TNV Circuit) Network Connectors (RJ11) (SELV) Alarm Connector (SELV) (For Future Use) NO COM NC Normally Closed (SELV) Common (Ground) (SELV) Normally Open (SELV) AC Power and Fuse RS232 Interface (SELV) Connectors Figure 2-4. Back Panel (with CC48-11 Phone Line Interface Board) Note: The CC4800 48 Volt Card Cage does not appear as illustrated. You will find a 3-terminal power input strip and hexagonal-shaped fuse holder instead of an AC Power outlet and fuse on the bottom right of the cage. 2-7 . Chapter 3 Cable and Connector Descriptions Cable and Connector Descriptions This chapter illustrates and describes the cables and connectors related to the MultiModemManager rack. These cables can be purchased from Multi-Tech Systems, any of its distributors, or from any cable manufacturer. RJ11 is readily available or may be purchased from Multi-Tech. 3.1 Standard DB25 Phone Line Interface Connector Panel The standard back panel phone line interface provides 16 DB25 male connections. The following diagram is typical for each of the 16 phone line connectors. 13 25 12 RTP-A RRING-A 24 11 TTIP-A TRING-A 23 10 MI-A MIC-A 9 Two-wire leased line or transmit pair of four-wire leased line RTIP-A PRING-A Receive pair of four-wire leased line MI-A MI-A MI/MIC (Special order) RING-A 21 8 RTIP-B RRING-B 20 7 TTIP-B TRING-B 19 6 MI-B Dial-up line TTIP-A TRING-A 22 TIP-A MIC-B 18 5 TIP-B RING-B For MT1432MRK: RRING-C TIP-A RING MI-A 17 4 RTIP-C 16 3 TTIP-C TRING-C 15 2 MIC-C - Line B Line A Shunt wire MIC-C 14 1 TIP-C Modem A TIP-A Ring-A RING-C Modem B (Same as above, except substitute “B” for “A”) Modem C (Same as above, except substitute “C” for “A”) DB25-P Male Connector The connector on the back of the rack; the cable connector is female. We offer the CA 1432MR cable to meet these requirements. Please see the following page for full information. 3-1 3.2 CA1432MR Line Cable Multi-Tech provides a standard line cable for connecting the MT1432MR or the MT 2834MR back panel phone line interface to the PSTN and/or leased lines. The DB25 (female) line cable and connector information is shown below. 1 14 25 CA1432MR Line Cable - DB25 Female Connector (Rear View) (All Pins Connected Except 13, 15, 19, and 23) 1- ORG/BLK 2- BLK/ORG 3- WHT/BLUE 4- BLUE/WHT 5- WHT/GRN 6- GRN/WHT 7- ORG/RED 8- RED/ORG 9- GRAY/RED 10- RED/GRAY 11- WHT/ORG 12- ORG/WHT 14- BLUE/BLK 16- BLK/BLUE 17- RED/GRN 18- GRN/RED 20- BLUE/RED 21- RED/BLUE 22- WHT/BRN 24- WHT/GRAY 25- GRAY/WHT 3-2 3.3 Dial-Up Line 50-Pin Connector (CC48-21L) RINGA9 RINGB9 RINGC9 RINGA10 RINGB10 RINGC10 RINGA11 RINGB11 RINGC11 RINGA12 RINGB12 RINGC12 RINGA13 RINGB13 RINGC13 RINGA14 RINGB14 RINGC14 RINGA15 RINGB15 RINGC15 RINGA16 RINGB16 RINGC16 These 50-pin RJ21 connectors are used on racks with an RJ21 Dial-up Phone Line Interface Board. We provide this interface board to facilitate RJ21 hook-up by your local telephone company. J18 1 2 3 4 5 6 7 8 9 10 11 12 13 14 15 16 17 18 19 20 21 22 23 24 25 Multi-Tech designation 50POS.-CHAMP-CONNECTOR J17 1 2 3 4 5 6 7 8 9 10 11 12 13 14 15 16 17 18 19 20 21 22 23 24 25 RINGA1 RINGB1 RINGC1 RINGA2 RINGB2 RINGC2 RINGA3 RINGB3 RINGC3 RINGA4 RINGB4 RINGC4 RINGA5 RINGB5 RINGC5 RINGA6 RINGB6 RINGC6 RINGA7 RINGB7 RINGC7 RINGA8 RINGB8 RINGC8 TIPA9 TIPB9 TIPC9 TIPA10 TIPB10 TIPC10 TIPA11 TIPB11 TIPC11 TIPA12 TIPB12 TIPC12 TIPA13 TIPB13 TIPC13 TIPA14 TIPB14 TIPC14 TIPA15 TIPB15 TIPC15 TIPA16 TIPB16 TIPC16 26 27 28 29 30 31 32 33 34 35 36 37 38 39 40 41 42 43 44 45 46 47 48 49 50 2 50POS.-CHAMP-CONNECTOR TIPA1 TIPB1 TIPC1 TIPA2 TIPB2 TIPC2 TIPA3 TIPB3 TIPC3 TIPA4 TIPB4 TIPC4 TIPA5 TIPB5 TIPC5 TIPA6 TIPB6 TIPC6 TIPA7 TIPB7 TIPC7 TIPA8 TIPB8 TIPC8 26 27 28 29 30 31 32 33 34 35 36 37 38 39 40 41 42 43 44 45 46 47 48 49 50 5 These numbers refer to the position of these connectors on the back panel of the rack as shown in Figure 2-3. 2 Dial-Up Slot 9-16 4 2 Wire Leased Line/ 4 Wire Transmit Pair Slot 1-8 6 4 Wire Receive Pair Slot 1-8 •• •• •• •• •• •• •• •• •• •• •• •• •• •• •• •• •• •• •• •• •• •• •• •• •• •• •• •• 2 Wire Leased Line/ 4 Wire Transmit Pair Slot 9-16 1 •• •• •• •• •• •• •• •• •• •• •• •• •• •• 4 Wire Receive Pair Slot 9-16 3 Dial-Up Slot 1-8 5 These will be used for dial back-up telephone lines in both 2 and 4-wire leased-line operation. 3-3 TTIPA1 TTIPB1 TTIPC1 TTIPA2 TTIPB2 TTIPC2 TTIPA3 TTIPB3 TTIPC3 TTIPA4 TTIPB4 TTIPC4 TTIPA5 TTIPB5 TTIPC5 TTIPA6 TTIPB6 TTIPC6 TTIPA7 TTIPB7 TTIPC7 TTIPA8 TTIPB8 TTIPC8 26 27 28 29 30 31 32 33 34 35 36 37 38 39 40 41 42 43 44 45 46 47 48 49 50 1 2 3 4 5 6 7 8 9 10 11 12 13 14 15 16 17 18 19 20 21 22 23 24 25 RRINGA1 TRINGB1 TRINGC1 TRINGA2 TRINGB2 TRINGC2 TRINGA3 TRINGB3 TRINGC3 TRINGA4 TRINGB4 TRINGC4 TRINGA5 TRINGB5 TRINGC5 TRINGA6 TRINGB6 TRINGC6 TRINGA7 TRINGB7 TRINGC7 TRINGA8 TRINGB8 TRINGC8 TTIPA9 TTIPB9 TTIPC9 TTIPA10 TTIPB10 TTIPC10 TTIPA11 TTIPB11 TTIPC11 TTIPA12 TTIPB12 TTIPC12 TTIPA13 TTIPB13 TTIPC13 TTIPA14 TTIPB14 TTIPC14 TTIPA15 TTIPB15 TTIPC15 TTIPA16 TTIPB16 TTIPC16 26 27 28 29 30 31 32 33 34 35 36 37 38 39 40 41 42 43 44 45 46 47 48 49 50 1 4 3-4 J20 1 2 3 4 5 6 7 8 9 10 11 12 13 14 15 16 17 18 19 20 21 22 23 24 25 TRINGA9 TRINGB9 TRINGC9 TRINGA10 TRINGB10 TRINGC10 TRINGA11 TRINGB11 TRINGC11 TRINGA12 TRINGB12 TRINGC12 TRINGA13 TRINGB13 TRINGC13 TRINGA14 TRINGB14 TRINGC14 TRINGA15 TRINGB15 TRINGC15 TRINGA16 TRINGB16 TRINGC16 Multi-Tech designation J19 3.4 2-Wire Leased Line or 4-Wire Transmit Pair Connector (CC48-21L) These 50-pin connectors are used on racks with an RJ21 Leased Line Phone Line Interface Board to simplify local telephone company installation. 50POS.-CHAMP-CONNECTOR 50POS.-CHAMP-CONNECTOR These numbers refer to the position of these connectors on the back panel of the rack as shown in Figure 2-3. RTIPA1 RTIPB1 RTIPC1 RTIPA2 RTIPB2 RTIPC2 RTIPA3 RTIPB3 RTIPC3 RTIPA4 RTIPB4 RTIPC4 RTIPA5 RTIPB5 RTIPC5 RTIPA6 RTIPB6 RTIPC6 RTIPA7 RTIPB7 RTIPC7 RTIPA8 RTIPB8 RTIPC8 26 27 28 29 30 31 32 33 34 35 36 37 38 39 40 41 42 43 44 45 46 47 48 49 50 1 2 3 4 5 6 7 8 9 10 11 12 13 14 15 16 17 18 19 20 21 22 23 24 25 RRINGA1 RRINGB1 RRINGC1 RRINGA2 RRINGB2 RRINGC2 RRINGA3 RRINGB3 RRINGC3 RRINGA4 RRINGB4 RRINGC4 RRINGA5 RRINGB5 RRINGC5 RRINGA6 RRINGB6 RRINGC6 RRINGA7 RRINGB7 RRINGC7 RRINGA8 RRINGB8 RRINGC8 RTIPA9 RTIPB9 RTIPC9 RTIPA10 RTIPB10 RTIPC10 RTIPA11 RTIPB11 RTIPC11 RTIPA12 RTIPB12 RTIPC12 RTIPA13 RTIPB13 RTIPC13 RTIPA14 RTIPB14 RTIPC14 RTIPA15 RTIPB15 RTIPC15 RTIPA16 RTIPB16 RTIPC16 26 27 28 29 30 31 32 33 34 35 36 37 38 39 40 41 42 43 44 45 46 47 48 49 50 3 6 1 J22 2 3 4 5 6 7 8 9 10 11 12 13 14 15 16 17 18 19 20 21 22 23 24 25 RRINGA9 RRINGB9 RRINGC9 RRINGA10 RRINGB10 RRINGC10 RRINGA11 RRINGB11 RRINGC11 RRINGA12 RRINGB12 RRINGC12 RRINGA13 RRINGB13 RRINGC13 RRINGA14 RRINGB14 RRINGC14 RRINGA15 RRINGB15 RRINGC15 RRINGA16 RRINGB16 RRINGC16 Multi-Tech designation J21 3.5 4-Wire Receive Pair (CC48-21L) These 50-pin connectors are used on racks with an RJ21 Leased Line Phone Line Interface Board to simplify local telephone company installation. 50POS.-CHAMP-CONNECTOR 50POS.-CHAMP-CONNECTOR These numbers refer to the position of these connectors on the back panel of the rack as shown in Figure 2-3. 3-5 . Chapter 4 Service, Warranty & Tech Support 4.1 Service If service is required, equipment may be sent, freight prepaid, to our factory. Return shipping charges will be paid by Multi-Tech Systems. Include a description of the problem, a return shipping address, and a check or purchase order for out-of-warranty repairs. The standard repair charge for a MultiModemManager Rack is $395, $95 for a Power Supply, and $95 for a Rack Controller Card. These prices are valid at the time of this publication, but could change in the future. Multi-Tech pays the return freight. Send equipment to this address: MULTI-TECH SYSTEMS, INC. 2205 Woodale Drive Mounds View, Minnesota 55112 Attn: Service You should check with the people that supplied you with your equipment on the availability of local service and/or loaner units, in your part of the country. You may call us at 1-800-328-9717; or if in Minnesota, at 763-785-3500. 4.2 Limited Warranty Multi-Tech Systems, Inc. (MTS) warrants that its products will be free from defects in material or workmanship for a period of five years from the date of purchase, or if the date of purchase is not provided, five years from the date of shipment. MTS MAKES NO OTHER WARRANTY, EXPRESSED OR IMPLIED, AND ALL IMPLIED WARRANTIES OF MERCHANTABILITY AND FITNESS FOR A PARTICULAR PURPOSE ARE HEREBY DISCLAIMED. This warranty does not apply to any products which have been damaged by lightning storms, water, or power surges or which have been neglected, altered, abused, used for purposes other than the one for which they were manufactured, repaired by the customer, or any party without MTS’s written authorization, or used in any manner inconsistent with MTS’s instructions. MTS’s entire obligation under this warranty shall be limited (at MTS’s option) to repair or replacement of any products which prove to be defective within the warranty period, or, at MTS’s option, issuance of a refund of the purchase price. Defective products must be returned by Customer to MTS’s factory transportation prepaid. 4-1 MTS WILL NOT BE LIABLE FOR CONSEQUENTIAL DAMAGES AND UNDER NO CIRCUMSTANCES WILL ITS LIABILITY EXCEED THE PURCHASE PRICE FOR DEFECTIVE PRODUCTS. 4.3 Tech Support Multi-Tech has an excellent staff of tech support personnel available to help you get the most out of your Multi-Tech products. If you have any questions about the operation of this unit, please call Tech Support at 1-800-972-2439 (U.S. and Canada only). Please note the status of your modem before calling Tech Support. This status can include LED indicators, screen messages, diagnostic test results, problems with a specific application, etc. Product serial numbers are also helpful in troubleshooting problems. 4-2 . Appendix Appendix A Related Products and Documentation MultiModemManager Products MMM-Starter Starter Rack includes either (must specify) a CC4800/ 11 (phone connections through 48-RJ11 connectors, 6pin modular) or CC4800/21 (phone connections through 6 RJ21 connectors, 50-pin amphenol) card cage, MR4800 controller module, one PS4800 power supply, AN301TP8 NIC and MMM software. MMM-Starter/PS Starter Rack includes either (must specify) a CC4800/11 (phone connections through 48 - RJ11 connectors, 6-pin modular) or CC4800/21 (phone connections through 6 - RJ21 connectors, 50-pin amphenol) card cage, MR4800 controller module, one PS4800 power supply, AN301TPPS NIC and MMM software. MT1432MR MMM modem card contains three independent V.32bis modems. Each is a 14,400/12,000/9600/7200/4800/ 2400/1200/300 bps intelligent auto-answer modem for dial-up or 2-wire leased line, or 4-wire leased line with dial backup. Their features include: phone number storage; auto-fallback from 14,400 to 4800 bps, autoswitching between all speeds, callback security; 11 LEDs; remote configuration; standards compatibility with V.32bis, V.32, V.22bis, V.22, V.23, V.21, Bell 212A, Bell 103, MNP® 2-4 and V.42 error correction; MNP® 5 and V.42 bis data compression. MT2834MR Supports 1432MR features, as above, and V.34 (28.8K bps) standard. PS4800/-48V Switching power supply module. A second PS4800 provides a CC4800 card cage with redundant power supply capability. PS4800 Universal switching power supply module. A second PS4800 provides a CC4800 card cage with redundant power supply capability. appendix - 1 MR4800 Rack controller module provides the interface between the rack modems and a PC equipped with AN301TP8 and MMM software. MMMSW MMM software, runs under Windows© 3.1x, 95, or NT. The software features point and click modem configuration, testing, reset, fault alerts, and callback security. Includes AN301TP8 NIC to connect central management PC to the MR4800 rack controller. AN508TP Eight-port hub used when 4 or more MMM racks are to be connected to the central management PC. AN516TP Sixteen-port hub used when 4 or more MMM racks are to be connected to the central management PC. MultiModemManager Manuals • MultiModemManager Model PS4800 Power Supply Installation Manual documents the installation of the PS4800 power supply. • MultiModemManager Owner’s Manual documents hardware features and installation, and is the complete reference manual for the MultiModemManager software. • MultiModemManager Model MR4800 Rack Controller Installation Manual documents the installation of the MR4800 Rack Controller. • MultiModem (Model MT1432MR, MT1432MRI, and MT1432MRK) Owner’s Manual documents the features and operation of the MT1432MR modem card. • MultiModem (Model MT2834MR, MT2834MRI, and MT2834MRK) Owner's Manual documents the features and operation of the MT2834MR modem card. appendix - 2