1
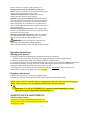
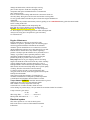
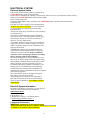
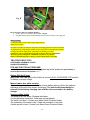
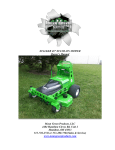
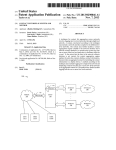
MGP-20 Push Mower
Owner’s Manual
Mean Green Products, LLC
4404 Hamilton Cleves Rd. Unit 2 * Hamilton, OH 45013
513-738-4736 or 513-200-7561(Sales & Service)
__Index________________________________Page
Warranty Information……………………………………………………….A-C
Warranty Registration…………………………………..........................C
Warranty Registration Card…………………………………..................C
General Information……………………………………………………………..1
Safety Precautions……………………………………………………………..2-6
Safety/Instruction Decals…………………………………………………..2-6
Mower Control Panel…………………………………………………………...4
Power ON Light…………………………………………………………………….4
Operator Presence Safety Rod……………………………………………5,7
Master Power Ignition Switch……………………………………………….6
Battery Capacity Indicator…………………………………………………….5
Deck Blade Start Button………………………………………………….…4,7
HI & LO Mode Switch…………………………………………………………4,6
Operation………………………………………………………………………….8-9
Use of ramp……………………………………………………………………..9-11
Slope Guide……………………………………………………………………….8A
Slope Operation……………………………………………………………….9-11
Children………………………………………………………………………………11
Manual Deck Height Adjustment ……….………………………………11
Discharge Chute………………………………………………………………...11
Safety Interlock System………………………………………………………12
Operating Suggestions…………………………………………………..12-13
Operating Instructions……………………………………………………13-14
Starting/Stopping your mower……………………………………………13
Index Continued
Page:
Maintenance & Adjustments…………………………………………..13-16
Electrical System……………………………………………………………..17-22
Mower Blade Maintenance………………………………………………….16
Electrical System Safety……………………………………………………….17
Electrical System Information………………………………………………17
Component Maintenance……………………………………………….17-18
Battery Connectors……………………………………………………………..19
Battery Charger…………………………………………………………………..19
Battery Maintenance………………………………………………………19-20
Battery Charging……………………………………………………………..20-22
Disconnecting Batteries……………………………………………………….21
Reconnecting Batteries………………………………………………………..22
Battery Storage…………………………………………………………………….22
Troubleshooting……………………………………………………………...22-23
Storage…………………………………………………………………………………23
New Season Preparation………………………………………………………23
MGP-20 Push Mower Assembly
Lithium Energy Module Maintenance
Tractors and Decks
Mean Green Products LLC
Two Year Limited Warranty For Residential and Commercial Use
WHAT IS COVERED BY THIS WARRANTY
Mean Green Products, makes the following warranty to the original purchaser only:
A. Residential Use: Mean Green Mowers used for normal residential purposes* are warranted for two (2) years
or 500 hours total usage (whichever comes first) from date of delivery on all materials and workmanship.
If the Purchaser discovers within this warranty period (two years from date of delivery) a defect in materials or
workmanship: He must promptly notify Mean Green Products or an authorized dealer, in writing of the defect.
In no event shall such notification be received by Mean Green Products, or an authorized dealer later than
twenty-four (24) months from date of delivery. Within a reasonable time after such notification,
Mean Green Products, will correct any defect in material or workmanship on the Mean Green Mower
by repairing or replacing part(s) with either new or used replacement parts.
Such repair, including parts and labor shall be at the expense of Mean Green Products, and,
the batteries are covered by a three (3) year pro-rated limited warranty or 500 hr. usage, whichever
comes first to the original owner (consumer) only.
1st year — 100%
2nd year — 66%
3rd year — 33%
NOTE: Failure to properly maintain batteries
and keep them fully charged will reduce
battery life and will void battery warranty.
The provisions of this limited warranty shall not apply to failure due to:
Abuse or neglect such as improper fluid levels, water damage, loose wiring, or rusted or corroded hardware;
lack of proper maintenance; damage caused by improper installation of the battery;
neglect, breakage, freezing, fire, explosion, wreckage, the addition of any chemical, operation
of the battery in an overcharged, or the operation of the battery in an uncharged condition (below half-charge
-1.200 specific gravity); and a battery charged by systems other than the original equipment type battery charger.
* Normal residential purpose means use of product
on same lot as your home. Use at more than one
location is considered commercial use, and then the
commercial use warranty would apply.
B. Commercial Use: Mean Green Mowers used for commercial and institutional use are warranted for
two (2) years or 500 hours total usage (whichever comes first) from date of delivery on all materials and
A
workmanship of chassis and deck structures and one (1) year or 500 hours total usage (whichever comes first)
from date of delivery on all materials and workmanship. If the Purchaser discovers within this warranty period a
defect in materials or workmanship:
He must promptly notify Mean Green Products, or an authorized dealer, in writing of the defect. In no
event shall such notification be received by Mean Green Products, or an authorized dealer later than
twelve to twenty-four (12-24) months from date of delivery. Within a reasonable time after such notification, Mean
Green Products, will correct any defect in material or workmanship on the Mean Green Mower, by
repairing or replacing part(s) with either new or used replacement parts. Such repair,
including parts and labor shall be at the expense of Mean Green Products, and, the batteries
are covered by a two (2) year pro-rated limited warranty or 500 hr. usage, whichever comes
first to the original owner (commercial) only.
1st year — 100%
2nd year — 50%
NOTE: Failure to properly maintain batteries
and keep them fully charged will reduce
battery life and will void battery warranty.
The provisions of this limited warranty shall not apply to failure due to:
Abuse or neglect such as water damage, loose wiring, or rusted or
corroded hardware; lack of proper maintenance; damage caused by improper installation of the battery;
neglect, breakage, freezing, fire, explosion, wreckage, the addition of any chemical, operation of the battery
in an overcharged, or the operation of the battery in an uncharged condition (below half-charge
-1.200 specific gravity); and a battery charged by systems other than the original equipment type battery charger.
C. Rental Use: Mean Green Mowers used in rental applications are not covered by warranty. This also
includes no warranty on the batteries.
WHO MUST PERFORM THE WARRANTY SERVICE
All warranty service will be performed by dealers authorized by Mean Green Products. Service calls and/or
transportation expense of the product to and from the authorized dealer, for
warranty work, will be paid by the owner of the product. For warranty service contact an authorized dealer.
WHAT IS NOT COVERED BY THIS WARRANTY
Mean Green Products, does not warranty:
Some product, components or parts not manufactured by Mean Green Products.
Repairs made by unauthorized persons. Damage caused by use of the Mean Green Mower
for purposes other than those for which it was designed. Damages caused by disasters such as fire, flood,
wind, and lightening. Damages caused by neglect, abuse, abnormal use, improper or unreasonable use, accident,
negligence, or misuse such as water damage. Repairs or replacement resulting from the use of
unauthorized parts, accessories or attachments. Repairs or replacement as the result if any alterations
or modifications, in the determination of the Mean Green Mower, which adversely affects the operation,
performance or durability of the equipment. The Mean Green Mower which has the serial number
removed or made illegible. Depreciation or damage caused by normal wear, lack
of reasonable and proper maintenance, failure to follow the product’s owner’s manual operating, maintenance
and adjustment instructions or other operational instructions provided by Mean Green Products.
Normal maintenance parts and service including, but not limited to, lubricants, tune-up parts, blades, blade
sharpening, bearings, brake or steering adjustments.
DISCLAIMER OF WARRANTY
The foregoing warranties are in lieu of all other warranties, expressed or implied, including but not limited to the
implied warranties of merchantability and fitness for a particular purpose. However, if the Mean Green Mower is
purchased as a consumer product, any implied warranty of merchantability or fitness for a particular purpose is
limited to the duration of this limited warranty. Some states do not allow limitations on how
long an implied warranty lasts, so the above limitation may not apply to you. This warranty gives you specific legal
rights, and you may also have other rights which vary from state to state.
LIMITATION OF REMEDIES
In no case shall Mean Green Products, be liable for any special, incidental, or consequential damages based upon
breach of warranty, breach of contract, negligence, strict liability in tort, or any other legal theory.
Such damages include, but are not limited to:
� Loss of profits
� Loss of savings or revenue
� Loss of use of the Mean Green Mower or any associated equipment
Cost of capital
B
Cost of any substitute equipment, facilities, services or downtime
The claims of third parties including customers, and injury to property
Some states do not allow the exclusion or limitation of incidental or consequential damages, so the above limitation
or exclusion may not apply to you.
TIME LIMIT
Any action for breach of warranty must be commenced within twenty-four (24) months following
delivery of the goods in a residential application. Any action for breach of warranty must be commenced
within twelve to twenty-four (12-24) months following delivery of the goods in a commercial application.
NO OTHER WARRANTIES
This agreement is understood to be the complete and exclusive agreement
between the parties, superseding all prior agreements, oral or written, and all other communications
between the parties relating to the subject matter of this agreement.
ALLOCATION OF RISKS
This agreement allocates the risks of product failure between Mean Green Products and the purchaser. This
allocation is recognized by both parties and is reflected in the price of the goods.
OWNER'S RESPONSIBILITY
You must maintain your Mean Green Mower following the maintenance procedures described in your owner's
manual. Such routine maintenance, whether performed by a dealer or by you, is at your expense.
This machine like any other powered equipment is potentially
dangerous unless properly operated. Any operator must be cautious and keep safety in mind at
all times. Any operator, prior to using the Mean Green Mower, should thoroughly
familiarize himself with the owner's manual regarding operation and safety of the machine, as well as
all safety warnings on the machine itself.
�
�
WARRANTY REGISTRATION
1. Owners must register the unit by filling out the Warranty
Registration Form, provided in the owner’s packet. It MUST be
completed and signed by the authorized dealer and original purchaser.
2. For validation, the completed Warranty Registration Form
MUST be forwarded to Mean Green Products, within
ten (10) days following date of purchase.
3. The date of purchase constitutes delivery.
www.meangreenproducts.com
4404 Hamilton Cleves Rd * Unit 2
Hamilton, OH 45013
513-738-GREN(4736) * 513-200-7561
C
GENERAL INFORMATION
This manual applies to the following Mean Green Products equipment lines:
Mean Green Mowers – MGP-20 Push Mower
To the new owner
The purpose of this manual is to assist owners and operators in maintaining and operating the mower.
Please read it carefully; information and instructions furnished can help you achieve years of dependable
performance. It is the owner’s responsibility to make certain that the operators and mechanics read and
understand this manual and all decals before operating this machine. It is also the owner’s responsibility
to make certain that the operators and mechanics are qualified and physically able individuals, properly
trained in the operation of this equipment. All operator and mechanics must become familiar with the safe
operation of the equipment, operator controls and safety signs. Never let children or untrained people
operate or service the equipment. Local regulations may restrict the age of the operator. The owner/user
can prevent and is responsible for accidents or injuries occurring to themselves, other people or property.
Using this manual
General operation, adjustment and maintenance guidance is outlined for both the experienced and novice
Mean Green Mower user. Operating conditions vary considerably and cannot all be addressed
individually. Through experience, however, operators should find no difficulty in developing good
operating skills suitable to most conditions. Directions used in this manual, for example RIGHT or LEFT,
refer to directions when seated on the mower/standing facing forward, unless otherwise stated.
Photographs and illustrations used were current at the time of printing, but subsequent production changes
may cause your machine to vary slightly in detail. Mean Green Products reserves the right to redesign and
change the machine as deemed necessary, without notification. If a change has been made to your
machine which is not reflected in this owner’s manual, or the parts manual, see your Mean Green
Products dealer for current information and parts.
Warranty registration
The Owner must register the unit by filling out the Warranty Registration Form, provided in the owner’s
packet, to validate your warranty protection. As the new equipment owner, you are
expected to see that this is done at the time of delivery. If using the Warranty Registration Form, it MUST
be completed and signed by the authorized dealer and original purchaser.
Be sure to register the mower plus each attachment that displays a model and serial identification number
plate with Mean Green Products.
IMPORTANT: Any unauthorized modification, alteration, or use of non-approved attachments voids the
warranty and releases Mean Green Products from any liability arising from subsequent use of this
equipment.
Model and serial number
The mower serial number is found on the serial identification plate located on the inside of the handle bar
attach mount. The model is the type of Mean Green Mower purchased i.e. residential or commercial, push
mower, walk behind or zero turn model. The serial numbers and model are required on the Warranty
Registration form. They will also assure you of the correct service parts when replacement becomes
necessary.
Parts and service
All warranty repair and service must be handled through an
authorized Mean Green Products dealer. Arrangements should be made
through your local service center.
1
SAFETY PRECAUTIONS
This safety alert symbol is used to call attention to a message
intended to provide a reasonable degree of PERSONAL
SAFETY for operators and other persons during the normal
operation and servicing of this equipment.
DANGER – denotes immediate hazards which WILL result
in severe personal injury or death.
WARNING – denotes a hazard or unsafe practice which
COULD result in severe personal injury or death.
This manual uses two other words to highlight information.
IMPORTANT calls attention to special mechanical information
and NOTE: emphasizes general information worthy of special
attention.
All operators and mechanics should read this manual and be
instructed about safe operating and maintenance procedures. If
the operators or mechanics cannot read and understand English,
it is the owner’s responsibility to explain this material to them.
However, improper use or maintenance by the operator or owner
can result in injury. To reduce the potential for injury, comply with
these safety instructions and always pay attention to the safety alert
symbol, which means DANGER or WARNING - “personal
safety instructions.” Failure to comply with the instructions
may result in personal injury or death.
Incorrect usage of this machine may result in severe
injury. Personnel operating and maintaining it should be
trained in the proper use and should read the manuals
completely and thoroughly before attempting to set-up,
operate, adjust, or service this machine.
It is the owner’s responsibility to make certain that the
operators and mechanics read and understand this manual and
all decals before operating this machine. It is also the owner’s
responsibility to make certain that the operators and mechanics
are qualified and physically able individuals, properly trained in
the operation of this equipment. All operators and mechanics
must become familiar with the safe operation of the equipment,
operator controls and safety signs.
Never let children or untrained people operate or service the
equipment. Local regulations may restrict the age of the
operator.
The owner/user can prevent and is responsible for accidents or
injuries occurring to themselves, other people or property.
The owner should also ensure that the operator/mechanic
know that they are responsible for their own safety as well as the
safety of other persons within the vicinity. Remember, the
operator is responsible for accidents or hazards occurring to
other people or their property.
Safety and Instruction Decals
Specific safety warning decals are located on the equipment near the immediate areas of potential hazards. These
decals should not be removed or obliterated. Replace them if they become non-readable.
The following illustrations show the various decals that are located on the machine. A brief explanation, for those
requiring one, is shown to help the operator understand the meanings of these decals.
• Read Owner’s Manual and Safety Warning Decals before attempting
to operate this machine.
2
DANGER: Rotating blades! (fig.1A)
* Keep shields and covers in place while
machine is in operation
* Keep hands, feet and clothing away from
rotating blades
1A
DANGER: Safety Precautions!: (fig.2A)
1.
2.
3.
4.
5.
6.
7.
8.
9.
10.
11.
Read Owner’s Manual Before Operation
Keep Hands, Feet, And Clothing Away From Rotating Blades
Maintain Safe Distance From People And Pets
Roll Over Warning – Never Operate Machine On Greater Than 15 Degree Slope
Electrical Maintenance By Trained Professionals ONLY
Keep Safe Distance From Drop-Offs and Ditches
Move Slowly On Slopes
Be Aware When Backing Up
Battery Hazards – Wear Eye And Clothing Protection
Keep Flames Away From Charging Batteries
See Owner’s Manual For Other Information
2A
3
Warning: Do Not Step! (fig.1B)
*Fall Hazard
1B
Important: Mower Control Panel (fig.1C)
A. Blade HI/LO B. Power ON light
C. Blade Start Button
C
..
A
B
Fig.1C Mower Control Panel
4
1H
Fig. 1H: Operator Presence Safety Rod (Rod underneath handle bar grips) Rod must be
depressed for mower blade switch to engage. Note: When lever is released, mower blades will
automatically stop in less than 3 seconds.
***Important: IN CASE OF EMERGENCY: Operator should immediately release
Operator Presence Safety Rod to STOP blades!!***
Fig. 1E
Fig. 1E: Battery Capacity Indicator – (Located on the bottom
left side of battery) When pushing the RED battery indicator
button (Fig.2E) the charge indicator LED will light, indicating the
relative charge remaining in the battery. 3 green LED lights
indicate maximum charge capacity. 2 green LED lights indicate
2/3 capacity. 1 green LED light indicates 1/3 capacity. A red
LED light indicates stoppage is imminent & return to a charging
station!
IMPORTANT: When battery voltage becomes low, the
mower blades will stop.
When the batteries discharge to this point they require recharging.
The unit should immediately be returned to the battery
charging area and the unit connected to the battery charger.
Fig.2E
5
Fig.1D
Fig. 1D: Master Power Ignition Switch – (Located on the right side
of battery) A three position Switch: Battery Lock, Off and On. With
key inserted, rotate key clockwise to lock the battery pin in mount.
Rotate clockwise again to the ON position to turn on power. Note:
Power ON light will turn on when key is in the ON position (located
on Mower Control Panel Fig.1C)
Fig. 2B: High & Low Mode Switch –
Located on the left side of the control panel.
Push switch to LO Mode for normal and light
grass conditions. Switch to HI mode for thick
and tall grass conditions.
NOTE: Mowing in LO mode will greatly
extend the run time of the mower. Use LO
mode as much as possible for maximum run
time.
2B
6
Fig. 1F: Deck Blades ON and
OFF: To engage blade, turn key to
ON position, pull UP operator
presence safety rod and
momentarily push RED button
(do not hold button down)(Fig.1G)
(located on control panel)
Operator Presence Safety Rod
MUST be held against the
handlebar for the blade to engage
and operate. Releasing the
Operator Presence Safety Rod will
disengage the blade and the blade
will stop spinning within 3
seconds.
NOTE: Always WAIT 3 seconds
before re-engaging the blade after
blade has been disengaged.
NOTE: There is always a few
second delay before blades will
start and stop!!
Operator Presence
Safety Rod
1F
1G
7
OPERATION
Safe Operating Practices
This product is capable of amputating hands and feet and throwing objects. Always follow
all safety instructions to avoid serious injury or death.
Operation
Evaluate the terrain to determine what accessories and attachments are needed to properly and
safely perform the job. Only use accessories and attachments approved by the manufacturer.
Clean battery compartment, drive motor compartment, mower deck, seat etc. of all dirt and
debris. Keep unit free of grass clippings, leaves and other debris. DO NOT
spray with water to clean unit. Do not use, solvents, hard cleaners or abrasives. Use only
compressed air. Wear adequate eye and hearing protection when cleaning the unit.
Never leave a running machine unattended. Always stop on level ground, disengage deck
blade switch, turn key to off position,
remove key and disconnect battery cables by pulling out on the black battery quick
disconnect handle for any reason including emptying the
catcher or unclogging the chute.
Always keep safety shields and covers in place.
Always maintain a safe distance from people and pets when mowing.
Always stop machine if someone enters the area.
Avoid injury. Keep area clear of bystanders when engaging deck blade switch.
Always operate machine in daylight or with adequate working lights.
Follow daily and weekly checklists, making sure electrical connections are secured and
bolts are tightened.
Watch for traffic when operating near or crossing roadways.
Always be alert for hazards such as rocks, metal objects and other debris which may be
thrown or entangled by mower blades. Watch out for holes or deep depressions.
Inspect area to be mowed for hazards such as rocks, metal objects and other debris which
may be thrown or entangled by mower blades. Remove these objects before mowing.
Always inspect machine for damage after striking a foreign object. If damage is found,
repair machine immediately. Be sure to stop on level ground, disengage deck blade
switch, release Operator Presence Safety Rod, turn key to OFF position,
remove key and disconnect battery cables by pulling out the black battery quick disconnect handle in battery box
compartment! Always wear adequate ear protection, such as earplugs, when operating this
equipment as prolonged exposure to uncomfortable or loud noises can cause impairment
or loss of hearing. Do not wear radios or music headphones while operating the machinery.
Safe operation requires your full attention.
Do not operate the equipment while wearing sandals, tennis shoes, sneakers, shorts or
any type of loose fitting clothing. Long hair, loose clothing or jewelry may get tangled in
moving parts. Always wear long pants, safety glasses, ear protection and safety shoes when
operating this machine.
Always wear safety goggles or safety glasses with side shields when operating the mower.
Always be aware of what is behind the machine before backing up. Do not mow in reverse
unless absolutely necessary.
Always look down and behind before and while backing up.
Never operate a poorly maintained machine.
Never attempt high speed maneuvering, especially in crowded, congested areas or on slopes.
Never allow persons to operate this machine without proper instruction or allow children to
operate machine. Allow only responsible adults who have read and understand
these instructions to operate this machine.
Never put hands or feet under any part of the machine while it is running.
Never carry passengers.
Never direct discharged material toward anyone. Avoid discharging material against
a wall or obstruction. Material may ricochet back toward the operator. Always disengage
the blades and wait for them to stop before crossing gravel drives, walks or roads.
Always keep clear of the mower blades and attachments during their operation.
Turn off blades when not mowing.
Slow down before tur ning.
8
Turn the key to the OFF position, remove key before removing the grass catcher or unclogging the discharge chute.
Never clear the discharge chute with the machine running. Turn
the key to the OFF position, remove key, and make sure the blades have stopped before cleaning.
Use a stick to clear a plugged discharge area. Never use your hand!
Do not operate the machine while under the influence of alcohol or drugs.
Exercise caution when loading or unloading the machine onto a trailer or truck.
Data indicates that operators, age 60 years and above, are involved in a large percentage
of mower-related injuries. These operators should evaluate their ability to
operate the mower safely enough to protect themselves and others from serious injury.
If any attachment or additional weight is mounted on the rear or side of the unit (depending on
model), any rapid movement in either direction could result in a reaction of the machine
that can cause serious injury.
Clean flammable material from machine. Prevent
fires by keeping battery compartment, deck and operator’s
station clean of accumulated trash, grass clippings,
and other debris.
Using a ramp
Use extreme caution when loading and unloading a unit onto a truck or trailer with a ramp.
Use only a single, full width ramp; do not use individual ramps for each side of the unit.
Having a full width ramp provides a surface for the mower frame to contact if the
unit starts to tip backwards. It also reduces the risk of a wheel going off and the
machine tipping over. Do not exceed a 15 degree angle between the ramp and the ground
or between the ramp and the trailer or truck. When on a ramp avoid sudden acceleration.
Slope operation (see page 8A)
Slopes are a major factor in loss-of-control and tip-over
accidents, which can result in severe injury or death. All
slopes require extra caution. If you cannot back up the slope
or if you feel uneasy on it; do not mow it.
REMINDER: Only operate on slopes of 15 degrees or less.
Use extreme caution when operating on slopes.
• Be extremely careful changing directions on a slope.
• Slow down.
• Do not operate where the machine could slip or tip.
• Turn slowly
• Turn on the most level part of the slope
• To maximize traction, it is better to turn the front of the
machine uphill, rather than downhill. If drive tires lose
traction, steering control is lost which could cause
serious injury or death.
• If it becomes necessary to turn downhill, turn slowly
and gradually.
Do not remove or modify the stabilizer wheels.
Watch for holes, ruts, bumps, rocks or other hidden
objects. Uneven terrain could overturn the machine. Tall
grass can hide obstacles.
Remove obstacles such as rocks, tree limbs, etc.
Keep all movement on slopes slow and gradual. Do not
make sudden changes in speed or direction.
Avoid starting and stopping on a slope. If tires lose traction,
disengage the blades and proceed slowly straight
down the slope.
Mow a safe distance (minimum of 10 feet, 3.05 meters)
away from drop-offs, retaining walls, drainage ditches,
embankments, water, and other types of hazards to avoid
a wheel dropping over the edge or to avoid the ground
from breaking away. This will reduce the risk of the
9
machine suddenly rolling over causing serious injury or
death.
Use a walk behind, push mower or hand-held trimmer on
slopes and near drop-offs, retaining walls, drainage
ditches, embankments and water to avoid machine rollover
and serious injury or death.
Do not mow on wet grass. Reduced traction could cause
sliding and loss of steering control.
Never make sudden starts, stops, turns, or reverse direction,
especially when maneuvering on slopes.
Never stop suddenly while backing down slopes. This
action may result in a reaction of the machine that can
cause serious physical injury.
The Mean Green Mower is capable of operating horizontally
(traverse) on moderate slopes. When operating on slopes
up to 15 degrees, be aware of any conditions that may
cause the mower to lose traction resulting in a
possible loss of control of the machine. An operator
should not operate on a slope until he is thoroughly
familiar with the equipment.
Do not operate on slopes greater than 15 degrees.
Refer to Slope Guide, page 8A when determining the
degree of slope to be mowed.
It is strongly recommended that the operator drive the
machine off of the slope, using extreme caution, if any
sign of loss of traction is detected. Wait until the condition
that caused the problem is resolved before attempting
to operate on the slope again.
Terrain conditions can affect traction resulting in possible
loss of control of the machine. Some of the conditions
to be aware of are:
1. Wet terrain
2. Depressions in the ground; i.e. holes, ruts, washouts
3. Mounds of dirt
4. Soil type; i.e. sand, loose dirt, gravel, clay
5. Grass type, density, and height
6. Extremely dry conditions of grass
7. Tire pressure (if applicable)
The attachments mounted to the mower will also
affect the way it handles on a slope. Be aware that each
attachment’s characteristics vary.
Another consideration is to always mow a safe distance
(minimum of 10 feet 3.05 meters) away from drop-offs,
retaining walls, drainage ditches, embankments,
water, and other types of hazards to avoid a wheel dropping
over the edge or to avoid the ground from breaking
away and always be aware of what is located at the bottom
of the slope. This will reduce the risk of the machine
suddenly rolling over causing serious injury or death.
Extreme caution should be used when there is a hazard
located at the bottom of the slope. Some examples
are:
1. Water; i.e. lake, river
2. Cliffs, retaining walls
3. Roads, highways
4. Buildings
5. Rocks
These are just a few examples of situations when caution must be used when operating
10
on a slope. There are many other possibilities too numerous to mention. Just remember to
always exercise extreme caution when operating on any slope.
Children
Tragic accidents can occur if the operator is not alert to the presence of children.
Children are often attracted to the machine and the mowing activity. Never assume that
children will remain where you last saw them.
Never leave machine unattended with key in switch, especially with children present.
Children or bystanders may be injured if they move or attempt to operate the machine while it is unattended. Always
disengage deck blade switch & turn key to OFF position and
remove key. Keep children out of the mowing area and under the watchful care of
a responsible adult other than the operator. Be alert and turn the machine off if children enter the area. Before and
while backing, look behind and down for small children.
Never carry children, even with the blades off. They may fall off and be seriously
injured or interfere with safe machine operation. Children who have been given rides
in the past may suddenly appear in the mowing area for another ride and be run over
or backed over by the machine. Never allow children to operate the machine.
Use care when approaching blind corners, shrubs, trees, the end of a fence or
other objects that may obscure vision. Never allow children or others in or on towed equipment.
C. Manual Deck Height Adjustment (Fig.3B) To adjust the deck height, each wheel must be manually removed
and moved to the appropriate wheel height position hole. The supplied “allen” wrench can be used to loosen each
wheel bolt and then tighten into new height position. (Located on right lower handle bar in allen wrench holder)
3B
3B
D. Discharge Chute – (Fig. 3C) Found on right side of chassis. WARNING: Always keep
Discharge Chute in the down position when mowing and blades are moving.
Warning: Keep all shields in place at all times to prevent injury! DO NOT operate mower without
discharge chute or other safety devices in place & working condition!
3C
11
E. Safety Start Interlock System
The machine is equipped with a safety start interlock system
consisting of the Operator Presence Safety Rod and Operator Safety Lever.
Operating suggestions
DANGER: Prior to operating the mower the operator
should be thoroughly familiar with the proper use and
operation of the equipment, should read the manual
completely and thoroughly, and should have attempted
slow moving maneuvers to become familiar with the
operation of the equipment before attempting normal
speed operation. An inexperienced operator should not
mow on slopes or on uneven terrain.
WARNING: Sharp depressions or raised obstacles
(such as gutters or curbs) should not be directly
approached at high speed in an attempt to “jump”
them as the operator could be thrown away from the equipment.
Approach at a slow speed and angle one drive
wheel at the obstruction. Continue at an angle until the
wheel clears and then pivot the opposite wheel around.
When turning on soft wet turf, keep both wheels rolling either
forward or backward. Pivoting on one stopped wheel can
damage turf. This is especially important when mowing.
Keep blades sharp. Many professional mowing companies
have additional sets of blades and change blades twice a day:
once in the morning and again at noon. Many problems with
incorrect cutting patterns are due to dull blades or blades
which have been sharpened incorrectly. Information on
sharpening blades is listed in this manual’s maintenance section.
In addition, most communities have individuals or companies
which specialize in sharpening mower blades. Blade sharpness
should be checked daily.
DANGER: Never work with blades while key is in
the ignition switch. Always place deck blade switch
in the disengaged position, release Operator Presence Safety Rod
and turn key to the OFF position, remove key from switch and
disconnect battery cables by pulling out on LARGE RED battery quick disconnect
handle!
Wear gloves when handling blades. Always check for blade damage
if mower strikes a rock, a branch or another foreign
object during mowing!
Direct grass discharge to right (with side discharge models),
away from un-mown area. Select a mowing pattern that directs grass discharge
towards the outside, not towards center, of mowing area. Generally, this
means using a pattern utilizing left turns because side discharge
is to right. In any case, avoid throwing grass discharge onto
un-mowed area because grass is then mowed “twice”. Mowing
twice puts an unnecessary load on the unit and reduces mowing efficiency.
When mowing a lawn for the first time cut grass slightly
longer than normal to avoid scalping uneven terrain. When
possible, it is best to use the cutting height that was used in the
past. When cutting grass taller than six inches, you may want to
12
mow the lawn twice to achieve a better quality of cut.
During normal mowing cut only about 1/3 of the grass
blade. Cutting more than that is not recommended unless grass
is sparse or it is the end of the mowing season.
Alternate mowing direction to keep the grass growing
straight and better dispersion of the clippings.
Remember, grass grows at different rates at different times
of the year. Mow more often in the early spring to maintain the
same cutting height. As the growth rate slows in mid summer,
mow less frequently. If you cannot mow at a regular interval,
mow at a high cutting height; then mow again two days later at a
lower cutting height.
Raise the cutting height of the mower if the cutting width of
the mower is wider than the previous mower. This ensures that
uneven turf is not cut too short.
Raise the cutting height of the mower if the grass if slightly
taller than normal or if it contains a high degree of moisture.
Then mow it again with the cutting height set lower.
WARNING: Never direct discharge of material from
mower deck towards bystanders. Do not operate the
mower without the discharge chute (with side discharge models).
Operating Instructions
Starting your mower:
1. With key inserted, turn Master Power Ignition Switch on by rotating key
clockwise to the On position. The green power light will turn on (located on control panel).
2. Check for the appropriate blade speed mode on the Hi/LO Mode Switch.
3. LIFT Operator Presence Safety Rod TOWARD handle bar. Operator Presence Safety Rod MUST be held against
the handlebar for the blade to engage and operate. NOTE: Releasing the Operator Presence Safety Rod will
disengage the blade and the blade will stop spinning within 3 seconds.
4. To engage blade, while Operator Presence Safety Rod is engaged, momentarily PUSH red button (do not
hold!)(located on control panel). Blade will start in 3 seconds.
Stopping your mower:
1. Release Operator Presence Safety Rod to stop the blades.
2. Rotate key in Master Power Ignition Switch counter clockwise to the OFF position.
NOTE: Always WAIT 3 seconds before re-engaging the blade after blade has been disengaged.
NOTE: There is always a few second delay before blades will start and stop!!
***Important: IN CASE OF EMERGENCY: Operator should immediately release
Operator Presence Safety Rod to STOP blades!!***
MAINTENANCE & ADJUSTMENTS
Safe Servicing Practices
This product is capable of amputating hands and feet and
throwing objects. Always follow all safety instructions to avoid
serious injury or death.
13
Service
Park the mower on level ground. Rotate key
to OFF position and remove key from switch before doing any
maintenance. Disconnect battery cables by pulling up out on the LARGE RED battery quick
disconnect handle! Wait for all movement to stop before
adjusting, cleaning or repairing. Repairs or maintenance
requiring power should be performed by trained maintenance
personnel only. Read and observe safety warnings
in front of manual.
• Any maintenance operation that requires
the removal of safety covers must be performed
by a trained service technician.
Before working on or under the deck, make certain master power ignition
switch is OFF and key is removed and deck blade switch cannot be accidentally
started. Disconnect battery cables by pulling up out on the LARGE RED battery quick
disconnect handle for maximum safety!
Repairs or maintenance requiring power should be performed by
trained maintenance personnel only.
Use a stick or similar instrument to clean under the
mower making sure that no part of the body, especially
arms and hands are under mower.
Keep your machine clean and remove any deposits of trash and clippings, which
can cause fires and overheating. Allow machine to cool before storing.
*Clean flammable material from machine. Prevent fires by keeping battery
compartment, deck and operator’s station clean of accumulated trash, grass clippings,
and other debris.*
Clean battery compartment, mower deck, etc. of all dirt and debris. DO NOT spray
unit with water. Do not use, solvents, hard cleaners or
abrasives. Use only compressed air.
Always wear adequate eye protection when servicing the
batteries, or when grinding mower blades and removing
accumulated debris.
Never attempt to make any adjustments or repairs to the mower deck or any attachment
while the blades are engaged. Repairs or maintenance requiring power
should be performed by trained maintenance personnel only.
Never work under the machine or attachment unless it is
safely supported with jack stands. Make certain machine
is secure when it is raised and placed on the jack stands.
The jack stands should not allow the machine to move
when the traction drive system is running and the drive
wheels are rotating. Use only certified jack stands. Use
only appropriate jack stands, with a minimum weight rating
of 2000 pounds (907.2 kg) to block the unit up. Use
in pairs only. Follow the instructions supplied with the
vehicle stands.
Do not touch hot parts of machine.
Keep nuts and bolts tight, especially the blade attachment
bolts. Keep equipment in good working condition.
Never tamper with safety devices. Check their proper
operation regularly.
Turn the key to the OFF position before unclogging the discharge chute.
Never clear the discharge chute with the machine running. Turn
the key to the OFF position and be sure the blades have
stopped. Disconnect battery cables by pulling out on LARGE RED battery quick disconnect handle for maximum
safety before cleaning. Use a stick to clear a plugged
discharge area. Never use your hand!
Stop unit, and allow blades to stop before unclogging chute.
Grass collection system components are subject to wear,
14
damage and deterioration, which could expose moving
parts or allow objects to be thrown. Frequently check
components and replace with manufacturer’s recommended
parts, when necessary.
Exercise caution when working under the deck as the mower blades are
extremely sharp. Wear gloves and use extra caution when servicing them.
Use only genuine Mean Green Mower parts to ensure that original standards are
maintained.
Always remove key and disconnect battery cables by pulling out on LARGE RED battery quick disconnect handle
before working on this unit.
Always disconnect batteries when transporting unit.
Keep unit free of grass clippings, leaves and other debris.
DO NOT spray with water to clean unit. Use only compressed
air. Wear adequate eye and hearing protection when cleaning the unit.
Always wear safety glasses and protective gear near battery.
Use insulated tools.
Regular Maintenance
Regular maintenance is the best prevention for costly
downtime or expensive, premature repair. The following pages
contain suggested maintenance information and schedules
which the operator should follow on a routine basis. For more
detailed information order the correct parts manual for your unit.
Remain alert for unusual noises, they could be signaling a
problem. Visually inspect the machine for any abnormal wear or
damage. A good time to detect potential problems is while
performing scheduled maintenance service. Correcting the
problem as quickly as possible is the best insurance.
Daily inspect mower for grass clippings and wire and string
tangles. The underside of the mower deck may collect a buildup
of grass clippings and dirt, especially when grass is wet or
has high moisture content. This build-up will harden, restricting
blade and air movement and will probably show a poorer quality
of cutting. Therefore it should be removed routinely.
To do this it will be necessary to raise and block the deck,
using jack stands or blocks, in the full up position and scrape the
build-up from underneath.
Some repairs require the assistance of a trained service
mechanic and should not be attempted by unskilled personnel.
Consult Mean Green Products when assistance is needed.
Torque Values: WARNING: Particular attention must be given to
tightening the drive wheel lug nuts and blade spindle
bolts. Failure to correctly torque these items may
result in the loss of a wheel or blade, which can cause
serious damage or personal injury. Call your Mean Green Products Dealer for assistance.
Torque values are given below:
Ft.-lbs.
Nm
Wheel (lug) Nuts………65-75………..88.14-101.7
Blade spindle bolt bottom..50……………67.8
Electrical system
This mower operates on a 36 volt electrical system.
Refer to the Electrical section of this manual for detailed
information.
15
Mower blade maintenance
Check the mower blades daily, they are the key to power
efficiency and well groomed turf. Keep them sharp, a dull blade
will tear rather than cut the grass, leaving a brown ragged top on
the grass within a few hours. A dull blade also requires more
power. Replace any blade which is bent, cracked or broken.
WARNING: Never attempt to straighten a bent blade by heating, or
weld a cracked or broken blade as the blade may break and cause serious
injury. Replace worn or damaged blades.
DANGER: Never work with blades while key is in
the ignition switch. Turn key to OFF position,
remove key from switch and disconnect battery cables by pulling out on
LARGE RED battery quick disconnect handle!
Block up mower when you must work under it. Wear gloves
when handling blades. Always check for blade damage if mower strikes
a rock, branch or other foreign objects during mowing!
WARNING: Always wear adequate eye protection when grinding mower blades.
Mower blade removal
Use a 1/2” wrench or socket to remove the 3/8” cap screw
holding the blade to the motor shaft from underneath. It may be
necessary to use a 1-1/4” channel lock pliers to keep the blade adapter from
turning while removing blade cap screw.
NOTE: The blade adapter will come off when the blade cap
screw is removed. Touch-up sharpening can be done with a file.
Check the blades for balance following grinding. A
commercial balancing tool is available through most hardware
supply stores, or balancing can be done by placing the blade on
an inverted line punch or 1/2” bolt. Blade should not lean or tilt.
Spin the blade slowly, blade should not wobble. If blade is out
of balance, true it up before reinstalling. Lay the blade on a flat surface
and check for distortion. Replace any distorted blade.
Mower blade installation
Do not re-use spindle bolts which have stripped, worn or undercut threads.
Make sure that the blade adapter is seated properly on the
blade motor shaft before tightening the blade cap screw. Use a 1/2”
socket with a torque wrench to re-attach the blade to the
motor shaft from underneath. It will be necessary to use a 1-1/4”
channel lock pliers to keep the blade adapter from turning. Torque cap
screws on motor shafts to 50 foot-pounds (67.8 Nm) when reinstalling blades.
IMPORTANT: The blade sail (curved part) must be pointing
upward toward the inside of the deck to ensure proper cutting.
IMPORTANT: When mounting blades, rotate them after
installation to ensure blade tips do not touch each other or sides
of the mower.
WARNING: Failure to correctly torque the bolt may
result in the loss of the blade which can cause serious injury.
WARNING: Mower blades are sharp and can cut.
Wear gloves and use extra caution when servicing them.
16
ELECTRICAL SYSTEM
Electrical System Safety
Remove key; disconnect battery cables by pulling out on
LARGE RED battery quick disconnect handle
and read owner’s manual before adjusting or repairing unit. Always remove key and disconnect battery cables by
pulling out on LARGE RED battery quick disconnect handle
before working on this unit.
Always disconnect battery cables by pulling out on LARGE RED battery quick disconnect handle when
transporting unit.
Keep unit free of grass clippings, leaves and other debris.
DO NOT spray water to clean unit. Use only compressed
air. Wear adequate eye and hearing protection when
cleaning the unit.
Always wear safety glasses and protective gear near battery.
Use insulated tools.
Clean battery compartment, drive motor compartment,
mower deck, seat etc. of all dirt and debris. Do not spray
unit with water. Do not use, solvents, hard cleaners or
abrasives. Use only compressed air.
Avoid injury. With key in ON position mower blade can
engage when safety lever switch is engaged, even if drive
motor is not turning. Keep area clear of bystanders when
engaging clutch switch.
All maintenance and storage areas should be properly
ventilated in accordance with applicable fire codes and
ordinances to avoid fire hazards. Proper ventilation is
required to remove hydrogen gas from the area during
battery charging. (With Lead Acid Models)
The amount of hydrogen gas emitted depends on several
factors such as; battery charger output rate, battery charge
time and battery condition. Because of the highly volatile
nature of hydrogen gas and its propensity to rise and
accumulate at the ceiling in pockets, a minimum of 5 air
changes per hour is recommended. Consult applicable
fire and safety codes for the specific ventilation levels
requirement, as well as requirements for the use of explosion
proof electrical apparatus.
Never allow flames, sparks or smoking near batteries.
Keep batteries out of reach of children.
Always keep protective shields, covers and guards in
place and securely fastened. If they become damaged,
repair or replace immediately. Never modify or remove
safety devices.
Electrical System Information
The Mean Green Mower is powered by a 36 volt electrical
system. It consists of the following components:
MGP-20 Push Mower
1. Blade controller - (1)
2. Deck Motors - (1)
3. Digital battery display (1) (on limited models)
4. Lithium Energy Modules (LEMs) - 1
Component Maintenance
IMPORTANT: Maintenance for the various electrical
components found on the Mean Green Mower should only be performed
by a Mean Green Products trained technician.
17
IMPORTANT: When battery voltage becomes low, the
mower blades will stop. When the batteries discharge to
this point they require recharging. The unit should immediately be returned to the
battery charging area and the unit connected to the battery charger.
Battery Safety
Battery posts, terminals, and related accessories may
contain lead and lead compounds, chemicals known to
the State of California to cause cancer and reproductive harm. Wash hands after handling.
WARNING: Charge batteries in an open well ventilated
area, away from spark and flames. Unplug charger
before connecting or disconnecting from the
charging port. Always wear safety glasses and protective
clothing/gear. Use insulated tools.
WARNING: A frozen battery can explode and
result in death or serious injury. Do Not charge batteries
if frozen. Thaw the batteries before connecting to charger.
WARNING: Avoid skin and clothing contact with
battery acid. LEAD ACID MODELS ONLY.
Always wear eye protection when checking the battery,
acid can cause serious injury to skin and eyes. If
contact occurs, flush area with clean water and call
physician immediately. Acid will also damage clothing.
Do not drink the battery electrolyte.
Do not allow open flame near the battery when charging.
Hydrogen gas forms inside the battery. This gas is
both toxic and flammable and may cause an explosion
if exposed to flame. Always remove the negative
ground connection first and replace it last.
Do not overfill battery.
Electrolyte may overflow and damage paint, wiring or
structure. When cleaning the battery, use soap and
water. Be careful not to get soap and water into the
battery. Clean the battery terminals with a solution of
four parts water and one part baking soda when they
become corroded.
WARNING: Sparks can cause a battery gas explosion
which will result in serious personal injury.
Prevent the battery terminals from touching any metal
mower parts when removing or installing the battery.
Do not allow metal tools to short between the battery
terminals and metal mower parts. Use insulated tools.
Always keep protective battery cover and rear cover in place.
WARNING: Explosive gases from batteries can cause
death or serious injury. Poisonous battery fluid contains
18
sulfuric acid and contact with skin, eyes or clothing
can cause severe chemical burns.
Internal contact: Get medical attention immediately!
WARNING: Incorrect battery cable routing could
cause damage to the mower and battery cables. This
can cause sparks which can cause a battery gas explosion
which will result in serious personal injury.
WARNING: Always disconnect battery cables by pulling out on
LARGE RED battery quick disconnect handle when transporting unit.
Battery Connectors
The battery connectors are located under the battery cover.
Always disconnect battery cables by pulling out on LARGE RED battery quick disconnect handle before
performing maintenance on the unit.
Battery Charger
Battery can be charged on the mower OR after being removed from mower mounting bracket.
Use only the battery charger provided with the Mean Green Mower.
Charger options vary for the Mean Green Mower. Certain models are equipped with
an on and off switch and others turn on automatically when plugged into outlet. NOTE: Always
plug BLACK charger plug into BLACK mower charger plug (fig.5A) and
THEN plug battery charger into 110-120 volt household GFCI protected outlet.
Battery Charger
Mower Battery
5A
Battery Maintenance (See Detailed Lithium Module Maintenance page at the end of
manual)
Your Mean Green Mower is powered by 1 Lithium Module (LEM) which,
when maintained properly, will provide years of useful
life. For proper care, adhere to the following instructions:
1. Always charge batteries after each use, regardless of how
little used. Batteries must be attached to a plugged in
battery charger with the charger power switch ON when the unit is not being used.
WARNING: Charge only with a Mean Green Mower approved
charger. Do not use battery chargers other than those
recommended by Mean Green Products. Incorrect
battery charging will void warranty and can lead to
equipment damage, serious injury or death.
2. Check that battery cables are securely tightened to
19
batteries each time you service the battery.
3. Keep grass, dirt and debris from collecting near battery
terminals.
4. Batteries are not to remain in a discharged state or
damage to the batteries will occur. Lead sulfate deposits
will form inside the batteries affecting charging and operation.
5. A discharged battery can freeze if left in conditions under
32 degree F (0 degrees C).
6. Charge batteries indoors in a well ventilated and dry
location away from sparks or flames. Never expose
charger to rain, vapor or liquid (dry location use only).
7. Charge only sealed lead acid type rechargeable batteries
Or Lithium Modules (LEMs) provided with the Mean Green Mower.
8. Do not touch un-insulated portion of charger (terminal
pins) of output connector.
9. Do not use with defective cords and wires. Replace
defective cords and wires immediately.
IMPORTANT: Batteries must be attached to a plugged in
battery charger with the charger power switch ON when the unit
is not being used. Failure to keep batteries fully charged will
reduce battery life and void battery warranty.
Battery Charging
NOTE: Lithium Modules can be charged either in or out of mower unit.
LEM10 lithium modules – approx. weight 12 lbs.
LEM20 lithium modules – approx. weight 20 lbs.
WARNING: Use Extreme Caution When Lifting Batteries Out Of Mower Unit.
Serious Injury Could Occur If Battery Is Mishandled or Dropped!!
1. Plug RED charger plug into RED mower charge plug found on end of battery.
(NOTE: Plug will only fit one way into the port. Make sure it is properly aligned before inserting.)
2. IMPORTANT: Turn Ignition Key Switch to FULL CLOCKWISE “ON” position for battery to accept
IMPORTANT!
charge.
3. Turn charger switch to the ON position (on certain models) OR unit will automatically turn on when unit is
plugged into outlet. The cooling fan (on certain models) may or may not engage depending on battery charge level
and charger temperature.
4. Allow 1-12 hours for a full battery charge (depending on battery charger option).
3 green LED lights indicate batteries are Fully Charged OR the red LED indicator will read 0.00
Amps. Leaving batteries on charger longer than 12 hours does not harm the batteries. The charger will
not overcharge batteries.
5. When ready to use mower again after charging, always turn charger OFF before
disconnecting charger from mower. Disconnect charger cord from wall outlet then from the mower.
6. Note: Be sure charger is positioned where air can flow unrestricted into and out of charger.
Charging Recommendations:
WARNING: Do not smoke while servicing the batteries.
WARNING: Always wear safety glasses and protective
clothing near battery. Use insulated tools.
1. Lead acid batteries and Lithium Modules do not develop a memory and need not be fully discharged before
recharging. 2. Over the winter season, when mower is not used regularly, the charger can
be kept plugged into the mower to maintain a full charge on the batteries. Batteries left
uncharged will slowly discharge. Before initial use each spring season, be sure batteries have
a full charge before mowing. 3. If charger is not left plugged in, the batteries should be
20
fully charged every 30 days to maintain battery life. 4. When charging, be sure charger cooling
fan inlet and outlet are not blocked.
Disconnecting the Batteries (LITHIUM MODULES)
NOTE: ALWAYS disconnect battery cables by pulling out on
LARGE RED battery quick disconnect handle
before ANY maintenance is performed on mower unit.
1. Unplug RED battery quick disconnect handle. (Fig.F)
2. To remove battery, push key in and rotate counter clockwise. This releases the mechanical pin.
3. Slide the battery to the left side of mower to remove from mounting tray. (Fig. Ga-b)
Fig.F
Fig.Ga
Fig.Gb
21
Fig. H
Reconnecting the Batteries (Lithium Modules)
1. Reverse process of disconnecting the battery (Fig.H).
2. Plug RED battery quick disconnect handle into right side of battery connecting port.
Battery Storage
To maximize battery life it is best to fully charge batteries
shortly after each use.
The Mean Green Mower charger is designed to remain plugged into the vehicle and turned
ON during storage. If the charger remains on and connected it will automatically maintain
the charge level of the battery pack. All batteries self discharge over time.
If the mower can not remain plugged in and on charger then it is required that
the battery pack be charged for a minimum of 12 hours every 30 days.
Failure to maintain the battery charge level will void the battery warranty.
TROUBLESHOOTING
SYMPTOMS & PROBABLE CAUSES
SUGGESTED REMEDIES
FOR ANY ELECTRICAL PROBLEMS
****RESET Mower Electronics by Switching Ignition Key to OFF position for approximately 5
seconds & then back to ON position.******
Battery Will Not Charge
MAKE SURE THAT THE Ignition Key Switch is turned to FULL CLOCKWISE “ON” position
for battery to accept charge.
Mower blades stop while mowing
When battery voltage becomes low, the mower blades will stop. When the batteries
discharge to this point they require recharging. The unit should immediately be
returned to the battery charging area and the unit connected to the battery
charger.
Uneven cutting height
The blade(s) are not sharp. Sharpen the blades.
A cutting blade(s) is/are bent. Install new cutting blade(s).
The deck is not level - Contact your Mean Green Products Dealer.
The underside of the deck is dirty. Clean the underside of the deck.
A blade spindle is bent. Contact your Mean Green Products Dealer.
22
Loss of deck operation
The deck fails to operate with fully charged batteries.
RESET Mower Electronics by Switching Ignition Key to OFF position for approximately
5 seconds & then back to ON position. If this does not remedy the problem - Contact
your Mean Green Products Dealer.
Mower will not start
Check that key is in the ON position.
Check all battery connections in back battery compartment.
Make sure batteries are charged.
Blades will not start
Make certain that Operator Safety Lever is pulled rearward toward operator (to release
safety) and at the same time you are lifting Operator Presence Safety Rod TOWARD
handle bar. After Operator Presence Safety Rod is lifted, Blades should begin within a
few seconds. Operator Presence Safety Rod MUST be held against the handlebar for
the blade to engage and operate.
Mower blades stop due to low charge & mower will not move
Turn blades off, turn key to OFF position and then back to ON. (this resets computer)
STORAGE
When storing the unit at the end of the mowing season, the following steps
should be taken to ensure readiness for the next mowing season.
1. Remove all grass, dirt, and trash from mower.
IMPORTANT: Wash the machine with a mild detergent
and small amount of water. Do not pressure wash the machine. DO NOT saturate
machine with water! Avoid excessive use of water, especially near
the control switches and mower deck motors (located on deck of mower)
DO NOT get water in electrical compartment or in battery compartment!!!
IMPORTANT: Excessive water use may void warranty if guidelines are not followed!
2. Check thoroughly for any worn or damaged parts that need replacing and order them from
your dealer.
3. Thoroughly lubricate wheel bearings & front caster spindles according to lubrication instructions. (if applicable)
4. Minimum half charge Lithium Ion batteries.
5. Do not deflate tires.
6. The mower should be stored in a well ventilated, clean
and dry place as the battery charger can not be used in a wet environment. Connect
the battery charger to the charger port. Always keep the batteries fully charged (lead acid). Especially important to
prevent battery damage when the temperature is below 32°F (0°C).
New season preparation
Before starting the mower following post season storage, the following servicing is required:
1. Clean machine, removing trash and dirt accumulation.
2. Review safety precautions listed in this manual.
3. Make sure that batteries are fully charged
23