1
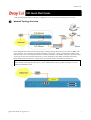
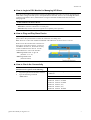
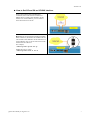
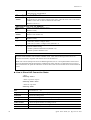
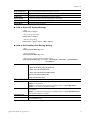
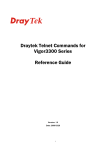
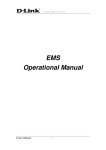
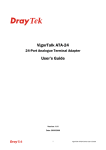
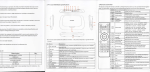
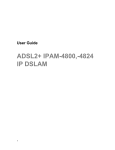
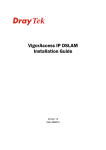
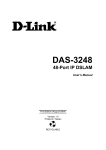
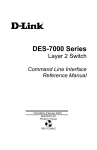
VigorAccess IVD
Quick Start Guide
Version: 1.0
Date: 2007/05/08
Version: 1.0
IVD Quick Start Guide
This quick start guide will provide basic configuration for accessing Internet with VigorAccess IVD.
X
Network Topology Overview
Above diagram shows the basic network topology (example) among master device, slave device, MDF, CPE
(ATU-R) router, user’s computer, and phone. One thing is important – always set the VPI/VCI value for the
CPE the same as the ones configured in master and slave IVD device. The default setting for VPI/VCI of IVD
is 8/35. By the way, the values for these devices can be changed (yet must match with CPE) if necessary.
Please finish all the connections according to the real situation of the environment for the devices.
Note: A master device connects to Internet through UP-G connector. Yet, a slave device also can work
alone without connecting the master device. For a standalone slave device, please use UP port to access
Internet with Ethernet cable.
Quick Start Guide for VigorAccess
1
Version: 1.0
Y
Management for IVD
If users want to configure or monitor the devices, there are some methods provided here. The MGN port on the
master device allows you to make control remotely; yet the Console port on the master/slave device only
allows you to make control locally.
Note: If you are not used to configure the settings with terminal emulator software or Telnet commands,
you can use EMS (SNMP-based) software to manage these devices. For the detailed information, please
contact your dealer.
IP DSLAM can be managed via MGN, Console, even Uplink Ports. It depends on your necessity.
Z
Port Connection for Management
No matter what tool you would like to use for managing master and/or slave device, the first thing you have to
do is making correct port connection.
For Master Device
Connect to a PC through
CONSOLE port. It is
useful for controlling the
device locally.
[
For Slave Device
Connect to a PC through
MGN port. It is useful
for controlling the
master device locally or
remotely.
Connect to a PC through
CONSOLE port. It is
useful for controlling
the device locally.
Connect to a PC through
MGN port. It is useful
for controlling the slave
device locally or
remotely.
Configuration by Using Terminal Emulator Software
S How to Login with a Terminal Emulator Software
For Master /Slave Device
1.
The default setting is “baud rate 9600, no parity, and 8 bit with 1 stop bit (N,8,1)”.
2.
Use any terminal emulator software for executing commands.
Username – admin
Password – 1234
(type ‘exit’ to return)
S How to Login with Telnet
For IVD Device
1. Make sure the device IP has been configured well. The default IP setting is 172.16.1.2
2. Make sure the connection of MGN port (for outband) or UPLINK port (for inband) is well done.
3. Open Telnet command screen.
4. Username/Password - admin/1234
2
(type ‘exit’ to return)
Quick Start Guide for VigorAccess IVD
Version: 1.0
S How to Login to DSL Module for Managing IVD Slave
Slave device have DSL/VoIP modules installed. The DSL module plays the core role for aggregating all
ATM traffic coming from DSL ports to the uplink Ethernet interface, and vice versa. Through the master
controller in the master device, administrator can login to the DSL module inside slave device for
managing IVD.
To DSL Module in IVD Slave Device
Only one slave device can be logged in at one time.
- IVD>dsl –c (Connect to dsl device via serial port)
- IVD>dsl –cf (Force the CLI access right to be occupied by a new operator)
S How to Plug and Play Slave Device
By default, ports G1 to G6 on master device are disabled. If the slave connects to the master device,
please refer to the picture below to ensure the connection is working well.
Note: Ports G1 to G6 will be enabled with default if the DSL F/W version is above V2.10.2.6.
Please turn on the interface that connected to a
slave device. In the above picture, you have to
turn ON the interface G1, G4 and G6 for they
connect to different slave devices. Use the
command below to turn on the interface.
- Admin>system link -m gn on
(n means “1” to “6”)
- Admin>system link
(check the status)
S How to Check the Connectivity
To check the connectivity between the Master
and Slave Devices, please do the following:
The results
1.
Login through terminal emulator software.
You will get the following results:
2.
Type the following command
- Admin>dsl
- Admin>dsl
Logic-Name
Slave-IP Connection-Status
dsl-slave-01 10.0.1.18 (NA)
dsl-slave-02 10.0.1.34 ON LINE
dsl-slave-03 10.0.1.50 ON LINE
dsl-slave-04 10.0.1.66 (NA)
dsl-slave-05 10.0.1.82 (NA)
dsl-slave-06 10.0.1.98 ON LINE
Quick Start Guide for VigorAccess
3
Version: 1.0
S How to Check the Version Information
To display the basic information of the
controller inside the master device
1.
Login through terminal emulator software.
2.
Type the following command
- Admin > system basic
The results
You will get the following results:
-Admin> system basic
-------------------------------------------------------------------------------SYSTEM BASIC INFORMATION
-------------------------------------------------------------------------------Machine Model
: IP DSLAM MASTER
Firmware Version
: V3.1.17.16
Hardware Version
: 1.1 - 1 Fiber(s)
Build Time
: Fri Jul 21 09:47:32 CST 2006
System Uptime
: 3 days 17h:30m:38s
System Contact
: [email protected]
System Name
: IPDSLAM
System Location
: urlocation
CPU Usage
: 01%
Memory Usage
: 52%
Current Time
To display the IVD module information inside
slave device
1.
Login the specified IVD slave module.
2.
Type the following command to get the DSL
module information
- IVD>system basicinfo
: Mon Jan 05 01:30:19 1970
The results
You will get the following results:
- IVD/system> basicInfo
--------------------------------------------------------------SYSTEM BASIC INFORMATION
--------------------------------------------------------------Machine Model
: IVD system
Firmware Version
: IVD_VOIP_V1.0.1.9
Hardware Version
: V1.0
Build Time
: Mon Jan 15 15:09:43 CST 2007
System Uptime
: 0 days 05h:49m:43s
System Contact
: [email protected]
System Name
: IVD
System Location
: urlocation
Memory Usage
: 41%
Current Time
To display the DSL module information inside
the IVD slave device
1.
2.
Login the specified DSL module.
- IVD>dsl –c (Connect to dsl device via
serial port)
Type the following command to get the
DSL module information
- $get system info
: Thu Jan 01 05:49:43 1970
The results
You will get the following results:
$get system info
Description
: IP DSLAM
Name
: IPDSLAM
Location
:
Contact
:
Vendor
:
LogThreshold
Object-id
:0
: 1.3.6.1.4.1.7367.2.11.1
Up Time(HH:MM:SS) : 140:49:31
HwVersion
4
: 1.2
Quick Start Guide for VigorAccess IVD
Version: 1.0
CPSwVersion
: A24-A-1GE-2.10.2.8
DPSwVersion
: DP_B02_10_14_60_ip1000a
System Time
: Tue Jan 06 23:39:02 1970
Time Zone
: GMT
DST
: off
S How to Save the Configuration
To save the configuration for the controller
To save the configuration for the DSL module
Type the following command to save the
configuration.
Type the following command to save the
configuration.
-
Admin>commit (Master)
- $commit
-
IVD>commit (IVD slave)
Note – For VoIP functions, users need to
activate it by manual as following
command.
-
IVD/voip>config activate
Quick Start Guide for VigorAccess
5
Version: 1.0
\
Configuration by Using Telnet
To use Telnet for managing Master/Slave device, refer to the following sections.
Default IP Settings for Master Device
Default IP Settings for Slave Device
1. The default IP address of Outband (MGN port):
172.16.1.1/255.255.255.0)
1. The default IP address of Outband (MGN port):
172.16.1.2/255.255.255.0)
2. IP address for Inband (UPLINK port): 0.0.0.0
(disable)
2. IP address for Inband (UPLINK port): 0.0.0.0
(disable)
S How to Change Master IP Setting
Changing master IP address setting (for management) is allowed to suit environment requirement.
Type the command below to change the settings.
For Outband (MGN port connection) , please set as the following
- Admin>network out <new-ip> <mask> [vlanid]
For Inband (UPLINK port connection) , please set as the following
- Admin>network in <new-ip> <mask> [vlanid]
For the Status, please set as the following
- Admin>network out or - Admin>network in
Note: The IP addresses for MGN port and UPLINK ports cannot belong to the same domain.
S How to Change Slave IP Setting
Changing IVD IP address setting (for management) is allowed to suit environment requirement.
Type the command below to change the settings.
For MGN/UP port connection , please set as the following
- IVD>network staticIP <ip> <netmask> <gateway>
Note:It is applied below version V1.0.1.7, MGN and UP will be different when the
version is above V1.0.1.7.
For the Status, please set as the following
- IVD>network staticIP -s
S How to Configure IP Address for Slave-Standalone DSL module
A slave device can work alone without connecting the master device. The device with one Gigabit
Ethernet interface version.
For one gigabit-ethernet interface version, please set as the following
- $ipconfig <ip> <mask>
S How to Login with Telnet
For Master/Slave Device
1. Make sure the device IP has been configured well.
2. Make sure the connection between MGN port (for outband) and UPLINK port (for inband).
3. Open Telnet command screen.
4. Username/Password
(type ‘exit’ to return)
- admin/1234
Now, please use Telnet commands to manage the master/slave device for your necessity.
6
Quick Start Guide for VigorAccess IVD
Version: 1.0
S How to Set G5 and G6 as UPLINK Interface
For the environment with available Fiber
connection, the UP-G1/UP-G2 connector in
Master device is used as the channel to access
Internet. For such condition, you can connect
slave devices from G1 to G6.
However, for the environment without available
Fiber connection, G5 and/or G6 in Master device
can be used as the channel to access Internet. For
such condition, only G1 to G4 connectors can be
used for the slave devices.
For example,
- Admin>system uplink G6 up
Enable the port by typing:
- Admin>system link –m G6 on
Quick Start Guide for VigorAccess
7
Version: 1.0
]
Reference – Common Use Commands for Configuration
Part I:
Here provides some general and common commands used in IVD for users to configure the IVD Master.
S How to configure Inband IP Address
Users can use the following commands to configure the inband IP address for the UP-LINK interface or
inband management.
Command
Description
Admin> network
Enter network directory
Admin/network> inband ?
Help
Admin/network> inband -s
Display the settings
Admin/network> inband <IP_addr>
<NetMask>
Edit the inband IP address without VLAN
Admin/network> inband <IP_addr>
<NetMask> <vlan_id>
Edit the inband IP address with VLAN
S How to configure Outband IP Address
Users can use the following commands to configure the outband IP address for outband management.
Command
Description
Admin> network
Enter network directory
Admin/network> outband ?
Help
Admin/network> outband -s
Display the settings
Admin/network> outband <IP_addr>
<NetMask>
Edit the outband IP address without VLAN
Admin/network> outband <IP_addr>
<NetMask> <vlan_id>
Edit the outband IP address with VLAN
S How to configure Static Route
Users can use the following commands to configure the default route and some static routes.
8
Command
Description
Admin> network
Enter network directory
Admin/network> route ?
Help
Admin/network> route –r
Display the routing table
Admin/network> route -s
Display the static route entries
Admin/network> route default <RtIP>
Add a default route
Admin/network> route default 0.0.0.0
Delete the default route
Quick Start Guide for VigorAccess IVD
Version: 1.0
Admin/network> route -a <TargetIP>
<NetMask> <GatewayIP>
Add a static route entry
Admin/network> route -e <RtIdx>
<TargetIP> <NetMask> <GatewayIP>
Edit the static route entry
Admin/network> route -d <RtIdx>
Delete the static route entry
Admin/network> route -D
Delete all static route entries
S How to configure NTP and Time
Users can use the following commands to configure the NTP server IP , the polling interval, time zone and
the daylight saves time. Users can enable/disable NTP function, too.
Command
Description
Admin> service
Enter service directory
Admin/service> ntp –s
Display the settings
Admin/service> ntp ?
Help
Admin/service> ntp now
Display the current time
Admin/service> ntp -e <IP_addr>
<interval>
Edit the NTP server IP address and the polling
interval
Admin/service> ntp -t <MMDDhhmmYYYY>
Edit the year, month, date, hour, and minute.
Admin/service> ntp -z <time_zone> <DST>
Edit the time zone and the daylight saving time.
Admin/service> ntp on/off
Turn on/off the NTP
S How to configure SNMP
Users can use the following commands to configure the SNMP settings, including SNMP community,
SNMP Trap port, and SNMP Trap host. After the following setting, EMS can communicate with IVD via
SNMP.
Command
Description
Admin> service
Enter service directory
Admin/service> snmp -l
Display the general SNMP settings
Admin/service> snmp -s
Display the SNMP Trap host entries
Admin/service> snmp -c <CommRO>
<CommRW> <CommTrap>
Edit the read-only, read-write, and trap community
Admin/service> snmp -a <HostIP>
Add a trap host
Admin/service> snmp -e <EntryIdx>
<HostIP>
Edit the trap host
Admin/service> snmp -d <EntryIdx>
Delete the trap host entry
Admin/service> snmp –D
Delete all the trap host entries
Quick Start Guide for VigorAccess
9
Version: 1.0
S How to Upgrade Firmware
Users can use the following commands to upgrade new firmware. Make sure you have prepared a TFTP
server on a host and put the firmware (ivd.all for example) in the right directory of the TFTP server
Command
Description
Admin> system
Enter system directory
Admin/system> upgrade <ServIP>
<FirmName>
Execute the firmware upgrading
Admin/system> reboot
Reboot the Controller to run the new firmware
Admin/system> basicInfo
After rebooting, check the firmware version
S How to Save Configuration
Users can use the following command to save the current configuration.
Command
Description
Admin> commit
Save the configuration
S How to Enable/Disable the Switch Port
Users can use the following commands to enable or disable the port on Controller. By default, G1 to G6
are off, but G0 and UP-G are on. If users find that when they connect the subtend slave machines to the
master machine but the connection cannot be constructed, check the link status of the port connected to
the master machine is enabled.
Note: Ports G1 to G6 will be on with default if the DSL F/W version is above V2.10.2.6.
Command
Description
Admin> system
Enter system directory
Admin/system> link_state -s
Display the current status of all ports
Admin/system> link_state -m <IntfName>
on/off
Turn on/off of the specific port
S How to Connect to DSL Module
Users can login to DSL module in master or slave units using the following command. Once entering into
DSL module, the command described in Part II can be used.
10
Command
Description
Admin> dsl
Display the current connectivity with DSL modules
Admin> dsl –c
Login to DSL module in master via serial channel
Admin> dsl –m
Login to DSL modules in master via Ethernet channel
Admin> dsl –s <salveId>
Login to DSL modules in slave via Ethernet channel
Quick Start Guide for VigorAccess IVD
Version: 1.0
Part II:
Here provides some general and common commands used in IVD for users to configure the IVD DSL Module.
Note: Please refer to the Command Line Interface manual for getting more commands that IVD supports.
Contact your dealer for advanced information.
S How to Monitor DSL Status
Users can use the following command to check the status for specified DSL port. The commands are listed
as below.
Command
Description
$get adsl atuc physical ifname dsl-*
for downstream (*: 0 ~ 23)
$get adsl atur physical ifname dsl-*
for upstream (*: 0 ~ 23)
S How to Enable/Disable a DSL Port
Users can use the following command to enable or disable DSL port for certain user. The commands are
listed as below.
Command
Description
$modify adsl line intf ifname dsl-*
enable
Enable
(*: 0 ~ 23)
$modify adsl line intf ifname dsl-*
disable
Disable
(*: 0 ~ 23)
S How to Read DSL Training Rate
Users can use the following command to read DSL Training Rate for specified DSL port. The commands
are listed as below.
Command
Description
$get adsl atuc channel ifname dsli-*
for downstream/interleave channel (*: 0 ~ 23)
$get adsl atur channel ifname dslf-*
for upstream/fast channel
$get adsl atuc channel ifname dsli-*
for downstream/interleave channel (*: 0 ~ 23)
$get adsl atur channel ifname dslf-*
for upstream/fast channel
(*: 0 ~ 23)
(*: 0 ~ 23)
S How to Change ADSL Line Profile
Users can use the following command to change the ADSL Line Profile for specified DSL port. The
commands are listed as below.
Command
Description
$modify adsl line intf ifname dsl-*
disable
Disable
$modify adsl line profile ifname dsl-* ?
(*: 0 ~ 23, ?: means to get more information)
$modify adsl line intf ifname dsl-*
enable
Enable
Quick Start Guide for VigorAccess
(*: 0 ~ 23)
(*: 0 ~ 23)
11
Version: 1.0
S How to Change ADSL Line Rate
Users can use the following command to change the ADSL Line Rate for specified DSL port. The
commands are listed as below.
Command
Description
$modify adsl line intf ifname dsl-*
disable
Disable
$modify adsl line profile ifname dsl-*
atucintlmaxtxrate 0x7e0000
Necessary variables
$modify adsl line intf ifname dsl-*
enable
Enable
(*: 0 ~ 23)
(*: 0 ~ 23)
(*: 0 ~ 23)
S How to Change ADSL to Fast Channel/Rate
Users can use the following command to change the ADSL to fast channel/rate for specified DSL port.
The commands are listed as below.
Command
Description
$modify adsl line intf ifname dsl-*
disable
Disable
$modify adsl line profile ifname dsl-*
type fastOnly atucfastmaxtxrate
0x7e0000
Necessary variables
$modify adsl line intf ifname dsl-*
enable
Enable
(*: 0 ~ 23)
(*: 0 ~ 23)
(*: 0 ~ 23)
S How to Set ADSL Alarm Profile
Users can use the following command to change the ADSL Alarm profile for specified DSL port. The
commands are listed as below.
12
Command
Description
$modify adsl line intf ifname dsl-*
disable
Disable
$modify adsl alarm profile ifname
dsl-* ?
(*: 0 ~ 23, ?: means to get more information)
$modify adsl line intf ifname dsl-*
enable
Enable
(*: 0 ~ 23)
(*: 0 ~ 23)
Quick Start Guide for VigorAccess IVD
Version: 1.0
S How to Change VPI/VCI for Existing VCC
Users can use the following command to change VPI/VCI for existing VCC. The commands are listed as
below. We strongly recommend to delete original VCC, then re-create a new VCC with new values.
Command
Description
$pvc delete <dsl: 1~24> <pvc: 1~8>
$pvc create <dsl: 1~24> <pvc: 1~8> <vpi>
<vci> [<llcmux|vcmux>]
[<interleaved|fast>]
S How to Change Management IP Address for Existing Ethernet Port
Users can use the following command to change management IP address for existing uplink Ethernet port.
The commands are listed as below.
Command
Description
$ipconfig <ip> <mask>
S How to Create more VC/EOA/Bridge
Users can use the following command to create more VC/EOA/Bridge. The commands are listed as
below.
Command
Description
$create atm vc intf ifname aal5-* vpi
<vpi> vci <vci> lowif atm-*
[vcmux/llcmux] [fast/interleaved]
(*:0 ~ 23 is used for atm; 0~191 is used for aal5)
$create eoa intf ifname eoa-* lowif
aal5-*
(*:0~191 is used for aal5 and eoa)
$create bridge port intf portid
<bridge-port-id> ifname eoa-*
(*:0~191 is used for eoa,; 1~192 is used for
<bridge-port-id>)
S How to Setup SNMP Community/Host/Trap
Users can use the following command to setup SNMP community/host/trap. The commands are listed as
below.
Command
Description
$snmpconfig <ro community> <rw
community> <trap community> <host ip>
Create SNMP community and host to manage the
device through SNMP
S How to Create VLAN
Users can use the following command to create VLAN. The commands are listed as below.
Command
Description
$create vlan static vlanname
<vlan-name> valnid <vlan-id>
[egressports <bridge ports>]
Create VLAN
Quick Start Guide for VigorAccess
(vlan-id is from 1~4094)
13
Version: 1.0
S How to Setup Port VLAN ID (PVID)
Users can use the following command to setup port VLAN ID. The commands are listed as below.
Command
Description
$modify gvrp port info portid
<bridge-port-id> portvlanid
<default-pvid>
Setup port VLAN ID
S How to Filter MAC Address by Port
Users can use the following command to filter MAC address by port. The commands are listed as below.
Command
Description
$create acl port macentry portId
<bridge-port-id> macaddr
00:00:00:01:02:03
Allow source address 00:00:00:01:02:03 access from
bridge port; bridge-port-id means other source
addresses from bridge port <bridge-port-id> are
denied
$create acl port macentry portId
<bridge-port-id> macaddr
00:00:00:01:02:04
Allow source address 00:00:00:01:02:04 access from
bridge port; bridge-port-id means other source
addresses from bridge port <bridge-port-id> are
denied
S How to Deny MAC Address Globally
Users can use the following command to deny MAC Address globally. The commands are listed as below.
Command
Description
$create acl global macentry macaddr
00:00:00:01:02:03 deny enable
Mac source address 00:00:00:01:02:03,04 access
from any bridge ports is denied
S How to Filter Net BIOS
Users can use the following command to filter Net BIOS. The commands are listed as below.
Command
Description
$create filter rule entry ruleid <id>
action drop description NETBIOS-TCP
NETBIOS-NS: Name Service137 TCP/UDP
$create filter subrule tcp ruleid <id>
subruleid 1 srcportfrom 137 srcportto
139 srcportcmp inrange
NETBIOS-DGM: Datagram Service 138 TCP/UDP
NETBIOS-SSN: Session Service
139 TCP/UDP
$modify filter rule entry ruleid <id>
status enable
$create filter rule map ifname all
ruleid <id> stageid 1
$create filter rule entry ruleid <id2>
action drop description NETBIOS-UDP
$create filter subrule udp ruleid <id2>
subruleid 1 srcportfrom 137 srcportto
139 srcportcmp inrange
$modify filter rule entry ruleid <id2>
14
Quick Start Guide for VigorAccess IVD
Version: 1.0
status enable
$create filter rule map ifname all
ruleid <id2> stageid 1
S How to Enable Spanning Tree Protocol
Users can use the following command to enable spanning tree protocol. The commands are listed as
below.
Command
Description
$modify stp info enable
Enable STP globally
$modify stp port info portid
<bridge-port-id> enable
Bridge port id: 1~193
$get stp port info portid
<bridge-port-id>
S How to Enable IGMP Snooping
Users can use the following command to enable IGMP snooping.
aware that IGMP Snooping is the Factory Default Setting.
The commands are listed as below. Be
Command
Description
$create filter rule entry ruleid <id>
action sendtocontrol description IGMP
The feature is enabled in default.
$create filter subrule ip ruleid <id>
subruleid 1 prototypefrom 2
prototypecmp eq
$modify filter rule entry ruleid <id>
status enable
$create filter rule map ifname all
ruleid <id> stageid 1
$modify igmpsnoop cfg info status
enable
$modify igmpsnoop port info portid
<bridge-port-id> status enable
leavemode fastNormal
or
$modify igmpsnoop port info portid
<bridge-port-id> status enable
leavemode Fast
S How to Upgrade Control Plane Code Remotely
Users can use the following command to remotely upgrade control plane code. Make sure you have
prepared TFTP server, vendor supplied CP.bin.gz , and put CP.bin.gz into root directory of TFTP server.
The commands are listed as below.
Command
Description
$firmware upgrade [-]<source file>
<CP|DP|FD|DSL|ALL> <server ip>
Upgrade the control plane code
Quick Start Guide for VigorAccess
15
Version: 1.0
S How to Upgrade Full Image Remotely
Users can use the following command to remotely upgrade full image. Make sure you have prepared
TFTP server. The commands are listed as below.
Command
Description
(Master)
Type command as below –
<tftp server ip> IP address of TFTP server.
-Admin> system upgrade <tftp server ip>
<F/W file name>
(Slave – IVD module)
Type command as below –
-IVD> system upgrade <F/W file name>
<tftp server ip>
<F/W file name> ex. IVD_V3.1.17.2.all
(Slave – DSL module)
1. Enter DSL module from IVD.
<tftp server ip> IP address of TFTP server.
<F/W file name> ex. IVD_VOIP_V1012.all
Switch CLI mode to DSL module.
-IVD> dsl –c
Connect to DSL Console...
Press <Ctrl-\> or <Ctrl-Z> to return.
2. If current firmware version is below V2.10.2.4
1) Upgrade CP file
$firmware upgrade [-]<source file>
<CP|DP|FD|DSL|ALL> <server ip>
<server ip> IP address of TFTP server.
Example$firmware upgrade
-CP-A24-A-1GE-2.10.2.8.bin.gz CP
<server ip>
2) Upgrade image file
Example$firmware upgrade
-DSLImage-A24-A-1GE-2.10.2.8.all ALL
<server ip>
* If current firmware version is above V2.10.2.5
$firmware upgrade
-DSLImage-A24-A-1GE-2.10.2.8.all ALL
<server ip>
$reboot
16
Reboot from Default mode
Quick Start Guide for VigorAccess IVD
Version: 1.0
S Wizard Commands
In addition to the primitive commands described as above. Several wizard commands are provided which is
used easily. Type wizard to see the command syntax.
Command
Description
$ wizard
<List of Wizard Commands>
--------------------------------------------------------------$dsl show [fast]
$alarm show
$pvc show
$pvc create <dsl: 1~24> <vc: 1~8> <vpi> <vci> [<llcmux|vcmux>] [<interleaved|fast>]
$pvc delete <dsl: 1~24> <vc: 1~8>
$bridge delete <bridge id: 1~193>
$tca show <acked>
$critical show <acked>
$firmware upgrade [-]<source file> <CP|DP|FD|DSL|ALL> <server ip>
$fd show
$port <disable|enable|restart> <dsl: 1~24>
$config backup <filename> <server ip>
$config restore <filename> <server ip>
--------------------------------------------------------dsl show [fast]
Display all the 24 ports DSL status
firmware upgrade
Upgrade firmware without removing the existing
one in advance
config backup/restore
Backup or restore the current configuration
Quick Start Guide for VigorAccess
17
Version: 1.0
Part III:
Here provides commands used in IVD for users to configure VoIP features.
S How to Reboot
- Help
IVD/system> reboot ?
- Reboot the system
IVD/system> reboot
- Reboot the system with keeping some important configuration
IVD/system> reboot keep
- Reboot the system with factory default configuration
IVD/system> reboot default
- Reboot the IVD VOIP board only
IVD/system> reboot voip
- Reboot the IVD DSL board only
IVD/system> reboot dsl
S How to Exit
- Help
IVD> ?
- Logout the CLI or the Telnet connection
IVD> exit
or
IVD> logout
or
IVD> quit
S How to Set VoIP Protocol Setting
- Help
IVD/voip>protocol ?
- Display the setting
IVD/voip>protocol -s
- Choose the voip protocol
IVD/voip>protocol <Protocol>
Protocol
18
Users can choose one of two protocols, one is SIP, and another is MGCP.
0: MGCP
1: SIP (Default is 1)
Quick Start Guide for VigorAccess IVD
Version: 1.0
S How to Set SIP local port Setting
- Help
IVD/voip/sip> localport ?
- Display the setting
IVD/voip/sip> localport –s
- Edit sip local port number
IVD/voip/sip> localport <Port>
1…65535 (Default is 5060)
Port
S How to Set SIP Proxy Server Setting
- Help
IVD/voip/sip> server ?
- Display the setting
IVD/voip/sip> server -s
- Enable/Disable the proxy server
IVD/voip/sip> server <Proxy#> <Active>
- Enable/Disable the proxy server and outbound proxy
IVD/voip/sip> server <Proxy#> <Active> <Outbound>
- Edit the proxy server parameters
IVD/voip/sip> server <Proxy#> <Active> <Outbound> <ProxyName> <ProxyIP>
<ProxyPort> <RegistrarIP> <RegistrarPort> <Expires> <Domain>
Proxy#
Active
Outbound
Proxy number is from 1 to 3.
0: Disable (Default is 0)
1: Enable
If users click this option, it means that each SIP protocol packet will be sent to SIP proxy
server always.
0: Disable (Default is 0)
ProxyName
ProxyIP
ProxyPort
RegistrarIP
RegistrarPort
Expires
Domain
1: Enable (It means that each SIP protocol packet will be sent to SIP proxy server
always.)
Assign a name of SIP proxy server. (Default is none)
Assign an IP address of SIP proxy server. (Default is 0)
Assign a port number of SIP proxy server.
1...65535 (Default is 5060)
Assign an IP address or domain name of SIP register server. (Default is 0)
Assign a port number of SIP register server.
1...65535 (Default is 5060)
Assign a timeout value for SIP protocol, the default value is 300.
(minimum 60 seconds)
Assign an IP address or domain name of SIP Domain/Realm. (Default is 0)
Quick Start Guide for VigorAccess
19
Version: 1.0
S How to Set MGCP Local Port Setting
- Display the setting
IVD/voip/mgcp> localport -s
- Edit the local port number for MGCP protocol
IVD/voip/mgcp> localport <Port>
Assign a UDP port number to Call Agent server.
1...65535 (Default is 2427)
Port
S How to Set MGCP Call Agent Setting
- Help
IVD/voip/mgcp> callagent ?
- Display the setting
IVD/voip/mgcp> callagent -s
- Edit the IP address and port number for call agent
IVD/voip/mgcp> callagent <IPAddress> <Port>
MGCP Call
Agent IP Address
MGCP Call
Agent Port
Assign an IP address of Call Agent server in MGCP.
(Default is 192.168.100.100)
Assign a UDP port number to Call Agent server.
1...65535 (Default is 2727)
S How to Set MGCP End Point ID Style Setting
- Help
IVD/voip/mgcp> epidstyle ?
- Display the setting
IVD/voip/mgcp> epidstyle -s
- Edit the style mode for end point
IVD/voip/mgcp> epidstyle <Mode>
- Edit the port number base id for end point
IVD/voip/mgcp> epidstyle –b <BaseNum>
- Edit the domain name for end point
IVD/voip/mgcp> epidstyle –m <DomainName>
EndPoint Name There are four options for users to select.
Style
0. aaln/#@[ip_addr]
ex: aaln/1@[1.1.1.1]
1. mac_addr/#@[ip_addr]
ex: 000504030201/1@[1.1.1.1]
2. aaln/#@mac_addr
ex: aaln/1@000504030201
3. aaln/#@domain_name
ex: aaln/[email protected]
(Default is 0)
20
Quick Start Guide for VigorAccess IVD
Version: 1.0
S How to Set MGCP Wildcarded End Point ID Setting
- Help
IVD/voip/mgcp> wildrsip ?
- Display the setting
IVD/voip/mgcp> wildrsip -s
- Setting the wildcarded RSIP action
IVD/voip/mgcp> wildrsip <Active>
There are two options for users to select.
Each endpoint sends its own RSIP
Send only one wild-carded RSIP
Active
0: Disable (Default is 0)
1: Enable
S How to Set Phone Number
- Help
IVD/voip/sip> phonenumber ?
- Display the setting
IVD/voip/sip> phonenumber -s
- Enable/Disable the port#
IVD/voip/sip> phonenumber <Port> <Active>
- Edit phone number, password, display name and authentication id for port#
IVD/voip/sip> phonenumber <Port> <Active> <PhoneNum> <Password> <DisplayName>
<AuthID>
Port
Active
PhoneNum
Password
Display
Name
AuthID
Device port number (1~24).
0: Disable (Default is 0)
1: Enable
Assign a number as a user name for each phone line.
(Default is 1001~1024 mapped to 1~24 port)
Assign a user password for each phone line.
(Default is 0000)
Assign a user name to be displayed on another phone terminal.
(Default is 1001~1024 mapped to 1~24 port)
Assign a auth ID to authenticate with proxy server.
(Default is 1001~1024 mapped to 1~24 port)
Quick Start Guide for VigorAccess
21
Version: 1.0
S How to Set Codec Setting
- Help
IVD/voip/sip> codec ?
- Display the setting
IVD/voip/sip> codec -s
- Edit prefect codec, codec rate and VAD for the port#
IVD/voip/sip> codec <Port> <PreferCodec> <CodecRate> <VAD>
- Edit single codec for the port#
IVD/voip/sip> codec –single <Port> <Active>
Port
Preferred
Codec
Device port number (1~24)
Select one Codec to be applied on this port. IVD supports five Codecs.
0: G.711U(PCMU) -64kbps
1: G.711A(PCMA) -64kbps
2: G.729A -8kbps (Default is 2)
3: G.723.1 -6.3kbps
4: G.726-32kbps
Codec Rate Select one rate value to be applied on this port.
20/40 - for PCMU or PCMA (Default is 20)
20/40/60/80 - for G.729A (Default is 20)
30/60 - for G.723.1 (Default is 30)
VAD
20/40 - for G.726 (Default is 20)
“Enable” to activate VAD (Voice Activity Detection, also known as Silence Suppression)
function.
“Disable” to stop using VAD.
0: Disable (Default is 0)
1: Enable
Active
0: Disable (Default is 0)
1: Enable
S How to Set Gain Control Setting
- Help
IVD/voip/misc> gain ?
- Display the setting
IVD/voip/misc> gain -s
- Edit the speaker and microphone gain
IVD/voip/misc> gain <Device port> <Speaker Gain> <Microphone Gain>
Device port number (1~24).
Device port
Speaker Gain Assign the gain value while receiving voice, default value is 0.
The range is from -14 to 6. (Default is 0)
Microphone Assign the gain value while transmitting voice, default value is 0.
The range is from -14 to 6. (Default is 0)
Gain
22
Quick Start Guide for VigorAccess IVD
Version: 1.0
S How to Set DTMF Relay Setting
- Help
IVD/voip/sip> dtmf_relay ?
- Display the setting
IVD/voip/sip> dtmf_relay -s
- Edit dtmf relay mode for the port#
IVD/voip/sip> dtmf_relay <Port> <Mode>
- Edit dtmf relay mode and SIP INFO mode for the port#
IVD/voip/sip> dtmf_relay <Port> <Mode> <SipInfoMode>
Device port number (1~24)
Port
Mode
0: Disable
1: RFC2833 (Default is 1)
SipInfoMode
2: SIP INFO
Click one option to be applied in DTMF function. There are three options to be supported
as below –
Disable(Inband)
RFC2833
SIP INFO
0: CISCO
1: NORTEL
(If Mode is 1, default is none)
(If Mode is 2, default is 0)
S How to Set Fax Transport Mode Setting
- Help
IVD/voip/sip> fax ?
- Display the setting
IVD/voip/sip> fax -s
- Edit fax mode for the port#
IVD/voip/sip> fax <Port> <Mode>
Port
Mode
Device port number (1~24)
Select a mode to be applied on FAX function. There are two options to be supported as
below –
Transparent : FAX will be transmitted via voice channel, no fax relay nor Codec
change will be involved.
T.38 Relay : Using T.38 Fax Relay. It is the default value.
0: Transparent
1: T.38 Relay (Default is 1)
Quick Start Guide for VigorAccess
23
Version: 1.0
S How to Set Call Forwarding Setting
- Help
IVD/voip/sip> callforward ?
- Display the setting
IVD/voip/sip> callforward –s
- Edit call forwarding mode
IVD/voip/sip> callforward <Port> <Mode>
- Edit call forwarding mode and SIP URL
IVD/voip/sip> callforward <Port> <Mode> <SipURL>
- Edit call forwarding mode, SIP URL and ringing number for no answer
IVD/voip/sip> callforward <Port> <Mode> <SipURL> <NoAnswerRings>
Port
device port number (1~24)
Mode
0: Disable (Default is 0)
1: Call forwarding all calls
2: Call forwarding busy
3: Call forwarding no answer
sip url format, ex: [email protected]
SIP URL
(Default is none)
NoAnswerRin
gs
1~10 (ringing times) (Default is 3)
S How to Set User Group Setting
- Help
IVD/voip/sip> group ?
- Display the setting
IVD/voip/sip> group –s
- Enable/Disable group function and edit ring type
IVD/voip/sip> group <Active > <Rings>
- Edit the group number for the port
IVD/voip/sip> group –p <Port> <Group>
Active
0: Disable (Default is 0)
1: Enable
Rings
0: Rings all ports in the group
1: Rings the first available port
2: Rings by round robin (Default is 2)
Port
Assign a port number (1~24)
(Default is 1~24 mapped to 1~ 24 port)
Group
24
Assign a group number for assigned port (1~24)
Quick Start Guide for VigorAccess IVD
Version: 1.0
(Default is 1~24 mapped to 1~ 24 port)
Note - It is very important to provide Group function for voice service in company. Customers can
simultaneously call a same phone number to destination. When IVD gets a phone which configured in
the first port of a group from Internet, IVD will ring all available ports belonged to this group to
provide voice service at the same time. It is the benefit for customer to remember one phone number
corresponding to one company. Users can configure 24 groups at most and select each phone line
belongs to one specific group. Each phone line is only for one group and not permitted to be
overlapped.
S How to Set Hotline Setting
- Help
IVD/voip/sip> hotline ?
- Display the setting
IVD/voip/sip> hotline -s
- Enable/Disable the hotline function
IVD/voip/sip> hotline <Port> <Active>
Port
device port number (1~24)
Active
0: Disable (Default is 0)
s
t
i
g
i
D
<
- Edit the hotline number
IVD/voip/sip> hotline <Port> <Active> <
>
1: Enable
Digits
Default is none
S How to Set Speed Dial Setting
- Help
IVD/voip/sip> speeddial ?
- Display the setting
IVD/voip/sip> speeddial –s
- Add speeddial number and destination for the entry
IVD/voip/sip> speeddial –a <Number> <Destination> <Memo>
- Edit speeddial number, destination and memo for the entry
IVD/voip/sip> speeddial –e <Index> <Number> <Destination> <Memo>
- Delete the entry
IVD/voip/sip> speeddial –d <Index>
- Delete all entries
IVD/voip/sip> speeddial –D
Index
1~150
Number
Assign a dialing phone number.Ex: 101
Quick Start Guide for VigorAccess
25
Version: 1.0
Destination
Assign an address of dialing destination. Ex: [email protected]
Memo
Users can add some descriptions for each number.
(Default is none)
S How to Set Advanced Speed Dial Setting
- Help
IVD/voip/sip> advspdial ?
- Display the setting
IVD/voip/sip> advspdial –s
- Add prefix, strip length, append number, destination and memo for the entry
IVD/voip/sip> advspdial –a <Prefix> <Strip> <Append> <Destination> <Memo>
- Edit prefix, strip length, append number, destination and memo for the entry
IVD/voip/sip> advspdial –e <EntryIdx> <Prefix> <Strip> <Append> <Destination>
<Memo>
- Delete the entry
IVD/voip/sip> advspdial –d <EntryIdx>
- Delete all entries
IVD/voip/sip> advspdial –D
26
EntryIdx
1~30
Prefix
Prefix number, ex: 101 (Default is none)
Strip
Strip length (Default is none)
Append
Append number (Default is none)
Destination
IP or Domain name (Default is none)
Memo
Free text (Default is none)
Quick Start Guide for VigorAccess IVD
Version: 1.0
S How to Set Region Code for Tone Setting
- Help
IVD/voip/tone> region ?
- Display the setting
IVD/voip/tone> region -s
- choose the region for CPT setting
IVD/voip/tone> region <Region Number>
Region Number
Select one country area for using VoIP feature. There is one option User Defined
for proprietary setting.
0
: User Defined
1
: Australia
2
: British (Default is 2)
3
: Canada
4
: China
5
: Denmark
6
: Finland
7 : France
8
: Germany
9
: Hong Kong
10 : India
11 : Japan
12 : Netherlands
13 : Norway
14 : Singapore
15 : Taiwan
16 : USA
Quick Start Guide for VigorAccess
27
Version: 1.0
S How to Set User Defined Busy Tone Setting
- Help
IVD/voip/tone/user_defined> busy ?
- Display the setting
IVD/voip/tone/user_defined> busy -s
- Edit frequency and cadence for busy tone
IVD/voip/tone/user_defined> busy <Lowfreq> <Highfreq> <Ton1> <Toff1> <Ton2>
<Toff2>
Assign a low frequency number in Hertz unit.
Lowfreq
(unit is HZ) (Default is 350)
Assign a high frequency number in Hertz unit.
Highfreq
(unit is HZ) (Default is 440)
Ton1(msec)
The duration of the first ringing.
(10msec per unit) (Default is 0)
TOff1(msec)
The silence duration after the first ringing.
(10msec per unit) (Default is 0)
Ton2(msec)
The duration of the next continuous ringing.
(10msec per unit) (Default is 0)
Toff2(msec)
The silence duration after the next continuous ringing.
(10msec per unit) (Default is 0)
S How to Set User Defined Ringing Tone Setting
- Help
IVD/voip/tone/user_defined> ringing ?
- Display the setting
IVD/voip/tone/user_defined> ringing -s
- Edit frequency and cadence for ringing tone
IVD/voip/tone/user_defined> ringing <Lowfreq> <Highfreq> <Ton1> <Toff1> <Ton2>
<Toff2>
Lowfreq
Assign a low frequency number in Hertz unit.
(unit is HZ) (Default is 440)
Highfreq
Assign a high frequency number in Hertz unit.
(unit is HZ) (Default is 480)
28
Ton1(msec)
(10msec per unit) (Default is 0)
TOff1(msec)
(10msec per unit) (Default is 0)
Ton2(msec)
(10msec per unit) (Default is 200)
Toff2(msec)
(10msec per unit) (Default is 400)
Quick Start Guide for VigorAccess IVD
Version: 1.0
S How to Set User Defined Congestion Tone Setting
- Help
IVD/voip/tone/user_defined> congestion ?
- Display the setting
IVD/voip/tone/user_defined> congestion -s
- Edit frequency and cadence for congestion tone
IVD/voip/tone/user_defined> congestion <Lowfreq> <Highfreq> <Ton1> <Toff1> <Ton2>
<Toff2>
Lowfreq
Assign a low frequency number in Hertz unit.
(unit is HZ) (Default is 480)
Highfreq
Assign a high frequency number in Hertz unit.
(unit is HZ) (Default is 620)
Ton1(msec)
(10msec per unit) (Default is 0)
TOff1(msec)
(10msec per unit) (Default is 0)
Ton2(msec)
(10msec per unit) (Default is 25)
Toff2(msec)
(10msec per unit) (Default is 25)
S How to Set Caller ID Type Setting
- Help
IVD/voip/tone/user_defined> callerid ?
- Display the setting
IVD/voip/tone/user_defined> callerid -s
- Edit caller id type
IVD/voip/tone/user_defined> callerid <Type>
0: North America
Type
1: JAPAN
2: ETSI (Default is 2)
3: DTMF
S How to Set VoIP RTP Port Setting
- Help
IVD/voip/misc> rtp_port ?
- Display the setting
IVD/voip/misc> rtp_port -s
- Edit the rtp starting port
IVD/voip/misc> rtp_port <Port number>
Port
number
Assign a starting port number in RTP protocol packet.
1…65535. (Default is 13456)
Quick Start Guide for VigorAccess
29
Version: 1.0
S How to Set ToS Setting
- Help
IVD/voip/qos> tos ?
- Display the setting
IVD/voip/qos> tos -s
- Edit the tos value for RTP
IVD/voip/qos> tos -r <Value>
- Edit the tos value for MGCP
IVD/voip/qos> tos -g <Value>
- Edit the tos value for SIP
IVD/voip/qos> tos -i <Value>
Assign a TOS value in VoIP protocol packet.
Value
Range: 00 ~ ff (by hex value) (Default is 0xa0)
S How to Set T.38 Starting Port Setting
- Help
IVD/voip/misc> t38port ?
- Display the setting
IVD/voip/misc> t38port -s
- Edit the T.38 starting port
IVD/voip/misc> t38port <port>
Assign a starting port number in T.38 protocol packet.
port
1...65535 (Default is 49170)
S How to Set T.38 Redundancy Number Setting
- Help
IVD/voip/misc> t38redundancy ?
- Display the setting
IVD/voip/misc> t38redundancy -s
- Edit the T.38 redundancy number
IVD/voip/misc> t38redundancy <Number>
Number
Assign a redundancy number in T.38 protocol. It means how many payloads to be
attached in the tail of packet.
0~4 (Default is 1)
30
Quick Start Guide for VigorAccess IVD
Version: 1.0
S How to Set Dialing Timeout Setting
- Help
IVD/voip/misc> dialing_timeout ?
- Display the setting
IVD/voip/misc> dialing_timeout -s
- Edit the dialing completion timeout value
IVD/voip/misc> dialing_timeout <value>
1~60 (unit is second) (Default is 4)
Value
S How to Set Metering
- Help
IVD/voip/misc> metering ?
- Display the setting
IVD/voip/misc> metering -s
- Setting Metering mode
IVD/voip/misc> metering -m <Metering Mode>
- Setting Reversal mode
IVD/voip/misc> metering -r <Reversal Mode>
Metering Mode 0:Line polarity reversal (default)
1:12KHZ Tone
2:16KHZ Tone
Reversal Mode 0: Reverse as peer end-point On-hook (default)
1: Reverse as callee Off-hook
S How to Set NAT Traversal Setting
- Help
IVD/voip/misc> nat ?
- Display the setting
IVD/voip/misc> nat -s
- Disable NAT traversal function
IVD/voip/misc> nat <Disable Mode>
- Enable Manual mode and WAN IP Address for NAT router
IVD/voip/misc> nat <Manual Mode> <NatIpAddr>
- Enable Auto mode and related parameters
IVD/voip/misc> nat <Auto Mode> <Type> <LocalPort> <ServerIP> <ServerPort>
- Edit symmetric media setting
IVD/voip/misc> nat –sym <sym_rtp_t38>
Disable mode
Disable this function. The application is IVD has a public WAN IP address.
(not behind a NAT router)
0: Disable NAT traversal (Default is 0)
Quick Start Guide for VigorAccess
31
Version: 1.0
1: Manually input NAT IP address
2: Auto discover NAT IP address
Manually Input NAT IP Address
Assign an IP address as NAT IP address.
The application is when IVD is behind a NAT router, and NAT router uses a static WAN
IP address. This value is same as WAN IP in NAT router.
NAT IP
Address
(Default is 172.0.0.1)
Auto Discovery NAT IP Address
STUN Local
Port
Assign a port number of STUN server.
STUN Server
Address
Assign an IP address of STUN server.
STUN Server
Port
Type
Assign a server port number of STUN server.
(Default is 3478)
(Default is 3478)
(Default is stun.fwdnet.net)
0: Semi-auto (need to configure NAT)
1: Full-auto (no need to configure NAT) (Default is 1)
Sym_Rtp_T38 Symmetric Media Setting
0: Disable symmetric RTP and T.38 (Default is 0)
1: Enable symmetric RTP and T.38
Note: “Auto Discovery NAT IP Address” option is used when IVD is behind a NAT router, NAT uses
dynamic WAN IP address like as DHCP or PPPoE client. There must be having a STUN server in
Internet. IVD needs to negotiate with STUN server for this function.
Note: The “STUN”(Simple Traversal of UDP through NATs) server is an implementation of the STUN
protocol that enables STUN functionality in SIP-based systems. STUN is an application-layer protocol
that can determine the public IP and nature of a NAT device that sits between the STUN client and STUN
server.
S How to Show VoIP Connection Status
- Help
IVD/voip> status ?
- Show voip status of port#
IVD/voip> status <Port>
- Show all voip status
IVD/voip> status
Port
Port number is 1 ~ 24
Register Status
It shows the status of registering in proxy server.
Call Status
It shows the calling status.
Call Type
It shows the dialing direction for this phone calling.
Caller Number
It shows the phone number of caller.
Callee Number
It shows the phone number of calling receiver.
Start Time
It shows the starting time of calling.
Remote RTP Address It shows the IP address of remote voice site.
32
Quick Start Guide for VigorAccess IVD
Version: 1.0
Remote RTP Port
It shows the used port number of remote voice site.
RTP Statistic
It shows the RTP Statistic.
Codec Type
It shows the Codec mode used for this phone calling.
Packet Period
It shows the period of time for sampling on voice signal.
VAD
It shows the status of VAD.
DTMF Relay
It shows the status of DTMF.
S How to Show SIP Syslog Message
- Help
IVD/system> syslogd ?
- Display the syslog setting
IVD/system> syslogd -s
- Edit the syslog setting
IVD/system> syslogd <Active> <RIP> <RPort>
S How to Set Incoming Call Barring Setting
- Help
IVD/voip/sip/incallbarring> set ?
- Display the setting
IVD/voip/sip/incallbarring> set -s
- Edit the class, match mode and speeddial entries
IVD/voip/sip/incallbarring> set <Class> <MatchName> <MatchIP> <SpeeddialFrom>
<SpeeddialTo>
Class
There are five options users can use.
0: Allow all incoming calls. (Default is 0)
1: Allow only calls from allow list.
2: Allow only calls from speed dial entries.
3: Deny only calls from deny list.
4: Deny all incoming calls.
Match Method
MatchName
MatchIP
“Disable” to disable this field mapped in speed dial table as “Speed Dial Phone
Number” to be checked.
“Enable” to enable this field mapped in speed dial table as “Speed Dial Phone
Number” to be checked. (Default is Enable)
“Disable” to disable this field mapped in speed dial table as “Speed Dial Destination”
to be checked.
“Enable” to enable this field mapped in speed dial table as “Speed Dial Destination”
to be checked. (Default is Enable)
SpeeddialFrom
1~150 (Default is 1)
SpeeddialTo
1~150 (Default is 150)
Quick Start Guide for VigorAccess
33
Version: 1.0
S How to Set Allow List of Incoming Calls Setting
- Help
IVD/voip/sip/incallbarring> allow ?
- Display the setting
IVD/voip/sip/incallbarring> allow -s
- Add the index entry in the allow list
IVD/voip/sip/incallbarring> allow –a <Name> <IP/Domain>
- Edit the index entry in the allow list
IVD/voip/sip/incallbarring> allow –e <Index> <Name> <IP/Domain>
- Delete the index entry in the allow list
IVD/voip/sip/incallbarring> allow –d <Index>
- Delete all entries
IVD/voip/sip/incallbarring> allow –D
Index
1~30 (Default is none)
Name
Assign a name or number in allow list. Free text (Default is none)
IP/Domain
Assign an IP address or domain name in allow list.
If the other side had registered in SIP proxy server, please type the domain name of SIP
proxy server.
If the other side had not registered in SIP proxy server, please type the static IP address
or DDNS domain name.
ex: 192.168.1.1/iptel.org (Default is none)
S How to Set Deny List of Incoming Calls
- Help
IVD/voip/sip/incallbarring> deny ?
- Display the setting
IVD/voip/sip/incallbarring> deny -s
- Add the index entry in the deny list
IVD/voip/sip/incallbarring> deny -a <Name> <IP/Domain>
- Edit the index entry in the deny list
IVD/voip/sip/incallbarring> deny -e <Index> <Name> <IP/Domain>
- Delete the index entry in the deny list
IVD/voip/sip/incallbarring> deny –d <Index>
- Delete all entries
IVD/voip/sip/incallbarring> deny –D
34
Index
1~30 (Default is none)
Name
Assign a name in deny list. Free text (Default is none)
IP/Domain
Assign an IP address or domain name in deny list.
If the other side had registered in SIP proxy server, please type the domain name of SIP
proxy server.
If the other side had not registered in SIP proxy server, please type the static IP address
or DDNS domain name.
ex: 192.168.1.1/iptel.org (Default is none)
Quick Start Guide for VigorAccess IVD
Version: 1.0
S How to Activate VoIP configuration
- Help
IVD/voip> config ?
- To activate voip configuration
IVD/voip> config activate
Quick Start Guide for VigorAccess
35