1
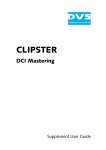
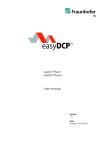
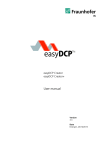
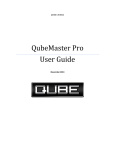
Supplement: CLIPSTER DCI Mastering (Version 1.2)
CLIPSTER
DCI Mastering
Supplement
Supplement: CLIPSTER DCI Mastering
Document Version 1.2 for the CLIPSTER Software Version 2.5
Copyright © 2008 by DVS Digital Video Systems AG, Hanover. All rights reserved.
The manuals as well as the soft- and/or hardware described here and all their constituent parts are
protected by copyright. Without the express permission of DVS Digital Video Systems AG any form
of use which goes beyond the narrow bounds prescribed by copyright legislation is prohibited and
liable to prosecution.
This particularly applies to duplication, copying, translation, processing, evaluation, publishing, and
storing and/or processing in an electronic system.
Specifications and data may change without notice. We offer no guarantee that this documentation
is correct and/or complete. In no event shall DVS Digital Video Systems AG be liable for any damages whatsoever (including without limitation any special, indirect, or consequential damages, and
damages resulting from loss of use, data, or profits, or business interruption) arising out of the use
of or inability to use the hardware, software and/or manual materials.
Those parts of this documentation that describe optional software or hardware features usually
contain a corresponding note. Anyway, a lack of this note does not mean any commitment from
DVS Digital Video Systems AG.
CLIPSTER and DVS are registered trademarks of DVS Digital Video Systems AG.
Any other product names mentioned in this documentation may be trademarks or registered trademarks of their respective owners and as such are subject to the usual statutory provisions.
Contents
C
1
Introduction ............................................................................... 1-1
2
Creating the DSM ..................................................................... 2-1
3
Creating and Using a DCDM ................................................. 3-1
3.1 Creating the DCDM ............................................................. 3-1
3.2 Using a DCDM to Create a DCP .......................................... 3-3
4
Creating the DCP ...................................................................... 4-1
4.1 Preparing the DCP Creation ................................................. 4-1
4.1.1 Opening the DSM Project ............................................ 4-2
4.1.2 Setting Reel Markers ................................................... 4-2
4.1.3 Configurations ............................................................ 4-3
4.2 Finalize Settings – Naming and Storage Options ................... 4-5
4.3 Finalize Settings – File and Video Format .............................. 4-7
4.4 Finalize Settings – CPL .......................................................... 4-8
4.5 Finalize Settings – KDM ...................................................... 4-10
4.6 Further Finalize Settings and Rendering .............................. 4-12
5
Using the DCP and Self KDM ................................................ 5-1
5.1 Configurations for a Self KDM ............................................. 5-2
5.2 Loading the DCP .................................................................. 5-3
5.3 Creating Additional KDMs .................................................... 5-4
5.4 Modifying a DCP ................................................................. 5-6
5.5 The Menu Option ’Load KDM...’ ......................................... 5-7
i
Contents
6
Miscellaneous ........................................................................... 6-1
6.1
6.2
6.3
6.4
6.5
Color Space Conversions ...................................................... 6-1
Adapting the Rating Agencies .............................................. 6-2
Merging DCPs ...................................................................... 6-3
JPEG2000 Options ............................................................... 6-4
Keys and Certificates Explained ............................................ 6-6
6.5.1 What’s a Key .............................................................. 6-6
6.5.2 What’s a Certificate ..................................................... 6-7
6.5.3 The Key Players of the DCI Mastering ........................... 6-7
6.5.4 The Keys Applied ...................................................... 6-10
6.5.5 Where are the Keys Set in CLIPSTER ............................ 6-12
6.5.6 What’s a Certificate Chain .......................................... 6-13
6.5.7 Validating Certificates ................................................ 6-15
6.5.8 The Keys and Certificates Delivered with CLIPSTER ....... 6-16
ii
1
Introduction
This document describes the steps required to perform a DCI Mastering
with CLIPSTER.
The CLIPSTER DCI Mastering feature allows you to create digital content which adheres to the specifications of the Digital Cinema Initiatives
(DCI). With it you will be able to take the DCI steps from DSM to DCP
over CPL and KDM with ease. The CLIPSTER DCI Mastering feature is
available in two variants:
CLIPSTER DCI
Mastering software based
CLIPSTER DCI
Mastering hardware accelerated
Provides in the CLIPSTER software the user interface items to create a DCP. They allow you to
generate the JPEG2000 encoded content
wrapped in MXF in software.
Provides in the CLIPSTER software the user interface items to create a DCP. Furthermore, the
rendering of the DCP is supported by additional
hardware (the CLIPSTER JPEG2000 accelerator
board), enabling you to generate JPEG2000 encoded 12-bit X’Y’Z’ files near or in real time.
The CLIPSTER DCI Mastering is available as an optional feature. Upgrades to the hardware accelerated variant may be
possible but depend on the CLIPSTER system delivered to you.
The descriptions in this document often only point out the configurations that must be made to successfully complete a DCI
Mastering. For further details about user interface items not
described in the following please refer to the other user guides
of CLIPSTER.
In detail this document describes the following tasks:
1.
2.
3.
4.
How to create a DSM.
How to create and use a DCDM (optional step).
How to create the DCP.
How to use a self KDM.
Furthermore, the last chapter of this document provides additional information worth noticing for a DCI Mastering.
1-1
Creating the DSM
2
The first step to create a DCI compliant Distribution Package for digital
cinemas is the same as with most projects. You simply have to assemble
your project in the timeline of the CLIPSTER Edit Tool and edit it as desired with, for example, trimmings, transitions, color corrections, etc. It
is this ’master project’ that can then be converted to different formats
for various applications, such as a Digital Cinema Distribution Master
(DCDM), a home video master or a master for archiving purposes.
The DCI clearly states that the Digital Source Master (DSM) itself is not
defined, i.e. it ’can be made of any color space, resolution, sampling
frequency, color component bit depths and many other metrics.’1
Therefore, it lies totally in your own discretion how to prepare a project
and thus the Digital Source Master.
However, for best results when making a DCI Mastering, it is recommended that the timeline of the DSM consists of clips in the RGB color
space only.
1) Digital Cinema System Specification Version 1.2. Ed. by Digital Cinema Initiatives, LLC, 7. March 2008: 25.
2-1
Creating and Using a DCDM
3
The creation of a DCDM is a step which is not required for a DCI Mastering with CLIPSTER. The chapter “Creating the DCP” on page 4-1
describes how to use a DSM directly to create a DCP because with
CLIPSTER this is the fastest way to achieve this.
However, according to the DCI a DCDM should be created as a complete and standardized way to communicate movies, for example, between studio and post production. This section describes how to create
a DCDM. Additionally, in case it is needed, it is explained how to use
the DCDM for the creation of a DCP.
3.1 Creating the DCDM
In CLIPSTER the DCDM will be created via a finalizing of the project’s
timeline. As specified by the DCI the DCDM has to be saved in 16-bit
X’Y’Z’ in the TIFF file format.
However, the TIFF file format natively does not store the X’Y’Z’ color
space, it saves the RGB or Luma color space only. To make this work
nevertheless, a 3D look-up table (LUT) has to be applied to the DSM
which will create the X’Y’Z’ color space compliant with the DCI specification.
This section describes how to create the DCDM with the CLIPSTER Edit
Tool:
y If not already the case load the project containing the DSM (video
as well as audio) in the timeline.
y Call up the finalize dialog of CLIPSTER (menu Project » Finalize…).
y Next set up the finalizing as detailed below:
– Choose a naming and storage location for the finalized files
according to your project’s needs.
3-1
Creating and Using a DCDM
Figure 3-1: File name and storage location
– As the file format select the TIFF file format with the saving
type 16 bit RGB big endian. Furthermore, make sure
that the hardware finalize support is activated.
Figure 3-2: File format settings
– To convert the DSM to X’Y’Z’ select the 3D LUT appropriate
for your project’s material with the button 3D LUT…
(
). For this you may use one of the available
3D LUTs provided by DVS. After the selection and when
returned to the finalize dialog, make sure that the check box in
front of the 3D LUT… button is activated, otherwise the
3D LUT will not be applied and no color space conversion to
X’Y’Z’ takes place.
Figure 3-3: Window to select a 3D LUT file
– Use the buttons, the list box and the settings items in the middle of the finalize dialog to specify the video format. Adjust
3-2
Creating and Using a DCDM
them so that they match the requirements of the DCI (e.g. as
the video raster select 2048 × 1080 or 4096 × 2160 at 24p).
– Specify the audio format for the DCDM according to the DCI
and your project’s needs, for example, select the WAV file format in 24 bit as a multi-channel file.
Figure 3-4: Audio settings
After this the settings to create a DCDM are complete and you can start
the finalize process at any time:
y Press the button RENDER to start the generation of the DCDM.
This will start the finalizing of the DCDM and it will be created at the
specified location.
3.2 Using a DCDM to Create a DCP
The DCDM is deemed the exchange format for D-Cinema environments by the DCI. In case it is needed, this section explains how to use
a DCDM to create a DCP.
Instead of opening the project with the DSM in the timeline to create
the DCP (see section “Opening the DSM Project” on page 4-2), the
DCDM can be used. For this the DCDM clips must be properly prepared
and available in the timeline of the CLIPSTER Edit Tool so that the software will use them for the finalizing:
y Open a new project in the CLIPSTER Edit Tool.
y With the button SETTINGS… of the timeline area configure the
timeline output settings so that they match the format of the
DCDM (usually the same as the final DCP format).
y Add the finalized DCDM clips (video as well as audio) to the bin, for
example, by dragging them to the contents area of the bin from a
file manager or by using the menu option Add clip of the bin’s
context menu.
Afterwards the DCDM clips will be visible in the contents area of the
bin. However, because CLIPSTER registers the added video clip as an
RGB clip (as stated in the image files’ headers), you have to change the
color space of the added clip manually in CLIPSTER:
3-3
Creating and Using a DCDM
y Open the properties of the video clip of the DCDM in the bin (context menu of bin clip » Properties…).
y Set its color space settings to X’Y’Z’ (XYZ) and confirm your alteration with the OK button.
Figure 3-5: Altering the color space settings of the DCDM video clip
Once X’Y’Z’ has been selected as the color space, the color matrix setting (YUV matrix) will switch to the correct color matrix
automatically.
With this setting made, an automatic color space conversion from RGB
to X’Y’Z’ will be prevented during the DCP finalizing (see section “Color Space Conversions” on page 6-1).
y Next, add the video clip of the DCDM to the video track of the
timeline.
y Add the audio clip(s) of the DCDM to the audio tracks of the timeline.
y If necessary adapt the routing of the audio tracks that now contain
audio data so that they are suited for the DCP to be created.
With this the DCDM clips are added to the timeline of the CLIPSTER
Edit Tool and they will be used for the creation of the DCP. You may
now continue the creation of the DCP with section “Setting Reel Markers” on page 4-2.
3-4
Creating the DCP
4
With the DSM in the timeline you can directly continue the DCI Mastering and create the Digital Cinema Package (DCP). The DCP has to
be created via a finalizing: It will generate the JPEG2000 encoded video
files in X’Y’Z’ 12 bit as well as the audio data that afterwards will be
wrapped in separate MXF containers. Of course, all preprocessing
steps, such as scalings or color corrections will be performed as well.
Furthermore, this step also creates the Composition Playlist (CPL), the
Key Delivery Messages (KDMs), a Packing List (PKL), and an Asset Map
file for a direct ingest into a D-Cinema screen server.
This chapter describes how to use the DSM to create a DCP because this is the fastest way with CLIPSTER to achieve it. However, a DCP can also be created from a DCDM. For further
information about this see section “Using a DCDM to Create a
DCP” on page 3-3.
To create a DCP the project has to be prepared first, followed by the
setup of the finalizing. Then the project has to be rendered which will
result in the final DCP.
4.1 Preparing the DCP Creation
To prepare the project for the creation of the DCP several steps are required first:
– You have to open the project with the DSM in the timeline of the
CLIPSTER Edit Tool.
– You may want to set reel markers to automatically divide the finalized files according to the specifications of the DCI.
– You have to set some general settings for the DCP creation, such as
the private key that should be used to sign the extra files of the
DCP (Signing Key).
Once all these are made, the project will be properly prepared and afterwards the finalize settings for the DCP can be made.
4-1
Creating the DCP
4.1.1 Opening the DSM Project
To create a DCP the original Digital Source Master (see chapter “Creating the DSM” on page 2-1) should be used:
y If not already the case load the project that contains the DSM
(video as well as audio) in the timeline.
When the DSM is available in the timeline of the CLIPSTER Edit Tool,
you can continue the preparations with the next step.
4.1.2 Setting Reel Markers
To split the loaded project during the finalizing of the DCP into reels to
comply with the requirements of a DCP, you have to add reel markers
to the timeline: When wrapping to MXF, the finalized files will be automatically divided at the markers in the timeline, resulting each in one
MXF file per output format (video and/or audio). To add reel markers
to the timeline do as detailed below:
Instead of the procedure described in the following, you may
also add markers manually to the timeline (context menu on
the timeline scale » Add marker).
Only markers of the type DC-Reel Marker are observed as
DCP split points. Other marker types will be ignored during the
DCP creation. Marker types can be changed easily on the tab
Markers of the tool area.
y Select from the context menu of the timeline scale the menu option
Set markers automatically….
This will open the following window:
Figure 4-1: Dialog to add markers to the timeline automatically
4-2
Creating the DCP
y Configure the settings according to your requirements:
– As the marker type select DC-Reel Marker.
– Determine the way markers should be generated (e.g. with a
set timed interval).
– If necessary enable that already existing reel markers are to be
deleted from the timeline automatically.
y Afterwards generate the markers by clicking the OK button.
This will create reel markers in the timeline of the CLIPSTER Edit Tool.
4.1.3 Configurations
For a complete and appropriately prepared DCP you have to make
some general settings for the DCP creation and set, for example, the
private key to sign the extra files of the DCP (CPL, KDMs, etc.). To
make the general settings the Configuration Tool of CLIPSTER has to
be used:
y Open the DCI settings in the CLIPSTER Configuration Tool (menu
Options » Defaults… » group DCI).
Figure 4-2: DCI configuration settings
y Configure the DCP creation according to your requirements:
4-3
Creating the DCP
– Use the button
on the right-hand
side of the field Private Signing Key
to select the private key file (*.pfx)
that should be used to sign the extra
files of the DCP (Signing Key). For this you may have to enter a
password to authenticate your usage of the private key. Afterwards the corresponding public key is detailed in the field Public Key above. This public key will be attached to the extra files
and has to be used by D-Cinema players to verify the origin of
the files of a DCP.
– Use the area Self KDM with the field Certificate to configure
the creation of a KDM which can afterwards be used with your
or another CLIPSTER DCI Mastering system (depending on the
entered public key). With this KDM you will be able to load a
DCP (e.g. to view and check the correctness of the DCP) on the
respective CLIPSTER. Select the file (*.cer or *.pem) that
holds the public key of this CLIPSTER with the button
to the
right of the field Certificate.
This public key file can be found either already stored in
the installation directory of the CLIPSTER software or
on a separate CD-ROM.
Further information about the usage of self KDMs as
well as their creation can be found in chapter “Using
the DCP and Self KDM” on page 5-1.
– An activated check box SMPTE Phase 1 creates a DCP that is
SMPTE/DCI compliant. You have to deactivate the check box
to generate a DCP for D-Cinema players which are based on
the JPEG Interop instead of the SMPTE standard.
y After these settings are determined confirm them by clicking on the
OK button.
The project is now properly prepared and you can continue with the finalizing of the DCP.
Your authentication to the password protected private key for
the signing (Signing Key) will be valid for this session of the
software only. After a restart of CLIPSTER you have to authenticate your usage of the signing key again.
4-4
Creating the DCP
4.2 Finalize Settings – Naming and Storage Options
With the project prepared for the creation of the DCP you can now begin to set up the DCP finalizing:
y Call up the finalize dialog of CLIPSTER (menu Project » Finalize…).
y Next choose a name and storage location for the finalized files
according to your project’s needs.
To set the file name(s) you can also use a variable naming
with the button NAME OPTIONS… (see “Excursus Name Options” below).
Figure 4-3: File name and storage location
With this the file naming and storage location are determined. Next you
have to continue with section “Finalize Settings – File and Video Format” on page 4-7 and set the video format for the DCP.
Excursus Name Options
In CLIPSTER you can get variable file names that will write certain details of your DCP automatically to the file names of, for example, the
MXF files during finalizing. To enable the variable file names in the finalize dialog you have to perform the following first:
y Select as the file format for the video output the entry DC MXF.
This will automatically set the audio file format to DC MXF as well and
the NAME OPTIONS… button and its check box will be made available
in the finalize dialog.
The items for a variable naming will be available only when in
all activated finalize outputs DC MXF is selected as the file format. Please note that this behavior will change with coming
CLIPSTER versions, where the variable naming will be generally
available for files written to the storage.
y Then click on the NAME OPTIONS… button.
4-5
Creating the DCP
Figure 4-4: Options to configure a variable file naming
In the opening window you can set the variable naming options:
y Enter a file name prefix in the entry field File name.
y With the File name extensions check box activated, add variable
or static components to the file name:
– A variable/separator can be selected from the list of the lower
combo box. Then it can be added to the upper combo box at
the current cursor position with the ADD button.
– By double-clicking (marking) variables/separators in the upper
combo box they can be deleted or modified using the respective buttons (for deletion, even without marking, you may also
use the respective keys on the keyboard).
– The variable Customized adds a user-defined string to the
extension at a selectable position. With Customized selected
the configurable string can be entered in field of the lower
combo box and then be transferred to the upper one with the
button ADD.
A preview of the file name can be seen below the items to set a file
name extension.
y When the file name is set as desired click the OK button.
This will close the window to configure a variable naming and you will
be returned to the finalize dialog.
y In the finalize dialog make sure that the check box in front of the
NAME OPTIONS… button is activated, otherwise they will not be
applied.
Then the chosen file naming will be detailed in the finalize dialog accordingly (entry field File name). As long as the variable naming is ac4-6
Creating the DCP
tivated with its check box, the field File name will be unavailable. The
set name options will be applied to the generated files as soon as the
rendering of the DCP is initialized.
4.3 Finalize Settings – File and Video Format
Next you have to configure the file and video format of the DCP:
y If not already set select DC MXF as the file format which sets the
proper saving type automatically.
During the DCP creation the video material will be encoded
in JPEG2000. The encoding is already configured to the
highest quality allowed for a DCP. However, you may have
to adapt the color space interpretation of the video material
in the timeline. Further information about this can be found
in section “Color Space Conversions” on page 6-1.
This will automatically set the audio file format to DC MXF as well.
y If provided with the hardware accelerated variant of the CLIPSTER
DCI Mastering, make sure that the hardware finalize support is activated.
y Use the buttons, the list box and the settings items in the middle of
the finalize dialog to specify the video format. If not already set correctly adjust them to the format that the final DCP should provide
(e.g. as the video’s raster select 2048 × 1080 or 4096 × 2160 at
24p).
4-7
Creating the DCP
Figure 4-5: Video format settings
With this the file and video format are set properly.
4.4 Finalize Settings – CPL
When finalizing to a DCP you also have to generate a Composition
Playlist (CPL).
The items for a CPL will be available only when in at least one
activated finalize output DC MXF is selected as the file format.
y To activate the generation of the CPL enable the check box D-Cinema Playlist in the finalize window.
This will be enough to generate the CPL when the DCP is finalized.
However, there is also the possibility to configure the CPL. For this perform the following:
y Click on the PLAYLIST… button.
This will open the window to configure the CPL:
4-8
Creating the DCP
Figure 4-6: CPL configuration
y Configure the settings according to your requirements:
– Use the entry fields in the upper part of the window to provide
details about the DCP to be created. They will be written to the
CPL file.
– Use the two list fields to detail a rating for the DCP to be created. Select the applicable rating agency in the left list field
with the mouse. Then drag and drop it to the right list field.
Afterwards adjust the rating with the provided combo box.
A set rating and rating agency can be removed from the
right list field by pressing the [Del] key on your keyboard.
The rating and rating agencies can be adapted. Further
information about this can be found in section “Adapting the Rating Agencies” on page 6-2.
– Select the font that the subtitles should be displayed in (true
type font, *.ttf).
– Add the subtitles for the DCP in *.xml format to the listed
reels. These files must be already available and one *.xml file
4-9
Creating the DCP
has to be assigned to each reel.
Currently it is not possible to review or display subtitles
with CLIPSTER. However, the D-Cinema player will recompose them from the provided *.xml files during
play-out.
y When everything is set as desired click the OK button.
This will close the window to configure the CPL and you will be returned to the finalize dialog.
With the check box in front of the PLAYLIST… button activated, the
Composition Playlist will be generated during the finalizing of the DCP.
4.5 Finalize Settings – KDM
For the DCP one or more Key Delivery Messages (KDMs) containing
the encrypted AES key to decrypt the content of the DCP have to be
created as well. Usually you will create one KDM for each D-Cinema
player that should play out the content. Their generation as well as the
keys that should be used can be configured with the items D-Cinema
Encryption.
The items for a KDM will be available only when in at least one
activated finalize output DC MXF is selected as the file format.
To configure the generation of the KDM(s) perform the following:
y Click on the KEY… button.
This will open the window to configure the KDM generation:
4-10
Creating the DCP
Figure 4-7: KDM generation configuration
y In this window set the generation of the KDM(s) according to your
needs:
– Use the entry and date/time fields in the upper part of the window to provide further details about the KDM(s) to be created
as well as their validity.
– Use the Forensic Marking settings to set whether the D-Cinema players should apply a watermarking to the played out
video and/or audio data.
– With the Encryption settings an encryption of the content can
be turned on or off. Select the material that should be
encrypted with the respective check boxes.
– Activate the subsequent check box to create a self KDM, i.e. a
KDM to decrypt the contents of the final DCP on a selectable
CLIPSTER DCI Mastering system, for example, for a final check
of the delivered content.
Further information about the usage of self KDMs as
well as their creation can be found in chapter “Using
the DCP and Self KDM” on page 5-1.
4-11
Creating the DCP
– Use the directory/file tree and the list field to its right to select
the public keys of the D-Cinema players (recipient certificates,
Encryption Key). For each selected key one KDM will be created: In the directory/file tree to the left browse to the location
on your system where the public keys (certificates) of the DCinema players are stored. Then select them and add them to
the list field to the right with the transfer button (
). A
set key file can be removed from the list on the right-hand side
by pressing the [Del] key on your keyboard.
y When everything is set as desired click the OK button.
This will close the window to configure the KDM(s) and you will be returned to the finalize dialog.
y In the finalize dialog make sure that the check box in front of the
KEY… button is activated, otherwise the KDM(s) will not be created.
With this the KDM(s) will be created during the finalizing.
4.6 Further Finalize Settings and Rendering
Now only the audio settings remain to be set:
y If necessary enable the output of audio.
y In case it is not already set select DC MXF as the file format.
The fields Resolution and Render audio in will be automatically configured to the correct settings for a DCP.
y Use the remaining settings items to configure the audio output to
the needs of your DCP.
Figure 4-8: Audio format settings
After this the settings to create a DCP should be complete and you can
start the finalize process at any time:
y Press the button RENDER to start the generation of the DCP.
This will start the finalizing and the DCP will be created at the specified
location. It generates the JPEG2000 video files in 12 bit as well as the
4-12
Creating the DCP
audio data and afterwards wraps them in separate MXF containers. If
reel markers are available in the timeline, you will receive for each reel
marker one MXF file per output format (video and/or audio) as well as
one XML file for subtitles, if appropriate. Furthermore, this step also
creates the CPL, the KDM(s), a PKL, and an Asset Map file.
Figure 4-9: The resulting DCP
The following table lists shortly the generated files and their purpose:
File
Explanation
*.ttf
The font (true type) file to display the subtitles
in.
ASSETMAP
The Asset Map details the content of the delivered DCP and the paths to its files relative to
the Asset Map. It can be loaded by D-Cinema
players which use it to reconstruct the track
files.
CPL_*.xml
Composition Playlist specifying the sequence of
the track files and thus the order of the playout. Contains hash values of the DCP’s track
files, certificates and a signature for verification
purposes as well.
4-13
Creating the DCP
File
Explanation
*.mxf
The (encrypted) content of the DCP (track
files), i.e. for each reel one video and one audio
file.
*.xml
The subtitles of the DCP. One file for each reel.
KDM_*.xml
Key Delivery Message containing the encrypted key for the content as well as certificates and
a signature for verification purposes. One for
each playback system (D-Cinema player).
KDM_self_*.xml
Key Delivery Message for a CLIPSTER DCI
Mastering system. The self KDM is not intended for D-Cinema players and should only be
used to administer the DCP on site (e.g. for
quality checks).
PKL_*.xml
Packing List containing information and IDs
about the files of a DCP. Thus it allows for asset
management of the delivered DCP. Contains
hash values of most of the DCP’s files, certificates and a signature for verification purposes
as well.
Once these files are available you have successfully created a DCI compliant Digital Cinema Package (DCP) with CLIPSTER that is ready for
distribution.
4-14
Using the DCP and Self KDM
5
When a DCP of a feature film is created, it is usually encrypted with the
decryption key stored in the KDMs. The decryption key in each KDM is
also encrypted, and it can be decrypted only with the private key of the
respective D-Cinema player for whom it was created. The conclusion of
this is that, once a DCP is created, it cannot be modified or checked for
flaws that may have occurred during the encoding and/or wrapping
process. The DCP together with a KDM and all other extra files are selfcontained, intended only for a specific usage in a defined period of time
on a particular device.
DVS’s solution to this problem is the self KDM of CLIPSTER that can be
created together with the other KDMs. It has to be generated with the
public key of a CLIPSTER DCI Mastering system (hardware accelerated). This system can afterwards be used to load the DCP. Although the
self KDM carries a validity same as the other KDMs, with CLIPSTER you
will be able to use the content nevertheless.
Once the DCP is loaded into CLIPSTER with the self KDM, you can, for
example, play out and check its content, create other KDMs (e.g. for
later releases) or modify it (e.g. exchange audio). Additional finalizing
processes will be performed only where alterations were made, i.e. the
DCP will not be generated again completely.
DCPs can also be created unencrypted, for example, for trailers
or advertisements. Then, of course, they do not require KDMs
or a self KDM. Unencrypted DCPs as well can be used as described in this chapter, but will not prompt for a self KDM.
This section describes how to use a self KDM as well as a DCP once they
have been created. It will be explained, for example, how to configure
the creation of a self KDM, how to load a DCP with CLIPSTER and how
to use a DCP to create additional KDMs.
5-1
Using the DCP and Self KDM
5.1 Configurations for a Self KDM
The necessary configurations to create a self KDM have to be made
during the creation of the DCP (see chapter “Creating the DCP” on
page 4-1 for further details):
1. During the preparations for the DCP’s creation some general settings have to be made in the Configuration Tool of CLIPSTER (tab
Defaults » group DCI, see also section “Configurations” on
page 4-3): In the field Certificate of the area Self KDM you have
to enter the path to the file (*.cer or *.pem) that holds the
public key of the CLIPSTER where the DCP should be loaded.
Figure 5-1: Setting the public key for a CLIPSTER DCI Mastering system
This public key file can be found either already stored in the installation directory of the CLIPSTER software or on a separate
CD-ROM.
Because the settings on the Defaults tab are general settings of
the CLIPSTER software, they will be set and available for each initialized new project. This way you do not have to configure the
path to the public key file of the respective CLIPSTER again when
creating other DCPs in the future.
2. When setting up the creation of the KDMs in the finalize dialog
(button KEY…), you have to activate the creation of the self
KDM. In the dialog for the KDMs enable the check box Create a
KDM for current Clipster (see also section “Finalize Settings –
KDM” on page 4-10).
Figure 5-2: Activating the creation of the self KDM
The described procedure to create a self KDM is available for
convenience reason: You have to set it only once and its generation can be turned on or off via a check box. A self KDM is
just another KDM, only that it is made for a CLIPSTER DCI
Mastering system. If wanted, you may create a self KDM the
same way the other KDMs are generated.
When these settings are made, the self KDM will be created during the
finalizing of the DCP. It will be stored at the same location as the other
files of the DCP with the file name KDM_self_<ID>.xml. This file can
then be used to load an encrypted DCP in CLIPSTER, for example, to
check its contents.
5-2
Using the DCP and Self KDM
5.2 Loading the DCP
Once created, a DCP can be loaded with CLIPSTER. Unencrypted DCPs
can be loaded on every CLIPSTER providing the DCI Mastering feature.
However, decrypted DCPs require a self KDM and can be loaded only
on the CLIPSTER for which the self KDM was intended, i.e. on the
CLIPSTER DCI Mastering system that holds the complementary key
(private RSA key) to the public key that was entered in the Configuration Tool of CLIPSTER (see section “Configurations for a Self KDM” on
page 5-2).
To load a DCP perform the following:
y In the CLIPSTER software open the dialog window to load a saved
project (select Project » Open…).
y Switch to the directory where the DCP, or more explicitly the CPL, is
stored.
y Select as the file type to be displayed in the ’Load Project’ window
the setting Digital Cinema Composition Playlist
files (combo box Files of type):
Figure 5-3: Loading the Composition Playlist (CPL) of the DCP
The extra files of the DCP (in *.xml format) will be displayed in the
dialog window.
y Select the CPL of the DCP that you want to load and open it with
the CLIPSTER software by clicking the button OPEN.
5-3
Using the DCP and Self KDM
This checks the CPL whether the content of the DCP is encrypted. If this
is the case, another dialog window to open a file will be displayed on
the screen:
Figure 5-4: Loading of the self KDM
y In this window select the created self KDM
(KDM_self_<ID>.xml) and confirm your selection with the button OPEN.
Then the content of the DCP will be loaded in the CLIPSTER Edit Tool
and you will see it in the timeline. Afterwards you can use the DCP, for
example, to play out the timeline and review the content of the DCP to
check its correctness.
Currently encrypted material provides no thumbnails or waveforms in CLIPSTER. However, the decrypted video can be seen
in the overlay of the Edit Tool.
A loaded CPL is no project file of CLIPSTER. Therefore, certain
settings may not be configured correctly and you may have to
set them again. Additionally, a loaded CPL should not be saved
as a CLIPSTER project file.
5.3 Creating Additional KDMs
With an already encrypted DCP and a self KDM you are able to create
further KDMs, for example, for later releases of the same material without having to generate the DCP again. For this perform the following:
5-4
Using the DCP and Self KDM
y Load the encrypted DCP as described in section “Loading the DCP”
on page 5-3.
y Then call up the finalize dialog of CLIPSTER (menu Project » Finalize…).
y Next choose a naming and storage location for the KDM(s):
Figure 5-5: File name and storage location
y Activate the finalizing of video with the check box Video output.
With a DCP loaded via a self KDM, you will get in the list of file formats
(combo box File format) an additional entry named DC KDM.
y As the file format select DC KDM.
y Afterwards click on the KEY… button.
This will open the window to configure the KDM generation:
Figure 5-6: Configuration of additional KDMs
5-5
Using the DCP and Self KDM
y In this window configure the generation of the additional KDM(s)
(see section “Finalize Settings – KDM” on page 4-10). However,
because a self KDM for the current DCP is already available, you
may deactivate the check box Create a KDM for current Clipster.
y When everything is set as desired click the OK button.
This will close the window to configure the KDM(s) and you will be returned to the finalize dialog.
y In the finalize dialog make sure that the check box in front of the
KEY… button is activated, otherwise the KDM(s) will not be created.
After this the settings to create additional KDM(s) are finished and you
can start their creation at any time:
y Press the button RENDER to start the creation of the additional
KDM(s).
This will start the creation and the additional KDM(s) will be written to
the specified location.
5.4 Modifying a DCP
A DCP can be used to modify its content, for example, to exchange audio or subtitles, or for a later encryption of the content. With this you
are able to create different versions of the same DCP without having to
finalize it again completely (i.e. unaltered track files will not be rendered
again but copied).
Modifications to track files are observed reel-wise only: For example, even if only one frame of video is changed, this reel will
be rendered again completely.
When using a DCP limit the modifications to an exchange of
complete video/audio reels or subtitles. The track files should
not be submitted to additional rendering processes (e.g. effects on audio or video). For this use the original source files
instead (DSM or DCDM).
To modify a DCP perform the following:
y Load the DCP as described in section “Loading the DCP” on
page 5-3.
y If required replace video/audio reels in the timeline.
y Then call up the finalize dialog of CLIPSTER (menu Project » Finalize…).
5-6
Using the DCP and Self KDM
y In the finalize dialog adjust all settings including the ones for CPL
and KDMs so that they match the original DCP (see chapter “Creating the DCP” on page 4-1), except the following ones:
– You may select another file name for the finalized files. After
the generation only the newly generated files will carry this
name.
– As a storage location choose a different directory.
– If required select in the dialog window to configure the CPL
(button PLAYLIST…) other subtitle files.
– If required adjust the encryption or KDMs to be created in the
dialog window to configure the KDMs (button KEY…).
If track files have been modified, you will need another
self KDM to be able to load them with CLIPSTER.
Once the modifications are made you can start the generation of the
modified DCP at any time:
y Press the button RENDER to start the modification of the DCP.
This will start the modification of the DCP: Altered or newly added track
files will be generated and wrapped in MXF, whereas all unchanged files
will be copied to the location specified for the DCP. Additionally, the extra files (i.e. CPL, KDMs and PKL) will be created as well.
5.5 The Menu Option ’Load KDM...’
When working on other projects on a CLIPSTER DCI Mastering system,
you may want to add parts of video or audio from already created
DCPs. While unencrypted DCP track files can be added without further
ado, for encrypted material you have to use the menu option Load
KDM…. It allows you to load the keys of a self KDM into the hardware
accelerated CLIPSTER DCI Mastering system. Afterwards the encrypted
clip can be added to the bin and you can use it in your project.
The self KDM must have been created for the CLIPSTER where
you are working on (see also section “Configurations for a Self
KDM” on page 5-2).
The number of keys which can be loaded into a hardware accelerated CLIPSTER DCI Mastering system is limited. A single
KDM usually contains several keys (one for each track file) and
up to 256 different keys can be loaded.
To use an encrypted track file in another project of CLIPSTER perform
the following:
y On the Project menu select the menu option Load KDM….
5-7
Using the DCP and Self KDM
This will open the dialog window to open a file (same as in figure 5-4
on page 5-4).
y In this window select the self KDM generated for the DCP from
which the track file should be used and confirm your selection with
the button OPEN.
This will load the keys of the self KDM into the CLIPSTER DCI Mastering system.
y Afterwards add the wanted track file (video or audio) to the bin
either by using a file manager or the menu option Add clip of the
bin’s context menu.
This will make the encrypted track file available in CLIPSTER and you
can use it in your project.
You can also work the other way around: First load the encrypted track file and then the self KDM.
KDM keys are not stored in a project file. Once the project is
closed and opened again at a later time, you have to load the
respective self KDM again to access the material of the encrypted track file.
Currently encrypted material provides no thumbnails or waveforms in CLIPSTER. However, the decrypted video can be seen
in the overlay of the Edit Tool.
5-8
Miscellaneous
6
This chapter explains other DCP related topics, such as how to adapt
the rating agencies, how to merge DCPs or how to deal with keys and
certificates.
6.1 Color Space Conversions
According to the DCI specification a DCP or DCDM should be converted and saved in the X’Y’Z’ color space. There are several user interface
items available to configure the color space conversion to X’Y’Z’ in
CLIPSTER.
The most important concept about a color space conversion is, that you
should know the source material that you want to finalize. The properties of clips added to the bin and used in the timeline (context menu of
bin clip » Properties…) must reflect these, i.e. they have to match the
properties of the material on the storage.
Usually this will be sufficient when performing a play-out or finalizing
to another color space: The color space of each clip in the timeline (set
via the bin clip properties) will be evaluated separately and an automatic color space conversion will be applied when the set output color
space differs.
However, when finalizing to JPEG2000 or DC MXF, another setting has
to be observed as well. This setting (the Color Space Interpretation
setting) can be found under the JPEG2000 encoding parameters (see
section “JPEG2000 Options” on page 6-4). When finalizing to
JPEG2000 or DC MXF, it describes the color profile of the source material in RGB, and you have to set it to the profile that matches your video
material in the timeline (see also section “JPEG2000 Options” on
page 6-4).
6-1
Miscellaneous
Once these two settings (i.e. the bin clip properties and the color profile
of the JPEG2000 encoding) are set properly, the color space conversion
to X’Y’Z’ will be performed correctly during the creation of the DCP.
Further information about color space conversions and how
CLIPSTER deals with them can be found in the “CLIPSTER
Configurations” user guide.
6.2 Adapting the Rating Agencies
During the configuration of the CPL (see section “Finalize Settings –
CPL” on page 4-8) you can set one or more rating agencies. Ex factory
the software already offers a few rating agencies. However, these may
not be enough for your work. Then you can add new selectable rating
agencies or edit the already available ones.
The file RatingAgency.xml in the program installation directory of
CLIPSTER (usually C:\Program Files\DVS\Clipster) contains
the rating agencies that will be displayed in CLIPSTER. It is a file in XML
syntax that can be adapted to your needs: Just copy, paste and edit the
entries and afterwards save the file. The adaptations will be displayed
as soon as the CPL dialog window is opened.
The name of the agency (attribute NAME of the <AGENCY>
tag) should contain a URI that uniquely identifies the agency
which issued the ratings.
The following shows an example of the file RatingAgency.xml already adapted to another rating system:
<?xml version="1.0" encoding="utf-8"?>
<RA>
<AGENCY NAME="http://www.classification.gov.au/
2007-ratings">
<RATING>G</RATING>
<RATING>PG</RATING>
<RATING>M</RATING>
<RATING>MA 15+</RATING>
<RATING>R 18+</RATING>
<RATING>X 18+</RATING>
</AGENCY>
</RA>
6-2
Miscellaneous
6.3 Merging DCPs
You can merge two or more DCPs to a single DCP. This way you can
include in one DCP delivery not only the content of the feature film but,
for example, trailers, advertisements or different versions of audio or
subtitles.
The following example demonstrates how to include two versions of
audio in one DCP:
Please note that the current procedure is meant as a workaround only. It requires the manual editing of an Asset Map. A
more convenient merging of DCPs is planned for a future CLIPSTER version.
y Create a DCP as described in this document.
y Next carry out the steps as described in section “Modifying a DCP”
on page 5-6 and do the following to modify the loaded DCP (carry
out the other steps as described):
– In the timeline of the CLIPSTER Edit Tool replace the audio reels
with the ones that provide the other version.
– In the finalize dialog enter another file name for the newly generated files.
This will create a new DCP at another location and all unchanged files
will be copied while the changed ones (in this case audio) will be given
a new name and rendered anew. New versions of the extra files are created as well. Once this is done, you can start merging the two DCPs:
When doing the following steps no files should be overwritten
in the original DCP. If you receive a warning that files will be
overwritten, something may be wrong. Then review and
check the files that you want to copy as well as the way they
were created.
y Copy the newly created audio files to the original DCP.
y Copy the new CPL, PKL and KDM files to the original DCP.
Once the new DCP files are copied to the original DCP, you have to edit
the Asset Map of the original DCP to include references to the copied
files as well:
y Adapt the Asset Map (file ASSETMAP) of the original DCP: Copy
the new entries of the audio reels as well as of the extra files (CPL
6-3
Miscellaneous
and PKL) from the newly created Asset Map to the one of the original DCP.
You have to copy the respective XML entries from the
<Asset> start tag to the </Asset> close tag.
The entries can be simply appended to the original Asset
Map, i.e. you may add them in random order right in front
of the </AssetList> close tag.
y Once the editing is finished save the Asset Map file.
After this the merging of the DCPs is finished and the two versions of
audio can be loaded via the two CPLs which are both referring to the
same video track files.
6.4 JPEG2000 Options
With the JPEG2000 options you can set its encoding parameters. They
can be accessed via the OPTIONS button to the right of the File format
field in the finalize dialog window (Project » Finalize…). The button
will be available as soon as a JPEG2000 format is selected as the file format for video (e.g. JP2, JPC or DC MXF):
Figure 6-1: Accessing the JPEG2000 options
Then the following window will be displayed on the screen:
Figure 6-2: Configuring the JPEG2000 encoding
By default the settings of the JPEG2000 encoding are configured to the
highest quality allowed for a DCP. For example, they are set to a file size
6-4
Miscellaneous
of 1.302083 MB per image equivalent to a sustained data rate of
250 Mbit/sec. as specified as the maximum data rate by the DCI.
In detail the window to configure the JPEG2000 encoding provides the
following settings items:
Further information about color space conversions can be
found in section “Color Space Conversions” on page 6-1.
Color Space
Interpretation
This setting determines the color profile and interpretation of RGB video material:
– When converting from RGB to another color
space (material in timeline is RGB, finalized
output format is set to another color space), it
sets the color profile of the source material, i.e.
of the material in bin and timeline.
– When converting from another color space to
RGB (material in timeline is in another color
space, finalized output format is set to RGB), it
sets the profile of the target material, i.e. of the
material to be finalized and rendered.
– When converting from RGB to RGB (1:1 conversion) or when no RGB material is involved
in the color space conversion, this setting has
no effect.
Rate Control
The timeline material is handled clip-wise,
meaning each clip in the timeline is evaluated separately and converted with regard to its color space.
For maximum efficiency CLIPSTER encodes the image data with a variable bit rate (VBR). This setting
enables the post compression rate control, i.e. it
determines the maximum file size (in megabyte)
that one image file may provide after encoding.
Thus in turn, it determines the maximum bit rate
(data rate). To calculate the file size from a given
bit rate use the following formula:
<rate (Mbit/sec.)> : 8 : <frames/sec.>= <file size (MB)>
With the check box in front of this setting you can
turn off the rate control. Once deactivated the images will still be compressed and encoded with
VBR but use the maximum possible files size (e.g.
between 2 and 3 MB for 2K images).
6-5
Miscellaneous
ICT
This setting enables the Irreversible Color Transform, meaning an internal conversion of the images’ colors prior to encoding. With this the colors of
the images will be encoded more efficiently. If the
check box is deactivated, the original colors of the
images will be used for the encoding, which would
normally result in a larger file size, but with the setting Rate Control activated it will result in a lower
quality of the finalized material.
A deactivated setting ICT does not apply
a Reversible Color Transform (RCT).
High Quality
This check box optimizes the quantization steps,
i.e. smaller steps will be used to encode the image,
resulting in a higher quality of the image. When
deactivated larger quantization steps will be used,
which would normally result in a smaller file size.
6.5 Keys and Certificates Explained
There are various keys and certificates involved in the process of creating a DCP. This section tries to shed some light on them and the way
they are used.
6.5.1 What’s a Key
A key is a piece of information (normally a string) that determines the
output of a cryptographic algorithm. The key is used during encryption
by the cryptographic algorithm to transform a certain piece of information (e.g. plaintext) to ciphertext, i.e. encrypted information. Vice versa, during decryption the key is used by the algorithm to decode the
ciphertext back to the original information.
There are two types of keys available:
symmetric
If the algorithm uses the same key during en- and
decryption, it is known as a symmetric key algorithm.
6-6
Miscellaneous
asymmetric
Algorithms that require two different keys, one for
encryption and one for decryption, are called asymmetric key algorithms. The concept behind them is
that it is almost impossible to compute one key from
the other. With this you can make one key public
(the public key) while keeping the other in secret (the
private key), thus providing others with the means,
for example, to send encrypted pieces of information
to the private key holder that only he can decode.
6.5.2 What’s a Certificate
A certificate is a file that usually contains a key. Additionally it includes
a digital signature to ensure the validity of the key/certificate. With this
the purpose of a certificate is, on the one hand, to provide you with a
key and, on the other, to confirm that this certificate and key belong to
a certain identity (e.g. a person, institute or company).
Ideally the signature comes from a certificate authority (CA) employed
with the task to check identities before issuing certificates that refer to
this identity. However, the most commonly used certificates are those
that users make for themselves (self-signed certificates). Also common
are certificates that users make for others so that these can certify validities on behalf of the user (certificate chain, see section “What’s a
Certificate Chain”).
In the DCI Mastering a certificate normally contains a public key
(*.cer or *.pem files). A private key is usually provided in a personal
information exchange file (*.pfx) which is typically encrypted and requires a password to be opened. Mostly this file will contain the publickey certificate (or more than one if a certificate chain is involved) for authentication as well.
6.5.3 The Key Players of the DCI Mastering
Detailed in the following you can find the key pairs that are used during
a DCI Mastering.
AES Key
The AES key is a symmetric key used to en- and decrypt the content of
the DCP (track files). For each track file an individual AES key is generated. This key will be encrypted with the Encryption Key on CLIPSTER
(see below) and written to the KDM file.
The AES key is generated randomly and automatically by CLIPSTER.
6-7
Miscellaneous
Encryption Key
The Encryption Key is an asymmetric key pair (RSA) used to encrypt and
decrypt the AES key. Typically this key pair is generated by the manufacturer of the D-Cinema player and handed to the purchaser of the
player.
– The public key of the Encryption Key is used to encrypt the AES
key when it is written to the KDM. Usually it is embedded in a
certificate file.
– The private key of the Encryption Key is stored on the D-Cinema server at the recipient’s site. It is used to decrypt the AES
key provided via the KDM.
The private key is stored at the recipient’s site and will not be distributed. Thus it can be disregarded because it will not be available to you.
The public key should have been sent to you in a signed certificate to
enable you to create a DCP for this player. It has to be set on CLIPSTER.
Signing Key
The Signing Key is an asymmetric key pair (RSA) used to sign and validate the files of a DCP (e.g. KDM or CPL). With it the creator of the
DCP digitally signs the extra files, while the recipient will be able to verify that the DCP was distributed by the creator/distributor and not altered in the meantime.
Because DVS will not be the creator of a DCP (just the manufacturer of
the DCI Mastering system), the user of CLIPSTER has to provide this
key. For a DCI Mastering DVS suggests that you use either your own
Signing Key or one provided by your client.
The most appropriate way to receive a Signing Key is to order
it from a certificate authority (CA). However, you can find included in the delivery of the CLIPSTER DCI Mastering feature
a tool that can be used to create a Signing Key (i.e. a selfsigned certificate).
Do not take the step of creating your own Signing Key lightly.
With it you should define and install a certificate hierarchy to
enable others to validate your identity. You are the one responsible for the certificates issued within your certificate
chain.
– The private key of the Signing Key is used to create a signature
for the files of a DCP, i.e. it is used to encrypt hash values of the
files.
– The public key of the Signing Key will be part of a certificate
that will be attached to the extra files (if required, the certificate
chain will be attached).
6-8
Miscellaneous
The private key has to be set on CLIPSTER. Because usually it is stored
in a special file, it may require a password to be opened.
Due to the fact that the public key is attached to the extra files via certificates, it will be distributed with them to the D-Cinema player automatically. There the exhibitor can extract it from the files and use it to
verify the origin and validity of the DCP.
Self KDM Key
This key is not necessarily required. A DCP can be created without it,
but afterwards it would be impossible to load it again with a CLIPSTER
DCI Mastering system.
The key for a self KDM is in most respects identical to an Encryption
Key. While the private key is stored securely in the hardware of the respective CLIPSTER DCI Mastering system, the complementary public
key is provided via a certificate file. You can find this file either already
stored in the installation directory of the CLIPSTER software or on a
separate CD-ROM. However, compared to the Encryption Key this key
has to be set differently in the CLIPSTER software.
Further information about a self KDM and where it can be set
in CLIPSTER can be found in chapter “Using the DCP and Self
KDM” on page 5-1.
Summary
The following lists shortly the most important points about the different
keys:
AES key
– Generated automatically by CLIPSTER
Encryption Key
– Certificate with public key must have been sent
to you by the theater (typically the public key
of a specific D-Cinema player)
– Has to be set on CLIPSTER
Signing Key
– You have to provide this key pair
– The private key has to be set on CLIPSTER
– The public key will be attached to the extra files
of the DCP and is thus delivered with the DCP
automatically
Self KDM
– Similar to the Encryption Key
– Public key file is available on CD-ROM or in the
installation directory of CLIPSTER
– Requires a different setting than the Encryption
Key in CLIPSTER
See chapter “Using the DCP and Self KDM” on
page 5-1.
6-9
Miscellaneous
6.5.4 The Keys Applied
The following shows in diagrams the keys as they are applied during a
DCI Mastering on CLIPSTER and a play-out by the D-Cinema player.
Please note that the explanations of the keys at the recipient
side are detailed for clarification only.
The Keys on CLIPSTER
This diagram shows the keys applied on a CLIPSTER DCI Mastering system:
Creator
Track File
AES Key
(created by
CLIPSTER)
Encryption
Key
(public)
encrypt
encrypt
Recipient
Certificate
CPL KDM PKL
Signing Key
(private of Creator Certificate)
sign
Hash
AES encrypted
Track File
CLIPSTER DCI Mastering System
RSA encrypted
AES Key
DCP
Figure 6-3: The keys and where they are used on the Creator side
The generated track file of the DCP is encrypted with an AES key that
has been randomly generated by CLIPSTER. For each track file one AES
key will be created and used. The AES keys are then encrypted with the
6-10
Miscellaneous
public key of the Encryption Key. Afterwards the encrypted AES keys
are written to the KDM file. Of each encrypted track file a hash value
is created which is then written to the PKL file. Next, the completed
CPL, KDM and PKL are signed with the Signing Key. The finished DCP
can then be sent to the Recipient.
The Keys at the Recipient
This diagram shows the keys as they are applied at the Recipient’s site:
Recipient
DCP
Signing
Key
(public)
validate
Creator
Certificate
Validated
CPL KDM PKL
Hash
compare
Hash
AES encrypted
Track File
RSA encrypted
AES Key
decrypt
AES Key
Encryption Key
(private of Recipient Certificate)
decrypt
D-Cinema Player
Track File
Figure 6-4: The keys and where they are used on the Recipient side
At the Recipient the received DCP has to be validated with the help of
the public Signing Key that is attached to each extra file of the DCP
(e.g. CPL, KDM or PKL). Whether the track files were received unmodified can be checked by comparing the hash values written in the validated (and thus unaltered) PKL file with hashs calculated from the
received track files. The completely validated DCP can then be played
6-11
Miscellaneous
out by decrypting the AES keys with the private key of the Encryption
key. After this the AES keys will be used to decrypt the track files of the
DCP.
6.5.5 Where are the Keys Set in CLIPSTER
The following describes comprehensively where the keys in CLIPSTER
have to be set:
Signing Key
During the preparations for the DCP’s creation
some general settings have to be made in the Configuration Tool of CLIPSTER (tab Defaults » group
DCI, see also section “Configurations” on
page 4-3): In the field Private Signing Key you
have to enter the path to the file holding the private
Signing Key (*.pfx).
Figure 6-5: Setting the private Signing Key
To load it you may have to enter a password to authenticate your usage of the private key.
Figure 6-6: Entering a password
Your authentication to the password protected private key will be valid for this session of the software
only. After a restart of CLIPSTER you have to authenticate your usage of the key again.
Because the settings on the Defaults tab are general settings of the CLIPSTER software, they will be
set and available for each initialized new project.
This way you do not have to configure the path to
the key file again when creating other DCPs in the
future.
6-12
Miscellaneous
Encryption Key
The Encryption Key has to be set during the configurations of the DCP’s finalizing in the KDM generation dialog (button KEY…, see also section
“Finalize Settings – KDM” on page 4-10).
Figure 6-7: Setting the public Encryption Key
Gather in the right list field the public key certificate
files of the D-Cinema players that should receive
the DCP. For each selected file one KDM will be created.
Self KDM
See section “Configurations for a Self KDM” on
page 5-2.
6.5.6 What’s a Certificate Chain
Certificates (see section “What’s a Certificate”) can be distributed in a
chain, where the last certificate (the leaf certificate that cannot create
other certificates) certifies that it comes from another certificate (the intermediate certificate), this certifying that it comes from a further certificate (another intermediate), and so on until the last certificate in the
chain is reached (the root certificate that confirms the validity of the
whole chain as well as the identity of its issuer).
The whole structure of a certificate chain implies a hierarchy where the
highest rank is held by the root and the lowest by the leafs.
6-13
Miscellaneous
Root Certificate
Intermediate A2
Certificate
Intermediate A1
Certificate
Intermediate B1
Certificate
Leaf
Certificate
Intermediate B2
Certificate
Leaf
Certificate
Intermediate B3
Certificate
Leaf
Certificate
Intermediate B4
Certificate
Leaf
Certificate
Figure 6-8: Certificate hierarchy
The root certificate is either a CA-issued certificate or a self-signed one,
i.e. it is signed by its own private key. From this root certificate other
certificates can be created (intermediates), that enable other users to
digitally sign items in the name of the root via their private keys. Additionally, from intermediate certificates further certificates can be created (either other intermediates or leaf certificates). The last link in the
chain is the leaf certificate that can only be used for signing, meaning
other certificates cannot be created from a leaf.
All certificates in a certificate chain refer back to the identity that is
bound to the root certificate and thus inherit the trustworthiness of the
root.
6-14
Miscellaneous
Private Key
(keep secret)
sign
Private Key
(keep secret)
sign
Private Key
(keep secret)
sign
Public Key
Public Key
Public Key
Signature
(self signed)
Signature
(signed by Root)
Signature
(signed by
Intermediate A1)
Root
Certificate
Intermediated A1
Certificate
Leaf
Certificate
validate
Root Certificate
must be trusted
validate
Figure 6-9: Certificate chain validation
In a public-key certificate no certificate chain is stored. So, in order to
validate a leaf certificate at the end of a certificate chain, the complete
chain up to the root certificate has to be available.
The maximum path depth from root to leaf that is allowed in a certificate hierarchy is a property of the root certificate. During the creation
of the root it has to be set and it will be inherited correspondingly to the
lower ranks. Within this path depth certificates can be created from root
and intermediate certificates.
When setting up a certificate hierarchy take care that only trusted users
receive certificates (i.e. the private key of these certificates). This applies
especially to intermediate certificates that can be used to create other
certificates.
6.5.7 Validating Certificates
As useful as the concept of certificates may seem, it fails when the validating certificate itself is a forgery. Thus the remaining question is, how
can a receiver be sure about the origin of the signed files.
If the certificate was issued by a certificate authority, you can validate
the certificate either via a public certificate repository, i.e. a database of
issued certificates that is maintained by the CA, or by contacting the CA
directly.
When dealing with a self-signed certificate, there is only one way: You
should have received a duplicate of the respective public-key certificate
6-15
Miscellaneous
in a trusted communication and compare this with the certificate delivered with signed files.
To validate a certificate chain the complete certificate chain has to be
available to you. Nevertheless, although you need the certificate chain
to verify the origin of a leaf certificate, only its root certificate has to be
verified via a secure communication because the chain leads to it (see
also section “What’s a Certificate Chain” on page 6-13).
6.5.8 The Keys and Certificates Delivered with CLIPSTER
In the delivery of the CLIPSTER DCI Mastering feature you can find on
the enclosed CD-ROM the following keys and certificates:
File:
*.cer
Path:
DVS\CLIPSTER\Key Store\
Explanation:
Public key for the self KDM of the CLIPSTER DCI Mastering station.
File:
DvsClipsterDCIRoot.cer
DvsClipsterDCIDvsAG.cer
Path:
DVS\CLIPSTER\Certificate Store\DVS\
DVS\CLIPSTER\Certificate Store\DVS\
Explanation:
The certificate chain of the public key for the self KDM
(intermediate and root) for verification.
Use the following files for testing purposes only. They should
not be used to create a DCP for distribution. For this you
should use your own Signing Keys (see section “Signing Key”
on page 6-8).
File:
TestSigningCertificateLeaf.pfx
Path:
DVS\CLIPSTER\Signature Store\DVS Test\
Explanation:
For testing only: Private Signing Key for testing. With
it you can sign the extra files of a DCP. Contains the
complete chain of test certificates.
Password: DVS
6-16
Miscellaneous
File:
TestSigningCertificateLeaf.pem
Path:
DVS\CLIPSTER\Certificate Store\DVS
Test\
Explanation:
For testing only: Test certificate. The public-key certificate of the private Signing Key for testing. With this
file and the certificate chain the DCP can be validated.
File:
TestSigningCertificateRoot.pem
TestSigningCertificateIntermediate.pem
Path:
DVS\CLIPSTER\Certificate Store\DVS
Test\
Explanation:
For testing only: Test certificates. The certificate chain
for the public-key certificate of the private Signing Key
for testing (intermediate and root) for verification.
6-17