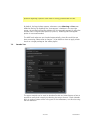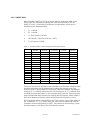
1
easyDCP Player
easyDCP Player+
User manual
Version
3.3
Date
Erlangen, 22/10/2015
Contents
1
Introduction
4
2
Feature Overview
5
3
3.1
3.2
System Requirements
Software-based decoder
GPU-based decoder (Windows only)
6
6
6
4
4.1
4.2
4.3
4.4
4.5
4.6
4.7
4.8
4.9
Installation
Installation on Windows
Uninstallation on Windows
Installation on Mac OS
Uninstallation on Mac OS
Demo Mode Restrictions
License Activation and Certification
View current License Information
Application Data and Settings
Software Upgrade
8
8
9
11
12
12
13
13
13
14
5
5.1
5.2
5.3
5.4
5.5
5.6
5.7
5.8
5.9
5.10
5.11
5.12
5.13
Playback
Opening a DCP/IMP
Opening a Supplemental package (VF)
Opening an encrypted DCP
Opening Audio/Video File
Opening and Creating a Playlist
Opening high-bitrate content
Opening an IMP with multiple virtual audio tracks
Playback control
Subtitle Inspector
Adding external subtitle files
Color Transforms
2D/3D
30 Bit Colors via DisplayPort
15
15
17
17
18
20
21
21
22
25
27
29
31
32
6
Export
33
7
7.1
7.2
7.3
7.4
7.5
Quality control
Log/Issue Reports
Decode Test
Metadata Inspector
File Hash Checker
Audio Waveform Visualizer
36
36
37
38
39
40
8
8.1
8.2
8.3
8.4
Preferences
Preferred Video Codec
Video Rendering
Audio Rendering
HD-SDI Play-out
41
41
41
43
44
2 of 70
22/10/2015
8.5
8.6
8.7
Subtitles
Software JPEG 2000 Codec
GPU-based JPEG 2000 Codec
46
47
48
9
9.1
9.2
Content Decryption
Server Certificates
KDM Management
50
50
52
10
10.1
10.1.1
10.1.2
10.1.3
10.2
10.3
10.4
10.4.1
10.4.2
10.4.3
10.4.4
10.4.5
Audio Routing
Audio Channel Identification
Interop DCPs
SMPTE DCPs
IMF Packages
Configuration and output behavior
Behavior
Configuration and output examples
Using a standard 2.0/5.1 speaker setup
Fixing swapped channels
IMF Package 5.1 + HI/VI-N
IMF Package Lt/Rt (default configuration)
IMF Package Lt/Rt (custom configuration)
54
54
54
55
56
56
57
58
58
59
60
61
62
11
11.1
11.2
Command-Line Interface (CLI)
On Windows
On Mac OS X
63
65
65
12
12.1
12.2
12.3
Limitations
DCPs
IMPs
Timed Text
66
66
66
66
13
Frequently Asked Questions (FAQs)
67
14
Disclaimer
68
15
Contact
69
16
References
70
3 of 70
22/10/2015
1
Introduction
Thank you for purchasing easyDCP Player, a software-based solution for
playback and quality analysis of Digital Cinema Packages (DCPs) and
Interoperable Mastering Packages (IMPs). While easyDCP Player was designed
to be a quality assurance tool for checking packages before their final
distribution, it may also be a perfect low-budget solution for screenings in your
facilities. Bundling easyDCP Player with easyDCP Creator, an application for
creating DCPs or IMPs, and easyDCP KDM Generator, a tool for creating Key
Delivery Messages (KDMs), Fraunhofer IIS offers everything necessary to benefit
from the advantages of Digital Cinema.
easyDCP Player handles video resolutions up to 4K at arbitrary frame rates as
well as multi-channel audio, subtitles and captions. The easyDCP Player+
edition is even capable of playing back encrypted DCPs and lets you watch
stereoscopic DCPs. Furthermore it allows you to export your DCPs’ or IMPs’
audio, video and timed-text content to allow for fast repackaging, creation of
proxies for subtitling or transcoding into other formats.
4 of 70
22/10/2015
2
Feature Overview
easyDCP
Player
GPU-based real-time decoding *, ***
Software-based real-time decoding
easyDCP
Player+
Demo
Version
15 sec
**
15 sec
Reads DCPs, MXF, JPEG 2000, TIFF, DPX, PNG, JPEG,
GIF, BMP, PPM sequences, M3U playlists
Playback of unrendered easyDCP Creator projects
X
Validation (incl. XML validation) report
Customizable color space conversion
Adjustable playback frame rate
Supports discarding of resolution levels
Audio waveform visualization
Multiple Timed Text Tracks (Text, PNG) visualization
Add external subtitles on the fly
Finely-tunable Quality-vs.-Performance Trade-off
Timeline shows reel boundaries and subtitles
IMF playback & validation
X
HD-SDI output**
X
30 bit DisplayPort output***
X
Playback of encrypted DCPs with KDMs
X
Stereoscopic playback
X
Export to JPEG 2000, QuickTime, TIFF, DPX, WAV
X
X
X
Available for 64 bit Windows 7, Windows 8
Available for 64 bit Mac OS X (10.7-10.10)
*) Required graphics device setup described below
**) Required hardware described below
***) Windows only
5 of 70
22/10/2015
3
System Requirements
easyDCP Player comes with a GPU-based JPEG 2000 Codec and a softwarebased JPEG 2000 Codec. The GPU-based codec is only available for Windows
and requires an additional graphics device.
Provided the proper hardware is available, both codecs are capable of decoding
2K DCPs and IMPs (with up 250mbit/s, 24 fps) in real-time. This is sufficient for
smooth real-time playback of monoscopic and stereoscopic packages with a
resolution up to 2K (2048x1080). easyDCP Player even allows to open and play
4K content in full resolution, though by default it will opt to efficiently decode
only the 2K portion of a 4K DCP.
3.1
Software-based decoder
In order to guarantee real-time playback with at least 24 fps, the softwarebased decoder needs to be backed up by a fast multi-core CPU with at least
four cores. It is recommended to download the demo version in order to find
out how your system performs.
The scalability of JPEG 2000 encoded images can be exploited to watch a 1K or
0.5K resolution preview in real-time on systems that don’t have a sufficiently
powerful CPU. Optionally you can choose to upscale the lower resolution
preview to full-screen, without negatively impacting the maximum speed.
3.2
GPU-based decoder (Windows only)
For smooth playback in GPU-based mode, easyDCP Player always requires a
bundle of two graphics devices - a primary device for rendering (with OpenGL)
and a secondary device for video decompression (with NVIDIA® CUDA®1).
Using a sufficiently powerful graphics device pair, the GPU-based codec can
provide real-time playback even for framerates above 24 fps or UHD IMPs with
up to 800 Mbit/s. Both graphics devices should ideally be connected with PCIe
x16.
Primary graphics device
This device is dedicated to rendering video and optionally color post-processing,
using OpenGL. Displays need to be attached to this device. It is recommended
1
CUDA® is a registered trademark by the Nvidia Corporation
6 of 70
22/10/2015
to install the primary device in the mainboard’s top slot. This device does not
necessarily need to support the NVIDIA® CUDA®2 technology.
In order for the 3D output option “Quad-buffered stereo” to be available, this
device needs to support quad buffering (e.g. NVIDIA Quadro®3 series). Using
this technology, easyDCP Player+ supports the use of active shutter glasses or
Stereo over Dual-DVI. The graphics driver control panel can be used to specify
how stereo images should be processed by the primary graphics card.
In order for the “30 bit Colors” option to be available, this device as well as the
connected display need to support 30 bit per color.
When a HD-SDI output device is used and the option “Enable subtitling, colorprocessing and scaling” is activated, images are also processed with the
primary graphics card, before they are emitted to the HD-SDI device. In this use
case, a NVIDIA Quadro® series graphics card (even a low-end model) might
also be beneficial for a better render performance. Otherwise, a mid-range
NVIDIA® GeForce® device, e.g. NVIDIA® GeForce®4 GTX 750 Ti, is a good
choice.
Secondary graphics device
This device is dedicated to the computationally very expensive JPEG 2000
decompression. It must not be used as a video output. For best performance,
this device should be a CUDA®-enabled graphics card (e.g. from the latest
NVIDIA® GeForce® series) with many CUDA®-cores installed in the
mainboard’s secondary slot. Please refer to www.easydcp.com for a list of
supported devices. It should be connected with PCIe x16. PCIe x2, x4 or x8 will
lower the performance significantly. Make sure to connect both on-board
power connectors to the power supply unit and that the power supply unit
meets the system’s requirements.
2
CUDA® is a registered trademark by the Nvidia Corporation
NVIDIA Quadro® is a registered trademark by the Nvidia Corporation
4 NVIDIA® GeForce® is a registered trademark by the Nvidia Corporation
3
7 of 70
22/10/2015
4
Installation
The installation of easyDCP Player will only take a few minutes. You can
download a single executable setup file (for Windows and for Mac OS X) here:
www.easydcp.com
Please check frequently to make sure you have the latest version.
To install easyDCP Player, make sure you have the required user rights (i.e.
admin rights).
4.1
Installation on Windows
In Windows OS systems, double-click the easyDCP Player installer. The
following dialog should appear (version may differ):
Press „Next >“ to continue installation or „Cancel“ to abort.
After pressing „Next >“ the License Agreement window appears. Please read
the license agreement carefully. To agree with the license and continue the
installation process, press “Agree”. Next, choose a target folder. easyDCP
Player will be installed in the “Destination Folder”. If you want to change the
destination folder, click the “Browse” button and select another folder. Make
sure you have the required user rights (i.e. admin rights) to write to that folder.
Please verify you have sufficient free disc space available on your system. The
required disc space is displayed in the text “Space required” below. Your free
8 of 70
22/10/2015
disc space is displayed in the text “Space available”. This will be recalculated
every time you change the destination folder.
After pressing “Install” the installation process window appears. This
installation process should take only a few seconds. After finishing the
installation process, the following dialog should appear:
After successful installation, easyDCP Player will be installed on your computer.
In your start menu’s application list, you will now find an entry called
“Fraunhofer easyDCP Player” that contains links to open easyDCP Player,
uninstall easyDCP Player or open this user manual.
4.2
Uninstallation on Windows
To uninstall all easyDCP Player components run “Remove easyDCP Player” from
your windows start menu.
If your easyDCP Player start menu entry does not exist anymore, go to the
folder where you installed easyDCP Player and run the executable “Uninstall
easyDCP Player 3.0.0.exe” by double-clicking. The default location is
“C:\Program Files (x86)\Fraunhofer IIS\easyDCP Player 3.0.0”.
9 of 70
22/10/2015
„Uninstalling from“ shows the folder where the easyDCP Player installation is
located. All files and directories will be deleted, except for user files (e.g.
licenses). Directories including user files will not be removed. This way, if you
update easyDCP Player to a newer version, your license file will be found and
re-used.
To start the un-installation process, press the button „Uninstall“ or „Cancel“ to
abort. Make sure you have the required rights (e.g. admin rights).
After a few seconds the uninstallation of easyDCP Player should be complete.
Press the button „Show details“ to show details which files were deleted. Press
„Close“ to finish uninstalling easyDCP Player.
10 of 70
22/10/2015
After the successful uninstallation only user files in the application data folder
will remain on your system. User files include:
Settings file (settings.ini)
License file
Color transform files
Content key files (KDMs and easyDCP Digests) (PLUS-edition only)
Public certificates, private key, user password file (PLUS-edition only)
Make sure you have the required rights (e.g. admin rights) to do such an
operation.
4.3
Installation on Mac OS
The installation image for easyDCP Player or easyDCP Player+ looks like the icon
below. This file may be named differently, depending on which version was
downloaded. Double-click the icon to mount the image. A license information
screen pops up. Read the software license agreement carefully.
To agree with the license and continue the installation procedure, press
“Agree”. After the image has been opened a new drive is mounted and a
window will open.
11 of 70
22/10/2015
You need to copy the package into a directory of your choice. In order to copy
it into the Applications directory, simply drag and drop the easyDCP Player icon
onto the Applications icon.
4.4
Uninstallation on Mac OS
Simply drag your easyDCP Player application icon into the trash.
All user files in the library folder will remain on your system. User files include:
Settings file (settings.ini)
License file
Color transform files
Content key files (KDMs and easyDCP Digests) (PLUS-edition only)
Server certificate set (PLUS-edition only)
4.5
Demo Mode Restrictions
In demo mode,
Full-resolution playback is limited to 15 seconds. Afterwards, the quality
is reduced and audio is muted.
(PLUS only) playback of encrypted DCPs and ingesting KDMs or
easyDCP Digest files is locked
(PLUS only) The export module is locked
12 of 70
22/10/2015
4.6
License Activation and Certification
Download free demo versions of easyDCP Player or easyDCP Player+ at
www.easydcp.com
These free versions are subject to the demo mode restrictions listed in chapter
4.5. In easyDCP Player, go to “context menu->Help->Request License &
Certificates” and fill in the licensee’s name, the URL that shall be stated in the
custom server certificates (easyDCP Player+ only) and a password that is used to
protect access to the certificates. If the computer is connected to the Internet,
click the “submit” button. The default web-browser will open
www.easydcp.com, where further instructions will guide you through the
purchase process.
After the purchase, a link to the commercial installer as well as a zip file with
the License and certificates will be available for download within your user
account at www.easydcp.com. The zip file can be dragged & dropped into the
commercial easyDCP Player installation to unlock it.
The procedure is also described in a screen cast at www.easydcp.com.
4.7
View current License Information
To view the license details, right-click the canvas to open the context menu and
select „Help -> License information“.
4.8
Application Data and Settings
easyDCP Player automatically creates an application data folder. It contains the
settings file as well as a folder where the server certificates are stored, a
repository for KDM and easyDCP Digest files and a repository for color
transform files.
On Windows, it is located in <User Application Data>/Fraunhofer IIS/easyDCP
Player/ and <User Application Data>/Fraunhofer IIS/easyDCP Player+/
The user application data folder on Windows 7 is in "C:/Documents and
Settings/<username>/Application Data/. On Windows 7 it is located in
C:/Users/<username>/AppData/Roaming/
A shortcut is to just enter %APPDATA% into the address bar.
On Mac OS X, it is located in \Users\<username>\Library\Application
Support\Fraunhofer IIS\easyDCP Player\ or
\Users\<username>\Library\Application Support\Fraunhofer IIS\easyDCP Player+\
13 of 70
22/10/2015
4.9
Software Upgrade
To upgrade easyDCP Player, log into your user account at www.easydcp.com.
Before installing a new version, please uninstall your existing version of
easyDCP Player.
Make sure your license is valid for the new version by reviewing the license
information (hit ‘F2’). If you need a new license for the new version, you may
purchase it at www.easydcp.com.
Only major releases require a new license, e.g. 3.0 to 3.1. Point releases do not
require a new license, e.g. 3.0.0 to 3.0.1.
14 of 70
22/10/2015
5
Playback
When launching easyDCP Player, a splash screen will be displayed during the
start-up phase.
At the first launch of easyDCP Player+, a message will pop up, prompting you
to request a server certificate. Each easyDCP Player+ installation has an
individual server certificate, which will be created by Fraunhofer IIS. This
certificate is required to be able to receive Key Delivery Messages (KDMs),
which unlock encrypted DCPs. Please refer to chapter 9 for more details.
This is the main window:
5.1
Opening a DCP/IMP
To open an existing package, click on the button with the eject icon in the
bottom left corner.
15 of 70
22/10/2015
Drag and Drop: For convenience you can also drag and drop supported
sources directly onto the canvas, playlist editor or the playback toolbar, or
onto the application icon to open a new instance. Supported sources are
one or more DCP/ IMP folders
a CPL / Assetmap or PKL .xml file
a numbered file sequence (see 2 for supported file types)
an audio or video *.mxf file or multi-channel *.wav file
a *.m3u playlist file
a DCP/IMP project file (*.dcpproj), created with easyDCP Creator
If one or more packages were opened, the playlist editor will pop up. It lets you
select a single composition playlist for playback or arrange a playlist. You can
always drag further assets into the playlist editor or re-open it from the contextmenu.
For some of the fields, the tooltips contain more information or metadata like
the creator, issue date, etc. You can also browse the XML or MXF files, or
expand/collapse all items.
16 of 70
22/10/2015
5.2
Opening a Supplemental package (VF)
A supplemental package (typically ends with “_VF”, which stands for Version
File) is an add-on container that does not contain all the track files it references,
but relies on the presence of an additional package (typically one that ends
with “_OV”, which stands for Original Version). The concept is well explained
at www.digitalcinemanamingconvention.com/appendix_8.asp.
Often, the folder that contains the VF, resides within the folder that contains
the OV, but other times, the two folders are located next to each other on the
same level.
If a folder with an OV is opened, easyDCP Player will automatically detect any
additional VF packages located within the folder and load them as well.
When only the VF is loaded into easyDCP Player, the original location of all
those track files that are not contained in it, is unknown. These track files, as
well as the whole Composition is drawn in grey.
When the corresponding OV package is also loaded into easyDCP Player, it will
automatically resolve all missing references from the VF against the OV and the
VF will become available.
5.3
Opening an encrypted DCP
When an encrypted DCP is opened and the keys have not yet been ingested,
the missing keys can be loaded from the corresponding Key Delivery Message
(KDM) or easyDCP Digest (*.dcpdig) file. Either click on the lock icon or simply
drag & drop the file into the playlist editor.
17 of 70
22/10/2015
If the keys are read from a Key Delivery Message (KDM), they are only valid
within a certain time window (“engagement window”).
5.4
Opening Audio/Video File
To open an existing media essence other than a DCP/IMP package (e.g. audio
file, video file(s)), click on the button with the eject icon in the bottom left
corner.
18 of 70
22/10/2015
A dialog appears:
Here you can select single video and/or audio files. Currently supported video
sources are numbered *.j2c file sequences or OP-Atom MXF files with DCIcompliant JPEG 2000 content. Currently supported audio sources are Wave
files with uncompressed PCM samples or OP-Atom MXF files with
uncompressed PCM samples. The easyDCP Player+ edition also supports
encrypted MXF files. When an encrypted MXF file is selected, a button with the
key icon will become visible, allowing you to enter the decryption key. Content
keys for individual encrypted MXF files are not looked up in the repository. You
will always have to re-enter them, either by entering the key manually, or by reingesting the corresponding content key file (easyDCP Digest). The “OK”
button will only be enabled when all fields are either empty or contain a valid
essence.
It is also possible to combine two MXF files or file sequences to a stereoscopic
video asset by clicking on the “3D” radio button.
It is perfectly possible to arbitrarily combine any two kinds of video sources: file
sequence with file sequence, file sequence with MXF, MXF with MXF. If a
stereoscopic MXF file is selected, only its first channel is regarded. If the same
file sequence is selected for both channels, the sequence will be interpreted as
19 of 70
22/10/2015
two interleaved channels, i.e. frames at even indices will be used for the left
channel, frames at odd indices for the right channel.
For convenience, supported file formats can also be dragged onto the
easyDCP Player+ canvas or playlist editor.
Both video channels are required to have matching technical properties like edit
rate and resolution. The shorter channel’s duration will be used as the overall
duration.
5.5
Opening and Creating a Playlist
easyDCP Player has limited support for playlists. Currently, only the m3u format
is supported. To open an m3u file, drag and drop it onto the canvas or the
easyDCP Player icon. Items will be played back to back. Enabling the loop
button will cause the whole playlist to be looped, not individual items. Playlists
may be nested, but not recursively nested.
A playlist can be created from within the Playlist Editor, with the “Save Playlist”
option.
The simplest form of a m3u playlist is a text file with one absolute path to a
source asset per line.
Optionally, each line may be preceded by a line with metadata that starts with
“#EXTINF:”. It is followed by a number that denotes the maximum number of
seconds the asset shall be played. A negative value or zero indicates that the
full length shall be played. If the asset is shorter than the provided duration or
the easyDCP Player demo’s maximum playback duration limit is reached, the
duration stated in the playlist is ignored.
Following the duration, separated by a comma, a title needs to be specified.
However, easyDCP Player will continue to display the asset’s title and not the
one stated in the playlist. A proprietary extension is that an additional, commaseparated, field, stating the audio volume, can be supplied. Valid values are
numbers between 0-100.
All blank lines and lines that start with “#”are ignored.
Sample:
#EXTM3U
# play only first 5 seconds
#EXTINF:5, title 1
\\server\DCPs\sample DCP\cpl.xml
# play at 50% audio volume
#EXTINF:0, title 2, 50
20 of 70
22/10/2015
\\server\FileSequences\j2c\img_00.j2c
C:\DCPs\sample DCP\video.mxf
5.6
Opening high-bitrate content
According to DCI specifications, the video bitrate for DCPs shall not exceed 250
Mbit/s. Surpassing that limit will cause easyDCP Player to generate a warning
message. To set a custom limit, e.g. when working with high-framerate (HFR)
content or high-bitrate (HBR) content, open the playlist editor window (Press
“P” or context menu -> Playback -> “Playlist Editor”) and modify the bitrate
setting. easyDCP Player will remember custom values set for each item across
program starts.
5.7
Opening an IMP with multiple virtual audio tracks
The pendent to a DCP’s reels in an IMF package are segments. A segment may
contain audio, picture and/or timed text. However, in contrast to DCPs, a reel
can contain a sequence of multiple tracks of the same essence (e.g. picture)
that will be played back-to-back. In the screenshot above, the first segment has
a sequence of eight tracks that will be played back to back.
Another concept that is new in IMF packages is that of virtual tracks. In the
screenshot above, the composition has two alternative virtual audio tracks –
one with stereo channel audio and another one with 5.1 audio. The active
virtual tracks are printed in bold.
21 of 70
22/10/2015
When opening the composition, the first virtual track will initially be opened.
Subsequently, any other audio track can be selected by clicking the speaker
icon in the toolbar.
5.8
Playback control
Play/Pause Playback:
Starts or pauses playback of the currently loaded media asset (hit ‘Space’).
Loop Video:
If this option is activated, the currently loaded playlist will be restarted from the
beginning when it reaches the end.
e Discard resolution level:
By clicking this button, a resolution level of the JPEG 2000 code-stream will be
discarded. Discarding a resolution level will half the resolution in both
dimensions, while speeding up decompression times. Discard a resolution level,
if the picture essence cannot be played back in real-time.
f Add resolution level:
By clicking this button, an additional resolution level of the JPEG 2000 codestream will be added. Adding a resolution level will double the resolution in
both dimensions while slowing down decompression times.
22 of 70
22/10/2015
As seen above, a DCP contains multiple embedded resolutions.
Fit To Window
This button is grouped with the resolution level buttons as well as the combo
box listing all accessible embedded resolutions. Normally, the application
window resizes itself to the decoded video resolution, which is always visible in
the drop-down combo box displayed above. If the window is too small to fit
the video resolution, scroll bars appear. When the “Fit to Window” button next
to the combo box is checked, however, the displayed video resolution will be
artificially scaled to optimally fit the current window size. Tip: In order to speed
up the decompression, discard one resolution level and scale the resolution
back up to full screen by enabling the “Fit To Window” option. The loss in
quality is acceptable in many cases.
23 of 70
22/10/2015
The above screenshot shows the same 256x107 pixels embedded resolutions,
but with the “Fit to Window” option enabled.
Frame number:
Enter a value to directly jump to a specific frame number of the currently
loaded asset. You can also use the blue slide bar to jump to a specific location.
Frames per Second:
Arbitrary frame rates can be specified. If the audio edit rate is known (as is the
case when playing a DCP, IMP or MXF), audio will only be played for the
original edit rate. If a fractional frame rate is specified, the time code display
will round to the next even integer. Hence, the time code no longer matches
the world time.
Timed Text:
The currently opened package’s timed text tracks can be shown or hidden. To
be able to distinguish the tracks they can be colorized.
Volume control (audio)
Change the audio volume with this slider from left to right. At full left, audio is
muted. At full right, audio is played back at 100% of volume, no additional
gain is added to the audio. When clicking the speaker-symbol a menu will
open. The option to mute all audio is always available. In case an IMF package
with virtual audio tracks is currently opened the track can be selected. If lossless
audio output is enabled (see Options, Audio tab), volume control is not
available.
24 of 70
22/10/2015
When playing back an m3u playlist, it is possible to predefine the volume level
for every package in the m3u file as shown in chapter 5.5. In this case, the
volume slide will be automatically updated.
Timeline
The timeline displays the playback progress of the current playlist item.
Hovering over it will display additional information, clicking will jump to the
associated time code. If the currently playing asset contains subtitles, markers
will be drawn on the timeline at the fade-in points of all subtitle entries.
Multiple reels inside a single package will be drawn in slightly different colors
for easier distinction. Additionally, the context entries in Playback->”Jump to”
allow navigation between reels, subtitles or playlist items.
5.9
Subtitle Inspector
Since version 3.0 of the easyDCP Player(+), a Subtitle Inspector window can be
used to display subtitles and their properties for an opened asset. A Subtitle
Inspector window can be opened by using the easyDCP Player(+) context menu
(right click on Canvas) or main menu -> Asset -> Subtitle Inspector #1 to #4 (or
using the shortcuts CTRL+1 to CTRL+4). Each window can be used to show
different Subtitle Tracks and search results. By default, the same subtitles like in
the Canvas are shown in the Subtitle Inspector windows. To change this
behavior, the “Tracks” menu can be used by disabling its “Same as Canvas”
option and selecting the subtitle tracks arbitrarily and independently from the
Canvas.
Additionally, the search box in the top of the window can be used to instantly
find particular subtitle entries by typing in, for example, a part of their text or
their time code. All visible columns will be searched and wild-cards like “?” and
“*” can also be applied.
25 of 70
22/10/2015
The order of the columns can be re-arranged via drag & drop of the column
headers. The column headers’ context menus contain options to hide or show a
particular column.
Selecting a subtitle in the Subtitle Inspector by clicking on it automatically
jumps to the first frame the subtitle appears (please note that the subtitle could
still have a high transparency in that first frame because of the fade-up time).
The other way around, while playback is running, the subtitles that are
currently visible in the Canvas are also marked in the Subtitle Inspector
windows.
For testing purposes, each subtitle track can be rendered in a different color by
either enabling the “Colorizing” option in the Subtitle menu of the tool bar or
in the context menu of any subtitle entry in the Subtitle Inspector (right click on
a subtitle entry to open up the context menu). Using this context menu,
alternatively a custom color can be selected for each subtitle track by choosing
“Pick a Color” for one of its subtitle entries. Moreover, by clicking on “Extra
vertical offset”, each subtitle track can get an additional offset for its position
in the image, so all of its subtitle entries get moved up or down in the image.
This is convenient when comparing two alternative subtitle tracks (e.g. two
different languages) that would normally overlap each other. The default
percentage of +/-40% can also be customized in the context menu by using
the “+10%” and “-10%” options.
26 of 70
22/10/2015
5.10
Adding external subtitle files
easyDCP Player (+) can also load external subtitles on-the-fly via the playlist
editor window. To do so, right click the desired package and choose “Add
subtitle file(s) to Composition” or “Add subtitle file(s) to Reel”. Drag & Drop is
supported as well.
27 of 70
22/10/2015
Please note that it makes a difference whether you drop the subtitle on the
composition or on a particular reel. In case you selected to add the subtitle file
to the composition and its length exceeds the duration of the first reel, the
remaining subtitle contents will be added to the following reels (if any). When
you later unwrap the package in the Export dialog (see chapter 6), the single
imported subtitle file will then be split up into multiple files (one for each reel).
“Add subtitle file(s) to Reel” will only affect the selected reel. Make sure that
the subtitle contains no entries beyond the reel’s end.
To remove an external subtitle element, right click it and choose “Remove
Subtitle” from the context menu.
For convenience, no distinction between the different supported
subtitle formats (SMPTE DCP, Interop DCP, IMF) is made. For instance,
adding SMPTE subtitles to an Interop package or vice versa will work
as expected. When the package is exported, the subtitle format will
automatically be converted.
You may add multiple subtitle files at the same time.
In order to distinguish them from regular ones, external subtitle
elements in the playlist editor are displayed in italics.
easyDCP Player(+) will automatically monitor external subtitle files for
changes and update them accordingly (e.g. in case you modify the
wording in an external editor)
28 of 70
22/10/2015
5.11
Color Transforms
With this button you can select a color transform. Enabling a color transform
results in a better representation of how colors and “look” appear on the
screen. Multiple standard color transforms are included with easyDCP Player.
Color Transform Presets
In versions prior to 3.3.2, color transforms were of the form “source space ->
target space”. Each transform is represented by a file in the color transform
repository. They use a proprietary XML format. The files can be edited and new
ones can be added. These types of color transforms are still available for
backwards compatibility. In the screenshot above, select the “Color Transforms
/ 3D LUTs” group box. The repository can be opened by clicking the folder icon.
New files or 3D LUTs (*.3dl) can be added with the plus icon.
Color Space Presets
Beginning with version 3.3.2, the more flexible way to define color transforms
is by individually assigning source and destination color spaces. The source
color space is specific to the currently loaded package and will be restored the
next time the package is loaded. The first time a package is loaded, the source
color space will be automatically inferred from the metadata. The destination
color spaces can be individually selected for the computer monitor and for the
SDI monitor. These selections will be permanently maintained. The color spaces
are also represented by files that are located in the color space repository. The
files are stored in a proprietary XML format that is different from the one used
for the legacy color transform files. This repository is shared by both easyDCP
Player and easyDCP Creator. Existing presets can be edited and new ones can
be created. When adding new files, please make sure to assign a unique name.
The “comment” attribute will be displayed as a tool tip. When creating a new
preset it is recommended to copy and paste any of the existing presets and
29 of 70
22/10/2015
make adjustments as opposed to starting from scratch. All possible values can
be looked up in the “template.xml.example” file located in the repository.
ICC Profile
Optionally, a separate ICC profile file can be referenced. This works with both
the color transform and color space formats. The profile file needs to be
located in the same folder. This profile will then be embedded when exporting
QuickTime or TIF files to enable proper downstream color management.
Example: DCP
As seen above, images look greyish or greenish, when displayed in the
package’s native X’Y’Z’ color space with 2.6 gamma and P3 white point. When
viewing on a computer monitor with the sRGB color profile, the colors need to
be converted into the sRGB color space.
30 of 70
22/10/2015
5.12
2D/3D
The 2D/3D context menu lists the same options as the 3D button in the
detachable control bar. Features are only enabled when a stereoscopic asset is
loaded. Both the context menu and the button are only available in the
easyDCP Player+ edition.
The “Swap Left/Right” check box works in combination with all following
modes that display both channels. It swaps the input channels and should
therefore normally be unchecked.
31 of 70
22/10/2015
The first group of modes only displays one channel at a time.
The second group of modes lists several common anaglyph filters that can be
used with widely available anaglyph glasses.
The third group contains a range of modes, most of which spatially interleave
both channels or place them next to each other. Especially the side-by-side and
top-and-bottom formats are common for addressing 3D displays.
Finally, Quad Buffered Stereo delivers the highest-quality 3D effect as it
provides synchronous double-buffering for each eye. This option is only
supported by professional graphics devices and therefore not always available.
In order for this option to be available the graphics device needs to support
Quad Buffering and stereo needs to be enabled in the graphics device control
panel as well as in the easyDCP Player video options pane. When this option is
selected in easyDCP Player, the graphics driver control panel is also the place to
configure how exactly left and right images should be output. Common
choices are output for shutter glasses or Dual-DVI stereo, e.g. left images over
one DVI output and right images over the other DVI output. easyDCP Player
simply passes left and right images at full resolution to the graphics driver.
5.13
30 Bit Colors via DisplayPort
By default, images are displayed with 8 bits per color (also referred to as 24
bit). Beginning with version easyDCP Player+ 1.8, 30 bit output can be enabled
(10 bit per color), provided both the primary graphics device and the display
support 10 bit per color and the display is connected with a DisplayPort link.
This option can be enabled in the main context menu’s “View” submenu. The
“30 Bit Colors” option is only selectable, if the hardware requirements are met.
32 of 70
22/10/2015
6
Export
easyDCP Player+ allows exporting a source’s video, audio or timed-text assets.
The individual video frames can be unwrapped and saved as JPEG 2000 images
(*.j2c) or decoded to uncompressed DPX, uncompressed TIF or a QuickTime
container using any of the available installed QuickTime codecs. When
exporting decoded images, various image processing options can be applied.
Unwrap whole DCP: easyDCP Player+ can simply unwrap the whole DCP
track file by track file. It will automatically generate an easyDCP Creator project
file, which can be opened with easyDCP Creator to generate a new package.
Regenerating the exported DCP will be almost as fast as a copy operation since
image files are already in the proper format and a time-consuming JPEG 2000
compression is not necessary. Just make sure that easyDCP Creator is
configured to (1) disable JPEG 2000 re-encoding, (2) disable automatic pillar/letterboxing, (3) bypass the video track files’ color transform. This option
requires that keys were ingested for all compositions as it will unwrap the
33 of 70
22/10/2015
whole package. When extending an existing package, e.g. by adding subtitles,
this option should usually be preferred over the “Export sequence” option.
Create supplemental project: This option is only available if external subtitles
were loaded. Exporting in this mode will create a easyDCP Version File (VF)
project file to be opened by easyDCP Creator. The project will reference all
track files from the original package. Any externally added subtitles will be split
into reels and converted to SMPTE or Interop, when necessary. During the
conversion, any subtitle attributes that use the default values defined in the
specifications will be stripped.
Export Sequence: This option can also be used to export a package’s content
into image and audio files. However, it will skip the reels’ invisible frames, e.g.
when the movie has a run-in. To work around this, it is also possible to load a
package’s MXF files individually and unwrap those one by one. This is
effectively what the “Unwrap whole DCP” option does.
In- and Out-Points: Start and end points can be specified in terms of frame
indices or reel indices. Exporting reels comes in handy when creating proxy file
sequences to be used during the subtitling process, because subtitle files have
to be provided individually for each reel.
Stereo Mode: A stereo package’s left and right channel will be exported
individually. Creating a stereoscopic QuickTime video is not supported.
Resolution Level: JPEG 2000’s scalability by resolution can be utilized to
export proxy sequences.
File Format: JPEG 2000 (unwrap only), DPX, TIF or QuickTime. “Check (decode
only)” is a quality assurance feature. It will decrypt and decode all frames in the
package as fast as possible, verifying that the JPEG 2000 files are decodable,
contain the proper profile flags and don’t violate the maximum bitrate assigned
to the asset (250 Mbit/s by default).
Codec: When exporting to QuickTime, any of the installed QuickTime codecs
can be selected (Audio and Video).
Scaling/Letterboxing: When exporting to QuickTime, the source can
optionally be scaled and/or letterboxed. When enabled, the image will be
scaled until either the width or height matches the desired resolution. If the
output aspect ratio is different from the source, the remainder will be letter/pillarboxed.
Color Transform: Any of the XML-based color transforms can be applied
during the export. Please note, that this will impact the decoding performance.
Color Depth: For DPX, bit depths of 8, 10 and 16 bits as well as the native bit
depth can be selected. Choose 10-bit for the highest compatibility with other
tools. For TIFF, bit depths of 8 and 16 bits as well as the native bit depth can be
34 of 70
22/10/2015
selected. Export to QuickTime is restricted to 8 bits or 16 bits per color. The
option to export to QuickTime in 16-bit mode will only be present when the
source material actually exceeds a bit depth of 8 bits.
Chroma Subsampling: When exporting chroma-subsampled source material
(i.e. in 4:2:2 or 4:2:0 configurations) to DPX or TIFF, 4:4:4 or the native
subsampling scheme can be selected. In case 4:4:4 is selected, the video
material will be upsampled accordingly.
Burn-In Subtitles: Any of the present timed-text tracks can be embedded into
the image. Optionally, the subtitles’ original positions can be shifted vertically.
This comes in handy when creating new subtitles: a proxy file with the original
subtitles burnt-in can be provided to the subtitler, who can add a new
translated subtitle track and position it comfortably.
Burn-In Timecode: Allows to burn in the time-code.
Burn-In Text: Allows to burn in a static text, e.g. “Property of Fraunhofer”.
Clicking the “…” button, will pop up an editor dialog that provides more
space.
File Name Prefix: Will be used as the base file name.
Audio: Audio essence can be stored as a single multi-channel WAV file,
multiple single-channels WAV files or a in a QuickTime container. When the
target wav-file exceeds the limit of 2GB file size, it will be split into multiple
files. If both audio and video essence is exported using the QuickTime format,
data will be interleaved into a single container file. Please note that depending
on the selected codec, not all audio channel layouts might be supported.
35 of 70
22/10/2015
7
Quality control
Before distributing a DCP or IMP, it is highly recommended to run both the
hash check and the decode test (both explained below). When running these
tests, the package should be loaded not from the local drive, but directly from
the mobile hard-drive.
7.1
Log/Issue Reports
When a new asset is loaded, easyDCP Player automatically executes numerous
checks, identifying potential issues related to integrity, formatting and security.
The results are collected and presented to the user in a log window.
The user should always read the error or warning messages very carefully.
Issues are presented in a hierarchical tree. Typically, the lowest level contains
the most detailed error message. The bottom half of the window shows all
details of the highlighted issue. Each log entry has a severity level: Info,
Warning or Error.
Info: Feedback to the user or general log entries are classified as infos.
Warning: Issues that might result in the DCP/IMP not working on some
servers, but that easyDCP Player can still cope with are classified as warnings.
Error: If easyDCP Player cannot continue to process the asset, an issue is
classified as an error.
The whole log can be saved as a *.HTML or *.XML file using the “Save As”
button in the tool bar. When turning to the easyDCP technical support with a
36 of 70
22/10/2015
question regarding a specific issue listed in the log, please attach the file.
By default, the log window appears, whenever a new Warning or Error was
added to the log. By disabling the “auto-appear” checkbox in the top right
corner, the window will be kept hidden until it is manually popped up using the
context menu->Log Window option (or press G). Disabling the auto-appear
option is not recommended.
The MXF hash values are not checked automatically, since this would be too
time consuming. Please refer to chapter 7.4 for details on how to apply a hashcheck on a single package or the whole playlist.
7.2
Decode Test
The export module can be used to decode all audio and video frames as fast as
possible to verify their integrity by selecting the output format “Check (decode
only). In order to detect errors in any part of the codestream, run this test using
the full resolution.
37 of 70
22/10/2015
By default, log files can be created for each export, containing an entry for
every successfully decoded frame. This can be disabled by editing the settings
file:
[dummyexport]
write_log_file=true
7.3
Metadata Inspector
The Metadata Inspector can be opened via “context menu->Asset->Metadata
Inspector” or by pressing “I” on the keyboard. It gives information about the
current asset’s general properties as well as audio- and video-specific
properties. Each field is explained in its tool tip. The video properties
“Resolution” and “Bit Depth” contain data that is listed individually for each
color component (for DCPs they are always identical).
Additionally, the same information is available by clicking on
playlist item.
38 of 70
next to a
22/10/2015
7.4
File Hash Checker
When loading a package, easyDCP Player will validate file sizes of all files.
However, it will only validate the XML files’ hash values. A file hash validation
of the remaining files in the package has to be manually triggered by the user
since it takes too long to be done automatically, especially for large files. Before
distributing a DCP/IMP, the hash values should be checked. To do this, it makes
sense to load the package directly from the mobile hard drive. Select “Check
File Hashes” in the context menu or press “H”. If a package has been loaded,
all asset files and their reference hash values will be listed. Click “Check
Hashes” to start the hash value calculation. To make the hash check available
for encrypted DCPs without requiring content keys to be loaded, the “Playlist
Editor” Dialog also has a button that opens the “Check File Hashes” dialog.
In order to calculate hash values for arbitrary other files, drag & drop the file
into the “Check File Hashes” dialog.
A hash value validation succeeds if the calculated hash value is identical to the
reference hash value listed in the DCP/IMP. The “status” column will then
display a green “Ok”.
easyDCP Player also has a command-line parameter to perform the hash check.
Please refer to chapter 10.
39 of 70
22/10/2015
7.5
Audio Waveform Visualizer
This module visualizes the audio tracks of the currently opened assets. In can be
used to mute individual channels in order to check if the channel order is
correct. The white cursor represents the currently showing frame and by
aligning it to a peak in the waveform, audio-video-sync issues can be identified
conveniently.
In cases where easyDCP Player(+) was unable to read correct channel labels
from the asset, it will show “Channel X” instead.
40 of 70
22/10/2015
8
Preferences
8.1
Preferred Video Codec
This option is available in the Windows version only. Both easyDCP Player and
easyDCP Player+ come with two JPEG 2000 decoders.
The GPU-based codec outsources the computationally expensive JPEG 2000
decompression to a secondary graphics device. It allows real-time playback
even on low-end computers as it does not heavily use the CPU.
The software-only codec decodes images using only the CPU. It is not
dependent on a special graphics device. This codec automatically detects the
number of CPU cores and utilizes them all for optimal performance. On lowend computers (e.g. dual core) it will not be able to playback DCPs/IMPs at full
resolution in real-time. On high-end computers with many CPU cores, however,
it is even able to playback stereoscopic 2K@48fps packages in real-time.
In the options dialog, you can setup which codec should be used by changing
the “use Nvidia CUDA JPEG 2000 Decoder” option.
8.2
Video Rendering
easyDCP Player employs multiple advanced video rendering technologies, that
are both platform and hardware dependent. The settings found in the options
dialog’s “video” pane merely influence if easyDCP Player requests these
features. If they are actually available on the system can be seen in the easyDCP
Player system info dialog (Press F10).
41 of 70
22/10/2015
Vertical Sync (V-Sync): This option should only be enabled, if the video
rendering suffers from tearing artifacts. Enabling V-Sync will typically negatively
impact the render performance.
30 bit colors: (easyDCP Player+ only). Also, Mac OS X does not support 30 bit
rendering. In order for this option to be available, both the graphics adapter
and the display need to support it. Within easyDCP Player+, 30 bit rendering
additionally needs to be enabled or disabled with the corresponding option in
the “View” menu, e.g. “context menu->View->30 bit Colors”.
Quad-Buffering: (easyDCP Player+ only). Also, Mac OS X does not support
Quad Buffering. Quad Buffering is available, if the graphics adapter supports it
(e.g. NVIDIA Quadro® series) and stereo is activated in the driver settings.
When active, left and right images of a stereo source are both passed at full
resolution to the graphics driver. Within easyDCP Player+, Quad Buffering
additionally needs to be enabled or disabled in the “2D/3D” menu, e.g.
“context menu->2D/3D->Quad Buffering” or alternatively by pressing the
corresponding button in the control bar.
Background Color: This button allows to pick a custom color for the video
canvas in order to determine if an asset contains black pillar- or letter- boxes.
V-Sync Rendering: Since v3.0 easyDCP Player has two render modes: V-syncindependent rendering and V-Sync-rendering.
V-sync-independent rendering: This was the only option in all versions prior to
v3.0. It is still a good choice if the display runs with 60 Hz or more. It is also the
fallback option, if V-Sync rendering is not available or not enabled.
42 of 70
22/10/2015
V-Sync-rendering: Especially, if the target display is a LCD-TV or a projector, or
if the maximum refresh rate is significantly lower than 60 Hz (e.g. only 30 Hz),
then the V-Sync rendering mode should be selected. It can be activated in
Options->Video->V-Sync Rendering (only available if Options->Video->General
->Rendering->V-Sync is “currently on”). Even if V-Sync was requested, the
driver might not enable V-Sync due to other conflicting settings in the graphics
driver control panel. When you start playback in V-Sync-Rendering mode, the
package's frame rate as well as the display's refresh rate will be started in curly
brackets next to the "Render" fps line (e.g. "Render (24 fps @ 24 Hz) in the
statistics window. easyDCP Player will now explicitly translate between the
package's frame rate and the display's refresh rate, which gives best results
when both rates are equal or when the display's refresh rate is an even multiple
of the package's frame rate.
Hint: When using two Nvidia graphics cards (e.g. one for rendering and one for
decoding with CUDA), it might be necessary, to manually specify the graphics
card that will be rendering: NVIDIA Control Panel->3D Settings->Manage 3D
settings->Global Settings->OpenGL rendering GPU-> <select the graphics card
that drives the display where easyDCP Player's canvas is located>. This can
make a significant difference in terms of render performance.
8.3
Audio Rendering
Both easyDCP Player and easyDCP Player+ support multi-channel output. By
default the audio output device that supports most channels will be selected.
Open the audio options pane (context menu->Options->Audio tab) for a list of
all available audio renderers. Supported interfaces are DirectSound (Windows),
MME (Windows), ASIO (Windows) and CoreAudio (Mac OS X).
43 of 70
22/10/2015
Latency: It is possible to specify a latency in milliseconds for each renderer. This
latency will be taken into consideration when synchronizing audio and video
frames. Changing the latency will take effect immediately, so it can be easily
tweaked while simultaneously watching a test package. Except for HD-SDI
output, the latency should normally be positive, i.e. video output will be slightly
delayed to compensate for the latency introduced by the operating system’s
audio processing pipeline.
Lossless audio output: When this option is active, audio samples are passed
to the audio renderer in their native sample format without applying any
volume control or a downmix. Using a ASIO driver and a sound adapter with a
digital output, samples are passed-through losslessly.
Automatic Stereo Downmix: Select this option to downmix 5.1 sound to
stereo.
Audio routing: The audio channel order is retrieved from the input MXF
Sound Track File, if possible. If the audio channels are not labeled in the Track
File at all, a default channel order is read from the easyDCP Player settings file.
A default output order is read from the settings file as well. For more details,
please refer to chapter 10.
8.4
HD-SDI Play-out
Enable HD-SDI output: Since version 2.0, easyDCP Player+ is capable of
playing out HD-SDI with the Blackmagic Design UltraStudio and DeckLink
44 of 70
22/10/2015
series. Both, PCIe-connected cards and Thunderbolt-connected external devices
are supported.
Thunderbolt devices will only be detected, if they are attached at the time
easyDCP Player+ is started. When enabling HD-SDI output within easyDCP
Player+, the audio output device should be “ASIO (<name of HD-SDI device>)”
on Windows and “CoreAudio (<name of HD-SDI device>)” on Mac OS X, so
that audio and video signals emitted via HD-SDI are in sync. ASIO drivers for
Windows are available for download at www.asio4all.com. The audio latency
should normally be negative.
Advanced HD-SDI related settings can be configured in the Blackmagic Design
Control Panel.
Output mode: Select a HD-SDI output mode. The frame rate is required to be
identical to that of the currently playing package. When playing back multiple
DCPs or IMPs with different frame rates back to back, the HD-SDI output is not
automatically adjusted. If the resolution is smaller than the package’s resolution
and “Enable subtitling, color-processing and scaling” is disabled, images will be
cropped. On the other hand, if the resolution is larger and the processing
option is disabled, images will be pillar-/letterboxed.
Color Depth: Sets the bits per component.
Levels: Select whether to apply a legal range conversion or not. “Automatic”
will apply a conversion, if the output format requires it. Alternatively, you can
select “Convert full-range to legal-range” to enforce the conversion or “No
conversion” to always skip it.
Show video also in main window: Displaying video in the main window
while HD-SDI output is active will impact the render performance and might
lead to stuttering. Enable this option with care. (Enable the statistics from
“context menu->View->Show FPS stats”)
Enable subtitling, color-processing and scaling: If this option is enabled,
images will be scaled to meet the currently set-up HD-SDI output resolution.
Additionally, the currently selected color transform will be applied and subtitles
will be rendered. This option has significant impact on the render performance.
(Enable the statistics from “context menu->View->Show FPS stats”)
Enable HD-SDI video frame statistics: This option should normally be
disabled.
45 of 70
22/10/2015
8.5
Subtitles
Default Visible Subtitles: A composition may have one or more timed-text
tracks. Select here which track shall be rendered.
Subtitle Rendering: On some systems, subtitle outlines are not anti-aliased.
This effect is noticeable, when multisampling is not enabled. Whether or not
multi-sampling is enabled can be seen in the easyDCP Player system info dialog
(Press F10). On Windows, disabling “Allow 30 bit colors” and “Allow QuadBuffering” might lead to multi-sampling becoming available. Alternatively,
outlines can simply be ignored by enabling the option “Do not render
subtitle outlines”.
Servers behave differently, when it comes to rendering PNG sub-images.
Toggling the option “Include PNG Subtitles in Color Transform” specifies if
sub-images should also be included in a color transform, i.e. XYZ to RGB, or
not.
46 of 70
22/10/2015
8.6
Software JPEG 2000 Codec
Performance vs. Quality trade-off: Since version 2.0, easyDCP Player is
capable of trading some decoding precision for a better performance.
Especially, when viewing DCPs/IMPs (which have 12 bit per color) on a regular
24 bit monitor, some information from the JPEG 2000 codestream can safely
be ignored without significantly impacting the resulting image quality.
The algorithm is designed in a way that the trade-off does not have to be reconfigured for every package. At a certain position, codestreams from a
DCP/IMP that contain so many details that they fully utilized the maximum
available data rate might already be truncated. When subsequently loading a
package that has only a low data rate, because it does not contain many
details, the precision would not be impacted, however, because it has a lowrate to begin with. This is desirable, because the performance requirements for
decoding a low-bitrate package is much lower, anyway.
Make 4K resolution level available: By default, 4K assets are loaded in a
way that only a maximum resolution of 2K is available, mainly to save memory
and lower the performance requirements. Since many displays are not capable
of rendering 4K anyway and 4K playback has much higher demands on
memory and hardware, only the 2K part of a 4K JPEG 2000 codestream is
evaluated. A 4K DCP or IMP can also be opened in full resolution by enabling
this option. Smooth playback requires much more hardware resources and is
not guaranteed.
Ignore codestream errors, if possible: Being a software-quality tool,
easyDCP Player aborts playback as soon as a corrupt JPEG 2000 codestream is
encountered. This option controls the decoder’s error resilience mode.
47 of 70
22/10/2015
Maximum bitrate violation tolerance: Unless error resilience is enabled,
easyDCP Player also checks if the limit is met. Some packages in the field
slightly violate this limit by a few bytes, which does not seem to cause any
playback issues on D-Cinema servers. To avoid warning messages in easyDCP
Player, the limit should be slightly raised. The default is 0 bytes.
8.7
GPU-based JPEG 2000 Codec
This codec is not available in easyDCP Player for Mac OS X.
The options “Performance vs. Quality trade-off”, “Make 4K resolution
level available.”, “Ignore codestream errors, if possible” and “Max
bitrate violation tolerance“ are identical to those in the Software JPEG 2000
Codec configuration pane (8.6).
For playback of DCPs in real-time in GPU-based mode, easyDCP Player requires
a bundle of two graphics devices - a primary device for rendering and a
secondary device for video decompression. Refer to chapter 3 for more details
on the system requirements.
On most systems, easyDCP Player is able to automatically configure itself. It
attempts to use only the secondary device’s GPUs for JPEG 2000
decompression and ignore the primary GPU as it will be used for rendering.
The options pane contains a list of all GPUs reported by the OS and a list of
GPUs that support the NVIDIA® CUDA® technology. NVIDIA® CUDA® is a
technology that allows to execute calculations - in the case of easyDCP Player
the JPEG 2000 decompression - on the graphics device. Therefore, if the
48 of 70
22/10/2015
primary device supports the NVIDIA® CUDA® technology, easyDCP Player
needs to ignore it, i.e. not use it for JPEG 2000 decompression. If the primary
device does not support the NVIDIA® CUDA® technology, easyDCP Player
should use all CUDA-enabled devices it finds for JPEG 2000 decompression.
In the screenshot above, the primary device is the NVIDIA Quadro® K600. Even
though it does support the NVIDIA® CUDA® technology, it must not be used
as a CUDA device, because then decoding with CUDA and rendering with
OpenGL would get in the way of each other, which leads to heavy stuttering.
If you play back a video asset with the GPU-based codec, hit ‘s’ to display
the performance statistics. The bottom line usually needs to read “GPU
Decode (1x GPUs)” (unless the CUDA device has two cores like in the
screenshot above. Then it should be “2x GPUs”). Do not enable a CUDA
graphics card marked with “(connected to display)”
The CUDA-enabled decoder is only available in the Windows version.
49 of 70
22/10/2015
9
Content Decryption
9.1
Server Certificates
easyDCP Player+ allows playing back encrypted content. Each Digital Cinema
play-out system or mastering station has its own private key and public key,
and so does each easyDCP Player+ installation. The private key is known only to
the play-out system, whereas the public key is contained in a public server
certificate and may be distributed to content providers. When content providers
choose to encrypt a DCP, they need to somehow provide the decryption keys
(there is one key for every encrypted track file) to the play-out system. To
ensure that no one else is able to read these sensitive decryption keys, they are
themselves encrypted in a way that only the targeted play-out system is able to
decrypt them. To do this, the content provider will need the play-out system’s
public server certificate. This encrypted message is called a Key Delivery
Message (KDM). easyDCP Player+ will keep all ingested KDMs in a repository
(key repository subfolder in easyDCP Player+ application data folder. See 4.8) so
that encrypted DCPs can be viewed multiple times without having to re-ingest
the keys each time. KDMs will not be removed from the repository after they
expired, but an expired KDM will no longer grant access to the DCP.
When easyDCP Player+ is first started, it does not yet have a server certificate
set. The demo edition does not allow playback of encrypted content. Only in
the commercial edition, server certificates can be requested from Fraunhofer
support by clicking “context menu->Request License & Certificates”. The
process is described in a screen cast at www.easydcp.com.
Unique private and public keys will be generated and provided to you online.
The received license and certificate set (a Zip file) can be imported via drag &
drop (or with „context menu->Help ->Import License & Certificates“.
The certificates are created and signed by Fraunhofer IIS. Fraunhofer IIS will
delete the private key immediately, and keep the public leaf certificate in a
database. The certificate is digitally signed by a chain of Fraunhofer certificates.
These certificates are referred to as a certificate chain and this certificate chain,
even though already included in the public server certificate, is additionally
saved in a separate file. These certificates are meant for commercial use as they
state the licensee’s URL and have a unique serial number that links the
certificates to the license. These server certificates are tied to the licensee’s
computer, using the easyDCP system hash. If the license should need to be
migrated to another system, a new certificate set will have to be requested. A
migration is possible in the user account at www.easydcp.com. Since the
private key is very sensitive, it is asynchronously encrypted using a combination
of easyDCP Player internal keys and a password selected by the user during the
License & Certificates request. Likewise, if the user chooses to store their
50 of 70
22/10/2015
password, it is first asynchronously encrypted. The user password needs to have
6 to 20 letters and cannot be changed after it was created.
All mentioned files are stored in the user application data folder’s certificates
subfolder (see 4.8). Hence, the OS user management can be used to maintain
multiple sets of certificates simultaneously. In order to easily determine which
files belong together, they are each identified by a unique ID. The ID of the set
that is currently used by easyDCP Player+ is also listed in the “About” dialog
(hit ‘F6’).
easydcpexport_<ID>.privkey.pem contains the encrypted private key
easydcpexport_<ID>.cert.sha256.crt is the public server certificate
easydcpexport_<ID>.chain.sha256.pem contains the certificate chain
easydcpexport_<_<ID>.privkey.passwd contains the encrypted user
password
When easyDCP Player+ is uninstalled, none of these files will be removed. If the
user password file (*.passwd) is manually deleted, the user will simply be
prompted for the password again the next time a KDM is ingested or an
encrypted DCP is opened.
On demand, we can also offer the easyDCP Player+ NE edition, where “NE”
stands for “No Export”. It contains all the features of easyDCP Player+ except
for the export. It’s certificate prefix (stated in the filename as well as in the
certificate itself) is “easydcpnoxport_” as opposed to “easydcpexport_”. This
way, content owners easily distinguish which edition they issue a KDM for.
51 of 70
22/10/2015
9.2
KDM Management
The content decryption context menu is only available in the easyDCP Player+
edition.
“Ingest Content Keys” pops up a file browser and lets you ingest content key
files (Key Delivery Message or easyDCP Digest).
Drag & Drop: You can also ingest multiple Key Delivery Messages (KDM) or
easyDCP Digests by simply dragging & dropping them onto the canvas.
The option “Export Public Server Certificate” will copy both the public leaf
certificate (easydcpexport_<id>.cert.sha256.crt) and the signature chain
(easydcpexport_<id>.chain.sha256.pem) to the selected folder. The signature
chain contains the leaf certificate as well as intermediate certificates and the
root certificate. You may safely distribute these certificates to content providers
who want to issue a Distribution KDM to your easyDCP Player+ installation.
When issuing (D)KDMs with easyDCP KDM Generator, place only the leaf
certificate file (*.crt) into the server certificate’s folder or just drag and drop it
into the corresponding input form.
For a description of how to request your custom certificates, please refer to
chapter 4.6 (License Activation and Certification).
For more details on the decryption workflow, please refer to chapter 9
(Content Decryption).
52 of 70
22/10/2015
The option “Open Key Repository” opens the key repository in a Windows
Explorer / Finder window. All ingested Key Delivery Messages (*.xml, *.kdm)
and easyDCP Digests (*.dcpdig) will be stored in this folder and renamed
according to the contained CPL UUID (digests with keys for multiple CPLs are
duplicated). Expired key files can be deleted from here manually when easyDCP
Player is not running.
53 of 70
22/10/2015
10
Audio Routing
Different mechanisms are used to identify audio channels carried in MXF Sound
Track Files within Digital Cinema Packages (DCP) and Interoperable Master
Format (IMF) Packages. Playback systems rely on such information for
eventually outputting sound to connected loudspeaker setups.
This chapter describes configuration options for easyDCP Player 3 and explains
routing mechanisms for different package types.
10.1
Audio Channel Identification
10.1.1 Interop DCPs
Interop DCPs usually don’t carry explicit audio channel configuration
information. The Inter-Society Digital Cinema Forum (ISDCF) recommends the
channel layout specified in Table 1. Theater operators rely on the optional use
of the Digital Cinema Naming Convention [5] in order to identify the channel
layout correctly. See [8] for more details.
Table 1 - Recommended Audio Channel Assignments for Interop DCPs
Channel
1
2
3
4
5
6
5.1
L
R
C
LFE
Ls
Rs
7.1 SDDS
L
R
C
LFE
Ls
Rs
7
HI
8
VI-N
9
10
11
12
-
Lc
Rc
-
7.1 DS
L
R
C
LFE
Lss
Rss
Lrs
Rrs
13
Motion Data
14
Sync Signal
15
16
-
54 of 70
Speaker Position
Left
Right
Center
Low Frequency Effects
Left Surround (Left Side Surround)
Right Surround (Right Side Surround)
Hearing impaired (with emphasis on
dialog)
Visually impaired narrative (audio
description)
Left center
Right center
Left rear surround
Right rear surround
Synchronous signal (e.g. used by DBox)
Used for external sync – not used for
Interop DCP
Unused
Unused
22/10/2015
10.1.2 SMPTE DCPs
Most of today’s SMPTE DCPs use an audio channel assignment label in the
Sound Track File metadata to identify the audio channel order in the file.
SMPTE ST 429-2 [1] describes five different configurations, which can be
identified by the associated label:
1.
5.1 + HI/VI-N
2.
6.1 + HI/VI-N
3.
7.1 SDDS Layout + HI/VI-N
4.
16 Channels “Wild Track Format” (WTF)
5.
7.1 DS Layout + HI/VIN
Table 2 - Standard Audio Channel Assignments for SMPTE DCPs
Channel
1
2
3
4
5
6
7
8
9
10
11
12
13
14
15
16
5.1 +
HI/VI-N
L
R
C
LFE
Ls
Rs
HI
VI-N
-
6.1 +
HI/VI-N
L
R
C
LFE
Ls
Rs
Cs
not used
HI
VI-N
-
7.1 SDDS
+ HI/VI-N
L
R
C
LFE
Ls
Rs
Lc
Rc
HI
VI-N
-
Wild Track
Format
CH1
CH2
CH3
CH4
CH5
CH6
CH7
CH8
CH9
CH10
CH11
CH12
CH13
CH14
CH15
CH16
7.1 DS +
HI/VI-N
L
R
C
LFE
Ls
Rs
Lrs
Rrs
HI
VI-N
-
Of course, not all DCPs actually contain HI and/or VI-N channels. Whether these
channels are present can be determined by taking the channel count into
account, which is also indicated in the Sound Track File metadata. For example,
config #1 (5.1 + HI/VI-N) combined with a channel count of “6”, indicates that
no HI/VIN channels are present in the corresponding Track File. That being said,
some facilities add silent channels for missing HI/VI-N channels, which makes it
difficult to determine whether useful HI/VI-N channels are present, or not.
DCPs containing Dolby Atmos® [6] Sound Tracks require a sync signal added to
the “traditional” 5.1 / 7.1 Sound Track File. Since such a channel can only be
included in channel assignment #4 (WTF), the content of the remaining audio
channels present in this Sound Track File remains unclear.
55 of 70
22/10/2015
The 2013 version of SMPTE ST 429-2 [2] adds support for Multi-Channel Audio
(MCA) Labeling, which is defined in SMPTE ST 377-4 [3]. Sound Track Files
using this, contain a number of SubDescriptors in the Wave Audio Essence
Descriptor. These SubDescriptors, besides other things, identify and describe
every audio channel present in the MXF file and leave no room for ambiguity.
SMPTE 429-16 [4] defines a way to carry additional (machine-readable)
metadata in CPLs. Besides other things, sound configurations can be stored for
Sound Track Files that are referenced by the CPL in that metadata. While the
standard document was released in 2014, hardly any DCPs in the field include
this metadata as of today.
10.1.3 IMF Packages
According to SMPTE ST 2067-2 [7], Audio Track Files in IMF Packages are
required to use Multichannel Audio Labeling, as defined in [3].
10.2
Configuration and output behavior
Some adjustments can be made in easyDCP Player’s settings.ini file (see chapter
4.8 for location of file). Two entries influence audio channel routing:
output_channel_order: specifies the local output layout (e.g.
speaker setup)
fallback_input_channel_order: used if no audio channel
configuration is signaled in the Package (InterOp/Wild Track Format)
Both entries have a default value that represents the 7.1 SDDS layout (Left –
Right – Center – LFE – Left Surround – Right Surround – Left Center – Right
Center). The output_channel_order value has to be adjusted to match the
local speaker setup, in case it uses a different layout.
[audio]
output_channel_order="L, R, C, LFE, Ls, Rs, Lc, Rc"
fallback_input_channel_order="L, R, C, LFE, Ls, Rs, Lc, Rc"
56 of 70
22/10/2015
The recognized channel symbols are listed in the following table.
Table 3 - Audio channel symbols for use in settings.ini
Symbol
L
R
C
LFE
Ls
Rs
Lss
Rss
Lrs
Rrs
Lc
Rc
Cs
HI
VIN
M1
M2
Lt
Rt
Lst
Rst
S
10.3
Description
Left
Right
Center
Low Frequency Effects
Left Surround
Right Surround
Left Side Surround
Right Side Surround
Left Rear Surround
Right Rear Surround
Left Center
Right Center
Center Surround
Hearing Impaired
Visually Impaired Narrative
Mono One
Mono Two
Left Total
Right Total
Left Surround Total
Right Surround Total
Surround
Package Type
DCP/IMF
DCP/IMF
DCP/IMF
DCP/IMF
DCP/IMF
DCP/IMF
DCP/IMF
DCP/IMF
DCP/IMF
DCP/IMF
DCP/IMF
DCP/IMF
DCP/IMF
DCP/IMF
DCP/IMF
IMF
IMF
IMF
IMF
IMF
IMF
IMF
Behavior
If a Sound Track Files signals an audio channel configuration, this configuration
is taken into account. If not, the fallback_input_channel_order is read
from the easyDCP Player settings file.
The output channel configuration is read from the settings file
(output_channel_order). If the number of channels, listed in settings.ini,
exceeds the number of channels actually supported by the selected output
device (e.g. soundcard), all channels exceeding this count remain unused.
If a package contains channels, for which there is no output channel
configured in the settings file, these channels are ignored and not played out.
Only exceptions are Lt/Rt channels, which can be used in IMF packages. If no
Lt/Rt output channels are specified in the settings file, they are routed to the
L/R output channels (if present).
In case stereo downmixing is enabled in easyDCP Players options menu, the
channels L, R, C, LFE, Ls and Rs are detected by the described mechanisms and
a downmix is played out on L/R.
The lossless audio setting in the options menu does not have any influence on
audio channel routing.
57 of 70
22/10/2015
10.4
Configuration and output examples
10.4.1 Using a standard 2.0/5.1 speaker setup
There is no need to change settings.ini at all, since the first entries of the
default configuration match a 2.0/5.1 speaker setup.
The diagram visualizes the internal process from DCP to loudspeaker:
The DCP Sound Track File contains the audio channel assignment label #4,
which indicates “Wild Track Format”. Since this configuration does not specify
a discrete channel layout, the fallback input configuration from the settings file
is used for the number of channels present in the Sound Track File.
The input channels are then routed to the matching output channels, as
specified in the settings.ini configuration file.
58 of 70
22/10/2015
10.4.2 Fixing swapped channels
Let’s assume the Center channel and the LFE channel are mixed up in your
output device. In that case, output_channel_order needs to be changed
in settings.ini (see chapter 4.8 for location of file). The following line will
internally switch these channels:
output_channel_order="L, R, LFE, C, Ls, Rs, Lc, Rc"
The diagram visualizes the internal process from DCP to loudspeaker:
internal input
channel
representation
DCP
Audio Channel Assignment Label: #1
ChannelCount: 8
output channel
configuration as
specified in
settings.ini
output channels
actually present
(offered by output
device)
ch1: L
ch1: L
ch2: R
ch2: R
ch2: R
ch3: C
ch3: LFE
ch3: LFE
ch4: LFE
ch4: C
ch4: C
ch5: Ls
ch5: Ls
ch5: Ls
ch6: Rs
ch6: Rs
ch6: Rs
ch7: HI
ch7: Lc
ch8: VI-N
ch8: Rc
ch1: L
No output channels
setup for HI/VI-N in
settings.ini, so they
will not be played out
The DCP Sound Track File contains the audio channel assignment label #1,
which indicates a 5.1 + HI/VI-N channel layout. Internally, the eight contained
channels are then being labeled accordingly.
HI/VIN are not further processed by easyDCP Player, because these channels are
not listed in the output_channel_configuration entry in settings.ini.
They are therefore not routed to any output channel. The remaining input
channels are routed to their matching output channels. So, in the case of the
center channel, input channel “C” (channel #3) is routed to output channel
“C” (channel #4).
59 of 70
22/10/2015
10.4.3 IMF Package 5.1 + HI/VI-N
Conditions: IMF Package containing 5.1 + HI/VI-N, 7.1 loudspeaker setup
connected to computer, default output channel configuration in settings.ini.
Since no HI/VI-N output channels are defined in settings.ini, the HI/VIN tracks
are ignored and only 5.1 is sent to the loudspeakers.
This behavior is identical for SMPTE DCPs that use the audio channel
configuration label #1 to identify the contained sound tracks as 5.1 + HI/VI-N.
internal input
channel
representation
IMF
using MCA labeling
No output channels
setup for HI/VI-N in
settings.ini, so
these channels are
not output
output channel
configuration as
specified in
settings.ini
output channels
actually present
ch1: LFE
ch1: L
ch2: R
ch2: R
ch1: L
ch2: R
ch3: Ls
ch3: C
ch3: C
ch4: L
ch4:LFE
ch4:LFE
ch5: Rs
ch5: Ls
ch5: Ls
ch6: VI-N
ch6: Rs
ch6: Rs
ch7: C
ch7: Lc
ch7: Lc
ch8: HI
ch8: Rc
ch8: Rc
No Lc/Rc present in
the package, so no
output on these
channels
60 of 70
22/10/2015
10.4.4 IMF Package Lt/Rt (default configuration)
Conditions: IMF Package containing Lt/Rt channels only, stereo loudspeaker
setup connected to computer, default output channel configuration in
settings.ini.
The default output configuration in settings.ini does not include Lt/Rt channels.
In that case, Lt/Rt is send to the L/R output channels and played out on the
connected stereo loudspeakers.
internal input
channel
representation
IMF
using MCA labeling
output channel
configuration as
specified in
settings.ini
ch1: Lt
ch2: Rt
output channels
actually available
ch1: L
ch1: L
ch2: R
ch2: R
ch3: C
ch4:LFE
ch5: Ls
No specific Lt/Rt
channels are
specified in
settings.ini, so L/R
will be used
ch6: Rs
ch7: Lc
ch8: Rc
61 of 70
22/10/2015
10.4.5 IMF Package Lt/Rt (custom configuration)
Conditions: IMF Package containing Lt/Rt channels only, 16 channel sound
output device, custom output channel configuration in settings.ini (see chapter
4.8 for location of file):
output_channel_order="L, R, C, LFE, Ls, Rs, Lc, Rc, , ,
, , , , Lr, Rt"
The custom output configuration in settings.ini does include Lt/Rt channels that
might be hooked to a separate pair of stereo speakers. In this case, Lt/Rt is send
to the Lt/Rt output channels (15/16).
62 of 70
22/10/2015
11
Command-Line Interface (CLI)
easyDCP Player can be used on the command line to perform a hash-check on
a package. easyDCP Player+ additionally provides all options required to export
a package. For detailed descriptions of the available parameters, call the
executable file with the parameter “–help”.
C:\Program Files (x86)\Fraunhofer IIS\easyDCP Player\bin>”easyDCP
Player+.com” –help
Usage: easyDCP Player+.exe <source>
A source can be the path to a Package directory, CPL,
Assetmap, M3U Playlist, MXF, J2C or WAV file.
Individual audio and video sources need to be separated with a space.
When a KDM or digest is required to load the source, just provide it
seperated by a space.
Optional parameters:
-stats
<statsfile.csv>
write fps performance statistics to a file.
-log
<logfile>|CONSOLE
enable log and write it to a file or the console
-logqt
<folder>
enable log of QuickTime Helper processes and
write the logs to the given folder.
-hashCheck
only perform hash check
-play
start playback immediately
Export parameters:
--exportDirectory|-o <path to export directory>
Sets the export directory. The directory has to exist.
[--exportType|-t Project|Sequence|Reel]
Select export type:
Unwrap easyDCP project
Export a frame sequence
Export reels
[--exportFilePrefix|-p <export image prefix>]
Specify file prefix for image files or container file, e.g. "image_".
[--exportVideo|-v DPX|TIFF|J2C|Check (decode only)|QuickTime]
Select image file format for export sequence.
[--exportVideoCodecPriority|-vcp GPU|CPU]
Set preferred JPEG 2000 video decoder:
hardware (GPU) or software (CPU) based.
If this parameter is not set,
the last saved setting is used as default.
[--exportAudio|-a WAV|MultichannelWAV|QuickTime]
Select audio file format for export sequence.
[--exportStartIndex|-from]
Set start of sequence, 0 is the default.
[--exportStopIndex|-to]
Set end of sequence, the last frame is the default.
[--exportStereoMode|-c left|right|leftandright]
Select export channel for stereoscopic 3D assets.
[--exportRlvl|-rlvl]
Set number of resolution levels to be discarded.
Default is 0 for full resolution.
[--exportColorDepth|-bps 8|10|12|16]
Select color depth 8, 10, 12 or 16. Default is the original color depth
of the video asset.
[--exportColorTransformation|-ct]
Set the color transformation.
63 of 70
22/10/2015
Default is no color transformation.
"Brighter for Shutter Glasses"
"X'Y'Z' -> R'G'B' (P3)"
"X'Y'Z' -> R'G'B' (Rec BT.709)"
"X'Y'Z' -> R'G'B' (Rec BT.709) (Brighter for Shutter Glasses)"
"X'Y'Z' -> R'G'B' Legal Range (Rec BT.709)"
"Y'Cb'Cr' Full Range -> R'G'B' Full Range (Rec BT.709)"
"Y'Cb'Cr' Legal Range -> R'G'B' Full Range (Rec BT.709)"
[--exportVideoBitrate|-b]
Set the desired average video bitrate in kbit/s.
[--exportScaleX|-scaleX <width in pixels>]
Set scaled width in pixels. If aspect ratio is different,
the remaining pixels will be letterboxed.
[--exportScaleY|-scaleY <height in pixels>]
Set scaled height in pixels. If aspect ratio is different,
the remaining pixels will be letterboxed.
[--exportFourCC|-fourcc <FourCC>]
Set one of the following FourCC codes for QuickTime video export:
"rle " (Animation)
"WRLE" (BMP)
"cvid" (Cinepak)
"yuv2" (Component Video)
"dvcp" (DV - PAL)
"dvc " (DV/DVCPRO - NTSC)
"dvpp" (DVCPRO - PAL)
"jpeg" (Foto - JPEG)
"smc " (Grafik)
"h261" (H.261)
"h263" (H.263)
"avc1" (H.264)
"mjp2" (JPEG 2000)
"raw " (None)
"mp4v" (MPEG-4 Video)
"mjpa" (Motion JPEG A)
"mjpb" (Motion JPEG B)
"png " (PNG)
"8BPS" (Planar RGB)
"SVQ1" (Sorenson Video)
"SVQ3" (Sorenson Video 3)
"tga " (TGA)
"tiff" (TIFF)
"rpza" (Video)
[--exportAudioFourCC|-audiofourcc <FourCC>]
Set one of the following FourCC codes for QuickTime audio export:
"alaw" (A-Law 2:1)
"aac " (AAC)
"alac" (Apple Lossless)
"lpcm" (Linear PCM)
"aach" (MPEG-4 HE AAC)
"ulaw" (µ-Law 2:1)
[--exportBurnInSubtitles|-burnsub]
Burn in subtitles.
[--exportBurnInSubtitlesVOffset|-burnsubvoffs] <offset 0-100>
Set additional vertical offset from bottom in procent 0-100.
[--exportBurnInSubtitlesType|-burnsubtype]
Set one of the following codes:
"OpenSubtitle"
"MainSubtitle"
"ClosedSubtitle"
"OpenCaption"
"MainCaption"
"ClosedCaption"
"MainClosedCaption"
[--exportBurnInSubtitlesLanguage|-burnsublang]
Set specific language of subtitle.
None (default) means all available languages for the given type are used.
[--exportBurnInTimecode|-burntc]
Burn in time-code.
[--exportBurnInTimecodeVOffset|-burntcvoffs <offset 0-100>]
Specify vertical offset from bottom in procent 0-100.
[--exportBurnInTimecodeColor|-burntccolor <color e.g. "red", "#RGB",
64 of 70
22/10/2015
"#RRGGBB">]
Set color for burning-in time-code.
[--exportBurnInTimecodeFont|-burntcfont <color e.g. "arial">]
Set font for burning-in time-code.
[--exportBurnInTimecodeFontSize|-burntcfontsize <font size in points>]
Set font size for burning-in time-code.
[--exportBurnInText|-burntxt <text>]
Burn in static text, e.g. "property of Fraunhofer IIS".
[--exportBurnInTextVOffset|-burntxtvoffs] <offset 0-100>
Specify vertical offset from bottom in procent 0-100.
[--exportBurnInTextColor|-burntxtcolor] <color>
Set color for burning-in text.
Format can be "red", "#RGB" or "#RRGGBB"
[--exportBurnInTextFont|-burntxtfont] <color e.g. "arial">
Set font for burning-in text.
[--exportBurnInTextFontSize|-burntxtfontsize] <font size in points>
Set font size for burning-in text.
11.1
On Windows
On Windows, the command prompt or a script (e.g. a batch file) would
typically be used pass command line parameters to easyDCP Player. easyDCP
Player.exe / easyDCP Player+.exe were built using the Windows Subsystem and
therefore their output is not visible in the command prompt. Instead, easyDCP
Player.com / easyDCP Player+.com should be used. Since the executable file
contains a space, enclose any calls into “”, e.g.
C:\>”Program Files (x86)\Fraunhofer IIS\easyDCP Player\bin\easyDCP
Player+.com” –help
11.2
On Mac OS X
On Mac OS X, the terminal or a script (e.g. a shell script) would typically be
used to pass command line parameters to easyDCP Player. The easyDCP Player
application is in truth a directory called “easyDCP Player.app”. The executable
file which can be started and passed parameters is “easyDCP
Player.app/Contents/MacOS/easyDCP Player”. Since the executable file contains
a space, enclose any calls into “”, e.g.
Mymac:~ user$ “/Applications/easyDCP Player+ 3.3.0.app/Contents/MacOS/easyDCP
Player+ 3.3.0” -help
65 of 70
22/10/2015
12
Limitations
12.1
DCPs
DCPs split across multiple volumes (VolIndex) are not supported.
“E-Cinema” DCPs with MPEG2 essence are not supported.
12.2
IMPs
The GPU-based codec supports IMPs in versions 3.3.0and later. In older
versions, they can be decoded with the software-based codec.
Resolutions higher than 4K are not supported.
Rendering of IMF subtitles is an experimental feature.
12.3
Timed Text
The timed text formats specified for Interop DCPs, SMPTE DCPs and IMF
packages are supported.
Only a subset of the elements defined in DLP CinemaTM Projection Technology
(“Interop timed text”), SMPTE 428-7 (“SMPTE timed text”) and TTML IMSC1
(“IMF timed text”) are supported. This subset covers PNG as well as text
subtitles or captions, rendered horizontally with or without custom fonts,
outlines or shadows. A not exclusive list of ignored elements are ruby
characters, attributes related to rotation, attributes related to scaling, ,
attributes and related to stretching.
Stereo 3D subtitles are not supported.
66 of 70
22/10/2015
13
Frequently Asked Questions (FAQs)
please refer to FAQs at www.easydcp.com
67 of 70
22/10/2015
14
Disclaimer
The fact that easyDCP Player and easyDCP Player+ are able to playback a media
asset, e.g. DCP, does not guarantee that another piece of software or Digital
Cinema server, regardless which vendor, will also playback the asset.
Being a software solution, easyDCP Player does not contain a Secure Media
Block (SMB). Therefore it does not comply with the DCI’s security requirements
being applied to playback servers used for commercial screenings in a theatre
environment. easyDCP Player is designed to be a quality control tool.
68 of 70
22/10/2015
15
Contact
We appreciate very much to have your feedback and your annotations about
easyDCP Player and easyDCP Player+. In order to enhance the software and to
optimize it for your applications, we are looking forward to your cooperation.
If you have any problems or questions, please contact us at the following
addresses:
Sales & Technical Support
easyDCP GmbH
Eiblwiesweg 2
82418 Murnau, Germany
[email protected]
Product Management
Fraunhofer Institute for Integrated Circuits IIS
Department Moving Picture Technologies
Heiko Sparenberg
91058 Erlangen, Germany
[email protected]
69 of 70
22/10/2015
16
References
[1]
SMPTE ST 429-2:2011: D-Cinema Packaging – DCP Operational Constraints
[2]
SMPTE ST 429-2:2013: D-Cinema Packaging – DCP Operational Constraints
[3]
SMPTE ST 377-4:2012: MXF Multichannel Audio Labeling Framework
[4]
SMPTE ST 429-16:2014: Additional Composition Metadata and Guidelines
[5]
http://digitalcinemanamingconvention.com
[6]
http://www.dolby.com/us/en/technologies/dolby-atmos.html
[7]
SMPTE ST 2067-2:2013: Interoperable Master Format – Core Constraints
[8]
http://isdcf.com/papers/ISDCF-Doc4-Interop-audio-channel-recommendations.pdf
70 of 70
22/10/2015