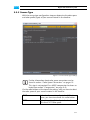
1
CLIPSTER DCI Mastering Supplement User Guide (Version 3.7) CLIPSTER DCI Mastering Supplement User Guide Supplement User Guide: CLIPSTER DCI Mastering Document Version 3.7 for the CLIPSTER Software Version 3.5 and higher Copyright © 2008-2011 by DVS Digital Video Systems GmbH, a Rohde & Schwarz company, Hanover. All rights reserved. The manuals as well as the soft- and/or hardware described here and all their constituent parts are protected by copyright. Without the express permission of DVS Digital Video Systems GmbH any form of use which goes beyond the narrow bounds prescribed by copyright legislation is prohibited and liable to prosecution. This particularly applies to duplication, copying, translation, processing, evaluation, publishing, and storing and/or processing in an electronic system. Specifications and data may change without notice. We offer no guarantee that this documentation is correct and/or complete. In no event shall DVS Digital Video Systems GmbH be liable for any damages whatsoever (including without limitation any special, indirect or consequential damages, and damages resulting from loss of use, data or profits, or business interruption) arising out of the use of or inability to use the hardware, software and/or manual materials. Those parts of this documentation that describe optional software or hardware features usually contain a corresponding note. Anyway, a lack of this note does not mean any commitment from DVS Digital Video Systems GmbH. CLIPSTER and DVS are registered trademarks of DVS Digital Video Systems GmbH. Windows is a registered trademark or trademark of Microsoft Corporation in the United States and/or other countries. Any other product names mentioned in this documentation may be trademarks or registered trademarks of their respective owners and as such are subject to the usual statutory provisions. CLIPSTER DCI Mastering Supplement User Guide Introduction 1 Getting Started 2 Digital Cinema Delivery Tool 3 Using the DCP and Self KDM 4 Creating a DCP Manually 5 Miscellaneous 6 Index I Headquarters: DVS Digital Video Systems GmbH Krepenstr. 8 30165 Hannover GERMANY Phone: +49-511-67807-0 Fax: +49-511-630070 E-mail: [email protected] Internet: http://www.dvs.de Support: Phone: +49-511-67807-125 Fax: +49-511-371985 E-mail: [email protected] For the Americas: U.S. Headquarters: DVS Digital Video, Inc. 300 East Magnolia Boulevard, Suite 102 Burbank, CA 91502 USA Phone: +1-818-846-3600 Fax: +1-818-846-3648 E-mail: [email protected] Internet: http://www.dvsus.com Support: E-mail: [email protected] Contents 1 Introduction ............................................................................... 1-1 1.1 1.2 1.3 1.4 1.5 2 C Overview ............................................................................. 1-2 Target Group ........................................................................ 1-3 Conventions Used in this User Guide .................................... 1-4 Abbreviations ....................................................................... 1-5 General Notes ...................................................................... 1-5 Getting Started .......................................................................... 2-1 2.1 Basics ................................................................................... 2-2 2.1.1 The DCI Mastering Steps ............................................. 2-2 2.1.2 Possible Formats for a DCI Mastering ............................ 2-4 2.1.3 DCP Standards ............................................................ 2-6 2.2 Preparing the Source Data .................................................... 2-7 2.2.1 The Steps to Prepare a DSM ......................................... 2-7 2.2.2 The Steps to Prepare a DCDM ...................................... 2-7 2.2.3 The Steps to Prepare JPEG2000 Data ............................. 2-9 2.3 Adding Subtitles ................................................................. 2-10 2.3.1 Adding Subtitles to the Timeline .................................. 2-10 2.3.2 Adding Further Subtitles (via Subtitle Tracks) ................ 2-12 2.3.3 The Subtitle Timeline Element ..................................... 2-14 2.3.4 Timeline Element Properties ........................................ 2-14 2.4 Setting Reels ...................................................................... 2-18 2.4.1 Setting Reels Automatically ........................................ 2-18 2.4.2 Setting Reels Manually ............................................... 2-20 2.4.3 Editing and Configuring the Reels ............................... 2-21 2.5 Configuring the System for a DCP Creation ....................... 2-25 2.6 How to Start a DCI Mastering ............................................ 2-28 i Contents 3 Digital Cinema Delivery Tool ................................................. 3-1 3.1 Starting the Digital Cinema Delivery Tool ............................. 3-2 3.2 Overview ............................................................................. 3-3 3.3 The Configuration Steps ....................................................... 3-5 3.3.1 Delivery Type .............................................................. 3-5 3.3.2 Compression .............................................................. 3-9 3.3.3 Source Type .............................................................. 3-11 3.3.4 Delivery Format ........................................................ 3-13 3.3.5 CPL ......................................................................... 3-16 3.3.6 KDM ....................................................................... 3-18 3.3.7 Delivery Creation ...................................................... 3-20 3.4 The Generated Files ............................................................ 3-22 4 Using the DCP and Self KDM ................................................ 4-1 4.1 4.2 4.3 4.4 4.5 4.6 5 Configurations for a Self KDM ............................................. 4-2 Loading the DCP .................................................................. 4-3 The Menu Option ’Load KDM...’ ......................................... 4-5 Creating the Extra Files Again (CPL only) ............................. 4-6 Creating Additional KDMs (KDM only) ................................ 4-6 Modifying a DCP (Supplemental DCP) ................................. 4-7 4.6.1 Preparations ............................................................... 4-7 4.6.2 The Configuration Steps .............................................. 4-8 4.6.3 Reel Settings ............................................................... 4-8 4.6.4 Delivery Creation ...................................................... 4-10 Manual Creation of a DCP ..................................................... 5-1 5.1 Creating a DCDM Manually ................................................. 5-2 5.2 Creating JPEG2000 D-Cinema Data Manually ...................... 5-5 5.3 Creating a DCP Manually ..................................................... 5-7 5.3.1 Finalize Settings – Naming and Storage Options ............. 5-7 5.3.2 Finalize Settings – File and Video Format ........................ 5-7 5.3.3 Finalize Settings – CPL ................................................. 5-9 5.3.4 Finalize Settings – KDM ............................................. 5-10 5.3.5 Further Finalize Settings and Rendering ....................... 5-11 5.4 Creating Additional KDMs Manually .................................. 5-13 5.5 Modifying a DCP Manually ................................................ 5-14 ii Contents 6 Miscellaneous ........................................................................... 6-1 6.1 Stereoscopic DCP ................................................................. 6-2 6.1.1 Preparing a 3D DCP .................................................... 6-2 6.1.2 Creating a 3D DCP ...................................................... 6-3 6.2 6.3 6.4 6.5 6.6 I Color Space Conversions ...................................................... 6-5 Adapting the Rating Agencies .............................................. 6-7 Keyboard Shortcuts .............................................................. 6-8 JPEG2000 Options ............................................................... 6-9 Keys and Certificates Explained .......................................... 6-11 6.6.1 What’s a Key ............................................................ 6-11 6.6.2 What’s a Certificate ................................................... 6-11 6.6.3 The Key Players of the DCI Mastering ......................... 6-12 6.6.4 The Keys Applied ...................................................... 6-14 6.6.5 What’s a Certificate Chain .......................................... 6-16 6.6.6 Validating Certificates ................................................ 6-18 6.6.7 The Keys and Certificates Delivered with CLIPSTER ....... 6-19 Index ............................................................................................ I-1 iii Introduction 1 This document describes the optionally available DCI Mastering feature of CLIPSTER and the steps that are required to create a DCP successfully. The CLIPSTER DCI Mastering feature allows you to create digital content which adheres to the standards formulated by the Society of Motion Picture and Television Engineers (SMPTE), and thus widely to the specifications as originally formulated by Digital Cinema Initiatives (DCI). With it you will be able to take the D-Cinema steps from DSM to DCP over CPL and KDM with ease. With the CLIPSTER DCI Mastering feature you can generate a Digital Cinema Package (DCP) from a Digital Source Master (DSM) directly in one step. However, all intermediate steps, such as a Digital Cinema Distribution Master (DCDM) or JPEG2000 encoded files, can be generated as well. For all this the DVS software provides the comprehensive digital cinema delivery tool which will lead you through the different configurations step by step. Truly beneficial is the possibility to load and adapt an already created DCP. With this you cannot only quality check the final result or create additional KDMs, for example, for future releases, but you can create different versions of a DCP, for instance, for localizations of a feature film. Additionally, you will be able to handle 3D material in the timeline and thus to create stereoscopic digital cinema content. Any renderings which may be necessary during the creation of an intermediate result or the final DCP will be supported by additional hardware (such as the CLIPSTER JPEG2000 accelerator board), enabling you, for example, to generate JPEG2000 encoded 12-bit X’Y’Z’ files in near or even faster than real time. 1-1 Introduction 1.1 Overview This user guide describes the possibilities and user interface items of the DCI Mastering feature of CLIPSTER as well as the steps required to create digital cinema content. The chapters in this user guide contain the following information: Chapter 1 Begins with a short introduction to the DCI Mastering feature, followed by a note regarding the audience this manual is written for and an explanation of the conventions used in this manual. Additionally, it details the abbreviations used and some general notes that you should observe. Chapter 2 Contains basic information about a DCI Mastering. Here you can find, for example, information about the phases that a final DCP consists of or the basic configurations that are required for the DVS system. Furthermore, this chapter describes how to handle and prepare the source data to be converted to digital cinema content. Chapter 3 Describes the digital cinema delivery tool which will lead you through the different steps to create digital cinema content. Chapter 4 Explains how to use a DCP and the self KDM after their creation, for example, to quality check the final result, to add KDMs or to generate different versions of a DCP. Chapter 5 Describes the steps how to manually create the final DCP or an intermediate result with the DVS software via finalizing. Chapter 6 Provides further details and information that may be useful for a DCI Mastering. Among others it is explained how to create a stereoscopic DCP. Index This chapter facilitates the search for specific terms. 1-2 Introduction 1.2 Target Group To use this manual and the DCI Mastering feature effectively you should be familiar with the DVS soft- and hardware as well as the manuals delivered with the DVS system. Furthermore, to create content for digital cinemas you should have knowledge about the digital cinema environments where it will be used as well as about the expected form/ structure of the content (because a few may deviate from the SMPTE standards and/or the specifications of DCI). Additionally, it would be beneficial to be familiar with the SMPTE standards concerned with the creation of digital cinema content and the specifications of DCI. 1-3 Introduction 1.3 Conventions Used in this User Guide The following typographical conventions will be used in this documentation: Texts preceded by this symbol describe activities that you must perform in the order indicated. – Texts preceded by this symbol are parts of a list. Texts preceded by this symbol are general notes intended to facilitate work and help avoid errors. You must pay particular attention to text that follows this symbol to avoid errors. “ ” Texts enclosed by quotation marks are references to other manuals, guides, chapters, or sections. ’Window’ BUTTON Group/Menu Menu » Option Item Directory/File Entry [Key] Text in bold with single quotation marks indicates a window name Text in small caps and bold indicates a push button Text in italic and bold indicates either a group name, menu name or options in a menu list In the specified group or menu select the stated item Text in bold only stands for other labeled items of a user interface Directory structure or file Indicates parameters or variables, as well as selections or entries made in a program; it may also indicate a command (e.g. at a command line), a syntax or contents of a file/output An individual key or a key combination on a keyboard Keyboard Shortcuts To perform options or procedures with the keyboard often requires a simultaneous pressing of two keys. Example: [Ctrl + F1] If this is given, hold down the [Ctrl] key and press simultaneously the [F1] key. 1-4 Introduction Screenshots The screenshots shown in this documentation may differ from the user interface(s) displayed on your system. They may have been taken, for example, from previous/pre-release software versions or from other systems with a similar user interface. However, they should contain the items required to understand the described actions. 1.4 Abbreviations The following lists the abbreviations used in this document. Most are from the SMPTE standards and/or the specifications of DCI. Abbreviation Shortened Form of CPL Composition Playlist DCDM Digital Cinema Distribution Master DCI Digital Cinema Initiatives, LLC DCP Digital Cinema Package DSM Digital Source Master KDM Key Delivery Message PKL Packing List SMPTE Society of Motion Picture and Television Engineers 1.5 General Notes In the following you can find some general notes that may be helpful for your work with the DCI Mastering feature or this user guide: The DCI Mastering is available as an optional feature. Upgrades from previous CLIPSTER versions may be possible but depend on the system hardware delivered to you. For further details about user interface items not described in this document please refer to the other user guides delivered with the DVS system. 1-5 Getting Started 2 This chapter provides basic information about a DCI Mastering and describes the preliminary steps to start one. Here you can find, for example, information about the phases that a final DCP creation comprises or the basic configurations that are required for the DVS system. Additionally, it will be described how to deal with the source data and prepare it to be converted to digital cinema content. 2-1 Getting Started 2.1 Basics This section provides some basic information for a DCI Mastering. First the general steps and phases that a DCP consists of will be described as they are outlined by DCI. Among them you can find some recommendations and useful notes for a DCI Mastering with CLIPSTER. Afterwards details about some of the allowed video and audio formats for digital cinema content are provided because a DCP has to be created in one of the defined formats only. This is followed by information about the different standards for a DCP packaging that have been in use and can be applied with the DVS system. 2.1.1 The DCI Mastering Steps The generation of a Digital Cinema Package (DCP) consists of various steps and phases that can be easily accomplished with the DCI Mastering feature of CLIPSTER. These were outlined by DCI and with CLIPSTER you are totally free in your decision whether to make one of the intermediate steps towards a DCP, to finish an intermediate state to a DCP or to create a DCP in a single step. The individual steps that a DCP is composed of are explained shortly in the following. Figure 2-1: The DCP steps Digital Source Master (DSM) The first step to create a SMPTE/DCI compliant Distribution Package for digital cinemas is the Digital Source Master (DSM). With CLIPSTER this step would be the same as with most projects: You simply have to assemble your project in the timeline of the Edit Tool and edit it as desired with, for example, trimmings, transitions, color corrections, etc. The SMPTE as well as DCI clearly state that the Digital Source Master (DSM) itself is not defined, i.e. it ’may consist of any color space, pixel matrix (spatial), frame rate (temporal), bit depth and many other metrics’ (SMPTE 428-1). Therefore, it lies totally in your own discretion how to prepare a project and thus the DSM. It is this ’master project’ that can then be converted to different formats for various applications, such as a Digital Cinema Distribution Master (DCDM), a home video master, a broadcast master, or a master for archiving purposes. For best results DVS recommends that the timeline of a DSM in the Edit Tool consists of clips in the RGB color space only and that it is set to a digital cinema compliant frame rate. 2-2 Getting Started Digital Cinema Distribution Master (DCDM) The Digital Cinema Distribution Master (DCDM) as the next phase for a DCP is deemed the exchange format by DCI for environments involved in the task to create D-Cinema content. It can be used as a complete and standardized format to communicate movies, for instance, between studio and post production. To serve as a master and exchange format the DCDM should be saved in very high quality (i.e. in 16-bit X’Y’Z’ in the TIFF file format) with the resolution, frame rate and audio channel distribution of the later DCP (see also section “Possible Formats for a DCI Mastering” on page 2-4). It is one of CLIPSTER’s advantages that an explicit creation of a DCDM is not mandatory. With CLIPSTER a DCP can be made from a DSM directly and you do not have to make a DCDM first in order to get a DCP. Nevertheless, in case a DCDM is required, it can be generated with CLIPSTER easily. DCI suggested to store the DCDM in 12 bit padded to 16 bit that the SMPTE in their standards reduced to 12 bit altogether. For best results CLIPSTER will store the data in true 16 bit when creating a DCDM, meaning when the DSM is in 16 bit already, it will be stored in the DCDM in 16 bit as well and not rounded down to 12 bit. JPEG2000 For the sake of storage space and bandwidth the size of a DCP must be reduced so that it can be transported, saved and displayed without great efforts. For this the image files of the DCP will be converted to 12 bit (X’Y’Z’) and then encoded with JPEG2000 (lossy compression). For maximum efficiency CLIPSTER encodes the image data with a variable bit rate (VBR). The audio data will not be compressed. Same as with the DCDM, with CLIPSTER you do not have to create the JPEG2000 material explicitly to get a DCP. A DCP can be created from a DSM directly which will include the JPEG2000 compression automatically. However, if only the JPEG2000 encoded data is required, it can be created with CLIPSTER without difficulty. The DCI specification limits the data rate for a successful presentation in a digital cinema theater to a file size of 1.302083 MB per 2K image at 24 frames per second, equivalent to a sustained data rate of 250 Mbit/s. For a frame rate of 48 fps, a 2K distribution should be set to a maximum of 651,041 bytes per frame (also 250 Mbit/s). In CLIPSTER the settings of a JPEG2000 encoding are configured by default to this maximum data rate specified by DCI, i.e. to the highest quality allowed for a DCP. 2-3 Getting Started Digital Cinema Package (DCP) During the last stage of a DCP creation, the audio and JPEG2000 encoded image files will be wrapped (either encrypted or unencrypted) in the MXF format as the DCP’s content delivery format. This last phase in the creation of the final Digital Cinema Package (DCP) performs various steps itself: It will split the video/audio data into reels, encrypt the data (if wanted), wrap the audio and video reels separately in the MXF format, and generate the extra files for a DCP, such as the Composition Playlist (CPL), Key Delivery Message (KDM), Packing List (PKL), etc. (see section “The Generated Files” on page 3-22). With this you will get a D-Cinema compliant output that can then be sent to the theaters for which it has been created (if encrypted). All this and the steps mentioned before (DCDM and JPEG2000) can be created with CLIPSTER from a DSM in a single step. But, of course, any intermediate step towards a DCP can also be converted to a DCP with the DVS software easily. For this you have to prepare your source material appropriately prior to the creation by determining reels, adding subtitles and configuring the key for CLIPSTER. This is in detail described in the following sections of this chapter. 2.1.2 Possible Formats for a DCI Mastering This section describes some formats for audio and video that are suitable for a DCP. They were taken from the respective SMPTE specifications. While the video formats listed here can be considered complete, the audio channel mapping described below is only an example. In the SMPTE 428-3 you can find further mappings. Please note that the formats for video and audio detailed in the following must be applied to a DCDM and JPEG2000 encoding (if created separately) as well as to the final DCP (see also section “The DCI Mastering Steps” on page 2-2). For best results the DSM should have been created in the format of the final DCP already. 2-4 Getting Started Video Formats The following lists the video formats that are suitable for a DCP: No. of Active No. of Active Pixel Aspect Frame Aspect Ratio Horizontal Pixels Vertical Pixels Ratio Rate 4096 2160 1.90:1 (full) 1:1 24 4096 1716 2.39:1 (scope) 1:1 24 3996 2160 1.85:1 (flat) 1:1 24 2048 1080 1.90:1 (full) 1:1 24/48 2048 858 2.39:1 (scope) 1:1 24/48 1998 1080 1.85:1 (flat) 1:1 24/48 If your source material is in a different aspect ratio than the ones detailed above, the material should be scaled for the digital cinema output so that it fits either vertically or horizontally in one of the ’full’ formats (thereby applying either letter- or pillarboxing). Audio Formats and Mapping Audio should be saved in 24 bit at 48,000 Hz and the DCI specification suggests the WAV file format. For a DCI Mastering the routing of the audio tracks containing the audio data must be adapted as outlined in SMPTE 428-3 in the CLIPSTER Edit Tool. The table below shows mapping and labels suitable for audio in a DCP (quoted from the specification for nine channels): AES Channel Pair / Ch. Label / Name Description 1/1 1 L/Left Far left screen loudspeaker 1/2 2 R/Right Far right screen loudspeaker 2/1 3 C/Center Center screen loudspeaker 2/2 4 LFE/Screen Screen low frequency effects subwoofer loudspeakers 3/1 5 Ls/Left surround Left wall surround loudspeakers 3/2 6 Rs/Right surround Right wall surround loudspeakers 4/1 7 Lc/Left center Mid-left to center screen loudspeaker 4/2 8 Rc/Right center Mid-right to center screen loudspeaker 5/1 9 Cs/Center surround Rear wall surround loudspeakers 5/2 10 SMPTE reserved 6/1 11 SMPTE reserved 6/2 12 SMPTE reserved 7/1 13 SMPTE reserved 7/2 14 SMPTE reserved 2-5 Getting Started AES Channel Pair / Ch. Label / Name Description 8/1 15 User defined 8/2 16 User defined Other audio channel mappings can be found in SMPTE 428-3. 2.1.3 DCP Standards Until today, there have been several different DCP standards in use: SMPTE Phase 0 (MPEG) Also called ’MPEG Interop’ or ’MXF Interop’. This standard was originally defined by the MPEG Interop Group and is based on MPEG compressed files wrapped in MXF containers. SMPTE Phase 0 (JPEG) Also called ’JPEG Interop’. A transitional standard that is identical to the MPEG Interop standard but applies a JPEG2000 compression as proposed by DCI. SMPTE Phase 1 This standard is based on JPEG Interop but uses different KDMs (i.e. SHA-256 instead of SHA-1). SMPTE Phase 2 Also called ’SMPTE DCP’. Full compliance with SMPTE standards. To create a DCP that can be viewed in a digital cinema theater you should know which of the different standards/phases to apply to your DCP creation. With the DCI Mastering feature you can create DCPs in all standards: – The respective SMPTE phase has to be selected with the combo box DCI Phase of the Configuration Tool (see section “Configuring the System for a DCP Creation” on page 2-25). – For MPEG Interop (i.e. SMPTE Phase 0 (MPEG)) an MPEG compression has to be selected. – For all other standards normally the JPEG compression must be selected. – When using subtitles there are further restrictions that must be observed for the different standards. They are detailed in section “Adding Further Subtitles (via Subtitle Tracks)” on page 2-12 and section “Delivery Format” on page 3-13. 2-6 Getting Started 2.2 Preparing the Source Data In order to create a DCP or one of its intermediate steps the available source data has to be prepared. Depending on the step from which to create the digital cinema content (see section “The DCI Mastering Steps” on page 2-2) the source data has to be prepared differently. When creating a delivery type other than a DCDM, all preprocessing steps, such as scalings or color corrections will be performed as well. For particulars about the creation of a DCDM see section “Digital Cinema Distribution Master (DCDM)” on page 2-3 and section “Color Space Conversions” on page 6-5. 2.2.1 The Steps to Prepare a DSM To create, for example, a DCP from the original DSM you have to perform the following: If not already the case load the project that contains the DSM (video as well as audio) in the timeline. It is recommended that the DSM consists of video clips in the RGB color space only and that the timeline is set to a D-Cinema compliant frame rate. Additionally, the routing of the audio tracks containing audio data should be configured to the final routing of the DCP. See also section “Possible Formats for a DCI Mastering” on page 2-4. Once the DSM is available in the timeline, you can continue the preparation as described later in this chapter (see section “Adding Subtitles” on page 2-10 and/or section “Setting Reels” on page 2-18). 2.2.2 The Steps to Prepare a DCDM A DCDM is normally saved in X’Y’Z’ in the TIFF file format. However, TIFF natively does not store the X’Y’Z’ color space, it saves the RGB or Luma color space only. To use a DCDM for the creation of a DCP nevertheless, it must be properly prepared and available in the timeline of the Edit Tool: Open a new project in the Edit Tool. With the button SETTINGS… of the timeline area configure the timeline output settings so that they match the format of the DCDM (normally the same as the final DCP format). Add the DCDM clips (video as well as audio) to the bin, for example, by dragging them to the contents area of the bin from a file manager or by using the menu option Add clip… of the bin’s context menu. 2-7 Getting Started Afterwards the DCDM clips will be visible in the contents area of the bin. However, because the software registers the added video clip(s) as RGB clips (as stated in the image files’ headers), you have to change the color space of the added clip(s) manually: Open the properties of the video clip(s) of the DCDM in the bin (context menu of bin clip » Properties…). The properties of several clips can be changed in a single step by selecting the clips in the bin and then opening their properties. Then the properties window of the bin clip(s) will be displayed on the screen. In this window set the color space settings to X’Y’Z’ (XYZ) and confirm your alteration with the OK button. Figure 2-2: Altering the color space settings of the DCDM video clip Once X’Y’Z’ has been selected as the color space, the color matrix setting (YUV matrix) will switch to the correct color matrix automatically. With this setting made, an automatic color space conversion from RGB to X’Y’Z’ will be prevented during the creation of the DCP. If your material is in YCxCz (i.e. it was processed with a YUV matrix beforehand), the color space setting must be set to YUV. Additionally, the appropriate YUV matrix that was used for the material during processing must be set manually (setting YUV matrix). Next, add the video clip(s) of the DCDM to the video track(s) of the timeline. Add the audio clip(s) of the DCDM to the audio tracks of the timeline. If necessary adapt the routing of the audio tracks that now contain audio data so that they are suited for the DCP to be created (see section “Possible Formats for a DCI Mastering” on page 2-4). With this the DCDM clips are added to the timeline of the Edit Tool and they will be used for the creation of the digital cinema content. You may now continue the preparation as described later in this chapter (see section “Adding Subtitles” on page 2-10 and/or section “Setting Reels” on page 2-18). 2-8 Getting Started 2.2.3 The Steps to Prepare JPEG2000 Data JPEG2000 data that is already adapted for digital cinema will normally be in the format of the final DCP in 12 bit X’Y’Z’. In so far it resembles a DCDM and thus the steps to use such data for the creation of a DCP are almost the same: Open a new project in the Edit Tool. With the button SETTINGS… of the timeline area configure the timeline output settings so that they match the format of the JPEG2000 data (normally the same as the final DCP format). Add the required clips (video as well as audio) to the bin, for example, by dragging them to the contents area of the bin from a file manager or by using the menu option Add clip… of the bin’s context menu. Afterwards the clips will be visible in the contents area of the bin and they will be automatically set to the correct color space. Next, add the JPEG2000 clip(s) to the video track(s) of the timeline. Add the audio clip(s) to the audio tracks of the timeline. If necessary adapt the routing of the audio tracks that now contain audio data so that they are suited for the DCP to be created (see section “Possible Formats for a DCI Mastering” on page 2-4). With this the clips have been added to the timeline of the Edit Tool and they will be used for the creation of the DCP. You may now continue the preparation as described later in this chapter (see section “Adding Subtitles” on page 2-10 and/or section “Setting Reels” on page 2-18). 2-9 Getting Started 2.3 Adding Subtitles The DCI Mastering feature supports subtitles and, if wanted, you can add them to your prepared project (see section “Preparing the Source Data” on page 2-7), view them in the video overlay and edit or create them. The DVS software supports XML subtitle files as specified by SMPTE/DCI, PNG images as subtitles and subtiltes already wrapped in MXF. This section describes how to use subtitles in the Edit Tool. 2.3.1 Adding Subtitles to the Timeline Working with subtitles in the Edit Tool is different from working with clips in the timeline: Subtitles have to be present in the timeline as a subtitle timeline element in an empty timeline track above the video timeline track(s). The subtitle timeline element, however, is just a container: It can be used for different subtitles, i.e. it may contain more than just one subtitle. For this, each subtitle timeline element provides up to seven subtitle tracks, where you can add the subtitles according to your needs (e.g. as main subtitle, main captions, closed subtitle, or closed captions). To receive a subtitle timeline element in the timeline you have several possibilities at hand: – You can add an MXF/XML subtitle file to the bin and then to an empty timeline track or – you can add an empty subtitle timeline element to an empty timeline track and then reference it to one or more MXF/XML subtitle files. This section describes these ways to add a subtitle to the timeline. Subtitles can be placed at every position in the timeline, i.e. gaps between subtitle timeline elements are allowed. Adding a Subtitle via the Bin An available MXF/XML subtitle file can be added to the bin and then to the timeline just as any other clip in the Edit Tool. For this perform the following: Add the MXF/XML subtitle file to the bin, for example, via the Add MXF/XML subtitle file menu option on the Project menu (or on the context menu of the bin) or drag and drop it to the bin from a file manager. Configure the timeline to show another empty video track, for example, via the timeline output settings or by using the menu option Add track on the context menu of a video track. 2-10 Getting Started Then add the subtitle from the bin to the timeline by dragging and dropping it into the empty timeline track: Figure 2-3: Adding a subtitle bin clip Once the subtitle bin clip has been added to the timeline, you will see its timeline element in the video track. It will already contain the MXF/ XML subtitle file in a subtitle track. Then you can add further subtitles as described in section “Adding Further Subtitles (via Subtitle Tracks)” on page 2-12. Contrary to video or audio clips, a subtitle timeline element does not have a connection to a bin clip. For example, the respective bin clip can be deleted without influencing the subtitle added to the timeline. Adding a Subtitle via an Empty Timeline Element To add subtitles you can also use an empty timeline element. You can find the empty subtitle timeline element in the effects pane of the tool area: Configure the timeline to show another empty video track, for example, via the timeline output settings or by using the menu option Add track on the context menu of a video track. In the tool area activate the tab Effects. Select from the folder ’titling’ the effects operator ’Subtitling’ and drag and drop it to the empty timeline track: 2-11 Getting Started Figure 2-4: Adding an empty subtitle timeline element With this you will get an empty subtitle timeline element in the video track. Then it can be filled with subtitles as described in section “Adding Further Subtitles (via Subtitle Tracks)” on page 2-12. The subtitle effects operator can also be used as the other effects operators, i.e. it can be added to the effects list of a video clip. However, then the subtitles will be valid for the clip only and when the clip is trimmed the subtitles are trimmed as well. 2.3.2 Adding Further Subtitles (via Subtitle Tracks) The subtitle timeline element visible in the timeline is just a container: It can be used for up to seven different subtitles. These must be added to subtitle tracks in the timeline element. This way you can add different subtitle types to your project (e.g. main subtitle, main captions, closed subtitle, or closed captions), all via a single timeline element. This section describes how to add a new subtitle track to a subtitle timeline element as well as how to reference it to a subtitle file. The subtitle tracks of a subtitle timeline element should not be used for different languages. For further information about this see section “The Area ’Subtitle tracks’” on page 2-15. To add a subtitle via a subtitle track you have to use the timeline element properties of the subtitle timeline element: 2-12 Getting Started Either double-click the subtitle timeline element or call up its context menu and select the menu option Show properties. This will display the timeline element properties of the subtitle timeline element: Figure 2-5: Timeline element properties of subtitles (first 2 areas of 4) When an MXF/XML subtitle has been added via the bin (see section “Adding a Subtitle via the Bin” on page 2-10), you will find the MXF/ XML subtitle file already entered in the area Subtitle tracks (column ’Subtitle file’). Otherwise this table may be empty. Use the button NEW TRACK to add a subtitle track to the subtitle timeline element. Then double-click the field ’Subtitle file’ and enter the path to the MXF/XML subtitle file or use the button to the right to browse for it. The button will be available when the field is double-clicked. For MXF subtitles you may have to select *.mxf from the Files of type combo box. Afterwards, if necessary, adapt the fields ’Track type’ and ’Language’ to your requirements. The fields ’Track type’ and ’Language’ must be filled in. When using more than one subtitle timeline element in the timeline, each will provide the same number of tracks, and the track types as well as languages will be identical (see also section “The Area ’Subtitle tracks’” on page 2-15). 2-13 Getting Started The subtitle types (field ’Track type’) must be assigned with regard to the standard that the final DCP should be created in (see section “DCP Standards” on page 2-6): SMPTE Phase 0 ’Main subtitle’ and ’Closed captions’ are allowed only SMPTE Phase 1 Same as SMPTE Phase 0 SMPTE Phase 2 All four types are allowed All phases Only one shall be of the type ’Main subtitle’ By performing the above mentioned steps repeatedly you can add the subtitles for your project to the subtitle timeline element. 2.3.3 The Subtitle Timeline Element Once a subtitle timeline element has been added to the timeline, it can be handled just as any other timeline element (e.g. moved, cut or trimmed). A subtitle timeline element that has been added via a subtitle bin clip to the timeline (see section “Adding a Subtitle via the Bin” on page 2-10) will already have the length as determined by the MXF/ XML subtitle file. When using an empty subtitle timeline element (see section “Adding a Subtitle via an Empty Timeline Element” on page 2-11), it must be adjusted (trimmed) to the correct length. The length of the subtitle timeline element can also be set with the field Dur of the timeline element properties. Subtitles can be placed at every position in the timeline, i.e. gaps between subtitle timeline elements are allowed. Any subtitles whose in- or outpoint are not available in the timeline (e.g. due to cutting or trimming) will be marked in orange in the area Track subtitles (timeline element properties). Via the menu option Match subtitle on the context menu of a timeline element you can display the timeline element properties of the respective subtitle. Additionally, the subtitle currently displayed in the video overlay (position of the timeline cursor) will be highlighted in the properties. 2.3.4 Timeline Element Properties The timeline element properties of a subtitle timeline element (see also section “Adding Further Subtitles (via Subtitle Tracks)” on page 2-12) can be operated from left to right: First select the subtitle track that should be displayed in the properties then select the subtitle in the Track subtitle area. The respective subtitle images or lines will be dis- 2-14 Getting Started played in the area Subtitle elements. When you select one of the subtitle elements, its appearance will be shown in the areas Appearance settings and Position settings. The Area ’Subtitle tracks’ A new subtitle track can be added as already described in section “Adding Further Subtitles (via Subtitle Tracks)” on page 2-12 and it can be deleted with the button Delete track. Additionally, this area provides a context menu that can also be used to edit the subtitle tracks. The concept of subtitles and subtitle tracks in the timeline of the Edit Tool is to have different subtitle types of a single language in a project. Thus, when using more than one subtitle timeline element in the timeline (e.g. for different reels), each will provide the same number of tracks. Moreover, they will be set to the same track type(s) and language(s) and will affect each other if a track is altered for one subtitle timeline element. For subtitles in different languages you should exchange the subtitles and create supplemental DCPs for each language (see section “Modifying a DCP (Supplemental DCP)” on page 4-7). The Area ’Track subtitles’ The area Track subtitles lists the in- and outpoints of the subtitles. Any subtitles whose in- or outpoint are not available in the timeline will be marked in orange. When a subtitle is selected with the mouse, the timeline cursor will automatically be positioned on the subtitle. A subtitle can be deleted or a new one can be created with the buttons DELETE SUBTITLE and NEW SUBTITLE at the bottom right of this area. Furthermore, most values of a subtitle shown in the table can be changed after double-clicking a field. The context menu of this area can also be used to edit the subtitles. It provides even further editing possibilities besides the ones already mentioned: 2-15 Getting Started Figure 2-6: The subtitles of the track Slip subtitle… Allows you to adjust the in- and outpoints of subtitles in a single step. It can be used either on one subtitle, a selection of subtitles or on all. Positioning Determines where the timeline cursor will be positioned when a subtitle is selected from the list (e.g. at time in/out, after its fade in, before its fade out, or in the middle of a subtitle). Select all Selects all subtitles in a single step. The Area ’Subtitle elements’ Once a subtitle has been selected from the table Track subtitles, its elements are displayed in the area Subtitle elements: Either the subtitle text(s) or the path to the PNG image(s). Additionally, you can use this area to add further elements to a subtitle with the button NEW IMAGE. Figure 2-7: The elements of a subtitle A mixing of MXF/XML subtitles with PNG images at one position is not allowed. Currently only PNG images can be added to a subtitle. 2-16 Getting Started The Areas ’Appearance settings’ and ’Position settings’ When a subtitle element has been selected from the table Subtitle elements, its appearance is shown in the areas Appearance settings and Position settings. Then you can use these areas to change the appearance of the selected element, for example, you can set its position with the items of the area Position settings. Figure 2-8: Appearance and position of a subtitle element Currently the items of the area Appearance settings are for information reasons only. 2-17 Getting Started 2.4 Setting Reels To split the loaded or created project (see section “Preparing the Source Data” on page 2-7) during the creation of the DCP into reels to comply with the requirements of a DCP, you have to define reels in the timeline: When wrapping to MXF (see section “The DCI Mastering Steps” on page 2-2), the finalized files will be automatically divided at the reel edit points in the timeline, resulting each in one MXF file per output format (video and audio). The setting of DC reels is not required in case you want to create an intermediate step towards a DCP. DC reels are evaluated during the generation of a DCP only. If creating a DCP with subtitles, you should place the reel edit points between two subtitles. However, apart from that, there are no restrictions where to place DC reels or to what length they should be set. According to DCI it is common practice to divide a feature film into reels of a length between 10 and 20 minutes. According to SMPTE a reel must have a duration of at least one second. Some digital cinema players may be unable to display reels that are shorter than 5 seconds. For the viewing and manual editing of DC reels in the timeline the Edit Tool provides a special mode. It can be activated with the toggle button IN/OUT/DC REELS of the timeline area: In its deactivated state the button of the timeline area is labelled IN/OUT. In this mode you can see the timeline as usual and set the timeline’s in- and outpoint. When the button is activated, it will be labelled DC REELS and the timeline area will show you the already set reels. Additionally, the tab DC reels of the tool area will be activated. In this mode you can view the DC reels and set their in- and outpoints. To set reels in the timeline you have two possibilities at hand: You can set them automatically or manually. Both possibilities will be described in this section. Furthermore, it will be described how to edit and configure the reels. 2.4.1 Setting Reels Automatically The reels for a DCP can be set automatically which is the most convenient way to do this. Afterwards the reels can be altered and configured 2-18 Getting Started to your liking manually. To set reels automatically in the timeline do as described in the following: Select from the context menu of the timeline scale the menu option Set DC reels automatically…. This will switch the timeline area to the view of the DC reels automatically and the following window will be displayed on the screen: Figure 2-9: Dialog to set reels automatically It provides the settings items as described below: Item Description DC reel name These two fields determine the names of the reels. The name prefix as entered in the field to the left will be used for each reel, supplemented by a consecutive numbering that can be configured with the field to the right (start number of the numbering). DC reel position mode Determines the way the reels should be generated. Via the radio buttons you can select between one of the following possibilities: One DC reel per time interval: With this setting you can set a fixed duration for the reels via the entry field to the right. The timeline/ range will then be divided into reels of the stated duration (the last reel may be shorter). Number of DC reels …: Use this setting to set a definite number of reels with the entry field to the right. The timeline/range will then be divided into this amount of reels of equal length. 2-19 Getting Started Item Description Set a DC reel …: Use this setting and its combo box to specify that the video and/or audio clips available in the timeline should determine the reels. The reels’ in- and outpoints will then be set at the edit points (cuts) of the clips. Apply to This setting allows you to limit the procedure. You can perform it either on all clips of the timeline or on the clips of a timeline range only, i.e. between a set in- and outpoint for the timeline. Configure the creation of the reels according to your requirements. Afterwards create the reels by clicking the OK button. This will start the creation of the reels and when finished, you can see them in the timeline area. After this they can be edited and configured to your liking as described in section “Editing and Configuring the Reels” on page 2-21. 2.4.2 Setting Reels Manually The reels for a DCP can also be set manually. For this perform the following: If not already the case switch to the view of the DC reels by activating the toggle button IN/OUT/DC REELS of the timeline area. When in the DC reels viewing mode, you can use the items to set the timeline’s in- and outpoint to determine the DC reels. They can be used in exactly the same way to set the in- and outpoints of the DC reels: Figure 2-10: Items to set in- and outpoints Move the timeline cursor via its controls or manually to the position where the reel’s inpoint should be set. Then press the button for the inpoint. Perform the same for the reel’s outpoint. This will automatically create a DC reel in the timeline with the name Reel name_<no.>. By performing the same procedure repeatedly 2-20 Getting Started you can create DC reels manually in the timeline. They can be created and edited in the following ways: To set reel in-/outpoints and to move within a reel you can also use the provided shortcuts (see section “Keyboard Shortcuts” on page 6-8). – The reels will be formed by setting an inpoint as well as an outpoint. – The nearest, free and unobstructed (no already defined reel inbetween) in-/outpoint will be used to form a reel. – In-/outpoints can also be set by entering a number in the respective entry field and afterwards pressing [Enter]. – Already determined reels can be altered by either setting a new in-/ outpoint within an already defined reel (shortens the reel), or by setting a new in-/outpoint and deleting the old one (lengthens the reel). – When in the DC reels mode, reel in- and outpoints can be deleted the same way as deleting the timeline’s in- and outpoint, i.e. by using the toggle button DELETE. – The number <no.> of the reel name will increase by one (1) with each created reel. Once you are finished with the creation and setting of the DC reels, they can be edited and configured to your liking as described in section “Editing and Configuring the Reels” on page 2-21. 2.4.3 Editing and Configuring the Reels By activating the toggle button IN/OUT/DC REELS you switch the timeline area to the viewing and editing mode for DC reels. This also activates the tab DC reels of the tool area. In this mode you can view the DC reels as well as edit and configure them. The timeline area will then show you already set DC reels: DC reels action duration Figure 2-11: DC reels in the timeline area The DC reels already defined in the timeline will be displayed in the timeline area with a blue line showing the name of the reel right above it. Once the timeline cursor is placed inside a reel, the respective timeline stretch between its in- and outpoint will be highlighted in blue. 2-21 Getting Started With the timeline area switched to the DC reels mode you can set new DC reels manually or edit already determined ones as indicated in section “Setting Reels Manually” on page 2-20. Newly created reel in- and outpoints, when not assigned to a reel already, will be shown in the timeline with an in-/outpoint marker without the blue line. Apart from editing already determined reels manually in the timeline, they can also be configured with the tab DC reels of the tool area as well as with some menu options of the context menu of the timeline scale. Both possibilities will be described in the following. The Tab ’DC reels’ Already set reels can be configured with the tab DC reels of the tool area: Figure 2-12: The tab ’DC reels’ The tab DC reels shows you the already defined DC reels as they can be seen in the timeline. When selecting a reel, for example, with a click of the mouse, the DVS software will switch to the viewing mode for DC reels (if not already activated) and highlight the respective reel in the timeline. Additionally, the timeline cursor will be positioned at the inpoint of the selected reel. The entries on this tab provide information about the exact in- and outpoints of the reels as well as their durations. Furthermore, for each reel you can specify an ’action in- and outpoint’ (i.e. determine the parameters ’EntryPoint’ and ’Duration’ of a DCP asset in a CPL). You may use them, for example, if the targeted digital cinema player requires something similar to pre- or postroll times. When an action in- or outpoint is specified, the material of this reel that lies outside the action duration will not be displayed by a digital cinema player, only the material of the action duration will be shown during a presentation. An action duration is marked in the timeline area with an orange line below the blue line of a reel, and it will appear as soon as one of the action in-/outpoints is set differently than the in-/outpoint of the reel. 2-22 Getting Started You can change the values of a reel displayed on the tab DC reels, i.e. the names of the reels as well as their in-/outpoints, by double-clicking a particular entry with the mouse and entering a new one. Further information about a reel can be viewed by clicking on the plus/ minus (+/-) signs in front of a reel entry. It will expand or collapse the contents of the reel: Figure 2-13: The expanded contents of a reel With this you can easily confirm the contents of a reel and, furthermore, view the mapping of the audio data (routing of the audio tracks, see also section “Possible Formats for a DCI Mastering” on page 2-4). The Context Menu The context menu of the timeline scale provides some menu options to help you during the configuration and editing of DC reels. Most of them will be available when the DC reels viewing mode is activated: 2-23 Getting Started Figure 2-14: The context menu of the timeline scale The following menu options are available to configure and edit DC reels: Remove DC reel This menu option removes the DC reel that is currently selected (highlighted) in the timeline area. Remove all DC reels Removes all DC reels defined for the timeline in a single step. Set DC reels automatically… With this menu option you can set reels automatically. Further information about this can be found in section “Setting Reels Automatically” on page 2-18. 2-24 Getting Started 2.5 Configuring the System for a DCP Creation For the creation of a DCP you have to make some general settings on the tab Defaults of the Configuration Tool of the DVS software and set, for example, the private key to sign the extra files of the DCP (i.e. CPL, KDMs and PKL). These settings are not required in case you want to create an intermediate step towards a DCP. They are applied during the generation of a DCP only. Further information about the keys and certificates used during the creation and usage of a DCP can be found in section “Keys and Certificates Explained” on page 6-11, and information about the keys and certificates delivered with the DVS system can be found in section “The Keys and Certificates Delivered with CLIPSTER” on page 6-19. Because the settings on the tab Defaults are general settings for the CLIPSTER software, they will be set and available for each initialized new project. This way you do not have to configure them again when creating other DCPs in the future: Open the DCI settings in the CLIPSTER Configuration Tool (menu Options » Configuration defaults… » group DCI). Figure 2-15: DCI configuration settings 2-25 Getting Started Configure these settings according to your requirements: – Use the area Self KDM with the field Certificate to select the public key of a DVS DCI Mastering system that should be able to load the DCP, e.g. for quality checks. This public key will then be used during the creation of a DCP to generate a special KDM file (the self KDM). With this KDM you will be able to load the DCP on the respective DCI Mastering system (e.g. to view it, to create additional KDMs of the same DCP at a later time, or to modify it). Select the file (*.cer) that holds the public key of this DCI Mastering system with the button to the right of the field Certificate. For further information about the usage of the self KDM as well as its creation see chapter “Using the DCP and Self KDM” on page 4-1. This public key file can be found either already stored in the installation directory of the CLIPSTER software on the respective system or on a separate CD-ROM. – Use the button on the righthand side of the field Private Signing Key to select your own private key file (*.pfx) that should be used to sign the extra files of the DCP (Signing Key). For this you may have to enter a password to authenticate your usage of the private key. It will be applied if the check box Use System Signing Key is deactivated. For further information about the Signing Key see section “Signing Key” on page 6-12. Your authentication for the private key will be valid for this session of the software only. After a restart of the DVS software and when performing a DCI Mastering again, you will be asked automatically by the software to enter the password once more. – By activating the check box Use System Signing Key you can override the setting Private Signing Key. Then the DVS system will use a system specific Signing Key to sign the extra files of the DCP. For further information about this see section “Signing Key” on page 6-12. – With the DCI Phase combo box you select the standard that the DCP should be created in. Further information about this can be found in section “DCP Standards” on page 2-6. – Activate the check box Use UUID in CPL name to get a shorter version for the file name of the CPL based on its UUID (universally unique identifier, file name syntax will be CPL_<UUID>.xml). If deactivated, the file name of the DCP will be used. 2-26 Getting Started After these settings are determined confirm them by clicking on the OK button. With this the project and system are properly prepared for a DCI Mastering and you can start one at any time as described in section “How to Start a DCI Mastering” on page 2-28. 2-27 Getting Started 2.6 How to Start a DCI Mastering As soon as the preparations appropriate for your source material and the general configurations are performed as described in this chapter, you can start a DCI Mastering and create material for digital cinema workflows. There are two ways to create such material: digital cinema delivery tool With the digital cinema delivery tool you can create MPEG or JPEG2000 compressed DCPs or an intermediate state towards one. This tool is the recommended way to create D-Cinema material because it will lead you step by step through the different configurations necessary to create digital cinema content. manual creation Every state towards a DCP or the final DCP itself can also be created manually via finalizing(s) with the Edit Tool. When using this way to create digital cinema content, you are more flexible regarding the created output. But, as the name suggests, this way of creating digital cinema material is not as intuitive and forthcoming as when using the digital cinema delivery tool. How to use the digital cinema delivery tool to create DCPs or an intermediate result is described in chapter “Digital Cinema Delivery Tool” on page 3-1. How to manually create a final DCP or an intermediate result with the Edit Tool via finalizing is described in chapter “Manual Creation of a DCP” on page 5-1. How to create a 3D/stereoscopic DCP is described in section “Stereoscopic DCP” on page 6-2. 2-28 Digital Cinema Delivery Tool 3 The digital cinema delivery tool is the recommended way to create DCPs or an intermediate state towards one. Its usage is most convenient because it will lead you step by step through the different configurations required to create a DCP. This chapter explains the digital cinema delivery tool in detail. First, it will be described how to get the delivery tool started, followed by an overview of its user interface. After this the individual configuration steps will be described. Because some of the configuration steps are not required for certain delivery types, the section where you have to select the delivery type will also summarize the steps that are necessary for a delivery type. Subsequently all available configuration steps will be described (e.g. as they have to be specified when creating an encrypted DCP). Once you are through with the steps/screens of the digital cinema delivery tool, the chosen delivery type can be created. This chapter will be concluded with a description of the resulting output. 3-1 Digital Cinema Delivery Tool 3.1 Starting the Digital Cinema Delivery Tool To get the digital cinema delivery tool started perform the following: Configure the system and prepare your source data in the timeline of the Edit Tool as described in chapter “Getting Started” on page 2-1. Then select Project » Digital Cinema Delivery Tool… from the menu bar of the DVS software. Alternatively, you can use the keyboard shortcut [Ctrl + D]. This will start the digital cinema delivery tool and the first configuration step is displayed on the screen (see section “Overview” on page 3-3 and section “Delivery Type” on page 3-5). 3-2 Digital Cinema Delivery Tool 3.2 Overview After starting the digital cinema delivery tool (see section “Starting the Digital Cinema Delivery Tool” on page 3-2) its user interface is displayed on the screen, showing you the first configuration step: configuration steps settings pane button area Figure 3-1: The digital cinema delivery tool The arrow at the top of the window of the digital cinema delivery tool shows you the configuration steps that have to be performed for the currently selected delivery type. Depending on the selected delivery type there are different configuration steps required and the arrow indicates them with different colors: yellow The current configuration step. orange Configuration steps which have to be performed for the selected delivery type. grey Configuration steps that are not required for the selected delivery type and cannot be made. Further details about the delivery types and the required configuration steps can be found in section “Delivery Type” on page 3-5. 3-3 Digital Cinema Delivery Tool The configurations that can be made for the currently displayed configuration step are shown in the settings pane in the middle of the window. When you are finished with the configurations for the current step, you can go to the next or previous configuration step with the appropriate buttons in the button area at the bottom of the window. The buttons of the button area allow you to control the digital cinema delivery tool: Saves the already specified configuration settings of the digital cinema delivery tool to a file. Loads previously saved configuration settings from a file. Steps to the previous configuration step for the currently selected delivery type. Steps to the next configuration step for the currently selected delivery type. When the last step is reached, it will be labelled ’Create’, which will then start the creation of the digital cinema content. Closes the digital cinema delivery tool without creating digital cinema content. However, already specified configurations will not be lost but stored during run-time. Already made configuration settings are saved in a project file as well. 3-4 Digital Cinema Delivery Tool 3.3 The Configuration Steps This section explains the settings possibilities of the configuration steps in detail. Depending on the selected delivery type (see section “Delivery Type” on page 3-5) there are different configuration steps required and this section explains them all. The configuration steps that are required for a delivery type are summarized in section “Delivery Type” on page 3-5. 3.3.1 Delivery Type Right after starting the digital cinema delivery tool (see section “Starting the Digital Cinema Delivery Tool” on page 3-2), the very first configuration step will be displayed. With it you determine the type of content that should be created, i.e. the delivery type. Figure 3-2: The delivery type settings 3-5 Digital Cinema Delivery Tool In the settings pane select the delivery type that you want to create by activating one of the available radio buttons. When finished you can go to the next configuration step with the button NEXT. Depending on the selected delivery type there are different configuration steps required. The following explains shortly the available delivery types and shows the configuration steps that have to be performed for each. For the last three options an already created DCP is required and, in case the DCP is encrypted, a self KDM for the DCP. If an MPEG compression is selected, the step to set a source type is not required. ’DCDM’ This option creates a DCDM from a DSM, i.e. a sequence of TIFF image files in 16 bit X’Y’Z’ (see also section “Digital Cinema Distribution Master (DCDM)” on page 2-3). For this the following configuration steps are necessary: Figure 3-3: Configuration steps for a DCDM For some particulars about the creation of a DCDM see section “Color Space Conversions” on page 6-5. ’JPEG2000’ This option creates JPEG2000 compressed data optimized for the digital cinema either from a DSM or DCDM in a single step, i.e. a sequence of JPEG2000 files in 12 bit X’Y’Z’ (see also section “JPEG2000” on page 2-3). For this the following configuration steps are necessary: Figure 3-4: Configuration steps for JPEG2000 data ’Master DCP without KDM’ This option creates an unencrypted DCP (e.g. for trailers or advertisements) either from a DSM, a DCDM or digital cinema compliant JPEG2000 data in a single step (see also section “Digital Cinema Package (DCP)” on page 2-4). Afterwards this DCP can be used as a master 3-6 Digital Cinema Delivery Tool for later adaptations (supplemental DCP). For a DCP without KDM the following configuration steps are necessary: Figure 3-5: Configuration steps for a DCP without KDM ’Master DCP with KDM’ This option creates an encrypted DCP (e.g. for a feature film) either from a DSM, a DCDM or digital cinema compliant JPEG2000 data in a single step (see also section “Digital Cinema Package (DCP)” on page 2-4). Afterwards this DCP can be used as a master for later adaptations (supplemental DCP). In case you have an unencrypted DCP, you can use this option to encrypt it. An unencrypted DCP can also be encrypted via a finalizing (see section “Modifying a DCP Manually” on page 5-14). For an encrypted DCP the following configuration steps are necessary: Figure 3-6: Configuration steps for a DCP with KDM ’CPL only’ This option allows you to create the extra files of a DCP again without generating the DCP again completely (e.g. to correct typos or other delivery issues in the extra files). It will be available when a DCP (encrypted or unencrypted) has been loaded into CLIPSTER (see section “Creating the Extra Files Again (CPL only)” on page 4-6). Then the following configuration steps are necessary: Figure 3-7: Configuration steps for a CPL only Whether the configuration step for KDMs is required depends on whether an encrypted or unencrypted DCP has been loaded. With this delivery type you can create additional KDMs as well (see ’KDM only’ below). 3-7 Digital Cinema Delivery Tool ’KDM only’ This option allows you to create additional KDMs without generating the DCP again completely (e.g. for later releases of the same encrypted DCP). It will be available when an encrypted DCP has been loaded into CLIPSTER (see section “Creating Additional KDMs (KDM only)” on page 4-6). For this the following configuration steps are necessary: Figure 3-8: Configuration steps for a KDM only ’Supplemental DCP’ This option allows you to create additional material for an already generated DCP (master DCP), if feasible without generating the DCP again completely (e.g. for localizations of a feature film). It will be available when a DCP (encrypted or unencrypted) has been loaded into CLIPSTER (see section “Modifying a DCP (Supplemental DCP)” on page 4-7). For this the following configuration steps are necessary: Figure 3-9: Configuration steps for a supplemental DCP Whether the configuration step for KDMs is required depends on whether an encrypted or unencrypted DCP has been loaded. An unencrypted DCP can be encrypted later either with the option Master DCP with KDM or via a finalizing (see section “Modifying a DCP Manually” on page 5-14). 3-8 Digital Cinema Delivery Tool 3.3.2 Compression With the compression configuration step you configure the compression rate of the digital cinema content. Figure 3-10: The compression settings At the very top of these settings you can change the compression type. By default the JPEG2000 compression is activated. However, to support alternative D-Cinema players you can also select an MPEG compression. The available MPEG compression settings are the default ones. Explanations for them can be found, for example, at http:// www.mpeg.org. The JPEG2000 compression settings are already set to the highest quality allowed for a DCP. Further details about the JPEG2000 encoding can be found in section “JPEG2000” on page 2-3. 3-9 Digital Cinema Delivery Tool The JPEG2000 compression type provides the following settings items: ICT This setting enables the Irreversible Color Transform, meaning an internal conversion of the images’ colors prior to encoding. With this the colors of the images will be encoded more efficiently. If the check box is deactivated, the original colors of the images will be used for the encoding, which would normally result in a larger file size per image, but with one of the Limit the maximum bit rate/file size… settings activated it will result in a lower quality of the finalized material. Maximum With this setting activated the applied JPEG2000 quality VBR encoding will get the maximum quality out of each processed image. It can be specified further with the settings sorted under it: – Limit the maximum bit rate/file size to be compliant to the DCI spec: This setting enables the post compression rate control. It is available for convenience purposes, already providing the optimum settings for digital cinema content. It cannot be altered. – Limit the maximum bit rate/file size to: This setting enables the post compression rate control. When it is activated, the limitation values can be adjusted. Select whether you want to adjust the bit rate or the file size from the drop-down list and then change its value in the entry field to the right to the desired one. – No limit: This setting disables the post compression rate control, meaning a JPEG2000 compression will still be performed but without further bit rate/file size limitation, resulting in the highest quality and the largest file sizes (e.g. between 2 and 3 MB for 2K images). Constant quality The constant quality VBR setting operates near the VBR maximum quality VBR (when set to 100%). During encoding it tries to get the same quality for the complete timeline so that you will receive the same impression for each image. It can be specified further with the settings sorted under it, which operate the same way as for the maximum quality VBR (see above). When everything is set up correctly, you can go to the next configuration step with the button NEXT. 3-10 Digital Cinema Delivery Tool 3.3.3 Source Type With the source type configuration step you determine the color space and color profile (type) of your source material in the timeline: Figure 3-11: The source type settings Further information about color space conversions can be found in section “Color Space Conversions” on page 6-5. This step is not required if an MPEG compression has been selected (see section “Compression” on page 3-9). Via the radio buttons at the top of the settings area you have to select the color space of your source material in the timeline: RGB If the timeline contains clips in the RGB color space, you have to activate this radio button. XYZ Select this setting if the clips in the timeline are all in the X’Y’Z’ color space. 3-11 Digital Cinema Delivery Tool Depending on the selected color space the options (radio buttons) in the middle of the settings area will be displayed. With them you have to specify how to interpret the color space of the source material in the timeline, i.e. the color profile/type of the selected color space: Table 3-1: Settings for color space ’RGB’ RGB REC 709 Activate this radio button if your material is stored in the REC 709 color profile. You can adjust the gamma (luminance) of the output with the items to the right: When switching the combo box to the right from SMPTE gamma (the default gamma as specified by SMPTE which cannot be adjusted) to another setting, the slider will be made available. Then the gamma value can be changed via the slider or the entry field to the right. RGB DLP P3 Activate this radio button if your material is stored in the DLP P3 color profile. With the slider and the entry field to the right you can adjust the gamma (luminance) of the output. RGB DLP P7 Activate this radio button if your material is stored in the DLP P7 color profile. With the slider and the entry field to the right you can adjust the gamma (luminance) of the output. RGB with applied 3D LUT… This setting will be available when a user-defined 3D LUT has been applied to the timeline. When activated, this 3D LUT will be used for the color conversion. Table 3-2: Settings for color space ’XYZ’ XYZ native Activate this radio button if your material is stored in the X’Y’Z’ color space already. Then no color conversion will be performed. YCxCz If you material was processed with a YUV matrix, this setting has to be activated. The bin clip properties of these clips in the timeline have to be set to YUV with the appropriate YUV matrix selected that was used to process the material (see also section “The Steps to Prepare a DCDM” on page 2-7). When everything is set up correctly, you can go to the next configuration step with the button NEXT. 3-12 Digital Cinema Delivery Tool 3.3.4 Delivery Format The delivery format configuration step is used to determine the output format of the digital cinema content. Figure 3-12: The delivery format settings Depending on the type of material that is available in the timeline (video and/or audio) the respective output types will already be activated. In the settings pane use the buttons, the list box and the settings items for the video output to specify the video format. Adjust them so that they match your desired output format (normally the one of the final DCP, see section “Possible Formats for a DCI Mastering” on page 2-4). 3-13 Digital Cinema Delivery Tool Additionally, specify the audio format for the digital cinema content according to your needs, for example, select the WAV (DCDM or JPEG2000) or MXF (DCP) file format in 24 bits as a multi-channel file. Audio retiming should be activated when the output frame rate differs from the one selected for the timeline. These settings items are almost identical to the ones used in the finalize dialog. For further information about them see the “CLIPSTER Edit Tool” user guide. For details about the Stereoscopic output item refer to section “Creating a 3D DCP” on page 6-3. In case the digital cinema content should provide subtitles, the check box Subtitle output must be activated. With the button SUBTITLING… to the right you can specify the output of the subtitles further. It opens the following window: Figure 3-13: The options for subtitles In the window ’Subtitling options’ you can determine whether or not to create subtitle files with the check box at the top. If activated, you can select the subtitle tracks that a file should be created for (see also section “Adding Further Subtitles (via Subtitle Tracks)” on page 2-12) with the additional check boxes in the list box. The file format of the subtitle files to be created should be set with regard to the standard of the final DCP (see section “DCP Standards” on page 2-6): SMPTE Phase 0/SMPTE Phase 1 XML (*.xml) SMPTE Phase 2 MXF (*.mxf) 3-14 Digital Cinema Delivery Tool If one of the subtitles should be rendered into the images, you can activate this with the check box Render subtitle track into image. Then you can select the subtitle track that should be rendered into the images with the combo box to the right. When activating this option, deselect the respective subtitle track in the upper list box, i.e. deselect it from a separate file creation (if separate file creation has been activated as well). Once the subtitles are set up correctly confirm this with the button OK. After this the configurations for the delivery format are complete and you can go to the next configuration step with the button NEXT. 3-15 Digital Cinema Delivery Tool 3.3.5 CPL When creating a DCP, you also have to perform the configuration step for a Composition Playlist (CPL). Figure 3-14: The CPL settings In the settings pane configure the CPL to be generated to your requirements: For details about the Currently set DC reels and the Automatically set DC reels items please refer to section “Modifying a DCP (Supplemental DCP)” on page 4-7. With the entry fields in the upper part of the window you can provide details about the DCP to be created (e.g. language or kind of content). They will be written to the CPL file. As a minimum setting the Content Title is required. To include a rating for the DCP to be created you have to use the two list fields. Select the applicable rating agency in the list field to the left with the mouse. Then drag and drop it to the list field to the right. Afterwards adjust the rating with the provided combo box. An already set 3-16 Digital Cinema Delivery Tool rating and rating agency can be removed from the list field at the right by selecting it and pressing the [Del] key on your keyboard. The rating and rating agencies can be adapted. Further information about this can be found in section “Adapting the Rating Agencies” on page 6-7. After this the configurations for the CPL are complete and you can go to the next configuration step with the button NEXT. 3-17 Digital Cinema Delivery Tool 3.3.6 KDM If you create an encrypted DCP, one or more Key Delivery Messages (KDMs) have to be created as well. They will contain the encrypted AES key to decrypt the content of the DCP. Usually you will create one KDM for each D-Cinema player that should play out the content and for this the respective public key of the D-Cinema player is required. The generation of the KDMs as well as the keys that should be used can be configured with the KDM configuration step. Further information about the keys and certificates used during the creation and usage of a DCP can be found in section “Keys and Certificates Explained” on page 6-11. Figure 3-15: The KDM settings In the settings pane configure the generation of the KDM(s) according to your needs: With the entry and date/time fields in the upper part of the window you have to provide further details about the KDM(s) to be created as well as their validity. For the generation of a KDM a correct time setting 3-18 Digital Cinema Delivery Tool is essential. Date/time entries are standardized and must be given in the format YYYY.MM.DD hh:mm:ss. In the area Forensic Marking you can select whether the D-Cinema players should apply a watermarking to the played out video and/or audio data. It is a flag that will be set in the KDM and interpreted by the players. Via the Encryption settings an encryption of the content can be turned on or off. With the respective check boxes you can select the material that should be encrypted. In the area Recipient certifications you can determine the D-Cinema players that should be able to play out the DCP. They have to be selected via their public keys (recipient certificates, Encryption Key). Use the button ADD… to select one or more keys (*.cer or *.pem) via a standard dialog window. Alternatively, you can use a file manager of Windows and drag and drop the keys directly to the list box of this area. Afterwards they will be detailed in the list box and for each selected key file one KDM file will be created. Already set players/keys can be removed by selecting them from the list box and pressing the button DELETE. With the check box Create a KDM for current Clipster you can activate the creation of a self KDM, i.e. of a KDM to decrypt the contents of the final DCP on a selectable DVS DCI Mastering system, for example, for a final check of the delivered content. Further information about the usage of the self KDM as well as its creation can be found in chapter “Using the DCP and Self KDM” on page 4-1. After this the configurations for the KDMs are complete and you can go to the next configuration step with the button NEXT. 3-19 Digital Cinema Delivery Tool 3.3.7 Delivery Creation The delivery creation configuration step is the last step to be performed before the digital cinema content is created. With it you can check the material of a DCP as well as specify further output settings such as the path where the content should be stored: Figure 3-16: The delivery creation settings The area DCP audio/video assets will provide information when you create a DCP and at least one DC reel is specified in the timeline. Then it will show you the DC reels as defined in the timeline and their assets. By clicking on a plus/minus (+/-) sign in front of an entry the assets of the reel can be expanded or collapsed, thereby providing you with further details about them. With this you can easily check and confirm the material of each reel of the DCP. With the settings in the area Delivery Creation you can specify the output of the digital cinema content further and determine, for exam- 3-20 Digital Cinema Delivery Tool ple, its storage location and name. To set the file name(s) you can also use a variable naming with the button NAME OPTIONS…. The settings items of the area Delivery Creation are almost identical to the ones used in the finalize dialog. For further information about them see the “CLIPSTER Edit Tool” user guide. A click on the button CREATE will close the digital cinema delivery tool and start the finalizing process to generate the digital cinema content according to your settings at the specified location (see section “The Generated Files” on page 3-22). 3-21 Digital Cinema Delivery Tool 3.4 The Generated Files The generation of the digital cinema content initiates a standard finalizing process that will create the content according to your settings. The output of the intermediate steps for a DCDM or JPEG2000 files will be as described in the “CLIPSTER Edit Tool” user guide. When creating a DCP, the finalizing generates the video files as well as the audio data according to your settings (e.g. the chosen DCP standard, see section “DCP Standards” on page 2-6) and afterwards wraps them in separate MXF containers. If reels were set in the timeline, you will receive for each reel one MXF file per output format (video and/or audio). For a DCP in SMPTE Phase 0 or 1 the specified subtitle files for the reels will be sorted into subfolders. For a SMPTE DCP (SMPTE Phase 2) they will be wrapped in MXF containers as well. Additionally, the CPL, the KDM(s), a PKL, an Asset Map file, as well as a Volume Index file are created. For a SMPTE DCP you can expect the following output: Figure 3-17: The resulting DCP The following table lists shortly the generated files and their purpose: File/Folder *.mxf Explanation The (encrypted) content of the DCP (track files), i.e. for each reel one video and one audio file. Additionally, if subtitles have been specified, they will be wrapped in MXF as well, i.e. for each reel one MXF file per subtitle track (generated only if subtitles were present in the reel/subtitle track). 3-22 Digital Cinema Delivery Tool File/Folder Explanation CPL_*.xml The Composition Playlist specifying the sequence of the track files and thus the order of the play-out. Contains hash values of the DCP’s track files, certificates and a signature for verification purposes as well. ASSETMAP The Asset Map details the content of the delivered DCP and the paths to its files relative to the Asset Map. It can be loaded by D-Cinema players which use it to reconstruct the track files. PKL_*.xml Packing List containing information and IDs about the files of a DCP. Thus it allows for asset management of the delivered DCP. Contains hash values of most of the DCP’s files, certificates and a signature for verification purposes as well. VOLINDEX The Volume Index is used to map the assets of a DCP when they are stored across several storage volumes (e.g. if the DCP is larger than a single storage medium). The creation of a multi-volume distribution is currently not supported. KDM_*.xml Key Delivery Message containing the encrypted key for the content as well as certificates and a signature for verification purposes. One for each playback system (D-Cinema player). KDM_self_*.xml Key Delivery Message for a DVS DCI Mastering system. The self KDM is not intended for D-Cinema players and should only be used to administer the DCP on site (e.g. for quality checks). This file is essential to create new KDMs or load an encrypted DCP (see chapter “Using the DCP and Self KDM” on page 4-1). Once these files are available, you have successfully created a compliant Digital Cinema Package (DCP) with the DVS software that is ready for distribution. 3-23 Using the DCP and Self KDM 4 When a DCP of a feature film is created, it is usually encrypted with the decryption key stored in the KDMs. The decryption key in each KDM is also encrypted, and it can be decrypted only with the private key of the respective D-Cinema player for whom it was created. The conclusion of this is that, once an encrypted DCP is created, it cannot be modified or checked for flaws that may have occurred during the encoding and/or wrapping processes. The DCP together with a KDM and all other extra files are self-contained, intended only for a specific usage in a defined period of time on a particular device. DVS’s solution to this problem is the self KDM that can be created together with the other KDMs. It has to be generated with the public key of a DVS DCI Mastering system, which can be either the one used to create the DCP or any other one (e.g. another CLIPSTER DCI Mastering system). This DCI Mastering system can then be used to load the DCP. Although the self KDM carries a validity same as the other KDMs, with the DVS DCI Mastering system you will be able to use the content nonetheless even if the validity has expired. Once a DCP is loaded with the self KDM, you can, for example, play it out and check its content, create other KDMs (e.g. for later releases) or modify it (e.g. exchange audio). Additional rendering/encoding processes will only be performed where alterations were made, i.e. the DCP will not be generated again completely. The self KDM is essential if you want to create new KDMs for an already generated DCP. DCPs can also be created unencrypted, for example, for trailers or advertisements. Then, of course, they do not require KDMs or a self KDM. Unencrypted DCPs as well can be used as described in this chapter, but do not require a self KDM. This section describes how to use a DCP and a self KDM once they have been created. It will be explained, for example, how to configure the creation of a self KDM, how to load a DCP with the DVS software, how to use a DCP to create additional KDMs, and how to modify a DCP (e.g. for localized versions). 4-1 Using the DCP and Self KDM 4.1 Configurations for a Self KDM The necessary configurations to create a self KDM have to be made during the preparations of the system and its software: 1. During the general preparations for a DCI Mastering (see section “Configuring the System for a DCP Creation” on page 2-25) some settings have to be made in the Configuration Tool (tab Defaults » group DCI): In the field Certificate of the area Self KDM you have to enter the path to the file (*.cer) that holds the public key of the DVS DCI Mastering system where the DCP should be loaded. Figure 4-1: Setting the public key for a self KDM This public key file can be found either already stored in the installation directory of the DVS software on the respective system or on a separate CD-ROM. Because the settings on the Defaults tab are general settings of the DVS software, they will be set and available for each initialized new project. This way you do not have to configure the path and file name of the public key file of the respective system again when creating other DCPs in the future. 2. In the KDM settings during the configurations of a DCP creation, you have to activate the generation of the self KDM. For this enable the check box Create a KDM for current Clipster (see section “KDM” on page 3-18 and section “Finalize Settings – KDM” on page 5-10). Figure 4-2: Activating the creation of the self KDM The described procedures to create a self KDM are available for convenience reason: You have to set it only once and its generation can be turned on or off via the check box described above. Anyway, a self KDM is just another KDM, only that it is made for a DVS DCI Mastering system. If wanted, you may create a self KDM the same way as any other KDM. Once these settings are made, the self KDM will be created during the generation of the DCP. It will be stored at the same location as the other files of the DCP (normally with the file name KDM_self_*.xml). This file will then be used when loading the encrypted DCP on the DVS system for which it has been created, for example, for quality checks. 4-2 Using the DCP and Self KDM 4.2 Loading the DCP After a DCP has been created it can be loaded with the DVS software. Unencrypted DCPs can be loaded on every DVS system that provides the DCI Mastering feature. Encrypted DCPs, however, require a self KDM and can be loaded only on the system for which the self KDM has been intended, i.e. on the DCI Mastering system that holds the complementary key (private RSA key) to the public key that was entered in the Configuration Tool (see section “Configurations for a Self KDM” on page 4-2). To load a DCP perform the following: When loading a DCP the DCP standard configured for the system (see section “DCP Standards” on page 2-6) should be set to the same that the DCP was created in. Otherwise you may receive error messages. In the DVS software open the dialog window to load a project (Project » Open…). Switch to the directory where the DCP or, more explicitly, the CPL is stored. Select as the file type to be displayed in the ’Load Project’ window the setting Digital Cinema Composition Playlist files (combo box Files of type): Figure 4-3: Loading the Composition Playlist (CPL) of a DCP 4-3 Using the DCP and Self KDM The extra files of the DCP (in *.xml format) will be displayed in the dialog window. Select the CPL of the DCP that you want to load and open it with the DVS software by clicking the button OPEN. This will check the CPL if the DCP contains encrypted content. When this is the case, the DVS software will search for an appropriate KDM for the DCP (i.e. the self KDM) in the directory level of the extra files of the DCP. If none can be found, a dialog window for the selection of a file will appear, asking you for the location of the file. Once the KDM has been found and/or loaded, the content of the DCP will be opened in the Edit Tool and you will see it in the timeline. Afterwards you can use the DCP, for example, to play out the timeline and review the content of the DCP for quality checks. A loaded CPL is not a DVS project file. Therefore, certain settings may not be configured correctly and you may have to set them again. A loaded DCP can be saved as a project file. This way you can work on an already finished DCP and save your work’s progress, e.g. when modifying it. If you want to view the DCP on an XYZ projector, you have to deactivate the automatic color conversion from X’Y’Z’ to RGB of the DVS software. For this you have to alter the color spaces of the clips in the bin of the Edit Tool and set them to RGB. For further hints about how to do this see section “The Steps to Prepare a DCDM” on page 2-7. 4-4 Using the DCP and Self KDM 4.3 The Menu Option ’Load KDM...’ When working on other projects on a DVS DCI Mastering system, you may want to add parts of video or audio from already created DCPs. While unencrypted DCP track files can be added without further ado, for encrypted material you have to use the menu option Load KDM…. It allows you to load the keys of a self KDM into the hardware of the DCI Mastering system. Afterwards the encrypted clips can be added to the bin and you can use them in your project. The self KDM must have been created for the DVS system where you are working on (see also section “Configurations for a Self KDM” on page 4-2). The number of keys that can be loaded at a time is limited. A single KDM usually contains several keys (one for each track file) and up to 256 different keys can be loaded. To use an encrypted track file in another project of the DVS software perform the following: On the Project menu select the menu option Load KDM…. This will open the dialog window to open a file. In this window select the self KDM generated for the DCP from which the track file should be used and confirm your selection with the button OPEN. A message will appear on the screen warning you that the selected KDM is not intended for the currently opened project. In the message window click on the button IGNORE. This will load the keys of the self KDM into the DCI Mastering system. Afterwards add the wanted track file (video, audio or subtitles) to the bin either by using a file manager or the menu option Add clip… of the bin’s context menu. This will make the encrypted track file available in the DVS software and you can use it in your project. You can also work the other way around: First load the encrypted track file and then the self KDM. When using this function, encrypted material may sometimes provide no thumbnails or waveforms in the DVS software. However, the material is decrypted and can be used as usual (e.g. video can be seen in the overlay). 4-5 Using the DCP and Self KDM 4.4 Creating the Extra Files Again (CPL only) When an already generated DCP is loaded in the Edit Tool (see section “Loading the DCP” on page 4-3), you can create the extra files (e.g. CPL, KDMs and PKL) of the DCP again, for example, to correct typos in the extra files or other delivery issues. This way you do not have to generate the DCP again completely. To create only the extra files the digital cinema delivery tool provides the option CPL only (see section “Delivery Type” on page 3-5). It will lead you straight to the configuration steps where you can set up their creation (see from section “CPL” on page 3-16 onwards). Whether the configuration step for KDMs is required depends on whether an encrypted or unencrypted DCP has been loaded. This way you can create additional KDMs (see section “Creating Additional KDMs (KDM only)” on page 4-6) as well. After finishing the configuration of the extra files they can be saved at any location you want in the configuration step for the delivery creation (see section “Delivery Creation” on page 4-10). When saving in the directory of the loaded DCP, all already existing extra files (including all KDMs) will be deleted and the new ones will be saved in their stead. 4.5 Creating Additional KDMs (KDM only) Once an already generated DCP is loaded in the Edit Tool (see section “Loading the DCP” on page 4-3), it can be used to create further KDMs, for example, for later releases. This way you do not have to generate the DCP again completely. To create additional KDMs the digital cinema delivery tool provides the option KDM only (see section “Delivery Type” on page 3-5). It will lead you straight to the configuration step where you can set up their creation (see section “KDM” on page 3-18). After finishing the configuration of the KDMs to be created they can be saved at any location you want in the configuration step for the delivery creation (see section “Delivery Creation” on page 4-10). 4-6 Using the DCP and Self KDM 4.6 Modifying a DCP (Supplemental DCP) An already created DCP can be modified, for example, to exchange audio, subtitles or certain parts of video. For this the digital cinema delivery tool provides the option Supplemental DCP (see section “Delivery Type” on page 3-5). It can be used to create different versions of a DCP, for instance, for localizations of a feature film. A DCP made with the option Supplemental DCP from a master DCP generates anew only the content that was modified. For the unaltered parts of content it still requires and refers to the content of the master. In addition, a supplemental DCP will contain all the extra files that are normally included in a DCP (i.e. CPL, KDMs, PKL, etc.), and thus can be seen as a DCP of its own. The purpose of a supplemental DCP is to minimize the time and effort to encode different versions of the same package and to reduce its overall size. All cinemas worldwide receive the same international version (master DCP) with identical reels and extra files. Depending on the country a supplemental DCP is provided in addition (normally in a subdirectory of the master DCP) containing only the relevant changes. To load the localized version of the DCP the extra files of the supplemental DCP have to be used. Whenever necessary they reference to the original material of the master DCP. This section describes how to use the supplemental DCP feature of the digital cinema delivery tool. 4.6.1 Preparations After loading an already generated DCP (see section “Loading the DCP” on page 4-3) it can be modified in the timeline of the Edit Tool. There you can change, for example, the subtitles, certain frames of video and the audio reels: The track files of a DCP should not be submitted to further rendering processes (e.g. effects on audio or video). For this use the original source project instead. A loaded DCP can be saved as a project file. This way you can work on an already finished DCP and save your work’s progress, e.g. when modifying it. 4-7 Using the DCP and Self KDM Subtitle: Video: Audio 1: Audio 2: Audio 3: Modified content Figure 4-4: Example of a timeline with modified content Afterwards, by using the digital cinema delivery tool with the option Supplemental DCP (see section “Delivery Type” on page 3-5) you can create additional supplementing content for this DCP. 4.6.2 The Configuration Steps The configuration steps that must be performed when creating a supplemental DCP are the same as they were made for the master DCP during its creation. Therefore, to create a supplemental DCP you can use the digital cinema delivery tool as described in chapter “Digital Cinema Delivery Tool” on page 3-1. However, because the supplemental content has to be for the most part in the same format as the master DCP, several settings items will already be set and cannot be altered. 4.6.3 Reel Settings Same as when generating a full DCP, the option to create a supplemental DCP will deal with the content reel-wise. To comprise only the changed parts of a timeline it offers you the possibility use automatically set DC reels for the creation of the additional content (see section “CPL” on page 3-16): Figure 4-5: Reel configuration for a supplemental DCP 4-8 Using the DCP and Self KDM According to SMPTE a reel must have a duration of at least one second. Some digital cinema players may be unable to display reels that are shorter than 5 seconds. For further information about DC reels see section “Setting Reels” on page 2-18. The option Automatically set DC reels… sets virtual DC reels for the timeline which will include only the changed material. For the example timeline shown in figure 4-4 on page 4-8 this would mean reels like the following: Subtitle: 1 Video: 1 2 3 4 5 6 5 Audio 1: Audio 2: 1 2 3 4 5 6 Audio 3: Reels Figure 4-6: Reels to be created Our example (see figure 4-4 on page 4-8) would create two reels for video and a whole new set of reels for audio and subtitles. The remaining video data (parts in light grey in the figure above) would not be generated anew. During the creation process they can be either copied to the supplemental DCP or left in the master DCP. With the latter the new CPL of the supplemental DCP will reference to them. Please note that the total amount of reels increases when using automatically set DC reels. When using the option Currently set DC reels, the reels as currently configured for the DCP in the timeline will be used. If not manually adjusted by you in the meantime, they will be set to the reel settings of the master DCP. By configuring the DC reels in the timeline manually prior to creating a supplemental DCP, you can achieve reels according to your needs. 4-9 Using the DCP and Self KDM 4.6.4 Delivery Creation At the configuration step to specify the delivery creation the digital cinema delivery tool shows you the content that will be created (see also section “Delivery Creation” on page 3-20): Figure 4-7: The content that will be created When creating a supplemental DCP, the list box in the area DCP audio/ video assets indicates the reels and assets that will be generated with activated check boxes. The check boxes of assets that are mandatory for the supplemental DCP will appear dimmed and cannot be excluded from the creation process. Assets that are optional for the creation of the supplemental DCP can be deselected. By selecting check boxes that were initially deactivated, you can copy content from the master DCP to the supplemental DCP during the creation process, e.g. to create a DCP that is self-sustained and independent from the master’s content. If these assets are left deactivated, the master DCP will be needed to load the supplemental DCP. The supplemental DCP can be created at any location you like. Anyway, when creating a supplemental DCP that requires the material of the master DCP, it should be stored in a subfolder of the master DCP. Otherwise the references of the supplemental DCP to the original material would be invalid (when loading such a supplemental DCP with the DVS software, you would be asked for their location). After clicking on the respective button in the digital cinema delivery tool the supplemental DCP will be created according to your settings. 4-10 Manual Creation of a DCP 5 Every state towards a DCP or the final DCP itself can also be created manually by using the finalizing dialog of the DVS software. This way to create digital cinema material is not as intuitive and forthcoming as the digital cinema delivery tool (see chapter “Digital Cinema Delivery Tool” on page 3-1), but it is to some extent more flexible regarding the created output. This section describes how to create digital cinema material manually via finalizing(s), i.e. the following will be explained: 1. 2. 3. How to create a DCDM from a DSM, i.e. a sequence of TIFF image files in 16 bit X’Y’Z’ (see also section “Digital Cinema Distribution Master (DCDM)” on page 2-3). How to create JPEG2000 compressed data optimized for the digital cinema either from a DSM or DCDM, i.e. a sequence of JPEG2000 files in 12 bit X’Y’Z’ (see also section “JPEG2000” on page 2-3). How to create a DCP either unencrypted (e.g. for trailers or advertisements) or encrypted (e.g. for a feature film) from a DSM, a DCDM or digital cinema compliant JPEG2000 data (see also section “Digital Cinema Package (DCP)” on page 2-4). Additionally, it will be described how to use the finalizing dialog to create additional KDMs or to modify a DCP manually. 5-1 Manual Creation of a DCP 5.1 Creating a DCDM Manually This section describes how to create a DCDM from a DSM. For further information about this delivery type see section “Digital Cinema Distribution Master (DCDM)” on page 2-3: For some particulars about the creation of a DCDM see section “Color Space Conversions” on page 6-5. Prepare the DSM as described in section “The Steps to Prepare a DSM” on page 2-7. Afterwards call up the finalize dialog of the DVS software (menu Project » Finalize…). Choose a name and storage location for the finalized files according to your project’s needs. To set the file name(s) you can also use a variable naming with the button NAME OPTIONS…. Figure 5-1: File name and storage location As the file format select the TIFF file format with the file type 16 bit RGB big endian. Make sure that the hardware finalize support is activated. Figure 5-2: File format settings As specified by SMPTE/DCI the DCDM has to be saved in X’Y’Z’ in the TIFF file format. However, the TIFF file format natively does not store the X’Y’Z’ color space: It saves the RGB or Luma color space only. To make this work nevertheless, a 3D look-up table (LUT) has to be applied to the DSM material which will then create the X’Y’Z’ color space compliant with the specifications: To convert the DSM to X’Y’Z’ select the 3D LUT appropriate for your project’s material with the button 3D LUT… ( ). For this you may use one of the available 3D LUTs provided by DVS. 5-2 Manual Creation of a DCP Figure 5-3: Window to select a 3D LUT file After the selection and when returned to the finalize dialog, make sure that the check box in front of the 3D LUT… button is activated, otherwise the 3D LUT will not be applied and no color space conversion to X’Y’Z’ takes place. In case your source data provides 3D material or subtitles use the Stereoscopic output and the Subtitle output settings items and configure them accordingly. For details about 3D and the Stereoscopic output item refer to section “Stereoscopic DCP” on page 6-2 as well as the “CLIPSTER 3D/Stereoscopy” supplement user guide. Further information about the Subtitle output items can be found in section “Delivery Format” on page 3-13. Use the settings items in the middle of the finalize dialog to specify the video format. Set them so that they match the format of the final DCP (see section “Possible Formats for a DCI Mastering” on page 2-4). Specify the audio format for the digital cinema content according to your project’s needs, for example, select the WAV file format in 24 bits as a multi-channel file. Figure 5-4: Audio settings 5-3 Manual Creation of a DCP After this the settings to create a DCDM are complete and you can start the finalize process at any time: Press the button RENDER to start the generation of the DCDM. This will start the finalizing of the DCDM and it will be created at the specified location. 5-4 Manual Creation of a DCP 5.2 Creating JPEG2000 D-Cinema Data Manually This section describes how to create JPEG2000 compressed data optimized for the digital cinema either from a DSM or DCDM. For further information about this delivery type see section “JPEG2000” on page 2-3: Prepare your source data (either a DSM or a DCDM) appropriately as described in section “Preparing the Source Data” on page 2-7. Afterwards call up the finalize dialog of the DVS software (menu Project » Finalize…). Choose a name and storage location for the finalized files according to your project’s needs. To set the file name(s) you can also use a variable naming with the button NAME OPTIONS…. Figure 5-5: File name and storage location As the file format select the JP2 file format with the file type 12 bit XYZ. Configure the JPEG2000 encoding options as described in section “JPEG2000 Options” on page 6-9. Make sure that the hardware finalize support is activated. Figure 5-6: File format settings In case your source data provides 3D material or subtitles use the Stereoscopic output and the Subtitle output settings items and configure them accordingly. For details about 3D and the Stereoscopic output item refer to section “Stereoscopic DCP” on page 6-2 as well as the “CLIPSTER 3D/Stereoscopy” supplement user guide. Further information about the Subtitle output items can be found in section “Delivery Format” on page 3-13. Use the settings items in the middle of the finalize dialog to specify the video format. Adjust them so that they match the format of the 5-5 Manual Creation of a DCP final DCP (see section “Possible Formats for a DCI Mastering” on page 2-4). Specify the audio format for the digital cinema content according to your project’s needs, for example, select the WAV file format in 24 bits as a multi-channel file. Figure 5-7: Audio settings After this the settings to create JPEG2000 encoded digital cinema content are complete and you can start the finalize process at any time: Press the button RENDER to start the generation of the JPEG2000 data. This will start the finalizing process and the JPEG2000 data will be created at the specified location. 5-6 Manual Creation of a DCP 5.3 Creating a DCP Manually This section describes how to create a DCP either unencrypted (e.g. for trailers or advertisements) or encrypted (e.g. for a feature film) from a DSM, a DCDM or digital cinema compliant JPEG2000 data. For further information about this see section “Digital Cinema Package (DCP)” on page 2-4: To create a DCP the source data has to be prepared first as described in chapter “Getting Started” on page 2-1, i.e. it has to be prepared and reels, subtitles as well as the general configurations have to be set. Afterwards the finalizing has to be configured and as the final step the project has to be rendered which will result in the final DCP. These last two steps are described in this section. 5.3.1 Finalize Settings – Naming and Storage Options With the project properly prepared for the creation of the DCP (see chapter “Getting Started” on page 2-1) you can begin to set up the DCP finalizing: Call up the finalize dialog of the DVS software (menu Project » Finalize…). Next choose a name and storage location for the finalized files according to your project’s needs. To set the file name(s) you can also use a variable naming with the button NAME OPTIONS…. Figure 5-8: File name and storage location With this the file naming and storage location are determined. Next you have to continue with section “Finalize Settings – File and Video Format” on page 5-7 and set the video format for the DCP. 5.3.2 Finalize Settings – File and Video Format In this step you have to configure the file and video format of the DCP: If not already set select DC MXF as the file format. This will automatically set the file type to 12 bit XYZ and the audio file format to DC MXF. 5-7 Manual Creation of a DCP Next, you have to refine the compression type and set it according to the DCP standard that the DCP should be created in (see section “DCP Standards” on page 2-6): – Either configure the JPEG2000 encoding options as described in section “JPEG2000 Options” on page 6-9 or – select MPEG2 VES (instead of 12 bit XYZ) as the file type to create an MPEG compressed DCP. This can also be configured further same way as the JPEG2000 options. The available MPEG compression settings are the default ones. Explanations for them can be found, for example, at http://www.mpeg.org. Make sure that the hardware finalize support is activated. Use the settings items in the middle of the finalize dialog to specify the video format. If not already set correctly adjust them to the format that the final DCP should provide (see also section “Possible Formats for a DCI Mastering” on page 2-4). Figure 5-9: Video format settings With this the file and video format are set properly and you can continue the configuration of the finalizing by setting up the CPL (see section “Finalize Settings – CPL” on page 5-9). 5-8 Manual Creation of a DCP 5.3.3 Finalize Settings – CPL When finalizing to a DCP you also have to generate a Composition Playlist (CPL). The items for a CPL will be available only when in at least one activated finalize output DC MXF is selected as the file format. To activate the generation of a CPL enable the check box D-Cinema Playlist in the finalize window. This will be enough to generate a CPL when the DCP is finalized. However, there is also the possibility to configure the CPL. For this perform the following: Click on the PLAYLIST… button. This will open the window to configure the CPL: Figure 5-10: CPL configuration Configure the settings according to your requirements. These settings items are identical to the ones used in the digital cinema delivery tool. For further information about them see section “CPL” on page 3-16. When everything is set as desired click the OK button. 5-9 Manual Creation of a DCP This will close the window to configure the CPL and you will be returned to the finalize dialog. With the check box in front of the PLAYLIST… button activated, the CPL will be generated during the finalizing of the DCP. As the next step the creation of the KDMs must be configured (see section “Finalize Settings – KDM” on page 5-10). 5.3.4 Finalize Settings – KDM For an encrypted DCP one or more KDMs have to be created as well. Usually you will create one KDM for each D-Cinema player that should play out the content and for this the public key of the D-Cinema player is required. The generation of the KDMs as well as the keys that should be used can be configured with the items D-Cinema Encryption. The items for a KDM will be available only when in at least one activated finalize output DC MXF is selected as the file format. To create an unencrypted DCP see that the check box in front of the KEY… button is deactivated. To configure the generation of the KDM(s) perform the following: Click on the KEY… button. This will open the window to configure the KDM generation: Figure 5-11: KDM generation configuration 5-10 Manual Creation of a DCP In this window set the generation of the KDM(s) according to your needs. These settings items are identical to the ones used in the digital cinema delivery tool. For further information about them see section “KDM” on page 3-18. When everything is set as desired click the OK button. This will close the window to configure the KDM(s) and you will be returned to the finalize dialog. In the finalize dialog make sure that the check box in front of the KEY… button is activated, otherwise an encryption will not be made and KDM(s) will not be created. With this the KDM(s) will be created during the finalizing and you can continue the configuration of the finalizing by finishing it (see section “Further Finalize Settings and Rendering” on page 5-11). 5.3.5 Further Finalize Settings and Rendering Via the remaining finalize settings you can determine the digital cinema content that should be created further: In case your source data provides 3D material or subtitles use the Stereoscopic output and the Subtitle output settings items and configure them accordingly. For details about 3D and the Stereoscopic output item refer to section “Stereoscopic DCP” on page 6-2 as well as the “CLIPSTER 3D/Stereoscopy” supplement user guide. Further information about the Subtitle output items can be found in section “Delivery Format” on page 3-13. Afterwards only the audio settings remain to be set: If necessary enable the output of audio. In case it is not already set select DC MXF as the file format. This will automatically configure the fields Bit depth and Render audio in to the correct settings for a DCP. Use the remaining settings items to configure the audio output to the needs of your DCP (see also section “Delivery Format” on page 3-13). 5-11 Manual Creation of a DCP Figure 5-12: Audio format settings After this the settings to create a DCP should be complete and you can start the finalize process at any time: Press the button RENDER to start the generation of the DCP. This will start the finalizing and the files of the DCP will be created at the specified location as described in section “The Generated Files” on page 3-22. Once these are available you have successfully created a compliant DCP with the DVS software that is ready for distribution. 5-12 Manual Creation of a DCP 5.4 Creating Additional KDMs Manually With an already encrypted DCP and a self KDM you are able to create further KDMs, for example, for later releases of the same material without having to generate the DCP again. For this perform the following: Load the encrypted DCP as described in section “Loading the DCP” on page 4-3. Then call up the finalize dialog of the DVS software (menu Project » Finalize…). Next choose a name and storage location for the KDM(s). Figure 5-13: File name and storage location Activate the finalizing of video with the check box Video output. With a DCP loaded via a self KDM, you will get in the list of file formats (combo box File format) an additional entry named DC KDM. As the file format select DC KDM. Afterwards click on the KEY… button. This will open the window to configure the KDM generation (see section “Finalize Settings – KDM” on page 5-10). In this window configure the generation of the additional KDM(s) (see section “KDM” on page 3-18). However, because a self KDM for the current DCP is already available, you may deactivate the check box Create a KDM for current Clipster. When everything is set as desired click the OK button. This will close the window to configure the KDM(s) and you will be returned to the finalize dialog. In the finalize dialog make sure that the check box in front of the KEY… button is activated, otherwise the KDM(s) will not be created. After this the settings to create additional KDM(s) are finished and you can start their creation at any time: Press the button RENDER to start the creation of the additional KDM(s). This will start the creation and the additional KDM(s) will be written to the specified location. 5-13 Manual Creation of a DCP 5.5 Modifying a DCP Manually An already created DCP can be used to modify its content, for example, to exchange audio or subtitles, or for a later encryption of the content. With this you are able to create different versions of the same DCP without having to generate it again completely (i.e. unaltered track files will not be rendered again but copied). This approach to modify a DCP creates a complete DCP from the master DCP. To create a supplemental DCP you have to use the digital cinema delivery tool (see section “Modifying a DCP (Supplemental DCP)” on page 4-7). The track files of a DCP should not be submitted to further rendering processes (e.g. effects on audio or video). For this use the original source project instead. To modify a DCP perform the following: Load the DCP as described in section “Loading the DCP” on page 4-3. If required replace video, audio and/or subtitle track files in the timeline. When using the finalize dialog to modify a DCP, modifications to track files are observed reel-wise only: For example, even if only one frame of video is changed, this reel will be rendered again completely. However, by changing the DC reels in the timeline area similar to the automatically created ones as described in section “Reel Settings” on page 4-8 additional renderings can be avoided. This can be achieved easily by setting the reels automatically at the edit points of the exchanged material (see section “Setting Reels Automatically” on page 2-18). If required adapt the DC reels in the timeline (see section “Setting Reels” on page 2-18). Then call up the finalize dialog of the DVS software (menu Project » Finalize…). In the finalize dialog adjust all settings including the ones for CPL and KDMs so that they match the master DCP (see section “Creating a DCP Manually” on page 5-7), except the following ones: – You may select another file name for the finalized files. After the generation only the newly generated files will carry this name. – As a storage location choose a different directory. 5-14 Manual Creation of a DCP – If required adjust the encryption or KDMs to be created in the dialog window to configure the KDMs (button KEY…). If track files have been modified, you will need another self KDM to be able to load them with the DVS software. Once the settings are made you can start the generation of the modified DCP at any time: Press the button RENDER to start the modification of the DCP. This will start the modification of the DCP: Altered or newly added track files will be generated and wrapped in MXF, whereas all unchanged files will be copied to the location specified for the DCP. Additionally, the extra files (i.e. CPL, KDMs and PKL) will be created as well. 5-15 Miscellaneous 6 This chapter explains other DCP related topics, such as how to create a 3D/stereoscopic DCP or how to adapt the rating agencies. Furthermore, some background information about color space conversions as well as keys and certificates are provided. 6-1 Miscellaneous 6.1 Stereoscopic DCP With the DCI Mastering feature you can also create a stereoscopic DCP and thus material to be screened in 3D. This section explains the items that are specifically available for a stereoscopic DCP and how to create one. The general items available for working with 3D material are not described in this manual. A description of them can be found in the “CLIPSTER 3D/Stereoscopy” supplement user guide accessible via the software’s online help. Please note that for a DCI Mastering not all items described in the above mentioned manual may be available to you. 6.1.1 Preparing a 3D DCP The creation of a 3D/stereoscopic DCP has to be prepared same way as described in chapter “Getting Started” on page 2-1. However, instead of single tracks the content of your project must be available in 3D stereo tracks (see the “CLIPSTER 3D/Stereoscopy” supplement user guide for further information about this). This applies to subtitles as well: In order to have subtitles in 3D in the DCP the subtitle timeline elements have to be placed in a 3D stereo track instead of a single track. With this you will get in the timeline element properties of a subtitle timeline element for the Position settings the Z position slider. It can be used to adjust the 3D effect of the selected subtitle(s): Figure 6-1: Z position setting of subtitles Apart from this subtitles in a 3D stereo track can be used same as the standard subtitles in the Edit Tool (see section “Adding Subtitles” on page 2-10 for further information). Once your project is properly prepared, you can start the creation of the DCP. A stereoscopic DCP always starts with the left eye clip as the first frame. 6-2 Miscellaneous 6.1.2 Creating a 3D DCP When your project is properly prepared for 3D (see section “Preparing a 3D DCP” on page 6-2), you can start the creation of the DCP as described in chapter “Digital Cinema Delivery Tool” on page 3-1. A stereoscopic DCP can also be created manually via finalizing (see section “Creating a DCP Manually” on page 5-7 as well as the “CLIPSTER 3D/Stereoscopy” supplement user guide). For the creation of a stereoscopic DCP there will be the Stereoscopic output settings items available in the digital cinema delivery tool. They can be found in the settings pane of the delivery format configuration step (see section “Delivery Format” on page 3-13): Figure 6-2: Configuring the stereoscopic output for a DCP To create a stereoscopic DCP the check box of the Stereoscopic output settings items must be activated. With the combo box to the right you can then configure the output type of the 3D DCP. Because the interleaved 3D clip is the native format for a stereoscopic DCP, it must be set to 3D Interleaved stream. With this the DCP will be created as a stereoscopic DCP. At the delivery creation configuration step the digital cinema delivery tool will show you for the video assets the sources of the left and right eye clips separately, thereby allowing you to confirm the contents of the 3D DCP (see also section “Delivery Creation” on page 3-20): Figure 6-3: The assets of a 3D DCP 6-3 Miscellaneous After clicking on the respective button in the digital cinema delivery tool the stereoscopic DCP will be created according to your settings. A stereoscopic DCP can be loaded in the DVS software as described in chapter “Using the DCP and Self KDM” on page 4-1. The video track will be automatically configured to a 3D stereo track. 6-4 Miscellaneous 6.2 Color Space Conversions According to the specifications a DCDM/DCP should be converted and saved in the X’Y’Z’ color space. The most important concept about a color space conversion is, that you should know the source material that you want to process. The properties of the clips added to the bin and used in the timeline (context menu of bin clip » Properties…) must reflect these, i.e. they have to match the properties of the material on the storage. For a DCI Mastering DVS recommends that the timeline of the Edit Tool consists of clips in a single color space only. Furthermore, when using the digital cinema delivery tool or manually finalizing to digital cinema content, the color space of your material in the timeline has to be specified further by choosing the correct color profile (color type) for the source material in the timeline. With the digital cinema delivery tool it can be set in the configuration step for the source type (see section “Source Type” on page 3-11). When converting to digital cinema content manually, it can be found among the JPEG2000 encoding parameters (see section “JPEG2000 Options” on page 6-9). This way the DVS software will know how to interpret the color space of your video material in the timeline. Once these two settings (i.e. the bin clip properties and the color profile) are set properly, the color space conversion(s) will be performed correctly during the creation of the digital cinema content. Particulars for a DCDM Conversion The color space conversion for a DCDM is performed via a 3D look-up table (LUT). For this the clips in the timeline of the Edit Tool must be in a single color space only. When using the digital cinema delivery tool, you can choose between predefined 3D LUTs or a LUT of your own (see section “Source Type” on page 3-11). A predefined 3D LUT can be selected by choosing one of the color profiles/types detailed in the source type configuration step. With this, a 3D LUT that has been applied to the timeline already (i.e. via the output settings) will be overwritten. To use a 3D LUT of your own it must be applied to the timeline the usual way. Then, with the appropriate option selected in the digital cinema delivery tool, it will be used for the DCDM conversion. When converting to a DCDM manually, you have to select the 3D LUT that should be applied to the DSM material in the finalize dialog (see section “Creating a DCDM Manually” on page 5-2) the usual way to set a 3D LUT. DVS delivers several predefined LUT files together with the DVS software that may be suitable for the color space conversion. This way you can also apply a 3D LUT of your own. 6-5 Miscellaneous Particulars for All Other Delivery Types Contrary to a DCDM conversion, when converting material to a delivery type where a JPEG2000 encoding is involved (i.e. all other delivery types but a DCDM), the color space conversion is performed via a matrix. This way provides the best possible color space conversion. Furthermore, a 3D LUT that is applied to the timeline will be evaluated during the conversion as well (regardless of whether the digital cinema delivery tool is used or the conversion is made manually). The only exception from this is when you use in the digital cinema delivery tool a 3D LUT of your own to effect the color space conversion to X’Y’Z’ (see section “Source Type” on page 3-11). Then, only this one will be used for the conversion. To use a 3D LUT applied to the timeline the clips on the timeline of the Edit Tool should be of a single color space only. In case a 3D LUT is not used, the mixing of clips in the RGB and X’Y’Z’ color space on the timeline of the Edit Tool is possible (only native X’Y’Z’, not YCxCz). 6-6 Miscellaneous 6.3 Adapting the Rating Agencies During the configuration of the CPL (see section “CPL” on page 3-16 and section “Finalize Settings – CPL” on page 5-9) you can set one or more rating agencies. Ex factory the software already offers a few rating agencies. However, these may not be enough for your work. Then you can add new selectable rating agencies or edit the already available ones. The file RatingAgency.xml in the program installation directory of the DVS software (usually C:\Program Files (x86)\DVS\Clipster) contains the rating agencies that will be displayed in the Edit Tool. It is a file in XML syntax that can be adapted to your needs: Just copy, paste and edit the entries and afterwards save the file. The adaptations will be displayed in the software when configuring a CPL creation. The name of the agency (attribute NAME of the <AGENCY> tag) should contain a URI that uniquely identifies the agency which issued the ratings. The following shows an example of the file RatingAgency.xml already adapted to another rating system: <?xml version="1.0" encoding="utf-8"?> <RA> <AGENCY NAME="http://www.classification.gov.au/ 2007-ratings"> <RATING>G</RATING> <RATING>PG</RATING> <RATING>M</RATING> <RATING>MA 15+</RATING> <RATING>R 18+</RATING> <RATING>X 18+</RATING> </AGENCY> </RA> 6-7 Miscellaneous 6.4 Keyboard Shortcuts For a more easy and faster control of the DCI Mastering feature there are various keyboard shortcuts available which are listed in the tables below: Table 6-1: General keyboard shortcuts Action Shortcut Open the digital cinema delivery tool [Ctrl + D] Open the finalize dialog [Ctrl + F] Table 6-2: Keyboard shortcuts for DC reels (i.e. when in DC reel mode) Action (when in DC reel mode) Shortcut Set DC reel inpoint [E], [I] Set DC reel outpoint [R], [O] Delete DC reel inpoint [D] Delete DC reel outpoint [F] Delete DC reel in- and outpoint [G] Go to DC reel inpoint [Q] Go to DC reel outpoint [W] 6-8 Miscellaneous 6.5 JPEG2000 Options With the JPEG2000 options you can set its encoding parameters. They can be accessed via the OPTIONS button to the right of the File format field in the finalize dialog window (Project » Finalize…). The button will be available as soon as a JPEG2000 format is selected as the file format for video (e.g. JP2, JPC or DC MXF): Figure 6-4: Accessing the JPEG2000 options Then the following window will be displayed on the screen: Figure 6-5: Configuring the JPEG2000 encoding Further information about color space conversions can be found in section “Color Space Conversions” on page 6-5. Further information about a JPEG2000 encoding can be found in section “JPEG2000” on page 2-3. 6-9 Miscellaneous In detail the window to configure the JPEG2000 encoding provides the following settings items: Colorspace Interpretation This setting determines the color profile and interpretation of RGB video material: – When converting from RGB to another color space (material in timeline is RGB, finalized output format is set to another color space), it sets the color profile of the source material, i.e. of the material in bin and timeline. – When converting from another color space to RGB (material in timeline is in another color space, finalized output format is set to RGB), it sets the profile of the target material, i.e. of the material to be finalized and rendered. – When converting from RGB to RGB (1:1 conversion) or when no RGB material is involved in the color space conversion, this setting has no effect. The timeline material is handled clip-wise, meaning each clip in the timeline is evaluated separately and converted with regard to its color space set in the bin properties. The remaining settings items are identical to the ones displayed at the JPEG2000 configuration step. For further information about them see section “Compression” on page 3-9. 6-10 Miscellaneous 6.6 Keys and Certificates Explained There are various keys and certificates involved in the process of creating a DCP. This section tries to shed some light on them and the way they are used. 6.6.1 What’s a Key A key is a piece of information (normally a string) that determines the output of a cryptographic algorithm. The key is used during encryption by the cryptographic algorithm to transform a certain piece of information (e.g. plaintext) to ciphertext, i.e. encrypted information. Vice versa, during decryption the key is used by the algorithm to decode the ciphertext back to the original information. There are two types of keys available: symmetric If the algorithm uses the same key during en- and decryption, it is known as a symmetric key algorithm. asymmetric Algorithms that require two different keys, one for encryption and one for decryption, are called asymmetric key algorithms. The concept behind them is that it is almost impossible to compute one key from the other. With this you can make one key public (the public key) while keeping the other in secret (the private key), thus providing others with the means, for example, to send encrypted pieces of information to the private key holder that only he can decode. 6.6.2 What’s a Certificate A certificate is a file that usually contains a key. Additionally it includes a digital signature to ensure the validity of the key/certificate. With this the purpose of a certificate is, on the one hand, to provide you with a key and, on the other, to confirm that this certificate and key belong to a certain identity (e.g. a person, institute or company). Ideally the signature comes from a certificate authority (CA) charged with the task of checking identities before issuing certificates that refer to this identity. However, the most commonly used certificates are those that users make for themselves (self-signed certificates). Also common are certificates that users make for others so that these can certify validities on behalf of the user (certificate chain, see section “What’s a Certificate Chain”). In the DCI Mastering a certificate normally contains a public key (*.cer or *.pem files). A private key is usually provided in a personal 6-11 Miscellaneous information exchange file (*.pfx) which is typically encrypted and requires a password to be opened. This file will also contain the public key certificate (or more than one if a certificate chain is involved) for authentication as well. Thus, a PFX file contains besides the private key one or more public keys. 6.6.3 The Key Players of the DCI Mastering Detailed in the following you can find the key pairs that are used during a DCI Mastering. AES Key The AES key is a symmetric key used to en- and decrypt the content of the DCP (track files). For each track file an individual AES key is generated. This key will be encrypted with the Encryption Key on CLIPSTER (see below) and written to the KDM file. The AES key is generated randomly and automatically by CLIPSTER. Encryption Key The Encryption Key is an asymmetric key pair (RSA) used to encrypt and decrypt the AES key. Typically this key pair is generated by the manufacturer of the D-Cinema player and handed to the purchaser of the player: – The public key of the Encryption Key is used to encrypt the AES key when it is written to the KDM. Usually it is embedded in a certificate file. – The private key of the Encryption Key is stored on the D-Cinema server/player at the recipient’s site. It is used to decrypt the AES key provided via the KDM. The private key is stored at the recipient’s site and will not be distributed. Thus it can be disregarded because it will not be available to you. The public key should have been sent to you in a signed certificate to enable you to create a DCP for this player. It has to be set on CLIPSTER. Signing Key The Signing Key is an asymmetric key pair (RSA) used to sign and validate the files of a DCP (e.g. KDM or CPL). With it the creator of the DCP digitally signs the extra files, while the recipient will be able to verify that the DCP was distributed by the creator/distributor and not altered in the meantime: 6-12 Miscellaneous – The private key of the Signing Key is used to create a signature for the files of a DCP, i.e. it is used to encrypt hash values of the files. – The public key of the Signing Key will be part of a certificate that will be attached to the extra files (if required, the certificate chain will be attached). The private key has to be set on CLIPSTER. Normally, it is stored encrypted in a PFX file and will require a password to be opened. The creator of a DCP has to provide this key (i.e. his own Signing Key). The most appropriate way to receive a Signing Key is to order it from a certificate authority (CA). However, you can find included in the delivery of the DCI Mastering feature a tool that can be used to create a Signing Key (i.e. a self-signed certificate). Alternatively, you can use a system specific (unique) Signing Key that DVS generates for each DCI Mastering system. It can be used instead of your own key if you are sure that it meets the safety requirements of your distribution chain (setting Use System Signing Key, see section “Configuring the System for a DCP Creation” on page 2-25). DVS grants you usage of this Signing Key under the provision that you shall be directly and exclusively liable for its application. The public key of the Signing Key will be attached to the extra files of the DCP via certificates. Thus, it will be distributed with them to the D-Cinema player automatically. There the exhibitor can extract it from the files and use it to verify the origin and validity of the DCP. Self KDM Key This key is not necessarily required. A DCP can be created without it, but afterwards it would be impossible to load it again with a DVS DCI Mastering system. The key for a self KDM is in most respects identical to an Encryption Key. While the private key is stored securely in the hardware of the respective DVS DCI Mastering system, the complementary public key is provided via a certificate file. You can find this file either already stored in the installation directory of the DVS software on the respective system or on a separate CD-ROM. However, compared to the Encryption Key this key has to be set differently in the DVS software. Further information about a self KDM and where it can be set in the DVS software can be found in chapter “Using the DCP and Self KDM” on page 4-1. 6-13 Miscellaneous Summary The following lists shortly the most important points about the different keys: AES key – Generated automatically by CLIPSTER Encryption Key – Certificate with public key must have been sent to you by the theater (i.e. the public key of a specific D-Cinema player) – Has to be set on CLIPSTER Signing Key – Normally, you must provide this key pair (i.e. your own Signing Key) and its private key has to be set on CLIPSTER – Alternatively, you may use a system specific Signing Key provided by DVS if it meets your safety requirements – The public key of the Signing Key will be attached to the extra files of the DCP and is thus delivered with the DCP automatically Self KDM – Similar to the Encryption Key – Public key file is available on CD-ROM or in the installation directory of the respective DVS system – Requires a different setting than the Encryption Key in the DVS software See chapter “Using the DCP and Self KDM” on page 4-1. 6.6.4 The Keys Applied The following shows in diagrams the keys as they are applied during a DCI Mastering on CLIPSTER and a play-out by the D-Cinema player. Please note that the explanations of the keys at the recipient side are detailed for clarification only. The Keys on CLIPSTER This diagram shows the keys applied on a DVS DCI Mastering system: 6-14 Miscellaneous Figure 6-6: The keys and where they are used on the Creator side The generated track file of the DCP is encrypted with an AES key that has been randomly generated by the DVS system. For each track file one AES key will be created and used. The AES keys are then encrypted with the public key of the Encryption Key. Afterwards the encrypted AES keys are written to the KDM file. Of each encrypted track file a hash value is created which is then written to the PKL file. Next, the completed CPL, KDM and PKL are signed with the Signing Key. The finished DCP can then be sent to the Recipient. The Keys at the Recipient This diagram shows the keys as they are applied at the Recipient’s site: 6-15 Miscellaneous Figure 6-7: The keys and where they are used on the Recipient side At the Recipient the received DCP has to be validated with the help of the public Signing Key that is attached to each extra file of the DCP (e.g. CPL, KDM or PKL). Whether the track files were received unmodified can be checked by comparing the hash values written in the validated (and thus unaltered) PKL file with hashs calculated from the received track files. The completely validated DCP can then be played out by decrypting the AES keys with the private key of the Encryption key. After this the AES keys will be used to decrypt the track files of the DCP. 6.6.5 What’s a Certificate Chain Certificates (see section “What’s a Certificate”) can be distributed in a chain, where the last certificate (the leaf certificate that cannot create 6-16 Miscellaneous other certificates) certifies that it comes from another certificate (the intermediate certificate), this certifying that it comes from a further certificate (another intermediate), and so on until the last certificate in the chain is reached (the root certificate that confirms the validity of the whole chain as well as the identity of its issuer). The whole structure of a certificate chain implies a hierarchy where the highest rank is held by the root and the lowest by the leafs. Figure 6-8: Certificate hierarchy The root certificate is either a CA-issued certificate or a self-signed one, i.e. it is signed by its own private key. From this root certificate other certificates can be created (intermediates), that enable other users to digitally sign items in the name of the root via their private keys. Additionally, from intermediate certificates further certificates can be created (either other intermediates or leaf certificates). The last link in the chain is the leaf certificate that can only be used for signing, meaning other certificates cannot be created from a leaf. All certificates in a certificate chain refer back to the identity that is bound to the root certificate and thus inherit the trustworthiness of the root. 6-17 Miscellaneous Figure 6-9: Certificate chain validation In a public-key certificate no certificate chain is stored. So, in order to validate a leaf certificate at the end of a certificate chain, the complete chain up to the root certificate has to be available. The maximum path depth from root to leaf that is allowed in a certificate hierarchy is a property of the root certificate. During the creation of the root it has to be set and it will be inherited correspondingly to the lower ranks. Within this path depth certificates can be created from root and intermediate certificates. When setting up a certificate hierarchy take care that only trusted users receive certificates (i.e. the private key of these certificates). This applies especially to intermediate certificates that can be used to create other certificates. 6.6.6 Validating Certificates As useful as the concept of certificates may seem, it fails when the validating certificate itself is a forgery. Thus the remaining question is, how can a receiver be sure about the origin of the signed files. If the certificate was issued by a certificate authority, you can validate the certificate either via a public certificate repository, i.e. a database of issued certificates that is maintained by the CA, or by contacting the CA directly. When dealing with a self-signed certificate, there is only one way: You should have received a duplicate of the respective public-key certificate 6-18 Miscellaneous in a trusted communication and compare this with the certificate delivered with the signed files. To validate a certificate chain the complete certificate chain has to be available to you. Nevertheless, although you need the certificate chain to verify the origin of a leaf or intermediate certificate, only its root certificate has to be verified via a secure communication because the chain leads to it (see also section “What’s a Certificate Chain” on page 6-16). 6.6.7 The Keys and Certificates Delivered with CLIPSTER In the delivery of the DCI Mastering feature you can find on the enclosed CD-ROM and/or in the installation directory of the DVS software the following keys and certificates: Test Keys You may use the following files for testing purposes only. They should not be used to create a DCP for distribution: File: TestSigningCertificateLeafSHA*.pfx Path: DVS\CLIPSTER\Signature Store\DVS Test\ Explanation: For testing only: Private Signing Key for testing. With it you can sign the extra files of a DCP. Contains the complete chain of test certificates. Use SHA-1 for SMPTE Phase 0 compliant DCPs, and SHA-256 for SMPTE Phase 1 and 2. Password: DVS File: TestSigningCertificateLeaf.pem Path: DVS\CLIPSTER\Certificate Store\DVS Test\ Explanation: For testing only: Test certificate. The public-key certificate of the private Signing Key for testing. With this file and the certificate chain the DCP can be validated. 6-19 Miscellaneous File: TestSigningCertificateRoot.pem TestSigningCertificateIntermediate.pem Path: DVS\CLIPSTER\Certificate Store\DVS Test\ Explanation: For testing only: Test certificates. The certificate chain for the public key certificate of the private Signing Key for testing (intermediate and root) for verification. Live Keys The following keys can be used for the creation of digital cinema content: File: DvsClipsterDCI_*.cer Path: DVS\CLIPSTER\Key Store\ Explanation: Public key for a self KDM for this CLIPSTER DCI Mastering system, i.e. the certificate/key to create a KDM for this DVS system to be able to decrypt a DCP here. File: DvsClipsterDCIRoot.cer DvsClipsterDCIDvsAG.cer Path: DVS\CLIPSTER\Certificate Store\DVS\ Explanation: The certificate chain of the public key for a self KDM (intermediate and root) for verification. DVS grants you usage of the Signing Key under the provision that you shall be directly and exclusively liable for its application. See also section “Signing Key” on page 6-12. File: DvsClipsterDCISigningSHA*.pfx Path: DVS\CLIPSTER\Key Store\ Explanation: Private Signing Key (leaf certificate). It can be used to sign the extra files of a DCP. SHA-1 will be used for SMPTE Phase 0 compliant DCPs, and SHA-256 for SMPTE Phase 1 and 2. 6-20 I Index Delete track ............................ 2-15 In/Out / DC reels . 2-18, 2-20, 2-21 inpoint ................................... 2-20 Key .................... 5-10, 5-13, 5-15 Load settings ............................ 3-4 Name options ...3-21, 5-2, 5-5, 5-7 New image ............................. 2-16 New subtitle ........................... 2-15 New track .............................. 2-13 Next ........................................ 3-4 Options ................................... 6-9 outpoint ................................. 2-20 Playlist ..................................... 5-9 Previous ................................... 3-4 Render . 5-4, 5-6, 5-12, 5-13, 5-15 Save settings ............................ 3-4 Settings ............................2-7, 2-9 Subtitling ............................... 3-14 Numerics 3D ................................................ 6-2 creating DCP ............................ 6-3 interleaved ............................... 6-3 preparing DCP ......................... 6-2 preparing subtitles .................... 6-2 z-position (subtitle) ................... 6-2 3D LUT ................. 3-12, 5-2, 6-5, 6-6 3D stereo tracks ............................. 6-2 A abbreviations ................................. 1-5 action in-/outpoints ...................... 2-22 D-Cinema player .................... 2-22 AES key .................... 6-12, 6-14, 6-15 arrow (configuration steps) .............. 3-3 aspect ratio .................................... 2-5 asset ........................................... 3-20 3D DCP ................................... 6-3 supplemental DCP .................. 4-10 Asset Map ................................... 3-23 audio channel mapping ................... 2-5 audio format .2-5, 3-14, 5-3, 5-6, 5-11 audio retiming ............................. 3-14 audio routing ......... 2-7, 2-8, 2-9, 2-23 B bit rate ................................. 2-3, 3-10 blue line (DC reel) ........................ 2-21 button 3D LUT ................................... 5-2 Add ...................................... 3-19 Cancel ..................................... 3-4 Create ............................ 3-4, 3-21 Delete ..........................2-21, 3-19 Delete subtitle ........................ 2-15 C captions .............................2-10, 2-12 certificate ...........................3-19, 6-11 certificate authority (CA) .....6-11, 6-13, 6-18 certificate chain ............................ 6-16 channel mapping ............................ 2-5 chapter overview ............................ 1-2 ciphertext .................................... 6-11 closed captions ....................2-10, 2-12 closed subtitle .....................2-10, 2-12 closing digital cinema delivery tool ... 3-4, 3-21 color profile ................ 3-11, 6-5, 6-10 color space .................................. 3-11 conversion ............................... 6-5 DCDM ..............................2-7, 5-2 DSM ..................2-2, 2-7, 6-5, 6-6 matrix ...................................... 6-6 I-1 Index compression ................... 2-3, 3-9, 6-9 configuration step ........... 3-3, 3-5, 3-6 CPL (extra files) only ................. 4-6 KDM only ................................ 4-6 supplemental DCP .................... 4-8 Configuration Tool ................ 2-6, 2-25 configuring self KDM .............2-26, 4-2 configuring the system .................. 2-25 constant quality VBR .................... 3-10 container ............................2-10, 2-12 conventions of user guide ............... 1-4 conversion (color space) .................. 6-5 CPL ....................................... 1-5, 2-4 creation .......................... 3-16, 5-9 file ........................................ 3-23 load ........................................ 4-3 UUID .................................... 2-26 CPL only ................................ 3-7, 4-6 configuration steps ................... 4-6 creating 3D DCP ................................... 6-3 CPL ................................ 3-16, 5-9 DCDM .............................3-6, 5-2 DCP .................................3-6, 5-7 extra files only ...................3-7, 4-6 further KDMs .................. 4-6, 5-13 JPEG2000 ......................... 3-6, 5-5 KDMs ...........................3-18, 5-10 self KDM ........................3-19, 4-2 supplemental DCP .................... 3-8 D data rate ....................................... 2-3 DC KDM ..................................... 5-13 DC MXF ....................... 5-7, 5-11, 6-9 DC reel ....................................... 2-18 action in-/outpoints ................ 2-22 assets ................... 3-20, 4-10, 6-3 automatic setting .............2-18, 4-9 editing ................................... 2-21 in-/outpoints .................2-20, 2-23 name ................. 2-19, 2-20, 2-23 remove .................................. 2-24 subtitles ................................. 2-18 supplemental DCP .................... 4-9 tab ’DC reels’ ......................... 2-22 DC reel mode .....................2-18, 2-21 DCDM ................................... 1-5, 2-3 audio format ................... 3-14, 5-3 color space ........................2-7, 5-2 color space conversion ............... 6-5 creation ............................3-6, 5-2 generated files ........................ 3-22 preparation .............................. 2-7 DCI ........................................1-1, 1-5 DCI Mastering ................................ 1-1 start ...................................... 2-28 DCI Phase .............................2-6, 2-26 D-Cinema player .......................... 3-19 action in-/outpoints ................ 2-22 forensic marking ..................... 3-19 KDM ............................3-18, 5-10 key ........................................ 6-12 DCP .......................................1-5, 2-4 3D .......................................... 6-2 audio format ......... 2-5, 3-14, 5-11 creation .................... 3-6, 3-7, 5-7 encrypted .............. 3-7, 3-19, 5-10 extra files .................. 2-4, 3-7, 4-6 formats .................................... 2-4 generated files ........................ 3-22 load ......................................... 4-3 localization ......................4-7, 5-14 master ..... 3-6, 3-7, 3-8, 4-7, 5-14 name ..................................... 3-21 unencrypted .......... 3-6, 3-19, 5-10 versions ..........................4-7, 5-14 video format ............................. 2-5 DCP phases ................................... 2-2 DCP standards ........................2-6, 5-8 see also SMPTE phases select ..................................... 2-26 delivery creation ........................... 3-20 3D .......................................... 6-3 supplemental DCP .................. 4-10 delivery format ............................. 3-13 delivery type .................................. 3-5 digital cinema delivery tool .....2-28, 3-1 3D .......................................... 6-3 close ...............................3-4, 3-21 configuration steps ..... 3-3, 3-5, 3-6 load settings ............................. 3-4 overview .................................. 3-3 save settings ............................. 3-4 start ........................................ 3-2 DLP P3 ........................................ 3-12 DLP P7 ........................................ 3-12 DSM ......................................1-5, 2-2 color space .........2-2, 2-7, 6-5, 6-6 preparation .............................. 2-7 Duration ...................................... 2-22 I-2 Index creation ............................3-6, 5-5 generated files ........................ 3-22 preparation .............................. 2-9 E editing DC reels ........................... 2-21 effects operator (subtitle) .............. 2-11 encrypted DCP ..................... 3-7, 3-19 finalizing ................................ 5-10 Encryption Key .......... 6-12, 6-14, 6-15 setting ................................... 3-19 EntryPoint ................................... 2-22 exchange format ............................ 2-3 extra files of a DCP ......................... 2-4 creating again ...................3-7, 4-6 K KDM ......................................1-5, 2-4 creating further KDMs ......4-6, 5-13 creation ........................3-18, 5-10 file ........................................ 3-23 KDM only ...............................3-8, 4-6 configuration steps .................... 4-6 key ............................................. 6-11 F file size ................................. 2-3, 3-10 finalizing ....................................... 5-1 DCDM .................................... 5-2 DCP ........................................ 5-7 encrypted DCP ....................... 5-10 further KDMs ......................... 5-13 JPEG2000 ................................ 5-5 unencrypted DCP ................... 5-10 forensic marking .......................... 3-19 format .......................................... 2-4 of subtitles ............................. 2-10 frame rate ...................... 2-2, 2-3, 2-7 L language .................. 2-13, 2-15, 3-16 leaf certificate .............................. 6-17 letterboxing ................................... 2-5 load settings .................................. 3-4 loading of CPL ..................................... 4-3 of DCP .................................... 4-3 of self KDM .......................4-4, 4-5 of supplemental DCP ................. 4-7 localization of a DCP ..............4-7, 5-14 loudspeaker ................................... 2-5 G M general settings ............................ 2-25 main captions ......................2-10, 2-12 main subtitle ............. 2-10, 2-12, 2-14 manual creation ....................2-28, 5-1 mapping ........................................ 2-5 master DCP ... 3-6, 3-7, 3-8, 4-7, 5-14 master project ................................ 2-2 matrix ........................................... 6-6 maximum quality VBR ................... 3-10 MPEG ............................ 2-6, 3-9, 5-8 MPEG Interop ................................ 2-6 multi-channel file ........... 3-14, 5-3, 5-6 MXF ............................................. 2-4 audio .................. 3-14, 3-22, 5-11 reels ...................................... 2-18 subtitle .........................2-10, 3-14 video ..............................3-22, 5-7 MXF Interop .................................. 2-6 H hardware finalize support . 5-2, 5-5, 5-8 hierarchy ..................................... 6-17 I ICT ............................................. 3-10 interleaved .................................... 6-3 intermediate certificate ................. 6-17 intermediate step ........................... 2-2 J JP2 ........................................5-5, 6-9 JPC ............................................... 6-9 JPEG Interop .................................. 2-6 JPEG2000 ................ 2-3, 3-9, 5-8, 6-9 audio format ................... 3-14, 5-6 N name of DC reel ........ 2-19, 2-20, 2-23 I-3 Index name of DCP ............................... 3-21 next step ....................................... 3-4 notes ............................................ 1-5 O option ........................................... 1-5 orange ........................................ 2-15 orange line (DC reel) .................... 2-22 overview of chapters ............................... 1-2 of DCP phases .......................... 2-2 of digital cinema delivery tool ..... 3-3 P path depth .................................. 6-18 PFX file .................... 2-26, 6-12, 6-13 phases of a DCP ............................. 2-2 pillarboxing ................................... 2-5 PKL ....................................... 1-5, 2-4 file ........................................ 3-23 plaintext ...................................... 6-11 PNG ..................................2-10, 2-16 post compression rate control ........ 3-10 preparing 3D DCP ................................... 6-2 3D subtitles .............................. 6-2 DCDM .................................... 2-7 DSM ....................................... 2-7 JPEG2000 ................................ 2-9 previous step ................................. 3-4 profile ........................ 3-11, 6-5, 6-10 properties of bin clip ................................ 2-8 of subtitle .....................2-12, 2-14 R rating ................................... 3-16, 6-7 rating agency ........................3-16, 6-7 REC 709 ...................................... 3-12 reel ............................................... 2-4 see also DC reel MXF ...................................... 2-18 removing DC reel ......................... 2-24 retiming (audio) ........................... 3-14 RGB ............................................ 3-11 root certificate ............................. 6-17 routing .................. 2-7, 2-8, 2-9, 2-23 S save settings .................................. 3-4 screenshots .................................... 1-5 self KDM ....................................... 4-1 configuration ...................2-26, 4-2 creation ..........................3-19, 4-2 file .................................3-23, 4-2 key ...............................6-13, 6-14 key setting ............................. 2-26 load ..................................4-4, 4-5 loading DCP ............................. 4-3 public key .............................. 6-20 validity ..................................... 4-1 verification ............................. 6-20 setting Encryption Key ................... 3-19 setting Signing Key ....................... 2-26 shortcuts ....................................... 6-8 signature .................. 3-23, 6-11, 6-13 signing extra files ....... 2-26, 6-12, 6-15 Signing Key ............... 6-12, 6-14, 6-15 setting ................................... 2-26 System Signing Key ........2-26, 6-13 SMPTE ...................................1-1, 1-5 SMPTE DCP ..........................2-6, 3-22 SMPTE phases ................................ 2-6 keys .............................6-19, 6-20 result ..................................... 3-22 select ..................................... 2-26 subtitle output format .............. 3-14 subtitle track type ................... 2-14 source data .............................2-7, 6-5 source type .................................. 3-11 standards ....................................... 2-6 starting DCI Mastering ........................ 2-28 digital cinema delivery tool ......... 3-2 stereoscopy see 3D storage location ......3-21, 5-2, 5-5, 5-7 supplemental DCP .................. 4-10 subtitle ...............................2-10, 2-12 3D .......................................... 6-2 appearance ............................ 2-17 bin clip ................................... 2-11 DC reels ................................. 2-18 effects operator ...................... 2-11 gap ..............................2-10, 2-14 in- and outpoints .................... 2-15 in the timeline ......................... 2-10 language ................................ 2-15 length .................................... 2-14 I-4 Index output format ........................ 3-14 output settings ....................... 3-14 position ................................. 2-17 properties .....................2-12, 2-14 render into image ................... 3-15 result ..................................... 3-22 slip ........................................ 2-16 subtitle track ....... 2-10, 2-12, 2-15 supplemental DCP ............. 4-7, 4-9 supported formats .................. 2-10 timeline element .. 2-10, 2-11, 2-14 track type .....................2-14, 2-15 z-position ................................ 6-2 supplemental DCP .......................... 4-7 assets .................................... 4-10 configuration steps ................... 4-8 creation ................................... 3-8 DC reels .................................. 4-9 delivery creation ..................... 4-10 load ........................................ 4-7 storage location ...................... 4-10 subtitles ............................ 4-7, 4-9 supported subtitle formats ............. 2-10 System Signing Key .............2-26, 6-13 T tab ’DC reels’ ............................... 2-22 target group .................................. 1-3 TIFF ........................ 2-3, 2-7, 3-6, 5-2 timeline element properties ..2-12, 2-14 trusted communication ................. 6-19 typographical conventions ............... 1-4 U unencrypted DCP .................. 3-6, 3-19 finalizing ................................ 5-10 user interface ................................. 1-5 UUID .......................................... 2-26 V validation ................. 6-12, 6-16, 6-18 validity ........................................ 6-11 of DCP .................................. 3-18 of self KDM .............................. 4-1 VBR .....................................2-3, 3-10 verification ................ 3-23, 6-12, 6-19 versions of a DCP ..................4-7, 5-14 video format .. 2-5, 3-13, 5-3, 5-5, 5-8 virtual DC reel ................................ 4-9 Volume Index .............................. 3-23 W watermarking ............................... 3-19 WAV .....................2-5, 3-14, 5-3, 5-6 X X’Y’Z’ ... 2-3, 2-7, 3-11, 3-12, 5-2, 6-5 XML extra files ........................3-23, 4-4 subtitle .........................2-10, 3-14 XYZ projector ................................. 4-4 Y YCxCz .......................... 2-8, 3-12, 6-6 YUV matrix ...........................2-8, 3-12 Z z-position (subtitle) ......................... 6-2 I-5