1
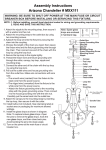
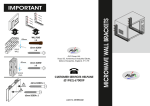
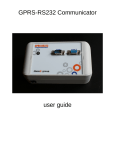
TouchMD Computer Setup
TouchMD currently uses the 23” HP Compaq Elite 8300 or HP TouchSmart 9300 Elite all-in-one computers.
The computers can be mounted on the with a Chief F Series wall mount or set on a desk/countertop using
the factory installed stands.
Tools Needed
•
•
•
•
•
•
Electric Drill
1/2” drill bit (for steel stud install)
1/8” drill bit (wood stud install & Pilot Holes)
#2 phillips head screwdriver
#3 phillips head screwdriver
Flat head screwdriver
•
•
•
•
•
Stud Finder
Bubble Level
Tape measure
Razor Blade
Pencil
Installation
1. Identify an agreeable location for the Touch Screen computer with the site contact. TouchMD advises
the site contact to work with their doctors to determine the location/height of the install and mark it
with tape prior to your arrival. Keep in mind the following as you place the Touch Screen computer:
1.1. Is the location suitable for the install?
1.1.1. The Touch Computer should be located on a wall where the doctor can use TouchMD to
educate the patient, and/or the patient can use TouchMD themselves the during a normal
consultation (the computer can swivel and extend up to 16” as needed).
1.1.2. The Touch Computer height should be between the EYE LEVEL of the doctor and patient
during a normal consultation (the computer can tilt up or down as needed).
1.1.3. The Touch Computer should be mounted on the closest wall stud available and at the
height indicated by the site contact.
1.2. Is there power for the screen (within 3 ft)?
1.3. Is this a safe location for the computer screen?
2. Install the Chief FWD wall mount for wood studs, or the Chief FWDSK for steel studs according to the
directions included in the box. If not mounting on the wall unbox the computer, setup at the desired
desktop location, and skip to step 9 below. If the instructions are not included with the mount, you
can download copies of these instructions at our website:
2.1. Chief FWD (wood stud): www.touchmd.com/documents/FWD_WoodStud.pdf
2.2. Chief FWDSK (steel stud): www.touchmd.com/documents/FWDSK_MetalStud.pdf
TouchMD Computer Setup (version December 2012)
Page 1
3. Make sure to adjust the wall mount arms with the included 3/16” hex key so arm move freely, but hold
in place. Also insure that the “Centris” head screw is adjusted with a #3 phillips head screwdriver to
hold the weight of the screen. FAILURE TO ADJUST THE
“CENTRIS” HEAD SCREW PROPERLY WILL RESULT IN A
RETURN VISIT CALL! When TouchMD installs, we usually turn
the screw until it won’t turn easily, then turn the screw
another ¼ turn. This is usually tight enough to hold the
screen in place but still adjust the computer screen with two
hands on the frame.
4. Unpack the computer. If mounting on the wall, remove the factory installed stand per the instructions
at the end of this document. Otherwise, setup at the desired desktop location and skip to step 9 below.
4.1. See Appendix A for HP Compaq Elite 8300 stand removal instructions
4.2. See Appendix B for HP TouchSmart 9300 Elite stand removal instructions
5. Prepare to mount the Touch
Screen Computer to the
Chief Wall Mount by
attaching top two screws
(use the medium length
screws included with the
mount bracket) to the VESA
mount 100mm hole pattern
on the Touch Screen
Computers. Leave screws half way out, do not tighten as this will allow you to set the computer on the
open slots of the mount centris head in step 6. See illustration A.
6. Lift the computer onto
open top slots of the
Chief wall mount centris
head and allow it to set
into place. Tighten top
screws on the Centris
Head to the VESA mount
to hold in place (See
illustration B). Attach
and tighten bottom two screws between the Centris Head and the VESA mount to secure to computer
to the Chief wall mount (See Illustration C).
TouchMD Computer Setup (version December 2012)
Page 2
7. Run cables to computer and conceal inside wall mount arms per the Chief FWD or FWDSK cable
management instructions. Use the small screws and metal cord covers included with the wall mount
(see illustration D). Attach the screws to the bottom of the mounts, tighten half way, and push the
cables up into the arm (see illustration E). With the cables in place, twist the metal plate onto the
screws and tighten the screws (see illustration F). Repeat the above steps until the cables are conceal
in both arms (see illustration G)
8. For HP TouchSmart 9300 computers, use double
stick tape to attach the power supply to the wall
next to the wall mount (See illustration H). This step
is not needed for HP Compaq Elite 8300 computers
as the power supply is inside the computer.
9. Plug in and turn on computer.
10. If the computer was dropped shipped directly from
HP, you will need to perform the “Windows 7 Setup”
and “Installing LogMeIn” instructions below.
Otherwise, skip to step 11.
11. Connect the computer to the wireless network in the Office. The wireless network password will be
provided by the site contact.
TouchMD Computer Setup (version December 2012)
Page 3
12. Attach Web Cam AND/OR Insert Eye-fi SDHC cards:
12.1. Un-box MicroSoft LifeCam Cinema AND/OR Eye-fi SDHC card
12.2. Attach camera to a rear USB port AND/OR insert the Eye-fi card in the SD card reader on the left
side of the computer
12.3. Discard packaging and give the software disk AND/OR Eye-Fi USB card reader to the site contact,
TouchMD will install and configure camera AND/OR Eye-Fi card.
13. Unbox the wireless keyboard and mouse included with the computer and test the connection. If the
computers were shipped from TouchMD, the USB dongle will already be in a rear USB port and
connected with wireless keyboard and mouse. If the computers were drop shipped directly from HP,
you will need to setup the wireless keyboard and mouse according to the enclosed instructions (the
USB dongle is in the side of the keyboard packaging).
14. Give all the ‘system recovery’ disks included with the computer to the site contact and instruct them to
keep the disks in a safe place just in case a repair is needed to the computers.
Once setup and installation is completed on all computers call the TouchMD offices at
435-867-0077 to verify that all the computers are online. You may also call the number
above for support.
TouchMD Computer Setup (version December 2012)
Page 4
Windows 7 Setup
(This step is not needed if shipped from TouchMD, refer to your work order from Rollouts)
1. On the Windows 7 Setup dialog box accept the following default values and click or touch “next”:
1.1. Coutry or Region: United States
1.2. Time & Currency: English (United States)
1.3. Keyboard Layout: US
2. On the User Name setup dialog box enter the following information and click or touch “next”:
2.1. User Name: TouchMD
2.2. Computer Name: <See email from Rollouts or call TouchMD at 435-867-0077>
3. On the Set Password setup dialog box leave the password blank and click or touch “next”.
4. On the License Terms setup dialog box accept the license terms and click or touch “next”.
5. On the Protect Computer & Improve Windows Automatically setup dialog box click on the “Use
recommended Settings” button.
6. On the Clock setup dialog box review the Time and Date settings; set current date, time, and time
zone. Click or touch “Next” when finished setting the date and time.
7. On the Join a Wireless Network setup dialog box:
7.1. Select the office wireless network for the office (usually the strongest signal) or ask the office
contact for network name.
7.2. Enter the Wireless Security Key provided in the email from Rollouts or provided by the office
contact.
7.3. Ensure the “Start the connection automatically” option box is checked (enabled)
8. On the Computer Location setup dialog box click or touch “Work Network”.
Windows 7 will now finalize settings and start the HP “Welcome to your new HP Computer” program. This
process takes about 3-5 minutes to complete. Touch the “GO” button to start.
9. HP Registration Step 1 of 4: Leave the registration blank and click or touch the “Register Later” button.
10. HP Stay Updated Step 2 of 4:
10.1. Keep Your PC Running Smoothly: Select the “Yes, download and install updates automatically”
option
TouchMD Computer Setup (version December 2012)
Page 5
10.2. Experience Improvement Program: Select the “No” option
10.3. Click or touch “Next”
11. HP Protect your PC Step 3 of 4: Select “No, do not turn on Norton Internet Security” and click or touch
“Next”. Click to “Yes” to confirm your selection.
12. HP Get Online Step 4 of 4: This step should show that “you are connected” if a wireless connection
was set-up earlier in Step 7, or if the computer is connected to the internet via a LAN connection. Click
or touch the “Finish HP Setup” button
13. Click or touch “Finish” on the HP Setup Complete window
The computer will now start Windows 7 and open the windows desktop.
Installing LogMeIn
1. Open Internet Explorer (click or touch link on desktop)
2. Enter the “LogMeIn Deployment” link URL from your INC email
3. Enter a computer description: <Dr Name> Room <Room#> <ComputerName> (Example: Dr Smith
Room 1 TouchMD86)
4. Select the “I have received this link form a trusted source” checkbox and click or touch “Continue”
5. On Download & Install click the “Install LogMeIn” button. If a security warning appears click or touch
“Run”
LogMeIn will now download and install. Follow the Installer instructions using the following settings:
•
•
Software Options: Typical
Computer Access Code: touchmd00000 (that is touchmd followed by 5 zeros. The access
code is case sensitive).
Once setup and installation is completed on all computers call the TouchMD offices at
435-867-0077 to verify that all the computers are online. You may also call the number
above for support.
TouchMD Computer Setup (version December 2012)
Page 6
Appendix A
Stand Removal Instructions for the HP Compaq Elite 8300
83
1. Make sure the computer is completely shut down,
and disconnect the power adaptor from the back of
the computer. Place the computer face down on a
soft, flat surface. Use a shipping foam or soft cloth to
protect the touch screen from scratches or other
damage
2. Insert your finger, or a flathead screwdriver, into the
slot on the stand cover to pry it off the computer
stand. Remove the stand cover from the computer
stand.
3. Loosen the two locking screen located on the back of
the stand.
4. Lift the stand up and off the computer.
5. Continue with step 5 of the computer setup
instructions above.
TouchMD Computer Setup (version December 2012)
Page 7
Appendix B
Stand Removal Instructions for the HP TouchSmart 9300 Elite
1. Make sure the computer is completely shut down,
and disconnect the power adaptor from the back of
the computer. Place the computer face down on a
soft, flat surface. Use a shipping foam or soft cloth
to protect the touch screen from scratches or other
damage
2. Insert your finger, or a flathead screwdriver, into the
slot on the stand cover to pry it off the computer
stand. Remove the stand cover from the computer
stand.
3. Use a Phillips screwdriver to tighten the recessed to
brake screws (for the rails) on the computer. It
should take about 5-10
10 turns of the screwdriver to
secure the screws. Take care not to over tighten the
screws. NOTE: The
he tightened brake screws will hold
the VESA adapter plate in the locked position, so that
the computer does not slide down once it is
mounted on the wall. These screws MUST be
tightened before placing the VESA adapter plate on
the back of the computer.
4. Using
sing a Torx or Flathead screwdriver, remove the
four screws attaching the VESA adapter plate to the
bottom of the computer stand and remove it from
the bottom of the computer stand. SAVE THE
SCREWS (these will be used to attach the mount to
the VESA adpter plate). We recommend that you
put these screws in the 100x100mm screw pattern
on the VESA adapter plate until you are ready to
mount the computer on the wall mount.
TouchMD Computer Setup (version December 2012)
Page 8
5. Using a Torx or Flathead screwdriver, remove the
four screws attaching the computer stand to the
back of the computer and lift it away from the
computer. SAVE THE SCREWS
CREWS (these will be used to
attach the VESA adpter plate to the computer). Give
the stand to the office contact for storage.
6. Place the VESA adapter plate over the rails on the
back of the computer, matching the cutouts on each
side of the plate with the screw holes and the hooks
on the rails. Attach the VESA adapter plate using the
fours screw removed in the previous step 12.
7. Slide the VESA adapter plate upward until it locks
into place. You will hear a click when the VESA
adapter plate is locked into place. NOTE: if you do
not hear the click or the plate does not lock into
place, it means the two brake screws were not
sufficiently tightened when the computer stand was
removed. You will need to remove the VESA adapter
plate and repeat steps 10, and 13--14.
TouchMD Computer Setup (version December 2012)
Page 9
8. Using the screws removed in step #11, aattach the
wall-mounting
mounting hardware to the VESA adapter plate in
the 100x100mm screw hole position and mount on
the wall.
9. Continue with step 5 of the computer setup
instructions above.
Additional detailed instructions and video tutorials can be found on HP’s website if needed:
Installing HP VESA Adapter
ter Plate on HP TouchSmart 99300 series computers:
TouchMD Computer Setup (version December 2012)
Page 10