1
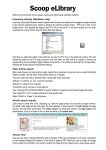
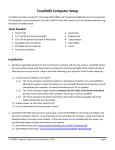
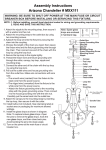
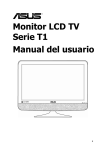
NewsPlanner User Manual Windows S c o o p N e w s P l a n n e r 2 M a r c h W i n 2 0 0 7 Contents Main Window.................................................... 4 Step 2 – Assign different resources............. 17 Sort the lists.................................................... 6 Step 3 – Send assignments to Scoop Edit... 19 Adjust column headlines................................ 6 Printouts........................................................... 20 Calendar Window............................................. 7 Printout format................................................ 20 Resource Window............................................ 8 Assignment list................................................ 20 Proposals Window........................................... 9 Printing a work schedule................................ 21 Planning Window............................................. 11 Menu commands............................................. 22 Proposals......................................................... 13 File.................................................................... 22 Add proposal................................................... 13 Edit.................................................................... 23 Change proposal............................................. 14 Proposal........................................................... 24 Delete proposal............................................... 14 Maintenance . .................................................. 24 Planning a day................................................. 15 Update screen.................................................. 24 Step 1 – Decide which proposals to use...... 15 Help ................................................................. 24 About this manual This manual is a complement to the Administrator Manual, which describes installation and setup. This manual does not provide you with instructions for using your PC. Refer to your Windows manual for that. Program commands are written in parentheses, with an arrow between the menu levels (Maintenance Setup). Keyboard functions are written inside brackets. Important information in the normal text is written in bold style. Notes and comments are slightly indented. Function keys [alt] [ctrl] [Tab] [Arrow up] [Arrow down] [Return] [Enter] S c o o p N e w s P l a n n e r 2 M a r c h W i n 2 0 0 7 About NewsPlanner NewsPlanner is a newsroom planning tool. The program handles suggestions, assignments and distribution of resources. Everybody can make proposals for articles, with attached information. These proposals are displayed in a list. From these, the planning editor selects the proposals to become articles on a certain day. Moving these proposals to another window indicates that the articles are to be written and published on a certain day. Proposals can also be moved to another day by “dropping” them on that day in the calendar. They will then appear when that day is active. The editor selects different resources from a list and drops on the assignments, the articles to be written. These resources can be e.g. reporters, photographers, editors or vehicles. In this way, e.g. reporters and photographers can be allocated to different assignments. The editor has total control over proposals and planning of coming events. Add a calendar with day-specific information, and you have a superb tool for planning the work around a newspaper. NewsPlanner is based on different user levels. User rights range from the Supervisor who can do “everything” to the Limited reader who can only see his/her own assignments. All user levels can make proposals to NewsPlanner. Working with Scoop NewsPlanner is easy and intuitive. All work is done in one main window, giving an overview of the whole procedure. Operations consist of simple “drag and drop”. There are separate versions for Mac and Windows. The program works stand-alone but is integrated with Scoop Edit and can be combined with other editorial systems. Registered trademarks Scoop is a trademark of Scoop Publishware AB. All other trademarks mentioned are the property of their respective owners. Scoop Publishware AB, Finlandsgatan 12, SE-164 74 Kista, Sweden tel +46-8-722 0220, fax: +1 909 498 8814, www.scoop.se Edited by Per Åkesson, since Nov 2003, rev date in page head. S c o o p N e w s P l a n n e r 2 M a r c h W i n 2 0 0 7 Main Window Double-click on the program icon to start. When you have started and logged in, the main window appears. It is divided into four parts: Calendar Window Resource Window Proposals Window Planning Window Planning Window Calendar Window Resource Window Proposals Window To activate the different windows, either click the desired window part, or move between the different window parts with [Tab]. The title bar in the active window will turn blue. Move around in the lists with [Arrow up] and [Arrow down]. S c o o p N e w s P l a n n e r 2 M a r c h W i n 2 0 0 7 Appearance of the main window Change size of window parts The size of the windows can be adjusted by taking hold of the coloured frame that separates the parts and dragging it with the mouse until the window reaches the desired size. Change style/size/colour of the text in the main window The style, size and colour of the text in the main window can be changed with Maintenance Setup Font. With Maintenance Setup Color, the style, size and colour of the text in the individuals windows can be changed. The settings apply tor the individual elements, e.g. Proposals. We suggest that you are careful with the colour settings, or you may end up with text that is too difficult to read. S c o o p N e w s P l a n n e r 2 M a r c h W i n 2 0 0 7 Sorting the lists All window parts, except the Calendar Window, can be sorted. By clicking a column headline, the list will be sorted according to that criterion. The chosen sorting method is indicated by a line under the column headline. An additional click on the column headline will sort the list in the opposite order. Example: Click the column headline “Name” in the Resources Window and the list will be sorted in alphabetical order. Click the same column headline again, and the list will be sorted in the opposite alphabetical order. Adjust columns Re-size column The size of the different columns can be adjusted by dragging the edges that separate the column headlines with the mouse. Move column Column headlines can be moved from the inside by clicking a column headline and dragging it to the desired place in the headline row. Add or delete column All columns can be reached by sliding the horisontal scroll bar. To make a column visible, drag it to the left until it’ inside the visible window part. To remove a column, drag it to the right until it’s moved outside the visible part. S c o o p N e w s P l a n n e r 2 M a r c h W i n 2 0 0 7 Calendar Window The calendar is on the left-hand side. It contains all the days in the current month. The basic setting is that the logged in user’s tasks for the current day are shown. To change the date, either click with the mouse on the desired date or move with [Arrow up] or [Arrow down]. The year and month can be chosen at the top. When you change the date, the information will automatically be changed in the Resources Window. Date comment After respective dates, there may be a comment with datespecific information. If publishing does not take place every day in the week, this will be indicated by days highlighted in grey. By double-clicking a date in the calendar and selecting Maintenance Day info, additions/changes can be made to the date comments. See also the section “Date Status”. Status for resource The status of resources that have been selected in the resource list is shown on the right-hand side of the Resources Window. Click another resource in the resource list, and its status will be shown, i.e. how he/she works this month. See also the section “Resources Window”. Column headlines The size of the column headlines can be adjusted by dragging the line that separates the column headlines. S c o o p N e w s P l a n n e r 2 M a r c h W i n 2 0 0 7 Resource Window On the right-hand side, there is a list of all the resources (users) that are defined. When NewsPlanner starts, the user that is logged will always be selected. The actual resource status will be shown with the number of assignments that the respective resource has for the active day (the day that is selected in the Calendar Window). By selecting/clicking a certain resource, the user’s calendar and assignments will be shown. Where and when the different co-workers are in the editing office is shown in the Status column. Double click the column headline to sort the resources by work schedules. This can be helpful when planning meetings. Double click your own resource to change your work schedule for the current day. Show information about a resource Double click a resource (or select it and press [Return]) and a window will appear with resource information. Show chosen parts of the resource list At the top of the Resources Window, the department’s resources, respectively the type of resource, can be chosen. These will then be shown in the resource list. Choose All departments or a Selected department (Sport, for example). Choose All resource types or a Selected resource (Photographer, for example) in the same way. Sorting The resource list can be adjusted in the normal way. See the section “Sort the lists”. Column headlines Column headlines can be moved and adjusted. See the section “Adjust column headlines”. S c o o p N e w s P l a n n e r 2 M a r c h W i n 2 0 0 7 Proposals Window The middle section is divided in an upper and a lower part. Proposals for articles are in the lower part. Each proposal contains a great deal of information: Title: title of the proposal Department: the department to which the proposal belongs When: date and time of event Where: location of the event Optional: box for optional information Date of publication: when the article is to be published Production date: when the article is to be produced Deadline: time of deadline Depth: depth of the article, for example, number of characters Priority: the priority of the proposal (1–5), default value=5 Format: format of the article Description: a short or long description of the proposal Recurring jobs The proposal can be of two types; normal proposals and recurring proposals. The recurring proposals (templates) will only be shown in the Proposals Window when the list is sorted to show them. If the proposal is only a small article, the whole text can be written in here. Example: Every day a column is to be written on the sport that in short deals with the previous day’s events. A recurring job is created and all necessary information about the article is filled in. When the job is applied, a proposal is created every day in the Planning Window. S c o o p N e w s P l a n n e r 2 M a r c h W i n 2 0 0 7 Limit the proposal list There are several pop-up menus in the top of the Proposals Window. Choosing different alternatives, will limit the amount of information shown in the proposal list. Show different types of proposals The different types of proposals that can be shown are: Used, Unused, Time bound, Non-time bound, Text selection, Templates and All. Text selection is an easy way to filter, displaying only those descriptions matching the text string that you enter. Show proposals for a certain period of time This can be steered so that proposals can be assigned to: This day, Within two days, Within a week, Two weeks forward, This month, Within one month, One month forward and Two months forward. If you select Used and This month, you will have an overview of the most recently assigned jobs. Show a department’s proposals In the pop-up menu on the right, the desired department’s proposals can be chosen. Copy proposal A proposal can be copied using Proposal Copy proposal, or <Ctrl-D> Sorting The resource list can be adjusted in the normal way. See the section “Sort the lists”. Column headlines Column headlines can be removed, added, moved and adjusted. See the section “Adjust column headlines”. 10 S c o o p N e w s P l a n n e r 2 M a r c h W i n 2 0 0 7 Planning Window The proposals to be published are in the upper part of the middle section. They are dragged here from the lower window. They will be highlighted in grey in the lower window. Show description of proposal The long proposal description can be only be seen by double clicking the proposal. Limit the proposals in the planning list There are several pop-up menus at the top of the Proposals Window. By choosing different alternatives here, information in the planning list can be limited. Publishing, Production and Event date Proposals can be chosen here that show the actual Publication, Production or Event date. This choice can be made in the pop-up menu on the left. Example: A football match is played on October 25th at 3:00 p.m. The Event date is October 25. The article is to be published on the 27th of October. The Publication date is October 27. The article is to be written on the 26th of October. The Production date is October 26. Show a department’s proposals Planning for All departments or a Selected department can be chosen in the pop-up menu in the middle. Show planning for a resource In the right-hand pop-up menu, the desired resource planning can be chosen. These can be All resources or Selected resources for a particular day. Sorting The resource list can be adjusted according to the section “Sort the lists”. Column headlines Column headlines can be removed, added, moved and adjusted. See the section “Adjust column headlines”. Display page In the upper right corner is the ”Page” box. Default ”-1” displays assignments planned for all pages, ”0” assignments without set page. Other values display those pages. 11 S c o o p N e w s P l a n n e r 2 M a r c h W i n 2 0 0 7 Proposals No special authorisation is needed to add, change or delete proposals. Anybody with access to Scoop NewsPlanner can create a proposal. Add proposal Adding proposals is easy. By selecting Edit New proposal or pressing Ctrl+N, a window will appear. Fill in all the information needed for the proposal. Note: It is not always necessary to give date and/or time for a proposal. Not all proposals need to occur on a certain date (for example, an article about the weather this year). By pressing [Return] in the text box where the description is written, the row will be changed in the text. Click <Cancel> to cancel the operation. N.B. If a deadline is given, this will refer to the Production date. All proposals automatically record the name of the user that created the proposal. You can add (attach) any file types, e.g. PDF, to the proposal, by dragging files into the proposals window. When the assignment finally is sent to a reporter, the attached document is sent as a link, so it’s important that attached documents are in network folders that can be reached by all staff. 12 S c o o p N e w s P l a n n e r 2 M a r c h W i n 2 0 0 7 Change proposal Anybody can double-click a proposal and read its information, including the name of the user who created it. But to change a Proposal you must be logged in as a Planner. Double-clicking a proposal in the proposal list, or select the proposal and press [Return], and the proposal’s window appears. Besides the fields from ”Add proposal”, the following can be changed by the Planner editor: Fill in Page for the intended page. From is the author of the proposal. If Publishing date is today’s date, you can set it by clicking on the ”Set” button. If Production date is tomorrow’s date, you can set it by clicking on the ”Set” button. These both dates are filled in automatically when the proposal is dropped in the Planning Window, or assigned resources, or dropped on a date. Thus, it’s not necessary to click these buttons. If you set a Deadline, that will be the time on the production date. Depth is desired size in characters or words. Priority is default 5 unless you raise it. In the Format field you can e.g. give a Quark format, like ”100 1 2” etc. In the Description field you can add further information, before it is sent as an assignment to reporter and photographer. You can assign resources when the proposal becomes an assignment. See page 17. You can aattach any file types, e.g. PDF texts, to the proposal, by dragging files into the Attachment field. When the assignment finally is sent to a reporter, the attached document is sent as a link, so it’s important that attached documents are in network folders that can be reached by all staff. Presently, this it is not possible to attach documents if the personal baskets that are SQL folders used by NewsPlanner SQL. If you use NewsPlanner SQL, you have more fields: 13 S c o o p N e w s P l a n n e r 2 M a r c h W i n 2 0 0 7 Select IPTC category, for the eLibrary archive. Select Channel, if any. Click <OK> when you are done. Delete proposal To delete a proposal from the proposal list, you must be logged in as a Planner. Select the proposal and select Edit Delete. The proposal will disappear immediately from the list. Note: Proposals can be selected in both the proposal list and the planning list at the same time. Before deleting proposals, be sure that the right window part is active, otherwise wrong proposals can be deleted. Active window parts have a thin black frame. Several proposals can be selected or cleared at the same time. Create recurring jobs Create a recurring in almost the same way as creating a “normal” proposal. Select Maintenance New Template. Fill in the proposal as usual. Finally, select a weekday in Template Status and click on Apply. You will see your job entered for all those weekdays in the current month. All recurring proposal in the proposal list can be seen by choosing “Show recurring jobs” in the pop-up menu on the left. 14 S c o o p N e w s P l a n n e r 2 M a r c h W i n 2 0 0 7 Planning a day Working with Scoop NewsPlanner is done in three stages. Step 1 Decide which proposals are to be used and when they are to be published. Step 2 Assign different resources to a proposal. Step 3 Send the proposals to Scoop Edit. Step 1 – Decide which proposals to use and when to publish 1 2 3 Make sure that the Proposals Window displays unused proposals. Revise and edit interesting proposals (see page 13) and select those to be published. Drag and drop the selected proposals into the desired publishing day in the Calendar Window. The proposals move to the Planning Window for that day, where they appear if you select that day in the Calendar Window. If proposals are to be produced on the day that is active in the calendar, drag them directly to the Planning Window where they immediately appear (if the list shows the production day). If you now open the assignment you will see that the day in which the proposal is placed displays in the Publish and Prod date fields, i.e. the Publication and Production dates for the assignment. 3 2 1 Note: The date in the Date column is the Event date for the proposals that not used. The dates for the grey proposals, i.e. the proposal in use, show the Publication date. 15 S c o o p N e w s P l a n n e r 2 M a r c h W i n 2 0 0 7 Production date/publication date If you drop a proposal to the Planning Window, and you have set the Publication date , the Production date will automatically appear as the day before. If the proposal is dropped into planning showing the Production date, the Publication date will automatically appear as the day after. (if it’s a publishing day) Change planning If you change your mind, proposals can be dragged from the Planning Window back to the Proposals Window. They will then disappear from the Planning Window. Proposals from the Proposals Window that have already been placed on a day can be dragged to another day, if you display “All” proposals in the Proposals Window.. The Publication date for the proposal in the Date field will be shown directly as the new Publication date and the proposal will disappear from the first day. Click on the column ”Page” to get an overview of which assignments are planned for which pages. All resources that are connected to the assignment will follow the proposal and the resource list will be updated with new number of jobs for the affected days. 16 S c o o p N e w s P l a n n e r 2 M a r c h W i n 2 0 0 7 Step 2 – Assign resources to a proposal 1 Select the resource/resources that are to carry out an assignment 2 Drag and drop them into a proposal. If you are editing a proposal as described on page 13, you can also assign resources to the assignment by dragging resources into the Resource field. 2 1 The figure to the right of the resource in the resource list will be updated, indicating the number of assignments to which the resource has been assigned on this day. Resources can be dragged and dropped into proposals both in the Proposals Window and the Planning Window. Each time you drag a resource to an assignment, the ”Job” column for that resource is incremented. Note: If a resource is dragged to a proposal in the Proposals Window, it will not be updated with the number of jobs on that day. When the proposal is later dragged to a day in the Calendar Window, the number will be updated. 17 S c o o p N e w s P l a n n e r 2 M a r c h W i n 2 0 0 7 Find right resource quickly The resource list can be limited and sorted in order to find someone who can carry out an assignment. Example: An important football match is to be played. An article is to be written about the match and pictures are to be included. First, the resource list must be sorted so that it only shows those in the Sport Department. Then, sport reporters are chosen. This list must be sorted with considerations for status to find someone who can carry out the assignment. A photographer can be chosen in the same way. Change the assignment of resources If you change your mind, resources can be dragged away from the Planning and Proposals Windows and dropped into the Resources Window. The figure indicating the number of assignments will be updated automatically. 18 S c o o p N e w s P l a n n e r 2 M a r c h W i n 2 0 0 7 Step 3 – Send the assignments to Scoop Edit As soon as one or more assignments has been planned and finished they can be sent to Scoop Edit., if you are using Scoop Edit. An empty article is created in a specific folder for each assignment and has all information from NewsPlanner. The information is attached to the article in a note. This is not a necessary step. The assignment is already placed in NewsPlanner, but it is convenient to send it directly to the reporter’s desk in Scoop Edit. Note: This demands that the editorial system Scoop Edit is installed. The one who is planning in NewsPlanner must have Scoop Edit running Send assignments to Scoop Edit Mark one ore more assignments in the Planning Window and select Proposal Send to Scoop Edit. The field ”Sent” is indicating that the assignment has been sent to Scoop Edit. Where are the proposals sent? The setup for each resource has a field defining in which basket the assignments should appear, as seen from Scoop Edit, no matter where that basket is physically located on the server or SQL database. This is explained in the NewsPlanner Administrator manual. Example: Charles When the planner sends an assignment to Scoop Edit, he must have Scoop Edit running, and in his Scoop Edit having a basket by the same name pointing to the same folder. If the receiving basket is a Watch Basket, a red flag is visible. Example: In order for the planner to send the assignment to the reporter Lois, both Lois and the planner must have the basket ”Lois” created in their Scoop Edit, and the planner’s Scoop Edit must be running. For this reason, the planner’s Scoop Edit should have separate baskets pointing to the personal baskets of all reporters. 19 S c o o p N e w s P l a n n e r 2 M a r c h W i n Printouts You can print from all window parts in Scoop NewsPlanner. Printout format The setup for printing, i.e. margins, font styles and font sizes can be chosen in the “Printout format” (File Printout format) window. These settings will apply for all window parts. You can also select which data fields to print on the job list. Assignment list For you morning meeting you’ll need a current job list, or “budget list”. Click on any of the proposals/ tasks in the Planning Window, and print (File Print) and you will get a printout of all the proposals/tasks in the Planning Window, in the order they were sorted, with the fields that you selected under Printout Format. If you only want to print some selected assignments, select those in NewsPlanner, then click the button ”Selected” in the print dialog. 20 2 0 0 7 S c o o p N e w s P l a n n e r 2 M a r c h W i n 2 0 0 7 Printing a work schedule If you select several resources and then select to print, by <Ctrl-P> you get a dialog where you can set the extent of the schedule to print. Printing In the window that opens, choose the settings for printing. Choose between the selected fields or all fields, and the number of days ahead that are to be written out. Printouts can be made from all window parts in NewsPlanner. It is important, therefore, that the window from which you want to print is active before selecting File Print. After that, follow the instructions in the window that opens. 21 S c o o p N e w s P l a n n e r 2 M a r c h W i n Menu commands File Save (Standard function in Windows) Read Login Login as user to the database. Printout Format Choose alternative settings for a printout. Print (Standard function in Windows) Export to HTML Exit Exit and close Scoop NewsPlanner. 22 2 0 0 7 S c o o p N e w s P l a n n e r 2 M a r c h W i n Edit Cut (Standard function in Windows) Copy (Standard function in Windows) Paste (Standard function in Windows) Delete (Standard function in Windows) Select all (Standard function in Windows) Layout reset Page view Displays a page view if the program is used with PageTrack. Find Find next 23 2 0 0 7 S c o o p N e w s P l a n n e r 2 M a r c h W i n 2 0 0 7 Proposal New proposal Create a new proposal to add to the proposal list. Send to Scoop Edit Sends the proposal to Scoop Edit. Copy proposal Copies the proposal in the same window. You are asked for a name for your copied proposal. Maintenance The Maintenance menu is only for the administrator and described in the NewsPlanner for Windows Administrator Manual. Update screen When the database changes, a red icon displays on top of the Main Window. To update the screen, click “Update screen”. This is a manual function in order to prevent the screen to update just when you are going to pull e.g. a proposal to a date. That could easily cause you to grab the wrong object. Help About Scoop NewsPlanner Displays information about the program version. Contents Displays the user manual in PDF format. 24