1
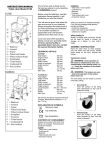
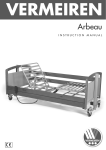
VERMEIREN Gemini 2 INSTRUCTION MANUAL Instructions to the specialist dealer This instruction manual is part and parcel of the product and must accompany every product sold. Version: A, 2014-03 All rights reserved, including translation. No part of this manual may be reproduced in any form what so ever (print, photocopy, microfilm or any other process) without written permission of the publisher, or processed, duplicated or distributed by using electronic systems. © N.V. Vermeiren N.V. 2014 Gemini 2 2014-03 Contents Preface 1 1.1 1.2 1.3 1.4 1.5 1.6 2 2.1 2.2 2.3 2.4 2.5 2.6 2.7 2.8 2.9 2.10 2.11 2.12 2.13 2.14 3 3.1 3.2 3.3 3.4 3.5 3.6 3.7 3.8 3.9 3.10 4 ...................................................................................................................................... 2 Product description..................................................................................................... 3 Intended Use ................................................................................................................ 3 Technical specifications .............................................................................................. 4 Components ................................................................................................................. 5 Accessories .................................................................................................................. 6 Explanation of symbols ............................................................................................... 6 Safety rules .................................................................................................................. 7 Use ................................................................................................................................ 7 Carrying the wheelchair .............................................................................................. 7 Assembly / dissassembly the wheelchair .................................................................... 8 Mounting or removing the rear wheels ....................................................................... 1 Folding / Unfolding the frame ..................................................................................... 1 Operating the brake ..................................................................................................... 2 Abduction Wedge (B22) .............................................................................................. 3 Safety belts .................................................................................................................. 3 Transfer in and out the wheelchair .............................................................................. 4 Correct position in the wheelchair .............................................................................. 4 Riding the wheelchair.................................................................................................. 4 Moving on slopes ........................................................................................................ 5 Negotiating steps or curbs ........................................................................................... 5 Transport in the car...................................................................................................... 6 Transport in other vehicles .......................................................................................... 6 Installation and adjustment ....................................................................................... 7 Tools ............................................................................................................................ 7 Manner of delivery ...................................................................................................... 7 Adjusting the seat depth Gemini 2 32 ......................................................................... 8 Adjusting the seat depth Gemini 2 40 ......................................................................... 8 Footrest Gemini 2 (Seat width 32) .............................................................................. 9 Footrest Gemini 2 (Seat width 40) ............................................................................ 11 Backrest ..................................................................................................................... 12 Seat ............................................................................................................................ 14 Side supports (Pelots) ................................................................................................ 17 Tyre changing ............................................................................................................ 19 Maintenance .............................................................................................................. 20 Page 1 Gemini 2 2014-03 Preface First of all we want to thank you for putting your trust in us by selecting one of our wheelchairs. The Vermeiren wheelchairs are the result of many years of research and experience. During the development, special attention was given to the ease of use and the serviceability of the wheelchair. The expected lifetime of your wheelchair is strongly influenced by the care and maintenance of the wheelchair. This manual will help you get acquainted with the operation of your wheelchair. Following the user instructions and the maintenance instructions are an essential part of the warranty. This manual reflects the latest product developments. Vermeiren has the right to introduce changes without the obligation to adapt or replace previously delivered models. For any further questions, please consult your specialist dealer. Page 2 Gemini 2 2014-03 1 Product description 1.1 Intended Use The wheelchair is intended for children with a disability or movement dysfunction through brain damage. The wheelchair is designed to transport 1 child. The wheelchair is suited for indoor and outdoor use in combination with a supervisor. The Gemini 2 can be pushed by an attendant or the parent. The modular construction allows to choose the optimal design in specific need to your child. Together with a variety of colors for the frame will this chair ensure a physical and mental happiness for your child. When providing for individual requirements: body size and weight physical and psychological condition residential circumstances environment should be taken into consideration. Your wheelchair should only be used on surfaces where all four wheels are touching the ground and where there is sufficient contact to propel the wheels equally. You should practice for use on uneven surfaces (cobblestones, etc.), slopes, curves and to get past obstacles (curbs, etc.). The wheelchair should not be used as a ladder, nor is it a transport for heavy or hot objects. When used on mats, carpeted floors or loose floor coverings, the floor covering can get damaged. Use only Vermeiren approved accessories. The manufacturer is not liable for damage caused by the lack of or improper service or as a result of not following instructions from this manual. Compliance with the user and maintenance instructions are an essential part of the guarantee conditions. Page 3 Gemini 2 2014-03 1.2 Technical specifications Technical terms below are valid for the wheelchair in standard settings. If other footrests or other accessories are used, the tabulated values will change. Make Vermeiren Address Vermeirenplein 1/15, B-2920 Kalmthout Type Manual wheelchair Model Gemini 2 Description Gemini 2 32 Gemini 2 40 35 kg 50 kg Effective seat width 320 mm 400 mm Overall width (depends on the model) 620 mm 690 mm Overall length (footrest open, back in laying position) 1150 mm 1250 mm Overall length (footrest closed, back in seating position) 950 mm 910 mm Folded length 820 mm without rear wheels: 800 mm 930 mm without rear wheels: 920 mm Folded width 620 mm without rear wheels: 600 mm 690 mm without rear wheels: 680 mm Folded height 460 mm without rear wheels: 350 mm 560 mm without rear wheels: 460 mm Total height (including push bar) 1180 mm 1220 mm Total mass ± 13,5 kg ± 27 kg Mass of heaviest part ± 12,5 kg ± 25 kg Rear wheels: 1 kg / piece Rear wheels: 1 kg / piece Maximum occupant mass Masses of parts that can be dismantled or removed Static stability downhill 10° (in standard configuration) Static stability uphill 10° (in standard configuration) Static stability sideways 10° (in standard configuration) Obstacle climbing 40 mm (when seated correctly) Seat plane angle Effective seat depth Seat surface height at front edge -19° - +20° -25 - +22° 300 - 360 mm 380 - 430 mm 510 mm (without cushions) 510 mm (without cushions) Backrest angle 45° 40° Backrest height 520 – 640 mm 650 – 780 mm 250 mm - 340 mm 315 – 400 mm Angle between seat and footrest 2,5° - 85,5° 3° - 88° Angle foot supports -17° - +23° -11,5° - +14° 200 mm 200 mm Front location of armrest structure 280 - 340 mm 340 mm Head pelots 160 - 210 mm 160 - 210 mm Distance between footrest and seat Distance between armrest and seat Not applicable Handrim diameter Horizontal location of axle (deflection) Minimum turning diameter 230 mm 150 mm 1200 mm (footplate folded up) 1480 mm (footplate folded down) 1620 mm (footplate folded up) 1850 mm (footplate folded down) 290 mm x 60 mm Diameter PU Rear wheels Page 4 Gemini 2 2014-03 Max. 2,5 bar Tyre pressure, rear (driving) wheels (for air tyres) 200 mm x 50 mm Diameter PU steering wheels Max. 2.5 bar Tyre pressure, steering wheels (for air tyres) Change the direction of the seat Storage and use temperature Storage and use humidity Yes Yes + 5 °C + 41 °C 30% 70% We reserve the right to introduce technical changes. Measurement tolerance ± 15 mm / 1,5 kg / ° Table 1: Technical specifications Gemini 2 The wheelchair complies to the requirements set up in: ISO 7176-8: Requirements and test methods for static, impact and fatigue strengths. 1.3 Components Gemini 2 32 1 = Pushbar 2 = Backrest 3 = Armrests 4 = Brake 5 = Driving wheels (rear wheels) 6 = Frame 7 = Steering wheels (Front wheels) 8 = Head pelots 9 = Backrest pelots (big) 10 = Hip pelots 11 = Abduction wedge 12 = Seat 13 = Footrest 14 = Foot supports 15 = Footplate 16 = Identification plate Page 5 Gemini 2 2014-03 Gemini 2 40 1.4 1 = Pushbar 2 = Backrest 3 = Armrests 4 = Brake 5 = Driving wheels (rear wheels) 6 = Frame 7 = Steering wheels (Front wheels) 8 = Head pelots 9 = Backrest pelots (big) 10 = Hip pelots 11 = Abduction wedge 12 = Seat 13 = Footrest 14 = Foot supports 15 = Footplate 16 = Identification plate Accessories The following accessories are available for the Gemini 2: Collapsible cover The accessory enhances the comfort of the Gemini 2. Special holes in the frame of the Gemini 2 are made to fix the cover. It suffices to lock the ends of the cover into the holes. Depending on the needs, the cover can open or closed. Table Barrier Safety belts Small backrest pelots We offer a wide range of interesting and useful additional elements for the Gemini 2, which will increase the comfort and usefulness of the Gemini 2. Please refer to your local dealer for more information on the available options. 1.5 Explanation of symbols Maximum mass Indoor and outdoor use Maximum Safe Slope CE conformity Type designation Not intended to be used as a seat in a Motor vehicle Page 6 Gemini 2 2014-03 1.6 Safety rules L To prevent injury and/or damage to your wheelchair, make sure that no objects L L L L L L L L L L L L L L L L L 2 and/or body parts are caught in the driving wheels. The central brake should be applied before getting into and out the Gemini 2. When getting into and out the wheelchair, do not stand on the footplate. These should be folded up beforehand. Investigate the effects of shifting the centre of gravity on the behavior of the wheelchair, for example on up or down gradients, on laterally sloping ground, or when overcoming obstacles. Obtain support from an attendant. If you want to pick up something (lying in front of, on the side, or to the rear of the wheelchair), you should not lean too far out to avoid tipping over. When moving through doors, arches, etc. ensure that there is enough room at the sides so that you do not get your hands or arms caught or crushed and that there is no damage to the wheelchair. Only use your wheelchair according to regulations. For example, avoid uncontrolled rolling against obstacles (steps, curbs, doorframes, etc) or dropping down from ledges. The manufacturer cannot assume liability for damage caused by overloading, collision or other improper use. Stairs may only be negotiated when aided by another person. If furnishings like drive-on, ramps or lifts are available, use them. When moving on the public highway, you are subject to the rules of the road. When travelling outdoors, adapt your driving to weather and traffic conditions. When transporting the wheelchair, never pick it up by grasping movable parts (footrest, rear wheels, etc.). To be better visible when driving in the dark, wear the brightest possible clothing or clothes with reflectors, and check that the reflectors mounted on the sides and rear of the wheelchair are clearly visible. Be careful when using possible causes of fire such as cigarettes since they may set the seat and back covers alight. Never exceed the maximum load. Check the profile depth and the inflation pressure of the tyres. Only use a Gemini 2 which has been adjusted to the weight and length of the child. The Gemini 2 cannot be tipped too much backwards because the shift of the centre of gravity may cause the Gemini 2 to flip backwards. The person who operates the wheelchair must be aware of the responsibility of his actions concerning the correct usage of the Gemini 2. Use This chapter describes the everyday use. These instructions are for the user and the specialist dealer. The wheelchair is delivered fully assembled by your specialist dealer. The instructions intended for the specialist dealer on how to set up the wheelchair are given in § 3. 2.1 Carrying the wheelchair The best way to carry the wheelchair is to make use of the wheels and roll the wheelchair. If this is not possible (e.g. when the rear wheels are taken off for transportation in a car), firmly grasp the frame on the front and the rear. Do not use the footrest to grasp the wheelchair. Also is it possible to fold the Gemini 2 for an easy transport. Page 7 Gemini 2 2014-03 2.2 Assembly / dissassembly the wheelchair L CAUTION: Risk of clamping – Keep fingers away from moving parts of the wheelchair. Assembly 1. Mount the rear wheels. 2. Unfold the lower frame of the Gemini 2, by unfolding the tubes. 3. Mount the seat frame on the lower frame. 4. Mount the abduction wedge. 5. Unfold the footplate. 6. Adjust the chair comfortably for the child Disassembly 1. Fold the footplate. 2. Remove the abduction wedge. 3. Remove the seat frame from the lower frame. 4. Fold up the lower frame. 5. Remove the rear wheels. It is also possible not to remove the seat frame and fold the Gemini 2 like shown in the drawing. Be aware that you first remove all the pelots and abduction wedge before completely folding the backrest to the front. Page 8 Gemini 2 2014-03 2.3 Mounting or removing the rear wheels L CAUTION: Risk of injury – Check that the rear wheels are correct mounted before using the Gemini 2. The fast and safe removal of the wheels is very convenient for transport in smaller cars. By usage of the special axle, a fast removal is possible. Use your thumb to press the silver U clamp on the wheels to the inside. After that, the wheel can be removed, by pulling the wheel softly out the frame. For mounting the wheels again, the same procedure needs to be followed. Push the silver U clamp and slide the wheel in the lower frame to lock into position. Improper assembly or use of tyres other than ours voids any warranty claim. 2.4 Folding / Unfolding the frame L CAUTION: Risk of clamping – Keep fingers, buckles away from the folding mechanism. To fold the frame: 1. Pull parts Ⓐ on both sides upwards until it comes loose from tube Ⓑ. 2. Push the pushbar Ⓒ to the front, to fold the frame. 3. Turn the frame so the front and rear wheels and tube Ⓓ rest on the ground. 4. Now the frame can be completely folded. 5. Turn the pushbar downwards with the buttons Ⓔ. To unfold the frame: 1. Grasp the pushbar Ⓒ and move these upwards to unfold the frame. 2. Turn the frame so the front and rear wheels can rest on the ground. 3. Move the pushbar backwards to unfold the frame completely. 4. Check that the parts Ⓐ clicks over the tube Ⓑ and the frame is firmly secured. 5. Turn the pushbar with the buttons Ⓔ in the desired position. Page 1 Gemini 2 2014-03 2.5 Operating the brake L WARNING: The brake is not used to slow down the wheelchair during L L L movements – Use the brake only to prevent the wheelchair from unintended movements. WARNING: Good operation of the brake is influenced by wear and contamination of the tires (water, oil, mud, …) – Check the condition of the tires before each use. WARNING: The brake can wear – Check the operation of the brake before each use. CAUTION: Risk of unintended movement – Make sure the wheelchair is on a flat horizontal surface before releasing the brake. The central brake must be used when the wheelchair is not in motion. First stop moving / pushing the wheelchair Gemini 2 and use than the central brake. The person who is pushing the Gemini 2 is responsible for the correct usage of the brake.The Gemini 2 has been equipped with a central brake. Push the central brake in direction to activate the brake. By pushing the central brake in direction , the brake will be released. A good performance of the break depends on the correct tyre pressure. If the brake have lost their effectiveness because of wear and tear and/or damage to the tyres and inner tubes, we advise you to consult your specialist dealer to renovate the system, since he has suitable tools and knowledge. Improper maintenance or the use of unsuitable tools might cause damage and/or loss of function. Page 2 Gemini 2 2014-03 2.6 Abduction Wedge (B22) By default, an abduction wedge , covered with textile, is mounted on the seatframe. It will prevent your child from sliding out of the Gemini 2. The abduction wedge has been mounted with two wing nuts . It can easily be removed by loosening/tightening the wing nuts . The usage of the wedge depends on the physical and mental condition of your child. 2.7 Safety belts L WARNING: Risk of injury – Make sure all the safety belts are locked into place before driving the Gemini 2. Every Gemini 2 has been equipped with adjustable belt to the purpose of a correct and safe seating position. These belts have an adjustable length and are mounted to the seating frame. The ends are connected to each other by means of a central lock. After applying the safety belts to your child, you need to hear an auditable clicking sound to make sure the belts are locked into place. Push the buttons on the locks to release them again. The belts can only be adjusted after the locks are into place. Adjusting the safety belts Adjusting the length of each belt is done individually by shortening or extending the length of each belt by means of the buckles. The connection points of the belts on the plate of the back support can be located in different positions depending on the size of your child. To do so, the shoulder belts need to go through the oval openings in the back support and retightened again. The correct procedure of adjusting the length of the safety belts and the power by which they are drawn will influence the safety and driving comfort of your child. In case of questions regarding the locking and safety systems, please refer to our dealers. Page 3 Gemini 2 2014-03 2.8 Transfer in and out the wheelchair L CAUTION: Risk of tipping over of the wheelchair – Do not stand on the footplate. 1. Position the wheelchair as close as possible to the chair, couch or bed to/from you wish to transfer. 2. Check the central brake from the wheelchair is activated. 3. Fold the footplate upwards to prevent standing on them. 4. Transfer the child to/from the wheelchair. 2.9 Correct position in the wheelchair Some recommendations for a comfortable use of the wheelchair: Position your backside as close as possible to the back rest. Make sure your upper legs are horizontal – If needed adjust the length of the footrest. (see § 3.4.2) 2.10 Riding the wheelchair L WARNING: Risk of clamping – Be careful passing through restricted passages (e.g. doors). L WARNING: Risk of burns – Be careful when driving in hot or cold environments 1. 2. 3. (sunshine, extreme cold, saunas, etc.) for a sufficient amount of time and when touching - Surfaces can assume the environment temperatures. Release the brake. Take the pushbar. Push the wheelchair by an attendant or parent. Pushbar The Gemini 2 has been equipped with rubber pushing handgrips, which have been mounted, on an adjustable pushbar. This will make it easier for the person who pushes the Gemini 2 and remain a firm grip under different driving circumstances. Setting the pushbar Simultaneously, push both buttons at the clamp of the pushbar and lock in the desired position. Releasing the buttons on the clamp will automatically lock the pushbar in the desired position. Page 4 Gemini 2 2014-03 2.11 Moving on slopes L WARNING: Control your speed – Moving on slopes as slow as possible. L WARNING: Consider the capacities of your attendant – If your attendant does not have enough force to control the wheelchair, activate the central brake. L WARNING: Risk of tipping over – Lean forward to move your centre of gravity 1. 2. 3. 4. forward. To improve a better stability. If available on the wheelchair, wear the safety belt. Do not attempt moving on too high slopes. The maximum slope angles (upwards and downwards) are mentioned in table 1. Lean forward to move your centre of gravity forward. Push the wheelchair up or down the slopes. 2.12 Negotiating steps or curbs 2.12.1 Getting down steps or curbs Riding down curbs can be done moving forwards. Make sure that the footrest do not touch the ground. 1. 2. 3. Ask the attendant/parent to tip the wheelchair slightly backwards. Get past the curbs while moving on the rear wheels. Put the wheelchair back on the four wheels. 2.12.2 Moving up steps or curbs Moving up steps or curbs with attendant as follows: 1. 2. 3. 4. 5. Prevent the footrest from touching the curbs. Ask the attendant to tip the wheelchair backwards, just enough to move the front wheels over the curbs. Lean backwards to move your centre of gravity above the rear wheel. Place the front wheels on the curbs. Roll rear wheels of the wheelchair over the curb. 2.12.3 Taking of stairs Taking of stairs while you staying in the wheelchair shall be according following rules: L WARNING: Risk of tipping over – Taking of stairs shall always with 2 attendants. L WARNING: Risk of injury – Lifting the wheelchair while the patient is seated in the wheelchair is forbidden! Always keep the rear wheels on the ground/stairs. L WARNING: Risk of injury – Wear suitable safety belt systems while being transported (information obtainable from your specialist dealer). L WARNING: Risk of injury or damages – No persons or objects should be below the wheelchair while being transported. 1. Remove the accessories. 2. Take the child out the wheelchair. 3. One attendant tip the wheelchair slightly backwards. 4. The second attendant take the front of the frame. 5. Take the steps on the rear wheels of the wheelchair. 6. Mounting the accessories back after taking the stair. 7. Place the child back in the wheelchair. Page 5 Gemini 2 2014-03 2.12.4 Using ramps L WARNING: Risk of injury – Do not exceed the maximum load of the ramps. L WARNING: Risk of injury - Choose the correct ramps so there cannot be caused L L L any injury or damage. We do not accept any liability for injury or damage caused by an improper choice of ramps. WARNING: Risk of injury - Be sure that the wheel height is high enough to get over the free height of the ramps. The wheelchair frame may not touch the ramps. WARNING: Risk of injury - Use a restraining safety belt to secure yourself in your wheelchair. WARNING: Risk of tipping over - Put the adjustment functions (seat--horizontal, back--vertical, ...) that the wheelchair has the best stability. If you are considering the installation of ramps to overcome obstacles, kindly note the following: Never go up or down ramps without the aid of a helper. 2.13 Transport in the car L DANGER: Risk of injury – The wheelchair is not suited for use as a seat in a motor vehicle. L WARNING: Risk of injury – See that the wheelchair is attached properly. So you can avoid injury from the passengers during collision or sudden braking. L WARNING: Risk of injury – Use for attaching the wheelchair and passenger NEVER the same seatbelt. Never use your wheelchair as a seat in an automobile or other vehicle. The wheelchair shall be marked with following symbol. To transport the wheelchair in the car use following steps: 1. Remove accessories. 2. Store accessories safely. 3. Fold up the footplate. 4. If possible, fold the wheelchair and remove the rear wheels. 5. Place the wheelchair in the luggage place. 6. If the wheelchair and the passenger compartment is NOT separated, attach the frame of the wheelchair securely to the vehicle. You can use the available safety belts in the vehicle. 2.14 Transport in other vehicles Examples of other vehicles are airplanes, buses, ships, trams, trains etc. You should ask the service officials about travelling safely with your wheelchair to your intended destinations and about the applicable requirements. The wheelchair can be transported in an airplane. The wheelchairs shall be checked at the desk. Announce the wheelchair on time by the concern airline before departure. Do not use the wheelchair as a seat in an airplane or other vehicles, the wheelchair must be stored in the luggage place. To transport the wheelchair in an airplane note the following requirements: 1. Dimensions and weight of the wheelchair The allowable weight and dimensions of the wheelchair depends on the type of the airplane. Page 6 Gemini 2 2014-03 2. Damage on the wheelchair It is possible that the wheelchair could be damaged because the wheelchair will be stored in a narrow area with the suitcases and other goods. To prevent damage on the wheelchair: Remove the accessories. Fold the footrest upwards and fold up the wheelchair. Check that the adjustment levers are positioned inwards. Before travelling contact the concern airline about their requirements for transporting the wheelchair in an airplane or other vehicle. 3 Installation and adjustment The instructions in this chapter are for the specialist dealer and the user. The Vermeiren wheelchairs Gemini 2 has been designed entirely for the comfort of your child. To find a service facility or specialist dealer near you, contact the nearest Vermeiren facility. A list of Vermeiren facilities can be found on the last page. L WARNING: Risk of unsafe settings - Use only the settings described in this manual. L WARNING: Variation of allowed adjustments can still change the stability of your wheelchair (tilt back or sideways). 3.1 Tools To set up the Gemini 2 the following tools are needed. Wrench set n° 10 Allen key set n° 4 3.2 Manner of delivery The Vermeiren Gemini 2 shall be delivered with: 1 frame structure rear wheels (removable) and front wheels footrest with adjustable inclination and length, foot supports with velcro straps backrest inclinable and adjustable in height removable seat with adjustable inclination and depth central brake side supports (pelots) wedge (B22) head cushion safety belts tools manual accessories (optional) air pump (with pneumatic tyres only) Before use check if everything is included and that no products are damaged (example by transport, ...). When delivered, your product has been mounted/adjusted that only the length of the footrest, the ideal inclination of the backrest, seat and pelots need to be adjusted to your own specifications (follow the instructions in this manual). Page 7 Gemini 2 2014-03 3.3 Adjusting the seat depth Gemini 2 32 The function to alter the seat depth can be used after loosening the bolts (M6) on the seating plate (The needed tools are included in the package) and sliding the full segment into the desired position. The range of the adjustment is about 60 mm (stepless), which, in combination with the range of other adjustments of the Gemini 2, allows a wide variety of adjustments. 3.4 Adjusting the seat depth Gemini 2 40 The function to alter the seat depth can be used after loosening the bolts (M6) on the seating plate (The needed tools are included in the package) and sliding the full segment into the desired position. Three different positions: steps of 25 mm, which, in combination with the range of other adjustments of the Gemini 2, allows a wide variety of adjustments. Page 8 Gemini 2 2014-03 3.5 Footrest Gemini 2 (Seat width 32) L WARNING: Risk of injury – Check that the footrest is securely locked in L L L place before use. WARNING: Risk of injury, stability – Check the position of the adjustment knobs every time to prevent that they would be in a position that would endanger the user. WARNING: Risk of injury, stability – Never stand on the footplate with your full body weight. CAUTION: Risk of clamping – Keep objects and people away from the footrest swing range. The footrest consists out of: 1. A foldable footplate 2. Undercarriage with blocking pins 3. Hinged upperparts with regulating strips The footrest segment is connected to the seat module through a plate, which acts as a seat depth regulator. This design allows your child to put its legs in any desired position. 3.5.1 Positions of the footplate By default the footplate is in a horizontal position. With the emphasis on transport and rehabilitation and getting out of the Gemini 2, the footplate must be turned into the direction of the undercarriage of the footrest. The footplate has been equipped with plastic foot supports to prevent uncontrollable sliding of the feet. As additional security, foot belts (B19) have been implemented. The angle of the foot supports can be adjusted in 5 different positions (steps: 10°) 1. Loosen the wing nuts . 2. Turn the foot supports in the desired position. 3. Retighten the wing nuts . 4. Check the foot supports are firmly fixated. Page 9 Gemini 2 2014-03 3.5.2 Adjusting the length of the footrest Due to the super design of the Gemini 2, the footrest can be set into 4 different lengths: 250 – 280 – 310 - 340 mm (steps: 30 mm). Adjust them as follows: 1. Retract both blocking pins . 2. Adjust the undercarriage of the footplate into the desired position. 3. Block the undercarriage again with the blocking pins . 4. Check the footplate is firmly fixated. 3.5.3 Adjusting the inclination of the footrest The adjustment of the inclination of the footrest (range 83°: stepless), in combination with other adjustments, will increase the possible positions of the Gemini 2. Adjust them as follows: 1. Turn both levers from the regulator strips loose. 2. Adjust to optimal inclination for the footrest. 3. Retighten both levers again. 4. Check the footrest is firmly fixated. For a correct adjustment of the footrest, turn to your specialist dealer who will support you with professional advice and technical support. In case the disorder of your child makes the correct adjustment of the footrest difficult, turn to your specialist dealer who will find a suitable and proper solution. Page 10 Gemini 2 2014-03 3.6 Footrest Gemini 2 (Seat width 40) L WARNING: Risk of injury – Check that the footrest is securely locked in L L L L place before use. WARNING: Risk of injury – Check the screw connections are secured before using the footrest. WARNING: Risk of injury, stability – Check the position of the adjustment knobs every time to prevent that they would be in a position that would endanger the user. WARNING: Risk of injury, stability – Never stand on the footplate with your full body weight. CAUTION: Risk of clamping – Keep objects and people away from the footrest swing range. 3.6.1 Positions of the footplate By default the footplate is in a horizontal position. With the emphasis on transport and rehabilitation and getting out of the Gemini 2, the footplate must be turned into the direction of the undercarriage of the footrest. The footplate has been equipped with plastic foot supports to prevent uncontrollable sliding of the feet. As additional security, foot belts (B19) have been implemented. The angle of the foot supports can be adjusted in 4 different positions (steps: 8,5°) 1. Loosen the wing nuts . 2. Turn the foot supports in the desired position. 3. Retighten the wing nuts . 4. Check the foot supports are firmly fixated. 3.6.2 Adjusting the length of the footrest The design of Gemini 2 40 provides a gradual change in the length of the footrest. The footrest of the Gemini 2 40 can be changed in 2 different lengths (steps 35 mm: outer tube) and 4 different lengths (steps of 25 mm: inner tube). Adjustments are made as follows: 1. Loosen the screws on both sides. 2. Move the footplate up- or downwards until the desired length. 3. Retighten the two screws again. 4. Check the footplate is firmly fixated. Page 11 Gemini 2 2014-03 3.6.3 Adjusting the inclination of the footrest Changing the angle of the footrest can be in the range of 85°. Adjust them as follows: 1. Turn both levers from the regulator strips loose. 2. Adjust to optimal inclination for the footrest. 3. Retighten both levers again. 4. Check the footrest is firmly fixated. 3.7 Backrest L WARNING: Risk of injury – Check the backrest is well fixated. The Gemini 2 has been equipped with a back with adjustable inclination and adjustable height. In combination with the adjustable seat and footrest will the Gemini 2 provide optimal settings for your child. 3.7.1 Adjusting the inclination of the backrest Gemini 2 32: 1. Loosen the lever located on the rear side of the backrest. 2. Push or pull the backrest tubes in the desired position (from folded position --> easy for transport to laying position: 0° - 45°). The layingposition has been secured with limiters . 3. Retighten the lever . 4. Check that the backrest is well fixated. Page 12 Gemini 2 2014-03 Gemini 2 40: On the rear of the backrest frame is a rod and blocking pin . 1. Pull the pin to change the angle of the backrest. 2. Pull or push on the backrest until the desired angle (6 different positions in steps of 8°). The maximum angle is when the rod hits the blocking pin . There is an extra hole (hole 7), that prevents that the backrest will be lift back in the vertical position when the backrest is folded to the seat (for transportation). 3. Release the pin . 4. Check that the backrest is well fixated. 3.7.2 Adjusting the height of the backrest L WARNING: Risk of injury – Check that all connections and bolts are secured before using the Gemini 2. L WARNING: Risk of tipping over – Do not place more weight on the back (example: a backpack or shopping bag). This will cause overweight at the backrest and may cause the Gemini 2 to tip backwards, which can cause injuries to the user of the Gemini 2! Adding additional elements to the Gemini is only allowed after careful consideration and in collaboration with one of our retailers. Page 13 Gemini 2 2014-03 1. Loosen the two wing nuts on the back of the backrest. 2. Move the upper part (headrest) of the backrest upwards or downwards until the desired backrest height (520 - 640 mm for Gemini 2 32, 650 - 780 mm for Gemini 2 40). 3. Retighten the two screws and wing nuts firmly by hand. On the bottom of the backrest are 2 clamps for the safety belts. This is an additional adjustment depending on the personal needs of each user. 3.8 Seat 3.8.1 Rotating the seat L WARNING: Risk of tipping over – Be aware that you change the stability of your wheelchair because the center of gravity shall changed. The construction of the Gemini 2 makes it very easy to adjust the inclination and depth of the seat. Also a full conversion of the orientation of the seating parts towards the person who is pushing the Gemini 2 has been made very easy and fast to accomplish. Check that the footrest is placed before the tubes of the lower frame before mounting the seat frame. Page 14 Gemini 2 2014-03 3.8.2 Adjusting the inclination of the seat Gemini 2 32: To adjust the angle of the seat use instructions below: 1. Loosen the levers just below the seat frame. 2. Move the seat frame until the desired inclination (range 39°: stepless). 3. Retighten the levers . 4. Check that the seat frame is well fixated. Gemini 2 40: To adjust the angle of the seat use instructions below: 1. Loosen the levers just below the seat frame. 2. Move the seat frame until the desired inclination (6 positions range 46°: steps: 9°). 3. Retighten the levers . 4. Check that the seat frame is well fixated. A wide range in adjustments allows the Gemini 2 to be positioned in many ways. From an almost vertical position (ideal for revalidation) till a laying position. By tightening the adjustment bars, the full seating part will be unmovable. Page 15 Gemini 2 2014-03 3.8.3 Mounting the seatframe L CAUTION: Risk of injury - Check if the clamps are mounted correctly on the frame during the placement of the seatframe. L CAUTION: Risk of injury - Make sure the locking clamps are locked before L L L L you place your child in the Gemini 2. CAUTION: Risk of clamping - Make sure no fingers, buckles or clothes are squeezed between the seatframe and the lowerframe of the Gemini 2. CAUTION: Risk of injury - Switching the direction of the seat is only allowed when the child is no longer present in the Gemini 2! CAUTION: Risk of injury - Do not use the Gemini 2 without the seatframe. CAUTION: Risk of injury - Check all connections, screws are secured before using the Gemini 2. The Gemini 2 stands for comfort when it comes to removing or switching positions of the seating element. As such, you can push the Gemini 2 with your child facing forward or facing towards you. The seatframe will be disassembled as follows: Use the brake to make the Gemini 2 unmovable. Unlock the two clamps in the rear part of the seat. Slide the full seatframe backwards and pull these vertically upwards while holding on to the side supports. Assembling the seatframe will happen in reverse order as described above. Page 16 Gemini 2 2014-03 The seat of the Gemini 2 can only be extended with additional elements after approval of your retailer. 3.9 Side supports (Pelots) 3.9.1 Head pelots Adjusting width: 1. Loosen the two knurled knobs on the rear side of the backrest. 2. Move the head pelot inwards or outwards until the desired position (range 25 mm each side: stepless). 3. Retighten the two knurled knobs . 4. Check that the pelot is well fixated. 5. Repeat these instructions for the other pelot . Adjusting height: 1. Loosen the two knurled knobs on the rear side of the backrest. 2. Move the head pelot up or down until the desired height (range 30 mm: stepless). 3. Retighten the two knurled knobs . 4. Check that the pelot is well fixated. 5. Repeat these instructions for the other pelot . Adjusting height: 1. Loosen the two knurled knobs on the side of the backrest. 2. Move the head pelot up or down until the desired height (range 25 mm: stepless). 3. Retighten the knurled knobs . 4. Check that the pelot is well fixated. 5. Repeat these instructions for the other pelot. Adjusting depth: 1. Loosen the two knurled knobs on the side of the backrest. 2. Move the head pelot to the front or back until the desired depth (range 22,5 mm: stepless). 3. Retighten the two knurled knobs . 4. Check that the pelot is well fixated. 5. Repeat these instructions for the other pelot. Page 17 Gemini 2 2014-03 3.9.2 Backrest pelots (large) Adjusting height: 1. Loosen the two screws . 2. Move the backrest pelot up or down until the desired height (2 positions: steps 40 mm). 3. Retighten the two screws . 4. Check that the pelot is well fixated. 5. Repeat these instructions for the other pelot. 3.9.3 Hip pelots Adjusting width: 1. Loosen the two screws . 2. Move the hip pelot outwards or inwards until the desired width (range 18,8 mm: stepless). 3. Retighten the two screws . 4. Check that the pelot is well fixated. 5. Repeat these instructions for the other pelot. Page 18 Gemini 2 2014-03 3.10 Tyre changing L NOTE: Always make sure that the wheels are sufficiently inflated, since it could L L L affect the driving behaviour. NOTE: We do not accept any liability for wheels not supplied by the manufacturer. NOTE: There must be no air in the tube before it can be removed. CAUTION: Chance of damage - If handled improperly, the rim might be damaged. Rather let an expert perform these activities. If you want to change the tyres or inner tubes, you should note the following: 1. Let all the air out of the inner tube. 2. Insert a tyre lever between the tyre and the rim. 3. Slowly and gently push the tyre lever downwards. This will pull the tyre over the edge of the rim. 4. Then move the lever along the rim, the tyre will jump out. 5. Now carefully remove the tyre from the rim and then remove the tube. L NOTE: Only an expert can guarantee correct assembly. Work not done by your L L L specialist dealer, would void the warranty of claims. WARNING: Chance of damage and injury - When mounting a tyre, make sure no objects or body parts are pinched between the tyre and the rim. CAUTION: Chance of damage - When inflating the tyres, always check that the pressure is correct. The correct pressure is given on the tyre walls. CAUTION: Chance of damage - Use only inflating equipment which complies with regulations and indicates the pressure in bar, or use the supplied air pump. We do not accept any liability for damage caused by using inflating equipment not supplied by the manufacturer. Note the following before inserting the new inner tube: Check the rim bed and the inside wall of the tyre for foreign matter and clean these properly if necessary. Check the condition of the rim bed, especially around the position of the air valve. Please use only genuine original replacement parts. We do not accept any liability for damage caused by non-genuine parts. Kindly contact your specialist dealer. Place the rim belt in position over the air valve before inserting it into the rim. Then the rim belt can be pulled over easily. Check that all spoke heads are covered (a rim belt is not required in the case of a plastic rim). Push the tyre over the edge of the rim, starting behind the air valve. Inflate the tube slightly until it is round, and place it inside the tyre. If the tube fits snugly inside the tyre without any folds (in the case of folds: let out some air), then the upper side of the tyre can be pressed lightly onto the rim with both hands, starting at the air valve. Check all around on both sides that the tube is not pinched between the rim and the edge of the tyre. Lightly push the air valve inwards and pull it out again to make sure that the tyre is positioned properly in the region of the air valve. Page 19 Gemini 2 2014-03 To ensure that the wheel inflated correctly, admit only so much air initially that the tyre can still be easily pushed inwards by using your thumbs. If the check-lines are equidistant from the edge of the rim on both sides of the tyre, then the tyre is centered properly. If not - let out the air and position the tyre afresh. Now the tyre can be inflated to its full operating pressure (note the maximum!!) and the valve cap should be replaced. 4 Maintenance For the maintenance / cleaning instructions refer to the separate maintenance manual of the wheelchairs for kids. Refer for these separate manual to your specialist dealer. Page 20 Gemini 2 2014-03 SERVICE The manual wheelchair was serviced: Dealer´s stamp: Dealer´s stamp: Date: Date: Dealer´s stamp: Dealer´s stamp: Date: Date: Dealer´s stamp: Dealer´s stamp: Date: Date: Dealer´s stamp: Dealer´s stamp: Date: Date: Dealer´s stamp: Dealer´s stamp: Date: Date: For service checklists an additional technical information, please see our specialist dealers nearest to you. More information on our website at: www.vermeiren.com. Germany N.V. Vermeiren N.V. Vermeirenplein 1 / 15 B-2920 Kalmthout Tel: +32(0)3 620 20 20 Fax: +32(0)3 666 48 94 website: www.vermeiren.be e-mail: [email protected] Vermeiren Deutschland GmbH Wahlerstraße 12 a D-40472 Düsseldorf Tel: +49(0)211 94 27 90 Fax: +49(0)211 65 36 00 website: www.vermeiren.de e-mail: [email protected] France Austria Vermeiren France S.A. Z. I., 5, Rue d´Ennevelin F-59710 Avelin Tel: +33(0)3 28 55 07 98 Fax: +33(0)3 20 90 28 89 website: www.vermeiren.fr e-mail: [email protected] L. Vermeiren Ges. mbH Winetzhammerstraße 10 A-4030 Linz Tel: +43(0)732 37 13 66 Fax: +43(0)732 37 13 69 website: www.vermeiren.at e-mail: [email protected] Italy Switzerland Reatime S.R.L. Vermeiren Suisse S.A. Viale delle Industrie 5 I-20020 Arese MI Tel: +39 02 99 77 07 Fax: +39 02 93 58 56 17 website: www.reatime.it e-mail: [email protected] Hühnerhubelstraße 59 CH-3123 Belp Tel: +41(0)31 818 40 95 Fax: +41(0)31 818 40 98 website: www.vermeiren.ch e-mail: [email protected] Poland Spain / Portugal Vermeiren Polska Sp. z o.o ul. Łączna 1 PL-55-100 Trzebnica Tel: +48(0)71 387 42 00 Fax: +48(0)71 387 05 74 website: www.vermeiren.pl e-mail: [email protected] Vermeiren Iberica, S.L. Carretera de Cartellà, Km 0,5 Sant Gregori Parc Industrial, Edifici A 17150 Sant Gregori (Girona) Tel: +34 902 48 72 72 Fax: +34 972 40 50 54 website: www.vermeiren.es e-mail: [email protected] Czech Republic Vermeiren ČR S.R.O. Nadrazni 132 702 00 Ostrava 1 Tel: +420 596 133 923 Fax: +420 596 133 277 website: www.vermeiren.cz e-mail: [email protected] R.E.: N.V. Vermeiren N.V., Vermeirenplein 1/15 - 2920 Kalmthout - Belgium – 2014-03- Instruction Manual Gemini 2- vA Belgium