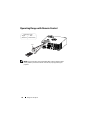
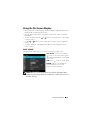
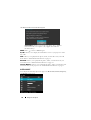
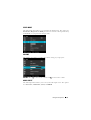
1
Dell™ M110 Projector
User’s Guide
Notes, Cautions, and Warnings
NOTE: A NOTE indicates important information that helps you
make better use of your projector.
CAUTION: A CAUTION indicates potential damage to hardware
or loss of data if instructions are not followed.
WARNING: A WARNING indicates a potential for property
damage, personal injury, or death.
____________________
Information in this document is subject to change without notice.
© 2011 Dell Inc. All rights reserved.
Reproduction of these materials in any manner whatsoever without the written
permission of Dell Inc. is strictly forbidden.
Trademarks used in this text: Dell and the DELL logo are trademarks of
Dell Inc.; DLP and DLP logo are trademarks of TEXAS INSTRUMENTS
INCORPORATED; Microsoft and Windows are either trademarks or registered
trademarks of Microsoft Corporation in the United States and/or other countries.
Other trademarks and trade names may be used in this document to refer to either
the entities claiming the marks and names or their products. Dell Inc. disclaims
any proprietary interest in trademarks and trade names other than its own.
Model M110
October 2011
Rev. A00
Contents
1
Your Dell Projector .
About Your Projector
2
6
. . . . . . . . . . . . . . . . .
. . . . . . . . . . . . . . . . .
Connecting Your Projector .
Connecting to a Computer
. . . . . . . . . . .
10
. . . . . . . . . . . . . . . .
11
. . . .
11
. . . . . . .
12
Connecting a Computer Using a VGA Cable
Connecting a Computer by USB Cable
Connecting a Computer Using Wireless
Dongle (Optional) . . . . . . . . . . . .
Connecting a DVD Player
8
. . . . . .
13
. . . . . . . . . . . . . . . .
14
Connecting a DVD Player Using a A/V to RCA Cable 14
Connecting a DVD Player Using a HDMI Cable
Connecting to Multi-Media
. .
15
. . . . . . . . . . . . . . .
16
.
16
. .
17
Using Your Projector
. . . . . . . . . . . . . . . .
18
Turning Your Projector On
. . . . . . . . . . . . . . . .
18
Turning Your Projector Off
. . . . . . . . . . . . . . . .
18
Connecting Multi-Media Using a USB Flash Disk
Connecting Multi-Media Using a MicroSD Card
3
Adjusting the Projected Image
. . . . . . . . . . . . .
Raising the Projector Height
. . . . . . . . . . . .
Lowering the Projector Height
. . . . . . . . . . .
Contents
19
19
19
3
Adjusting the Projector Focus .
. . . . . . . . . . . . .
. . . . . . . . . . . .
21
. . . . . . . . . . . . . . . . .
23
Adjusting Projection Image Size
Using the Control Panel
Installing the Remote Control Battery (Optional)
. . . .
27
. . . . . . . . .
28
. . . . . . . . . . . . . .
29
INPUT SOURCE
. . . . . . . . . . . . . . . . . . .
29
AUTO ADJUST
Operating Range with Remote Control
Using the On-Screen Display
. . . . . . . . . . . . . . . . . . .
30
. . . . . . . . . . . . . . . . . . . .
31
. . . . . . . . . . . . . . . . . . . . . .
31
VIDEO MODE
VOLUME
AUDIO INPUT .
. . . . . . . . . . . . . . . . . . .
ADVANCED SETTINGS
LANGUAGE
. . . . . . . . . . . . . . .
32
42
. . . . . . . . . . . . . . . .
43
How to set-up File Type for Multi-Media with USB
44
How to set-up File Type for Multi-Media with
MicroSD . . . . . . . . . . . . . . . . . . .
. . .
46
How to set-up File Type for Multi-Media with
Internal Memory . . . . . . . . . . . . . . .
. . .
48
Multi-Media SETUP for USB, Micro SD, and
Internal Memory . . . . . . . . . . . . . . .
. . .
50
PHOTO SETUP
VIDEO SETUP
MUSIC SETUP
. . . . . . . . . . . . . . . . . . .
50
. . . . . . . . . . . . . . . . . . . .
51
. . . . . . . . . . . . . . . . . . .
51
FIRMWARE UPDATE
. . . . . . . . . . . . . . . .
Troubleshooting Your Projector
Guiding Signals
4
Contents
31
. . . . . . . . . . . . . . . . . . . . .
Multi-Media Introduction
4
20
52
. . . . . . .
53
. . . . . . . . . . . . . . . . . . . . .
56
5
Specifications
. . . . . . . . . . . . . . . . . . . . .
57
6
Contacting Dell
. . . . . . . . . . . . . . . . . . . .
61
7
Appendix: Glossary
. . . . . . . . . . . . . . . . .
Contents
62
5
Your Dell Projector
1
Your projector comes with all the items shown below. Ensure that you have all the
items, and contact Dell™ if anything is missing.
Package Contents
Power cable
Universal 24-pin to VGA cable
CD User’s Guide and Documentation
Carrying case
Informacion Importante
tor
M110HD Projec
Dell M110/
Guide
Quick Setup
TM
DOCOMENTATION
Dell M110/M110HD
TM
Projector
Dell
oduc
TM
t Info
Proje
ctor
rmat
ion
s
Guid
AC adapter
6
Your Dell Projector
e
Optional Contents
Remote control
3.5 mm jack A/V to RCA cable
1.2 m HDMI cable
3.5 mm jack A/V cable.
1.2 m USB cable (USB-A to USB-A)
Universal 24-pin to VGA and Audio
out cable
Mini tripod
Wireless dongle
S
U
: 5C
ID 20
C 5
C U
F Z -W
Your Dell Projector
7
About Your Projector
Top View
Bottom View
4
1
2
5
3
1
Control panel
2
Focus ring
3
Lens
4
Tilt adjusting wheel
5
Mounting hole for tripod: Insert nut 1/4"*20 UNC
CAUTION: Safety Instructions
1 Do not use the projector near appliances that generate a lot of heat.
2 Do not use the projector in areas where there is an excessive amount of dust. The
dust may cause the system to fail and the projector will automatically shut down.
3 Ensure that the projector is mounted in a well-ventilated area.
4 Do not block the ventilation slots and openings on the projector.
5 Ensure the projector operates between ambient temperatures (5 ºC to 35 ºC).
6 Do not try to touch the ventilation outlet as it can become very hot after the
projector has been turned on or immediately after it is turned off.
7 Do not look into the lens while the projector is on as it may cause injury to your
eyes.
8 Do not place any objects near or in front of the projector or cover its lens while the
projector is on as the heat may cause the object to melt or burn.
9 Do not use alcohol to wipe the lens.
10 Do not use the wireless projector near cardiac pacemakers.
8
Your Dell Projector
11 Do not use the wireless projector near medical equipment.
12 Do not use the wireless projector near microwave ovens.
NOTE:
• Recommended Projector Tripod Kit (VXJN3). For more information, see
the Dell Support website at support.dell.com.
• For more information, see the Safety Information that shipped with your
projector.
Your Dell Projector
9
Connecting Your Projector
1
7
1
2
3
4
6
2
2
5
MicroSD card slot for multimedia playback
(Video/Audio/Photo) and
supporting media and image
processor firmware upgrade
USB Type A connector for USB
display, multi-media playback
(Video/Audio/Photo), USB
memory storage access (USB flash
drive/internal memory), projector
firmware upgrade, and supporting
optional wireless dongle and
mobishow
DC input connector
Audio/Video input connector
4
3
5
HDMI connector
6
Universal I/O connector for VGA
input and Audio output
7
Security cable slot
CAUTION: Before you begin any of the procedures in this section, follow the
Safety Instructions as described on page 8.
10
Connecting Your Projector
Connecting to a Computer
Connecting a Computer Using a VGA Cable
2
3
1
1
Power cord
2
AC adapter
3
Universal 24-pin to VGA cable
NOTE: Only one universal 24-pin to VGA cable is shipped with your projector.
An additional universal 24-pin to VGA cable or 24-pin to VGA and Audio out
cable can be purchased on the Dell website at www.dell.com.
Connecting Your Projector
11
Connecting a Computer by USB Cable
XELOM
3
2
XELOM
1
1
Power cord
2
AC adapter
3
USB-A to USB-A cable
NOTE: Plug and Play. The USB (USB A to A) cable is not shipped with your
projector. You can purchase the USB (USB A to A) cable on the Dell website at
www.dell.com.
12
Connecting Your Projector
Connecting a Computer Using Wireless Dongle (Optional)
S
Z
U ID
52 :
05
C
C
-W
F
U
C
NOTE: Your computer should be equipped with a wireless connector and
properly configured to detect another wireless connection. Refer to your
computer’s documentation on how to configure a wireless connection.
NOTE: Your projector must be installed with a wireless dongle if you want to
use the wireless display. The wireless dongle is not shipped with your projector.
You can purchase it on the Dell website at www.dell.com.
Connecting Your Projector
13
Connecting a DVD Player
Connecting a DVD Player Using a A/V to RCA Cable
3
2
1
1
Power cord
2
AC adapter
3
3.5 mm jack A/V to RCA cable
NOTE: The 3.5 mm jack A/V to RCA cable is not shipped with your projector. You
can purchase the 3.5 mm jack A/V to RCA cable on the Dell website at
www.dell.com.
14
Connecting Your Projector
Connecting a DVD Player Using a HDMI Cable
3
2
1
1
Power cord
2
AC adapter
3
HDMI cable
NOTE: The HDMI cable is not shipped with your projector. You can purchase
the HDMI cable on the Dell website at www.dell.com.
Connecting Your Projector
15
Connecting to Multi-Media
Connecting Multi-Media Using a USB Flash Disk
3
2
1
1
Power cord
2
AC adapter
3
USB flash disk
NOTE: The USB flash disk is not shipped with your projector.
16
Connecting Your Projector
Connecting Multi-Media Using a MicroSD Card
3
2
1
1
Power cord
2
AC adapter
3
MicroSD card
NOTE: The microSD card is not shipped with your projector.
Connecting Your Projector
17
Using Your Projector
3
Turning Your Projector On
NOTE: Turn on the projector before you turn on the source (computer, DVD
player, etc.). The Power button light blinks blue until pressed.
1 Connect the power cord with AC adapter and appropriate signal cables to the
projector. For information about connecting the projector, see "Connecting Your
Projector" on page 10.
2 Press the Power button (see "Using the Control Panel" on page 23 to locate the
Power button).
3 Turn on your source (computer, DVD player, etc).
4 Connect your source to the projector using the appropriate cable. See
"Connecting Your Projector" on page 10 for instructions to connect your source to
the projector.
5 By default, the input source of the projector is set to VGA. Change the input
source of the projector if necessary.
6 If you have multiple sources connected to the projector, press the Source button
on the remote control or control panel to select the desired source. See "Using the
Control Panel" on page 23 and "Using the Remote Control (Optional)" on page 25
to locate the Source button.
Turning Your Projector Off
CAUTION: Unplug the projector after properly shutting down as explained in
the following procedure.
1 Press the Power button. Follow the instruction displayed on screen to properly
turn off the projector.
NOTE: The "Press Power Button to Turn off Projector" message will
appear on the screen. The message disappears after 5 seconds or you can
press the Menu button to clear it.
2 Press the Power button again. The cooling fans continue to operate for 120
seconds.
18
Using Your Projector
3 To power off the projector quickly, press the Power button and hold for 1 second
while the projector’s cooling fans are still running.
NOTE: Before you turn on the projector again, wait for 60 seconds to allow the
internal temperature to stabilize.
4 Disconnect the power cord and AC adapter from the electrical outlet and the
projector.
Adjusting the Projected Image
Raising the Projector Height
1 Raise the projector to the desired display angle, and use the front tilt adjustment
wheel to fine-tune the display angle.
Lowering the Projector Height
1 Lower the projector, and use the front tilt adjustment wheel to fine-tune the
display angle.
1
1
1 Front tilt adjustment wheel
(Angle of tilt: 0 to 6 degrees)
Using Your Projector
19
Adjusting the Projector Focus
CAUTION: To avoid damaging the projector, ensure that the adjustment
wheels are fully retracted before moving the projector or placing the projector
in its carrying case.
1 Rotate the focus tab until the image is clear. The projector focuses at distances
ranging between 3.18 ft to 8.48 ft (97 cm to 258 cm).
1
1
Focus tab
20
Using Your Projector
Adjusting Projection Image Size
80" (203.2 cm)
70" (177.8 cm)
Projector to screen distance
60" (152.4 cm)
50" (127.0 cm)
40" (101.6 cm)
4.23' (1.29 m)
5.28' (1.61 m)
6.36' (1.94 m)
7.41' (2.26 m)
8.48' (2.58 m)
30" (76.2 cm)
3.18' (0.97 m)
Using Your Projector
21
Screen (Diagonal)
30"
(76.2 cm)
40"
(101.6 cm)
50"
(127.0 cm)
60"
(152.4 cm)
70"
(177.8 cm)
80"
(203.2 cm)
Screen Size
25.59" X
15.75"
33.86" X
21.26"
42.13" X
26.38"
50.79" X
31.89"
59.45" X
37.01"
67.72" X
42.52"
(65 cm X
40 cm)
(86 cm X
54 cm)
(107 cm X
67 cm)
(129 cm X
81 cm)
(151 cm X
94 cm)
(172 cm X
108 cm)
15.75"
(40 cm)
21.26"
(54 cm)
26.38"
(67 cm)
31.89"
(81 cm)
37.01"
(94 cm)
42.52"
(108 cm)
3.18''
(0.97 m)
4.23'
(1.29 m)
5.28'
(1.61 m)
6.36'
(1.94 m)
7.41'
(2.26 m)
8.48'
(2.58 m)
Hd
Distance
D
ist
an
ce
:1
.9
4
m
Height (Hd): 81 cm
* This graph is for user reference only.
22
Using Your Projector
Using the Control Panel
1
2
9
3
4
8
5
7
6
1
Power
Turns the projector on or off. For more
information, see "Turning Your Projector On" on
page 18 and "Turning Your Projector Off" on
page 18.
2
Up
/ Keystone
adjustment
Press to navigate through the On-Screen Display
(OSD) Menu items.
Press to adjust image distortion caused by tilting
the projector (+/-40 degrees).
3
Right
/ Auto Adjust
Press to navigate through the On-Screen Display
(OSD) Menu items.
Press to synchronize the projector to the input
source.
NOTE: Auto Adjust does not operate if the
on-screen display (OSD) is displayed.
4
TEMP LED
If the TEMP amber indicator is on or blinking,
one of the following problems could be occurring:
• Internal temperature of the projector is too
high
For more information, see "Troubleshooting Your
Projector" on page 53 and "Guiding Signals" on
page 56.
Using Your Projector
23
5
Error LED
Error LED is blinking amber, one of the fans has
failed. The projector will automatically shut
down.
6
Menu
Press to activate the OSD. Use the directional
keys and the Menu button to navigate through
the OSD.
7
Down
/ Keystone
adjustment
Press to navigate through the On-Screen Display
(OSD) Menu items.
Press to adjust image distortion caused by tilting
the projector (+/-40 degrees).
8
Left
/ Source
Press to navigate through the On-Screen Display
(OSD) Menu items.
Press to toggle through Analog RGB, Composite,
and HDMI sources when multiple sources are
connected to the projector.
9
24
Enter
Using Your Projector
Press to confirm the selection item.
Using the Remote Control (Optional)
1
11
2
12
3
13
4
5
14
15
6
7
16
17
8
18
9
19
10
20
1
LED light
LED indicator.
2
Source
Press to switch between Analog RGB, Composite,
and HDMI source.
3
Auto adjust
Press to synchronize the projector with the input
source. Auto adjust does not operate if the OSD
(On-Screen Display) is displayed.
4
Up
Press to navigate through the On-Screen Display
(OSD) Menu items.
5
Left
Press to navigate through the On-Screen Display
(OSD) Menu items.
6
Enter
Press to confirm the selection.
7
Menu
Press to activate the OSD.
8
Down
Press to navigate through the On-Screen Display
(OSD) Menu items.
9
Mute
Press to mute or un-mute the projector speaker.
Using Your Projector
25
10 Aspect ratio
Press to change aspect ratio of a displayed image.
11 Power
Turns the projector on and off. For more
information, see "Turning Your Projector On" on
page 18 and "Turning Your Projector Off" on
page 18.
12 Video mode
The projector has preset configurations that are
optimized for displaying data (presentation
slides) or video (movies, games, etc.).
Press the Video Mode button to toggle between
Presentation mode, Bright mode, Movie mode,
sRGB, or Custom mode.
Pressing the Video Mode button once will show
the current display mode. Pressing the Video
Mode button again will switch between modes.
13 Play/Pause
Press to play/pause media file.
14 Blank screen
Press to hide/unhide the image.
15 Stop
Press to stop playing media file.
16 Right
Press to navigate through the On-Screen Display
(OSD) Menu items.
17 Volume up
Press to increase the volume.
18 Keystone adjustment Press to adjust image distortion caused by tilting
the projector (+/-40 degrees).
19 Volume down
Press to decrease the volume.
20 Keystone adjustment Press to adjust image distortion caused by tilting
the projector (+/-40 degrees).
26
Using Your Projector
Installing the Remote Control Battery (Optional)
1 Remove the battery holder by holding down
the side release firmly and pulling out the
battery holder.
32
20
LT
R
O
3V
C
the polarity correctly according to the marking
in the battery holder.
S
2 Insert a CR2032 coin cell battery and align
NOTE: When you use the remote control for the
S
LT
R
C
O
20
32
first time, there is a plastic sheet between the
battery and its contact. Remove the sheet
before use.
3V
Using Your Projector
25
20
LT
R
O
C
M
S
3 Replace the battery holder.
3V
27
Operating Range with Remote Control
Operating range
Angle
Distance
±20°
7 m/22.97 feet
Angle
Di
sta
nc
e
NOTE: Actual operating range may slightly differ from the diagram. Weak
battery will also prevent the remote control from properly operating the
projector.
28
Using Your Projector
Using the On-Screen Display
• The projector has a multi-language On-Screen Display (OSD) Menu that can be
displayed with or without an input source.
• Press the Menu button on the control panel or the remote control to enter the
Main Menu.
• To select an option, press the
or
buttons on your projector’s control panel
or remote control.
• Use the
or
buttons on the control panel or remote control to adjust the
settings.
• To exit the OSD, press the Menu button directly on the control panel or the
remote control.
INPUT SOURCE
The Input Source menu allows you to select your projector's input source.
AUTO SOURCE—If you select and press
to activate, the Auto Source option
will automatically find the next available
input source.
VGA—Press
to detect a VGA signal.
DOUSB—Allows you to display the
computer/laptop screen to your
projector via the USB cable.
NOTE: When you connect the projector and computer via the USB cable, a
USB Connected message will pop up and allow you to select input sources as
DoUSB or Storage.
Using Your Projector
29
The USB Connected Screen shown below appears:
STORAGE MODE—Allows you to execute copy, delete, move, and more
instructions from your computer (only supports microSD and
internal memory).
HDMI—Press
to detect a HDMI signal.
A/V IN—Allows you to display the Audio/Video source to your projector via the
A/V cable.
USB—Allows you to playback the photo, Audio, or Video files from your USB
flash disk. See "Multi-Media Introduction" on page 43.
MICROSD—Allows you to playback the photo, Audio, or Video files from your
microSD card. See "Multi-Media Introduction" on page 43.
INTERNAL MEMORY—Allows you to playback the photo, Audio, or Video files from
internal memory of the projector. See "Multi-Media Introduction" on page 43.
AUTO ADJUST
Auto Adjust automatically adjusts the projector's Horizontal, Vertical, Frequency,
and Tracking in PC mode.
30
Using Your Projector
VIDEO MODE
The Video Mode menu allows you to optimize the display image. The options are:
Presentation, Bright, Movie, sRGB (provides more accurate color representation),
and Custom (set your preferred settings) mode.
VOLUME
The Volume menu allows you adjust the volume setting of your projector.
VOLUME—Press
to decrease the volume and
to increase the volume.
AUDIO INPUT
The Audio Input menu allows you to select your audio input source. The options
are: Auto Source, Multimedia, A/V In, and HDMI.
Using Your Projector
31
ADVANCED SETTINGS
The Advanced Settings menu allows you to change settings for Image, Display,
Projector, Menu, Power, and Information.
IMAGE SETTINGS (IN PC MODE)—Select and press
to activate image settings.
The image settings menu provides the following options:
32
Using Your Projector
BRIGHTNESS—Press
CONTRAST—Press
and
and
to adjust the brightness of the image.
to adjust the display contrast.
COLOR TEMPERATURE—Allows you to adjust the color temperature. The
screen appears cooler at higher color temperatures and warmer at
lower color temperatures.
WHITE INTENSITY—Press
intensity.
and use
and
to display white
NOTE: If you adjust the settings for Brightness, Contrast, Color Temperature,
and White Intensity the projector automatically switches to Custom mode.
IMAGE SETTINGS (IN VIDEO MODE)—Select and press
to activate image settings.
The image settings menu provides the following options:
BRIGHTNESS—Press
CONTRAST—Press
and
and
to adjust the brightness of the image.
to adjust the display contrast.
COLOR TEMPERATURE—Allows you to adjust the color temperature. The
screen appears cooler at higher color temperatures and warmer at
lower color temperatures.
SATURATION—Allows you to adjust the video source from black and
white to fully saturated color. Press
to increase the amount of
color in the image and
to decrease the amount of color in the
image.
SHARPNESS—Press
the sharpness.
to increase the sharpness and
to decrease
TINT—Press
to increase the amount of green in the image and
to decrease the amount of green in the image (available for NTSC
only).
Using Your Projector
33
WHITE INTENSITY—Press
intensity.
and use
and
to display white
NOTE:
1 If you adjust the settings for Brightness, Contrast, Color Temperature,
Saturation, Sharpness, Tint, and White Intensity the projector automatically
switches to Custom mode.
2 Saturation, Sharpness, and Tint are only available when input source is from
A/V in.
DISPLAY SETTINGS (IN PC MODE)—Select and press
to activate display settings.
The display settings menu provides the following options:
HORIZONTAL POSITION—Press
move the image left.
VERTICAL POSITION—Press
the image down.
to move the image right and
to move the image up and
to
to move
FREQUENCY—Allows you to change the display data clock frequency to
match the frequency of your computer’s graphics card. If you see a
vertical flickering wave, use the Frequency control to minimize the
bars. This is a coarse adjustment.
TRACKING—Synchronize the phase of the display signal with the
graphic card. If you experience an unstable or flickering image, use
the Tracking to correct it. This is a fine adjustment.
ASPECT RATIO—Allows you to select the aspect ratio to adjust how the
image appears. Options are: Origin, 16:9, and 4:3.
• Original — Select Origin to maintain the aspect ratio of the image
projector according to the input source.
• 16:9 — The input source scales to fit the width of the screen to project a
16:9 screen image.
34
Using Your Projector
• 4:3 — The input source scales to fit the screen and projects a 4:3 image.
ZOOM—Press
and
to zoom and view the image.
ZOOM NAVIGATION—Press
Navigation menu.
Use
to activate the Zoom
to navigate the projection screen.
DISPLAY SETTINGS (IN VIDEO MODE)—Select and press
to activate display
settings. The display settings menu provides the following options:
ASPECT RATIO—Allows you to select the aspect ratio to adjust how the
image appears. Options are: Origin, 16:9, and 4:3.
• Original — Select Origin to maintain the aspect ratio of the image
projector according to the input source.
• 16:9 — The input source scales to fit the width of the screen to project a
16:9 screen image.
• 4:3 — The input source scales to fit the screen and projects a 4:3 image.
ZOOM—Press
and
to zoom and view the image.
ZOOM NAVIGATION—Press
Navigation menu.
Use
PROJECTOR SETTINGS—Select and press
to activate the Zoom
to navigate the projection screen.
to activate projector settings. The
Using Your Projector
35
projector settings menu provides the following options:
PROJECTOR MODE—Allows you to select the projector mode,
depending upon how the projector is mounted.
• Rear Projection-Desktop — The projector reverses the image so that
you can project from behind a translucent screen.
• Front Projection-Desktop — This is the default option.
SPEAKER—Select On to enable speaker. Select Off to disable speaker.
CLOSED CAPTION—Select On to enable close caption and activate the
closed caption menu. Select appropriate closed caption options:
CC1, CC2, CC3, and CC4.
NOTE: Closed caption option is available for NTSC only.
TEST PATTERN—Test Pattern is used to test focus and resolution.
You can enable or disable the Test Pattern by selecting Off, 1, or 2.
You can also invoke the Test Pattern 1 by pressing and holding down
and
buttons on the control panel simultaneously for 2
36
Using Your Projector
seconds. You can also invoke the test pattern 2 by pressing and
holding down
and
buttons on the control panel
simultaneously for 2 seconds.
Test Pattern 1:
Test Pattern 2:
FACTORY RESET—Select and press
to reset all settings to its factory
default. The below warning message appears:
Reset items include both computer sources and Video source
settings.
Using Your Projector
37
MENU SETTINGS—Select and press
to activate the menu settings. The menu
settings consists of the following options:
MENU POSITION—Allows you to change the position of the OSD
menu on the screen.
MENU TIMEOUT—Allows you to adjust the time for an OSD timeout.
By default, the OSD disappears after 20 seconds of non-activity.
MENU TRANSPARENCY—Select to change the transparency level of the
OSD background.
MENU LOCK—Select On to enable Menu Lock and hide the OSD
menu. Select OFF to disable the Menu Lock. If you want to disable
the Menu Lock function and have the OSD disappear, press the
Menu button on the control panel or remote control for 15 seconds,
then disable the function.
PASSWORD—When Password Protect is enabled, a Password Protect
screen requesting you to enter a password will be displayed when the
power plug is inserted into the electrical outlet and the power for the
projector is first turned on. By default, this function is disabled. You
can enable this feature by selecting Enabled. If the password has
been set before, key in the password first and select the function.
This password security feature will be activated the next time you
turn on the projector. If you enable this feature, you will be asked to
enter the projector's password after you turn on the projector:
1 First time password input request:
38
Using Your Projector
a Go to Menu Settings, press
password settings.
and then select Password to Enable the
b Enabling the Password function will pop up a change screen. Key in a
4-digit number from the screen and press
.
c To confirm, enter the password again.
d If the password verification is successful, you may resume with
accessing the projector's functions and its utilities.
2 If you have entered an incorrect password, you will be given another two
chances. After three invalid attempts, the projector will automatically
turn off.
NOTE: If you forget your password, contact DELL™ or a qualified
service personnel.
3 To disable the password function, select the Disable option to close the
function.
4 To delete the password, select the Delete option.
Using Your Projector
39
CHANGE PASSWORD—Key in the original password. Then, enter the
new password and confirm the new password again.
40
Using Your Projector
POWER SETTINGS—Select and press
to activate power settings. The power
settings menu provides the following options:
POWER SAVING—Select Off to disable Power Saving mode. By default,
the projector is set to enter power saving mode after 120 minutes of
no activity. A warning message appears on screen showing a 60
seconds countdown before switching to power saving mode. Press
any button during the countdown period to stop the power-saving
mode.
You can also set a different delay period to enter power saving mode.
The delay period is the time you want the projector to wait without
an input signal. Power saving can be set to 30, 60, 90, or 120 minutes.
If an input signal is not detected during the delay period, the
projector turns off. To turn on the projector, press the Power button.
LED MODE—Allows you to select between Normal or ECO mode.
Normal mode operates at full power level. ECO mode operates at a
lower power level which may provide longer LED life, quieter
operation, and dimmer luminance output on the screen.
INFORMATION—The information menu displays the current M110 projector settings.
Using Your Projector
41
LANGUAGE
Allows you to set the language for the OSD. Press
languages and press
to change the language.
42
Using Your Projector
and
to select different
Multi-Media Introduction
Multi-media format supported:
Photo Format
Image Type
(Ext Name)
Sub Type
Encode Type
Baseline
Jpeg / Jpg
progressive
YUV420
YUV422
YUV440
YUV444
YUV420
YUV422
YUV440
YUV444
File Format
Max Size
No Limitation
2GB
64x panel
resolution
2GB
64x panel
resolution
BMP
Video Format
Max Pixels
Video
Format
Profile &
Level
MAX
Res
MAX Bit Audio Format
Rate (bps)
MOV, MP4, AVI,
MKV, DIVX
H264
less than 4
reference
frames
1080P
20Mbps
AC3, DTS, MP1, MP2,
MP3, PCM, ADPCM
MOV, MP4
MPEG4
1080P
20Mbps
AMR, PCM, ADPCM
WMV
WMV3
1080P
20Mbps
WMA2, WMA3
Audio Format
Music Type (Ext Name)
Sample Rate (KHz)
Bit Rate (Kbps)
MP1
8-48
8-320
MP2
8-48
8-320
MP3
8-48
8-320
WMA
22-48
5-320
Using Your Projector
43
How to set-up File Type for Multi-Media with USB
NOTE: A USB flash disk must be plugged into the projector if you want to use
the multimedia USB function.
Follow these steps to playback the Photo, Video, or Music files on your projector:
1 Connect the power cable with AC adapter and turn on the projector by
pressing the power button.
2 Plug in a USB flash disk to your projector.
44
Using Your Projector
3 Access the Input Source menu, select the USB option and press the
button. The image input source will automatically switch to Multimedia
Menu when USB option is selected in this step.
The USB Screen shown below appears:
4 Select the multi-media files: Photo, Video, or Music, and then press the
to start playing. Or select the SETUP option to change settings for Photo,
Video, or Music. See "Multi-Media Setup" on page 50.
Using Your Projector
45
How to set-up File Type for Multi-Media with MicroSD
NOTE: A microSD card must be plugged into the projector if you want to use
the multimedia microSD function.
Follow these steps to playback the Photo, Video, or Music files on your projector:
1 Connect the power cable with AC adapter and turn on the projector by
pressing the power button.
2 Plug in a MicroSD card to your projector. The image input source will be
automatically switched to microSD screen when you plug in a microSD card.
46
Using Your Projector
3 Access the Input Source menu, select the MicroSD option and press the
button. The image input source will automatically switch to MicroSD screen
when MicroSD option is selected in this step.
The Micro SD Screen Screen shown below appears:
4 Select the multi-media files: Photo, Video, or Music, and then press the
to start playing. Or select the SETUP option to change settings for Photo,
Video, or Music. See "Multi-Media Setup" on page 50.
Using Your Projector
47
How to set-up File Type for Multi-Media with Internal Memory
Follow these steps to playback the Photo, Video, or Music files on your projector:
1 Connect the power cable with AC adapter and turn on the projector by
pressing the power button.
2 Access the Input Source menu, select the Internal Memory option and press
the
button. The image input source will be automatically switched to
Internal Memory screen when Internal Memory option is selected in this
step.
48
Using Your Projector
The Internal Memory Screen shown below appears:
3 Select the multi-media files: Photo, Video, or Music, and then press the
to start playing. Or select the SETUP option to change settings for Photo,
Video, or Music. See "Multi-Media Setup" on page 50.
Using Your Projector
49
Multi-Media SETUP for USB, Micro SD, and Internal Memory
The multi-media setup menu allows you to change settings for Photo, Video, and
Music.
NOTE: Multi-media setup menu and set are the same for the USB, Micro SD,
and Internal Memory.
PHOTO SETUP
Select and press
to activate photo setup menu. The photo setup menu
provides the following options:
DISPLAY MODE—Press
or
to select the display mode of the photo on the
screen. Options are: File List, Browse Mode, Thumbnail, and Slideshow.
DISPLAY RATIO—Press
to select the display ratio of the photo as Auto
or
(original ratio) or Full (full screen).
SLIDESHOW DURATION—Press
or
to select the slideshow duration. The
image will automatically switch to the next photo after the time out. Options are:
5 sec, 15 sec, 30 sec, 1 min, 5 min, and 15 min.
SLIDESHOW REPEAT—Select On to repeat slideshow always. Or select "Off" to stop
slideshow when it goes to the last page.
SLIDESHOW EFFECT—Press
or
to select what slideshow effect you want.
Options are: Random, Rect., Off, Snake, Partition, Erase, Blinds, Lines,
GridCross, Cross, and Spiral.
NOTE: Slideshow Duration, Slideshow Repeat, and Slideshow Effect function
only support Slideshow mode.
50
Using Your Projector
VIDEO SETUP
Select and press
to activate video setup menu. The video setup menu provides
the following options:
DISPLAY RATIO—Press
or
to select the display ratio of the Video.
AUTO—Keep original aspect ratio.
ORIGINAL SIZE—Display video in original size of the content.
PLAY MODE—Press
or
to select the video play mode. Options are: Once,
Repeat Once, Repeat, and Random.
AUTO PLAY—Select On to play the video automatically while entering the video
list.
MUSIC SETUP
Select and press
to activate music setup menu. The music setup menu
provides the following options:
Using Your Projector
51
PLAY MODE—Press
or
to select the music play mode. Options are: Once,
Repeat Once, Repeat, and Random.
SHOW SPECTRUM—Select On to show the spectrum plot while music is playing.
AUTO PLAY—Select On to play the music automatically while entering the music
list.
FIRMWARE UPDATE
Select and press
to activate firmware update menu. The firmware update
menu provides the following options:
MEDIA—Select "Yes" to enter firmware update screen, and then select Confirm
option to update your media firmware by micro SD card.
IMAGE PROCESSOR—Select "Yes" to enter firmware update screen, and then select
Confirm option to update your Video decoder firmware by micro SD card.
NOTE: Media and Image Processor firmware update only supports micro SD
interface, firmware files must be stored in the micro SD card.
NOTE: You can download the "media and image processor" firmware files from
the Dell Support site at support.dell.com.
52
Using Your Projector
Troubleshooting Your Projector
4
If you experience problems with your projector, see the following troubleshooting
tips. If the problem persists, contact Dell™ (see Contacting Dell™ on page 61).
Problem
Possible Solution
No image appears on the
screen
• Ensure that the projector is turned on.
• Ensure that you have chosen the correct
input source on the INPUT SOURCE menu.
• Ensure the external graphics port is enabled.
If you are using a Dell™ laptop computer,
press
(Fn+F8). For other
computers, see your respective
documentation. If images are not displayed
properly, please upgrade the video driver of
your computer. For Dell computers, see
support.dell.com.
• Ensure that all the cables are securely
connected. See "Connecting Your Projector"
on page 10.
• Ensure that the pins of the connectors are
not bent or broken.
• Use Test Pattern in the Projector Settings of
the Advanced Settings menu. Ensure that
the colors of the test pattern are correct.
F8
CRT/LCD
Fn
Troubleshooting Your Projector
53
Problem (continued)
Partial, scrolling, or
incorrectly displayed image
Possible Solution (continued)
1 Press the Auto Adjust button on the remote
control or the control panel.
2 If you are using a Dell™ portable computer,
set the resolution of the computer to WXGA
(1280 x 800):
a Right-click the unused portion of your
Microsoft® Windows® desktop, click
Properties, and then select Settings tab.
b Verify that the setting is 1280 x 800 pixels
for the external monitor port.
c Press
(Fn+F8).
If you experience difficulty in changing
resolutions, or if your monitor freezes, restart
all the equipment and the projector.
If you are not using a Dell™ portable
computer, see your documentation. If images
are not displayed properly, please upgrade the
video driver of your computer. For a Dell
computer, see support.dell.com.
The screen does not display
your presentation
If you are using a portable computer, press
(Fn+F8).
Image is unstable or flickering Adjust the tracking in the OSD Display
Settings of the Advanced Settings menu (in
PC Mode only).
Image has vertical flickering
bar
Adjust the frequency in the OSD Display
Settings of the Advanced Settings menu (in
PC Mode only).
Image color is incorrect
• If the display receives the wrong signal
output from the graphics card, please set the
signal type to RGB in the OSD Display
Settings of the Advanced Settings menu.
• Use Test Pattern in the Projector Settings of
the Advanced Settings menu. Ensure that
the colors of the test pattern are correct.
54
Troubleshooting Your Projector
Problem (continued)
Image is out of focus
Possible Solution (continued)
1 Adjust the focus ring on the projector lens.
2 Ensure that the projection screen is within
the required distance from the projector
(3.18 ft [97 cm] to 8.48 ft [258 cm]).
The image is stretched when
displaying a 16:9 DVD
The projector automatically detects the input
signal format. It will maintain the aspect ratio
of the projected image according to input
signal format with an Original setting.
If the image is still stretched, adjust the aspect
ratio in the Display Settings of the Advanced
Settings menu in the OSD.
Image is reversed
Select Projector Settings of the Advanced
Settings from the OSD and adjust the
projector mode.
Error LED is blinking amber
A projector fan has failed and the projector
will automatically shut down.
TEMP LED is solid amber
The projector has overheated. The display
automatically shuts down. Turn the display on
again after the projector cools down. If the
problem persists, contact Dell™.
TEMP LED is blinking amber If the projector fan fails, the projector will
automatically shut down. Clear the projector
mode by pressing and holding the POWER
button for 10 seconds. Please wait for about 5
minutes and try to power up again. If the
problem persists, contact Dell™.
The OSD does not appear on
the screen
Press the Menu button on the panel for 15
seconds to unlock the OSD. Check the Menu
Lock on page 38.
The remote control is not
operating smoothly or works
only within a limited range
The battery may be low. Check if the LED
indication from the remote is too dim. If so,
replace with a new CR2032 battery.
Troubleshooting Your Projector
55
Guiding Signals
Control Buttons
Projector
Status
Description
Indicator
Power
(Blue/Amber)
TEMP
(Amber)
(Amber)
Standby mode
Projector in Standby mode. Ready to
power on.
BLUE
Flashing
OFF
OFF
Warming up
mode
Projector takes some time to warm up
and power on.
BLUE
OFF
OFF
LED on
Projector in Normal mode, ready to
display an image.
Note: The OSD menu is not
accessed.
BLUE
OFF
OFF
Cooling mode
Projector is cooling to shutdown.
BLUE
OFF
OFF
Projector
overheated
Air vents might be blocked or ambient
temperature may be above 35 ºC. The
projector automatically shuts down.
Ensure that the air vents are not blocked
and that the ambient temperature is
within operational range. If the problem
persists, contact Dell.
OFF
AMBER
OFF
Fan breakdown
One of the fans has failed. The projector
automatically shuts down. If the problem
persists, contact Dell.
OFF
AMBER
Flashing
OFF
LED failure
LED shutdown.
OFF
OFF
AMBER
56
Troubleshooting Your Projector
5
Specifications
Light Valve
0.45" WXGA S450 DMD, DarkChip3™
Brightness
300 ANSI Lumens (Max.)
Contrast Ratio
10000:1 Typical (Full On/Full Off)
Uniformity
80% Typical (Japan Standard - JBMA)
Number of Pixels
1280 x 800 (WXGA)
Internal Flash
1 GB Memory (Max.)
Displayable Color
1.073 billion colors
Projection Lens
F-Stop: F/ 2.0
f=14.95 mm
Fixed Lens
Throw ratio =1.5 wide and tele
Offset ratio: 100%
Projection Screen Size
30~80 inches (diagonal)
Projection Distance
3.18~8.48 ft (97 cm ~ 258 cm)
Video Compatibility
Composite Video: NTSC (M, 3.58, 4.43), PAL (B,
D, G, H, I, M, N, 4.43), SECAM (B, D, G, K, K1, L,
4.25, 4.4)
Component Video input via VGA: 1080i (50/60 Hz),
720p (50/60 Hz), 576i/p, 480i/p
HDMI input: 1080p, 720p, 576i/p, 480i/p
Power Supply
Universal AC 100-240 50-60 Hz with 65 W power
adapter
Power Consumption
Normal mode: 44 W ± 10% @ 110 Vac
Eco mode: 36 W ± 10% @ 110 Vac
Power saving mode: <10 W (Fan speed at
minimum)
Standby mode: < 0.5 W (VGA_OUT Off)
Specifications
57
Audio
1 speaker x 1 watt RMS
Noise Level
36 dB(A) in Normal mode, 32 dB(A) in Eco mode
Weight
0.8 lb ± 0.05 lb (0.36 kg ± 22.7 g)
Dimensions (W x H x D)
4.14 x 1.43 x 4.09 inches (105.3 x 36.5 x 104 mm)
4.14
"(10
5.3 m
m)
4.
09
"(
10
4
m
m
)
1.44"(36.5 mm)
Environmental
Operating temperature: 5 ºC - 35 ºC (41 ºF- 95 ºF)
Humidity: 80% maximum
Storage temperature: 0 ºC to 60 ºC
(32 ºF to 140 ºF)
Humidity: 90% maximum
Shipping temperature: -20 ºC to 60 ºC
(-4 ºF to 140 ºF)
Humidity: 90% maximum
I/O Connectors
Power: One DC power jack
VGA input: One 24-pin universal connector (Black)
for analog RGB input signals and supporting Audio
output.
HDMI input: One HDMI connector for supporting
HDMI 1.3. HDCP compliant.
AV input: One 3.5 mm connector for supporting
Audio/Video input.
USB (type A) port: One USB connector for
supporting USB display, multimedia playback
(Video/Audio/Photo), and USB Memory storage
access (USB flash drive/internal memory), and
supporting optional wireless dongle.
58
Specifications
MicroSD card slot: One microSD connector for
supporting multimedia playback
(Video/Audio/Photo) and supporting media and
image processor firmware upgrade.
Wireless Dongle (Optional) Wireless Standard: IEEE802.11b/g/n
Wireless: One USB (type A) connector for
supporting wireless dongle (USB interface, optional)
and mobishow.
OS environment: Windows 7/Vista/XP/2000, MAC
OS X
LED
OSTAR Q6WP LED (up to 20000 hours in Normal
mode)
NOTE: The LED life rating for any projector is a measure of brightness
degradation only, and is not a specification for the time it takes a LED to fail
and cease light output. LED life is defined as the time it takes for more than 50
percent of a LED sample population to have brightness decrease by
approximately 50 percent of the rated lumens for the specified LED. The LED
life rating is not guaranteed in any way. The actual operating life span of a
projector LED will vary according to operating conditions and usage patterns.
Usage of a projector in stressful conditions which may include dusty
environments, under high temperatures, many hours per day, and abrupt
powering-off will most likely result in a LED’s shortened operating life span or
possible LED failure.
Specifications
59
Compatibility Modes (Analog/Digital)
Resolution
60
Refresh Rate (Hz) Hsync Frequency (KHz) Pixel Clock (MHz)
640 x 350
640 x 480
70.087
59.940
31.469
31.469
25.175
25.175
720 x 480 p60
720 x 576 p50
720 x 400
640 x 480
640 x 480
59.940
50.000
70.087
75.000
85.008
31.469
31.250
31.469
37.500
43.269
27.000
27.000
28.322
31.500
36.000
800 x 600
800 x 600
800 x 600
60.317
75.000
85.061
37.879
46.875
53.674
40.000
49.500
56.250
1024 x 768
1280 x 720 p50
1280 x 720 p60
1920 x 1080 i50
1920 x 1080 i60
1280 x 720
1024 x 768
1280 x 800
1366 x 768
1360 x 768
1024 x 768
1440 x 900
60.004
50.000
60.000
50.000
60.000
59.855
75.029
59.810
59.790
60.015
84.997
59.887
48.363
37.500
45.000
28.125
33.750
44.772
60.023
49.702
47.712
47.712
68.677
55.935
65.000
74.250
74.250
74.250
74.250
74.500
78.750
83.500
85.500
85.500
94.500
106.500
1280 x 1024
1400 x 1050
1280 x 800
60.020
59.978
84.880
63.981
65.317
71.554
108.000
121.750
122.500
1280 x 1024
1440 x 900
1680 x 1050
1280 x 960
1920 x 1080
75.025
74.984
59.954
85.002
60.000
79.976
70.635
65.290
85.938
67.500
135.000
136.750
146.250
148.500
148.500
Specifications
Contacting Dell
For customers in the United States, call 800-WWW-DELL (800-9993355).
NOTE: If you do not have an active Internet connection, you can find contact
information on your purchase invoice, packing slip, bill, or Dell product catalog.
Dell™ provides several online and telephone-based support and service
options. Availability varies by country and product, and some services may
not be available in your area. To contact Dell for sales, technical support,
or customer service issues:
1
Visit Support.dell.com.
2
Verify your country or region in the Choose A Country/Region dropdown menu at the bottom of the page.
3
Click Contact Us on the left side of the page.
4
Select the appropriate service or support link based on your need.
5
Choose the method of contacting Dell that is convenient for you.
Contacting Dell
61
Appendix: Glossary
ANSI Lumens — A standard for measuring the brightness. It is calculated by
dividing a square meter image into nine equal rectangles, measuring the lux (or
brightness) reading at the center of each rectangle, and averaging these nine
points.
Aspect Ratio — The most popular aspect ratio is 4:3 (4 by 3). Early television and
computer video formats are in a 4:3 aspect ratio, which means that the width of
the image is 4/3 times the height.
Brightness — The amount of light emitted from a display or projection display or
projection device. The brightness of projector is measured by ANSI lumens.
Color Temperature — The color appearance of white light. Low color
temperature implies warmer (more yellow/red) light while high color temperature
implies a colder (more blue) light. The standard unit for color temperature is
Kelvin (K).
Component Video — A method of delivering quality video in a format that
consists of the luminance signal and two separate chrominance signals and are
defined as Y'Pb'Pr' for analog component and Y'Cb'Cr' for digital component.
Component video is available on DVD players.
Composite Video — A video signal that combines the luma (brightness), chroma
(color), burst (color reference), and sync (horizontal and vertical synchronizing
signals) into a signal waveform carried on a single wire pair. There are three kinds
of formats, namely, NTSC, PAL, and SECAM.
Compressed Resolution — If the input images are of higher resolution than the
native resolution of the projector, the resulting image will be scaled to fit the
native resolution of the projector. The nature of compression in a digital device
means that some image content is lost.
Contrast Ratio — Range of light and dark values in a picture, or the ratio between
their maximum and minimum values. There are two methods used by the
projection industry to measure the ratio:
1 Full On/Off — measures the ratio of the light output of an all white image (full
on) and the light output of an all black (full off) image.
2 ANSI — measures a pattern of 16 alternating black and white rectangles. The
average light output from the white rectangles is divided by the average light
output of the black rectangles to determine the ANSI contrast ratio.
Full On/Off contrast is always a larger number than ANSI contrast for the same
projector.
62
Glossary
dB — decibel — A unit used to express relative difference in power or intensity,
usually between two acoustic or electric signals, equal to ten times the common
logarithm of the ratio of the two levels.
Diagonal Screen — A method of measuring the size of a screen or a projected
image. It measures from one corner to the opposite corner. A 9 FT high, 12 FT
wide, screen has a diagonal of 15 FT. This document assumes that the diagonal
dimensions are for the traditional 4:3 ratio of a computer image as per the example
above.
DLP® — Digital Light Processing™ — Reflective display technology developed by
Texas Instruments, using small manipulated mirrors. Light passing through a color
filter is sent to the DLP mirrors which arrange the RGB colors into a picture
projected onto screen, also known as DMD.
DMD — Digital Micro-Mirror Device — Each DMD consists of thousands of
tilting, microscopic aluminum alloy mirrors mounted on a hidden yoke.
Focal Length — The distance from the surface of a lens to its focal point.
Frequency — It is the rate of repetition in cycles per seconds of electrical signals.
Measured in Hz (Hertz).
HDCP — High-Bandwidth Digital-Content Protection — A specification
developed by Intel™ Corporation to protect digital entertainment across digital
interface, such as DVI, HDMI.
HDMI — High-Definition Multimedia Interface — HDMI carries both
uncompressed high definition video along with digital audio and device control
data in a single connector.
Hz (Hertz) — Unit of frequency.
Keystone Correction — Device that will correct an image of the distortion
(usually a wide-top narrow-bottom effect) of a projected image caused by
improper projector to screen angle.
Maximum Distance — The distance from a screen the projector can be to cast an
image that is usable (bright enough) in a fully darkened room.
Maximum Image Size — The largest image a projector can throw in a darkened
room. This is usually limited by focal range of the optics.
Minimum Distance — The closest position that a projector can focus an image
onto a screen.
NTSC — National Television Standards Committee. North American standard for
video and broadcasting, with a video format of 525 lines at 30 frames per second.
PAL — Phase Alternating Line. A European broadcast standard for video and
broadcasting, with a video format of 625 lines at 25 frames per second.
Glossary
63
Reverse Image — Feature that allows you to flip the image horizontally. When
used in a normal forward projection environment text, graphics, etc. are
backwards. Reverse image is used for rear projection.
RGB — Red, Green, Blue — typically used to describe a monitor that requires
separate signals for each of the three colors.
SECAM — A French and international broadcast standard for video and
broadcasting, closely related to PAL but with a different method of sending color
information.
SVGA — Super Video Graphics Array — 800 x 600 pixels count.
SXGA — Super Extended Graphics Array, — 1280 x 1024 pixels count.
UXGA — Ultra Extended Graphics Array — 1600 x 1200 pixels count.
VGA — Video Graphics Array — 640 x 480 pixels count.
XGA — Extended Video Graphics Array — 1024 x 768 pixels count.
WXGA — Wide Extended Graphics Array — 1280 x 800 pixels count.
Zoom Lens — Lens with a variable focal length that allows the operator to move
the view in or out making the image smaller or larger.
Zoom Lens Ratio — Is the ratio between the smallest and largest image a lens can
project from a fixed distance. For example, a 1.4:1 zoom lens ratio means that a 10
foot image without zoom would be a 14 foot image with full zoom.
64
Glossary
Index
A
Adjusting the Projected Image 19
Adjusting the Projector Height
19
lower the projector
Front tilt adjustment
wheel 19
Adjusting the Projector Zoom and
Focus 20
Focus ring 20
C
Connecting the Projector
3.5 mm jack A/V to RCA cable
14
AC adaptor 11, 12, 15
Connecting with an HDMI
Cable 15
HDMI cable 15
Power cord 11, 12, 14, 15, 16, 17
To Computer 11
Universal 24-pin to VGA cable
11
USB-A to USB-A cable 12
Connection Ports
A/V In connector 10
HDMI connector 10
MicroSD card slot 10
Universal I/O connector for VGA
input and Audio
input/output 10
USB Type A connector 10
VGA-A output (monitor
loop-through) 10
Contact Dell 6, 55
Control Panel 23
D
Dell
contacting 61
M
Main Unit 8
Control panel 8
Focus ring 8
Lens 8
Tilt adjusting wheel 8
Menu Position 38
Menu Settings 38
Menu Timeout 38
Menu Transparency 38
O
On-Screen Display 29
Input Source 29
Index
65
P
Password 38
phone numbers 61
Power Saving 41
Power Settings 41
Powering On/Off the Projector
Powering Off the Projector 18
Powering On the Projector 18
Video Compatibility 57
Weight 58
support
contacting Dell 61
T
telephone numbers 61
Test Pattern 36
Troubleshooting 53
Contact Dell 53
R
Remote Control 25
Reset, Factory 37
S
Specifications
Audio 58
Brightness 57
Contrast Ratio 57
Dimensions 58
Displayable Color 57
Environmental 58
I/O Connectors 58
Internal Flash 57
Light Valve 57
Noise Level 58
Number of Pixels 57
Power Consumption 57
Power Supply 57
Projection Distance 57
Projection Lens 57
Projection Screen Size 57
Uniformity 57
66
Index