1
LIGHT CARTRIDGE REPLACEMENT
LED LIGHT FIXTURES SHOULD NEVER BE ELECTRICALLY
CONNECTED TO A POWER SOURCE OTHER THAN AN APPROVED POOL “SAFETY" UL LISTED
OUTDOOR RATED CLASS 3, 12VAC TRANS-FORMER. THE SAVI NOTE SHOULD ONLY BE CONNECTED
TO THE SAVI M4 CONTROLLER. FAILURE TO COMPLY WILL EITHER DAMAGE OR DESTROY THE LIGHT
FIXTURE AND VOID THE WARRANTY.
TURN OFF MAIN POWER TO LIGHT BEFORE INSTALLATION
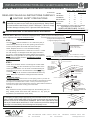
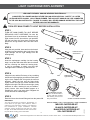
STEP 1
Fixture Body
TURN OFF MAIN POWER TO LIGHT BEFORE
REPLACING LIGHT CARTRIDGE. Be sure the
light fixture is in a dry environment. Remove the (8)
eight screws from the lens with the tool provided.
Pull the lens from the fixture body. Remove and
discard the O-ring between the Lens and Fixture
Body.
O-Ring
Lens
STEP 2
Using the tool provided, insert and turn the threaded portion into the extraction hole in the face of the
Light Cartridge. Pull the Light Cartidge from the
housing body.
Extraction Tool /
Screw Driver
Light Cartridge
STEP 3
Insert the replacement cartridge into the housing
body. Line up the TAB at the end of the circut board
with the receiving slot inside the housing body.
It may be necessary to slowly turn the Light
Cartridge until the TAB lines up with the SLOT.
SLOT
STEP 4
Clean the Lens and the Enclosure of any remaining
old Silicone before applying new Silicone and replacing the Lens. Replace the O-ring with the new one
provided. Attach the lens onto the fixture body.
Tightly secure the eight (8) screws indicated in the
diagram to the right. Once all screws are tight, slowly
submerse in water, checking for any air bubbles quickly remove from water bubbles appear as it
indicates the seal is not water tight. Retighten the
screws and test for bubbles again.
STEP 5
Reset the fixture into the wall fitting and turn the power ON.
TAB
Replacement
Light Cartridge
New O-Ring
2
3
5
8
SILICONE BEAD ON LENS
Apply a new silicone bead to
the lens with tube provided
after cleaning the lens and
body of old silicone.
7
6
4
1
SCREW TIGHTENING DIAGRAM
WINTERIZING
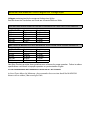
REPLACEMENT LIGHT CARTRIDGE KIT PART NUMBERS
MELODY-CARTRIDGE-KIT
BLANCO-CARTRIDGE-KIT
BLANCOPRO-CARTRIDGE-KIT
SOL-CARTRIDGE-KIT
LC111912
The water level should be lowered to approximately 12
inches below the pool lights, make certain the water is
drained out of the wall housing. Consult a Local Swimming
Pool Professional for proper winterization. Minimum
safeguard requires dropping the water level 2”-4” below
the light. At NO TIME should there be water removed from
the pool without checking ground water tables.
9400 Southridge Park Court Suite 200 Orlando, Florida 32819 USA T. 407.855.5630 NextStepProduct.com