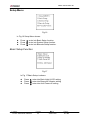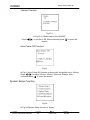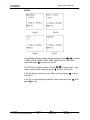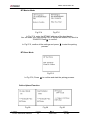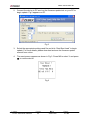
1
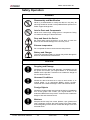
Portable Data Collector Z-2121 series User’s Manual ( Version 3.2) ZEBEX INDUSTRIES INC. Editorial Record Version Description of Version Date of edited V1.0 Nov. 15, 2010 Initial release V2.0 April. 12, 2011 Updated for firmware V.1.05. Added Bluetooth section V3.0 April. 26, 2011 Added BT-HID section V3.1 July 2, 2012 Corrected General Guide picture V3.2 July 9, 2013 Deleted the word “USB” from Charging by cable section V3.3 October 4, 2013 Corrected charging signal for LED Subject Z-2121 series User’s Manual Version 3.2 Date 2013/10/04 Page 2 / 44 ZEBEX INDUSTRIES INC. Table of Contents Preface About This Manual................................................................................................. 4 Symbols used in this manual ............................................................................... 4 Copyright................................................................................................................ 5 Safety Information ................................................................................................. 5 Laser Safety ........................................................................................................... 5 Safety Operation .................................................................................................... 6 Federal Communication Commission (FCC) Statement .................................... 7 Unpacking Package Contents .................................................................................................. 8 Optional Parts ........................................................................................................ 9 Cradle package....................................................................................................... 9 Purchaseable accessories.................................................................................... 9 General Guide ...................................................................................................... 10 Getting Start Inserting the Battery............................................................................................ 11 Remove the Battery ……...................................................................................12 Charging the Battery ........................................................................................... 13 Charging by cable ................................................................................................ 13 Charging by cradle............................................................................................... 13 Charging the Battery Separate in the Cradle……………………………………15 PC System Requirements ................................................................................... 16 Connecting To PC................................................................................................ 16 Connecting via USB Cradle ................................................................................ 16 Connecting the Z-2121 directly via USB cable.................................................. 17 About The Product .............................................................................................. 18 Prerequisites ........................................................................................................ 20 Specifications ...................................................................................................... 21 Start to operate the Z-2121 Firmware Operstion and Start Guide…………………………………………….22 Subject Z-2121 series User’s Manual Version 3.2 Date 2013/10/04 Page 3 / 44 ZEBEX INDUSTRIES INC. Preface About This Manual Thank you for your purchase of the ZEBEX Z-2121 Portable Data Collector. ZEBEX Z-2121 product is at the forefront of data collector technology, and this manual will provide the necessary information on the many and varied options available to you. The Z-2121 product is a compact, ergonomic, modular and durable data collector. It is designed for easy upgrade with an integrated BT communication, 1D barcode scanner and vibration. The design is ideal for the mobile worker as it simple and easy to use anywhere along a supply chain. Symbols used in this manual A triangular shape indicates you should exercise caution. A circle shape indicates something you should not to do. A black circle indicates something you must to do. A note symbol indicates you the information that is important and you should be observed. Subject Z-2121 series User’s Manual Version 3.2 Date 2013/10/04 Page 4 / 44 ZEBEX INDUSTRIES INC. Copyright ZEBEX Industries Inc. makes no warranty of any kind with regard to this material. Including but not limited to the imply warranties of merchantability and fitness for a particular purpose. ZEBEX Industries Inc. shall not be liable for errors contained herein or for incidental consequential damages in connection with the furnishing, performance or use of this product. ZEBEX Industries Inc. will be under no liability in respect of any defect arising from fair wear and tear, willful damage, negligence, abnormal working conditions, failure to follow the instructions and warnings, or misuse or alteration or repair of the products without written approval. No part of this document may be reproduced, transmitted, stored in a retrieval system, transcribed or translated into any language or computer language in any form or by any means electronic, mechanical, magnetic, optical, chemical, manual or otherwise, with express writ- ten consent and authorization. We reserve the right to make changes in product design without reservation and without notification. The material in this guide is for information only and is subject to change without notice. ZEBEX is a registered trademark of ZEBEX INDUSTRIES INC. Copyright © 2011. All rights reserved. Safety Information Your safety is of the utmost importance so please observe and follow the following guidelines that allow you to use the scanner in a safe and responsible way. Laser Safety The Z-2121 series Portable Data Collector complies with safety standard IEC825-1(1993) for a Class 2 laser product. It also complies with U.S.21CFR1040 as applicable to a Class II laser product. Avoid staring at direct laser light as the laser beam may hurt your eyes. LASER BEAM Never look directly into the laser beam. Doing so can cause serious eye damage. Subject Z-2121 series User’s Manual Version 3.2 Date 2013/10/04 Page 5 / 44 ZEBEX INDUSTRIES INC. Safety Operation WARNING Disassembly and Modification Never try to disassemble or modify the device in any way. All servicing should be carried out be qualified Zebex personnel or Zebex- approved engineers. Interior Parts and Components Never touch interior high voltage parts or components. Doing so creates the danger of electrical shock. Drop and Knock the Device Be careful when using the device; do not drop or knock the device as irreversible damage to the unit may occur. Extreme temperature Do not operate the device under extreme temperature. Battery and Charger The use of third-party battery or charger may either damage the device or shorten the life of the device. CAUTION Dropping and Damage Should the drop the device and damage it, immediately turn off the power and contact your original dealer or an authorized ZEBEX service provider. Continued use creates the danger of fire and electrical shock. Abnormal Conditions Should the device become hot or start to emit smoke or an original dealer or an authorized ZEBEX service provider. Continued use creates the danger of fire and electrical shock. Foreign Objects Should any foreign matter ever get into the device, immediately turn off the power and contact your original dealer or an authorized ZEBEX service provider. Continued use creates the danger of fire and electrical shock. Moisture Keep the device away from vases, planters, cups, glasses and other containers of liquid. Also keep it away from metal. Water and metal getting into the device creates the danger of fire and electrical shock. Subject Z-2121 series User’s Manual Version 3.2 Date 2013/10/04 Page 6 / 44 ZEBEX INDUSTRIES INC. Federal Communication Commission (FCC) Statement 15.21 You are cautioned that changes or modifications not expressly approved by the part responsible for compliance could void the user’s authority to operate the equipment. 15.105(b) This equipment has been tested and found to comply with the limits for a Class B digital device, pursuant to part 15 of the FCC rules. These limits are designed to provide reasonable protection against harmful interference in a residential installation. This equipment generates uses and can radiate radio frequency energy and, if not installed and used in the accordance with the instructions, may cause harmful interference to radio communications. However, there is no guarantee that interference will not occur in a particular installation. If this equipment does cause harmful interference to radio or television reception, which can be determined by turning the equipment off and on, the user is encouraged to try to correct the interference by one or more of the following measures: • Reorient or relocate the receiving antenna. • Increase the separation between the equipment and receiver. • Connect the equipment into an outlet on a circuit different from that to which the receiver is connected. • Consult the dealer or an experienced radio/TV technician for help. Operation is subject to the following two conditions: This device may not cause interference; This device must accept any interference, including interference that may cause undesired operation of the device. FCC RF Radiation Exposure Statement This equipment complies with FCC radiation exposure limits set forth for an uncontrolled environment. End users must follow the specific operating instructions for satisfying RF exposure compliance. This transmitter must not be co-located or operated in conjunction with any other antenna or transmitter. Subject Z-2121 series User’s Manual Version 3.2 Date 2013/10/04 Page 7 / 44 ZEBEX INDUSTRIES INC. Unpacking Package Contents u Z-2121 series Portable Data Terminal USB Cable (Terminal connect to PC USB port) AC Adapter Battery Pack OR RS-232 DB9 (F) Cable Subject Z-2121 series User’s Manual Version 3.2 Date 2013/10/04 Page 8 / 44 ZEBEX INDUSTRIES INC. Optional Parts Cradle package RS-232 Docking Cradle USB Docking Cradle AC Adapter Purchaseable accessories Main Battery USB Cable RS-232 DB9 (F) Cable AC Adapter Subject Z-2121 series User’s Manual Version 3.2 Date 2013/10/04 Page 9 / 44 ZEBEX INDUSTRIES INC. General Guide 1 LED indicator (Right) Indicates the status of battery charge : Red for battery charging and off when it’s full. 2 LCD screen Display various data when a program is being run. 3 Scan button The trigger of Barcode reading. 4 Keypad A total of 26 keys are provided to the power and other function keys. 5 Scan windows Emits a laser for bar code reading. 6 Battery Main battery Communication port Communication with PC or charge by USB port 7 Subject Z-2121 series User’s Manual Version 3.2 Date 2013/10/04 Page 10 / 44 ZEBEX INDUSTRIES INC. Getting Started Inserting the Battery When inserting the battery for the first time, follow these directions: 1-3. Push the top lock to pick up the battery pack. 5-4. Insert the battery as shown. 6-7. Put the battery cover back. Subject Z-2121 series User’s Manual Version 3.2 Date 2013/10/04 Page 11 / 44 ZEBEX INDUSTRIES INC. Remove the Battery 1. Turn the power off. 2. Remove the back cover. 3. Press the battery against the Z-2121 terminal, and lift it up and away from the compartment. 4. Put the cover back. Subject Z-2121 series User’s Manual Version 3.2 Date 2013/10/04 Page 12 / 44 ZEBEX INDUSTRIES INC. Charging the Battery The Li-ion rechargeable battery can be charged while inserted in the device itself or independently via the recharging slot at the back of the cradle. Charging by cable Connect the charging cable and AC adaptor as shown. Charging by cradle 1. Put the Z-2121 on the cradle as shown in figure 2. 2. Connect the power adapter to the DB-9 (female) connector 3. Insert the power adapter to the wall socket. Note 1: 1. The cradle can be connected both to the power adaptor for battery charging and to the host computer for data uploading as well as downloading at the same time. 2. To charge the battery, connect the power plug of the power supply into the power jack on the DB-9 female connector. 3. The DB-9 (female) connector is used for battery charging and/or communication with the PC. Subject Z-2121 series User’s Manual Version 3.2 Date 2013/10/04 Page 13 / 44 ZEBEX INDUSTRIES INC. 4. Battery charging and data exchange can be done at the same time or respectively. The Z-2121 Data Collector, however, is unable to communicate with the host computer when placed on the cradle without the battery attached to it. 5. The battery is always charged via the cradle. There are two ways to charge the battery. First, take the battery out from the Z-2121, and insert it in the back slot of the cradle for fast charging, as shown in Fig 3, which takes about 3 hours before it is fully charged; second, put the battery in the Z-2121, and place it on the cradle, with the Z-2121 either on or off, for slow charging, as shown in Fig 2. This will need approximately 6 hours. To maximize the battery’s life span, it is recommended that slow charging be adopted unless there is a need for fast charging. 6. While the battery is being charged within the Z-2121 on the cradle, data can still be exchanged between the PC and the Z-2121 via the DB-9 connector and the RS-232 port. 7. The battery should stay on the cradle (either with the terminal or independently) for at least 12 hours before being used the first time or after months of idleness. Subject Z-2121 series User’s Manual Version 3.2 Date 2013/10/04 Page 14 / 44 ZEBEX INDUSTRIES INC. Charging the Battery separately in the cradle Insert the battery into the compartment at the rear of the cradle. Cradle-front view Connect the power jack to the cradle and plug AC adapter into the socket. NOTES When charging the battery for the first time, charge for at least 12 hours prior to use. Subject Z-2121 series User’s Manual Version 3.2 Date 2013/10/04 Page 15 / 44 ZEBEX INDUSTRIES INC. PC System Requirements Windows XP Operating System 64 MB RAM 50 MB free HDD space USB ports communication Interface WLAN transmitter (optional) Bluetooth transmitter/receiver (optional) Connecting To PC In order to use the software supplied with the Terminal, the mobile data terminal must be connected to a PC. Connecting via USB Cradle The cradle must also be connected via one of your PC’s USB ports. Attach one end of the cable to the USB interface on the cradle and the other to your PC. Subject Z-2121 series User’s Manual Version 3.2 Date 2013/10/04 Page 16 / 44 ZEBEX INDUSTRIES INC. Connecting the Z-2121 directly via USB cable You can connect the Z-2121 directly to your PC, without the need for the cradle, using the Mini USB cable, attaching it to the port on the left hand side of the device. Subject Z-2121 series User’s Manual Version 3.2 Date 2013/10/04 Page 17 / 44 ZEBEX INDUSTRIES INC. About The Product The Z-2121 is a compact, ergonomic and durable portable data collector. It is designed with an integrated Bluetooth communication and 1D laser barcode scanner and 26-keys keypad. The design is ideal for the mobile worker as it simple and easy to use anywhere along a supply chain. The Z-2121 features a 32-bit C-MOS Microprocessor. This combination delivers high performance, low power consumption and the diversity of a Bluetooth communication. Compared with other systems currently available on the market, Z-2121 is the most cost-effective to offering optimum performance. Features Hardware features a. Compact size, lightweight, elegant, and easy to carry on the waist strap by means of a tab mounted on the back of the unit and a clip attached to the user’s waist strap. b. Ergonomic design, operated with one hand, easy to capture data. c. Low power consumption. Good for 48-hour operation after a full charge. d. Auto shut-off function reduces power consumption and extends battery life. e. Built-in FREETASK allows the Z-2121 to be used for data collecting without outside supports. f. Programmable functions support WinTask Gen. for special data collection. g. Built-in Laser scanner as input device. h. Built-in Real Time Clock for time-stamp. i. Tone controllable buzzer. j. A lithium back-up battery for memory protection. k. Low-battery detecting circuit and low-power warning device. l. RS-232C communication port. m. BT connection. Note: a. The FREETASK is a built-in simple Data Base system with which you can define your own storage structure for data collection operation. b. Win Task Gen. is a Windows based utility program with which you can design the procedure for specified tasks and execute designed tasks on the data terminal. Subject Z-2121 series User’s Manual Version 3.2 Date 2013/10/04 Page 18 / 44 ZEBEX INDUSTRIES INC. Firmware features a. Supports most of the popular barcode symbols. b. Ability to discriminate among barcodes c. Programmable auto-power-off time d. The uploading or downloading can be fully controlled by the computer. e. Easy user-defined FREETASK, able to assign as many as 16 fields f. Ability to execute as many as 8 TASK Development Software features a. Windows 95/98/NT based WinTask Gen. b. Able to remotely program all functions as long as the terminal (including the decoder) is connected to PC via the cradle. c. Ability d. The FREETASK may be downloaded (from PC) to the terminal e. In addition to the FREETASK, as many as 8 TASKs may be downloaded to the terminal f. Ability to edit TASK to execute specified data collecting tasks. to upload data to PC Cradle features a. A special recharging circuit ensures recharging effects and security of the lithium Ion battery during recharging. b. Able to communicate with PC using a widely used RS-232 or USB interface as shown in Fig 6. CRD-21 DB-9 connector & power jack Fig 6 Subject Z-2121 series User’s Manual Version 3.2 Date 2013/10/04 Page 19 / 44 ZEBEX INDUSTRIES INC. Note: There are 2 LEDs and 2 holes at the front bottom of the CRD-21 as shown in Fig 6. The 2 LEDs are located on the left and right, whereas the two holes in the middle. The LED on the left is illuminated when power is on, and will not be illuminated if the power adaptor is not connected to the AC output, or the 9VDC jack is not inserted into the RS-232 connector. The LED on the right is illuminated when a battery is put in the back slot of the cradle for recharge. It will remain illuminated as long as recharging is going on until a full charge is achieved. It flashes intermittently, however, when the battery slot is empty, indicating that the cradle is detecting the presence of the battery. The LED at the upper-right corner of the terminal is terminal is placed on the illuminated when the cradle for a recharge, and will be off when a full recharge is achieved. Prerequisites Skills Required The following skills are required by developers aiming to develop application software for the ZEBEX Z-2121 series. ● Good knowledge of one or more of the following: * C language Subject Z-2121 series User’s Manual Version 3.2 Date 2013/10/04 Page 20 / 44 ZEBEX INDUSTRIES INC. Specifications SYSTEM Processor Memory LCD Display Keypad Audio POWER Main battery Backup battery Input Device Barcode scanner Indicator Power & Charging Bluetooth Vibration Interface Cradle - RS-232 Terminal – USB Cable Radio Bluetooth Physical Dimensions Weight Color Environmental Rugged Operating temperature Storage temperature Humidity Regulatory Safety regulation Subject Z-2121 series User’s Manual ST 32-bit processor with Flash Area 256/512KB SRAM - 2MB FSTN 96x49 dot (6Lx16C) , with Backlight LCD 26 Keys without backlight 1 X Mono Buzzer 830mAh (Lithium-ion) (3.0V, 25mAH Li-ion rechargeable battery) 2 weeks – data and RTC define by remove main battery keep time SE-955 1D barcode Laser scanne engine 1 X LED Two color , Red for charging Green Good Read N/A Yes With RS-232 cable (Full Function) Detect – USB cable function (Power by PC USB power detect or Travel Charge) Bluetooth 2.0 compliance , CLASS I , DISTANCE=10~100M 134.9(L) x 23.6(W) x 48(H) mm 125g Dark Gray (Resistance to fall impact : 1.0M in height) 0℃~ 50℃ -10℃~ 60℃ 95% non-condensing FCC, CE, CE RF , RoHS, FCC RF , LVD Version 3.2 Date 2013/10/04 Page 21 / 44 ZEBEX INDUSTRIES INC. Start to operate the Z-2121 Scanning Data 1. Insert a fully charged battery. 2. Press the “Power” key. After the display appears, press “M2” key to enter the System Menu. 3. Then Press “1” to enter the “Run Task” menu. 4. Press “SCAN” to do barcode scanning and data collecting. System Menu Press the “Power” key. Fig 1 appears showing the firmware version, memory status, and the date and time. Press M2 to go to the System Menu as shown in Fig 2. Fig 1 Fig 2 In Fig 2 System Menu is shown: Press Press Press Press 1 2 3 4 enter into Run Task function. enter into Task Utility function. enter into Setup function. enter into Upload function. Run Task Fig 3 Subject Z-2121 series User’s Manual Version 3.2 Date 2013/10/04 Page 22 / 44 ZEBEX INDUSTRIES INC. In Fig 3 press SCAN to read barcode data, and the vibration will shake once when SCAN key is pressed. If want to revise the barcode data, please press F6 to show on the data and key in the number, or can press F4 to delete the data or number. And then press F1 back Fig 3. Task Utility Fig 4 In Fig 4 is shown for Task Utility function, the following is the description of each function: Press Press Press Press 1 2 3 4 enter into File Status function. enter into Format function. enter into Delete Data function. enter into Delete Task function. File Status Function Fig 5 In Fig 5 the data record is shown. Press M1 can leave the screen. Subject Z-2121 series User’s Manual Version 3.2 Date 2013/10/04 Page 23 / 44 ZEBEX INDUSTRIES INC. Format Function Fig 6 Fig 7 Fig 8 Fig 9 Fig 10 Fig 11 Fig 12 Fig 13 In Fig 6 press any key to go to the next screen. In Fig 7 total field is shown, enter the number from 1 to 16, after confirmed press E to enter into Fig 8. In Fig 8 input device setting is shown, press or to adjust Scan only, Keyin + Scan, Keyin Only. After confirmed press E to enter into Fig 9. In Fig 9 field length is shown. Enter the field length from 1 to 32. After confirmed press E to enter into Fig 10. Subject Z-2121 series User’s Manual Version 3.2 Date 2013/10/04 Page 24 / 44 ZEBEX INDUSTRIES INC. In Fig 10 prompt is shown. Enter the message for the prompt. After confirmed press E to enter into Fig 11. In Fig 11 field editing is shown. See the chart below to enter ndaulcp to set the format. After confirmed press E to enter into Fig 12. In Fig 12 delay is shown. Enter the number to set the delay. After confirmed press E to enter into Fig 13. In Fig 13 time stamp is shown. Press or Long. After confirmed press E to exit. to adjust None, Short, Delete Data Function Fig 14 In Fig 14 press M2 to select YES or NO for deleting data downloaded from PC. After confirmed press E to leave the screen. Delete Task Function Fig 15 In Fig 15 press M2 to select YES or NO for deleting task downloaded from PC. After confirmed press E to leave the screen. Subject Z-2121 series User’s Manual Version 3.2 Date 2013/10/04 Page 25 / 44 ZEBEX INDUSTRIES INC. Setup Menu Fig 16 In Fig 16 Setup Menu shown: Press 1 enter into Basic Setup function. Press 2 enter into System Setup function. Press 3 enter into Barcode Setup function. Basic Setup Function Fig 17 In Fig 17 Basic Setup is shown: Press 1 enter into Back Light & LCD setting Press 2 enter into Beep and Vibrator setting Press 3 enter into Auto Power off setting Subject Z-2121 series User’s Manual Version 3.2 Date 2013/10/04 Page 26 / 44 ZEBEX INDUSTRIES INC. Back Light Function Fig 18 In Fig 18 press or to switch ON or OFF the LCD back light. After confirmed press E to leave the screen. LCD Contrast Function Fig 19 In Fig 19 LCD contrast is shown with the default set to 45. Press or to adjust the contrast, after confirmed press E to leave the screen. Beep Volume Function Fig 20 In Fig 20 Beep Volume is shown with the default set to Loud. Press or to adjust Quite, Low or Medium, after confirmed press E to leave the screen. Subject Z-2121 series User’s Manual Version 3.2 Date 2013/10/04 Page 27 / 44 ZEBEX INDUSTRIES INC. Vibrator Function Fig 20-1 Press or In Fig 20-1 Vibrator can be turn ON/OFF. to set On or Off. After confirmed press E to leave the screen. Auto Power Off Function Fig 21 In Fig 21 Auto Power Off function is shown with the default set to 10mins. to adjust 15mins, 20mins, 30mins or Disable. After Press or confirmed press E to leave the screen. System Setup Function Fig 22 In Fig 22 System Setup function is shown: Subject Z-2121 series User’s Manual Version 3.2 Date 2013/10/04 Page 28 / 44 ZEBEX INDUSTRIES INC. Press 1 enter into Communication function test. Press 2 enter into System Timer function test. Press 3 enter into ID/PW/Data Mode function test. Communication Function Fig 23 In Fig 23 is shown for System Setup function, the following is the description of each function: Press 1 enter into Comm. Parameter. Press 2 enter into OnLine Upload. Press 3 enter into Timeout Value. Comm. Parameter Function Fig 23-1 In Fig 23-1, you can adjust communication profile for the device. Press or to adjust RS232, USB, BT. After confirmed press E to leave the screen. Subject Z-2121 series User’s Manual Version 3.2 Date 2013/10/04 Page 29 / 44 ZEBEX INDUSTRIES INC. RS232 Fig 24 Fig 26 Fig 25 Fig 27 In Fig 24 Baud Rate is shown for speed setup. Press or to adjust 115200, 57600, 38400, 19200, 9600, 4800, 2400 or 1200, after confirmed press E to enter into Fig 25. In Fig 25 Parity Check is shown. Press or to adjust even, odd, mark or space. After confirmed press E to enter into Fig 26. In Fig 26 data bit setup is shown. After confirmed press E to enter into Fig 27. In Fig 27 you can setup stop data bit, after confirmed press E then press M1 to exit. Subject Z-2121 series User’s Manual Version 3.2 Date 2013/10/04 Page 30 / 44 ZEBEX INDUSTRIES INC. USB Fig 27-1 In Fig 27-1, you can set the communication profile to USB Press E to confirm and leave the screen. BT Fig 27-2 Fig 27-3 In Fig 27-2, you can set the communication profile to Bluetooth Press E to confirm and continue with BT (SPP) setting In Fig 27.2, you can adjust the SPP Bluetooth paring Mode. to adjust Master Mode or Slave Mode. After confirmed press Press or E to continue. Subject Z-2121 series User’s Manual Version 3.2 Date 2013/10/04 Page 31 / 44 ZEBEX INDUSTRIES INC. BT-Master Mode Fig 27-4 Fig 27-5 In Fig 27-4, enter the BT MAC address of the host device. You can enter your own pairing PIN, or accept the default PIN, which is 12345678. PressE to confirm. In Fig 27-5, confirm all the settings and press E to start the pairing process. BT-Slave Mode Fig 27-6 In Fig 27-6, Press E to confirm and start the pairing process. Online Upload Function Fig 28 Subject Z-2121 series User’s Manual Fig 29 Version 3.2 Fig 30 Date 2013/10/04 Page 32 / 44 ZEBEX INDUSTRIES INC. In Fig 28 Online Upload function is shown for data upload to PC. Press or to adjust On or Off. After confirmed press E to enter Fig 29. In Fig 29 Send Delimiter is shown. Press , or to adjust None, (,), (;), Space, CRLF, CR, or LF. After confirmed press E to enter Fig 30. In, Fig 30 BT mode selection are shown. Press or to adjust between SPP, HID or Off. After confirmed press E to continue. SPP Mode Fig.30-1 In, Fig 30-1, Z-2121 is trying to connect to PC using SPP profile in Master Mode. After confirmed press E to continue. HID Mode Fig. 30-2 Fig. 30-3 In, Fig 30-2, Z-2121 is trying to connect to PC using HID profile in Master Mode. After confirmed press E to continue. In, Fig 30-3, HID selection are shown. Press , or to select between PC HID mode or IPAD HID mode. After confirmed press E to continue. Subject Z-2121 series User’s Manual Version 3.2 Date 2013/10/04 Page 33 / 44 ZEBEX INDUSTRIES INC. Fig. 30-3 In, Fig 30-1, Z-2121BTV2 is waiting for Bluetooth connection..Now go to iOS device / computer and turn on the Bluetooth to search. After confirmed press E to continue, or press Clr to exit the process. Timeout Value Function Fig 31 to adjust In Fig 31 you can set up the Timoeout Value. Press or 10 Times, 20 Times, 50 Times, 100 Times, or Normal. After confirmed press E to exit. Subject Z-2121 series User’s Manual Version 3.2 Date 2013/10/04 Page 34 / 44 ZEBEX INDUSTRIES INC. System Timer Function Fig 32 Fig 33 In Fig 32 is shown to set up the date, press number t key to adjust the number, after confirmed press E to enter into Fig 33. In Fig 33 is shown to set up the time, press number t key to adjust the number, after confirmed press E to leave the screen. ID/PW/Date Mode Function Fig 34 In Fig 34 ID/password screen is showing: Press 1 enter into Device ID function test. Press 2 enter into Password function test. Press 3 enter into Date Mode function test. Subject Z-2121 series User’s Manual Version 3.2 Date 2013/10/04 Page 35 / 44 ZEBEX INDUSTRIES INC. Device ID Function Fig 35 Fig 36 In Fig 35 is shown to set up the Device ID, after confirmed press E to enter into Fig 36, and press the number, after confirmed press E to leave the screen. Password Function Fig 37 Fig 38 In Fig 37 is shown to set up password, after setup press E to leave the screen, If there is no setting will enter into Fig 38 automatically, please press E to leave the screen. Date Mode Function Fig 39 In Fig 39 is shown to set Date Mode. Press or to adjust MM/DD/YY, DD/MM/YY, or MM/DD/YYYY. After setup press E to leave the screen. Subject Z-2121 series User’s Manual Version 3.2 Date 2013/10/04 Page 36 / 44 ZEBEX INDUSTRIES INC. Barcode Setup Function Fig 40 In Fig 40 is shown for Barcode Setup function, the following is the description of each function: Press 1 enter into Basic Set function test. Press 2 enter into Advance Set function test. Press 3 enter into Pre/Postamble function test. Basic Set Function Fig 41 In Fig 41 is shown for Basic Set function, can adjust the barcode type like Code 39, F ASCII 39, Codabar, ITF25, Code 128 and Code 93, after confirmed press E to leave the screen. Advance Set Function Fig 42 Subject Z-2121 series User’s Manual Version 3.2 Date 2013/10/04 Page 37 / 44 ZEBEX INDUSTRIES INC. In Fig 42 is shown for Advance Set function, can adjust EAN to ISBN/ISSN, EAN-13 digits, EAN-8 digits, IATA code or Codabare ST/SP, after confirmed press E to leave the screen. Pre/Postamble Function Fig 43 Fig 44 Fig 45 In Fig 43 press or to adjust Enable or Disable for Get Barcode Type. After setup press E to enter into Fig 44. In Fig 44 press or to adjust Scan Timeout Beep. After setup press E to enter into Fig 45. In Fig 45 Pre/Postamble setup is shown. Enter the necessary parameters and press E to leave the screen. Upload Menu Fig 46 Press 1 enter into Upload Data function. Press 2 enter into Delimiter Set function. Subject Z-2121 series User’s Manual Version 3.2 Date 2013/10/04 Page 38 / 44 ZEBEX INDUSTRIES INC. Upload Data Function The method use in “Upload Data” is determined by the communication method set in “Communication” menu. You can upload the data using Bluetooth, USB, or RS232. Bluetooth Upload (SPP) Fig 47 Fig 48 Fig 49 In Fig 47 RF Connect screen is shown. This screen only appears for Bluetooth connection. Please wait for connection to be made or press CLR to exit. In Fig 48 upload Free Task is shown. Press or to adjust Y or N to upload Free Task. After confirmed press E to go to Fig 47. In Fig 49 upload screen is shown. Press E to begin uploading data. Bluetooth Upload (USB) Fig. 49-1 In Fig 49-1 upload screen is shown. Press E to begin uploading data. Subject Z-2121 series User’s Manual Version 3.2 Date 2013/10/04 Page 39 / 44 ZEBEX INDUSTRIES INC. Delimiter Set Function Fig 50 Fig 51 Fig 52 In Fig 50 Field Delimiter setup is shown. The default is (,); press or to adjust ;, Space or None. After confirmed press E to go to Fig 51. In Fig 51 Record Delimiter set up is shown. The default is (,); press or to adjust CR, LF, or None. After confirmed press E to go to Fig 52. or In Fig 52 Upload Header setup is shown. Press or On. After confirmed press E to leave the screen. Subject Z-2121 series User’s Manual Version 3.2 Date 2013/10/04 Page 40 / 44 to adjust Off ZEBEX INDUSTRIES INC. Connecting Bluetooth to PC 1. Install and run Bluetooth USB Adaptor driver. Plug in the Bluetooth USB adapter to your PC to begin connection. Fig 1 2. In Fig 1, a list of Bluetooth devices are shown on the screen. Z-2121 will appear as “ZBBT”. Double click “ZBBT“ to make the connection. Fig 2 appears prompting for password. Fig 2 Subject Z-2121 series User’s Manual Version 3.2 Date 2013/10/04 Page 41 / 44 ZEBEX INDUSTRIES INC. 3. Enter the password for Bluetooth connection. Please see the Upload/Upload Device section for instructions on setting Bluetooth password. Click OK after you enter the password. Fig 3 appears. Fig 3 4. Click Yes in Fig 3 to allow connection. A message appears as shown in Fig 4 notifying the COM port used. 5. To receive data on PC, use a program such as the Hyper Terminal with the appropriate COM port settings to connect the PC to the data collector. Please see the System Setup/Communication section for more details. Bootloader Function Quick Start Guide Please note that once you entered the Bootloader function you must complete the update and/or the reset before you can exit the function. All data stored on the device will be lost. Firmware update Please download and install the latest firmware and firmware update tool from the ZEBEX website before you begin. 1. Press F1+F2+PW when the device is off to enable the Bootloader function as shown in Fig 1. Fig 1 Subject Z-2121 series User’s Manual Version 3.2 Date 2013/10/04 Page 42 / 44 ZEBEX INDUSTRIES INC. 2. Connect the device to PC and run the firmware update tool on your PC to begin update. Fig 2 appears on PC. Fig 2 3. Select the appropriate settings and file and click “Start Boot Load” to begin update. For more details, please download and see the firmware update manual from online. 4. The reset screen appears as shown in Fig 3. Press M2 to select Y and press E to rest the device. Fig 3 Subject Z-2121 series User’s Manual Version 3.2 Date 2013/10/04 Page 43 / 44 ZEBEX INDUSTRIES INC. << MEMO >> Subject Z-2121 series User’s Manual Version 3.2 Date 2013/10/04 Page 44 / 44