1
USER’S MANUAL
FOR
TPL7000
PORTABLE LASER
DATA TERMINAL
Contents
PART I
Laser Safety
Important Notice
FCC Notice
EMC Safety
Preface
Contents of the Product Package
Precautions
Preparation
The First-step of the Operation of the TPL7000 Terminal
Features
1. Hardware Features
2. Firmware Features
3. Development Software Features
4. Cradle Features
How to Communicate via the IrDA
Specifications
1. CPU/Memory
2. Power Supply
3. Integrated Optics
4. Decoding Capability
PART II
1. Two Initial Screens
1.1.Power-off Screen
1.2. Power-on Screen
2. Basic Operations and Settings of the TPL7000
Quick Set-up
Remote Connection with the Host Computer
Reset TPL7000
Set always scan
3. Display of the System Menu, Item Selection and Low Power
The System Menu Display
How to Select an Item
Low Power Warning
4. Run Task
Run Task Menu
Executing the Free Task
Scanning the Barcode Data
Keying in Data (via the Keypad)
Inputting Numerical Data
Modifying the Input Data
Inputting Alphabetical Data
Inputting Special Symbols
Checking and Correcting the Input Field Data
Checking the Data
Modifying the Data
Exiting the Editing Mode
Error Message
Length Error
Format Error
5. Task Utility
Task Utility Menu
File Status
Data Format
Setting Total Field Number
Selecting the Inputting Device
Setting Data Length
Setting Field Prompting
Setting Field Format
Storing Format Prompting Characters
Formatting All Fields
Setting the Delay Time
Setting the Time Stamp
Delete Data
Delete Task
6. Setup
Setup Menu
Basic Setup
Back Light &. LCD
Beep Volume
Power-up Scan
System Setup
6.3.1. Communication
Communication Parameter
Online Upload
6.3.2. System Timer
6.3.3. Device ID, Password, and Date Mode Setups
6.3.3.1. Device ID Setup
6.3.3.2. Password Setup
6.3.3.3. Date Mode Setup
Barcode Setup
Parameters and Options with Each Barcode
Basic Barcode Setup
Advanced Barcode Setup
Pre/Post Amble Setup
7. Upload
Upload Menu
File Upload Format
Upload Data
Delimiter Setup
Field Delimiter Setup
Record Delimiter Setup
Upload Header Setup
Upload Device
The Protocol
Communication Protocol Control Code
Control Codes for Data Transmission
Handshake Control Code
1 byte unsigned character
Communication Sequence
Appendix
1.
The Data Storage Format
2.
Specifications of the TPL7000 Database
3.
Applications of the Files in the TPL7000 Database
User’s Manual for TPL7000 Series Portable Data Terminal
PART I
LASER SAFETY
The TPL7000 laser scanner complies with safety standard IEC 825-1(1993) for a
Class 2 laser product. It also complies with U.S. 21CFR1040 as applicable to a
Class IIa laser product. Avoid staring at direct laser light lest the laser beam hurts
your eyes.
IMPORTANT NOTICE
POSLINE, S. A. DE C.V., MAKES NO WARRANTY OF ANY KIND WITH REGARD TO THIS
MATERIAL, INCLUDING, BUT NOT LIMITED TO, THE IMPLIED WARRANTIES OF
MERCHANTABILITY AND FITNESS FOR A PARTICULAR PURPOSE. POSLINE, S. A. DE C.V.
SHALL NOT BE LIABLE FOR ERRORS CONTAINED HEREIN OR FOR INCIDENTAL
CONSEQUENTIAL DAMAGES IN CONNECTION WITH THE FURNISHING, PERFORMANCE, OR
USE OF THIS MATERIALS.
Copyright 2002 by
POSLINE, S. A. DE C. V.
6
User’s Manual for TPL7000 Series Portable Data Terminal
POSLINE is a registered trademark of POSLINE, S. A. DE C. V.
All rights reserved, reproduction of this document or any portion of its contents is
not allowed without the specific written consent of POSLINE, S. A. DE C. V.
Every effort is made to ensure the accuracy of our product information; however,
we accept no responsibility for errors or omission. Specification or version may
be subject to change without notice. The actual specification and version are
based on the product delivered.
PRINTED IN 21 July, 2008
FCC Notice
This equipment generates, uses and can radiate radio frequency energy and if not
installed and used in accordance with the instruction manual, may cause interference to
radio communications. It has been tested and found to comply with the limits for a Class
A computing device pursuant to Subpart J of Part 15 of FCC Rules, which are designed to
provide reasonable protection against interference when operated in a commercial
environment. Operation of this equipment in a residential area may cause interference in
which case the user at his own expense will be required to take whatever measures may
be required to correct the interference.
If this equipment does cause interference to radio or television reception, which can be
determined by turning the equipment off and on, the user is encouraged to try to correct
the interference by one or more of the following measures:
* Reorient the receiving antenna
* Relocate the computer with respect to the receiver
* Move the computer away from the receiver
* Plug the computer into a different outlet so that computer and receiver are on different
branch circuits
If necessary, the user should consult the manufacturer, an authorized dealer or
experienced radio/television technician for additional suggestions. The user may find
the following booklet prepared by the Federal Communications Commission helpful:
7
User’s Manual for TPL7000 Series Portable Data Terminal
" How to Identify and Resolve Radio-TV Interference Problems". This booklet is
available from the U.S. Government Printing Office, Washington, DC 20402, Stock No.
004000003454.
EMC Safety
According to EN 50081-1(1992) :EN 55022/EN61000-3-2
EN 50082-1(1992) :IEC 801-2/IEC 801-3/IEC 801-4
Preface
First of all, please accept our congratulations for owning one of the most
compact- sized and high-performance portable terminals in the world. This book
provides to first-time users information about the POSLINE TPL7000 as both a
barcode scanner and a computerized terminal. By reading this manual, the users
will obtain all necessary information about how to operate the TPL7000 .
8
User’s Manual for TPL7000 Series Portable Data Terminal
Contents of the Product Package
Each package of product may include:
1.
The TPL7000 Portable Data Terminal.
2.
3.
A power adapter
A cradle for communication and battery recharge
4.
5.
A set of Lithium ion rechargeable battery
A clip and a tab
6. TPL7000 User’s Manual
Please check that each package you have received includes the above items.
If there is anything missing or broken, please contact your local agent.
9
User’s Manual for TPL7000 Series Portable Data Terminal
Precautions
1. Be careful with your TPL7000. Avoid dropping or banging it.
2. Keep the TPL7000 from dampness, water, corrosive liquids, etc.
3. Do not operate the TPL7000 under extreme temperatures.
Refer to the Specifications for the temperature limitations.
4. Use only the specified charger for recharging.
10
User’s Manual for TPL7000 Series Portable Data Terminal
Preparation
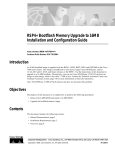
1. Mount the Battery in the TPL7000 Terminal
Take the TPL7000 Portable Data Terminal out from the box;
place the accompanying battery in the battery compartment as shown in fig 1:
a. Press the catch, slide the back cover, and lift it in the sequence.
b. Place the battery in the compartment, and press it down.
c. Place the cover back as indicated.
2. Charge the battery
a. Put the TPL7000 on the cradle as shown in figure 2.
b. Connect the power adapter to the DB-9 (female) connector
c. Insert the power adapter to the wall socket.
Fig 1
Fig 2
Note 1:
a.
The cradle can be connected both to the power adaptor for battery
b.
charging and to the host computer for data uploading as well as
downloading at the same time.
To charge the battery, connect the power plug of the power supply into
c.
the power jack on the DB-9 female connector.
The DB-9 (female) connector is used for battery charging and/or
communication with the PC.
11
User’s Manual for TPL7000 Series Portable Data Terminal
d.
Battery charging and data exchange can be done at the same time or
e.
respectively. The TPL7000 Laser Data Terminal, however, is unable to
communicate with the host computer when placed on the cradle without
the battery attached to it.
The battery is always charged via the cradle. There are two ways to
charge the battery. First, take the battery out from the TPL7000, and
insert it in the back slot of the cradle for fast charging, as shown in Fig 3,
which takes about 3 hours before it is fully charged; second, put the
battery in the TPL7000, and place it on the cradle, with the TPL7000 either
on or off, for slow charging, as shown in Fig 2. This will need
approximately 6 hours. To maximize the battery’s life span, it is
recommended that slow charging be adopted unless there is a need for
fast charging.
f.
While the battery is being charged within the TPL7000 on the cradle, data
g.
can still be exchanged between the PC and the TPL7000 via the DB-9
connector and the RS-232 port.
The battery should stay on the cradle (either with the terminal or
independently) for at least 12 hours before being used the first time or
after months of idleness.
Fig 3
12
User’s Manual for TPL7000 Series Portable Data Terminal
Note 2: How to remove the battery
a. Turn the power off.
b.
Remove the back cover in a sequence similar to Fig 1.
c.
Press the battery against the TPL7000, and lift it up and away from the
compartment, as Fig 4 shows.
Place the cover back in place.
d.
3. Mounting the tab
a. Remove the battery from the battery compartment as shown in Fig 4.
b. Push the tab into the thumb-like indentation as shown in Fig 5.
c.
Place the battery and the back cover back in place.
Fig 4
Fig 5
13
User’s Manual for TPL7000 Series Portable Data Terminal
How to Start the Operation of the TPL7000 Terminal?
Take out the terminal, install in a set of fully charged battery.
a.
Press the “Power” key. After the display appears, press “M2” key to
enter the System Menu.
b.
Then Press “1” to enter the “Run Task” menu. Then press “1” again to
execute the “FREETASK”.
Press “SCAN” to do barcode scanning and data collecting.
c.
Features
1. Hardware features
a.
Compact size, lightweight, elegant, and easy to carry on
the waist
strap by means of a tab mounted on the back of the unit and a clip
attached to the user’s waist strap.
b.
Ergonomic design, operated with one hand, easy to capture data.
c.
Low power consumption. Good for 48-hour operation after a full charge.
d.
Auto shut-off function reduces power consumption and extends battery
life.
g.
h.
i.
Built-in FREETASK allows the TPL7000 to be used for data collecting
without outside supports.
Programmable functions supports Win Task Gen. for special data
collection.
Built-in Laser scanner as input device.
Built-in Real Time Clock for time-stamp.
Tone controllable buzzer.
j.
k.
l.
A lithium back-up battery for memory protection.
Low-battery detecting circuit and low-power warning device.
RS-232C communication port.
e.
f.
Note:
a. The FREETASK is a built-in simple Data Base system with which you
can define your own storage structure for data collection operation.
b. Win Task Gen. is a Windows based utility program with which you can
design the procedure for specified tasks and execute designed tasks on the
data terminal.
14
User’s Manual for TPL7000 Series Portable Data Terminal
2. Firmware features
a.
b.
Supports most of the popular barcode symbols.
Ability to discriminate among barcodes
c.
d.
Programmable auto-power-off time
The uploading or downloading can be fully controlled by the computer.
e.
f.
Easy user-defined FREETASK, able to assign as many as 16 fields
Ability to execute as many as 8 TASK
3. Development Software features
a.
b.
c.
d.
e.
f.
Windows 95/98/NT based Win Task Gen.
Able to remotely program all functions as long as the terminal (including
the decoder) is connected to PC via the cradle.
Ability to upload data to PC
The FREETASK may be downloaded (from PC) to the terminal
In addition to the FREETASK, as many as 8 TASKs may be downloaded
to the terminal
Ability to edit TASK to execute specified data collecting tasks
4. Cradle features
a.
b.
c.
A special recharging circuit ensures recharging effects and security of the
lithium Ion battery during recharging.
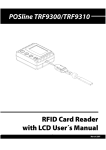
Able to communicate with PC using a widely used RS-232 interface as
shown in Fig 6.
Able to do infrared communication using the built-in IrDA
communication port.
CRD-20
DB-9 connector & power jack
Fig 6
15
User’s Manual for TPL7000 Series Portable Data Terminal
Note:
There are 2 LEDs and 2 holes at the front bottom of the CRD-20 as shown in
Fig 6. The 2 LEDs are located on the left and right, whereas the two holes in
the middle, each containing an IrDA element. The LED on the left is
illuminated when power is on, and will not be illuminated if the power adaptor
is not connected to the AC output, or the 9VDC jack is not inserted into the
RS-232 connector. The LED on the right is illuminated when a battery is put
in the back slot of the cradle for recharge. It will remain illuminated as long as
recharging is going on until a full charge is achieved. It flashes intermittently,
however, when the battery slot is empty, indicating that the cradle is detecting
the presence of the battery. The LED at the upper-right corner of the terminal
is illuminated when the terminal is placed on the cradle for a recharge, and
will be off when a full recharge is achieved.
The two IrDA elements inside the front middle holes and those at the
front-end of the TPL7000 Terminal are designed for remote uploading and
downloading of data and tasks between the terminal and the host computer.
The communication will be hampered if the two sides cannot “see” each other.
16
User’s Manual for TPL7000 Series Portable Data Terminal
How to Communicate via the IrDA
1. Aim the red IR elements at the top of the TPL7000 directly at those in the cradle.
2. Make sure that the TPL7000 IR function has been activated.
3. Make sure the distance between the cradle and the terminal is within 1.5m.
Specification
CPU/Memory
CPU
SRAM
ROM
Keypad
Buzzer
Real Time Clock
LCD Display
Power Supply
Main Battery
Backup Battery
Battery Life
Integrated Optics
Optical System
Resolution
PCS Value
Scanning Speed
Depth of Field
Decoding Capability
Barcode Symbols
8 bit C-MOS microprocessor
512/1024/2048K on board
Flash ROM 128K
26 fine touch rubber key
Tone programmable
Year, Month, Date, Hour, Minute, second
STN, 96 x 49 Graphic LCD display, ASCII 16
characters x 6 lines
3.6V lithium-Ion 600mAH rechargeable battery
3V 25mAH lithium rechargeable battery
48 HRS (8 scan/min.) after full charge
Laser scanning technology
(CODE 39, PCS=90%)
0.125 mm (5 mil)
30% or more
36 scans/sec
(UPC x 1, PCS = 90%)
20 ~ 260 mm (0.8"~ 10.8")
UPC-A/E, EAN-8/13, Codabar, Code 39, Code 39 full
ASCII, Code 128, ITF 2 of 5, ISBN/ISSN, UPC-E to
UPC-A, Code 93, China Post Code 25, IATA Code.
17
User’s Manual for TPL7000 Series Portable Data Terminal
PIN-OUT CONFIGURATION
PIN-OUT CONFIGURATION
DB-9(F)
1.
CD (Carrier detect)
2.
TxD(Transmit data)
3.
RxD(Receive data)
4.
DSR(Data set ready)
5.
GND(sSingal ground)
6.
DTR(Data terminal ready)
7.
CTS(Clear to send)
8.
RTS(Request to send)
9.
DC JACK
RI(Ring indicator)
INNER +9V, 1A;
OUTER: GND
18
User’s Manual for TPL7000 Series Portable Data Terminal
Part II
1. Two Initial Screens
1.1. Power-off Screen
With a TPL7000 in hand, you will find its screen exactly as that shown
above with no message on it before you turn it on,. We now define this
screen the “Power-off Screen”.
After power-on, the following screen will show as default, it’s defined as
“Power-on Screen.”
TPL7000 VER X.XX
Memory 1024 KB
Free
1018 KB
Wait
Remote
M2 to Sel Func.
22/10
00:00:00
19
User’s Manual for TPL7000 Series Portable Data Terminal
When the "Power-on screen" is displayed, press M2 to enter
the "System Menu screen".
1.2. The Power-on Screen
Press and hold on the red PW key on the bottom of the keypad to turn the
TPL7000 on. The terminal will emit a “beep”.
TPL7000
VER
X.XX
Memory 1024
KB
Free
KB
Wait
M2 to
22/10
1018
Remote
Sel
Func
00:00:00
Once the Power-on screen
as shown on the left is
displayed, the TPL7000
can be linked to a host
computer for data to be
either uploaded or
downloaded. Press M2 to
enter the System Menu.
Notes:
a.
The “TPL7000” at the upper left corner of the screen indicates
the model of the terminal.
b.
The “X.XX” at the upper right corner indicates the current
version of the firmware.
c.
The “Memory” indicates the total memory built in the terminal.
d.
The “Free” indicates the usable memory in the terminal. In this
case, the system takes 6K, and leaves 1018K or 2043K(2M
e.
RAM TPL7000) for the “free memory”.
The “Wait Remote” on line 4 indicates that during the
transmission of the data, the terminal does nothing but “wait”
on the cradle. In other words, uploading or downloading of the
data is always done at the host computer.
20
User’s Manual for TPL7000 Series Portable Data Terminal
2. Basic Operations and Settings of the TPL7000
When the “Power-on Screen” is displayed, pressing M2 will lead it to the
“System Menu Screen” as shown below. From this screen, the user can
select all functions the TPL7000 provides.
<SYSTEM MENU>
1 Run Task
2. Task Utility
3.
Setup
4. Upload
M1=esc M2=select
All the Select Sequences begin from the System Menu Screen
Item
Run Task
File Status
Data Format
Delete Data
Delete Task
LCD Contrast
Beep Volume
Power up Scan
Auto Power off
Comm. Parameter
On Line Upload
Select Seq.
1
2 1
2 2
2
2
3
3
3
3
3
4
1
1
1
1
1
2
3
4
3 2 1 1
3 2 1 2
SET DATE/TIME 3 2 2
Device ID
3 2 3 1
Password
3 2 3 2
Function Descriptions
To select and execute one of the
tasks
To show the number of records
in each file
To set format in the Free Task
for data storage
To delete data files
To delete downloaded Task
To set LCD contrast
To set Beep Volume
To set Power up Scan
To set Auto Power off
To set Baud Rate, Parity Check,
Data Bits, Stop Bits
To set Enable/Disable, Send
Delimiter and Scan Data
To set DATE/TIME
To set Device ID
To set Password
21
User’s Manual for TPL7000 Series Portable Data Terminal
Set Date Mode
To set Date Format: mm/dd/YY;
dd/mm/YY; mm/dd/yyyy;
dd/mm/yyyy
Basic Barcode
To set Basic Barcode decoder
3 3 1
parameter
Advanced
To set Advanced Barcode
3 3 2
Barcode
decoder parameter
Get Barcode Type
To decide if the Barcode Type
ID will be added to the barcode
3 3 3
in each scan
Pre/Postamble
To decide if the Preamble or
Postamble will be added to the
3 3 3
barcode in each scan
Note: The information in the above table is only for reference.
3 2 3 3
2.1. Quick Setup
a.
When the “Power-on Screen” is displayed, press M1 and F1 in
sequence (or F2, or F3, or F4) for a quick setup of the following
functions:
i.
To set beep volume: M1 + F1
The TPL7000 provides 4 different volume levels: “quiet”,
“low”, “middle”, and “loud”. Each time M1 and F1 are
pressed in sequence, the beep volume goes from one level to
the next. It eventually goes back to the first one upon the fifth
pressing. Under this mode, however, no volume change is
indicated on the screen. The user can only sense the change by
listening to the beeps carefully.
ii.
Pressing M1 and F1 once will turn the volume off (quiet).
iii.
Pressing M1 and F1 twice will set the volume at Low.
iv.
v.
vi.
Pressing M1 and F1 three times will set the volume at Middle.
Pressing M1 and F1 four times will set the volume at Loud.
Pressing M1 and F1 five times will turn the volume off again.
b.
Each time you press M1 and F2 in order, the “Firmware Date” at
the upper right corner of the display will appear for about 0.5 sec.
c.
Pressing M1 and F3, the backlight is on, and press again to switch it
off.
22
User’s Manual for TPL7000 Series Portable Data Terminal
d.
To enter the “Multi Drop Mode”, press M1 and then F3. To go
back to the “Power-on Screen”, press M1.
2.2. Remote Connection with the Host Computer
When the terminal is on the cradle, and the Power-on Screen is
displayed, a command can be issued (by the user) from the host computer
to the TPL7000 terminal through the RS232 port, ordering the terminal to
enter the connection mode. When the connection is made, the green LED
at the upper right corner of the terminal will be illuminated; the
connection command and the result will all be displayed on the terminal
screen, as shown below:
< Host Remote>
Send data 2:-->
unit status
Finished
Line 2 : command function
Line 3 : command items
Line 4 : the result (or communication status)
2.3 Reset TPL7000
In Power-off state, press "<" + ">" + "PW", system is powered on and
enters the Reset mode (see the figure below). Press "M2" to choose "Y"
and press "Enter", then system will begin to reset.
User Reset!
Warning!
Clear All Data
M2 sel Y/N ? N
23
User’s Manual for TPL7000 Series Portable Data Terminal
2.4 Set Always Scan
Before system finishes resetting, press "F5" + "F6" together until
resetting is finished. The "Set always scan" screen is displayed for about
3 seconds (see the figure below), then TPL7000 is set to the “Always Scan
Mode”.
To cancel “Always Scan Mode” setting, turn off TPL7000 then press "<"
+ ">" + "PW" to turn on and reset TPL7000 again.
Scan" mode is cancelled.
The "Set Always
TPL7000
Set always scan
Press any key
3. Display of the System Menu, Item Selection and Low Power
3.1. The System Menu Screen
When the System Menu is displayed as shown below, there are 4 items
to choose from: 1. Run Task, 2. Task Utility, 3. Setup, and 4. Upload.
To enter a desired item, press the corresponding number.
24
User’s Manual for TPL7000 Series Portable Data Terminal
<SYSTEM MENU>
1 Run Task
a. To select an item, press
the item number or press
2. Task Utility
< or > to move the cursor
to the desired item, then
4.
press M2 or Enter.
Setup
4. Upload
M1=esc M2=select
b.
To return to the previous
screen, press M1 or
CLR.
3.2. How to Select an Item
The method mentioned above for selecting an item applies to all menus.
A cursor will appear in each menu display. Generally speaking, to enter
an item:
a. Press the numerical key corresponding to the item; or
b. Press < or > to move the cursor to the item, then press M2 or Enter
to select it. To return to the previous screen, press M1 or CLR.
3.3. Low Power Warning
A figure indicating “Low Power” will be displayed on the bottom line of
the LCD display when the power appears insufficient to backup the
TPL7000 for prolonged operation.
4. Run Task
4.1 Run Task Menu
There is a built-in Free Task in the TPL7000. In addition to it, as many as
8 tasks (or procedures) can be downloaded from a host computer to the
TPL7000. Therefore, in total, there may be 9 different tasks as shown
below. Press Enter to shift from one screen to the next.
25
User’s Manual for TPL7000 Series Portable Data Terminal
< RUN TASK
>
1.Free Task
2.Down load 1
3.Down load 2
M2=sel,ENT=Next
< RUN TASK
>
4.Down load 3
5.Down load 4
6.Down load 5
M2=sel,ENT=Next
< RUN TASK
7.Down load 6
8.Down load 7
9.Down load 8
M2=sel,ENT=Next
Executing the Free Task
The following display will appear when the Free Task is executed:
(Note: The Free Task is a task, which can be programmed on the
TPL7000 terminal without having to use a computer.)
Rec
1
Field 1
▐
M1:Exit F6:Edit
F3:Ins. F4:Del.
Line 1: the record number and the
field number.
Lines 2 and 3: a 32-byte space
provided for data input.
Line 4: key promptings or message
indicating improper operation.
Line 5: key promptings
Note:
a.
In putting field prompting: When setting the “Data Format” under
the “Task Utility” mode, the user can input field prompting. If the
format is not specified (or nothing is input to specify the format),
what is displayed on the screen are only the record number and the
field number, for example: “Rec 1, field 1”, as shown above. Refer
to 5.3.5. for inputting procedure of field prompting data.
26
>
User’s Manual for TPL7000 Series Portable Data Terminal
b.
Lines 4 and 5 contain key prompting message: press M1 to exit the
Free Task ; press F6 to enter the editing mode; press F3 to insert a
blank character; and press F4 to delete a character.
c.
Error message: A data verification function can be set by the user
while setting the Data verification format. Refer to 4.5. for “Data
verification Function Setting”. When an error is found (by the
terminal), the “Error Message” will be displayed in line 4,
indicating that the input data is not correct (or the data is not
correctly input), and the nature of the error. When this happens, the
cursor will stay at the field (where the error occurred), waiting for
new data to be input.
4.3. Scanning the Barcode Data
a.
In the “Free Task” mode, press and hold the orange SCAN key. A
laser beam will be activated and shoot out from the window at the
lower front end of the TPL7000.
b.
Aim the laser beam at the barcode to be scanned. A beep will be
given and the beam will disappear if the data scanned has been
successfully decoded by the TPL7000. The decoded message will
then be displayed, as shown on the 2nd line in the following screen.
Rec 1 Field 1
0028200106605
M1:Exit F6:Edit
F3:Ins. F4:Del.
c.
The following display appears as soon as the SCAN key is released,
indicating that the scanned data has been stored, and the next field
is ready to be filled.
27
User’s Manual for TPL7000 Series Portable Data Terminal
Rec 2 Field 1
▊
M1:Exit F6:Edit
F3:Ins. F4:Del.
d.
Usually, it takes less than 3 seconds for a barcode to be scanned and
its data to be decoded. For the protection of the laser engine built in
the TPL7000, any such procedure that has run for more than 3
seconds will cause the TPL7000 terminal to give a warning beep,
and, at the same time, deactivate the laser beam.
4.4. Keying in Data (via keypad)
4.4.1. Inputting Numerical Data
To input numerical data, press the corresponding keys. To save the
input data, press Enter after the data is input. See the following
display.
Rec
2 Field 1
12345
M1:Exit F6:Edit
F3:Ins. F4:Del.
4.4.2. Modifying the Input Data
To modify the input data,
a. To move the cursor, press < or > .
b. To delete the data, press CLR.
c. To insert a blank where the cursor is located, press F3. For
28
User’s Manual for TPL7000 Series Portable Data Terminal
example, if the data is “1234567,” and you want to insert a
blank between “3” and “4”, move the cursor to “4”, and press
F3 .
d. If you want to delete “4,” move the cursor to “4,” and press
F4 .
e. To change a character, move the cursor to the character to be
changed, and input a new character.
f. A character can only be modified when the cursor stays at it.
4.4.3. Inputting Alphabetical Data
a. To input an alphabetical character, first find the appropriate
key. The following table displays the numerical keys and their
corresponding alphabetical characters.
b. Press the key, and the numerical character corresponding to the
key will be displayed. Pressing M2, will turn the character into
the first alphabetical one.
c. Pressing M2 each time will turn the character into the next one.
Eventually it turns back into the numerical character.
For example,
To input “M”, press “5” and then M2.
To input “N”, press “5” and M2 twice.
To input “o”, press “5” and M2 six times.
Pressing M2 once more will turn “o” back into “5”.
d. Keep pressing M2 until the desired character is approached.
Press the symbols are available for data inputting as shown
below on the table:
7
8
9
4
5
6
1
2
3
0
A
D
G
J
M
P
S
V
Y
(
B
E
H
K
N
Q
T
W
Z
@
C
F
I
L
0
R
U
X
,
)
a
d
g
j
m
p
s
v
y
b
e
h
k
n
q
t
w
z
c
f
i
l
o
r
u
x
;
29
User’s Manual for TPL7000 Series Portable Data Terminal
e. To alternate between the upper case and the lower one of an
English letter, press F1. For example, when “A” appears,
pressing F1 will change it into “a”, and vice versa.
4.4.4. Inputting Special Symbols
To input special symbols, press F2. The following screen will be
displayed:
Rec 4 Field 1
M1:Exit F6:Edit
F3:Ins. F4:Del.
!#$ %&* /+a. Keeping pressing F2 will bring about different sets of special
symbols in sequence on the bottom line.
Press F2, the first set of symbols will be displayed.
Press F2 again, the second set of symbols will be displayed.
Press F2 the third time, the third set of symbols will be
displayed.
Press F2 the fourth time, the symbols disappear.
b. When a set of symbols that includes the desired one is
displayed, press the numerical key corresponding to the
symbol to select it. For example, when the first set is displayed,
press 5 to select “&
&”.
.
Numerical keys
1st set
2nd set
3rd set
!
[
<
1
#
]
=
2
$
,
>
3
4
%
(
?
5
&
)
\
6
*
‘
_
7
/
:
|
8
+
;
`
9
“
@
c. All ASCII characters are available, with the exception of 4
characters, namely {, }, ~, ^ .
30
User’s Manual for TPL7000 Series Portable Data Terminal
Checking and Correcting the Input Field Data
4.5.1. Checking the Data
When running the Free Task, press F6 to enter the editing mode.
The following screen (which is defined “Data Checking Screen”)
will be displayed:
Rec
4
Field 1
Line 1 : the current record number
and field number
Line 2 : space provided for field
data to be displayed
Line
<CURRENT REC.>←
F6:Help
4 : key promptings or
description about the file
currently used
Line 5 : key prompting
Note:
Why do you need to know where you are located in the file?
You want to know where you are (or where the data you are
currently dealing with is) located in the file because without the
knowledge of your current location, you are not able to edit the
file. The Free Task is similar to a form in which data is recorded
and arranged in lines and columns. Although the screen of the
terminal is not big enough to display the overall form, by moving
an “invisible” cursor, however, the user of the terminal can get an
idea of where a certain data is located in the form, and where a
new data should be input.
By pressing < or > , you can move (the invisible cursor) to a
certain location in the Free Task file. When (the invisible cursor)
is moved to the end of the file, where you can input new data, the
<CURRENT REC.> will be displayed on line 4, indicating that
here is a blank where new data is to be input. When “the invisible
cursor” is moved to the beginning of the file, the <TOP OF
FILE> appears in line 4. Each time < or > is pressed,
either the record number or the field number (in line 1) or the data
31
User’s Manual for TPL7000 Series Portable Data Terminal
displayed in line 2 will change, reflecting the movement of the
“invisible cursor”. For example, if there are 5 records in the Free
Task, and each record has 2 fields, the <TOP OF FILE> will be
displayed when “Rec
1 Field 1” is displayed on line 1.
Pressing > key at this point will change the message shown on
line 1(which is “Rec 1
Field 1”) into “Rec
1
Field
2”,
which subsequently goes to “Rec 2 Field 1” if you press > again.
Input new data when the “CURRENT REC” appears on line 4
and the data on line 2 disappears.
a. Whenever a field is reached, the data in the field will be
displayed for the user to check it.
b. When the <CURRENT DATA> is displayed, new data cannot
be input unless M1 is pressed to exit the editing mode.
c. To modify the data as described in the next paragraph, press
M2.
d. To obtain more key promptings as shown below, press F6.
1. If the current position is Rec.
F1: Last 10 Rec.
100, pressing F1 would move it
back to Rec. 90; pressing F2
would move it forward to Rec.
F2: Next 10 Rec.
110.
F3: Insert Rec.
2. To insert or edit a data at the
F4: Delete Rec.
current position, press F3.
F5: Jump to Rec.
3. To delete a data at the current
location, press F4.
4. To move to a certain record,
press F5 and the number of the
record to approach.
4.5.2. Modifying the Data
Under the data verification mode, press M2 to modify the data. The
following display will appear:
26
User’s Manual for TPL7000 Series Portable Data Terminal
Rec
4 Field 1
1234567890
M1:Exit
F3:Ins. F4:Del.
Line 1 : the current
record and field
numbers
Lines 2 & 3: provide a 32-byte
zone where data is composed or
edited.
a. Data can only be modified via the keypad. Refer to the above
paragraphs for inputting method.
b. To move the cursor, press < or > .
c. To delete the data, press CLR.
d. To insert a blank character before a certain character, first move the
cursor to the character, then press F3.
e. To delete a character, first move the cursor to the character, then
press F4.
f. To replace a character, move the cursor to it and type a new
character
Note:
a. When a key is pressed, the numerical character corresponding to
the key will be input to replace the character at which the cursor
stays. The cursor will, in turn, move right to the next character.
b.
For example, if the data is “456”, and the cursor stays at “6”,
pressing “7” will replace the “6” with “7”, and the data will be
changed into “457”, while the cursor moves to the right of “7”.
c.
Pressing M2 changes “7” into “A”. Pressing it again changes
“A” into “B”.
Each time M2 is pressed, the input character will change in order.
d.
The sequence of change is: 7–A-B-C-a-b-c-7. Refer to 4.4.3 for
further information.
e.
To save the modified data, press Enter. To quit modification and
return to the previous data before the cursor appeared, press M1.
4.5.3. Exiting the Editing Mode
To exit the Editing Mode, press M1 while the “Data Checking
27
User’s Manual for TPL7000 Series Portable Data Terminal
Screen” is displayed to return to the “Data Input Mode” as shown
below, ready for data to be input.
F6
Rec 1 Field 1
Rec 1 Field 1
▊
M1:Exit F6 : Edit
F3: Ins.
F4 : Del.
Data Inputting Mode
M1
<CURRENT REC.>←
F6: Help
Data Checking Mode
28
User’s Manual for TPL7000 Series Portable Data Terminal
4.6. Error Messages:
4.6.1. Length Error
The TPL7000 will automatically check the data length when the data is
input. Any discrepancy between the input length and the preset value (or
default value) will cause the terminal to give a beep, prompting that an
error has occurred. In the meantime, the following display will appear,
showing “length error” in the fourth line and requesting the data to be
modified or corrected. Refer to the next paragraph for setup:
Rec
4 Field 1
Take this screen as an example. An input data
should include at least 1 character, yet there is
no (or zero) character at all on line 2.
Length Error...
F3:Ins. F4:Del.
4.6.2. Format Error
When data is input or corrected, the TPL7000 will automatically check its
format. Any discrepancy between the input and the preset formats will
cause the terminal to give a warning beep, prompting that an error has
taken place. In the meantime, the following display will appear, showing
“format error” and requesting the data or format to be modified or
corrected. Refer to the next paragraph for formatting:
Rec
4
Field 1
1234M
Suppose the input data on the screen on the
left should contain all numerical characters,
the “Format Error” shown on line 4 is caused
by the “M” at the end of the data.
Format Error...
F3:Ins. F4:Del.
29
User’s Manual for TPL7000 Series Portable Data Terminal
5. Task Utility
5.1.
Task Utility Menu
The Task Utility is used to manage the Free Task’s database of the
TPL7000 It provides the following functions:
< Task Utility >
1.Statu 2.Format
3.Delete Data
4.Delete Task
M1=esc,M2=select
5.2.
1. Showing the status of the files
2. Setting the format in which the Free
Task data is stored
3. Deleting files in the database
4. Deleting the downloaded Task
File Status
When 1. “Status” is selected, the following screen will be displayed.
< File Status >
FREE TASK
Records:
Line 2 : the file name
Line 3 : the number of the records in
the file
5
Line 4 : key prompting
M1 to exit
Note:
5.3.
Press any key to show the next file; or press M1 to exit.
Data Format
Go back to the “Task Utility” screen shown in 5.1. Select 2. “Format”
to set data format for the Free Task. The screen on the left will be
displayed if data has already existed in the file. Under this circumstance,
no modification is allowed. What the user can do is only check the data.
It is only when the Free Task file is cleared as the screen to the right
shows can the Free Task Data Format be reset.
30
User’s Manual for TPL7000 Series Portable Data Terminal
< Data Format >
Data Exist
Check ONLY or
M1 to exit
Data exists. Press M1 to return to Task
Utility or press any key to check the
storage format.
< Data Fo
Format
rmat >
Data does not exist.
Free Task Data
Format setting.
Press any key
5.3.1.
Setting Total Number of Field
Each record in a database file can have as many as 16 fields.
However, if you want to set total number of field for a file, first
make sure that the file is empty. After the number is set, you can
press Enter to confirm; or press M1 to give up, if you want to.
Total field No.
01
Maximun=16
Line 1: total field number
Line 2: input data
Line 3: prompting showing maximum field
number
ENT to Confirm
31
User’s Manual for TPL7000 Series Portable Data Terminal
5.3.2. Selecting the Inputting Device
The user uses this screen to specify how he is to input the data
for a (number of) field: by scanning or by keying in, or both.
Press <
or
> to select, and press Enter to confirm.
Input Device
Line 2 : data inputting method
Lines 4 and 5 : key promptings
Keyin + Scan
<>=Select,M1=Esc
5.3.3. Setting Data Length
This screen is displayed for the user to set the length of data
allowable in each field. You must specify both the minimum and
maximum lengths. The maximum length should not exceed 32
bytes. However, regardless of the actual length, each data will
take a full formatted memory size when stored. After setting the
lengths, press Enter to confirm.
Field 1 Length
Min/Max: 01/32
0 to 32
Line 2 : the length range to be set up
Line 3 : the min/max length allowable
Line 5 : key promptings
ENT to Confirm
32
User’s Manual for TPL7000 Series Portable Data Terminal
5.3.4.
Setting Field Prompting
This screen is displayed for an accompanying prompting of a
certain field to be input, such as “MATERIAL” or “ITEM”, etc..
Such promptings will remind the user what the data to be input
relates to. The message on line 3 indicates that the data to be
input should not be more than 16 characters. After inputting the
prompting on line 2, press Enter to confirm.
Field 1 Prompt
Line 2: providing a space for data to be input
Line 3: the maximum range
Maximum 16 chars
Line 5: key prompting
ENT to Confirm
5.3.5. Setting Data Input Verification Format (Constraint)
This screen is used to set the data input verification (constraint)
in each field. After entering this screen, you can choose not to
set any “ verification format”, and skip it. But once you choose
to do it for a certain field (such as “field 1” as presented on the
following screen), the format you set (or input) on line 2 will
decide how the data input in this field is constructed. For
example, a verification format presented as “nnnnaaaa” defines
that the first 4 characters of the input data should be numerical
ones (represented by 4 “n’s”), and the others alphabetical ones
(represented by 4 “a’s”).
Field 1 Editing
Line 2: where the format is input
Line 4: the verification prompting characters
Line 5: the key promptings
ndaulcp*
ENT to Confirm
33
User’s Manual for TPL7000 Series Portable Data Terminal
Note:
a. The Verification Character Promptings-“ndaulcp*” on the
4th line prompts how many kinds of character you can use,
and what they are. For example, if the data you are going
to input in a certain field contains 5 alphabetical
characters, of which the first one is an upper case
character and the others lower case ones, you input “ullll”
on the second line.
Format
character
Prompting
Definition
n
Numeric characters 0~9 and
+,-,.
digital characters 0~9
Alphabetic characters A~Z,a~z
upper case alphabetic
characters A~Z
lower case alphabetic
characters a~z
full ASCII characters
printable characters, ASCII
code 32~127
Remove a character from a
specified data entry
d
a
u
l
c
p
*
b. The characters represented by ”*”, such as the check
character(s) in the barcodes, will (or may) be deleted
when the data is stored. Characters other than the
“Verification Promptings” mentioned above (namely n, d,
a, u, l, c, p, and *) will be regarded as format symbols.
c. For example:
Format string
nnnn.nn
DATE: dd/dd/dd
aaa-uuu-lll-ppp
Input data
+12500
123199
aBcDEFghi!@#
Display string
+125.00
Date: 12/31/99
aBc-DEF-ghi-!@#
34
User’s Manual for TPL7000 Series Portable Data Terminal
5.3.6. Storing Data Verification Prompting Characters
This screen is used to specify if the above-mentioned “format
symbols” should be stored as a part of the data to be input in the
field. For example, “123199” input as a “date” will be
displayed as 12/31/99 if you select “Yes, Add it” (Add the
“format symbol”, which is “/”). Otherwise, it will be displayed
“123199” if you select “Display only”.
Insert to data?
Line 2 : “Display only” or “Yes, Add it”
Lines 4 and 5 : key promptings
Display only
<>=Select,M1=Esc
ENT to Confirm
The “Field Format” defines the form of every character the input
data contains.
5.3.7. Formatting All Fields
Repeat the processes described in 5.3.2. to set up formats for all
fields.
5.3.8. Setting the Delay Time
This is to decide the length of time a barcode message is
displayed on the screen after the barcode is scanned.
.
Note:
a. The following screen will not be displayed for “Delay-time”
to be set up until all the set-ups mentioned before 5.3.8 have
been completed.
35
User’s Manual for TPL7000 Series Portable Data Terminal
Delay(1/1000sec)
0
Maximum=32767
Line 2 : where the “length of time” is
input
Line 3 : maximum range of time
Line 5: key prompting
ENT to Confirm
b. When you have entered the screen mentioned in 4.3., and
hold on the SCAN key to activate a scanning, the data being
decoded from the scanned barcode will appear on the 2nd line
of this screen. It will remain there as long as you hold the
SCAN key. Even after you release it, it would still remain
there for the length of time programmed under the “Setting
the Delay Time” mode. For example, if the “time” you set
up is “5,000”, which means 5 seconds, and if the data
obtained from scanning is “1234567”, as shown on the
following screen, this data will remain on display for 5 more
seconds after you release the SCAN key. To change the
length of time, enter the above-mentioned mode and
reprogram the “delay-time” .
Rec 2 Field 1
1234567
M1:Exit F6:Edit
F3:Ins. F4:Del.
36
User’s Manual for TPL7000 Series Portable Data Terminal
5.3.9. Setting Time Stamp
This is to set up a “Time Stamp Field” and its format to record
and display the time when a record takes place.
Time Stamp
Line 2: None, Short or Long
Lines 4 and 5: key promptings
None
<>=Select,M1=
Esc
ENT to Confirm
a. TPL7000 has two Time-Stamp formats: a long one and a
short one.
b. The short format is DATE/ hhmm, which indicates the
Month, Date, Hour, and Minute.
c. The short format is DATE/hhmmss, which indicates the
Year, Month, Date, Hour, Minute, and second.
d. Set up the format of DATE using the Date Format. Refer to
the Date Format for detailed description.
Note:
a. Although the “Time Stamp” format is set from the TPL7000,
it is only displayed on the screen of the host computer when
the data is uploaded. On the host screen, each record will be
followed by a distinct time stamp, indicating the exact time
the record takes place. For example, when a barcode
representing “217706” is scanned at 1 o’clock, 35 minute,
53 second PM, on June 30, in year 2000, it will be displayed
in Form 1 if the long “Time Stamp” is formatted; and in
Form 2 if the short one is formatted.
b. The “Time Stamp” following the data when displayed is
actually marked by a timekeeping device built in the
TPL7000.
37
User’s Manual for TPL7000 Series Portable Data Terminal
Form 1.
21770606302000133553
Form 2.
21770606301353
c. The message in the 1st form includes the data (217706), the
month (06), the date (30), the year (2000), the hour (13 or 1
PM), the minute (35), and the second (53).
5.4. Delete Data
Select 3. “Delete Data” under the “Task Utility” mode, the following
screen will be displayed.
< Delete data >
Line 2 : the file name and enquiry
Lines 4 and 5 : key promptings
FREE TASK(Y/N)?N
M2 to Select
ENT to Confirm
Note:
a. To choose between “Y” and “N”, Press M2.
b. To exit the “Delete data” mode, Press M1.
c. To confirm deletion of the file, Press Enter. The following
screen will be displayed, indicating that the data has been
deleted.
< Delete data >
FREE TASK(Y/N)?Y
Data Deleted
Press any key->
d. The next file will be displayed subsequently. Repeat the
same procedure as mentioned above.
e.
38
User’s Manual for TPL7000 Series Portable Data Terminal
5.5. Delete Task
Select 4. “Delete Task” under the “Task Utility” mode. The following
screen will be displayed.
< Delete task >
Line 2: the enquiry
Lines 4 and 5: key promptings
(Y/N)?N
M2 to Select
ENT to Confirm
a. To choose between “Y” and “N”, Press M2.
b. To exit the “Delete Task”, press M1. The task will remain
unchanged.
c. To confirm deletion of the task, Press Enter. The following screen
will be displayed, indicating that the file has been deleted.
< Delete Task>
FREE TASK(Y/N)?Y
Task Deleted
Press any key->
39
User’s Manual for TPL7000 Series Portable Data Terminal
6. Setup
6.1. Setup MENU
The Setup Menu, which includes 4 setup items, is used to set up
parameters for the TPL7000.
< Setup MENU >
1.Basic Setup
2.System Setup
3.Barcode Setup
M1=esc,M2=select
6.2. Basic Setup
When 1. Basic Setup is selected, the following screen will be
displayed:
1.BackLit &. LCD
2.Beep Volume
3.Power up Scan
4.Auto Power off
M1=esc,M2=select
6.2.1. Back Light &. LCD
a. Under the Basic Setup mode, when 1. “Back Light &.
LCD” is selected, the following screen will be displayed.
Back light
Off
<>=Select,M1=Esc
ENT=Set
Use "<" or ">" to turn on or turn off back
light, then press "Enter". The following
screen will display.
40
User’s Manual for TPL7000 Series Portable Data Terminal
b. Whenever the “LCD Contrast” is selected, the value on
line 2 always remains “50”.
c. To select a status other than the default setting “50”, press
either < or > .
d. Pressing either of the said two keys and holding it on will
make the status change continuously between 40 and 60.
e. To increase the value and make the screen darker, press > .
To decrease the value and make the screen lighter, press
<.
LCD Contrast
50
<>=Adjust,M1=Esc
M2=Set
Line 2 : the total range of contrast lies
between 40 and 60; the default setting is
50
Lines 4 and 5: key promptings
6.2.2. Beep Volume
a. When 2. “Beep Volume” is selected, the following screen
will be displayed.
b. There are four stages available: “Quiet”, “Low”,
“Medium” and “Loud”. Each time you press < or > ,
the beep volume goes accordingly from one stage to the next,
and eventually back to the first stage.
Beep Volume
Loud
Line 2 : where the volume set is shown
Lines 4 and 5 : key promptings
<>=Select
M2=Set,M1=Exit
41
User’s Manual for TPL7000 Series Portable Data Terminal
6.2.3. Power-up Scan
When 3. “Power up Scan” is selected, the following screen will
be displayed. Two options are available: “Enable” and
“Disable”.
If choose "Enable", every times the TPL7000 is turned off either
under the “Free Task” mode or when any other task is executed,
press PW to turn the TPL7000 on again. It will automatically go
to the former state that the TPL7000 is turned off.
Power up Scan
Enable
Line 2 : the setting.
Lines 4 and 5 : key promptings.
<>=Select
ENT=Set
6.2.4. Auto Power Off
Auto Power OFF
10 mins
Line 2: the settings
Lines 4 and 5: key prompings
<>=select,M1=Esc
ENT=Set
There are 5 options to choose from: “10 mins”, “15 mins”, “20
mins”, “30 mins” and “Disable”. The default setting is “10
mins”, which means that the TPL7000 will be automatically
turned off 10 minutes since the moment it becomes idle.
42
User’s Manual for TPL7000 Series Portable Data Terminal
6.3
System Setup
Press M1 to go back to the “Setup Menu”, and select 2. “System
Setup”, the following screen will be displayed.
< System Setup >
1.Communication
2.System Timer
3.ID/PW/DateMode
M1=esc,M2=select
6.3.1. Communication
When 1. “Communication” is selected, the following screen
will be displayed.
<COMM. Setting>
1.Comm. paramter
2.On Line Upload
M1=esc,M2=select
6.3.1.1. Communication Parameter
a. Select 1. “Comm. Paramter” to setup the
communication parameters, including: Baud Rate,
Parity Check, Data Bits, Stop Bits, etc.
b. There are 6 Baud Rates available to choose from:
19200, 9600, 4800, 2400, 1200, and 300. The default
setting is 9600, as shown below.
43
User’s Manual for TPL7000 Series Portable Data Terminal
Baud Rate
9600
Line 2 : the default setting.
Lines 4 and 5 : the key promptings.
<>=Select,M1=Esc
ENT=Set
c. There are 5 Parity Check options available: none,
even, odd, mark, and space. The default setting is
none.
Parity Check
none
Line 2 : the default setting.
Lines 4 and 5 : the key promptings.
<>=Select,M1=Esc
ENT=Set
d. Choose 7 or 8 bits for the Data Bits. The default
setting is 8, as shown below:
Data Bit
8
Line 2 : the default setting.
Lines 4 and 5 : key promptings.
<>=Select,M1=Esc
ENT=Set
e. There are 2 kinds of Stop Bits available: 1 or 2 bytes.
The default setting is 1, as shown below:
Stop Bit
1
Line 2 : the default setting.
Lines 4 and 5 : the key promptings.
<>=Select,M1=Esc
ENT=Set
44
User’s Manual for TPL7000 Series Portable Data Terminal
f.
Press M2 or Enter to confirm the set value after it is
setup. The TPL7000 will automatically enter the next
setting mode.
g. Pressing M1 during any setting procedure will bring
the procedure to a halt, and return to the screen shown
on 6.3.1.
6.3.1.2. Online Upload
a. When 2. “On Line Upload” is selected from the
“COMM Setting” screen, the following screen will be
displayed.
On Line Upload
Line 2 : the default setting.
On
Lines 4 and 5 : key promptings.
<>=Select,M1=Esc
ENT=Set
b. The Online Upload mode provides two functions when
set “On”. First, it allows the input data to be sent out
via the RS 232 port immediately (Refer to the next
section for detailed description); second, when the Free
Task is executed, it allows the data to be sent out via
the communication port at the moment the data occurs
and is stored up in each field.
c. When the Online Upload mode is set Off, and the
setting procedure is put to an end; the screen goes back
to COMM Setting. When the mode is set On, the
following screens is displayed for delimiters to be set.
The delimiters, after being set up, will be transmitted
out after each data is uploaded. There are 7 kinds of
parity characters available: None,,
,,;
;, Space, CRLF,
CR, and LF. The default setting is None.
45
User’s Manual for TPL7000 Series Portable Data Terminal
Send Delimiter
None
Line 2 : the default setting.
Lines 4 and 5 : the key promptings.
<>=Select,M1=Esc
ENT=Set
d. After the delimiter character is set, the following screen
will be displayed to indicate that the TPL7000 is ready
for the above-mentioned operation to begin. The
barcode data will appear on the screen right after the
SCAN key is pressed to activate laser scanning. And as
soon as the SCAN key is released, the data will
immediately be uploaded via the communication port to
the host. To exit this mode, press M1.
Scan Data
Line 2 : the scanned data containing no
more than 32 bytes.
6.3.2. System Timer
When 2. “System Timer” is selected from the “System Setup”
screen, the following screen will be displayed:
<SET DATE/TIME >
DATE: 01/01/2000
TIME: 12:00:00
Form: MM/DD/YYYY
Line 2 : date and month
Line 3 : time
Line 4 : data format
46
User’s Manual for TPL7000 Series Portable Data Terminal
a. When this mode is selected, the cursor appears on the 2nd
line. Input the correct “date” as per the format provided on
line 4. To confirm the input, press Enter. To go back to the
original setting, press M1.
b. After “date” is set, the following display appears for “time”
to be set up, too.
<SET DATE/TIME >
Line 2 : Date
Line 3 : Time
DATE: 01/01/2000
Line 4 : data format
TIME: 12:00:00
Form: hh/mm/ss
c. The cursor appears on line 3 when this mode is entered.
Update the “time” data as per the format provided on line 4,
and then press Enter to confirm the new setting; or, if
needed, press M1 to cancel the new setting and resume the
original one. When M1 is pressed, the time shown on the
screen always reflects the real time, which kept running
when the System Timer Setup was conducted. It is only
when Enter is pressed to confirm the new time setting that
the old timekeeping record will be made obsolete.
6.3.3. Setting up Device ID, Password, and Date Mode Setups
Select 3. ID/PW/DateMode, the following screen will be
displayed:
< ID/Password >
1.Device ID
2.Password
3.Date Mode
M1=esc,M2=select
47
User’s Manual for TPL7000 Series Portable Data Terminal
6.3.3.1.
Device ID Setup
a. Select 1. Device ID, the following screen will be
displayed. Press Enter, and reset the Device ID.
Device ID:
11111111
Line 2 : the current Device ID
Press Enter key
To change
b. If a password has been setup and input, the following
screen will be displayed, requesting the original Password
to be input.
Input Password
Enter to Confirm
Press Enter to confirm after the Password
is input.
c. Re-set the Device ID. The following screen will be
displayed:
ID Code Setting
11111111
Max. 8 Digits
The Device ID is edited on line 2
d. Upon completion of editing, press Enter to confirm the
setting or press M1 to invalidate the setting.
48
User’s Manual for TPL7000 Series Portable Data Terminal
6.3.3.2.
Password Setup
a. Select 2. Password, the following screen will be
displayed, requesting the original password to be input, if
a password has been setup with the TPL7000. Such a
request will not be made if there has been no password at
all.
Input Password
Press Enter after the password is input.
Enter to Confirm
b. Set a new password, regardless of the original one. The
following screen will be displayed:
ID Code:
11111111
Set Password
22222222
The Password is edited on line 4.
c. After the editing of the password is completed, press
Enter to confirm the setting. If you want to abandon the
setting, press M1.
d. If the original password remains unchanged, the following
screen will be displayed.
49
User’s Manual for TPL7000 Series Portable Data Terminal
NO CHANGE!
USE ORIGINAL
Password !!
22222222
e. If the password is changed, the following screen will be
displayed:
Re-Confirm
Password :
Re-input a password, and press Enter to
confirm.
Enter to Confirm
f. When a password is reconfirmed to be correct, the
following screen will be displayed, reminding you to
memorize it.
Setting Accepted
REMEMBER THIS
NEW Password!!
33333333
g. The following screen will be displayed if the setting is
rejected due to the user’s failure to recall the password
that has been input.
Setting Rejected
USE ORIGINAL
Password !!
22222222
50
User’s Manual for TPL7000 Series Portable Data Terminal
h. After the password is set, the following screen will be
displayed, providing 2 options: “Enable” and “Disable”.
The barcode data will be displayed if “Enable” is selected,
and would not if “Disable” is selected. The default setting
is “Enable”.
Display ScanData
Enable
Line 2 : the default setting.
Lines 4 and 5 : key promptings.
<>=Select,M1=Esc
ENT=Set
6.3.3.3.
Date Mode Setup
When 3. “Date Mode” is entered, the following screen
will be displayed:
Set Date Mode
MM/DD/YYYY
Line 2 : the default setting.
Lines 4 and 5 : key promptings.
<>=Select,M1=Esc
ENT=Set
There are 4 options available: MM/DD/YYYY 、
DD/MM/YYYY、MM/DD/YY、DD/MM/YY. The
default setting is: MM/DD/YYYY.
51
User’s Manual for TPL7000 Series Portable Data Terminal
6.4. Barcode Setup
When 3. Barcode Setup is selected from the “Setup MENU”, the
following screen will be displayed:
< Barcode Setup>
1.Basic Set
2.Advance Set
3.Pre/Postamble
M1=esc,M2=select
There are a lot of barcodes available for different applications. With
some parameters set up, the TPL7000 series of lists provided in 6.4.1
demonstrate some widely-used barcodes and their parameters, options,
defaults, and other remarks, etc.
6.4.1. Parameters and Options with Each Barcode
The parameters and options that can be set up with each barcode
are as follows:
a. EAN/UPC
Parameters
EAN/UPC
UPC-A Digits
UPC-E Digits
UPC-E to UPC-A
UPC/EAN ADD 5
UPC/EAN ADD 2
EAN to ISBN/ISSN
EAN-13 Digits
EAN-8 Digits
Options
On, Off
11,12,13
6,7,8
On, Off
No Send, Send
No Send, Send
On, Off
12,13
7,8
Default
On
13
8
Off
No Send
No Send
Off
13
8
Remarks
Basic Setup
Basic Setup
Basic Setup
Basic Setup
Basic Setup
Basic Setup
Advance Setup
Advance Setup
Advance Setup
b. Code 39
Parameters
Code 39
Code 39 CDV
Code 39 ST/SP
Code 39 CKD
Options
On, Off
On, Off
Send, No Send
Send, No Send
Default
On
Off
No Send
No Send
Remarks
Basic Setup
Basic Setup
Basic Setup
Basic Setup
52
User’s Manual for TPL7000 Series Portable Data Terminal
Italian Pharmac
Pharmac. Add 'A'
On, Off
No Add, Add
c. Full ASC II Code 39
Parameters
Options
F ASCII Code 39
On, Off
d. Codebar
Parameters
Codabar
Codebar CDV
Codebar ST/SP
Codebar CKD
Codebar ST/SP
Off
No Add
Basic Setup
Basic Setup
Default
Off
Remarks
Basic Setup
Options
Default
On, Off
On
On, Off
Off
Send, No Send No Send
Send, No Send No Send
ABCD
ABCD
a/t, b/n, c/*, d/e
DC1,
DC2,
DC3, DC4
Remarks
Basic Setup
Basic Setup
Basic Setup
Basic Setup
Advance Setup
Options
Default
On, Off
Off
On, Off
Off
Send, No Send No Send
Minimum,
06 to 32
Maximum 2 to
64
Remarks
Basic Setup
Basic Setup
Basic Setup
Basic Setup
Options
Default
On, Off
On
On, Off
Off
Min/Max: 1 to 01/32
64
Remarks
Basic Setup
Basic Setup
Basic Setup
g. Code 93
Parameters
Code 93
Options
On, Off
Default
Off
Remarks
Basic Setup
h. CPC 25
Parameters
CPC 25
CPC 25 CDV
CPC 25 CKD
Options
On, Off
On, Off
Send, No Send
Default
Off
Off
No Send
Remarks
Advance Setup
Advance Setup
Advance Setup
e. ITF 25
Parameters
ITF 25
ITF 25 CDV
ITF 25 CKD
ITF 25 Length
f. Code 128
Parameters
Code 128
Enable EAN 128
Code 128 Length
53
User’s Manual for TPL7000 Series Portable Data Terminal
CPC 25 Length
i. IATA Code
Parameters
IATA Code
6.4.2.
10 to 12
Minimum,
Maximum 1 to
64
Advance Setup
Options
On, Off
Remarks
Advance Setup
Default
Off
Basic Barcode Setup
Enter 1. Basic Set screen and further enter the EAN/UPC screen,
which is displayed on the left. Line 2 shows that the setting is
On. The “M2=more” also shown on Line 2 indicates that
pressing M2 will lead to more parameters: the UPC-A digits,
UPC-E digits, and UPC-E to UPC-A. When the decoding
function is turned off, as shown on the right-hand side screen, no
other parameters need to be set up.
EAN/UPC
On
M2=more
UPC-A digits
13
<>=Select,M1=esc
ENT=Set
<>=Select,M1=esc
ENT,M2=Set/Next
a.
EAN/UPC
Off
<>=Select,M1=esc
ENT=Set
Basic barcode setups involve 7 barcode symbologies
including: 1. EAN/UPC, 2. Code 39, 3. Full ASCII Code
39, 4. Codabar, 5. ITF- 25, 6. Code 128, and 7. Code 93.
Refer to the X.X.X. for the procedure flow.
b.
After parameters of one symbology have been setup, which
is when On or Off appears on line 2 of the screen, press
Enter to shift to the next barcode system for further setup.
For example, When EAN/UPC is setup, and when “On/Off
M2=more” appears on line 2, press Enter to enter the
“Code 39” screen for subsequent setup.
c.
Upon completion of all 7 basic barcode setups (that is
when Code 93 has been set either On or Off), press Enter
54
User’s Manual for TPL7000 Series Portable Data Terminal
to go back to the Barcode Setup screen.
6.4.3. Advanced Barcode Setup
a. Select 2. “Advance Set” to enter CPC 25. Set up all
parameters in a manner similar to that mentioned in 6.4.2.
b. Advanced barcode setups involve 6 barcode symbologies
including: 1. CPC 25, 2. EAN to ISBN/ISSN, 3. EAN-13
Digits, 4. EAN-8 Digits, 5. IATA Code, and 6. Codabar
ST/SP.
c. After parameters of one barcode symbology have been setup,
press Enter to shift to the next symbology for subsequent
setup.
d. After all 6 advanced barcode setups (that is when under the
Codabar ST/SP screen, either “ABCD” or “a/t, b/n, c/*,
d/e” or “DC1, DC2, DC3, DC4” has been selected and
confirmed) have been completed, press Enter to go back to
the Barcode Setup screen.
6.4.4.
Pre/Post Amble Setup
a. The Pre/Post Amble Setup consists of set-ups of 3 different
codes: the Barcode type ID code, the preamble, and the Post
Amble. Once a piece of data is collected and stored in the
database of the TPL7000 terminal, it will automatically be
stored with the 3 said codes attached to it. Take EAN-13 for
example: the Barcode type ID code is “->10”, the Preamble
“123”, and the Post Amble “999”. Suppose a barcode
representing “0028200106605” is scanned and decoded, and
the data gets stored and uploaded, what is going to be
displayed
on
the
host
screen
will
be
“->101230028200106605999”.
b. Select 3. Pre/Post Amble from the Barcode Setup screen, the
55
User’s Manual for TPL7000 Series Portable Data Terminal
following screen will come up first:
Get Barcode Type
Enable
Line 2 : the default setting.
Lines 4 and 5 : the key promptings.
<>=Select,M1=esc
ENT=Set
c. After the Barcode Type is setup, press Enter to shift to the
next screen:
<Pre/Postamble>
Pre:□□□□□□□□□
Post:
Enter to Confirm
ENT=Set
Line 2 provides blanks for the Pre Amble
to be set up.
d. Fill up the blanks provided on line 2 with the Preamble
characters. Press Enter to shift to the next line as shown
below, and input the Postamble characters in the blanks
provided therewith.
<Pre/Postamble>
Pre :123
Post: □□□□□□□□
Enter to Confirm
ENT=Set
Line 3 provides blanks for the Post Amble
to be set up.
56
User’s Manual for TPL7000 Series Portable Data Terminal
7. Upload
Upload MENU
The TPL7000 is built with an uploading function, that allows collected
raw data to be sent out via its RS232 series port without the need of any
computer software.
Note:
You can receive data, however, by using any PC host computer with
standard Terminal Communication software (For example, Telix, Vetrm,
and Hyper Terminal, etc.)
< Upload MENU >
1.Upload Data
2.Delimiter Set
3.Upload Device
M1=esc,M2=select
File Uploading Format
a. Data Uploading Format
The selected files will be uploaded from the TPL7000 to the host in
sequence. The header goes first, and each record follows in order.
b. The File Header Format
The header format consists of file name and upload time. Take
“FREETASK010120001200” for example, “FREETASK” is the
file name; 010120001200 the upload time, which is similar to the
Date Mode. Please refer to 6.3.3.3. for detail.
c. The Delimiter Character
The record delimiter will be attached to the end of the header and
every record. The field delimiter is inserted between two adjacent
fields.
d. End-of-file Character
The End-of-file character (ASCII Code 1AH) will be attached to the
end of each file.
57
User’s Manual for TPL7000 Series Portable Data Terminal
Upload Data
Select 1.Upload Data, the following screen will be displayed:
< Upload data >
Line 2 shows the file name and enquiry
FREETASK(Y/N)?Y
M2 to Select
ENT to Confirm
a. The name of the file (in this case, Free Task) will be displayed on
line 2. Also, the user is requested to make a choice between Y(yes)
and N(no).
b. Press M2 to choose Y or N, and press Enter to confirm.
c. If there is another file to be uploaded, its name will then be
displayed on the screen. Repeat the above procedure to choose and
confirm.
d. The following screen will be displayed after all files to be uploaded
are picked up, indicating that the TPL7000 is ready to upload the
file(s).
< Upload data >
Line 2 : the filename and promptings for
selection.
Ready to Upload
ENT to Confirm
e. If you want to upload the file, press Enter to confirm. The files will
thus be uploaded.
f. If you want to cancel the uploading, press M1 to exit the mode and
return to the Upload MENU screen.
g. After the uploading is finished, the following screen will be
displayed. Press any key to return to the Upload MENU screen.
< Upload data >
Line 2: the name of the last file being
FREETASK
uploaded.
Record :
30
Line 3: total number of the file records.
Finished
Line 4: the result of uploading.
Press any key->
58
User’s Manual for TPL7000 Series Portable Data Terminal
Delimiter Setup
From the Upload Menu, select 2. Delimiter Set to setup the delimiter
characters between fields and between records as well as to select
whether the header is going to be uploaded.
7.4.1. Setting up the Field Delimiter
Select 2. Delimiter Set from the “Upload MENU” screen to first
set up the field delimiter. The following screen will be displayed:
Field Delimiter
None
Line 2 : the default setting.
Lines 4 and 5 : key promptings.
<>=Select,M1=Esc
ENT=Set
a. There are 4 field delimiters available: “None”, “,
,”, “;
;” and
“Space”. The default is “None”.
b. Press Enter to confirm the setup and shift to the “Record
Delimiter” screen after the desired field delimiter is selected;
or press M1 to go back to the Upload MENU if you want to
cancel the setup.
Note:
“None” means “Nothing”.
“,” means “ASCII 2CH”,
“;” means “ASCII 3BH”,
“Space” means “ASCII 20H”.
7.4.2. Record Delimiter Setup
Record Delimiter
None
<>=Select,M1=Esc
ENT=Set
Line 2 : the default setting.
Lines 4 and 5 : key promptings.
59
User’s Manual for TPL7000 Series Portable Data Terminal
a. There are 4 record delimiters available: None, CRLF, CR, and
LF.
b. Press Enter to confirm the setup and moves forward to the
Upload Header screen, or press M1 to go back to the Upload
MENU if you want to cancel the setup.
7.4.3. The Upload Header Setup
Upload Header
Off
Line 2 : the default setting.
Lines 4 and 5 : key promptings.
<>=Select,M1=Esc
ENT=Set
a. To decide whether the Upload Header is to be uploaded, press
either < or > to choose between On and Off. The
default setting is Off.
b. Press Enter to confirm the setup and move to the Field
Delimiter screen mentioned in 7.4.1, and then press M1 to put
an end to the setup procedure and go back to the Upload Menu
screen.
Upload Device
Select 3. “Upload Device” to enter the following screen to decide
whether the Protocol is to be used or not:
RS232/IR Select
RS232
<>=Select,M1=Esc
ENT=Set
Line 2 : the default setting.
Lines 4 and 5 : key promptings.
a. To choose to use RS232 or IR, press
<
or
>.
b. Press Enter to confirm the setup, or press M1 to go back to the
Upload MENU if you want to abandon the setup.
c. If RS232 is chose, it will go to "Protocol Set" automatically as
60
User’s Manual for TPL7000 Series Portable Data Terminal
follow.
Protocol
Off
Line 2 : the default setting.
Lines 4 and 5 : key promptings.
<>=Select,M1=Esc
ENT=Set
d. To choose to use the Protocol or not, press
<
or
>
to set the
Protocol On or Off.
e. Press Enter to confirm the setup, or press M1 to go back to the
Upload MENU if you want to abandon the setup.
7.5.1. The Protocol
During the communication between a TPL7 and a host
computer, protocols are used to make notification, inspection,
and confirmation.
7.5.2. Communication Protocol Control Code
VALUE
1
2
3
4
5
6
21
CTRL
A
B
C
D
E
F
U
CHARACTER
SOH
STX
ETX
EOT
ENQ
ACK
NAK
DESCRIPTION
START OF HEADING
START OF TEXT
END OF TEXT
END OF TRANSMISSION
ENQUIRY
ACKNOWLEDGE
NEGATIVE ACKNOWLEDGE
7.5.3. Control Codes for Data Transmission
a. SOH is transmitted from the TPL7000 prior to the header.
b. The TPL7000 will send the STX out prior to the data of all the
records.
c. After the data is sent out, the TPL7000 will send out ETX.
7.5.4. Handshake Control Code
a. Before a file is transmitted, the TPL7000 usually performs
handshaking with the host computer.
61
User’s Manual for TPL7000 Series Portable Data Terminal
b. Before sending out the file, the TPL7000 would send ENQ.
c. Upon receipt of ENQ, the host can send back ACK to
acknowledge acceptance of the ENQ; or it can send back
NAK to reject the file to be sent by the TPL7000.
7.5.5. 1 byte unsigned character
a. BCC is the sum of the byte values of the header, data and
control code put together. The BCC will be sent out by the
TPL7000 after the data and ETX have all been sent out.
b. Upon receipt of BBC, the computer will first check if it is
correct. If it is, the computer will then send ACK back to
confirm. The TPL7000 will then send the next file.
c. Or, upon receipt of the BBC, the host, after checking and
confirming that the BCC it receives from the TPL7000 is
incorrect, can send back NAK to inform that the BBC is
incorrect, and stopping the TPL7000 from sending files.
7.5.6. Communication Sequence
a. The communication between a TPL7000 and a computer goes
in such sequence: 1, handshaking; 2, data transmission; 3,
confirmation of correct BBC.
b. All files are transmitted in the same sequence as mentioned
above till the transmission is completed.
62
User’s Manual for TPL7000 Series Portable Data Terminal
Appendix—the TPL7000’s Database
1.
The Data Storage Format
The TPL7000 keeps the data it has collected. The data, which is stored in
a
simple form of database and presented as records, is composed of
visible ASCII characters. Every record contains all its fields.
FORM 1
Record 1
Record 2
.
.
.
Record m
2.
Field 1
data R1,F1
data R2,F1
.
.
.
data Rm,F1
Field 2
data R1,F2
data R2,F2
.
.
.
data Rm,F2
.......
.......
.......
.
.
.
.......
Field n
data R1,Fn
data R2,Fn
.
.
.
data Rm,Fn
Specifications of the TPL7000’s Database
a. The TPL7000 database can incorporate as many as 9 files. Each file
can have its own format.
b. Each file can store as many as 65,536 records.
c. Each record can have as many as 16 fields.
d. As many as 32 characters can be stored in each field.
3.
Applications of the Files in the TPL7000 Database
a. Each TPL7000 database has one built-in FreeTask file, and could
have as many as 8 downloaded files.
b. The TPL7000 has an inherent function that allows the Free Task’s
format to be configured on the terminal itself without exerting an
auxiliary computer.
c. The TPL7000 is able to store the collected data and distribute the
data sequentially in each Free Task field.
d. The TPL7000 provides a Macro-command function that allows data
to be collected, searched, transformed, compared, calculated, and
stored.
e. The TPL7000 also has an operation-programming function that
allows the Macro-command to be executed according to the preset
downloading procedure.
63