1
Paper type: OK Prince Eco G100(55kg), Paper Thickness=80 µm // Pages in book=88 // Print scale=81%
Gap (when printed at 81% scale) = Pages in book × Paper thickness / 2 = 3.520000 mm
FAX Option Type 2027
FAX Option Type 2027 Operating Instructions Facsimile Reference <Basic Features>
EN USA B576-8607
FAX Option Type 2027 Operating Instructions Facsimile Reference <Basic Features>
Printed in Japan
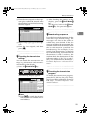
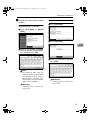
Operating Instructions
Facsimile Reference
<Basic Features>
1
Getting Started
2
Faxing
3
Using Internet Fax Functions
4
Programming
5
Troubleshooting
For safe and correct use of this machine, please be sure to read the Safety Information in the
General Settings Guide before you use it.
Paper type: OK Prince Eco G100(55kg), Paper Thickness=80 µm // Pages in book=88 // Print scale=81%
Gap (when printed at 81% scale) = Pages in book × Paper thickness / 2 = 3.520000 mm
Introduction
USA
This manual describes detailed instructions on the operation and notes about the use of this machine.
To get maximum versatility from this machine all operators are requested to read this manual carefully
and follow the instructions. Please keep this manual in a handy place near the machine.
❖ FCC Requirements
Notes
Some illustrations in this manual might be slightly different from the machine.
Certain options might not be available in some countries. For details, please contact your local dealer.
Two kinds of size notation are employed in this manual. With this machine refer to the inch version.
Important
Contents of this manual are subject to change without prior notice. In no event will the company be liable for direct, indirect, special, incidental, or consequential damages as a result of handling or operating the machine.
Trademarks
Microsoft® and Outlook® are either registered trademarks or trademarks of Microsoft Corporation in the
United States and/or other countries.
Adobe® and Acrobat® are registered trademarks of Adobe Systems Incorporated.
Other product names used herein are for identification purposes only and might be trademarks of their
respective companies. We disclaim any and all rights in those marks.
Instructions for the optional extra G3 interface unit (G3 Interface Unit Type 2027) are included
in the Basic Features and Advanced Features manuals.
1. This equipment complies with Part 68 of the FCC rules. On the cover of this equipment is a label
that contains, among other information, the FCC registration number and ringer equivalence
number (REN) for this equipment. If requested, this information must be provided to the telephone company.
2. This equipment uses the RJ11C USOC jack.
3. A plug and jack used to connect this equipment to the premises wiring and telephone network
must comply with the applicable FCC Part 68 rules and requirements adopted by the ACTA. A
compliant telephone cord and modular plug is provided with this product. It is designed to be connected to a compatible modular jack that is also compliant. See installation instructions for detail.
4. The REN is used to determine the number of devices that may be connected to a telephone line.
Excessive RENs on a telephone line may result in the devices not ringing in response to an incoming call. In most but not all areas, the sum of RENs should not exceed five (5.0). To be certain of the number of devices that may be connected to a line, as determined by the total RENs,
contact the local telephone company.
5. If this equipment causes harm to the telephone network, the telephone company will notify you
in advance that temporary discontinuance of service may be required. But if advance notice is
not practical, the telephone company will notify the customer as soon as possible. Also, you will
be advised of your right to file a complaint with the FCC if you believe it is necessary.
6. The telephone company may make changes in its facilities, equipment, operations or procedures that could affect the operation of the equipment. If this happens the telephone company
will provide advance notice in order for you to make necessary modifications to maintain uninterrupted service.
7. If trouble is experienced with this equipment, for repair or warranty information, please contact
RICOH CORP. CUSTOMER SUPPORT DEPT. at 1-800-FASTFIX. If the equipment is causing
harm to the telephone network, the telephone company may request that you disconnect the
equipment until the problem is resolved.
8. In the event of operation problems (document jam, copy jam, communication error indication),
refer to the solving problems section in this manual.
9. Connection to party line service is subject to state tariffs. Contact the state public utility commission, public service commission or corporation commission for information.
❖ WHEN PROGRAMMING EMERGENCY NUMBERS AND/OR MAKING TEST CALLS TO
EMERGENCY NUMBERS:
1. Remain on the line and briefly explain to the dispatcher the reason for the call before hanging up.
2. Perform such activities in the off-peak hours, such as early morning hours or late evenings.
CANADA
The Industry Canada label identifies certified equipment. This certification means that the equipment
meets telecommunications network protective, operational, and safety requirements as prescribed in
the appropriate Terminal Equipment Technical Requirements document(s). The department does not
guarantee the equipment will operate to the user's satisfaction.
Before installing this equipment, users should ensure that it is permissible to be connected to the facilities of the local telecommunications company. The equipment must also be installed using an acceptable method of connection. The customer should be aware that compliance with the above conditions
may not prevent degradation of service in some situations.
Repairs to certified equipment should be coordinated by a representative designated by the supplier.
Any repairs or alterations made by the user to this equipment, or equipment malfunctions, may give the
telecommunications company cause to request the user to disconnect the equipment.
User should ensure for their own protection that the electrical ground connections of the power utility,
telephone lines, and internal metallic water pipe system, if present, are connected together. This precaution may be particularly important in rural areas.
Caution: Users should not attempt to make such connections themselves, but should contact the appropriate electric inspection authority, or electrician, as appropriate.
NOTICE: The Ringer Equivalence Number is an indication of the maximum number of devices allowed
to be connected to a telephone interface. The termination on an interface may consist of any combination of devices subject only to the requirement that the sum of the RENs of all the devices does not
exceed five.
Copyright © 2003
RussianC3Fax-combine-EN_F_FM.book Page i Thursday, July 3, 2003 7:15 PM
Manuals for This Machine
The following manuals describe the operational procedures of this machine. For
particular functions, see the relevant parts of the manual.
Note
❒ Manuals provided are specific to machine type.
❒ Adobe Acrobat Reader is necessary to view the manuals as a PDF file.
❒ Two CD-ROMs are provided:
• CD-ROM 1“Operating Instructions for Printer/Scanner”
• CD-ROM 2“Scanner Driver & Document Management Utilities”
❖ General Settings Guide
Provides an overview of the machine and describes System Settings (paper
tray, Key Operator Tools, etc.), Document Server functions, and troubleshooting.
Refer to this manual for Address Book procedure such as registering fax numbers, e-mail addresses, and user codes.
❖ Network Guide (PDF file - CD-ROM1)
Describes procedures for configuring the machine and computers in a network environment.
❖ Copy Reference
Describes operations, functions, and troubleshooting for the machine’s copier
function.
❖ Facsimile Reference <Basic Features>(this manual)
Describes operations, functions, and troubleshooting for the machine’s facsimile function.
❖ Facsimile Reference<Advanced Features>
Describes advanced functions and settings for key operators.
❖ Printer Reference 1
Describes system settings and operations for the machine’s printer function.
❖ Printer Reference 2 (PDF file - CD-ROM1)
Describes operations, functions, and troubleshooting for the machine’s printer function.
❖ Scanner Reference (PDF file - CD-ROM1)
Describes operations, functions, and troubleshooting for the machine’s scanner function.
i
RussianC3Fax-combine-EN_F_FM.book Page ii Thursday, July 3, 2003 7:15 PM
❖ Manuals for DeskTopBinder V2 Lite
DeskTopBinder V2 Lite is a utility included on the CD-ROM labeled “Scanner
Driver & Document Management Utilities”.
• DeskTopBinder V2 Lite Setup Guide (PDF file - CD-ROM2)
Describes installation of, and the operating environment for DeskTopBinder V2 Lite in detail. This guide can be displayed from the [Setup] dialog box when DeskTopBinder V2 Lite is installed.
• DeskTopBinder V2 Lite Introduction Guide (PDF file - CD-ROM2)
Describes operations of DeskTopBinder V2 Lite and provides an overview
of its functions. This guide is added to the [Start] menu when DeskTopBinder V2 Lite is installed.
• Auto Document Link Guide (PDF file - CD-ROM2)
Describes operations and functions of Auto Document Link installed with
DeskTopBinder V2 Lite. This guide is added to the [Start] menu when
DeskTopBinder V2 Lite is installed.
❖ Manuals for ScanRouter V2 Lite
ScanRouter V2 Lite is a utility included on the CD-ROM labeled “Scanner
Driver & Document Management Utilities”.
• ScanRouter V2 Lite Setup Guide (PDF file - CD-ROM2)
Describes installation of, settings, and the operating environment for ScanRouter V2 Lite in detail. This guide can be displayed from the [Setup] dialog box when ScanRouter V2 Lite is installed.
• ScanRouter V2 Lite Management Guide (PDF file - CD-ROM2)
Describes delivery server management and operations, and provides an
overview of ScanRouter V2 Lite functions. This guide is added to the [Start]
menu when ScanRouter V2 Lite is installed.
❖ Other manuals
• PS3 Supplement (PDF file - CD-ROM1)
• Unix Supplement (Available from an authorized dealer, or as a PDF file on
our Web site.)
Note
❒ The following software products are referred to using a general names:
• DeskTopBinder V2 Lite and DesktopBinder V2 Professional → DesktopBinder V2 Lite/Professional
• ScanRouter V2 Lite and ScanRouter V2 Professional (optional) → ScanRouter V2 Lite/Professional
• SmartNetMonitor for Admin and SmartNetMonitor for Client → SmartNetMonitor for Admin/Client
ii
RussianC3Fax-combine-EN_F_FM.book Page iii Thursday, July 3, 2003 7:15 PM
TABLE OF CONTENTS
Manuals for This Machine ...................................................................................... i
NOTICE ...................................................................................................................1
Important Safety Instructions ...............................................................................3
Caution.......................................................................................................................3
How to Read This Manual .....................................................................................4
Symbols .....................................................................................................................4
1. Getting Started
Control Panel..........................................................................................................5
Reading the Display ...................................................................................................7
Reading the display panel and using keys ..............................................................7
Reading the Destination List.................................................................................... 9
Standby Display..................................................................................................... 10
Communication Display......................................................................................... 11
User Code Entry Display ....................................................................................... 12
2. Faxing
Transmission Modes ........................................................................................... 13
Switching between Memory Transmission and Immediate Transmission................ 14
Placing Originals.................................................................................................. 15
Placing a Single Original on the Exposure Glass..................................................... 16
Bound original page order ..................................................................................... 17
Placing Originals in the Optional Auto Document Feeder (ADF) ............................. 17
Originals unsuitable for the optional Auto Document Feeder ................................ 18
Setting a Scan Area ................................................................................................. 18
Original sizes difficult to detect .............................................................................. 21
Memory Transmission......................................................................................... 22
Canceling a Memory Transmission.................................................................... 26
Before the Original Is Scanned ................................................................................ 26
While the Original Is Being Scanned........................................................................ 26
While the Original Is Being Transmitted ................................................................... 26
Before the Transmission Is Started.......................................................................... 27
Immediate Transmission..................................................................................... 29
Canceling an Immediate Transmission ............................................................. 31
Before You Have Pressed the {Start} Key ............................................................... 31
After You Have Pressed the {Start} Key .................................................................. 31
Scan Settings ....................................................................................................... 32
Resolution ................................................................................................................ 32
Original Type............................................................................................................ 33
Image Density (Contrast) ......................................................................................... 34
Mixing Scan Settings for a Multiple Page Original ................................................... 35
When placing originals on the exposure glass ...................................................... 36
When placing originals in the optional Auto Document Feeder............................. 36
iii
RussianC3Fax-combine-EN_F_FM.book Page iv Thursday, July 3, 2003 7:15 PM
Specifying a Destination ..................................................................................... 37
Entering a Fax Number ............................................................................................ 37
Pause .................................................................................................................... 37
Tone ...................................................................................................................... 38
Entering an E-mail Address ..................................................................................... 38
Using Destination Lists............................................................................................. 39
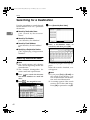
Searching for a Destination ................................................................................ 42
Search by Destination Name ................................................................................... 42
Search by Fax Number ............................................................................................ 43
Search by E-mail Address........................................................................................ 44
Specifying a Registration Number............................................................................ 45
Reception.............................................................................................................. 47
Switching the Reception Mode................................................................................. 47
Receiving a Fax in Manual Reception Mode............................................................ 48
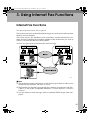
3. Using Internet Fax Functions
Internet Fax Functions ........................................................................................ 49
Internet Fax Precautions .......................................................................................... 50
Functions Not Supported by E-mail Transmission ................................................... 50
Functions Not Supported by E-mail Reception ........................................................ 51
Sending Internet Fax Documents....................................................................... 52
Confirming Reception............................................................................................... 58
Canceling a Transmission of an Internet Fax ................................................... 59
Before the Original Is Scanned ................................................................................ 59
While the Original Is Being Scanned In.................................................................... 59
After the Original Has Been Scanned In .................................................................. 60
Receiving Internet Fax Documents .................................................................... 61
Auto E-mail Reception ............................................................................................. 61
Manual E-mail Reception ......................................................................................... 61
Received Images ..................................................................................................... 62
4. Programming
Initial Settings and Adjustments ........................................................................ 65
Programming............................................................................................................ 66
Editing ...................................................................................................................... 68
Deleting .................................................................................................................... 69
Programming Fax Number and E-mail Addresses ........................................... 71
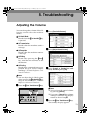
5. Troubleshooting
Adjusting the Volume .......................................................................................... 73
When the {Facsimile}
} Key Is Lit in Red................................................................ 74
When Toner Runs Out ......................................................................................... 75
Error Messages and Their Meanings ................................................................. 76
Solving Problems................................................................................................. 80
When Things Don't Go as Expected .................................................................. 82
INDEX......................................................................................................... 83
iv
RussianC3Fax-combine-EN_F_FM.book Page 1 Thursday, July 3, 2003 7:15 PM
NOTICE
Note to users in the United States of America
- Notice:
This equipment has been tested and found to comply with the limits for a Class
B digital device, pursuant to Part 15 of the FCC Rules. These limits are designed
to provide reasonable protection against harmful interference in a residential installation. This equipment generates, uses and can radiate radio frequency energy and, if not installed and used in accordance with the instructions, may cause
harmful interference to radio communications. However, there is no guarantee
that interference will not occur in a particular installation. If this equipment does
cause harmful interference to radio or television reception, which can be determined by turning the equipment off and on, the user is encouraged to try to correct the interference by one more of the following measures:
• Reorient or relocate the receiving antenna.
• Increase the separation between the equipment and receiver.
• Connect the equipment into an outlet on a circuit different from that to which
the receiver is connected.
• Consult the dealer or an experienced radio /TV technician for help.
- Warning
Changes or modifications not expressly approved by the party responsible for
compliance could void the user's authority to operate the equipment.
1
RussianC3Fax-combine-EN_F_FM.book Page 2 Thursday, July 3, 2003 7:15 PM
- Notice about the Telephone Consumer Protection Act (Valid in USA
only).
The Telephone Consumer Protection Act of 1991 makes it unlawful for any person to use a computer or other electronic device, including FAX machines, to
send any message unless such message clearly contains in a margin at the top or
bottom of each transmitted page or on the first page of the transmission, the date
and time it is sent and an identification of the business or other entity, or other
individual sending the message and the telephone number of the sending machine or such business, other entity, or individual. (The telephone number provided may not be a 900 number or any other number for which charges exceed
local or long-distance transmission charges.)
In order to program this information into your FAX machine, you should complete the following steps: Follow the FAX HEADER programming procedure in
the Programming chapter of the operating instructions to enter the business
identification and telephone number of the terminal or business. This information is transmitted with your document by the FAX HEADER feature. In addition to the information, be sure to program the date and time into your machine.
Note to users in Canada
- Note:
This Class B digital apparatus complies with Canadian ICES-003.
Remarque concernant les utilisateurs au Canada
- Avertissement:
Cet appareil numérique de la classe B est conforme à la norme NMB-003 du
Canada.
- Notice:
This equipment meets the applicable Industry Canada technical specifications.
2
RussianC3Fax-combine-EN_F_FM.book Page 3 Thursday, July 3, 2003 7:15 PM
Important Safety Instructions
Caution
When using your telephone equipment, basic safety precautions should always
be followed to reduce the risk of fire, electric shock and injury to persons, including the following:
• Do not use this product near water, for example, near a bathtub, wash bowl,
kitchen sink or laundry tub, in a wet basement or near a swimming pool.
• Avoid using a telephone during an electrical storm. There may be a remote
risk of electric shock from lightning.
• Do not use a telephone in the vicinity of a gas leak to report the leak.
• Use only the power cord and batteries indicated in this manual. Do not dispose of batteries in a fire. They may explode. Check with local codes for possible special disposal instructions.
Save these instructions.
IMPORTANTES MESURES DE SÉCURITÉ
Certalnes mesures de sécurité doivent être prises pendant l’utilisation de matérial
téléphonique afin de réduire les risques d’incendle, de choc électrique et de
blessures. En voici quelquesunes:
• Ne pas utiliser l’appareil près de l’eau, p.ex., près d’une balgnoire, d’un lavabo,
d’un évier de cuisine, d’un bac à laver, dans un sous-sol humide ou près
d’une piscine.
• Éviter d’utiliser le téléphone (sauf s’il s’agit d’un apparell sans fil) pendant un
orage électrique. Ceci peut présenter un risque de choc électrique causé par la
foudre.
• Ne pas utiliser l’appareil téléphonique pour signaler une fulte de gaz s’il est
situé près de la fuite.
• Utiliser seulement le cordon d’alimentation et le type de piles indiqués dans ce
manual. Ne pas jeter les piles dans le feu: elles peuvent exploser. Se conformer
aux ègrlements pertinents quant à l’élimination des piles.
Conserver ces instructions.
3
RussianC3Fax-combine-EN_F_FM.book Page 4 Thursday, July 3, 2003 7:15 PM
How to Read This Manual
Symbols
In this manual, the following symbols are used:
R WARNING:
This symbol indicates a potentially hazardous situation that might result in
death or serious injury when you misuse the machine without following the instructions under this symbol. Be sure to read the instructions, all of which are included in “Safety Information”, General Settings Guide.
R CAUTION:
This symbol indicates a potentially hazardous situation that might result in minor or moderate injury or property damage that does not involve personal injury
when you misuse the machine without following the instructions under this
symbol. Be sure to read the instructions, all of which are included in “Safety Information”, General Settings Guide.
* The statements above are notes for your safety.
Important
If this instruction is not followed, paper might be misfed, originals might be
damaged, or data might be lost. Be sure to read this.
Preparation
This symbol indicates information or preparations required prior to operating.
Note
This symbol indicates precautions for operation, or actions to take after abnormal operation.
Limitation
This symbol indicates numerical limits, functions that cannot be used together,
or conditions under which a particular function cannot be used.
Reference
This symbol indicates a reference.
[
]
Keys that appear on the machine's display panel.
[
]
Keys and buttons that appear on the computer's display.
{
}
Keys built into the machine's control panel.
4
RussianC3Fax-combine-EN_F_FM.book Page 5 Thursday, July 3, 2003 7:15 PM
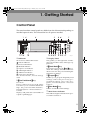
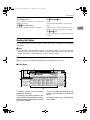
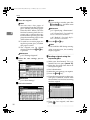
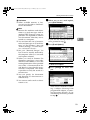
1. Getting Started
Control Panel
The actual machine control panel may differ from this illustration depending on
installed optional units. This illustration has all options installed.
ZLBS000N
1. Indicators
3. Display Panel
Shows errors and machine status.
: Data In indicator
L: Service Call indicator
x: Misfeed indicator
M: Open Cover indicator
d: Add Staple indicator
D: Add Toner indicator
B: Paper run-out indicator
See “Control Panel”, General Settings
Guide.
This guides you through tasks and displays the machine status. Messages appear here.
2. {User Tools/Counter}} key
User Tools:
Press to enter User Tools mode. These
tools allow you to customize default settings. See p.139 “Facsimile Features”,
Facsimile Reference <Advanced Features> .
Counter:
Displays and prints the total number of
copied or printed pages.
4. {Check Modes}} key
Press before pressing the {Start}
} key to
check the settings selected for the fax
about to be sent. See p.25 “Checking the
transmission settings”.
5. {Program}} key
Enables you to program frequently used
settings and recall previously program med settings. See p.127 “Programs”, Facsimile Reference <Advanced
Features> .
6. {Clear Modes}} key
Press to cancel the current settings.
7. Main Power indicator
This indicator lights when the main power switch is turned on.
5
RussianC3Fax-combine-EN_F_FM.book Page 6 Thursday, July 3, 2003 7:15 PM
Getting Started
8. On indicator
12. Confidential file indicator
This indicator lights when the operation
switch is turned on.
Lights when a message is received into
memory with Confidential Reception or
Personal Box. See p.41 “Printing Personal
Box Messages”, Facsimile Reference <Advanced Features> .
Blinks when a Memory Lock file is received into memory. See p.38 “Printing a
File Received with Memory Lock”, Facsimile Reference <Advanced Features> .
Important
❒ Do not turn off the main power
switch while the On indicator
stays lighted or is blinking. Neglecting this may damage the hard
disk.
1
Note
❒ If the main power switch is on even
when the On indicator is off, the machine will receive a fax message.
9. Operation switch
Press to turn the power on (the On indicator lights). To turn the power off, press
this switch again (the On indicator goes
off). See p.193 “Power Failure Report”,
Facsimile Reference <Advanced Features> .
Note
❒ The Operation switch does not function when the [User Tools/Counter/Inquiry] display is shown.
10. Communicating indicator
Lights during transmission or reception.
11. Receive File indicator
Lights when a message other than a Confidential Reception or Memory Lock file
is received. See p.86 “Substitute Reception”, Facsimile Reference <Advanced Features> .
When Reception File Setting is set to
Store, also lights when a message is received. See p.189 “Storing or Printing Received Documents”, Facsimile Reference
<Advanced Features> .
6
13. {Facsimile}} key
Press to switch to facsimile mode.
• Lights up in yellow
Facsimile mode has been selected.
• Lights up in green
Printing while in facsimile mode.
• Lights up in red
Lights up whenever a facsimile error
occurs. Press the { Facsimile}
} key to
display the error message and take appropriate action. See p.74 “When the
{Facsimile} Key Is Lit in Red”.
14. {Start Manual RX}} key
Press when Manual Reception is set. See
p.48 “Receiving a Fax in Manual Reception Mode”.
15. {On Hook Dial}} key
Press when you want to dial while hearing tone from the internal speaker. See
p.56 “On Hook Dial”, Facsimile Reference
<Advanced Features> .
16. {Tone}} key
Press to send tonal signals down a pulse
dialing line. See p.38 “Tone”.
17. {Pause/Redial}} key
Pause:
Inserts a pause when you are dialing or
storing a fax number. A pause cannot be
inserted as the first digit. See p.37
“Pause”.
Redial:
Press to redial one of the last ten numbers. See p.47 “Redial”, Facsimile Reference <Advanced Features> .
RussianC3Fax-combine-EN_F_FM.book Page 7 Thursday, July 3, 2003 7:15 PM
Control Panel
18. Number keys
20. {Clear/Stop}} key
Use to dial fax numbers, or enter the
number of copies.
Clear:
Cancels entered numbers or characters.
Stop:
Interrupts the current operation (transmission, scanning, copying, or printing).
19. {#}} key (Enter key)
Programs entered contents or settings.
1
21. {Start}} key
Press to start faxing, or printing reports,
or lists.
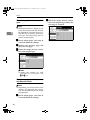
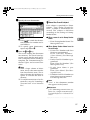
Reading the Display
The display shows you the machine status, messages, and guides you through
operations.
Note
❒ This machine automatically returns to standby mode if you do not use the
machine for a certain period of time. You can select the period using the Fax
Reset Timer. See “Timer Settings”, General Settings Guide.
Reading the display panel and using keys
Display contents will differ depending on installed optional units.
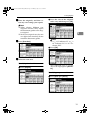
❖ Initial Display
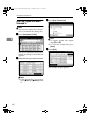
ZLBX060N
1. Allows you to select scanning
conditions and sizes.
2. Displays the date and time, the
name and facsimile number of a destination when transmitting, and the
size of the original.
3. Press to add a destination by entering a fax number or e-mail address.
4. Displays messages and the machine status.
7
RussianC3Fax-combine-EN_F_FM.book Page 8 Thursday, July 3, 2003 7:15 PM
Getting Started
1
5. Displays the entered number of a
destination. When adding destinations using the number keys, press
[Add].
8. Displays Quick Operation Keys
6. Press to display various informa-
transmitting.
tion about transmission.
7. Switches transmission mode be-
set for often used functions. [TX File
Status] and [RX File Status] are preset.
9. Displays various functions for
10. Displays the destination lists of
programmed destinations.
tween Memory Transmission and
Immediate Transmission.
❖ Initial Display (When Internet Fax Settings is ON)
ZLBX050N
1. Switches the destination between fax number and e-mail address.
Note
❒ To use the Internet Fax functions,
the optional printer/scanner unit
is required.
❒ You also need to set Internet Fax
Settings to ON in Fax Features. See
p.148 “E-mail Settings”, Facsimile
Reference <Advanced Features> .
8
RussianC3Fax-combine-EN_F_FM.book Page 9 Thursday, July 3, 2003 7:15 PM
Control Panel
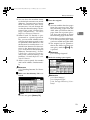
Reading the Destination List
When using the facsimile function, only fax or Internet Fax destinations programmed in the Address Book appears.
1
❖ Destination List
ZLBX060E
1. Title word keys appear. Allows
you to switch from one page (display) to another on the destination
list.
2. Allows you to search for a destination by destination name, fax
number, e-mail address, or registration number.
3. Appears on Quick Dial keys programmed as a transfer station.
4. Appears on Quick Dial keys programmed with a group of destinations.
9
RussianC3Fax-combine-EN_F_FM.book Page 10 Thursday, July 3, 2003 7:15 PM
Getting Started
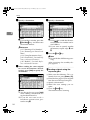
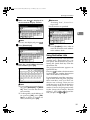
Standby Display
While the machine is in standby mode (immediately after the {Facsimile}
} key is
pressed or after the {Clear Modes}
} key is pressed), the following display appears.
1
❖ Memory Transmission (initial display)
❖ Immediate Transmission
Note
❒ To return to standby mode, do one of the following:
• If you have placed the original in the optional Auto Document Feeder
(ADF) and have not pressed the {Start}
} key, remove the original.
• If you have not placed an original, press the {Clear Modes}
} key.
• If you are in User Tools mode, press the {User Tools/Counter}
} key.
10
RussianC3Fax-combine-EN_F_FM.book Page 11 Thursday, July 3, 2003 7:15 PM
Control Panel
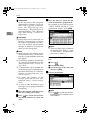
Communication Display
While communicating, the machine status is displayed.
❖ Memory Transmission (fax transmission)
1
Note
❒ While e-mail is being sent, the "Sending E-mail...:" message appears.
❖ Reception
Note
❒ Even when the machine is being used as a copier, printer, or scanner, the
sender name or number will appear for received faxes.
❖ Immediate Transmission
11
RussianC3Fax-combine-EN_F_FM.book Page 12 Thursday, July 3, 2003 7:15 PM
Getting Started
User Code Entry Display
When the following message appears on the display, User Code Management is
active. Enter a user code to deactivate User Code Management.
1
The machine can be set up so that no one can use it without entering a user code.
This prevents unauthorized people from sending fax messages and helps track
the activity of each user or department.
Note
❒ You can specify a user code with “System Settings”. See “Registering a New
User Code”, General Settings Guide.
❒ Even when User Code Management is on, you can still receive and print fax
messages as normal.
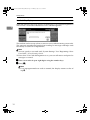
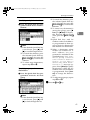
A Enter a user code of up to eight digits using the number keys.
#].
B Press [#
Note
❒ If an unprogrammed user code is entered, the display returns to that of
step A.
12
RussianC3Fax-combine-EN_F_FM.book Page 13 Thursday, July 3, 2003 7:15 PM
2. Faxing
Transmission Modes
There are two types of transmission:
• Memory Transmission
• Immediate Transmission
❖ Memory Transmission
Transmission starts automatically
after the original has been stored in
memory. It is a convenient method
for when you are in a hurry and
want to take the document away
with you. You can also send the
same original to several destinations (broadcasting).
❖ Immediate Transmission
Immediately dials the destination
number, and while reading the
original, sends it. It is very convenient when you want to send an
original quickly or when you want
to check the destination you are
sending to. When using this type
of transmission, the original is not
stored in memory. You can only
specify one address.
Important
❒ If power outage lasts about an
hour, or the machine is disconnected from the power outlet
for about an hour, documents
stored in the fax machine's
memory are deleted. If any document is deleted, the Power
Failure Report is automatically
printed out when the main
power switch is turned on. Use
this report to check which documents were deleted. Simply
turning off the power by pressing the Operation switch does
not delete stored documents.
See p.193 “Power Failure Report”, Facsimile Reference <Advanced Features> .
13
RussianC3Fax-combine-EN_F_FM.book Page 14 Thursday, July 3, 2003 7:15 PM
Faxing
Note
❒ You can use Parallel Memory
Transmission that dials while
the original is being scanned.
See p.77 “Parallel Mem ory
Transmission”, Facsimile Reference <Advanced Features> .
2
Switching between Memory
Transmission and Immediate
Transmission
Check the display to see which mode
is currently active. You can change
t ran sm ission mo de by p ressing
[Immed. TX] or [Memory TX].
Note
❒ You can select the transmission
mode that is operative when the
machine is turned on with [Memory/Immed. Transmission Switch] under Gen. Settings/Adjust. See
p.144 “General Settings/Adjustment”, Facsimile Reference <Advanced Features> .
❒ You can have the machine return
to default mode after each transmission using [Scan End Reset] under Gen. Settings/Adjust. See
p.144 “General Settings/Adjustment”, Facsimile Reference <Advanced Features> .
14
RussianC3Fax-combine-EN_F_FM.book Page 15 Thursday, July 3, 2003 7:15 PM
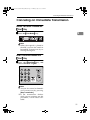
Placing Originals
Placing Originals
You can place the originals either in
the optional ADF or on the exposure
glass. Some types of originals are unsuitable for the ADF, so they must be
placed on the exposure glass.
Which way you place the original depends on its size and whether you are
using the ADF or the exposure glass.
See p.21 “Original sizes difficult to
detect”.
❖ How to place A4, B4 JIS (Japanese
×11",
Industrial Standard), A3, 81/2"×
81/2"×
×14", and 11"×
×17" size originals
Original
❖ How to place A5 and B5 JIS size
originals
Original
Where to place originals
Exposure glass
The ADF
2
ZLBH020E
Limitation
❒ If you place A5 size documents on
the exposure glass, they will not be
d e te c t ed . A 5 siz e do c u m e nt s
placed in the ADF are sent. See
p.21 “Original sizes difficult to detect”.
Where to place originals
Exposure glass
The ADF
ZLBH030E
Note
❒ When you place originals as
shown in the above illustration,
the fax header will be printed on
received faxes at the destination as
follows:
• *1 On the top of the fax
• *2 On the left side of the fax
Note
❒ When you place originals as
shown in the above illustration,
the fax header will be printed on
the received faxes at the destination as follows:
• *1 On the top of the fax
• *2 On the left side of the fax
❒ When sending a fax, the image
output at the other end depends on
the size and orientation of paper
used in the receiver's terminal. If
the receiver does not use paper of
the same size and orientation as
that of the original, the fax image
may be reduced in size, trimmed at
both edges, or divided into two or
more sheets. When sending an important original, we recommend
you ask the receiver about the size
and orientation of the paper used
in their terminal.
15
RussianC3Fax-combine-EN_F_FM.book Page 16 Thursday, July 3, 2003 7:15 PM
Faxing
❒ When sending an original of irregular (i.e. custom) size or part of a
large original, you can specify the
scan area precisely. See p.18 “Setting a Scan Area”.
❒ Custom size documents are scanned
as regular size documents, so the receiver may find extra blank margins
or edges of images missing. If you
specify a scan area, only that area
will be scanned regardless of actual
document size.
❒ Make sure that all ink, correcting
fluid etc., has completely dried before placing your original. If it is
still wet, the exposure glass will be
marked and those marks will appear on the received image.
❒ If you place an A4 or LT (81/2"×11")
size original in the portrait orientation, the machine rotates the image
by 90 degrees before sending. See
p.79 “Transmission with Image
Rotation”, Facsimile Reference <Advanced Features> .
❒ You can send the first pages from
the exposure glass then the remaining pages from the ADF. After you have removed the last page
from the exposure glass, insert the
remaining pages in the ADF, and
then press the {Start}
} key.
❒ When using the Internet Fax function, documents transmitted are
sent at A4 width. Documents larger
than A4 are reduced to A4 width.
2
Reference
For how to place two-sided docum e n t s , s e e p . 6 2 “ T w o -S id e d
T ra n sm i s s io n ( D o ub l e - S i d e d
Transmission)”, Facsimile Reference
<Advanced Features> .
For acceptable types of originals,
see p.204 “Acceptable Types of
Originals”, Facsimile Reference <Advanced Features> .
16
Placing a Single Original on
the Exposure Glass
Place originals that cannot be placed
in the optional ADF, such as a book,
on the exposure glass one page at a
time.
A Lift
the exposure glass cover or
the ADF by at least 30 degrees.
Note
❒ If you do not lift the ADF by at
least 30 degrees, the original
size will not be detected.
B Place the original face down and
align its upper left corner with the
reference mark at the upper left
corner of the exposure glass.
1. Positioning mark
2. Scale
C Lower the ADF.
Note
❒ When setting a bound original,
the received image may contain
some black areas. To reduce this
effect, hold down the original to
prevent the bound part from
rising.
RussianC3Fax-combine-EN_F_FM.book Page 17 Thursday, July 3, 2003 7:15 PM
Placing Originals
Bound original page order
When setting bound originals (books,
magazines, etc.), you can select to
have either the left page or right page
sent first. See p.61 “Book Fax”, Facsimile Reference <Advanced Features> .
Note
❒ You can select whether the left
page or right page is sent first. See
p.162 “User Parameters”, Facsimile
Reference <Advanced Features>
(switch 06, bit 6).
Placing Originals in the
Optional Auto Document
Feeder (ADF)
Use the ADF to scan in a stack of originals in one operation. The ADF can
handle both one-sided and two-sided
originals.
❒ Documents longer than 800 mm
(32") must be sent by memory
transmission (immediate transmission is not possible).
❒ If your original is bent or folded,
flatten it before you place it.
❒ When sending thin originals, place
them on the exposure glass.
❒ If an original jammed, press the
{Clear/Stop}
} key, and then slowly
remove the original.
❒ You can check information about
the sizes and number of originals
that can be placed in the ADF. See
p.204 “Acceptable Types of Originals”, Facsimile Reference <Advanced Features> .
2
A Adjust
the document guide to
match the size of the originals.
B Align the edges of the originals
and stack them in the ADF face
up.
Limitation
❒ Place all the originals to be sent in
a single stack.
❒ You cannot place originals in the
ADF one page at a time or in
sheaves.
Note
❒ The maximum document length is
1200 mm (47").
❒ If you send documents longer than
420 mm (17"), specify the area to be
scanned. If you send such documents frequently, select Long Document mode with the User
Parameters. If a jam occurs, the
document might be damaged because scanning will not stop. See
p.18 “Setting a Scan Area”. See
p.162 “User Parameters”, Facsimile
Reference <Advanced Features>
(switch 14, bit 1).
ZLFH050E
1. Limit mark
2. Document guide
17
RussianC3Fax-combine-EN_F_FM.book Page 18 Thursday, July 3, 2003 7:15 PM
Faxing
Originals unsuitable for the optional
Auto Document Feeder
Do not place the following types of
originals in the ADF because they
may be damaged. Place them on the
exposure glass instead.
• Originals in unacceptable sizes
(See p.204 “Acceptable Types of
Originals”, Facsimile Reference <Advanced Features> .)
• Originals containing staples or
clips
• Perforated or torn originals
• Curled, folded, or creased originals
• Pasted originals
• Originals with any kind of coating,
such as thermosensitive paper, art
paper, aluminum foil, carbon paper, or conductive paper
• Originals with index tabs, tags, or
other projecting parts
• Sticky originals, such as translucent paper
• Thin and soft originals
• Originals of inappropriate weight
(See p.204 “Acceptable Types of
Originals”, Facsimile Reference <Advanced Features> )
• Originals in bound form, such as
books
• Transparent originals, such as
OHP transparencies or translucent
paper
2
18
Setting a Scan Area
Normally, a placed document is
scanned according to the automatically detected size. If a scan area is
specified, the document is scanned
accordingly. Thus, documents can be
sent without extra space or blank
margins.
❖ Auto Detect
The placed document is scanned
according to the automatically detected size.
Note
❒ If the machine cannot detect the
original size, a confirmation
message appears. Replace the
original.
❖ Regular
The placed document is scanned
according to specified size regardless of actual size.
The sizes that can be specified are
A4KL, B4 JISL, A3L,
8 1/2"×11"KL, 8 1/2"×14"L, and
11"×17"L.
❖ Area
Enter the area to be scanned. Only
the area in the specified size is
scanned regardless of the actual
size of a placed document. See
p.156 “Programming, Changing
and Deleting a Scan Size”, Facsimile Reference <Advanced Features> .
Note
❒ To cancel the selected scan area,
select [Auto Detect]. See p.20
“Specifying Auto Detect”.
RussianC3Fax-combine-EN_F_FM.book Page 19 Thursday, July 3, 2003 7:15 PM
Placing Originals
A Place the originals, and then select any scan settings you require.
B Press the size of the originals
to be sent, and then press [OK].
Note
❒ When placing different size
originals into the ADF, adjust
the document guide to the largest original.
❒ Small-size originals may be sent
at a slight slant since they do not
match the document guide.
B Press [Scan Area].
2
Note
❒ 81/2"×11" indicates LT. 81/2"×
14" indicates LG. 11"×17" indicates DLT.
C Press [OK].
C Select the scan area.
Specifying standard sizes
A Press [Regular].
The selected size is shown
above the highlighted [Scan Area].
Specifying programmed sizes
A Press [Area 1] or [Area 2].
19
RussianC3Fax-combine-EN_F_FM.book Page 20 Thursday, July 3, 2003 7:15 PM
Faxing
B Press [OK].
2
"Area 1" or "Area 2" is shown
above the highlighted [Scan Area].
Specifying Auto Detect
A Make sure that [Auto Detect] is
selected.
Note
❒ If it is not, press [Auto Detect].
B Press [OK].
“Auto Detect” is shown above
[Scan Area].
D Specify
a destination and press
the {Start}
} key.
20
RussianC3Fax-combine-EN_F_FM.book Page 21 Thursday, July 3, 2003 7:15 PM
Placing Originals
Original sizes difficult to detect
The machine finds it difficult to detect the size of the following kinds of originals. If this happens, the receiving machine may not select print paper of the correct size.
• Documents placed on the exposure glass of sizes other than those listed in the
table below
• Originals with index tabs, tags, or protruding parts
• Transparent originals, such as OHP transparencies or translucent paper
• Dark originals with dense text or drawings
• Originals which partially contain solid printing
• Originals which have solid printing around their edges
• Originals with glossy surfaces
• Bound originals of more than 10 mm (0.3") in thickness, such as books.
The following paper sizes are automatically detected in facsimile mode.
2
❖ Metric Version
Paper size
A3L
L
where original is placed
×13"
8 1/2"×
(F4)
B4 JISL
L
A4K
KL
B5 JIS
KL
A5K
KL
Exposure glass
Ο
Ο
Ο
Ο
Ο
×
ADF
Ο
Ο
Ο
Ο
Ο
Ο
❖ Inch Version
Paper size
11"×
×17"L
L
×14"L
L
8 1/2"×
8 1/2"×
×11"K
KL
5 1/2"×
×8 1/2"K
KL
where original is placed
Exposure glass
Ο
Ο
Ο
×
ADF
Ο
Ο
Ο
Ο
Ο - Auto detect
× - Unable to auto detect
21
RussianC3Fax-combine-EN_F_FM.book Page 22 Thursday, July 3, 2003 7:15 PM
Faxing
Memory Transmission
In Memory Transmission mode, after
you press the {Start}
} key, the machine
does not dial the destination until all
pages of your fax message have been
scanned into memory (in contrast to
Immediate Transmission, where the
number is dialed first and pages are
scanned and sent one by one).
Memory Transmission is useful because:
• You can take your original away
from the machine without having
to wait too long.
• While your message is being sent,
other people can use the machine.
• You can send the same message to
more than one place in a single operation (broadcasting).
Memory transmission mode has normal fax and Internet Fax functions.
2
Important
❒ If there is a power failure (the main
power switch is off) or the machine
is unplugged out for more than
one hour, all the documents stored
in memory are deleted. As soon as
the main power switch is turned
on, the Power Failure Report is
printed to help you identify deleted files. If you turn only the operation switch off, documents are not
deleted. See p.193 “Power Failure
Report”, Facsimile Reference <Advanced Features> .
❒ We recommend you call the receiver and confirm with them
when sending important messages.
22
Limitation
❒ If memory is full (0% appears on
the display), Memory Transmission is disabled. Use Immediate
Transmission instead.
Note
❒ Maximum number of destinations
per Memory Transmission: 500.
❒ Combined total number of destin at io ns of s t and b y m e ssa ge s
stored in memory: 500 (2,000 with
the optional fax function upgrade
unit).
❒ After the total number of programmed destination numbers exceeds 500 (2,000 with the optional
fax function upgrade unit), you
c a n p e rf o rm o nly I m m ed ia t e
Transmission.
❒ The number of documents you can
store is 400. You can store 800 documents with the optional fax function upgrade unit.
❒ The number of pages you can store
in memory depends on the original images and the scan settings.
You can store up to 320 standard
pages (ITU-T #4 chart, Resolution:
Standard, Original Type: Text).
You can store up to 2,240 standard
pages, with the optional expansion
memory installed.
❒ You can have the machine set to
Memory Transmission mode or
Immediate Transmission mode
right after the power is turned on
or the {Clear Modes}
} key is pressed.
See p.144 “General Settings/Adjustment”, Facsimile Reference <Advanced Features> .
RussianC3Fax-combine-EN_F_FM.book Page 23 Thursday, July 3, 2003 7:15 PM
Memory Transmission
❒ You can have the machine return
to the default transmission mode
(Memory Transmission or Immediate Transmission) after every
transmission. You can change this
so that the desired setting is maintained. See p.144 “General Settings/Adjustment ”, Facsimile
Reference <Advanced Features> .
❒ When E-mail TX Results is programmed in a Quick Operation
key, you can select whether transmission result report e-mail is sent
to specified e-mail addresses. The
destination for notification is selected from Internet Fax destinations in the destination list. See
p.82 “Transmission Result Report
(Memory Transmission)”, Facsimile Reference <Advanced Features>
and p.144 “General Settings/Adjustment”, Facsimile Reference <Advanced Features> .
❒ Allows you to specify fax number
and e-mail address simultaneously.
B Place the original.
Note
❒ You can send the first few pages
from the exposure glass then
the remaining pages from the
ADF. After you remove the last
page from the exposure glass,
you have 60 seconds to insert
the remaining pages in the ADF.
❒ Note that you cannot place pages on the exposure glass after
you have started using the ADF.
❒ The original can be placed either in the ADF or on the exposure glass, until the {Start}
} key
is pressed.
2
Reference
p.15 “Placing Originals”
C Make the settings you require.
Reference
p.52 “Sending Internet Fax Documents”
A Make sure that Memory TX is selected.
Reference
p.32 “Scan Settings”
p.33 “Original Type”
p.34 “Image Density (Contrast)”
Note
❒ If it is not, press [Memory TX].
23
RussianC3Fax-combine-EN_F_FM.book Page 24 Thursday, July 3, 2003 7:15 PM
Faxing
D Specify a destination.
F Specify a destination.
2
Note
❒ If you make a mistake, press the
{Clear/Stop}
} key, and then enter
the correct number.
Note
❒ Press
to switch the destination between fax number and email address.
❒ If you want to specify another
destination, repeat steps E and
F.
Reference
p.37 “Entering a Fax Number”
p.38 “Entering an E-mail Address”
p.39 “Using Destination Lists”
p.47 “Chain Dial”, Facsimile Reference <Advanced Features>
p.47 “Redial”, Facsimile Reference <Advanced Features>
G Press the {Start}} key.
Note
❒ Do not lift the ADF during scanning.
After scanning, the standby display appears.
E When sending the same original
to several destinations (broadcasting), press [Add] to specify the
destinations.
-Sending originals using the
exposure glass
A
B
C
D
E
Note
❒ You do not have to press [Add]
when adding a destination using the destination list.
❒ If you do not want to do a
broadcast transmission, proceed to step G.
24
Make sure that Memory TX is selected, if it is not, press [Memory TX].
Place the first page of your original
face down on the exposure glass.
Specify a destination.
Make the scan settings you require.
Press the {Start}
} key.
The machine starts scanning.
RussianC3Fax-combine-EN_F_FM.book Page 25 Thursday, July 3, 2003 7:15 PM
Memory Transmission
F
Place the next original on the exposure glass within 60 seconds after
the machine has finished scanning
the first original.
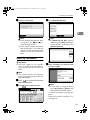
B
After checking the settings on the
display, press the {Check Modes}
}
key.
The display before the { Check
Modes}
} key was pressed appears.
2
-Broadcasting sequence
G
H
Repeat steps D to F for all originals.
Place the last original, and then
press [#
#].
- Checking the transmission
settings
You can check the transmission settings (e.g. destination and transmission mode) on the display.
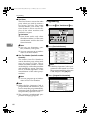
A Press the {Check Modes}
} key.
ZLBS040N
The following display appears.
If you dial several destinations for the
same message (broadcasting), the
messages are sent in the order in
which they were dialed. If the fax
message could not be transmitted, the
machine redials that destination after
the last destination specified for
broadcasting. For example, if you
specify four destinations, A through
D, for broadcasting, and if the lines to
destinations A and C are busy, the
machine dials the destinations in the
following order: A, B, C, D, A, and C.
See p.79 “Simultaneous Broadcast”,
Facsimile Reference <Advanced Features> .
-Checking the transmission
progress
To check the transmission progress,
print the TX file list. See p.25 “Printing a List of Files in Memory (Print TX
File List)”, Facsimile Reference <Advanced Features> .
Note
❒ Press
to switch the destination between fax number and email address.
25
RussianC3Fax-combine-EN_F_FM.book Page 26 Thursday, July 3, 2003 7:15 PM
Faxing
Canceling a Memory Transmission
Even when fax number and e-mail
address are simultaneously specified,
or only e-mail address is specified,
you can cancel the mode using the
same procedure. However, you cannot cancel the transmission of an Internet Fax document being sent.
2
Before the Original Is Scanned
Use this procedure to cancel a trans} key.
mission before pressing the {Start}
A Press the {Clear Modes}} key.
ZLBS050N
Note
❒ When documents are placed in
the ADF, you can cancel transmission simply by removing
them.
Note
❒ You can also cancel scanning by
pressing [Stop Scanning].
❒ Scanning may be completed
while you are performing the
cancel operation.
While the Original Is Being
Transmitted
Note
❒ If the transmission finishes while
you are carrying out this procedure, it will not be canceled.
❒ If you cancel a message while it is
being sent, the transmission is halted as soon as you finish the cancellation procedure. However, some
pages of your message may have
already been sent and received at
the other end.
A Press the {Clear/Stop}} key.
While the Original Is Being
Scanned
Use this procedure to cancel a transmission after pressing the {Start}
} key.
A Press the {Clear/Stop}} key.
Note
❒ You can also cancel a Memory
Transmission by pressing
[Change/Stop TX File].
26
The machine stops scanning.
RussianC3Fax-combine-EN_F_FM.book Page 27 Thursday, July 3, 2003 7:15 PM
Canceling a Memory Transmission
B Select the file you want to cancel.
Before the Transmission Is
Started
Use this procedure to cancel a transmission after the original has been
scanned.
A Press [Change/Stop TX File].
2
Note
❒ If the desired file is not shown,
press [U
U Prev.] or [T
T Next] to find
it.
C Press [Stop Transmission].
The list of stored files being transmitted or waiting for transmission
appears.
B Select the file you want to cancel.
Note
❒ To cancel another file, repeat
steps B and C.
❒ To cancel stopping transmission, press [Save].
D Press [Exit].
Note
❒ If the desired file is not shown,
press [U
U Prev.] or [T
T Next] to find
it.
C Press [Stop Transmission].
The standby display appears.
27
RussianC3Fax-combine-EN_F_FM.book Page 28 Thursday, July 3, 2003 7:15 PM
Faxing
Note
❒ To cancel another file, repeat
steps B and C.
❒ To cancel stopping transmission, press [Save].
D Press [Exit].
2
The standby display appears.
28
RussianC3Fax-combine-EN_F_FM.book Page 29 Thursday, July 3, 2003 7:15 PM
Immediate Transmission
Immediate Transmission
With Immediate Transmission, when
you press the { Start}
} key, the fax
number is dialed immediately. The
message is scanned and transmitted
page by page without being stored in
memory. This contrasts with Memory
Transmission which scans all pages
into memory before dialing the destination.
Immediate Transmission is useful if
you want immediate confirmation
that the message is being sent to the
correct destination (just check the other terminal's Own Name or Own Fax
Number on the control panel during
transmission).
Limitation
❒ Internet Fax is executed in only
Memory Transmission that starts
transmission automatically after
storing documents in memory. If
you specify Immediate Transmission in Internet Fax, the mode is
switched to Memory Transmission
while an e-mail address is being
entered.
Note
❒ You cannot send the same document to multiple destinations
(broadcasting). Memory Transmission allows this function.
❒ You can have the machine set to
Memory Transmission mode or
Immediate Transmission mode
right after the power is turned on.
See p.144 “General Settings/Adjustment”, Facsimile Reference <Advanced Features> .
❒ You can have the machine return
to the default transmission mode
(Memory Transmission or Immediate Transmission) after every
transmission. You can change this
so that the desired setting is maintained. See p.144 “General Sett ings/Adjustm ent”, Facsim ile
Reference <Advanced Features> .
❒ When E-mail TX Results is programmed in a Quick Operation
key, you can send notification of
memory transmission results to
specified e-mail addresses. The
destination for notification is selected from Internet Fax destinations in the destination list. See
p.83 “Transmission Result Report
(Immediate Transmission)”, Facsimile Reference <Advanced Features> and p.144 “General
Settings/Adjustment”, Facsimile
Reference <Advanced Features> .
2
A Make sure that Immed. TX is selected.
Note
❒ If it is not, press [Immed. TX].
29
RussianC3Fax-combine-EN_F_FM.book Page 30 Thursday, July 3, 2003 7:15 PM
Faxing
B Place the original.
Note
❒ You can scan a few pages of
your original from the exposure
glass and the remaining pages
from the ADF. When you have
finished scanning from the exposure glass, remove the original from the exposure glass and
place the remaining pages in the
ADF within ten seconds.
❒ To send two or more pages using the exposure glass, set them
one page at a time.
❒ The original can be placed
whenever, before the {Start}
} key
is pressed.
2
Reference
p.15 “Placing Originals”
C Select
the scan settings you re-
quire.
Note
❒ If you make a mistake, press the
{Clear/Stop}
} key, and then enter
the correct number.
Reference
p.37 “Specifying a Destination”
p.47 “Chain Dial”, Facsimile Reference <Advanced Features>
p.47 “Redial”, Facsimile Reference <Advanced Features>
E Press the {Start}} key.
Note
❒ Do not lift the ADF during scanning.
After transmission, the standby
display appears.
-Sending originals using the
exposure glass
A
B
C
D
E
F
Reference
p.32 “Scan Settings”
D Dial a destination.
G
H
30
Make sure that Immed. TX is selected. If it is not, press [Immed. TX].
Place the first page face down on
the exposure glass.
Dial a destination.
Make the scan settings you require.
Press the {Start}
} key.
Place the next original on the exposure glass within 10 seconds after
the machine has finished scanning
the first original.
Repeat steps D to F for all originals.
Place the last original, and then
press [#
#].
RussianC3Fax-combine-EN_F_FM.book Page 31 Thursday, July 3, 2003 7:15 PM
Canceling an Immediate Transmission
Canceling an Immediate Transmission
Before You Have Pressed the
{Start}
} Key
A Press the {Clear Modes}} key.
2
ZLBS050N
Note
❒ When the original is placed in
the ADF, you can also cancel an
Immediate Transmission by removing the original.
After You Have Pressed the
{Start}
} Key
A Press
the {Clear/Stop}
} key, and
then remove the original.
Note
❒ You can also cancel an Immediate Transmission by pressing
[Stop Transmission].
❒ If the transmission finishes
while you are carrying out this
procedure, it will not be canceled.
31
RussianC3Fax-combine-EN_F_FM.book Page 32 Thursday, July 3, 2003 7:15 PM
Faxing
Scan Settings
You may want to send many different
types of fax messages. Some of these
may be difficult to reproduce at the
receiver's end. However, your machine has three settings that you can
adjust to help you transmit your document with the best possible image
quality.
2
❖ Resolution:
Standard, Detail, Super Fine (optional)
❖ Original Type:
Text, Text/Photo, Photo
❖ Image Density (Contrast):
Auto Image Density, Manual Image Density (seven levels), Combined Auto and Manual Image
Density
Resolution
Images and text are scanned into the
machine by converting them to sequences of dots. The density of the
dots determines the quality of the image and how long it takes to transmit.
Therefore, images scanned at high
resolution (Super Fine) have high
quality but transmission takes longer.
Conversely, low resolution (Standards) scanning results in lower quality but your original is sent more
quickly. Select the setting that matches your needs based upon this trade
off between speed and image clarity.
❖ Standard (8 x 3.85 lines/mm, 200 x 100
dpi)
Select for originals containing normal size characters.
32
❖ Detail (8 x 7.7 lines/mm, 200 x 200 dpi)
Select for originals containing
small characters or when you require greater clarity. This resolution is twice as fine as Standard.
❖ Super Fine (optional expansion memory required: 16 x 15.4 lines/mm, 400
x 400 dpi)
Select for originals with very fine
details or when you require the
best possible image clarity. This
resolution is eight times finer than
Standard.
Limitation
❒ If the other party's machine does
not support the resolution at
which you are sending, this machine automatically switches to a
resolution that is supported. You
can check the resolution at which
you sent actually. See p.158 “Printing the Journal”, Facsimile Reference
<Advanced Features> .
❒ Sending with Super Fine resolution requires that your machine
has the optional expansion memory, and the other party's machine
has the capability to receive fax
messages at Super Fine resolution.
Note
❒ The machine supports Standard,
Detail, and (with the optional expansion memory) Super Fine resolutions.
RussianC3Fax-combine-EN_F_FM.book Page 33 Thursday, July 3, 2003 7:15 PM
Scan Settings
❒ You can select the resolution type
that is selected right after the machine is turned on or modes are
cleared with [Scan End Reset] under
Gen. Settings/Adjust. See p.144
“General Settings/Adjustment”,
Facsimile Reference <Advanced Features> .
❒ You can have the machine return
to the resolution default setting after every transmission, with [Text
Size Priority] und er Gen. Settings/Adjust. See p.144 “General
Settings/Adjustment”, Facsimile
Reference <Advanced Features> .
❒ In Internet Fax transmission, the
original is scanned using "Detail"
for transmission, even if you select
"Super Fine".
A Press [Resolution].
Original Type
If your original contains photographs, illustrations, or diagrams
with complex shading patterns or
grays, select the appropriate original
type to optimize image clarity.
2
❖ Text
Select [Text] to send high-contrast
black-and-white image originals.
Use this setting even if your original contains text and photographs,
or if you only want to send clearer
text.
❖ Text/Photo
Select [Text/Photo] to send an original containing both a high-contrast
black-and-white image, such as
text, and a halftone image, such as
a photograph.
❖ Photo
Select [Photo] to send an original
containing a halftone image, such
as a photograph or a color original.
B Select the resolution you require,
and then press [OK].
Note
❒ If you install the optional expansion memory, “Super Fine”
will be displayed in the Resolution box.
Note
❒ If you select [Text/Photo] or [Photo],
the transmission will take longer
than when [Text] is selected.
❒ If you send a fax message with
[Text/Photo] or [Photo] and the background of the received image is
dirty, reduce the density setting
and resend the fax. See p.34 “Image Density (Contrast)”.
❒ You can set the original type that is
selected right after the machine is
turned on or modes are cleared,
with [Original Type Priority] under
Gen. Settings/Adjust. See p.144
“General Settings/Adjustment”,
Facsimile Reference <Advanced Features> .
33
RussianC3Fax-combine-EN_F_FM.book Page 34 Thursday, July 3, 2003 7:15 PM
Faxing
❒ You can have the machine return
to the original type default setting
after every transmission, with
[Scan End Reset] under Gen. Settings/Adjust. See p.144 “General
Settings/Adjustment”, Facsimile
Reference <Advanced Features> .
A Press [Original Type].
2
B Select
the original type you require, and then press [OK].
Image Density (Contrast)
The text and diagrams on originals
should stand out clearly from the paper they are on. If your original has a
darker background than normal (for
example, a newspaper clipping), or if
the writing is faint, adjust the image
density.
❖ Auto Image Density
The appropriate density setting for
the original is automatically selected.
34
❖ Manual Image Density
Use manual image density to set
image density yourself.
You can select one of seven image
density levels.
❖ Combined Auto and Manual Image
Density
You can only adjust image density
for photographs, illustrations, or
diagrams if the original has a dark
background.
You can select one of seven image
density levels.
Note
❒ Selecting [Text] or [Text/Photo] for
the original type causes [Auto Image
Density] to be selected.
❒ You can set the image density that
is selected right after the machine
is turned on or modes are cleared,
with [Auto Image Density] under
Gen. Settings/Adjust. See p.144
“General Settings/Adjustment”,
Facsimile Reference <Advanced Features> .
❒ You can have the machine return
to the image density default setting after every transmission, with
[Scan End Reset] under Gen. Settings/Adjust. See p.144 “General
Settings/Adjustment”, Facsimile
Reference <Advanced Features> .
RussianC3Fax-combine-EN_F_FM.book Page 35 Thursday, July 3, 2003 7:15 PM
Scan Settings
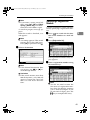
A Select the type of image density.
Auto Image Density
A Make sure that [Auto Image Density] is selected.
Combined Auto and Manual
Image Density
A Make sure that [Auto Image Density] is selected.
Note
❒ If [Auto Image Density] has not
been selected, press [Auto Image Density].
B Press [i
iLighter] or [Darkerj
j] to
adjust the density.
The square moves.
2
Note
❒ If [Auto Image Density] has not
been selected, press [Auto Image Density].
Manual Image Density
A Make sure that [Auto Image Density] is not selected. If it has
been selected, press [Auto Image
Density] to turn it off.
Note
❒ If [Auto Image Density] has not
been selected, proceed to
step B.
B Press [i
iLighter] or [Darkerj
j] to
adjust the density.
Mixing Scan Settings for a
Multiple Page Original
When sending an original of several
pages, you can select a different image density, resolution, and original
type setting for each page.
Place the original, select the scan settings for the first page, dial, and then
press the {Start}
} key as you would
normally. Then follow one of the following two procedures.
Note
❒ It is recommended that originals
be placed on the exposure glass
when mixing scan settings for a
multiple page original.
35
RussianC3Fax-combine-EN_F_FM.book Page 36 Thursday, July 3, 2003 7:15 PM
Faxing
When placing originals on the exposure
glass
Note
❒ While the machine is beeping, you
have about 60 seconds (10 seconds
for Immediate Transmission) to select density, resolution, and original type. The remaining time is
shown on the display.
2
A Check which pages you want to
scan with different settings.
B Remove
the previous page and
place the next page.
C Select the image density, resolution, and original type.
Note
❒ Adjust the settings for each
page before you press the
{Start}
} key.
When placing originals in the optional
Auto Document Feeder
Note
❒ Depending on what time the scan
settings are adjusted, the settings
may not be reflected in the resulting operation.
A Check which pages you want to
scan with different settings.
36
B Select the image density, resolu-
tion, and original type before the
next page is scanned.
RussianC3Fax-combine-EN_F_FM.book Page 37 Thursday, July 3, 2003 7:15 PM
Specifying a Destination
Specifying a Destination
You can specify the destination using
one of three methods.
A Enter
the fax number using the
number keys.
❖ Fax number
p.37 “Entering a Fax Number”
2
❖ E-mail address
p.38 “Entering an E-mail Address”
❖ Destination list
p.39 “Using Destination Lists”
This section covers these functions
and others in more detail.
Note
❒ The display shows the percentage
of free memory space for storing
originals. Since fax numbers and email addresses are programmed in
separate memory, dialing fax
numbers using the number keys
does not change the percentage on
the display.
Entering a Fax Number
Enter numbers directly using the key
pad on the right side of the control
panel.
Note
❒ Maximum length of a fax number:
128 digits.
Note
❒ If you make a mistake, press the
{Clear/Stop}
} key, and then enter
again.
❒ If the optional extra G3 interface
unit is installed, select G3 before
you proceed to the next step.
See p.59 “Changing the Line
Port”, Facsimile Reference <Advanced Features> .
❒ Press [ProgDest] after entering
the fax number to store the fax
number in the destination list.
Pause
Press the {Pause/Redial}
} key when dialing or storing a number to insert a
pause of about two seconds.
❒ You can insert pauses and tones in
a fax number. See p.37 “Pause”,
p.38 “Tone”.
37
RussianC3Fax-combine-EN_F_FM.book Page 38 Thursday, July 3, 2003 7:15 PM
Faxing
Note
❒ You cannot insert a pause before
the first digit of a fax number. If
you press the {Pause/Redial}
} key at
the first digit, a redial occurs. See
p.47 “Redial”, Facsimile Reference
<Advanced Features> .
❒ A pause is shown as a “-” on the
display.
2
Using the {Tone}
} key with On Hook
Dial
A Press the {On Hook Dial}} key.
ZLBS070N
B Enter
the fax number using the
number keys.
Note
❒ You can also program numbers including pauses in destination lists.
C Press the {Tone}} key.
Tone
This function allows a machine connected to a pulse dialing line to send
tonal signals (for example if you want
to use a special service on a tone dialing line). When you press the {Tone}
}
key, the machine dials the number using tonal signals.
Limitation
❒ Certain services may be unavailable when using the {Tone}
} key.
Note
❒ A tone is shown as a “•” on the display.
D Enter
the number you want to
tone dial using the number keys.
Entering an E-mail Address
When using Internet Fax transmission, specify the e-mail address in
place of the fax number.
Note
❒ You can enter up to 128 characters.
38
RussianC3Fax-combine-EN_F_FM.book Page 39 Thursday, July 3, 2003 7:15 PM
Specifying a Destination
A Make sure that
is displayed in
the destination display column.
Reference
“Entering Text”, General Settings Guide
The destination is specified.
2
Note
❒ If it is not displayed, press
.
B Press [Manual Input].
Note
❒ Press [ProgDest] in this order to
store the entered e-mail address
in the address book.
Using Destination Lists
C Enter the e-mail address destination and then press [OK].
Note
❒ If you enter an incorrect character, press [Backspace] or [Delete
All]. Then, re-enter the characters correctly.
❒ To change the e-mail address after pressing [OK], press [Edit
Dest.], re-enter an e-mail address, and then press [OK].
When you program a destination
number into a destination list, you
can specify the destination by just selecting the Quick Dial key from the
destination list.
The programmed name appears on
Quick Dial key.
Pressing
switches the destination
list between fax number destination
and e-mail address destination.
If you frequently send the same message to more than one place, program
these numbers and/or e-mail addresses into a Group. Then you can
send messages to all the destinations
in that Group with just a few keystrokes. You can also program a name
for the Group (for example, “Branch
Offices”), this will be displayed before you press the {Start}
} key.
39
RussianC3Fax-combine-EN_F_FM.book Page 40 Thursday, July 3, 2003 7:15 PM
Faxing
Preparation
In the destination list, program
individual fax number, e-mail address and/or groups of destinations. See “Registering a Fax
Destination”, “Registering an Email Destination”, and “Registering a New Group”, General Settings Guide.
2
Limitation
❒ Group Dial can be used only for
Memory Transmission; it cannot
be used for Immediate Transmission. The machine automatically
changes to Memory Transmission
when you use Group Dial.
Note
❒ When you press the title key above
the destination keys, the destination keys programmed in that title
key appear.
❒ To check the contents of Quick Dial, print the destination list. See
“Key Operator Tools”, General Settings Guide.
❒ A stored name can be printed out
on the first page of a received fax at
the other end. See p.74 “Label Insertion”, Facsimile Reference <Advanced Features> .
❒ To check the contents of the
Groups, print the list. See “Key
Operator Tools”, General Settings
Guide.
❒ A total of 500 destinations (per
message) can be programmed for
Group Dial.
A Place the original, and then select
the scan settings you require.
B Press
to switch the destination to fax number or e-mail address.
40
C Press the title key where the de-
sired destination is progammed.
For example, if you want to specify
“NEW YORK OFFICE” programmed in “LMN”, press [LMN].
Note
❒ There are three types of title for
destination lists; “Title 1”, “Title
2”, and “Title 3”. The above display shows “Title 1”.
Switching the titles of Destination
lists
A Press
.
B Press [Switch Title].
C Select the type of the title, and
then press [Exit].
D Select a destination.
Note
❒ Press
to switch the destination between fax number and email address.
RussianC3Fax-combine-EN_F_FM.book Page 41 Thursday, July 3, 2003 7:15 PM
Specifying a Destination
Specifying a single destination
A Press the Quick Dial key programmed with the desired destination.
Note
❒ If the desired Quick Dial key
is not shown, press [U
U] and
[T
T] to scroll through the list.
❒ To cancel the selection, press
the selected Quick Dial key
again. You can also press the
{Clear / Stop}
} key to cancel the
selection.
❒ To select more destinations,
repeat steps C and D.
Specifying a group of
destinations
A Press the Quick Dial key programmed with the desired
group.
❒ To cancel the selection, press
the selected Quick Dial key
again. You can also press the
{Clear / Stop}
} key to cancel the
selection.
❒ To cancel any destination(s)
among the group, press [U
U
Prev.] or [T
T Next] to display
t h e d e s ir e d d e s t i n a t i o n .
Then, press the {Clear / Stop}
}
key.
❒ Quick Dial keys with fax
numbers and e-mail addresses programmed to them appear in both fax destination
and Internet Fax destination.
❒ When a destination where
neither fax number nor email address are programmed is included in the
specified group, “The spec-
2
ified group contains
some invalid destination(s). Do you want to
select only valid destination(s)? ” message ap-
pears. Press [Select] to specify
destinations where the fax
number or the e-mail address
is programmed. Press [Cancel] to change the destination.
❒ To select more groups, repeat
steps C and D.
E Press the {Start}} key.
Note
❒ If the desired Quick Dial key
is not shown, press [U
U] and
[T
T] to look through the list.
41
RussianC3Fax-combine-EN_F_FM.book Page 42 Thursday, July 3, 2003 7:15 PM
Faxing
Searching for a Destination
Use this procedure to search through
the destination lists for a particular
destination.
C Press [Search by Dest. Name].
❖ Search by Destination Name
p . 4 2 “Se arch b y D e st in at i o n
Name”
2
❖ Search by Fax Number
p.43 “Search by Fax Number”
❖ Search by E-mail Address
p.44 “Search by E-mail Address”
ID
D Enter
a destination name to
search for, and then press [OK].
❖ Specifying a Registration Number
p.45 “Specifying a Registration
Number”
Search by Destination Name
Note
❒ The search returns only destinations whose beginnings match the
entered name.
❒ This function distinguishes between small and capital letters.
A Press
to switch the destination to fax number or e-mail address.
B Press
42
, the magnifier icon.
A search-in-progress message appears.
When the search is finished, a result appears.
Note
❒ If you press [Fax] or [E-mail] on
the search result display, you
can switch between fax destination and e-mail destination.
❒ A warning appears if the search
returns more than 100 items.
Press [OK] to proceed to step E.
RussianC3Fax-combine-EN_F_FM.book Page 43 Thursday, July 3, 2003 7:15 PM
Searching for a Destination
E Select a destination.
C Press [Search by Fax No.].
2
Note
❒ If the desired destination does
not appear, use [U
U] or [T
T ] to
scroll through the list.
❒ If the search returns more than
100 destinations, only 100 will
appear. Change the destination
name to view fewer destinations.
Note
❒ If [Search by Fax No.] appears
dimmed, press [Fax] on the right
of the display, and then press
[Search by Fax No.].
Search by Fax Number
Limitation
❒ You can search by fax number
only. To search by e-mail address,
see p.44 “Search by E-mail Address”.
D Enter a number to search for, and
then press [OK].
Note
❒ The search returns only destinations whose beginnings match the
entered number.
A Press
to switch the destination to fax number.
B Press
, the magnifier icon.
Note
❒ If you enter a wrong number,
press [←
←]/[→
→] and [Clear], and
then enter the number again.
A search-in-progress message appears.
When the search is finished, a result appears.
43
RussianC3Fax-combine-EN_F_FM.book Page 44 Thursday, July 3, 2003 7:15 PM
Faxing
Note
❒ A warning appears if the search
returns more than 100 items.
Press [OK] to proceed to step E.
B Press
, the magnifier icon.
E Select a destination.
2
C Press [Search by E-mail].
Note
❒ If the desired destination does
not appear, use [U
U] or [T
T ] to
scroll through the list.
Limitation
❒ If the search rerurns more than
100 destinations, only 100 will
appear. Change the number to
view fewer destinations.
Note
❒ If [Search by E-mail] appears
dimmed, press [E-mail] on the
right of the display, and then
[Search by E-mail].
Search by E-mail Address
Limitation
❒ You can search by e-mail address
only. To search by fax number, see
p.43 “Search by Fax Number”.
Note
❒ The search returns only destinations whose beginnings match the
entered e-mail address.
A Press
to switch the destination to e-mail address.
44
D Enter an e-mail address to search
for, and then press [OK].
RussianC3Fax-combine-EN_F_FM.book Page 45 Thursday, July 3, 2003 7:15 PM
Searching for a Destination
Note
❒ If you enter a wrong e-mail address, press [←
←]/[→
→] and [Backspace]/[Delete All], and then
enter the e-mail address again.
A search-in-progress message appears.
When the search is finished, a result appears.
Specifying a Registration
Number
Note
❒ A warning appears if the search
returns more than 100 items.
Press [OK] to proceed to step E.
B Press [Registration No.].
Use this procedure to select a destination by specifying a registration number.
A Press
2
to switch the destination to fax number or e-mail address.
E Select a destination.
The registration number entry display appears.
C Enter a registration number using
Note
❒ If the desired destination does
not appear, use [U
U] or [T
T ] to
scroll through the list.
Limitation
❒ If the search rerurns more than
100 destinations, only 100 will
appear. Change the e-mail address to view fewer destinations.
the number keys.
Note
❒ You do not need to enter the
first zeros of a registration number when the display prompts
you to enter five digits. If you
do not enter 5 digits, press the
{#}
} key to complete the entry.
45
RussianC3Fax-combine-EN_F_FM.book Page 46 Thursday, July 3, 2003 7:15 PM
Faxing
The corresponding destination appears.
2
Note
❒ The Title word key switches to
that which the specified destination is programmed in.
❒ If the “Cannot find the specified Registration No. ”
message appears, the specified
registration number is wrong.
Press [Exit], check the registration number again, and then follow the procedure from step A.
❒ If the “No valid destination
under the specified No.”
message appears, the
key is
wrong. Press [Exit], and then follow the procedure from step A.
46
RussianC3Fax-combine-EN_F_FM.book Page 47 Thursday, July 3, 2003 7:15 PM
Reception
Reception
There are two ways you can set up
your machine to handle incoming
calls:
• Manual Reception (the optional
handset or an external telephone
required)
• Auto Reception
You can change the reception mode
only if a standard G3 line is used.
You cannot change the reception
mode when a line other than the standard G3 line (G3-2) is used.
Note
❒ You can only use this function after programming a Quick Operation key as the reception mode
switch with [Quick Operation Key (1
to 3)] under Gen. Settings/Adjust.
See p.144 “General Settings/Adjustment”, Facsimile Reference <Advanced Features> .
2
A Press the [Switch RX Mode] Quick
Operation key.
❖ Manual Reception
When a telephone call comes in,
the machine rings. If the call is a fax
message, you must switch manually to facsimile mode.
❖ Auto Reception
When a telephone call comes in,
the machine automatically receives it as a fax message. Use this
setting on a dedicated fax line.
B Select
the reception mode, and
then press [OK].
Note
❒ The optional handset or an external telephone is required to
use this machine as a telephone.
Switching the Reception Mode
You can switch reception modes using the Reception Settings menu (under Facsimile Features). See p.146
“Reception Settings”, Facsimile Reference <Advanced Features> .
If you program a Quick Operation
key with Switch Reception Mode, you
can switch reception mode quickly.
The standby display appears.
Note
❒ To cancel the selection, press
[Cancel].
47
RussianC3Fax-combine-EN_F_FM.book Page 48 Thursday, July 3, 2003 7:15 PM
Faxing
Receiving a Fax in Manual
Reception Mode
A When the machine rings, pick up
the optional handset or the handset of the external telephone.
2
B If you hear beeps, press the {Start}}
key or the {Start Manual RX}
} key.
(The {Start}
} key is only available
in facsimile mode when an original is not placed.)
C Replace the handset of the external telephone. The machine will
start receiving.
Limitation
❒ When printing documents
stored in the Document Server,
the {Start Manual RX}
} key or the
{ Start}
} key cannot be used to
switch to facsimile mode. Press
the { 2}
} key of the optional
handset or the external telephone.
48
RussianC3Fax-combine-EN_F_FM.book Page 49 Thursday, July 3, 2003 7:15 PM
3. Using Internet Fax Functions
Internet Fax Functions
The optional printer/scanner unit is required.
This machine converts scanned document images to e-mail format and transmits
the data over the Internet.
The e-mail sent by this machine can be received by another Internet Fax machine. Instead of dialing the telephone number of the destination you want to
send to, you enter the relevant e-mail address.
You can also print or forward received e-mail messages.
GLBF010E
Note
❒ This machine must be connected to a LAN and set up correctly in order to use
its Internet Fax functions. See Network Guide.
❒ The Internet Fax function supported by this machine is compliant with ITUT Rec. T.37. See p.203 “Compatible Machines”, Facsimile Reference <Advanced
Features> .
❒ You can receive e-mail messages with an attached TIFF-F image from computers.
49
RussianC3Fax-combine-EN_F_FM.book Page 50 Thursday, July 3, 2003 7:15 PM
Using Internet Fax Functions
Internet Fax Precautions
• Internet Fax communicates with a server over a LAN. It cannot communicate
directly with other parties.
• If a transmission is not successful, this machine usually receives an e-mail error notification. See p.195 “Server-Generated Error E-mail”, Facsimile Reference <Advanced Features> . However, e-mail error notifications may not be
transmitted for various reasons. We recommend you confirm receipt of important document by calling the other party.
• The level of security for Internet communications is low. We recommend you
use the telephone network for confidential communications.
• Voice communication is not supported over a LAN.
• Internet Fax delivery might be delayed due to network congestion. Use a
standard fax whenever communication is time sensitive.
• If you use this machine with a dial-up connection, the Auto E-mail Reception
function accesses the provider's e-mail server via telephone line and this may
incur call charges even if you do not receive e-mail. To reduce the frequency
of server access, specify a large E-mail Reception Interval. For the E-mail Reception Interval setting, see “Settings You Can Change with User Tools–File
Transfer”, Network Guide.
3
Functions Not Supported by E-mail Transmission
The following functions are supported with standard fax transmission, but not
with Internet Faxing.
• Immediate Transmission
• Confidential Transmission
• ID Transmission
• Polling Transmission
• Chain Dial
• Transmission by SUB Code
• On Hook Dial
• Manual Dial
• JBIG Transmission
• Batch Transmission
• ECM (Error Correction Mode)
• Memory File Transfer
50
RussianC3Fax-combine-EN_F_FM.book Page 51 Thursday, July 3, 2003 7:15 PM
Internet Fax Functions
Functions Not Supported by E-mail Reception
The following functions are supported with standard fax reception, but not with
Internet Faxing.
• Confidential Reception
• Memory Lock Reception
• Polling Reception
• SUB Code Reception
• Authorized Reception
• Reception File Print Quantity
3
51
RussianC3Fax-combine-EN_F_FM.book Page 52 Thursday, July 3, 2003 7:15 PM
Using Internet Fax Functions
Sending Internet Fax Documents
Preparation
You need to make System Settings
beforehand. See “Setting to the
Machine Up a Network”, Network
Guide.
This section describes how to scan a
document into this machine's memory and send it as e-mail. Specify the
destination's e-mail address instead
of fax number.
You can send Internet Fax documents
only by Memory Transmission. If you
specify Immediate Transmission in
Internet Fax, the mode is switched to
Memory Transmission when one email address or more is specified.
When sending documents, you can
set e-mail options using [Sub TX Mode].
You can set the following options:
3
❖ Enter Subject
Allows you to enter a subject for
the document you want to send.
Note
❒ For convenience, program frequently-used subject. “Urgent”,
and “High” are programmed as
default. See “Settings You Can
Change with User Tools–File
Transfer”, Network Guide.
❒ You can enter up to 64 characters in total.
❒ If you send e-mail without setting a subject/text in "E-mail
Options under “Sub TX Mode”,
the subject is automatically inserted. For more details about
how a subject is automatically
inserted, see p.57 “About the Email Subject”.
❒ You cannot send a subject only
as e-mail without an original.
52
❖ Enter Text
Allows you to enter the text to be
transmitted.
Note
❒ To enter text, program it beforehand. See “Settings You Can
Change with User Tools–File
Transfer”, Network Guide.
❒ You cannot send a text only
without an original.
❖ Reception Notice
You can confirm sent documents
were properly received using email or Journal.
❖ BCC Transmission
E-mails are sent to all specified
destinations as bcc.
Important
❒ If power outage lasts about an
hour, or the machine is disconnected from the power outlet for about
an hour, documents stored in the
fax machine's memory are deleted.
If any document is deleted, the
Power Failure Report is automatically printed out when the main
power switch is turned on. Use this
report to check which documents
were deleted. Simply turning off
the power by pressing the Operation switch does not delete stored
documents. See p.193 “Power Failure Report”, Facsimile Reference
<Advanced Features> .
❒ You may not be able to send large
files as e-mail, depending on email environment conditions.
❒ The level of security for Internet
communications is low. Use of the
telephone network is recommended
for confidential communications.
RussianC3Fax-combine-EN_F_FM.book Page 53 Thursday, July 3, 2003 7:15 PM
Sending Internet Fax Documents
Limitation
❒ When available memory is low,
you may not be able to send Internet Fax documents.
Note
❒ Because this machine sends documents as e-mail messages with an
attached TIFF-F image, viewer applications are required in order to
view documents when they are received on a computer.
❒ You can limit the size of transmitted e-mail messages in “E-mail Settings” of “Fax Features”. See p.148
“E-mail Settings”, Facsimile Reference <Advanced Features> .
❒ See p.62 “Received Images” for
how e-mail is actually received by
the computer when it is sent with
mail options selected.
❒ When you send an Internet Fax
document specifying a user code,
and the e-mail address is set as the
routing destination of the specified
user code, a Communication Result Report is sent after the transmission is completed. This makes
it possible to verify the result of a
transmission.
❒ You can specify fax destination
and Internet Fax destination simultaneously.
❒ You cannot send e-mails to destinations as cc.
A When
you set an e-mail option,
press [Sub TX Mode].
3
If you are not setting e-mail options, proceed to step E.
B Press [E-mail Options].
To enter the subject
A Press [Change] for Enter Subject.
There are two methods of entering a subject: Selecting from
programmed subjects, or entering characters directly. If you
are entering characters, proceed
to step C.
53
RussianC3Fax-combine-EN_F_FM.book Page 54 Thursday, July 3, 2003 7:15 PM
Using Internet Fax Functions
B Select the subject from the displayed list.
3
The selected subject appears in
the manual input column.
D After entering the subject,
press [OK].
Reference
“Entering Text”, General Settings Guide
Entered characters appear in the
manual input column.
Note
❒ You can enter extra characters after the selected subject.
If you do not need to enter
extra characters, proceed to
step E.
C Press [Manual Input].
54
Note
❒ You can add a programmed
subject after the entered subject. Select the subject from
the displayed subjects.
E Press [OK].
RussianC3Fax-combine-EN_F_FM.book Page 55 Thursday, July 3, 2003 7:15 PM
Sending Internet Fax Documents
To enter the text
To set BCC transmission
A Press [Change] for Enter Text.
A Select [Yes] or [No] for BCC TX.
3
B Select a text, and then press
[OK].
C Press [OK].
D Press [OK].
To set reception notice
A Select [ON] or [OFF] for Recept.
Notice.
E Place the original.
Reference
p.58 “Confirming Reception”
Note
❒ You can send the first few pages
from the exposure glass then
the remaining pages from the
ADF. After you remove the last
page from the exposure glass,
you have 60 seconds to insert
the remaining pages in the ADF.
55
RussianC3Fax-combine-EN_F_FM.book Page 56 Thursday, July 3, 2003 7:15 PM
Using Internet Fax Functions
❒ Note that you cannot place pages on the exposure glass after
you have started using the ADF.
❒ The original can be placed either in the ADF or on the exposure glass, until the {Start}
} key
is pressed.
G Specify the e-mail address.
Reference
p.15 “Placing Originals”
F Select
3
the scan settings you re-
quire.
Note
❒ If is not displayed in the destination display column, press
.
Reference
p.38 “Entering an E-mail Address”
p.39 “Using Destination Lists”
p.47 “Redial”, Facsimile Reference <Advanced Features>
Note
❒ In Internet Fax transmission, the
original is scanned using "Detail" resolution for transmission,
even if you select "Super Fine".
❒ When using the Internet Fax
function, documents transmitted are sent at A4 width. Documents larger than A4 are
reduced to A4 width.
Reference
p.32 “Resolution”
p.33 “Original Type”
p.34 “Image Density (Contrast)”
56
H To
send the same document to
multiple destinations, press [Add].
To send e-mail to one destination
only, proceed to step J.
Note
❒ It is not necessary to press [Add]
when adding destinations using
the destination list.
RussianC3Fax-combine-EN_F_FM.book Page 57 Thursday, July 3, 2003 7:15 PM
Sending Internet Fax Documents
I Specify the next destination.
-About the E-mail Subject
If no subject is specified for “Enter
Subject / Text” under “E-mail Options”, a subject is automatically inse rt e d . T he su bj e c t is d if fe re nt
according to the settings of Stamp
Sender Name.
Note
❒ Press
to switch the destination between fax number and email address.
❒ To specify more destinations,
repeat steps H and I.
J Press the {Start}} key.
This starts reading the document
into memory. The e-mail send operation starts after the read operation is complete. When scanning is
complete, the Communicating indicator lights and transmission
starts.
Note
❒ With a large volume of document, it may take some time before transmission starts. This is
due to the time this machine requires to convert the data in
memory.
❒ To cancel transmission of an Internet Fax, see p.59 “Canceling a
Transmission of an Internet
Fax”.
❖ When a name is set to Stamp Sender
Name:
• From "Stamp Sender Name" Fax
Message NO.xxxx.
3
❖ When Stamp Sender Name is set to
Do not Stamp:
• If Own Fax Number and Own
Name are programmed:
From "Own Fax Number"
("Own Name") (Fax Message
NO.xxxx)
• If only Own Fax Number is programmed:
From "Own Fax Number" (Fax
Message NO.xxxx)
• If only Own Name is programmed:
From "Own Name" (Fax Message NO.xxxx)
• If neither Own Fax Number nor
Own Name are programmed:
Fax Message NO.xxxx
Note
❒ "xxxx" is the document number
that appears in the Journal.
Reference
p.75 “Selecting transmission options for a single transmission”,
Facsimile Reference <Advanced Features>
57
RussianC3Fax-combine-EN_F_FM.book Page 58 Thursday, July 3, 2003 7:15 PM
Using Internet Fax Functions
- E-mail Text
When Internet Fax e-mail is sent to
computer, the following information
is always inserted in the e-mail text.
To check the host name and e-mail
add ress, see “Settings You Can
Change with User Tools”, Network
Guide.
This e-mail was sent from “Host
Name” (product name)
Queries to: “Administrator's e-mail
address”
3
Confirming Reception
When Reception Notice is set under
"E-mail Options", the receiver sends
back a reception notice message.
Once the reception notice message
has been received, "OK" appears in
the Result column of Journal, allowing the originator to verify that the
transmission has been received.
Limitation
❒ The Reception Notice feature is
only available if the receiver supports MDN (Message Disposition
Notification).
Note
❒ If your fax is not received normally, “Error” appears in the Result
column.
58
❒ Information regarding the last 200
messages is recorded, but only the
last 50 communications appear in
Journal. If you do not receive a reception notice message for one of
the last 50 communications from
the receiver's machine, you may
not be able to confirm that the email has been received by the Journal's Result column.
❒ If you specify mailing list addresses, do not set for Reception Notice.
Otherwise, you will receive multiple reception notice messages from
e-mail recipients, and the Result
column will be overwritten each
time a new notice message is received. However, if you receive a
reception notice message indicating an error, “Error” appears in the
Result column and will not be
overwritten, even if you subsequently receive a reception notice
message as "OK" following the error message.
❒ Reception notice results are only
shown in Journal. The Result column in all other files, lists, and
transmission reports show "- -".
❒ The Reception notice messages
themselves are not recorded in
Journal.
❒ The reception notice can be printed
out. This can be set with user parameters. See p.162 “User Parameters”, Facsimile Reference <Advanced
Features> (switch 21, bit 0).
❒ You cannot broadcast e-mails with
the Reception Notice feature.
RussianC3Fax-combine-EN_F_FM.book Page 59 Thursday, July 3, 2003 7:15 PM
Canceling a Transmission of an Internet Fax
Canceling a Transmission of an Internet
Fax
When fax and Internet Fax destinations are specified simultaneously,
you can cancel sending using the
same method. However, you cannot
cancel the transmission of an Internet
Fax document being sent.
Before the Original Is Scanned
While the Original Is Being
Scanned In
Use this procedure to cancel a transmission after pressing the {Start}
} key.
3
A Press the {Clear/Stop}} key.
Use this procedure to cancel a transmission before pressing the { Start}
}
key.
A Press the {Clear Modes}} key.
ZLBS050N
Note
❒ When documents are placed in
the ADF, you can cancel transmission simply by removing
them.
The machine stops scanning.
Note
❒ You can also cancel scanning by
pressing [Stop Scanning].
❒ Scanning may be completed
while you are performing the
cancel operation.
59
RussianC3Fax-combine-EN_F_FM.book Page 60 Thursday, July 3, 2003 7:15 PM
Using Internet Fax Functions
After the Original Has Been
Scanned In
C Press [Stop Transmission].
Note
❒ You can not cancel the transmission of an Internet Fax being sent.
A Press [Change/Stop TX File].
3
Note
❒ To cancel another file, repeat
steps B and C.
❒ To save the scanned file, press
[Save].
D Press [Exit].
The list of stored files being transmitted or waiting for transmission
appears.
B Select the file you want to cancel.
The standby display appears.
Note
❒ If the desired file is not shown,
press [U
U Prev.] or [T
T Next] to find
it.
60
RussianC3Fax-combine-EN_F_FM.book Page 61 Thursday, July 3, 2003 7:15 PM
Receiving Internet Fax Documents
Receiving Internet Fax Documents
You can receive e-mail documents by
Internet Fax.
There are two methods of receiving email: Auto E-mail Reception and
Manual E-mail Reception.
Limitation
❒ E-mail with attachments other
than TIFF-F format files cannot be
received. Senders receive an Error
Mail Notification if their e-mail
contains attachments. You can select whether or not the machine
sends this message with user parameters. See p.162 “User Parameters”, Facsimile Reference <Advanced
Features> (switch 21, bit 7). However, TIFF-F documents created by
the Saving function of DesktopBinder V2 Professional Lite can be
received.
Note
❒ When Reception Protocol is set to
POP3 or IMAP4, you can set the
machine to retain incoming e-mail
or delete it from the server in “System Settings”. See “Settings You
Can Change with User Tools–File
Transfer”, Network Guide.
❒ With user parameters, you can
have the machine return the acknowledgment of e-mail to the
sender. See p.162 “User Parameters”, Facsimile Reference <Advanced
Features> (switch 21, bit 1).
Auto E-mail Reception
When this function is turned on, this
machine periodically checks the email server for incoming e-mail and
downloads it as necessary.
E-mail auto-reception should be set in
“System Settings”. When you select
auto-reception, set the reception interval in minutes.
See “Settings You Can Change with User
Tools–File Transfer””, Network Guide.
3
Note
❒ If memory runs out, e-mail will not
be received at the specified intervals.
Reception will resume when sufficient memory becomes available.
Manual E-mail Reception
The following operation allows you
to receive e-mail at all times.
Preparation
Program the Manual E-mail RX
function to the Quick Operation
key first. See p.144 “General Settings/Adjustment”, Facsimile Reference <Advanced Features> .
A Press [Manual E-mail RX].
Access the server to check for email. Receive any saved e-mails.
61
RussianC3Fax-combine-EN_F_FM.book Page 62 Thursday, July 3, 2003 7:15 PM
Using Internet Fax Functions
B Check
the message, and then
press [Exit].
3
The standby display appears.
Received Images
Here is an example of an Internet Fax message sent from this machine and received on a computer using Outlook e-mail software.
The received image varies according to e-mail software.
ZLJX010E
1. Mail transmitted without specifying a subject in “E-mail Options”.
2. Mail transmitted with a subject
specified in “E-mail Options”.
62
3. From
The name (e-mail address) of the sender
Note
❒ The display format of the sender name
differs according to that of Stamp
Sender Name setting and other functions.
RussianC3Fax-combine-EN_F_FM.book Page 63 Thursday, July 3, 2003 7:15 PM
Receiving Internet Fax Documents
4. Date
The date and time of e-mail transmission
5. To
The e-mail address of the recipient
6. Subject
Shows the subject specified in "E-mail
Options" at the time of transmission. If no
subject is specified, one is automatically
assigned in the format shown in 1 above.
From "Own Fax Number" ("Own Name")
(Fax Message NO. document number)
3
Note
❒ The format varies according to Stamp
Sender Name and other settings. See
p.57 “About the E-mail Subject”.
7. The message is inserted in all emails.
“xxxx” is the product name.
8. Attachment File
Any message included by the sender is
displayed as an attached document.
63
RussianC3Fax-combine-EN_F_FM.book Page 64 Thursday, July 3, 2003 7:15 PM
Using Internet Fax Functions
3
64
RussianC3Fax-combine-EN_F_FM.book Page 65 Thursday, July 3, 2003 7:15 PM
4. Programming
Initial Settings and Adjustments
You can send information to the other
party when transmitting or receiving
a fax message. This information is
shown on the display of the other machine and printed as a report. The following information can be sent.
Important
❒ You can confirm programmed settings from the user parameter list.
We recommend that you print and
keep the user parameter list when
you program or change settings.
See p.167 “Printing the User Parameter list”, Facsimile Reference
<Advanced Features> .
❖ Fax Header
The Fax Header is printed as the
header of every fax you send. You
should include your name in the
Fax Header.
You can program Fax Header1 or
Fax Header2. When you send originals using Quick Dial, you can select which Fax Header will be
printed on the message received
by the other party.
Important
❒ In the USA, the Fax Header
must contain the telephone
number of the line your machine is connected to. It will be
printed on the header of every
page you send. Required in the
USA.
Note
❒ You can program up to 32 characters in the Fax Header.
❒ You can use characters, symbols, numbers, and spaces.
❒ You can set whether or not to
print a Fax Header using [Fax
Header Print] under Options.
Seep.73 “Fax Header Print”,
Facsimile Reference <Advanced
Features>
❒ In program No. 1 you can program a preference about whether or not the Fax Header is
always printed. You will then
switch the setting using the Fax
Header Print function only
w hen nec essary . See p.128
“Registering a priority function
using a program”, Facsimile Reference <Advanced Features>
❒ In the USA, law requires that
your fax number be included in
the Fax Header. Program the fax
number and switch on Fax
Header Print.
Reference
p.73 “Fax Header Print”, Facsimile Reference <Advanced Features>
p.128 “Registering a priority
function using a program”, Facsimile Reference <Advanced Features>
65
RussianC3Fax-combine-EN_F_FM.book Page 66 Thursday, July 3, 2003 7:15 PM
Programming
❖ Own Name
The Own Name is sent to the other
party when you send or receive a
fax using a G3 line. This name
should include your name. The
Own Name is shown on the display of the other machine and
printed in a report.
Programming
A Press the {User Tools/Counter}} key.
Limitation
❒ Own Name works only when
the other machine is of the same
manufacturer, and has the Own
Name function.
4
Note
❒ You can use characters, symbols, numbers, and spaces.
❒ You can program up to 20 characters as an Own Name.
❖ Own Fax Number (facsimile number
of sender)
The sender's Own Fax Number is
sent to the other party when sending a fax using a G3 line. The received facsimile number is shown
on the display of the other machine
and printed in a report. This function is available regardless of the
manufacturer of the other party's
machine.
Note
❒ You can program up to 20 characters in Own Fax Number.
Note
❒ When the Key Operator Code is
programmed and turned on, user
have to enter the programmed Key
Operator Code (maximum 8 digit)
to operate Key Operator Tools.
❒ This prevents unauthorized people from changing program.
66
B Press [Facsimile Features].
Note
❒ If the Key Operator Code is programmed and turned on, enter
the programmed Key Operator
Code and press the [OK] key.
C
Press [Program Fax Information].
RussianC3Fax-combine-EN_F_FM.book Page 67 Thursday, July 3, 2003 7:15 PM
Initial Settings and Adjustments
D Program the name and facsimile
number.
Programming an Own Name
A Press [Own Name].
Programming a Fax Header
A Press [First Name] or [Second
Name].
B Press [Own Name].
4
B Enter a fax header including
your Own Name and Fax Number, and then press [OK].
C Enter an own name, and then
press [OK].
Note
❒ You need to add your fax
number to the programmed
Fax Header in this step so
that your Fax Header contains both your Own Name
and your fax number.
Reference
“Entering Text”, General Settings Guide
Reference
“Entering Text”, General Settings Guide
67
RussianC3Fax-combine-EN_F_FM.book Page 68 Thursday, July 3, 2003 7:15 PM
Programming
Programming an Own Fax
Number
A Press [Own Fax Number].
E Press [Exit].
F Press the {User Tools/Counter}} key.
The standby display appears.
Editing
Note
❒ The following procedure explains
how to edit Own Name, as an example of editing.
B Select line type to program.
4
Note
❒ The display differs depending on the optional units installed on your machine.
C Enter your own facsimile's
number using the number
keys, and then press [OK].
A Press the {User Tools/Counter}} key.
B Press [Facsimile Features].
C Press [Program Fax Information].
Note
❒ To enter a + sign or a space,
press [+] or [Space].
❒ If you make a mistake, press
[Clear] or the { Clear / Stop}
}
key, and then enter the facsimile number again.
68
RussianC3Fax-combine-EN_F_FM.book Page 69 Thursday, July 3, 2003 7:15 PM
Initial Settings and Adjustments
D Press [Fax Header], [Own Name], or
[Own Fax Number] for editing.
E Press the item you want to edit.
G Press [OK].
H Press [Exit].
4
F Press
[Backspace] or [Delete All],
and then re-enter the name or
number.
I Press the {User Tools/Counter}} key.
The standby display appears.
Deleting
Note
❒ The following procedure explains
how to delete Own Name, as an example of deleting.
A Press the {User Tools/Counter}} key.
Note
❒ Press [Clear] or the {Clear/Stop}
}
key if you want to edit Own Fax
Number.
69
RussianC3Fax-combine-EN_F_FM.book Page 70 Thursday, July 3, 2003 7:15 PM
Programming
B Press [Facsimile Features].
C Press [Program Fax Information].
4
F Press
[Backspace] or [Delete All],
and then press [OK].
Note
❒ Press [Clear] or the {Clear/Stop}
}
key if you want to edit Own Fax
Number.
G Press [Exit].
D Press [Fax Header], [Own Name], or
[Own Fax Number] to delete.
H Press the {User Tools/Counter}} key.
The standby display appears.
E Press the item you want to delete.
70
RussianC3Fax-combine-EN_F_FM.book Page 71 Thursday, July 3, 2003 7:15 PM
Programming Fax Number and E-mail Addresses
Programming Fax Number and E-mail
Addresses
You can program fax destinations using Address Book Management in the Key
Operator Tools menu under System Settings.
You can also register the programmed fax numbers and e-mail addresses in a
Group.
Note
❒ When you press the {Facsimile}
} key after changing the contents of the Address Book, such a message appears that indicates that the destination list has
been updated. Press [Exit]. The standby display appears.
4
Reference
“Key Operator Tools”, General Settings Guide
“E-mail Destination”, General Settings Guide
“Registering Destinations to a Group”, General Settings Guide
71
RussianC3Fax-combine-EN_F_FM.book Page 72 Thursday, July 3, 2003 7:15 PM
Programming
4
72
RussianC3Fax-combine-EN_F_FM.book Page 73 Thursday, July 3, 2003 7:15 PM
5. Troubleshooting
Adjusting the Volume
You can change the volume of the following sounds that the machine
makes.
B Press [Facsimile Features].
❖ On Hook Mode
Heard when the {On Hook Dial}
} key
is pressed.
❖ At Transmission
Heard when the machine sends a
message.
❖ At Reception
Heard when the machine receives
a message.
C Press [Adjust Sound Volume].
❖ At Dialing
Heard after pressing the { Start}
}
key, until the line connects to the
destination.
❖ At Printing
Heard when a received message is
printed. See p.97 “Print Completion Beep”, Facsimile Reference <Advanced Features> .
D Press [Lower] or [Louder] for each
item, and then press [OK].
Note
❒ You can adjust the On Hook volume
when you press the {On Hook Dial}} key.
See p.56 “On Hook Dial”, Facsimile
Reference <Advanced Features> .
A Press the {User Tools/Counter}} key.
Note
❒ You can hear the actual volume
by pressing [Check].
❒ If you press [Cancel], the volume
setting is canceled. The display
returns to that of step C.
E Press the {User Tools/Counter}} key.
The standby display appears.
73
RussianC3Fax-combine-EN_F_FM.book Page 74 Thursday, July 3, 2003 7:15 PM
Troubleshooting
When the {Facsimile}
} Key Is Lit in Red
If this key is lit, press the key to enter the facsimile mode. Then, refer to the table
below and take the appropriate action.
ZLBS010N
5
Problem
Solutions
The paper output tray is full.
Remove the paper from the tray.
A facsimile error has occurred.
The facsimile has a problem. Contact your service representative. See p.76 “Error Messages
and Their Meanings”. The copier will still
function normally.
Out of paper
Add more paper.
"Loading Paper", General Settings Guide
A network error has occurred.
• Check the displayed message. See p.76 “Error Messages and Their Meanings”.
• Check the machine is correctly connected
to the network, and the machine is correctly set. See Network Guide.
• Consult your network administrator.
• When the key is still lit in red even if you
take the measures above, please contact
your service representative.
74
RussianC3Fax-combine-EN_F_FM.book Page 75 Thursday, July 3, 2003 7:15 PM
When Toner Runs Out
When Toner Runs Out
When the machine has run out of toner, the symbol appears on the display.
Note that even if there is no toner left,
you can still send fax messages.
Important
❒ The number of communications,
that have been executed after the
toner has run out and that automatically-output Journal has not
list, exceeds 200 (1000 with the opt ion al e xp ans io n m em o ry installed), communication will not
be possible.
B Press
[Exit], and then perform
transmission operation.
The error message disappears.
Reference
p.22 “Memory Transmission”
p.29 “Immediate Transmission”
5
Limitation
❒ The Memory Storage Report, Polling Reserve Report, and Confidential File Report are not printed.
A Make sure that the machine is in
facsimile mode.
ZLBS001N
Note
❒ If the standby screen is not displayed, press the { Facsimile}
}
key.
75
RussianC3Fax-combine-EN_F_FM.book Page 76 Thursday, July 3, 2003 7:15 PM
Troubleshooting
Error Messages and Their Meanings
If there is an error, one of the following messages may appear on the display. If
other message appears, follow the message.
Message
Causes and solutions
Put original back, check it and
press [Start].
Original jammed during Memory Transmission. Place originals that have not been
scanned again.
Error occurred, and transmission was canceled.
A document jam occurred during Immediate
Transmission. Press [OK], and then resend the
pages that have not been sent.
An error occurred during Immediate Transmission. Press [OK], and then resend the original.
Note
5
❒ There may be a problem with the machine
or the telephone line (for example noise or
cross talk). If the error reoccurs frequently,
contact your service representative.
Cannot detect original size.
Place original again, then
press [Start].
The machine failed to detect the size of the
original. Place originals again, and then press
} key.
the {Start}
L Call Service
There is a problem with the fax. Record the
code number shown in the display and contact
your service representative. The copy function
will still work normally.
Functional problems with facsimile. Please call service.
Memory is full. Cannot scan
more. Transmitting only scanned
pages.
If you press [OK], the machine returns to standby mode and starts transmitting the pages that
have been stored.
Following output tray is full.
Remove paper.
The paper output tray is full. Remove paper
from the tray indicated in the display.
Cannot scan to send fax message
as scanner is in use for other
function.
The Copy or Document Server function is in
use. To cancel the job in process, do the following, and then try faxing again.
} or {DocPress [Exit], and then press the {Copy}
ument Server}
} key. Next press the {Clear/Stop}
}
key. When the message “[Stop] key was
pressed. Stop copying?” or
“[Stop] key was pressed. Stop
storing?” appears, press [Stop].
76
RussianC3Fax-combine-EN_F_FM.book Page 77 Thursday, July 3, 2003 7:15 PM
Error Messages and Their Meanings
Message
Causes and solutions
Updating the destination list.
Wait with the main power switch on. The machine will enter standby mode after it exits
from RDS mode.
Please wait. Selected destinations or function settings have
been cleared. Please reselect
after the update finishes.
Check whether there are any
network problems.
[14-01]
Cannot find the DNS server or SMTP server.
• Check the DNS server's IP address is correctly programmed using the Web browser. See the Web browser's Help.
• Check the DNS server is correctly programmed using the Web browser. See the
Web browser's Help.
• Check the host name or IP address of the
SMTP server is correctly programmed using the Web browser. See the Web browser's Help.
5
• Check the SMTP server is correctly programmed using the Web browser. See the
Web browser's Help.
• Check the LAN cable is correctly connected
to the fax machine. See "Connecting the
Network Cable to the Network", Network
Guide.
• Consult your network administrator.
Check whether there are any
network problems.
[14-09]
E-mail transmission was refused by SMTP authentication or POP before SMTP authentication.
• Check the user name and password for
SMTP authentication or POP before SMTP
authentication are correctly programmed
from File Transfer under System Settings.
See “Settings You Can Change with User
Tools – File Transfer”, Network Guide.
• Check the user name and password of the
e-mail account are correctly programmed
from File Transfer under System Settings.
See “Settings You Can Change with User
Tools – File Transfer”, Network Guide.
• Consult your network administrator.
Check whether there are any
network problems.
[14-33]
No machine's e-mail address is programmed.
• Check the fax machine's e-mail address is
correctly programmed from File Transfer
under System Settings. See “Settings You
Can Change with User Tools – File Transfer”, Network Guide.
• Consult your network administrator.
77
RussianC3Fax-combine-EN_F_FM.book Page 78 Thursday, July 3, 2003 7:15 PM
Troubleshooting
Message
Causes and solutions
Check whether there are any
network problems.
[15-01]
No POP3/IMAP4 server's address is programmed.
• Check the host name or IP address of the
POP3/IMAP4 server is correctly programmed using the Web browser. See the
Web browser's Help.
• Consult your network administrator.
Check whether there are any
network problems.
[15-02]
Cannot log on to the POP3/IMAP4 server.
• Check the user name and password of the
e-mail account are correctly programmed
from File Transfer under System Settings.
See “Settings You Can Change with User
Tools – File Transfer”, Network Guide.
• Consult your network administrator.
5
Check whether there are any
network problems.
[15-03]
No machine's e-mail address is programmed.
Check whether there are any
network problems.
[15-11]
Cannot find the DNS server or POP3/IMAP4
server.
• Check the fax machine's e-mail address is
correctly programmed from File Transfer
under System Settings. See “Settings You
Can Change with User Tools – File Transfer”, Network Guide.
• Check the DNS server's IP address is correctly programmed using the Web browser. See the Web browser's Help.
• Check the DNS server is correctly programmed using the Web browser. See the
Web browser's Help.
• Check the host name or IP address of the
POP3/IMAP4 server is correctly programmed using the Web browser. See the
Web browser's Help.
• Check the POP3/IMAP4 server is correctly
programmed using the Web browser. See
the Web browser's Help.
• Consult your network administrator.
78
RussianC3Fax-combine-EN_F_FM.book Page 79 Thursday, July 3, 2003 7:15 PM
Error Messages and Their Meanings
Message
Causes and solutions
Check whether there are any
network problems.
[15-12]
Cannot log on to the POP3/IMAP4 server.
• Check the user name and password of the
e-mail account are correctly programmed
from File Transfer under System Settings.
See “Settings You Can Change with User
Tools – File Transfer”, Network Guide.
• Check the user name and password for
POP before SMTP authentication are correctly programmed from File Transfer under System Settings. See “Settings You Can
Change with User Tools – File Transfer”,
Network Guide.
• Consult your network administrator.
- Out of paper display message
5
If the paper tray runs out of paper, “No paper. Load it, then press [Exit].” appears on the display, asking you to add more paper.
Note
❒ If there is paper left in the other paper trays, you can receive messages as usual, even if the message appears on the display.
❒ You can turn this function on or off with the User Parameters. See p.162 “User
Parameters”, Facsimile Reference <Advanced Features> (switch 05, bit 7).
- Network error display message
If the "Check whether there are any network problems" message appears,
the machine is not correctly connected to the network or the settings of the machine is not correct. If you do not need to connect the machine to the network,
you can select so that the message disappear and the key goes out with User Parameters. See p.162 “User Parameters”, Facsimile Reference <Advanced Features>
(switch 21, bit 6).
Note
❒ When you restart connecting the machine to the network, make sure to set
"Display" with User Parameters. Otherwise, you cannot check the status of
the network connection.
79
RussianC3Fax-combine-EN_F_FM.book Page 80 Thursday, July 3, 2003 7:15 PM
Troubleshooting
Solving Problems
This table lists some common problems and their solutions.
Problem
Causes and solutions
Reference
Image background appears
dirty when received at the
other end. Images from the
back page appears.
Adjust scan density.
p.34 “Image Density (Contrast)”
Printed or sent image contains
spots.
The ADF or exposure glass is
dirty. Clean them.
“Maintaining Your Machine”,
General Settings Guide
Make sure that ink or correction fluid is dry before placing
originals.
Received image is too light.
5
Request the sender to increase
image density.
---
When using moist, rough, or
processed paper, the printed
image may be partly invisible.
Only use recommended paper.
“Copy Paper”, General Settings Guide
When D appears on the display, toner is beginning to run
out. Replace the toner cartridge soon.
“DAdding Toner”, General
Settings Guide
The machine failed to print re- If this happened when the re- p.86 “Substitute Reception”,
Facsimile Reference <Advanced
ceived fax messages.
ceive file indicator was lit, a
problem such as run out of pa- Features>
per or toner might disable
printing.
Message appears blank at the
other end.
[Store] has been selected for
[Reception File Setting]. Print
the fax messages using a Web
browser or the print Stored
RX File function.
p.122 “Printing fax information using a Web browser”,
Facsimile Reference <Advanced
Features> and p.34 “Printing
Received and Stored Documents”, Facsimile Reference
<Advanced Features>
When B is lit, load paper into
the tray.
"Loading Paper", General Settings Guide
The original was placed upside down. Place it properly.
p.15 “Placing Originals”
Both transmission and receiv- Make sure that the modular
ing are impossible.
cord is correctly connected.
p.198 “Connecting the Machine to a Telephone Line and
Telephone”, Facsimile Reference <Advanced Features>
The terminal adaptor setting
--is incorrect. Check the setting.
80
RussianC3Fax-combine-EN_F_FM.book Page 81 Thursday, July 3, 2003 7:15 PM
Solving Problems
Problem
Causes and solutions
Reference
Transmission is possible,
though receiving is impossible.
The optional terminal adaptor
setting is incorrect. Check the
setting.
---
Receiving is possible, though
transmission is impossible.
The optional terminal adaptor
setting is incorrect. Check the
setting.
---
When using On Hook Dial or
Manual Dial, “Receiving”
appears and transmission is
not allowed.
If the machine fails to detect
the size of the original when
the {Start}
} key is pressed, it
performs a receiving operation. Press [Scan Area], select
the scan area, and then resend
the document.
p.18 “Setting a Scan Area”
All fax messages stored in
memory have been lost. Those
messages include ones stored
through Memory Transmission/Reception, Confidential
Reception, Substitute Reception, or Auto Document.
When about one hour passes p.193 “Power Failure Report”,
after power to the machine is Facsimile Reference <Advanced
turned off, all fax messages
Features>
stored in memory are lost. If
any messages have been lost
for this reason, a Power Failure Report is automatically
printed when the machine is
turned on. If fax messages
stored for Memory Transmission have been lost, check the
destinations and resend the
messages. If fax messages received through Memory, Confidential or Substitute
Reception have been lost, ask
the senders to resend the messages. If Auto Documents
have been lost, reprogram
them.
Transmission failed due to
“Exceeded max. E-mail size”
error.
If the e-mail size specified on p.148 “E-mail Settings”, Facthe machine exceeds, an Inter- simile Reference <Advanced Feanet Fax document cannot be
tures>
sent. Set Max. E-mail Size to
OFF, or specify the maximum
e-mail size to a larger volume.
Then, resend the document.
When a correct password is
entered, you cannot print documents that appear in the confidential box or bulletin board
box, or transmit / print out
stored documents.
Documents are locked by a se- “Extended Security Funccurity function when incorrect tion”, General Settings Guide
passwords are entered a certain number of times. Contact
the administrator.
5
81
RussianC3Fax-combine-EN_F_FM.book Page 82 Thursday, July 3, 2003 7:15 PM
Troubleshooting
When Things Don't Go as Expected
I Want...
Operation
p.26 “Canceling a Memory
Transmission”
If the original is being sent or
if it is in standby, press
[Change/Stop TX File] or the
{Clear/Stop}
} key.
p.26 “Canceling a Memory
Transmission”
to cancel an Immediate Trans- Press [Stop Transmission] or the
mission.
{Clear/Stop}
} key.
5
82
Reference
to cancel a Memory Transmis- If the original is being
sion.
scanned, press [Stop Scanning]
or the {Clear/Stop}
} key.
p.19 “Canceling a Transmission”, Facsimile Reference <Advanced Features>
p.31 “Canceling an Immediate
Transmission”
RussianC3Fax-combine-EN_F_FM.book Page 83 Thursday, July 3, 2003 7:15 PM
INDEX
A
F
Adjusting The Volume, 73
At Dialing, 73
At Printing, 73
At Reception, 73
At Transmission, 73
On Hook Mode, 73
Authorized Reception, 51
Auto E-mail Reception, 61
Auto Reception, 47
Facsimile key, 6, 74
Fax Header, 65
Deleting, 69
Editing, 68
Programming, 66
Faxing, 13
Functions Not Supported by e-mail
Reception, 51
Functions Not Supported by e-mail
Transmission, 50
B
Batch Transmission, 50
BCC transmission, 52
Broadcasting, 22
Broadcasting Sequence, 25
C
Chain Dial, 50
Check Modes key, 5
Clear Modes key, 5
Clear/Stop key, 7
Communicating indicator, 6
Confidential file indicator, 6
Confidential Reception, 51
Confidential Transmission, 50
Control Panel, 5
CSI->Own Fax Number, 66
D
Destination list, 37, 39
Detail, 32
Display, 7
Display Panel, 5
E
ECM, 50
Entering a fax number, 37
Entering an e-mail address, 38
Enter Text, in e-mail, 52
Error Messages, 76
G
Getting Started, 5
Groups
Specifying a Destination, 37
I
ID Transmission, 50
Image Density (Contrast), 32, 34
Immediate Transmission, 13, 14, 29, 50
Canceling, 31
Internet Fax, 49
Internet Fax Precautions, 50
Internet Fax, Sending, 52
J
JBIG Transmission, 50
K
# key (Enter key), 7
M
Main Power indicator, 5
Manual Dial, 50
Manual Reception, 47
Memory File Transfer, 50
Memory Lock Reception, 51
Memory Transmission, 13, 14, 22
Canceling, 26
N
Number keys, 7
83
RussianC3Fax-combine-EN_F_FM.book Page 84 Thursday, July 3, 2003 7:15 PM
O
On Hook Dial, 50
On Hook Dial key, 6
On indicator, 6
Operation switch, 6
Original Type, 32, 33
Own Fax Number, 66
Deleting, 69
Editing, 68
Programming, 66
Own Name, 66
Deleting, 69
Editing, 68
Programming, 66
P
Pause, 37
Pause/Redial key, 6
Photo, 33
Placing Originals, 15
Polling Reception, 51
Polling Transmission, 50
Program key, 5
Programming, 65
S
Scan Settings, 32
Stamp Sender Name, 57
Standard, 32
Start key, 7
Start Manual RX key, 6
SUB Code Reception, 51
Subject, in e-mail, 52, 57
Super Fine, 32
T
Text, 33
Text / Photo, 33
Tone, 38
Tone key, 6
Toner, 75
Transmission by SUB Code, 50
Transmission of an Internet Fax
Canceling, 59
TTI->Fax Header, 65
U
User Tools/Counter key, 5
Q
Quick Dial
Specifying a Destination, 37
R
Received Images, 62
Receive File indicator, 6
Receiving Internet Fax, 61
Reception, 47
Auto Reception, 47
Manual Reception, 47
Reception Confirmation, 58
Reception File Print Quantity, 51
Reception Notice, 52, 58
Resolution, 32
RTI->Own Name, 66
84
EN
USA
B576-8607
Paper type: OK Prince Eco G100(55kg), Paper Thickness=80 µm // Pages in book=88 // Print scale=81%
Gap (when printed at 81% scale) = Pages in book × Paper thickness / 2 = 3.520000 mm
Introduction
USA
This manual describes detailed instructions on the operation and notes about the use of this machine.
To get maximum versatility from this machine all operators are requested to read this manual carefully
and follow the instructions. Please keep this manual in a handy place near the machine.
❖ FCC Requirements
Notes
Some illustrations in this manual might be slightly different from the machine.
Certain options might not be available in some countries. For details, please contact your local dealer.
Two kinds of size notation are employed in this manual. With this machine refer to the inch version.
Important
Contents of this manual are subject to change without prior notice. In no event will the company be liable for direct, indirect, special, incidental, or consequential damages as a result of handling or operating the machine.
Trademarks
Microsoft® and Outlook® are either registered trademarks or trademarks of Microsoft Corporation in the
United States and/or other countries.
Adobe® and Acrobat® are registered trademarks of Adobe Systems Incorporated.
Other product names used herein are for identification purposes only and might be trademarks of their
respective companies. We disclaim any and all rights in those marks.
Instructions for the optional extra G3 interface unit (G3 Interface Unit Type 2027) are included
in the Basic Features and Advanced Features manuals.
1. This equipment complies with Part 68 of the FCC rules. On the cover of this equipment is a label
that contains, among other information, the FCC registration number and ringer equivalence
number (REN) for this equipment. If requested, this information must be provided to the telephone company.
2. This equipment uses the RJ11C USOC jack.
3. A plug and jack used to connect this equipment to the premises wiring and telephone network
must comply with the applicable FCC Part 68 rules and requirements adopted by the ACTA. A
compliant telephone cord and modular plug is provided with this product. It is designed to be connected to a compatible modular jack that is also compliant. See installation instructions for detail.
4. The REN is used to determine the number of devices that may be connected to a telephone line.
Excessive RENs on a telephone line may result in the devices not ringing in response to an incoming call. In most but not all areas, the sum of RENs should not exceed five (5.0). To be certain of the number of devices that may be connected to a line, as determined by the total RENs,
contact the local telephone company.
5. If this equipment causes harm to the telephone network, the telephone company will notify you
in advance that temporary discontinuance of service may be required. But if advance notice is
not practical, the telephone company will notify the customer as soon as possible. Also, you will
be advised of your right to file a complaint with the FCC if you believe it is necessary.
6. The telephone company may make changes in its facilities, equipment, operations or procedures that could affect the operation of the equipment. If this happens the telephone company
will provide advance notice in order for you to make necessary modifications to maintain uninterrupted service.
7. If trouble is experienced with this equipment, for repair or warranty information, please contact
RICOH CORP. CUSTOMER SUPPORT DEPT. at 1-800-FASTFIX. If the equipment is causing
harm to the telephone network, the telephone company may request that you disconnect the
equipment until the problem is resolved.
8. In the event of operation problems (document jam, copy jam, communication error indication),
refer to the solving problems section in this manual.
9. Connection to party line service is subject to state tariffs. Contact the state public utility commission, public service commission or corporation commission for information.
❖ WHEN PROGRAMMING EMERGENCY NUMBERS AND/OR MAKING TEST CALLS TO
EMERGENCY NUMBERS:
1. Remain on the line and briefly explain to the dispatcher the reason for the call before hanging up.
2. Perform such activities in the off-peak hours, such as early morning hours or late evenings.
CANADA
The Industry Canada label identifies certified equipment. This certification means that the equipment
meets telecommunications network protective, operational, and safety requirements as prescribed in
the appropriate Terminal Equipment Technical Requirements document(s). The department does not
guarantee the equipment will operate to the user's satisfaction.
Before installing this equipment, users should ensure that it is permissible to be connected to the facilities of the local telecommunications company. The equipment must also be installed using an acceptable method of connection. The customer should be aware that compliance with the above conditions
may not prevent degradation of service in some situations.
Repairs to certified equipment should be coordinated by a representative designated by the supplier.
Any repairs or alterations made by the user to this equipment, or equipment malfunctions, may give the
telecommunications company cause to request the user to disconnect the equipment.
User should ensure for their own protection that the electrical ground connections of the power utility,
telephone lines, and internal metallic water pipe system, if present, are connected together. This precaution may be particularly important in rural areas.
Caution: Users should not attempt to make such connections themselves, but should contact the appropriate electric inspection authority, or electrician, as appropriate.
NOTICE: The Ringer Equivalence Number is an indication of the maximum number of devices allowed
to be connected to a telephone interface. The termination on an interface may consist of any combination of devices subject only to the requirement that the sum of the RENs of all the devices does not
exceed five.
Copyright © 2003
Paper type: OK Prince Eco G100(55kg), Paper Thickness=80 µm // Pages in book=88 // Print scale=81%
Gap (when printed at 81% scale) = Pages in book × Paper thickness / 2 = 3.520000 mm
FAX Option Type 2027
FAX Option Type 2027 Operating Instructions Facsimile Reference <Basic Features>
EN USA B576-8607
FAX Option Type 2027 Operating Instructions Facsimile Reference <Basic Features>
Printed in Japan
Operating Instructions
Facsimile Reference
<Basic Features>
1
Getting Started
2
Faxing
3
Using Internet Fax Functions
4
Programming
5
Troubleshooting
For safe and correct use of this machine, please be sure to read the Safety Information in the
General Settings Guide before you use it.