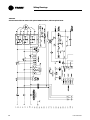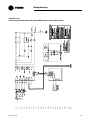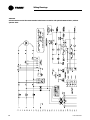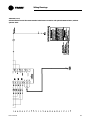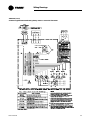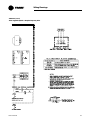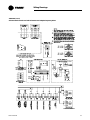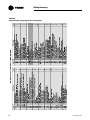
1
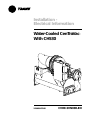
Installation Electrical Information
Water-Cooled CenTraVac™
With CH530
X39640647040
CVHE-SVN03D-EN
Warnings and
Cautions
Notice that warnings and cautions appear at appropriate intervals throughout
this manual. Warnings are provided to alert manufactures, designers,
installers, servicers, and installing contractors to potential hazards that could
result in personal injury or death, while cautions are designed to alert
personnel to conditions that could result in equipment damage.
Your personal safety and the proper operation of this machine depend upon
the strict observance of these precautions.
NOTICE: Warnings and Cautions appear at appropriate sections
throughout this literature. Read these carefully.
WARNING: Indicates a potentially hazardous situation which, if not
avoided, could result in death or serious injury.
CAUTION: Indicates a potentially hazardous situation which, if not
avoided, may result in minor or moderate injury. It may also be used to
alert against unsafe practices.
CAUTION: Indicates a situation that may result in equipment or property-damage only accidents.
© 2005 American Standard All rights reserved
CVHE-SVN03D-EN
Contents
Warnings and Cautions ....................................................... 2
General Information............................................................. 4
Trane Supplied Remote Starter........................................... 5
Customer Supplied Remote Starter ................................... 6
Power Supply ....................................................................... 8
PFCC ...................................................................................... 9
Unit Mounted Starter ........................................................ 12
Remote Starter ................................................................... 13
Motor Lugs ......................................................................... 16
Field Control Panel Signal Wiring ..................................... 17
Wiring Drawings................................................................. 23
CVHE-SVN03D-EN
3
General
Information
General
Requirements
Note: Unit-mounted starters are
available as an option on most
CVHE, CVHF, and CVHG units with
wye delta, and solid-state starters,
with nominal voltages of up to 600
volts and unit mounted medium
voltage across-the-line starters.
While this option eliminates most
field-installed wiring requirements,
the electrical contractor must still
complete the electrical connection
for: (1) Power supply wiring to the
starter, (2) Other unit control options
present, and (3) Any field-supplied
control devices.
WARNING!
Hazardous Voltage w/
Capacitors!
Disconnect all electric power,
including remote disconnects before
servicing. Follow proper lockout/
tagout procedures to ensure the
power cannot be inadvertently
energized. For variable frequency
drives or other energy storing
components provided by Trane or
others, refer to the appropriate
manufacturer’s literature for
allowable waiting periods for
discharge of capacitors. Verify with
an appropriate voltmeter that all
capacitors have discharged. Failure
to disconnect power and discharge
capacitors before servicing could
result in death or serious injury.
WARNING
Rotating Parts!
During installation, testing,
servicing and troubleshooting of
this product it may be necessary to
measure the speed of rotating
components. Have a qualified or
licensed service individual who has
been properly trained in handling
exposed rotating components
CVHE-SVN03D-EN
perform these tasks. Failure to
follow all safety precautions when
exposed to rotating components
could result in death or serious
injury.
As you review this manual, along
with the wiring instructions
presented in this section, keep in
mind that:
Typical field connection
requirements for remote-mounted
starters are shown at the end of the
manual, and summarized in Table 1.
All field-installed wiring must
conform to National Electric Code
(NEC) guidelines, as well as to any
applicable state and local codes. Be
sure to satisfy proper equipment
grounding requirements per NEC.
All field-installed wiring must be
checked for proper terminations, and
for possible shorts or grounds.
Note: The typical customer
connection diagrams shown in this
manual are representative of
standard CVHE, CVHF and CVHG
units, and are provided only for
general reference. Always refer to
the actual wiring diagrams that
shipped with the chiller for specific
as built electrical schematic and
connection information.
Do not modify or cut enclosure to
provide electrical access. Removable
panels have been provided for this
purpose. Modify these panels only;
away from enclosure. Refer to
installation information shipped
with the starter or submittal
drawings.
CAUTION
Component Damage!
Remove all debris from inside the
starter panel. Failure to do so may
result in an electrical short and
could cause serious starter
component damage.
4
Trane Supplied
Remote Starter
Table 1. CVHE, CVHF, and CVHG standard remote starter field wiring requirements
Power supply wiring (to Starter Panel)
Starter Panel Terminals
3-Phase Line Voltage:
2X3-L1, L2, L3, and
Terminal Block (2TB3 or 2X3)
GROUND
3-Phase Line Voltage: Circuit Breaker
Remote Starter to Chiller Motor Junction Box
Starter to UCP 120VAC control wiring
120VAC Power Supply (from starter to UCP)
High Pressure Cutout to Starter
1Q1 Circuit Breaker to Starter
Oil Pump Interlock
Low Voltage Circuits (less than 30VAC)
Standard Circuits
Inter Processor Communications (IPC)
Remote Mounted
2Q1-L1, L2, L3, and
GROUND
T1 through T6
Starter to UCP 120VAC
control wiring
2X1-1-1, 2X1-2
2X1-20(Ground)
2X1-4
2X1-6
2X1-7, 2X1-8
Starter Panel
Terminals
2A1- J3-3 to 4, or
2X1-12 to 13 if present
(do not ground shield at
starter)
Unit Control Panel
Terminations
1X1-1, 1X1-12
1X1-18 (Ground)
1X1-4
1X1-3
1A7-J2-4, 1A7-J2-2
Unit Control Panel
Terminations
1A1-J5-3 to 4
Shield ground at
1X1- 22(GND) only.
All wiring to be in
accordance with National
Electrical Code and any local
codes.
#8 gauge minimum
40 amps circuit
14 ga.
14 ga.
14 ga.
2 wire w/ ground
Comm link.
Standard Field Power wiring:
Note: All wiring to be in accordance with National Electrical Code and any local codes.
Reference Field connection diagram 2309-4935 in this manual
CVHE-SVN03D-EN
5
Customer Supplied
Remote Starter
Table 2. CVHE, CVHF, and CVHG standard customer supplied remote field wiring requirements
Power supply wiring (to Starter Panel)
Starter Panel Terminals
Starter by others Power wiring:
See “Starter by others”
schematic
3-Phase Power Supply
Starter and Motor Junction Box
Interconnection (Remote starter only)
Starter provided by others:
Starter to UCP 120VAC control wiring
120VAC Power Supply
Power from UCP 1Q1
Interlock Relay signal
Start contactor signal
Oil Pump Interlock
Run Contactor signal
Transition Complete
Low Voltage Circuits (less than 30VAC)
Standard Circuits
Current Transformers* (see table next page)
codes.
Starter to UCP 120VAC
control wiring
See “Starter by others”
schematic
5X1-1, 5X1-2, 5X1-20
(Ground)
5X1-3
5X1-4
5X1-5
5X1-7, 5X1-8
5X1-10
5X1-14
Starter Panel
Terminals
Unit Control Panel
Terminations
1X1-1, 1X1-12, 1X1-18
1X1-3, 1A23-J6-3
1A23-J10-1
1A23-J8-1
1A7-J2-4, 1A7-J2-2
1A23-J6-12
1A23-J12-2
Unit Control Panel
Terminations
5CT4- wht, blk
1A23-J7-1,2
5CT5- wht, blk
1A23-J7-3,4,
5CT6- wht, blk
1A23-J7-5,6,
Potential Transformers
5T17-236,237
1A23 –J5-1,2,
5T18-238,239
1A23 –J5-3,4,
5T19-240,241
1A23 –J5-5,6
Starter Supplied by Others -Standard Field Power wiring:
Note: All wiring to be in accordance with National Electrical Code and any local codes.
Reference Field Connection Customer Supplied Starter diagram 2309-4936 in this manual
Reference “Starter by Others” Specification available from your local Trane sales office.
6
All wiring to be in
accordance with National
Electrical Code and any local
#8 gauge minimum 40 amps
circuit
14
14
14
14
14
14
ga.
ga.
ga.
ga.
ga.
ga.
Note: Phasing must be
maintained
Note: Phasing must be
maintained
CVHE-SVN03D-EN
Customer Supplied
Remote Starter
Table 3. Current transformer and potential transformer wire sizing tables for customer supplied starter to chiller unit
control panel starter module 1A23
The maximum recommended wire length for secondary CT leads in a dual CT system are:
Maximum Wire Length Secondary CT Leads
Wire AWG (mm2)
Feet
Meters
8 (10)
1362.8
415.5
10 (6)
856.9
261.2
12 (4)
538.9
164.3
14 (2.5)
338.9
103.3
16 (1.5)
213.1
65.0
17 (1)
169.1
51.5
18 (0.75)
134.1
40.9
20 (0.5)
84.3
25.7
Note:
1. Wire lengths are for copper conductors only.
2. Wire lengths are total “one way” distance that the CT can be from the Starter module.
The maximum recommended total wire length for PT’s in a single PT system:
Wire Gauge
Max lead length (ft)
8
5339
10
3357
12
2112
14
1328
16
835
17
662
18
525
20
330
21
262
22
207
Max lead length (m)
1627
1023
643
404
254
201
160
100
79
63
The maximum recommended total wire length (to and from) for PT leads in a dual PT system are:
Wire Gauge
Max Wire Length
Max Wire Length
Max Wire Length
8
10
12
14
16
17
18
20
21
22
Primary (ft)
3061
1924
1211
761
478
379
301
189
150
119
Primary (m)
933
586
369
232
145
115
91
57
45
36
Secondary (ft)
711
447
281
177
111
88
70
44
34
27
Max Wire Length
Secondary (m)
217
136
85
53
33
26
21
13
10
8
Note: These wire lengths are for copper conductors only
Note: The above lengths are maximum round trip wire lengths. The maximum distance the PT can be located from the Starter module is 1/2 of the listed value.
CVHE-SVN03D-EN
7
Power
Supply
Power Supply
Wiring
CAUTION
Use Copper Conductors
Only!
To assure that power supply wiring
to the starter panel is properly
installed and connected, review and
follow the guidelines outlined
below.
Unit terminals are not designed to
accept other types of conductors.
Failure to use copper conductors
may result in equipment damage.
4
3-Phase Power Source
1
2
Verify that the starter nameplate
ratings are compatible with the
power supply characteristics and
with the electrical data on the
unit nameplate.
If the starter enclosure must be
cut to provide electrical access,
exercise care to prevent debris
from falling inside the enclosure.
If the starter cabinet has a
removable panel, be sure to
remove the panel from the unit
before drilling holes.
CAUTION
Component Damage!
Remove all debris from inside the
starter panel. Failure to do so may
result in an electrical short and
could cause serious starter
component damage.
3
Use copper conductors to
connect the 3-phase power
supply to the remote or unitmounted starter panel.
5
Size the power supply wiring in
accordance with the Minimum
Circuit Ampacity (MCA) shown
on the unit nameplate.
(MCA = (RLA x 1.25) + Control
Power Load)
Make sure that the incoming
power wiring is properly phased;
each power supply conduit run
to the starter must carry the
correct number of conductors to
ensure equal phase
representation. See Figure 1.
Note: Connect L1, L2 and L3 per
starter diagram.
As you install the power supply
conduit, make sure that this
position does not interfere with
the serviceability of any of the
unit components, nor with
structural members and
equipment.
7
Tightening torque -follow starter
manufactures torque
specifications and annual
inspection methods.
Also, assure that the conduit is long
enough to simplify any servicing
that may be necessary in the
future (e.g. starter removal).
Note: Use flexible conduit to
enhance serviceability and
minimize vibration transmission.
Circuit Breakers and
Fusible Disconnects
Size the circuit breaker or fuse
disconnect in compliance with NEC
or local guidelines.
)
Figure 1. Proper phasing for starter power supply wiring and conduit loading
L3 L2 L1 G
L3
L2
L1
L3 L2 L1 G L3 L2 L1 G
L3
G
8
6
L2
L1
G
CVHE-SVN03D-EN
PFCC
Optional PFCCs
Power factor correction capacitors
(PFCCs) are designed to provide
power factor correction for the
compressor motor. They are
available as an option.
Note: Remember that the PFCC
nameplate voltage rating must be
greater than or equal to the
compressor voltage rating stamped
on the unit nameplate. See Table 4
to determine what PFCC is
appropriate for each compressor
voltage application.
CAUTION
Motor Damage!
Table 4. PFCC design voltage sizing per compressor voltage application
PFCC Design Voltage
Compressor Motor Rating
(See Unit Nameplate)
240/60 Hz
208V/60 Hz
480V/60 Hz
380V/60 Hz
440V/60 Hz
460V/60 Hz
480V/60 Hz
600V/60 Hz
575V/60 Hz
600V/60 Hz
2400V/60 Hz
2300V/60 Hz
2400V/60 Hz
PFCC Rating
480V/50 Hz
4160V/60 Hz
Compressor Motor Rating
(See Unit Nameplate)
346V/50 HZ
380V/50 HZ
400V/50 Hz
415V/50 Hz
3300V/60 Hz
4160V/60 Hz
PFCCs must be wired into the
starter correctly. Failure to do so
may cause misapplication of these
capacitors and result in a loss of
motor overload protection and
subsequently cause motor damage.
CVHE-SVN03D-EN
9
PFCC
Rule 1
Simultaneously disconnect
capacitors and load from line power.
If the capacitors are not switched offline when the load is disconnected,
they continue to add capacitance to
the electrical distribution system. A
“leading” power factor—too much
capacitance—may eventually
develop. This overcorrection causes
poor voltage regulation, i.e., voltage
is high when the circuit is unloaded,
then drops as loads are added.
Figure 2. PFCCs Installed Downstream of
Starter Contactor, Upstream of Overload
Motor Starter
Contactor
Power
Circuit
1
Overload
Protectors
2
Motor
3
Fusible
Safety Switch
or
Suitable Breaker
Fuses
Enclosed
Capacitor
Unit
Rule 2
Size motor overload protection to
account for capacitor-supplied
current.
3-Phase
Capacitor
Figure 3. PFCC Wires Routed Through Overload Protectors
Overloads are typically set to
measure the total current drawn by
the motor. When PFCCs are used,
they become the source of part of
that current. If the current they
provide isn’t registered by the
overload protectors, potentially
damaging amperage can reach the
motor. The simplest way to ensure
that the overloads “see” all current
supplied to the motor is to position
the PFCCs upstream of the overloads
as shown in Figure 2.
If the capacitor connection points
are downstream of the overload
devices, route the PFCC leads
through the overloads as shown in
Figure 3. This assures that the
overloads register both line and
capacitor-supplied current.
10
Fusible
Safety Switch
or
Suitable Breaker
Overload
Protectors
1
2
Motor
3
Power
Circuit
Motor
Starter
Contactor
Fuses
Enclosed
Capacitor
Unit
3-Phase
Capacitor
CVHE-SVN03D-EN
PFCC
Recommended Procedures
for Discharging Capacitors
Verifying Discharge of
Capacitors
Prior to performing any service on
energized equipment, the proper
Lockout-Tagout procedures must
always be followed. Regardless of
the equipment being serviced, the
following steps must be taken:
After following the proper
lockouttagout procedure it is
important to verify that all applicable
capacitors are discharged and
rendered safe. Many capacitors in
HVAC equipment include internal
bleeder circuits that will
automatically discharge the
capacitor. These circuits must be
allowed sufficient time to discharge
the capacitor prior to performing
service.
Lockout-Tagout Steps
1
Prepare the equipment for
shutdown.
2
Shut down the equipment.
3
Disconnect any energy isolating
devices.
4
Apply the necessary lockout or
tagout devices.
5
Render safe all stored or residual
energy.
6
Verify the isolation and
deenergization of the equipment.
Personal Protective
Equipment
Always wear appropriate personal
protective equipment in accordance
with applicable regulations and/or
standards to guard against potential
electrical shock and flash hazards.
While most capacitors contained in
Trane equipment include internal
bleeder circuits, this is not always
the case and these circuits can
sometimes fail. In addition, some
bleeder circuits can take up to 30
minutes to fully discharge. It is
important to verify that the
capacitor has been fully discharged
by using a voltmeter that is rated for
the voltage of the capacitor being
tested.
WARNING
Live Electrical
Components!
During installation, testing,
servicing and troubleshooting of
this product, it may be necessary to
work with live electrical
components. Have a qualified
licensed electrician or other
individual who has been properly
trained in handling live electrical
components perform these tasks.
Failure to follow all electrical safety
precautions when exposed to live
electrical components could result
in death or serious injury.
Discharging Capacitors
In the event that a capacitor does not
have an internal bleeder circuit, the
bleeder circuit has failed, or the
discharge process is not complete,
the capacitor must be discharged
properly prior to performing service.
In order to safely discharge a
capacitor, a proper capacitor
discharge tool must be used.
Screwdrivers and other hand tools
are not designed to safely discharge
capacitors. Use of these tools may
result in death or serious injury and/
or equipment damage.
WARNING
Hazardous Voltage!
Disconnect all electric power,
including remote disconnects before
servicing. Follow proper lockout/
tagout procedures to ensure the
power can not be inadvertently
energized. Discharge capacitors
before servicing. Failure to
disconnect power and discharge
capacitors before servicing could
result in death or serious injury
CVHE-SVN03D-EN
11
Unit Mounted
Starter
Interconnecting
Wiring
Typical equipment room conduit
layouts with and without unit
mounted starters are shown in
Figure 4 and Figure 5, respectively.
Important: Keep in mind that the
interconnecting wiring between the
starter panel, compressor and UCP
control panel is factory-installed
with unit-mounted starters but must
be field-installed when a remote
mounted starter is used.
Figure 4. Typical equipment room layout with unit-mounted, Wye-Delta
Line Side Power
Conduits
Unit Control
Panel
Unit Mounted
Starter
Note:
See Starter submittal drawing for location of incoming wiring to the starter.
12
CVHE-SVN03D-EN
Remote
Starter
Figure 5. Typical equipment room layout with remote-mounted Wye-Delta starter
Line Side
Power Wiring
Remotemounted
Starter
Lead Power
Wiring
IPC Circuit
Conduit <30V
See Note 3
115V Control
Conduit
See Note 2
Motor Terminal Box
Notes:
1. Refer to the unit field connection diagram for approximate UCP knockout locations.
2. 115-volt conduit must enter the higher than 30 Vdc Class I portion of the unit control panel.
3. IPC circuit conduit must enter the Low Voltage Class II portion of the UCP. (1000 ft. max)
4. See starter submittal drawing for location of incoming wiring to the starter.
CVHE-SVN03D-EN
13
Remote Starter
Starter to Motor
(Remote-Mounted
Starters Only)
2
A terminal clamp with a 3/8” bolt
is provided on each motor
terminal stud; use the factorsupplied Belleville washers on
the wire lug connections.
Figure 6 illustrates the juncture
between a motor terminal stud
and terminal clamp.
Ground Wire Terminal Lugs
Ground wire lugs are provided in the
motor terminal box and in the starter
panel.
3
Tighten each bolt to 24 footpounds.
Terminal Clamps
4
Install but do not connect the
power leads between the starter
and compressor motor. (These
connections will be completed
under supervision of a qualified
Trane service engineer after the
pre-start inspection.)
Terminal clamps are supplied with
the motor terminals to
accommodate either bus bars or
standard motor terminal wire lugs.
Terminal clamps provide additional
surface area to minimize the
possibility of improper electrical
connections.
Wire Terminal Lugs
Wire terminal lugs must be field
supplied.
1
Use field-provided crimp-type
wire terminal lugs properly sized
for the application.
Note: Wire size ranges for the
starter line and load-side lugs are
listed on the starter submittal
drawings supplied by the starter
manufacturer or Trane. Carefully
review the submitted wire lug
sizes for compatibility with the
conductor sizes specified by the
electrical engineer or contractor.
CAUTION
Component Damage!
Starter to UCP
(Remote- Mounted
Starters Only)
Electrical connections required
between the remote-mounted starter
and the unit control panel are shown
in an example of a point-to-point
starter-to-UCP connection diagram
as shown at the end of the manual.
Note: Install control voltage conduit
into control voltage section of chiller
control panel and starter panel. Do
not route with low voltage (30 volts)
conduit wires.
When sizing and installing the
electrical conductors for these
circuits, follow the guidelines listed.
Unless otherwise specified use
14 ga. wire for 120 V control circuits.
Ensure the power supply wiring and
output to motor wiring are
connected to the proper terminals.
Failure to do so will cause
catastrophic failure of the starter
and, or motor.
Bus Bars
Install the bus bars between the
motor terminals when a low-voltage
“across-the-line”, “primary reactor/
resistor,” “auto transformer” or
customer-supplied solid-state, or
customer-supplied AFD.
Be sure to bus motor terminal T1 to
T6, T2 to T4, and T3 to T5.
Note: Bus bars are not needed in
high-voltage applications since only
3 terminals are used in the motor
and starter.
14
CVHE-SVN03D-EN
Remote Starter
CAUTION
Component Damage!
5
For UCP IPC shielded twisted pair
wiring, the shield should be
grounded on one end only at
UCP at 1X1-G. The other end
should be un-terminated and
taped back on the cable sheath to
prevent any contact between
shield and ground. (1000 ft. max)
6
Oil Pump Interlock - All starters
must provide an interlock (N.O.)
contact with the chiller oil pump
connected to the UCP at
Terminals 1A7-2-4 and 1A7-J2-2
(14 ga.) The purpose of this
interlock is to power the oil pump
on the chiller in the event that a
starter failure, such as welded
contacts, keeps the chiller motor
running after the controller
interrupts the run signal.
Remove all debris from inside the
starter panel. Failure to do so may
result in an electrical short and
could cause serious starter
component damage.
1
2
CVHE-SVN03D-EN
If the starter enclosure must be
cut to provide electrical access,
exercise care to prevent debris
from falling inside the enclosure.
Do not cut AFD enclosure.
Use only shielded twisted pair
for the interprocessor
communication (IPC) circuit
between the starter and the UCP
on remote mounted starters.
Recommended wire is Beldon
Type 8760, 18 AWG for runs up to
1000 feet.
Note: The polarity of the IPC wire
pair is critical for proper operation.
CAUTION
Electrical Noise!
3
Separate low-voltage (less than
30V) wiring from the 115V wiring
by running each in its own
conduit.
4
As you route the IPC circuit out
of the starter enclosure, make
sure that it is at least 6" from all
wires carrying a higher voltage.
Maintain at least 6 inches between
low-voltage (<30V) and high voltage
circuits. Failure to do so could result
in electrical noise that may distort
the signals carried by the low
voltage wiring, including the IPC.
15
Motor
Lugs
Figure 6. Terminal stud, clamp and lug assembly
Belleville
Washer
Terminal
Lugs
3/8" Bolt
Belleville
Washer
Motor
Terminal
Stud
Terminal
Clamp
Front View
Mid Voltage
RXL RATR RPIR CXL CATR CPIR
16
CVHE-SVN03D-EN
Field Control
Panel Signal Wiring
Table 5.
Standard Control Circuits:
UCP Control Wiring (120 VAC)
Unit Control
Terminations
Included in
Factory
Package
Input or
Output Type
Chilled Water Flow Proving Input
1X1-5 to 1A6-J3-2
Std.
Binary Input
Condenser Water Flow Proving Input
1X1-6 to 1A6-J2-2
Std.
Binary Input
Chilled Water Pump Relay Output
Condenser Water Pump Relay Output
1A5-J2- 4 to 6
1A5-J2-1 to 3
Std.
Std.
Binary Output
Binary Output
All wiring to be in
accordance with
National Electrical Code
and any local codes.
Contacts
Normally Open,
closure with flow
Normally Open,
closure with flow
Normally Open
Normally Open
Optional Control Circuits (120 VAC)
Alarm Relay MAR (Non-Latching) Output
Limit Warning Relay Output
Alarm Relay MMR (Latching) Output
Compressor Running Relay Output
Maximum Capacity Relay Output
Head Relief Request Relay Output
Purge Alarm Relay Output
Ice Making Relay Output
Free Cooling Relay Output
1A8-J2-1 to 3
1A8-J2-4 to 6
1A8-J2-7 to 9
1A8-J2-10 to 12
1A9-J2-1 to 3
1A9-J2-4 to 6
1A9-J2-7 to 9
1A5-J2-10 to 12
1A11-J2-4 to 6
OPST
OPST
OPST
OPST
OPST
OPST
OPST
EXOP
FRCL
Binary
Binary
Binary
Binary
Binary
Binary
Binary
Binary
Binary
Normally
Normally
Normally
Normally
Normally
Normally
Normally
Normally
Normally
Standard Low Voltage Circuits Low
Voltage Circuits (less than 30VAC)
External Auto Stop Input
Unit Control Panel
Terminations
1A13-J2-1 to 2
Std.
Binary Input
Emergency Stop Input
1A13-J2-3 to 4
Std.
Binary Input
1A18-J2-1 to 2
1A18-J2-3 to 4
1A19-J2-1 to 2
1A20-J2-1 to 2
1A15-J2-1 to 3
1A15-J2-4 to 6
1A16-J2-2 to 3
1A16-J2-5 to 6
1A17-J2-2 to 3
1A17-J2-5 to 6
IPC bus Connection
and sensor
1A14-J2-1(+) to 2(-)
1A14-J2-3(+) to 4(-)
EXOP
EXOP
EXOP
FRCL
GBAS or CDRP
GBAS or CDRP
GBAS
GBAS
EXOP
EXOP
CWR
Binary Input
Binary Input
Binary Input
Binary Input
Analog Output
Analog Output
Analog Input
Analog Input
Analog Input
Analog Input
Communication and
sensor.
Communication to
Tracer
Optional Low Voltage Circuits
External Base Loading Enable Input
External Hot Water Control Enable Input
External Ice Machine Control Enable Input
External Free Cooling Input Enable Input
RLA Compressor Output
External Condenser Pressure Output
External Current Limit Setpoint Input
External Chilled Water Setpoint Input
External Base Load Setpoint Signal Input
Generic Refrigerant Monitor input
Outdoor Air Temperature sensor
Tracer Comm Interface
CVHE-SVN03D-EN
Output
Output
Output
Output
Output
Output
Output
Output
Output
Open
Open
Open
Open
Open
Open
Open
Open
Open
Input or Output Type
TRIMM or LCI-C
Closure required for
normal operation
Closure required for
normal operation
Normally Open
Normally Open
Normally Open
Normally Open
2-10 vdc
2-10 vdc
2-10 vdc, or 4-20
2-10 vdc, or 4-20
2-10 vdc, or 4-20
2-10 vdc, or 4-20
mA
mA
mA
mA
17
Field Control Panel Signal Wiring
UCP Electrical
Specifications
Following is a requirements list for
the UCP in the control panel:
Note that the control panel is
designed to receive input from the
secondary of a power transformer in
the starter panel.
1
Nominal Voltage: 115/110 VAC,
60/50 Hz with operating range of
98 to 127 VAC, inclusive.
2
Maximum VA: 4K VA (40-amp
fuse) for units with the
refrigerant pump.
3
Power input wiring must be at
least 6" (152 mm) from low
voltage, less than 30V wiring.
4
All signal inputs are low-voltage
less than 30V.
5
UCP Storage Range: -40°F to
158°F (-40°C to 70°C) i.e., not
applicable for chiller.
Chilled Water Proof of Flow
Wire the auxiliary contacts of the
evaporator water pump contactor
(5K1) in series with the flow switch
(5S1) installed in the evaporator
supply pipe. Use 14 AWG, 600-volt
copper wire.
Connect this circuit to UCP terminals
1X1-5 to 1A6-J3-2.
When installed properly, the chilled
water interlock circuit will only allow
compressor operation if the
evaporator pump is running and
providing at least the minimum
water flow required.
Condenser Water Pump
Wire the condenser water pump
contactor (5K2) to a separate 120volt, single phase power supply with
14 AWG, 600-volt copper wire; then
connect this circuit to UCP terminals
1A5-J2-3. Then use 1A5-J2-1 120
VAC output to allow UCP to control
the condenser pump.
Condenser Water Proof of Flow
Water Pump Interlock
Circuits and Flow Switch
Input
Chilled Water Pump
Wire the evaporator water pump
contactor (5K1) to a separate 120
volt single phase power supply with
14 AWG, 600 volt copper wire, then
connect this circuit to 1A5-J2-6.
Then use 1A5-J2-4 120 VAC output
to allow the UCP to control the
evaporator water pump, or wire the
5K1 contactor to operate remotely
and independently of the UCP.
18
Next, use 14 AWG, 600-volt copper
wire to connect the auxiliary
contacts of the condenser water
pump contactor (5K2) in series with
the flow switch (5S2) installed in the
condenser supply pipe.
Temperature Sensor
Circuits
All temperature sensors are factory
installed except the optional outdoor
air temperature sensor. This sensor
is required for the outdoor air
temperature type of chilled water
reset. Follow the guidelines below to
locate and mount the outdoor air
temperature sensor. Mount the
sensor probe where needed,
however, mount the sensor module
in the UCP.
CWR - Outdoor Option
The outdoor temperature sensor
similar to the unit mounted
temperature sensors in that it
consists of the sensor probe and the
module. A four-wire IPC bus is
connected to the module for 24 vdc
power and the communications link.
We recommend mounting the
sensor module within the UCP and
the sensor two wire leads be
extended and routed to the outdoor
temperature sensor probe sensing
location. This assures the four wire
IPC bus protection and provides
access to the module for
configuration at start-up.
Connect this circuit to UCP terminals
1X1-6 to 1A6-J2-2.
When installed properly, the
condenser water lock circuit will only
allow the compressor to operate if
the condenser pump is running and
providing at least the minimum
water flow required.
CVHE-SVN03D-EN
Field Control Panel Signal Wiring
The sensor probe lead wire between
the sensor probe and the module
can be separated by cutting the two
wire probe lead leaving equal
lengths of wire on each device; the
sensor probe and the sensor
module. Note this sensor and
module are matched and must
remain together or inaccuracy may
occur. These wires can then be
spliced to with two 14-18 AWG 600V
wires of sufficient length to reach the
desired outdoor location, maximum
length 1000 feet (305 meters). The
module four-wire bus must be
connected to the UCP four-wire bus
using the Trane approved
connectors provided.
The sensor will be configured (given
its identity and become functional)
at start-up when the serviceman
performs the start-up configuration.
It will not be operational until that
time.
Note: If shielded cable is used to
extend the sensor leads, be sure to
tape off the shield wire at the
junction box and ground it at the
UCP. If the added length is run in
conduit, do not run them in the
same conduit with other circuits
carrying 30 or more volts.
Note: Maintain at least 6 inches
between low-voltage (<30v) and
high voltage circuits. Failure to do so
could result in electrical noise that
may distort the signals carried by the
low-voltage wiring, including the
IPC.
Optional Relay Circuits
Optional Control and Output
Circuits
Install various optional wiring as
required by the owner’s
specifications.
TRMM or LC1-C
Optional Tracer
Communication Interface
This control options allows the UCP
to exchange information such as
chiller status and operating set
points with a Tracer system.
Figure 9 illustrates how such a
communication/control network
might appear.
Note: The circuit must be run in
separate conduit to prevent
electrical noise interference.
Additional information about the
Tracer Comm option is published
in the installation manual and
operator’s guide that ships with
the Tracer.
Unit Start-Up
All phases of initial unit start-up
must be conducted under the
supervision of a qualified local
service engineer.
This includes pressure testing,
evacuation, electrical checks,
refrigerant charging, actual start-up
and operator instruction.
Advance notification is required to
assure that initial start-up is
scheduled as close to the requested
date as possible.
CVHE-SVN03D-EN
Starter Module
Configuration
The starter module configuration
settings will be checked (and
configured for Remote Starters)
during start-up commissioning. To
configure starter module, and
perform other starter checks, it is
recommended that the line voltage
three phase power be turned off and
secured (locked out), and then a
separate source control power
(115 vac) be utilized to power up the
control circuit. To do this, remove
control coil circuit fuse, typically 2F4,
and then connect separate source
power cord to starter terminal block
2X1-1 (H), 2X1-2 (N), and Ground.
Use the “as-built starter schematic”
to assure correct fuse and terminals.
Verify correct fuse is removed,
control circuit connections are
correct, then apply the 115 vac
separate source power to service
the controls.
Forms Information
Samples of start-up and operating
forms along with other helpful forms
are found in the Operation
Maintenance manual which can be
obtained from the nearest
Trane office.
It is recommended that the
serviceman contact the local Trane
office to obtain the most recent
printing date of the form. The forms
in the operation and maintenance
manual are only current at the time
of printing of the manual.
After obtaining the most recent
form, complete all information and
forward it to your local Trane office.
19
Field Control Panel Signal Wiring
Figure 7. Standard Enclosure
Control wiring (120 VAC)
Low voltage entrances
(less than 30 VAC)
Note: UCP control wiring (120 VAC) must not be routed with low voltage circuits (less than 30 VAC). Conduit
access holes are furnished in the top of the unit control panel. Use the left holes for low voltage wiring, and
use center and right hand holes for control (120 VAC) wiring.
Note: The wire is retained in the clamp by the force of the spring which pushes the wire against the
connecting bar. Use care to ensure full insertion of screwdriver into terminal block wire release mechanism.
Proper tool engagement is required to release the tension for wire insertion.
Control Panel Internally
mounted devices
For visual identification Internal
Control Panel mounted devices are
identified by their respective
schematic designation number.
Control panel items are marked on
the inner back panel in the control
panel. Figure 7 illustrated below,
identifies these devices. The Control
Panel Devices table corresponds to
the same device designators (see
right hand column). Optional
controls are present when a specific
optional controls package is
specified, as listed in the second
column.
20
Optional controls packages are;
OPST Operating Status, GBAS
Generic Building Systems, EXOP
Extended operation, CDRP
Condenser Pressure, TRMM Tracer
communications, WPSR Water Flow
Pressure sensing, FRCL Free
Cooling, HGBP Hot Gas Bypass, and
EPRO Enhanced Protection.
Figure 20 illustrates the Control
Panel Components Layout.
Modules 1A1, 1A3, 1A4, 1A5, 1A6,
1A7, and 1A13 are standard and
present in all configurations. Other
Modules vary depending on
machine optional devices.
CVHE-SVN03D-EN
Field Control Panel Signal Wiring
Figure 8. Control panel components layout
CVHE-SVN03D-EN
21
Field Control Panel Signal Wiring
Figure 9. Illustrated communication/control network to chiller with CH530
22
CVHE-SVN03D-EN
Wiring
Drawings
Schematic Wiring
Drawings
The following pages consist of
typical wiring drawings for an CVHE,
CVHF or CVHG chiller. However,
please refer to the submittals and
drawings that actually shipped with
the unit.
Refer to the chiller operation and
maintenance manual for an example
of a typical sequence of operation
for a Unit Mounted Wye-Delta
Starter.
In the starter drawings, shown in
this manual, all starter variables are
the same in the Sequence of
Operation except the Maximum
Acceleration Time.
Table 6 provides a listing of included
schematics, connection diagrams
and field wiring drawings to follow.
Table 6 also shows variables of the
Maximum Acceleration Time for all
starter drawings in this manual.
Table 6. Wiring addendum
Type of Drawing
Field Wiring Layout Drawings
Legend (Unit Mounted Wye-Delta Starter)
Unit Mounted Wye-Delta Starter (USTR)
Unit Mounted Solid-State Starter (USID)
Unit Mounted Across-the-Line (UXL)
Unit Mounted Adaptive Frequency
Drive (UAFD)
Unit Mounted Auto Transformer Start (UATR)
Unit Mounted Primary Transformer (UPIR)
Remote Wye-Delta Starter (RSTR)
Remote Mounted Solid-State Starter (FSID,
WSID)
Remote Across-the-Line Starter (RXL)
Remote Primary Reactor Starter (RPIR)
Remote Auto Transformer Starter (RATR)
Customer Supplied Wye-Delta Starter (CSTR)
Customer Supplied Primary Reactor or Auto
Transformer Starter (CATR, CPIR)
Customer Supplied Across-the-Line Starter
(CXL)
Customer Supplied Solid-State Starter (CSOL)
Purge Schematic
Unit Controls Schematic
System Controls Schematic
Options Schematic
Connection Diagrams
Standard Connection Diagram Panel with
Options
Field Connection Trane Starter (LV)
Field Connection Trane Starter (MV)
Customer Supplied Starter (LV)
Customer Supplied Starter (MV)
Trane Supplied AFD
Unit Wiring
Purge Control Panel (Unit Mounted)
Drawing
Number
2309-8045
2309-7954
2309-7962
2309-7996
2309-8033
2309-8034
2309-7974
2309-7985
2309-7952
2309-7960
Maximum
Acceleration
Page #
Time
(seconds)
27
15
6
30
68-69
22-23
26-27
30-31
38-39
11
11
27
15
24-25
28-29
2309-7994
2309-7983
2309-7972
2309-7998
2309-8012
6
11
11
27
11
32-33
34-35
36-37
40-41
42-43
2309-8022
6
44-45
2309-8002
2309-8041
2309-8036
2309-8039
2309-8043
20
-
46-47
48-49
50-51
52-53
54-55
2309-2178
-
56-57
2309-2169
2309-2171
2309-2173
2309-2175
2309-2177
2309-2181
2309-2182
-
58-59
-
60-61
-
62-63
66-67
Note: These are typical drawings only. Refer to specific as-built schematics for actual unit drawings which
represent the unit wiring as shipped.
Note: Contact your local Trane representative for all other schematics, wiring diagrams and/or connection
diagrams not listed.
CVHE-SVN03D-EN
23
Wiring Drawings
2309-7945
Unit mounted wye-delta starter with optional GRDF and PFCC, without optional CPTR
24
CVHE-SVN03D-EN
Wiring Drawings
2309-7945 (Con’t)
Unit mounted wye-delta starter with optional GRDF and PFCC, without optional CPTR
CVHE-SVN03D-EN
25
Wiring Drawings
2309-7962
Unit mounted solid state starter with optional GRDF and PFCC, without optional CPTR
26
CVHE-SVN03D-EN
Wiring Drawings
2309-7962 (Con’t)
Unit mounted solid state starter with optional GRDF and PFCC, without optional CPTR
CVHE-SVN03D-EN
27
Wiring Drawings
2309-7996
Unit mounted across the line starter standard 3-lead motor connection with optional GRDF and PFCC, without
optionaL CPTR
28
CVHE-SVN03D-EN
Wiring Drawings
2309-7996 (Con’t)
Unit mounted across the line starter standard 3-lead motor connection with optional GRDF and PFCC, without
optionaL CPTR
CVHE-SVN03D-EN
29
Wiring Drawings
2309-8033
Unit mounted adaptive frequency drive 405-608A LiquiFlo 2, Frame 3
30
CVHE-SVN03D-EN
Wiring Drawings
2309-8033 (Con’t)
Unit mounted adaptive frequency drive 405-608A LiquiFlo 2, Frame 3
CVHE-SVN03D-EN
31
Wiring Drawings
2309-8034
Unit mounted adaptive frequency drive 810-1210A LiquiFlo 2, Frame 4
32
CVHE-SVN03D-EN
Wiring Drawings
2309-8034 (Con’t)
Unit mounted adaptive frequency drive 810-1210A LiquiFlo 2, Frame 4
CVHE-SVN03D-EN
33
Wiring Drawings
2309-7974
Unit mounted auto-transformer starter standard 3-lead motor connection with optional GRDF and PFCC, without
optional CPTR
34
CVHE-SVN03D-EN
Wiring Drawings
2309-7974 (Con’t)
Unit mounted auto-transformer starter standard 3-lead motor connection with optional GRDF and PFCC, without
optional CPTR
CVHE-SVN03D-EN
35
Wiring Drawings
2309-7985
Unit mounted primary reactor starter standard 3-lead motor connection with optional GRDF and PFCC, without
optional CPTR
36
CVHE-SVN03D-EN
Wiring Drawings
2309-7985 (Con’t)
Unit mounted primary reactor starter standard 3-lead motor connection with optional GRDF and PFCC, without
optional CPTR
CVHE-SVN03D-EN
37
Wiring Drawings
2309-7952
Remote mounted wye-delta starter with optional GRDF and PFCC, without optional CPTR
38
CVHE-SVN03D-EN
Wiring Drawings
2309-7952 (Con’t)
Remote mounted wye-delta starter with optional GRDF and PFCC, without optional CPTR
CVHE-SVN03D-EN
39
Wiring Drawings
2309-7960
Remote mounted solid state starter with optional GRDF and PFCC, without optional CPTR
40
CVHE-SVN03D-EN
Wiring Drawings
2309-7960 (Con’t)
Remote mounted solid state starter with optional GRDF and PFCC, without optional CPTR
CVHE-SVN03D-EN
41
Wiring Drawings
2309-7994
Remote mounted across the line starter standard 3-lead motor connection with optional GRDF and PFCC, without
optional CPTR
42
CVHE-SVN03D-EN
Wiring Drawings
2309-7994 (Con’t)
Remote mounted across the line starter standard 3-lead motor connection with optional GRDF and PFCC, without
optional CPTR
CVHE-SVN03D-EN
43
Wiring Drawings
2309-7983
Remote mounted primary reactor starter standard 3-lead motor connection with optional GRDF and PFCC, without
optional CPTR
44
CVHE-SVN03D-EN
Wiring Drawings
2309-7983 (Con’t)
Remote mounted primary reactor starter standard 3-lead motor connection with optional GRDF and PFCC, without
optional CPTR
CVHE-SVN03D-EN
45
Wiring Drawings
2309-7972
Remote Mounted Auto-transformer Starter
46
CVHE-SVN03D-EN
Wiring Drawings
2309-7972 (Con’t)
Remote Mounted Auto-transformer Starter
CVHE-SVN03D-EN
47
Wiring Drawings
2309-7998
Customer supplied wye-delta starter standard chiller without optional CPTR
48
CVHE-SVN03D-EN
Wiring Drawings
2309-7998 (Con’t)
Customer supplied wye-delta starter standard chiller without optional CPTR
CVHE-SVN03D-EN
49
Wiring Drawings
2309-8012
Customer supplied auto-transformer or primary reactor starter standard 3-lead motor connection without optional
CPTR
50
CVHE-SVN03D-EN
Wiring Drawings
2309-8012 (Con’t)
Customer supplied auto-transformer or primary reactor starter standard 3-lead motor connection without optional
CPTR
CVHE-SVN03D-EN
51
Wiring Drawings
2309-8022
Customer supplied across the line starter standard 3-lead motor connection without optional CPTR
52
CVHE-SVN03D-EN
Wiring Drawings
2309-8022 (Con’t)
Customer supplied across the line starter standard 3-lead motor connection without optional CPTR
CVHE-SVN03D-EN
53
Wiring Drawings
2309-8002
Customer supplied solid state starter standard chiller without optional CPTR
54
CVHE-SVN03D-EN
Wiring Drawings
2309-8002 (Con’t)
Customer supplied solid state starter standard chiller without optional CPTR
CVHE-SVN03D-EN
55
Wiring Drawings
2309-8041
Factory installed standard, NEMA 4 or industrial earthwise purge
56
CVHE-SVN03D-EN
Wiring Drawings
2309-8041 (Con’t)
Factory installed standard, NEMA 4 or industrial earthwise purge
CVHE-SVN03D-EN
57
Wiring Drawings
2309-8036
Unit controls without optional CPTR
58
CVHE-SVN03D-EN
Wiring Drawings
2309-8036 (Con’t)
Unit controls without optional CPTR
CVHE-SVN03D-EN
59
Wiring Drawings
2309-8039
System controls with optional HGBP or FRCL
60
CVHE-SVN03D-EN
Wiring Drawings
2309-8039 (Con’t)
System controls with optional HGBP or FRCL
CVHE-SVN03D-EN
61
Wiring Drawings
2309-8043
Optional controls
62
CVHE-SVN03D-EN
Wiring Drawings
2309-8043 (Con’t)
Optional controls
CVHE-SVN03D-EN
63
Wiring Drawings
2309-2178)
Main unit control panel used with all low and medium voltage starters
64
CVHE-SVN03D-EN
Wiring Drawings
2309-2178 (Con’t)
Main unit control panel used with all low and medium voltage starters
CVHE-SVN03D-EN
65
Wiring Drawings
2309-2169
Trane supplied Wye-delta or solid state starter
66
CVHE-SVN03D-EN
Wiring Drawings
2309-2169 (Con’t)
Trane supplied Wye-delta or solid state starter
CVHE-SVN03D-EN
67
Wiring Drawings
2309-2171
Trane supplied auto-transformer, primary reactor or across the line starter
68
CVHE-SVN03D-EN
Wiring Drawings
2309-2171 (Con’t)
Trane supplied auto-transformer, primary reactor or across the line starter
CVHE-SVN03D-EN
69
Wiring Drawings
2309-2173
Customer supplied wye-delta or solid state starter
70
CVHE-SVN03D-EN
Wiring Drawings
2309-2173 (Con’t)
Customer supplied wye-delta or solid state starter
CVHE-SVN03D-EN
71
Wiring Drawings
2309-2175
Customer supplied auto-transformer, primary reactor or across the line starter
72
CVHE-SVN03D-EN
Wiring Drawings
2309-2175 (Con’t)
Customer supplied auto-transformer, primary reactor or across the line starter
CVHE-SVN03D-EN
73
Wiring Drawings
2309-2177
Trane supplied LiquiFlo 2 adaptive frequency drive
74
CVHE-SVN03D-EN
Wiring Drawings
2309-2177 (Con’t)
Trane supplied LiquiFlo 2 adaptive frequency drive
CVHE-SVN03D-EN
75
Wiring Drawings
2309-2181
Unit mounted controls used with all starters and adaptive frequency drives
76
CVHE-SVN03D-EN
Wiring Drawings
2309-2181 (Con’t)
Unit mounted controls used with all starters and adaptive frequency drives
CVHE-SVN03D-EN
77
Wiring Drawings
2309-2182
CH530 schematic wiring diagram device descriptions
78
CVHE-SVN03D-EN
Wiring Drawings
2309-2182 (Con’t)
CH530 schematic wiring diagram device descriptions
CVHE-SVN03D-EN
79
Literature Order Number
Trane
A business of American Standard Companies
www.trane.com
For more information, contact your local Trane
office or e-mail us at [email protected]
CVHE-SVN03D-EN
Date
March 2005
Supersedes
CVHE-SVN03C-EN
Stocking Location
La Crosse
Trane has a policy of continuous product and product data improvement and reserves the right to
change design and specifications without notice.