1
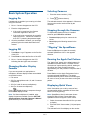
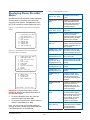
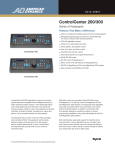
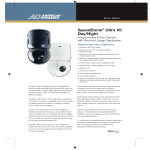
ADTT16E Advanced Dome Controller
Quick Reference Guide
Controller (Touch Tracker®) Features
LCD
(liquid crystal display)
Display format selection
A
B
Pe
el
Info
1
Zoom In
Me
O
Ou
tpu n
t
Off
nu
Cle
5
Flip
6
7
Vie
w
C lo
se
8
Op
Zoom Out
Number buttons
D
3
ar
Iris
C
2
4
Pat
tern
9
en
Re
pe
at
Pat
ter
n
0
Camera
selection
Se
q
Pre
vio
us
Nex
t
Focus Near
Pan/Tilt control
(Tracker Ball)
Focus Far
Controller Keypad
Quest Multiplexer functions
(A, B, C, D)
Run SpeedDome
Apple Peel Pattern
Rotates SpeedDome 180º
Displays the dome
DirectSet menu
A
C
B
D
Display Quick View
Activate/Deactivate
the dome's output.
Peel
1
View
Info
Starts the controller
menu
4
On
Output
5
Pattern
Repeat
Pattern
Menu
7
Clear
Close
Iris
Open
8
0
Makes camera image
appear darker
Makes camera image
appear brighter
© 2004
6
Off
Clears active alarm or
keypad entry
Run Pattern once
Flip
3
9
Repeat Pattern indefinitely
Run Controller Sequence
Previous
Next
Displays subsequent
camera in series.
Displays prior camera in
series
Sensormatic Electronics Corp.
ADTT16E ADVANCED DOME CONTROLLER
QUICK REFERENCE GUIDE
8200-0306-03, REV. A1
1 of 7
Selecting Cameras
Basic System Operation
1. Enter the camera number (1-64).
Logging On
2. Press
If passwords are enabled, you must log on before
using the controller.
(Camera button).
The selected camera’s video appears in full-screen
format on the monitor under control by the
controller.
1. Enter Password appears on the LCD.
2. Enter the 4-digit password.
Stepping through the Cameras
• If the code is recognized, the Camera
information appears on the LCD.
To sequentially display the first 16 installed
cameras, press Previous and Next.
• If the code is not recognized, the controller
beeps and Enter Password remains on
the LCD. Try entering the password again.
3. Once the password is entered, you can begin
performing the other tasks described in this
manual.
• Previous displays the prior camera in the
series.
• Next displays the following camera in the
series.
“Flipping” the SpeedDome
Logging Off
Press the Flip button to rotate the currently
selected SpeedDome 180° in the opposite
direction.
1. Press Menu. Logoff appears on the first line
of the LCD.
2. Press Zoom to select the first line of the LCD.
Running the Apple Peel Pattern
3. Enter Password appears on the LCD
indicating that the logoff was successful.
The “Apple Peel” pattern is the default pattern for
SpeedDome camera domes. It consists of three
revolutions of camera panning with tilt, starting at
the ceiling line. Each revolution tilts down
approximately 30° and provides a complete view of
the area.
Changing Monitor Display
Formats
If you are connected to a quad splitter or
multiplexer, different display formats are available
on the Main monitor.
Press Peel to run the Apple Peel pattern for the
currently selected SpeedDome. The pattern
repeats indefinitely until a camera command (pan,
tilt, zoom or focus) is sent to the dome running the
pattern.
• Full-screen
• 2X2 (for quad splitters and 4, 9, and 16-camera
multiplexers)
• 3X3 (for 9 and 16-camera multiplexers)
Displaying Quick Views
• 4X4 (for 16-camera multiplexers)
Quick Views allow you to call up a scene from
programmable domes, regardless of where that
dome is currently pointing.
(Display button) to sequence through
Press
the available display formats.
Note: SpeedDome Ultra III and newer domes
support 96 Quick Views. Domes older than
SpeedDome Ultra III support 4 Quick Views.
Note: If a Quest multiplexer is installed, other
display formats are available. See the ADTT16E
Advanced Dome Controller Operator’s Manual
(8200-0306-02) for more information.
ADTT16E ADVANCED DOME CONTROLLER
QUICK REFERENCE GUIDE
1. Select the camera whose Quick View you want
to display.
2. Enter the Quick View number (1-96) and press
View.
The selected Quick View displays on the monitor.
8200-0306-03, REV. A1
2 of 7
Running Patterns
Clearing Alarms
Patterns are sequential series of pan, tilt, zoom,
and focus movements from a single programmable
dome. You “teach” the dome a combination of
these movements that can be replayed
automatically.
Press Clear to acknowledge the alarm whose
information appears on the LCD. Up to four alarms
may be queued on the controller.
Note: If Automatic Alarm Acknowledgement is
enabled, the alarm clears after a 60 seconds.
Note: Most SpeedDome series domes support 3
patterns. SpeedDome LT does not support
patterns, but uses Pattern 1 for the auto pan
function.
Advanced System Operation
1. Select the camera whose Pattern you want to
run.
IMPORTANT! Some advanced functions are only
available on the primary controller.
2. Enter the Pattern number (1-3), and then do
one of the following:
Working in Menu Mode
• Press Pattern to run the pattern one time
and stop.
Press Menu to switch the controller to menu mode.
This mode allows you to program features and
configure controller settings. When menu mode is
active:
• Press Repeat Pattern to run the pattern
indefinitely.
Note: To stop a pattern, issue a camera command
(pan, tilt zoom or focus) to the dome running the
Pattern.
• Use the Tracker Ball to scroll through the
menu.
Running the Controller
Sequence
• Press Focus to select the menu item appearing
on the second line of the LCD.
• Press Zoom to select menu item appearing on
the first line of the LCD.
The Controller Sequence is a collection 16 Quick
Views, Patterns, and fixed shots, that play one
after the other on the Main monitor. It provides a
broad surveillance of a facility.
Programming Quick Views
1. Select the camera where the Quick View will
be saved.
2. Adjust the pan, tilt, zoom and focus settings for
the camera until the scene you want to save
appears on the monitor.
3. Press Menu.
4. Scroll through the menu until Setup View is
displayed on the LCD. Press Zoom or Focus
to select.
5. Enter View#? appears on the LCD. Enter the
view number (1-96), then press Zoom, Focus
or View to save.
View Saved appears briefly on the LCD.
To initiate the pre-defined Sequence, press Seq.
The Sequence repeats indefinitely until you press
Seq or Clear.
Control Dome Outputs
Use a copy of the Inputs/Outputs Worksheet to
determine which output you want to control.
1. Enter the camera number and press
select the dome.
to
2. Enter the output number (1-4), and press
Output On or Output Off.
• Output On activates the output.
• Output Off deactivates the output.
ADTT16E ADVANCED DOME CONTROLLER
QUICK REFERENCE GUIDE
8200-0306-03, REV. A1
3 of 7
Programming Patterns
Controller Sequence
Programming
1.
Select the camera where the Pattern will be
saved.
2.
Adjust the pan, tilt, zoom and focus settings for
the camera until the starting point of Pattern
appears on the monitor.
3.
Press Menu.
3.
4.
Scroll through the menu until Record Pattern
is displayed on the LCD. Press Zoom or Focus
to select.
4.
5.
Enter the Pattern number (1 - 3) that you want to
assign to this pattern.
6.
Move the camera around, zoom and focus as
necessary to create a logical camera pattern.
7.
1.
2.
5.
6.
When you complete creating the pattern, press
Next.
7.
SpeedDome LT Auto Pan Programming
8.
The auto pan for SpeedDome LT is programmed the
same as other Patterns with the following exceptions:
Only Pattern 1 can be programmed.
•
Any extraneous movements made during the Auto
Pan programming will be ignored when the
programming is complete.
•
1.
2.
3.
Lock/Unlock the Multiplexer
4.
To prevent or allow access to the front panel
functions on the multiplexer, use the lock/unlock
function.
Press Menu.
2.
Scroll through the menu items until
Tog MUX Lock appears on the LCD. Pressing
Zoom or Focus toggles the setting.
3.
•
If lock is enabled, Lock_key momentarily
displays on-screen.
•
If lock is disabled, Unlock_key momentarily
displays on-screen.
1.
2.
3.
Note: When locked, the Quest multiplexer front panel
4.
illuminates.
ADTT16E ADVANCED DOME CONTROLLER
QUICK REFERENCE GUIDE
Press Menu.
Scroll through the menu items until
Adj Backlighting appears on the LCD. Press
Zoom or Focus to select.
Press Previous and Next to change the setting.
• Previous makes the backlighting dimmer.
• Next makes the backlighting brighter.
When finished making changes, press Menu to
resume camera control mode.
Turn Key Click On / Off
Press Menu to resume camera control mode.
lock button
• For a Pattern, press Pattern. Enter the Pattern
number (1-3).
Move the cursor to the Dur field. Enter the event
duration time (1 to 90 seconds).
To program other events, repeat steps 3 through
6. When finished, press Zoom or Focus to save
the Sequence.
When you complete defining the Sequence,
press the Menu button. This returns the controller
to the camera control mode.
Adjust LCD Backlighting
Do not attempt to create an Auto Pan that is
greater than one revolution (360º) of the
SpeedDome LT.
1.
Move the cursor to the Act field. Do one of the
following:
• For a Quick View or fixed shot, press View.
Enter the Quick View number (1-96) or press
Clear to remove numbers for a fixed shot.
Note: If you make a mistake during programming
and no longer want to program the pattern, press
Clear.
•
Press Menu.
Scroll through the menu until Define Sequence
appears on the LCD. Press Zoom or Focus to
select.
Use the Tracker Ball to scroll to the event you
want to define. If necessary, press Clear to
remove any previously programmed information.
Enter the camera number in the Cam field.
Press Menu.
Scroll through the menu items until Key Click
On/Off appears on the LCD. Press Zoom or
Focus to select.
The current key click setting appears on the LCD.
Press Next to change the setting.
• Keyclick ON indicates that key click sound is
enabled.
• Keyclick OFF indicates that key click sound
is disabled.
When finished making changes, press Menu to
resume camera control mode.
8200-0306-03, REV. A1
4 of 7
Adjust Key Click Volume
Quest Multiplexer Support
1. Press Menu.
The ADTT16E advanced dome controller provides
support for the MultiVision Quest triplex
multiplexer. The following table describes which
controller features are used with the Quest triplex
multiplexer.
2. Scroll through the menu items until
Adj Keyclick Vol appears on the LCD.
Press Zoom or Focus to select.
3. Press Previous or Next to change the setting.
• Press Previous to make the volume softer.
• Press Next to make the volume louder.
4. When finished making changes, press Menu to
resume camera control mode.
Changing the Controller
Language Setting
1. Press Menu.
2. Scroll through the menu items until
Select Language appears on the LCD.
Press Zoom or Focus to select.
3. The list of supported languages appears on the
LCD, two items at a time. The following
languages are available:
•
•
•
•
English
French
Spanish
German
•
•
•
•
Dutch
Italian
Japanese
Portuguese
• Swedish
• Hungarian
Initiates or selects one of three
multiplexer sequence screens.
B
Toggle between multiplexer digital
zoom and zoom area adjustment.
C
Toggle between freeze frame and
freeze field mode.
D
Exit current multiplexer mode.
Tracker
Ball
Adjust position of highlighted
window or zoom area.
(Display)
Change display format between
available multiplexer window
formats.
(Camera)
Zoom/
Focus
4. Scroll through the list until the preferred
language setting appears. Press Zoom or
Focus to activate the language setting.
Assign cameras to windows in
multiplexer display format.
Select page to program for selected
multiplexer sequence.
The ADTT16E Advanced Dome Controller
System Operator’s Manual (8200-0306-02)
describes in detail how to use the controller to
access the Quest multiplexer functions. Refer to
this manual for more information about the
supported functions.
The controller automatically restarts to activate the
new setting.
ADTT16E ADVANCED DOME CONTROLLER
QUICK REFERENCE GUIDE
A
8200-0306-03, REV. A1
5 of 7
Table 1: DirectSet Menu Items
Displaying Dome DirectSet
Menu
SpeedDome Ultra VII and other suitably equipped
domes provide a “DirectSet” menu to access
commonly used features. The Info button on the
ADTT16E controller is used to display this menu.
Figure 1: SpeedDome Ultra VII 22x DirectSet
Menu
0
1
2
3
4
15
16
17
20
TOGGLE QUICK SET MENU
DOME CONFIG MENU
AUTO IRIS/AUTO FOCUS
FLIP
PEEL PATTERN
SMOOTH SCAN
STEPPED SCAN
RANDOM SCAN
DOME INFORMATION
Figure 2: SpeedDome Ultra VII Day/Night
DirectSet Menu (2 pages)
0
1
2
3
4
10
11
12
13
14
FOCUS
15
16
17
20
TOGGLE QUICK SET MENU
DOME CONFIG MENU
AUTO IRIS/AUTO FOCUS
FLIP
PEEL PATTERN
NIGHT MODE
DAY MODE
AUTO DAY/NIGHT MODE
WDR ON
WDR OFF
FAR = next page
SMOOTH SCAN
STEPPED SCAN
RANDOM SCAN
DOME INFORMATION
0+Info: Toggle
Quick Set Menu
Toggles between displaying
and hiding the DirectSet
menu.
1+Info: Dome Config
Menu
Displays the SpeedDome
Ultra configuration menu.
Refer to the dome manual
for information about the
available settings.
2+Info: Auto
Iris/Auto Focus
Resumes Auto Focus/Auto
Iris mode.
3+Info: Flip
Rotates the SpeedDome
180° from its current
pointing direction. This is the
same as pressing the Flip
button on the controller.
4+Info: Peel
Pattern
Runs the default Apple Peel
Pattern. This is the same as
pressing the Peel button on
the controller.
10+Info: Night Mode
Day/Night dome only
Switches the dome to fulltime black-and-white (B/W)
mode. Day/Night dome only.
11+Info: Day Mode
Day/Night dome only
Switches the dome to fulltime color mode.
12+Info: Auto
Day/Night Mode
Day/Night dome only
Resumes the most recently
selected automatic IR mode
setting.
13+Info: WDR On
Day/Night dome only
Enables Wide Dynamic
Range.
14+Info: WDR Off
Day/Night dome only
Disables Wide Dynamic
Range.
15+Info: Smooth
Scan
Initiates a smooth 360°
clockwise rotation around
the dome axis using the
current tilt, zoom and focus
settings.
16+Info: Stepped
Scan
Initiates a clockwise rotation
around the dome axis
pausing briefly every 10°
using the current tilt, zoom
and focus settings.
17+Info: Random
Scan
Initiates a clockwise or
counterclockwise rotation
around the dome axis using
the current tilt, zoom and
focus settings. The dome
pauses randomly as it
rotates around the axis.
20+Info: Dome
Information
Displays the Dome
Information screen available
through the dome
configuration menu.
FOCUS NEAR = previous page
IMPORTANT! Flip and Peel Pattern are also
available by pressing the appropriate buttons on
the controller keypad.
•
To select a DirectSet menu item, enter the
menu item number and press Info.
•
To close the DirectSet menu without making a
selection, press Info (or 0 + Info).
Note: You can access any DirectSet feature by
entering the menu number and pressing Info even
if the DirectSet menu is not displayed.
ADTT16E ADVANCED DOME CONTROLLER
QUICK REFERENCE GUIDE
8200-0306-03, REV. A1
6 of 7
Specifications
Declarations
SensorNet
Regulatory Compliance
Bit Rate.......................................................... 230.4Kbps
Emissions ........................FCC: 47 CFR Part 15, Class A
CE: EN55022 Class B
CE: EN61000-3-2
CE: EN61000-3-3
AS/NZS 3548, Class A
CISPR22
ICES-003
Physical Layer ..........................Non-shielded twisted pair
Link Layer Protocol ................................................. SDLC
Application Protocol ........................................ Proprietary
Network Nodes ................................................ Controller,
SensorNet domes
Immunity ............................................... CE: EN50130-4
Advanced Dome Controller
Safety ........................................................... UL: UL1950
cUL: CSA 22.2 No. 950
IEC950
CE: EN60950
Operator Inputs........................................ 31-key keypad,
4 micro-switches,
1 Tracker Ball
Operator Outputs ...........................................LCD screen
(2-line x 16 characters)
FCC COMPLIANCE: This equipment complies with Part 15 of the
FCC rules for Class A digital devices when installed and used in
accordance with the instruction manual. Following these rules
provides reasonable protection against harmful interference from
equipment operated in a commercial area. This equipment should not
be installed in a residential area as it can radiate radio frequency
energy that could interfere with radio communications, a situation the
user would have to fix at their own expense.
Control Input/Output ......... SensorNet (domes, controller)
RS232 (multiplexer or quad splitter)
Electrical
Power Source: .............................. 16–30Vac at 50/60Hz
EQUIPMENT MODIFICATION CAUTION: Equipment changes
or modifications not expressly approved by Sensormatic Electronics
Corporation, the party responsible for FCC compliance, could void the
user's authority to operate the equipment and could create a hazardous
condition.
Power Consumption: .......................... 1400mA, 2A max.
Mechanical
Height .............................................................13cm (5in.)
Other Declarations
Width ...........................................................19cm (7.5in.)
Thank you for using American Dynamics products. We support our products
through an extensive and worldwide network of dealers. The dealer, through
whom you originally purchased this product, is your point of contact if you
have a need for service or support. Our dealers are fully empowered to provide
the very best in customer service and support. Dealers should contact American
Dynamics at (800) 507-6268 or (561) 912-6259 or on the web at
www.americandynamics.net.
Depth ............................................................26cm (10in.)
Weight ........................................................... 1kg (2.2lbs)
Environmental
Operating Temperature: .................................... 0°–50°C
(32°–122°F)
WARRANTY DISCLAIMER: Sensormatic Electronics Corporation makes no
representation or warranty with respect to the contents hereof and specifically
disclaims any implied warranties of merchantability or fitness for any particular
purpose.
Relative Humidity: ............................................. 0%–95%
non-condensing
NOTICE: The information in this manual was current when published. The
manufacturer reserves the right to revise and improve its products. All
specifications are therefore subject to change without notice.
Storage Temperature: ..................................... -20°–64°C
(-4°–149°F)
LIMITED RIGHTS NOTICE: For units of the Department of Defense, all
documentation and manuals were developed at private expense and no part of it
was developed using Government Funds. The restrictions governing the use and
disclosure of technical data marked with this legend are set forth in the definition
of “limited rights” in paragraph (a) (15) of the clause of DFARS 252.227.7013.
Unpublished - rights reserved under the Copyright Laws of the United States.
Product Compatibility
Domes ................................. All SpeedDome Optima and
SpeedDome Ultra Series domes
TRADEMARK NOTICE: Touch Tracker, American Dynamics and
Sensormatic are trademarks or registered trademarks of Sensormatic Electronics
Corporation. Other product names mentioned herein may be trademarks or
registered trademarks of Sensormatic or other companies.
J-Boxes ..................... All versions of Indoor and Outdoor
SensorNet J-Boxes
Quads ................................... All Sensormatic, Robot and
American Dynamics Quads
COPYRIGHT: Under copyright laws, the contents of this manual may not be
copied, photocopied, reproduced, translated or reduced to any electronic medium
or machine-readable form, in whole or in part, without prior written consent of
Sensormatic Electronics.
Multiplexers ....................................... Robot/Sensormatic
Simplex and Duplex models
(includes Multivision Pro series)
Multivision Quest series triplex models
BSL 2/2004
www.americandynamics.net
ADTT16E ADVANCED DOME CONTROLLER
QUICK REFERENCE GUIDE
8200-0306-03, REV. A1
7 of 7