1
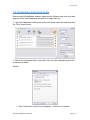
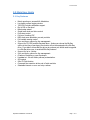
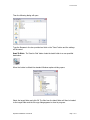
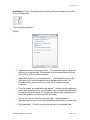
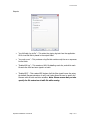
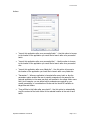
Ripstation DataGrabber Operating Manual V 1.0.35.0 or higher Ripstation A Division of Formats Unlimited, Inc 155 Sherwood Avenue Farmingdale, NY 11735 T: +1 631 249 9393 F: +1 631 249 9273 Author: Robert Warnock [email protected] www.mfdigital.com/techsupport.html © Copyright 2013 100-5-01-000 Copyright All rights within this document and related software belong to Formats Unlimited. Ripstation is a registered trademark of Formats Unlimited. BY USING THIS SOFTWARE YOU ARE AGREEING TO THESE TERMS AND CONDITIONS. This software (the SOFTWARE) is prepared as a solution to dealers, systems integrators. This SOFTWARE is provided as is and with warranty only as detailed in the applicable License agreement. Ripstation specifically disclaim to the fullest extent permitted by law all warranties, expressed or implied, including but not limited to implied warranties of merchantability and fitness for a particular purpose, with respect to this software. Ripstation shall have no liability including without limitation in negligence with respect to this software. Ripstation shall have no liability including without limitation in negligence with respect to any loss or damage directly or indirectly arising out of the use of this software. Without limiting the foregoing, Ripstation shall not be liable, including without limitation in negligence for any loss of profit, interruption of business, loss or damage to equipment or data, interruption of operations or any other damage, including but not limited to direct, special, incidental or consequential damages. This software must not be used for unauthorised duplication of CD's or any other works protected by copyright unless permitted by law. No license to infringe copyright is granted by the possession, installation and/ or use of this software. Any statutory rights you may have are unaffected. Ripstation DataGrabber User Manual Page 2 of 23 Software EULA 100-5-01-000 Software EULA End User Software License Agreement for Ripstation Software NOTICE TO ALL USERS: PLEASE CAREFULLY READ THE FOLLOWING LEGAL AGREEMENT ("AGREEMENT") FOR THE LICENSE OF Ripstation ("SOFTWARE") BY Formats Unlimited, Inc. ("FUI"). BY CLICKING THE ACCEPT BUTTON OR INSTALLING THE SOFTWARE, YOU (EITHER AN INDIVIDUAL OR A SINGLE ENTITY) CONSENT TO BE BOUND BY AND BECOME A PARTY TO THIS AGREEMENT. IF YOU DO NOT AGREE TO ALL OF THE TERMS OF THIS AGREEMENT, CLICK THE BUTTON THAT INDICATES THAT YOU DO NOT ACCEPT THE TERMS OF THIS AGREEMENT AND DO NOT INSTALL THE SOFTWARE. 1. License Grant. Subject to the payment of the applicable license fees, and subject to the terms and conditions of this Agreement and a pre agreed License term, FUI hereby grants to you a non exclusive, non transferable right to use one copy of the specified version of the Software and the accompanying documentation (the "Documentation") on one computer only unless otherwise agreed. 2. Term. This Agreement is effective for an unlimited duration unless and until earlier terminated as set forth herein. This Agreement will terminate automatically if you fail to comply with any of the limitations or other requirements described herein. Upon any termination or expiration of this Agreement, you must destroy all copies of the Software and the Documentation. You may terminate this Agreement at any point by destroying all copies of the Software and the Documentation. 3. Ownership Rights. The Software is protected by International copyright laws and international treaty provisions. FUI and its suppliers own and retain all right, title and interest in and to the Software, including all copyrights, patents, trade secret rights, trademarks and other intellectual property rights therein. Your possession, installation, or use of the Software does not transfer to you any title to the intellectual property in the Software, and you will not acquire any rights to the Software except as expressly set forth in this Agreement. 4. Restrictions. You may not rent, lease, loan, sublicense or resell the Software. You may not permit third parties to benefit from the use or functionality of the Software via a timesharing, service bureau or other arrangement. You may not transfer any of the rights granted to you under this Agreement. You may not reverse engineer, decompile, or disassemble the Software, except to the extent the foregoing restriction is expressly prohibited by applicable law. You may not modify, or create derivative works based upon, the Software in whole or in part. You may not copy the Software or Documentation. Except that you may either (a) make one copy of the Software solely for backup or archival purposes, or (b) transfer the Software to a single hard disk provided that you keep the original solely for backup or archival purposes. You may not remove any proprietary notices or labels on the Software. All copies must contain the same proprietary notices that appear on and in the Software. All rights not expressly set forth hereunder are reserved by FUI. 5. Warranty and Disclaimer. a. Limited Warranty. FUI warrants that for sixty (60) days from the date of original purchase the media (e.g., CD Rom) on which the Software is contained will be free from defects in materials and workmanship. Ripstation DataGrabber User Manual Page 3 of 23 Software EULA 100-5-01-000 b. Remedies. FUI and its suppliers' entire liability and your exclusive remedy for any breach of the foregoing warranty shall be, at FUI’s option, either (i) return of the purchase price paid for the license, if any, or (ii) replacement of the defective media in which the Software is contained. You must return the defective media to FUI at your expense with a copy of your receipt. This limited warranty is void if the defect has resulted from accident, abuse, or misapplication. Any replacement media will be warranted for the remainder of the original warranty period. c. Warranty Disclaimer. Except for the limited warranty set forth herein, THE SOFTWARE IS PROVIDED "AS IS." TO THE MAXIMUM EXTENT PERMITTED BY APPLICABLE LAW, FUI DISCLAIMS ALL WARRANTIES, EITHER EXPRESS OR IMPLIED, INCLUDING BUT NOT LIMITED TO IMPLIED WARRANTIES OF MERCHANTABILITY, FITNESS FOR A PARTICULAR PURPOSE, TITLE AND NONINFRINGEMENT WITH RESPECT TO THE SOFTWARE AND THE ACCOMPANYING DOCUMENTATION. YOU ASSUME RESPONSIBILITY FOR SELECTING THE SOFTWARE TO ACHIEVE YOUR INTENDED RESULTS, AND FOR THE INSTALLATION OF, USE OF, AND RESULTS OBTAINED FROM THE SOFTWARE. WITHOUT LIMITING THE FOREGOING PROVISIONS, FUI MAKES NO WARRANTY THAT THE SOFTWARE WILL BE ERROR FREE OR FREE FROM INTERRUPTIONS OR OTHER FAILURES OR THAT THE SOFTWARE WILL MEET YOUR REQUIREMENTS. SOME STATES AND JURISDICTIONS DO NOT ALLOW LIMITATIONS ON IMPLIED WARRANTIES, SO THE ABOVE LIMITATION MAY NOT APPLY TO YOU. The foregoing provisions shall be enforceable to the maximum extent permitted by applicable law. 6. Limitation of Liability. UNDER NO CIRCUMSTANCES AND UNDER NO LEGAL THEORY, WHETHER IN TORT, CONTRACT, OR OTHERWISE, SHALL FUI OR ITS SUPPLIERS BE LIABLE TO YOU OR TO ANY OTHER PERSON FOR ANY INDIRECT, SPECIAL, INCIDENTAL, OR CONSEQUENTIAL DAMAGES OF ANY CHARACTER INCLUDING, WITHOUT LIMITATION, DAMAGES FOR LOSS OF GOODWILL, COMPUTER FAILURE OR MALFUNCTION, OR FOR ANY AND ALL OTHER DAMAGES OR LOSSES. IN NO EVENT WILL TOPIARY BE LIABLE FOR ANY DAMAGES IN EXCESS OF THE LIST PRICE TOPIARY CHARGES FOR A LICENSE TO THE SOFTWARE, EVEN IF TOPIARY SHALL HAVE BEEN ADVISED OF THE POSSIBILITY OF SUCH DAMAGES. FURTHERMORE, SOME STATES AND JURISDICTIONS DO NOT ALLOW THE EXCLUSION OR LIMITATION OF INCIDENTAL OR CONSEQUENTIAL DAMAGES, SO THIS LIMITATION AND EXCLUSION MAY NOT APPLY TO YOU. The foregoing provisions shall be enforceable to the maximum extent permitted by applicable law. 7. Miscellaneous. This Agreement is governed by the laws of the Ireland, without reference to conflict of laws principles, and the parties agree that the sole location and venue for any litigation which may arise hereunder shall be Ireland. The application of the United Nations Convention of Contracts for the International Sale of Goods is expressly excluded. This Agreement sets forth all rights for the user of the Software and is the entire agreement between the parties. This Agreement supersedes any other communications with respect to the Software and Documentation. This Agreement may not be modified except by a written addendum issued by a duly authorized representative of FUI. No provision hereof shall be deemed waived unless such waiver shall be in writing and signed by FUI or a duly authorized representative of FUI. If any provision of this Agreement is held invalid, the remainder of this Agreement shall continue in full force and effect. The parties confirm that it is their wish that this Agreement has been written in the English language only. 8. The Software and Documentation are provided with Restricted Rights. 9. You agree not to export this software unless previously agreed with FUI Copyright © 2002 2006 Formats Unlimited, Inc. All Rights Reserved. Ripstation DataGrabber User Manual Page 4 of 23 Software EULA 100-5-01-000 Overview DataGrabber is a dedicated software tool to allow for batch transfer of data files from Blu-Ray*, DVD or CD utilising MF Digitals’ 7602/7604 robotic autoloaders. DataGrabber will take any Data Blu-Ray, DVD or CD and create an ISO image or the resulting file structure from the disc itself, creating a local copy, for use in archive or backup applications. The application operates on the Windows Platform. The product is designed for use by individuals, system integrators and service providers and offers flexibility, ease of use and high throughput at the core of its operation. This document provides a user manual to allow basic and advanced operation as well as customisation of all parameters, set up and use of robotics for a complete end to end process. * Please Note, a Blu-ray drive upgrade is necessary to support Blu-ray data ripping – this can be added at time of purchase as an optional upgrade to your system. DataGrabber WILL NOT rip Blu-ray discs without a Blu-ray drive. Ripstation DataGrabber User Manual Page 5 of 23 Software EULA 100-5-01-000 Contents 1.0 Hardware Installation ................................................................................................ 7 1.1 Robotic Hardware ......................................................................................................... 7 1.2 Step by step guide of Robotic Hardware 7602/7604 .................................................... 7 1.2.1 STEP ONE Remove the Packing Constraints ............................................................ 7 1.2.2 STEP TWO Plug in the Peripherals (KVM PC inside units only) ............................. 7 2.0 DataGrabber Quick Start Guide ............................................................................... 8 3.0 Main User Guide ....................................................................................................... 11 3.1 Key Features ............................................................................................................... 11 3.2 DataGrabber Main Screen: Advanced Options........................................................... 12 3.2.1 Button and Screen Operations ................................................................................. 12 3.2.1.1 Group 1: loader type............................................................................................ 12 3.2.1.2 Group 2: Select an output format ........................................................................ 13 3.2.1.3 Group 3: Enter disc count and type ..................................................................... 13 3.2.1.4 Group 4: Folder name and destination ............................................................... 14 3.2.1.6 Group 6: Batch Status Window............................................................................ 21 3.2.1.7 Group 7: Batch Logging Window ........................................................................ 21 3.2.2 Main Screen Menu Options ..................................................................................... 21 4.0 Help and Support ...................................................................................................... 22 Appendix – Director and Scribe Installations.................................................. 23 Ripstation DataGrabber User Manual Page 6 of 23 100-5-01-000 1.0 Hardware Installation This section details a set of instructions for correct assembly of the robotic hardware (if purchased). It begins by listing the items contained within the packaging. 1.1 Robotic Hardware The autoloader box should contain: 1. 2. 3. 4. The robotic hardware system Power cable Quick Setup Instructions Warranty & support documents 1.2 Step by step guide of Robotic Hardware 7602/7604 1.2.1 STEP ONE Remove the Packing Constraints Carefully remove the autoloader from its carton, lifting from the bottom using the hand cut outs in the foam base. DO NOT attempt to lift the machine using the spindles, column tower, or pick arm, as these are delicate pieces and are depended on for proper alignment and functioning of the unit. Place the system on a level workspace free of debris, dust, humidity, excessive heat, and electronic or electromagnetic interference. Keep out of direct sunlight. Allow at least six inches of clearance on all sides of unit for ventilation. Remove protective plastic cover from system and save along with the rest of the packaging. 1.2.2 STEP TWO Plug in the Peripherals (KVM PC inside units only) Plug in a monitor (VGA DSUB), keyboard and mouse (PS2 or USB) to the robot Attach the Ethernet cable. Using the enclosed 3 prong power cord, plug in the autoloader to a properly grounded AC receptacle. It is highly recommended that a surge protector is used to ensure safety in operation. Power on the unit using the main switch at the back Windows will now load and you will see the Ripstation Desktop Double click the icon for Ripstation DataGrabber to run the ripper application. Ripstation DataGrabber User Manual Page 7 of 23 100-5-01-000 2.0 DataGrabber Quick Start Guide Before using the DataGrabber software, please use the following steps as a ‘quick start’ guide to set the initial parameters and perform a simple batch rip. 1. Open the DataGrabber software and on the main screen select the loader type and the “Files” output format. 2. Click on the preferences button, open each of the four tabs individually and set the preferences as below: Rejects Check “Reject discs which are not recognised...” and set to 2.5 minutes. Ripstation DataGrabber User Manual Page 8 of 23 100-5-01-000 Check “Copy file creation and modification time stamps” SQL All options left blank Reports Check “log full batch log to file” Ripstation DataGrabber User Manual Page 9 of 23 100-5-01-000 Actions All options left blank Then click OK to exit the preferences. 3. On the main screen enter the number of discs you wish to rip, or enter 0 to have it rip continuously 4. Choose the folder name by entering it into the text box and then the destination directory for the files to be ripped to by clicking the icon. For the first test batch it is recommend that you rip to D:\Local Data\ and use the variables of Test\%n %v\ This will rip the data disc to the local hard drive. 5. Once all the details have been entered, click the start batch button ripping to begin Once all of your discs are ripped, you will see a folder on your local hard drive with all the Data titles. Ripstation DataGrabber User Manual Page 10 of 23 100-5-01-000 3.0 Main User Guide 3.1 Key Features Batch reporting on successful & failed discs Live batch process logging window 7602/7604 robotic autoloader support Rip to ISO or files level Batch setup wizard Single touch start and drive control Drive stop control Full error checking CRC MD5 check sum calculation pre and post disc Full variable naming control Sync and Async options for disc management Support for CD, DVD and Blu-Ray data discs - Unless you choose the Blu-Ray option at the time of purchase, the robotics will not be equipped with a Blu-Ray drive. If you didn’t choose Blu-Ray drives at purchase you would need to upgrade to a Blu-Ray drive now, to enable all Blu-Ray features. Support for up to 4 drives Sync and Async options for disc management Creation of matching or new file stamps Userdata.txt - file and folder pathway customisation. SQL output Send To Disk function Command line execution at the end of batch and disc Selectable timeout on error and retry routines Ripstation DataGrabber User Manual Page 11 of 23 100-5-01-000 3.2 DataGrabber Main Screen: Advanced Options The DataGrabber main user interface is shown below. Operations are carried out using the button controls and information is displayed throughout the rest of the screen. The user interface is split into groups from 1 to 7 and Section 3.2.1 of the manual details each of these groups in turn. 3.2.1 Button and Screen Operations 3.2.1.1 Group 1: loader type Here the user will select from the dropdown list, which type of device they will be using, whether it is manual or MFD (7602/7604). When MFD is selected the advanced button becomes active and allows further settings to be changed. These settings are com port selection, shake mode and drive placement. Ripstation DataGrabber User Manual Page 12 of 23 100-5-01-000 3.2.1.2 Group 2: Select an output format The option to rip to an ISO image or just to rip the actual files on the disc is available. To change between one and the other is simple, as the user will just select the option for the type of output they desire from the dropdown box. The following variables are available: %v %n %i %s Volume name Incremental counter Unique ID Volume Serial Number If you choose ISO, you should have the default pathway of %n %v\%v entered under folder name and if you choose Files you should have the default pathway of n %v\ entered under folder name. The pathways are fully editable and you can use any of the specified above variables. File extension is automatically set. Through the use of UserData.txt, DataGrabber allows complete customisation of the file and folder naming path through a system of user defined variables (Documentation on the userdata.txt process is included in the program folder and can be accessed through the Windows start menu for the application). IMPORTANT NOTE: The software will not rip multisession DVD or Blu-ray to “ISO/MDF” format. This is not supported. These discs can be ripped to the “Files” format without any issues. 3.2.1.3 Group 3: Enter disc count and type Here the user will enter the amount of discs to rip, or they can set it to 0 to rip indefinitely. If you only want to rip ONLY certain file type from a disc you can enter the file extension in the File Type Filter box. For example if I only wanted mp3 files I would enter mp3 in the File Type Filter box as below: If you want to rip more than one file please enter the extensions and separate with a comma as below: Ripstation DataGrabber User Manual Page 13 of 23 100-5-01-000 3.2.1.4 Group 4: Folder name and destination The user will enter the folder name mask to ensure each folder name is unique, and will choose the destination they want all the files saved to. 3.2.1.5 Group 5: Buttons The 5 buttons are as follows: Start – This button starts the batch Load – This button loads the settings from a customised “settings.dat” file To load a “Settings.dat” file click on the load button on the main user interface as shown below: Ripstation DataGrabber User Manual Page 14 of 23 100-5-01-000 Then the following dialog will open: Select the required file and click on the “Open” button and the settings will be loaded. Save – This button saves the settings to a “settings.dat” file To save a “Settings.dat” file click on the save button on the main user interface as shown below: Ripstation DataGrabber User Manual Page 15 of 23 100-5-01-000 Then the following dialog will open: Type the filename in the box provided and click on the “Save” button and the settings will be saved. Send To Disk – The ‘Send to Disk’ button loads the batch folder to a user specified destination. When the button is clicked the standard Windows explorer dialog opens: Select the target folder and click OK. The files from the batch folder will then be loaded to the target folder and the file copy dialog appears to show its progress. Ripstation DataGrabber User Manual Page 16 of 23 100-5-01-000 Preferences – Click on the preference icon and the preferences dialog will open with its four individual tabs. The four tabs are as follows: Rejects “Reject discs which are ripping too slowly” - This enables the user to reject discs that the unit is ripping slowly. The threshold for the minimum speed can be set from 0.25x to 3.00x in regular increments. “Reject discs which are not recognised within” - This enables the user to reject discs that the unit cannot recognise within a specified period of time. The threshold for the rejection can be set from 2.5 to 25 minutes in regular increments. “Copy file creation and modification time stamps” – Switching this on enables the user to copy across the source files and folders original creation and modification time stamps. When this option isn’t checked new creation and modification time stamps are created for the files when they are ripped. “Do not warn the user when the reject pile is full” – When selected the application will not warn the user if the application has rejected 16 or more discs. “Rip sequentially” – This will rip and unload the discs in a sequential order. Ripstation DataGrabber User Manual Page 17 of 23 100-5-01-000 SQL DataGrabber offers full SQL reporting. This will only connect to MS SQL or MS SQL Lite. DG uses stored procedures to allow your DBA to customise their own data table structure unique to your organisations requirements. Please see the SQL folder in the main program folder for SP lists and connection details. You must set up a valid and authenticated SQL DB with your own structure before you attempt to connect. At this stage you will require your server name (localhost or remote), DB username and password. Hitting the TEST button will check the connection is valid. IMPORTANT NOTE: MF Digital do not offer support on SQL integration. This is the responsibility of the user and his/her DBA. Ripstation DataGrabber User Manual Page 18 of 23 100-5-01-000 Reports “Log full batch log to file” – This writes the ripping log text from the application UI to a text file that is placed in the output folder. “Log only errors” – This produces a log file that contains only the error responses from a batch. “Enable XML log” – This creates an XML file detailing each disc, and within each file each disc that has been ripped in a batch. “Enable MD5” – This creates MD5 hashes of all the files ripped from a disc using the default filename extension of md5, and it also allows the user to specify the filename with all batch and disc variables. Note: Please ensure that you also specify the file extension of md5 file while naming Ripstation DataGrabber User Manual Page 19 of 23 100-5-01-000 Actions “Launch this application after every successful batch” – Use this option to browse to the location of the application you would like to launch after every successful batch. “Launch this application after every successful disc” – Use this option to browse to the location of the application you would like to launch after every successful disc. “Launch this application after every failed disc” – Use this option to browse to the location of the application you would like to launch after every failed disc. “Parameters” – When an application is launched after every batch or disc the parameters option enables the user to specify parameters to be passed to the external application in the same way they are specified in the output folder name field. As an example, you can utilise switch parameters as required by your specific executable, or a combination of these and the inbuilt DG variables to target files and folders. “Copy all files to this folder after every batch” - Use this option to automatically copy the content of the batch folder to the selected location at the end of each batch. Ripstation DataGrabber User Manual Page 20 of 23 100-5-01-000 Help – Click on the help button to open the help file and search the manual. 3.2.1.6 Group 6: Batch Status Window The batch status window is designed to give a dynamic preview of the current batch job, listing the attached drives, ability to optionally select each drive or not, the progress of each drive and the ability to skip the disc in that drive. 3.2.1.7 Group 7: Batch Logging Window Real time logging of robotic operation, disc loading, metadata lookup, ripping and encoding process and failed discs. Each log entry is time stamped. 3.2.2 Main Screen Menu Options Right click on DataGrabber in the taskbar and the following window will be displayed as shown below: Ripstation DataGrabber User Manual Page 21 of 23 100-5-01-000 4.0 Help and Support Support terms are detailed in client specific contracts, but at minimum shall include 24 hour support via our online helpdesk. In addition we offer an extended warranty package which includes remote access to your site from our headquarters and extended hardware warranty coverage. Support response is guaranteed within 24 hours. Contact details: Ripstation A Division of Formats Unlimited, Inc 155 Sherwood Avenue Farmingdale, NY 11735 EU Support: T: +44-28-90022342 US Support: T: +1-631-249-9393 F: +1 631-249-9273 [email protected] www.mfdigital.com/techsupport.html Ripstation DataGrabber User Manual Page 22 of 23 100-5-01-000 Appendix – Director and Scribe Installations When using DataGrabber or MediaGrabber on the same unit as Director or Scribe, please ensure that spindle select is turned off and Director or Scribe is rebooted. If the Spindle Select is not turned off using the following procedure, the software will display an error and the batch will fail. Director Turn off the Spindle Select by deselecting the “Separate CD/DVD Spindles” option in Director, then click Apply in the bottom right of the screenshot below and reboot the computer. Scribe Turn off the Spindle Select option in Scribe then click OK and reboot the computer. Ripstation DataGrabber User Manual Page 23 of 23