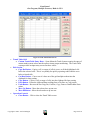
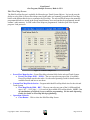
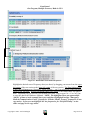
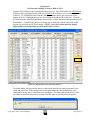
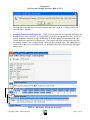
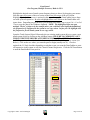
1
ScanControl Version 7.1.x PSR-500, PSR-600, PRO-106, PRO-197 Users Guide One Program, Multiple Scanners, Made in USA Copyright 2009 – 3D Technologies ScanControl One Program, Multiple Scanners, Made in USA ScanControl User’s Guide Version 7.1.x – 03/2009 PSR-500, PSR-600, PRO-106, PRO-197 Introduction Table of Contents INTRODUCTION..............................................................................................................................................2 TABLE OF CONTENTS ................................................................................................................................................2 SOFTWARE OVERVIEW .............................................................................................................................................3 SOFTWARE ARCHITECTURE .....................................................................................................................................3 MINIMUM SYSTEM REQUIREMENTS ........................................................................................................................3 THE BASICS ...............................................................................................................................................................4 GETTING STARTED....................................................................................................................................................5 MAIN CONTROL SCREEN ..........................................................................................................................................6 GLOBAL SETTINGS SCREENS ....................................................................................................................................8 VSCANNER FOLDER MANAGEMENT ......................................................................................................................14 EDIT OBJECTS SCREENS .........................................................................................................................................15 EDIT FLEET MAP SCREEN ......................................................................................................................................25 SCANLIST VIEW SCREEN ........................................................................................................................................26 DATAGRABBER OVERVIEW ....................................................................................................................................28 USING THE DATAGRABBER ....................................................................................................................................28 IMPORT CSV FILE DATA SCREEN..........................................................................................................................36 RADIO CONTROL / MONITOR SCREEN...................................................................................................................36 PROGRAM OPTIONS SCREEN ..................................................................................................................................39 INTELLIGENT AUDIO CAPTURE (IAC)...................................................................................................................44 IMPLEMENTING INTELLIGENT AUDIO CAPTURE (IAC) .......................................................................................44 LOAD FILE SCREEN .................................................................................................................................................51 SAVE FILE SCREEN..................................................................................................................................................51 APPENDIX.......................................................................................................................................................53 TABLE OF FIGURES .................................................................................................................................................53 LIMITED SOFTWARE WARRANTY:.........................................................................................................................54 Copyright 2009 – 3D Technologies Page 2 of 54 ScanControl One Program, Multiple Scanners, Made in USA Software Overview ScanControl has been developed to provide sophisticated scanning radio monitoring, control and automation. It currently supports the Uniden BC95XLT, BC245XLT, BC895XLT, BC898T, BCT8, BC780XLT, BC250D, BC296D, BC785D, BC796D, SC230, BC246T, BR330T, BCD396T, BCT15, BCD996T, PSR-500, PSR-600 and the Radio Shack PRO2052, PRO-106 and PRO197. Visit our Web Site at http://www.scannersoft.com for the latest product details and software version information. Software Architecture The software has been developed to provide two basic types of functionality: 1. Scanner Memory Management (SMM) Scanner Memory Management (SMM) solves the problem of having to manually enter frequencies and Talkgroup IDs into the radio but it goes far beyond this convenience. SMM provides functionality for programming frequencies, Channel tags, control attributes (Priority, Delay, Lockout, Attenuate, Trunked), Talkgroup IDs and Talkgroup Tags into your Personal Computer (PC), saving them to your PCs hard disk, recalling them from your PCs hard disk, programming them into your scanner and printing them. The program supports creating, saving, recalling programming and uploading (from the scanner) an unlimited number of scanner data files. Each file is an exact copy of the scanner’s memory structure with the addition of Bank, Channel and Talkgroup ID tags (alphanumeric descriptors) so you can easily identify the Bank, Channel and Talkgroup IDs. This feature makes it very convenient to create and store multiple scanner data files organized any way you want that can then be programmed into the scanner in minutes. 2. Scanner Monitoring and Control (SMC) Scanner Monitoring and Control (SMC) provides direct radio monitoring and control simulating the radio keypad operation on your PC. It also provides a Scan and Search Hit List capability with Hit tagging and Hit exportation directly into .CSV (Excel) format. Minimum System Requirements • • • • • • • Personal Computer (i486 or higher) running Microsoft Windows ME, NT, 2000, XP, Vista or higher Minimum Monitor Screen Resolution of 800 X 600 (w/Small Fonts) (1024 X 768 Recommended) BASIC Edition - Uniden BC95XLT or SC230 RACE Edition - Uniden SC230 or BR330 FULL Uniden Edition - Uniden BCT8, BC95XLT, BC245XLT, BC895XLT, BC898T, BCT8, BC780XLT, BC250D, BC296D, BC785D, BC796D, SC230, BC246T, BR330T, BCD396T, BCT15, BCD996T or Radio Shack PRO2052 Scanner FULL GRE Edition - GRE Manufactured Radio: PSR-500, PSR-600, Radio Shack PRO-106, PRO197 PRO Edition - Uniden BCT8, BC95XLT, BC245XLT, BC895XLT, BC898T, BCT8, BC780XLT, BC250D, BC296D, BC785D, BC796D, SC230, BC246T, BR330T, BCD396T, Copyright 2009 – 3D Technologies Page 3 of 54 ScanControl One Program, Multiple Scanners, Made in USA • • • BCT15, BCD996T, Radio Shack PRO2052 AND GRE Manufactured PSR-500, PSR-600, Radio Shack PRO-106, PRO197 Intelligent Audio Capture (IAC) requires a PC Sound Card with available audio input jack and an audio cable to connect the scanner audio output to the sound card input. Cable type will vary with specific sound card jack requirements. Scanner to PC Serial Port Cable (USB Interface is not supported in these radios, but USB to serial port converters are available – see our Web Site at http://www.scannersoft.com) Available Serial Port on PC (COM1 through COM15) The Basics In order for the user to get the most out of ScanControl an explanation of the terminology used throughout the program and this guide would be helpful and would provide the best general understanding of the program’s features and functionality. • Scanner’s Radio Memory – Non-volatile storage of Channel frequencies, control attributes and Talkgroup IDs (trunked Banks) in the scanner. • Non DMA Radios – Radios that do not employ Dynamic Memory Architecture. These are the BC95XLT, BC245XLT, BC895XLT, BC898T, BCT8, BC780XLT, BC250D, BC785D, BC296D, BC796D and the PRO2052. • DMA Radios – Radios that employ Dynamic Memory Architecture. These are the SC230, BC246T, BR330T, BCD396T, BCT15 and the BCD996T. • GRE Radios – Radios manufactured by GRE and sold as the GRE PSR-500, PSR-600, Radio Shack PRO-106, PRO-107. • ScanControl Memory Area – The active PC memory area (RAM) being used by ScanControl. The user interacts with this memory area when entering frequencies, alphanumeric tags, Fleet Maps and Talkgroup IDs into the ScanControl program. • ScanControl Data File – A PC data file on hard disk containing a complete set of radio memory information. • Program Radio – Copy ScanControl Memory Area information into the scanner’s radio memory. • Upload or Load Memory – Copy the scanner’s radio memory information into the ScanControl Memory Area. • VScanner Folders – Virtual Scanner folders that can be read from and written to a GRE radio. • Scanner Objects – A stored object in a GRE radio such as a conventional frequency, talkgroup ID, search range, sweeper range or a trunk system. Logging – ScanControl has detailed function logging. This feature can be turned on or off from the Main Control Screen. When active each program action is time stamped and logged into a file (<drive>:\<install directory path>\Scanctrl.log) for history and audit purposes. The log file has a size maximum of 100KB. When the log reaches 100KB the program automatically archives it into a time stamped file (e.g. scanctrl071602143220.log) and creates a new, empty log file. Intelligent Audio Capture (IAC) – During Control / Monitoring sessions ScanControl can capture and record the audio from the scanner. The audio is recorded to your PCs hard drive in digitized audio files located in a folder in the ScanControl installation directory. This folder name would be <drive>:\<install directory path>\audio_capture\). The audio files would then be separated into Copyright 2009 – 3D Technologies Page 4 of 54 ScanControl One Program, Multiple Scanners, Made in USA separate files & folders depending on the IAC grouping chosen on the ScanControl Program Options screen. Getting Started 1. Connect scanner to an available PC serial port via the cable supplied by the scanner manufacturer. 2. Turn scanner power on. 3. Start the ScanControl software by clicking on START, PROGRAMS, SCANCONTROL from the Start Menu or by selecting <drive>:\<install directory path>\Scanctrl.exe from within Windows Explorer. 4. When ScanControl starts it attempts to connect to the scanner automatically by searching all available COM ports and displays the screen below: Figure 1 - Radio Search Screen It detects the Baud Rate and COM port in use by the radio automatically. If for some reason ScanControl cannot connect to your radio automatically you will get an error message. Check your radio, cable, etc. again. If you get this message you have 3 options: 1) Abort – Exit the program. 2) Retry – Attempt to connect to the radio again. 3) Ignore – Proceed through the error message and go to the Main Control Screen. Once the correct COM port and speed are detected and communications with the radio is established these settings will be saved and used by ScanControl every time it is run in the future until the radio is reconfigured. Once radio communication is established the first time you may get a warning message saying “Data File Not Forward Compatible … “. This is normal if you are not connecting a BC245XLT scanner to ScanControl. As a default ScanControl expects a BC245XLT radio. Click on OK to continue through the message. ScanControl then remembers the radio now connected and establishes it as your default. Copyright 2009 – 3D Technologies Page 5 of 54 ScanControl One Program, Multiple Scanners, Made in USA Main Control Screen The Main Control Screen is the first screen presented to the user once all the program initiation steps have completed. It provides all feature / function selection and program status information to the user. It contains several sections organized by function as described below. Figure 2 - Main Control Screen • Scanner Section – Displays radio communications status information, communications options settings and performs basic radio control. o Radio Status Window – RED = No radio connected, GREEN = Radio connected and type displayed. o Communications Speed (Baud) – ScanControl automatically detects the baud rate set in your radio during initialization and sets this value accordingly. This value is then stored in your configuration session file for future use. If you change the baud rate in your radio ScanControl will automatically re-configure itself the next time you start the program or the next time you click on the “Connect Radio” button. ScanControl supports a maximum baud rate of 115,200. o Communications Port (Port) – ScanControl automatically detects the COM Port your radio is connected to during initialization (provided the radio is powered ON and in remote mode) and sets this value accordingly. This value is then stored in your Copyright 2009 – 3D Technologies Page 6 of 54 ScanControl One Program, Multiple Scanners, Made in USA configuration session file for future use. If you change the port your radio is connected to ScanControl will automatically re-configure itself the next time you start the program or the next time you click on the “Connect Radio” button. Ports COM1 through COM9 are supported. o Connect / Disconnect Radio Button – Click to attempt to connect to radio after communications settings in radio are changed or when radio is switched to a different type. Click to disconnect radio to change radios without having to exit and restart ScanControl. Facilitates switching radios in mid session or disconnecting current radio in order to operate on data files from different radio types. o Global Settings Button - Click to open the Global Settings Screens (See Below). These screens are used to set global functions in the radio such as display backlighting, screen contrast, etc. Copyright 2009 – 3D Technologies Page 7 of 54 ScanControl One Program, Multiple Scanners, Made in USA Global Settings Screens The Global Settings Screens provide for viewing, changing and storing global radio attributes in GRE radios. Global Settings are radio settings that affect overall use of the radio. These settings make the radio highly configurable and provide the user powerful flexibility. Refer to your GRE radio Owner’s Manual for details on each of the settings and their purpose. Global Settings Screen Figure 3 - Global Settings Screen o Welcome Msg Frame: – The user can edit the 4 opening message lines of text that appear when the radio is powered on. The maximum # of characters per line is 16. o Priority Frame: - The user can modify the radio Priority settings. o Battery Frame – The user can select the radio Battery settings. Check your radio owner’s manual for details on what these settings control. o Misc Frame: – The user can modify these miscellaneous radio settings. Check your radio owner’s manual for details on what these settings control. o Operation Controls Copyright 2009 – 3D Technologies Page 8 of 54 ScanControl One Program, Multiple Scanners, Made in USA Prog To > Button – Programs all ScanControl data into the radio, including the Global settings made on this screen. > Load Fr Button – Loads all radio data into ScanControl, including the Global settings made on this screen. Close Button – Closes the Global Settings Screens WX / QText Settings Screen Figure 4 – WX / QText Settings Screen o WX SAME Frame: – The user can modify and update the SAME weather emergency settings. o WX Settings Frame: - The user can set the weather priority channel and attenuate any of the 7 weather channels. o QuickText Frame: – The user can modify the 10 available Quick Text fields. o Operation Controls Prog To > Button – Programs all ScanControl data into the radio, including the settings made on this screen. Copyright 2009 – 3D Technologies Page 9 of 54 ScanControl One Program, Multiple Scanners, Made in USA > Load Fr Button – Loads all radio data into ScanControl, including the settings made on this screen. Close Button – Closes the Global Settings Screens Audio / Visual Settings Screen Figure 5 – Audio / Visual Settings Screen o Backlight Frame: – The user can modify the radio backlight settings. Options marked “(600)” are only available on the PSR-600 / PRO-197 models. o Audio/Visual Frame – The user can modify the audio / visual settings available on the radio. o Global LED Colors Frame: - The user can set the Global LED colors according to their preference. The Global LED colors then become the basis for color selections for the LED flash and solid settings per object. o Operation Controls Prog To > Button – Programs all ScanControl data into the radio, including the settings made on this screen. > Load Fr Button – Loads all radio data into ScanControl, including the settings made on this screen. Copyright 2009 – 3D Technologies Page 10 of 54 ScanControl One Program, Multiple Scanners, Made in USA Close Button – Closes the Global Settings Screens Advanced Settings Screen Figure 6 - Advanced Settings Screen o Global Advanced Settings Frame – The user can modify the advanced settings in the radio. CAUTION: These settings, if not adjusted properly, can negatively impact the performance of the radio. It is recommended only expert users make these adjustments. The “Defaults” button can be used to reset all values to their default settings. o Lock All Settings Checkbox – Prevents accidental changes to values on this screen. This box must be unchecked to make any adjustments. o Operation Controls Prog To > Button – Programs all ScanControl data into the radio, including the Global settings made on this screen. > Load Fr Button – Loads all radio data into ScanControl, including the Global settings made on this screen. Close Button – Closes the Global Settings Screens Copyright 2009 – 3D Technologies Page 11 of 54 ScanControl One Program, Multiple Scanners, Made in USA • Data File Ops Section – Manages ScanControl Data File Operations. o New File Button – Click to create a new, empty ScanControl Data File. If there is no radio connected (see Connect / Disconnect button use above) then the radio selection screen, shown below, will be displayed allowing the user to select which radio type the new file will be configured for. You will be given the option to clear the ScanControl Memory Area. If you select NO the action will be aborted and the new file will not be created. If you select YES the ScanControl Memory Area will be cleared and a new empty file will be created and saved under the name you enter. Figure 7 - Radio Selection Screen • o Load File Button – Click to load an existing ScanControl Data File into the ScanControl Memory Area. You will be given the option to save the current data file, if it has changed, before it is overwritten. o Save File Button – Click to save the current ScanControl Memory Area to a data file on the PC’s hard disk. You can save the current data file using its current name or you can enter a new name for it thereby creating a different data file. o Current File Window – Displays the name of the current active data file. o Updated On Window – Displays the date the active data file was last updated. o From Radio: - Displays the type of radio the current active data file was created for. When a data file is loaded into ScanControl, and no radio is connected to your PC, ScanControl automatically reconfigures itself for the radio type found in the data file. This feature allows the user to make data edits to any data file, regardless of which radio it was created for, even if no radio is connected. o V-Scanner Button – Click to open the VScanner Folder Management screen (See Below). o Import Data Files Button – Click to open the Import Data Files screen (See Below). NOTE: This feature for GRE radios may not be available upon initial release of ScanControl Version 7.1. It will be made available in a subsequent release at no additional cost to licensed users. ScanList Navigator Section The ScanList Navigator displays a current list of the 23 available ScanLists with their assigned names. The user can view the contents of any ScanList by double clicking on the desired ScanList Navigator entry. A “*” in the far left column next to a ScanList name entry indicates the ScanList is enabled. o Edit Objects Section Conven – Opens the Conventional Object editor. Talkgrps - Opens the Talkgroup Object editor. Copyright 2009 – 3D Technologies Page 12 of 54 ScanControl One Program, Multiple Scanners, Made in USA • • • • Lim Srch - Opens the Limit Search Object editor. Svc Srch - Opens the Service Search Object editor. Sweep - Opens the Sweeper Object editor. Trunk Sys - Opens the Trunk System Object editor. o SLists View Button - Opens the ScanList View screen. o Print Button – Click to print all radio data. Load Fr / Prog To Radio Section o From Button – Selects direction of data flow: FROM loads data from the radio. o To Button - Selects direction of data flow: TO programs data to the radio. o All Data Button – Click to proceed with Loading or Programming all data from or to the radio. Functions Section o Control / Monitor Radio Button – Click to open the Control / Monitor radio screen. o Program Options Button – Launches the Program Options screen. (See detail screen description below.) o Logging Checkbox – Enables / disables the program logging function. The initial default is to have logging enabled. Checking or un-checking this box changes the default setting. Operations Controls o Exit Button – Click to exit the program. All updated default settings are stored and if any ScanControl Memory Area changes have been made you will be given the option to save them in the existing file or save them in a new file. Status Display Section o Status Display Window – Displays program status information. o Date Display Window – Displays the current system date. o Time Display Window – Displays the current system time. Copyright 2009 – 3D Technologies Page 13 of 54 ScanControl One Program, Multiple Scanners, Made in USA VScanner Folder Management VScanner Folders are a unique feature of the GRE manufactured PSR-500, PSR-600, PRO-106 and PRO-197. A VScanner Folder is a special area of radio memory that is used to store an exact COPY of the active radio memory. The radio has 21 VScanner Folders available numbered 0 through 20. The ScanControl VScanner Folder Manager allows the user to read and store VScanner Folders that have been created in your radio, individually or en masse, on your PC hard drive. VScanner Folders stored on your hard drive serve as backups and copies of the folders in your radio and can be written back into your radio from ScanControl. All VScanner Folders are saved on your PC hard drive in a directory name “\VScanners\” found in the ScanControl Installation directory. A VScanner Folder file on your PC will have a .vs file extension. The name of the file will be “nn_yyyyyyyyy.vs” where nn is the folder number (00 – 20) and yyyyyyyyyyy is the name of the folder, either the alpha tag in the radio or a name entered by the user. If the “ALL” option is chosen during the Read process then all 21 VScanner Folders are saved in a new directory created in the “\VScanners\” directory named “\ALL_mmddyy_hhmm\” using the date and time of the save. Figure 8 - VScanner Folder Management Screen • VScanner Folder Selection o Folder # Drop Down List – The user can select an individual VScanner Folder to Read or Write OR the user can select “ALL” to Read or Write all Vscanner Folders in one step. o Use Folder Tag(s) Checkbox –If checked ScanControl will use the VScanner Folder alpha tag from the radio as part of the PC filename. o Read Fr Radio and Save File Button – Reads the individual selected VScanner Folder or all Folders from the radio and stores them on your PC hard drive. o Load File and Write to Radio Button – Loads the individual selected VScanner Folder or all Folders from your PC hard drive and writes them to the radio. Copyright 2009 – 3D Technologies Page 14 of 54 ScanControl One Program, Multiple Scanners, Made in USA • • o Erase Folder in Radio Button – Clears, or erases, a selected VScanner Folder in the radio. o Progress Bar – Displays the progress of each folder Read or Write. VScanner Folder Translation NOTE: This feature for GRE radios may not be available upon initial release of ScanControl Version 7.1. It will be made available in a subsequent release at no additional cost to licensed users. o Xlate SC Memory to VScanner Folder – TBD o XLate VScanner Folder to SC Memory - TBD Operation Controls o Close Button – Closes the VScanner Folder Management screen. Edit Objects Screens The ScanControl Object Editor is the single, common user interface for creating and editing scanner objects. These can be Conventional Objects, Talkgroup Objects, Limit Search Objects, Service Search Objects, Sweeper Objects or Trunk System Objects. Clicking on the appropriate tab across the top of the screen opens the desired editor. From this screen the user has complete control over all scanner objects. Copyright 2009 – 3D Technologies Page 15 of 54 ScanControl One Program, Multiple Scanners, Made in USA Figure 9 - Edit Objects Screen - Conventional • • • Object Tab Section (Common for all Object Edit Screens) o Object Count Window – Displays the number of objects of the type being edited and total number of objects in memory. E.g. 76/511 Objs is 76 Conventional Objects out of 511 Objects in memory. o Blocks Avail Window – Displays the number of available (free) memory blocks. o Sort By Drop Down List Box – The user can select which column in the editor grid is used to sort the display of the object data. o Sort Direction Button – The user can click to change the sort direction: Up = ascending, Dn = descending. o Active ScanLists Frame – The Active ScanLists frame appears when the user elects to edit the ScanLists column of an object. Checking the individual ScanList checkboxes for an object places that object into the chosen ScanList(s). The Default ScanList drop down list assigns the users’ preference for a default ScanList. The Default ScanList is assigned to every new object when the object is created. Views Section (Common for all Object Edit Screens) o ScanLists Button – Switches the screen to the ScanList View. o Objects Button – Switches the screen to the Object Editor. Edit Section (Common for all Object Edit Screens) o Add Row Button – Adds a new, initialized object to the end of the editor screen. o Cut Row Button – Cuts a complete object row, or several rows, and puts them into the clipboard for later pasting. o Copy Dn Button – Copies a cell, or a range of cells in the same row, to all the highlighted cells below the selected range. This is very handy for quickly repeating settings into the rows below a cell or range of cells. o Copy Button – Copies a cell, range of cells or complete rows into the clipboard for later pasting. o Paste Button – Pastes the clipboard data resulting from a Cut Row or Copy action. . When pasting a cell or range of cells the destination paste range MUST begin in the same left column as the original Copy. When pasting complete rows the destination must be selected by selecting a complete row or rows. o Undo Button – Reverses the last Cut Row, Copy Dn, Copy, Paste or DataGrabber Paste action. o DG Paste Button – Performs a DataGrabber Paste. See the DataGrabber section of this document below. o DG Edits Button – Opens the DataGrabber Edits screen (see below). Copyright 2009 – 3D Technologies Page 16 of 54 ScanControl One Program, Multiple Scanners, Made in USA • • o Print Button – Prints all objects in the Object Editor. Radio Section (Common for all Object Edit Screens) o Prog To > Button - Programs all ScanControl data into the radio. o > Load Fr Button – Loads all radio data into ScanControl memory. Operation Controls o Close Button – Click to close the Object Editor or ScanList View screen. Copyright 2009 – 3D Technologies Page 17 of 54 ScanControl One Program, Multiple Scanners, Made in USA Figure 10 - Edit Objects Screen - Talkgroup IDs Copyright 2009 – 3D Technologies Page 18 of 54 ScanControl One Program, Multiple Scanners, Made in USA Figure 11 - Edit Objects Screen - Limit Search Copyright 2009 – 3D Technologies Page 19 of 54 ScanControl One Program, Multiple Scanners, Made in USA Figure 12 - Edit Objects Screen - Service Search Copyright 2009 – 3D Technologies Page 20 of 54 ScanControl One Program, Multiple Scanners, Made in USA Figure 13 - Edit Objects Screen - Sweeper Copyright 2009 – 3D Technologies Page 21 of 54 ScanControl One Program, Multiple Scanners, Made in USA Figure 14 - Edit Object Screen - Trunk Systems Copyright 2009 – 3D Technologies Page 22 of 54 ScanControl One Program, Multiple Scanners, Made in USA Figure 15 - Edit Trunk Frequencies Screen • • • Trunk Frequency Grid o Frequency Entry Rows – A trunk system can have up to 32 trunk system frequencies assigned. These frequencies can be entered into the grid above manually, pasted using the DataGrabber Paste function or pasted from the clipboard containing frequencies copied from another trunk system Trunk Frequencies screen. Edit Section o Copy Dn Button - Copies a cell to all the highlighted cells below the selected cell. This is very handy for quickly repeating values into the rows below a selected cell. o Copy Button - Copies a cell into the clipboard for later pasting. o Paste Button - – Pastes the clipboard data resulting from a Copy action. o Undo Button - Reverses the last Copy Dn, Copy, Paste or DataGrabber Paste action. o DG Paste Button - Performs a DataGrabber Paste. See the DataGrabber section of this document below. o CC Only Checkbox – When checked tells the DataGrabber to only paste Control Channel frequencies as designated on the RadioReference.com web page. o Move Up Button – Move the selected value up one row. o Move DnButton - Move the selected value down one row. Operation Controls o Close Button – Click to close the Trunk Frequency screen. Copyright 2009 – 3D Technologies Page 23 of 54 ScanControl One Program, Multiple Scanners, Made in USA Figure 16 - Edit Trunk Table Screen • • • Trunk Table Grid o Custom Trunk Table Entry Rows – Some Motorola Trunk Systems require the entry of custom trunk system values into the radio to insure proper monitoring. The Trunk Table screen provides an input entry screen for these values. Edit Section o Copy Dn Button - Copies a cell, or range of cells in a row, to all the highlighted cells below the selected cells. This is very handy for quickly repeating values into the rows below selected cells. o Cut Row Button – Cuts a row of values out of the grid and places them into the clipboard for later pasting. o Copy Button - Copies a cell, or range of cells, into the clipboard for later pasting o Paste Button - Pastes the clipboard data resulting from a Cut Row or Copy action. o Undo Button - Reverses the last Copy Dn, Cut Row, Copy, Paste or DataGrabber Paste action. o Move Up Button - Move the selected row up one row. o Move DnButton - Move the selected row up one row. Operation Controls o Close Button – Click to close the Trunk Table screen. Copyright 2009 – 3D Technologies Page 24 of 54 ScanControl One Program, Multiple Scanners, Made in USA Edit Fleet Map Screen The Edit Fleet Map Screen is available for Motorola type Trunk System Objects. It gives the user the ability to select from 16 Preset Fleet Maps stored in the radio or to manually program the 8 Fleet Map blocks with different block sizes to customize the Fleet Map. The selected Preset map or the manually programmed blocks are stored in the ScanControl Memory Area and can then be programmed into the scanner’s radio memory. In GRE radios Fleet Maps are programmed / loaded as part of the System program / load processes. Figure 17 - Edit Fleet Map Screen • • • Preset Fleet Maps Section – Preset Fleet Map selection fields for the selected Trunk System. o Preset Fleet Maps: E1P1 – E1P16 – The user can select any one of the 16 available Preset Fleet Maps stored in the radio. See the radio Operating Guide for details on the available Presets and how to use them. Custom Fleet Map Blocks Section – Program individual Fleet Map block sizes for the selected Trunk System o Fleet Map Blocks: Blk0 – Blk7 – The user can select any one of the 16 different block sizes (“S0” – “S14” plus “—“) for each of the available 8 Fleet Map blocks. NOTE: Not all combinations of all block sizes are valid for programming. See the radio Operating Guides for details on Fleet Map block programming. Operations Controls o Close Button – Click to close the Edit Fleet Map Screen. Copyright 2009 – 3D Technologies Page 25 of 54 ScanControl One Program, Multiple Scanners, Made in USA ScanList View Screen ScanList view is a special object display screen showing scanner objects grouped according to the ScanLists the objects are assigned into. The radio contains 20 ScanLists, numbered 1 – 20, and 3 additional “special” ScanLists: Not Scanned, Favorites and Skywarn. When you click on a ScanList tab the view displays all the objects that are assigned to that ScanList. Editing of objects in this view is limited to assigning new or additional ScanLists (double click in the ScanLists cell for the row) to the object or adding the object to the Favorites or Skywarn ScanLists. If you need to edit other object details you can double click on the “Object Type” for that row and you will be taken to the correct Object Editor row for that object. While viewing a ScanList tab you can also enable that ScanList (putting the list into the scan rotation) by checking the “Enable” checkbox at the top of the tab. Figure 18 - ScanList View Screen • Object Tab Section o ScanList Name Field – Enter the alpha tag of the ScanList. This tag will appear in the radio display when the ScanList is enabled or being assigned. o Object Count Window – Displays the number of objects in the ScanList and total number of objects in memory. E.g. 18/511 Objs is 18 Objects out of 511 Objects in memory. Copyright 2009 – 3D Technologies Page 26 of 54 ScanControl One Program, Multiple Scanners, Made in USA • • • • o Blocks Avail Window – Displays the number of available (free) memory blocks. o ScanList Enable Checkbox – Enables / disables the ScanList in the scan rotation. o Sort By Drop Down List Box – The user can select which column in the ScanList View grid is used to sort the display of the object data. o Sort Direction Button – The user can click to change the sort direction: Up = ascending, Dn = descending. Views Section (Common for all Object Edit Screens) o ScanLists Button – Switches the screen to the ScanList View. o Objects Button – Switches the screen to the Object Editor. Edit Section (Common for all Object Edit Screens) o Copy Dn Button – Copies a cell, or a range of cells in the same row, to all the highlighted cells below the selected range. This is very handy for quickly repeating settings into the rows below a cell or range of cells. o Print Button – Prints all objects displayed in the currently selected ScanList. o All Checkbox – Changes the Print button function to print all objects in all ScanLists Radio Section (Common for all Object Edit Screens) o Prog To > Button - Programs all ScanControl data into the radio. o > Load Fr Button – Loads all radio data into ScanControl memory. Operation Controls o Close Button – Click to close the Object Editor or ScanList View screen. Copyright 2009 – 3D Technologies Page 27 of 54 ScanControl One Program, Multiple Scanners, Made in USA DataGrabber Overview Go to our DataGrabber web page ( www.scannersoft.com/datagrabber.htm ) for brief demonstration videos showing how to use the DataGrabber features. The ScanControl DataGrabber revolutionizes the way you program frequency and talkgroup data into your scanner. Instead of manually typing hundreds of numbers and text tags into your PC you simply drag your mouse to highlight the frequency and talkgroup information you want, click Ctrl+Ins (the Windows copy keystroke) or your browser's Edit, Copy function and then click the Paste button in ScanControl. Tailored to work with RadioReference.com now, the popular on-line and most up to date radio system database, and other Web data sources in the future, the DataGrabber makes it easy and quick to capture radio system data and program it into your scanner. (Terms of use: Use of the ScanControl DataGrabber is not intended to circumvent the requirement for a user subscription to RadioReference.com for downloading RadioReference.com data. 3D Technologies, the makers of ScanControl, urges its ScanControl users to abide by the Terms of Use for the data presented on RadioReference.com and purchase a subscription to their service in order to support their continuing efforts in maintaining the vast amount of radio system data they deliver over the public Internet. 3D Technologies will not be responsible for individual users found to be in violation of the RadioReference.com Terms of Use through the use of DataGrabber technology.) • DataGrabber Intelligence - Other scanner programming software products offer data "imports" from RadioReference.com. But they import entire systems in one step and then the data needs to be manually configured and manipulated to fit your radio's memory structure or your personal preferences, or both. The DataGrabber gives you the flexibility to "grab" all the data in a system, or only the data you want, and paste it into the ScanControl editors "intelligently". During pasting the DataGrabber knows your radio's memory structure (objects, banks & scanlists or systems, sites & groups) and offers options that make it easy to optimize your scanner memory and configure the data grouped the way you want it. • Data Aware - The ScanControl DataGrabber is "data aware" during the pasting process. This means it knows the difference between conventional frequencies, trunk frequencies and talkgroup IDs and uses that knowledge to capture and configure the data for the type of scanner object you are programming. Conventional frequencies are brought over with alpha tags, CTCSS codes and modulation modes intact. Trunk frequencies are pasted correctly for single or multiple site systems. Talkgroup IDs are pasted with format checking so you're sure of getting the right format for the trunk system type. Even LCN values are carried over for EDACS and LTR systems. Using the DataGrabber • Grabbing Conventional Frequencies - Using the RadioReference.com RR Database select a State and County to display the radio system data you are looking to capture. Scroll your web browser up or down to display the frequency or talkgroup ID data. See the example page below … Copyright 2009 – 3D Technologies Page 28 of 54 ScanControl One Program, Multiple Scanners, Made in USA Figure 19 – DataGrabber:Conventional Frequencies Highlight the desired rows of frequency data (see above) by dragging your mouse from the upper left corner of the row section to the lower left corner of the row section. The DataGrabber needs to have the field name row (“Frequency, Input, License, … etc.”) in at least one of the copy steps on any given web page. Be sure to highlight entire rows of data or the DataGrabber will ignore them. Depending on your browser you can then select Edit, Copy or type Ctrl + C or Ctrl + Ins to copy the data to the Windows clipboard. NOTE: The highlighted area can span multiple “blocks” of data so in the example above you could have highlighted both the “Emergency Medical Communications Center” frequencies AND the “Bethel, Town of” frequencies in one copy action. In fact you can highlight ALL the frequencies for “Fairfield County” on the entire web page in one copy action. Copyright 2009 – 3D Technologies Page 29 of 54 ScanControl One Program, Multiple Scanners, Made in USA Open the Object Editor to the Conventional Objects screen. The DataGrabber can APPEND the frequency rows to the data already in the list or PASTE the frequency rows over the data already in the list. To APPEND the data click the Add Row button to add a new object row to the bottom of the list. Highlight the new row by clicking on the Object ID for that row. Click the DG Paste button to start the DataGrabber Paste process. Follow the instructions presented by the DataGrabber. To PASTE the data over existing rows of data just click the Object ID for the desired row and click the DG Paste button. (NOTE: Your object editor may look slightly different than below depending on which model radio is in use.) Figure 20 – DataGrabber:Conventional Frequencies The DataGrabber will process the data rows and advise the user how many frequencies were found and processed. In the example above the DataGrabber has detected that some rows contained frequency pairs: both frequencies and inputs. The DataGrabber asks the user if he / she wants to paste both the primary frequency and the input or just the primary frequency. Copyright 2009 – 3D Technologies Page 30 of 54 ScanControl One Program, Multiple Scanners, Made in USA Clicking OK on the message screen will complete the Paste / Append. Clicking Cancel will abort the Paste / Append. • Grabbing Trunk System Frequencies – Trunk system frequencies are organized differently on RadioReference.com web pages. In a large trunk system they are organized by sites. A site is a specific transmitter location, usually identified by its location name, which transmits the radio system traffic on a specific set of frequencies. The system used in the example below has one site named “Primary” but a complex trunk system will have multiple sites. The DataGrabber is aware of the concept of a site and therefore can distinguish between each of the sites during the paste process. Figure 21 – DataGrabber:Trunk System Frequencies Copyright 2009 – 3D Technologies Page 31 of 54 ScanControl One Program, Multiple Scanners, Made in USA Highlight the desired rows of trunk system frequency data (see above) by dragging your mouse from the upper left corner of the row section to the lower left corner of the row section. Highlighting the field name row is optional in this type of copy. The DataGrabber knows these are trunk system frequencies. Be sure to highlight entire rows of data or the DataGrabber will ignore them. Depending on your browser you can then select Edit, Copy or type Ctrl + C or Ctrl + Ins to copy the data to the Windows clipboard. NOTE: The highlighted area can span multiple “blocks” of data so in the example above you could have also highlighted additional site frequencies if configured in the system in one copy action. In fact you can highlight ALL the frequencies for the trunk system in one copy action. Open the Trunk System Object Editor and select an existing trunk system object or create a new trunk system object by clicking on the Add Row button. BE SURE TO CORRECTLY SET THE SYSTEM TYPE BEFORE ATTEMPTING THE PASTE / APPEND. Double click on the Tr Frequencies column for the desired row to open the Edit Trunk Frequencies screen (See Below). Click on the row where you want the paste to begin (usually row #1). Check or uncheck the CC Only checkbox depending on whether or not you want the DataGrabber to paste all frequencies in the system or only the Control Channel frequencies. Click the DG Paste button to start the DataGrabber Paste process. Figure 22 – DataGrabber:Trunk System Frequencies Copyright 2009 – 3D Technologies Page 32 of 54 ScanControl One Program, Multiple Scanners, Made in USA The DataGrabber will process the data rows and advise the user how many frequencies were found and processed. Clicking OK on the message screen will complete the Paste. Clicking Cancel will abort the Paste / Append. • Multiple Site Copy / Paste – If you want to program multiple trunk system sites they may be configured as separate objects in the radio OR you can program all the sites’ control channels into one trunk system object. The DataGrabber does either of these for you automatically. When processing multiple sites the DataGrabber will ask if you want to paste all frequencies into the one object or split them into multiple objects. If you have chosen the CC Only option the DataGrabber will only paste the control channel frequencies. If you have not chosen the CC Only option the DataGrabber will attempt to paste all the trunk system frequencies. o Single Trunk System Object - If you answer No to the split question the DataGrabber will paste all sites’ frequencies, subject to the CC Only option, into the one trunk system object AND turn on the Roam option for the trunk system object. The Roam option tells the radio to sample all the programmed control channels and use the strongest signal. This allows you to roam around the trunk system and always have the strongest control channel signal. o Multiple Trunk System Objects – If you answer Yes to the split question the DataGrabber will paste each of the sites’ frequencies, subject to the CC Only option, into separate trunk system objects and turn on the Stat, or Stationary, option for those objects. The Stat option tells the radio to always use the primary control channel for that site. • Grabbing Trunk System Talkgroup IDs – Trunk system Talkgroup IDs are displayed in several different formats on RadioReference.com. The DataGrabber is aware of this and compensates for it during the paste process. The copy / paste process for Talkgroup IDs, however, is the same. Display the Talkgroup IDs on the RadioReference.com page in your browser. In the example below we are displaying one group of Talkgroup IDs but most trunk systems will have multiple groups on the page. Copyright 2009 – 3D Technologies Page 33 of 54 ScanControl One Program, Multiple Scanners, Made in USA Figure 23 – DataGrabber Talkgroup IDs Highlight the desired rows of TGID data (see above) by dragging your mouse from the upper left corner of the row section to the lower left corner of the row section. The DataGrabber needs to have the field name row (“DEC, HEX, Display, … etc.”) in at least one of the copy steps on any given web page. Be sure to highlight entire rows of data or the DataGrabber will ignore them. Depending on your browser you can then select Edit, Copy or type Ctrl + C or Ctrl + Ins to copy the data to the Windows clipboard. NOTE: The highlighted area can span multiple “blocks” of data so in the example above you could have highlighted both the “Zone C3 Talkgroups” AND the adjacent zone talkgroups in one copy action. In fact you can highlight ALL the talkgroup IDs on the entire page for the entire system in one copy action. Open the Object Editor to the Talkgroup Objects screen. The DataGrabber can APPEND the talkgroup rows to the data already in the list or PASTE the takgroup rows over the data already in the list. To APPEND the data click the Add Row button to add a new object row to the bottom of the list. Highlight the new row by clicking on the Object ID for that row. Click the DG Paste button to start the DataGrabber Paste process. Follow the instructions presented by the Copyright 2009 – 3D Technologies Page 34 of 54 ScanControl One Program, Multiple Scanners, Made in USA DataGrabber. To PASTE the data over existing rows just click the Object ID for the desired row and click the DG Paste button. NOTE: Before the DataGrabber can paste talkgroup objects it needs to know which trunk system object the pasted talkgroups will be assigned to. Existing talkgroup rows will already have a trunk system assigned but a new, added row will not. Before you can proceed with the paste the DataGrabber will ask you to select an existing trunk system object or create a new one to attach to the talkgroup objects that are about to be pasted. Figure 24 – DataGrabber Talkgroup IDs The DataGrabber will process the data rows and advise the user how many Talkgroup IDs were found and processed. Clicking OK on the message screen will complete the Paste / Append. Clicking Cancel will abort the Paste / Append. Copyright 2009 – 3D Technologies Page 35 of 54 ScanControl One Program, Multiple Scanners, Made in USA Import CSV File Data Screen NOTE: This feature for GRE radios may not be available upon initial release of ScanControl Version 7.1. It will be made available in a subsequent release at no additional cost to licensed users. Radio Control / Monitor Screen Figure 25 – GRE Radio Control / Monitor Screen • • • Display Section – Presents the contents of the radio LCD display in real time. Keypad Section – Replicates all the radio keypad functions. Search / Scan Hits Section – Provides display and function control of the Scan / Search Hits feature of ScanControl. o Search / Scan Hit List Window – Display list that gets populated with detailed information about individual Scan and Search Hits. Each line contains specific Copyright 2009 – 3D Technologies Page 36 of 54 ScanControl One Program, Multiple Scanners, Made in USA • • information about the Hit event. The check box □ on the left side of each Hit event can be used to flag a particular Hit event by the user. The user clicks on the checkbox to flag the Hit event. The flagged events are then easily distinguished from all the others in the list when reviewed or when the list is saved to the PCs hard disk. New Hit events are added to the top of the list and the list will hold up to the maximum number of Hits selected by the user in the Program Options screen. If the number of Hits exceeds the maximum then the list “rolls over” saving the newest Hits and overwriting the oldest. The Search / Scan Hit List can be scrolled horizontally to view the entire Hit data row. Additionally, the Hit duration is appended to the end of the data row when the transmission is complete. Each Hit line in the list contains the following data: “Hit#” “System Name” “Group Name” “Alpha Tag” “ID or Freq” “PL Code” “Date” “Time” “Hit Duration” “| separator” “# of hits for this ID/Freq” “Total Time for this ID / Freq hh:mm:ss” o CSV File Autosave Checkbox – Enables the Hit List Autosave function. If this checkbox is checked the Scan / Search Hit List will automatically be saved to the PCs hard disk when the Radio Control / Monitor screen is closed. This prevents the user from inadvertently losing the Hit List events when leaving the Control / Monitoring screen. The default for this checkbox is checked. o Log Srch/Scan Hits Checkbox – Enables the Scan / Search Hit logging function. If this checkbox is unchecked then no Hit event logging takes place. The default for this checkbox is checked. o Tag All Button – Turns on automatic tagging of all Search / Scan Hits. When clicked this button will tag all existing Search / Scan Hits AND it will start automatically tagging all new hits that arrive in the list. o Clr All Button - Turns off (Clears) automatic tagging of all Search / Scan Hits. When clicked this button will untag or clear all existing Search / Scan Hits AND it will turn off automatic tagging of all new hits that arrive in the list. o Clear List Button – Clears all entries from the Scan / Search Hit list box. o Hit Count Box – Displays the total current number of Search / Scan hits in the list. o Save List Button – Saves the entries from the Scan / Search Hit List box to a unique .CSV file on your PCs’ hard disk. The .CSV files will have a name like 071602143220.csv (the 071602143220 filename is based on the current date / time stamp when the save occurs) and be located in the <drive>:\<install directory path>\Search Hits\ directory. The .CSV files can then be directly loaded into Microsoft Excel. IAC Section o Record Time Display – Numeric display (0.00 Seconds) of audio recording time for the current Channel / TGID / Search Hit. This value displays RED when recording is paused and GREEN when recording is active. The time in seconds represents the TOTAL accumulated time for the Channel / TGID / Search Hit recording since the session began. o L / R Audio Level Display – Recording audio level bar graphs for the Left and Right channels of audio input. Some radios only output 1 channel (Mono) of audio. In those cases only the Left or Right bar graph will be active during recording. o Start / Stop / Res(ume) Button – Clicking Start begins the current recording session. Clicking Stop during the current recording session pauses the session. Clicking Res(ume) restarts the current session. Operations Controls Copyright 2009 – 3D Technologies Page 37 of 54 ScanControl One Program, Multiple Scanners, Made in USA • o Min View Button - Hide the full Control / Monitor screen and open the “always on top” Mini Monitor Screen (see below). o Help Button - Click to open this Help file. o Close Button – Click to close the Control / Monitor Screen and return to the Main Control Screen. Status Display Section o Status Display Window – Displays program status information. o Date Display Window – Displays the current system date. o Time Display Window – Displays the current system time. Figure 26 - Mini Monitor Screen • Scanner Monitor – Displays real time snapshot information about the active channel or talkgroup ID being monitored. o Freq / TG ID – Displays the active frequency or talkgroup ID. o Mode / Tag – Displays the Radio Mode or Alpha Tag associated with the frequency / talkgroup ID. o Sys / Obj – Displays the associated system and Object ID of the scan hit. o Hits – The current number of hits in the Search / Scan Hit list. Updated as new hits arrive. • Operations Controls o Hold Button – Places the radio in Hold mode to stop on the current channel / TGID. o Scan Button – Resumes Scan mode. o Max View Button – Close the Mini Monitor Screen and show the full Control / Monitor Screen. o On Top Checkbox – Checked – The Mini Monitor remains “always on top” of your Desktop. Unchecked – the Mini Monitor remains open and active but can be placed in the background of your Desktop as new applications are opened. NOTE: The Mini Monitor Screen can be positioned anywhere on your Desktop for maximum visibility and convenience. Copyright 2009 – 3D Technologies Page 38 of 54 ScanControl One Program, Multiple Scanners, Made in USA Program Options Screen (NOTE: Grayed out options indicate a feature / function not available or not applicable for a particular radio) The Program Options Screen allows the user to set various program option defaults and thus tailor the ScanControl environment. Each option is enabled when checked and disabled when unchecked. These values are stored as part of the current session and saved for all future sessions. In most cases these defaults can be temporarily overridden on their respective screens when using the program. However, these defaults will again be in effect when ScanControl is restarted. Figure 27 - Program Options Screen Copyright 2009 – 3D Technologies Page 39 of 54 ScanControl One Program, Multiple Scanners, Made in USA • • • • • • • • • • Program Logging (All Radios) - Program logging is a feature that logs all program activity to a file on your hard disk. Operations such as Edit Banks, Edit Talkgroups, Control / Monitor, Exit Program, etc. are captured and stored in the file so an audit trail of operations is available for reference and tracking. Setting can be overridden on the Main screen. Search / Scan Hit Logging (All Radios w/Control Monitoring) - Sets the default for Search / Scan Hit Logging on the Control / Monitor Screen. If checked Search / Scan Hit Logging is ON when you enter the Control / Monitor screen. If unchecked Search / Scan Hit Logging is OFF when you enter the Control / Monitor screen. Setting can be overridden on the Control / Monitor screen. Log Size (All Radios w/Control Monitoring) - Sets the Log Size for Search / Scan Hit Logging. When this value is reached during Hit Logging the log then "rolls over", i.e. the oldest logged hit is dropped from the list and the newest log hit replaces it at the top of the list. Logging does not stop when this maximum size is reached, it continues adding hits to the top of the list. Full Hit Log Save (All Radios w/Control Monitoring) - Sets the default for the Full Hit Log Save feature. When checked, during Control / Monitoring, ScanControl automatically creates a Hit Log CSV File whenever the log fills to the Log Size, and any multiple of the Log Size. No user message is displayed when this file is created so as to allow ScanControl to continue logging unattended while automatically saving the log every time the count reaches the log size or any multiple thereof. The Full Log Save CSV file will have a "FullLog" prefix on the filename. Search Hit Autostore (All Radios w/Control Monitoring) - Sets the default for Search Hit Autostore Mode on the Control / Monitor Screen. If checked Search Hit Autostore is ON when you enter the Control / Monitor screen. If unchecked Search Hit Autostore is OFF when you enter the Control / Monitor screen. Setting can be overridden on the Control / Monitor screen. Mute Mode (Uniden Models Only) - Sets the default for Mute Mode when programming and loading data to / from the radio. Mute mode ON automatically mutes the radio when performing these functions. Mute mode OFF does not mute the radio when performing these functions. Autosave CSV File (All Radios w/Control Monitoring) - Sets the default for Autosave CSV File Mode on the Control / Monitor Screen. If checked Autosave CSV File Mode is ON when you enter the Control / Monitor screen. If unchecked Autosave CSV File Mode is OFF when you enter the Control / Monitor screen. Setting can be overridden on the Control / Monitor screen. Delay Flag Default (Uniden Models Only) - Sets the default for the Delay Flag when initializing bank data. When checked the Delay Flag is set to ON when channel data is initialized. When unchecked the Delay Flag is set to OFF when channel data is initialized. Lockout Flag Default (Uniden Models Only) - Sets the default for the Lockout Flag for channels and talkgroups when initializing bank data. When checked the Lockout Flag is set to ON when channel or Talkgroup data is initialized. When unchecked the Lockout Flag is set to OFF when channel or Talkgroup data is initialized. Program “0” Frequencies (Uniden Non-DMA Models Only) - Sets the default for the Program “0” Frequencies mode on the Edit Banks and Edit ScanLists screens. When checked the Program “0” Frequencies mode is set to ON when you enter the editing screens. When unchecked the Program “0” Frequencies mode is set to OFF when you enter the editing screens. Setting can be overridden on the Edit Banks & Edit ScanList screens. Copyright 2009 – 3D Technologies Page 40 of 54 ScanControl One Program, Multiple Scanners, Made in USA • • • • • • Alpha Tag Default (Uniden Models Only) - Sets the default for the Alpha Tag values when initializing bank data. When checked the Alpha Tags are defaulted to a string with the Channel / Scanlist # in it, e..g “* Chnl Tag #27 *”. When unchecked the Alpha Tags are left blank when Channel / ScanList data is initialized. Duplicate Entry Check (Uniden Models Only) - Sets the default for frequency and Talkgroup ID duplicate entry checks. When checked the duplicate entry check is performed and the user is alerted if a duplicate frequency or Talkgroup ID is entered. When unchecked the duplicate entry check is not performed therefore the user is not alerted if a duplicate frequency or Talkgroup ID is entered. DataGrabber SmartTag (All Radios) – Enables / disables automatic alpha tag abbreviation during DataGrabber pastes. When enabled, commonly found phrases like "Police Dept" or "Public Service" are automatically abbreviated to "PD" and "Pub Svc" during the paste process. This results in shorter alpha tags that don't have their right end characters "chopped off" in ScanControl and in the radio's display. The list of phrases can be found in the file named “SmartTags.cfg” which is located in the ScanControl Installation Directory ( Default is “c:\program files\ScanControl” ) and can be amended by adding phrase pairs to the end of the file using any text editor. MAKE A COPY OF THE ORIGINAL SMARTTAGS.CFG FILE BEFORE AMENDING IT IN CASE IT NEEDS TO BE RESTORED. A phrase pair is a simple two word pair record with the words separated by a comma. A valid word pair would be [US, United States] without the brackets. The first word [US] is the desired abbreviation and the second word or phrase [United States] is the phrase to be abbreviated. If the user amends new phrase pairs to the file it is recommended the user make a copy of the updated file using a different file name so it can be restored after a software upgrade (the upgrade will replace the SmartTags.cfg file with a default list). DataGrabber Tag Prefix (All Radios) – Enables / disables automatic prefixing in bank style, non DMA radios. This option uses the "Group" name from RR.COM as an automatic prefix for the alpha tag going into a channel or talkgroup ID during a DataGrabber paste. If a group of frequencies is titled "Chesterfield County" in RR.com and there are 20 frequencies with their alpha tags in the group, the DataGrabber will append "Chesterfield Co" to the beginning of each alpha tag for each frequency. This makes the tags more meaningful when you're pasting a large number of channels from several groups into a bank during one paste step. DataGrabber Tag Pref (All Radios) – Selection for the DataGrabber alpha tag data source. The DataGrabber can use either the Alpha Tag field or the Description field on the radioReference.com web page for the alpha tag information during the DG Paste process. This option lets the user determine which is preferred. The selection is not absolute. If Alpha Tag is preferred but there is no Alpha Tag the DataGrabber will use the Description if one is available. If Description is preferred and there is no Description the DataGrabber will use the Alpha Tag if one is available. Comm Rate Slide Bar (Uniden Models Only) – Adjustment for the communications interface between the scanner and ScanControl running on your PC. ScanControl communicates with the scanner asynchronously through the serial port. Since much of that communication dialogue is timing dependent ScanControl needs a way to compensate for differences in PC speed, CPU loading and overall performance. This slider bar allows the user to “slow down” or “speed up” the communications handshaking to accommodate these differences. The small window below the slide bar displays the relative value selected (number from 1 to 19) with the default being a value of 10. The optimum setting for most radios is between 11 and 14. If you change this Copyright 2009 – 3D Technologies Page 41 of 54 ScanControl One Program, Multiple Scanners, Made in USA • • • • setting the new value will be stored as part of your session settings and recalled upon each future use of ScanControl. OPERATING TIP: If you are experiencing problems using ScanControl such as losing the connection to the radio, garbled or missing data in the radio or other error messages, selecting a lower number on the control should help correct this problem. If ScanControl is operating properly but appears to be running too slowly selecting a higher number on the control should increase performance. The caution, however, is if you increase the value too much the program may become unstable and communications with the scanner may cease to function until you reduce the setting back to an operating value. GRE Tag Justification – Sets the programmed justification for Alpha Tags in the radio. Options are Left, Cent(er) or Right. Initial Screen Location (All Radios) - Sets the default value for initial screen location for all screens. This option allows users with lower resolution monitors (800 X 600) to maximize the screen area to be used by ScanControl. 800 / 600 screen users may want to set this value to “Top Left” so they see full screens when the program runs. Higher resolution screen users would want this setting to be “Centered” in most cases. Print Columns (All Radios) - User can select the number of columns that will appear on a bank data printout. Choices can be made for Channel printouts and Talkgroup ID printouts. Intelligent Audio Capture (IAC) Options (All Radios w/Control Monitoring): o Audio Device – Drop down list containing available audio devices in the PC. Select the device that will be connected to the scanner for audio input. This is typically the PC’s sound card. o Audio Device Line – Drop down list containing the available device line(s) for the audio device selected above. A device line is a specific input to which the scanner’s audio output should be connected. Choices here might be line in, mic in, mixer, etc. o Format – Drop down list containing available sound file formats (i.e compression types) for storing the recorded audio. Only MP3 is supported in the initial release of ScanControl Version 6.x. o Wave Format – Drop down list containing available Bit Rate, Sampling Rate and Channel combinations. The higher the Bit and Sampling Rates the better the sound quality. However, the higher the Bit and Sampling Rates the larger the file size of the recorded audio file. Choose Mono or Stereo channels depending on whether or not your radio outputs audio in Mono or Stereo. o Group by – Drop down list containing IAC Group by options. Select an audio file "Grouping" option. The three current options are Session, Date/Time and Chnl / TGID. The Session option places all the audio files for all Chnls / TGIDs / Searches etc. into one folder labeled with a date / time stamp based on when the session started. The Date / Time option creates a folder hierarchy with the top folder being the Date, subfolders under it, one for each hour of the day and then each of the Chnl / TGID / Search etc. audio streams is placed into a folder based on the hour in which the audio stream began. The Chnl / TGID option creates a folder for each Chnl / TGID being monitored and places each audio stream file into the appropriate folder. o THold – Drop down list for selecting the silence threshold level. This threshold level tells ScanControl what audio input level value should be the threshold for what the software should consider as “silence”, or no audio. This value is used to determine when the audio recorder should turn on or off based on the amplitude of the incoming audio. Copyright 2009 – 3D Technologies Page 42 of 54 ScanControl One Program, Multiple Scanners, Made in USA This functions much like a VOX control on a voice activated tape recorder. The default level of 100 is optimized for almost all situations and should rarely have to be changed. Copyright 2009 – 3D Technologies Page 43 of 54 ScanControl One Program, Multiple Scanners, Made in USA Intelligent Audio Capture (IAC) Intelligent Audio Capture, or IAC, provides the ability to record to your PC hard disk the audio normally heard from your scanner’s speaker or earphones. These audio files can then be played back using any PC media file application such as iTunes or Windows Media Player. IAC is intelligent in that it records audio in “streams”. Each stream is a continuous audio recording of each channel, TGID or search hit that has been active during the recording session. ScanControl can currently accommodate up to 100 parallel active streams at one time. IAC also drops out any “dead air”, time when there is no activity on a particular channel, TGID or search hit. This means the final recording is a condensed, continuous stream of a single channel, TGID or search hit for the entire time the recording session is active. Of course, the scanner can only receive one channel, TGID or search hit at a time so the audio streams will be made up of only the audio segments, called snippets, that are actually received by the radio. See the diagram below: Each snippet represents a slice of time when the channel has gone active during a scanning / search session. If the radio stops on that time slice then IAC records that audio and places it in the file for that channel / TGID / search hit. If the radio does not stop on a particular channel / TGID / search hit because it is receiving another one, (e.g. snippet5 vs snippet2, snippet7 vs snippet1) then, of course, that piece of audio is never received so it cannot be recorded. The grey snippets below represent times when the channel / TGID / search hit went active but was not recorded because the radio was “listening” on another channel / TGID / search hit. Figure 28 - Intelligent Audio Capture Implementing Intelligent Audio Capture (IAC) 1. Audio From Your Scanner – The scanners that ScanControl supports have different methods of transferring the received audio to the PC. The table below shows each model ScanControl supports and the recommended way to connect the scanner to your PC’s sound card. Please note the cautions and warning statements in the chart as an incorrect connection can damage your radio, sound card or both. In all cases you will need an audio “patch” cable, stereo or mono depending on your radio, to connect your radio’s audio output to your PC’s sound card input. Our testing shows a stereo cable works with all radios even though some only output one channel. Pay particular attention to the Audio Volume from Radio column in the table below. On some radios the audio level (volume) has to be controlled using the volume control on the Copyright 2009 – 3D Technologies Page 44 of 54 ScanControl One Program, Multiple Scanners, Made in USA radio, in others the audio volume is output at a constant level regardless of where the volume control on the radio is set. ScanControl Intelligent Audio Capture (IAC) Radio Usage Parameters 3/24/2009 WARNING: Using incorrect audio output / input connections can damage your sound card and / or your radio. Radio Type BC245XLT BC895XLT BC898XLT PRO2052 BC780XLT BCT8 BC250D / BC296D BC785D / BC796D SC230 BC246T BR330T BCD396T BCT15 BCD996T PSR500 / PRO106 PSR600 / PRO107 Recommended Audio Connection(1) Earphone Jack >>> Sound Card LINE IN LINE Out >>> Sound Card LINE IN LINE Out >>> Sound Card LINE IN Earphone Jack >>> Sound Card MIC IN Audio Output from Radio Audio Volume from Radio Left + Right Chnl Left Chnl MONO Radio Volume Control Radio Volume Control Left Chnl MONO Constant Level Left Chnl MONO Radio Volume Control TAPE Out >>> Sound Left Chnl MONO Radio Volume Card LINE IN Control Ext Spkr >>> Sound Card Left Chnl MONO Radio Volume LINE IN Control Earphone Jack >>> Left + Right Radio Volume Sound Card LINE IN Chnl Control TAPE Out >>> Sound Left + Right Constant Level Card LINE IN Chnl Earphone Jack >>> Left + Right Radio Volume Sound Card LINE IN Chnl Control Earphone Jack >>> Left + Right Radio Volume Sound Card LINE IN Chnl Control Earphone Jack >>> Left + Right Radio Volume Sound Card LINE IN Chnl Control Earphone Jack >>> Left + Right Radio Volume Sound Card LINE IN Chnl Control REC Out >>> Sound Left + Right Constant Level Card LINE IN Chnl REC Out >>> Sound Left + Right Constant Level Card LINE IN Chnl Earphone Jack >>> Left + Right Radio Volume Sound Card LINE IN Chnl Control Earphone Jack >>> Left + Right Radio Volume Sound Card LINE IN Chnl Control Record Out Attribute(2) Comments S/W Only CAUTION: Adjust radio to minimum volume to avoid damage to sound card. CAUTION: Adjust radio to minimum volume to avoid damage to sound card. Radio + S/W Radio + S/W S/W Only Radio + S/W S/W Only S/W Only CAUTION: Adjust radio to minimum volume to avoid damage to sound card. Use MIC IN (high impedence) to avoid damage to radio. CAUTION: Adjust radio to minimum volume to avoid damage to sound card. CAUTION: Adjust radio to minimum volume to avoid damage to sound card. CAUTION: Adjust radio to minimum volume to avoid damage to sound card. Radio + S/W S/W Only S/W Only S/W Only S/W Only CAUTION: Adjust radio to minimum volume to avoid damage to sound card. CAUTION: Adjust radio to minimum volume to avoid damage to sound card. CAUTION: Adjust radio to minimum volume to avoid damage to sound card. CAUTION: Adjust radio to minimum volume to avoid damage to sound card. Radio + S/W Radio + S/W None None CAUTION: Adjust radio to minimum volume to avoid damage to sound card. CAUTION: Adjust radio to minimum volume to avoid damage to sound card. Figure 29 - IAC Usage Matrix 2. Configuring the PC Sound Card – The PC’s Sound Card is the means by which the radio’s audio is transferred into the PC for recording. Every PC sound card is different but almost all have multiple inputs and outputs. Your PC should have a sound card control utility similar to the one displayed below. There are two or three controls you need to adjust in order to have the audio coming from the scanner set to the proper volume level and input. Master Volume – The sound card should have a Master Volume control that should be set to the appropriate level. Recording Source (some cards) – The recording source control tells the sound card which input is being used as the source for the recorded audio coming into the PC. Input Control – The input control enables and disables the various inputs on the sound card and sets a volume level, subject to the Master Volume level, for the input. So, if your radio’s output is connected to the Line-In input of your sound card then you would do the following: Open the sound card control utility from your PC’s control panel. Enable (un-mute) the Line-In input of the sound card and set its volume level. Set the Recording Source to be the Line-In input. Set the Master Volume to be the appropriate level. If all these connections and settings are made correctly then you should Copyright 2009 – 3D Technologies Page 45 of 54 ScanControl One Program, Multiple Scanners, Made in USA be able to hear the radio’s audio coming from the PC speakers if your channels have been programmed to enable Record Out. The general rule of thumb is the volume level you hear from the PC speakers will be the volume level that is recorded by IAC, however, you should use the audio level bar graphs in the IAC section of the ScanControl Control / Monitor screen to verify the proper level. Figure 30 - PC Audio Control 3. Configuring IAC Program Options – Start ScanControl with your radio connected via the serial cable as you would normally and the audio cable as described above. Open the Program Options screen and set the Audio Device, Audio Device Line, Wave Format and Group by options as appropriate for your configuration. You should not have to adjust the THold setting, 100 is the recommended value. Save these settings and close the Program Options screen. Figure 31 - IAC Program Options 4. Starting a Recording Session – Once you have done all of the configuration steps above and you are hearing the radio’s audio through the PC speakers you are ready to start a recording session. From within ScanControl open the Control / Monitor screen. Click the Start button within the IAC Section of the Control / Monitor screen (see the Control / Monitor screen shot for your particular radio elsewhere in this document). The displays within the IAC Section will become un-greyed and as a scan or search hit is logged in the Scan / Search Hit window and audio is received from the radio you should see the Recording Time number counting up and the audio level bar graphs bouncing up and down indicating the recording level. Copyright 2009 – 3D Technologies Page 46 of 54 ScanControl One Program, Multiple Scanners, Made in USA 5. Completing a Recording Session – The IAC recording session will continue until you click the IAC Stop button or until you Close the Control / Monitoring screen in ScanControl. If you click the IAC Stop button its label will change to “Res” for resume, allowing you to resume the current session if you wish. 6. Playback of the Recorded Files – IAC recorded files are not played back through ScanControl. The files can be played back using any available PC media software such a iTunes or Windows Media Player. The files will be located on the PC’s hard drive in accordance with the folder structure established with the Group by IAC option set on the ScanControl Program Options screen. The screen shots below show how the IAC recording files are organized for each of the 3 Group by options. Using Windows Explorer the user can locate any of the IAC recording files and double click on them to invoke the default audio player and playback the recording. Copyright 2009 – 3D Technologies Page 47 of 54 ScanControl One Program, Multiple Scanners, Made in USA Group by option – Session: Time Session Folder w/ Date (012007) and Time (084824) Date Frequency / TGID# Channel / TGID Alpha Tag Figure 32 - IAC Session Group by Option Copyright 2009 – 3D Technologies Page 48 of 54 ScanControl One Program, Multiple Scanners, Made in USA Group by Option - Date / Time: Channel / TGID Alpha Tag Frequency / TGID# Date Time Date / Hour Folders Figure 33 - IAC Date / Time Group by Option Group by Option – Channel / TGID: Time Date Frequency / TGID# Channel / TGID Alpha Tag Channel / TGID Folders Figure 34 - IAC Chnl / TGID Group by Option Copyright 2009 – 3D Technologies Page 49 of 54 ScanControl One Program, Multiple Scanners, Made in USA 7. IAC Troubleshooting – If you are having trouble getting IAC to record your scanner’s audio the following flowchart should help. START Scanner Audio From PC Speakers/ Headphones? Audio Cable Connected? NO YES YES Sound Card Settings Correct? IAC Recording? NO YES YES IAC Session Started? NO Start IAC Session from Control / Monitor Screen SC IAC Program Options Correct? YES YES NO Scanner Programmed for Record Out? Program Record Out Attributes into Scanner NO Connect Audio Cable from Scanner to Sound Card Input NO Sound Card Controls: Enable Input & Set Volume NO SC Program Options Screen: Set IAC Options to Match Sound Card YES Scanner Volume Control Set? NO Adust Scanner Volume if Necessary YES SUCCESS Figure 35 - IAC Troubleshooting Flowchart Copyright 2009 – 3D Technologies Page 50 of 54 ScanControl One Program, Multiple Scanners, Made in USA Load File Screen The Load File Screen allows the user to select the drive, folder and filename of the ScanControl Data File to be loaded into the ScanControl Memory Area. Figure 36 - Load File Screen • • • • • Drive Selection – Drop down box used to select the drive letter of the device where a ScanControl Data File will be loaded from. Folder Selection – Selection box used to select the folder on the drive where a ScanControl Data File will be loaded from. File Selection – Selection box used to select the file from the folder on the drive where a ScanControl Data File will be loaded from. Filename Entry – Data entry field that displays the selected Filename or allows entry of a Filename for loading. Operation Controls o OK Button – Click to proceed with ScanControl Data File load. o Cancel Button - Click to cancel ScanControl Data File load. Save File Screen The Save File Screen allows the user to select the drive, folder and filename of the ScanControl Data File to be saved from the ScanControl Memory Area. Copyright 2009 – 3D Technologies Page 51 of 54 ScanControl One Program, Multiple Scanners, Made in USA Figure 37 - Save File Screen • • • • • Drive Selection - Drop down box used to select the drive letter of the device where a ScanControl Data File will be saved. Folder Selection - Selection box used to select the folder on the drive where a ScanControl Data File will be saved. File Selection - Selection box used to select the file from the folder on the drive where a ScanControl Data File will be saved. Filename Entry - Data entry field that displays the selected Filename or allows entry of a Filename for saving. Operation Controls o OK Button – Click to proceed with ScanControl Data File save. o Cancel Button - Click to cancel ScanControl Data File save. Copyright 2009 – 3D Technologies Page 52 of 54 ScanControl One Program, Multiple Scanners, Made in USA Appendix Table of Figures Figure 1 - Radio Search Screen Figure 2 - Main Control Screen Figure 3 - Global Settings Screen Figure 4 – WX / QText Settings Screen Figure 5 – Audio / Visual Settings Screen Figure 6 - Advanced Settings Screen Figure 7 - Radio Selection Screen Figure 8 - VScanner Folder Management Screen Figure 9 - Edit Objects Screen - Conventional Figure 10 - Edit Objects Screen - Talkgroup IDs Figure 11 - Edit Objects Screen - Limit Search Figure 12 - Edit Objects Screen - Service Search Figure 13 - Edit Objects Screen - Sweeper Figure 14 - Edit Object Screen - Trunk Systems Figure 15 - Edit Trunk Frequencies Screen Figure 16 - Edit Trunk Table Screen Figure 17 - Edit Fleet Map Screen Figure 18 - ScanList View Screen Figure 19 – DataGrabber:Conventional Frequencies Figure 20 – DataGrabber:Conventional Frequencies Figure 21 – DataGrabber:Trunk System Frequencies Figure 22 – DataGrabber:Trunk System Frequencies Figure 23 – DataGrabber Talkgroup IDs Figure 24 – DataGrabber Talkgroup IDs Figure 25 – GRE Radio Control / Monitor Screen Figure 26 - Mini Monitor Screen Figure 27 - Program Options Screen Figure 28 - Intelligent Audio Capture Figure 29 - IAC Usage Matrix Figure 30 - PC Audio Control Figure 31 - IAC Program Options Figure 32 - IAC Session Group by Option Figure 33 - IAC Date / Time Group by Option Figure 34 - IAC Chnl / TGID Group by Option Figure 35 - IAC Troubleshooting Flowchart Figure 36 - Load File Screen Figure 37 - Save File Screen Copyright 2009 – 3D Technologies 5 6 8 9 10 11 12 14 16 18 19 20 21 22 23 24 25 26 29 30 31 32 34 35 36 38 39 44 45 46 46 48 49 49 50 51 52 Page 53 of 54 ScanControl One Program, Multiple Scanners, Made in USA Limited Software Warranty: LIMITED WARRANTY. The warranties and disclaimers described in this paragraph are collectively the "Limited Warranty". 3D Technologies warrants to you (and only you) that the Software Product will perform substantially in accordance with the accompanying documentation (if any) for a period of ninety (90) days from the date of original purchase of a license to the Software Product from an authorized retailer or directly from 3D Technologies (or the date you have obtained authorization from 3D Technologies or an authorized retailer to convert an Demonstration Version to a Full-License Version) (in each case the "Purchase Date"). Implied warranties on the Software Product, to the extent required by applicable law, are limited to ninety (90) days from the Purchase Date. Some states do not allow limitations on how long an implied warranty lasts, so the above limitation may not apply to you. TO THE MAXIMUM EXTENT PERMITTED BY APPLICABLE LAW, 3D TECHNOLOGIES AND ITS SUPPLIERS DISCLAIM ALL OTHER WARRANTIES AND CONDITIONS WITH REGARD TO OR ARISING OUT OF THE SOFTWARE PRODUCT, EITHER EXPRESS OR IMPLIED, INCLUDING, BUT NOT LIMITED TO, IMPLIED WARRANTIES OF MERCHANTABILITY, FITNESS FOR A PARTICULAR PURPOSE, NON-INFRINGEMENT AND/OR ACCURACY OF INFORMATION. The Limited Warranty is void if failure of the Software Product has resulted from accident, abuse, misapplication, use of the Software Product other than as described in the documentation issued by 3D Technologies, use of the Software Product in combination with other Software Products that are not described as compatible in the documentation issued by 3D Technologies, or your breach of the terms of this EULA. This warranty gives you specific legal rights, and you may also have other rights which vary from State to State. No individual (except a duly authorized officer of 3D Technologies) and no reseller or retailer has any authority to amend or add to any of the above representations and disclaimers. Copyright 2009 – 3D Technologies Page 54 of 54