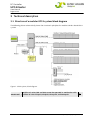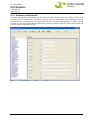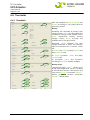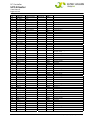
1
DC Controller UPC4 Master USER MANUAL UM_UPC4_V2.00_E_R1.1_2011-01-04 DC Controller UPC4 Master User Manual Page 2/100 Notes to this manual ATTENTION! Read this manual carefully before installing and commissioning the specified unit. This manual is a part of the delivered unit. Familiarity with the contents of this manual is required for installing and operating the specified unit. The rules for prevention of accidents for the specific country and the general safety rules in accordance with IEC 364 must be observed. The function description in this manual corresponds to the date of publishing. Technical changes and changes in form and content can be made at any time by the manufacturer without notice. There are no obligations to update the manual continually. The unit is manufactured in accordance with applicable DIN and VDE standards such as VDE 0106 (part 100) and VDE 0100 (part 410). The CE marking on the unit confirms compliance with EU standards 2006-95-EG (low voltage) and 2004-108-EG (electromagnetic compatibility) if the installation and operation instructions are followed. Supplier: FAX Email Internet ELTEK VALERE DEUTSCHLAND GmbH GB Industrial Schillerstraße 16 D-32052 Herford + 49 (0) 5221 1708-210 + 49 (0) 5221 1708-222 [email protected] http://www.eltekvalere.com Please note: No part of this document may be reproduced or transmitted in any form or by any means -electronic or mechanical, including photocopying and recording- for whatever reason without the explicit written permission of Eltek Valere. Changes and errors excepted. 2010. ELTEK VALERE DEUTSCHLAND GmbH. All rights reserved. ©2010. ELTEK VALERE DEUTSCHLAND GmbH. UM_UPC4_V2.00_E_R1.1_2011-01-04 DC Controller UPC4 Master User Manual Page 3/100 The current revision status of this user manual is the following: Revision: 1.1 Date: 2010-01-04 Revision Description of change Writer Date 0.0 Translation of the German version; proofreading version RTH 2010-12-02 1.0 First edition according to the development status of 2010-12-09 RTH 2010-12-09 1.1 Photos replaced, minor text modifications 2011-01-04 ©2010. ELTEK VALERE DEUTSCHLAND GmbH. RTH UM_UPC4_V2.00_E_R1.1_2011-01-04 DC Controller UPC4 Master User Manual Page 4/100 Contents 1 SAFETY INSTRUCTIONS & NOTES TO ELECTRONIC WASTE DISPOSAL ................................................... 7 2 GENERAL DESCRIPTION ....................................................................................................................... 8 3 TECHNICAL DESCRIPTION .................................................................................................................... 9 3.1 3.2 Structure of a modular UPC4 system/block diagram........................................................... 9 Electrical connectors & operating elements.........................................................................10 3.2.1 3.2.1.1 3.2.1.2 3.2.1.3 3.2.2 3.2.2.1 3.2.2.2 3.2.2.3 3.2.2.4 3.2.2.5 3.2.2.6 3.2.2.7 3.2.3 3.2.3.1 3.2.3.2 4 CAN connectors & Ethernet connector ...................................................................................................10 Ethernet connector.......................................................................................................................................10 CAN connectors .............................................................................................................................................11 Termination switches ...................................................................................................................................11 Modem connector/Fieldbus connector/SD card slot/LED indications ............................................12 SD card slot .....................................................................................................................................................12 Push buttons 1 & 2........................................................................................................................................12 LED indication .................................................................................................................................................12 Fieldbus connectors......................................................................................................................................13 Hex switch 1 & Hex switch 2 ......................................................................................................................13 Function of the dip switches ......................................................................................................................14 Connector RS232 (Modem) .........................................................................................................................14 Power supply inputs/Relay outputs/MSTB Modbus connection ......................................................15 Power supply ..................................................................................................................................................15 Relay outputs X12/X13/X14 .....................................................................................................................16 THE CONCEPT ...................................................................................................................................17 4.1 4.2 General............................................................................................................................................17 Rectifier monitoring .....................................................................................................................17 4.2.1 4.2.2 4.2.3 4.2.4 4.3 Battery backup systems ............................................................................................................20 4.3.1 4.3.2 4.3.3 4.3.4 4.3.5 4.3.6 4.3.7 4.3.8 4.3.9 4.3.10 4.4 4.5 4.6 4.7 4.8 Temperature controlled output voltage..................................................................................................20 Charge current limitation.............................................................................................................................21 Autarkic rectifier operation.........................................................................................................................21 PLD function (Power Load Disconnect) ....................................................................................................21 LVD function (total discharge protection)...............................................................................................22 Battery asymmetry.......................................................................................................................................22 Battery test ....................................................................................................................................................22 Battery test data memory ..........................................................................................................................23 Equalize charge..............................................................................................................................................23 Boost charge ..................................................................................................................................................24 Isolation monitoring .....................................................................................................................24 Monitoring of general measured values.................................................................................24 DC/AC inverters/static bypass switch) .................................................................................25 Virtual measured values system..............................................................................................25 Signal concept/alarm signalling/event list ...........................................................................25 4.8.1 4.8.2 4.9 Error state (alarm signaling)........................................................................................................................25 Event history...................................................................................................................................................26 Safety concept/authorization..................................................................................................26 4.9.1 4.10 5 Rectifiers of the PSR/PSS group ...............................................................................................................17 Rectifiers of the Flat-, Mini-, Micro-, and Powerpack group.................................................................18 Monitoring of load sharing of the rectifiers ............................................................................................18 Monitoring of rectifier load..........................................................................................................................19 Default User and Password.........................................................................................................................26 Automatic log on of rectifiers, inverters, DC/DC converters............................................27 THE MENU (DISPLAY OPERATION) .....................................................................................................28 5.1.1 5.1.2 5.2 Changing the display (leafing) ....................................................................................................................28 Changing the menu .......................................................................................................................................28 Measured values ..........................................................................................................................28 ©2010. ELTEK VALERE DEUTSCHLAND GmbH. UM_UPC4_V2.00_E_R1.1_2011-01-04 DC Controller UPC4 Master User Manual Page 5/100 5.3 Operating status ..........................................................................................................................30 5.3.1 5.3.2 5.3.3 5.3.4 5.4 Control function............................................................................................................................33 5.4.1 5.4.2 5.4.3 5.4.4 5.4.5 5.4.6 5.4.7 5.5 Control function battery test .....................................................................................................................33 Control function "boost charge" ................................................................................................................34 Start..................................................................................................................................................................34 Stop...................................................................................................................................................................35 Control function "equalize charge" ...........................................................................................................35 Start..................................................................................................................................................................35 Stop...................................................................................................................................................................35 Control function "Hand-op. charge" ..........................................................................................................36 Control function "System test"..................................................................................................................36 Control function "modem" ...........................................................................................................................37 Start..................................................................................................................................................................37 Stop...................................................................................................................................................................37 Log in ................................................................................................................................................................38 Secondary menu...........................................................................................................................39 5.5.1 5.5.2 5.5.3 5.6 6 Event list..........................................................................................................................................................30 Failure list ........................................................................................................................................................31 Operating status "Battery test".................................................................................................................31 Operating status "Modem" ..........................................................................................................................32 Date, time, illumination, contrast, and lamp test ..................................................................................40 Status “Default OK”.......................................................................................................................................41 Configuring at the display/MMT ................................................................................................................41 IP address/network settings ....................................................................................................42 CONFIGURATION – UPC4 .................................................................................................................43 6.1 6.1.1 6.1.2 6.1.3 6.2 6.3 6.4 6.4.1 6.4.2 6.4.3 6.4.4 6.4.5 6.4.6 6.5 6.5.1 6.5.2 6.6 6.6.1 6.6.2 6.7 6.7.1 6.7.2 6.7.3 6.8 6.9 6.10 6.10.1 6.10.2 6.10.3 6.10.4 6.10.5 6.10.6 General Information .....................................................................................................................43 Configuration of UPC systems by external modem via RS232 ..........................................................43 UPC4 parameter groups ..............................................................................................................................44 Parameter, hide function .............................................................................................................................45 Table “Overview of the configuration items” ........................................................................46 Overview by screenshot.............................................................................................................48 Basic settings of the UPC4 ........................................................................................................49 UPC4 .................................................................................................................................................................49 CAN Devices Cnt ............................................................................................................................................50 Charge control................................................................................................................................................52 Service/Enable...............................................................................................................................................53 System parameters ......................................................................................................................................55 Battery .............................................................................................................................................................56 Measuring system........................................................................................................................58 Assignment measured values ....................................................................................................................58 Assignment Shunt* .......................................................................................................................................60 Thresholds .....................................................................................................................................61 Thresholds.......................................................................................................................................................61 Thresh. Gen. par .............................................................................................................................................62 Outputs/Alarm signaling ............................................................................................................63 Digital inputs* .................................................................................................................................................63 Signals enable ................................................................................................................................................63 Signals Sw mode............................................................................................................................................65 LVD/PLD/Drop diode ...................................................................................................................65 Remote Display .............................................................................................................................67 Additional functions ....................................................................................................................68 Battery Test* ..................................................................................................................................................68 Equalize Charge* ............................................................................................................................................69 Boost charge* .................................................................................................................................................69 Capacity Calculator* .....................................................................................................................................70 SNMP* ...............................................................................................................................................................71 Modem* ............................................................................................................................................................72 ©2010. ELTEK VALERE DEUTSCHLAND GmbH. UM_UPC4_V2.00_E_R1.1_2011-01-04 DC Controller UPC4 Master User Manual Page 6/100 6.10.7 6.10.8 6.10.9 6.10.10 6.11 6.11.1 6.11.2 6.11.3 6.11.4 6.11.5 6.11.6 6.11.7 6.11.8 6.11.9 6.11.10 6.12 6.12.1 Fieldbus*...........................................................................................................................................................73 MMB*/Mains monitoring...............................................................................................................................74 Hand operation charge* ...............................................................................................................................75 System test* .............................................................................................................................................75 UPC4 Text ......................................................................................................................................76 Installation.......................................................................................................................................................76 Text System parameter...............................................................................................................................76 Text battery parameter* .............................................................................................................................76 Text Batt ident...............................................................................................................................................76 Text Digital input*..........................................................................................................................................77 Text Relay output..........................................................................................................................................78 Text Fuses* .....................................................................................................................................................78 Text General parameters ............................................................................................................................79 Module IDtexts 1............................................................................................................................................79 Module IDtexts 2 ......................................................................................................................................79 Miscellaneous parameters.........................................................................................................80 Special Set.......................................................................................................................................................80 7 LIST OF ALL AVAILABLE MEASUREMENT SOURCES ............................................................................81 8 EVENT LIST UPC4 (FAILURE LIST) ....................................................................................................86 8.1 8.2 8.3 8.4 9 General............................................................................................................................................86 System............................................................................................................................................90 Battery ............................................................................................................................................92 Fuses ...............................................................................................................................................93 TECHNICAL DATA UPC4..................................................................................................................98 9.1 9.2 Options............................................................................................................................................99 Dimensional drawing ...................................................................................................................99 Index of Figures Figure 1. UPC4 system, block diagram.............................................................................................................. 9 Figure 2. CAN connectors & Ethernet connector .........................................................................................10 Figure 3. Modem connector/Fieldbus connector/SD card slot/LED indications ..................................12 Figure 4. Fieldbus female connector RS485 ..................................................................................................13 Figure 5. Power supply inputs/Relay outputs/MSTB Modbus connection ............................................15 Figure 6. Diagram “Output voltage depending on temperature” ..............................................................20 Figure 7. Diagram “Charge current limitation” ...............................................................................................21 Figure 8. Module dimensions..............................................................................................................................99 ©2010. ELTEK VALERE DEUTSCHLAND GmbH. UM_UPC4_V2.00_E_R1.1_2011-01-04 DC Controller UPC4 Master User Manual Page 7/100 1 Safety instructions & notes to electronic waste disposal WARNING! Because several components of operating electric devices are charged by dangerous voltage, the improper handling of electric devices may cause accidents involving electrocution, injury, or material damages. Operation and maintenance of electrical devices must be performed by qualified skilled personnel such as electricians in accordance with EN 50110-1 or IEC 60950. Install the device only in areas with limited access to unskilled personnel. Before starting work, the device must be disconnected from mains. Make sure that the device is earthed. Only spare parts approved by the manufacturer must be used. The correct disposal of electronic waste is the responsibility to recycle discarded electronic equipment and is necessary to achieve the chosen level to protect human health and the environment. In the case of waste disposal of your discarded equipment we recommend to contact a professional waste management company. ©2010. ELTEK VALERE DEUTSCHLAND GmbH. UM_UPC4_V2.00_E_R1.1_2011-01-04 DC Controller UPC4 Master User Manual Page 8/100 2 General description The new DC controller UPC4 Master is an integrated unit for control, monitoring and signaling of battery-backed DC power supply systems. The unit is easy to use and programmable via display panel or RS232/Ethernet interface in combination with PC software. On the basis of a free programmable signal matrix, the customer is able to configure several alarms to groups and which of all the signaling outputs are to be used. The UPC4 Master is the communication centre of the modular UPC4 structure. The control of the rectifier modules is realized via CAN communication bus. Due to the system wide CAN communication concept each of our power modules such as DC/DC converters, inverters and static bypass switches can additionally be monitored by the UPC4 Master. Additional input and output CAN modules, such as Mains Monitoring Board, Fuse Monitoring Board, Digital Input Board, Relay Board etc. are available. All these extensions are configurable and controlled by the UPC4 Master. As a special extension module the Basic-Unit (BU) is available. It can be placed as close as possible to the measurement point and transmits the measured values digitally via CAN. Due to this, no long measurement wires are necessary. The UPC4 Master is able to support up to eight Basic-Units in the same system. For remote control PC connection, external modem, SNMP or Modbus (Profibus is planned) can be used. For the proprietary communication protocol special PC software (Multi Management Tool) for remote monitoring, controlling and parameter setting is available. For detailed technical data please see section 9 Technical Data UPC4. For a list of available options please see section 9.1 “Options”. ©2010. ELTEK VALERE DEUTSCHLAND GmbH. UM_UPC4_V2.00_E_R1.1_2011-01-04 DC Controller UPC4 Master User Manual Page 9/100 3 Technical description 3.1 Structure of a modular UPC4 system/block diagram The following picture schematically shows the structure in principle of a modular CAN bus based UPC4 system. Figure 1. UPC4 system, block diagram IMPORTANT! Rectifiers of series PSR and PSS cannot be operated in combination with rectifiers of series Flatpack, Minipack, Micropack, and Powerpack. ©2010. ELTEK VALERE DEUTSCHLAND GmbH. UM_UPC4_V2.00_E_R1.1_2011-01-04 DC Controller UPC4 Master User Manual Page 10/100 3.2 Electrical connectors & operating elements 3.2.1 CAN connectors & Ethernet connector ON/OFF CAN connector 4 (RJ45) LED green Termination switch CAN connector 3 (RJ45) RJ 45 Ethernet LED yellow ON/OFF CAN connector 2 (RJ12) Termination switch CAN connector 1 (RJ12) Figure 2. CAN connectors & Ethernet connector 3.2.1.1 Ethernet connector The UPC4 Master provides one Ethernet connector RJ45 10/100 Mbit. o o LED green: The LED is ON if contact is available. LED yellow: The LED is flickering at communication. IMPORTANT! To connect the UPC4 Master to a PC a cross cable must be used. For details regarding IP address please see section 5.6 “IP address/network INFORMATION: settings”. ©2010. ELTEK VALERE DEUTSCHLAND GmbH. UM_UPC4_V2.00_E_R1.1_2011-01-04 DC Controller UPC4 Master User Manual Page 11/100 3.2.1.2 CAN connectors (see also section 4.2 “Rectifier monitoring”) The UPC4 Master provides two different CAN bus systems (see also Figure 1.). CAN bus connectors as described in the following are available: 1. 100 kbit/proprietary protocol → two CAN connectors RJ12 (CAN 1 & CAN 2). CAN 1 & CAN 2 are designed to connect the following CAN devices (modules): o Inverters INV & UNV o Static bypass switches STS & UNB o Rectifiers PSR & PSS o DC/DC converters PSC o Remote control panels RDP & RDD o Extension modules such as UPC4 Basic Unit BUI, battery monitoring board BMB, mains monitoring board MMB, fuse monitoring board FMB, digital input board DI8, relay board RLB, universal measurement devices UMA & UMB. 2. 125 kbit/proprietary protocol → two CAN connectors RJ45 (CAN 3 & CAN 4). CAN 3 & CAN 4 are designed to connect rectifiers of type “Flatpack”, “Minipack”, “Micropack”, and “Powerpack”. 3.2.1.3 Termination switches Both CAN bus systems CAN 1 & 2 and CAN 3 & 4 as well are equipped with CAN bus termination switches as shown in Figure 2. The CAN-Bus of the system must be terminated at both ends. If the UPC4 Master is used as final CAN node within the system (in this case only one of the CAN connectors CAN 1 or CAN 2 are connected), the termination resistor must be enabled by moving the slide switch (Termination ON/OFF) to ON position. If the unit is connected between two CAN nodes, the termination resistor must be disabled by moving the slide switch to OFF position. The same is valid for CAN 3 and CAN 4. NOTE: Missing terminations or too many terminations within the system may disturb the CAN-Bus communication. ©2010. ELTEK VALERE DEUTSCHLAND GmbH. UM_UPC4_V2.00_E_R1.1_2011-01-04 DC Controller UPC4 Master User Manual Page 12/100 3.2.2 Modem connector/Fieldbus connector/SD card slot/LED indications Hex switch 2 Push button 2 SD card slot Push button 1 Hex switch 1 LED 5 (green) LED 4 (orange) Male connector RS232 (Modem) Female connector RS485 (Mod-/Profibus) LED 3 (green) LED 2 (red) Dip switches OFF ON LED 1 (green) Figure 3. Modem connector/Fieldbus connector/SD card slot/LED indications 3.2.2.1 SD card slot REMARK: This functionality is not available at version 2.12. The SD card slot is designed for future extensions. 3.2.2.2 Push buttons 1 & 2 Push button 1 Pressing push button 1 causes release of the SD card (when the SD functionality is supported in the future). Push button 2 (→ is designed for future use). 3.2.2.3 LED indication LED 1 to LED 5 (see figure 3.) indicates the status of the UPC4 Master according to the table below. LED 1 2 3 Colour green red green 4 5 orange green Indication of: Operation status OK ALARM CAN communication (LED is flickering) Field bus active (LED is flickering) SD card active ©2010. ELTEK VALERE DEUTSCHLAND GmbH. During power up procedure of the UPC4 unit the status of LED 1 & 2 is the following: During booting procedure the red LED is ON. After finishing power up the red LED “ALARM” is OFF; the green LED “Operation status OK” is ON. UM_UPC4_V2.00_E_R1.1_2011-01-04 DC Controller UPC4 Master User Manual Page 13/100 3.2.2.4 Fieldbus connectors The UPC4 Master provides two different fieldbus connectors: 1.) Fieldbus connector RS485 The female connector RS485 (see Figure 3.) is designed to connect Modbus (Profibus is not available at version 2.12). 11 10 Figure 4. Fieldbus female connector RS485 Pin assignment of the RS485 connector: Connector RS485 Pin 1 2 3 4 5 6 7 8 9 10 & 11 Function SHIELD Not used LINE B RTS GND +5V Not used Line A Not used SHIELD 2.) Fieldbus connector MSTBO 2.5 (X8) In addition the fieldbus can be also connected to the MSTBO 2.5 connector (X8) as shown in Figure 5. Pin assignment of the MSTB connector: Connector X8 (Modbus) Pin 1 2 3 4 Function Corresponds to RS485 SHIELD Corresponds to RS485 LINE A Corresponds to RS485 LINE B Corresponds to RS485 GND 3.2.2.5 Hex switch 1 & Hex switch 2 If the field bus address is set to “0“ by software, the field bus address (that is a hexadecimal number) must be set using hex switch 1 & 2. Switch 2 refers to the more significant nibble, whereas switch 1 refers to the lower significant nibble. EXAMPLE: Address “18” = 0x1 2 Hexswitch 1 = 2 Hexswitch 2 = 1 ©2010. ELTEK VALERE DEUTSCHLAND GmbH. UM_UPC4_V2.00_E_R1.1_2011-01-04 DC Controller UPC4 Master User Manual Page 14/100 3.2.2.6 Function of the dip switches The dip switches (see Figure 3.) are designed to terminate the field bus. By switching switch 1 to ON position the termination resistor of 120 Ω is enabled. That is necessary if the UPC4 master is one end of the field bus. In this case the field bus is either connected to the RS485 connector or to the MSTB connector. If both connectors are used or e.g. a Y-cable is connected to the RS485 connector the UPC4 master is between two field bus nodes. In this case the termination resistor must be switched OFF by switch 1. In order to enforce the idle level on the bus system at the period of time when no data transmitter is active, LINE B can be switched via a resistor of 1 kΩ to ground by switch 2. LINE A can be switched via a resistor of 1 kΩ to VCC by switch 3. Whether this functionality is used or not depends on the bus architecture as well on what the user wants. The enforced idle level should be carried out on the bus once only. 3.2.2.7 Connector RS232 (Modem) In addition to the Ethernet connector the UPC4 Master can be configured via RS232. In this case a “Null Modem Cable” must be used for the connection to the configuration software MMT. Furthermore a modem can be connected to the RS232 connector (see Figure 3.). REMARK: The modem functionality is not supported at version 2.12. For details please see section 6.1.1 “Configuration of UPC systems…” and section 5.4.6 “control function modem” as well. ©2010. ELTEK VALERE DEUTSCHLAND GmbH. UM_UPC4_V2.00_E_R1.1_2011-01-04 DC Controller UPC4 Master User Manual Page 15/100 3.2.3 Power supply inputs/Relay outputs/MSTB Modbus connection 1 2 1 2 3 4 X2 (Power supply input 1) X8 (Modbus/Profibus) 1 2 X3 (Power supply input 2) 1 2 3 X12 (Relay 1) 1 2 1 2 3 X4 (Power supply input 3) X13 (Relay 2) 1 2 3 X14 (Relay 3) Figure 5. Power supply inputs/Relay outputs/MSTB Modbus connection 3.2.3.1 Power supply Three power supply inputs are available (see Figure 5.). The UPC4 must be supplied by 24 VDC ±10% by external power supply units AC/DC or DC/DC. We recommend using not less than two (n + 1 redundancy) power supplies which are fed by save DC of the system. Depending on the system (high voltage or low voltage) we provide DC/DC converters as power supply for the UPC4 Master as listed below: Article code Designation 302-UP4-DCDC.LV Power supply, DIN rail mounting, Vi=18-75 VDC; Vo=24 VDC, Imax=2.5 A 302-UP4-DCDC.HV Power supply, DIN rail mounting, Vi=85-375 VDC; Vo=24 VDC, Imax=2.5 A ©2010. ELTEK VALERE DEUTSCHLAND GmbH. UM_UPC4_V2.00_E_R1.1_2011-01-04 DC Controller UPC4 Master User Manual Page 16/100 The power supplies have to be connected to the inputs X2, X3, X4 according to the following table. Connector type: MSTBO 2.5, two-pole. Pin assignment of the power supply inputs: Connector X2 (Input 1) X3 (Input 2) X4 (Input 3) Pin 1 2 1 2 1 2 Function positive terminal (+) negative terminal (-) positive terminal (+) negative terminal (-) positive terminal (+) negative terminal (-) 3.2.3.2 Relay outputs X12/X13/X14 The UPC4 Master provides three isolated relay outputs. o Switching capacity of the relays: max. 0.5 A at 60 VDC Connector type: MSTBO 2.5, three-pole Pin assignment of the relay outputs: Connector X12 (Relay 1) X13 (Relay 2) X14 (Relay 3) Pin 1 2 3 1 2 3 1 2 3 Function COM NC NO COM NC NO COM NC NO ©2010. ELTEK VALERE DEUTSCHLAND GmbH. UM_UPC4_V2.00_E_R1.1_2011-01-04 DC Controller UPC4 Master User Manual Page 17/100 4 The concept 4.1 General The UPC4 is a central control unit for the purpose of controlling the power system. The unit collects the data of CAN bus connected modules such as voltages, electric current values measured by basic units (BU), digital status information (via digital input board DCC-Di8) and status messages/values of the power modules (rectifiers, DC/DC converters, DC/AC inverters, static bypass switch (STS) etc. The data are analyzed by the UPC4 and the system is controlled according to the settings such as rectifier output voltage, alarm messages etc. corresponding to the configuration. In addition the information is provided via SNMP and Modbus as well. (Profibus is planned). 4.2 Rectifier monitoring The Controller UPC4 is able to support two entirely different groups of rectifiers: On the one hand rectifiers of type PSR/PSS on the other hand rectifiers of type Flatpack, Minipack, Micropack, and Powerpack. It has to be observed that both different groups have to be connected to different CAN bus connectors: 1. Rectifiers of type PSR/PSS >>CAN 1 & CAN 2 (RJ12 connectors) have to be used. 2. Rectifiers of type Flatpack, Minipack, Micropack, and Powerpack >>CAN 3 & CAN 4 (RJ45 connectors) have to be used. (see also section 3.2.1.2 “CAN connectors”) Both different rectifier groups are specified by the configuration software in the area "CAN Devices Cnt" (see section 6.4.2) as well as in the measurement value area of the RD. But the configuration data of the rectifiers such as e.g. nominal voltage are related to "rectifier" in general. That means that it dos'nt matter whether it's a question of rectifiers of series PSR, PSS or Flatpack, Minipack, Micropack, or Powerpack. IMPORTANT! Rectifiers of series PSR and PSS cannot be operated in combination with rectifiers of series Flatpack, Minipack, Micropack, and Powerpack. 4.2.1 Rectifiers of the PSR/PSS group The UPC4 supports all rectifiers of the PSR/PSS group at its first CAN bus port "CAN 1 & CAN 2" (RJ12 connectors). If more than one PSR backplane (rack) is used, the CAN address of the rack has to be set by DIP or HEX switch at the rack. (For details, please see the user manuals of the specific rack.) Whereas the module slots within the rack are firmly encoded. Due to this each of the module slot has a definite CAN ID which is transmitted to the respective rectifier after it is switched ON. Using this address the rectifier logs on at the UPC4 and is integrated in the system and controlled via this address. Because cassette modules such as PSS rectifiers have no automatic log on functionality, the CAN addresses have to be manually set at the units and additionally they have to be set at the UPC4 using the configuration software MMT. (For more information please see section 6.4.2 CAN Devices Cnt). ©2010. ELTEK VALERE DEUTSCHLAND GmbH. UM_UPC4_V2.00_E_R1.1_2011-01-04 DC Controller UPC4 Master User Manual Page 18/100 4.2.2 Rectifiers of the Flat-, Mini-, Micro-, and Powerpack group The UPC4 supports all rectifiers of the Flat-, Mini-, Micro-, and Powerpack group at its second CAN bus port "CAN 3 & CAN 4" (RJ45 connectors). Compared to the PSR rectifiers (see section 4.2.1 Rectifiers of the PSR/PSS group) the slots of the xxpack rectifiers have no fixed CAN addresses. Therefore the log on procedure between UPC4 and these types of rectifiers is different. If a rectifier is plugged to a backplane slot, the rectifier logs automatically on to the UPC4 transmitting its serial number. After it has logged on the rectifier is controlled by the UPC4. The communication between UPC4 and rectifier takes place using the serial number. (For details please see section 6.4.2 CAN Devices Cnt). 4.2.3 Monitoring of load sharing of the rectifiers With the assistance of this functionality it is possible to monitor the load utilization of each individual rectifier (REC). For this a changeable threshold (in percent) has to be set at the menu item "System parameters" (section 6.4.5). The UPC calculates the percentages of the difference of the maximum current of a rectifier and the minimum current of one rectifier compared to the maximum current of one rectifier. If the settable percentaged value is exceeded, the UPC generates the event "RECLoadDistrib". For details please see "System parameters" (section 6.4.5). ©2010. ELTEK VALERE DEUTSCHLAND GmbH. UM_UPC4_V2.00_E_R1.1_2011-01-04 DC Controller UPC4 Master User Manual Page 19/100 4.2.4 Monitoring of rectifier load If the power system is equipped with more rectifiers as necessary (redundancy), these spare rectifiers can be configured as redundant. All rectifiers within the power system remain operating; merely the signalling is changed in the case of a unit failure. At the menu "CAN Devices Cnt" (section 6.4.2) two types of signaling concerning redundancy are settable. 1. Modus “Redundancy type 1” (Redundancy event is active as soon as redundancy is not available). Example: Four rectifiers are fitted, two rectifiers are set as redundant. If one rectifier failes, the UPC4 generates the event "REC No CAN". If two rectifiers fail, the events "REC No CAN" as well as "REC Redundant" are generated. 2. Modus “Redundancy type 2” (Redundancy event is active as soon as the redundant rectifiers and additional at least one more are failed). Example: Four rectifiers are fitted; two rectifiers are set as redundant. If two rectifier failes, the UPC4 generates only the alarm messages "REC No CAN". If three rectifiers faile, the UPC4 generates the alarm messages "REC No CAN" and "REC Redundant" as well. For details please see section 6.4.5 "System parameters". ©2010. ELTEK VALERE DEUTSCHLAND GmbH. UM_UPC4_V2.00_E_R1.1_2011-01-04 DC Controller UPC4 Master User Manual Page 20/100 4.3 Battery backup systems 4.3.1 Temperature controlled output voltage (Float charge of batteries in backup systems) U [V] 0°C 20°C 40°C T [°C] Figure 6. Diagram “Output voltage depending on temperature” For this operation mode a temperature sensor of type KTY 81- 220 which is connected to a BasicUnit BU is necessary. The temperature information provided by the temperature sensor is analyzed by the UPC4 according to the voltage/temperature characteristic line. The output voltage for the CAN-Bus connected rectifiers are controlled accordingly. This characteristic line linearly proceeds in an adjustable range (e.g. 0°C…40°C) and is constant beyond this range (see illustration). The steepness of the characteristic line is adjustable as the charge voltage difference, related to one battery cell and one degree C is changed. The charge voltage difference of a lead acid battery is -2mV per cell and per °C by default. (For details please see section 6.4.6 Battery) ©2010. ELTEK VALERE DEUTSCHLAND GmbH. UM_UPC4_V2.00_E_R1.1_2011-01-04 DC Controller UPC4 Master User Manual Page 21/100 4.3.2 Charge current limitation Figure 7. Diagram “Charge current limitation” Discharged batteries, e.g. after backup operation, are charged with an adjustable maximum current until the value of the temperature-controlled trickle charge voltage is reached. The battery voltage is measured at the beginning of the battery charging. Commencing with this battery voltage, the output voltage of the rectifiers is increased accordingly so that the set maximum of the battery charging current is reached. This process is retained as long as the output voltage has reached the value of the trickle charge voltage (temperature-controlled). (For details please see section 6.4.3 Charge Control). 4.3.3 Autarkic rectifier operation (Emergency operation) If the rectifiers do not receive a control signal, e.g. because of breakdown of the UPC4, breakdown of the CAN-Bus connection (e.g. cable break), the rectifiers self-acting return to a constant output voltage as default. Example: Rectifiers of a 48 VDC system return to default voltage value of 54.5 V (factory preset). At battery backed systems this operating mode should be seen as an emergency operation. 4.3.4 PLD function (Power Load Disconnect) The PLD function makes it possible to disconnect inferior priority loads during battery backed operation. Due to this the backup time of more important loads is extended. There is the possibility to configure up to two consumer load levels (inferior priority loads) independently of each other. The following criteria for PLD recognition are available: PLD recognition at under-run of an adjustable voltage threshold, reset after exceeding the adjusted voltage threshold. PLD recognition at detection of battery operation after expiration of an adjustable time delay, reset after ending of battery operation. ©2010. ELTEK VALERE DEUTSCHLAND GmbH. UM_UPC4_V2.00_E_R1.1_2011-01-04 DC Controller UPC4 Master User Manual Page 22/100 PLD recognition at detection of mains failure (requires MMB) after expiration of an adjustable time delay, reset after ending of mains failure. (For details please see section 6.8 LVD/PLD/Drop diode). 4.3.5 LVD function (total discharge protection) The LVD (Low Voltage Disconnection) function makes it possible to protect the batteries against total discharge. The following criteria for LV recognition are available: LVD recognition at under-run of an adjustable voltage threshold, reset after exceeding the adjusted voltage threshold. LVD recognition at detection of battery operation after expiration of an adjustable time delay, reset after ending of battery operation. LVD recognition at detection of mains failure (requires MMB) after expiration of an adjustable time delay, reset after ending of mains failure. (For details please see section 6.8 LVD/PLD/Drop diode). 4.3.6 Battery asymmetry It is possible to monitor the battery symmetry voltage in order to locate faulty batteries within a battery string. Therefore, a voltage (symmetry voltage) is measured at a tap point of the battery string and compared with the total battery string voltage. If the batteries are okay, the measured symmetry voltage is equal to the symmetry voltage as expected. If the measured symmetry voltage differs from the (adjustable) value, the event "Unsymmetry" is generated. (For details please see section 6.4.6 Battery). 4.3.7 Battery test The battery test serves for the inspection of the batteries as well as for the inspection of the faultless connection to the batteries. This test can be executed by the following manners: manually at the display (an external remote display RDD, RDP is required) automatically by date and time automatic repetition at selectable days externally via MMT software, SNMP, Modbus via digital input Furthermore it is possible to suppress the battery test via digital input. (For details please see section 6.4.4 Service/Enable). The rectifiers’ voltages are reduced to an adjustable voltage value during the battery test. ATTENTION! This voltage value should be greater than the voltage threshold of the LVD/PLD function. Otherwise the load supply could be disconnected during the battery test if the batteries are faulty. ©2010. ELTEK VALERE DEUTSCHLAND GmbH. UM_UPC4_V2.00_E_R1.1_2011-01-04 DC Controller UPC4 Master User Manual Page 23/100 Thereby the batteries supply the connected load and consequently are discharged. Following criteria finish a battery test: achievement of test duration under-running of a battery voltage value maximum discharge battery capacity (%) The battery test is assessed as faulty and a respective event is generated, if the minimum test voltage has been achieved within the test duration or the maximal battery capacity has been withdrawn. After finishing the test duration or after an identification of a faulty battery the rectifiers are set back to the default value considering the battery charging current limitation. An activated alarm message "battery test failure" manually can be cancelled at battery test menu, via reset of the UPC4 or via an anew execution and faultless completion of the battery test. (For details please see section 4.3.7 Battery test). 4.3.8 Battery test data memory By the assistance of the data memory the data are recorded during a battery test and later the data can be readout via the PC program MMT (Multi Management Tool). The following is automatically recorded during any battery test: Start- und stop time of the battery tests Duration of the battery tests Starting of the battery tests (manually or automatically) The withdrawn capacity during the battery tests and the measured battery voltage at the end of the test The data of the battery type, date of the battery installation and the nominal battery capacity These data are retrieved from the entered data in the main menu. The data as described above are each saved for the last 16 battery tests. Additionally the collection of the following data of the last battery test is saved: Number of the generated data set The elapsed time of the battery test (hours, minutes, seconds) The particular battery voltage and battery symmetry voltage The particular battery current The particular battery temperature Due to this fact, detailed information about the run of the test is available after the test is finished. 4.3.9 Equalize charge At equalize charge (compensating charge) the battery is charged using an increased charge voltage which effects a recirculation of the battery acid and therefore cleaning of the battery plates. This increases the battery lifetime (depending on the battery type). Equalize charge can be started in different ways: manually at the display (an external remote display RDD, RDP is required) automatically by date and time automatic repetition at selectable days externally via MMT software, SNMP, Modbus or Profibus (planned) alternatively via digital input Furthermore it is possible to suppress equalize charge via digital input. ©2010. ELTEK VALERE DEUTSCHLAND GmbH. UM_UPC4_V2.00_E_R1.1_2011-01-04 DC Controller UPC4 Master User Manual Page 24/100 (For details please see section 6.4.4 Service/Enable). During equalize charge the charge voltage is increased compared to the trickle charge voltage. Furthermore this charging mode is current-limited by a settable value. After the end-of-charge voltage is reached for a period of 40 minutes or a settable max. time value is reached, equalize charging is finished. (For details please see section 5.4.3 Equalize charge). 4.3.10 Boost charge For rapid recharge of the battery (only ventilated batteries) a boost charge mode is available. Boost charge can be started in different ways: manually at the display (an external remote display RDD, RDP is required) at under-run of a settable voltage value at battery operation or mains failure automatically by date and time automatic repetition at selectable days externally via MMT software, SNMP, Modbus or Profibus (planned) alternatively via digital input via different parameters depending of the capacity calculator Furthermore it is possible to suppress boost charge via digital input. (For details please see section 6.4.4 Service/Enable). During boost charge mode is running the battery voltage is increased to a greater value than the trickle charge voltage. Furthermore a considerably greater battery charge current is defined for the duration of the boost charge mode. If the defined charge voltage value is reached, a follow up charge duration starts. After the expiration the boost charge voltage is automatically decreased to the value of the trickle charge voltage. Boost charge is not temperature-compensated. (For details please see section 5.4.2 Boost charge). 4.4 Isolation monitoring Each BU is able to enable isolation monitoring. The resistance value (or several resistance values) is transmitted to the UPC4. The UPC4 detects "Isolation failure" according to the set threshold values. Isolation monitoring can be suppressed via digital input. Due to this further systems are coupleable (Master/Slave). (For details please see section 6.4.4 Service/Enable). 4.5 Monitoring of general measured values Voltage, current and temperature values can be monitored within a particular range by configuring the respective threshold values. If the measuring value leaves the range which is defined by thresholds, an event is generated by the the UPC4. By allocating the event to an alarm output (configuration), e.g. over and under voltage alarms can be realized. ©2010. ELTEK VALERE DEUTSCHLAND GmbH. UM_UPC4_V2.00_E_R1.1_2011-01-04 DC Controller UPC4 Master User Manual Page 25/100 4.6 DC/AC inverters/static bypass switch) If inverters (with or without static bypass switch STS) are intergrated in the system, the status and failure messages respectively are provided by the UPC4 such as for the most of the other CAN devices. ATTENTION! If a system is combined with an STS, there is the following difference: compared to a system without STS the UPC4 is only sniffing for inverter values via CAN bus because the inverters get their threshold values by the STS. That means that in this case the configuration of the inverters have to be done at the STS. But nevertheless monitoring is done by the UPC4; "Event No Can" and miscellaneous failures respectively are provided by the UPC4 in the same way as for a system without STS. For mains monitoring additionell measuring modules are available. E.g. the mains monitoring board (MMB) measures AC voltages and currents as well in order to provide the values to the UPC4. These values also can be monitored by the UPC4. 4.7 Virtual measured values system In the virtual measured values system to each input the source can be freely allocated. Example: To the input "Vload" the source "BU1_V2" or e.g. a voltage input of a BMB can be allocated. That means that the freely allocated measuring input complies with the load voltage (Vload). (For details please see section 6.5.1 Assignment measured values). 4.8 Signal concept/alarm signalling/event list Within the UPC4 different events such as e.g. "V> Vload", "Battery operation", "INV no CAN", "Digital input1" are stored. These events can be freely allocated to each available output. If one of the events is active, the allocated output is set. Please consider that outputs also can be inverted at configuration. (For details please see section 6.7.3 Signals Sw mode). Following outputs are available: Disable Signals Error state Event history Modem/Traps Seven LEDs 12 relays 4.8.1 Error state (alarm signaling) All events which are allocated to that output generate an alarm. Within the failure list all existing alarms are provided with a clear event number and failure name (recallable respectively displayable by RDD, RDP, MMT, SNMP). If a failure (alarm) is not active anymore it is not shown any longer in the failure list. ©2010. ELTEK VALERE DEUTSCHLAND GmbH. UM_UPC4_V2.00_E_R1.1_2011-01-04 DC Controller UPC4 Master User Manual Page 26/100 REMARK: Existing alarms can be cancelled only by remedy of the cause of the alarm. If an RDD or RDP is used, the red LED "ALARM" blinks as long as a minimum of one alarm is existend. 4.8.2 Event history All events which are allocated to this output are written into the event history list. They are there recorded including information such as start and stop of the event, date, and time. Attention: With leaving the event list the system requests whether the list shall be deleted or not. If the list shall be deleted, the system asks for a log-in if the actual user has no privilege for “delete event list” or if no log-in has been done before. If the memory is full (500 entries), the first failure is deleted and the last one is added. (For details please see section 6.7.2 Signals enable). 4.9 Safety concept/authorization A configurable user administration is implemented in the UPC4. The safety settings show, which parameters can be seen or changed by the user or which privileges are available for him (e.g. “delete event history”). If an user wants to carry out a protected operation at the unit, he has to authorize via login. The log out automatically is carried out after 10 minutes inactivity time of the control keys. 4.9.1 Default User and Password In order to differentiate between different user levels there are eight different user available. For the user "Factory" only access by the factory is available. ATTENTION The password for „user1“ to “user7“ is „user“ (factory-preset). ©2010. ELTEK VALERE DEUTSCHLAND GmbH. UM_UPC4_V2.00_E_R1.1_2011-01-04 DC Controller UPC4 Master User Manual Page 27/100 4.10 Automatic log on of rectifiers, inverters, DC/DC converters The following product families log automatically on at the UPC4: Rectifiers PSR, Flatpack 2, Micropack, Minipack, and Power Pack DC/DC converters of PSC series Inverters of INV series If one of those modules are plugged to a backplane, it logs automatically on to the UPC4 and therefore is controlled by the UPC4. If subsequently a module is removed or fails, an event is generated, e.g. "INV alarm", "INV no CAN", "DCC alarm" etc. If the current system status is okay, that means that the number of the modules is okay, you are able to set this status to "OK" using the function "Status default ok". For details please see section 5.5.2 "Status default ok". Due to this the available modules are defined as "OK" and previous events "…no CAN" are deleted. ©2010. ELTEK VALERE DEUTSCHLAND GmbH. UM_UPC4_V2.00_E_R1.1_2011-01-04 DC Controller UPC4 Master User Manual Page 28/100 5 The menu (display operation) Operation of the UPC4 takes place using a CAN bus-connected remote display (as option) or via remote control using the PC software Multi Management Tool (MMT) alternatively. As a standard four menu blocks are available as described as follows: 1. 2. 3. 4. Measured values Control functions Operating status System menu Section 5.4.7 “Log in“ describes how to log-in at the UPC4. An authorization is necessary if you want to get access to a secured area. 5.1.1 Changing the display (leafing) Leafing through the displays takes place by pressing the buttons "" or "". Endless leafing in both directions is possible. 5.1.2 Changing the menu Displays which include a selectable submenu are marked with the symbol „“. By pressing the “ENT” button you get the submenu. Return to the superordinated menu takes place by pressing the “ESC” button. 5.2 Measured values In this menu block the measured data of the system is displayed according to the configuration of the system. Measured values: General: 6 x current, 6 x temperature, 6 x resistors, and 6 x voltages Mains: Voltage, current and frequency (only systems equipped with mains monitoring (MM) board) Power modules: REC#1→(PSR, PSS), REC#2→(Micro-, Mini-, Flat- Powerpack), DC/DC converters, inverters, static bypass switch (e.g. output voltage, output current, temperature) Power system: System voltage/-current, earth fault measurement (if activated), and the calculated battery-, rectifier- and consumer load currents. Batteries: Battery voltage, -current, center tapping voltage of the battery, and battery temperature. ©2010. ELTEK VALERE DEUTSCHLAND GmbH. UM_UPC4_V2.00_E_R1.1_2011-01-04 DC Controller UPC4 Master User Manual Page 29/100 x times ESC UPC4 12.07.10 OKAY 11:47:36 x times ▲ ENT ENT Measuring values ►Power Modules Power Modules ►Rectifier R#1 ▼ ENT (1)* R#1 1:OKAY Vo= 54.4 V ▼ ▼ ENT R#1 1:OKAY Io=11.5 A R#1 1:OKAY T= 43C° ENT ENT R#1 2:OKAY Vo= 54.4 V R#1 2:OKAY Io=11.5 A R#1 2:OKAY T= 43C° ▼ R#1 3…96 ENT Power Modules ►DC/DCConverters DCC1:OKAY Vo= 54.4 V ▼ ENT DCC1:OKAY Io=11.5 A DCC1:OKAY T= 43C° ▼ DCC2…64 INV, STS, Rectifiers R#2 ENT ENT Measuring values ►Power System ▲ ENT Vlo: 54.5 V ILo: 21.0 A ►Batteries Vb1: 54,5 V Ib1: 21,0 A ▼ ▼ ▼ ENT ▼ Vo2: 0.0 V T2: 0.0 °C ENT Batteries 3…7 ▼ Batteries 3…7 ENT MM1: [V] [V] [V] 230 230 230 ►Mains ▼ ENT ▼ ENT V1 0.0 V MM1:[Hz Hz Hz] 50.0 50.0 50.0 ENT MM2: [A] [A] [A] 20.4 30.0 30.0 ENT ENT ►General ENT MM1: [A] [A] [A] 20.4 30.0 30.0 MM2: [V] [V] [V] 230 230 230 Measuring values ILoad 0.0 Vo1: 0.0 V T1: 0.0 °C Vb2: 54,5 V Ib2: 21,0 A Measuring values Irectifier 0.0 ENT ENT Measuring values Ibatt 0.0 ENT MM2:[Hz Hz Hz] 50.0 50.0 50.0 ENT V2 0.0 V V3..6, all I, T, R… (1)* ©2010. ELTEK VALERE DEUTSCHLAND GmbH. UM_UPC4_V2.00_E_R1.1_2011-01-04 DC Controller UPC4 Master User Manual Page 30/100 Rectifiers of the series PSR & PSS are in the group "R#1". The abbreviation for those rectifiers is "R#1". Rectifiers of the series Micro-, Mini-, Flat-, and Powerpack are in the group "R#2". The abbreviation for those rectifiers is "R#2". 5.3 Operating status In this menu block information about the actual operating status of the system can be queried. Operating status: Digital inputs: Status active/inactive of the digital inputs (digital extension modules are required). Relay outputs: Status of the relays: active/inactive. FM board: Status active/inactive of the fuse monitoring board. Failure list: The failure list shows the active alarms. Event list: The event list shows all stored events (date/time, appearance/disappearance). Fan racks: Show „Okay“ or „Failure“ of each of the connected fan racks. Battery test: Battery test active = ’*’, inactive = ’ -’. Furthermore the withdrawn capacity (Ah) is shown. Capacity calculator: Shows the available capacity of the complete system or of individual battery strings. Data memory: Shows whether data currently are stored or not. ’ OFF/ON’ Boost charge: Boost charge active = ’*’, inactive = ’ -’ Equalize charge: Compensating charge. Manual operation: Manual charge of the batteries. System test: Test of the system. Modem: Shows the initialisation status of the external or internal modem. 5.3.1 Event list ▼ UPC4 12.07.10 OKAY 11:47:36 x times▼ OperatingStatus ►Event List ESC ENT ENT (1)* Vlo < Vmin ->[3000] #5 ▲ 27.10.2010 8:11:26 ENT (3)* Delete History? No/Yes: ESC/ENT Login procedure ►User1 ENT INV No CAN ->[3041] #5 ▲ (2)* ENT 27.10.2010 9:10:05 ENT INV No CAN <-[3041] #5 27.10.2010 10:10:05 ▲ More events (1)* The appeared event is shown. Within the squared bracked the ecplicit event number is shown. The numeral behind "#" indicates the quantity of the events. " ->" indicates that the event is active, "<-" indicates that the event is inactive. (2)* Indicates the date of the recorded event. (3)* If the event list is to be deleated, a log in could be necessary, see section 5.4.7 Log in. ©2010. ELTEK VALERE DEUTSCHLAND GmbH. UM_UPC4_V2.00_E_R1.1_2011-01-04 DC Controller UPC4 Master User Manual Page 31/100 5.3.2 Failure list (1)* 2x ESC UPC4 12.07.10 ERR 11:47:36 x times▼ Operating Status ►Failure List ENT (2)* Vlo < Vmin 3000 1(5) ▲ Vis < Vmin_INV 3002 2(5) ▲ More failures (1)* "The failure LED at the RDP or RDD is active"; "ERR" at the display indicates that one or more failures (alarms) are existing. (2)* Shows the active failure. The first number (e.g. 3000 as shown in the example above) indicates the explicit event number. The second number indicates the position within the failure list. The number within the brackets indicates the total quantity of failures. 5.3.3 Operating status "Battery test" (Only available if „manual battery test“ is enabled). 2x ESC UPC4 12.07.10 OKAY 11:47:36 x times▼ Operating Status ►Battery Test (1)* ENT (1)* * Manual Cap= 12Ah Shows the withdrawn capacity during running battery test. ©2010. ELTEK VALERE DEUTSCHLAND GmbH. UM_UPC4_V2.00_E_R1.1_2011-01-04 DC Controller UPC4 Master User Manual Page 32/100 5.3.4 Operating status "Modem" (Only available if „enable modem“ is configured). 1. Modem configured. Modem status is stopped. Direct communication via RS232 is possible. Modem operation not possible. 2. Modem configured. Modem status is started. Direct communication via RS232 is not possible. Exclusively modem operation is possible. 2x ESC UPC4 12.07.10 OKAY 11:47:36 x times▼ Operating status ► Modem ENT (1)* Int: (2)* Int: .____0/+lI (1)* Status A) Modem status is stopped. No character string beside Int respectively Ext (see figure above). Direct communication is possible. Modem operation is not possible. For starting the modem please see section 5.4.6 Control function modem. (2)* Status B) Modem status is started. There is a character string beside Int respectively Ext (see figure above). Direct communication is not possible. Only modem operation is possible. For stopping the modem please see section 5.4.6 Control function modem. Explanation of the modem status string: *____0=+lI .caeo1/!?i CAEO21>W 32w 43 54 65 76 87 9 # ^ Important is the first and the final character. Meaning of the first character: "*"= UPC3 communicates with the modem (e.g. sending of the initial string). "."= no communication with the modem Meaning of the final character: ©2010. ELTEK VALERE DEUTSCHLAND GmbH. UM_UPC4_V2.00_E_R1.1_2011-01-04 DC Controller UPC4 Master User Manual Page 33/100 "I"= initialised "i"= not initialised During starting the UPC4 and during starting initialisation, the first character is “*”, the final character is “i”. After a time period the first character is “.”, the final character is “I”. This indicates a successful initialisation. 5.4 Control function UPC4 functions which are enabled can be executed in this menu block. Control function: Battery Test: Start/stop battery test, deleting of battery test failures.* Data memory: Manual start/stop of the data memory. Boost charge: Start/stop boost charge.* Equalize charge: Start/stop equalize charge.* Manual operation: Start/stop manual charge.* System test: Start/stop system test.* Modem external: Start/stop external modem operation. Second menu: Further system sub menus. LAN Parameter: Shows (only shows!) the current IP configuration. The items, marked with "*" must be enabled by configuration. 5.4.1 Control function battery test (Only available if “enable manual battery test” is configured). Manual start UPC4 12.07.10 OKAY 11:47:36 x times ▼ Control Function ►Battery Test ENT ENT (1)* Battery Test ↕ Battery Test Start?->ENTER ENT (2)* (1)* "Log in" could be necessary, see section 5.4.7 Log in. (2)* Battery test is started. ©2010. ELTEK VALERE DEUTSCHLAND GmbH. UM_UPC4_V2.00_E_R1.1_2011-01-04 DC Controller UPC4 Master User Manual Page 34/100 Manual stop UPC4 12.07.10 OKAY 11:47:36 x times ▼ ENT Control Function ►Battery Test ENT (1)* Battery Test ↕ Battery Test Stop?->ENTER ENT (2)* (1)* "Log in" could be necessary, see section 5.4.7 Log in. (2)* Battery test is stopped. Clear battery test error 3 times ESC UPC4 12.07.10 OKAY 11:47:36 x times ▼ Control Function ►Battery Test ▲▼ ENT Battery Test ↕ ENT (1)* Clear Error Test=1 Clear Error Test=0 (1)* Battery test error is cleared. 5.4.2 Control function "boost charge" (Only available if "boost charge" is enabled). Start UPC4 12.07.10 OKAY 11:47:36 x times ▼ Control Function ►Boost charge ENT(1)* Boost charge Start?->ENTER ENT (2)* (1)* "Log in" could be necessary, see section 5.4.7 Log in. (2)* Boost charge is started. ©2010. ELTEK VALERE DEUTSCHLAND GmbH. UM_UPC4_V2.00_E_R1.1_2011-01-04 DC Controller UPC4 Master User Manual Page 35/100 Stop UPC4 12.07.10 OKAY 11:47:36 x times ▼ Control Function ►Boost charge ENT(1)* Boost charge Stop?->ENTER ENT (2)* (1)* "Log in" could be necessary, see section 5.4.7 Log in. (2)* Boost charge is stopped. 5.4.3 Control function "equalize charge" (Only available if "equalize charge" is enabled). Start UPC4 12.07.10 OKAY 11:47:36 x times ▼ Control Function ► Equalize Char ENT(1)* Equalize Char Start?->ENTER ENT (2)* (1)* "Log in" could be necessary, see section 5.4.7 Log in. (2)* Equalize charge is started. Stop UPC4 12.07.10 OKAY 11:47:36 x times ▼ Control Function ► Equalize Char ENT(1)* Equalize Char Stop?->ENTER ENT (2)* (1)* "Log in" could be necessary, see section 5.4.7 Log in. (2)* Equalize charge is stopped. ©2010. ELTEK VALERE DEUTSCHLAND GmbH. UM_UPC4_V2.00_E_R1.1_2011-01-04 DC Controller UPC4 Master User Manual Page 36/100 5.4.4 Control function "Hand-op. charge" (Only available if "Hand-op. charge" is enabled). 2x ESC UPC4 12.07.10 OKAY 11:47:36 x times ▼ ENT (1)* Hand-op. char start Act.: 20.0A 54,0V Control Function ► Hand-op. char ▼▲ Automatic (2)* Nomin.: 54,0V Act.:20.0A 54,0V (3)* ENT (4)* Nomin.: 54,2V Act.:20.0A 54,2V Hand-op. char start Act.: 20.0A 54,2V (1)* "Log in" could be necessary, see section 5.4.7 Log in. (2)* The screen automatically changes to the next. In the top line the default voltage of the rectifiers is shown. In the second line the present measured values are shown. (3)* By pressing the arrow keys the default voltage value of the rectifiers is changed. (4)* At this position hand operation charge is stopped. 5.4.5 Control function "System test" (Only available if "System test" is enabled). 2x ESC UPC4 12.07.10 OKAY 11:47:36 x times ▼ Control Function ->System test ENT Automatic (1)* System test start Act.: 20.0A 54,0V ▼▲ Nomin.: 54,0V Act.:20.0A 54,0V (2)* ENT (3)* Nomin.: 54,2V Act.:20.0A 54,2V System test start Act.: 20.0A 54,2V (1)* The screen automatically changes to the next. In the top line the default voltage of the rectifiers is shown. In the second line the measured values are shown. (2)* By pressing the arrow keys the default voltage value of the rectifiers is changed. (3)* At this position system test is stopped. ©2010. ELTEK VALERE DEUTSCHLAND GmbH. UM_UPC4_V2.00_E_R1.1_2011-01-04 DC Controller UPC4 Master User Manual Page 37/100 5.4.6 Control function "modem" (Only available if "modem" is enabled). Start UPC4 12.07.10 OKAY 11:47:36 x times ▼ ENT Control Function ► Modem Modem Opera Start?->ENTER ENT (1)* (1)* Modem is started, i. e. the UPC4 operates in the modem mode. Stop UPC4 12.07.10 OKAY 11:47:36 x times ▼ ENT Control Function ► Modem Modem Opera Stop?->ENTER ENT (1)* (1)* Modem is stopped, i. e. the UPC4 dos not operate in the modem mode. REMARK: The status of the modem is indicated at “Operating status modem”, see section 5.3.4 please. ATTENTION! If the UPC4 is used with a modem, it is necessary for direct configuration via RS232 to deactivate the modem mode using the function as described above. Otherwise, communication is not possible. After the configuration is finished "modem operation" must be switched ON again, and additionally the plug must be plugged in again. ©2010. ELTEK VALERE DEUTSCHLAND GmbH. UM_UPC4_V2.00_E_R1.1_2011-01-04 DC Controller UPC4 Master User Manual Page 38/100 5.4.7 Log in (1)* ENT Login Procedure User1 ▲ Login Procedure User2 (2)* ▲▼ User: User1 Passwd: a (3)* User: User1 Passwd: ****r ▲▼ ENT User: User2 Passwd: a User: User2 Passwd: ****r ▲ User3…7 (4)* (1)* If within the menue an action is to be carried out which requires expanded access right (such as e.g. delete Event list , see section 5.3.1), the log in procedure is automatically called. (2)* Select user At first the user has to be selected using the arrow keys. (3)* Password entry Using the arrow keys the alphabet, figures and additional characters are passed trough. The required character is selected by pressing “ENT”. After this, the cursor jumps to the next digit, overtakes the previous character as proposal and sets “*” as placeholder for the previous character. If the password consists of two consecutive equal characters (e.g. the password “Cooperation”), please note: After keying in “Co”, first select another character using the arrow keys. Following, go back to the character “o” and press ENT. Finishing password entry In order to finish "password entry" after you have entered the final character please press „ENT“ for two times without changing to another character by pressing the arrow keys. (4)* After finishing password entry the menu skips to the entry point, see (1)* and from there to the following place, e.g. delete Event list (see section 5.3.1). ©2010. ELTEK VALERE DEUTSCHLAND GmbH. UM_UPC4_V2.00_E_R1.1_2011-01-04 DC Controller UPC4 Master User Manual Page 39/100 5.5 Secondary menu Using the secondary menu, the status and the configuration parameters of the UPC4 are visible and can be changed after authorization, see section 5.5.3 Configuring at the display/MMT. Control Function2nd Menu: Error list: All present errors (failures) History list: The last 500 incoming and outgoing failures/events Information menu o Indicator measuring param.: Shows all available measuring objects Config. UPC4: Configuration of the UPC4 hardware o Date & Time o Display backlight o Display contrast o Lamp test o Delete, Restart Control function.: Control functions of the UPC4 o Status default OK. Current CAN device number determining as default o Rectifiers flashing o Rectifiers RESET o RESET capacity calculator: up to date calculated capacity is cancelled System parameter: displaying respectively processing of the UPC4 configuration parameters Factory menu: Protected area Aut./User/Login: Explicit login/logout at the unit ©2010. ELTEK VALERE DEUTSCHLAND GmbH. UM_UPC4_V2.00_E_R1.1_2011-01-04 DC Controller UPC4 Master User Manual Page 40/100 5.5.1 Date, time, illumination, contrast, and lamp test UPC4 12.07.10 OKAY 11:47:36 x times ▼ Control function ►Sekundar menu ▼ ►Error List History List ▼ ►Config UPC4 Controlfunction ENT ENT ►Date & Time Display backli ▼▲ (1)* 12.07.2010 11:47:36 13.07.2010 11:47:36 6x ENT (2)* ▲ ENT ▼▲ ►Displaybackli Displaycontrast 70 72 ENT (3)* ▲ ENT ▼▲ ►Displaycontra Lamp test 70 72 ENT (4)* ▲ ENT ►Lamp test Displaycontrast automatically LED - Test LEDs off LED - Test LEDs on automatically (5)* (1)* Day, month, hours, minutes, and seconds are individually set. The element indicated by curser can be set by pressing the arrow keys. Skipping to the next element takes place by pressing the ENTER key. A log in could be necessary, see section 5.4.7 Log in. (2)* As described at (1)*, the curser changes from day to month to year, etc. by pressing the ENTER key. If the curser has reached "seconds" and therefore has reached the final block, the set date/time is stored by pressing "ENTER". (3)* The set backlight is stored. ©2010. ELTEK VALERE DEUTSCHLAND GmbH. UM_UPC4_V2.00_E_R1.1_2011-01-04 DC Controller UPC4 Master User Manual Page 41/100 (4)* The set contrast is stored. (5)* Lamp test is finished. 5.5.2 Status “Default OK” UPC4 12.07.10 OKAY 11:47:36 ENT ENT x times ▼ Control function ►Sekundar menu ►Error list History list ENT ►Controlfunction Display Systemp ENT ►Statusdefault OK Rectifiers BLINK ►Statusdefault OK <ENTER> ENT automatically ►Statusdefault OK WAIT…OK ►Statusdefault OK OKAY 5.5.3 Configuring at the display/MMT The menu navigation and parameterizing of the UPC4 is very extensive. In addition: not all of the parameters are available at the display (e.g. network settings, see section 5.6). Consequently we recommend to configure the UPC4 using the configuration tool "Multi Management Tool" (MMT). The various configuration areas are well-arranged in the MMT. Furthermore, not enabled areas are hidden. Consequently for clarity only the modules which are to be configured are displayed. The MMT can be connected to the UPC4 via modem, network or serial by using a null modem cable. ©2010. ELTEK VALERE DEUTSCHLAND GmbH. UM_UPC4_V2.00_E_R1.1_2011-01-04 DC Controller UPC4 Master User Manual Page 42/100 5.6 IP address/network settings 2x ESC UPC4 12.07.10 OKAY 11:47:36 ▲ ENT x times ▼ Control funktion ►LAN Parameter IP 192.168.0.123 ▲ ▲ Netmask 255.255.255.0 Gateway 0.0.0.0 DNS-Server 0.0.0.0 IP address and other network settings as well cannot be set at the display. Either they can be configured by MMT or by the use of the software "Eltek Valere Network Utility". This software enables you to find out all available UPC4 units within the network if you don't know their IP addresses. ATTENTION! Default IP address of a brand-new UPC4: 192.168.0.123 ©2010. ELTEK VALERE DEUTSCHLAND GmbH. UM_UPC4_V2.00_E_R1.1_2011-01-04 DC Controller UPC4 Master User Manual Page 43/100 6 Configuration – UPC4 6.1 General Information Because direct configuration at the UPC4 control unit (display panel) is not practice-oriented (see section 5.5.3) please use the PC software "Multi Management Tool" (MMT) free of charge. The UPC4 provides an Ethernet interface (RJ45), a serial interface RS232 and optional a connection via modem is possible as well. The configuration software (MMT) works in combination with the system software Windows® 2000/XP/2003/Vista/7. The user manual for the dial-up and general operation of this software is optionally available (MMT user manual). REMARK: This user manual is related to the configuration parameters which are available for "user 1" as default. But the configuration parameters are freely customizable. 6.1.1 Configuration of UPC systems by external modem via RS232 The UPC4 controls a connected modem via modem specific commands (AT commands). The user data are “framed” by the AT commands. Due to this the communication via Null modem cable at direct configuration is constrained. Consequently the operation mode “modem” has to be temporary disabled. Both of the two possible operation modes of the modem (“started” or “stopped”) can be changed in the menu “control function modem”. 1) Modem has been started. Dialing in the system is possible. The system can be configured via modem. In this case a configuration directly via serial interface is not possible. 2) Modem has been stopped. Dialing in the system via modem is not possible. The modem specific commands are deactivated. Configuration via a serial interface is possible. Basically please note the following order: 1. Stop the external modem 2. Check whether the external modem has been stopped. 3. Disconnect the serial cable of the modem from the RS232 interface. Connect the PC via Null Modem Cable to the UPC4. 4. Configuring of the system 5. Disconnect the Null Modem Cable, connect the serial cable to the modem. 6. Start the external modem 7. Check whether the external modem has been started/initialised For information how to start and stop the modem, please see section 5.4.6 „Control function modem“. For information about the modem status please see section 5.3.4 „Operating status modem“. ©2010. ELTEK VALERE DEUTSCHLAND GmbH. UM_UPC4_V2.00_E_R1.1_2011-01-04 DC Controller UPC4 Master User Manual Page 44/100 6.1.2 UPC4 parameter groups REMARK: The pictures shown in the following are screenshots of the configuration software MMT. The "hide function" is enabled for the following picture (see also the following page). After successful readout/start of a configuration a register of the parameter groups is shown to the left of the screen (MMT configurator). A selected group (via left mouse button) is shown to the right. Parameter groups ©2010. ELTEK VALERE DEUTSCHLAND GmbH. UM_UPC4_V2.00_E_R1.1_2011-01-04 DC Controller UPC4 Master User Manual Page 45/100 6.1.3 Parameter, hide function To make the operation comfortable for the end-user, MMT configuration areas which are not used according to the configuration are hidden. For the sake of completeness the following picture as example shows a screenshot of a system in which all areas are used and therefore are visible. The hide function can be manually enabled/disabled using the MMT software tool. For details please read the specific section in the MMT manual. ©2010. ELTEK VALERE DEUTSCHLAND GmbH. UM_UPC4_V2.00_E_R1.1_2011-01-04 DC Controller UPC4 Master User Manual Page 46/100 Parameters which effect that other areas are hidden/unhidden are marked green. Those parameters which can be hidden due to this are marked blue (see the following picture please). The concerned parameters are represented in this manual by a number followed by a superscripted "N" or a star (*) and a superscripted number in addition. Example 1: "1.10)*1.6": That means that the parameter 1.6 must be enabled in order to make parameter 1.10 visible (see 6.4 "Basic setting UPC4"). Example 2: (2.18) N*2.19 : That means that the parameter 2.19 must not be enabled in order to make parameter 2.18 visible (see section 6.4.2 „CAN Devices Cnt“). 6.2 Table “Overview of the configuration items” The configuration items are divided in several groups for clarity as shown in the table as follows: Basic settings of the UPC4 (section 6.4) UPC4 (section 6.4.1) CAN devices Cnt (section 6.4.2) Charge control (section 6.4.3) Service/Enable (section 6.4.4) Syst parameters (section 6.4.5) Battery (section 6.4.6) Serial number, firmware version, configuration date/person, IP, time server, language selection Number of the CAN bus connected modules such as rectifiers, analog measurement inputs (UMD2), fan racks etc. Settings of the battery charge controller Enabling of services, e.g. battery test, boost charge, equalize charge, system test, insulation measurement, SNMP, ModBus, etc. Default values (voltage/current) of the rectifier modules Battery values, battery fuses, asymmetric measurement, temperature compensation Measurement system (section 6.5) Assignment Measu (section 6.5.1) Affords the assignment of measuring channels to measuring objects Assignment Shunt* (section 6.5.2) Assignment of shunt values to current measuring inputs (*BU is required) Tresholds (section 6.6) Thresholds (section 6.6.1) Thres. Gen. par (section 6.6.2) Threshold values of: battery over/under voltage, over/under temperature, battery operation Threshold values of general parameters e.g. UMD2 analog measuring inputs Outputs/Alarm signaling (section 6.7) ©2010. ELTEK VALERE DEUTSCHLAND GmbH. UM_UPC4_V2.00_E_R1.1_2011-01-04 DC Controller UPC4 Master User Manual Page 47/100 Digital inputs* (section 6.7.1) Signals enable (section 6.7.2) Signals Sw mode (section 6.7.3) Inversion and/or time delay of digital inputs DIB (*DIB is required) Configuration of events, LEDs, and relays inverting/delaying of output signals LVD/PLD/Drop diode (section 6.8) LVD/PLD/Drop d. Setting of LVD/PLD & drop diode functions Remotedisplay (section 6.9) RD/RDP Remote Settings for "Remote Door Display" (RDD) and extended settings for „Remote Display Panel“ (RDP*) respectively (*RDP enabled is required) Additional functions (section 6.10) Service/Enable (section 6.4.4) Battery Test* (section 6.10.1) Equalize charge* (section 6.10.2) Boost charge* (section 6.10.3) Capacity Calc* (section 6.10.4) SNMP* (section 6.10.5) Modem* (section 6.10.6) Field bus* (section 6.10.7) Mains monitoring (section 6.10.8) Hand-op. charge* (section 6.10.9) System test* (section 6.10.10) The services/functions which are enabled in the section "Service/Enable" can be configured as described in the following: The switch off conditions of a running battery test can be configured as well as the start date of an automatic battery test (requires the enabled service "battery test"). The start and switch off conditions of an equalize charge can be configured (* requires the enabled service "equalize charge"). The start conditions of automatic boost charge and the conditions of "follow up charge" (follow up charge time, voltage threshold) can be configured (*requires the enabled service "boost charge"). The capacity calculator can be configured. It calculates the expected battery capacity (only of lead acid batteries). (*requires the enabled capacity calculator) SNMP settings (*SNMP enabled required) Modem configuration (*modem enabled is required) ModBus/ ProfiBus configurations (*field bus enabled is required) Configuration of external mains monitoring units or MMB board* (*MMB enabled is required) Manual charge of the batteries (*Hand-op. charge enabled is required) Manual control of the rectifiers to test the system (*System test enabled is required) REMARK: Texts have no direct effect to system functions. UPC4 Text (section 6.11) Installation (section 6.11.1) Text Syst param (section 6.11.2) Text Battery* (section 6.11.3) Text Batt ident (section 6.11.4) Text Digital inp* (section 6.11.5) Location, service no., contact person, etc. Display text for system measuring values Display text e for battery measuring values (*battery enabled is required) Text of the used battery Text for digital inputs of the UPC4. Appears e.g. in the failure list (* DIB enabled is required) Text Relay outp (section 6.11.6) Text for relay output of the UPC4. Only for the display. Text Fuses* (section 6.11.7) Text for the monitorable fuses (* FMB enabled is required) Texte Gen. param. (section 6.11.8) Display text for general measuring values Module ID-text (section 6.11.9) Text of the CAN modules are read out. Module ID text EV (section 6.11.10 Text of the CAN modules are read out. ©2010. ELTEK VALERE DEUTSCHLAND GmbH. UM_UPC4_V2.00_E_R1.1_2011-01-04 DC Controller UPC4 Master User Manual Page 48/100 6.3 Overview by screenshot UPC 4 Installation UPC4 CAN Devices Cnt Service/Enable Charge control Syst parameters Thresholds Assignment Measu Assignment Shunt* Battery Battery Test* Equalize charge* Boost charge* Capacity Calc.* Signals enable Signals Sw mode LVD/PLD/Drop d. Mains monitoring Digital inputs* RD/RDP Remote SNMP* Field bus* Modem* Thresh. Gen. par Hand-op. charge* System test* Text Syst param Text Batt param.* Text Batt ident Text Digital inp* Text Relay outp Text Fuses* Text Gen. param Module ID-texts ModuleIDtexts EV Special set For the meaning of the stars (*), please see section 6.1.3 Parameter, hide function. ©2010. ELTEK VALERE DEUTSCHLAND GmbH. UM_UPC4_V2.00_E_R1.1_2011-01-04 DC Controller UPC4 Master User Manual Page 49/100 6.4 Basic settings of the UPC4 6.4.1 UPC4 The text, which is entered in Logo line 1 (1.1) and Logo line 2 (1.2) appears as text for information at the display of the unit. 1.1 1.2 1.3 1.4 Information about the firmware version is indicated by the fields (1.3), (1.4), (1.5). (Only to read). 1.5 At "Time source" (1.6) can be choosen, wherefrom the internal clock shall be synchronized. 1.6 At (1.7)*1.6 a digital input can be choosen which shall set the time to 12:00. The value "0" means inactive. 1.7 1.9 1.10 1.8 Time zone and refresh interval are set at (1.8)*1.6 and (1.9)*1.6. At (1.10)*1.6 and (1.11)*1.6 NTP time servers can be entered. 1.11 1.12 1.13 1.14 1.15 Network settings of the UPC4 can be done at (1.12), (1.13), (1.14) and (1.15). In the fields "Config. Date" (1.16) and "Config. Person" (1.17) it automatically is entered the date and the person who has done the last configuration change. (Only to read). Information about the hardware such as e.g. serial number (1.18) is indicated in this area. (Only to read). 1.18 1.16 1.17 1.19 At "Language UPC4" (1.19) you can choose the language which shall be used in the UPC4. Three languages are available as standard. At "User" an additional language will be available via SD card in the future. At (1.20) the baudrate of the serial interface can be set. 1.20 ©2010. ELTEK VALERE DEUTSCHLAND GmbH. UM_UPC4_V2.00_E_R1.1_2011-01-04 DC Controller UPC4 Master User Manual Page 50/100 6.4.2 CAN Devices Cnt A multitude of devices (modules) can be connected to the UPC4 via CAN bus. 2.19 The number of the used rectifiers (2.1) & (2.20), DC/DC converters (2.2), and inverters (2.3) can vary in the different power supply systems. The most of the modules automatically log on themselves at the UPC4 and need'nt to be manually configured. 2.1 2.2 Rectifiers of series PSS (2.1), DC/DCconverters PSC (2.2), and inverters of series UNV (2.3) are excepted because they have no automatic log on functionality. 2.3 Each of the marked fields correspond to the CAN address of one registered module (2.1), (2.2), (2.3), (2.20). Due to the fact that not all of the slots must be equipped, gaps within the sequence can occur. 2.20 Two different rectifier families can be controlled by the UPC4: 2.8 - "REC#1": (2.1)*2.19 that are modules of series PSR and PSS. - "REC#2": (2.20)N*2.19 that are modules of series Flat-, Mini-, Micro-, and Powerpack. 2.7 ATTENTION! 2.4 2.5 2.6 2.18 The rectifier family which is used in the UPC4-controlled system has to be set at parameter (2.19). Either rectifiers of type according to "REC#1" or rectifiers of type according to "REC#2" are allowed to be used within one system. The interpretation of parameter REC#2 compared to the parameters REC#1, INV, DCC is different. As described above, REC#1 (2.1)*2.19, INV (2.3), DCC (2.2) have an automatic log on functionality. Therefore each of the backplane slots have an explicid CAN address which results from the number of the slot of the backplane in combination with the set CAN address of the backplane. That means that each of the plugged modules can explicitely be allocated. As shown in the picture above as example, REC#1, No. 1, is configured. That means that at the first slot of the first backplane a module is expected. This is not possible for REC#2. No allocation of (2.20) N *2.19 to the slots of the backplane is available. The numbers of (2.20) N *2.19 result from the temporal order of the plugged modules. Redundancy: At Systems with redundant rectifiers, DC/DC converters or inverters additional events can be generated by setting the parameters (2.4) *2.19, (2.5), (2.6), and (2.18) N*2.19. Parameter (2.4) *2.19 is allocated to REC#1 (2.1) ©2010. ELTEK VALERE DEUTSCHLAND GmbH. 2.19 whereas parameter (2.18) N *2.19 is allocated to UM_UPC4_V2.00_E_R1.1_2011-01-04 DC Controller UPC4 Master User Manual Page 51/100 REC#2 (2.20) N *2.19 . Two modes are available for the evaluation of the redundancy which can be set in the menu Special set, see section 6.12.1. The following example relates to rectifiers REC#1 but is valid for rectifiers REC#2, DC/DC converters, and inverters as well. Redundancy mode= UPC3/MU2000 (see item 35.3 at section 6.12.1). Redundancy event is active as soon as no redundancy is existent. Example: System with seven registered rectifiers (2.1), parameter "Redundant REC" (2.4) is set to "two". Breakdown of one REC#1: Event "REC#1 no CAN" is active. Redundancy still is available. Breakdown of two REC#1: Event "REC#1 no CAN" and "REC#1 redundancy" is active. Redundancy is'nt existant anymore. Redundancy mode= MU1000 (see item 35.3 at section 6.12.1). Redundancy event is active as soon as the redundant rectifiers and additionally at least one more have been broken down. Example: System with seven registered rectifiers (2.1), parameter "Redundant REC" (2.4) is set to "two". Breakdown of one or two REC#1: Event "REC#1 no CAN" is active. Redundancy still is available. Breakdown of three REC#1: The events "REC#1 no CAN" as well as "REC#1 redundancy" are active. Redundancy is'nt existant anymore. 2.9 2.10 2.17 2.11 2.12 2.13 2.14 2.15 2.16 ©2010. ELTEK VALERE DEUTSCHLAND GmbH. The CAN modules which are listed in the following table "Optional CAN devices (modules)" are not automatically registered at the UPC4. The particular numbers have to be set at (2.7) up to (2.16). REMARK: Three different types of battery monitoring boards (BMB) (2.10) are available. The used type has to be set at (2.17). UM_UPC4_V2.00_E_R1.1_2011-01-04 DC Controller UPC4 Master User Manual Page 52/100 Optional CAN devices (modules): CAN device item Comment BU Basic Unit (2.7) Modular measuring board. E.g. for battery monitoring STS Bypass (2.8) Active Static Bypass Switch (mains <—> inverter) MMB MainsMonitor (2.9) Mains monitoring (AC input) BMB AnalogInputs (2.10) Extension of the measuring inputs for battery monitoring DIB Digital Input (2.11) Extension of the digital inputs RLB Relais Outp (2.12) Extension of the relays FMB Fuse Board (2.13) Extension of fuse monitoring FAN tray (2.14) Active fan tablet UMB (2.15) Extension measuring control (only used for CONB03) UMA (2.16) Extension measuring control (only used for CONB03) 6.4.3 Charge control 3.1 3.3 3.2 3.4 3.5 3.6 The main function of the UPC4 is, to deliver a voltage default value to the rectifiers, in order to charge batteries or to keep them under good charge conditions. This regulator (see the picture on the left) provides several additional functions. After a restart, the system overtakes the measured voltage as start voltage for the regulator. Every second the voltage default value is controlled (up/down) at the value (3.6) if deviations of the current default value exist. For trickle charge the adjusted relative current default value (3.1) is used. For an activated boost charge and equalize charge respectively the raised charge current (3.2)*8.1 and (3.3)*7.3 respectively is used. If a diesel generator is used for power supply, the default value (3.4) is used. The digital input (3.5) indicates a working diesel generator. This function is disabled, if the digital input is set to “0”. The configured value of the norminal battery capacity (see item (5.2) at section 6.4.6) is used as point of reference for the relative charge currents. ©2010. ELTEK VALERE DEUTSCHLAND GmbH. UM_UPC4_V2.00_E_R1.1_2011-01-04 DC Controller UPC4 Master User Manual Page 53/100 6.4.4 Service/Enable 7.1 In the area „Service/Enable“, additional functions can be enabled at the UPC3. If a parameter is set to „0“, the function is disabled. If a parameter is set to “1” or greater, the function is enabled. A battery test (7.1) can be started/stopped in different ways at the UPC4: 7.2 7.3 -Start/stop via buttons of a display panel/menu of the UPC4 - Start depending on date & time - Start day to day - Start/stop by an external command e.g. configuration software - Start/stop by digital input (7.2) The settings regarding starting/stopping of "Equalize charge" (7.3) are identical to the battery test as described above. 7.4 8.1 For "Boost charge" (8.1) additional conditions for starting & stopping are possible: - Start/stop via front buttons of a display panel/menu of the UPC4 - Start if the battery voltage falls below the value which is set at "Boost charge" (see section 6.10.3) - Start after battery operation. If current is withdrawn from the Battery and the value is greater than the value which is set at "Thresholds" (see section 6.6.1), the UPC detects battery operation - Start after mains error (optional, MMB is required) - Start/stop by an external command e.g. configuration software - Start/stop by digital input - Start/stop by battery current - Start after battery test end (BtstE) by declaration of the final criteria 8.2 - Start depending on date & time, for details please see "Boost charge" Duration time. Repetition interval (day(s)), please see "Boost charge" "Battery test", "Equalize charge" and "Boost charge" can be started/stopped via digital inputs (7.2), ©2010. ELTEK VALERE DEUTSCHLAND GmbH. UM_UPC4_V2.00_E_R1.1_2011-01-04 DC Controller UPC4 Master User Manual Page 54/100 (7.4) and (8.2). At "Start" the digital input to start the function is set, at "Stop/Inhibit" the digital input to stop/inhibit the function is set. DIB extension module(s) are necessary. 9.1 9.2 9.3 9.4 9.5 9.8 9.6 9.11 9.9 9.7 9.10 By enabling the parameter „Hand-op. charge” (9.1) a manual control of the default voltage of the rectifiers is possible. Enabling "System test“ (9.2): For the configuration please see the menu "System test“ (section 6.10.10). Enabling „Energy balance“ (9.3): The current which is flown into the battery respectively is withdrawn from the battery is accumulated, the value (Ah) is shown on the display. Measurement of the isolation resistance: If the measurement of the insulation resistance "Isolat. measure" (9.4) is enabled, the measuring source is used which is defined as BU input at "Assignment Measu" (see section 6.5.1), subitem "Isolation". Additionally the UPC4 causes, that the assigned BU connects the half of the voltage value V1 via a highresistance resistive voltage divider by relay to the DIN rail. By differential measurement to this voltage it is detected whether an insulation failure is present or not. By parameter "Isol. by dig.inp" (9.5) isolation measurement can be disabled. That could be necessary if isolation measurement must not happened due to an external action for a certain time (e.g. alternative measurement enabled, system is maintained). ATTENTION! It is only permitted that only one BU measures per each ground. Otherwise an inherent isolation error is generated. Modem: For the automatic initialization of an external modem, parameter (9.6) has to be set to „1“. The modem settings have to be done at "Modem" (see section 6.10.6). SNMP: Parameter "SNMP Enable" (9.7) fades in the SNMP setting options which are enabled by this at the MMT. Parameter (9.11) is not used to enable SNMP physically. SNMP is continuously enabled in the background. Lamp test: At (9.8) it is possible to enable a lamp test by digital input. Capacity calculator: Parameter "CapacityCal enab" (9.9) enables the capacity calculator. For detailed information please see "Capacity calculator" (section 6.10.4). Field bus: At "Fieldbus" (9.10) a field bus (Modbus) can be enabled. ProfiBus is currently not implemented. ©2010. ELTEK VALERE DEUTSCHLAND GmbH. UM_UPC4_V2.00_E_R1.1_2011-01-04 DC Controller UPC4 Master User Manual Page 55/100 6.4.5 System parameters 4.1 4.3 4.5 4.4 4.2 4.6 4.10 4.9 4.7 4.8 4.11 "REC Nom. voltage" (4.1) is the float charge voltage. In systems in which no batteries are used it simply is the default voltage of the rectifiers. "REC Boost chge V" (4.2)*8.1 is the boost charge voltage, whereas "REC Equalize Vol" is the equalize charge voltage (4.3)*7.3. These values indicate how the maximum default voltage value should be set by the regulator in case of float/boost/equalize charge. For boost charge no temperature balancing is available. If temperature sensors are used, the other default voltage values are corrected depending on temperature. Parameter "REC Batt test V." (4.4) indicates to which voltage value the rectifiers shall be set during battery test. This value must be below nominal battery voltage in order to withdraw current out of the batteries. "REC Nom. current" (4.5) is sent as default via CAN bus to the rectifiers. Normally the value according to the type plate of the rectifier is keyed in. "REC load limit" (4.6) is associated to the set "REC Nom. current". The measured current of all rectifiers is compared to the maximum possible current ("Rec count" multiplied by "REC Nom. current" (4.5))". Parameter (4.7) and (4.8) enable the monitoring of rectifier load distribution. This feature is only applicable in systems with more than one rectifier. If the percentage of the difference of maximum and minimum rectifier current to maximum rectifier current is more than the value (4.7) for more than (4.8) seconds, the event bit "RECLoadDist" is set. (Re c Im ax Re c Im in) *100% LoadDis Re c Im ax The load distribution usually is worse at low system load. So the monitoring of the load distribution is only active, if the percentage of the rectifier which delivers the current with the greatest value compared to the nominal current exceeds the value (4.9) for more than (4.10) seconds. In systems with inverters but without static bypass switch (STS/UNB) the nominal inverter output voltage value "INV nom. voltage" (4.11) is sent by the UPC4 via CAN-Bus to the inverters. In section 6.4.3 "Charge control" (Regulator) the control process for battery charging is described. ©2010. ELTEK VALERE DEUTSCHLAND GmbH. UM_UPC4_V2.00_E_R1.1_2011-01-04 DC Controller UPC4 Master User Manual Page 56/100 6.4.6 Battery 5.1 In this menu the battery relevant settings are done. Battery count respectively available batteries are set at (5.1). "0"= not available, "1"= available. At (5.2) the nominal capacity value of the battery, at (5.3) the number of the battery cells (cell count) is set. 5.3 5.2 5.4 5.5 ©2010. ELTEK VALERE DEUTSCHLAND GmbH. Furthermore in this section temperature and fuse monitoring, asymmetrical as well as additionell battery relevant settings are described. For the analysis of the battery asymmetry the battery tapping point is set at (5.4). The number of the cells up to the tapped point is counted from the minus pole (-Vbat) of the battery. If the difference of the measured and calculated asymmetry voltage value exceeds the value of the set „Battery unsymm.” (5.5), an event is generated. If the tapping point is equal to the half of the number of cells of the battery, the calculation according to item a), see the following page, is done. Otherwise the missing voltage value +Vbat which relates to the tapping point is calculated considering a correction factor according to item b). UM_UPC4_V2.00_E_R1.1_2011-01-04 DC Controller UPC4 Master User Manual Page 57/100 Legend: Vtapp = Measured tapped voltage value against (–) Vbatt = Measured battery voltage Batc = Number of batteries (value has to be set) Ctapp = Tapping point counted from (-), value has to be set Vplus = Calculated tapped voltage value against (+) (a) Asymmetry calculation with tapping point at the center of the battery: Diff Vbatt 2 xVtapp If the difference (without consideration of sign) is greater than (5.5), asymmetry is indicated then. (b) Asymmetry calculation with tapping point not at the center of the battery: Vtapp 2 (Vbatt Vtapp) Vbatt * (Ctapp ( Batc Ctapp )) Batc Vtapp2 is the battery tapping voltage against (+), calculated with consideration of a correction factor. Diff Vtapp Vtapp 2 If the difference (without consideration of sign) is greater than (5.5), asymmetry is indicated then. NOTE: If "Battery Unsymm." (5.5) e.g. is set to 2V, the measured value may differ at +/- 1V related to the calculated unsymmetry voltage. 6.1 6.2 6.3 The detection of an opened/tripped battery fuse is only possible if the battery tap is located behind the battery fuse. If the difference between system- and battery voltage is greater than parameter “Vdiff Fuse case” (6.1) and the battery current less than parameter “Itrigg fuse case” (6.2), the event “Fuse open“ is activated. For the temperature compensation of the charge voltage the temperature sensor (6.3) of a battery has to be activated first, e.g. "Batt1". 6.4 6.7 ©2010. ELTEK VALERE DEUTSCHLAND GmbH. 6.6 6.5 The temperature coefficient "Tk (per cell)" (6.4) and "Base temp. Tcomp" (6.5) depend on the battery and have to be asked at the manufacturer. UM_UPC4_V2.00_E_R1.1_2011-01-04 DC Controller UPC4 Master User Manual Page 58/100 Example: Vload Vnom Tk * N cell * t (Tk = -4mV/cK; Ncell=24; t=+5°K are used for this example). Vload 54,3V (0,004) * 24 * 5 Vload 53,8V at 30C If the currently measured temperature value is below (6.6), then this value is used for temperature compensation. If the currently measured temperature value is above (6.7), then this value is used for temperature compensation. 6.5 Measuring system 6.5.1 Assignment measured values In this menu it is possible to assign an userdefined input parameter to each individual measurement value of the UPC4. For example: Battery current = input BU1 I1. Please see the following examples: 1. example: Three batteries are used, but only one measuring line from terminal V1 of the BU is connected to battery 1 for voltage monitoring. In this case at “Voltage Vbatt”, "Battery 1" and "Battery2" you can assign the same measurement source as for "Battery1". Voltage Battery 1= BU1_V1 Voltage Battery 2= BU1_V1 Voltage Battery 3= BU1_V1 2. example: Two batteries are available but only one battery shunt is connected. 2a) The battery shunt is series connected to both batteries. It is connected to input I1 of the first Basic-Unit (BU1). In this case the measured current is the total battery current. Current Ibatt, battery 1= BU1_I1 Current Ibatt, battery 2= undefined 2b) The battery shunt is connected within one battery string. In this case the measured current is the current of Battery 1. But the same input can be assigned to battery 2 because it is assumed that the same current is withdrawn from battery 2. Current Ibatt, battery 1= BU1_I1 Current Ibatt, battery 2= BU1_I1 ©2010. ELTEK VALERE DEUTSCHLAND GmbH. UM_UPC4_V2.00_E_R1.1_2011-01-04 DC Controller UPC4 Master User Manual Page 59/100 Explanation of the measuring values: (Important default assignments are listed below. For a list of all available measurement sources see Section 7 please). Batteries: "Voltage Vbatt", "Tapp voltage Vtapp", "Current Ibatt", "Battery temperat.": At this menu items the measurement sources concerning battery measurements have to be assigned. A maximum of seven batteries can be monitored by the UPC4. For batteries which are available respectively which are configured but without battery shunt, the measurement source must be set to "UNDEFINED". For details please see above. DC System: "Voltage Vload", "Current Iload": At this menu items the measurement sources concerning load voltage as well as load current have to be assigned. "Insulat. resist.", "Insulat voltage": (Basic-Unit BU is necessary). At this menu items the BU which is provided for isolation measurement has to be assigned. Enabling of the isolation measurement takes place at Service/Enable (see section 6.4.4). General: "General voltage", "General current", General temp.", "Isolation": At this menu items the measurement sources of the general measurement have to be assigned. LVD / PLD: "LVD voltages": Reference voltages for LVD/PLD circuit. Digital Inputs & Mains: Factory set, please do not change. Important default assignments: (Basic-Unit (BU) is necessary). BU1_V1 = Battery voltage BU1_V2 = System voltage BU1_V3 = Unsymmetry voltage BU1_I1 = Battery current BU1_I2 = Load current BU1_I3 = General measurement value I1 BU1_T1 = Temperature sensor T1 (battery compensation) BU1_T2 = General measurement value T1 REMARK: For a list of all available measurement sources see Section 7 please. ©2010. ELTEK VALERE DEUTSCHLAND GmbH. UM_UPC4_V2.00_E_R1.1_2011-01-04 DC Controller UPC4 Master User Manual Page 60/100 6.5.2 Assignment Shunt* (*2.7 or 2.10 is required) 9.11 In this menu the values of the connected shunts are configured. The value of 60 A (see the left-hand picture) means: If a voltage value of 60mV falls at the shunt it is interpreted as a current flow of 60 A. The current values of the Basic-Units (BU) are set at (9.11)*2.7. 9.12 The current values of the Monitoring Boards (BMB) are (9.12)*2.10. ©2010. ELTEK VALERE DEUTSCHLAND GmbH. Battery set at UM_UPC4_V2.00_E_R1.1_2011-01-04 DC Controller UPC4 Master User Manual Page 61/100 6.6 Thresholds 6.6.1 Thresholds 10.1 10.2 10.3 With the exception of (10.4), (10.20) and (10.21) all settings in this group serve for generating events. Battery 10.4 10.5 10.6 10.7 10.8 10.9 Exceeding the threshold of battery over voltage "Vmax" (10.1) or falling below the threshold of battery under voltage "Vmin" (10.2) respectively battery warning voltage "Vwarn" (10.3) activates the related event in the signal matrix. Parameter (10.4) definines the over voltage threshold at which the rectifiers (REC) are switched OFF. 0= no REC switch OFF. 10.10 10.11 At (10.1) and (10.4) hysteresis (10.7) and delay (10.5) is used. 10.12 10.13 At (10.2) hysteresis (10.8) and delay (10.6) is used. 10.14 At parameter (10.3) also hysteresis according to (10.8) is used but no delay. 10.15 10.16 10.17 "Temperature high" (10.9)*5.1 relates to all of the used temperature sensors. Enabling of the individual sensors takes place in the main menu "Battery". Parameter (10.11)*5.1 defines hysteresis whereas parameter (10.10)*5.1 defines delay. 10.18 10.19 10.20 10.21 10.22 10.23 10.24 ©2010. ELTEK VALERE DEUTSCHLAND GmbH. Battery temp. UM_UPC4_V2.00_E_R1.1_2011-01-04 DC Controller UPC4 Master User Manual Page 62/100 Battery operation Battery operation (10.12) is detected by negative battery current flow. Because of measuring inaccuracy the threshold should be ≥5% of the shunt value. At (10.14) hysteresis and at (10.13) delay is to be set. Isolation measuring Enabling as well as assignment is set in these menus. At this place the threshold for detecting isolation error is defined. Isolation error measuring (10.15) is only possible at ungrounded systems. The setting should relate to the nominal voltage of the system, e.g. 48V system 48k Riso. At (10.17) hysteresis and at (10.16) delay is to be set. Load For monitoring of the system voltage also Vmax (10.18) as well as Vmin (10.19) values can be set. Parameter (10.20) and (10.21) define the thresholds of under voltage at which the inverters and DC/DC converters respectively are switched OFF. At (10.23) hysteresis and at (10.22) delay is to be set. Parameter (10.24) defines a threshold for the maximum load current. If this value is exceeded, an accordant event is generated. ATTENTION! If the battery voltage exceeds the limit at (10.4), all rectifiers get an OFF command via CAN bus. ATTENTION! In Systems without static bypass switch (STS/UNB) all inverters get an OFF command via CAN bus if the voltage value falls below the threshold (10.20). But if a static bypass is used, it controls the inverters. ATTENTION! If the voltage value falls below the threshold (10.21) all DC/DC converters get an OFF command via CAN bus. 6.6.2 Thresh. Gen. par 12.1 12.2 The UPC4 provides the following general measurement channels: 6 x voltage 12.3 6 x current 12.4 6 x temperature 6 x isolation resistance The measurement sources are assigned at "Assignment Measu" (see section 6.5.1). The respective general parameter is used by the UPC after the text has been configured, please see section 6.11.8 "Text Gen. Param.". For each individual parameter a "min" (12.3) and "max" (12.4) threshold is available. If they are exceeded/falled below a respective signal is generated. Hysteresis (12.1) and delay (12.2) are valid for all general measuring values. ©2010. ELTEK VALERE DEUTSCHLAND GmbH. UM_UPC4_V2.00_E_R1.1_2011-01-04 DC Controller UPC4 Master User Manual Page 63/100 6.7 Outputs/Alarm signaling 6.7.1 Digital inputs* (*2.11 is required) 14.1 14.2 14.3 At "Digital inputs" a maximum up to 16 external digital inputs can be configured. Parameter (14.1)*2.11 and (14.2)*2.11 are for the first digital input board (DIB), parameter (14.3)*2.11 and (14.4)*2.11 are for the second DIB. At (14.1)*2.11 and (14.3)*2.11 the individual inputs can be inverted, at (14.2)*2.11 and (14.4)*2.11 the delay values are set. 14.4 6.7.2 Signals enable 15.1 In the area „Signals enable“, all external and internal failures and events respectively can be enabled to an output. Thereby e.g. relays or SNMP traps can be activated. The events are grouped into the groups General, System, Battery, and Fuses. They are available to each output. You can find a list of all individual failures and events as well at section 7 "Event list UPC4 (failure list)". 15.2 "Error state" (15.2) is of particular importance. If an event of this list is active, the red LED "ALARM" of the optional RDD and RDP respectively starts blinking. Events which are active at "Event history" and "Modem/Traps" as well (16.2) are signaled via SNMP. At "Disable Signals" (15.1) several events can be disabled for all other lists. ©2010. ELTEK VALERE DEUTSCHLAND GmbH. UM_UPC4_V2.00_E_R1.1_2011-01-04 DC Controller UPC4 Master User Manual Page 64/100 16.1 16.2 16.3 All events which have been activated in the list „Events history“(16.1) end up on the history memory of the UPC4. The history memory contains of maximum 500 messages and stores appeared as well as disappeared events. Readout and reset of this list takes place either directly at the RDD and RDP respectively or via configuration software. 16.4 16.5 The three available internal relays of the UPC4 are configured at (16.5), (16.6), and (16.7). 16.6 16.7 The red LED "Alarm" at the front of the RD panel blinks if events of the list "Error state" (15.2) are active. The green LED "" of the RD panel has to be parameterized at the matrix "LED OK" (16.3). "Error state" and "LED OK" have the same content as default ex factory. But "LED OK" is inverted at "Signals switch mode" (see section 6.7.3). In this area (16.4) the six configurable LEDs of the RDP "LED 1 RD" to "LED 6 RD" are configured. 17.1 The relays of the Basic-Units (BU) are configured at (17.1). The relays of the optional available relay boards (RLB) are configured at (17.2). 17.2 ©2010. ELTEK VALERE DEUTSCHLAND GmbH. UM_UPC4_V2.00_E_R1.1_2011-01-04 DC Controller UPC4 Master User Manual Page 65/100 6.7.3 Signals Sw mode In the area „Signals Sw mode“, the configured lists can be inverted at their outputs. Additional a time delay can be set. It is common practice to let a relay operate at failure free condition so that a cable break can be recognised as failure. Due to this fact, the relay output is inverted, e.g. „Relay 1.1 = 1“. If the green LED () shall glow if no failure occurs, the LED must be inverted too. 6.8 LVD/PLD/Drop diode LVD = Low Voltage Disconnect. This function is mainly used to protect batteries against total discharge. If the set under voltage limit is reached, the battery is disconnected from the system by contactor. PLD = Priority Load Disconnect. By this function it is possible to early disconnect “unimportant” loads at battery operation if the battery voltage under-runs voltage limit values. Consequently the backup time of prioritized loads is increased. Because the three areas for LVD, PLD1 and PLD2 are nearly identical, in the following the areas exemplarily are explained on the basis of the LVD function. 20.1 20.2 Parameter „Source select“ (20.4) decides on the general LVD/PLD functionality. Explanation of the figures: 20.5 20.4 20.6 20.9 20.7 20.10 20.8 0 (OFF) disabled 1-6 The measuring sources which are assigned at "Assignment measured values" are used as reference. The thresholds "Low limit OFF" (20.1) and "Low limit ON" (20.2) for detection refer to that measuring value. These thresholds are used only at this configuration. 7 Switches the LVD/PLD function depending on "battery operation" (see section 6.6.1 "Thresholds"). 8 (Mains error) only makes sense in conjunction with the connection of an external Mains Monitoring Board (MMB), optional. At recognition of LVD, PLD1, PLD2 respectively an event is generated which can be assigned to any output (relay) at “Signals enable” (see section 6.7.2). ©2010. ELTEK VALERE DEUTSCHLAND GmbH. UM_UPC4_V2.00_E_R1.1_2011-01-04 DC Controller UPC4 Master User Manual Page 66/100 "LVD": Selection source V1 (default battery voltage) as well as event “LVD active” is assigned to the LVD relay (e.g. K1). The LVD contactor (energized by relay) switches off as soon as the battery voltage drops below the limit „Low limit OFF“ (20.1) and additionally "Drop delay" (20.5) has been elapsed. Reactivation of the contactor takes place if „Low limit ON“ (20.2) has been exceeded. "PLD": The PLD contactor (energized by relay) switches off as soon as the battery voltage drops below the limit „Low limit OFF“ (20.6) and additionally "Drop delay" (20.7) has been elapsed. Reactivation of the contactor takes place if „Low limit ON“ (20.9) and the set "Connect delay"(20.10) as well has been exceeded. PLD2 has the same setting options as PLD1. Because the battery voltage directly increases after power load ATTENTION! disconnection, the switch-on voltage "Low limit ON" (20.2) should be set to a value great enough to avoid direct activation of the contactors. 21.1 21.2 ©2010. ELTEK VALERE DEUTSCHLAND GmbH. 21.3 Drop diodes in UPS systems are used to protect the consumer load against overvoltage, e.g. during boost charge. First of all the voltage reference (21.1) (1=Vbatt; 2=Vtapp; 3=Vload) and following the ON (21.2) and OFF (21.3) threshold is set for drop diode 1 as well as for drop diode 2 if applicable. UM_UPC4_V2.00_E_R1.1_2011-01-04 DC Controller UPC4 Master User Manual Page 67/100 6.9 Remote Display 22.1 22.3 22.4 22.5 22.2 In this area general settings can be made concerning RD and RDP as well. At (22.1) LCD contrast, at (22.2) ilumination is set. In the area "Alternate Display" it can be set what should be displayed first on the display: It is possible to display element 1 = Status + time, element 2 = load values (voltage/current) or element 3 = LOGO and/or element 4 = battery remaining time. It is also possible to let the display of the three elements chronologically change. The intervals can be set at (22.3). If only one of the three values is set >0, than it will be displayed continuously. The other values are hidden then. The battery remaining time is only displayed if the battery is discharged with a current greater than 1 A. In the area "Batteries" (22.4)*5.1 can be set whether battery measuring values should be hidden or not at the display. In the area "Syst" it is similarly valid for load values (22.5). 22.6 In the areas "CAN DeviceArrays" (22.6) and "General" (22.7) as well it can be set that CAN devices and other modules according to the list are hidden at the display. 22.7 ©2010. ELTEK VALERE DEUTSCHLAND GmbH. UM_UPC4_V2.00_E_R1.1_2011-01-04 DC Controller UPC4 Master User Manual Page 68/100 23.1 For RDP only: 23.2 On the Remote Display Panel definite block diagrams are used. For detailed information please see the specific user manual of the RDP. 23.3 By parameter "Enable RDP" (23.1) the RDP can be enabled. 23.4 At "StartUP action" (23.2)*23.1 it is set how the UPC4 system should act after a restart. „0 = none“ >> no command to the CAN devices. The present condition “ON” respectively “OFF” persists. “1 = CAN devices ON“ >> CAN devices explicitly get the ON command. “2 = CAN devices OFF“ >> CAN devices explicitly get the OFF command. Parameter (23.3)*23.1 and (23.4)*23.1 enables the CAN modules and digital inputs as well which should be used on the RDP. For more information about the RDP configuration please read the RDP user manual. 6.10 Additional functions 6.10.1 Battery Test* (*requires 7.1), see section 6.4.4. 26.3 26.1 26.2 Battery Test can be started by several options, please see section 6.4.4 Service/Enable. For an automatic battery test date and time (26.4)*7.1 are to be set. 26.4 26.5 Via parameter (26.5)*7.1 the battery test can regularly be repeated according to the set interval (day(s)). A running battery test either can be stopped manually or automatically by exceeding a break-off criterion. The automatic break-off criteria “Max DischargeCap“ (26.1)*7.1 (e.g. 80% of the battery capacity is discharged) and “Max Test-durat.“ (26.2)*7.1 (e.g. 240 min battery operation kept up) stop the battery test error-free, whereas the under-run of the minimum discharge voltage “MinDischarge vt” (26.3)*7.1 stops the test with error. If the battery test has been stopped with error, the battery error event can be reset by restarting the unit, deleting using the control keys of a remote display or by a successfully completed battery test. ©2010. ELTEK VALERE DEUTSCHLAND GmbH. UM_UPC4_V2.00_E_R1.1_2011-01-04 DC Controller UPC4 Master User Manual Page 69/100 6.10.2 Equalize Charge* (*requires 7.3), see section 6.4.4. 40.1 Enabling "Equalize charge" in general is already described at Service/Enable. In this menu the duration of "Equalize charge" (40.1)*7.3 has to be set. 40.2 40.3 Furthermore it is possible to start "Equalize charge" at a definite time (40.2)*7.3. Via parameter (40.3)*7.3 it can regularly be repeated according to the set interval (day(s)). Enabling has to be set at Service/Enable. 6.10.3 Boost charge* 27.1 27.2 27.8 27.10 27.3 27.5 27.9 27.11 27.7 27.6 27.12 (* requires 8.1), see section 6.4.4. In general the enabling of the boost charge is described in section function Service/Enable. At the area "Boost charge" the threshold values for start of an automatic boost charge have to be set. If the battery voltage falls below the value (27.1)*8.1, boost charge will run after a delay of (27.2)*8.1 seconds. (Requires enabling “Boost charge by Start voltage“, see Service/Enable). If the battery charge current exceeds the value "Threshold ON" (27.3)*8.1, boost charge will run after a delay of (27.2)*8.1 seconds. (Requires enabling “Boost charge by battery current“, see Service/Enable). If battery operation is detected for more than (27.5)*8.1 minutes, boost charge will run. (Requires enabling “Boost charge by battery operation", see Service/Enable). Boost charge can be automatically started at a set date/time (27.7). (Requires enabling by "Date + Time", see Service/Enable). The parameter (27.6)*8.1 defines the repetition interval in days. Example: Start boost charge at 1.1.2009 at 8:05 Repetition every 3 days Consequently boost charge is executed at: 1.1.2009 at 8:05, 4.1.2009 at 8:05, 7.1.2009 at 8:05, a. s. o. (Enabling of “Boost charge by Duration (daily) is additionally required, see Service/Enable). If only “Boost charge over Duration (daily)” is set and not “Boost charge over Date + Time”, the UPC ©2010. ELTEK VALERE DEUTSCHLAND GmbH. UM_UPC4_V2.00_E_R1.1_2011-01-04 DC Controller UPC4 Master User Manual Page 70/100 ignores the date and boost charge will start at the time as set. In the following boost charge will be executed according to the interval as set. Boost charge runs as long as the battery voltage has exceeded the parameter (27.8)*8.1 over (27.9)*8.1 seconds plus the "Follow up charge duration" as set (27.10)*8.1. Boost charge time can be additionally limited according to parameter "Timeout" (27.11)*8.1. If an optional fan rack is used, the fans run on for additional time (27.12)*8.1 after finishing boost charge. 6.10.4 Capacity Calculator* (*requires 9.9), see section 6.4.4. 28.6 28.5 28.7 28.1 28.2 In this area the configuration of the capacity calculator is done. NOTE: The capacity calculator works exclusively with lead acid batteries. The capacity calculator calculates the expected available capacity of the batteries (on the basis of a fully charged battery). A fully charged battery is detected by the UPC4 if the battery charge voltage ≥ the charging end voltage for a minimum of 150 seconds. This voltage results from the parameters System parameters (28.1)*9.9, see section 6.4.5. At this condition the percentages of the set nominal capacity (28.2)*9.9 is assumed as available capacity (see section 6.4.6 Battery). Subsequently the charge current is permanently estimated and resulting from that the still available capacity is calculated. The estimation of the discharge/charge current relates to the current I10. I10 is the 10th part of the current related to the nominal battery capacity. Example: Nominal capacity= 50Ah >> I10= 5A. The capacity calculation is based on an estimation of the charge current and discharge current respectively because the behaviour of the available capacity is not linear to the battery currents. Parameter p = 50% is factory preset as default for the estimation of the current. Calculation: (Default 50 relates to factor=1), see the table below. The table shows the dependency of the parameter p (%) to the factor F. This table is valid for battery current Ib = current I10. Factor F is calculated according to the formula as follows: F ib * (130 p) i10 * (30 p ) P= Parameter 50 % Ib= measured battery current I10 (A)= Nominal capacity (Ah)/ 10 h The following table is valid for Ib= I10: ©2010. ELTEK VALERE DEUTSCHLAND GmbH. UM_UPC4_V2.00_E_R1.1_2011-01-04 DC Controller UPC4 Master User Manual Page 71/100 Estimation of the discharge current Calculation (example): Battery 50 Ah Nominal capacity 95% (5.2), see section 6.4.6. Capacity= 47,5 Ah Example: 20A are withdrawn from the fully charged battery for more than one minute. For the calculation of factor F the accordant current values are used. 20 A * (130 50%) 5 A * (30 50%) F 4 F Iest Ib * F Iest 20 * 4 Iest 80 47,5 Ah * 3600 - 60 * 80/3600 46,166 Ah Estimation of the charge current At charging the estimation is the other way round. P= 50% ib * (130 p) i10 * (30 p) 9F Fl 8 Iest Ib * Fl * (Ch arg eEfficiency / 100) F Additional, parameter (28.5)*9.9 (ChargeEfficiency) is introduced, because more energy is necessary to charge a battery. If the parameters (28.6)*9.9, (28.7)*9.9 are under-run, in each case an event is generated. 6.10.5 SNMP* (* requires 9.7), see section 6.4.4. In this menu the SNMP relevant settings are done. 29.1 29.2 29.3 29.5 29.4 Parameter "Manager" (29.1)*9.7 is a possibility to restrict the SNMP access to the UPC4. If an IP is configured, it is only possible to get access to the UPC4 by this PC and by all configured trap receivers via SNMP. Whereupon the manager is the only one with write authorisation. If IP = "0.0.0.0", this function is disabled. If (29.5)*9.7 is empty, an SNMP requiry to Sysdescription iso(1).org(3).dod(6).internet(1).mgmt(2).mib©2010. ELTEK VALERE DEUTSCHLAND GmbH. UM_UPC4_V2.00_E_R1.1_2011-01-04 DC Controller UPC4 Master User Manual Page 72/100 2(1).system(1).sysDescr(1) is answered with „UPC4 Application“. But if a text is typed in, this text is used. The password for SNMP read authorisation has to be set at (29.2)*9.7, the password for SNMP write authorisation has to be set at (29.3)*9.7. Up to ten trap receivers (29.4)*9.7 can be configured. All IPs unequal to "0.0.0.0" are used. 6.10.6 Modem* (* requires 9.6), see section 6.4.4. 30.1 30.2 30.3 30.4 For remote control the UPC4 can be extended by an external modem. It is operated via serial interface. Modem operation can be enabled at "Service/Enable". If no connection exits, the external modem is initialized according to the “Init repeat time” as set at parameter (30.1)*9.6. For that the initial string (30.2 & 30.3) *9.6 is used. Modem password (30.4)*9.6 is required to make a dial-up from an external modem to the UPC4. Initial string: The initial string consists of (30.2)*9.6 & (30.3)*9.6. If the field (30.2)*9.6 is too small, the initial string can be continued in the field (30.3)*9.6. AT AT%O AT&F %dATX3E0L1S0=0 This is set in the configuration of the UPC4. This instruction set is executed from the left to the right and transferred to the modem. Specific features are the tokens “%” (e.g. %O, %d). Those are not transferred but are commands which are executed via the UPC4. Either a blank or the end of the string effects the transfer of a CR LF (ENTER KEY at PC). The Initial.string (see above) works nearly with all standard modems and should be changed only in exceptional cases. For the AT commands which are understood from your modem please see the attendant manual. IMPORTANT: The modem must not answer self acting (ATS0=0), otherwise pass word polling is avoided. ©2010. ELTEK VALERE DEUTSCHLAND GmbH. UM_UPC4_V2.00_E_R1.1_2011-01-04 DC Controller UPC4 Master User Manual Page 73/100 Token (UPC4 commands) %m %d %p %t40 %t %t0 %t100 %t400 %O %C %0 %% Sending without \r\n and waiting for answer from the modem 1 s pause 0.25 s pause Timeout 40 s Default 5 s (1-99 s) Timeout 320 ms min = 320 ms ditto ditto Timeout 400 ms 320 .. 999 ms Waiting for OK\r\n modem message Waiting for CONNECT\r\n ditto Waiting without check Default results in % as normal character Communication operation of the string AT AT%O AT&F %dATX3E0L1S0=0 (/r/n = carriage return line feed) Explanation of the AT commands: AT &F= Factory setting X3= Do not wait for dial tone E0= 0 Deactivates echo of sent bytes L1= Loudspeaker active, sound level 1 S0=0 Modem answers not self acting At section 5.3.4 Operating status „Modem“ the status of the modem is shown. 6.10.7 Fieldbus* (* requires 9.10 ), see section 6.4.2. 31.1 As fieldbus currently Modbus or (probably in the near future) ProfiBus can be enabled at Service/Enable. 31.2 31.3 The slave address of Modbus or ProfiBus respectively can be set at (31.1)*9.10 . 31.4 Modbus parameters These parameters are only relevant for Modbus operation. Serial settings such as parity (31.2)*9.10, baudrate (31.3)*9.10, and mode (31.4)*9.10 have to be set accordingly. ©2010. ELTEK VALERE DEUTSCHLAND GmbH. UM_UPC4_V2.00_E_R1.1_2011-01-04 DC Controller UPC4 Master User Manual Page 74/100 6.10.8 MMB*/Mains monitoring MMB* (requires 2.9), see section 6.4.2. 32.1 32.2 32.6 In connection with an optional available Mains Monitoring Board (MMB) the UPC4 is able to detect mains failure or phase break down. The mains failure is available as event and can also be used as source for „PLD/LVD“ function, see section 6.8. By the use of mains monitoring boards the voltages of each phase are measured. 32.3 32.5 32.4 The threshold values V< (32.1)*2.9 and V> (32.2)*2.9 are related to the nominal voltage of the inverters, which is set in the area "System parameters". A mains failure is detected if these values are exceeded/under-run, with inclusion of the parameters (32.3)*2.9, (32.4)*2.9, and (32.5)*2.9. 32.7 The monitoring of single phases can be enabled/disabled by parameter (32.6)*2.9. The phases 1A to 3A belong to the MM board A, the phases 1B to 3B belong to the MM board B. If an external mains monitoring module is used: The digital input which is connected to the external mains monitoring module can be defined by parameter (32.7). ©2010. ELTEK VALERE DEUTSCHLAND GmbH. UM_UPC4_V2.00_E_R1.1_2011-01-04 DC Controller UPC4 Master User Manual Page 75/100 6.10.9 Hand operation charge* 33.1 33.2 33.3 33.4 33.5 33.6 Enabling of "Hand operation charge" has to be set at Service/Enable (*requires 9.1), see section 6.4.4. During hand operation charge the automatic control of the rectifiers is invalid and therefore it is possible to charge the batteries manually using the RDD and RDP as well. In this case the user has to set the charge voltage value manually at the RDD/RDP. The last used voltage value of the trickle charge is assumed by the UPC4 as minimum voltage value for hand operation charge. This value can be set up to a maximum of parameter "Max. charge volt" (33.6). If the actual measured battery voltage value is greater about (33.3) than the manually set voltage, the hand operation charge is interrupted immediately. If (33.1) is set to "0", the following listed events are inhibited during hand operation charge and delayed according to parameter (33.4) after hand operation charge is finished: "Vbatt > Vmax", "Vload > Vlmax", "Vtapp > Vomax". During hand operation charge the nominal current value of the rectifiers can be reduced manually by parameter (33.5). But if this value exceeds the maximum possible current of the module, it has no effect. This value is valid per each rectifier. 6.10.10 System test* (* requires 9.2), see section 6.4.4. 34.1 34.2 34.3 34.4 34.6 34.5 During "system test" the automatic control of the rectifiers is invalid and therefore it is possible to control the rectifier voltage manually using the RDD: The user is able to set the rectifier voltage value manually at the RDD within the thresholds (34.5), (34.6) in order to test the system. If (34.1) is set to "0", the following listed events are inhibited during system test is running and delayed according to parameter (34.3) after system test is finished: "Vbatt < Vmin", "Vbatt > Vmax", "Vload < Vlmin", "Vload > Vlmax", "Vtapp < Vomin", "Vtapp > Vomax". During system test the nominal current value of the rectifiers can be reduced manually by parameter (34.4). But if this value exceeds the maximum possible current of the module, it has no effect. This value is valid per each rectifier. ©2010. ELTEK VALERE DEUTSCHLAND GmbH. UM_UPC4_V2.00_E_R1.1_2011-01-04 DC Controller UPC4 Master User Manual Page 76/100 6.11 UPC4 Text 6.11.1 Installation In this menu the texts which describe the system (“Installation”) can be changed. 6.11.2 Text System parameter Self-defined texts which are used for the system and load respectively. These user-specified texts are also displayed according to the related measuring values at the RD display. 6.11.3 Text battery parameter* (*requires 5.1), see section 6.4.6. Self-defined texts which are used for the batteries. These user-specified texts are also displayed according to the related measuring values at the RD display. 6.11.4 Text Batt ident Additional information text regarding batteries. ©2010. ELTEK VALERE DEUTSCHLAND GmbH. UM_UPC4_V2.00_E_R1.1_2011-01-04 DC Controller UPC4 Master User Manual Page 77/100 6.11.5 Text Digital input* (* requires 2.11), see section 6.4.2. 38.1 If digital input boards (DI8) are used, it is possible to assign individual texts to the digital inputs. These texts then also appear in the failure/event list. 38.2 For each individual digital input two texts are available. Text 1 is used if an event is active, text 2 is used if an event is inactive. 38.3 The texts (38.1)*2.11, (38.3)*2.11 are related to the digital inputs of the first DI8, the texts (38.2)*2.11, (38.4)*2.11 are related to the digital inputs of the second DI8. 38.4 Example 1: A switch (normally open contact) is connected to the digital input 1.1; the input is not inverted by configuration. First case: The switch is not activated. >No event is generated; status text input 1.1 of (38.3) is used. Second case: The switch is activated >An event is generated; status text fail input 1.1 of (38.1) is used. Example 2: A switch (normally closed contact) is connected to the digital input 1.2; the input is not inverted by configuration. First case: The switch is not activated. >An event is generated; status text fail input 1.2 of (38.1) is used. Second case: The switch is activated. >No event is generated; status text input 1.2 of (38.3) is used. Example 3: A switch (normally closed contact) is connected to the digital input 1.3; the input is inverted by configuration. First case: The switch is not activated. >An event is not generated; status text input 1.3 of (38.3) is used. Second case: The switch is activated. >An event is generated; status text fail input 1.3 of (38.1) is used. ©2010. ELTEK VALERE DEUTSCHLAND GmbH. UM_UPC4_V2.00_E_R1.1_2011-01-04 DC Controller UPC4 Master User Manual Page 78/100 6.11.6 Text Relay output 39.1 The texts are used in the menu "Relay Status" of the UPC4. The parameters (39.1), (39.4) are used for the internal relays of the UPC4. The texts of the relays of the optional BU(s) are set at (39.2)*2.7, (39.5)*2.7. 39.2 The texts of the optional relay boards (RB6) are set at (39.3)*2.12, (39.6)*2.12. If the event (e.g. relay 1.1) is active, the related fail texts (39.1), (39.2)*2.7, (39.3)*2.12 are used. 39.3 39.4 If the event is inactive, then the texts (39.4), (39.5)*2.7, (39.6)*2.12 are used. Either the event can be directly used for the relay or it can be inverted, see "Signals switch mode". 39.5 39.6 6.11.7 Text Fuses* (*requires 2.13), see section 6.4.2. These texts are used in combination with fuse monitoring boards (FMB). ©2010. ELTEK VALERE DEUTSCHLAND GmbH. UM_UPC4_V2.00_E_R1.1_2011-01-04 DC Controller UPC4 Master User Manual Page 79/100 6.11.8 Text General parameters >>User defined texts, which are used for general measuring values. ATTENTION! 6.11.9 If no text is keyed in, the measuring value is disabled and is not used in the UPC4. Module IDtexts 1 >> All texts are for information only and can not be changed. The UPC4 receives the texts from the connected modules automatically. These texts are received from power modules such as PSR rectifiers, PSC, INV etc. 6.11.10 Module IDtexts 2 >> All texts are for information only and can not be changed. The UPC4 receives the texts from the connected modules automatically. These texts are received from rectifiers of series FLATPACK, MINIPACK, MICROPACK, POWERPACK. ©2010. ELTEK VALERE DEUTSCHLAND GmbH. UM_UPC4_V2.00_E_R1.1_2011-01-04 DC Controller UPC4 Master User Manual Page 80/100 6.12 Miscellaneous parameters 6.12.1 Special Set Logging of measurement data Via Syslog Protocol UDP Port 514 measuring values can permanently be sent to a Syslog Server (35.2) *35.1. 35.1 35.2 35.4 35.3 ©2010. ELTEK VALERE DEUTSCHLAND GmbH. At (35.1) the cycle (seconds) is set. At (35.4)*35.1 the measuring sources are specified. Redundancy mode At (35.3) the redundancy mode is set. For details please see CAN Devices Cnt, see section 6.4.2. UM_UPC4_V2.00_E_R1.1_2011-01-04 DC Controller UPC4 Master User Manual Page 81/100 7 List of all available measurement sources NOTE: "X" in the table elements means that these parameters/elements are not factory defaultassigned. Index Name of the source 0 1 UNDEFINED STANDARD 2 BU1_V1 3 BU1_V2 Factory default assignment Parameter Location Description of the source Element BU 1 disabled If „Standard“ manually is assigned, the individual default value (see table column on the left) namely is used internally by the UPC4 but “Standard” is shown instead of an explicit assignation. Therefore it is recommended not to use the value “Standard” but to use an explicit assignation. Voltage terminal V1 BU 1 Voltage terminal V2 BU 1 Voltage terminal V3 BU 1 BU 1 BU 1 BU 1 BU 1 X BU 1 BU 1 Current terminal I1 Current terminal I2 Current terminal I3 Temperature sensor terminal T1 Temperature sensor terminal T2 Inexistent (Inex.) Voltage Vbatt LVD voltages Voltage Vload LVD voltages Tapp volt. Vtapp LVD voltages Current Ibatt Current Iload X Battery temperat General temp. X Insulat. resist. Insulat. voltage Battery 1 V1 X Voltage Vbatt LVD voltages LVD voltages X Battery 2 U4 U2 X BU 2 Voltage terminal V1 BU 2 Voltage terminal V2 Battery 2 U1 Battery 2 X BU 2 Voltage terminal V3 BU 2 BU 2 Current terminal I1 Current terminal I2 V2 Battery 1 V3 Battery 1 4 BU1_V3 5 6 7 8 9 10 11 12 BU1_I1 BU1_I2 BU1_I3 BU1_T1 BU1_T2 Zero value BU1_Risol BU1_Visol 13 14 Zero value BU2_V1 15 BU2_V2 16 BU2_V3 17 18 BU2_I1 BU2_I2 Tapp volt. Vtapp LVD voltages Current Ibatt X 19 20 21 22 23 24 BU2_I3 BU2_T1 BU2_T2 Zero value BU2_Risol BU2_Visol X Battery temperat X X X X X Battery 2 X X X X BU 2 BU 2 BU 2 X BU 2 BU 2 Current terminal I3 Temperature sensor terminal T1 Temperature sensor terminal T2 25 26 27 28 Zero value BU3_V1 BU3_V2 BU3_V3 Inex. Voltage Vbatt Battery 3 BU3_I1 Battery 3 U1 Battery 3 Voltage terminal V1 Voltage terminal V2 Voltage terminal V3 29 Tapp volt. Vtapp General voltage Current Ibatt BU 3 BU 3 BU 3 BU 3 Current terminal I1 ©2010. ELTEK VALERE DEUTSCHLAND GmbH. X Battery 1 T1 X Resistance value of the isolation monitoring Measured voltage of the isolation monitoring Resistance value of the isolation monitoring Measured voltage of the isolation monitoring UM_UPC4_V2.00_E_R1.1_2011-01-04 DC Controller UPC4 Master User Manual Page 82/100 30 BU3_I2 General current 31 32 33 BU3_I3 BU3_T1 BU3_T2 34 35 BU 3 Current terminal I2 X X Battery temperat Battery 3 General temp. T1 BU 3 BU 3 BU 3 Current terminal I3 Temperature sensor terminal T1 Temperature sensor terminal T2 Zero value BU3_Risol X Isolation X R1 X BU 3 Resistance value of the isolation monitoring 36 BU3_Visol X X BU 3 Measured voltage of the isolation monitoring 37 38 39 40 Zero value BU4_V1 BU4_V2 BU4_V3 Inex. Voltage Vbatt Battery 4 BU4_I1 BU4_I2 BU4_I3 BU4_T1 BU4_T2 Zero value BU4_Risol BU4_Visol Battery 4 U2 Battery 4 I2 X Battery 4 T2 X R2 X Voltage terminal V1 Voltage terminal V2 Voltage terminal V3 41 42 43 44 45 46 47 48 Tapp volt. Vtapp General voltage Current Ibatt General current X Battery temperat General temp. X Isolation X BU 4 BU 4 BU 4 BU 4 BU 4 BU 4 BU 4 BU 4 X BU 4 BU 4 Current terminal I1 Current terminal I2 Current terminal I3 Temperature sensor terminal T1 Temperature sensor terminal T2 49 50 51 52 Zero value BU5_V1 BU5_V2 BU5_V3 Voltage terminal V1 Voltage terminal V2 Voltage terminal V3 BU5_I1 BU5_I2 BU5_I3 BU5_T1 BU5_T2 Zero value BU5_Risol BU5_Visol Battery 5 X Battery 5 U3 Battery 5 I3 X Battery 5 T3 X R3 X BU 5 BU 5 BU 5 53 54 55 56 57 58 59 60 Inex. Voltage Vbatt X Tapp volt. Vtapp General voltage Current Ibatt General current X Battery temperat General temp. X Isolation X BU 5 BU 5 BU 5 BU 5 BU 5 Current terminal I1 Current terminal I2 Current terminal I3 Temperature sensor terminal T1 Temperature sensor terminal T2 BU 5 BU 5 Resistance value of the isolation monitoring Measured voltage of the isolation monitoring 61 62 63 64 Zero value BU6_V1 BU6_V2 BU6_V3 65 66 67 68 69 70 71 72 BU6_I1 BU6_I2 BU6_I3 BU6_T1 BU6_T2 Zero value BU6_Risol BU6_Visol X Voltage Vbatt X Tapp volt. Vtapp General voltage Current Ibatt General current X Battery temperat General temp. X Isolation X Battery 6 X Battery 6 U4 Battery 6 I4 X Battery 6 T4 X R4 X 73 74 Zero value BU7_V1 Voltage Vbatt Battery 7 ©2010. ELTEK VALERE DEUTSCHLAND GmbH. I1 X BU 6 BU 6 BU 6 Resistance value of the isolation monitoring Measured voltage of the isolation monitoring Voltage terminal V1 Voltage terminal V2 Voltage terminal V3 BU 6 BU6 BU 6 BU 6 BU 6 X BU 6 BU 6 Current terminal I1 Current terminal I2 Current terminal I3 Temperature sensor terminal T1 Temperature sensor terminal T2 BU 7 Voltage terminal V1 Resistance value of the isolation monitoring Measured voltage of the isolation monitoring UM_UPC4_V2.00_E_R1.1_2011-01-04 DC Controller UPC4 Master User Manual Page 83/100 75 76 BU7_V2 BU7_V3 77 78 79 80 81 82 83 84 BU7_I1 BU7_I2 BU7_I3 BU7_T1 BU7_T2 Zero value BU7_Risol BU7_Visol 85 86 87 88 Zero value BU8_V1 BU8_V2 BU8_V3 89 90 91 92 93 94 BU8_I1 BU8_I2 BU8_I3 BU8_T1 BU8_T2 Zero value 95 BU 7 BU 7 Voltage terminal V2 Voltage terminal V3 BU 7 BU 7 BU 7 BU 7 BU 7 X BU 7 BU 7 Current terminal I1 Current terminal I2 Current terminal I3 Temperature sensor terminal T1 Temperature sensor terminal T2 BU 8 BU 8 BU 8 Voltage terminal V1 Voltage terminal V2 Voltage terminal V3 BU 8 BU 8 BU 8 BU 8 BU 8 Current terminal I1 Current terminal I2 Current terminal I3 Temperature sensor terminal T1 Temperature sensor terminal T2 Tapp volt. Vtapp General voltage Current Ibatt General current X Battery temperat General temp. X Isolation X Battery 7 U5 Battery 7 I5 X Battery 7 T5 X R5 X Voltage Vbatt Battery 8 Tapp volt. Vtapp General voltage Current Ibatt General current X Battery temperat General temp. Battery 8 U6 Battery 8 I6 X Battery 8 T6 BU8_Risol Isolation R6 Resistance value of the isolation monitoring 96 BU8_Uisol X X Measured voltage of the isolation monitoring 97 Zero value X 98 99 100 STS1_1 (St) STS1_2 (Vm) STS1_3 (Va) Inex. Inex. Inex. STS STS STS 101 STS1_4 (Io) Inex. STS 102 103 104 105 106 107 108 109 STS1_5 (Vb) STS1_6 (fm) STS1_7 (fa) STS1_8 (Th) MMB1_VL1 MMB1_VL2 MMB1_VL3 MMB1_FLx Inex. Inex. Inex. Inex. Mains voltages Mains voltages Mains voltages Mains frequence STS STS STS STS MMB 1 MMB 1 MMB 1 MMB 1 110 111 112 113 114 115 116 117 MMB1_IL1 MMB1_IL2 MMB1_IL3 Not defin. MMB2_VL1 MMB2_VL2 MMB2_VL3 MMB2_FLx Mains currents Mains currents Mains currents Inex. Mains voltages Mains voltages Mains voltages Inex. 118 MMB2_IL1 Mains currents ©2010. ELTEK VALERE DEUTSCHLAND GmbH. Phase1 A Phase2 A Phase3 A Phase1A, 2A, 3A Phase1 A Phase2 A Phase3 A Phase1 B Phase2 B Phase3 B Phase1B, 2B, 3B Phase1 B Resistance value of the isolation monitoring Measured voltage of the isolation monitoring MMB 1 MMB 1 MMB 1 MMB 2 MMB 2 MMB 2 MMB 2 MMB 2 UM_UPC4_V2.00_E_R1.1_2011-01-04 DC Controller UPC4 Master User Manual Page 84/100 119 120 121 122 123 124 125 126 127 128 129 130 131 132 133 134 135 136 137 138 MMB2_IL2 MMB2_IL3 Not defin. DEB1_stat DEB1_2 DEB1_3 DEB1_4 DEB2_stat DEB2_2 DEB2_3 DEB2_4 RLB1_stat RLB1_2 RLB1_3 RLB1_4 RLB2_stat RLB2_2 RLB2_3 RLB2_4 BMB1_Vbatt Mains currents Mains currents Inex. X Digital Input1 X X X Digital Input2 X X X X X X X X X X X 139 140 141 142 143 144 145 146 147 148 149 150 151 152 153 154 155 156 157 158 159 160 161 162 163 164 165 166 167 168 169 BMB1_Vtapp BMB1_I BMB1_T BMB2_Vbatt BMB2_Vtapp BMB2_I BMB2_T BMB3_Vbatt BMB3_Vtapp BMB3_I BMB3_T BMB4_Vbatt BMB4_Vtapp BMB4_I BMB4_T BMB5_Vbatt BMB5_Vtapp BMB5_I BMB5_T BMB6_Vbatt BMB6_Vtapp BMB6_I BMB6_T BMB7_Vbatt BMB7_Vtapp BMB7_I BMB7_T BMB8_Vbatt BMB8_Vtapp BMB8_I BMB8_T X X X X X X X X X X X X X X X X X X X X X X X X X X X X X X X ©2010. ELTEK VALERE DEUTSCHLAND GmbH. Phase2 B Phase3 B MMB 2 MMB 2 DIB 1 DIB 1 DIB 1 DIB 1 DIB 2 DIB 2 DIB 2 DIB 2 BMB1 BMB1 BMB1 BMB1 BMB2 BMB2 BMB2 BMB2 BMB3 BMB3 BMB3 BMB3 BMB4 BMB4 BMB4 BMB4 BMB5 BMB5 BMB5 BMB5 BMB6 BMB6 BMB6 BMB6 BMB7 BMB7 BMB7 BMB7 BMB8 BMB8 BMB8 BMB8 Digital inputs 1 Digital inputs 2 Battery monitoring terminal Vbatt Terminal Vtapp Terminal I Terminal T Terminal Vbatt Terminal Vtapp Terminal I Terminal T Terminal Vbatt Terminal Vtapp Terminal I Terminal T Terminal Vbatt Terminal Vtapp Terminal I Terminal T Terminal Vbatt Terminal Vtapp Terminal I Terminal T Terminal Vbatt Terminal Vtapp Terminal I Terminal T Terminal Vbatt Terminal Vtapp Terminal I Terminal T Terminal Vbatt Terminal Vtapp Terminal I Terminal T UM_UPC4_V2.00_E_R1.1_2011-01-04 DC Controller UPC4 Master User Manual Page 85/100 170 . . . . . . . . 249 250 UMB1_1 . . . UMB4_4 UMA1_1 . . . UMA16_4 SystIbatt 1 251 252 SystIrect 1 SystIload 1 Inex. Inex. ©2010. ELTEK VALERE DEUTSCHLAND GmbH. Universal measurement controller, device 1. It has been designed for universal usage. But it is currently not used. Universal measurement controller, device 2. It has been designed for universal usage. But it is currently not used. Calculated battery current. Result= Systlrect. - load current Total current of all rectifiers Calculated load current. Result= Systlrect. - battery current UM_UPC4_V2.00_E_R1.1_2011-01-04 DC Controller UPC4 Master User Manual Page 86/100 8 Event list UPC4 (failure list) 8.1 General Eventno. 2000 Event text 2001 Dig. input 1[2] 2002 Dig. input 1[3] 2003 Dig. input 1[4] 2004 Dig. input 1[5] 2005 Dig. input 1[6] 2006 Dig. input 1[7] 2007 Dig. input 1[8] 2008 Dig. input 2[1] 2009 Dig. input 2[2] 2010 Dig. input 2[3] 2011 Dig. input 2[4] 2012 Dig. input 2[5] 2013 Dig. input 2[6] 2014 Dig. input 2[7] 2015 Dig. input 2[8] 2070 V1 <> Vmin/max1 2071 V2 <> Vmin/max2 V3 <> Vmin/max3 V4 <> Vmin/max4 2072 2073 Dig. input 1[1] Reference to parameter (14.1), (14.2), (14.3), (14.4) see event no. 2000 above see event no. 2000 above see event no. 2000 above see event no. 2000 above see event no. 2000 above see event no. 2000 above see event no. 2000 above see event no. 2000 above see event no. 2000 above see event no. 2000 above see event no. 2000 above see event no. 2000 above see event no. 2000 above see event no. 2000 above see event no. 2000 above see Tresh. Gen. Par. see event no. 2070 above see event no. 2070 above see event no. 2070 above ©2010. ELTEK VALERE DEUTSCHLAND GmbH. Description This event is active if the 1. digital input of the 1. digital input board (DI8) is active. An adjustable delay of activation and dropout as well takes effect. The active status is invertible (break contact functionality). 2. digital input of 1. DIB/DI8), for details please see event no. 2000 3. digital input of 1. DIB/DI8), for details please see event no. 2000 4. digital input of 1. DIB/DI8), for details please see event no. 2000 5. digital input of 1. DIB/DI8), for details please see event no. 2000 6. digital input of 1. DIB/DI8), for details please see event no. 2000 7. digital input of 1. DIB/DI8), for details please see event no. 2000 8. digital input of 1. DIB/DI8), for details please see event no. 2000 1. digital input of 2. DIB/DI8), for details please see event no. 2000 2. digital input of 2. DIB/DI8), for details please see event no. 2000 3. digital input of 2. DIB/DI8), for details please see event no. 2000 4. digital input of 2. DIB/DI8), for details please see event no. 2000 5. digital input of 2. DIB/DI8), for details please see event no. 2000 6. digital input of 2. DIB/DI8), for details please see event no. 2000 7. digital input of 2. DIB/DI8), for details please see event no. 2000 8. digital input of 2. DIB/DI8), for details please see event no. 2000 Voltage 1 of general parameters. This event is active if the assigned value is less than the adjustable min. value and greater than the adjustable max. value as well. A configurable delay and hysteresis as well which is valid for all general parameters is available. Voltage 2 of general parameters, for details please see event no. 2070. Voltage 3 of general parameters, for details please see event no. 2070. Voltage 4 of general parameters, for details please see event no. 2070. UM_UPC4_V2.00_E_R1.1_2011-01-04 DC Controller UPC4 Master User Manual Page 87/100 2074 2080 V5 <> Vmin/max5 V6 <> Vmin/max6 I1 <> Imin/max1 2081 I2 <> Imin/max2 2082 I3 <> Imin/max3 2083 I4 <> Imin/max4 2084 I5 <> Imin/max5 2085 I6 <> Imin/max6 2090 2128 T1 <> Tmin/max1 T2 <> Tmin/max2 T3 <> Tmin/max3 T4 <> Tmin/max4 T5 <> Tmin/max5 T6 <> Tmin/max6 R1 <> Rmin/max1 R2 <> Rmin/max2 R3 <> Rmin/max3 R4 <> Rmin/max4 R5 <> Rmin/max5 R6 <> Rmin/max6 Relay1.Q see event no. 2070 above see event no. 2070 above see event no. 2070 above see event no. 2070 above see event no. 2070 above see event no. 2070 above see event no. 2070 above see event no. 2070 above see event no. 2070 above see event no. 2070 above see event no. 2070 above see event no. 2070 above see event no. 2070 above see event no. 2070 above see event no. 2070 above see event no. 2070 above see event no. 2070 above see event no. 2070 above see event no. 2070 above see event no. 2070 above n/a 2129 Relay1.Q' n/a 2130 Relay2.Q n/a 2131 Relay2.Q' n/a 2132 Relay3.Q n/a 2133 Relay3.Q' n/a 2075 2091 2092 2093 2094 2095 2100 2101 2102 2103 2104 2105 ©2010. ELTEK VALERE DEUTSCHLAND GmbH. Voltage 5 of general parameters, for details please see event no. 2070. Voltage 6 of general parameters, for details please see event no. 2070. Current I1 of general parameters, for details please see event no. 2070. Current I2 of general parameters, for details please see event no. 2070. Current I3 of general parameters, for details please see event no. 2070. Current I4 of general parameters, for details please see event no. 2070. Current I5 of general parameters, for details please see event no. 2070. Current I6 of general parameters, for details please see event no. 2070. Temperature 1 of general parameters, for details please see event no. 2070. Temperature 2 of general parameters, for details please see event no. 2070. Temperature 3 of general parameters, for details please see event no. 2070. Temperature 4 of general parameters, for details please see event no. 2070. Temperature 5 of general parameters, for details please see event no. 2070. Temperature 6 of general parameters, for details please see event no. 2070. Isolation 1 (earth fault) of general parameters, for details please see event no. 2070. Isolation 2 (earth fault) of general parameters, for details please see event no. 2070. Isolation 3 (earth fault) of general parameters, for details please see event no. 2070. Isolation 4 (earth fault) of general parameters, for details please see event no. 2070. Isolation 5 (earth fault) of general parameters, for details please see event no. 2070. Isolation 6 (earth fault) of general parameters, for details please see event no. 2070. Virtual relay 1, normally open contact (Q). This relay can externally be set via SNMP (in the future). Virtual relay 1, normally closed contact (Q'). This relay can externally be set via SNMP (in the future). Virtual relay 2, normally open contact (Q). For details please see event no. 2128 Virtual relay 2, normally closed contact (Q'). For details please see event no. 2129 Virtual relay 3, normally open contact (Q). For details please see event no. 2128 Virtual relay 3, normally closed contact (Q'). For details please see event no. 2129 UM_UPC4_V2.00_E_R1.1_2011-01-04 DC Controller UPC4 Master User Manual Page 88/100 2134 Relay4.Q n/a 2135 Relay4.Q' n/a 2160 LVD active 2161 PLD1 active 2162 PLD2 active see LVD/PLD/Drop diode see LVD/PLD/Drop diode see LVD/PLD/Drop diode 2163 Tsensor limit 2164 Fan Rack: Error see CAN devices 2165 see CAN devices 2166 Fan Rack: No CAN BUI: Error state 2167 BUI: No CAN see CAN devices 2168 2169 STS: Error state STS: No CAN see CAN devices see CAN devices 2170 2171 MMB: Error state see CAN devices MMB: No CAN see CAN devices 2172 2173 BMB: Error state see CAN devices BMB: No CAN see CAN devices 2174 2175 DIB: Error state DIB: No CAN see CAN devices see CAN devices 2176 2177 RLB: Error state RLB: No CAN see CAN devices see CAN devices 2178 2179 FMB: Error state FMB: No CAN see CAN devices see CAN devices 2180 2181 UMB: ErrorState UMB: No CAN see CAN devices see CAN devices 2182 2183 UMA: ErrorState UMA: No CAN see CAN devices see CAN devices 2184 2185 RDX: Error state RDX: No CAN 2186 2187 RDP: Error state RDP: No CAN see CAN devices see Remote Display see Remote Display ©2010. ELTEK VALERE DEUTSCHLAND GmbH. Virtual relay 4, normally open contact (Q). For details please see event no. 2128 Virtual relay 4, normally closed contact (Q'). For details please see event no. 2129 It signals, whether the LVD opto coupler is active or not. Settable via SNMP in the future. It signals, whether the PLD 1 opto coupler is active or not. Settable via SNMP in the future. It signals, whether the PLD 2 opto coupler is active or not. Settable via SNMP in the future. This event is active if one of the temperatures of the general parameters has a temperature value which is less than -50°C or greater than +150°C. This event is active if one of the six fans of the up to 16 possible fan tablets (FAN) signals an error. This event is active if one of the up to 16 possible fan tablets (FAN) has no CAN connection. This event is active if one of the up to eight possible Basic-Units (BU) signals an error. This event is active if one of the up to eight possible Basic-Units (BU) has no CAN connection. This event is active if an STS signals an error. This event is active if an STS has no CAN connection. This event is active if an MMB signals an error. This event is active if an MMB has no CAN connection. This event is active if a BMB signals an error. This event is active if a BMB has no CAN connection. This event is active if a DI8 signals an error. This event is active if a DI8 has no CAN connection. This event is active if an RLB signals an error. This event is active if an RLB has no CAN connection. This event is active if an FMB signals an error. This event is active if an FMB has no CAN connection. This event is active if an UMB signals an error. This event is active if an UMB has no CAN connection. This event is active if an UMA signals an error. This event is active if an UMA has no CAN connection. This event is active if an RD signals an error. This event is active if an RD has no CAN connection. This CAN device is not stated at the configuration. If no RD/RDP Display is connected to the CAN bus, the signal "RDX: No CAN" will always be active. This event is active if an RDP signals an error. This event is active if an RDP has no CAN connection. UM_UPC4_V2.00_E_R1.1_2011-01-04 DC Controller UPC4 Master User Manual Page 89/100 2188 1.L1 V<>Vmin,max see Mains monitoring 2189 see Mains monitoring 2194 1.L2 V<>Vmin,max 1.L3 V<>Vmin,max 2.L1 V<>Vmin,max 2.L2 V<>Vmin,max 2.L3 V<>Vmin,max error bool seq. 2195 combined Error 1 see Signals enable 2196 combined Error 2 see Signals enable 2197 combined Error 3 see Signals enable 2198 combined Error 4 see Signals enable 2199 combined Error 5 see Signals enable 2200 UPC Supply 1 Err 2201 UPC Supply 2 Err 2202 UPC Supply 3 Err 2190 2191 2192 2193 see Mains monitoring see Mains monitoring see Mains monitoring see Mains monitoring see Signals enable ©2010. ELTEK VALERE DEUTSCHLAND GmbH. This event is active if AC voltage of the 1. phase of mains 1 is less than the minimum voltage or greater than the maximum voltage. One common delay and one hysteresis of the min. and one hysteresis of the max. voltage are available. The min. and max. voltage values as well are built using the nominal mains voltage with the help of two settable tolerance values. In order to set this event it is necessary that "set via digital input" is disabled, monitoring of this phase is enabled, and the assigned mains monitoring board (MMB) is enabled as well. Furthermore this event can be directly set via digital input. 2. phase of mains 1, for details please see event no. 2188. 3. phase of mains 1, for details please see event no. 2188. 1. phase of mains 2, for details please see event no. 2188. 2. phase of mains 2, for details please see event no. 2188. 3. phase of mains 2, for details please see event no. 2188. This event is active if there is a syntax error in the configured bool sequence. Boolean expression 1 is active. Currently not available for the common user. Boolean expression 2 is active. Currently not available for the common user. Boolean expression 3 is active. Currently not available for the common user. Boolean expression 4 is active. Currently not available for the common user. Boolean expression 5 is active. Currently not available for the common user. This event is active if the first internal power supply signals an error. This event is active if the second internal power supply signals an error. This event is active if the third internal power supply signals an error. UM_UPC4_V2.00_E_R1.1_2011-01-04 DC Controller UPC4 Master User Manual Page 90/100 8.2 System Eventno. 3000 Event text 3001 3002 3003 3010 3011 3012 3030 3035 3036 Vload > Vmax Vload < Vmin_INV Vload < Vmin_DCC REC#1 Error REC#1 No CAN REC#1 Redundancy REC#1 Load REC#1 Load distrib REC#2 Error REC#2 No CAN REC#2 Redundancy REC#2 Load REC#2 Load distrib Lim Load current DCC Error DCC No CAN 3037 3040 3041 3042 3043 3044 3045 3046 3047 3051 3052 3053 3056 3057 3060 3061 3064 DCC Redundancy INV Error INV No CAN INV Redundancy Equalize charge Equal.ch.Timeout Boost charge Boost ch Timeout Fan (boost chge) Insulation err P Insulation err M Isol. meas. runs Battery test Battery test err Drop diode 1 Drop diode 2 Difference Ah 3013 3014 3020 3021 3022 3023 3024 Vload < Vmin Reference to parameter see Thresholds see Thresholds see Thresholds see Thresholds see CAN devices Description This event is active if the load voltage of the system is less or equal to the minimum load voltage "Vmin". A configurable delay and hysteresis as well is available. In order to activate this signal, the parameter alarm at over voltage - system test of system [1] has to be set to "1" or alarm delay - system test of system [1] is elapsed. Additionally no battery test of system [1] may be active. Load voltage > Vmax. Detail s. Event no. 3000 Load voltage < Vmin_INV. Detail s. Event no. 3000 Load voltage < Vmin_DCC. Detail s. Event no. 3000 REC signals error One or more REC have no CAN connection REC redundancy error REC load limit exceeded REC load distribution not ok see CAN devices REC signals error One or more REC have no CAN connection REC redundancy error REC load limit exceeded REC load distribution not ok DC/DC converter signals error One or more DC/DC converter(s) have no CAN connection see CAN devices DC/DC converter redundancy error Inverter signals error One or more inverter(s) have no CAN connection see CAN devices Inverter redundancy error s. Equalize charge Equalize charge is running s. Equalize charge Equalize charge time limit is reached s. Boost charge Boost charge is running s. Boost charge Boost charge time limit is reached Fan boost charge is active s. Thresholds Insulation error against plus s. Thresholds Insulation error against minus s. Thresholds Isolation measurement is active s. Battery test Battery test is running s. Battery test The last battery test has been finished faultily s. LVD/PLD/Drop d. Drop diode 1 is active s. LVD/PLD/Drop d. Drop diode 2 is active This event ist active if the service "energy balance" (9.3) detects a difference of the capacity (Ah) of the batteries of system [1] compared with the set value at parameter "Difference Ah". ©2010. ELTEK VALERE DEUTSCHLAND GmbH. UM_UPC4_V2.00_E_R1.1_2011-01-04 DC Controller UPC4 Master User Manual Page 91/100 3067 Capacity low A s. Capacity Calc. This event is active if the capacity of the batteries of system [1] which is calculated by the capacity calculator is less than threshold A (%). This signal is a warning signal. 3068 3070 Capacity low B Tsensor lim Batt s. Capacity Calc. 3073 diesel operation s. Charge control 3075 3076 3077 3078 3079 3080 3081 3082 3083 3084 3085 3086 3087 3088 3089 3090 STS: Error state STS: No CAN STS Err source 1 STS Err source 2 STS Sync error STS Inverter err STS T. heat sink STS Current high STS DC volt. low STS DC volt.high STS DC v. low Wa STS DC v.high Wa STS Mains prior. STS Relay active STS Load on INV STS Coll. alarm Detail s. Event no. 3067 This event is active if one of the battery temperatures of system [1] has a value less than -50 °C or greater than +150 °C. At measuring value assignment the measuring source parameter must not be "0" (UNDEFINED). The related battery temperature measurement must be enabled. Diesel operation is active. This event status is taken in consideration at "Charge control" and "boost charge" as well. STS signals error STS has lost the CAN connection STS source 1 error STS source 2 error STS synchronization error STS signals inverter error STS temperature to high STS current to high STS DC voltage is low STS DC voltage is high STS warning DC voltage is low STS warning DC voltage is high STS mains priority STS Relay is active STS Load on inverter(s) STS collective alarm is active see CAN devices ©2010. ELTEK VALERE DEUTSCHLAND GmbH. UM_UPC4_V2.00_E_R1.1_2011-01-04 DC Controller UPC4 Master User Manual Page 92/100 8.3 Battery Eventno. 4100 4101 4102 4103 4107 4108 4109 4110 Event text Reference to parameter Description Vbatt < Vmin(B1) Vbatt > Vmax(B1) Vbat < Vwarn(B1) Vbat > VmaxR(B1) T > Tmax(B1) Asymmetrical(B1) Fuse open(B1) Battery oper(B1) s. s. s. s. s. s. s. s. 4200 4201 4202 4203 4207 4208 4209 4210 4300 4301 4302 4303 4304 4305 4306 4307 4400 4401 4402 4403 4407 4408 4409 4410 4500 4501 4502 4503 4507 4508 4509 4510 Vbatt < Vmin(B2) Vbatt > Vmax(B2) Vbat < Vwarn(B2) Vbat > VmaxR(B2) T > Tmax(B2) Asymmetrical(B2) Fuse open(B2) Battery oper(B2) Vbatt < Vmin(B3) Vbatt > Vmax(B3) Vbat < Vwarn(B3) Vbat > VmaxR(B3) T > Tmax(B3) Asymmetrical(B3) Fuse open(B3) Battery oper(B3) Vbatt < Vmin(B4) Vbatt > Vmax(B4) Vbat < Vwarn(B4) Vbat > VmaxR(B4) T > Tmax(B4) Asymmetrical(B4) Fuse open(B4) Battery oper(B4) Vbatt < Vmin(B5) Vbatt > Vmax(B5) Vbat < Vwarn(B5) Vbat > VmaxR(B5) T > Tmax(B5) Asymmetrical(B5) Fuse open(B5) Battery oper(B5) s. Event no. 4100 s. Event no. 4101 s. Event no. 4102 s. Event no. 4103 s. Event no. 4107 s. Event no. 4108 s. Event no. 4109 s. Event no. 4110 s. Event no. 4100 s. Event no. 4101 s. Event no. 4102 s. Event no. 4103 s. Event no. 4107 s. Event no. 4108 s. Event no. 4109 s. Event no. 4110 s. Event no. 4100 s. Event no. 4101 s. Event no. 4102 s. Event no. 4103 s. Event no. 4107 s. Event no. 4108 s. Event no. 4109 s. Event no. 4110 s. Event no. 4100 s. Event no. 4101 s. Event no. 4102 s. Event no. 4103 s. Event no. 4107 s. Event no. 4108 s. Event no. 4109 s. Event no. 4110 Thresholds Thresholds Thresholds Thresholds Battery Battery Battery Thresholds ©2010. ELTEK VALERE DEUTSCHLAND GmbH. Battery 1 Voltage < Vmin Battery 1 Voltage > Vmax Battery 1 Voltage > Vmax Battery 1 Voltage > VmaxREC Battery 1 Temperature > Tmax Battery 1 asymmetrical Battery 1 Fuse open The event is active, if the battery 1 current is negative and less than the negative value of the configurable battery operation current parameter of the related system. (The battery current is negative if current is withdrawn from the battery). For enabling no battery test of the related system may be active. A configurable delay and hysteresis as well is available. Battery 2, detail s. Event no. 4100 Battery 2, detail s. Event no. 4101 Battery 2, detail s. Event no. 4102 Battery 2, detail s. Event no. 4103 Battery 2, detail s. Event no. 4107 Battery 2, detail s. Event no. 4108 Battery 2, detail s. Event no. 4109 Battery 2, detail s. Event no. 4110 Battery 3, detail s. Event no. 4100 Battery 3, detail s. Event no. 4101 Battery 3, detail s. Event no. 4102 Battery 3, detail s. Event no. 4103 Battery 3, detail s. Event no. 4107 Battery 3, detail s. Event no. 4108 Battery 3, detail s. Event no. 4109 Battery 3, detail s. Event no. 4110 Battery 4, detail s. Event no. 4100 Battery 4, detail s. Event no. 4101 Battery 4, detail s. Event no. 4102 Battery 4, detail s. Event no. 4103 Battery 4, detail s. Event no.4107 Battery 4, detail s. Event no. 4108 Battery 4, detail s. Event no. 4109 Battery 4, detail s. Event no. 4110 Battery 5, detail s. Event no. 4100 Battery 5, detail s. Event no. 4101 Battery 5, detail s. Event no. 4102 Battery 5, detail s. Event no. 4103 Battery 5, detail s. Event no. 4107 Battery 5, detail s. Event no. 4108 Battery 5, detail s. Event no. 4109 Battery 5, detail s. Event no. 4110 UM_UPC4_V2.00_E_R1.1_2011-01-04 DC Controller UPC4 Master User Manual Page 93/100 4600 4601 4602 4603 4607 4608 4609 4610 4700 4701 4702 4703 4707 4708 4709 4710 Vbatt < Vmin(B6) Vbatt > Vmax(B6) Vbat < Vwarn(B6) Vbat > VmaxR(B6) T > Tmax(B6) Asymmetrical(B6) Fuse open(B6) Battery oper(B6) Vbatt < Vmin(B7) Vbatt > Vmax(B7) Vbat < Vwarn(B7) Vbat > VmaxR(B7) T > Tmax(B7) Asymmetrical(B7) Fuse open(B7) Battery oper(B7) s. Event no. 4100 s. Event no. 4101 s. Event no. 4102 s. Event no. 4103 s. Event no. 4107 s. Event no. 4108 s. Event no. 4109 s. Event no. 4110 s. Event no. 4100 s. Event no. 4101 s. Event no. 4102 s. Event no. 4103 s. Event no. 4107 s. Event no. 4108 s. Event no. 4109 s. Event no. 4110 Battery 6, detail s. Event no. 4100 Battery 6, detail s. Event no. 4101 Battery 6, detail s. Event no. 4102 Battery 6, detail s. Event no. 4103 Battery 6, detail s. Event no. 4107 Battery 6, detail s. Event no. 4108 Battery 6, detail s. Event no. 4109 Battery 6, detail s. Event no. 4110 Battery 7, detail s. Event no. 4100 Battery 7, detail s. Event no. 4101 Battery 7, detail s. Event no. 4102 Battery 7, detail s. Event no. 4103 Battery 7, detail s. Event no. 4107 Battery 7, detail s. Event no. 4108 Battery 7, detail s. Event no. 4109 Battery 7, detail s. Event no. 4110 8.4 Fuses Eventno. 6000 Event text Reference to parameter Description Fuse 1 see CAN devices 6001 6002 6003 6004 6005 6006 6007 6008 6009 6010 6011 6012 6013 6014 6015 6016 6017 6018 6019 6020 Fuse 2 Fuse 3 Fuse 4 Fuse 5 Fuse 6 Fuse 7 Fuse 8 Fuse 9 Fuse 10 Fuse 11 Fuse 12 Fuse 13 Fuse 14 Fuse 15 Fuse 16 Fuse 17 Fuse 18 Fuse 19 Fuse 20 Fuse 21 see see see see see see see see see see see see see see see see see see see see CAN devices CAN devices CAN devices CAN devices CAN devices CAN devices CAN devices CAN devices CAN devices CAN devices CAN devices CAN devices CAN devices CAN devices CAN devices CAN devices CAN devices CAN devices CAN devices CAN devices ©2010. ELTEK VALERE DEUTSCHLAND GmbH. Fuse error, signalled by the FMB. Strictly counted on the order of the FMBs and on their extension cards: x= number of the used fuses of FMB CAN1 (settable at the FMB). y= number of the used fuses of FMB CAN2 (settable at the FMB). Fuse 1= first fuse of FMB CAN1 Fuse x= last fuse of FMB CAN1 Fuse x+1= first fuse of FMB CAN2. Fuse x+y= last fuse of FMB CAN2, etc. For details about the FMB settings, please see the FMB manual. Fuse error, signalled by FMB. Fuse error, signalled by FMB. Fuse error, signalled by FMB. Fuse error, signalled by FMB. Fuse error, signalled by FMB. Fuse error, signalled by FMB. Fuse error, signalled by FMB. Fuse error, signalled by FMB. Fuse error, signalled by FMB. Fuse error, signalled by FMB. Fuse error, signalled by FMB. Fuse error, signalled by FMB. Fuse error, signalled by FMB. Fuse error, signalled by FMB. Fuse error, signalled by FMB. Fuse error, signalled by FMB. Fuse error, signalled by FMB. Fuse error, signalled by FMB. Fuse error, signalled by FMB. Fuse error, signalled by FMB. UM_UPC4_V2.00_E_R1.1_2011-01-04 DC Controller UPC4 Master User Manual Page 94/100 6021 6022 6023 6024 6025 6026 6027 6028 6029 6030 6031 6032 6033 6034 6035 6036 6037 6038 6039 6040 6041 6042 6043 6044 6045 6046 6047 6048 6049 6050 6051 6052 6053 6054 6055 6056 6057 6058 6059 6060 6061 6062 6063 6064 6065 6066 6067 6068 6069 6070 6071 6072 6073 Fuse 22 Fuse 23 Fuse 24 Fuse 25 Fuse 26 Fuse 27 Fuse 28 Fuse 29 Fuse 30 Fuse 31 Fuse 32 Fuse 33 Fuse 34 Fuse 35 Fuse 36 Fuse 37 Fuse 38 Fuse 39 Fuse 40 Fuse 41 Fuse 42 Fuse 43 Fuse 44 Fuse 45 Fuse 46 Fuse 47 Fuse 48 Fuse 49 Fuse 50 Fuse 51 Fuse 52 Fuse 53 Fuse 54 Fuse 55 Fuse 56 Fuse 57 Fuse 58 Fuse 59 Fuse 60 Fuse 61 Fuse 62 Fuse 63 Fuse 64 Fuse 65 Fuse 66 Fuse 67 Fuse 68 Fuse 69 Fuse 70 Fuse 71 Fuse 72 Fuse 73 Fuse 74 see see see see see see see see see see see see see see see see see see see see see see see see see see see see see see see see see see see see see see see see see see see see see see see see see see see see see CAN devices CAN devices CAN devices CAN devices CAN devices CAN devices CAN devices CAN devices CAN devices CAN devices CAN devices CAN devices CAN devices CAN devices CAN devices CAN devices CAN devices CAN devices CAN devices CAN devices CAN devices CAN devices CAN devices CAN devices CAN devices CAN devices CAN devices CAN devices CAN devices CAN devices CAN devices CAN devices CAN devices CAN devices CAN devices CAN devices CAN devices CAN devices CAN devices CAN devices CAN devices CAN devices CAN devices CAN devices CAN devices CAN devices CAN devices CAN devices CAN devices CAN devices CAN devices CAN devices CAN devices ©2010. ELTEK VALERE DEUTSCHLAND GmbH. Fuse error, signalled by FMB. Fuse error, signalled by FMB. Fuse error, signalled by FMB. Fuse error, signalled by FMB. Fuse error, signalled by FMB. Fuse error, signalled by FMB. Fuse error, signalled by FMB. Fuse error, signalled by FMB. Fuse error, signalled by FMB. Fuse error, signalled by FMB. Fuse error, signalled by FMB. Fuse error, signalled by FMB. Fuse error, signalled by FMB. Fuse error, signalled by FMB. Fuse error, signalled by FMB. Fuse error, signalled by FMB. Fuse error, signalled by FMB. Fuse error, signalled by FMB. Fuse error, signalled by FMB. Fuse error, signalled by FMB. Fuse error, signalled by FMB. Fuse error, signalled by FMB. Fuse error, signalled by FMB. Fuse error, signalled by FMB. Fuse error, signalled by FMB. Fuse error, signalled by FMB. Fuse error, signalled by FMB. Fuse error, signalled by FMB. Fuse error, signalled by FMB. Fuse error, signalled by FMB. Fuse error, signalled by FMB. Fuse error, signalled by FMB. Fuse error, signalled by FMB. Fuse error, signalled by FMB. Fuse error, signalled by FMB. Fuse error, signalled by FMB. Fuse error, signalled by FMB. Fuse error, signalled by FMB. Fuse error, signalled by FMB. Fuse error, signalled by FMB. Fuse error, signalled by FMB. Fuse error, signalled by FMB. Fuse error, signalled by FMB. Fuse error, signalled by FMB. Fuse error, signalled by FMB. Fuse error, signalled by FMB. Fuse error, signalled by FMB. Fuse error, signalled by FMB. Fuse error, signalled by FMB. Fuse error, signalled by FMB. Fuse error, signalled by FMB. Fuse error, signalled by FMB. Fuse error, signalled by FMB. UM_UPC4_V2.00_E_R1.1_2011-01-04 DC Controller UPC4 Master User Manual Page 95/100 6074 6075 6076 6077 6078 6079 6080 6081 6082 6083 6084 6085 6086 6087 6088 6089 6090 6091 6092 6093 6094 6095 6096 6097 6098 6099 6100 6101 6102 6103 6104 6105 6106 6107 6108 6109 6110 6111 6112 6113 6114 6115 6116 6117 6118 6119 6120 6121 6122 6123 6124 6125 6126 Fuse 75 Fuse 76 Fuse 77 Fuse 78 Fuse 79 Fuse 80 Fuse 81 Fuse 82 Fuse 83 Fuse 84 Fuse 85 Fuse 86 Fuse 87 Fuse 88 Fuse 89 Fuse 90 Fuse 91 Fuse 92 Fuse 93 Fuse 94 Fuse 95 Fuse 96 Fuse 97 Fuse 98 Fuse 99 Fuse 100 Fuse 101 Fuse 102 Fuse 103 Fuse 104 Fuse 105 Fuse 106 Fuse 107 Fuse 108 Fuse 109 Fuse 110 Fuse 111 Fuse 112 Fuse 113 Fuse 114 Fuse 115 Fuse 116 Fuse 117 Fuse 118 Fuse 119 Fuse 120 Fuse 121 Fuse 122 Fuse 123 Fuse 124 Fuse 125 Fuse 126 Fuse 127 see see see see see see see see see see see see see see see see see see see see see see see see see see see see see see see see see see see see see see see see see see see see see see see see see see see see see CAN devices CAN devices CAN devices CAN devices CAN devices CAN devices CAN devices CAN devices CAN devices CAN devices CAN devices CAN devices CAN devices CAN devices CAN devices CAN devices CAN devices CAN devices CAN devices CAN devices CAN devices CAN devices CAN devices CAN devices CAN devices CAN devices CAN devices CAN devices CAN devices CAN devices CAN devices CAN devices CAN devices CAN devices CAN devices CAN devices CAN devices CAN devices CAN devices CAN devices CAN devices CAN devices CAN devices CAN devices CAN devices CAN devices CAN devices CAN devices CAN devices CAN devices CAN devices CAN devices CAN devices ©2010. ELTEK VALERE DEUTSCHLAND GmbH. Fuse error, signalled by FMB. Fuse error, signalled by FMB. Fuse error, signalled by FMB. Fuse error, signalled by FMB. Fuse error, signalled by FMB. Fuse error, signalled by FMB. Fuse error, signalled by FMB. Fuse error, signalled by FMB. Fuse error, signalled by FMB. Fuse error, signalled by FMB. Fuse error, signalled by FMB. Fuse error, signalled by FMB. Fuse error, signalled by FMB. Fuse error, signalled by FMB. Fuse error, signalled by FMB. Fuse error, signalled by FMB. Fuse error, signalled by FMB. Fuse error, signalled by FMB. Fuse error, signalled by FMB. Fuse error, signalled by FMB. Fuse error, signalled by FMB. Fuse error, signalled by FMB. Fuse error, signalled by FMB. Fuse error, signalled by FMB. Fuse error, signalled by FMB. Fuse error, signalled by FMB. Fuse error, signalled by FMB. Fuse error, signalled by FMB. Fuse error, signalled by FMB. Fuse error, signalled by FMB. Fuse error, signalled by FMB. Fuse error, signalled by FMB. Fuse error, signalled by FMB. Fuse error, signalled by FMB. Fuse error, signalled by FMB. Fuse error, signalled by FMB. Fuse error, signalled by FMB. Fuse error, signalled by FMB. Fuse error, signalled by FMB. Fuse error, signalled by FMB. Fuse error, signalled by FMB. Fuse error, signalled by FMB. Fuse error, signalled by FMB. Fuse error, signalled by FMB. Fuse error, signalled by FMB. Fuse error, signalled by FMB. Fuse error, signalled by FMB. Fuse error, signalled by FMB. Fuse error, signalled by FMB. Fuse error, signalled by FMB. Fuse error, signalled by FMB. Fuse error, signalled by FMB. Fuse error, signalled by FMB. UM_UPC4_V2.00_E_R1.1_2011-01-04 DC Controller UPC4 Master User Manual Page 96/100 6127 6128 6129 6130 6131 6132 6133 6134 6135 6136 6137 6138 6139 6140 6141 6142 6143 6144 6145 6146 6147 6148 6149 6150 6151 6152 6153 6154 6155 6156 6157 6158 6159 6160 6161 6162 6163 6164 6165 6166 6167 6168 6169 6170 6171 6172 6173 6174 6175 6176 6177 6178 6179 Fuse 128 Fuse 129 Fuse 130 Fuse 131 Fuse 132 Fuse 133 Fuse 134 Fuse 135 Fuse 136 Fuse 137 Fuse 138 Fuse 139 Fuse 140 Fuse 141 Fuse 142 Fuse 143 Fuse 144 Fuse 145 Fuse 146 Fuse 147 Fuse 148 Fuse 149 Fuse 150 Fuse 151 Fuse 152 Fuse 153 Fuse 154 Fuse 155 Fuse 156 Fuse 157 Fuse 158 Fuse 159 Fuse 160 Fuse 161 Fuse 162 Fuse 163 Fuse 164 Fuse 165 Fuse 166 Fuse 167 Fuse 168 Fuse 169 Fuse 170 Fuse 171 Fuse 172 Fuse 173 Fuse 174 Fuse 175 Fuse 176 Fuse 177 Fuse 178 Fuse 179 Fuse 180 see see see see see see see see see see see see see see see see see see see see see see see see see see see see see see see see see see see see see see see see see see see see see see see see see see see see see CAN devices CAN devices CAN devices CAN devices CAN devices CAN devices CAN devices CAN devices CAN devices CAN devices CAN devices CAN devices CAN devices CAN devices CAN devices CAN devices CAN devices CAN devices CAN devices CAN devices CAN devices CAN devices CAN devices CAN devices CAN devices CAN devices CAN devices CAN devices CAN devices CAN devices CAN devices CAN devices CAN devices CAN devices CAN devices CAN devices CAN devices CAN devices CAN devices CAN devices CAN devices CAN devices CAN devices CAN devices CAN devices CAN devices CAN devices CAN devices CAN devices CAN devices CAN devices CAN devices CAN devices ©2010. ELTEK VALERE DEUTSCHLAND GmbH. Fuse error, signalled by FMB. Fuse error, signalled by FMB. Fuse error, signalled by FMB. Fuse error, signalled by FMB. Fuse error, signalled by FMB. Fuse error, signalled by FMB. Fuse error, signalled by FMB. Fuse error, signalled by FMB. Fuse error, signalled by FMB. Fuse error, signalled by FMB. Fuse error, signalled by FMB. Fuse error, signalled by FMB. Fuse error, signalled by FMB. Fuse error, signalled by FMB. Fuse error, signalled by FMB. Fuse error, signalled by FMB. Fuse error, signalled by FMB. Fuse error, signalled by FMB. Fuse error, signalled by FMB. Fuse error, signalled by FMB. Fuse error, signalled by FMB. Fuse error, signalled by FMB. Fuse error, signalled by FMB. Fuse error, signalled by FMB. Fuse error, signalled by FMB. Fuse error, signalled by FMB. Fuse error, signalled by FMB. Fuse error, signalled by FMB. Fuse error, signalled by FMB. Fuse error, signalled by FMB. Fuse error, signalled by FMB. Fuse error, signalled by FMB. Fuse error, signalled by FMB. Fuse error, signalled by FMB. Fuse error, signalled by FMB. Fuse error, signalled by FMB. Fuse error, signalled by FMB. Fuse error, signalled by FMB. Fuse error, signalled by FMB. Fuse error, signalled by FMB. Fuse error, signalled by FMB. Fuse error, signalled by FMB. Fuse error, signalled by FMB. Fuse error, signalled by FMB. Fuse error, signalled by FMB. Fuse error, signalled by FMB. Fuse error, signalled by FMB. Fuse error, signalled by FMB. Fuse error, signalled by FMB. Fuse error, signalled by FMB. Fuse error, signalled by FMB. Fuse error, signalled by FMB. Fuse error, signalled by FMB. UM_UPC4_V2.00_E_R1.1_2011-01-04 DC Controller UPC4 Master User Manual Page 97/100 6180 6181 6182 6183 6184 6185 6186 6187 6188 6189 6190 6191 Fuse 181 Fuse 182 Fuse 183 Fuse 184 Fuse 185 Fuse 186 Fuse 187 Fuse 188 Fuse 189 Fuse 190 Fuse 191 Fuse 192 see see see see see see see see see see see see CAN devices CAN devices CAN devices CAN devices CAN devices CAN devices CAN devices CAN devices CAN devices CAN devices CAN devices CAN devices ©2010. ELTEK VALERE DEUTSCHLAND GmbH. Fuse error, signalled by FMB. Fuse error, signalled by FMB. Fuse error, signalled by FMB. Fuse error, signalled by FMB. Fuse error, signalled by FMB. Fuse error, signalled by FMB. Fuse error, signalled by FMB. Fuse error, signalled by FMB. Fuse error, signalled by FMB. Fuse error, signalled by FMB. Fuse error, signalled by FMB. Fuse error, signalled by FMB. UM_UPC4_V2.00_E_R1.1_2011-01-04 DC Controller UPC4 Master User Manual Page 98/100 9 Technical Data UPC4 Type DC Controller UPC4 Master Article code 301-004-395.00 Supply voltage 3 x redundant power supply inputs 24 VDC ±10 % by external power supplies DC/DC or AC/DC Voltage measuring range 0-320 VDC by Basic-Unit Current measuring range ±0-60 mV (shunt value programmable) by Basic-Unit Power consumption Max. 25 W LED indications 5 LEDs Relay outputs 3 (isolated; max. 0.5 A @ 60 VDC), plus 1 per Basic-Unit (isolated; max. 0.1 A @ 300 VDC) Optocoupler output One LVD optocoupler control output per Basic-Unit Interfaces: Ethernet RJ45 10/100 Mbit CAN interface 2 x RJ12 (100 kbit) and 2 x RJ45 (125 kbit); proprietary CAN protocol Modem connection (not supported yet) 9-pole SUB-D male RS232 (modem optional, analogue, ISDN or GPRS/GSM) Fieldbus ( Modbus) connection 4-pole MSTB, 5 mm or 9-pole SUB-D female RS485 Controller functions Temperature compensated float charge, equalize charge, boost charge, battery test; boost charge automatic (power, voltage and time related), LVD control, PLD control; time controlled battery test; charge current limitation; drop diode control (double-stage) Monitoring functions Battery voltage, battery tap voltage, battery charge current, battery operation; isolation fault, battery voltage low, battery voltage high, CAN-Bus status, CANconnected module status; external alarm loops, internally switchable isolation measurement, six general voltages, six general currents, six general resistors, six general temperatures Event history function Text message of active faults; stack memory for the last 500 faults/events; stacking “coming/going” with time stamp (permanent) Battery test memory Storage of the last three battery test results; storage of the last battery test curve RTC with time and date Yes Control buttons Two; 1 x release of SD card, 1 x not decided Languages German, English, Swedish; other versions loadable on demand Ambient temperature Operation: -20 °C to +45 °C; non condensing; storage: -40 °C to +85 °C Cooling Convection cooling Max. installation altitude 1500 m Audible noise <30 dBA Type of construction DIN Rail mounting Dimensions (W/H/D) 47/103/110 mm Weight approx. 0.8 kg Type of enclosure / Protection class IP20/III Surfaces Stainless steel, brush-finished, neutral, black print RAL 9005 CE conformity yes Compliance to safety standards EN60950-1; EN50178; EN60146 Compliance to EMC standards EN55011/22 class “B“; EN61000-4 T2-5 ©2010. ELTEK VALERE DEUTSCHLAND GmbH. UM_UPC4_V2.00_E_R1.1_2011-01-04 DC Controller UPC4 Master User Manual Page 99/100 9.1 Options Article code Designation 302-UP4-DCDC.LV Power supply, DIN rail mounting, Vi=18-75 VDC; Vo=24 VDC, Imax=2.5 A 302-UP4-DCDC.HV Power supply, DIN rail mounting, Vi=85-375 VDC; Vo=24 VDC, Imax=2.5 A 301-004-395.10 Basic-Unit (BU), 3 x voltage (0-300 V), 3 x current (60 mV shunt), 2 x temperature, one output relay, one LVD optocoupler control output 302-UP3-MMT.00 Configuration software “Multi Management Tool” (MMT) 302-003-RDD.00 Remote display for door mounting; connection via CAN interface 302-003-RDMD.00 Remote display for door mounting with mimic diagram; connection via CAN interface 302-DCC-0MM.00 Mains monitoring board 1/3 phase; DIN rail module; connection via CAN interface 302-DCC-0BM.00 Battery monitoring board DCC-BMB (for one additional battery string; V, V/2, I, T); DIN rail module; max. six modules DCC-BMB applicable 302-DCC-DI8.00 Signalling board with 8 digital alarm inputs; DIN rail module; connected via CAN interface 302-DCC-0RB.00 Relay board with 6 isolated signalling outputs; DIN rail module; connected via CAN interface 302-DCC-0FM.00 Fuse monitoring board (20 fuses, 24-60 VDC, 1-pole); open frame 302-UP3-0SW.02 SNMP monitoring software (Win) TBD Analog modem, GSM, DIN rail, VDC 9.2 Dimensional drawing 103 mm 108 mm 47 mm Figure 8. Module dimensions ©2010. ELTEK VALERE DEUTSCHLAND GmbH. UM_UPC4_V2.00_E_R1.1_2011-01-04 Supplier: FAX Email Internet ELTEK VALERE DEUTSCHLAND GmbH GB Industrial Schillerstraße 16 D-32052 Herford + 49 (0) 5221 1708-210 + 49 (0) 5221 1708-222 [email protected] http://www.eltekvalere.com Changes and errors excepted. 2010. ELTEK VALERE DEUTSCHLAND GmbH. All rights reserved.