1
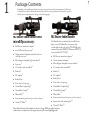
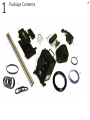
Redrock M2 Encore Cinema Lens Adapter
Welcome!
Congratulations on your purchase of the M2 Encore Cinema Lens Adapter!
Redrock Microsystems is committed to providing low cost, high quality cinema accessories to the independent filmmaker.
This manual describes basic setup procedures and maintenance for your M2 Encore system. We also have
a set of online video tutorials at start.redrockmicro.com that illustrate setup and configuration as well. We
encourage you to visit start.redrockmicro.com and view the video tutorials and access other resources to
ensure your Redrock equipment is set up properly and delivers optimal performance.
Visit http://start.redrockmicro.com/ <http://start.redrockmicro.com/> to take advantage of setup tutorials,
customer support forums, and a number of other support resources
Additional Support Resources
We also maintain customer support forums at forums.redrockmicro.com – please visit for additional tips
and troubleshooting. Please visit our user forums as there are many talented users registered and willing
to offer advice and feedback, and we encourage you to do the same. We feel that the sharing of ideas and
knowledge benefits us all.
Our forums require you to use your “real name.” Please visit our user forums as there are many talented
users already registered. We feel that the sharing of ideas and knowledge benefits us all.
Redrock Microsystems, LLC
P.O Box: 271395
Flower Mound, TX 75027-1395
Redrock contact information
• Sales: [email protected]
• Support: [email protected]
• Order status: [email protected]
Table of Contents
1. Package Contents
1
2. M2 Encore Feature List
3
3. Assembly With Flip Unit
Baseplate Assembly. . . . . . . . . 4
Attach Achromat. . . . . . . . . . . 5
Attach MicroX . . . . . . . . . . . . 5
Putting It All Together . . . . . . . . 6
4. Assembly Without Flip Unit
Baseplate Assembly. . . . . . . . . 7
Attach Achromat. . . . . . . . . . . 8
Mounting Kit Assembly. . . . . . . . 9
5. Using Your Adapter
Setting Backfocus. . . . . . . . . 10
Recommended Camera Settings. . . 10
Table of Contents
6. Additional Setup Information
Baseplate left and right adjust . .
UV Filter. . . . . . . . . . . .
Other Achromats. . . . . . . .
External Power. . . . . . . . .
7. Calibration and Maintenance
Collimation. . . . . . . .
Changing the Lens Mount.
Replacing the Batteries . .
Cleaning the system. . . .
. .
. .
. .
. .
.
.
.
.
. 11
. 11
. 11
. 11
. .
. .
. .
. .
. 12
. 13
. 13
. 14
8. Troubleshooting and Support
Power Troubleshooting. . . . . . . 15
Wrench and Screw Sizes. . . . . . . 15
Warranty. . . . . . . . . . . . . 16
Focus Chart. . . . . . . . . . . . 17
1
Package Contents
1
Depending on the bundle you ordered, you may or may not have received certain elements. Following is
a complete list of what should have been enclosed in the kit you have purchased. Each product is given a
number that corresponds with it’s image on the following page.
M2 Encore Indie Bundle with
microX flip accessory:
♦♦
♦♦
♦♦
♦♦
♦♦
♦♦
♦♦
♦♦
♦♦
♦♦
♦♦
♦♦
♦♦
M2 Encore cinema lens adapter1
microX Encore flip accessory2
72mm universal achromat matched to the microX flip accessory3
MicroSupport baseplate high riser edition4
Low riser 5
18” stainless steel microRods6
Shim kit7
M2 Encore Indie Bundle
This Bundle does not include the microX Encore
flip accessory. This Bundle is for cameras that
include built-in flip such as the JVC HD200 series
cameras, Panasonic HMC150, Panasonic HPX170
series, and the JVC GY-700.
♦♦
♦♦
♦♦
♦♦
♦♦
AC adapter8
♦♦
Redrock hat
♦♦
Your choice of step ring
9
55mm Blue Coupler Ring
72mm Blue Coupler10
Wrench Kit11
♦♦
♦♦
♦♦
♦♦
♦♦
Lens mount of your choice (pre-attached to adapter)
♦♦
♦♦
72mm UV Filter
♦♦
13
M2 Encore cinema lens adapter1
72mm universal achromat3
MicroSupport baseplate low riser edition5
18” stainless steel microRods6
Shim kit7
AC adapter8
Redrock hat
Your choice of step ring
55mm Blue Coupler Ring9
72mm Blue Coupler10
Wrench Kit11
Lens mount of your choice (pre-attached to adapter)
Spacer tubes and mounting kit12
13
72mm UV Filter
Please Note: Contents of the bundles are subject to change. While every effort has been
made to have accurate pictures, the images may not reflect actual shipping product.
♦♦
1
Package Contents
2
2
Feature List
M2 Encore Features
• Less than 1/2 stop light loss - best efficiency in industry, and
superior color contrast when stopping down
• Completely reformulated optics eliminates distortion and
vignetting
• Faster, easy setup
• Collimating lens mount (new adapters come pre-collimated
from the factory and adjustment is not necessary)
• Universal camera support, including Sony EX series cameras
• Interchangeable lens mounts without opening the adapter,
including PL mount
• Interchangeable knob accent colors
• New, more powerful motor for silent operation, faster shutter speeds up to 1/500 and beyond
• Internal dust trap
• Easy access port for cleaning adapter’s internals
• Rechargeable battery system for 18+ hours of continuous
level power
• Integrated battery charger: external sources power the
adapter and charge internal batteries
• Works with external battery bricks such as V-mount and
Anton Bauer
• Battery indicator status for charging, on, and low battery
3
• Intelligent power (Internal Power Regulation, built-in
battery charger, power management and fault protection,
diagnostic status indicator)
• Shock mounted motor to reduce vibrations and to protect the motor and cinescreen
• Full rubber gaskets in all seals for silent operation and
light leak prevention
• Works with existing Redrock microSupport system,
Baseplate and microRods
• Aircraft-grade machined aluminum construction
• 100% glue-free assembly
• Weight of complete M2 Encore Indie Bundle: 6lb 12 oz
(3 kg) (including rod support, baseplate, microX Encore
and all mounting equipment)
3
Setting up your M2 Encore with
MicroX Flip
Left Right Adjust:
Assembling Baseplate
Depending on your camera, you may need to adjust the
camera’s relation to the rods. Each M2e kit comes with a set
of shims, as pictured in the item checklist, and the ability to
move both left and right. For a complete list of cameras and
compatible shim and riser height visit start.redrockmicro.com.
microSupport Baseplate
with Highriser
Attaching Shims:
Our Redrock Micro shims are designed for
quick and easy assembly. They are cut with an
open mouth feature so that you can simply
loosen the screws on the bottom of the cheeseplate that are outlined in white, and slide the
shims in without completely removing the rod
mount.
You may find you camera’s lens does not line
up with the Encore rig. To move your camera
horizontally, loosen the screws highlighted
below and adjust the riser block as necessary
Attaching Your Camera
Our baseplate comes complete with a Bogen©
manufactured quick release base. This means
that it uses the standard Bogen Rapid Connect Sliding Plate. To attach your camera to the
quick release base you will:
1) Pull the quick release plate off of the base by
loosening it. To release the plate you must first
loosen the thumbscrew on the left side of the
unit by rotating it counter clockwise. You will
than hold the button on the right side of the
base as you simultaneously pull out the plate.
2) Choose the appropriate screw for your camera and remove all the others.
Shims are inserted under
rod clamp
3) Attach the base plate to your camera making
sure the gold locating pin is pointed forward.
Once you have attached the baseplate to your
camera, you must make sure the baseplate is in
the unlocked position via the thumbscrew, than
slide the camera into place from the back and
lock it into place.
4
3
Setting up your M2 Encore with
MicroX Flip
Building M2Encore
The first thing you should do is place the batteries into the encore unit. On the underside of
the unit there is a door as shown below. Unscrew the highlighted screws.
microTips:
Some cameras require the use of a 72mm UV filter in the
build to prevent contact between the camera lens and
achromat. This information is part of the camera setup chart
located at start.redrockmicro.com. All M2e bundles include a
72mm UV filter for this purpose.
Attach the MicroX
1) Remove Lens Cover on the back of the
Encore unit.
Unscrew both sets of screws and place the two
AA rechargeable batteries that are included in
the box.
2) There is a black cap on the front of the
MicroX, unscrew that to reveal a blue 55mm
coupler ring.
a
Then reseal the unit.
Attach the Achromat
The ‘low profile’ achromat has a coupler ring
integrated into the lens so assembly and disassembly of the unit is more efficient. The achromat is a standard 72mm thread, so if your camera is threaded at another size you will need the
appropriate step-up or step-down ring.
3) Remove the ring from the MicroX by
loosening the four tension screws.
4) Once removed, use the threaded side and
screw it into the back of the Encore unit. As
shown below.
5
3
Setting up your M2 Encore with
MicroX Flip
Attach the MicroX Continued
5)Screw the outer 72mm blue coupler ring to
the MicroX.
6) Attach the front of the MicroX (the side
with the four tension screws) to the blue coupler ring on the back of the Encore and tighten
down the tension screws on the MicroX
Putting it All Together
Slide the 18inch rods into the rod clamps of
the baseplate and tighten down the thumbscrews to secure them in place. Than slide the
M2 Encore onto the rods as shown below:
Your M2e unit should line up with the camera, and the lip of your achromat should slip
into the blue coupler attached to the MicroX.
Tighten down the three tension screws to complete assembly.
microTips:
If your unit is still not aligned, look at it and decide
whether it is a vertical or horizontal alignment issue.
If it is vertical, examine the shims. If it is horizontal,
loosen the four screws underneath the riser block on
the baseplate and slide the camera until it sits flat with
the microX. Then tighten down the screws. If there
is no more room for the baseplate to slide left or right
before hitting the iris rods, refer back to the left-right
adjust section.
Congratulations! You have now completed
the hardware setup of your M2 Encore
Cinema Lens Adapter!
6
4
Setting up your M2 Encore without
MicroX Flip
7
3) Now screw the baseplate onto the low riser.
Assemble the Baseplate
microSupport Baseplate
with Highriser
Replacing the Riser Block
Depending on the setup information for your
camera, you may need to switch riser blocks on
your microSupport baseplate.
1) On the bottom of the baseplate is a set of
four screws that are used for left right adjustment. Completely unscrew and remove the
highlighted screws.
2) Next remove the quick release sliding plate
from the base to reveal two more sets of screws.
Unscrew all four screws.
4) Finally, screw the low riser back onto the
cheeseplate using the original four screws.
Attaching Shims:
Depending on your camera, you may need to adjust the
camera’s relation to the rods. Each M2e kit comes with a set
of shims, as pictured in the item checklist, and the ability to
move both left and right. For a complete list of cameras and
compatible shim and riser height visit start.redrockmicro.com.
Our Redrock Micro shims are designed for
quick and easy assembly. They are cut with an
open mouth feature so that you can simply
loosen the screws on the bottom of the cheeseplate that are highlighted below and slide the
shims in without completely removing the rod
mount.
Shims are inserted
under rod clamp
Low Riser
4
Setting up your M2 Encore without
MicroX Flip
Building M2Encore
Left Right Adjust:
You may find you camera’s lens does not line
up with the Encore rig. To move your camera
horizontally, loosen the screws highlighted
below and adjust the riser block as necessary
Attaching Your Camera
Our baseplate comes complete with a Bogen©
manufactured quick release base. This means
that it uses the standard Bogen Rapid Connect Sliding Plate. To attach your camera to the
quick release base you will:
1) Pull the quick release plate off of the base by
loosening it. To release the plate you must first
loosen the thumbscrew on the left side of the
unit by rotating it counter clockwise. You will
than hold the button on the right side of the
base as you simultaneously pull out the plate.
2) Choose the appropriate screw for your camera and remove all the others.
3) Attach the base plate to your camera making
sure the gold locating pin is pointed forward.
Once you have attached the baseplate to your
camera, you must make sure the baseplate is in
the unlocked position via the thumbscrew, than
slide the camera into place from the back and
lock it into place.
The first thing you should do is place the batteries into the encore unit. On the underside of
the unit there is a door as shown below. Unscrew the highlighted screws.
Unscrew both sets of screws and place the two
AA rechargeable batteries that are included in
the box.
a
Then reseal the unit.
Attach the Achromat
The ‘low profile’ achromat has a coupler ring
integrated into the lens so assembly and disassembly of the unit is more efficient. The achromat is a standard 72mm thread, so if your camera is threaded at another size you will need the
appropriate step-up or step-down ring.
microTips:
Some cameras require the use of a 72mm UV filter in
the build to prevent contact between the camera lens
and achromat. This information is part of the camera
setup chart located at start.redrockmicro.com.
8
4
Setting up your M2 Encore without
MicroX Flip
Assembling the Encore Mounting Kit
Next, we are going to build the mount that will
connect your camera to the Encore.
1) Take the Encore and remove the rear lens
cap
5) Finally, slide the unit into towards your camera.
The unit should align with your camera perfectly
and the lip of the achromat should slide right into
the blue couplar ring. Tighten the tension screws.
2) Screw the 55mm Coupler into the Encore
Unit
3) Next screw the 55mm-72mm step-up ring
4) Attach both 1” spacer tubes, and than the
72mm Blue Coupler.
microTips:
If your unit is still not aligned, look at it and decide whether
it is a vertical or horizontal alignment issue. If it is vertical,
examine the shims. If it is horizontal, loosen the four screws
underneath the riser block on the baseplate and slide the
camera until it sits flat with the microX. Then tighten down
the screws. If there is no more room for the baseplate to
slide left or right before hitting the iris rods, refer back to the
left-right adjust section.
Congratulations! You have now completed
the hardware setup of your M2 Encore
Cinema Lens Adapter!
9
5
Using Your Adapter
Setting Back Focus
1) Turn on your camera and zoom all the way
out. Make sure you are pointed at something
bright such as a window or a light. Also, make
sure your M2 Encore motor is OFF and not
rotating.
10
5) Once zoomed in properly, focus on the texture of the cinescreen.
Use your camera’s focus assist or magnification
to help you get optimal focus, as well as your
camera’s peaking filter.
2) You will see something like the image above,
do not worry if your image is not centered, the
Encore system is designed with larger then
necessary optics and it is not necessary to align
the microX to have an optically centered image.
3) Attach a lens to the Encore and stop down
the aperture. Then adjust the focus ring so that
there is nothing in focus.
4) Zoom into the image until you reach the
recommended setting for your camera from the
camera setup chart at start.redrockmicro.com.
microTips:
Turn off autofocus, auto iris, and image stabilization
before following the below procedure.
6)Use the provided Focus Stop strap to keep
the focus or zoom wheel from being altered
once you have began filming. You will not need
to adjust your camera’s zoom or focus once your
backfocus has been set.
For a complete list of
recommended camera settings,
visit start.redrockmicro.com
6
Additional Setup Information
Left-Right Adjust
Some cameras will need a more drastic left
or right adjustment due to their build. If your
camera has a “d” in it’s Other Settings column
on the M2e Camera Chart, than your baseplate
must be moved to the right.
1) Remove the quick release plate from your
appropraite riser.
Other Achromats
If youre using a system with the older Encore
Achromat that is pictured below, you will need
to attach it slightly differently.
1) Remove the coupler rings from eachother.
2)Screw the inner ring of the 72mm coupler
ring onto your camera.
2) Move the quick release over to the right as shown
below and reattach it.
3) Screw the threaded side of the outer blue
72mm coupler ring onto the back of your
achromat.
UV Filter
Your camera may require the use of the UV
filter between the camera and achromat. If the
setup information for your camera includes
footnote [whatever footnote it is on the chart],
add a 72mm clear UV filter between your step
ring (or camera thread) and the low profile
achromat.
4) Attach the two and tighten the tension
screws.
External Power
The M2encore power system can accept any
power feed from 9V to 18V. In addition to
the A/C adapter that comes with the Encore
we offer a D-tap cable at store.redrockmicro.
com that you can use with accessories like our
microPowerpod to power your whole rig from a
professional battery system.
11
7
Calibration and Maintenance
Collimating
When you collimate the M2e, you adjust the
Flange Focal Length – the distance between
the cinescreen and the rear element of your
35mm lens. All M2 Encore units are collimated at the factory, though there are some
situations where you would want to collimate
the unit:
1) When changing lens mounts-all lens types
have a different FFL.
3) Loosen the three set screws on the collimating flange closest to the M2e.
2) When your lens markings do not match up
to actual focus distances or you are unable to
reach infinity focus.
4) Use the widest lens you have available, as
wider lenses are more sensitive to flange focal
length. Open the aperture of the SLR lens all
the way and set the focus ring on your 35mm
lens to 3 feet.
Collimating the M2Encore
5) Twist the collimating ring until the focus
chart is as sharp as possible.
To collimate the Encore you’ll need a focus
chart. We include a focus chart in every M2
Encore manual in the back, so if you do not already own one, feel free to use the one included
in this manual.
1) Attach the chart to a stand or wall and make
sure it is evenly lit.
2) Place the camera on a tripod and make sure
the film plane line of the adapter is exactly 3
feet away from the focus chart. Properly set
your backfocus and turn on your M2e system.
6) Tighten the 3 set screws on the flange as in
Step 3.
12
7
Calibration and Maintenance
Changing the Lens Mount
On the front of the Encore flange you will find
two sets of set screws. One set of three will be
located closest to the unit, and than another set
of three farther out, as shown below.
The set closest to the lens is used to change lens
mounts. Unscrew all three of them, and remove
the lens mount. Replace the current lens mount
with the new one.
Replacing the Encore’s Batteries
On the underside of the unit there is a door as
shown below that contains the serial number of
your unit. Unscrew the highlighted screws.
Unscrew both sets of screws and place two AA
rechargeable batteries. We currently ship the
Encore with AA NiMH 2000mAh batteries,
though other mAh ratings will work.
a
Then reseal the unit.
Note that the Encore PL mount replaces the
entire front threaded section of the Encore collimating flange.
13
7
Calibration and Maintenance
Cleaning the DCX Lens
The DCX lens is located inside the M2 Encore.
If you are seeing a static aberration in your
footage, it’s possible there is dust on the DCX
lens. Cleaning the DCX lens should not be a
routine maintenance. It should only be done if
all other external surfaces, such as the glass of
the
microX, have already been cleaned and
examined.
1) Open-up the Encore’s top-lid by removing
the thumbscrews
2) Watch your picture, while you set the focus
of the camera towards the back (closest-by
setting)
3) Take a cotton-swab, and without touching it
with your fingers, rub it with a microfiber/lens
cloth until it get’s fluffy. Apply compressed air
to the same end.
4) Hold the swab between your finger tips,
angled towards the DCX lens (you might even
want to bent the swap slightly)
5) Use the fluffy swab to clean the front and
back of the DCX lens (through the little
iron grate (back) and just behind the rotating
groundglass (front)
Do NOT start blowing compressed air into the
compartment, or you will probably have to start
over again as something else may be blown up
and stick to it.
microTips:
The procedure above will also reduce the electrostatic load of
the condenser lens. Because the groundglass rotates through
the stationary air, an electrostatic field is formed. It can be
both friend and foe; dust particles will stick to certain parts
of the mechanism and stay there, OR it will attach to the
condenser lens and stay there., which will than cause you to
repeat this cleaning routine.
14
8
Troubleshooting and Support
Power Troubleshooting
Wrench Sizes
VISIT http://start.redrockmicro.com/ to take advantage of setup tutorials, customer support forums, and a number of
other support resources
Batteries
The M2e uses an intelligent power system
and rechargeable NiMH AA batteries. Fully
charged batteries last for about 18 hours. Normally when the unit is on, the LED indicator
light remains solid ‘on’. The unit will begin
blinking when you have 20 minutes of power
remaining. When charging the batteries, the
LED above the ON/OFF switch will fade in
and out until charge cycle is complete.
Any AA NiMH rechargeable batteries will
work in the system. We ship the Encore with
2000mAh batteries.
What the battery light means
If the system is blinking in any other pattern
(4 blinks in a row, for example), see the ‘M2e
Rechargeable Battery System’ article in the
knowledge base at start.redrockmicro.com
.050” - microX, lens mount
1/16” - flange screws (inside the M2, for
changing lens mounts)
5/64” - M2 back
9/64” - Rod support/baseplate
15
8
Troubleshooting and Support
WARRANTY
Redrock Microsystems LLC (REDROCK MICRO) warrants that its accessories, when installed in accordance with
REDROCK MICRO installation instructions, will perform in accordance with the REDROCK MICRO specifications current as of the date of shipment, and will be free from defects in material and workmanship for a period of
one (1) month on new accessories as defined below and thirty (30) days on repaired accessories and/or components.
Specifically excluded from this Warranty is any physical damage caused by abuse, accident, or improper operation, and
any lack of performance attributable to such abuse, accident, or improper operation, as determined by REDROCK
MICRO. REDROCK MICRO shall not be liable for any incidental or consequential damages, including loss of
production time or money, regardless whether the accessory functioned properly or improperly for any reason, including those for which REDROCK MICRO bears liability under this Warranty. The one (1) month warranty period for
new accessories shall be the one (1) month period beginning with the date of the accessories receipt by the customer,
except that in no instance shall the warranty period extend beyond three (3) months from the date of shipment as
established with the serial number as identified on the accessory, its date of manufacture and its date of shipment.
Where an accessory consists of multiple components, the warranty period for all the components shall commence on
the receiptdate of the last component, providing that such date shall be no later than sixty (60) days from the earliest
date of shipment of a component for the purchased accessory. For repaired or replaced accessories, the repaired or replaced component is warranted to be free of material and workmanship defects, and to perform its function in accord
with REDROCK MICRO specifications for a period of thirty (30) days from its date of shipment, or its original new
accessory Warranty period, whichever is the latter. All claims under this Warranty shall be immediately submitted
to REDROCK MICRO in writing and are subject to confirmation by REDROCK MICRO. Should REDROCK
MICRO deem it appropriate to return the accessory or a component thereof to an REDROCK MICRO-designated
location, it will issue the Buyer a Return Material Authorization (RMA), which must accompany all returns. The returned accessory or component thereof shall remain the property of the Buyer who shall ship it freight prepaid to the
designated REDROCK MICRO location with the RMA number clearly displayed on the packaging exterior and all
accompanying paperwork. REDROCK MICRO, upon receipt and subsequent confirmation of a Warranty defect, at
its sole option, shall repair or replace the accessory or its component and return it freight prepaid to the Buyer within
thirty (30) days from date of its receipt. On otherequipment such as a video camera and/or other peripheral equipment, its original manufacturer warrants such equipment separately, and warranty claims should be addressed to that
respective manufacturer. This Warranty is made in lieu of all other warranties whatsoever, express, implied and statutory, including, without limitation, the implied warranties of merchantability and fitness. The acceptance of any order
with REDROCK MICRO is expressly made subject to the Buyer’s agreement to this Warranty.
16
17